

Page 1

Click 223 Dual-485 Surge
INSTALLER QUICK-REFERENCE GUIDE
Mount the device
1
e Click 223 mounts over a T-bus for power and communication:
1 If the Click 223 was shipped with the T-bus connector attached,
remove the connector from the module.
2 Snap the connector onto the DIN rail by positioning it over the
rail with the male connector pointing to the right. Hook one arm
over the edge of the DIN rail and press down on the other arm
until it snaps into place.
3 Connect the T-bus connector to the rest of the T-bus by sliding
them together until you hear them snap into place.
4 Mount the Click 223 onto the DIN rail: position it properly over
the T-bus connector, hook the lip over the lower edge of the DIN
rail, and use a rocking motion to snap the module into place.
Wire earth ground
2
All Click 223 devices must be grounded. To ground the device:
1 Connect a grounding wire (14 AWG) from one of the screw terminals marked PE (protective earth) to
a grounded location—for instance, to a lug bolt , if there is one on the cabinet for grounding, or to an
earth ground terminal block.
2 Make sure that the lug bolt or earth ground terminal block is grounded.
For additional security, ground the DIN rail that the Click 223 is mounted on:
1 Connect the grounding wire from the DIN rail to a grounded location—for instance, if there is a lug
bolt on the cabinet for grounding, or to an earth ground terminal block.
2 Connect another grounding wire from there to earth ground.
www.wavetronix.com
801.734.7200
Page 2
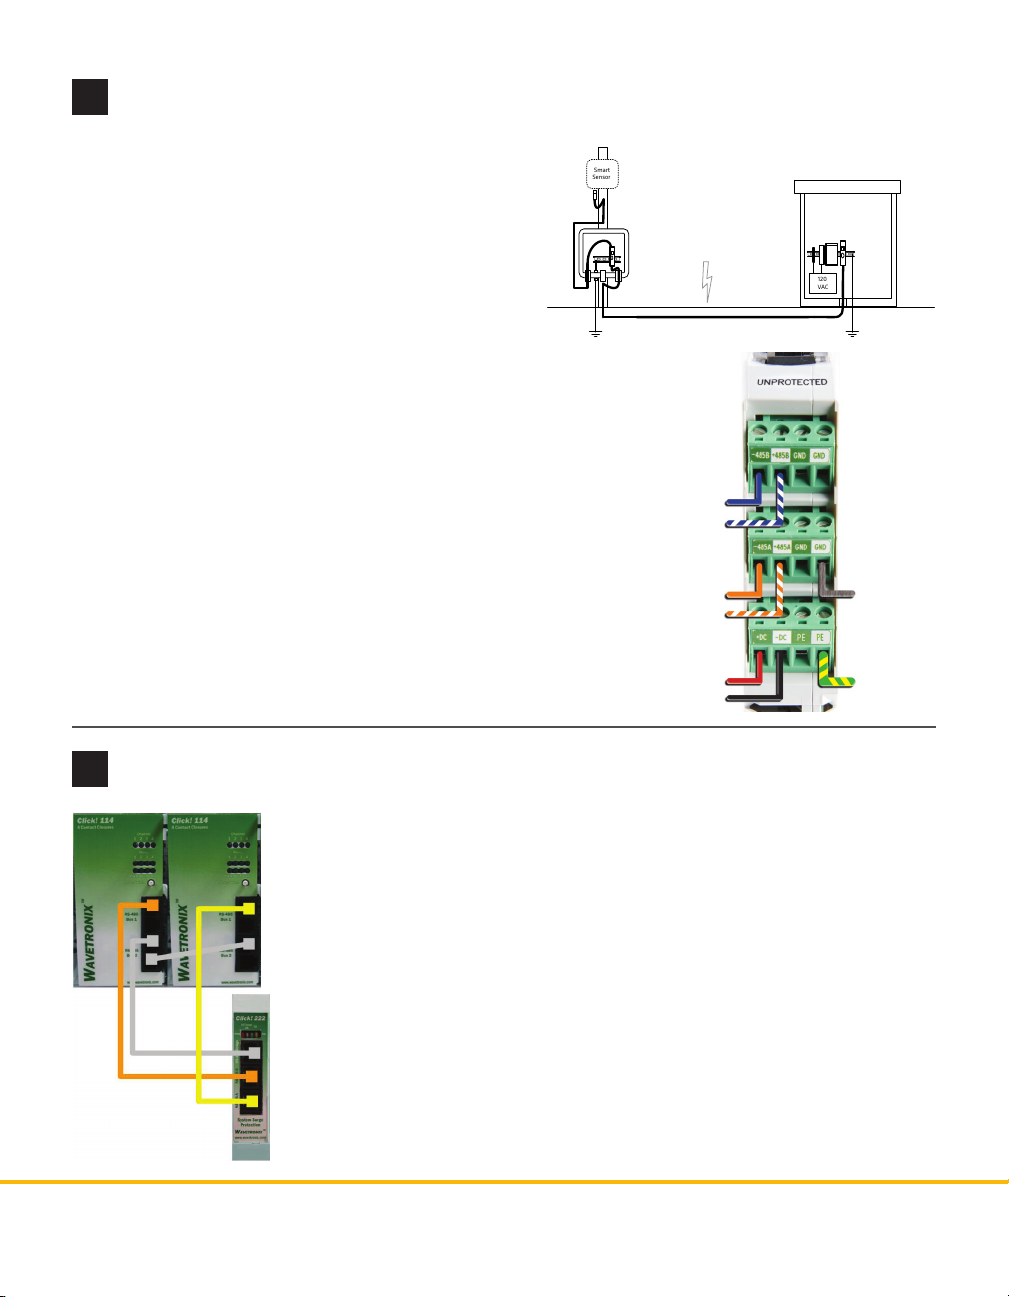
Wire the screw terminals
Smart
Sensor
120
VAC
Pole
Mount
Trac
Cabinet
3
If your installation has an underground cable run, protect
the sensor and the main trac cabinet from surges on the
underground cable run by using two Click 223 devices:
one in the pole-mount cabinet, one in the main trac
cabinet, as shown at right.
Note. e Advance does have onboard surge protection,
so you could install a Click 223 surge protector only in the
main trac cabinet, and rely on the sensor to protect itself
from surges. If you are in an area with lots of surges, however,
you may want to use a second Click 223 just to be safe.
e Click 223 is for use with a SmartSensor 6-conductor cable
and a sensor that uses this cable (like the SmartSensor Advance); if you don’t intend to use the Advance or the 6-conductor cable, ignore these wire colors and wire RS-485 and power
according to the labels on the terminals.
Wire the underground cable into the side of the 223 labeled
UNPROTECTED, as shown at right. For the cable coming from
the sensor, wire into the side labeled PROTECTED; this will be
similar to the image at right, just ipped, though you don’t need
to wire earth ground again.
Both ends of the homerun
cable connect to the
UNPROTECTED side of
the surge modules.
-485B (Blue)
+485B (Blue/White)
-485A (Orange)
+485A (Orange/White)
+DC (Red)
-DC (Black)
Main Trac Cabinet
Earth ground
Connect to the RJ-11 jacks
4
Finally, connect the Click 223 to contact closure cards. You will most likely use
the Click 112/114. e Click 223 has two RJ-11 jacks located on the faceplate;
the RS-485 B jack is for contact closure cards:
˽ RS-485 A – is jack is tied to the 485A screw terminals and the 5-position
connector that connects the device to the T-bus. It’s recommended you use
this bus for conguration.
˽ RS-485 B – is jack is tied to the 485B screw terminals. It’s recommended
you use this bus for detection calls. To do so:
1 Use jumper cables to connect from the RS-485 B jack on the faceplate
of the device to the topmost jack on the rst card (the lowest jacks on
the card are usually used for card conguration).
2 If you need more cards, daisy-chain them together using the jumper
cables and the upper two RJ-11 jacks on each card.
© 2014 Wavetronix LLC. All rights reserved. Protected by US Pat. Nos. 6,556,916; 6,693,557; 7,426,450; 7,427,930; 7,573,400; 7,889,097; 7,889,098; 7,924,170; 7,991,542; 8,248,272;
8,665,113; and Cdn. Pat. Nos. 2,461,411; 2,434,756; 2,512,689; and Euro. Pat. Nos. 1435036; 1438702; 1611458. Other US and international patents pending. Wavetronix, SmartSensor, Click,
Command and all associated logos are trademarks of Wavetronix LLC. All other product or brand names as they appear are trademarks or registered trademarks of their respective holders. Product specifications are subject to change without notice. This material is provided for informational purposes only; Wavetronix assumes no liability related to its use.
WX-500-0181
 Loading...