

Page 1
Click Power Plant
INSTALLER QUICK-REFERENCE GUIDE
An authorized technician should perform installation and operation of these units. Persons other than
authorized and approved electrical technicians should NOT attempt to install the power plant, as there is
a serious risk of electrical shock through unsafe handling of the power source. Extreme caution should be
used when connecting these units to an active power supply.
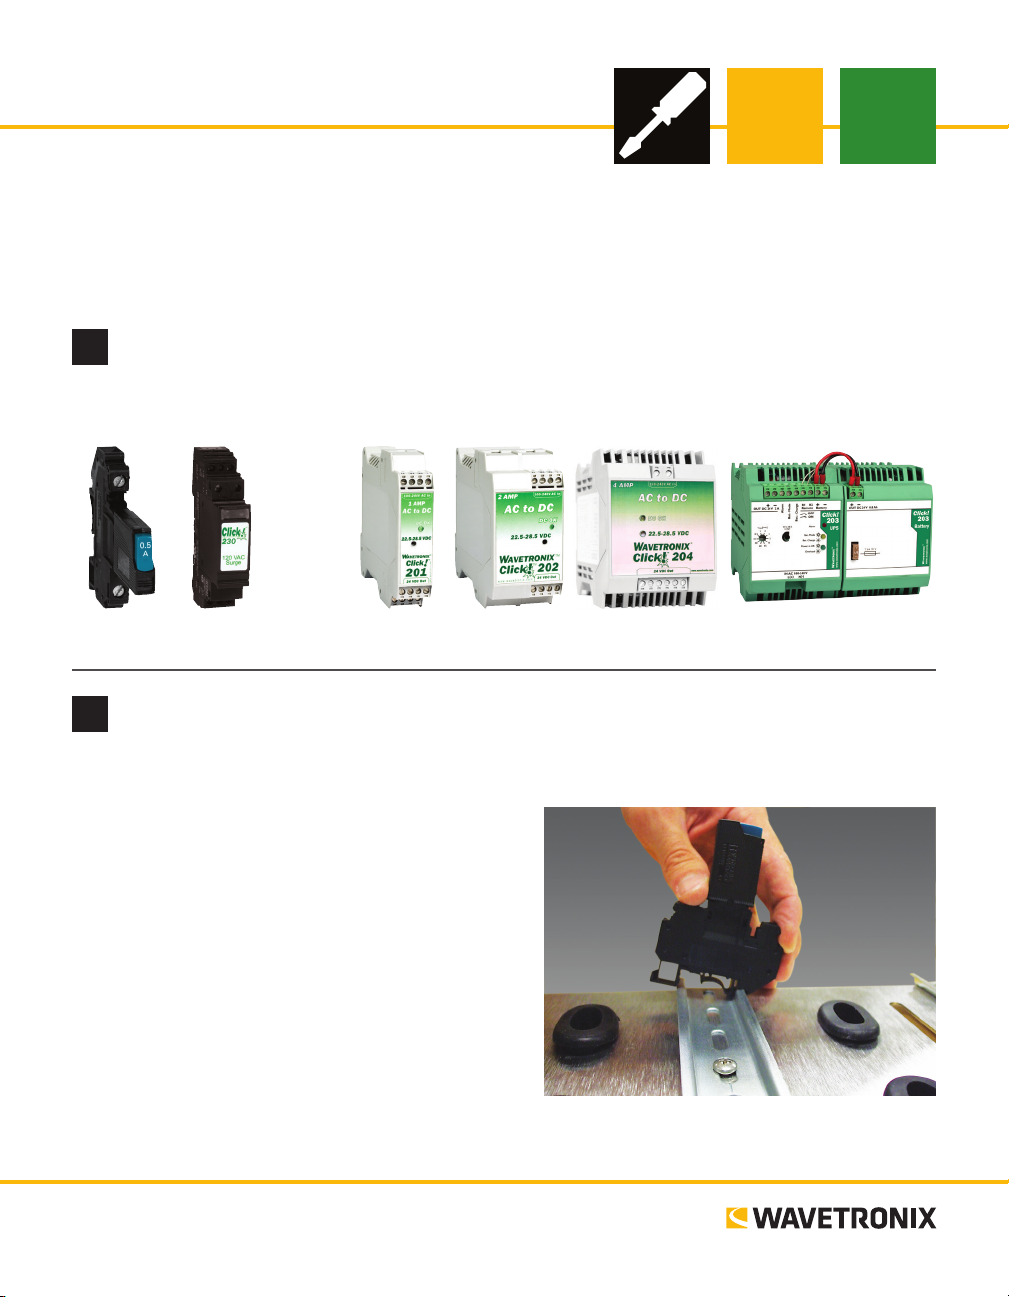
Identify the components
1
e following are included
in the Click power plant:
Click 210
Circuit Breaker
Mount the devices
2
WARNING. Make sure power to AC mains is disconnected before wiring any of the Click modules.
Mount each power plant device onto the DIN rail by
hooking the lip over the edge of the DIN rail and using a
rocking motion to snap the module into place.
Click 230
AC Surge
One of the following power supplies will be included in the Click
power plant:
Click 201
AC to DC converter
Click 202
AC to DC converter
Click 204
AC to DC converter
Click 203
UPS/Battery (optional)
www.wavetronix.com
801.734.7200
Page 2
Wire the Click 210 circuit breaker
3
Follow the steps below to add a Click 210 circuit breaker
and switch:
1 Mount the Click 210 onto the DIN rail.
2 Connect power in to the bottom of the module.
3 Connect power out to the top of the module.
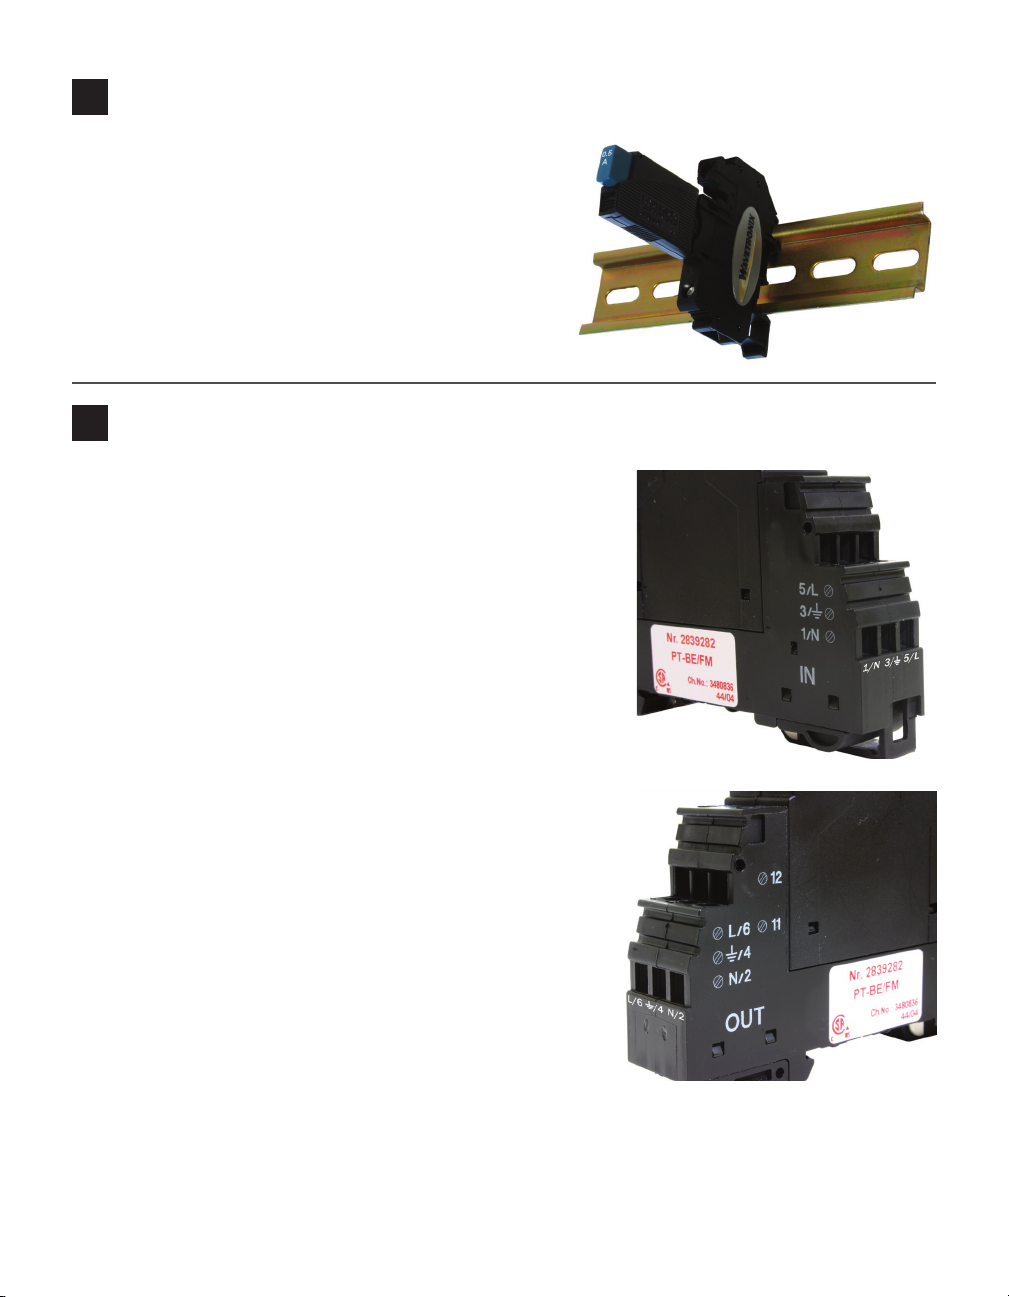
Wire the Click 230 AC surge
4
Follow the steps below to install the AC surge protection:
1 Mount the Click 230 onto the DIN rail.
2 Connect the line (hot) wire from the Click 210 to terminal 5
on the IN side of the Click 230.
3 Connect the neutral wire from the AC terminal block or
cord to the terminal marked 1 on the Click 230.
4 Connect the ground wire from the AC terminal block or
cord to the terminal marked 3 on the Click 230.
5 Connect the outgoing and protected neutral wire to the
terminal marked 2 on the Click 230.
6 Connect the outgoing and protected line wire to the terminal
marked 6 on the Click 230.
7 Terminal blocks 3 and 4 are directly connected to the DIN
rail via the metal mounting foot on the base of the device.
ere is no need for any additional grounding between terminals 3 and 4 and the DIN rail.
Page 3

Wire the Click 201/202/204 AC to DC converter
5
Wiring AC power in
Follow the steps below to properly wire an AC to DC power conversion
module:
1 Mount the Click 201/202/204 onto the DIN rail.
2 Connect the line (hot) wire from the Click 230 into the L screw terminal
on the top of the Click 201/202/204. e line wire is usually black.
3 Connect the neutral wire from the Click 230 to the N screw terminal to
the top of the Click 201/202/204. e neutral wire is usually white.
Wiring DC power out
To power the sensor, 10–30 VDC needs to be connected to the Click 200 in
the pole-mount cabinet. Additionally, if there is a main trac cabinet connected by a homerun cable, you will need to connect DC power to the Click
200 in that cabinet.
1 Connect a +DC conductor (usually a red wire) to the + screw terminal
on the bottom of the Click 201/202/204.
2 Connect a -DC conductor (usually a black wire) to either of the - screw
terminals on the bottom of the Click 201/202/204.
Note. Do NOT connect to the DC OK screw terminal.
Some installations use a Click 203 instead of a Click 201/202/204. e Click
203 is covered in Part 7 of this document.
Verify power is connected
6
Once the power plant is attached to the DIN
rail and wired correctly, follow the steps below
to verify your connections:
1 Push the blue switch down on the front of
the Click 210 circuit breaker.
2 Make sure that the Click 201/202/204 DC
OK light is on.
Earth Ground
Black (Line)
Green (Ground)
White (Neutral)
Black (Ground)
Red (+24 VDC)
Page 4

(Optional) Wire the Click 203
7
If you are using the Click 203 UPS and battery module,
follow the steps below to correctly wire it:
1 Wire AC power into the UPS module by connecting
the AC line (black wire) to the L (+) terminal.
2 Connect the AC neutral (white wire) to the N (-)
terminal.
3 Wire the supplied red wire from the + Battery
terminal on the UPS to the + OUT terminal on the
batter y.
4 Wire the supplied black wire from the - Battery
terminal to the - DC terminal on the battery.
5 DC power can be wired out of the UPS module
by connecting to the + and - OUT DC 24V 2A
terminals.
6 Short R1 to R2. If you don’t, the UPS will not switch
over to the battery when the power goes out.
DC Out
AC In
© 2014 Wavetronix LLC. All rights reserved. Protected by US Pat. Nos. 6,556,916; 6,693,557; 7,426,450; 7,427,930; 7,573,400; 7,889,097; 7,889,098; 7,924,170; 7,991,542; 8,248,272;
8,665,113; and Cdn. Pat. Nos. 2,461,411; 2,434,756; 2,512,689; and Euro. Pat. Nos. 1435036; 1438702; 1611458. Other US and international patents pending. Wavetronix, SmartSensor, Click,
Command and all associated logos are trademarks of Wavetronix LLC. All other product or brand names as they appear are trademarks or registered trademarks of their respective holders. Product specifications are subject to change without notice. This material is provided for informational purposes only; Wavetronix assumes no liability related to its use.
WX-500-0174
 Loading...