

Page 1
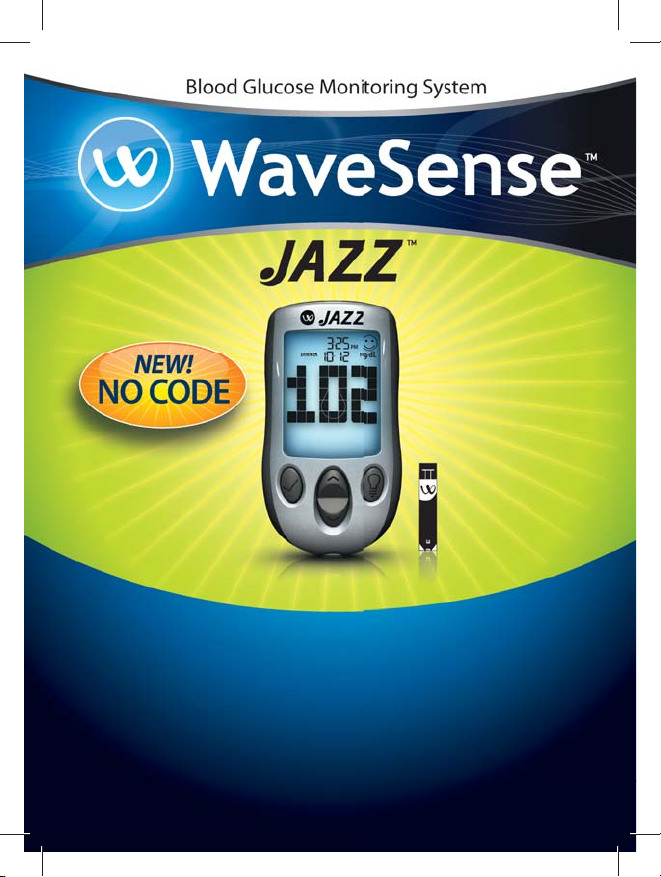
OWNER’S GUIDE
Page 2

Key Features in the WaveSense Jazz™
No Coding Required - The WaveSense Jazz doesn’t
require you to code your meter. Insert a test strip and
you are ready to test.
Pre/Post Tagging - After you test, tag your reading
with the mealtime. Better organize your data and see
how your test results change before and after meals.
Positive Feedback - In addition to a highly accurate
result, the WaveSense Jazz will also display a smiley
face icon if your result is within the target range.
Large Digits - The WaveSense Jazz has the world’s
largest digits when compared to the blood glucose
monitors produced by the leading brands.
24-Hour Customer Service: +1 (866) 906 4197
In case of emergency, contact your healthcare professional or
emergency medical response.
Manufacturer:
AgaMatrix, Inc.
10 Manor Park way
Salem, NH 03 079 USA
©2005-2008 Ag aMatrix, Inc. 10 Man or Parkway, Salem, N H 03079 USA
Meter Fir mware ©2005-2008 AgaM atrix, Inc.
US and Inter national Patents Pe nding. All right s reserved. All t rademarks and c opyrights
are the pro perty of thei r respective ow ners.
8100-03542 R ev C
1
Page 3
Contents
CHAPTER PAGE PAGECHAPTER
Getting Started
1
Important Health-related Information
2
Important Information about Your
3
WaveSense Jazz System
TITLE TITLE
4
4
12
13
14
6
15
About the WaveSense Jazz System
4
8
16
Meter Basics
5
14
17
Preparing For a Test With Your WaveSense
6
Jazz Meter
Performing a Control Solution Test
7
How To Test Your Blood Glucose Level
8
Testing on Your Palm or Forearm
9
Data Management Features
10
Viewing Ind ividual Results
10.1
Viewing 14 Day Statistics
10. 2
Viewing 14, 30, and 90 D ay Averages
10. 3
Viewing Pre/Pos t Mealtime Averages & Glucose Variabilit y Tracking
10.4
Viewing 1 Month , 2 Week, and 3 Day Trend Graphs
10. 5
16
17
22
30
32
33
34
34
35
37
18
19
20
21
22
23
24
25
Setting the Mealtime Tag
11
40
Setting Meter Volume
Setting the Time
Setting the Date
Setting Hypoglycemic Warning Alarms
Setting Hyperglycemic Warning Alarms
Setting the Glucose Target Range
Setting Alarms
Errors and Troubleshooting
Display Messages
Batteries
Caring For Your Meter and Lancing Device
Meter Specifications
Symbols
Warranty
40
41
42
44
45
46
48
50
54
57
60
60
62
62
2 3
Page 4
Getting Started
1
CHAPTER
Unpack your WaveSense Jazz System Kit. Dispose of the
packing material properly.
IMPORTANT: To ensure accurate use of meter, verify the
time, date and units of measure.
For step-by-step instructions on changing the time and date
settings, please refer to chapters 13 and 14.
Important Health-related Information
2
CHAPTER
Please Read the Following:
[1]
Severe dehydration and excessive water loss may yield
inaccurate results. If you believe you are suffering from severe
dehydration, consult your healthcare professional immediately.
[2] The ADA (American Diabetes Association) recommends
the following target ranges for adults with Diabetes:
- Pre-Prandial Plasma Glucose: 90-130 mg/dL
- Post-Prandial Plasma Glucose: < 180 mg/dL
Always consult your healthcare professional for your
recommended target ranges.
[4] Results over 240 mg/dL may mean high blood glucose
levels (hyperglycemia). Checking ketones may be advisable.
[5] If you get results below 70 mg/dL or above 240 mg/dL and
do not have symptoms of hypoglycemia or hyperglycemia,
repeat the test. If you have symptoms, or continue to get
results below 70 mg/dL or above 240 mg/dL, follow your
healthcare professional’s recommendations.
[6] If you are experiencing symptoms that are not consistent
with your blood glucose test and you have followed all
instructions described in the WaveSense Jazz Owner’s Guide,
follow your healthcare professional’s recommendations.
[7] Patients undergoing oxygen therapy may receive
inaccurate results.
[8] Always follow your healthcare professional’s
recommendations.
[3] Results below 70 mg/dL may mean low blood glucose
levels (hypoglycemia).
4 5
Page 5
Important Information about
3
CHAPTER
Your WaveSense Jazz System
The WaveSense Jazz System should be used:
[1]
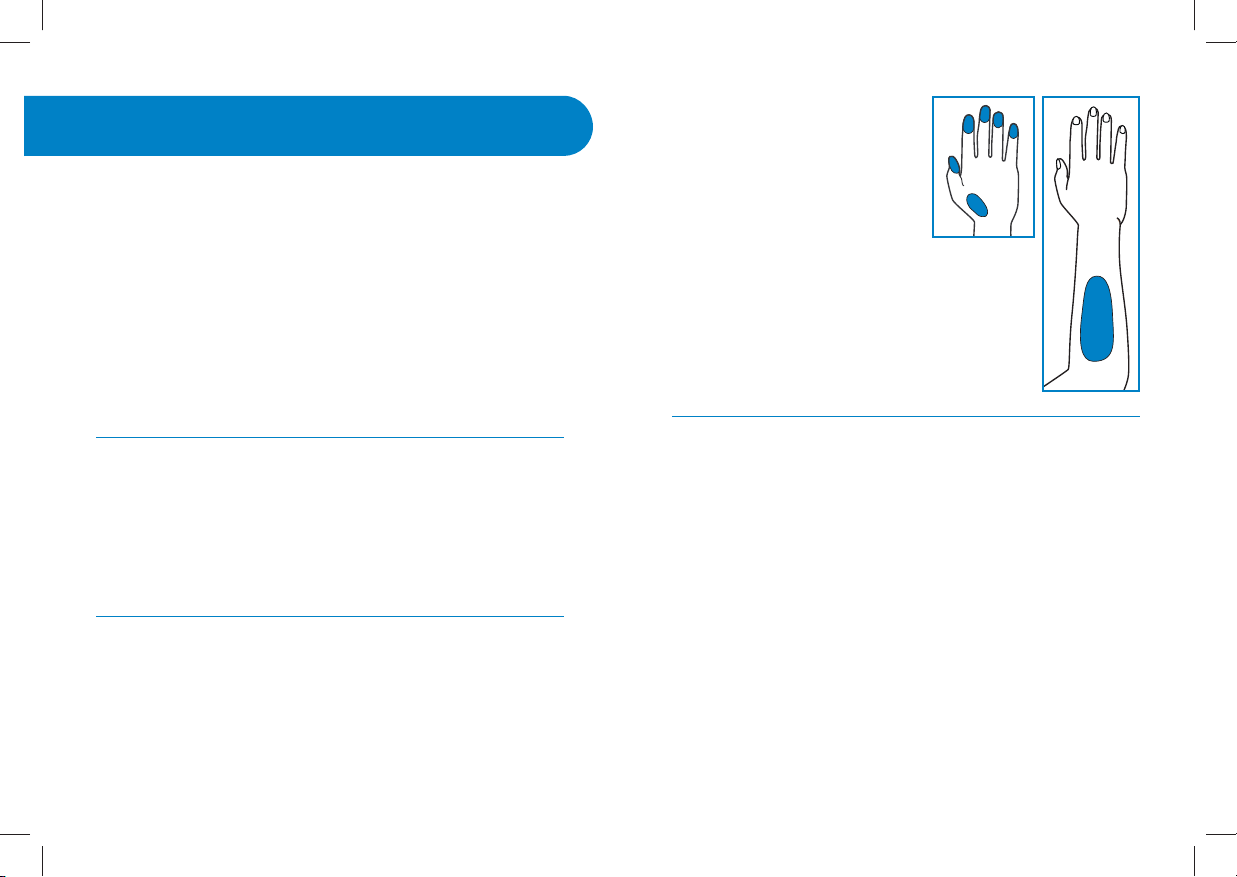
For measuring blood glucose levels from fresh capillary
whole blood samples taken from the fingertip, palms (at the
base of the thumb), or forearms.
[2] With WaveSense Jazz Test Strips and WaveSense Control
Solution only. Use with other unapproved test strips or control
solution will void the manufacturer’s warranty and will lead to
inaccurate results.
[3] Outside of the body (i.e., in vitro diagnostic use only).
Do not use the WaveSense Jazz System for:
[1]
The diagnosis of diabetes.
obvious veins and moles.
Physiological differences
in circulation between the
fingertip, palm (at the base of
the thumb), and forearm may
result in differences in blood
glucose test results between
these sites. Differences in
glucose concentrations may be observed after
eating, taking insulin medication, or exercise.
Changes in blood glucose may be detected at
the fingertips before the palm (at the base of
the thumb) and forearm, as there may be a lagtime in alternate test sites.
It is recommended that you use a ngertip sample if:
[1]
You are testing for hypoglycemia or if you suffer from
hypoglycemia unawareness,
[2] Testing the glucose levels of neonates.
[3] Testing glucose levels of arterial or venous blood.
Possible test sites:
The WaveSense Jazz System requires only 0.5 μL of blood to
perform a glucose test. For best results, test using blood from
the tip of any finger. The palm (at the base of the thumb) and
forearm are alternate, but less accurate test sites. Only select
soft and fleshy areas to lance. Avoid lancing any bony areas,
6 7
[2] You are testing your blood glucose within 2 hours of
eating, taking insulin or diabetes pills, exercising, or
[3] Your blood glucose results obtained from the palm (at the
base of the thumb) or forearm are not consistent with the way
you feel.
CAUTION: Please read all the instructions provided in this
Owner’s Guide and practice the testing procedures before
using the WaveSense Jazz Blood Glucose Monitoring
System. Blood glucose monitoring should be done under
the guidance of your healthcare professional.
Page 6
About the WaveSense Jazz System
4
CHAPTER
IMPORTANT: Only use WaveSense Jazz Test Strips with the
WaveSense Jazz System.
Your WaveSense Jazz System includes:
• WaveSense Jazz
Blood Glucose Meter
• Two Pre-installed CR2032,
3 volt, Lithium Batteries
• 10 Sterile Lancets
• Compact Carrying Case
• Control Solution
• Owner’s Guide
• Lancing Device with Cap
Important Test Strip Information:
[1]
Store the WaveSense Jazz Test Strip vial in a cool, dry place
at 46 °F to 86 °F (8 °C to 30 °C).
[2] Use WaveSense Jazz Test Strips only within the system oper-
ating temperature range of 50 °F to 104 °F (10 °C to 40 °C).
• Clear AST Lancing
Device Cap
Does not include: Test Strips
[3] Keep away from direct sunlight and heat.
[4] Store your WaveSense Jazz Test Strips in their original vial
only; never store them in another vial, any other container, or
outside the vial.
About the WaveSense Jazz Test Strip
[5] After removing a WaveSense Jazz Test Strip from the vial,
With your WaveSense Jazz System, you can test your blood
immediately close the vial cap tightly.
glucose on your fingertips, palms (at the base of the thumb)
or forearms. Testing with
the WaveSense Jazz System
requires a small sample size,
0.5 μL of blood, about the
size of a pinhead.
CAUTION: Dispose used
test strips properly.
IMPORTANT: Use
WaveSense Jazz Test
Strips only once.
8 9
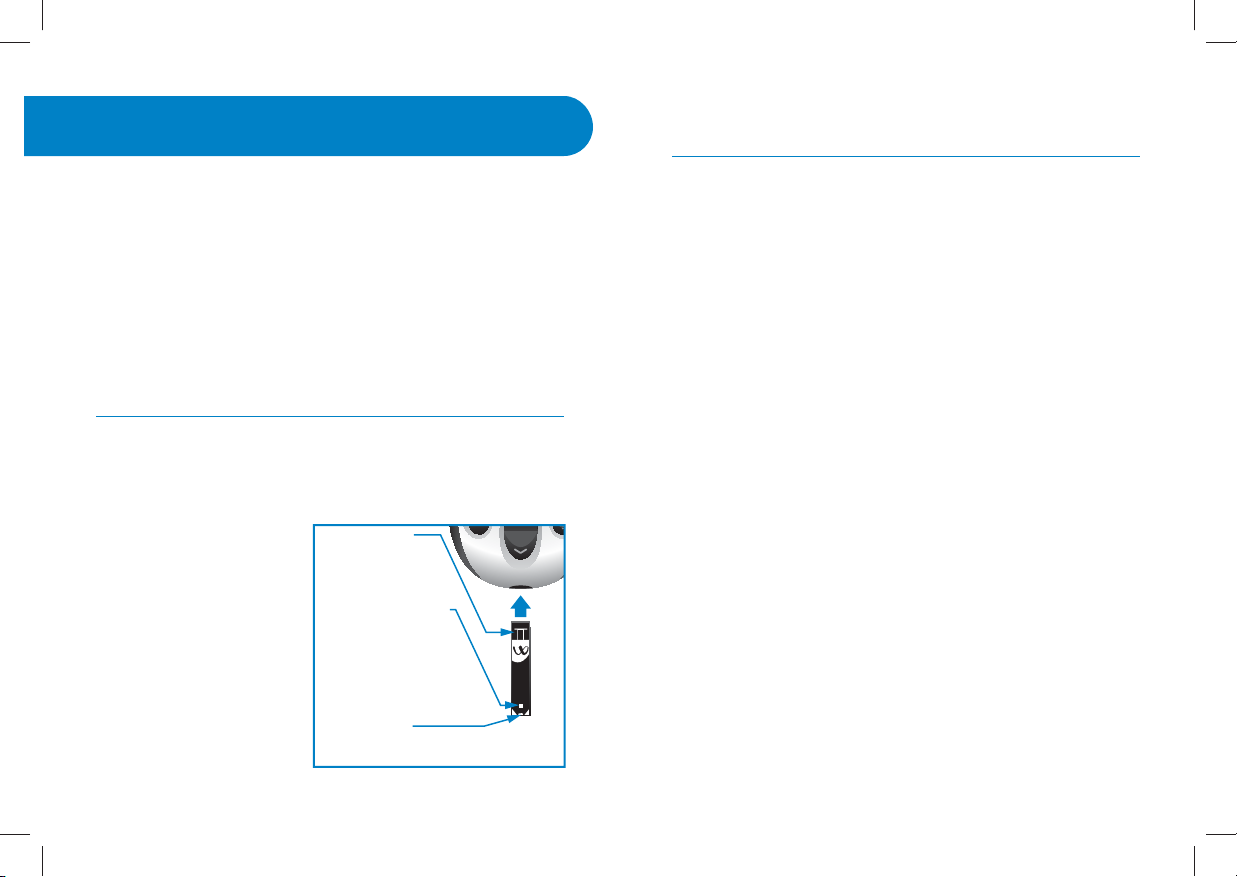
Contact Bars:
Insert this end,
facing up, into the
meter’s strip port.
Visual Fill Window:
The window will turn
red when enough
blood has been applied
or blue when enough
control solution has
been applied.
Sample Area:
Apply blood or control solution to the
tip of the test strip here.
[6] With clean, dry hands you may gently handle the
WaveSense Jazz Test Strip when removing it from the vial or
inserting it into the meter.
[7] Do not use WaveSense Jazz Test Strips beyond the
expiration date or 90 days after first opening the vial. This
may cause inaccurate results. Write the discard date (90 days
from the first opening) on the test strip vial.
[8] Do not bend, cut or alter WaveSense Jazz Test Strips.
[9] Apply only fresh capillary blood or control solution to the
sample area of the WaveSense Jazz Test Strip.
Page 7
About the WaveSense Jazz Meter
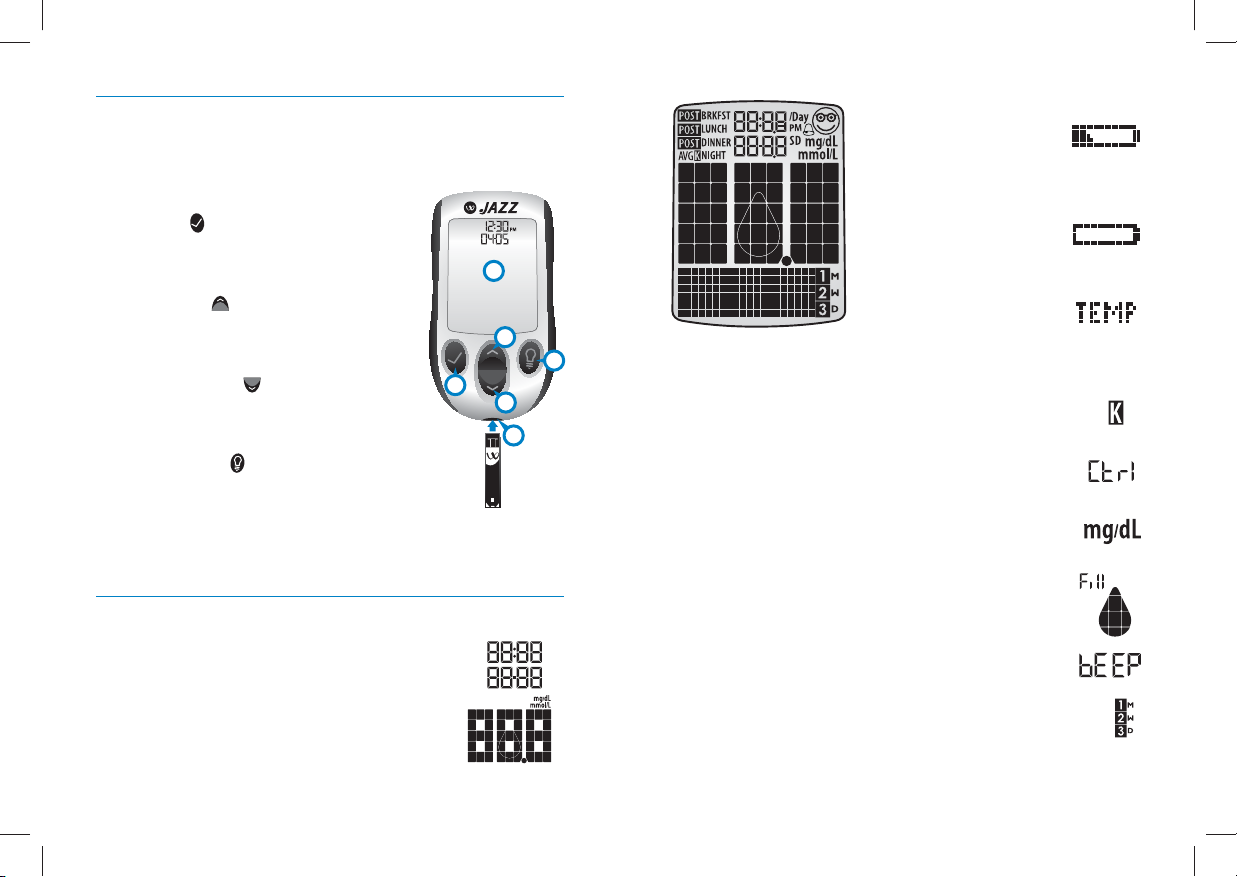
(1)
Display: Glucose test results, symbols, messages and
graphs appear here.
(2) CHECK ( ) Button: Use the CHECK
button to confirm an option or make a
selection in a menu.
1
(3) UP Arrow ( ) Button: Use the UP
arrow button to scroll backward through
options.
(4) DOWN Arrow ( ) Button: Use the
DOWN arrow button to scroll forward
through options.
3
2
4
6
(5) BACKLIGHT ( ) Button: Use the
BACKLIGHT button to turn the backlight
ON and OFF.
(6) Strip Port: Insert the WaveSense Jazz Test Strip, with the
contact bars facing up, into the strip port.
About the WaveSense Jazz Meter Display Symbols/Messages
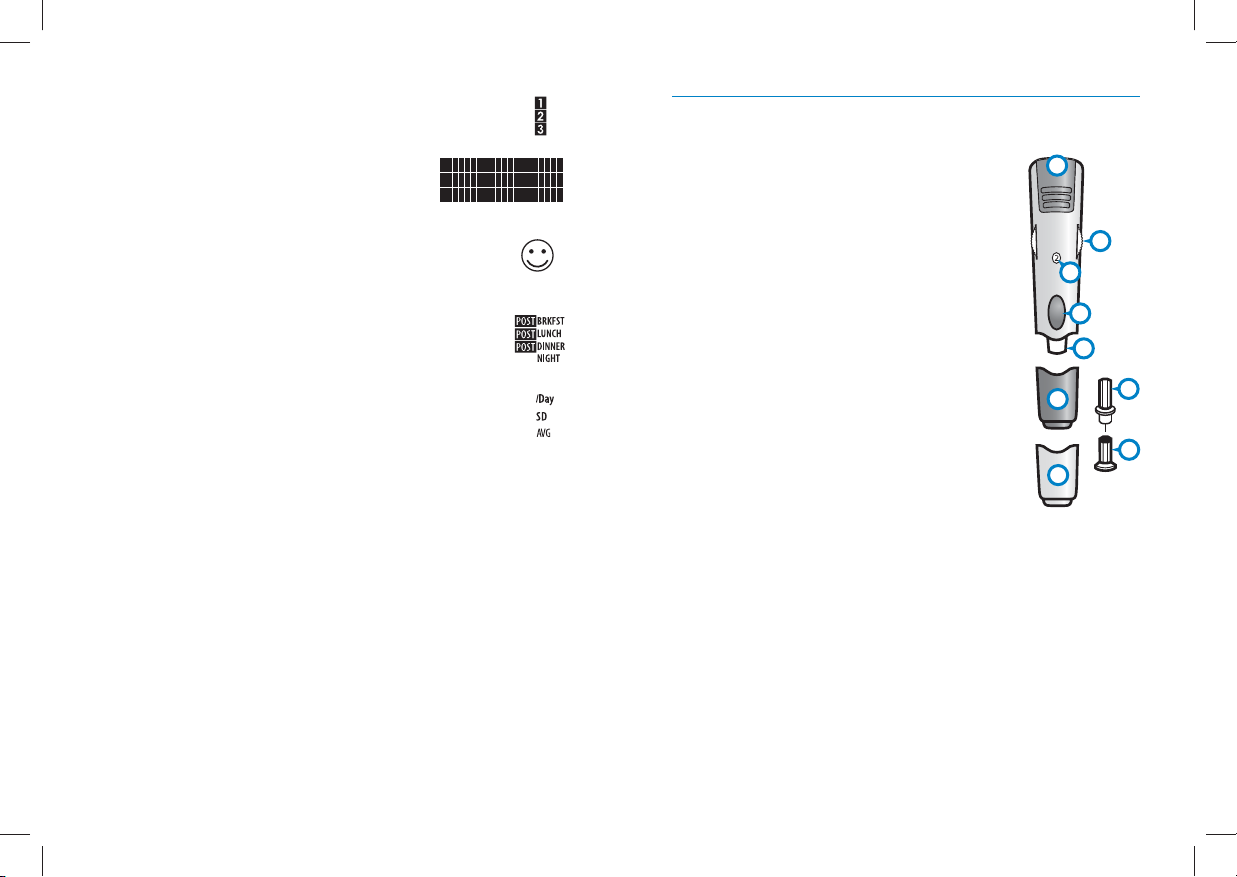
(3) Low Battery Message:
Appears when battery #2
in your meter is running
low.
(4) Dead Battery Message:
Appears when battery #2
in your meter is dead.
(5) Temperature Symbol:
Appears when the meter
is outside its operating
temperature range of 50 °F to
5
104 °F (10 °C to 40 °C).
(6) Ketone Symbol: Appears when your glucose
test results are higher than 240 mg/dL.
(7) Control Solution message: Appears after
you have performed a control solution test.
(8) Units of Measurement symbol: Results will
be displayed in mg/dL.
(9) Apply Sample to Test Strip message: The
flashing droplet symbol and the word “fill” will
signal you to apply a sample to the test strip.
(1) Date and Time: Appears here, including
(10) Volume Message: Can be set to ON or OFF.
when the meter is deactivated.
(11) 1 Month, 2 Week, 3 Day Indicators: The
(2) Glucose Test Results
appropriate number of days will appear when viewing
graphical averages.
10 11
Page 8
(12) 1,2,3 Countdown: The 1, 2 and 3 symbols will
appear during a glucose test.
About the WaveSense Lancing System
(13) Graphing Area: Areas of the dot
matrix will appear during a test and when
displaying graphs.
(14) Happy Face Symbol: The happy face is displayed
with glucose test results that fall within specific pre and
post meal target ranges.
(15) Mealtime Tags: The mealtime tags appear
after a test is complete and will help categorize your
results.
(16) /Day, SD, and AVG Symbols: These symbols
appear in the meter’s data management functions.
(1)
Cocking Handle: Cocks the device so
it is ready to lance.
(2) Depth Adjustment Dial: Adjusts how
deep the lancet will lance the skin.
(3) Depth Indicator Window: Displays
the depth setting of the lancing device.
(4) Release Button: Fires the lancet.
(5) Lancet: Lances the skin to produce a
drop of blood.
(6) Lancet Cap: Covers the lancet for
safety.
(7) Lancing Device Cap: Covers the lancet
when in lancing device. Remove after
inserting into the lancet holder cup.
(8) Alternate Site Testing Cap: An AST
clear lancing device cap used for obtaining
a blood sample on the palm (at the base of
the thumb) or forearm.
(9) Lancet Holder Cup: Holds the lancet
into place inside the lancing device.
1
2
3
4
9
7
5
6
8
12 13
Page 9
Meter Basics
5
CHAPTER
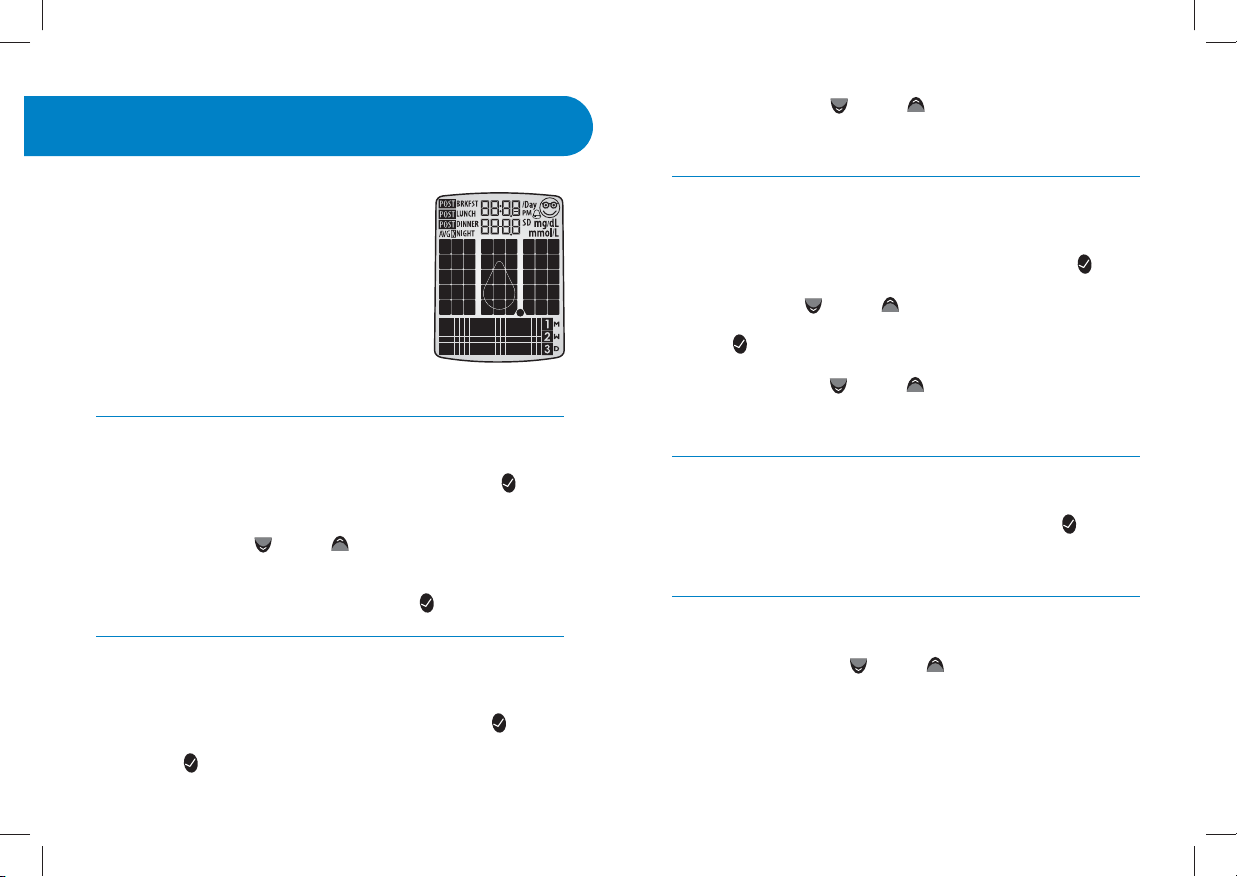
METER SYSTEM CHECK
Each time your meter is activated, the
meter will perform a meter system check.
All display segments and the backlight
will briefly flash ON.
IMPORTANT: If all the display segments
DO NOT ash ON (each time your meter
is activated), do not use the meter. Call
customer service immediately.
HOW TO ACTIVATE THE METER AND ENTER MENU MODE
[1]
When your meter is deactivated, press the CHECK ( ) but-
ton to enter the menu mode.
[2] Press the DOWN ( ) or UP ( ) arrow buttons to view the
options: MEM, STATS, AVG, MEAL, GRAPH, TIME, DATE, TAG,
RANGE, BEEP, HYPO, HYPER, and ALARM. To view/alter any of
these options or settings press the CHECK (
) button.
[2] Press the DOWN ( ) or UP ( ) arrow buttons repeatedly
to scroll thru every test result, starting from the most recent
and ending with the oldest.
HOW TO ACTIVATE THE METER AND VIEW MEALTIME
AVER AGES
When your meter is deactivated, press the CHECK ( ) but-
[1]
ton once to enter Menu mode. The word “MEM” is displayed.
Press the DOWN (
“MEAL” appears in the lower part of the display. Press the
CHECK (
[2] Press the DOWN ( ) or UP ( ) arrow buttons repeatedly
to scroll through your Breakfast, Lunch, Dinner, and Bedtime
Averages.
HOW TO DEACTIVATE THE METER
To deactivate the meter, press and hold the CHECK ( ) for 2
seconds. If the meter is inactive for 3 minutes, the meter will
be deactivated automatically.
HOW TO ACCELERATE THROUGH OPTIONS
) button again to see your most recent test result.
) or UP ( ) arrow buttons until the word
HOW TO ACTIVATE THE METER AND VIEW INDIVIDUAL
RESULTS
[1]
When your meter is deactivated, press the CHECK ( ) button to enter menu mode. The word “MEM” is displayed. Press
the CHECK (
14 15
) button again to see your most recent test result.
Hold down the DOWN ( ) or UP ( ) arrow buttons to accelerate through options or results.
Page 10

CHAPTER
Preparing For a Test With Your
6
WaveSense Jazz Meter
CHAPTER
Performing a Control Solution Test
7
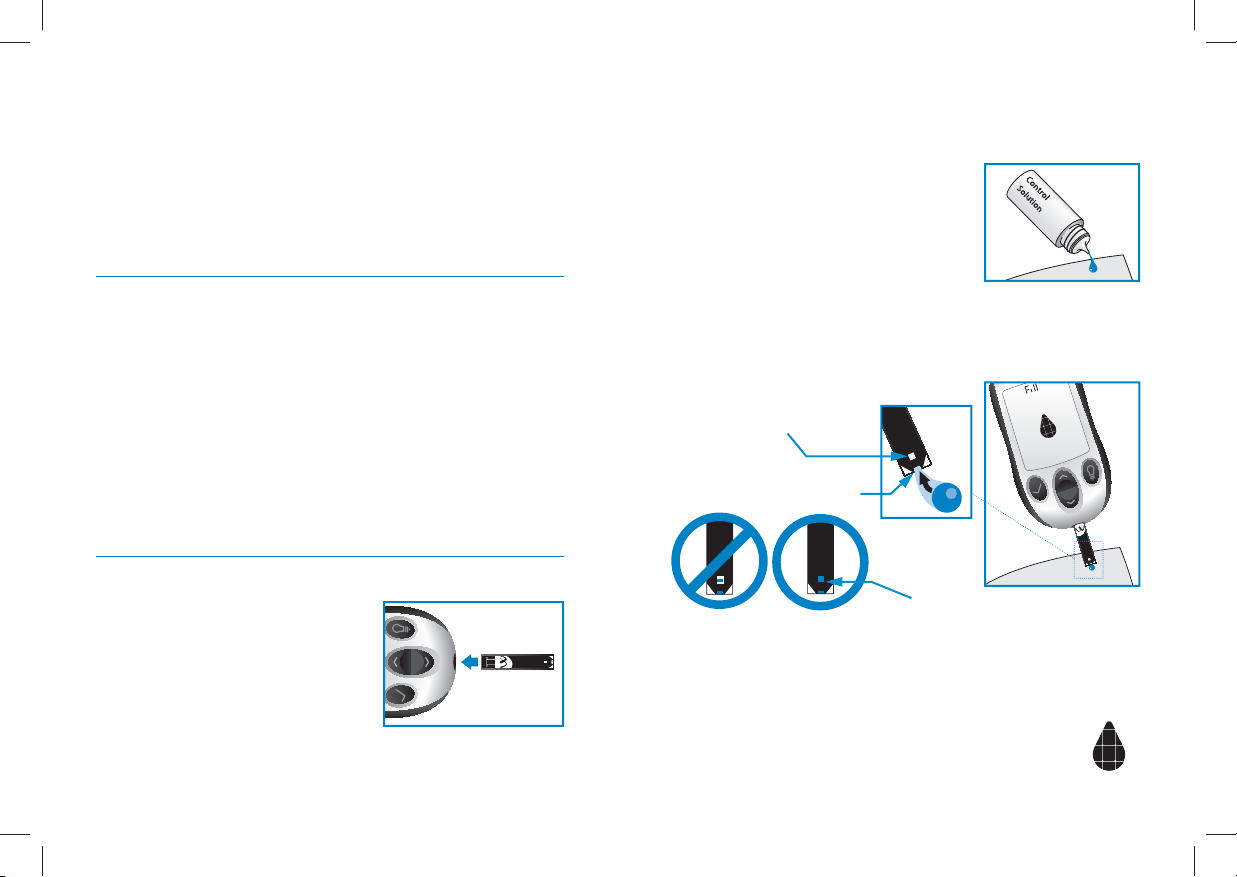
[1] Insert a WaveSense Jazz Test Strip: Insert a new
WaveSense Jazz Test Strip into the
meter. Make sure you insert the test
strip, with the contact bars facing up,
into the strip port. The meter will be
activated automatically.
Note: If you do not start the test
within 5 minutes, the meter will be deactivated. To reactivate
your meter, press the CHECK (
WaveSense Jazz Test Strip and reinsert it into the meter.
[2] Meter Ready for Test: The meter now
displays the blood drop symbol and the word
“Fill”. The WaveSense Jazz System is now ready
for you to apply control solution or blood.
) button or remove the unused
The WaveSense Jazz System has 2 levels of control solution:
Normal and High. Select the level of control solution you
want to use.
The control solution is used to:
[1]
Ensure that your WaveSense Jazz Meter and Test Strips are
working together properly.
[2] Practice testing without having to use your own blood.
Control solution tests should be performed when you:
[1]
First get your WaveSense Jazz Meter.
[2] Begin using a new vial of WaveSense Jazz Test Strips.
[3] Suspect that your WaveSense Jazz Meter or Test Strips are
not working properly.
[4] Think your test results are not accurate.
[5] Have dropped or damaged your meter or exposed your
meter to liquids other than blood samples.
[6] Are advised by your healthcare professional to do so.
16 17
Page 11
Control solution should only be used for 90 days after first
opening the bottle or until the expiration date printed on the
label, whichever comes first.
IMPORTANT: Count forward 90 days from the date you
open a new bottle of WaveSense Control Solution. This is
your discard date. Write the discard date on the WaveSense
Control Solution bottle.
Important WaveSense Control Solution information:
[1]
Use only WaveSense Control Solution with your
WaveSense Jazz System.
[2] Always replace the cap on the control solution bottle
immediately after use.
[3] Do not add water or any other liquid to control solution.
[4] Control solution tests should be performed within the system
operating temperature range of 50 °F to 104 °F (10 °C to 40 °C).
System is now ready for you to apply control solution. You do
not need to set a calibration code for this meter.
[3] Applying Control Solution: Shake
the control solution bottle. Discard the
first drop of control solution and wipe
the bottle tip clean using a clean tissue
or paper towel. Dispense a second drop
onto a clean surface, such as an unused
resealable plastic bag.
Bring the tip of the test strip to the control solution sample.
The WaveSense Jazz System will automatically detect if a test
is performed with WaveSense Control Solution.
This is the visual ll window.
DO NOT PUT CONTROL
SOLUTION HERE .
Apply control solution here.
How to perform a control solution test:
[1]
Inserting a WaveSense
Jazz Test Strip: Insert a new
WaveSense Jazz Test Strip into the
meter. The meter will be activated
when the test strip is fully inserted.
When control solution is applied, the visual fill window on
the WaveSense Jazz Test Strip turns blue. Your meter will
beep once indicating that you should remove the
tip of the WaveSense Jazz Test Strip from the control
The entire visual ll
window will turn blue.
Droplet
Symbol:
solution sample. On the meter display, the droplet
[2] Meter Ready for Test: The meter now displays the
droplet symbol and the word “Fill”. The WaveSense Jazz
18 19
symbol fills to indicate that the control solution is
filling the WaveSense Jazz Test Strip. The scrolling
Page 12
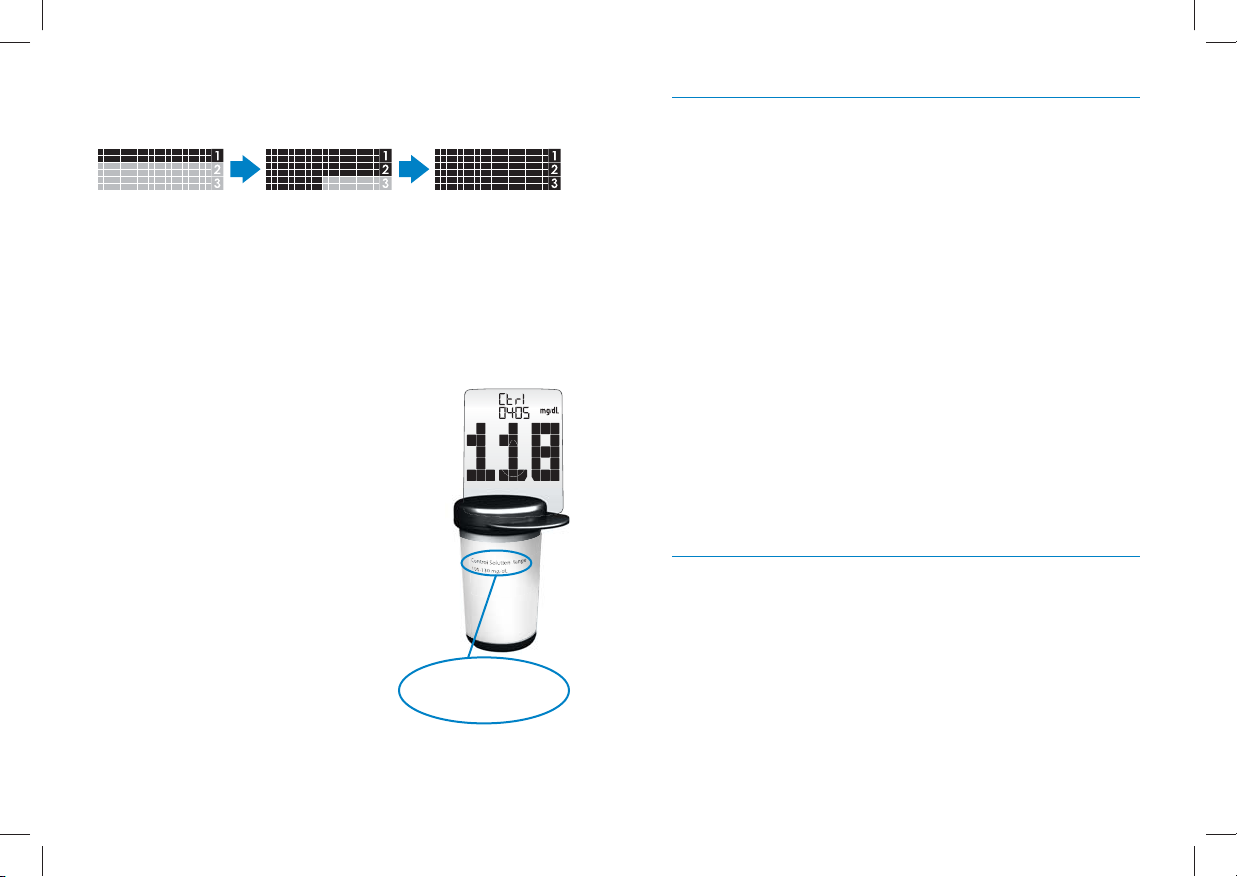
bar and 1-2-3 indicates that the meter is calculating your
results.
IMPORTANT: Out-of-range test results may be caused by a
number of factors including:
[1] Expired or defective control solution.
[4] Viewing Control Solution Test Result: The result will
[2] Expired or defective test strip.
appear on the display and, if the volume is enabled, your
meter will beep once. The date and the abbreviation “Ctrl”
[3] Error in performing test.
will also appear on the display.
[4] Watered-down control solution.
Compare the result of your control solution test to the range
printed on the WaveSense Jazz Test Strip vial
[5] Meter malfunction.
label for the control solution level (Normal
or High) that you used. Your control solution
result should fall within this range. The control
[6] Control solution test done outside the operating
temperature of 50 °F to 104 °F (10 °C to 40 °C).
solution test result is stored in memory.
[7] Failure to shake the control solution bottle vigorously
To deactivate the meter, remove the used
before use.
WaveSense Jazz Test Strip. Dispose of used
materials properly.
[8] Failure to discard the rst drop of control solution and to
wipe the bottle tip clean.
If your control solution test results are out of
the range, repeat the test. If the results from
the control solution tests continue to fall
outside that range, do not use the WaveSense
Jazz System to test your blood glucose. Call
customer service.
Control Solution Range
100 - 130 mg/dL
20 21
CAUTION: Results from control solution tests do not re ect
your blood glucose level. The control solution range is a
target range for control solution only. It is not a target
range for your blood glucose level.
Page 13
How to Test Your
8
CHAPTER
CAUTION: To ensure accurate results, wash your hands with
warm, soapy water and dry before every test. Make sure
there is no grease, oil or lotion on the test site. Interfering
substances (see test strip insert sheet for interfering
substances) on unwashed hands may lead to inaccurate
results. Use lancets only once. Do not use any lancet or
lancing device that has been used by another person.
How to test your blood glucose level:
Blood Glucose Level
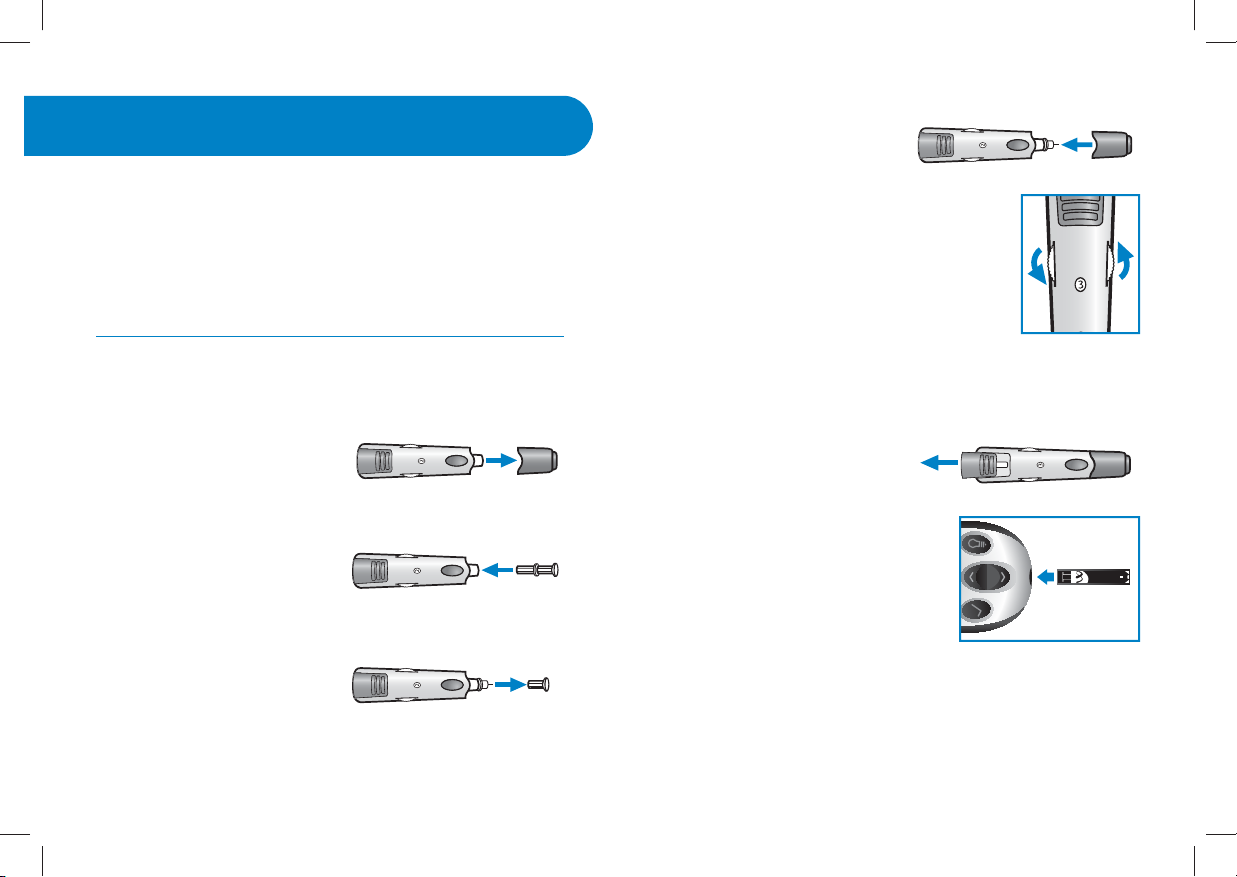
Replace Lancing Device Cap: Replace the lancing device
cap until it snaps into place.
Be careful not to touch the
exposed needle on the lancet.
Set the Lancing Level: The WaveSense Lancing Device offers 8 depth settings. Rotate
the dial to the desired setting as shown in
the depth indicator window. Level 1 is the
most shallow; level 8 is the deepest. If you
have never lanced before, it is recommended
that you start at level 3. If necessary, set the
depth level to a deeper setting to produce
enough blood to fill the test strip (0.5 μL).
[1]
Preparing the WaveSense Lancing Device:
Remove Lancing Device Cap:
Pull the cap off the lancing
device.
Insert New Lancet: Insert a new WaveSense Lancet firmly into
the lancet holder cup. Pushing
the lancet into the lancet holder
cup may cock the device; this
is OK.
Pull the Lancet Cap O : Hold the lancet firmly in place with
one hand and use your other
hand to pull off the lancet cap.
Do not discard the lancet cap. It
should be used when discarding
your used lancet.
22 23
Cock the Handle: Pull the cocking handle out until it clicks.
You may have already cocked the handle accidentally while
inserting the lancet; this is OK.
The lancing device is now ready
for use.
[2] Insert a WaveSense Jazz Test
Strip: Insert a new WaveSense Jazz
Test Strip into the strip port of the
meter. Make sure you insert the test
strip, with the contact bars facing
up, into the strip port. The meter
will be activated when the test strip
is fully inserted.
Note: If you do not start the test within 5 minutes, the meter will
be deactivated. To reactivate your meter, take out the unused
WaveSense Jazz Test Strip and reinsert it into the meter.
Page 14
Meter Ready for Test: The meter now displays the droplet
symbol and the word “Fill”. The WaveSense Jazz System is
now ready for you to apply blood. You do not need to set a
calibration code for this meter.
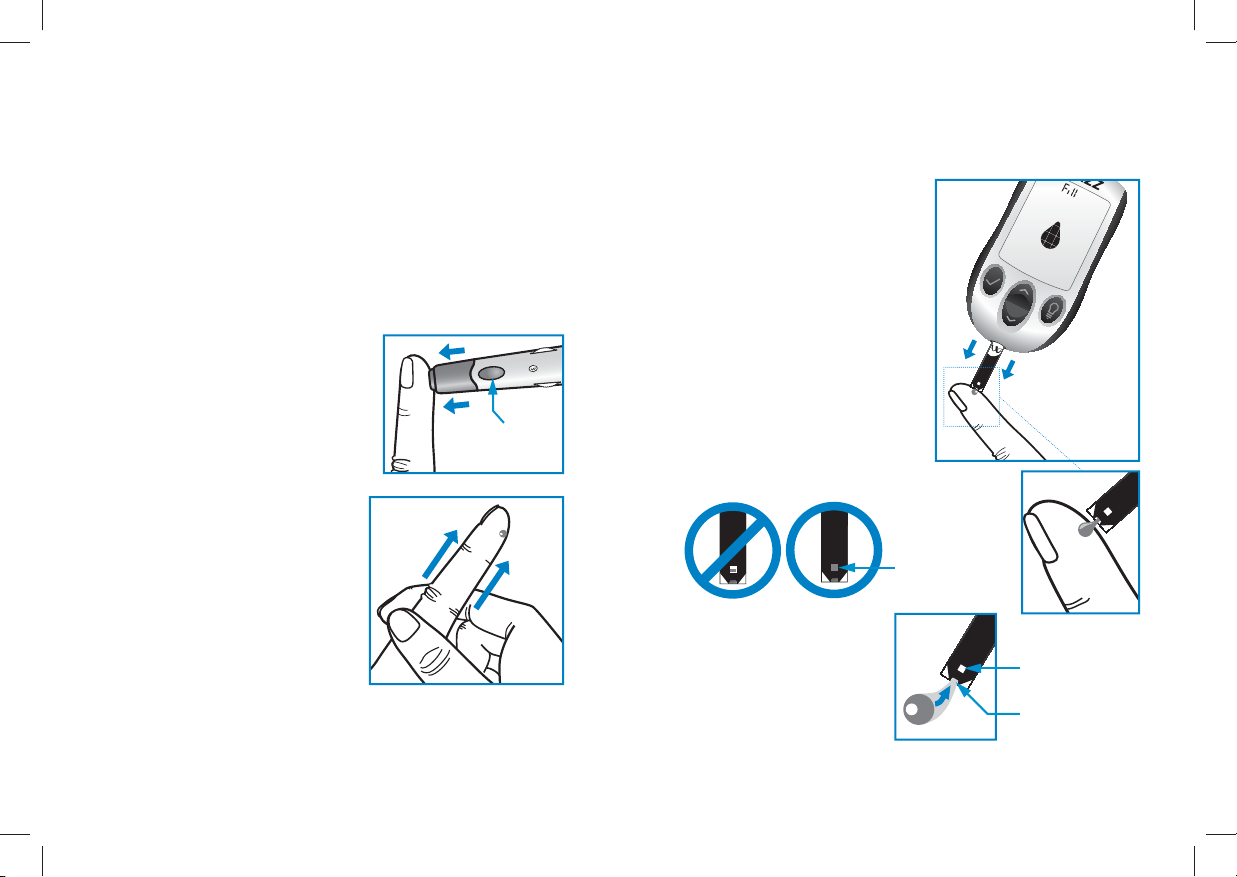
[3] Lancing: To ensure accurate results, wash hands with
warm, soapy water and dry before every glucose test. For
details on possible test sites, refer to chapter 3.
[4]
Applying Blood Sample
Bring Test Strip to Blood Sample: The meter now displays
the droplet symbol. This means your WaveSense Jazz System
is now ready for you to apply
blood. Immediately bring the
WaveSense Jazz Test Strip to the
blood sample.
For instructions on how to test on your palm or forearm,
please refer to chapter 9.
The test strip fills from the tip.
Do not apply blood on the top
surface of the test strip.
Note: Keep your hand warm or gently
massage the site you are lancing to
stimulate blood flow.
The WaveSense Jazz Test Strip
acts like a sponge and draws the
blood into the test strip through
Lance Test Site: Press the lancing
device against the site to be
lanced. Press the release button.
Express Blood Drop: When
testing on a finger tip, wipe away
the first blood drop that appears
using a clean tissue or paper
Release
Button
the sample area. The visual fill
window of the WaveSense Jazz
Test Strip will turn red.
The entire
visual ll
window will
turn red.
towel. Squeeze from the base of
your finger up towards the tip,
until a second small blood drop
forms.
Do not squeeze directly around
the lanced area.
If necessary, set the lancing device to a deeper setting or use
WARNING: If the visual
ll window does not
completely ll, you may
get an inaccurate result.
Retest and ensure that
the visual ll window is
completely full.
This is the visual ll
window. DO NOT
PUT BLOOD HERE .
Apply blood here.
a larger lancet to produce enough blood.
24 25
Page 15
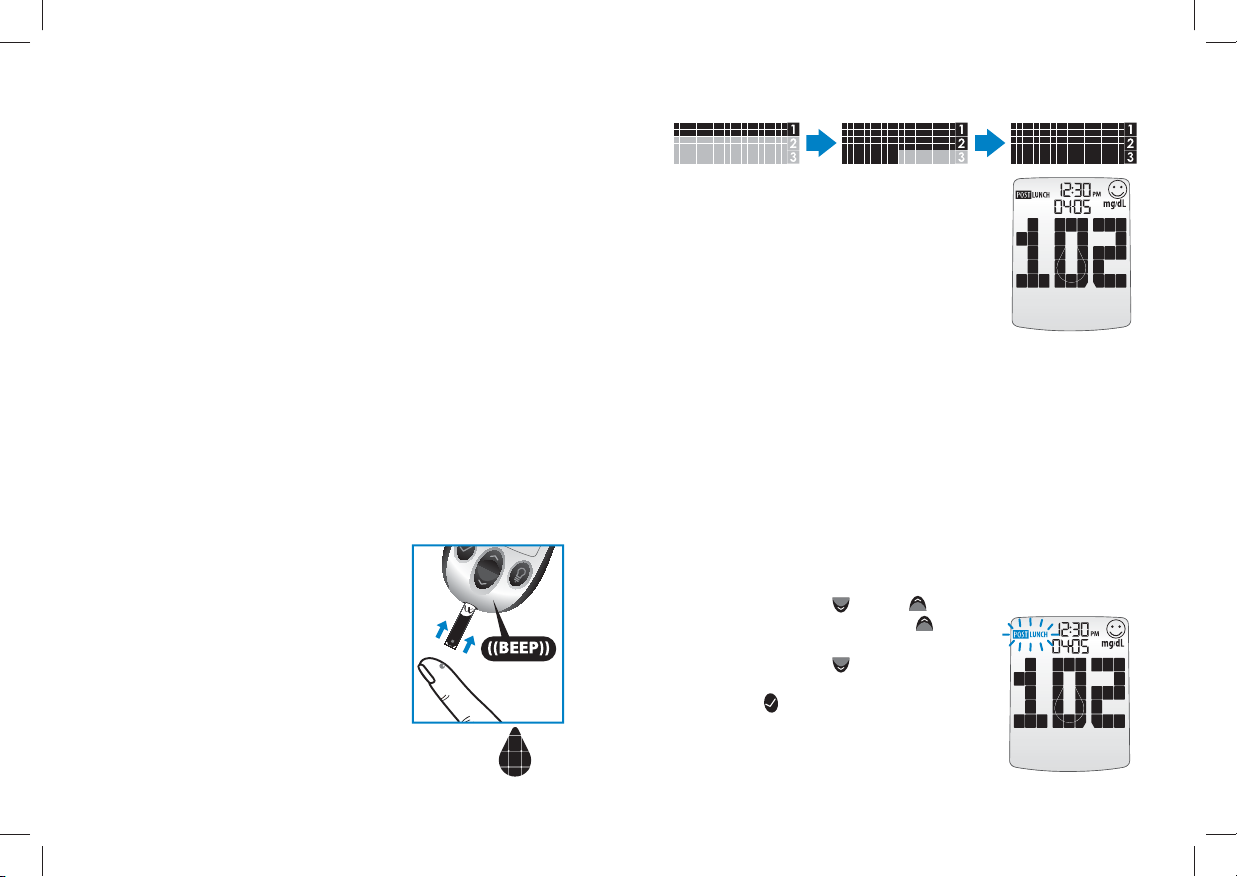
IMPORTANT:
[1] Remove the test strip from the blood sample as soon as
you hear the beep.
[2] Do not press the WaveSense Jazz Test Strip against the
test site.
[3] Do not scrape blood onto the WaveSense Jazz Test Strip.
the meter is calculating your results.
Your test is completed when your blood
glucose test result with time and date is
shown on the display. If the volume is ON,
you will hear a beep. Your test result is
now stored in the memory.
[4] Do not apply blood to the top side of the WaveSense
Jazz Test Strip.
[5] Do not apply blood to the WaveSense Jazz Test Strip
when the test strip is out of the meter.
[5] Test Result Mealtime Tagging and
Feedback
If the Mealtime Tag Feature is Enabled: The WaveSense Jazz
Meter allows you to add a tag to your test result. Tagging
results allows you to view averages before and after meals to
[6] Do not put blood or foreign objects into the WaveSense
see what effect food has on your blood glucose levels.
Jazz strip port. Doing so may lead to system failure.
After your result appears, a tag will flash on the display
[7] Do not apply more blood after beep.
suggesting a mealtime tag (Breakfast, Post Breakfast, Lunch,
Post Lunch, Dinner, Post Dinner, and Night). For example,
[8] Carefully read the test results on the display before
making any treatment decisions.
Remove Test Strip from Blood Sample
when you hear the beep: Your meter
will beep once when you should
remove the tip of the WaveSense Jazz
Test Strip from the blood sample.
if you test at 12:30PM, the meter will flash the word “POST
LUNCH.”
Example of
If the tag is incorrect, you can change it by
pressing the DOWN (
arrow buttons. Pressing the UP (
) or UP ( )
) arrow
Mealtime Tag:
POST LUNCH
button would change the tag to Lunch,
pressing the DOWN (
) arrow button
would change the tag to Dinner. Pressing
On the meter display, the droplet
symbol fills to indicate that the blood is
filling the WaveSense Jazz Test Strip.
The scrolling bar and 1-2-3 indicates that
26 27
Droplet
Symbol:
the CHECK (
) button confirms the
mealtime tag and it stops flashing. Your
test result’s mealtime tag is now stored in
the memory.
Page 16

You can still change
this setting by
pressing the DOWN
(
) or UP ( ) ar ro w
buttons, if you haven’t
removed the test strip
from the meter yet.
Example of
Mealtime Tag:
POST BREAKFAST
Example of
Mealtime Tag:
NO TAG (BLANK)
will automatically deactivate.
IMPORTANT: If you do not remove the used test strip after
3 minutes of testing, the meter will deactivate. To activate
your meter with a used test strip still in the meter, press the
CHECK (
) button once. Do not attempt to apply blood or
control solution to an already used test strip.
If you don’t want to
tag a reading, scroll
through the options
Remove the Lancet: When you have finished testing, pull off
the lancing device cap from
the lancing device.
by pressing the DOWN
(
) or U P ( ) arrow buttons. One of the options will leave the
Replace the lancet cap.
tag field blank. If you do not want to tag meals, this feature can
be turned OFF in the menu mode.
Extract the lancet from the
lancet holder cup by pulling
Tagging Values:
The WaveSense Jazz Meter
suggests mealtime tagging
values according to this chart:
Breakfast: 5:00AM - 7:59AM
Post Break fast: 8:00AM - 9:59AM
Lunch: 10:00AM - 11:59AM
Post Lunch: 12:00PM - 2:59PM
Dinner: 3:00PM - 5:59PM
Post Dinner: 6:00PM - 8:59PM
Night: 9:00PM - 4:59AM
Feedback: Depending on the mealtime tag and your
test result, the meter will display positive feedback in
on the plastic collar of the
lancet (near the middle of
the lancet).
Replace the lancing device
cap until it snaps or clicks into place.
Discard Properly: Discard the used WaveSense
Jazz Test Strip and Lancet properly.
the form of a happy face. The happy face symbol is
displayed with glucose test results that fall within specific
pre and post meal target ranges.
[6] Final Steps
Remove the Test Strip: Remove
the used WaveSense Jazz Test
WARNING: The lancing device and lancets should only be
used by one person. Never share lancing devices or lancets.
Used test strips, lancets, and lancing devices may be
considered biohazardous or medical waste in your city or
town. Follow all local regulations for proper disposal.
Strip. The WaveSense Jazz Meter
28 29
Page 17
Testing on Your Palm or Forearm
9
CHAPTER
Testing glucose levels with blood obtained from the palm
(at the base of the thumb) or forearm may reduce the pain of
testing. The technique for testing on the palm and forearm
is slightly different than testing on the finger. Always discuss
changes to your testing habits with your healthcare professional.
IMPORTANT: When testing on the palm (at the base of the
thumb) or forearm, you may need to set the lancing device
to a deeper setting or use a larger lancet to obtain enough
whole blood to perform a test. Consult your healthcare
professional for a recommendation.
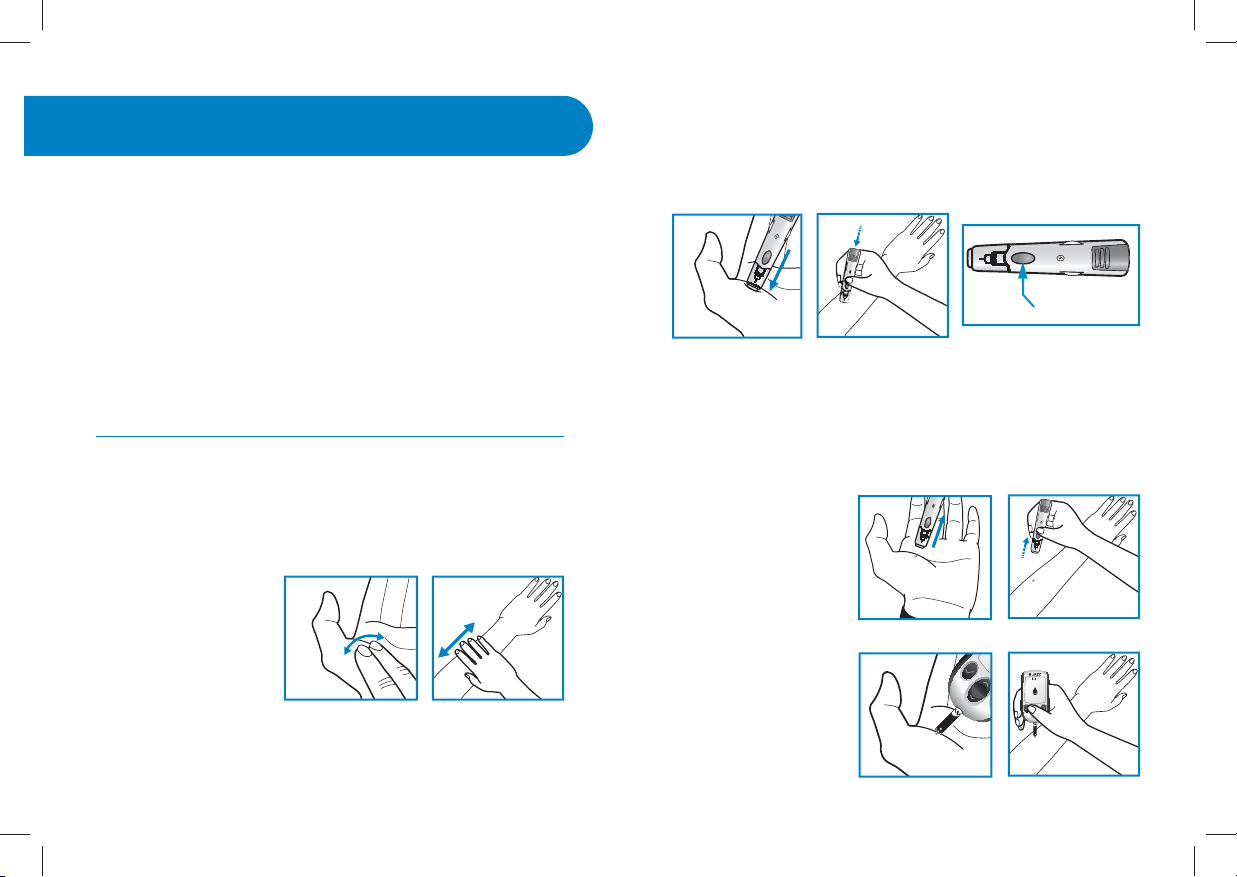
For testing on your palm or forearm:
[1] Prepare Lancing Device: Always use the AST clear lancing device cap on the lancing device.
[3] Lance Test Site: Press the tip of the clear cap against the
skin of your palm of your hand (at the base of the thumb) or
forearm. Hold the tip to the test site for a few seconds before
pressing the release button.
Palm: Forearm:
Release Button
[4] Express Blood Drop: After lancing, hold the lancing
device against your skin until a blood droplet forms. Make
sure the blood drop is large enough to completely fill the
visual fill window of the test strip. Pull the lancing device
directly off your palm or forearm to ensure that you do not
smear the blood drop.
Palm: Forearm:
[2] Rub Test Site:
To increase the blood
flow in your palm (at
the base of the thumb)
or forearm, rub the
area that you will be
testing. Ensure that
your palm or forearm
is facing up and held level.
30 31
Palm: Forearm:
Return to Chapter
8, step 4 to continue
with testing
instructions.
Palm:
Forearm:
Page 18

10
CHAPTER
IMPORTANT: Results, averages and graphs stored in
memory should only be used as a reference. Do not
make treatment decisions based solely on stored results,
averages and graphs. Consult with your healthcare
professional regarding treatment options.
Data Management Features
About averages and standard deviations:
Control solution, out-of-temperature-range results, and results
without a valid time or date are not included in averages,
standard deviations, and trend graphs. Hi and Lo test results will
be included in averages as values of 600 mg/dL and 20 mg/dL
respectively. 14, 30, and 90 day averages and trend graphs
are calculated by taking the average of all readings within the
respective time period. Standard deviations, averages, and trend
graphs do not include the current day in their calculations.
This chapter covers the steps on how to view your:
• Individual Results (1865 past results, with time and date)
• 14 Day Statistics
• 14, 30, and 90 Day Averages
• Pre/Post Mealtime Averages & Glucose Variability Tracking
• 1 Month, 2 Week, 3 Day Trend Graphs
How to access all data management features:
All past test results are accessed the same way. The following
instructions will explain how to get to the different types of
data.
[1] When your meter is deactivated press the CHECK ( ) but-
ton to enter menu mode. The word “MEM” is displayed.
[2] Press the DOWN ( ) arrow button to scroll forward and
press the UP (
the categories of data.
[3] Press the CHECK ( ) button to enter into a category and
view features.
32 33
) arrow button to move backward through
The standard deviation is an expression of the variation of
readings from the average reading. The greater this value the
more variation exists between individual readings and the
average. The standard deviation feature is a way to track your
glucose variability.
10.1
[1] When your meter is deactivated, press the
CHECK (
The word “MEM” is displayed.
[2] Press the CHECK ( ) button again to enter
the individual results section.
[3] Press the DOWN ( ) arrow button to
scroll through the individual readings. Press
the UP (
Note: When scrolling through, the oldest test re-
sult will cycle back to the most recent test result.
To return to the menu, press the CHECK (
Viewing Individual Results
) button once to enter menu mode.
) arrow button to scroll backwards.
) button.
Page 19
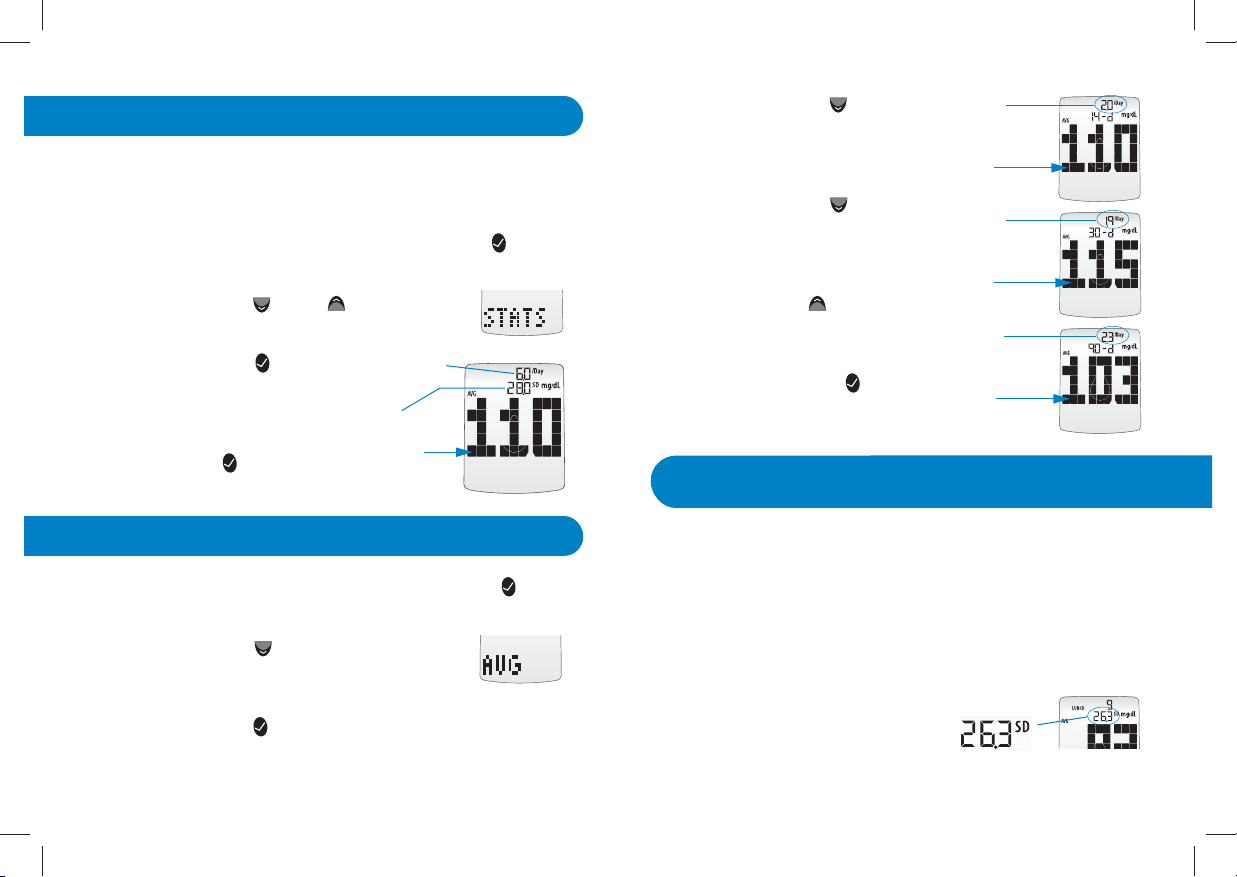
10.2
Viewing 14 Day Statistics
The stats feature allows you to compare your average test
result, the standard deviation between test results, and the
average number of tests per day over the last 14 day period.
[1] When your meter is deactivated, press the CHECK ( ) b u t to n
once to enter menu mode. The word “MEM” is displayed.
[2] Press the DOWN ( ) or UP ( ) arrow buttons
until the word “STATS” appears on the display.
[3] Press the CHECK ( )
button again to enter the
statistics section.
Note: To return to the menu,
press the CHECK (
) button.
Average number
of tests per day
Standar d
Deviation
Average Test
Result
[4] Press the DOWN ( ) arrow
button. The display now shows
your 30 day average and average
number of tests per day.
[5] Press the DOWN ( ) arrow
button. The display now shows
your 90 day average and average
number of tests per day.
Note: Press the UP (
) arrow button
to scroll backwards. When scrolling,
you will cycle through the 14, 30 and
90 Day Averages. To return to the
menu, press the CHECK (
) button.
Viewing Pre/Post Mealtime Averages
10.4
& Glucose Variability Tracking
Avera ge
Number of
Tests Per Day
14 Da y
Avera ge
Tes t Re sult
Avera ge
Number of
Tests Per Day
30 Day
Avera ge
Tes t Re sult
Avera ge
Number of
Tests Per Day
90 Day
Avera ge
Tes t Re sult
10.3
Viewing 14, 30, and 90 Day Averages
The WaveSense Jazz Meter categorizes readings as happening
before or after meals. These averages allow you to see how your
blood glucose levels vary by time of day. The pre/post mealtime
[1] When your meter is deactivated, press the CHECK ( ) but-
ton once to enter menu mode. The word “MEM” is displayed.
averages and standard deviations only include the first instance
of a particular mealtime tag (breakfast, post breakfast, lunch,
post lunch, etc.) per day over the last 14 day period. The second
[2] Press the DOWN ( ) arrow button twice.
The abbreviation “AVG” will appear in the lower
part of the display.
[3] Press the CHECK ( ) button again to enter the 14, 30, and
90 day averages section. The display now shows your 14 day
average and average number of tests per day.
34 35
and subsequent tests marked with the same time tag (on the
same day) are not included. The standard deviation feature is a
way to track your glucose variability.
Note: Standard deviation is always
displayed with a decimal point.
Exampl e of a standard deviati on of 26.3
Page 20
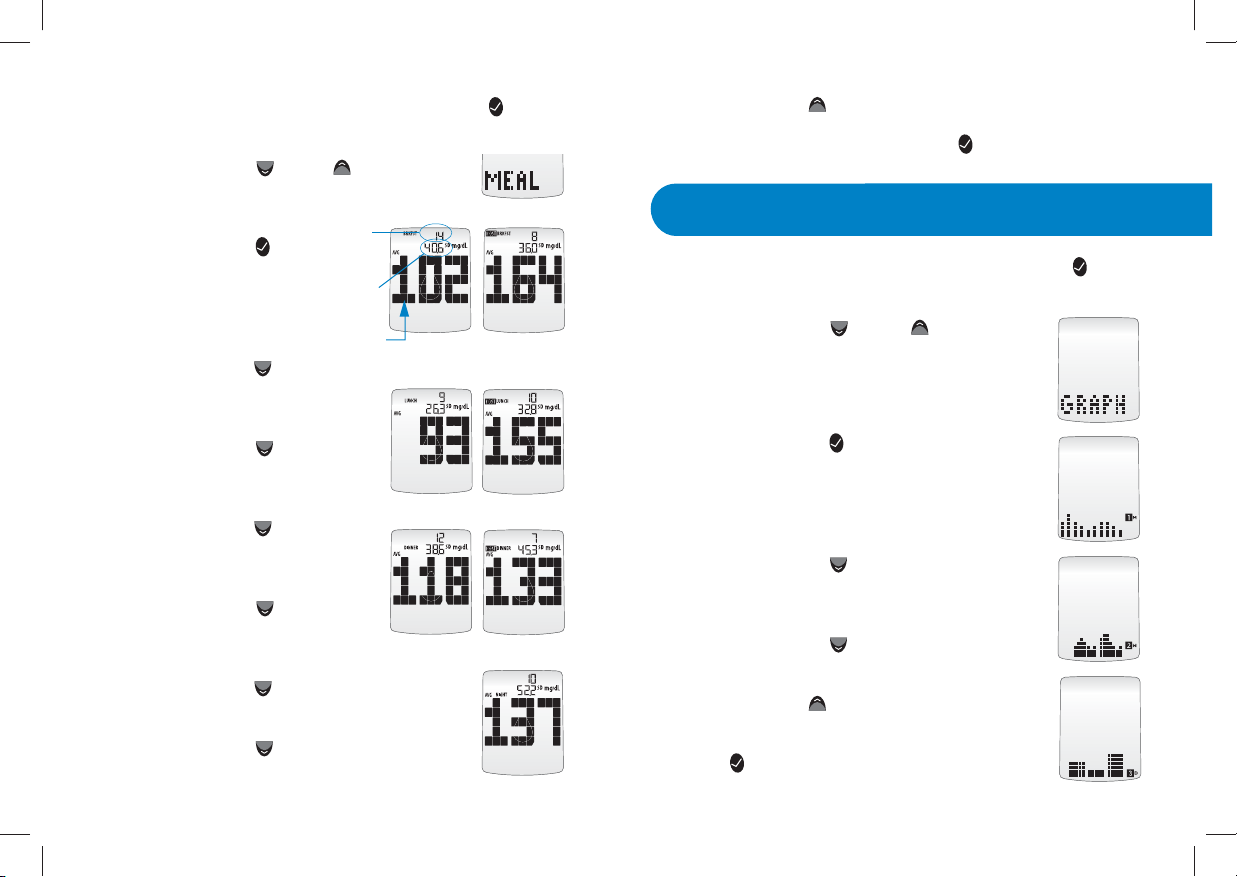
[1] When your meter is deactivated, press the CHECK ( ) b u t t o n
once to enter menu mode. The word “MEM” is displayed.
[2] Press the DOWN ( ) or UP ( ) arrow buttons
until the word “MEAL” appears in the lower part
of the display.
Number
[3] Press the CHECK ( )
button again to enter the
mealtime averages section.
The display now shows your
breakfast average.
of results
tagged
Standar d
Deviation
Avera ge
Tes t Re sult
[4] Press the DOWN ( ) arrow
button. The display now shows
your post breakfast average.
Note: Press the UP ( ) arrow button to scroll backwards. When
scrolling, you will cycle through the Pre/Post Mealtime Averages.
To return to the menu, press the CHECK (
) button.
Viewing 1 Month, 2 Week,
10.5
[1] When your meter is deactivated, press the CHECK ( )
button once to enter menu mode. The word “MEM” is displayed.
[2] Press the DOWN ( ) or UP ( ) arrow but-
tons until the abbreviation “GRAPH” appears in
the lower part of the display.
and 3 Day Trend Graphs
[5] Press the DOWN ( ) arrow
button. The display now shows
your lunch average.
[3] Press the CHECK ( ) button again to enter
the graph section. The display now shows your
1 month graph.
[6] Press the DOWN ( ) arrow
button. The display now shows
your post lunch average.
[4] Press the DOWN ( ) arrow button. The dis-
play now shows your 2 week trend graph.
[7] Press the DOWN ( ) arrow
button. The display now shows
your dinner average.
[5] Press the DOWN ( ) arrow button. The
display now shows your 3 day trend graph.
[8] Press the DOWN ( ) arrow button. The
display now shows your post dinner average.
Note: Press the UP (
) arrow button to scroll
backwards. When scrolling, you will cycle through
[9] Press the DOWN ( ) arrow button. The
display now shows your bedtime average.
36 37
the Trend Graphs. To return to the menu, press the
CHECK (
) button.
Page 21
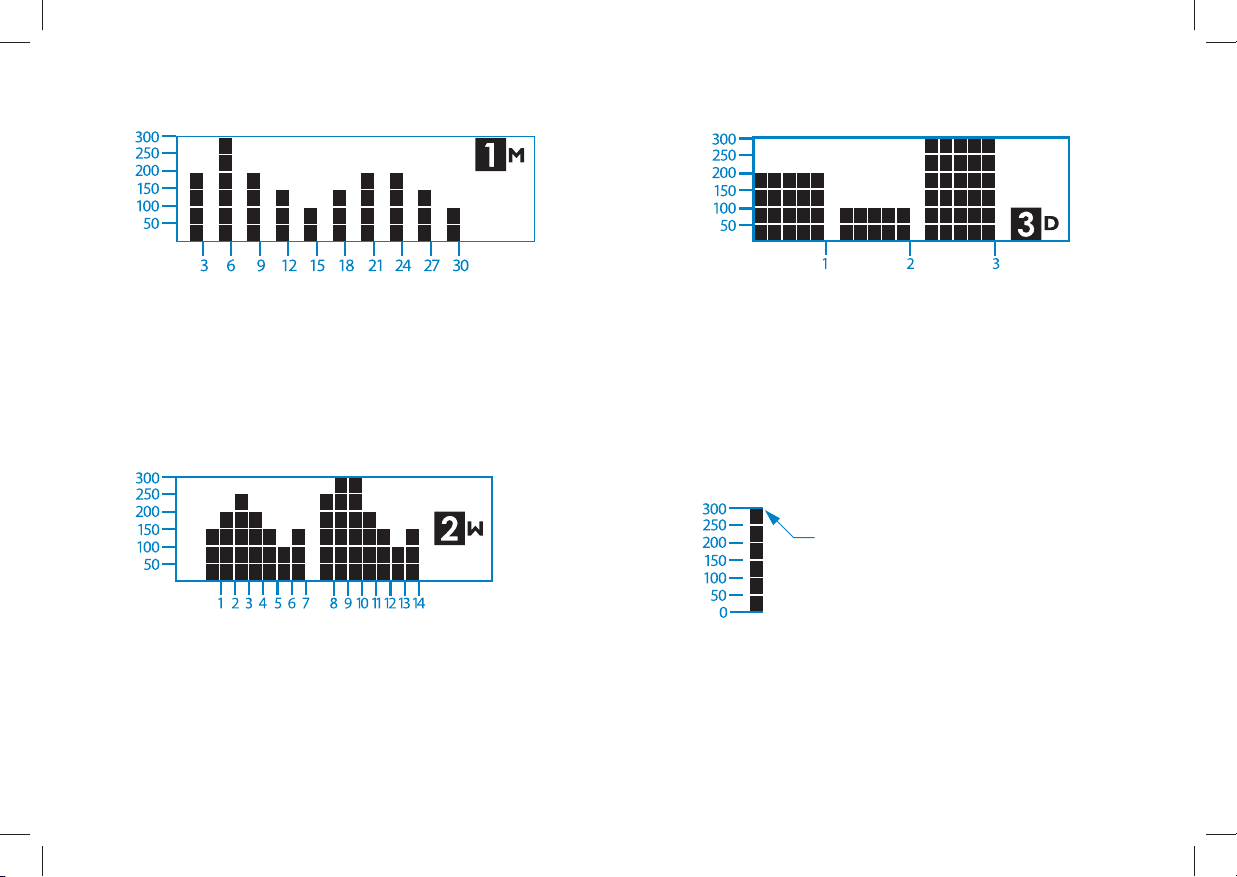
1 Month Trend Graph: 3 Day Trend Graph:
mg/dL
Days
Each bar represents a test result average from 3 days. Each
vertical unit represents 50 mg/dL. The most recent result is
on the right side of the screen.
2 Week Trend Graph:
mg/dL
Days
Each bar represents a test result average from 1 day. Each
vertical unit represents 50 mg/dL. The most recent result is
on the right side of the screen.
mg/dL
Days
Each bar represents a test result average from 1 day. Each
vertical unit represents 50 mg/dL. The most recent result is
on the right side of the screen.
IMPORTANT: Averages above 300 mg/dL will not be
represented in the trend graphs.
Any bars represented at 300 mg/dL may
represent a value higher than 300 mg/dL.
mg/dL
38 39
Page 22
[3] Press the CHECK ( ) button to enter and edit the alarm
11
CHAPTER
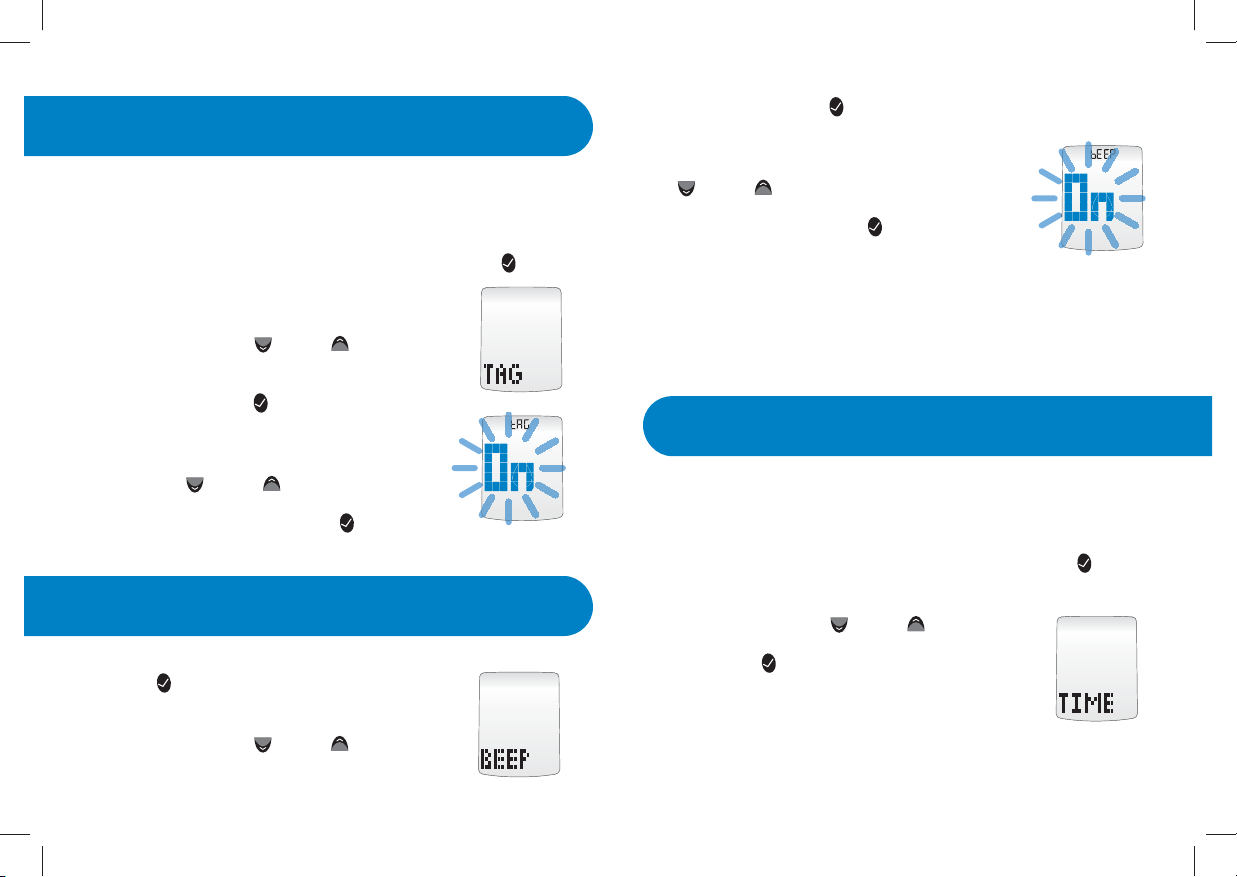
The WaveSense Jazz Meter allows you to turn ON or OFF the
feature that tags results as having occurred before or after a
meal.
[1] When your meter is deactivated, press the CHECK ( )
button once to enter menu mode. The word
“MEM” is displayed.
[2] Press the DOWN ( ) or UP ( ) arrow buttons
until the word “TAG” is displayed.
[3] Press the CHECK ( ) button to enter and
edit the tag setting.
[4] Turn the tagging feature ON or OFF with
the DOWN (
selection will be highlighted by the blinking
of the symbol. Press the CHECK (
confirm your selection and return to the menu.
12
CHAPTER
[1] When your meter is deactivated, press the
CHECK (
The word “MEM” is displayed.
[2] Press the DOWN ( ) or UP ( ) arrow but-
tons until the word “BEEP” is displayed.
40 41
Setting the Mealtime Tag
) or UP ( ) arrow buttons. Your
) button to
Setting Meter Volume
) button once to enter menu mode.
volume setting.
[4] Turn the volume ON or OFF with the DOWN
(
) or UP ( ) arrow buttons. Your selection
will be highlighted by the blinking of the
symbol. Press the CHECK (
your selection and return to the menu.
Note: The meter will always produce a beeping sound after you
have applied blood or control solution to a test strip. This sound
lets you know when to take your blood sample or control solution
away from the test strip. You will hear this sound if the volume is
set to ON or OFF.
13
CHAPTER
IMPORTANT: Check the Time and Date settings before
testing. In order to properly use the meter it is important to
ensure that the time and date are set correctly.
[1] When your meter is deactivated, press the CHECK ( ) but-
ton once to enter menu mode. The word “MEM” is displayed.
[2] Press the DOWN ( ) or UP ( ) arrow but-
tons until the word “TIME” is displayed. Press
the CHECK (
time settings.
[3] You should see a display with the message
blinking “12hr” or “24hr”, this means you are ready to set the
meter’s time. Select the 12 or 24 hour clock format with the
Setting the Time
) button to enter and edit the
) button to confirm
Page 23
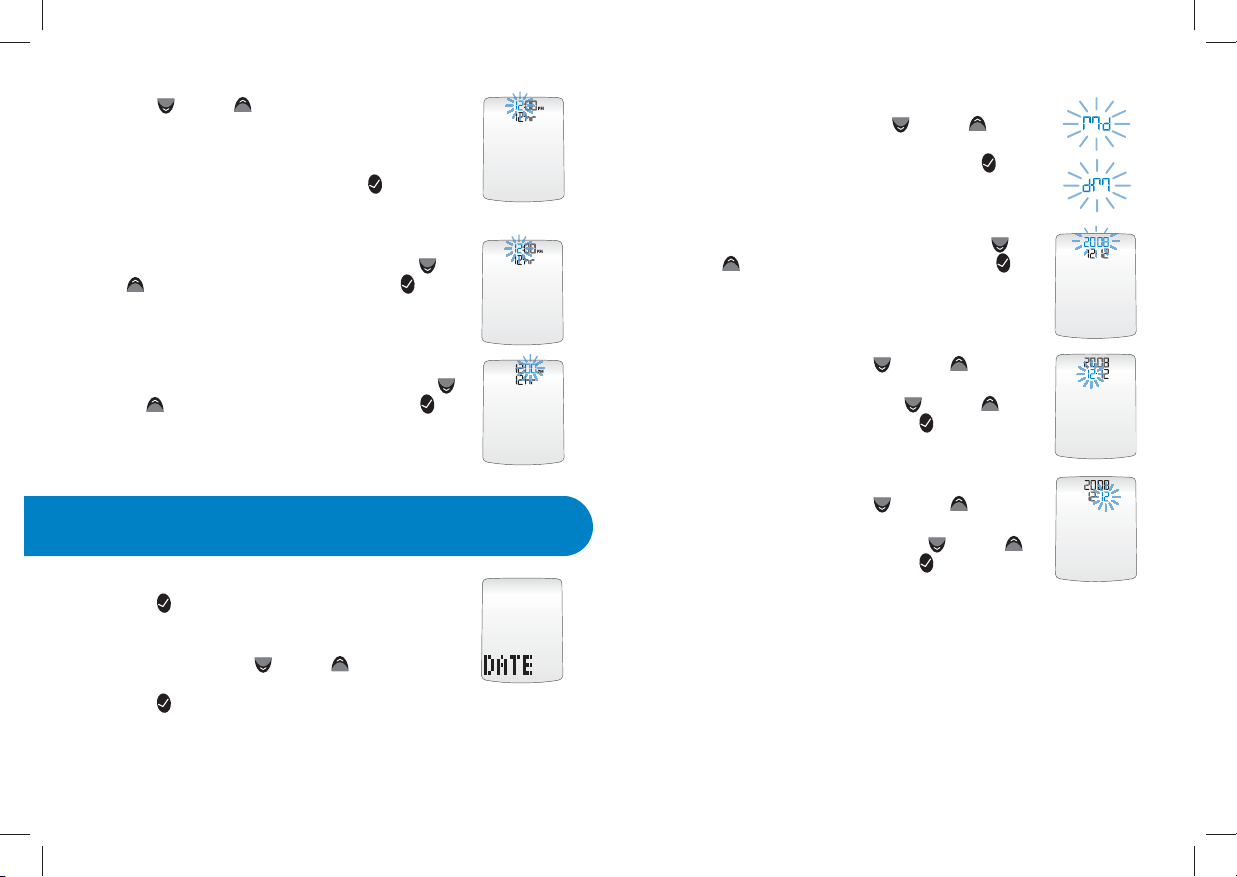
DOWN ( ) or UP ( ) arrow buttons. The 12 hour
clock display option is indicated by a 12hr. The 24
hour clock display option is indicated by a 24hr.
Your selection will be highlighted by the blinking of the symbol. Press the CHECK (
to confirm your selection and continue on to the
hour setting.
[4] Set the hour (flashing) with the DOWN ( ) or
UP (
) arrow buttons. Press the CHECK ( ) button to confirm your selection and continue on to
the minute setting.
[5] Set the minute (flashing) with the DOWN ( )
or UP (
ton to confirm and return to the menu.
[1] When your meter is deactivated press the
CHECK (
The word “MEM” is displayed.
[2] Press the DOWN ( ) or UP ( ) arrow buttons
until the word “DATE” is displayed. Press the
CHECK (
) arrow buttons. Press the CHECK ( ) but-
14
CHAPTER
Setting the Date
) button once to enter menu mode.
) button to enter and edit the date settings.
) button
Select the M-d (Month-Day) or d-M (Day-Month)
date format with the DOWN (
buttons. Your selection will be highlighted by the
blinking of the symbol. Press the CHECK (
ton to confirm your selection and move on to the
year setting.
[4] Set the year (flashing) with the DOWN ( )
or UP (
button to confirm your selection and move on
to the month or day setting.
[5] If in M-d (Month-Day) format, set the month
(flashing) with the DOWN (
buttons. If in d-M (Day-Month) format, set the
day (flashing) with the DOWN (
arrow buttons. Press the CHECK (
confirm your selection.
[6] If in M-d (Month-Day) format, set the day
(flashing) with the DOWN (
buttons. If in d-M (Day-Month) format, set the
month (flashing) with the DOWN (
arrow buttons. Press the CHECK (
confirm your selection and return to the menu.
) arrow buttons. Press the CHECK ( )
) or UP ( ) arrow
) but-
) or UP ( ) arrow
) or UP ( )
) button to
) or UP ( ) arrow
) or UP ( )
) button to
[3] You should see a display with the message blinking “M-d”
or “d-M”, this means you are ready to set the meter’s date.
42 43
Page 24
15
CHAPTER
Setting
Hypoglycemic Warning Alarms
16
CHAPTER
Setting
Hyperglycemic Warning Alarms
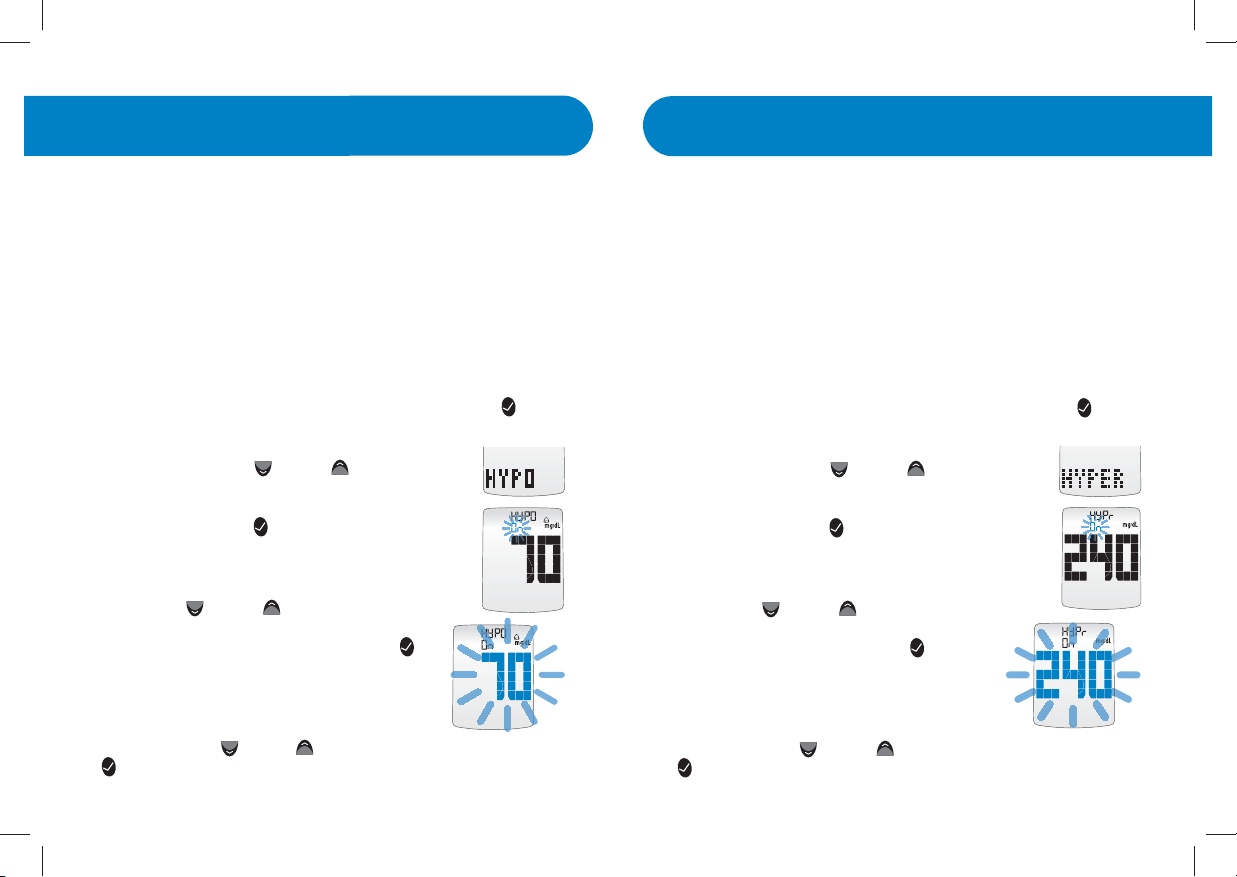
The Hypoglycemic Warning Alarm alerts you when your glucose
test results are below the hypoglycemic threshold that you have
set. The meter is pre-set to a hypoglycemic threshold of 70 mg/dL.
Always consult your healthcare professional for your recommended target ranges. When your glucose test results are below your
set hypoglycemic threshold, the meter display will flash your test
results, the abbreviation “HYPO,” time, and date repeatedly.
WARNING: Your healthcare professional should recommend
what your hypoglycemic limit is.
[1] When your meter is deactivated, press the CHECK ( ) but-
ton once to enter menu mode. The word “MEM” is displayed.
[2] Press the DOWN ( ) or UP ( ) arrow buttons
until the abbreviation “HYPO” is displayed.
[3] Press the CHECK ( ) button to enter and edit
the Hypoglycemic Warning Alarm settings.
[4] Set the Hypoglycemic Alarm ON or OFF with
the DOWN (
Your selection will be highlighted by the
blinking of the symbol. Press the CHECK (
button to confirm your selection and move
on to the hypoglycemic threshold setting.
[5] Set the hypoglycemic threshold (flashing)
with the DOWN (
(
) button to confirm your selection and return to the menu.
44 45
) or UP ( ) arrow buttons.
)
) or UP ( ) arrow buttons. Press the CHECK
The Hyperglycemic Warning Alarm alerts you when your glucose
test results are above the hyperglycemic threshold you have set.
The meter is pre-set to a hyperglycemic threshold of 240 mg/dL.
Always consult your healthcare professional for your recommended target ranges. When your glucose test results are above your
set hyperglycemic threshold, the meter display will flash your
test results, the abbreviation “HYPr,” time, and date repeatedly.
WARNING: Your healthcare professional should recommend
what your hyperglycemic limit is.
[1] When your meter is deactivated, press the CHECK ( ) but-
ton once to enter menu mode. The word “MEM” is displayed.
[2] Press the DOWN ( ) or UP ( ) arrow buttons
until the abbreviation “HYPER” is displayed.
[3] Press the CHECK ( ) button to enter and edit
the Hyperglycemic Warning Alarm settings.
[4] Set the Hyperglycemic Alarm ON or OFF with
the DOWN (
selection will be highlighted by the blinking
of the symbol. Press the CHECK (
confirm your selection and move on to the
hyperglycemic threshold setting.
[5] Set the hyperglycemic threshold (flashing)
with the DOWN (
(
) button to confirm your selection and return to the menu.
) or UP ( ) arrow buttons. Your
) button to
) or UP ( ) arrow buttons. Press the CHECK
Page 25
17
CHAPTER
Setting
The Glucose Target Range
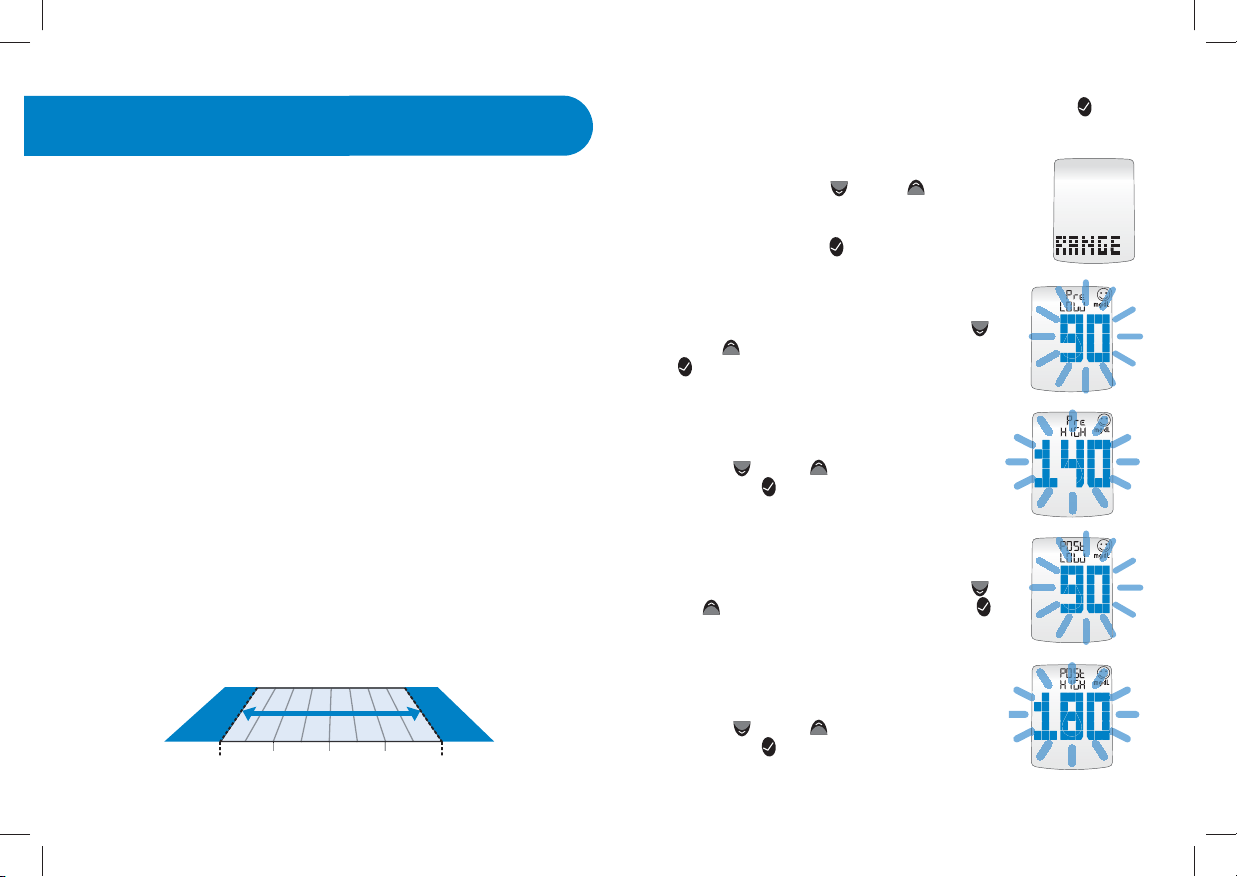
[1] When your meter is deactivated, press the CHECK ( )
button once to enter menu mode. The word “MEM” is displayed.
The WaveSense Jazz includes a unique positive feedback
feature where a happy face symbol is displayed with glucose
test results that fall within a specific target range. By entering
values for what your glucose levels should be before or after
a meal (target glucose ranges), you can customize when this
happy face symbol appears. Always consult your healthcare
professional for your recommended target ranges.
IMPORTANT: It is advised to set the hypoglycemic and
hyperglycemic thresholds before making changes within
the glucose target range menu (refer to chapters 15-16 for
setting hypoglycemic and hyperglycemic warning alarms).
When setting pre and post meal ranges, the lower limits are
restricted by the hypoglycemic threshold and the meter will not
allow you to select a number below this threshold. (For example:
If you want the pre meal target range to begin at 90 mg/dL, then
the hypoglycemic alarm needs to be set at 90 mg/dL or less).
The upper limits for pre and post meal ranges are restricted by
the hyperglycemic threshold and the meter will not allow you to
select a number above this threshold. (For example: If you want
the post meal target range to end at 180 mg/dL, then the hyperglycemic alarm needs to be set at 180 mg/dL or higher).
Hypoglycemic
Threshold
GLUCOSE TARGET RANGE
46 47
(mg/dL)
Hyperglycemic
Threshold
[2] Press the DOWN ( ) or UP ( ) arrow buttons
until the word “RANGE” is displayed.
[3] Press the CHECK ( ) button to enter and edit
the glucose target range settings.
[4] Set the lower limit of the pre meal glucose
target range (flashing) with the DOWN (
or UP (
(
tinue on to the upper limit pre meal setting.
[5] Set the upper limit of the pre meal
glucose target range (flashing) with the
DOWN (
the CHECK (
lection and continue on to the lower limit
post meal setting.
[6] Set the lower limit of the post meal glucose
target range (flashing) with the DOWN (
UP ( ) arrow buttons. Press the CHECK ( )
button to confirm your selection and continue
on to the upper limit post meal setting.
[7] Set the upper limit of the post meal
glucose target range (flashing) with the
DOWN (
the CHECK (
selection and return to the menu.
) arrow buttons. Press the CHECK
) button to confirm your selection and con-
) or UP ( ) arrow buttons. Press
) button to confirm your se-
) or UP ( ) arrow buttons. Press
) button to confirm your
)
) or
Page 26
18
CHAPTER
There are 7 alarms you can set to remind you when to test
your glucose levels.
When alarms are activated:
[1]
If an alarm is set and the WaveSense Jazz Meter is deactivated, the alarm will activate the meter. “AL1” thru “AL7” (depending which alarm is set) is displayed. The display backlight
flashes, and the meter will beep repeatedly for 15 seconds.
[2] You can turn the alarm OFF by pressing any button.
[3] The alarms will not appear during menu and test modes.
If an alarm is set to sound or flash while using these modes,
it will alarm after the meter is deactivated.
Setting Alarms
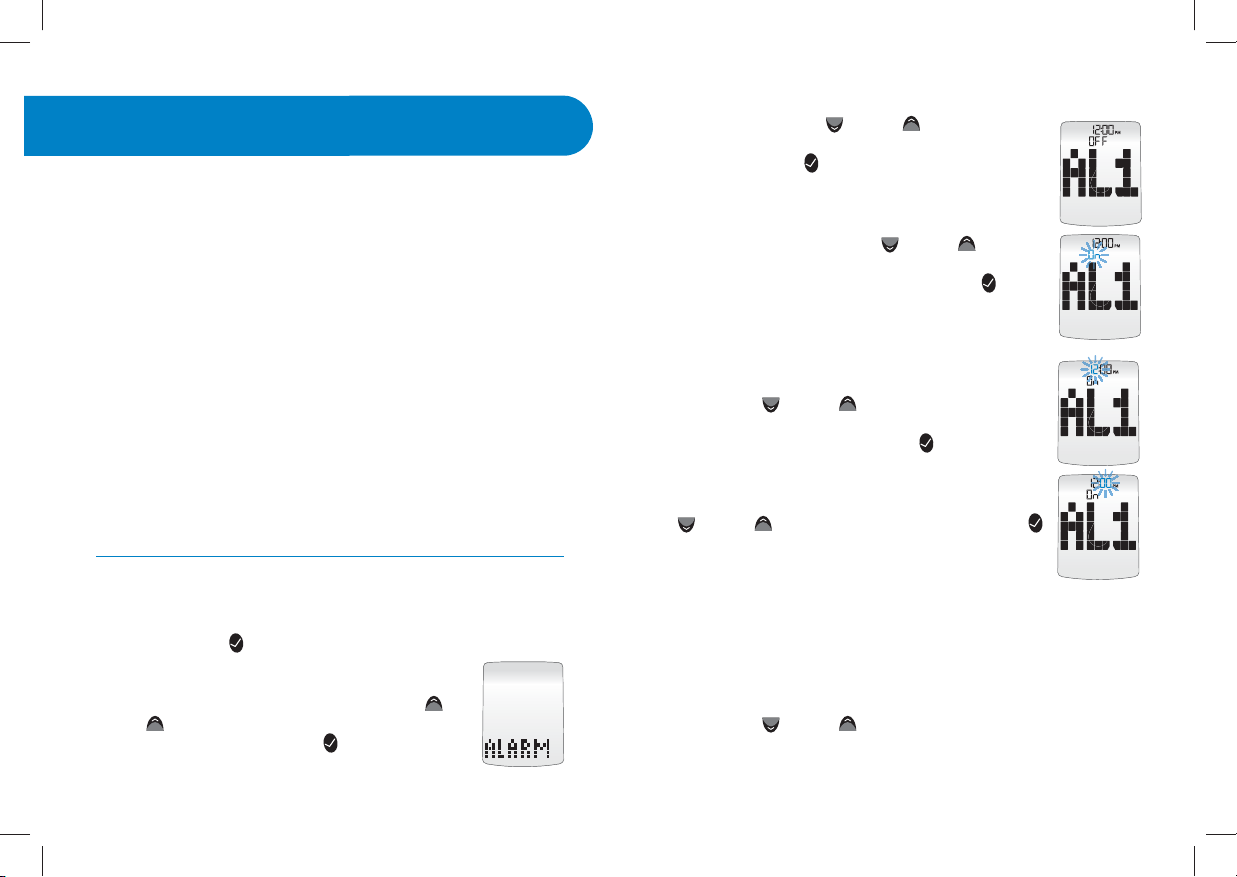
[3] Select An Alarm to Set: Choose the alarm you want to
set with the DOWN (
If this is your first time setting an alarm, use AL1.
Press the CHECK (
tion and advance to the alarm ON or OFF section.
[4] Turning Alarms ON or OFF: Turn the alarm
ON or OFF with the DOWN (
buttons. Your selection will be highlighted by the
blinking of the symbol. Press the CHECK (
ton to confirm your selection and move to the set
alarm time section.
[5] Set Alarm Time: You can now set the alarm
time. First, set the hour (flashing numbers) with
the DOWN (
erated change is possible by holding down the
arrow buttons. Press the CHECK (
confirm the hour and advance to the minutes.
) or UP ( ) arrow buttons. Accel-
) or UP ( ) arrow buttons.
) button to confirm your selec-
) or UP ( ) arrow
) but-
) button to
CAUTION: Follow your healthcare professional’s recommendations on when and how often to test your glucose.
How to set alarms:
[1]
Enter MEM Mode: When your meter is deactivated,
press the CHECK (
word “MEM” is displayed.
[2] Enter Alarm Option: Press the DOWN ( )
or UP (
is displayed. Press the CHECK (
and set an alarm.
48 49
) arrow buttons until the word “ALARM”
) button once to enter menu mode. The
) button to enter
Set the minute (flashing numbers) with the DOWN
(
) or UP ( ) arrow buttons. Press the CHECK ( )
button to confirm the minutes and return to the
MENU Mode.
Note: The volume of an alarm will be affected by your meter’s
volume setting, which can be changed in the meter’s “BEEP”
option. If your meter has the volume turned OFF, then the alarm
will not sound, but the backlight will flash.
[6] Setting Multiple Alarms: To set other alarms, press
the DOWN (
want to set (AL1 to AL7) is displayed. Follow the previous
steps in this section.
) or UP ( ) arrow buttons until the alarm you
Page 27
19
CHAPTER
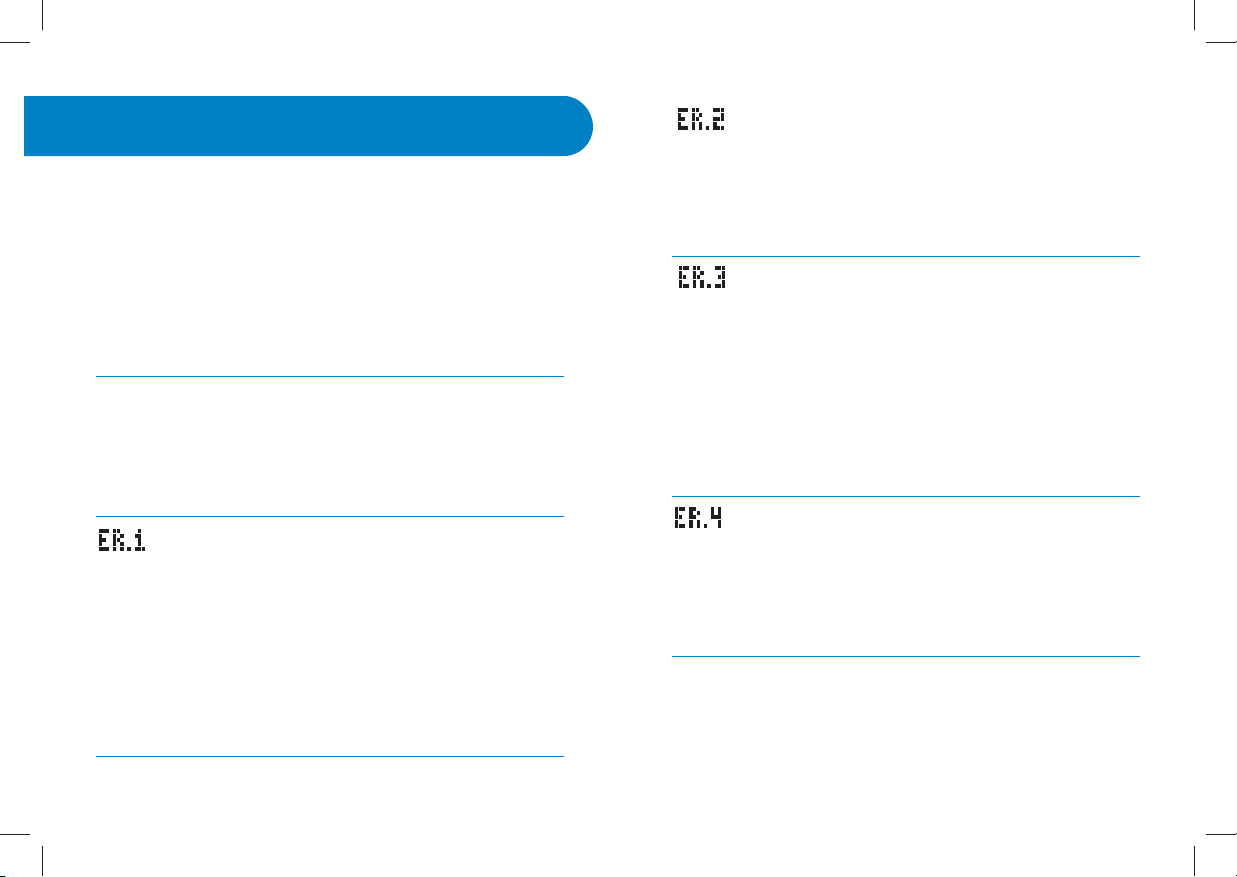
Errors and Troubleshooting
Error 2:
The meter has detected an irregularity with the sample.
The WaveSense Jazz Blood Glucose Monitoring System has
been designed to work accurately under normal conditions.
On rare occasions, the meter will display an error message
instead of a glucose result. The WaveSense Jazz System is able
to detect specific problems which may allow you to determine the cause of the error without wasting valuable test
strips. When you are presented with an error message, check
for common problems within this chapter that may explain
the source of the error.
CAUTION: In certain cases, the meter may return an error
code or provide an inaccurate result if it is being used near
electrical equipment, like a power generator or a computer monitor. If this is the case, move the meter away from
the source of electrical interference.
Error 1:
Problems have occurred that are related to test strip use.
[1] If this message appears the moment the test strip is in-
serted, the test strip may be wet or damaged.
[2] If the message appears during a test, the test strip may
have been removed too early.
[3] If this message appears after the last progress bar instead
of a result, it may indicate that you applied more blood after
testing began.
[1] The test strip may be partially filled; you should check the
window of the test strip to confirm that it is full.
[2] The sample may not be blood or control solution.
Error 3:
The meter has detected that the test strip is in poor condition.
[1] The test strip may have been improperly stored (e.g. hot,
humid conditions) or may be expired.
[2] The test strip may have been mishandled by vigorous
bending or shaking.
[3] Parts of the test strip may have become covered in grease,
oil, or lotion.
[4] The strip port connector may be dirty.
Error 4:
Unusual test strip problems have occurred that may be
related to extreme conditions.
[1] Retest where it is closer to a room temperature of 70 °F to
75 °F (21 °C to 24 °C).
50 51
Page 28
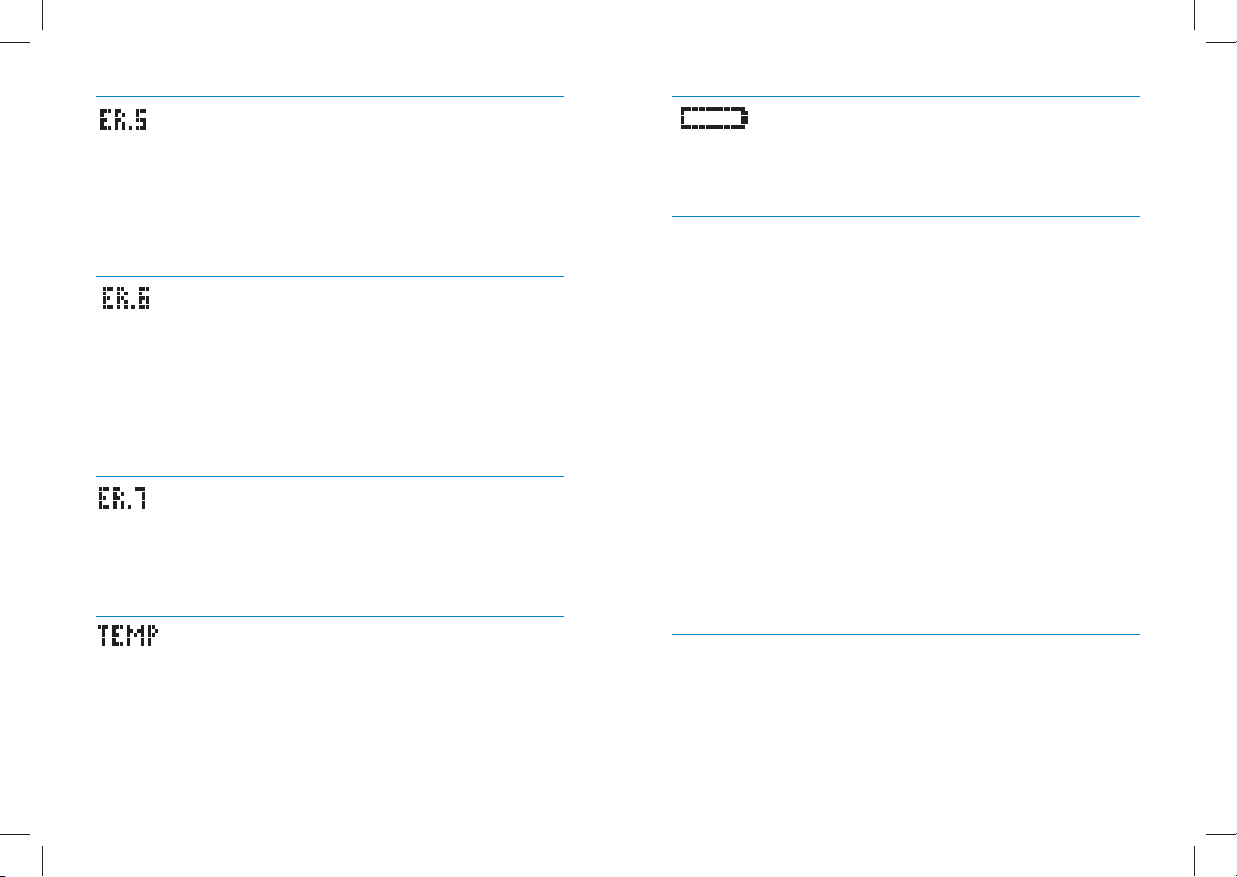
The meter was unable to produce a reliable result.
Error 5:
Battery Icon:
Battery #2 has died during test.
[1] This may be caused by a non-blood sample, or a combina-
Replace battery #2 immediately before retesting.
tion of high glucose and other medical conditions.
[2] If this error code persists on retesting, consult your health-
care professional.
Troubleshooting Situation #1: Meter does not enter the TEST
Mode after inserting a WaveSense Jazz Test Strip.
Error 6:
The test strip has taken too long to generate a signal.
[1] CAUSE: The batteries have insufficient power. ACT ION:
Replace the batteries, set time and date, and test.
[2] CAUSE: The batteries are installed incorrectly or there are no
[1] This may be caused by a combination of cold operating
temperature and high hematocrit levels. Retest in a warmer
location.
[2] If this error code persists on retesting, consult your
healthcare professional.
batteries in the meter. ACTIO N: Check that both batteries are
installed correctly, with the positive (+) sign facing up towards you.
[3] CAUSE: WaveSense Jazz Test Strip has been inserted upside
down, wrong end in, or incompletely inserted into the meter.
ACTI ON: Insert the WaveSense Jazz Test Strip with the black side
up and the contact bars of the test strip in the meter. Ensure that
the test strip is fully inserted.
Error 7:
Meter problems have occurred that are beyond your
control.
[4] CAUSE: Defective meter or defective WaveSense Jazz Test
Strips. ACTION: Call customer service.
[5] CAUSE: Blood or foreign objects introduced into the
WaveSense Jazz Meter strip port. ACTI ON: Please refer to
Contact customer service for assistance.
chapter 22. If problem persists, call customer service and have
the meter serial number available (located on back of the meter).
Temp Icon:
Test was performed outside the system operating
temperature range of 50 °F to 104 °F (10 °C to 40 °C).
Move to an area with an ambient temperature of 50 °F to 104
°F (10 °C to 40 °C). Wait for the meter and test strips to reach
the new temperature (usually 10-20 minutes) and retest.
52 53
Troubleshooting Situation #2: The glucose test sequence
does not start after applying the blood sample.
[1] CAUSE: Defective test strip. ACTION: Repeat the test
with a new WaveSense Jazz Test Strip. If problem persists,
call customer service and have the test strip LOT number
Page 29
available (located on the test strip vial).
[2] CAUSE: Sample applied after meter times out and
deactivates. ACTION: Repeat the test using a new WaveSense
Jazz Test Strip. Wait until you see the blood and test strip
symbols on the display before you apply the blood sample.
[3] CAUSE: Sample not applied to the tip of the test strip.
ACTION: Repeat the test using a new WaveSense Jazz Test
Strip.
[4] CAUSE: Defective meter. ACTION: Call customer service
and have the meter serial number available (located on the
back of the meter.
20
CHAPTER
CAUTION: Low or high blood glucose test results can
indicate a potentially serious medical condition. Follow
your healthcare professional’s recommendations.
The ADA (American Diabetes Association) recommends the
following target ranges for adults with Diabetes:
- Pre-Prandial Plasma Glucose: 90-130 mg/dL
- Post-Prandial Plasma Glucose: < 180 mg/dL
Always consult your healthcare professional for your
recommended target ranges.
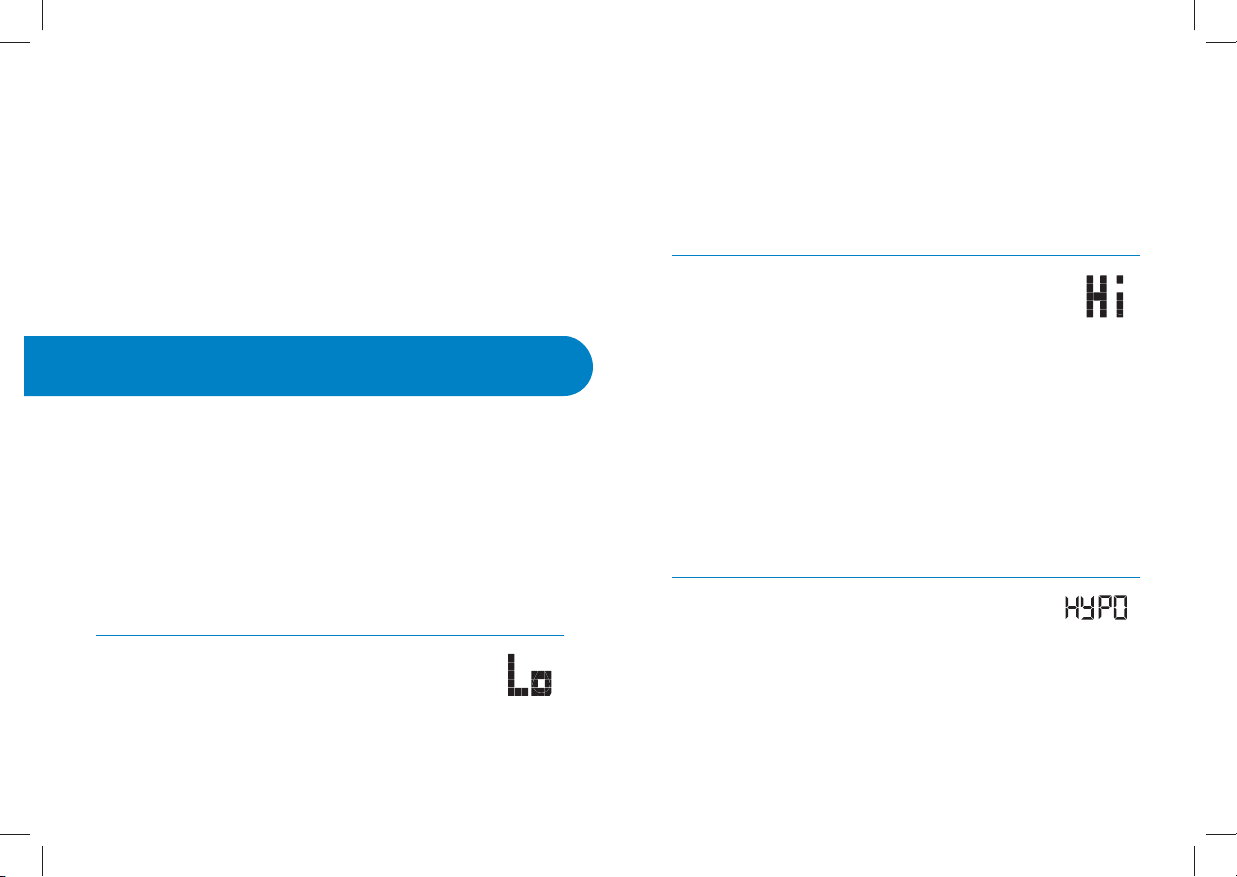
LO MESSAGE: Flashing message, with double beep
(if volume is enabled).
MEANING: Glucose test result is lower than 20 mg/dL. This Lo
result may indicate hypoglycemia (low blood glucose). The Lo
result is stored in the memory with time and date. It will not
54 55
Display Messages
be included in averages. ACTIONS: If you feel symptoms such
as weakness, sweating, nervousness, headache or confusion,
follow your healthcare professional’s recommendations. If
you get a Lo glucose test result but have no symptoms of low
blood glucose, then retest with a new WaveSense Jazz Test
Strip. If you still get a Lo test result, follow your healthcare
professional’s recommendations.
HI MESSAGE: Flashing message, with double beep (if
volume is ON).
MEANING: Glucose test result is above 600 mg/dL. This Hi result may indicate hyperglycemia (high blood glucose). The Hi
result is stored in the memory with time and date. It will not
be included in averages. ACTIONS: If you feel symptoms such
as fatigue, thirst, excessive urination, or blurry vision, follow
your healthcare professional’s recommendations. If you get
a Hi glucose test result but have no symptoms of high blood
glucose, then retest with a new WaveSense Jazz Test Strip. If
you still get a Hi glucose test result, follow your healthcare
professional’s recommendations. Checking ketones may be
advisable.
HYPOGLYCEMIC WARNING ALARM: Flashing
message with the time.
double beep (if volume is ON).
MEANING: If the Hypoglycemic Warning Alarm is set, your
glucose test result is lower than the pre-set threshold.
Test result flashes, with
Page 30
the dead battery symbol appears, the dead battery must be
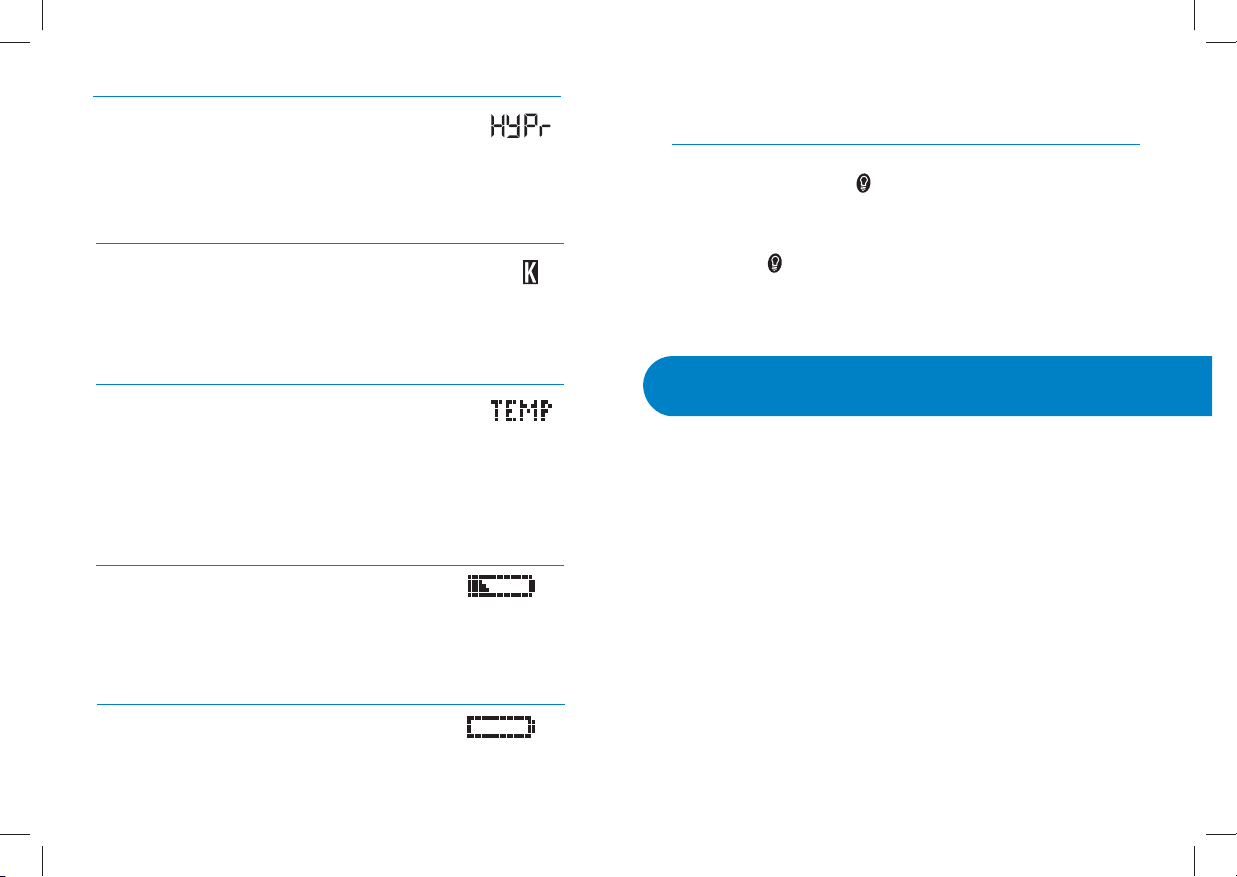
HYPERGLYCEMIC WARNING ALARM: Flashing
message with the time. Test result flashes, with
double beep (if volume is ON).
MEANING: If the Hyperglycemic Warning Alarm is set, your
glucose test result is higher than the pre-set threshold.
KETONE MESSAGE: Flashing message, with double
beep (if volume is ON).
MEANING: The result of the glucose test is higher than 240
mg/dL. ACTIONS: You should check ketones. Follow your
healthcare professional’s recommendations.
TEMPERATURE MESSAGE: Flashing message, with
double beep (if volume is ON).
MEANING: The test has been performed outside the operating temperature range. ACTIONS: Move to an area with an
ambient temperature of 50 °F to 104 °F (10 °C to 40 °C). Wait
for the meter and test strips to reach the new temperature
(usually 10-20 minutes) and retest.
LOW BATTERY MESSAGE: Flashing message
MEANING: Battery #2 in your meter is low. ACTIONS: If the
low battery symbol appears, battery #2 must be replaced.
Battery numbers are indicated by the numbers printed on the
pull tabs.
DEAD BATTERY MESSAGE: Flashing message
MEANING: Battery #2 in your meter is dead. ACTIONS: If
56 57
replaced.
LOW BACKLIGHT BATTERY: Backlight flashes when user
presses the BACKLIGHT (
MEANING: Battery #1, which powers the backlight, is low.
ACTIONS: If the backlight flashes when user presses the
BACKLIGHT (
backlight does not turn on, battery #1 is dead and must be
replaced. (Battery numbers are indicated by the numbers
printed on the pull tabs).
21
CHAPTER
CAUTION: When the battery symbol appears, you should
replace the batteries immediately. Only use CR2032
batteries.
Your WaveSense Jazz Meter comes with two pre-installed,
CR2032, 3 volt, lithium batteries. Battery #1 powers the backlight and battery #2 powers the basic meter functions. When
the power from battery #2 is low, the low battery symbol or
dead battery symbol will be displayed on the screen until you
change battery #2. When replacing battery #2, the time and
date information may be lost after the battery is removed
from the meter. If this happens, activate the meter after
installing the new battery and it will prompt you to set the
time and date. Correct time and date settings are needed to
get correct averages. Removing the batteries does not affect
the meter’s memory or previously stored user settings, such
as time format, alarms, etc.
) button, battery #1 must be replaced. If the
Batteries
) button
Page 31
Note: Dispose of used batteries according to your local environmental regulations. Your meter is an electronic device. When disposing of your meter follow all local environmental regulations.
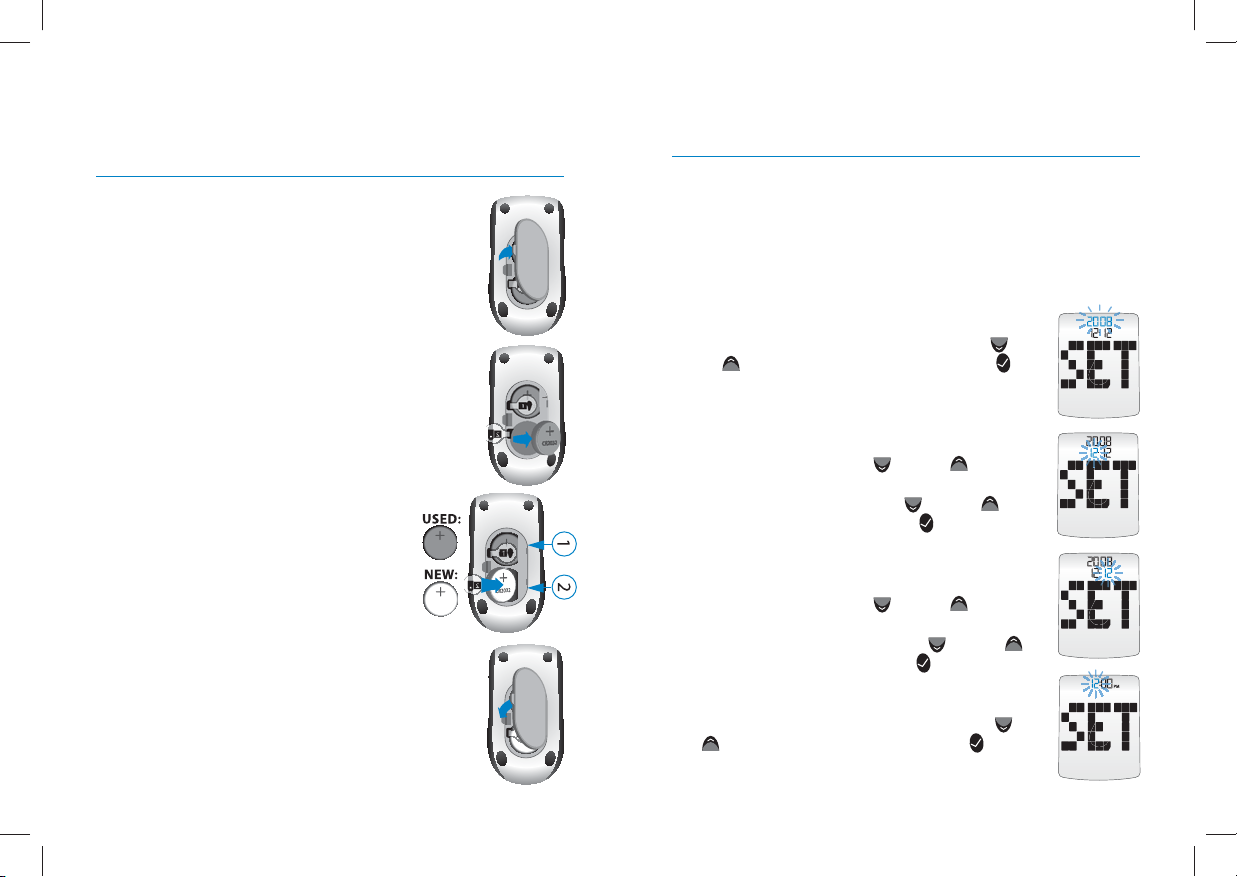
Replacing the Batteries
[1]
Open Battery Door: Make sure the meter is
deactivated. Turn the meter so you are looking
at the battery door. Press the battery door clip to
open. Remove the battery door. Be careful not to
CR2032
CR2032
misplace the battery door.
[2] Remove and Install the meter battery:
To remove the used battery, pull the appropriate
tab to pop out the battery. Install the new battery
1
with the positive (+) sign facing up towards you.
[3] Remove and Install the backlight battery:
To remove the used battery, pull the appropriate
tab to pop out the battery. Install the new
battery with the positive (+) sign facing
up towards you.
CR2032
12
activate the meter after installing the new battery and it
will prompt you to set the time and date.
Time and Date Setting After Battery Replacement
If the date and time need to be set, the word “SET” will be
displayed the first time the meter is activated.
Note: The meter retains the date and time format [24 or 12 hour
time, M-d (Month-Day) or d-M (Day-Month)]
[1] Set the year (flashing) with the DOWN ( )
or UP (
) arrow buttons. Press the CHECK ( )
button to confirm your selection.
[2] If in M-d (Month-Day) format, set the month
(flashing) with the DOWN (
) or UP ( ) arrow
buttons. If in d-M (Day-Month) format, set the
day (flashing) with the DOWN (
arrow buttons. Press the CHECK (
) or UP ( )
) button to
confirm your selection.
[4] Close Battery Door: Angle the
battery door back onto the meter and
CR2032
swing down until it snaps gently into
place. Make sure that the battery door
is completely closed before using.
12
IMPORTANT: When the meter is deactivated
and you are replacing battery #2, the time and
date information may be lost after the battery
CR2032
CR2032
is removed from the meter. If this happens,
58 59
[3] If in M-d (Month-Day) format, set the day
(flashing) with the DOWN (
) or UP ( ) arrow
buttons. If in d-M (Day-Month) format, set the
month (flashing) with the DOWN (
arrow buttons. Press the CHECK (
) or UP ( )
) button to
confirm your selection.
[4] Set the hour (flashing) with the DOWN ( ) or
UP (
) arrow buttons. Press the CHECK ( ) button
to confirm and continue on to set the minute.
Page 32

[5] Set the minute (flashing) with the DOWN ( )
or UP (
button to confirm your selection. If the meter was
activated via strip insertion, pressing CHECK (
allows you to perform a test. If the meter was
activated via the CHECK (
enter menu mode.
) arrow buttons. Press the CHECK ( )
)
) button, the meter will
Caring For Your
22
CHAPTER
When using your meter, avoid getting dirt, dust, blood, control solution, water or any other liquid into the strip port and
battery compartment. Clean the outside of the meter or the
lancing device using a cloth dampened with mild detergent
or mild soap. If you wish to clean the lancing device cap only,
remove the cap, wash it in warm water, rinse well, and dry.
CAUTION: Never immerse the meter or the body of the
lancing device in water or any other liquid solution.
23
CHAPTER
Assay Method: Dynamic Electrochemistry
Maximum Altitude: 10000 feet (3048 meters)
Calibration: Plasma equivalent
Coding: No Code
Sample: Whole blood, capillary
Sample Size: 0.5 microliters
Average Glucose Test Time: 6 seconds
Measurement Units: mg/dL
60 61
Meter and Lancing Device
Meter Specifications
Alarms: 7 programmable alarms
Result Range: 20 to 600 mg/dL
Hematocrit: 20% to 60%
Operating Relative Humidity: Up to 90%
Operating Temperature: 50 °F to 104 °F (10 °C to 40 °C)
Control Solution Storage Temperature: 36 °F to 86 °F (2 °C to
30 °C)
Test Strip Storage Temperature: 46 °F to 86 °F (8 °C to 30 °C)
Memory: 1865 blood glucose and control solution test results
with date, time, and averaging (14, 30, 90 days and mealtimes)
Power Source: Two replaceable CR2032, 3 volt, lithium batteries
Automatic Deactivation: 3 minutes after last user action
Size: 1.81” x 3.27” x 0.79” (4.6 cm x 8.3 cm x 2.0 cm)
Weight: 48 g (including batteries)
Equipment not suitable for use in the presence of flammable
mixtures.
This meter complies with the applicable standards for
Electromagnetic Compatibility; however it is not recommended
that it be used in the presence of strong electromagnetic
fields. When using this meter, keep away from sources of
electromagnetic disturbances such as electric motors or radio
transmitting equipment. This meter should not affect the
normal operation of other devices. If this does occur, provide
more distance between the meter and the affected device.
Page 33
24
CHAPTER
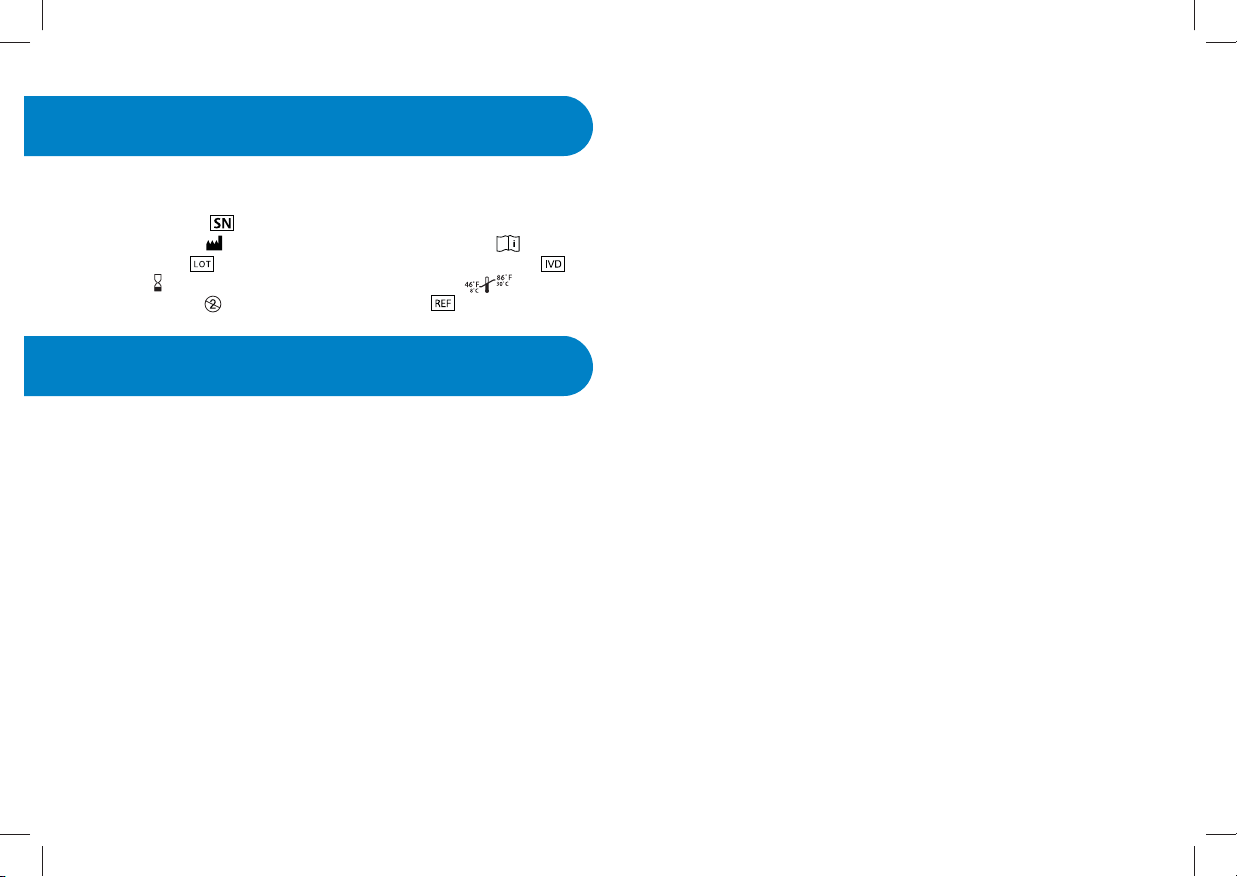
The following symbols may appear on the equipment
packages or in the documents.
Serial Number:
Manufacturer:
Batch Code:
Use By:
Do Not Reuse:
Symbols
Consult Instructions For Use:
In Vitro Diagnostic Medical Device:
Temperature Limitation:
Catalogue Number:
25
CHAPTER
Lifetime Warranty Terms:
AgaMatrix, Inc. offers customers who buy (“You”) a new
WaveSense Blood Glucose Meter (defined as “Meter”) within
the United States the following purchase protections.
WaveSense Lifetime Limited Warranty: AgaMatrix extends a
limited lifetime warranty to consumers who buy a new Meter.
Under this limited warranty, Your new Meter is covered for
the period of ownership as long as it has not been modified,
altered, or misused. Under this warranty AgaMatrix will
replace, free of charge, Your meter if it is defective in material
or workmanship. No other warranties, express or implied,
are made. AgaMatrix will not be liable for any incidental
or consequential damages, so the above limitations or
exclusions may not apply to You. This Warranty gives You
specific legal rights, and You may also have other rights that
vary from state to state. AgaMatrix may discontinue this
program at any time without notice.
62
Warranty
Page 34

 Loading...