

Page 1
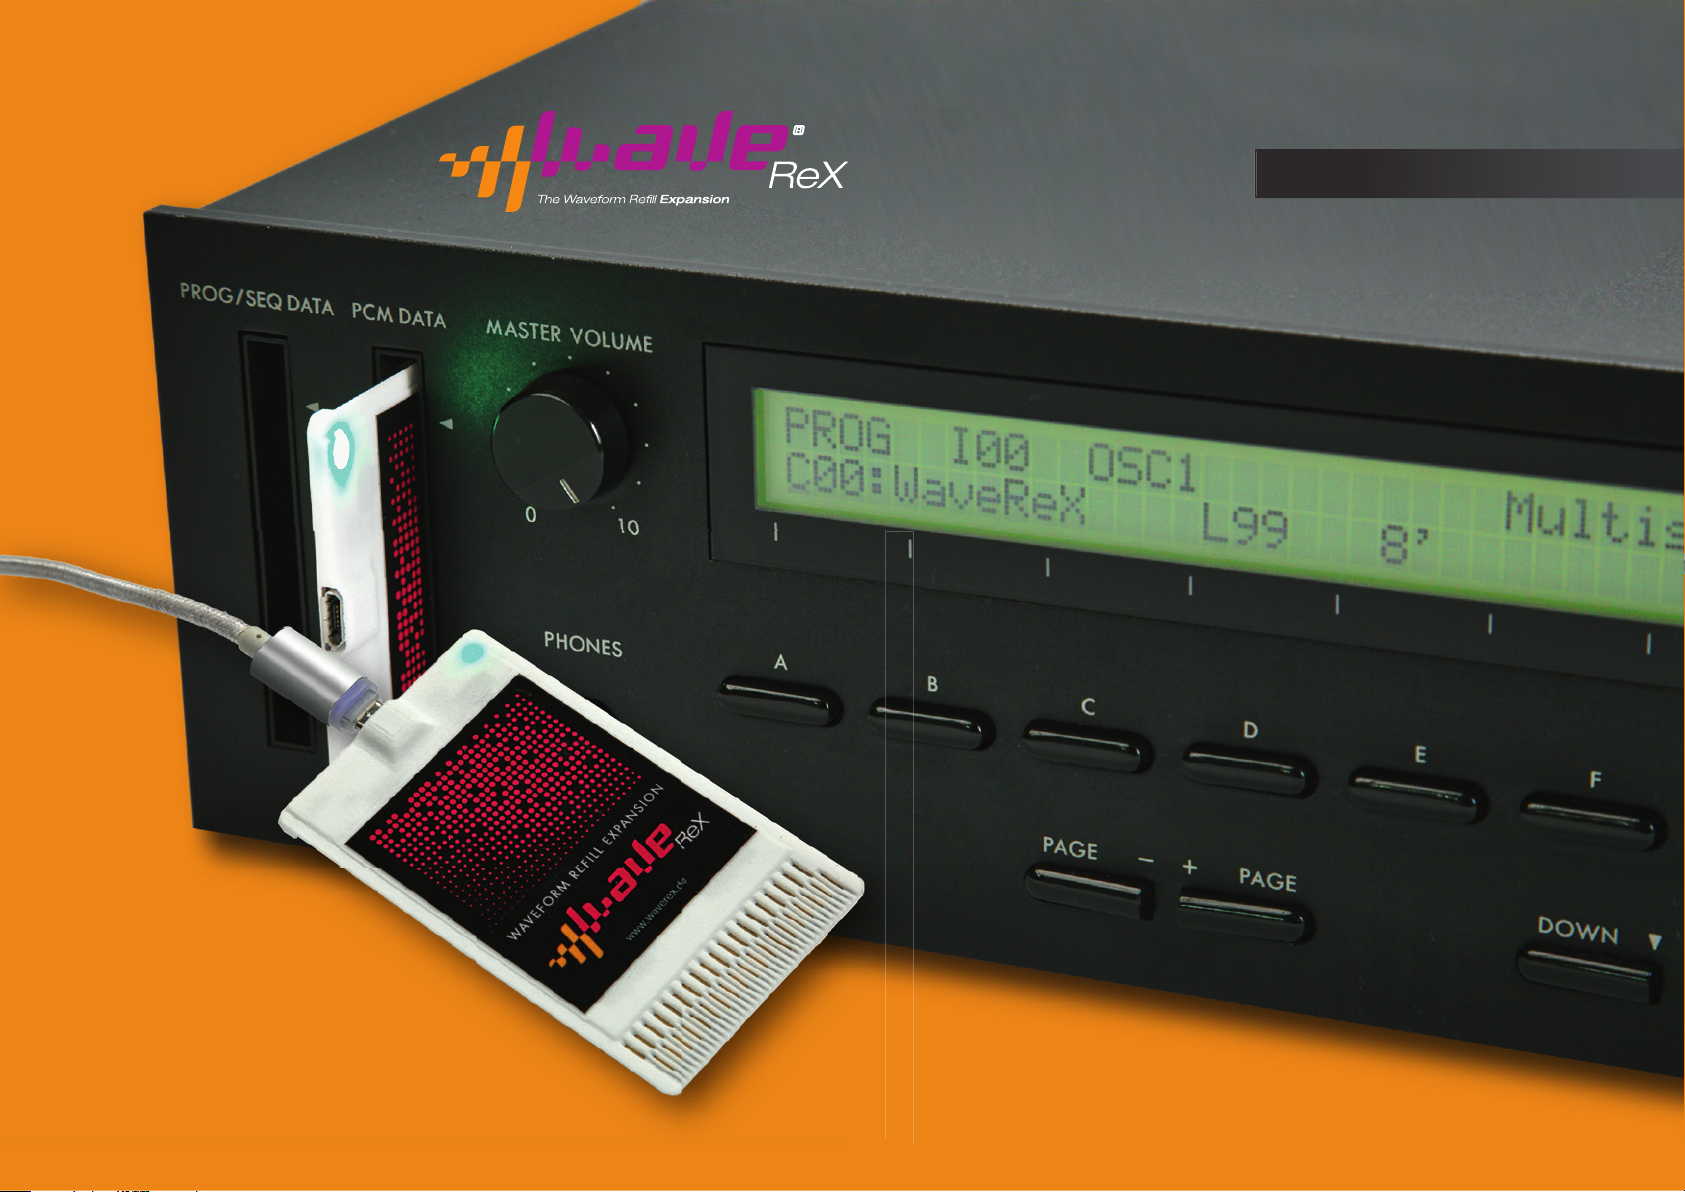
© 2019 WAVEREX® / SYNTHASTIX
ENGLISH VERSION
OPERATING
MANUAL
WWW.WAVEREX.DE | SHOP.WAVEREX.DE
Page 2
Preamble
Preamble
Thank you for purchasing WaveReX - M1. We are convinced that it will
give you a lot of pleasure in the future and above all will bring a lot of
momentum into your now 30-year-old Korg M1 Music Workstation. We
promise you one thing: with your help we will try everything to make
the M1 great again.
Why you should read the manual
Manuals are usually unpopular, boring or even annoying. We did our
best not to put you to sleep after the first two pages.
Whether you read this manual is up to you. However, you should know
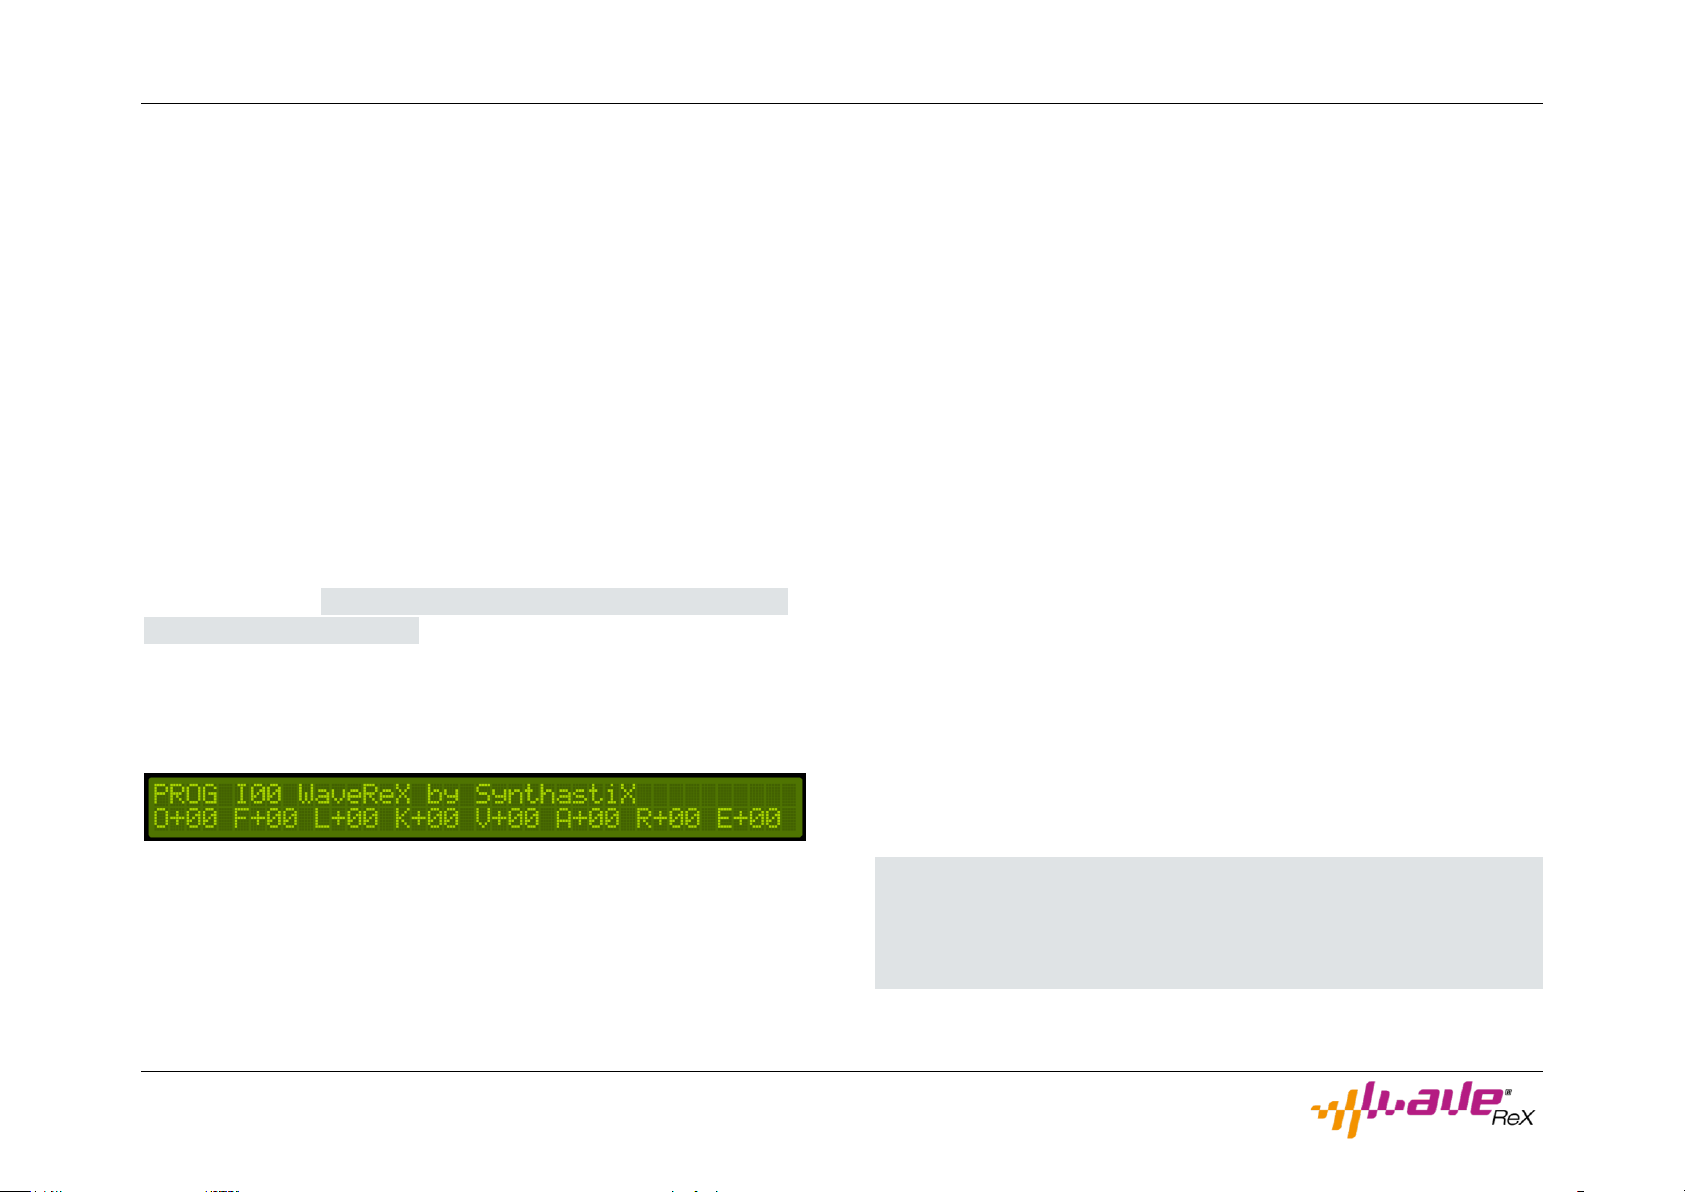
that this manual details the correct use of WaveReX. In addition, you
will find important safety and operational information here, which you
must be observed. These statements have a grey background and are
therefore easily recognizable.
Your WaveReX Team
Advice
We assume no responsibility for errors that may occur in this manual.
The contents of this manual are subject to change without notice. A
current version of this manual can be found at:
www.waverex.de/downloads/
Great care has been taken in the preparation of this manual to minimize errors, however some may have slipped through our quality assurance process.
No part of this manual may be published without permission.
Manufacturer:
SynthastiX - Komponenten für elektronische Klangerzeuger
Owner: Marco Pawlowski
Staatsrat-Schwamb-Str. 89c
DEU - 55278 Undenheim
WaveReX M1 – Manual Page 2 of 33
WaveReX is a registered trademark. The unauthorized use of the name
or the logo will be subject to legal action.
WaveReX is a standalone product and has no connection with KORG
Inc. of Japan.
Page 3
Preamble
www.waverex.de
www.waverex.com
www.shop.waverex.de
www.instagram.com/waverexboard/
www.facebook.com/WaveReX/
www.youtube.com/channel/UCfJzIp27T1ikvZaYJJHWSPA
The WaveReX Team
Development: Marco Pawlowski
Software: Dominik Vogel
Design: Mario Neitzke
Mech. Design: Nikolas Kirsch
Beta testers: Marco Pawlowski
Frank Neumann
Jon Sabberton
Malte Bergmann
Thilo Goldschmitz
Ridzert van der Zee
Stephan Schällmann
Special thanks to
Emily und Josephine, Dominique Bayer, Tobias Hopp, Dirk Stephan, Michael Wolter, Frank Neumann, Don Solaris, Paolo Di Nicolantonio, John
“Skippy” Lehmkuhl, Peter Gorges, Matrixsynth, Moogulator and all our
supporters
How to reach us
Manual - Revision
English Version: 1.2 – 31.05.2019
WaveReX M1 – Manual Page 3 of 33
Page 4

Table of contents
The case ................................................................................................................ 10
Table of contents
THE SOFTWARE EDITOR ................................................................. 11
PREAMBLE ........................................................................................ 2
The Main Window ................................................................................................ 11
Why you should read the manual ........................................................................ 2
User Interface ................................................................................................... 11
Advice..................................................................................................................... 2
The WaveReX Team .............................................................................................. 3
Manual - Revision .................................................................................................. 3
Special thanks to ................................................................................................... 3
How to reach us..................................................................................................... 3
TABLE OF CONTENTS .......................................................................4
SAFETY NOTES .................................................................................. 6
EU DECLARATION OF CONFORMITY ...............................................8
INTENDED USE .................................................................................. 9
PREPARATION .................................................................................. 9
The Setup Windows ............................................................................................. 12
User Interface ...................................................................................................13
QUICK START ................................................................................... 15
Principle ................................................................................................................ 15
Connecting ............................................................................................................ 15
Open the Software Editor .................................................................................... 15
Load a card ........................................................................................................... 16
Editing a card ....................................................................................................... 16
Delete a Sound ................................................................................................. 16
Renaming a sound ........................................................................................... 16
Adding a Multisound ........................................................................................ 17
Adding a Drumsound ........................................................................................ 17
Transferring a card ............................................................................................... 17
And into the Korg M1 Music Workstation… ...................................................... 18
THE HARDWARE ............................................................................. 10
The USB port ........................................................................................................ 10
Saving programs on the Korg M1 Music Workstation ...................................... 19
Loading programs into the Korg M1 Music Workstation ................................. 19
WaveReX M1 – Manual Page 4 of 33
Page 5

Table of contents
Creating a card .................................................................................................... 20
Creating a Multisound ..................................................................................... 20
An empty Multisound is created and displayed in the Multisounds list.
Initially it is named newMulti followed by an index.Editing a Multisound ... 20
Creating a Drumsound ..................................................................................... 21
Editing of Drumsounds .................................................................................... 22
Creating drum kits (Multisound) ..................................................................... 22
Editing of a drum kit (Multisound) .................................................................. 22
Transpose and the length of digital samples .................................................... 29
Loops in the Korg M1 Music Workstation .......................................................... 30
X-Fade ................................................................................................................31
Initialization of the memory of the Korg M1 Music Workstation ..................... 31
TIPS ................................................................................................... 31
Saving a card........................................................................................................ 23
BASICS ............................................................................................. 24
Multisounds ......................................................................................................... 24
Sample types ................................................................................................... 25
NT-Sounds ............................................................................................................ 26
Drumsounds ........................................................................................................ 26
Additional Information ....................................................................................... 27
The middle C ........................................................................................................ 27
The key range of the Korg M1 Music Workstation ........................................... 27
Technical Restrictions ......................................................................................... 27
Korg M1 Music Workstation.............................................................................27
Korg Wavestation............................................................................................ 28
Transposing and key zones ................................................................................ 28
Root note of samples ........................................................................................... 31
Cutting samples optimally ................................................................................... 31
Save your work .................................................................................................... 32
TROUBLESHOOTING ...................................................................... 32
My card is not recognized by the synthesizer ................................................... 32
The software editor does not display my WaveReX ......................................... 32
I discovered a bug ................................................................................................ 33
The Root Note represents the fundamental of the sample, i.e. the original
pitch of the sample. ............................................................................................ 28
WaveReX M1 – Manual Page 5 of 33
Page 6
Safety Notes
Safety Notes
Read these safety instructions carefully. To use WaveReX safely, you
must understand these instructions.
Keep these safety instructions to hand throughout the life of WaveReX.
If you have any questions or are unsure how to use WaveReX, please
contact our support immediately.
WaveReX is a slot card for the PCM DATA slot of the Korg M1 Music
Workstation. It can also be used in the M3R synthesizer and T-Series
Music Workstations. It serves as a replacement for the PCM cards from
Korg.
ATTENTION!
Only insert WaveReX into the card slot provided. Pay attention to the
correct orientation of the WaveReX card.
WaveReX was developed for use in private residences and recording
studios.
ATTENTION!
Usage outdoors doors may cause damage to WaveReX and your device
(exposure to direct sunlight, high humidity and rain for example).
Due to its design, WaveReX is particularly sensitive to inappropriate
force effects.
ATTENTION!
Do not try to bend, compress or twist WaveReX. Never force WaveReX
into the card slot of your device. Do not drop WaveReX and never apply force to the case.
WaveReX is an electronic product that was designed and developed using state-of-the-art electronic components.
ATTENTION!
Use WaveReX only in rooms at room temperature and low humidity.
Do not expose WaveReX to liquids. This can damage or even destroy
the electronic components.
The housing of WaveReX protects the underlying components and
serves as an insertion aid into the card slot.
ATTENTION!
Never open the case. This can destroy the board and the electronic
components. A defective housing can no longer guarantee the proper
insertion into the card slot. This can lead to malfunctions or to the destruction of WaveReX or even your device.
The contacts of WaveReX are gold-plated to withstand mechanical demands for longer. Nevertheless, it is a contact technology.
WaveReX M1 – Manual Page 6 of 33
Page 7
Safety Notes
ATTENTION!
Although WaveReX is designed for durability, only remove it from the
card slot only when necessary
You should avoid touching the gold contacts as these can be damaged
when touched excessively. And don't even think about licking the contacts! (Keep cats, pizzas and kids away from them).
Placing metallic objects on the contacts can cause short circuits.
ATTENTION!
Never short-circuit the contacts! This will destroy WaveReX and can
cause you serious physical damage! (Which we are not liable for).
Never insert WaveReX into your device while it is switched on.
ATTENTION!
Never plug your WaveReX into your Korg M1 Music Workstation while
it is switched on. This can cause serious damage to your M1.
A faulty WaveReX can seriously damage your device.
ATTENTION!
Memos
Do not use WaveReX if it has obvious damage. If you are not sure, contact support.
Web: www.waverex.de
Mail: [email protected]
WaveReX M1 – Manual Page 7 of 33
Page 8

EU Declaration of Conformity
Undenheim, 05.03.2019
Place/Date
Marco Pawlowski, CEO
EU Declaration of Conformity
The sole responsibility for drawing up this declaration of conformity lies
with the manufacturer.
We hereby certify
Manufacturer: SynthastiX – Komponenten für elektronische
Klangerzeuger
Marco Pawlowski, B.Eng.
Staatsrat-Schwamb-Str. 89c
D-55278 Undenheim
that the following described product
Product: WaveReX®
Type of product: Memory card with passive electronic compo-
nents for use in synthesizers Korg M1 and Korg
Wavestation
Type number: SX 001
Serial number: 10001 to 19999 (continuous)
complies with the basic safety and health requirements of the EU directives listed below in its design and construction as well as in the design
we put into circulation. This declaration loses its validity if the product is
modified without our consent.
Compliance with the following guidelines is declared:
- EU-Derective EMC 2014/30/EU of 26 February 2014
- EU-Derective RoHS2 2011/65/EU of 8 June 2011
- EU-Derective 2017/2102 of 15 November 2017
Applied harmonized standards in particular:
EN 55032:2016-02 Electromagnetic compatibility of multimedia
equipment - Emission Requirements (CISPR
32:2015); German version EN 55032:2015
WaveReX M1 – Manual Page 8 of 33
Page 9

Intended use
Intended use
WaveReX was designed exclusively for devices from KORG Inc. of Japan. It was developed to be used in the PCM DATA slot of the corresponding device.
WaveReX is compatible with all devices that use AI synthesis.
These include:
Korg M1(EX) and M1R(EX) Music Workstations
Korg M3R Synthesizer
Korg T1, T2 and T3 Music Workstations
WaveReX is compatible with the following devices that use AV synthesis:
Korg Wavestation(EX) and Wavestation A/D
This manual refers primarily to the Korg M1 Music Workstation, all instructions also apply if you are using WaveReX on one of the other
compatible devices.
WaveReX is not compatible with devices with AI2 synthesis such as the
Korg 01/W Music Workstation or with the AV Synthesis Wavestation S/R
module.
Preparation
To connect WaveReX to your computer you will need a micro-USB cable. This cable is included with the WaveReX card.
You can also use a USB extension, but make sure that the total length
does not exceed 5m. This is not included with the WaveReX card.
For Windows 7 a USB driver is needed. You can download it from the
download page www.waverex.de/downloads/
If you are using Windows 8 or higher, you do not need any additional
drivers.
To create your own sounds and upload them onto your WaveReX you
will need the WaveReX software editor. Download it from the download page www.waverex.de/downloads/. Make sure you always use
the latest version so you don't miss any updates or bug fixes.
In the following we will introduce you to the functionality of WaveReX
and the software editor with a kind of quick start. If you are familiar
with the basic principles of your device's sound generation, you can get
started right away. However, we recommend that you first understand
the basics and technical specifications. This section explains the basics
of how the whole system works and what you should pay attention to.
ATTENTION!
Never use WaveReX in incompatible devices it may destroy your device
and WaveReX!
WaveReX M1 – Manual Page 9 of 33
Page 10
The Hardware
5 4 2
3
1
The Hardware
The USB port
The USB port on your WaveReX is used to transfer data from your computer to WaveReX. It's a USB-B-Micro port, and we've included a USB
cable to match it.
To guarantee the longevity of your WaveReX we have chosen a USB
connector, which is fixed with four solder points on the board. Therefore a tearing off of the socket is impossible under normal conditions.
WaveReX is powered via your device as well as via USB, depending on
which voltage is higher.
Attention!
In the new condition, the connector may still be slightly tight. Never insert your USB cable by force, you can destroy the connector!
The case
The case was designed according to the original drawings of the PCM
cards. In particular, the contact guides above the pads correspond exactly to the original and thus guarantee a perfect fit in the card slot of
your device.
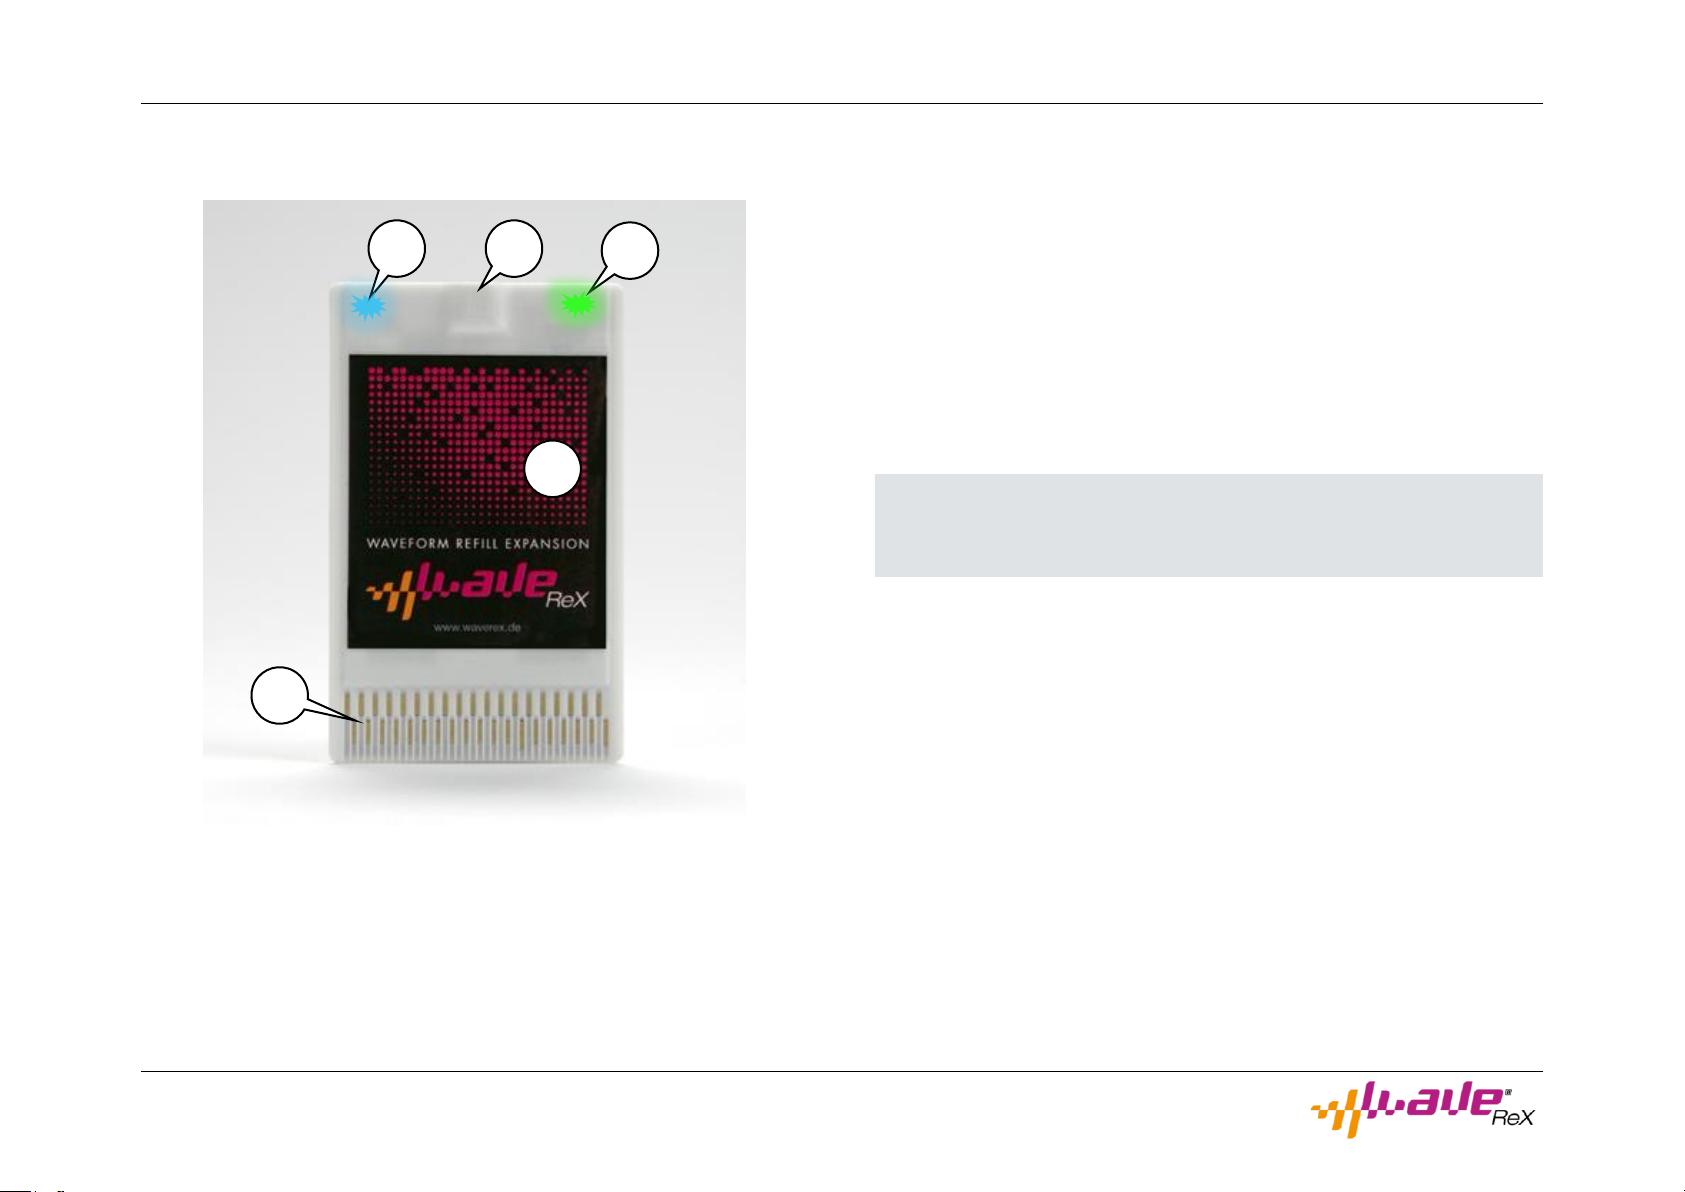
① – WaveReX card
② – Micro-USB-connector
③ – State-LED (green)
④ – Transmission-LED (blue)
⑤ – Contacts
The case is made of a special plastic for industrial use using the 3D
printing process. This is extremely wear and abrasion resistant.
If you should have problems that your card is not recognized, please
pay attention to the chapter Troubleshooting.
WaveReX M1 – Manual Page 10 of 33
Page 11
The Software Editor
The Software Editor
The Main Window
User Interface
NEW CARD button
Press this button if you want to discard your compilation and create a
new one.
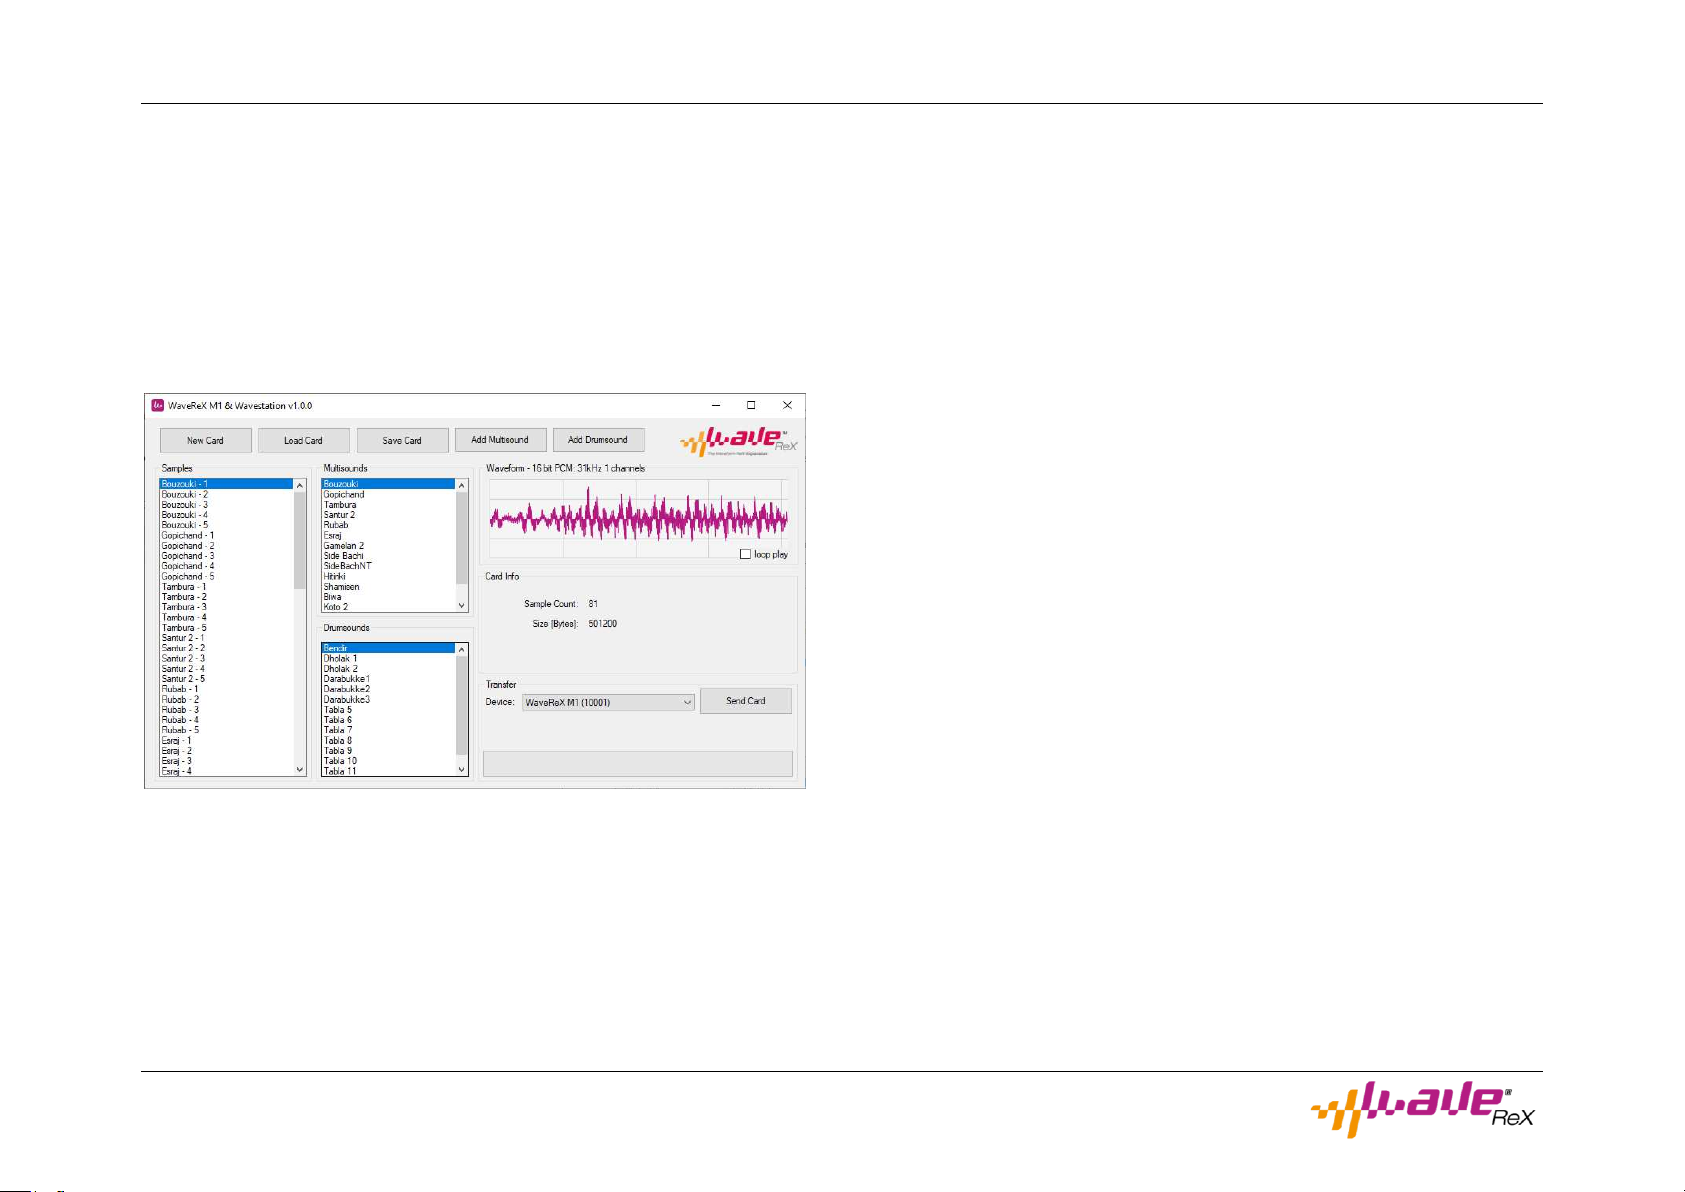
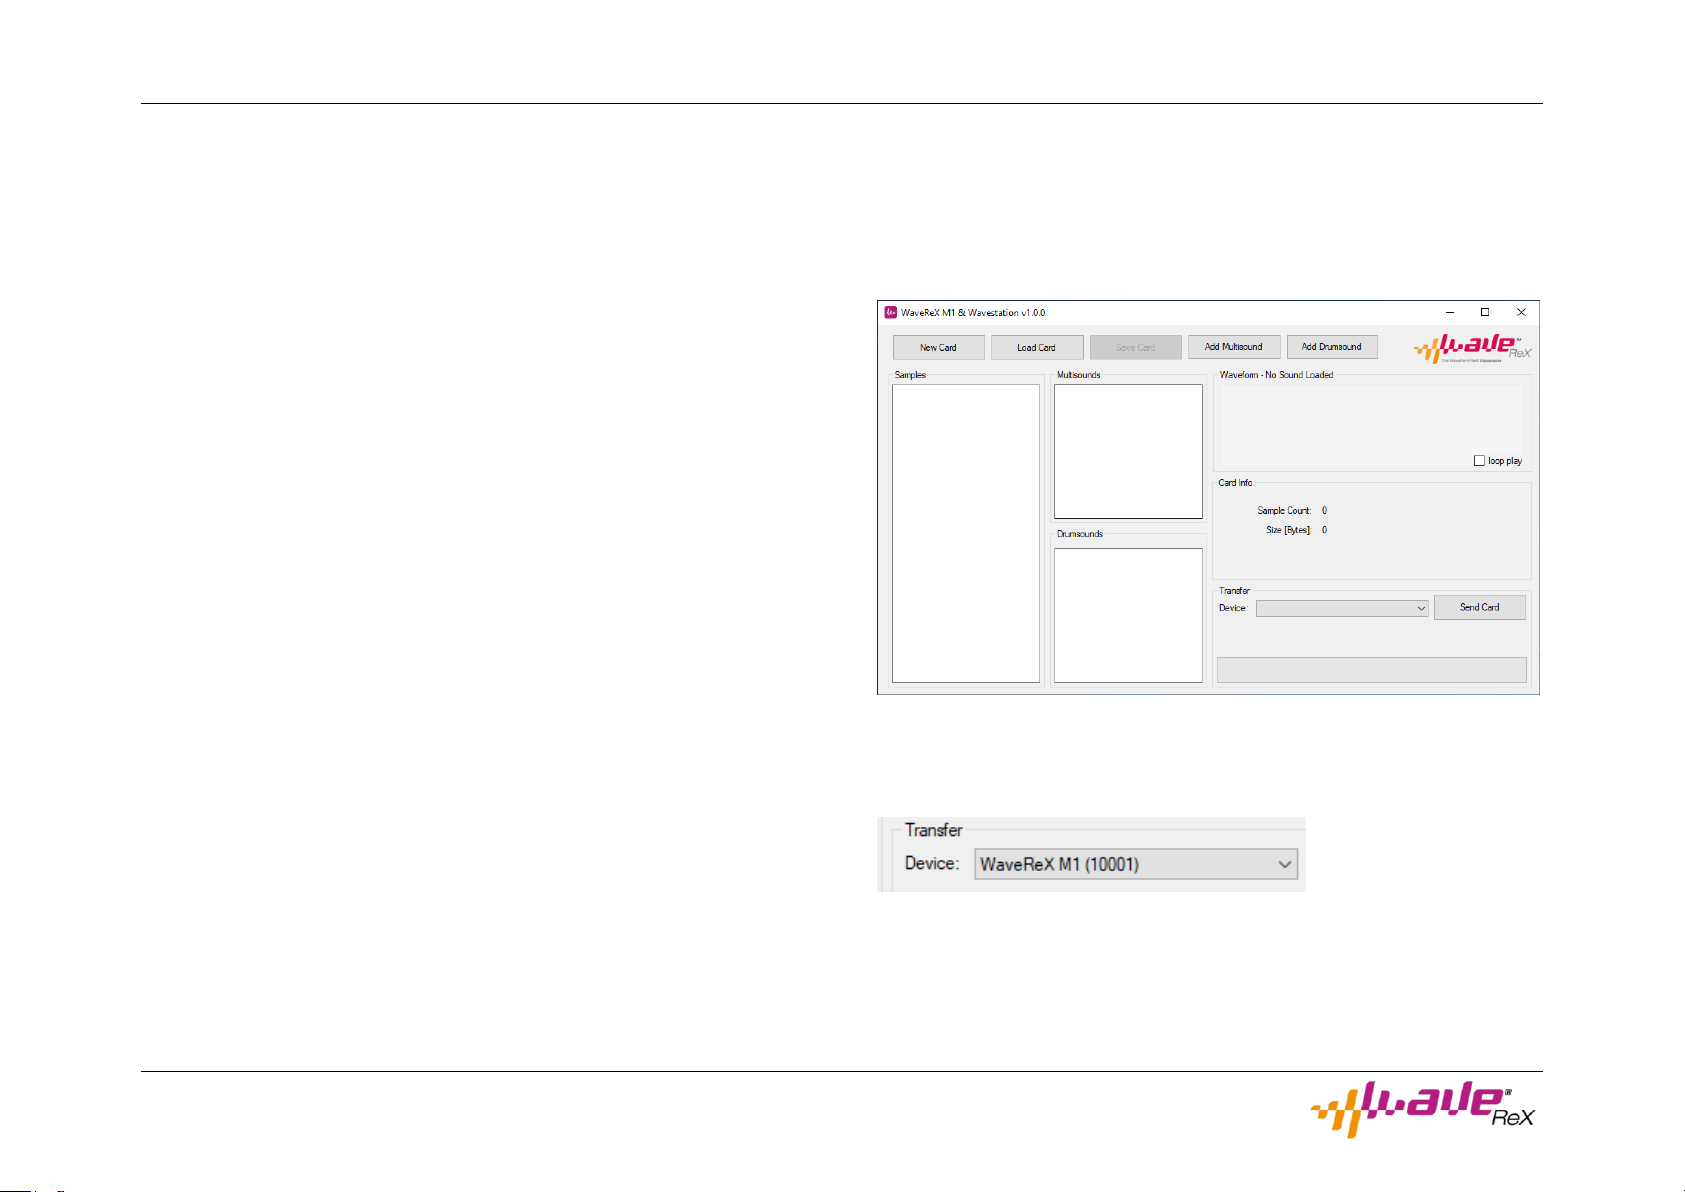
In the main window you can manage and edit your compilations. Here
you can add samples, create sounds and upload your compilation to
your WaveReX. You can also preview samples here and always have an
overview of the memory size used.
The content of the main window represents the content of your virtual
card. All sounds listed in the Multisounds and Drumsounds lists are
loaded onto the WaveReX and are then available as card sounds in the
Korg M1 Music Workstation. It does not matter how many samples are
in the sample list. Only samples that were used for sounds are transferred.
LOAD CARD button
With this button you can load previously saved compositions into the
editor.
Note that you can only open files with the extension .m1.
Also note that opening a card will irretrievably delete your current compilation. Always save your work before loading a card.
SAVE CARD button
Use this button to save your compilation as a virtual card (image).
Cards are saved with the file extension .m1.
ADD MULTISOUND button
Adds a new, empty Multisound to your compilation.
Add DRUMSOUND button
Adds a new, empty Drumsound to your compilation.
List of samples
All samples listed here are available for your compilation.
List of Multisounds
Here all Multisounds in your compilation are listed.
List of Drumsounds
Here all Drumsounds in your compilation are listed.
WaveReX M1 – Manual Page 11 of 33
Page 12
The Software Editor
Waveform Info
If you have previously selected a sample in the sample list, you can see
the waveform and information about the sample here.
You can also click on the waveform if you want to play the sample.
Click on the waveform again if you want to stop playback prematurely.
If you want to hear the sample in the loop, check loop play first.
Card Info
Information about the number of samples already used and the size of
the compilation is displayed here at any time. Note that you must not
exceed 512kb.
Transfer
In the Transfer section you will find the Device selection field. All WaveReX connected to your computer are displayed here. Select the WaveReX you want to describe using the selection box.
You can also use the Send Card button to send your compilation to
your WaveReX.
The Setup Windows
Use the setup window to edit multi and drum sounds. In the main window, double-click the sound you want to edit to open the setup window.
The progress bar at the bottom informs you about the progress of the
transfer.
WaveReX M1 – Manual Page 12 of 33
Page 13

The Software Editor
User Interface
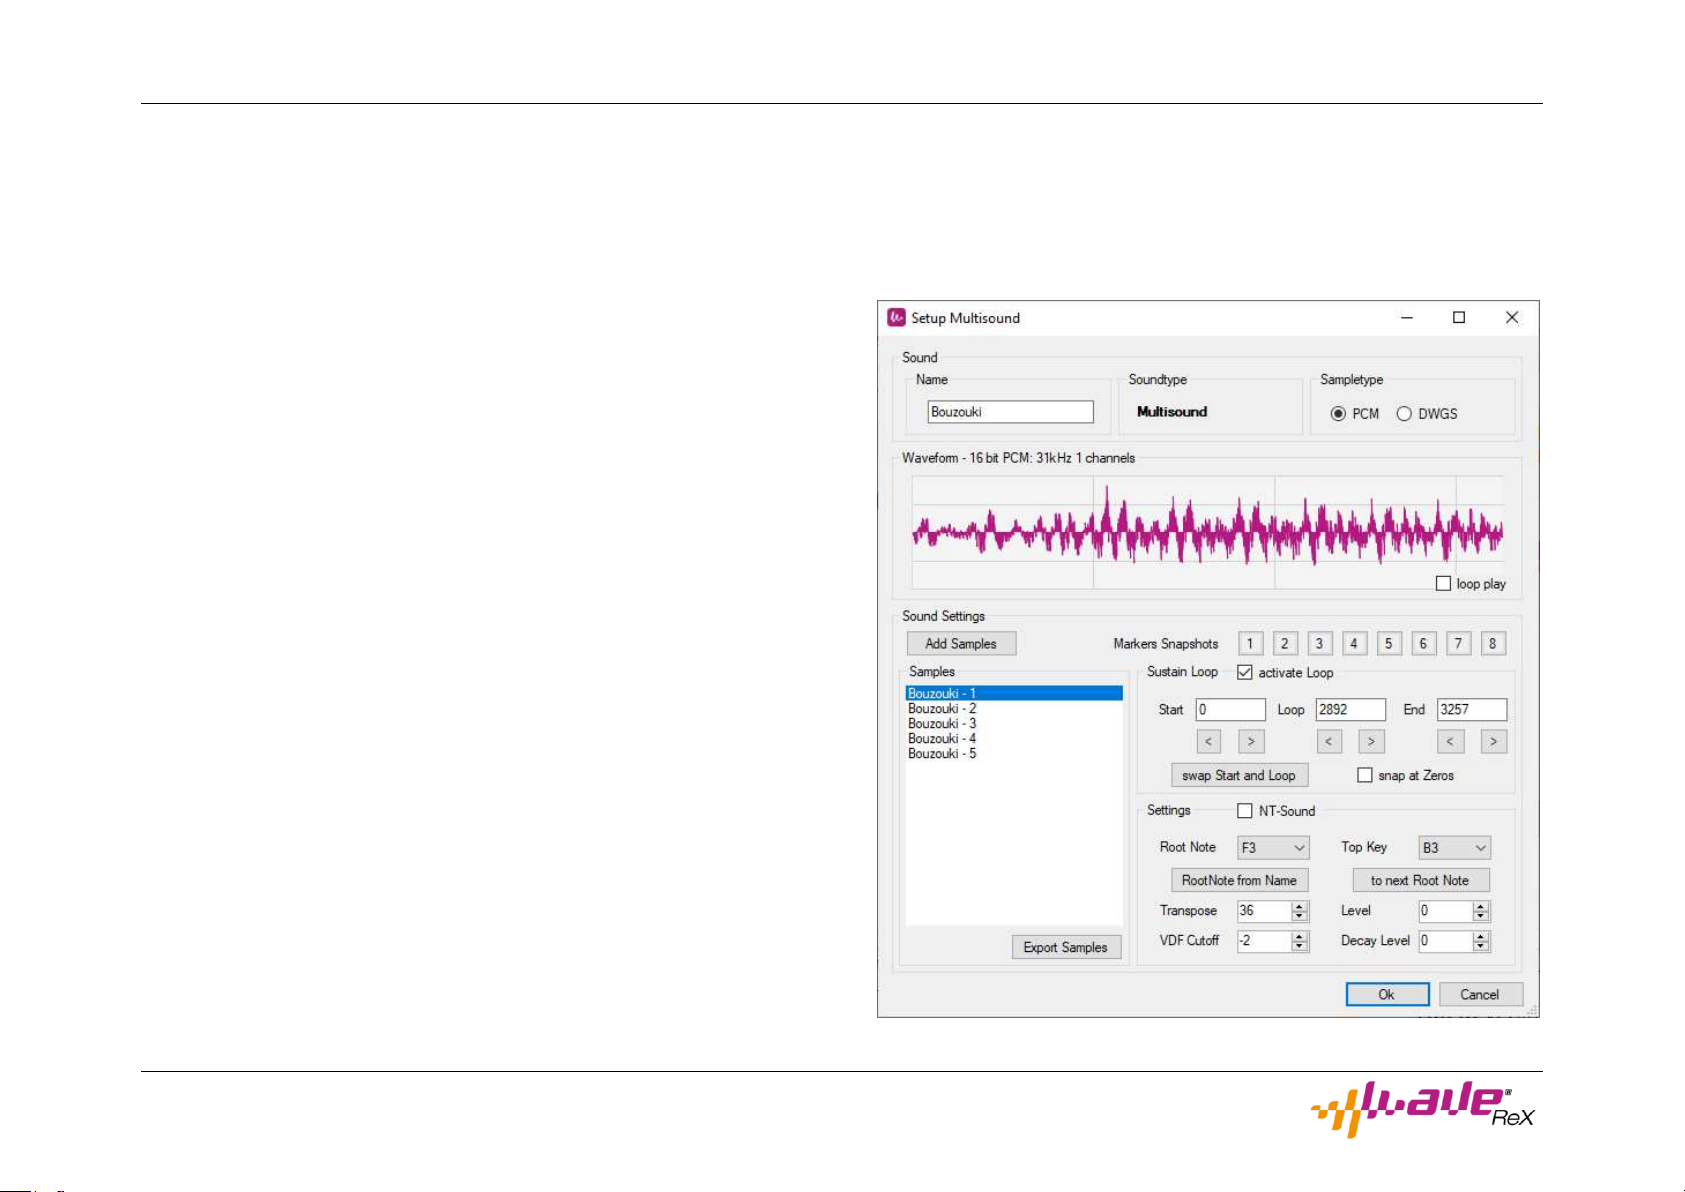
Sound
In the Name text box, you can change the name of your sound. Note
that you can only use ten characters. Umlauts and special characters
are possible.
The Sound Type info box tells you whether it is a Multisound or drum
sound.
Samples
A list of all samples used in this sound. Select a sample from the list to
edit its parameters in the right part of the window.
Sustain Loop
If you want to activate the loop for the previously selected sample,
check the Activate Loop box. Otherwise the M1 will play the sample
without loop.
Under Sample Type you can specify whether your samples are PCM-encoded samples (PCM) or single cycles (DWGS). Please refer to the chapter Basics.
Waveform Info
If you have previously selected a sample in the sample list, you can see
the waveform and information about the sample here.
You can also click on the waveform if you want to play the sample. This
allows you to hear directly whether your loop point is perfectly selected or whether the loop cracks.
Click on the waveform again if you want to stop playback prematurely.
If you want to hear the sample in the loop, check loop play first.
Sound Settings
Add Samples
Here you can add samples to your sound. A multi-selection is available
for multisounds. Drum sounds can only contain one sample.
The sample format is automatically converted during import.
If the samples contain loop information (in smpl chunk, no cue-points)
they will be automatically imported.
In the input boxes you can change the start, loop and end point of the
sample. If there is no loop information in the sample, the full length of
the sample is used as default and the loop point is set to the middle of
the sample.
To change the values of the points, you can also use the arrow keys below the input fields, where the step size is 1.
With the swap Start and Loop button you can swap the start and loop
point, this is especially useful for DWGS.
If you don't have any loop information available, the editor can help
you find the perfect loop. Activate the control box snap at Zeros. Then
you can use the arrow keys to jump to the nearest zero crossing of the
sample.
If you change the loop point, you will notice that the value in the Transpose field also changes automatically. This value is calculated mathematically each time the loop is changed. As a small rule of thumb, the
most likely loop is found when the Transpose is smallest. The values
should be between 0 and +/- 30 until the 6th octave. In higher octaves
the values can be higher. Please also note the section Transpose on the
next page.
WaveReX M1 – Manual Page 13 of 33
Page 14

The Software Editor
Note that the "perfect loop" does not necessarily have to be on a zero
crossing. So it can be useful to use this as a rough default and to adjust
the loop in single steps.
You can also try different loops by saving them as Marker Snapshots.
To save a snapshot, simply click on one of the eight memory slots. The
memory slot used will turn dark gray. Repeat this for all settings you
want to test. Each slot can only be used once. It is not possible to overwrite it.
To access the saved settings, simply click on one of the occupied
memory slots.
Settings
Here you can declare the respective sample as NT-Sound by checking
the box at NT-Sound (Attention! We built in a special feature). Please
refer to the chapter NT-Sound.
Root Note: This is the fundamental of the sample. Select the note that
corresponds to the frequency of your sample. If the root note is contained in the name of your sample, you can simply click the RootNote
from Name button to copy the root note. Please refer to the Tips sec-
tion!
Top Key: Enter the highest note up to which the selected sample is to
be played on the keyboard. The sample is then transposed upwards
through the M1, starting from the fundamental, up to this note.
Transpose: Here you can adjust the transposition of the sample in cent
steps. This is particularly necessary because the correct physical frequency cannot always be achieved with digitally stored waveforms.
Please refer to the chapter Transpose and the length of digital sam-
ples.
As already described in the Sustain Loop section, the Transpose is recalculated mathematically when the loop is changed. The set Root Note is
used for the calculation. Also a plausibility check is performed. If the
Transpose value turns red, this is an indicator that the set Root Note
does not match the loop. This will result in a detuned sustain loop. In
this case you should check whether the Root Note of your sample is
correct.
Level: with the level control the volume of the sample can be lowered.
This serves to adjust all samples in the sound to a volume.
VDF Cutoff: This is a low-pass filter upstream of the sound synthesis of
the device. It can be used to filter alias effects. In addition, differences
in the timbre of the individual samples can be adapted to each other.
Decay-Level: This allows you to adjust the decay level of the sample.
Please note that Drumsounds are not looped and no parameter input is
necessary. For this reason, all parameters are grayed out for drum
sounds. In this case, the setup window is only used to assign a sample
or a name.
You can export your samples, including all set parameters and loop
points, in WAV format. We use a mixture of standard parameters of the
sampler chunk and an extension of it. Simply click on the Export Sam-
ples button or drag and drop the samples from the Samples list.
The next time you import the files, the parameters are automatically
taken over.
WaveReX M1 – Manual Page 14 of 33
Page 15
Quick Start
Quick Start
Principle
With the WaveReX software editor you can create a virtual card, a socalled image, on your computer. This compilation can contain Multisounds and/or Drumsounds. The compilation can then be transferred
from the editor to your WaveReX and used by the Korg M1 Music Workstation.
Connecting
Turn on your computer and wait until it boots up.
Take your WaveReX out of the box. The side with the label is the top
side. On the bottom you should therefore see the back of the board.
Don't put it in the Korg M1 Music Workstation for now. Place your WaveReX on a smooth, dry surface, e.g. a table.
Now take the micro-USB cable and connect it to your WaveReX. You
can then plug the other side of the cable into an available USB port on
your computer. The WaveReX is compatible with both USB2 and USB3
ports. WaveReX is powered when the green LED is lit.
Open the Software Editor
Make sure your WaveReX is already connected to your computer. Now
open the WaveReX software editor (available at www.waverex.de/downloads). You should now see the main window:
You can see if your WaveReX is connected to the software in the lower
right corner of the device overview. The connected WaveReX and its
serial number are displayed here.
Your WaveReX starts for five seconds in bootloader mode. You can tell
by the double flashing of the blue LED. After that your WaveReX starts
automatically in operating mode.
With Windows 8 (or above), Windows should now install the drivers automatically. Check in the Device Manager (click start->run and type
devmgmt.msc) if your device appears as WaveReX, then you have successfully installed the driver.
You can also connect more than one WaveReX. In this case you can use
the drop-down box to select the device you want to use.
WaveReX M1 – Manual Page 15 of 33
Page 16
Quick Start
Load a card
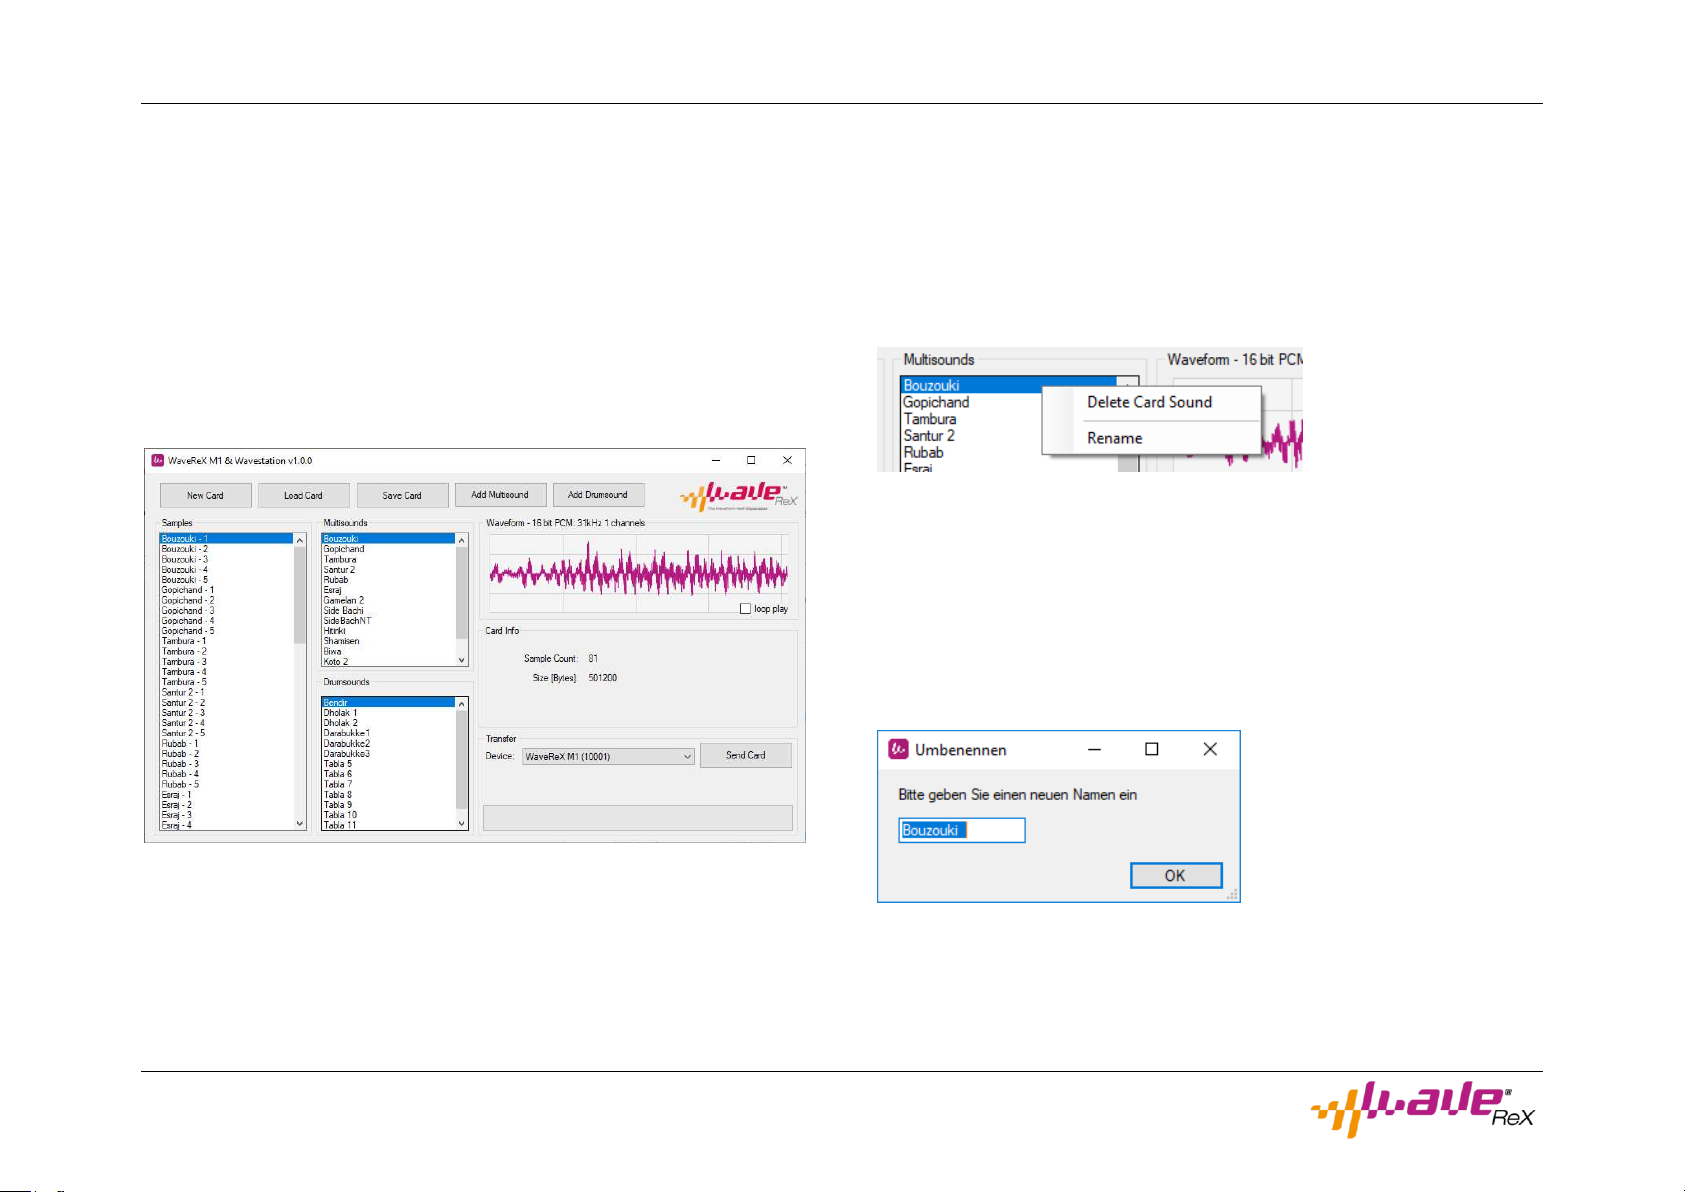
Click the Load Card button. A dialog box opens. Here you can now select a previously saved card. We have already provided you with a card
for this. The file has the extension .m1
If your files are in a different folder, navigate via the window to the desired folder.
Double click on the file or select it and click the Open button. The content of the card is loaded and displayed in the main window.
Editing a card
Delete a Sound
To delete a Multisound or Drumsound from your compilation, select it
in the corresponding list and then right-click on your selection.
A context menu opens up.
Click on Delete Card Sound to delete your sound from the compilation.
Renaming a sound
If you want to rename your sound you have two options.
Select a sound and right-click on your selection. In the context menu
that now appears, select Rename.
The Rename window opens.
Enter the new name in the text box and confirm by clicking the OK button.
Note that the M1 only supports ten characters for the names.
WaveReX M1 – Manual Page 16 of 33
Page 17
Quick Start
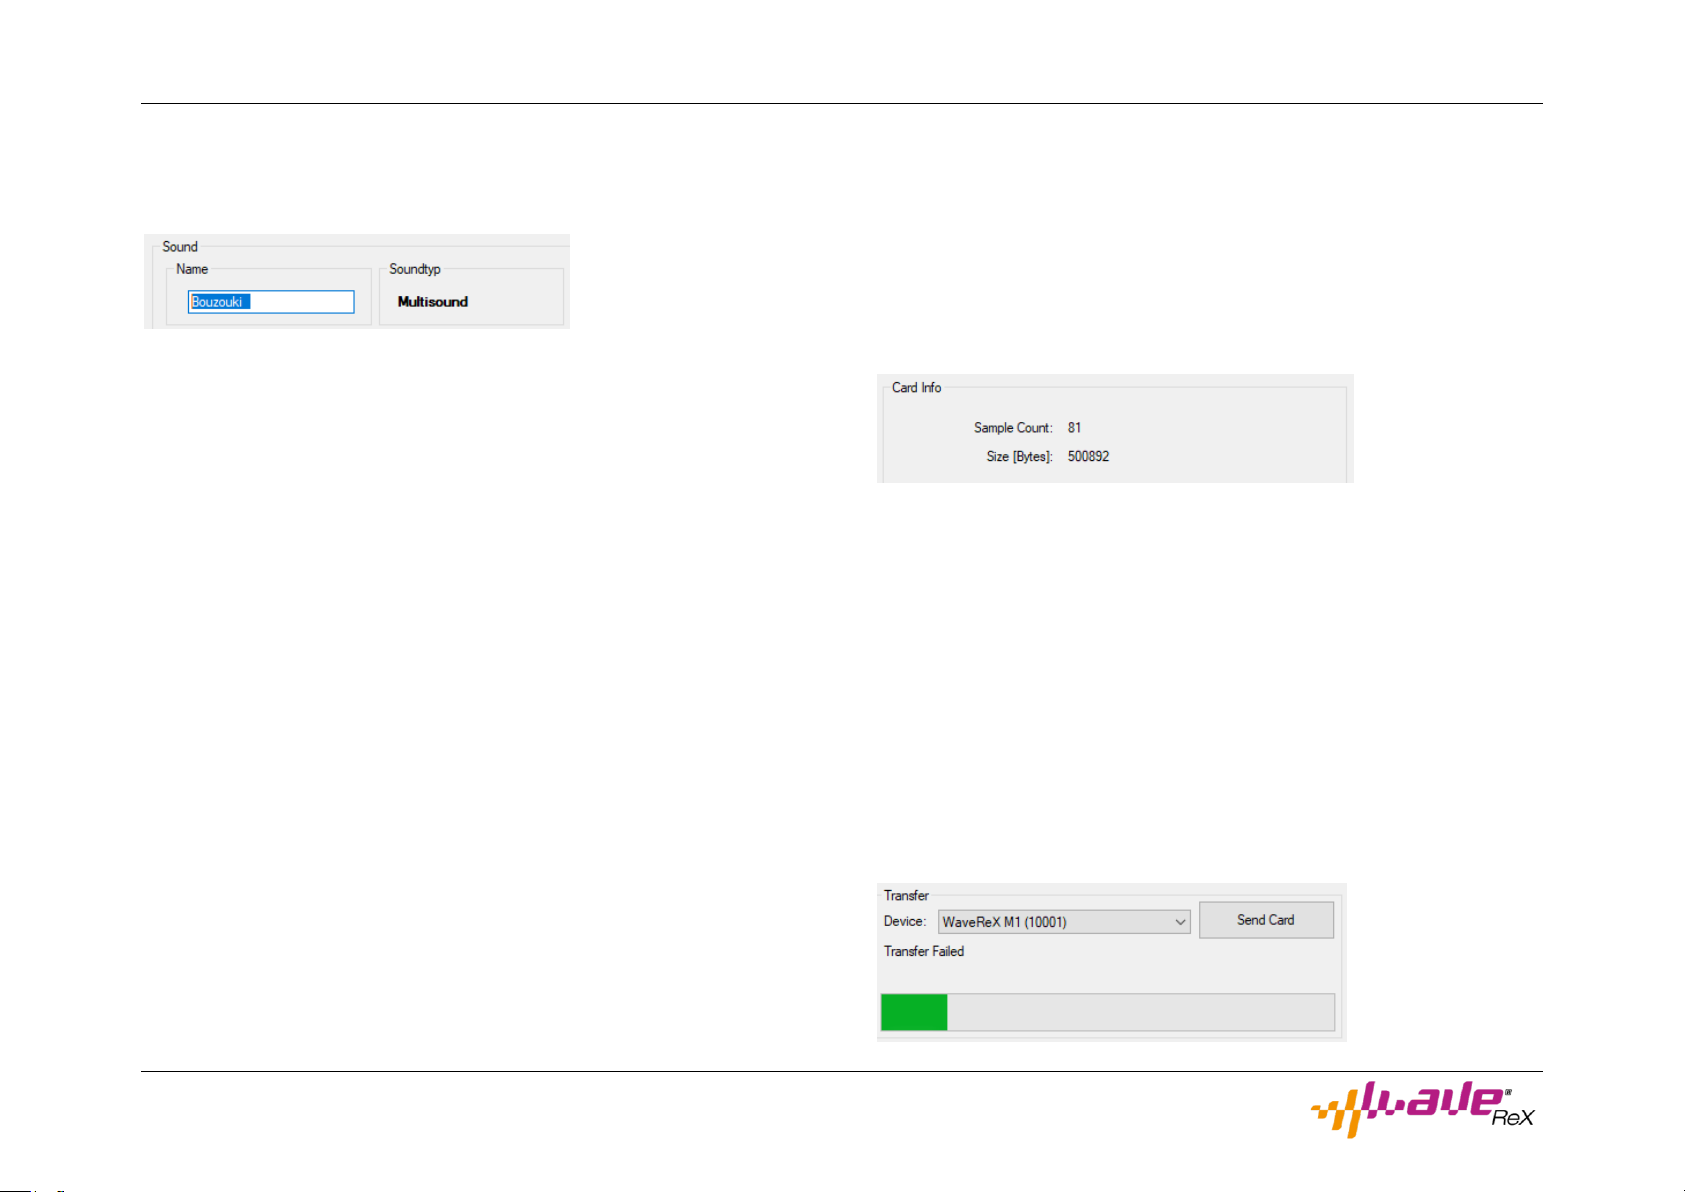
The second way is to change the name in the setup window of the respective sound. Double click on the sound whose name you want to
change. The setup window opens.
You can assign a new name in the name box in the upper left corner.
Then confirm your entry by clicking OK.
Transferring a card
When you have completed all settings to your satisfaction, you can
transfer the card to your WaveReX.
Make sure you are back in the main window. Check if your compilation
fits on your WaveReX. Remember: you have 512kB memory available.
You can see how much space your composition takes under Card Info.
Adding a Multisound
To add a Multisound to your compilation, right-click on the Multisound
list in the main window.
In the context menu that now appears, select Load Card Sound. A dialog box opens. Navigate through the window to the folder where your
Multisounds are located. The files have the extension .msound
Here you can see the number of samples used in your sounds and the
size of the compilation.
Click on Send Card at the bottom right to start the transmission.
Select the Multisound you want to add to your compilation. Double
click on your selection or confirm by clicking OK.
Adding a Drumsound
To add a Drumsound to your compilation, right-click on the drum sound
list in the main window.
In the context menu that now appears, select Load Card Sound. A dialog box opens. Navigate through the window to the folder where your
drum sounds are located. The files have the extension .dsound
Select the drum sound you want to add to your compilation. Double
click on your selection or confirm by clicking OK.
The blue LED on the WaveReX flashes to indicate that the transmission
is in progress. You can see the progress of the transfer in the progress
bar of the software. After a few seconds the transmission should be
completed and the blue LED goes out.
The status display informs you whether the transmission was successful. If the transfer was not successful, the Transfer Failed status is dis-
played. In this case, check if your WaveReX is connected to your computer and is displayed as described above under Device.
WaveReX M1 – Manual Page 17 of 33
Page 18
Quick Start
And into the Korg M1 Music Workstation…
If the transfer was successful, close the software editor. Disconnect
the micro-USB connector from your WaveReX and make sure your Korg
M1 Music Workstation is switched off.
ATTENTION!
Never plug your WaveReX into your Korg M1 Music Workstation while
it is on, especially when the Korg M1 Music Workstation is switched on.
This can cause serious damage to your Korg M1 Music Workstation.
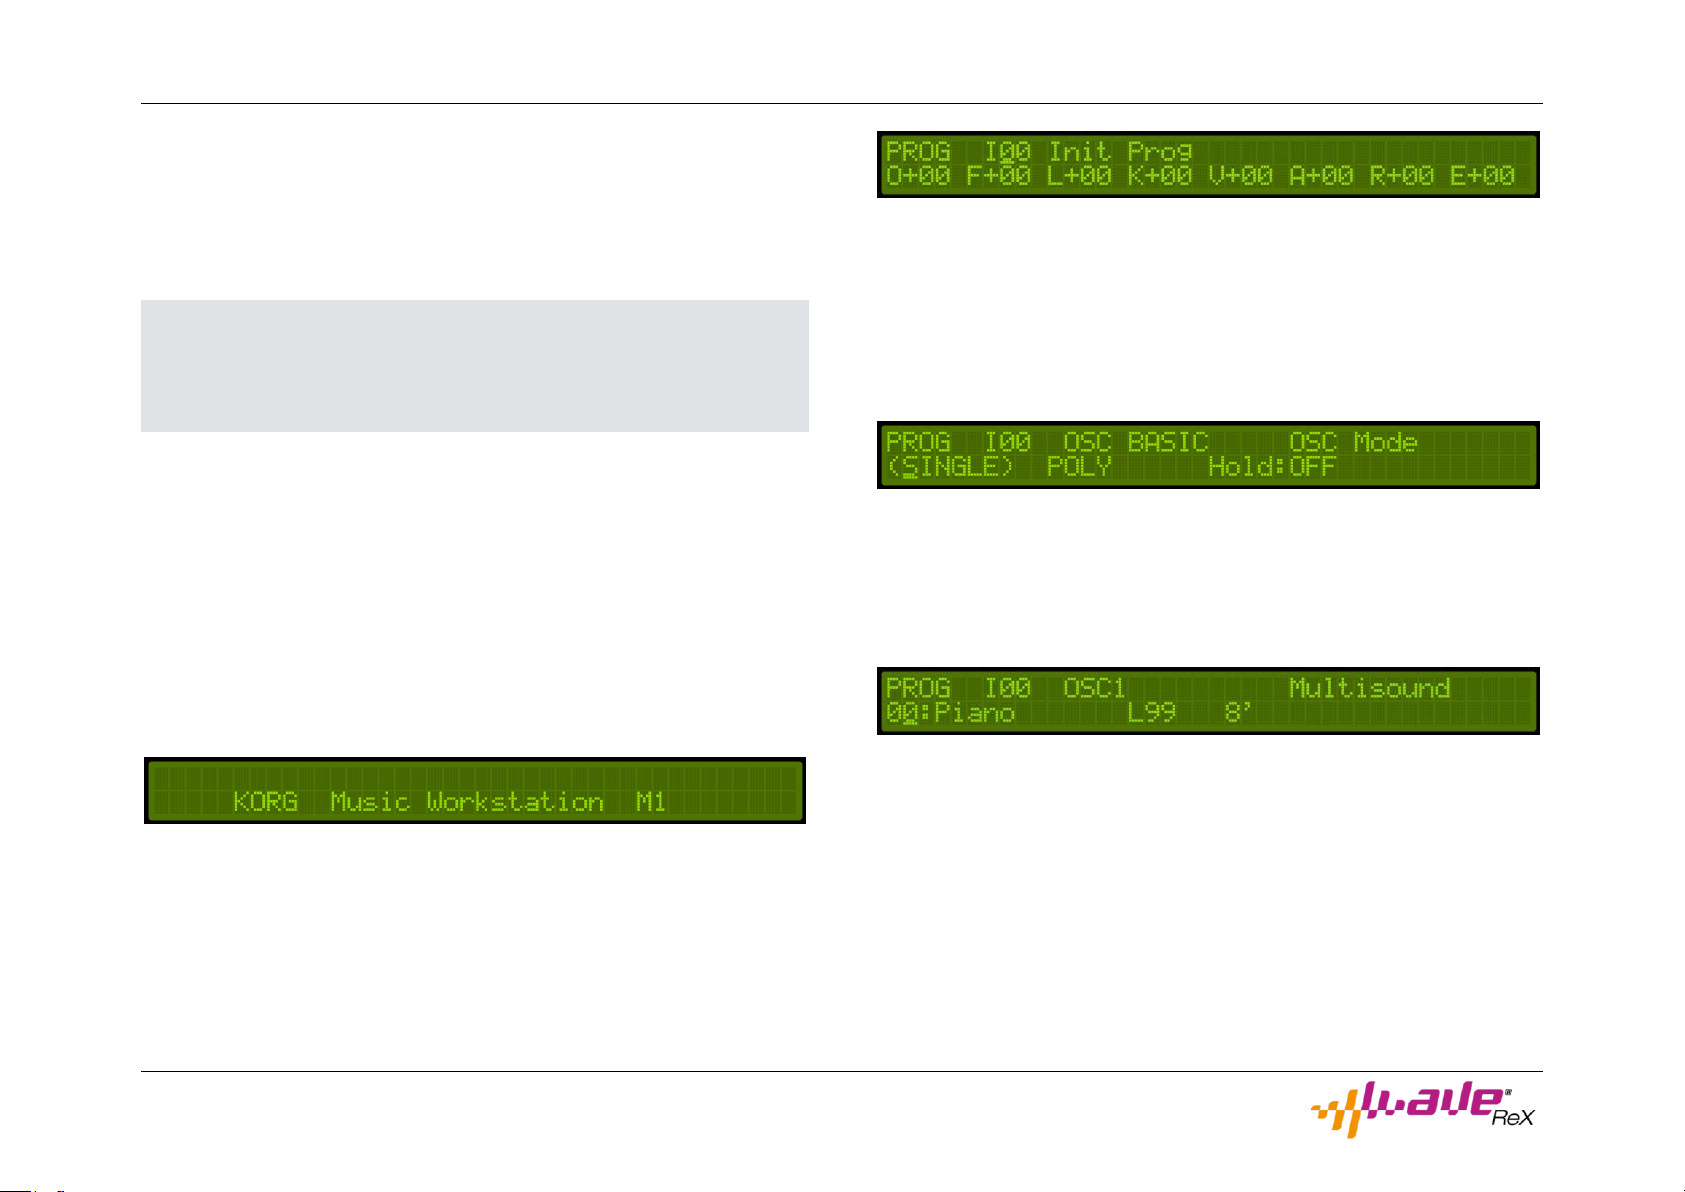
Now switch to the edit menu of the M1 by pressing the EDIT PROG key.
On the first page you can set whether you want to run the Korg M1 Music Workstation in single, double or drum mode. You can use your previously created Multisounds in single and double mode. Select the appropriate mode depending on whether you want to use one or two oscillators.
Insert your WaveReX into the PCM DATA slot of the Korg M1 Music
Workstation with the label facing up and the gold contacts in front, and
you will feel a slight resistance twice. These are the double-row contacts of the Korg M1 Music Workstation, which slide over the edge of
the card.
Slide your WaveReX straight into the slot as far as it will go. Depending
on how often your card slot has been used in the past, this can be
harder or easier. Don't worry, WaveReX fits perfectly into the slot!
Turn on your Korg M1 Music Workstation now.
When the card is correctly seated in the slot, the green LED lights up,
indicating that WaveReX is powered by the Korg M1 Music Workstation.
Select a program on your Korg M1 Music Workstation that you want to
use. You can choose an Init program or use a similar program as a template.
Switch to the next page by pressing the PAGE+ key. Here you can assign a Multisound to Oscillator 1. Use the UP and DOWN buttons to
navigate through the available Multisounds. All internal sounds are displayed first, followed by all sounds on the card. These are marked with
a C in front of the number.
Proceed accordingly for Oscillator 2. Hit the keys briefly in between,
you can already hear your sound.
To use your drum sounds, select Drum Mode on the first page.
Switch to the next page by pressing the PAGE+ key. Here you can set
which drum kit you want to use.
Note that you must assign your drum samples to this drum kit first. This
is done in the GLOBAL MENU of the Korg M1 Music Workstation.
WaveReX M1 – Manual Page 18 of 33
Page 19

Quick Start
Saving programs on the Korg M1 Music Workstation
WaveReX does not allow you to save your programs and combinations
created on the Korg M1 Music Workstation. You must still store them in
the internal memory or on a separately available memory card. (Note:
We already have plans to develop a program memory card in the future. Please let us know if you are interested).
Another way to save your programs is to transfer them to your computer via sysex. The best way to do this is to use relevant programs,
such as Midi-OX or the M1 Flex Editor.
You should always save your cards and programs as a set, just like the
original card sets. These consist of a program card (MPC) and a PCM
card (MSC). The sysex corresponds to the MPC card and the WaveReX
corresponds to the MSC card.
Save both files together in the same folder and with the same name.
This way, there will be no confusion later on.
According to this scheme the two files would be called e.g. card.m1
(WaveReX = MSC card) and card.syx (MPC card = programs for the
Korg M1 Music Workstation).
Loading programs into the Korg M1 Music
Workstation
WaveReX does not allow you to transfer programs or combinations
from your computer to the Korg M1 Music Workstation. Use relevant
programs such as Midi-OX or the M1 Flex Editor.
Make sure that you have loaded the corresponding Multisounds onto
your WaveReX if your programs use external waveforms.
WaveReX M1 – Manual Page 19 of 33
Page 20
Quick Start
Creating a card
Click New in the main window. If you have previously worked on a compilation, remember to save it beforehand.
The main window is now empty and you can start working.
Editing a Multisound
Double-click an entry in the Multisounds list. Each entry in this list represents a Multisound on the card.
Creating a Multisound
Click the Add Multisound button in the main window.
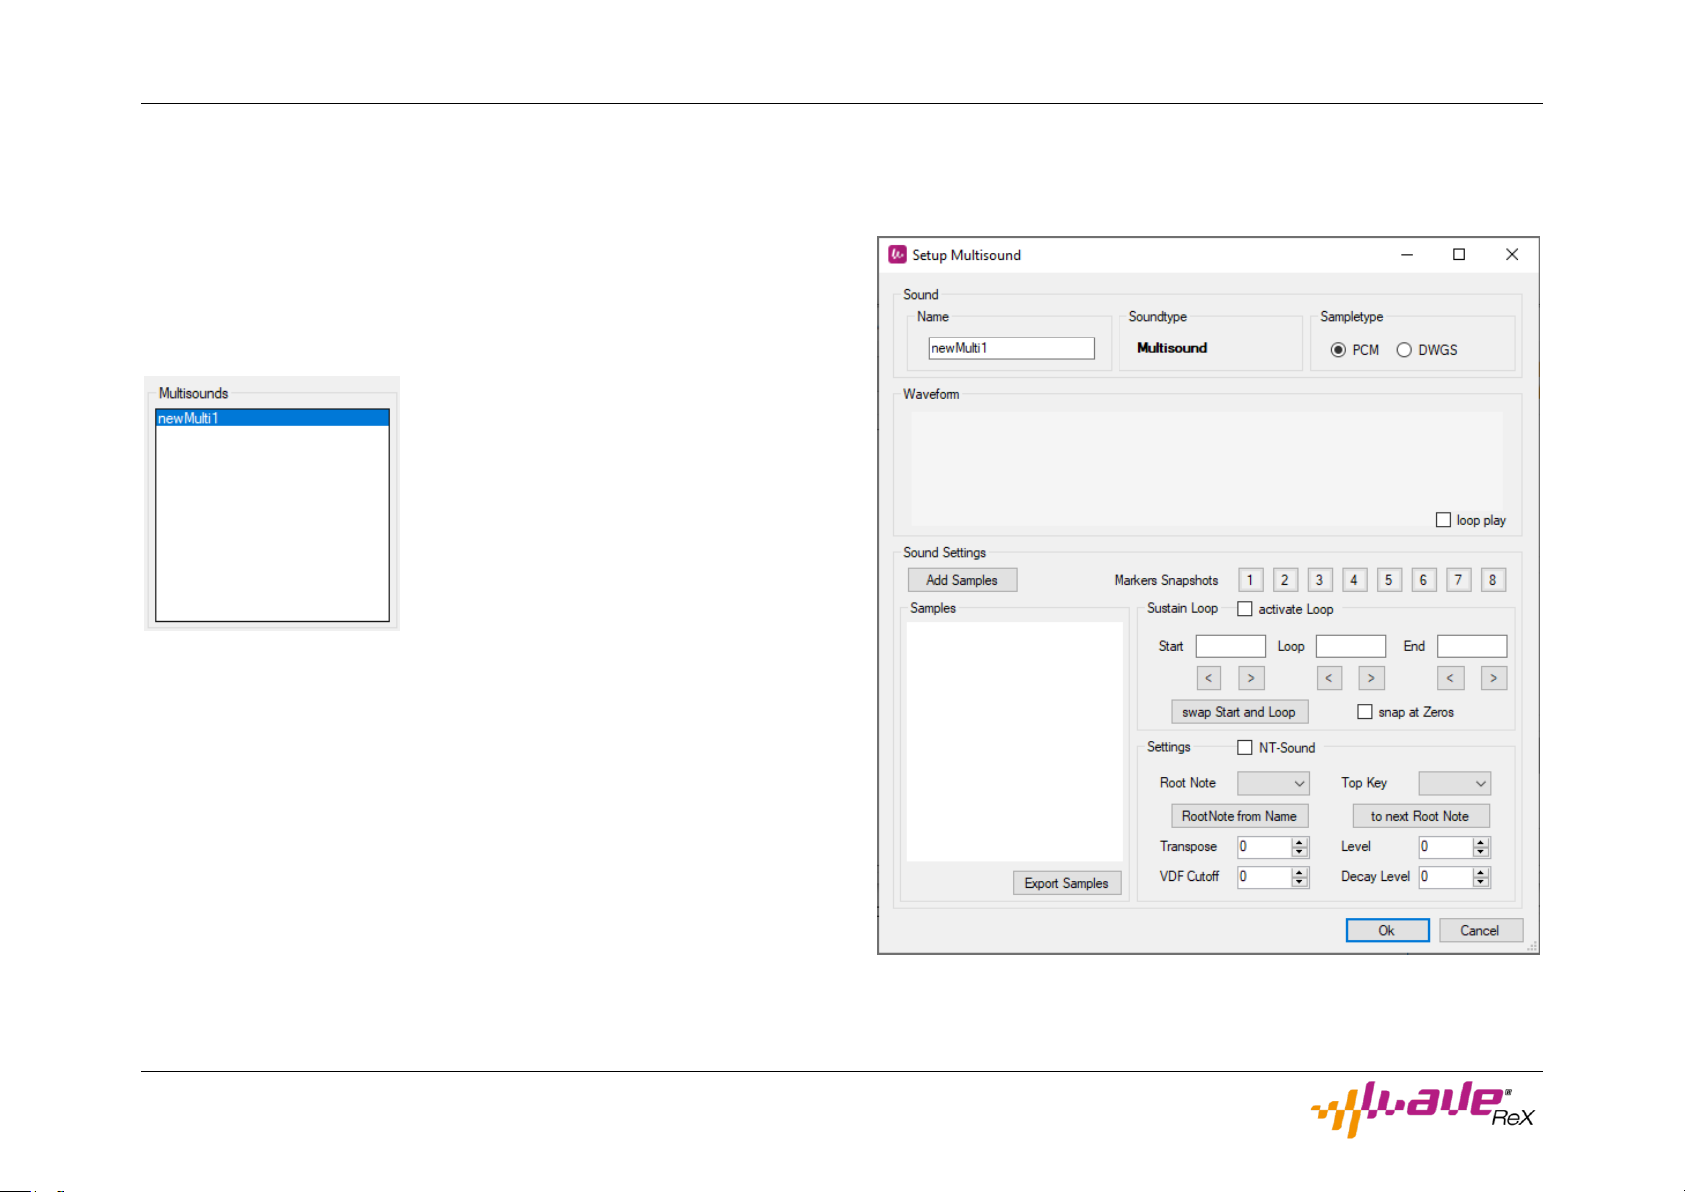
An empty Multisound is created and displayed in the Multisounds list.
Initially it is named newMulti followed by an index.
The setup window opens. All settings for the previously selected Multisound can be made here.
WaveReX M1 – Manual Page 20 of 33
Page 21
Quick Start
As you can see, your previously created Multisound is initially empty. To
add samples to your Multisound, click the Add Samples button. A dialog window opens.
Use the window to navigate to the folder containing your samples. Currently you can add WAV, AIFF and MP3 files. During import, the samples are automatically converted to the required format:
Sample format 31250 Hz, 16 Bit, Mono
You can remove samples from the Multisound at any time by selecting
the sample and pressing the Delete key on your keyboard.
Creating a Drumsound
Click the Add Drumsound button in the main window.
You can listen to the selected sample at any time by clicking on the
waveform. Clicking the waveform again stops playback. If you want to
hear the sample in a loop, you have to check the loop play box.
Make all the settings for each sample in your Multisound.
To apply your settings, click the OK button.
Repeat the whole process as often as you like for each Multisound you
want to change.
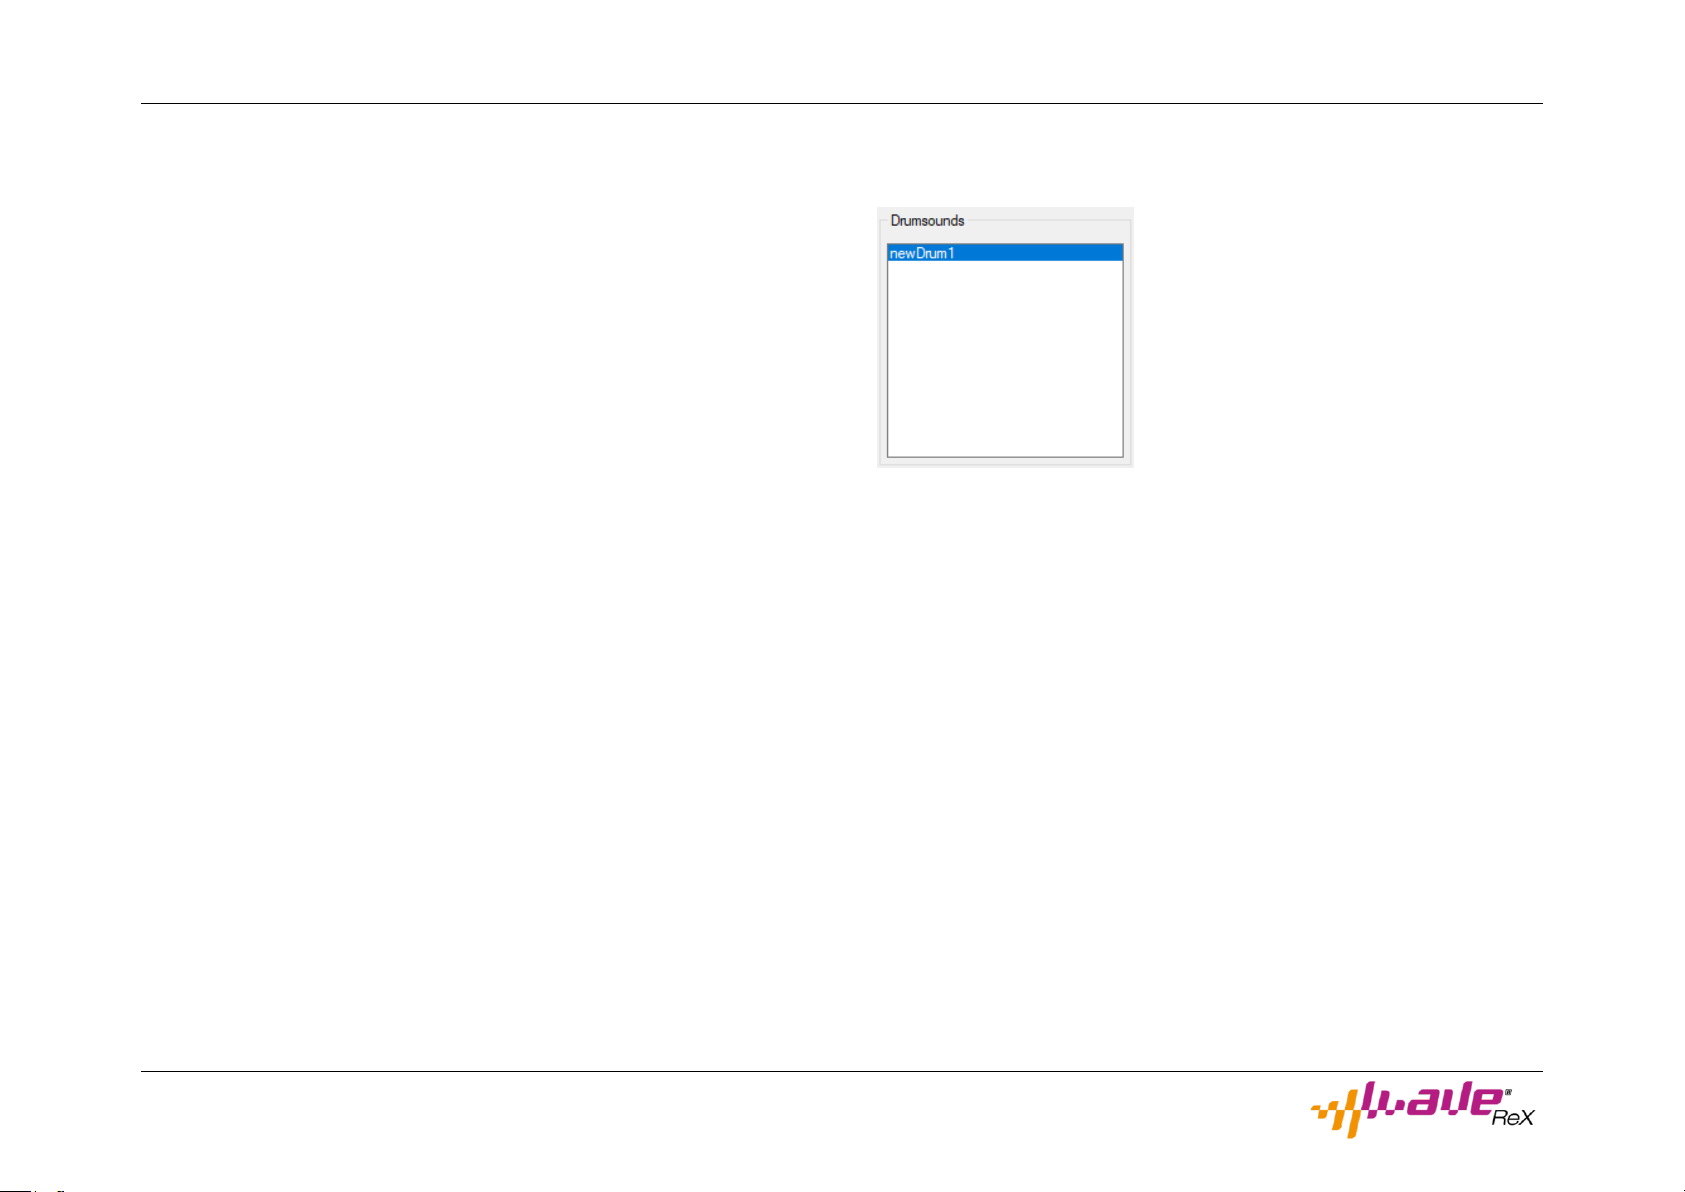
An empty drum sound is created and displayed in the Drumsounds list.
Initially it is named newDrum followed by an index.
You can assign Drumsounds created in this way to the four drum kits
available in the Korg M1 Music Workstation. Drumsounds are not usable in the Wavestation.
WaveReX M1 – Manual Page 21 of 33
Page 22
Quick Start
Editing of Drumsounds
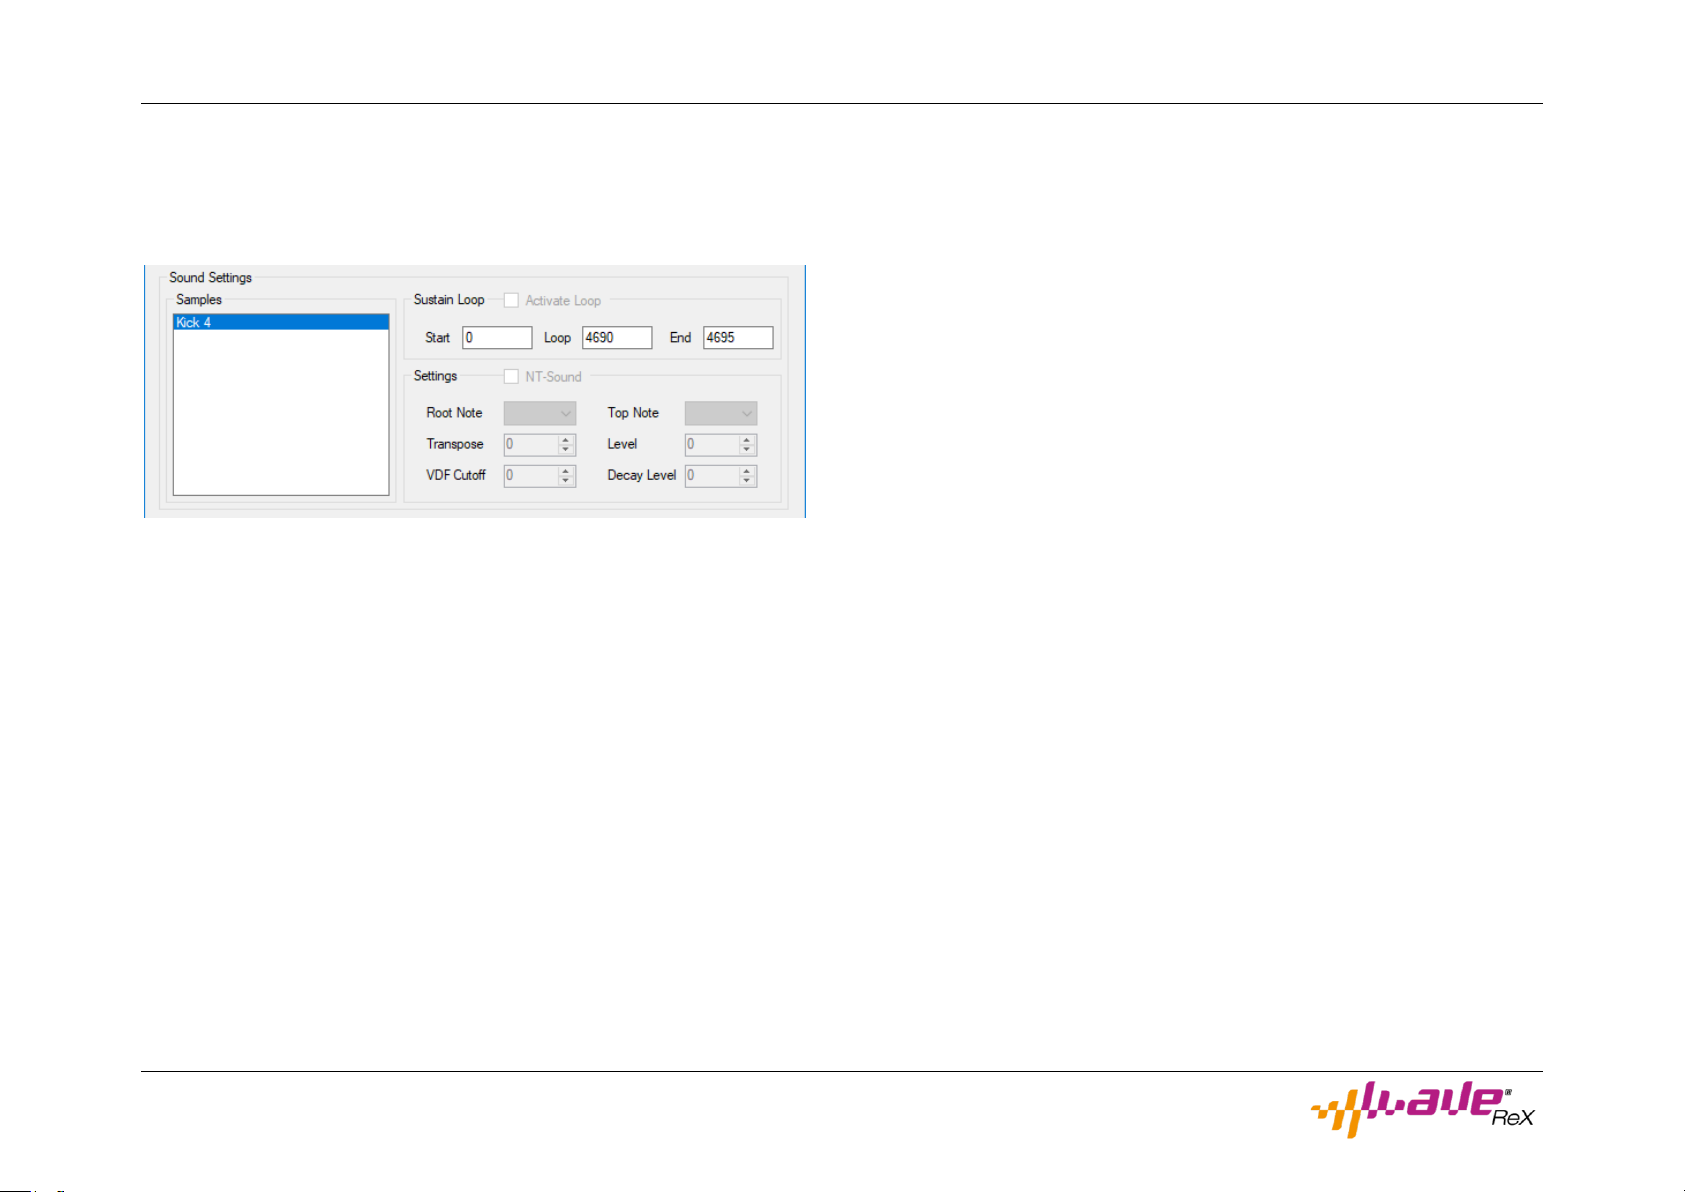
For Drumsounds, only the start, loop and end points of the sample can
be changed. All other parameters are automatically grayed out, since
changing them has no effect on the M1.
Editing of a drum kit (Multisound)
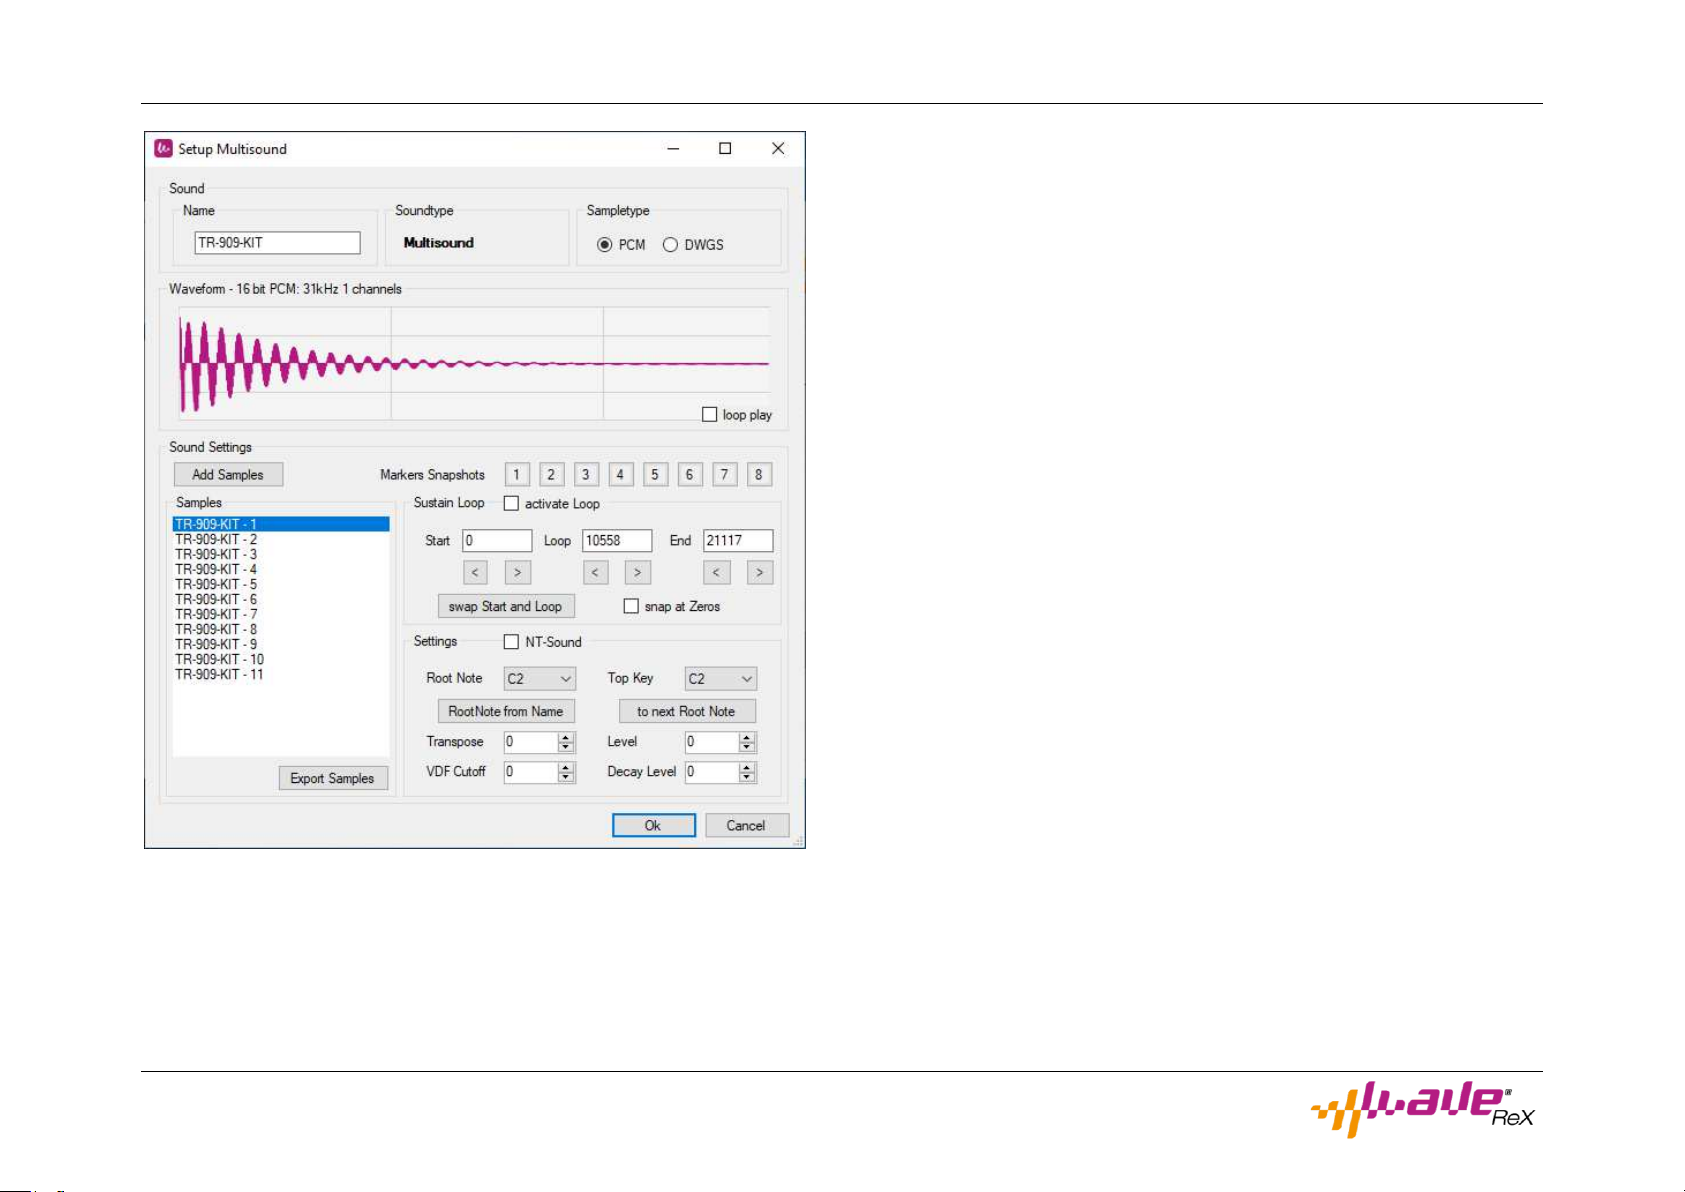
In the Multisounds list, double-click your previously created drum kit
(Multisound).
The setup window opens. All settings for the previously selected drum
kit can be made here. When placing the samples on the keyboard you
now have three options:
You can specify a key range for each sample by specifying a top note
larger than the root note. Note the chapter Transposition (keyword:
Transposition below the fundamental). The drum samples are then
transposed in this key range. Sometimes you want to, because so different tunings of the drum sound are available.
Note that in this case all relevant settings are made in the drum kits in
the M1.
Creating drum kits (Multisound)
A different method of creating drums in the M1 is to create your own
drum kits as a Multisound. The internal drum kits of the Korg M1 Music
Workstation are not used.
Proceed to create a drum kit according to the instructions for creating
a Multisound.
Note that drum kits or their samples cannot be assigned to the drum
kits in the Korg M1 Music Workstation. They can only be used as Multisounds, unless you also create them as Drumsounds.
The second option is to set the root note and top note to the same
note. As a result, transposition is only below the keynote (see chapter
Transposition).
The third way is to declare all samples as NT sound. Here, the sample is
placed on all keys between the next lower sample and the root note
without transposition.
WaveReX M1 – Manual Page 22 of 33
Page 23
Quick Start
Saving a card
You can of course save your compilation at any time. To do this, click
the Save Card button in the main window. A dialog box opens. Use the
window to navigate to your preferred location. Enter the name of your
compilation and click OK to save it.
Note that the button is grayed out if you have no sounds in your compilation, so there are no entries in the Multisounds or Drumsounds lists.
WaveReX M1 – Manual Page 23 of 33
Page 24

Basics
Basics
possible. The more samples available, the more natural the sampled
work will sound later.
Multisounds
Multisounds are multi samples and can, as the name suggests, consist
of several samples. You can imagine a multi-sound like a kind of container by storing several samples of the same sound. A Multisound piano can (and should) contain several samples of a piano.
Why do they do that?
Samples are short, recorded excerpts of an instrument or sound. Of
course, a sample has the same pitch (frequency) as the sound that was
recorded. Now you want to play this sample on the key of the keyboard, which corresponds to this pitch. Assign this sample to the corresponding key. But what about the other keys on the keyboard? You
want to play that sound over the entire keyboard.
Now you could simply transpose this sample up or down, i.e. you
simply change the pitch of one sample for each key of the keyboard.
That would be possible and not so difficult. The problem with this
method is only our hearing. We hear that it is the same sample, as
there are absolutely no variations in the notes. In nature, the timbre
also changes with increasing pitch. If only the pitch would change, it
would sound synthetic to our ears, simply not natural. The further you
move away from the original note on the keyboard, the greater the difference between the pitch played and the sampled pitch, the clearer
the effect.
Of course, one could also sample all frequencies in the audible spectrum of the human ear. But the more samples you use, the bigger the
whole thing gets. This would have exceeded the size of all available
memory, especially at this time.
In the end it is not necessary to sample all frequencies. You should always find a good compromise between quality and size. We recommend the series of articles "The Lost Art of Sampling" at
www.soundonsound.com to all those interested in sampling.
Multisounds take up the principle of combining several samples into
one sound. Although the pitches between the samples are also transposed here, the number of samples also reduces the difference between the sampled pitches, keeping the above effect as small as possible. This principle is used by all samplers today. In most cases, several
samples for different velocity levels are also possible. This can be done
in M1 with the combinations.
In order to counteract this, one traditionally tries to sample as many
tones of a sound as possible. Preferably at least one per octave. So you
try to keep the difference between two sampled pitches as small as
WaveReX M1 – Manual Page 24 of 33
Page 25

Basics
Sample types
Multisounds can contain two types of samples: PCM and DWGS.
PCM
PCM stands for pulse code modulation. This is a method for digitizing
analog audio signals. Each WAV file contains, for example, PCM data.
In the M1, PCM sounds represent "real" recordings that are usually
much longer than just an oscillation.
DWGS
The Digital Waveform Generator System is Korg's answer to single cycle waveforms.
DWGS are mathematical, i.e. not natural, waveforms with a length of
usually only one oscillation. They provide an efficient and compact storage option and are particularly suitable for typical synthesizer sounds.
Scheme of a DWGS
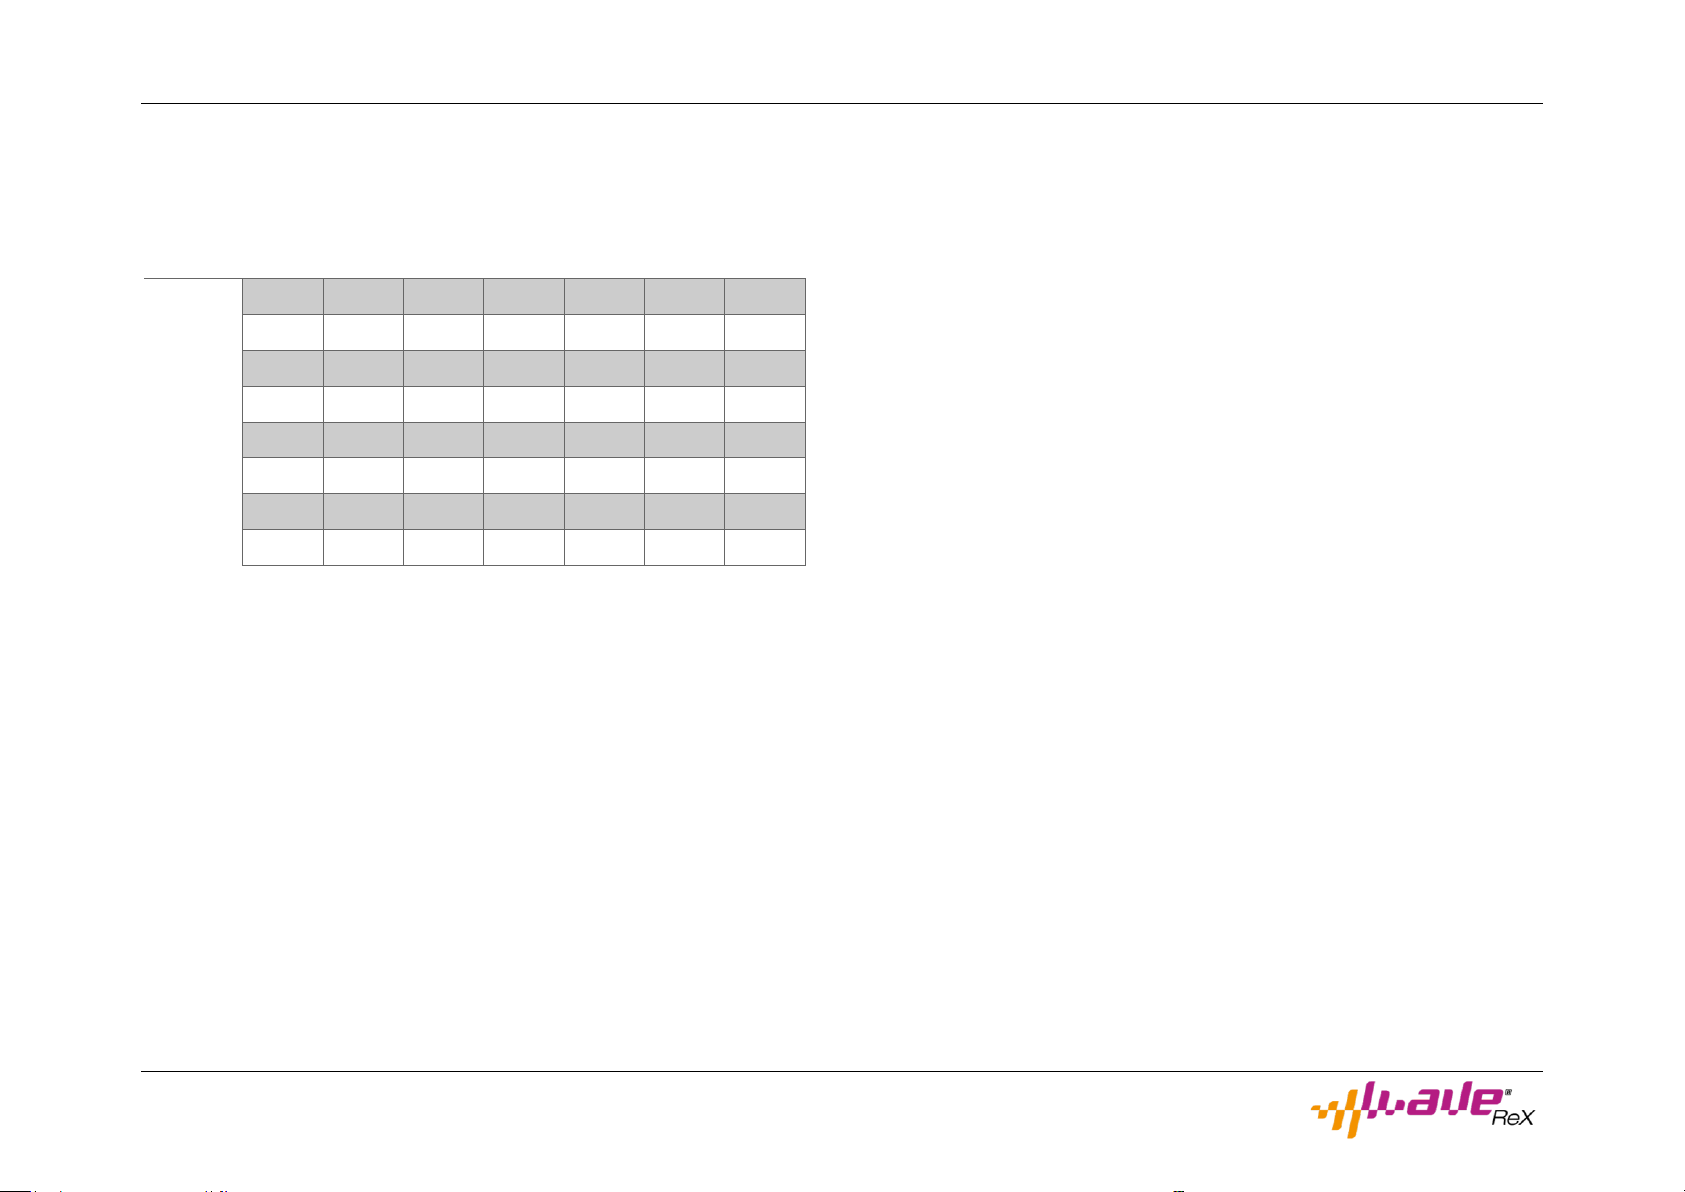
DWGS must always consist of eight samples with the following properties:
31250 Hz, 16 Bit, Mono, one oscillation
Length Sample 1 = 512, Note B1
Length Sample 2 = 256, Note B2
Length Sample 3 = 128, Note B3
Length Sample 4 = 64, Note B4
Length Sample 5 = 32, Note B5
Length Sample 6 = 16, Note B6
Length Sample 7 = 8, Note B7
DWGS are present in several Korg synthesizers, including the DSS-1 and
DW-8000, which can be loaded into the WaveReX, as well as all wavetables you can find if they do not exceed 8.388 s in length.
If you want to create your own single cycle waveforms, we highly recommend the SCW Editor from Sheets of Sounds (http://scw.sheetsofsound.com/).
When using DWGS, please note the technical limitations of your device
(see Technical Restrictions).
Length Sample 8 = 4, Note B8
The transpose is mathematically 20 for all samples. Which top key is
chosen is at your own choice. Theoretically every note between the
root note and the next higher root note is possible. The default for
Korg is the F note.
You should also make sure that you set the loop point to 0. Since the
sample consists of only one oscillation, otherwise only half the sample
would be looped. The sound would be significantly different.
Just use the swap Start and Loop button to change the start and loop
point. The sample will start in the middle and be looped over the whole
length. You can also set both the start and loop points to 0.
WaveReX M1 – Manual Page 25 of 33
Page 26
Basics
Sample
Start
Loop
End
Transpose
Level
Root
Top
Key
1
256 0 512
14
-15
B1
F2 2 128 0 256
16
-15
B2
F3 3 64 0 128
17
-15
B3
F4
4
32 0 64
19
-15
B4
F5
5
16 0 32
20
-15
B5
F6
6 8 0
16
22
-15
B6
F7
7 4 0 8 23
-15
B7
F8 8 2 0 4
25
-15
B8
F9
The Korg DWGS Standard
The following standard was used at Korg for the DWGS:
Each sample thus has a range from the next lower F# to the next higher
F, with the fundamental in the middle of the range. An exception is the
first sample. This is transposed from the M1 down to the C-1.
NT-Sounds
NT stands for Non-Transpose. Samples declared as NT-Sound are not
transposed and played back with the same pitch on the entire keyboard.
In Korg's original M1 concept, NT-Sounds are independent sound types
that exist in parallel to Multi and Drumsounds. They always consist of
only one sample!
We changed this concept with WaveReX. From now on any number of
samples can be declared as NT-Sound in a Multisound. This has the advantage that several non-transposed samples can be placed on the keyboard, e.g. on each octave one. Here you only have to specify the root
note for each sample. The M1 then automatically places this sample on
all keys between the specified root note and the next lower root note
(of another sample).
Nevertheless, NT-Sounds can be created according to the original concept.
Drumsounds
Drumsounds are always samples of type PCM. Using DWGS as drum
sounds is not intended.
The M1 has four drum kits. These kits can be assigned to individual
drum sounds on the M1.
To use samples as drum sounds in the kits of the M1, they only have to
be created or declared as Drumsounds on the card. This is the traditional procedure.
WaveReX M1 – Manual Page 26 of 33
Page 27

Basics
Another possibility is not to use the drum kits of the M1. Instead, custom drum kits are created as a Multisound. Each key of the keyboard is
assigned to exactly one drum sample. For this purpose, the root note
and top note are set to the same note for each sample or all samples
are declared as NT-Sound (see Editing a Drum Kit (Multisound)).
Additional Information
Transposing capacity upwards: 19 semitones
Transposing capacity downwards: unlimited
Multiple use of samples: not possible
Note that a card you have created must comply with the above conventions, otherwise it will either not be properly recognized by the M1 operating system or will be refused (card will not be recognized).
The middle C
Like most Japanese synthesizers, the C4 is the so-called middle C. You
should take this into account when setting the key range of the samples in the setup window.
The key range of the Korg M1 Music Workstation
The M1 has a key range from C-1 to G9, which means (almost) eleven
octaves.
Technical Restrictions
Korg M1 Music Workstation
Due to the technical limitations of the device, the following maximum
values cannot be exceeded:
Number of Multisounds: 28
Number of Drumsounds: 15
DWGS
A Multisound of single cycle waveforms (DWGS) must contain eight
samples. The operating system of the M1 cannot properly interpret any
Multisound other than these.
If you have less than eight single-cycle waveforms available for a Multisound, you can create a PCM Multisound instead. This makes no difference in sound. The only difference is that it takes up more memory on
the card than DWGS.
However, when using single cycle waveforms, you should try to use
DWGS Multisounds first, as the M1 cannot read more than 70 samples
with PCM Multisounds. With DWGS, the usable number of samples is
only limited by the total number of samples allowed, in this case 256.
M1(R) & M1(R)-EX
Currently, it appears that M1 or M1R with older operating systems have
problems reading cards containing only DWGS. The first Multisound
will be displayed, but not played.
If you also have the problem, just add a dummy PCM Multisound to the
beginning of the card.
Number of PCM-Samples: 70
Total number of samples: 256
The problem does not exist with the EX version of the devices.
WaveReX M1 – Manual Page 27 of 33
Page 28

Basics
Korg Wavestation
The following restrictions apply here:
The Root Note represents the fundamental of the sample, i.e. the original pitch of the sample.
Number of Multisounds: 118
Number of Drumsounds: not included in concept
Number of PCM-Samples: limited by total number of sam-
ples
Total number of samples: > 256
Transposing capacity upwards: 30 semitones
Transposing capacity downwards: unlimited
Multiple use of samples: possible
DWGS
The use of DWGS was not intended for the Wavestation, at least none
are used on the WSC cards of Korg.
Nevertheless, the Wavestation is also able to read and play DWGS, but
they are transposed in the device afterwards.
Please note that the sound may differ considerably from the original.
Transposing and key zones
For each sample a Root Note and a Top Key must be specified. The area
between the root note and the top note is the key range of the sample,
i.e. the area in which the M1 plays this sample.
The Top Key is the highest key on the keyboard to be assigned to the
sample. It represents the upper limit of the range in which the sample
is to be played. Today, this area is often called the key zone.
The lower limit of the key zone cannot be defined directly, for example
by a bottom key. Here the top key of the next lower sample is used indirectly as the lower limit.
Thus the key zone is determined by the top key of the sample and the
top key of the next lower sample. The M1 automatically transposes the
sample over the entire range based on the given root note. The root
note must not lie within the key zone. Thus a sample with the keynote
E5, for example, can also be assigned to a range from C4 to F4.
It is also possible to set a "wrong" fundamental as root note to tune
the sample deliberately differently
The M1 can transpose samples up 19 semitones (Wavestation 30 semitones), based on the specified root note of the sample. Above this, the
same note is assigned to all keys (up to the specified top key). All keys
above the highest specified top key remain unassigned. Thus the transposition upwards is always limited by the highest defined top key.
The transposition downwards is limited by the next lower Top Key. If
there is no next lower top key, the fundamental is transposed down to
the lowest key C-1.
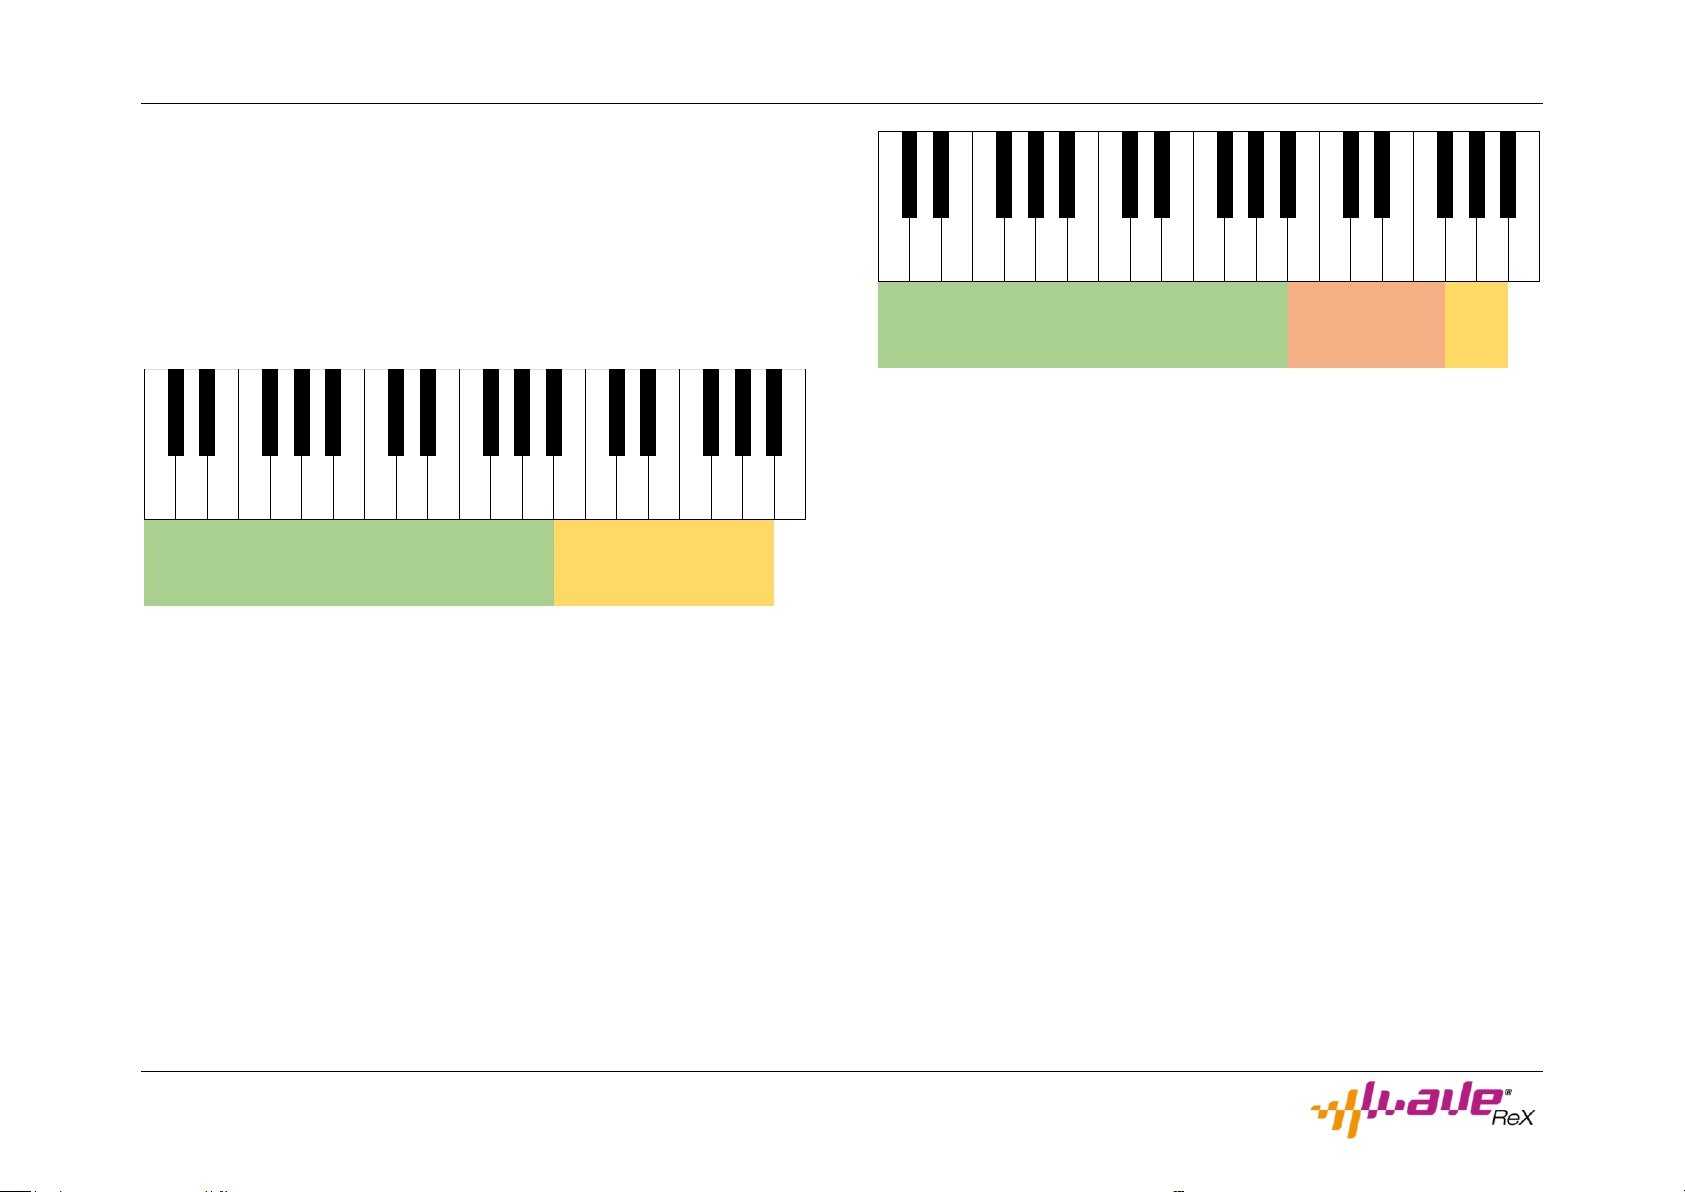
An example:
WaveReX M1 – Manual Page 28 of 33
Page 29
Basics
Sample 2
Sample 1
G3A3B3C3D3E3F3C2D2E2F2G2A2B2G4A4B4C4D4E4F4
Sample 2
Sample 1
Sample 3
G3A3B3C3D3E3F3C2D2E2F2G2A2B2G4A4B4C4D4E4F4
A Multisound shall consist of two samples. Sample 1 has the fundamental C3 and should be played up to key A3. Sample 2 has the fundamental C4 and should be played up to the A4 key.
For sample 1 the root note is set to C3 and the top key to A3.
For sample 2 the root note is set to C4 and the top key to A4.
The samples are assigned on the keyboard as follows:
The Top Key of Sample 1 now limits the range of Sample 3 downwards.
The Top Key of Sample 3, on the other hand, limits the range of Sample
2.
Transpose and the length of digital samples
Digitally stored waveforms often cannot represent the true frequency
The colored areas show the key zone of the respective sample. Sample
2 therefore sounds in the range B3 - A4. Sample 1 is transposed from A3
to the lowest note C-1 and can be played in this area because no other
top key was specified below Sample 1.
Another example:
Now you want to add a third sample. Sample 3 also has the fundamental C4 and should be playable up to F4. The result is as follows:
of the sampled instrument. This is primarily due to the fact that values
in the digital world consist only of whole bytes. This results in a certain
length of the sample.
An example: The note E5 corresponds to the frequency 659.2552013
Hz. With the sample rate of the M1 of 31250 Hz this results in a length of
47.4 values. This cannot be represented digitally. It must therefore be
rounded mathematically. In this case, it is rounded down to 47.
This results in 47 values that are stored digitally. However, if you now
calculate back to the resulting frequency with the sample rate, this results in 664.89 Hz. This corresponds to a difference of 5.6347987Hz or
15 cents compared to the original frequency.
These 15 cents have to be corrected afterwards. This is done via the
Transpose parameter in the setup window.
WaveReX M1 – Manual Page 29 of 33
Page 30
Basics
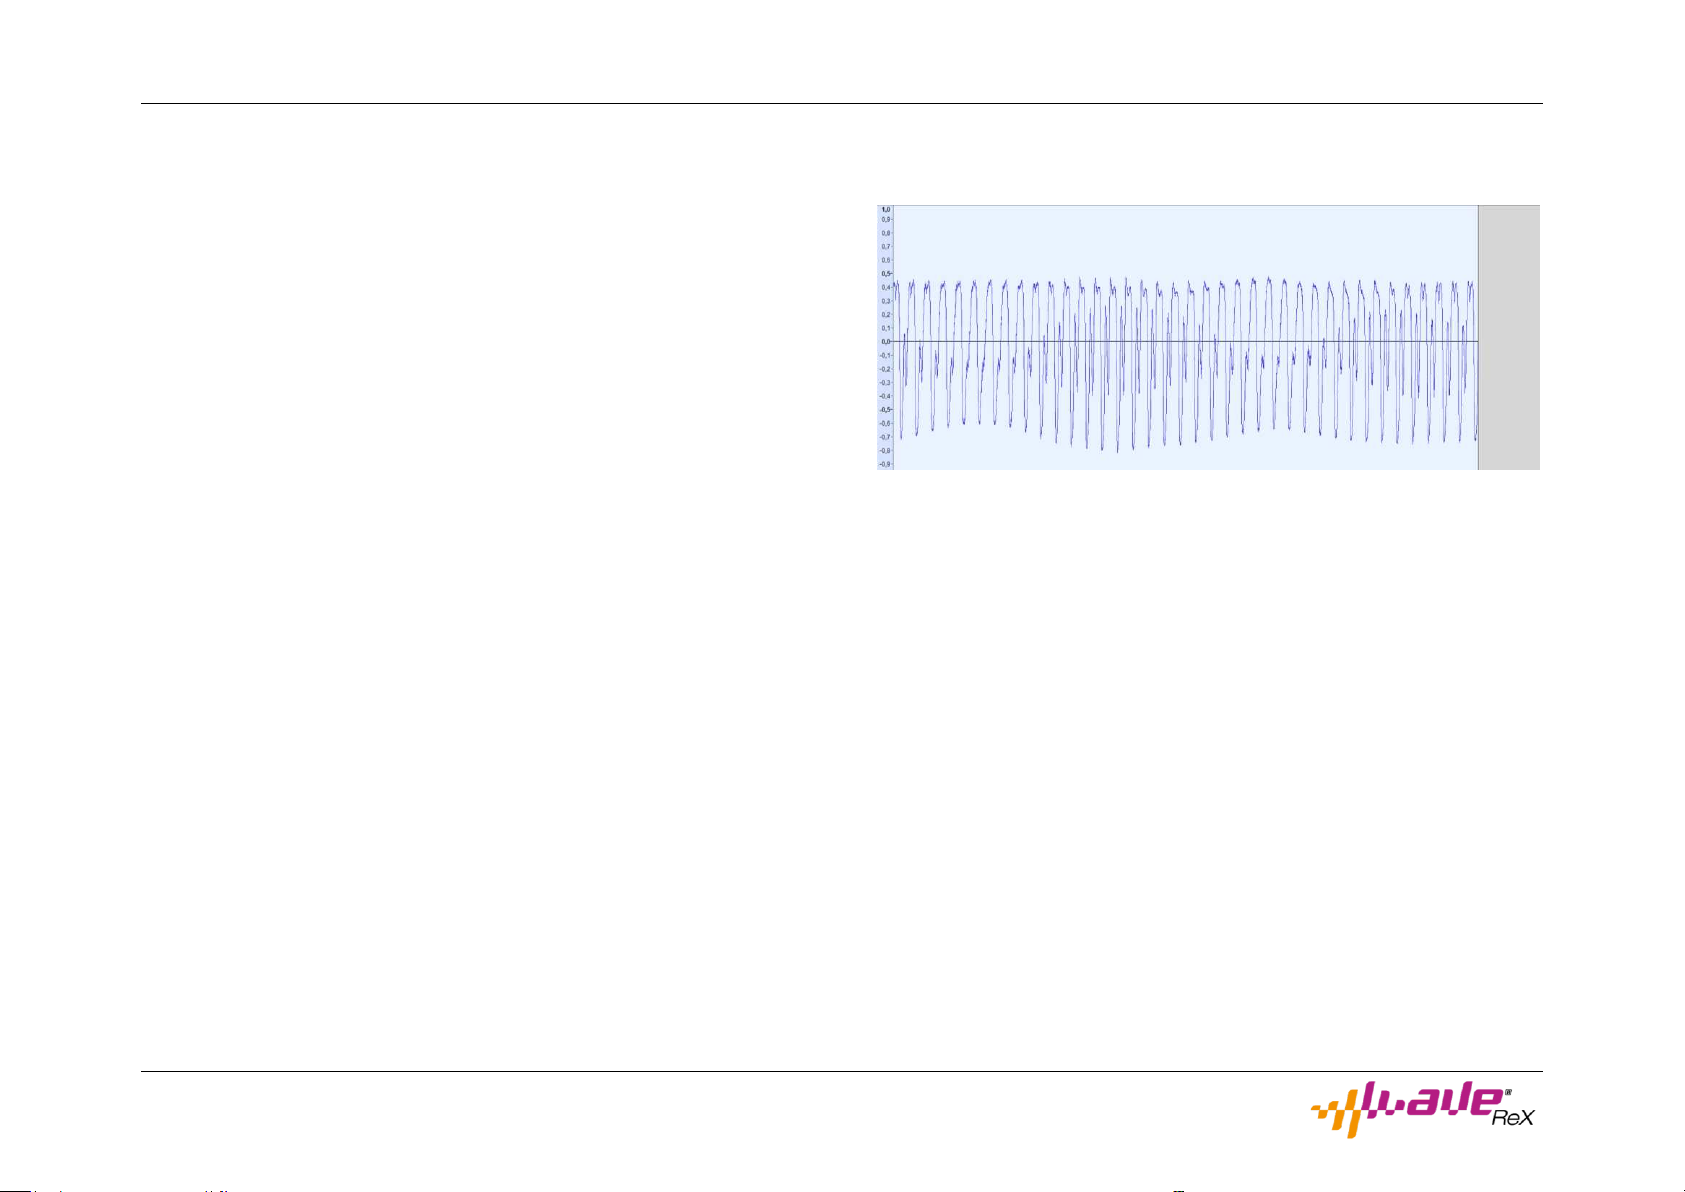
Especially when creating loops, make sure that they correspond to a
multiple of the "digital" length of the desired note. Otherwise, the loop
may become out of tune very quickly. Especially in higher frequencies
one byte corresponds to half a note.
Accordingly, all samples to be looped can and must be cut off "hard" at
the end, since the release takes over the Korg M1 Music Workstation.
Loops in the Korg M1 Music Workstation
There are several concepts for looping samples. The most common systems are probably systems with four points, Sample Start, Loop Start,
Loop End and Sample End.
If the note, i.e. the sample, is triggered, it starts at the sample start
point, passes through the loop start point and then reaches the loop
end point. At this point, the system jumps back to the loop start point
and traverses the sample to the loop end point again. As long as the
key remains pressed, the loop is made between these two points.
When the button is released, the system does not jump back to the
loop start point, but traverses the rest of the sample to the sample
end, the sample ends.
A fade out in the sample would be counterproductive, as this part
would be looped. Of course, samples with a fade out can also be used
as long as the loop is deactivated for this sample.
These systems are very flexible because you can move the loop freely
in the sample. If you want the sample to fade out, you need a sample
with the corresponding release phase at the end. However, this piece
of the sample unnecessarily takes up memory, so the developers of the
M1 have come up with something else:
The Korg M1 Music Workstation creates the release itself by continuing
the loop while fading out. This saves space in the memory. With the
Korg M1 Music Workstation only three points are needed: Sample
Start, Loop Start and Sample End. The M1 loops the sample between
the points Loop Start and Sample End.
WaveReX M1 – Manual Page 30 of 33
Page 31
Tips
Loop Ende
Loop Start
Loop Ende
Loop Start
X-Fade
<this function is still in progress>
Initialization of the memory of the Korg M1 Music Workstation
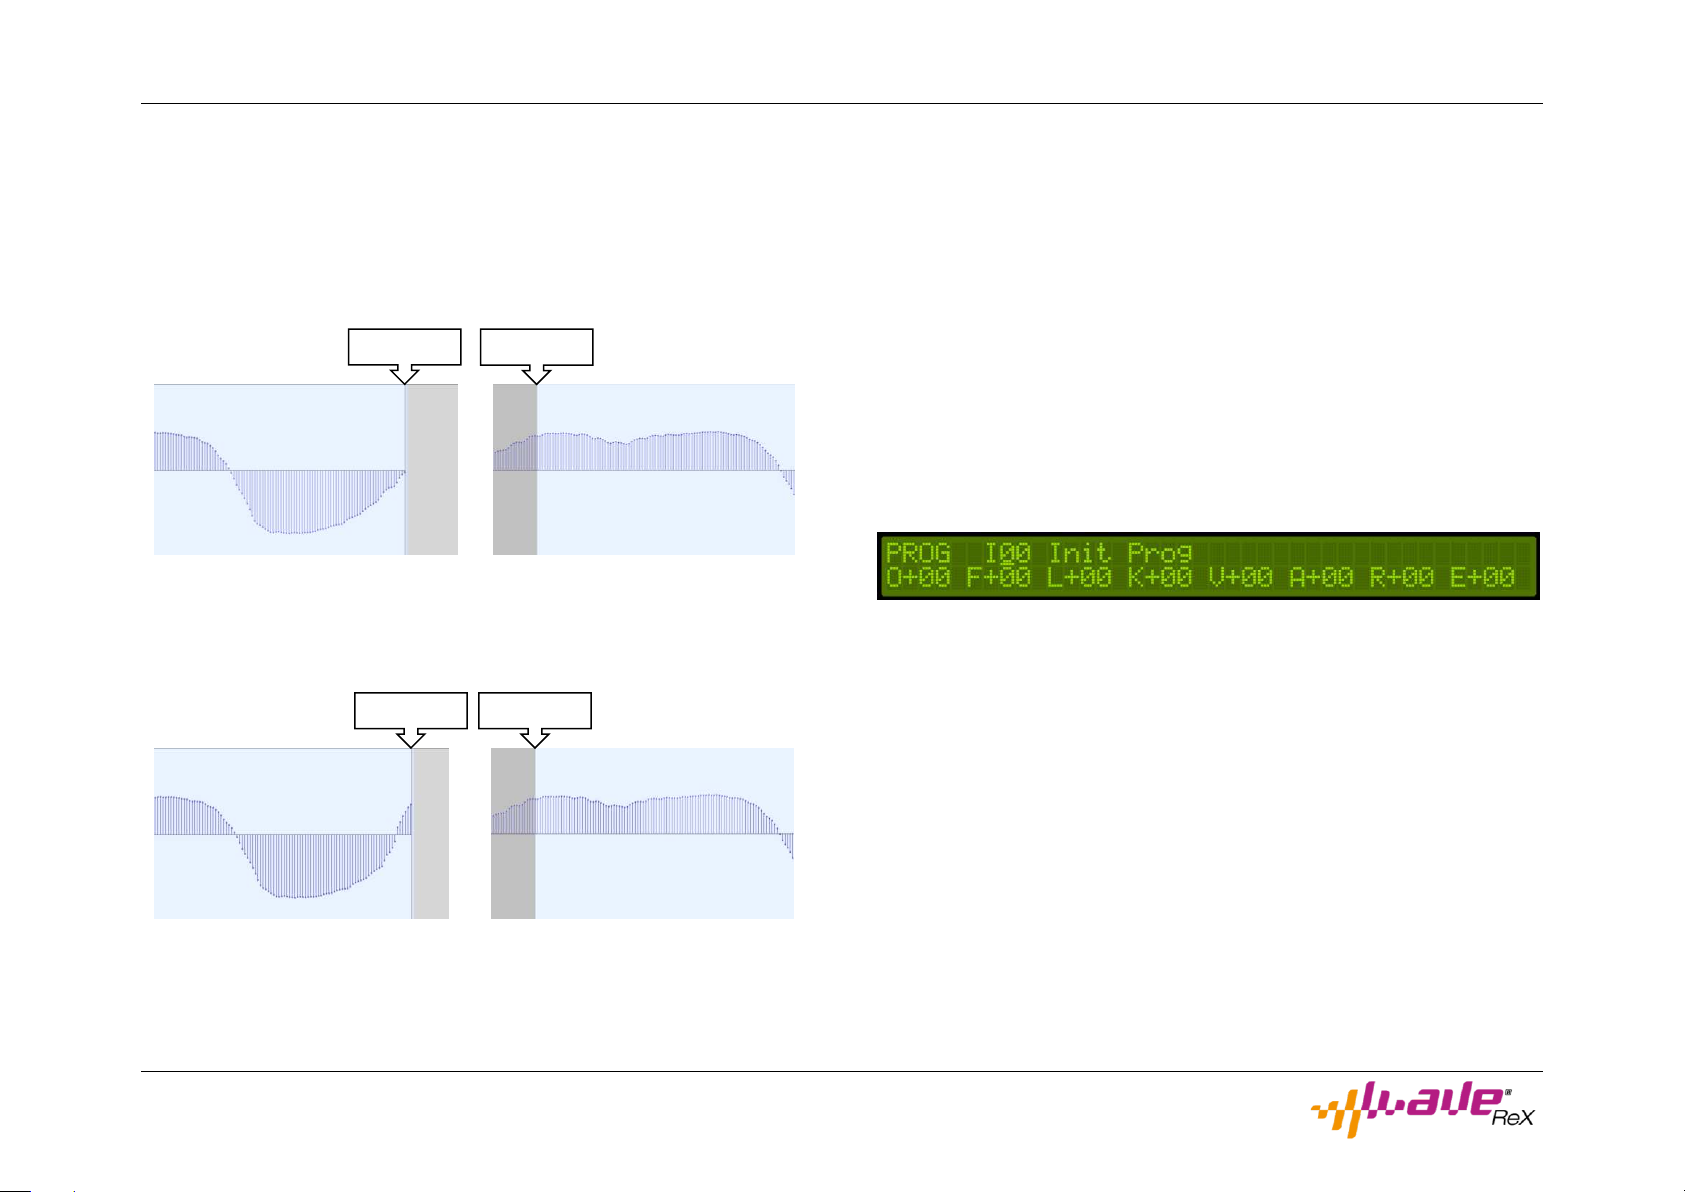
Usually it is very difficult to find a working loop. Especially the transition from the end of the loop to the beginning of the loop can be
tricky. If the difference between the last value of the loop and the first
value of the loop is too large, the loop cracks.
Here cross-fades (also called X-fades) can help considerably. The last
values of the loop are adjusted to the beginning of the loop. The result
is a smooth transition and cracking is prevented.
Sometimes you want to start a new sound from scratch. An Init program is a good way to do this. Unfortunately, the Korg M1 Music Workstation does not offer any Init programs by default. For this you have to
initialize the memory of the Korg M1 Music Workstation. Note that this
will erase all memory. You should therefore save it first.
Simply press the INT + COMBI + PROG keys on the Korg M1 Music
Workstation (when switched off) simultaneously and switch on the
Korg M1 Music Workstation. The memory is erased during startup. This
means that only Init programs are still in memory.
Tips
Root note of samples
You can find many samples on the internet right now whose authors
have written the root note in the name to make it easier for you. Double check it. In our experience, it often happens that the root note is
not correct!
Cutting samples optimally
Check if the samples are optimally cut, i.e. if there is still silence at the
beginning or end of the sample. Some samples were cut to a certain
WaveReX M1 – Manual Page 31 of 33
Page 32

Troubleshooting
length, or a certain timing was intended. That would be counterproductive in this case. Note that every byte, even if it is silence, takes up
space on your WaveReX.
Troubleshooting
My card is not recognized by the synthesizer
Save your work
Note that the Korg M1 Music Wavestation does not automatically save
your edited programs. You must always do this yourself in the corresponding menu. If the power goes out or you switch off the Korg M1
Music Workstation your changes are all gone. This also has the advantage that your programs are never overwritten automatically. Just
turn off the Korg M1 Music Workstation if you don't like a change and
want to return to the original state of your program.
First, make sure that there is readable content on your WaveReX. Without content the card is of course unreadable for your device.
However, especially in a brand new state, it can happen that your card
is not always recognized.
Don't worry! All WaveReX have been tested and left the house fully
functional. The fact that the original PCM cards often have the same
problems doesn't comfort you in this situation.
Unfortunately, the card slot of many devices is in better or worse condition, depending on how often the card slot has been used in the past.
This can contribute to contact problems.
In addition, the Wavestation seems to be more tolerant than the M1.
If your WaveReX is brand new, the case will have to "sand" itself into
your card slot. Experience has shown that the contacts of the card slot
snap better into the openings of the pads on the card if you insert the
card into the card slot with a little swing.
If you still have problems, please contact support.
The software editor does not display my WaveReX
Please make sure that your WaveReX is installed correctly. Please refer
to the section Installing the USB Driver.
WaveReX M1 – Manual Page 32 of 33
Page 33

Troubleshooting
If this is not the problem, make sure that your USB cable is not broken.
Just replace it with another one.
If this does not help, please contact support.
I discovered a bug
Please report this to support. We will immediately provide a bug fix.
Do not hesitate to send us your suggestions for improvement. We
made WaveReX for YOU.
WaveReX M1 – Manual Page 33 of 33
 Loading...