

WIRELESS 2.0 SOUND SYSTEM
Bedienungsanleitung..........................................3
User Manual......................................................13
Mode d'emploi...................................................23

2

Deutsch
Bedienungsanleitung
Sehr geehrter Anwender,
wir freuen uns, dass Sie das CUBE/CUBE
haben und gratulieren Ihnen zu dieser Entscheidung.
Sie haben mit dem wavemaster CUBE/CUBE
attraktives Audioprodukt erworben. Wir sind überzeugt, dass Ihnen unser Produkt viele Jahre
nützliche Dienste erweisen und vor allem eine Menge Freude bereiten wird.
... Ihr wavemaster Team!
Nach dem Auspacken
sollten Sie zunächst den Packungsinhalt auf Vollständigkeit überprüfen. Neben dieser Anleitung
sollten vorhanden sein:
2 Lautsprecherboxen
1 Netzkabel
1 Infrarot Fernbedienung
2 Batterien Format AAA bzw. Mikro
1 Lautsprecherkabel mit abisolierten Enden
1 Audio Verbindungskabel 2 Cinchstecker -> 3.5 mm Stereo Klinkenstecker
Lautsprecher-System von wavemaster gewählt
MINI NEO
ein gleichermaßen anspruchsvolles wie
MINI NEO
3

Deutsch
Aufstellungs-, Pflege- und Sicherheitshinweise
• Verbinden Sie den Audio Anschluss Ihres Sound Systems mit dem Line-Out, dem nicht
verstärkten Ausgang Ihrer Soundquelle. Ein verstärktes Tonsignal ( z.B. Speaker-Out)
könnte Ihr SoundSystem überlasten oder beschädigen.
• Um Ihr SoundSystem mit der Netzspannung zu verbinden, beachten Sie bitte, dass sich in
der Nähe des SoundSystems eine Steckdose befindet.
• Prüfen Sie vor der Inbetriebnahme unbedingt die Höhe der Netzspannung. Die bei Ihnen
gültige Netzspannung (230V oder 115V) können sie am Spannungswahlschalter des
CUBE/CUBE
eingestellten Wert dort jederzeit ablesen. Achtung, eine falsch eingestellte Netzspannung
kann zu einem Defekt des Geräts führen. Die gültige Netzspannung ist entsprechend
einzustellen, um Defekte zu vermeiden!
(neben dem POWER Netzschalter) einstellen und den aktuell
MINI NEO
• Sollte Ihr SoundSystem längere Zeit nicht benutzt werden, stellen Sie sicher, dass die
Stromversorgung unterbrochen wird.
• Benutzen Sie keinen Alkohol, Benzin, Verdünner oder Säuren, um das Gehäuse zu reinigen.
• Stellen Sie Ihr SoundSystem nicht in der Nähe von Klimaanlagen, Heizungen oder
Funkanlagen auf.
• Vermeiden Sie besondere Belastungen wie z. B. besondere Kälte oder Hitze, starke
Trockenheit oder Feuchtigkeit, mechanische Vibrationen oder Schläge.
• Öffnen Sie nicht das Gehäuse, sondern wenden Sie sich an qualifiziertes Servicepersonal.
• Für das Servicepersonal: Öffnen Sie nie das Gehäuse, wenn das Gerät mit dem
Netzspannungsanschluss 110-240 V~ verbunden ist.
• Achtung!! Durch den ON / STANDBY-Schalter erfolgt keine Trennung der
Netzspannung!
• Eine vorsätzliche Schädigung des Gerätes unterliegt nicht den Garantieleistungen.
• Bitte wenden Sie sich im Servicefall an Ihren Fachhändler.
4
Deutsch
Aufbau & Bedienung
Der Aufbau und die Bedienung des wavemaster CUBE/CUBE
Bitte beachten Sie, alle Anschlüsse nur im ausgeschalteten Zustand (POWER OFF)
durchzuführen.
sind sehr einfach.
MINI NEO
• Stellen Sie die Lautsprecher an den gewünschten Platz und beginnen Sie mit der
Verkabelung.
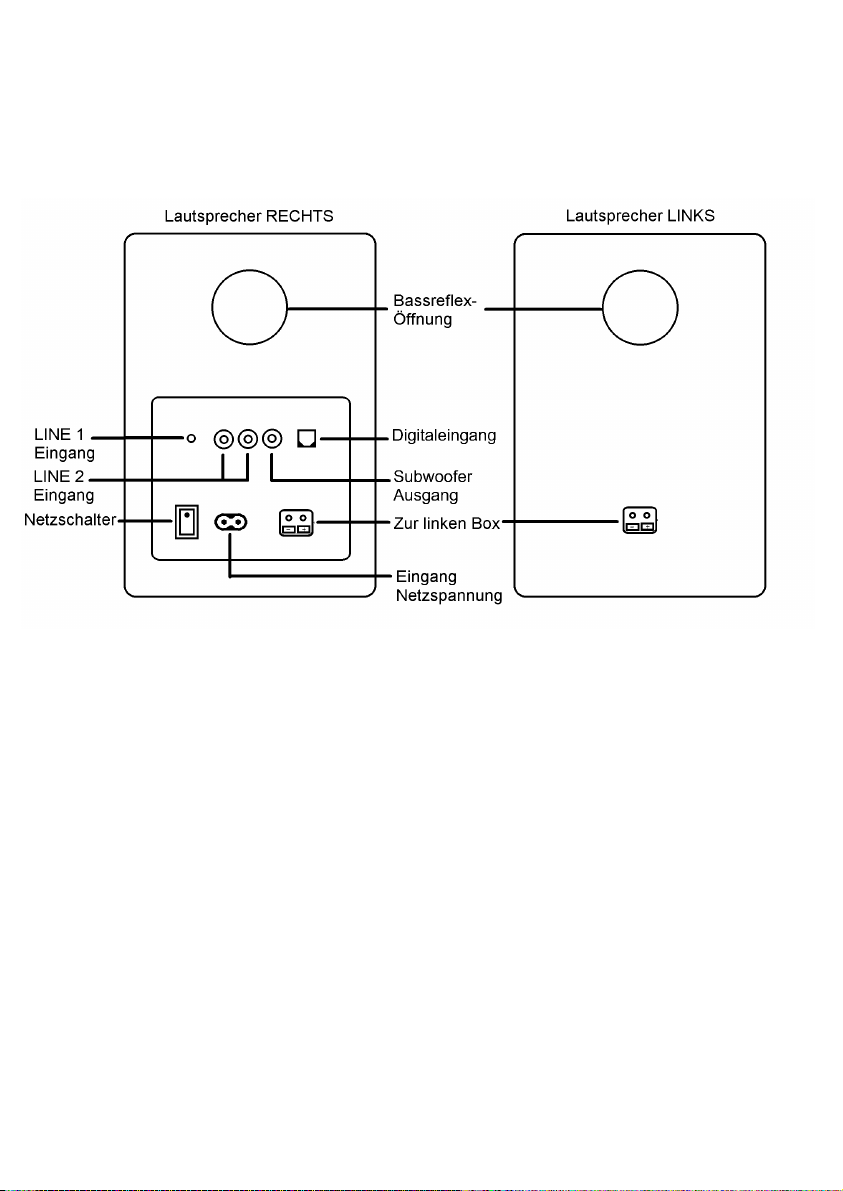
• Zuerst verbinden Sie die linke Box mit der rechten Box mittels Lautsprecherkabel. Die
vergoldeten Schraubanschlüsse können durch drehen gelöst werden. Die abisolierten
Kabelenden werden so in die Querlöcher eingesteckt, daß rot mit rot und schwarz mit
schwarz bei beiden Boxen verbunden werden. Drehen Sie die Schraubkappen mit der Hand
fest, so daß die Kabelenden guten Kontakt bekommen und die Verbindung des Ausgangs
der rechten (aktiven) Box zum Eingang der linken (passiven) Box hergestellt wird.
• Bitte achten Sie darauf, Kurzschlüsse zwischen roten (+) und schwarzen (-)
Anschlüssen unbedingt zu vermeiden, um Fehlfunktion und Defekte auszuschließen!
• Verbinden Sie nun die Eingangsbuchsen auf der Rückseite des CUBE/CUBE
Ihren entsprechenden Audioquellen.
MINI NEO
mit
• Die LINE 1 Klinken-Buchse ist für Geräte mit niedrigerem Line-Signalpegel wie z.B. portable
MP3-Player, Smartphones o.ä. vorbereitet.
• Die Cinch-Buchsen LINE 2 sind für Geräte mit Standard Line-Signalpegel wie z.B. PC oder
stationäre HiFi-Komponenten vorbereitet.
• Die optische TOSLINK-Buchse kann digitale PCM-Stereo-Signale annehmen.
5
Deutsch
• Mit dem rechts an der Frontseite des CUBE/CUBE
angebrachten Multifunktionsknopf
MINI NEO
mit Dreh- und Drucktast-Funktion können Sie die Grundfunktionen des Systems steuern:
1. Ein-/Ausschalten des CUBE/CUBE
manuell: Einschalten durch kurzen Druck
MINI NEO
(wenn zuvor ausgeschaltet), manuelles Ausschalten durch langen Druck (>2s).
Bei manuell ausgeschaltetem Gerät erfolgt eine stetige rote LED-Anzeige.
Bei automatisch in den Standby geschaltetem Gerät erfolgt eine langsam blinkende rote
Anzeige.
2. Lautstärkeeinstellung: Bei eingeschaltetem Gerät erhöhen oder vermindern Sie die
Wiedergabelautstärke durch Drehen des Knopfes.
Nach Aus- und Einschaltung bleibt die zuvor gewählte Lautstärke-Einstellung erhalten.
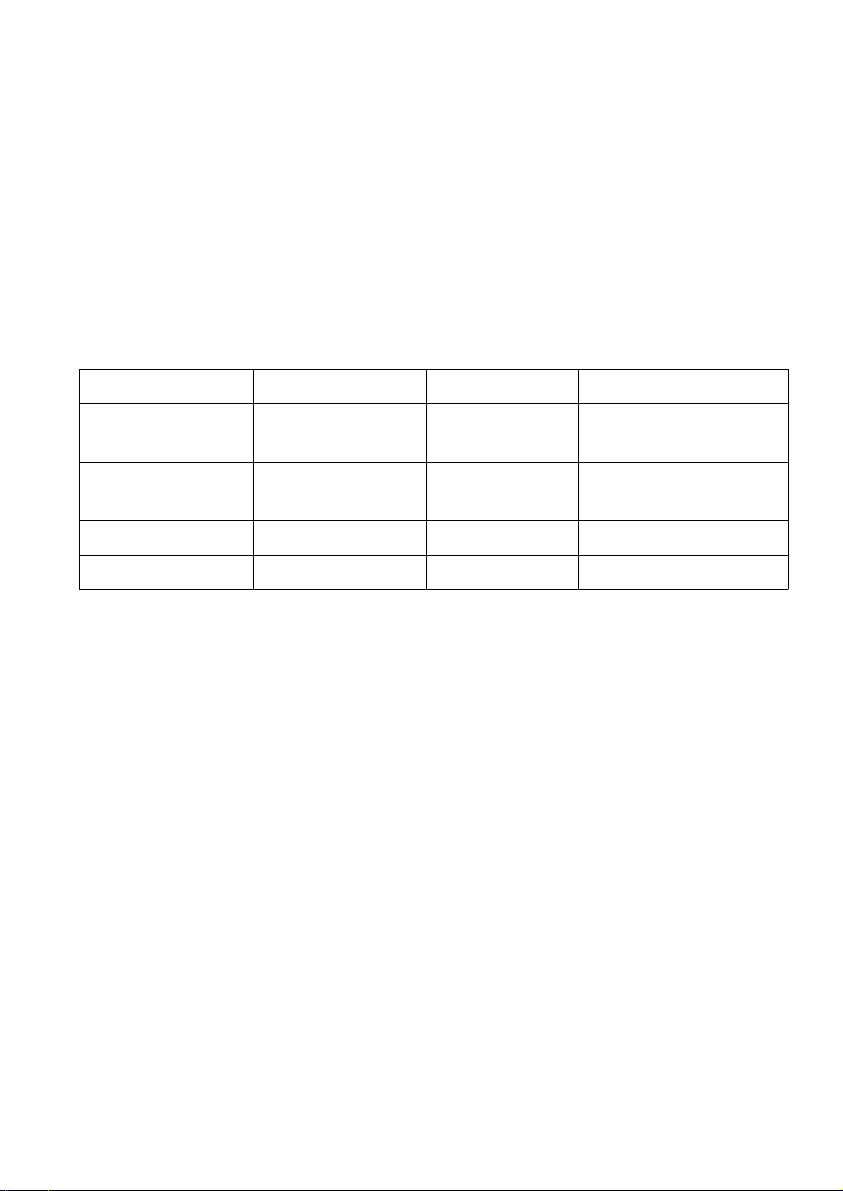
3. Sequenzielles Umschalten zwischen den Eingängen (kurzer Druck auf den Knopf):
Eingang Anschlußbuchse Anzeigefarbe Signalquelle, Format
LINE 1 Klinkenbuchse
3,5mm stereo
grün Smartphone, MP3-Player,
geringer Pegel bis 500mV
LINE 2 RCA (Cinch) L, R weiß PC, HiFi-Geräte
Standardpegel bis 2000mV
Bluetooth - blau Bluetooth-Audio A2DP
Digital optisch S/P-DIF TOSLINK orange PCM max. 24 Bit / 96 kHz
• Prüfen Sie vor der Inbetriebnahme unbedingt die Höhe der Netzspannung.
• Schließen Sie Ihr CUBE/CUBE
Sound System an die Stromversorgung an.
MINI NEO
• Schalten Sie die Netzspannung mit dem POWER-Schalter auf der Rückseite ein.
• EIN/STANDBY, Wahl der Audioquelle sowie LAUTSTÄRKE steuern Sie mit dem Einstellknopf
auf der Frontseite der rechten Box des CUBE/CUBE
Sound Systems.
MINI NEO
• Diese und weitere Einstellungen wie BASS, Höhen (TREBLE), LOUDNESS, MUTING,
steuern Sie bei Bedarf mit den Tasten der Infrarot-Fernbedienung.
Hinweis: Wenn Sie den Baßregler zu weit hochregeln, wird die maximal erreichbare
Lautstärke begrenzt, da der Tieftöner so eher seine Hubgenze überschreitet. Bitte achten Sie
darauf, die Tieftöner nicht zu überlasten (hörbare Verzerrungen treten auf), weil dies die
Lebensdauer der Tieftöner verringern kann!
• AUDIO SIGNAL SENSOR: Wenn das Eingangssignal für mehr als 10 Minuten sehr gering
bleibt oder aussetzt, schaltet der AUDIO SIGNAL SENSOR automatisch auf STANDBY.
Sobald wieder ein Audiosignal vorliegt, wird der AUDIO SIGNAL SENSOR das System
wieder automatisch einschalten! Bei automatischem STANDBY blinkt die Betriebsanzeige
langsam rot.
Diese Technik ist besonders vorteilhaft beim Einsatz von kabellosen Quellen wie z.B.
Airplay/Streaming (WLAN) oder Bluetooth Audio Systemen: Sie können das kabellose
System nutzen und das CUBE/CUBE
automatisch, gemäß den zugespielten Audiosignalen.
Sound System aktiviert und deaktiviert sich
MINI NEO
6

Deutsch
Audio Konfigurationen
Verbindung zu analogen Audio-Geräten mit RCA- oder Klinken-Ausgangsbuchsen
Nutzen Sie zur Verbindung ein herkömmliches RCA-zu-RCA (Cinch-zu-Cinch) oder Klinke-zuKlinke Audiokabel und schließen dieses an die Eingänge LINE 1 oder LINE 2 auf der Rückseite
Ihres CUBE/CUBE
MINI NEO
an.
Die Eingangsempfindlichkeit des 3,5mm Stereo-Klinken-Eingangs LINE 1 ist für portable Geräte
wie Smartphones, MP3-Player o.ä. ausgelegt.
Die Eingangsempfindlichkeit des RCA (Cinch) Eingangs LINE 2 ist für höhere Linepegel
ausgelegt, wie sie bei HiFi-Geräten oder PCs üblich sind.
Falls Ihre Audioquelle über Netzspannung versorgt wird, wie z.B. bei Streaming-Geräten, so
können Sie den Netzanschluß auf der Rückseite Ihres CUBE/CUBE
MINI NEO
verwenden.
Verbindung zu digitalen Audio-Geräten mit S/P-DIF- Anschluß
Digitaler optischer Anschluß (S/P-DIF TOSLINK): Verwenden Sie ein genormtes optisches
Verbindungskabel und schließen dieses an den Eingang OPTICAL auf der Rückseite Ihres
CUBE/CUBE
zu beschädigen. Der optische Eingang des CUBE/CUBE
an. Bitte das optische Kabel niemals scharf knicken, um den Lichtleiter nicht
MINI NEO
unterstützt digitale PCM-
MINI NEO
STEREO-Signale mit bis zu 24 Bit / 96 kHz.
7

Deutsch
Bluetooth-Audio-Wiedergabe
Aktivieren Sie die Bluetooth (BT / ) Funktion Ihrer Audioquelle (z.B. Smartphone). Schalten
Sie CUBE/CUBE
mit dem Lautstärkeregler oder mit der IR-Fernbedienung ein. Wählen Sie
MINI NEO
die BLUETOOTH-Funktion durch mehrfaches kurzes Drücken des Reglerknopfes (oder
SOURCE auf der Fernbedienung), bis die blaue Anzeige für Bluetooth aufleuchtet oder blinkt.
1. CUBE/CUBE
bestätigt die Aktivierung der Bluetooth-Funktion: die BT-Anzeige-LED
MINI NEO
blinkt langsam.
Das BT-System ist zunächst nur mit der vorherigen Quelle verbindbar und für fremde
Quellen gesperrt!
Ist Ihre zuvor verwendete BT-Quelle verfügbar, so wird CUBE/CUBE
MINI NEO
die BT-
Verbindung sofort erneut herstellen. Die BT-Anzeige-LED leuchtet nun konstant. Sie können
die BT-Wiedergabe über CUBE/CUBE
2. BT-Suchphase: Ist keine vorherige BT-Quelle empfangbar, wird CUBE/CUBE
jetzt verwenden.
MINI NEO
MINI NEO
nach
einigen Sekunden neue BT-Quellen suchen; die LED blinkt dabei schnell.
Nur bei dieser Suchphase ist das BT-System für externe Geräte für ca. 2 min sichtbar und
kann neu gepaart werden.
Rufen Sie nun die Bluetooth-Suchfunktion in Ihrer BT-Quelle (z.B. Smartphone) auf. Nach
einem Moment wird “wm CUBE/CUBE mini“ in der BT-Geräteliste des Quellengerätes
erscheinen. Wählen Sie “wm CUBE/CUBE mini“ zur Verbindung (Pairing) aus. Ihre BT-Quelle
wird sich nun mit CUBE/CUBE
verbinden. Sobald das Pairing abgeschlossen ist,
MINI NEO
leuchtet die LED zur Bestätigung stetig blau.
Im Falle einer Unterbrechung der BT-Verbindung, durch Störsignale oder zu große Distanz, wird
die Wiedergabe gestoppt und die LED blinkt. Sobald die BT-Quelle wieder empfangbar ist, wird
die Wiedergabe fortgesetzt und die LED leuchtet stetig.
BT Sicherheit: Generell bietet Bluetooth eine hohe Betriebssicherheit und ist vor Fremdzugriffen
geschützt. Um ein „neues“ Gerät mit dem CUBE/CUBE
zu verbinden, wird es nach dem
MINI NEO
Aktivieren der Bluetooth-Funktion nur in der BT-Suchphase für andere BT-Geräte sichtbar und
kann dann mit einer neuen BT-Quelle gepaart werden. Nach ca. 2 Minuten wird die Suchphase
abgeschlossen und das System ist wieder gegen Fremdzugriffe gesperrt.
Zur Abschaltung der Bluetooth-Funktion wählen Sie durch Drücken des Eingangswahlschalters
des CUBE/CUBE
eine andere Quelle. Dadurch wird die eingebaute BT-Funktion
MINI NEO
vollständig deaktiviert.
Bluetooth-Wiedergabe vom PC: Bitte beachten Sie, daß zur Wiedergabe der Bluetooth-
Standard A2DP unterstützt werden muß. So ist es z.B. bei WINDOWS (TM) Betriebssystemen
erforderlich, MANUELL den Bluetooth-Treiber des Bluetooth-Geräteherstellers(!) zu installieren!
Der Windows-eigene Treiber aus der automatischen Treiberfunktion unterstützt BT Audio nicht!
Subwoofer-Ausgang
Der Subwoofer-Ausgang des CUBE/CUBE
erlaubt die Ansteuerung eines aktiven
MINI NEO
Subwoofers mit Line-Eingang und elektronischem Subwoofer-Filter, zur Erweiterung der
Klangwiedergabe im Bereich tiefster Frequenzen. Dieser Ausgang liefert das ungefilterte MonoSummensignal der aktuell wiedergegebenen Audioquelle, in Abhängigkeit von der
Lautstärkeregelung des CUBE/CUBE
CUBE/CUBE
müssen mit den Filtern und den Einstellmöglichkeiten eines
MINI NEO
. Klanganpassungen des Subwoofers an
MINI NEO
angeschlossenen aktiven Subwoofers durchgeführt werden.
8
Deutsch
Infrarot-Fernbedienung
CUBE/CUBE
bietet eine Infrarot Fernbedienung. Zusätzlich zu den Funktionen des
MINI NEO
Multifunktionsknopfes auf der Lautsprecherfront können mit der Infrarot-Fernbedienung weitere
Bedienfunktionen genutzt werden.
Batterien:
Bevor die IR Fernbedienung verwendet werden kann, sind die Batterien einzulegen.
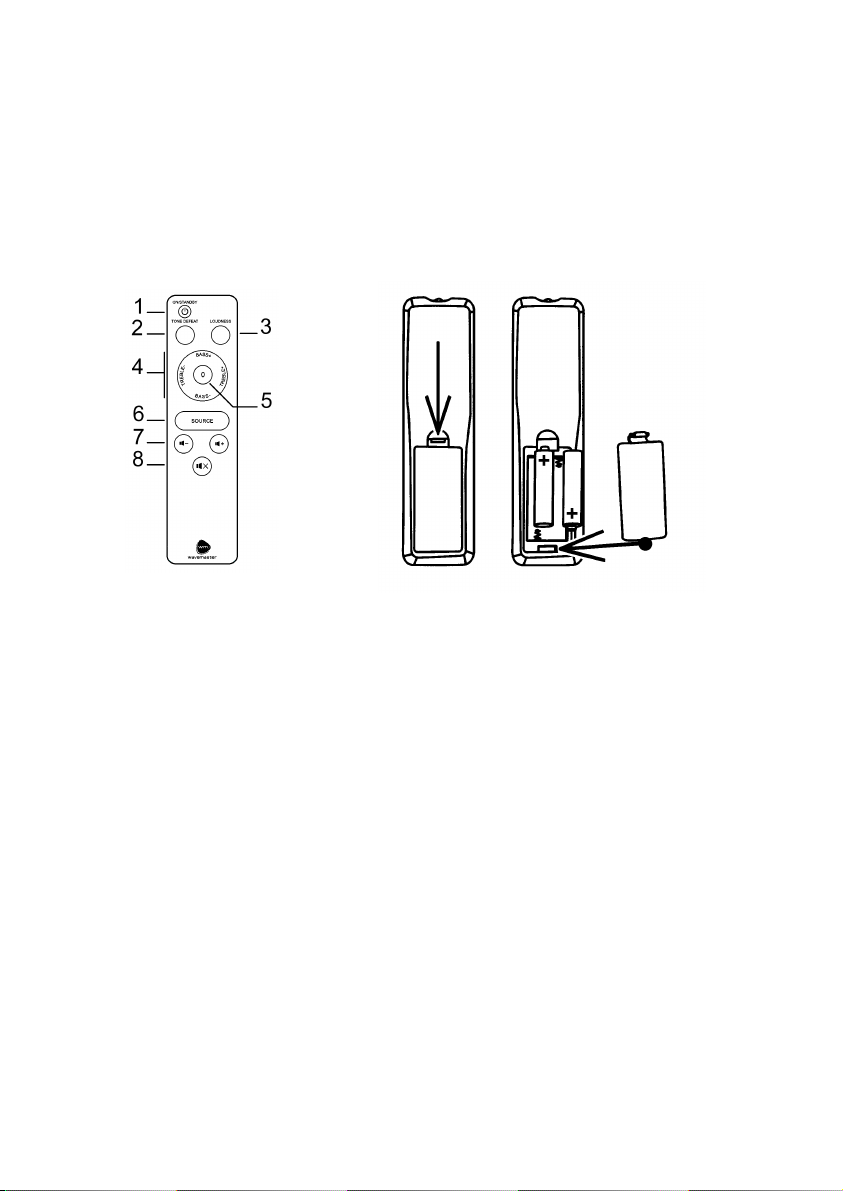
Das Batteriefach auf der Rückseite der Fernbedienung wird geöffnet, indem man den Griff des
Deckel-Rasthakens in Richtung des Deckels zieht und dann den Deckel heraushebt.
Setzen Sie die Batterien (2x Format AAA bzw. Mikro) gemäß der Markierung korrekt gepolt ein.
Falsch gepolte Batterien können zu einem Defekt führen. Mit falsch gepolten Batterien wird die
Fernbedienung nicht funktionieren.
Um das Batteriefach zu schließen zunächst den Haken unter dem Deckel einhängen und dann
auf der Seite des Rasthakens einrasten, so daß der Batteriefachdeckel sich wieder flach in den
Boden der Fernbedienung einfügt.
Vor längerem Nichtgebrauch der IR-Fernbedienung ist es zweckmäßig, die Batterien aus dem
Gehäuse zu entnehmen, um Schäden durch gealterte Batterien zu vermeiden.
Fernbedienungsfunktionen
• ON/STANDBY (1) Ein- und manuelles Ausschalten: das Gerät wird durch kurzen Druck
eingeschaltet oder manuell abgeschaltet.
Bitte beachten Sie, daß bei Anwendung der manuellen Ausschaltung die automatische
Einschaltung deaktiviert ist, das Gerät also nicht durch Musiksignale eingeschaltet werden
kann.
Um die automatische Ein- und Standby-Funktion zu nutzen, schalten Sie das CUBE/CUBE
Lautsprechersystem nicht manuell aus, sondern lassen es laufen, bis die
MINI NEO
automatische Standby-Schaltung es selbsttätig auf Standby schaltet. Voraussetzung dafür
ist, daß die Automatik mit dem Schalter AUTO-ON/STANDBY auf der Rückseite des
Lautsprechers auf ON eingestellt ist.
• TONE DEFEAT (2) Mit dieser Taste können Sie den mit den Tasten BASS und TREBLE
eingestellten Klang ein- oder ausschalten, ohne dabei die Klangeinstellung zu verlieren.
9

Deutsch
• LOUDNESS (3) Mit dieser Taste aktivieren Sie eine von der Stellung des Lautstärkereglers
abhängige Klangkorrektur, die den Verlust im Tieftonbereich bei niedrigen LautstärkereglerPositionen ausgleicht, aktivieren bzw. deaktivieren.
Achtung: die Loudness-Funktion hat bei hoher Lautstärke keine Auswirkung. Ob Loudness
ein- oder ausgeschaltet ist hören Sie am besten mit baßstarken Stücken bei niedriger
Lautstärkeregler-Position..
• BASS +/- und TREBLE +/- (4) Dies sind die Tasten für die Klangeinstellung Ihres
CUBE/CUBE
werden die Tiefen bzw. Höhen um 2 dB verändert.
. Sie können den Klang jeweils um +/- 5 Schritte variieren. Pro Schritt
MINI NEO
• Nulltaste 0 (5) Diese Taste gehört mit zur Klangregelung. Sie setzt die Klangeinstellung auf
die neutrale Nullposition zurück. Dabei hat die Nulltaste zwei Funktionen:
- Wird die Nulltaste kurz nach der Einstellung von BASS oder TREBLE gedrückt, so wird nur
diese eine Einstellung – also BASS oder TREBLE – auf Null gesetzt. So ist es möglich, die
Klangeinstellungen zu variieren bis man eine passende Einstellung gefunden hat, ohne
immer beide Klangregler neu einstellen zu müssen.
- Wenn Sie die Nulltaste drücken, ohne daß in den ca. 20 Sekunden zuvor eine
Klangregelung betätigt wurde, so werden beide Klangeinstellungen – also BASS und
TREBLE – gemeinsam zurückgesetzt.
• SOURCE (6) Mit dieser Taste wählen Sie den Eingang der Wiedergabequelle, identisch zu
der Eingangswahl mittels des Multifunktionsknopfes an der Lautsprecherfront.
• Lautstärke -/+ (7) Mit diesen Tasten können Sie die Wiedergabelautstärke einstellen,
identisch zur Drehfunktion des Multifunktionsknopfes an der Lautsprecherfront.
• MUTING (8) Mit dieser Taste können Sie die Wiedergabe stummschalten ohne die
Lautstärkeposition zu verändern. Zur Fortsetzung der Wiedergabe die MUTING-Taste erneut
drücken.
10

Deutsch
Technische Daten
• 2-Kanal 2-Wege Stereo Sound System
• 2 eingebaute Verstärkerkanäle
• BLUETOOTH Audio System für kabellose, digitale Signalübertragung (ab BT 2.1, A2DP,)
• Digitale TOSLINK- (optisch) Anschluß für Stereo-Signale bis zu 24 Bit / 96 kHz
• Digitale Audioverarbeitung mit hochwertigem, nativ 24/96-fähigem D/A-Wandler
• Line Eingänge mit Klinken- und RCA- (Cinch-) Buchsen sowie Cinch Subwooferausgang.
• Seidenkalotten Hochtöner 25mm, Zellulose-Konus Tieftöner CUBEMINI: 10cm, CUBE: 13cm
• Frontregler für LAUTSTÄRKE, EINGANGSWAHL und manuelle EIN/STANDBY-Schaltung
• Infrarot-Fernbedienung für alle Steuerfunktionen
• BASS/HÖHEN Klangregelung und schaltbare LOUDNESS-Funktion.
• Netz-Hauptschalter auf der Geräterückseite
• AUDIO SIGNAL SENSOR für Auto-EIN und Auto-STANDBY audiosignalabhängig
• Verbindung über Audiokabel, Digitalkabel oder Bluetooth-Audio-System
• Frequenzbereich: CUBEMINI: 55 - 22,000 Hz; CUBE: 45 - 22,000 Hz; S/N >95 dBA
• Verstärker-Ausgangsleistung (RMS): CUBEMINI: 2x 18W; CUBE: 2 x 25 W
• Netzspannung: 230/115 Volt ~, 50/60 Hz, Standby Power <0.5 W (230V)
• Abmessungen (BxHxT): CUBEMINI: 150 x 209 x 180 mm ; CUBE: 175 x 245 x 200 mm
• Systemanforderungen: analoge Stereoquelle mit RCA- oder Klinken-Anschlüssen oder digitale
Stereoquelle mit TOSLINK-Anschluß oder Bluetooth-Audio-System
CE - Erklärung
Wir erklären hiermit, dass das wavemaster CUBE/CUBE
mit den folgenden Normen bzw. normativen Dokumenten übereinstimmt:
EMC Direktive (2004/108/EC)
EMC: EN301 489-1 V1.9.2 & -17 V2.2.1, EN 55013: 2001 + A1: 2003 + A2: 2006,
EN 55020: 2007 + A11: 2011, EMF: EN 62479: 2010, RF: EN 300 328 V1.8.1
LVD Direktive (2006/95/EC)
LVD: EN60065: 2002 + A1: 2006 + A11: 2008 + A2: 2010 + A12: 2011, Erp: EU, EC 1275/2008
Dieser Erklärung liegen die Prüfberichte eines EMV - Labors zugrunde.
Alle Abbildungen und Texte wurden mit größter Sorgfalt bearbeitet. wavemaster kann jedoch für
fehlerhafte Angaben und daraus resultierende Folgen keinerlei Haftung übernehmen.
Technische Änderungen vorbehalten.
Durch starke Funkwellen (z.B. durch Mobiltelefone) kann es im normalen Betrieb zu
hörbaren Störungen kommen. Für die Dauer der Störungen empfehlen wir, die Lautstärke
des Gerätes mittels Lautstärke-Knopf zu reduzieren.
Sollten Sie spezielle Fragen zum Produkt haben, die diese vorliegende Anleitung nicht
beantworten kann, haben sie die Möglichkeit, auf unserer Homepage nähere Informationen zu
erhalten. Vielen Dank. www.wavemaster.eu
Lautsprechersystem
MINI NEO
Das Gerät darf nicht mit dem Siedlungsabfall (Hausmüll) entsorgt
werden. Dieses Gerät ist entsprechend der europäischen Richtlinie
2002/96/EG über Elektro- und Elektronik-Altgeräte (waste electrical
and electronic equipment - WEEE) gekennzeichnet. Die Richtlinie
gibt den Rahmen für eine EU-weit gültige Rücknahme und
Verwertung der Altgeräte vor. Für die Rückgabe Ihres Altgeräts
nutzen Sie bitte die Ihnen zur Verfügung stehenden Rückgabe- und
Sammelsysteme.
11

12

English
User Manual
Dear User,
we are pleased that you have chosen the CUBE/CUBE
wavemaster and congratulate you on this choice.
With this wavemaster CUBE/CUBE
that is in equal measure attractive and of high quality. We are sure that this product will provide
useful service and a lot of fun to you over the coming years.
... Your wavemaster Team!
After unpacking
After unpacking you should first check that the contents are complete. In addition to this
instruction manual there should be:
2 Speaker boxes
1 Power cable
1 Infrared remote control
2 AAA Batteries
1 Speaker cable with stripped ends
1 Audio connection cable 2 x RCA plug -> 3.5 mm stereo mini phono plug
you have acquired a modern piece of audio technology
MINI NEO
loudspeaker system from
MINI NEO
13

English
Advice on location, care and safety
• Connect the audio input to the line-out, non amplified output. Avoid connection to the
speaker-out jack of your sound source. The amplified signal from the speaker-out may cause
unnecessary distortion and may damage the speaker-circuit.
• To connect your sound-system with power supply system, please make sure to have a mains
socket close to your sound-system.
• Before mains connections, check your mains power system to be appropriate to the
CUBE/CUBE
the VOLTAGE SELECTOR of your CUBE/CUBE
can verify the actual setting of the mains voltage easily. Attention: if the mains voltage is set
wrong, the device may become defective! Always set the correct mains voltage to avoid
defects!
. The mains voltage (230V or 115V) of your power system you can set by
MINI NEO
(beside the POWER switch) and you
MINI NEO
• If the sound-system is not in use for a longer period of time, be sure that your system is
disconnected from mains power.
• Do not use alcohol, benzene, thinner or acids to clean the cabinet.
• Do not place your sound-system near radiators, airconditioning or radio-controlled systems.
• Avoid leaving the sound-system in permanent strain such as direct sunlight, extreme moist or
dryness, exceptional cold or heat, mechanical vibrations or shock.
• Do not open the cabinet, contact qualified personnel only.
• For service staff: Never open cabinet, when speaker system is connected to 110-240 V
AC power supply system.
• CAUTION!! Power ON / STANDBY switch does not separate mains power!
• Deliberate harm to the equipment is not covered by the guarantee.
• Please contact your dealer in case of technical problems.
14

Assembly and operation
English
Assembly and operation of your CUBE/CUBE
connections are shown in the following drawing.
Please connect all components only when the mains power switch is switched OFF.
speaker system is very easy to do. General
MINI NEO
• Place the speakers at their target area and start connecting.
• First, connect the left speaker to the right speaker by the speaker cable. The gold-plated
binding posts can be turned and the stripped cable ends shall be fitted to connect red to red
and black to black. Turn the binding posts tight by hand, so that the cables can achieve a
good connection from the output of the right speaker (active) to the left speaker (passive).
• Please care to avoid short circuits between red and black connectors, not to cause
malfunctions or defects!
• Connect the input socket on the back of your CUBE/CUBE
to your audio sources.
MINI NEO
• The LINE 1 phono socket input is prepared for devices with lower Line signal level, like
portable MP3-player, smartphones etc.
• The RCA sockets LINE 2 are prepared for audio devices with standard Line signal level, e.g.
PC or stationary HiFi devices.
• The optical TOSLINK input socket can receive digital PCM stereo signals.
15

English
• The multifunction knob at the front of the right CUBE/CUBE
and turning function. This knob controls the basic functions of your CUBE/CUBE
speaker box offers push
MINI NEO
MINI NEO
:
1. ON and manually OFF: a short push powers ON the device, manually OFF can be
forced by a longer push (>2s) on the knob.
If manually set OFF a static red LED will confirm this.
In case of automatic standby, this will be visible through a slowly blinking red LED.
2. VOLUME control: if the device is ON, by turning the knob, the volume can be increased
or decreased.
After switching OFF and ON, the previous volume setting is recovered.
3. Sequencial input selection (short push on the knob when the device is ON):
Input Socket Indication Colour Signal Source, Format
LINE 1 Phono Socket
3.5mm stereo
green Smartphone, MP3-Player,
lower level, apprx. 500mV
LINE 2 RCA L, R white PC, stationary HiFi
standard level max. 2000mV
Bluetooth - blue Bluetooth Audio A2DP
Digital optical S/P-DIF TOSLINK orange PCM max. 24 Bit / 96 kHz
• Before mains connections, check your mains power system to be appropriate to the
CUBE/CUBE
MINI NEO
.
• Connect the mains cable to the mains input socket and the wall socket plug connect to your
mains supply.
• Switch on the main switch on the back.
• ON/STANDBY, source selection as well as volume you can control with the multifunction
knob on the front of the right speaker box of your CUBE/CUBE
Sound System.
MINI NEO
• The same and further settings like BASS, TREBLE, DEFEAT, LOUDNESS, and MUTING
can be controlled by the infrared (IR) remote control.
Note: If you emphasize the bass control too much, the maximum total volume will be limited
since the woofer may run at overstroke earlier. Please care not to overstroke the woofer too
much (audible distortions) since this can reduce the life-span of the woofers!
• AUDIO SIGNAL SENSING: if the input signal is very low or off for more than 10 minutes, the
audio signal sensing automatically switches to STANDBY. Once there is an audio signal, the
audio signal sensing automatically switches ON again!
This technology is beneficial with many sources, especially with any kind of wireless sources
such as Airplay (WLAN) or Bluetooth audio systems: you can operate the wireless audio
source and the speaker system activates or deactivates according to the provided audio
signals.
16

English
Audio Configurations
Connection to analogue audio sources with RCA- or phono connector outputs
To connect with conventional stereo use RCA-to-RCA or phono-to-phono audio cables and
connect it to the LINE 1 or LINE 2 inputs on the back of your CUBE/CUBE
MINI NEO
.
The input sensitivity of the 3.5mm phono socket LINE 1 is prepared for portable devices like
smartphones, MP3-player etc.
The input sensitivity of the RCA input LINE 2 is prepared for high (standard) line levels, as
provided by stationary HiFi or PC.
If your audio source is mains powered, like streaming devices, you can connect it to the mains
socket on the back of your CUBE/CUBE
MINI NEO
.
Connection to digital audio sources with S/P-DIF connectors
Digital optical socket (S/P-DIF TOSLINK): employ a standard optical cable and connect it to
the OPTICAL input on the back of your CUBE/CUBE
. Please remember to never bend
MINI NEO
the optical cable in a small or sharp angle, to avoid damage of the optical fibre! The optical input
of CUBE/CUBE
supports digital PCM STEREO signals up to 24 Bit / 96 kHz.
MINI NEO
17

English
Bluetooth Audio Playback
Activate the Bluetooth (BT / ) function of your audio source (e.g. your smartphone). Switch on
CUBE/CUBE
by pushing on the volume knob or the IR remote POWER button. Select BT
MINI NEO
by short pushing the volume knob (SOURCE on IR remote) until reaching the BT position (blue
colour indication).
1. CUBE/CUBE
confirms the activation of its Bluetooth function through slow flashing the
MINI NEO
BT control LED.
The BT system first tries to re-connect with previous BT source and is protected against any
other device at this moment!
In case an earlier connected BT source is available, CUBE/CUBE
will instantly connect
MINI NEO
to that BT source again. When connected, the BT control LED lights constantly. Now you can
start BT playback through CUBE/CUBE
2. In case no prior connected source is available, after few seconds, CUBE/CUBE
MINI NEO
.
will
MINI NEO
search for new BT sources. This action will be confirmed by quick flashing of the BT control
LED.
Just during this search phase the BT system is visible to other devices for apprx. 2 minutes
and can be paired to a new source
Now start the Bluetooth search function of your BT souce (e.g. smartphone). After a moment,
you can find “wm CUBE mini“ resp. “wm CUBE“ in the BT devices list of your BT source.
Select it for pairing. Your BT source will now pair with CUBE/CUBE
procedure is finished the CUBE/CUBE
blue BT control LED lights constantly.
MINI NEO
. Once the pairing
MINI NEO
When the BT connection is interrupted through foreign signals interference or by too long
distance, playback will be stopped and the BT control LED shows flashing light. Once the BT
source can be received again, playback continues and the BT control LED lights constant again.
BT safety: Bluetooth offers a high safety and is protected against foreign access. To connect
CUBE/CUBE
to a new BT source, after activating the BT function, it will be visible to other
MINI NEO
BT sources only during the BT search phase and can be paired to a new BT source. After apprx.
2 minutes the search phase is ended and the system will be protected against foreign access
again.
To switch off the Bluetooth function select any other input source. This will completely deactivate
the built-in BT function.
Bluetooth playback from PC: please note, for audio playback, the source device need to
support the Bluetooth standard A2DP. In case of e.g. WINDOWS (TM) operating systems, it is
inevitable to MANUALLY install the Bluetooth driver of the Bluetooth device maker! The Windows
internal driver by the automatic driver installation is not suitable to support A2DP BT audio!
Subwoofer Output
The subwoofer output of CUBE/CUBE
offers the connection to a active subwoofer with line
MINI NEO
input and electronic subwoofer filters, to extend the system playback at the range of lowest
frequencies. This output provides the non-filtered mono summary signal of the actual playback
source, in dependance from CUBE/CUBE
match the subwoofer with CUBE/CUBE
MINI NEO
's volume control. All sound adjustments to
MINI NEO
need to be set by using the filters and other
controls of a connected active subwoofer .
18

English
Infrared (IR) remote control
CUBE/CUBE
offers infrared remote control function. Beside the multifunktion knob's
MINI NEO
features, there are a lot more functions to be controlled by the infrared remote control.
Batteries:
Before operation of the IR remote control, the batteries need to be installed.
The battery compartment can be opened by pushing the clip hook's handle in direction to the
battery cover and pulling out the battery cover.
Insert the batteries (2 x AAA batteries) with their polarity according to the markings in the battery
compartment. Wrong polarity can cause a defect! With wrong polarity of the batteries, there can
be no function of the remote control!
To close the battery cover, first insert the hook below it and clip-in the clip hook until you can see
the cover is flush with the cabinet bottom side.
If you plan not to use the IR remote control for a longer time, it will be recommended to remove
the batteries to avoid any damage by aged batteries.
IR remote control functions:
• ON/STANDBY (1) if the device is off, short push this button to power ON and manually force
OFF.
Please note: if you manually force the device OFF the automatic power-ON will be
deactivated, so the device cannot power-ON automatically by audio signals!
To utilize the automatic ON and STANDBY function, there is no need to power-OFF your
CUBE/CUBE
manually but simply keep it ON. The automatic STANDBY function will
MINI NEO
power-down (STANDBY) for you. Prerequisite is the switch AUTO-ON/STANDBY on the
speaker's backside is set to ON.
• TONE DEFEAT (2) With this button the sound effect set by tone controls BASS and
TREBLE can be deactivated and activated again, without losing the settings.
19

English
• LOUDNESS (3) With this button, you can activate/deactivate a physiological sound
correction to compensate the loss of low frequency range at low volume listening. The effect
strength of the LOUDNESS correction accordingly is dependant from the actual volume
control's setting.
Attention: the Loudness function has no effect at high volume. Whether the Loudness is
activated or deactivated can be heard best with a bass-strong track at a low position of the
volume knob.
• BASS +/- and TREBLE +/- (4) This are the buttons to individually control the sound of your
CUBE/CUBE
or high levels by 2 dB.
. You can change the sound by each +/- 5 steps. Each step changes low
MINI NEO
• Zero button 0 (5) This button is part of the sound control setting concept. It can reset the
sound settings back to a neutral zero position. The 0 button has two functions:
- If you push the 0 button (within 20 seconds) right after setting of BASS or TREBLE
controls, it will just set to zero the last controlled function – means: BASS or TREBLE will be
set to zero. By this feature it will be possible to control the sound until the best setting is
found, without re-setting both sound controls each time.
- If you push the 0 button without having operated any sound setting buttons before (within
the last 20 seconds), both sound settings – means: BASS and TREBLE – will be reset to
zero.
• SOURCE (6) With this button you can select the playback source, same way as the push
function of the multifunction knob on the speaker front. .
• Volume -/+ (7) With these buttons you can increase (+) or decrease (-) the playback volume,
same way as by the turning function of the multifunktion knob on the speaker front.
• MUTING (8) This button can mute the playback without changing the volume setting
position. To unmute and continue the playback, push the MUTING button again.
20

English
Specifications
• 2 channel 2-way stereo sound system
• 2 built-in amplifier channels
• BLUETOOTH Audio System for wireless digital transmission (BT 2.1 or above, A2DP)
• Digital TOSLINK (optical) input for stereo signals up to 24 bit / 96 kHz
• Digital audio processing with high resolution native 24/96-able D/A converter
• Line input terminals by mini phono and RCA sockets and RCA subwoofer output
• Silk dome tweeters 25mm (1”), Cellulose cone woofer CUBEMINI: 10cm, CUBE: 13cm
• Front control for VOLUME, INPUT SELECTION and ON/STANDBY manual switching
• Infrared (IR) remote control for all control functions
• BASS/TREBLE sound controls and switchable LOUDNESS function
• Mains power switch on the back
• AUDIO SIGNAL SENSING for auto-on and auto-standby depending from input signals
• Connections by audio cables, digital cables or wireless by Bluetooth Audio System
• Frequency range: CUBEMINI: 55 - 22,000 Hz; CUBE: 45 - 22,000 Hz; S/N >95 dBA
• Amplifier output power (RMS): CUBEMINI: 2x 18W; CUBE: 2 x 25 W
• Mains tension: 230/115 Volts ~, 50/60 Hz, standby power <0.5 W (230V)
• Dimensions (WxHxD): CUBEMINI: 150 x 209 x 180 mm ; CUBE: 175 x 245 x 200 mm
• System requirements: analogue stereo source with RCA or mini phono terminals or digital
stereo source with TOSLINK connector or Bluetooth Audio System
CE - Declaration of conformity
We herewith declare, that the wavemaster CUBE/CUBE
complies with the following standards or normative documents:
EMC Directive (2004/108/EC)
EMC: EN301 489-1 V1.9.2 & -17 V2.2.1, EN 55013: 2001 + A1: 2003 + A2: 2006,
EN 55020: 2007 + A11: 2011, EMF: EN 62479: 2010, RF: EN 300 328 V1.8.1
LVD Directive (2006/95/EC)
LVD: EN60065: 2002 + A1: 2006 + A11: 2008 + A2: 2010 + A12: 2011, Erp: EU, EC 1275/2008
This statement is based on the test reports of an EMC laboratory.
All texts and illustrations were produced with greatest care. wavemaster cannot however accept
any legal or other responsibility for any remaining incorrect information and its consequences.
Subject to change without further notice.
In case there is audible noise, possibly caused by strong radio waves (e.g. by mobile
phones) we recommend to turn down the volume control of the unit.
If you have special questions to the product and cannot find a solution in this introduction, you
can look for more informations at our homepage. Thank you!
www.wavemaster.eu
active speaker system
MINI NEO
The device may not be disposed of with household rubbish. This
appliance is labelled in accordance with European Directive
2002/96/EG concerning used electrical and electronic appliances
(waste electrical and electronic equipment - WEEE).
The guideline determines the framework for the return and recycling
of used appliances as applicable throughout the EU. To return your
used device, please use the return and collection systems available
to you.
21

22

Francais
Mode d'emploi
Cher utilisateur,
Vous avez opté pour le kit stéréo CUBE/CUBE
heureux de vous compter parmi nos clients.
Lorsque vous avez fait l’acquisition du kit stéréo CUBE/CUBE
matériel audio de haute technologie à la fois séduisant et de haute qualité. Nous sommes persuadés que ce
produit saura se montrer utile et vous procurera du plaisir dans les années à venir.
L’équipe wavemaster
Après avoir déballé le produit
Assurez-vous que la boîte contient l’intégralité des accessoires. En plus de ce manuel, vous
devriez trouver :
2 Haut-parleurs
1 Câble d’alimentation
1 Télécommande Infrarouge (IR)
2 Piles AAA
1 Câble de haut-parleurs avec extrémités dénudées
1 Câble stéréo 2 x connecteur Cinch (RCA) -> connecteur stéréo de 3,5 mm
de wavemaster. Nous vous félicitons et sommes
MINI NEO
, vous avez fait le choix d’un
MINI NEO
23

Francais
Consignes d’utilisation et de sécurité
• Raccorder la prise audio à la sortie non amplifiée. Veillez à ne pas la raccorder à la sortie
speaker de votre source audio. Le signal amplifié émis par la sortie speaker risque de causer
des distorsions indésirables et d’endommager les circuits de votre kit stéréo.
• Afin d’alimenter votre kit stéréo, assurez-vous de l’installer près d’une prise électrique.
• Avant d’effectuer les branchements sur l’alimentation, vérifiez que votre alimentation est
compatible avec CUBE/CUBE
réglée grâce à l’interrupteur (situé à côté de l’interrupteur de mise en marche). Vous pourrez
vérifier facilement le réglage. Attention : si le réglage n’est pas conforme, l’appareil peut être
endommagé et ne plus fonctionner. Veillez à utiliser les bons réglages pour éviter les
pannes.
. La tension du système (230V ou 115V) peut être
MINI NEO
• Si vous n’utilisez pas votre kit stéréo pendant une période de temps prolongée, veillez à le
débrancher de l’alimentation.
• Veillez à ne pas utiliser d’alcool, de benzène, de dissolvant ou d’acide pour nettoyer les haut-
parleurs.
• Veillez à ne pas installer votre kit stéréo près d’un radiateur, d’un climatiseur ou d’un appareil
radio commandé.
• Veillez à ne pas exposer le kit stéréo directement aux rayons du soleil, à une humidité
extrême ou un environnement trop sec, à des vibrations mécaniques ou à des chocs.
• N’ouvrez pas les haut-parleurs, contactez le personnel qualifié.
• A l’attention du personnel: N’ouvrez pas les haut-parleurs lorsque le système est
branché à l’alimentation 110-240 V AC.
• ATTENTION!! L’interrupteur ON/STANDBY (veille) ne déconnecte pas l’appareil de
l’alimentation!
• La garantie ne couvre pas les dommages occasionnés volontairement au système.
• En cas de problème technique, contactez votre revendeur.
24

Francais
Assemblage et fonctionnement
L’assemblage et le fonctionnement du kit stéréo CUBE/CUBE
est extrêmement simple.
MINI NEO
Veuillez trouver les connexions disponibles sur les dessins suivants.
Ne branchez les composants que lorsque l’interrupteur est en position OFF.
• Installez les haut-parleurs à l’endroit où vous les voulez et commencez les branchements.
• Tout d’abord, connectez les deux haut-parleurs avec le câble adéquat. Dévissez les attaches
dorées et insérez les extrémités dénudées des câbles, rouge sur rouge, noir sur noir.
Revissez les attaches fermement à la main afin que les câbles soient bien connectés de la
sortie du haut-parleur droit (actif) à celle du haut-parleur gauche (passif).
Veillez à ne pas créer de court circuits entre les connexions rouges et noires afin
d’éviter les défaillances et les pannes.
• Connectez les prises d’entrées sur la face arrière de votre CUBE/CUBE
à votre source
MINI NEO
audio
• La prise LINE 1 phono est prévue pour des appareil ayant un signal de ligne moins haut
comme un lecteur MP3, un smartphones etc…
• Les prises RCA LINE 2 sont prévues pour les appareils ayant un niveau de signal standard,
soit des PC ou appareils Hi-Fi fixes.
• La prise optique TOSLINK (OPTICAL) peut recevoir des signaux STEREO digitaux PCM.
25

Francais
• Le bouton circulaire multifonction sur la façade du CUBE/CUBE
peut se tourner et se
MINI NEO
faire enfoncer par pression. Ce bouton permet de contrôler les fonctions principales de votre
CUBE/CUBE
MINI NEO
:
1. ON et OFF manuels : un appui court sur le bouton permet d’allumer l’appareil tandis
qu’un appui long (>2s) l’éteindra. Si l’appareil est éteint manuellement une LED statique
rouge le confirmera ; en cas de veille automatique, la LED clignotera lentement de la
même couleur.
2. Contrôle du volume : Si l’appareil est allumé, le volume peut être baissé ou augmenté
par une rotation du bouton. Au prochain allumage le volume seléctionné sera conservé.
3. Choix de la source sonore (appui rapide quand l’appareil est allumé) :
SOURCE Prise Couleur
Signal Source, Format
indicative
LIGNE 1 Jack
3.5mm stéréo
Vert Smartphone, Lecteur MP3, Signal bas
niveau, approximativement 500mV
LIGNE 2 RCA L, R Blanc PC, Hifi stationnaire niveau standard
max. 2000mV
Bluetooth - Bleu Bluetooth Audio A2DP
Digitale Optique S/P-DIF TOSLINK Orange PCM max. 24 Bit / 96 kHz
• Avant d’effectuer les branchements sur l’alimentation, vérifiez que votre alimentation est
compatible avec CUBE/CUBE
MINI NEO
.
• Branchez les câbles d’alimentations dans les sorties prévues à cet effet sur votre système et
à votre source d’alimentation.
• Activez l’interrupteur principal à l’arrière (POWER).
• Marche/veille, sélection de la source, ainsi que le volume vous pouvez contrôler avec la
molette multifonction sur le devant de la boîte de haut-parleur de votre système de son
CUBE/CUBE
MINI NEO
.
• Les paramètres mêmes et autres comme BASS, TREBLE, DEFEAT, LOUDNESS et
MUTING peuvent être contrôlé par la télécommande à infrarouge (IR).
Note : Si vous réglez les basses trop fortes, le volume maximal sera diminué car il se peut
que le woofer fonctionne en surrégime. Evitez de faire fonctionner votre woofer en surrégime
(statut détectable grâce aux distorsions audibles du woofer) car cela diminuera sa durée de
vie.
• Système de DETECTION DE SIGNAL AUDIO : Si le signal d’entrée est très faible ou
inexistant pendant plus de 10 minutes, le système de détection de signal audio basculera
automatiquement le système en veille. Dès qu’un signal audio est capté, le système de
détection de signal audio allumera de nouveau les haut-parleurs.
Cette technologie fonctionne avec de nombreuses de sources différentes, particulièrement
avec les sources sans fil comme Airplay (WLAN) ou les systèmes audio Bluetooth ; utilisez
les sources audio sans fil et les haut-parleurs s’activeront ou se désactiveront en fonction du
signal audio.
26

Francais
Configuration Audio
Connexion à une source audio analogique via RCA ou cable jack 3.5mm
Pour vous connecter en stéréo conventionnel utilisez un câble RCA vers RCA ou jack 3.5mm
vers 3.5mm et connectez-le à la prise LINE 1 ou à la prise LINE 2 au dos de votre CUBE/CUBE
MINI NEO
La prise stéréo 3.5mm LINE 1 est préparée pour l’accueil d’appareils portables tels que les
smartphones, lecteurs MP3, etc…
La prise RCA, LINE 2 elle est davantage disposée à accueillir des lignes d’entrées de plus haut
standard tels que les chaînes Hifi stationnaires ou les PC
Si votre source audio doit être alimentée, comme pour un appareil de streaming vous pouvez la
connecter à la prise disponible au dos de votre CUBE/CUBE
MINI NEO
Connexion aux sources audio digitales avec prise S/P-DIF
Prise digitale optique (S/P-DIF TOSLINK) : utilisez un câble optique standard et connectez-le
sur la prise OPTICAL au dos de votre CUBE/CUBE
. Veuillez retenir qu’il ne faut jamais
MINI NEO
plier le câble optique suivant de petits angles ou angles aigus pour éviter de lui causer des
dommages. La prise optique du CUBE/CUBE
supporte les signaux digitaux PCM jusqu’à
MINI NEO
24 Bit / 96 kHz
27

Francais
Utilisation avec des sources connectées via Bluetooth
Activez le Bluetooth (BT / ) sur votre périphérique (ex. votre smartphone). Mettez en marche
votre CUBE/CUBE
en appuyant sur le bouton de volume de l’appareil ou le bouton
MINI NEO
POWER sur la télécommande Sélectionnez BT par courts répétés en poussant le bouton de
volume (SOURCE sur la télécommande IR) jusqu'à atteindre la fonction de BT (indication de
couleur bleue).
1. CUBE/CUBE
confirme l’activation de son module Bluetooth par le clignotement de la
MINI NEO
LED. Si une source Bluetooth précédemment connectée est disponible, votre
CUBE/CUBE mini s’y connectera automatiquement. Une fois connecté, la LED éclaire en
permanence. Vous pouvez alors écouter votre musique.
Le BT essaie systématiquement de se reconnecter au dernier élément appareillé et ainsi est
protégé de tout autre source pendant ce temps-là.
2. Si aucune source précédemment connectée n’est disponible votre CUBE/CUBE
MINI NEO
se
mettra en recherche de nouveaux périphériques Bluetooth à portée, la LED clignote en plus
vitesse. Après quelques secondes vous verrez apparaitre « wm CUBE mini » ou « wm CUBE »
dans la liste des périphériques Bluetooth disponibles. Cliquez dessus pour procéder à
l’appairage. Une fois l’appairage terminé votre CUBE/CUBE
émettra, la LED éclairera
MINI NEO
en permanence.
L’appareil sera disponible à l’appareillage uniquement pendant cette phase de recherche
pendant approximativement 2 minutes
Lorsque la connexion Bluetooth est interrompue par des interférences ou par un éloignement
trop important de la source, le streaming s’arrête et la LED de votre CUBE/CUBE
MINI NEO
se met à
clignoter. Une fois les interférences terminées ou la source de nouveau à portée, le streaming
reprend et la LED redevient fixe.
Sécurité Bluetooth : Le BT est sécurisé contre les accès étrangers. Après avoir activé le BT sur
l’enceinte CUBE/CUBE
vous avez seulement 2 minutes approximativement pour y
MINI NEO
appairer un nouvel appareil après quoi il ne sera plus possible de s’y connecter pour un appareil
étranger
Pour désactiver le Bluetooth fonction sélectionner une autre source d’entrée. Cela coupera
intégralement la fonction Bluetooth du produit.
Lecture BT depuis un PC : Notez que pour la lecture audio l’appareil sélectionné doit supporter
la norme BT A2DP, en cas de connexion via un appareil WINDOWS (tm) il est inévitable de
devoir installer les pilotes « Fabricant de dispositif Bluetooth ! » manuellement, le pilote interne
de chez WINDOWS puisque les pilotes natifs ne supportent pas le BT audio A2DP
Sortie de caisson de basses / subwoofer
La sortie subwoofer de CUBE/CUBE
offre la connexion à un caisson de graves actif
MINI NEO
(amplifié) avec entrée ligne et filtres électroniques de caisson de basses, pour prolonger la
lecture du système à la gamme des fréquences les plus basses. Cette sortie fournit le signal de
la source de lecture réelle, non filtrée et résumé en mono, en dépendance de commande de
volume de CUBE/CUBE
avec CUBE/CUBE
MINI NEO
. Tous les réglages sonores pour faire correspondre le subwoofer
MINI NEO
doivent être définis en utilisant les filtres et les autres contrôles d’un
subwoofer connecté.
28

Francais
Télécommande InfraRouge (IR)
Le CUBE/CUBE
propose une télécommande sans-fil infrarouge. Outre les fonctions que le
MINI NEO
bouton rond multifonction propose, il y a de nombreuses autres fonctionnalités contrôlées par la
télécommande IR.
Batterie :
Avant d’utiliser la télécommande IR les piles doivent être mises en place.
Le compartiment des piles peut être ouvert en poussant vers le bas la patte du cache de piles.
Insérez les piles (2x piles AAA) en respectant la polarité dans le correspondant. Un non-respect
des polarités peut provoquer un dysfonctionnement. Sans respect de la polarité la télécommande
ne pourra pas fonctionner.
Si vous prévoyez de ne pas utiliser la télécommande pendant un certain temps, il est
recommandé d’enlever les piles de la télécommande afin d’éviter tout dommage causé par des
piles usagées.
Fonctions de la télécommande IR :
• ON/VEILLE (1) Si l’appareil est éteint, appuyez brièvement sur ce bouton pour l’allumer,
vous pouvez également forcer l’extinction.
Veuillez noter : Si vous forcez l’extinction de l’appareil, la fonction d’allumage automatique
par détection du signal sera désactivée.
Pour utiliser la fonction automatique ON et VEILLE il suffit de ne pas éteindre l’appareil et de
le laisser passer en mode veille tout seul au bout de quelque instants ans utilisation. Il faut
avant ça que le switch AUTO-ON/STANDBY à l’arrière de l’enceinte principale soit en mode
ON
• TONE DEFEAT (2) Ce bouton permet de désactiver les effets des réglages des basses et
des aigus en les conservant au même niveau.
• LOUDNESS (3) Ce bouton permet d’activer/ désactiver la correction automatique des
niveaux de son dû aux pertes de fréquence à bas volume d’écoute. L’effet du bouton
LOUDNESS dépend du volume d’écoute.
ATTENTION : la fonction Loudness n’a aucun effet à volume élevé. Si le niveau sonore est
activé ou désactivé on peut entendre mieux avec une piste basse-forte à une position de
bouton de faible volume.
29

Francais
• BASS +/- et TREBLE +/- (4) BASSES et AIGUS Ce sont les boutons qui permettent de
régler indépendamment le son de votre CUBE/CUBE
niveaux qui permettent de monter et descendre les niveaux de 2dB.
. Chaque élément possède 5
MINI NEO
• Le bouton zéro 0 (5) Ce bouton fait partie des réglages du son. Il permet de remettre à
zéro tous les réglages pour revenir à une position neutre 0. Le bouton 0 a deux fonctions :
- Si vous appuyez sur la touche 0 dans les 20 secondes suivant une modification des aigus
et basses cela remettra à 0 uniquement la dernière variable touchée, ce qui signifie que
seules les basses OU les aigus seront réinitialisées. Grâce à ceci vous pourrez optimiser au
mieux vos réglages sonores sans réinitialiser systématiquement les deux contrôles sonores.
- Si vous appuyez sur la touche 0 sans avoir effectué de réglages préalables dans les 20
secondes précédentes, les deux contrôles sonores BASSES ET AIGUS seront réinitialisés
ensembles.
• SOURCE (6) Ce bouton vous permet de choisir la source à lire, de la même manière que
sur le bouton rond multifonction à l’avant de l’enceinte principale.
• Volume +/- (7) Avec ces boutons vous pouvez augmenter (+) ou baisser (-) le volume de
lecture, de la même manière que sur le bouton rond multifonction à l’avant de l’enceinte
principale.
• MUTING (8) Ce bouton permet de couper le son sans avoir besoin de modifier le réglage de
volume sonore. Pour annuler cela il suffit de ré-appuyer sur le bouton MUTING.
30

Francais
Spécifications
• Kit audio stéréo 2 voies
• 2 canaux d‘amplificateurs intégrés
• Module BLUETOOTH intégré pour streaming audio (Compatible BT 2.1 et plus, A2DP)
• TOSLINK digital entrée optique pour signaux stéréo jusqu’à 24 bit / 96 kHz
• Audio numérique avec convertisseur D/A de haute résolution native capables 24/96
• Prises jack 3,5mm et RCA pour les entrees et RCA pour la sortie subwoofer
• Haut-parleur d’aigu en soie 25mm, woofer cône en Cellulose CUBE MINI: 10cm CUBE: 13cm
• Réglage du VOLUME, SELECTEUR DES ENTREES et INTERRUPTEUR manuelle de veille en façade
• Télécommande à infrarouge (IR) pour tous les réglages
• Commandes audio BASS/TREBLE et des fonction LOUDNESS commutable
• Interrupteur à l’arrière
• Système de DETECTION DU SIGNAL AUDIO pour une mise en marche/veille automatique en fonction du
signal audio
• Connexion par les câbles audio, cables numérique ou par système Bluetooth audio
• Bande de fréquence : CUBEMINI: 55 - 22,000 Hz; CUBE: 45 - 22,000 Hz; S/N >95 dBA,
• Puissance (RMS): CUBEMINI: 2 x 18 W; CUBE: 2 x 25 W
• Tension : 230/115 Volts ~, 50/60 Hz, consommation en veille <0.5 W (230V)
• Dimensions (LxHxP) : CUBEMINI: 150 x 209 x 180 mm ; CUBE: 175 x 245 x 200 mm
• Configuration requise : source stéréo analogique RCA ou bornes mini phono ou source stéréo numérique
avec connecteur TOSLINK ou Bluetooth Audio système
Déclaration de la CE
Nous déclarons par ce présent document que le produit wavemaster CUBE/CUBE
LVD: EN60065: 2002 + A1: 2006 + A11: 2008 + A2: 2010 + A12: 2011, Erp: EU, EC 1275/2008
Toutes les figures et tous les textes ont été élaborés avec la plus grande minutie. Toutefois,
wavemaster ne pourra assumer aucune responsabilité pour des indications erronées, ni pour les
conséquences qui en résultent.
Sous réserve de modifications techniques.
Des ondes radio puissantes (provenant par exemple des téléphones portables) peuvent
provoquer des parasites audibles pendant le fonctionnement normal. Nous
recommandons de réduire le volume sonore de l’appareil avec le bouton de réglage du
volume sonore pendant tout le temps où les parasites persistent.
Si vous avez des questions concernant le produit et auxquelles cette présente notice ne peut
fournir aucune réponse, vous pouvez obtenir des informations plus détaillées en nous rendant
visite sur notre page d'accueil. Merci beaucoup. www.wavemaster.eu
Sound System correspond aux normes ou éléments normatifs suivants:
EMC: EN301 489-1 V1.9.2 & -17 V2.2.1, EN 55013: 2001 + A1: 2003 + A2: 2006,
Directive de compatibilité électromagnétique (2004/108/EC)
EN 55020: 2007 + A11: 2011, EMF: EN 62479: 2010, RF: EN 300 328 V1.8.1
Cette déclaration se base sur les rapports d'examen
d'un laboratoire de compatibilité électromagnétique.
LVD Directive (2006/95/EC)
MINI NEO
Il est interdit d’éliminer l’appareil avec les déchets urbains (déchets
ménagers). Cet appareil est marqué selon la directive européenne
2002/96/CE relative aux appareils électriques et électroniques
usagés (waste electrical and electronic equipment – WEEE). La
directive définit le cadre pour une reprise et une récupération des
appareils usagés applicables dans les pays de la CE. Pour
renvoyer votre ancien appareil, utilisez les systèmes de renvoi et de
collecte qui vous sont proposés.
31

CE - Declaration of conformity
We herewith declare, that the wavemaster CUBE/CUBE
active speaker system
MINI NEO
complies with the following standards or normative documents:
EMC Directive (2004/108/EC)
EMC: EN301 489-1 V1.9.2 & -17 V2.2.1, EN 55013: 2001 + A1: 2003 + A2: 2006,
EN 55020: 2007 + A11: 2011, EMF: EN 62479: 2010, RF: EN 300 328 V1.8.1
LVD Directive (2006/95/EC)
LVD: EN60065: 2002 + A1: 2006 + A11: 2008 + A2: 2010 + A12: 2011, Erp: EU, EC 1275/2008
This statement is based on the test reports of an EMC laboratory.
All texts and illustrations were produced with greatest care. wavemaster cannot however accept
any legal or other responsibility for any remaining incorrect information and its consequences.
Subject to change without further notice.
In case there is audible noise, possibly caused by strong radio waves (e.g. by mobile
phones) we recommend to turn down the volume control of the unit.
If you have special questions to the product and cannot find a solution in this introduction, you
can look for more informations at our homepage. Thank you!
www.wavemaster.eu
The device may not be disposed of with household rubbish. This
appliance is labelled in accordance with European Directive
2002/96/EG concerning used electrical and electronic appliances
(waste electrical and electronic equipment - WEEE).
The guideline determines the framework for the return and recycling
of used appliances as applicable throughout the EU. To return your
used device, please use the return and collection systems available
to you.
32
 Loading...