

Page 1

TrackSpacer User Manual
.
Copyright 2012 by Wavesfactory. All Rights Reserved.
Page 2

TrackSpacer User Manual, Revision A
Table of Contents
What Is TrackSpacer? ............................................................................................. 3
Installing TrackSpacer ............................................................................................ 4
Entering Your Serial Number ....................................................................................................... 6
Demo Version Limitations ........................................................................................................... 6
About Sidechaining ................................................................................................ 7
Setting Up TrackSpacer .......................................................................................... 7
Overview of the TrackSpacer GUI ........................................................................ 10
Controls ..................................................................................................................................... 11
EQ Display .................................................................................................................................. 11
Basic Usage of TrackSpacer .................................................................................. 12
Legal Agreement .................................................................................................. 15
Limited Warranty and Disclaimer ......................................................................... 16
2
Page 3
TrackSpacer User Manual, Revision A
What Is TrackSpacer?
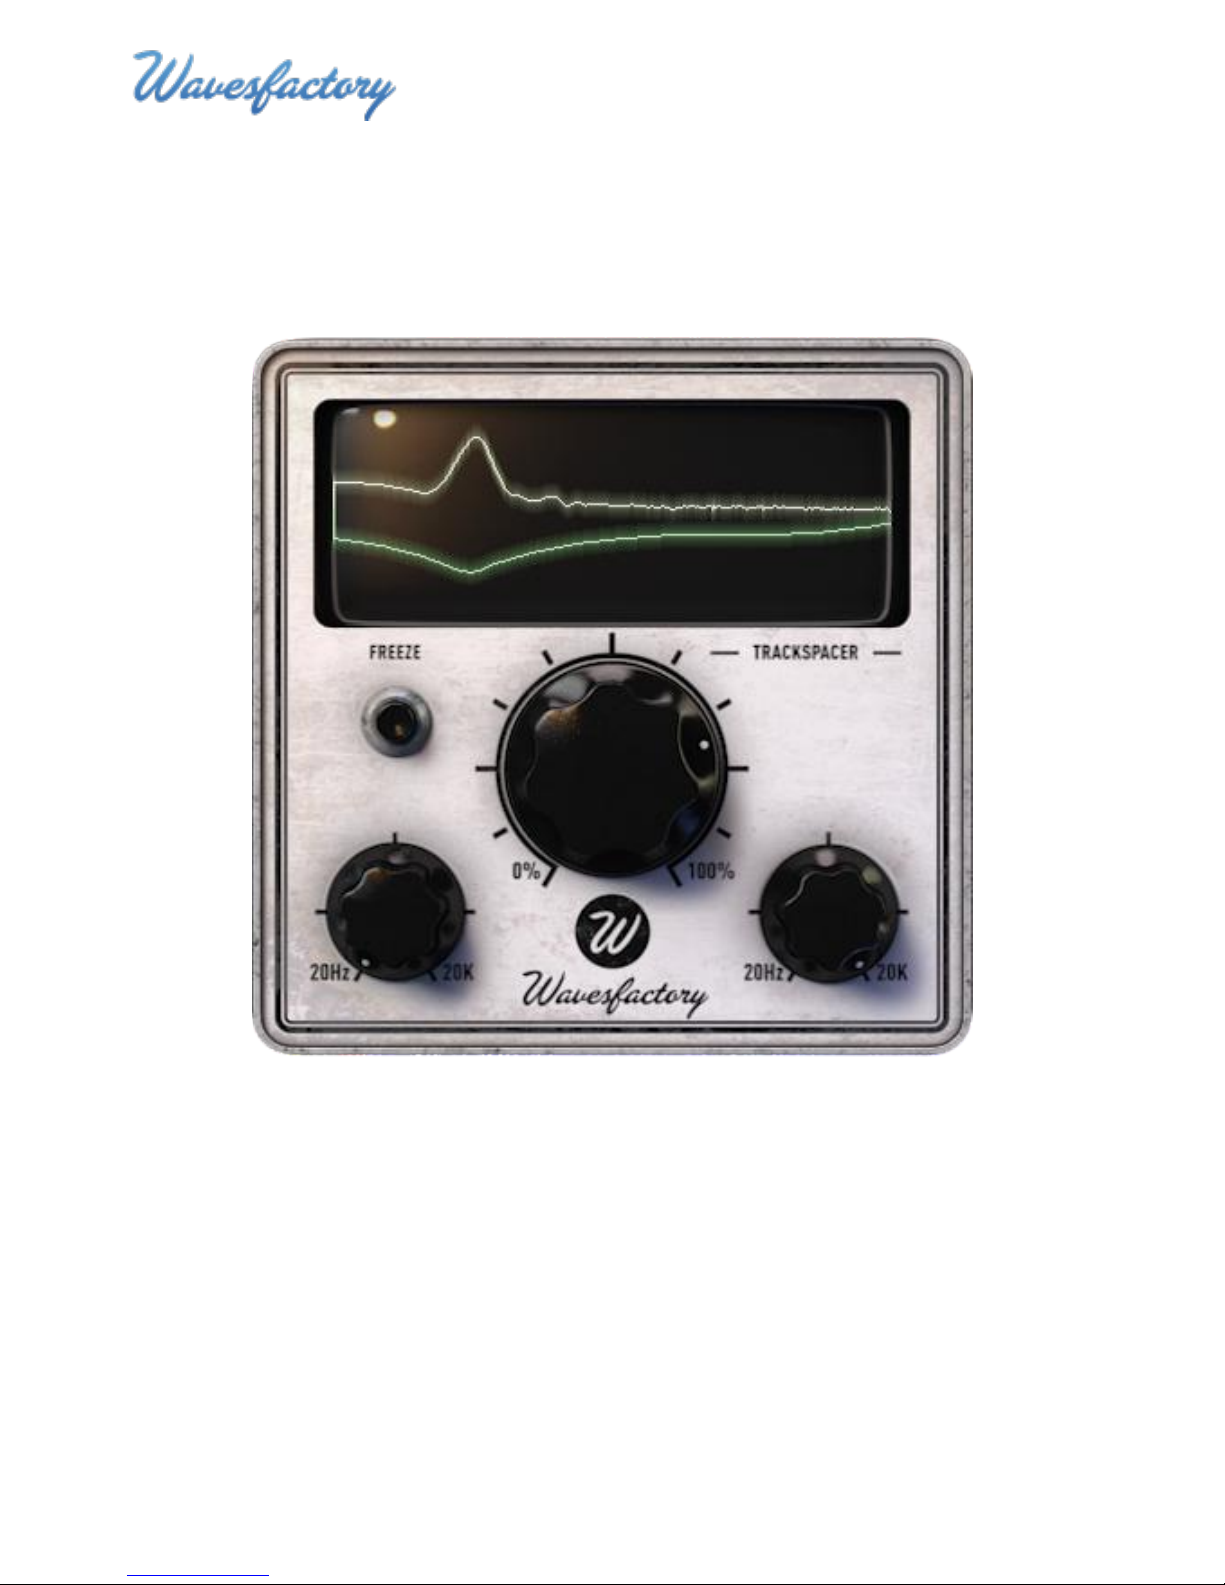
TrackSpacer is an audio plug-in (available in VST, AU, and RTAS formats) that creates space in the mix for
an instrument, voice, or other audio by performing automatic ,multiband equalization on a channel. In
real-time it analyzes the audio frequency content in a channel via sidechain, and applies an intelligent
32-band EQ to subtract those frequencies from the channel where TrackSpacer is inserted.
TrackSpacer is versatile and can be used in many different situations. But for illustration let’s look at
two common examples where it can solve complex EQ problems.
If the kick and bass are competing for space, insert TrackSpacer in the bass channel and have it listen to
the kick. Then you can easily fine-tune TrackSpacer so that it only subtracts from the bass signal the
frequencies that help define the core sound of the kick. The result is that both are heard more clearly.
If you need to create room for the vocal in a busy and dense mix, route all the competing instruments to
a bus, insert TrackSpacer, and have it listen to the vocal. As the performer talks or sings TrackSpacer
selectively subtracts the vocal’s audio frequency energy from the bus signal. This gives the vocal a lift
without a reduction in the overall volume level of the instruments.
3
Page 4
TrackSpacer User Manual, Revision A
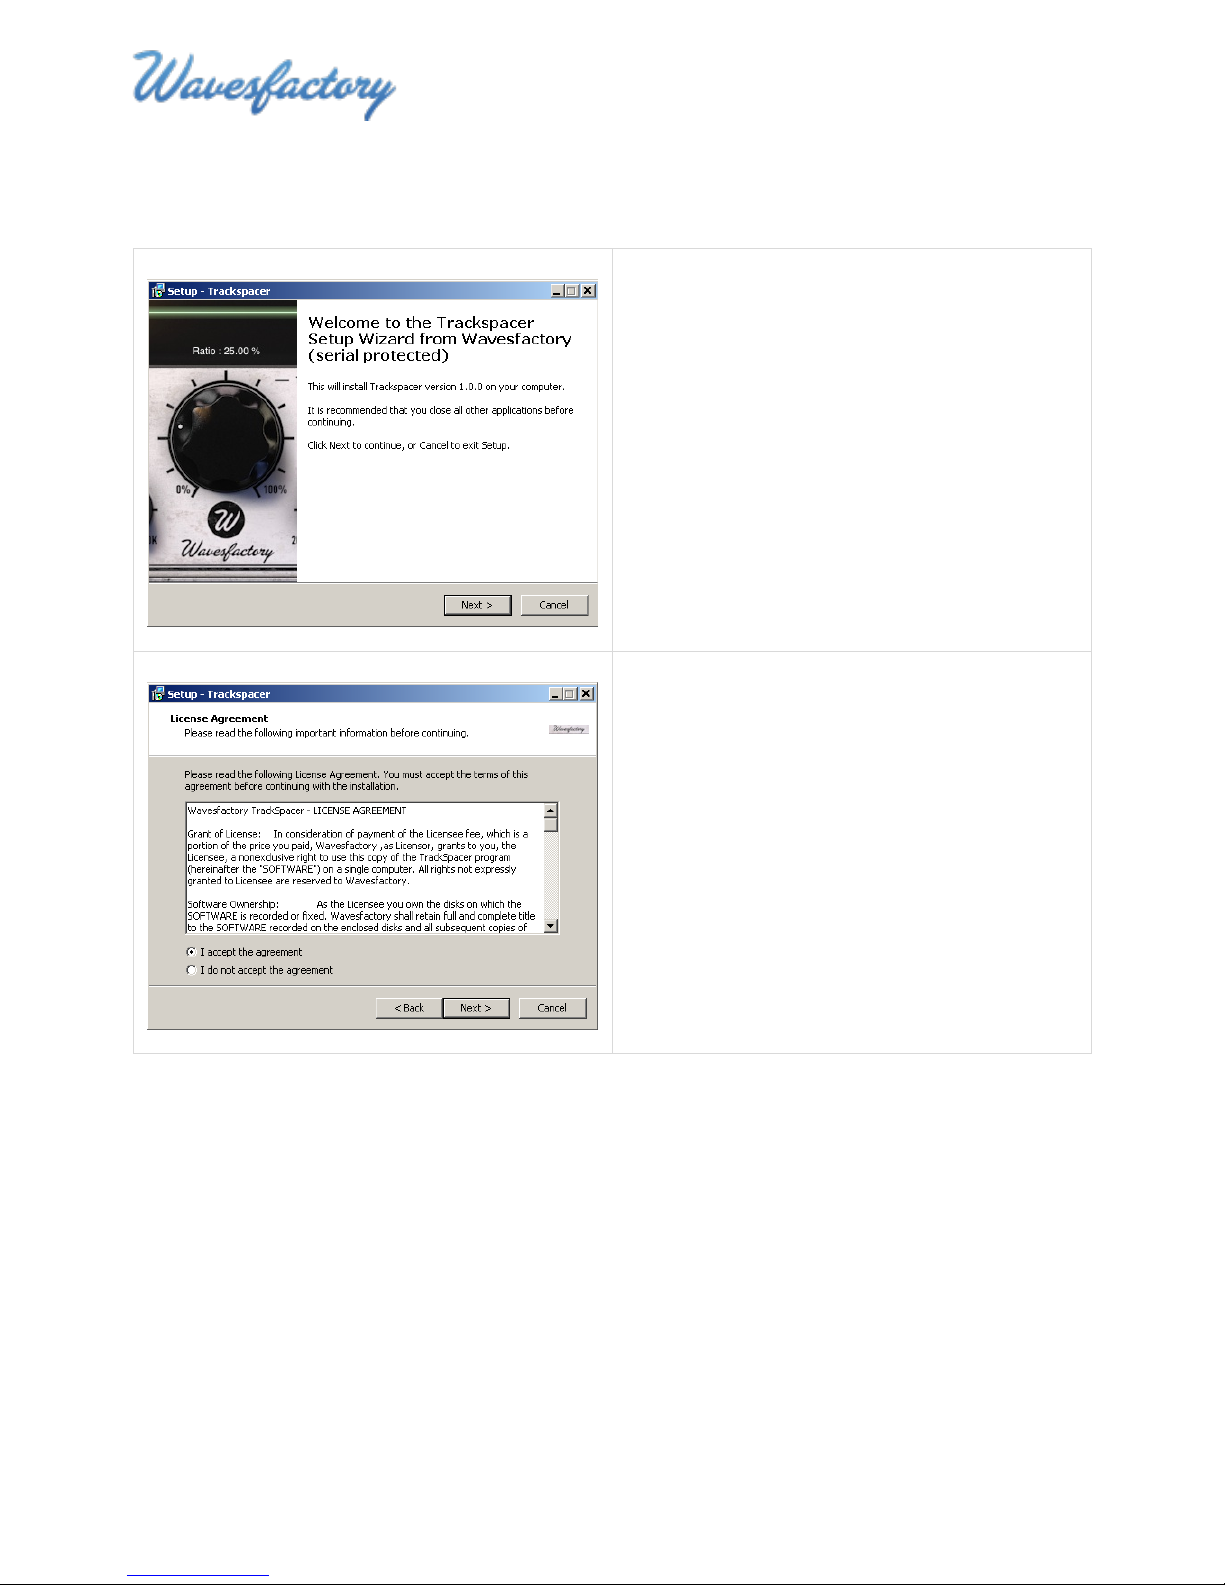
1. Start the install program to display the
TrackSpacer Setup Wizard.
2. Click Next to continue.
3. Review the license agreement.
4. Click the radio button beside “I accept the
agreement”.
5. Click Next to continue.
Installing TrackSpacer
Run the TrackSpacer install program to install TrackSpacer to your computer.
4
Page 5
TrackSpacer User Manual, Revision A
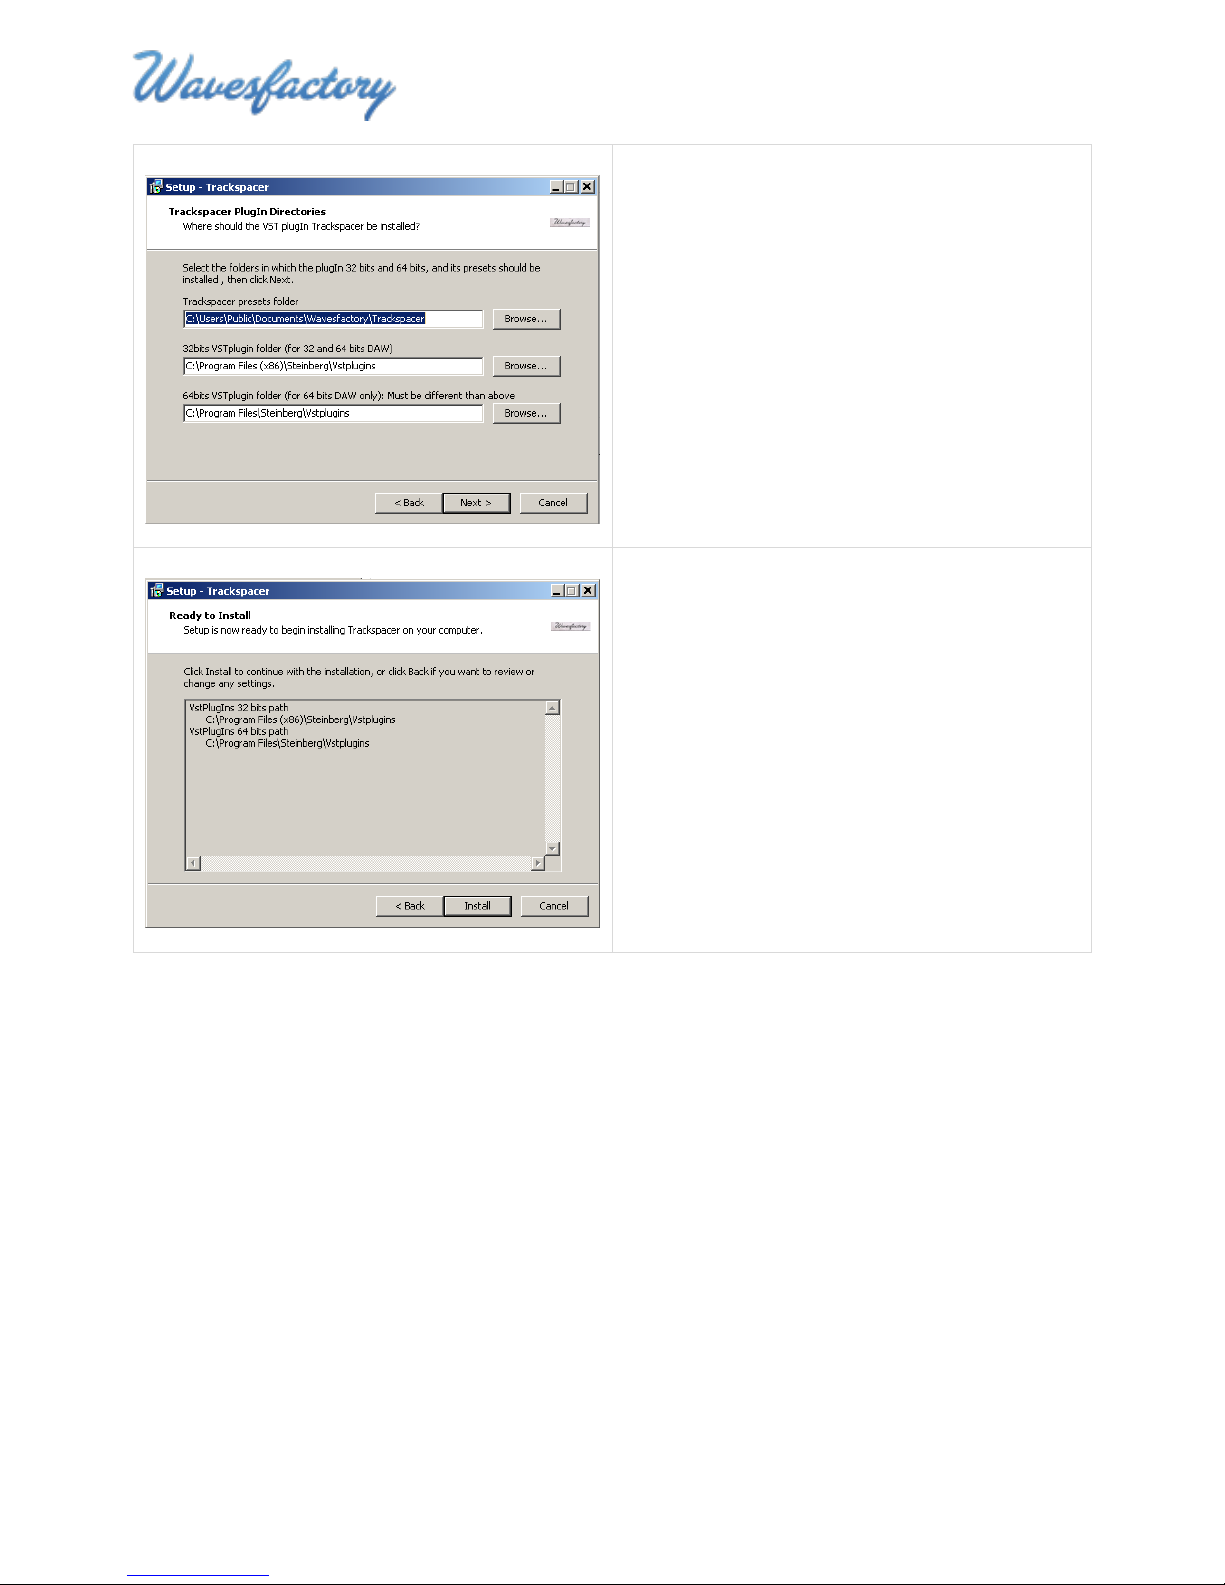
6. Select the folder where you wish TrackSpacer
to be installed.
Note: Apple users will see the folder location for
installing AU plug-ins.
7. Click Next to continue.
8. Confirm that the installation destination
folders are correct.
9. Click Install to install TrackSpacer.
5
Page 6
TrackSpacer User Manual, Revision A
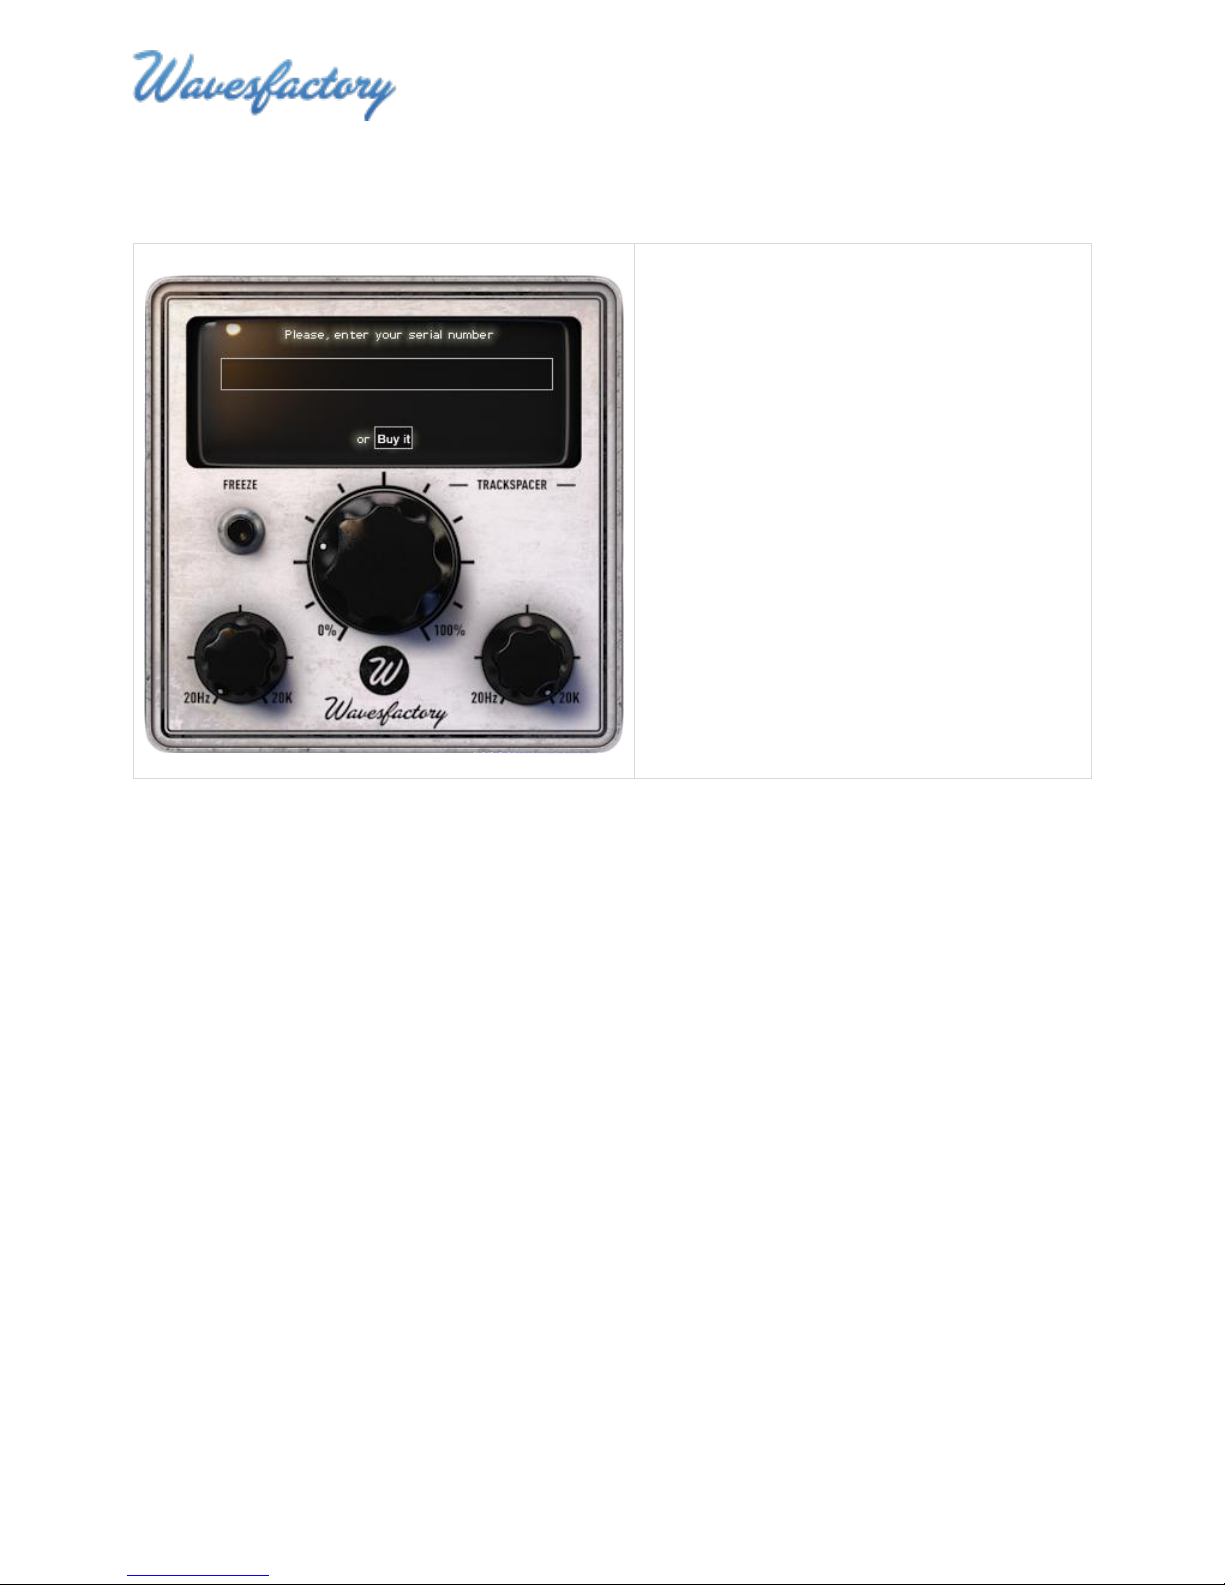
1. Copy and paste the serial number into the
text field, then press the Enter/Return key.
2. Close TrackSpacer.
3. Relaunch TrackSpacer.
Entering Your Serial Number
You will be prompted to enter a serial number the first time you insert TrackSpacer into a channel.
Demo Version Limitations
Please note that the demo version of TrackSpacer has the following limitations:
MIDI automation of controls is disabled
Control settings are not saved
An audio watermark sounds at two-minute intervals
6
Page 7
TrackSpacer User Manual, Revision A
Pro Tools
1. In the I/O section of the control signal’s channel strip, send the output to a bus.
2. Open the TrackSpacer GUI window within the wrapper and set the Key Chain
Input to the send from the control signal bus.
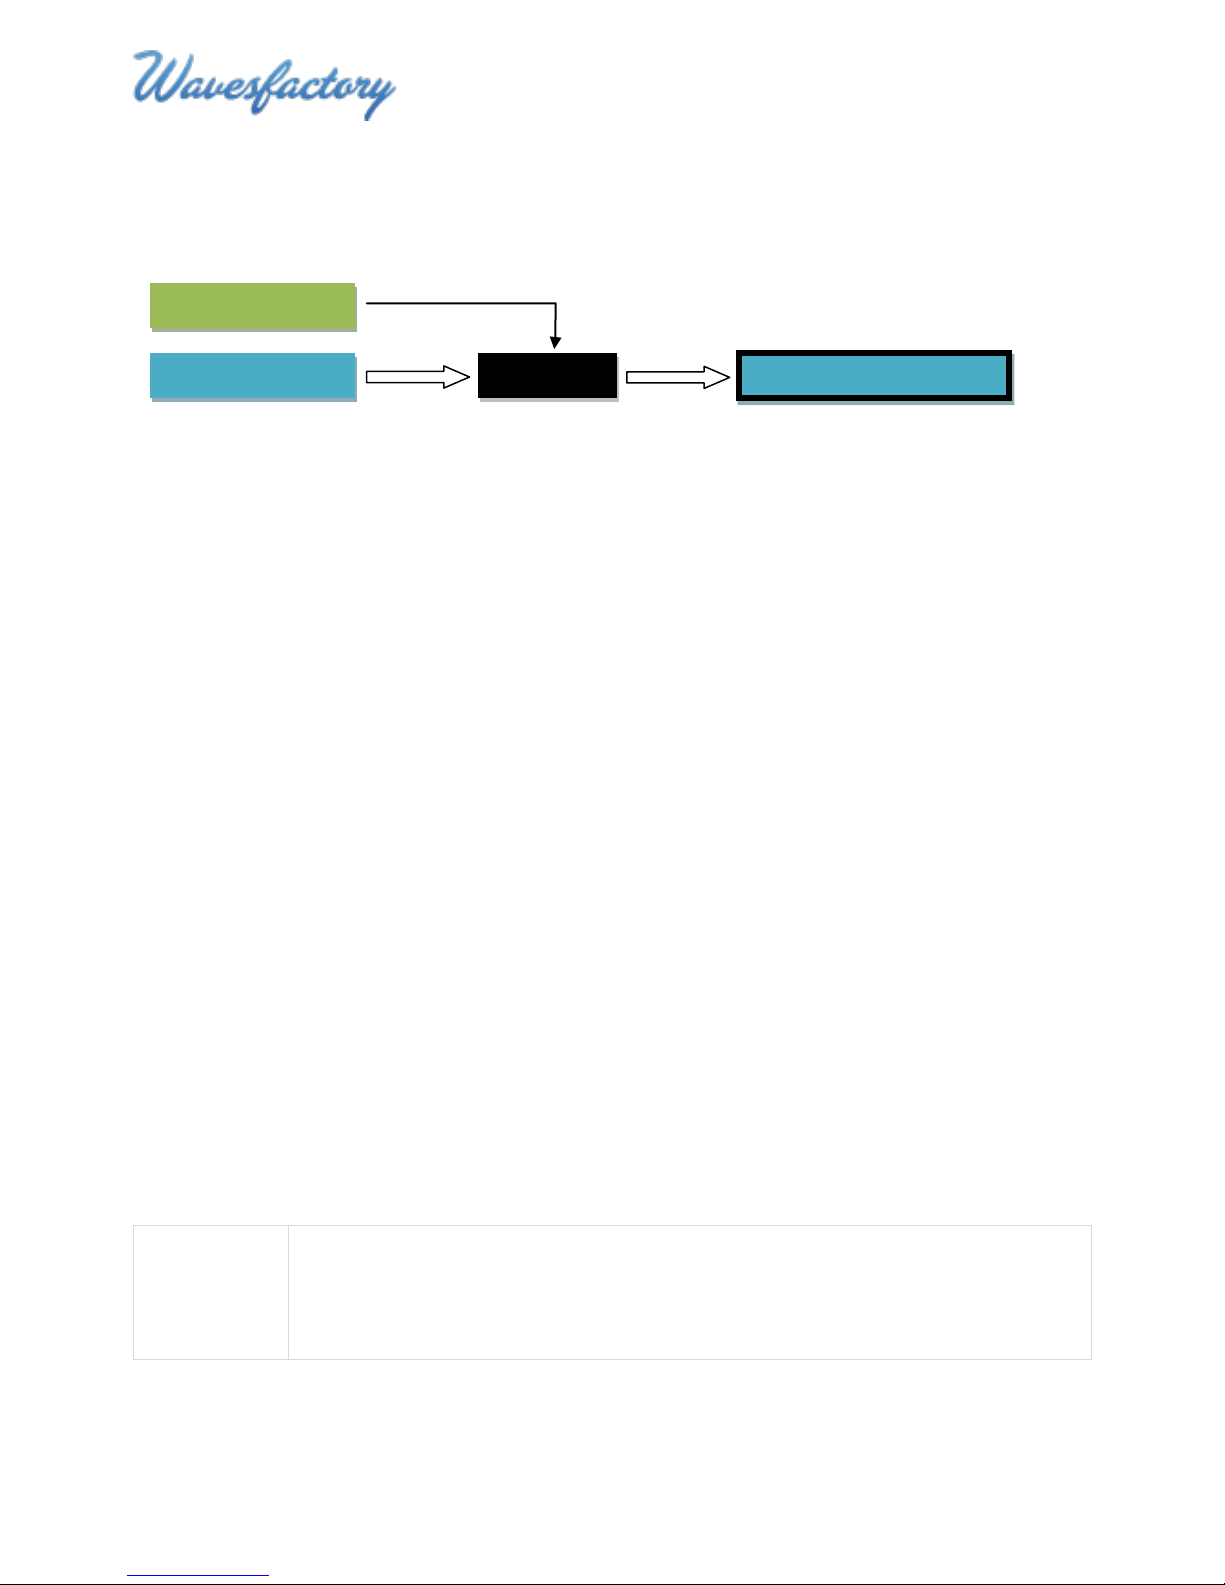
Channel 1 Send
Channel 2 Receive
VST Effect
Channel 2 Affected Audio
About Sidechaining
Sidechaining within a DAW refers to using the audio signal in one channel (the send) to trigger or control
a virtual effect (VST, AU, RTAS etc.) that modifies the audio in a different channel (the receive).
Two examples of sidechaining that you may be familiar both involve the use of a compressor:
Ducking – using the presence of one signal to trigger a volume reduction of another signal.
A classic ducking setup involves using a compressor on a rhythm guitar track, with the
compression triggered by the presence of a lead vocal. This causes the guitar to “duck” out of
the way of the vocal.
Gating – using the presence of one signal to trigger a gate on another signal. A common dance
and electronic music technique is to use the audio from a kick drum to open the gate on a bass
track. This tightens up the mix by making the kick drum and bass attacks perfectly in sync.
Of course you can also use sidechain techniques with stem mixes so that an entire group of tracks can
be ducked, gated, equalized, or otherwise affected in response to another signal.
Setting Up TrackSpacer
This section provides the steps for inserting TrackSpacer and setting up the sidechain.
1. Decide on two tracks or channels that you want TrackSpacer to analyze. The channel containing
the audio to be equalized is called the affected signal. The channel that TrackSpacer uses for
comparison is called the control signal.
2. Insert TrackSpacer as an effect on the channel you wish to EQ – the affected signal.
Note: The procedure for Cubase with VST 2.4 is different. Skip this step if using Cubase and
proceed to step 3.
3. Setup the sidechain. Each DAW requires a different procedure. The most popular ones are
covered below:
7
Page 8

TrackSpacer User Manual, Revision A
Logic
1. In the Sends field of the control signal’s channel strip, select a bus.
2. Open the TrackSpacer GUI window, then select the control signal (send) bus in the
Side Chain menu.
Cubase
1. CTRL+click on an empty channel space, then click Add Group Channel Track.
2. From the pop up menu, select Stereo>More>Quadro.
3. CTRL+click on this new group, select Add Child Bus, then select Stereo (Ls Rs).
4. In the Quadro Group channel you just created, go to the Inserts section and insert
TrackSpacer.
5. Open the TrackSpacer GUI window, then select the correct sidechain SC: option for
the control channel that TrackSpacer will listen to.
6. From the control channel, select Sends then select Side Chain. Then, turn the
send on and set the Pre-Fader button to on.
7. From the control channel, set the Output Routing to the Stereo (Ls Rs) output of
the Quadro Group channel.
8. From the channel containing the audio you wish TrackSpacer to EQ, set the
Output Routing to the Stereo (not child) output of the Quadro Group channel.
Ableton Live
1. From the control channel, go to I/O settings, then set Output Type to the track
where TrackSpacer is inserted.
2. Open the TrackSpacer GUI window, click the down arrow button beside the on/off
button, then click Sidechain.
3. Click the Audio From menu and select the channel containing the control signal.
Reaper
1. From the control signal’s channel strip, click and drag the I/O button to the
channel strip of the affected signal (the channel strip with TrackSpacer inserted).
The Routing/Controls window will display.
2. In the Sends section of the window, set the Receive channel using the second
Audio drop down menu (to the right of => symbol) to the channel with
TrackSpacer.
Important Note:
On most DAWs, setting a channel output to a sidechain bus will cause the audio from that channel to
8
Page 9

TrackSpacer User Manual, Revision A
not be audible. In order to hear the audio you must either create a duplicate of the control signal
channel with the output routed normally, or enable a master parent send to the master output fader.
9
Page 10
TrackSpacer User Manual, Revision A
Channel 1 Send
Channel 2 Receive
Freeze Button
EQ Ratio
Low Pass
Frequency
High Pass
Frequency
EQ Display
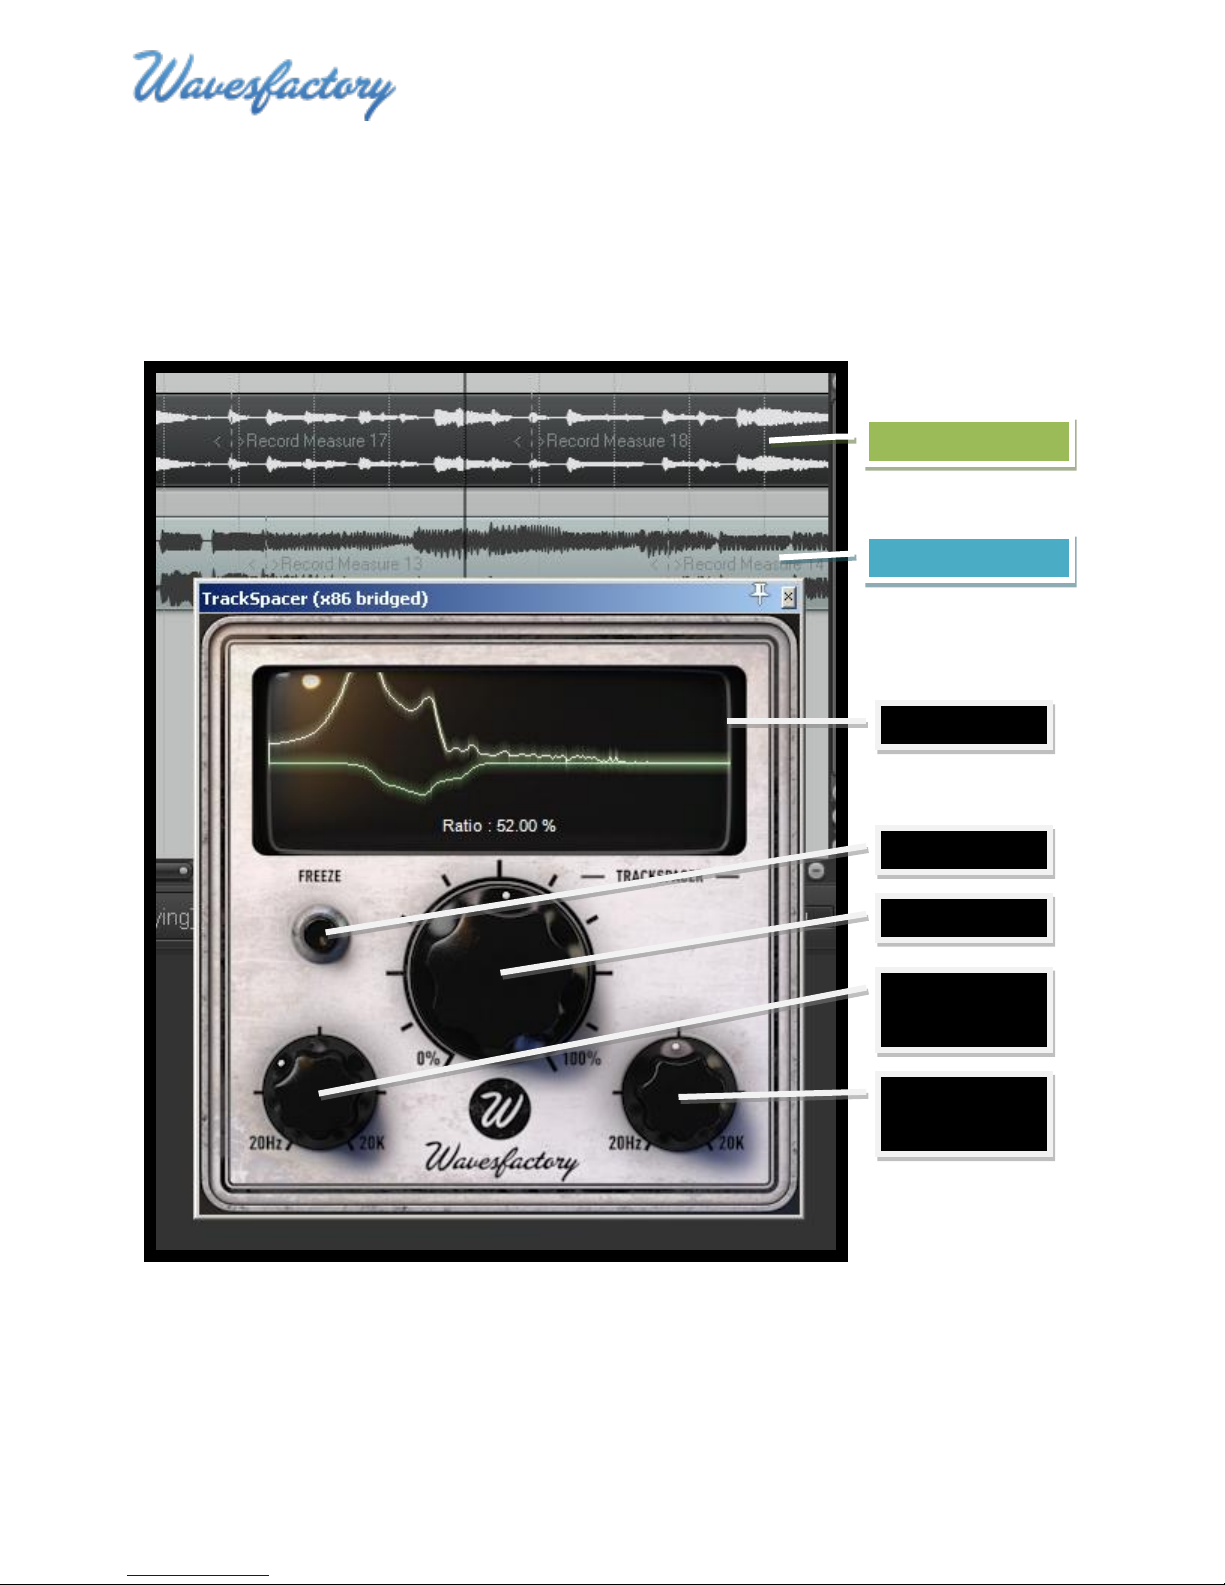
Overview of the TrackSpacer GUI
TrackSpacer is a powerful tool that is surprisingly simple to use. There are only four controls and an EQ
display that shows the control signal and the EQ amount of the affected signal.
Note: the screenshot below was taken from TrackSpacer used in Reaper DAW, with the control and
affected signals as channel 1 and channel 2.
10
Page 11
TrackSpacer User Manual, Revision A
Control Signal
EQ Applied
Controls
Freeze button – freezes the EQ at the current level based on the EQ Ratio, Low Pass, and High
Pass settings
EQ ratio control – sets the amount (ratio) that TrackSpacer subtracts
Low pass frequency control – sets the low pass frequency
High pass frequency control – sets the high pass frequency
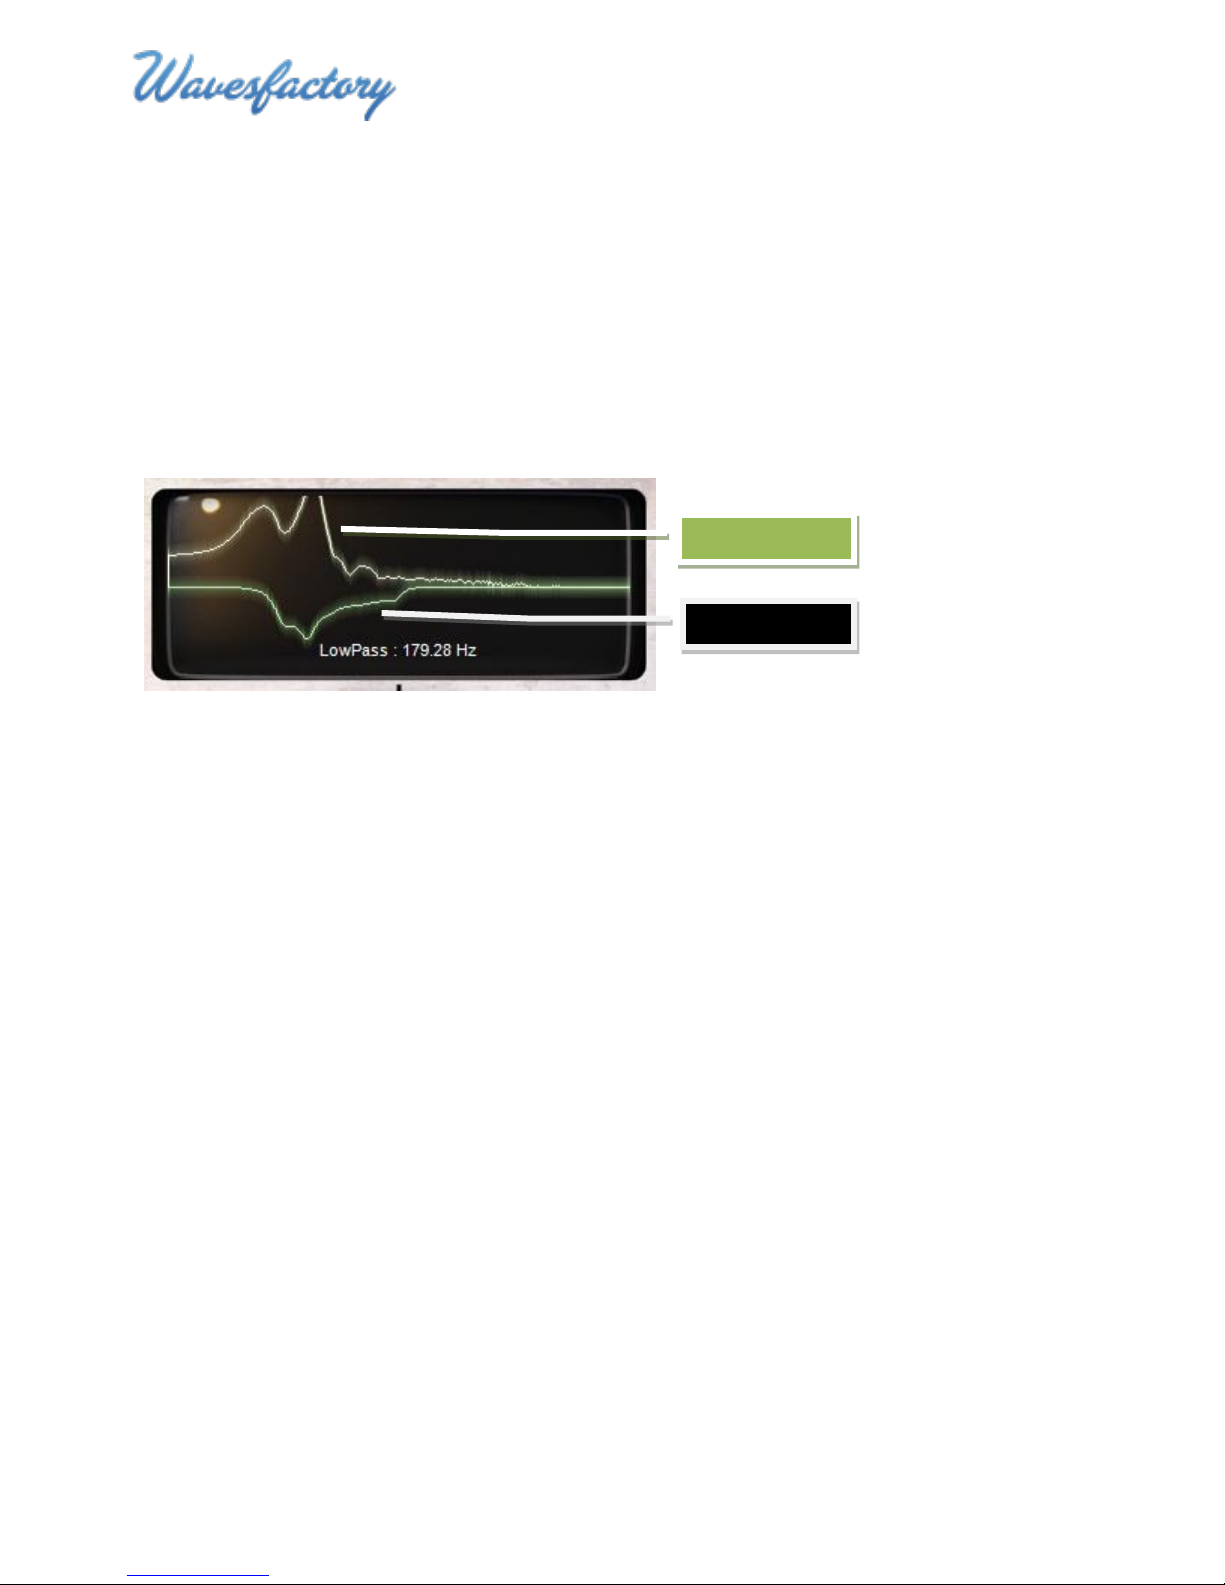
EQ Display
The EQ Display shows the traces of the control signal spectral content (upper trace – white) and the
spectral content of the frequencies subtracted (EQ applied) to the affected signal (lower trace – green).
TrackSpacer analyzes and subtracts frequencies in real time so the traces animate based on the audio
signals.
The area below the audio signals indicates the name and value of any control that is being changed (or
has the mouse cursor hovering over it).
11
Page 12
TrackSpacer User Manual, Revision A
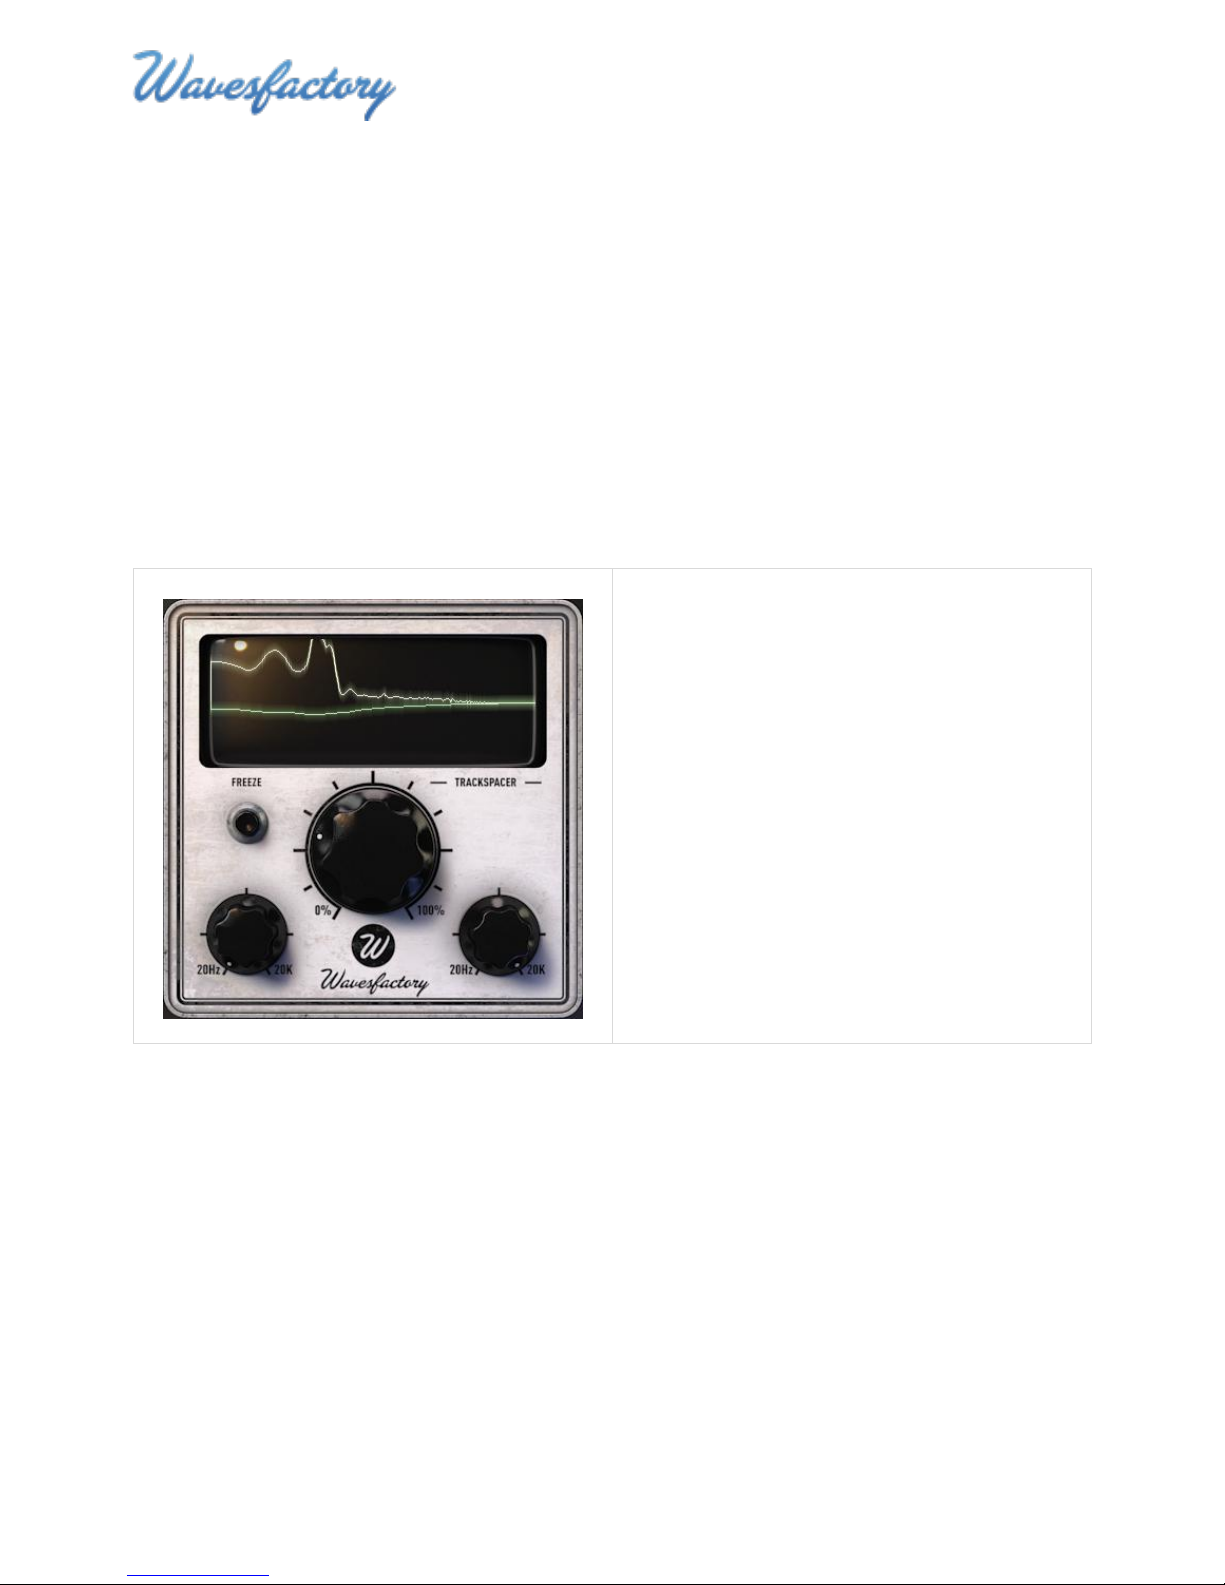
3. Listen to the audio of the affected signal and
watch the EQ Display.
In the screenshot on the left you can see that
the default settings need fine-tuning because
they are not creating much space.
Basic Usage of TrackSpacer
Basic usage involves adjusting TrackSpacer’s controls and most importantly, listening carefully to the
mix. The steps below are designed to get you started.
1. Ensure that the sidechain is setup correctly.
2. Start audio playback in the DAW. When you first insert TrackSpacer the audio controls will be at
their default settings:
EQ Ratio – 25%
Low Pass Frequency – 20 Hz
High Pass Frequency – 20,000 Hz
12
Page 13
TrackSpacer User Manual, Revision A
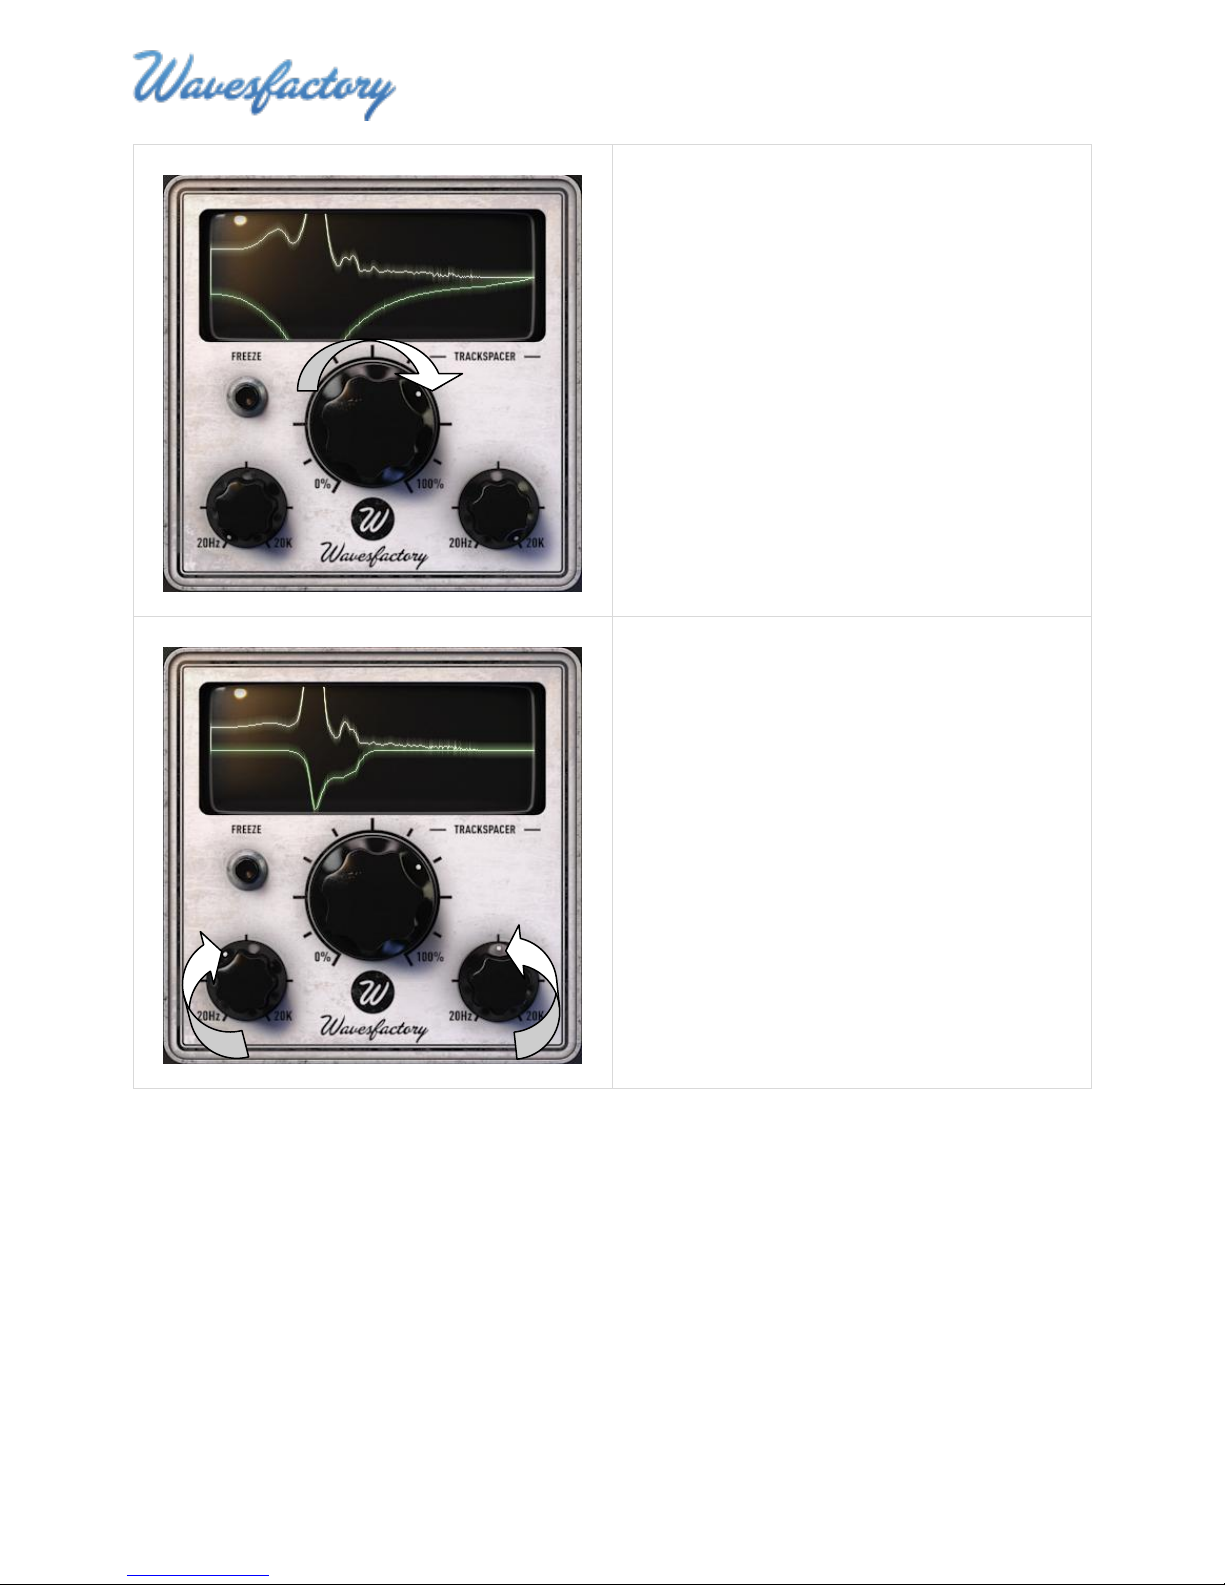
4. Increase the EQ Ratio to get a better
perspective of the range of frequencies being
subtracted from the affected signal.
At this point you may only be able to hear the
affected signal very faintly.
5. Adjust the Low Pass Frequency and High Pass
Frequency controls until you can hear (and
see) that TrackSpacer is subtracting enough of
the affected signal to make room for the audio
of the control signal.
In the screenshot on the left the Low Pass and
High Pass settings have been adjusted to
narrow the range of frequencies that are
subtracted.
Note: Although there are many ways to use
TrackSpacer, one effective method is to create
a notch that subtracts only those frequencies
that seem to be blurring or muddying the mix.
13
Page 14
TrackSpacer User Manual, Revision A
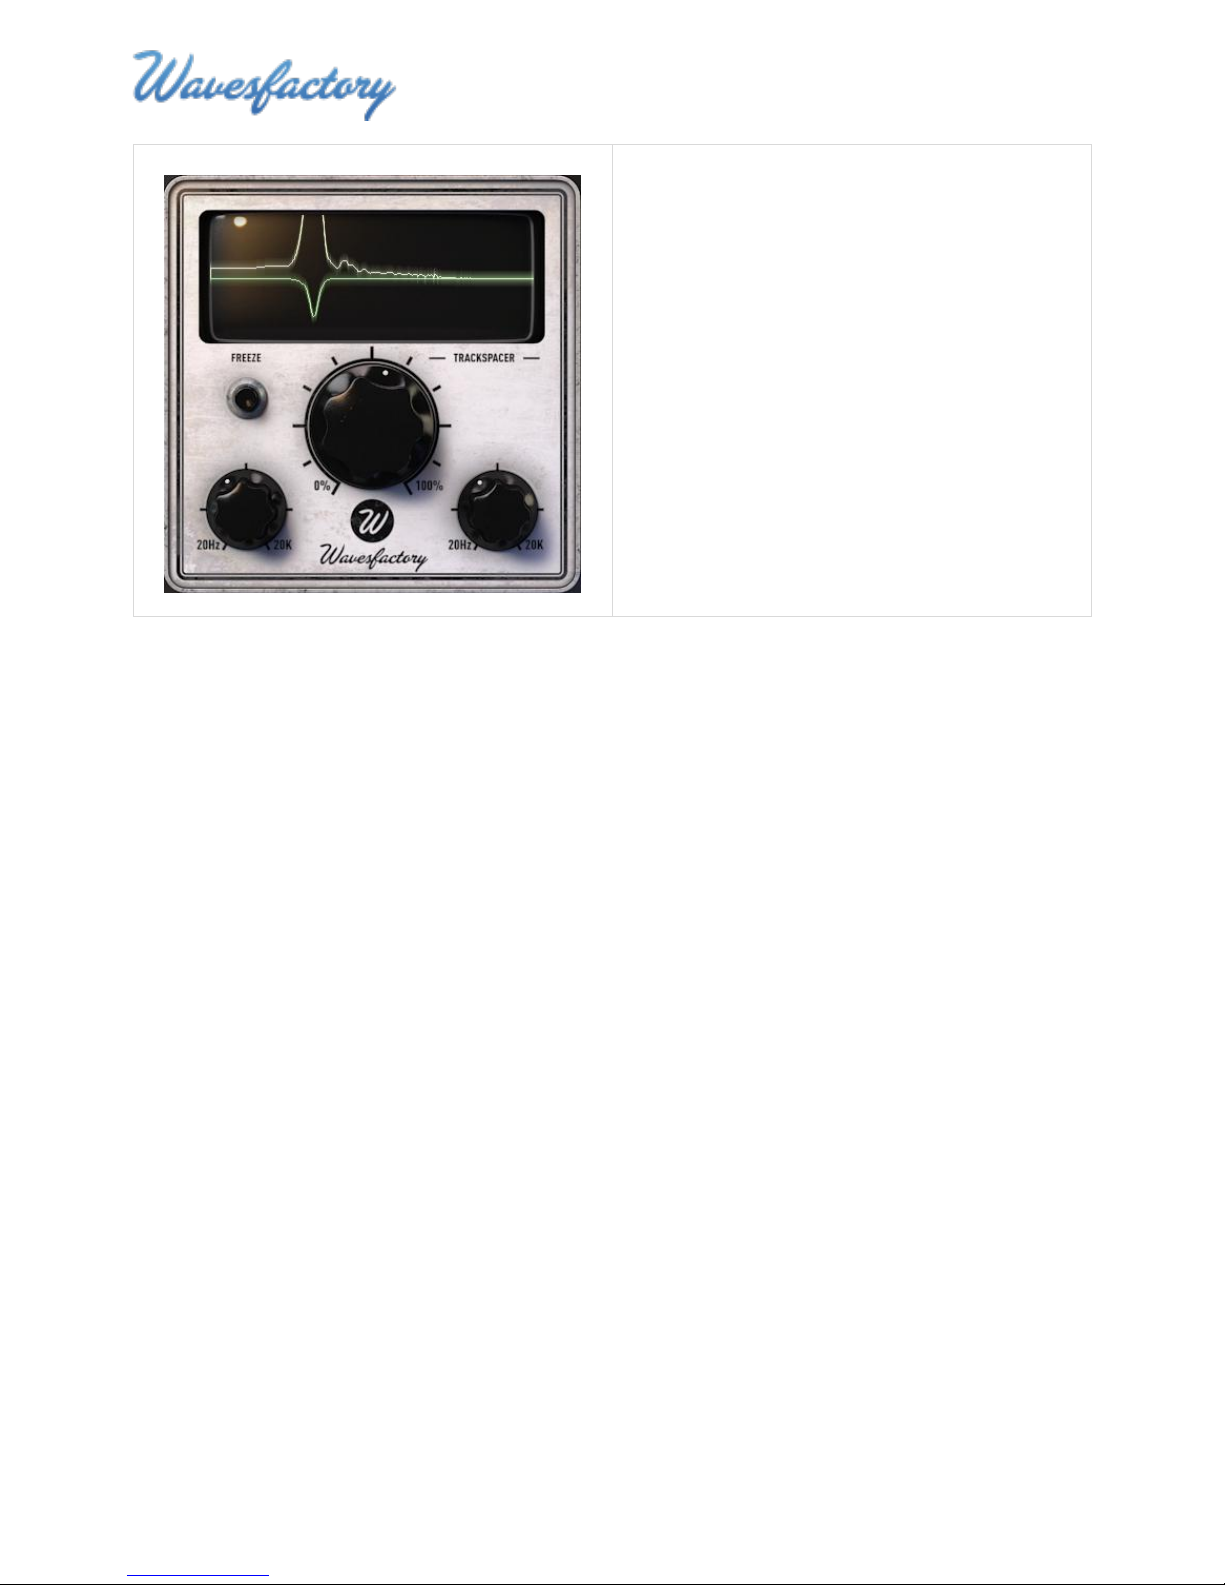
6. Fine tune TrackSpacer’s controls until you find
the sweet spot where both tracks are sitting
nicely in the mix.
In the screenshot on the left you can see that
TrackSpacer is subtracting a fairly narrow
range of frequencies in response to a wider
peak in the control signal.
Note: At any time you can click the Freeze
button to freeze the signal trace of the applied
equalization.
14
Page 15

TrackSpacer User Manual, Revision A
Legal Agreement
Wavesfactory TrackSpacer - LICENSE AGREEMENT
Grant of License:
In consideration of payment of the Licensee fee, which is a portion of the price you paid, Wavesfactory,
as Licensor, grants to you, the Licensee, a nonexclusive right to use this copy of the TrackSpacer program
(hereinafter the "SOFTWARE") on a single computer. All rights not expressly granted to Licensee are
reserved to Wavesfactory.
Software Ownership:
As the Licensee you own the disks on which the SOFTWARE is recorded or fixed. Wavesfactory shall
retain full and complete title to the SOFTWARE recorded on the enclosed disks and all subsequent
copies of the SOFTWARE, regardless of the media or form on or in which the original disks or copies may
exist. This License is not a sale of the original SOFTWARE.
Copyright Restrictions:
This SOFTWARE and the accompanying printed or written materials are copyrighted. Unauthorized
copying of the SOFTWARE, including those instances where the SOFTWARE has been modified, merged,
or included with other Software, or of the printed or written materials, for any reason, is expressly
forbidden. Licensee may be held liable for copyright infringement which results from such unauthorized
copying.
Restrictions on Use:
Licensee may physically transfer the SOFTWARE from one computer to another, provided that the
SOFTWARE is used on only one computer at any one time. Licensee may not electronically transfer the
SOFTWARE to multiple computers over a network system. Licensee may not distribute copies of the
SOFTWARE or accompanying materials to others. Licensee may not modify, adapt, translate, reverse
engineer, decompile, disassemble, or create derivative works based on the SOFTWARE or it's
accompanying printed or written materials.
Transfer Restrictions:
Licensee shall not assign, rent, lease, sell, sublicense or otherwise transfer the SOFTWARE to another
party without prior written consent of Wavesfactory. Any party authorized by Wavesfactory to receive
the SOFTWARE must agree to be bound by the terms and conditions of this Agreement.
15
Page 16

TrackSpacer User Manual, Revision A
Limited Warranty and Disclaimer
Limited Warranty:
Wavesfactory warrants that the disks on which the SOFTWARE is furnished to be free from defects in
materials and workmanship under normal use for a period of thirty (30) days from the date of purchase.
Your receipt shall be evidence of the date of purchase. Any implied warranties on the SOFTWARE are
limited to thirty (30) days from the date of purchase. Some states do not allow limitations on duration of
an implied warranty, so the above limitation may not apply to you. All programs and accompanying
materials are provided "as is" without warranty of any kind. The complete risk as to the quality and
performance of the programs is with you. Should the program prove defective, you assume the entire
cost of all necessary servicing, repair or correction.
Remedies:
Wavesfactory's entire liability and your exclusive remedy shall be at Wavesfactory's option either (a)
return of the purchase price or (b) replacement of the disk that does not meet the Limited Warranty and
which is returned to Wavesfactory with a copy of your receipt. This limited Warranty is void if failure of
the SOFTWARE has resulted from accident, abuse, modification, or misapplication. Any replacement
software will be warranted for the remainder of the original warranty period or thirty (30) days,
whichever is longer.
No other Warranties:
The above warranties are in lieu of all other warranties, expressed or implied, including but not limited
to, the implied warranties of merchantability and fitness for a particular purpose. No oral or written
information or advice given by Wavesfactory, its dealers, distributors, agents or employees shall create a
warranty or in any way increase the scope of this limited warranty. No Liability for Consequential
Damages Neither Wavesfactory nor anyone else involved in the creation, production, or delivery of this
product shall be liable for any direct, indirect, consequential, or incidental damages arising out of the
use of, or inability to use this product (including without limitation, damages for loss of business profits,
business interruption, loss of business information and the like) even if Wavesfactory was previously
advised of the possibility of such damages. Some states do not allow limitations on the length of an
implied warranty or the exclusion or limitation of incidental or consequential damages, so the above
limitation or exclusions may not apply to you. This warranty gives you specific legal rights, and you may
also have other rights which vary from state to state.
16
 Loading...