

Page 1

IOM-WQ-PWSRTA
PWSRTA Twin Alternating Series Softeners
Installation, Operation
and Maintenance Manual
Table of Contents
System Specification Table ................................ 2
Safety Information .......................................3
General Warnings ..................................... 3-4
Pre-Installation Considerations .................................4-5
General Installation Instructions ...................................5
PWSRTA System Programming ........................ 6-7
PWSRTA Quick Programming Guide .........................7
Regeneration and Error Screens ............................8
User Displays ..........................................9
Configuration Settings ................................ 10-13
OEM Softener System Setup........................... 14-16
Setting Option Table .................................... 17
OEM Filter System Setup.............................. 18-19
Installer Display Settings .................................20
Diagnostics ........................................ 21-22
PWSRTA Part List and Drawings ........................23
Front Cover and Drive Assembly ...........................23
PWSRTA Twin Alternating Softener
!
WARNING
Read this Manual BEFORE using this equipment.
Failure to read and follow all safety and use information can
result in death, serious personal injury, property damage, or
damage to the equipment.
Keep this Manual for future reference.
!
WARNING
You are required to consult the local building and plumbing
codes prior to installation. If the information in this manual
is not consistent with local building or plumbing codes,
the local codes should be followed. Inquire with governing
authorities for additional local requirements.
!
WARNING
Need for Periodic Inspection/Maintenance: This product must
be tested periodically in compliance with local codes, but at least
once per year or more as service conditions warrant. All products must be retested once maintenance has been performed.
Corrosive water conditions, and/or unauthorized adjustments or
repair could render the product ineffective for the service intended.
Regular checking and cleaning of the product’s internal components helps assure maximum life and proper product function.
!
WARNING
Do not use with water that is microbiologically unsafe or of unknown quality adequate disinfection before and after the system.
Valve Body Compliance Table .............................24
PWSRTA with 1.050” Distributor Tube Opening Identification...... 24
Drive Cap Assembly, Downflow Piston, Upflow Piston,
Regenerant Piston and Spacer Stack Assembly ...............25
Twin Transfer ....................................... 26-27
Injector Cap, Injector Screen, Injector, Plug and O-Ring ..........28
Injector Order Information ................................29
Refill Flow Control Assembly and Refill Port Plug ...............30
Drain Line – 3/4” .......................................31
Drain Line - 1” .........................................32
V4017-01 T1 Interconnect Fitting Assembly...................33
D1400 1191 In/Out Head ................................34
PWSRTA Control Valve System Description ...............35
Drive Assembly ........................................35
Drive Cap Assembly, Main Piston and Regenerant Piston ........35
Spacer Stack Assembly..................................36
Injector Cap, Screen, Injector Plug and Injector . . . . . . . . . . . . . . . . 36
Refill Flow Control Assembly or Refill Port Plug ................36
Drain Line Flow Control and Fitting Assembly .................37
Troubleshooting ................................... 38-41
NOTES ..............................................42
NOTICE
Hydrocarbons such as Kerosene, Benzene, Gasoline,
etc., may damage products that contain O-rings or plastic
components. Exposure to such hydrocarbons may cause
the products to leak. Do not use the product(s) contained in
this document on water supplies that contain Hydrocarbons
such as Kerosene, Benzene, Gasoline, etc.
Page 2

Systems Specification Table
A. PWSRTA Series
MINERAL TANK BRINE TANK FLOW RATE & PRESSURE
TANK
SIZE
RESIN
FT
GRAVEL
3
(LBS.)
TANK
SIZE
SALT
FILL
SERVICE
(GPM)
DROP
(PSI)
BKW
(GPM)
SHIP WT.
(LBS.)
MODEL NO.
CAPACITY
(MAX.)
PIPE SIZE
(IN.)
PWSRTA130 30,000 1 9 x 48 1 15 18 x 40 400 13-19 15-25 2.2 230
PWSRTA145 45,000 1 10 x 54 1.5 20 18 x 40 400 14-21 15-25 2.7 290
PWSRTA160 60,000 1 12 x 52 2 30 18 x 40 400 15-21 15-25 3.2 420
2 PWSRTA Twin Alternating Series Softeners
Page 3

!
WARNING
General Installation Guidelines
This water conditioner’s control valve conforms to UL/
CE Standards. Generic valves were tested and certified for
compliance as verified by the agency listing. This water
conditioning system is to be used only for potable water.
Inspect the water conditioning system for carrier shortage or
shipping damage before beginning installation.
Operating Perameters:
• Operating ambient temperature: 40° to 110°F (5° to 43°C).
• Operating water temperature: 40° to 110°F (5° to 43°C).
• Operating water pressure range : 25 to 120 psi (1.7 to
8.27bar).
Installation Perameters: All plumbing should be done in
accordance with local plumbing codes.
• Do not use pipe dope or other sealants on threads. Use Teflon
tape on the threaded inlet, outlet and drain fittings. Teflon tape
is not necessary on the nut connection or caps because of
o-ring seals.
• All plastic connections should be hand tightened. Teflon® tape
may be used on connections that do not use an O-ring seal.
Do not use pipe dope type sealants on the valve body. Do not
use pliers or pipe wrenches.
• Observe drain line requirements.
• Keep the media tank in the upright position. Do not turn upside
down or drop. Turning the tank upside down or laying the tank
on its side can cause media to enter the valve.
• The pipe size for the drain line should be a minimum of ½”.
Backwash flow rates in excess of 7 gpm (26.5 lpm) or length in
excess of 20’ (6.1m) require ¾” drain line.
• Do not support the weight of the system on the control valve
fittings, plumbing, or the bypass.
Environmental:
• Use only regenerants designed for water conditioning. Do not
use ice melting salt, block salt or rock salt.
During cold weather it is recommended that the installer warm
the valve to room temperature before operating.
®
is a trademark of E.I. duPont de Nemours.
Teflon
• Do not use petroleum-based lubricants such as Vaseline, oils
or hydrocarbon-based lubricants. Use only 100% silicone
lubricants.
• Do not allow this water conditioning system to freeze. Damage
from freezing will void this water conditioning system’s
warranty.
• HYDROCARBONS SUCH AS KEROSENE, BENZENE,
GASOLINE, ETC., MAY DAMAGE PRODUCTS THAT
CONTAIN O-RINGS OR PLASTIC COMPONENTS.
EXPOSURE TO SUCH HYDROCARBONS MAY
CAUSE THE PRODUCTS TO LEAK. DO NOT USE THE
PRODUCT(S) CONTAINED IN THIS DOCUMENT ON
WATER SUPPLIES THAT CONTAIN HYDROCARBONS
SUCH AS KEROSENE, BENZENE, GASOLINE, ETC.
• THIS WATER METER SHOULD NOT BE USED AS THE
PRIMARY MONITORING DEVICE FOR CRITICAL OR
HEALTH EFFECT APPLICATIONS.
• Do not use Vaseline, oils, other hydrocarbon lubricants or spray
silicone anywhere. A silicone lubricant may be used on black
o-rings but is not necessary.
PWSRTA Twin Alternating Series Softeners 3
Electrical:
• Use only the power transformer supplied with this water
conditioning system.
• All electrical connections must be completed according to local
codes.
• The power outlet must be grounded.
• All electrical connections must be connected according to local
codes. (Be certain the outlet is uninterrupted.)
• Install grounding strap on metal pipes.
• The power adapter comes with a 15 foot power cord and is
designed for use with the control valve. The power adapter is for
dry location use only. The control valve remembers all settings
until the battery power is depleted if the power goes out.
• After the battery power is depleted, the only item that needs to
be reset is the time of day; other values are permanently stored
in the nonvolatile memory. The control valve battery is not
rechargeable but is replaceable.
• No user serviceable parts are on the PC board, the motor or
the power adapter. The means of disconnection from the main
power supply is by unplugging the power adapter from the
wall.
• Install an appropriate grounding strap across the inlet and
outlet piping of the water conditioning system to ensure that a
proper ground is maintained.
• To disconnect power, unplug the AC adapter from its power
source.
Soldering:
• Use only lead-free solder and flux, as required by federal and
state codes, when installing soldered copper plumbing.
• Use caution when installing soldered metal piping near the
water conditioning system. Heat can adversely affect the
plastic control valve and bypass valve.
• Solder joints near the drain must be done prior to connecting
the drain line flow control fitting. Leave at least 6” between the
drain line control fitting and solder joints when soldering pipes
that are connected on the drain line control fitting. Failure to do
this could cause interior damage to the drain line flow control
fitting.
• When assembling the installation fitting package (inlet and
outlet), connect the fitting to the plumbing system first and
then attach the nut, split ring and o-ring. Heat from soldering
or solvent cements may damage the nut, split ring or o-ring.
Solder joints should be cool and solvent cements should be
set before installing the nut, split ring and o-ring. Avoid getting
primer and solvent cement on any part of the o-rings, split
rings, bypass valve or control valve.
Control Valve:
• This glass filled Noryl1 (or equivalent) fully automatic control
valve is designed as the primary control center to direct and
regulate all cycles of a water softener or filter.
• The control valve, fittings and/or bypass are designed to
accommodate minor plumbing misalignments but are not
designed to support the weight of a system or the plumbing.
• The nuts and caps are designed to be unscrewed or tightened
by hand or with the special plastic wrench. If necessary a
pliers can be used to unscrew the nut or cap. Do not use a
pipe wrench to tighten or loosen nuts or caps. Do not place a
screwdriver in the slots on caps and/or tap with a hammer.
• After completing any valve maintenance involving the drive
assembly or the drive cap assembly and pistons unplug power
source jack from the printed circuit board (black wire) and plug
back in or press and hold NEXT and REGEN buttons for 3
Page 4

General Warnings (continued)
!
WARNING
Installation Guidelines:
seconds. This resets the electronics and establishes the
service piston position. The display should flash all wording,
then flash the software version and then reset the valve to the
service position.
• The control valve is compatible with a variety of regenerants
and resin cleaners. The control valve is capable of routing
the flow of water in the necessary paths to regenerate or
backwash water treatment systems. The injector regulates the
flow of brine or other regenerants. The control valve regulates
the flow rates for backwashing, rinsing, and the replenishing of
treated water into a regenerant tank, when applicable.
• Control valve installation is made easy because the distributor
tube can be cut ½” above to ½” below the top of tank thread.
The distributor tube is held in place by an o-ring seal and
the control valve also has a bayonet lock feature for upper
distributor baskets.
Pre-Installation Considerations
A. Water Pressure
A minimum of 25 pounds of water pressure is required for
regeneration valve to operate effectively.
B. Electrical Facilities
A continuous 115 volt, 60 Hertz current supply is required. Make
certain the current supply is always hot and cannot be turned off with
another switch.
C. Existing Plumbing
Condition of existing plumbing should be free from lime and iron
buildup. Piping that is built up heavily with lime and/or iron should
be replaced. If piping is clogged with iron, a separate iron filter unit
should be installed ahead of the water softener.
D. Location Of Softener And Drain
The softener should be located close to a drain.
E. Bypass Valves
Always provide for the installation of a bypass valve.
F. Valve to Tank Installation Instructions
1. Spin the valve onto the tank, ensuring the threads are not crossthreaded.
NOTICE
The main control valve and tank adaptor have right-hand threads, or
clockwise, to install
2. Rotate the valve freely without using force until it comes to a stop
(this position is considered zero).
3. Rotate the valve clockwise from zero, between ¼ turn and ½
turn to fully tighten. No tools are needed. Hand tight is enough.
Overtightening may cause valve or tank damage.
NOTICE
If lubricant is required, a silicone compound is strongly
recommended. Dow Corning
Watts), is recommended for best possible results. Dow Corning
Release Compound is used in the manufacture of this control valve.
The use of other types of lubricants may attack the control’s plastic
or rubber components. Petroleum-based lubricants can cause
swelling in rubber parts, including O-rings and seals.
®
Silicone Compound (available from
®
7
1
Noryl is a trademark of Sabic.
4 PWSRTA Twin Alternating Series Softeners
Page 5

Pre-Installation Considerations
(continued)
G. Pre Installation and Loading of Media
Systems that are 13” in diameter and larger are not loaded with
media. These systems must be loaded with media before placing
into service. To load a system follow the below steps.
1. Cap the top open end of the distributor tube with tape and
plastic sheeting to keep foreign debris from entering the
distributor tube. This cap must be secure and not come off
during media loading.
2. Place the distributor tube, screen end down, into the mineral
tank and center it in the bottom. The top of the distributor
tube should be flush with the top of the tank. If 4” x 2.5” tank
bushings are used, the distributor tube should be flush with the
top of the tank bushing.
3. Make sure the plastic and tape cap is secure to the top of the
distributor tube, place a funnel on the top of the tank and load
first the gravel (if different sizes of gravel are used load the largest
gravel first, then the smaller gravel) then the resin media into the
tank. The cap must not come off of the distributor tube during
the loading of the media.
4. Remove the plastic cap from the distributor tube. DO NOT
PULL UP ON THE DISTRIBUTOR TUBE when removing the
cap. The distributor tube top must remain flush with the top of
the tank.
5. Clean any media from the threads and top of the mineral tank.
6. Lubricate the O-rings on the bottom of the control valve
(distributor pilot O-ring and top of tank O-ring). Use nonpetroleum based silicone lubricant only.
7. Place the control valve on top of the tank. When doing this step,
seat the top of the distributor tube inside the centered O-ring
sealed port on the bottom of the valve first then press the valve
down until the tank threads come in contact with the valve
threads. This ensures that the distributor tube is properly seated
into the bottom of the control valve. Thread the valve on to the
tank clockwise. Be careful not to cross thread the valve or over
tighten it. A hand tight snug fit is appropriate for the control valve
torque. A wrench is not necessary. Do not use thread sealant or
PTFE tape on the valve base threads.
8. The system is now ready for installation. Follow the Installation
Section in the Installation, Operation and Maintenance Manual.
!
WARNING
Do not exceed water pressure of 120 psi (8.2 bar). Do not
exceed 110°F (43.3°C). Do not subject unit to freezing
conditions.
Installation Instructions
1. Turn off water heater(s).
2. Turn off the main water supply to the home and open an inside
faucet (cold and hot) to relieve any pressure within the plumbing
system.
3. Place the system in the desired installation location. Make sure
that the location is level and sturdy enough to support the weight
of the system once it is in operation.
4. Place the bypass valve in the bypass position.
5. Connect the cold water supply to the inlet of the water
conditioning system. While constructing the supply line, install a
master supply valve (user supplied) in the supply line and close it.
6. Connect the feed water line to the home to the outlet of the
system.
7. Plumb the drain line to an appropriate drain abiding by all local,
city, and state codes. Use a 3/4” drain line for backwash flow
rates of 7 gpm or for drain lines of 7 gpm and less that exceed
20’ in length. Use a 1” drain line for backwash flow rates of 10
gpm and 12 gpm.
8. Connect the brine tank to the water softener control valve brine
inlet port using the factory supplied fittings and tubing. Add
enough water to the brine tank so that water covers the top of
the air check. DO NOT ADD SALT AT THIS TIME.
9. Open the user supplied feed water valve. Check for leaks and
repair as needed.
10. Allow the inside hot and cold faucet to remain open until all air
has been purged from the plumbing system. Then close the
faucet.
11. Locate Manual Regeneration Options in this manual to see the
steps to initiate an Immediate Manual Regeneration. Once you
have read that section place the system in backwash and unplug
the system from its electrical outlet once it has cycled into the
backwash position. This will stall the unit in backwash so all air
can be purged from one of the tanks.
12. Adjust the user supplied feed water valve to 1/4 open and place
the bypass valve into the service position.
13. Air will come out of the drain line until the backwashing tank is
completely purged of air. Then water will flow to drain. Allow
water to flow to drain for 15 minutes or until the water to drain is
clear of resin color throw.
14. Plug the system back into the electrical outlet and manually cycle
it through the remaining regeneration steps until it arrives in the
service position.
15. Repeat installation steps 11, 12, 13, and 14 of the General
Installation Instructions to purge the air from the second tank.
16. Check for leaks and repair as needed.
17. Installation is now complete and the system is ready for
programming and one cycle of brine tank refill so that the correct
amount of water is in the brine tank for the first regeneration
cycle. The brine tank refill must be done after programming the
system.
PWSRTA Twin Alternating Series Softeners 5
Page 6

PWSRTA System Programming
PWSRTA Quick Programming Guide
A quick programming guide has been listed below for convenience specifically for the PWSRTA series water softening systems. For other
programming requirements not listed in the Quick Programming Guide, please see the detailed programming section of this manual.
NOTICE
The electronics in the PWSRTA control valve are used across a wide
variety of control valves and applications, including backwashing
filters. All programming for the electronics has been included in this
manual for reference however the valve must be programmed for
Twin Alternating Softening Applications when called for during valve
programming.
6 PWSRTA Twin Alternating Series Softeners
Page 7

NOTICE
The Water Softener Capacity of the system needs to be known prior to programming the system, to insure proper programming and
efficiency of system
Chart 1: Setting Time of Day
Press the Set Clock button
Press the Next button to advance
to the minutes.
Press the Next button to set time To Exit
Adjust hour with the UP and Down arrow buttons. There is an AM and PM indicator at the
top of the display
Adjust minutes with the Up and Down arrow buttons.
NOTICE
Once in the programming settings, simply use the UP and DOWN arrow buttons to change values
Chart 2: Master Programming
To enter the Master Programming
mode, press and hold the NEXT
and DOWN arrow buttons simultaneously for 3 – 5 seconds
Press NEXT Button This will take you into 1st Backwash setting and should be set at 8 minutes
Press NEXT Button This will take you into BRINE DRAW setting and should be set at 60 minutes
Press NEXT Button This will take you into 2nd Backwash setting and should be set at 8 minutes
Press NEXT Button This will take you into RAPID RINSE setting and should be set at 6 minutes
Press NEXT Button
Press NEXT Button This will complete Master Programming Steps
The display should read SOFT with an arrow next to the word SET. If FLTr is displayed on
the screen, hit the UP or DOWN arrow to display SOFT. This indicates you are now in the
Master Programming Mode
This will take you into BRINE TANK REFILL setting and should be set at following times
based on your water softener capacity
For 30K Water Softener - Fill (brine tank refill) is set at 6 minutes, which is most efficient
setting. This can be changed to maximum brining if needed, maximum brining would be set
at 10 minutes.
For 45K Water Softener - Fill (brine tank refill) is set at 8 minutes, which is most efficent
setting. This can be changed to maximum brining if needed, maximum brining would be set
at 15 minutes.
For 60K Water Softener - Fill (brine tank refill) is set at 12 minutes, which is most efficient setting. This can be changed to maximum brining if needed, maximum brining would
be set at 20 minutes.
NOTICE
Next you will need to set up Installer Programming, this MUST be done in addition to the Master Programming
Chart 3: Installer Programming
To enter Installation Display Setting
Programming mode, press and hold
the NEXT and UP arrow buttons
simultaneously for 3 - 5 seconds
Press Next Button
Press Next Button REGEN - Indicated when the system will regenerate, should be read 0”
Press Next Button
Volumetric capacity in gallons to regeneration (will soften 2500 gallons before a regeneration
is queued.
Day Override. Default should be set to 14 Days. Watts Pure Water water softeners regenerate based on water usage, but this day override setting will come into play if the softener sits
idle or has not regenerated and will automatic initiate regeneration on the 14
th
day.
Programming completed, Valve will return to normal mode and will be in service.
If you have additional questions regarding your water softener programming, please contact
Pure Water Technical Support at 1.800.224.1299, then press #2
PWSRTA Twin Alternating Series Softeners 7
Page 8
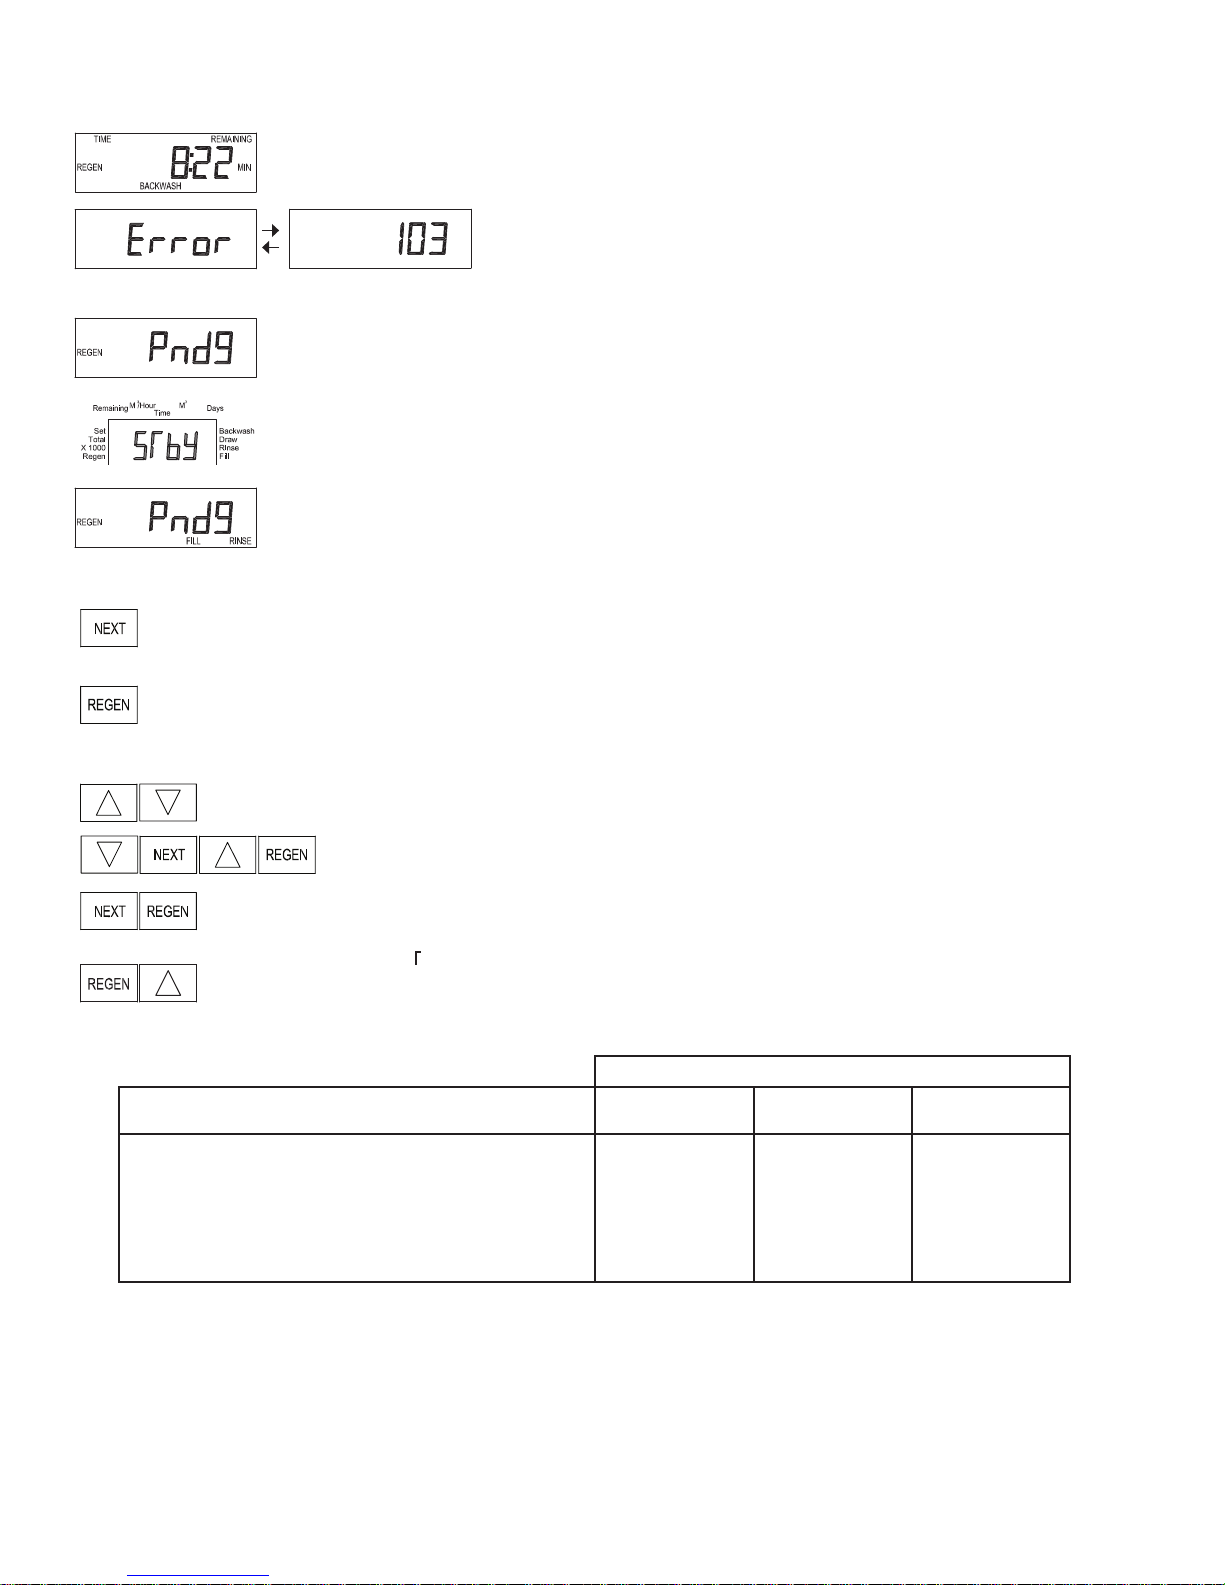
Regeneration and Error Screens
Regen Screen
Displays the time remaining in the current cycle. Pressing REGEN advances to the next cycle.
Error Screen
Alternated flashing Err and error code every 3 seconds. Clear by disconnecting
the power supply at the PC board and reconnecting, or press NEXT and REGEN
simultaneously for 3 seconds.
In Alternator Systems when a unit is waiting to initiate the first cycle step of regeneration, “REGEN
Pndg” is displayed.
“STbY” is displayed in Alternator Systems when a valve is in Standby state.
“REGEN Pndg RINSE FILL” is displayed whenever a zero-capacity tank has transferred to an off-line
state and is currently waiting to initiate the second portion of a regeneration cycle. Viewed only when
Delayed Rinse and Fill is set to ON.
Button Operation and Function
Scrolls to the next display.
Pressing once and releasing will schedule a regeneration at the preset delayed regeneration time.
Pressing again and releasing will cancel the regeneration.
Pressing and holding for 3 seconds will initiate an immediate regeneration
Pressing while in regeneration will advance to the next cycle.
Pressing in the program levels will go backwards to the previous screen
Changes variable being displayed.
Key sequence to lock and unlock program settings.
Holding for 3 seconds initiates a control reset. The software version is displayed and the piston returns
to the home/service position, resynchronizing the valve.
Used with valve type 1.0 , holding for at least 3 seconds causes a switch in the tank in Service without cycling the
regeneration valve. After tank switch, days remaining and capacity remaining status is retained for each tank until the
next regeneration.
Regeneration Cycles and Times
Range
Cycle Softening Filtering Regen
Backwash
Regenerant Draw/Slow Rinse (UP or DN)
Fast Rinse
Regenerant Rell
Regenerant Rell 2.0 or 1.5 set to MIN (softening only)
Service
If 1.5 or 2.0 is selected in Step 2CS, cycles can be set to “oFF”.
The user can initiate manual regeneration. The user has the option to request the manual regeneration at the delayed regeneration time or to
have the regeneration occur immediately:
1. Pressing and releasing the REGEN button. “
regeneration time. The user can cancel the request by pressing and releasing the REGEN button.
2. Pressing and holding the REGEN button for approximately 3 seconds will immediately start the regeneration. The user cannot cancel this
request, except by resetting the control by pressing NEXT and REGEN simultaneously for 3 seconds.
REGEN TODAY
” will flash on the display and the regeneration will occur at the delayed
1-120 minutes
1-180 minutes
1-120 minutes
0.1-200.0 lbs.
0.1-99.0 minutes
1-480 minutes
1-120 minutes
1-180 minutes
1-120 minutes
1-99.0 GAL
0.1-99.0 minutes
NA
Filtering
Backwash
1-120 min.
NA
1-120 min.
NA
NA
NA
8 PWSRTA Twin Alternating Series Softeners
Page 9

General Operation
User Displays
When the system is operating, one of five displays may be shown. Pressing NEXT will alternate
between the displays shown below.
User 1
Typical user display. Shows volume remaining to regeneration. This screen will not be viewed if the
control is set for time-clock operation.
User 2
Displays number of days to next regeneration.
User 3
Flow Rate.
Displays present flow rate.
Not viewed (along with SOFTENING or FILTERING Icon) if ALT A or ALT b is set in CONFIGURATION 4
and the valve is currently in Standby. When 1.0
the tank currently in Service (“A” or “b”) in the leftmost digit.
is set in CONFIGURATION 1, the display will indicate
User 4
Displays total volume in gallons since last reset. If a meter is not used this display will be shown but 0
will be displayed.
PRESS FOR 3 SECONDS TO RESET TO 0.
User 5
Shows current time.
Setting Time of Day
Push NEXT until time of day screen is displayed. Press and hold until SET TIME is displayed and the
hour flashes once. Press or until the correct hour is displayed.
Then press NEXT. The minutes will flash. Press or until the correct minute is displayed.
Press NEXT to return to the User Displays. Time of day should only need to be set after power outages
lasting more than 8 hours, if the battery has been depleted and a power outage occurs, or when
daylight saving time begins or ends. If a power outage lasting more than 8 hours occurs, the time of
day will flash on and off which indicates the time of day should be reset. If a power outage lasts less
than 8 hours and the time of day flashes on and off, the time of day should be reset and the battery
replaced.
PWSRTA Twin Alternating Series Softeners 9
Page 10
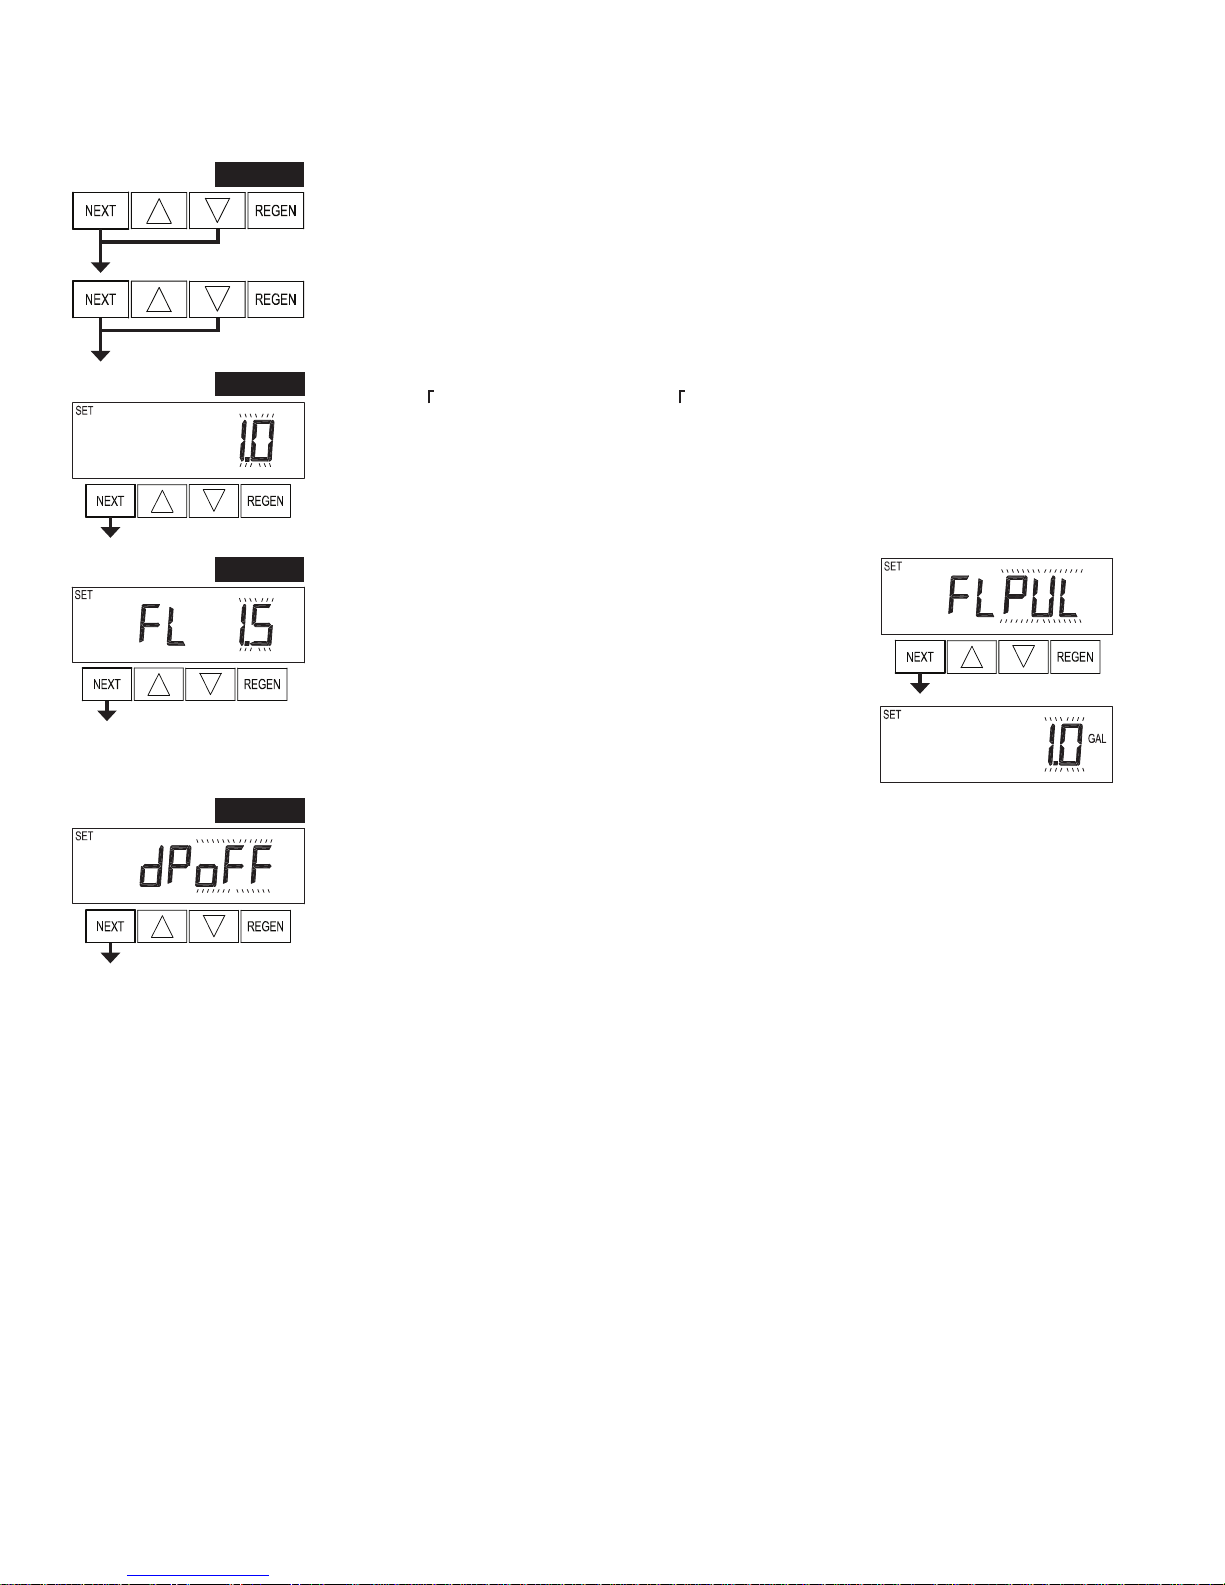
Step 1CS
Configuration Settings
Step 1CS – Press NEXT and simultaneously for 5 seconds and release. Press NEXT and simulta-
neously for 5 seconds and release. If the screen in Step 2CS does not appear, the lock on the valve is
activated. To unlock, press , NEXT, and REGEN in sequence, then press NEXT and simultaneously for 5 seconds and release. Press NEXT and simultaneously for 5 seconds and release.
Step 2CS
Step 3CS
Step 4CS
Step 2CS – Use or to select 1.0 for 1” valve, 1.25 for 1.25” valve, 1.5 for 1.5” valve, 2.0 for 2”
valve or 1.0
are selected, press NEXT to go to Step 3CS. Press REGEN to exit Configuration Settings.
for twin valve. If 1.0, 1.25 or 1.0 are selected, press NEXT to go to Step 4CS. If 1.5 or 2.0
Step 3CS – Use or to select meter size. Settings available
are 1.5, 2.0, 3.0, 1.0r (1.0 Remote Meter) or PUL (Variable Meter
Calibration.) Variable meter pulses of 0.1-150.0 PPG can be selected.
Press NEXT to go to Step 4CS. Press REGEN to return to previous
step.
Step 4CS – Selecting the use of an outside signal to initiate a regeneration: Selection only matters if a
connection is made to the two pin connector labeled DP SWITCH located on the printed circuit board.
Following is an explanation of the options:
oFF - feature not used
NOTE: In a twin alternating system each control must have a separate dP signal or dP switch. One dP
signal or one dP switch cannot be used for both controls.
on0 – If the dP switch is closed for an accumulative time of 2 minutes a regeneration will be signaled to
the unit. In a twin alternating system the MAV will transition first to switch units so that the signaled unit
can start regeneration. After the MAV has fully transitioned, the regeneration begins immediately. Note:
For PWSRTA control valves programmed for twin alternating: if the dP function “on0” is set, the Delayed
Rinse and Fill feature is not available.
dEL – If the dP switch is closed for an accumulative time of 2 minutes a regeneration will occur at the
scheduled delayed regeneration time. In a twin alternating system once the dP switch is triggered the PC
Board will display “REGEN TODAY” and when the delayed regen time comes the control will switch tanks
and the triggered unit will then go into regeneration. Note: For PWSRTA control valves programmed for
twin alternating: if the dP function “dEL” is set, the Delayed Rinse and Fill feature is not available.
HoLd – If the dP switch is closed a regeneration will be prevented from occurring while there is switch
closure. In a twin alternating system the regeneration of a unit can be prevented upon switch closure. If
the unit depletes the capacity down to zero, it will not be allowed to switch tanks to regenerate until the
switch is open. Note: For PWSRTA control valves programmed for twin alternating the Delayed Rinse and
Fill feature can be set.
Press NEXT to go to Step 5CS. Press REGEN to return to previous step.
10 PWSRTA Twin Alternating Series Softeners
Page 11

Step 5CS
Step 5CS –
2CS. Allows selection of one of the following using or :
• the Control Valve to have no hard water bypass;
• the Control Valve to act as an alternator;
• the Control Valve to have a separate source during the regeneration
cycle; or
• the Control Valve to operate with the System Controller.
Select OFF when none of these features are used.
Only use Watts No Hard Water Bypass Valves or Watts Motorized Alternating Valves (MAV) with these selections. Watts No Hard Water
Bypass Valves (1” or 1.25” V3070FF or V3070FM) are not designed to be used with the alternator or separate source functions.
Configuring the Control Valve for No Hard Water Bypass Operation:
Select nHbP for control operation. For no hard water bypass operation the three wire communication
cable is not used.
Selection requires that a connection to MAV or a No Hard Water Bypass Valve is made to the two pin
connector labeled MAV located on the printed circuit board. If using a MAV, the A port of the MAV must
be plugged and the valve outlet connected to the B port. When set to nHbP the MAV will be driven
closed before the first regeneration cycle that is not FILL or SOFTENING or FILTERING, and be driven
open after the last regeneration cycle that is not FILL.
This display will not appear if 1.0 was selected in Step
NOTICE
If the control valve enters into an error state during regeneration mode, the no hard water bypass valve
will return to the open Position, if not already there.
Configuring the Control Valve for Separate Source Operation:
Select SEPS for control operation. For separate source operation the three wire communication cable is
not used.
Selection requires that a connection to a Watts Motorized Alternator Valve (MAV) is made to the two pin
connector labeled MAV located on the printed circuit board. The C port of the MAV must be connected
to the valve inlet and the A port connected to the separate source used during regeneration. The B port
must be connected to the feed water supply.
When set to SEPS the MAV will be driven closed before the first regeneration cycle, and be driven open
after the last regeneration cycle.
NOTICE
If the control valve enters into an error state during regeneration mode, the MAV will return to the open
position, if not already there.
Selecting the Control Valve to act as an alternator:
519.0 and higher = Use 3-wire Interconnect Cables for all communication between units.
518.3 and lower = Use 2-wire Interconnect Cables for twin alternators with independent ow meters.
Prior to starting the programming steps, connect the communication cable to each control valve board’s three pin connector
labeled ‘COMM CABLE’. Also connect the meter cord to either control valve to the three pin connector labeled ‘METER’.
Softener Valve Programming Steps
Set to ALT A
Connect the outlet plumbing of ALT A
Configuration Settings Step 5CS
valve to the MAV’s A port and connect
the MAV’s two pin wire connector to
the two pin connector labeled “DRIVE”
Connect the outlet plumbing of ALT b valve to
the MAV’s B port. No electrical connections are
required between the ALT b valve and the MAV.
on the ALT A valve
Softener System Setup Step 10S Set System Capacity Set System Capacity
Softener System Setup Step 11S Set to ‘AUTO’ Set to ‘AUTO’
Softener System Setup Step 12S Set regeneration time option to ‘on 0’. Set regeneration time option to ‘on 0’.
Installer Display Settings Step 3I Set Day Override to “oFF” Set Day Override to “oFF”
If set up for a lter, in Step 5F set Volume Capacity in Gallons; in Step 6F select Regeneration Time Option “on 0”; and in Step 3I select
Day Override “oFF”.
NOTICE
If the control valve is in an error state during regeneration mode the MAV will close the B port and keep open the A port until the error is
corrected and reset.
PWSRTA Twin Alternating Series Softeners 11
Set to ALT b
Page 12

PWSRTA
For Watts alternator systems using PWSRTA valves there will be an option to delay the last two cycles of
regeneration (only “Rinse” and “Fill”). This feature splits the regeneration into two portions. The first portion
of the regeneration will start immediately and all programmed cycles before the “Rinse” and “Fill” cycles will
be performed. After all programmed cycles before “Rinse” and “Fill” are completed the control valve will
drive to the service position (displaying “Delayed Rinse + Fill Pending”). When the volume of the on-line
unit is depleted to 10% of its programmed capacity, the control valve will be triggered to finish the second
portion of the regeneration and complete the “Rinse” and “Fill” cycles and return to Service and be placed
into Standby mode, and wait to come on-line for service. Set to oFF to
deactivate this feature.
PWSRTA2
For Watts alternator systems using the PWSRTA2 valve, when NEXT is pressed after selecting ALT
A or ALT B, a display will allow the user to set the amount of pre-service rinse time for the stand by
tank just prior to returning to service. Set to oFF to deactivate this feature. With 1.0
display appears and is set in a similar manner.
set, the same
Retracted
Valve “A” in Service Position =
MAV piston rod Retracted
NOTICE
Watts Twin Alternator Operations
• Twin alternating systems can be programmed with a day override setting combined with the normal volume-based regeneration
programming. A twin alternating system in this conguration will then regenerate based on the volume used or the day override if there
is a period of low water usage.
• Twin alternating systems can be programmed as a time clock only based regenerating system. In this conguration, the days remaining
are counted only on the unit that is in service. The unit in Stand-by Mode only notes days in diagnostics, which results in time clock
only twin regeneration initiation.
• Twin alternating systems can be programmed for a delayed regeneration time. The system will allow an immediate transfer of the MAV
to switch tanks and place a fully regenerated unit in service once a unit becomes exhausted. The exhausted unit will then be placed into
Stand-by Mode and allowed to have a delayed regeneration at the pre-set time.
Extended
Valve “B” in Service Position =
MAV piston rod Extended
12 PWSRTA Twin Alternating Series Softeners
Page 13
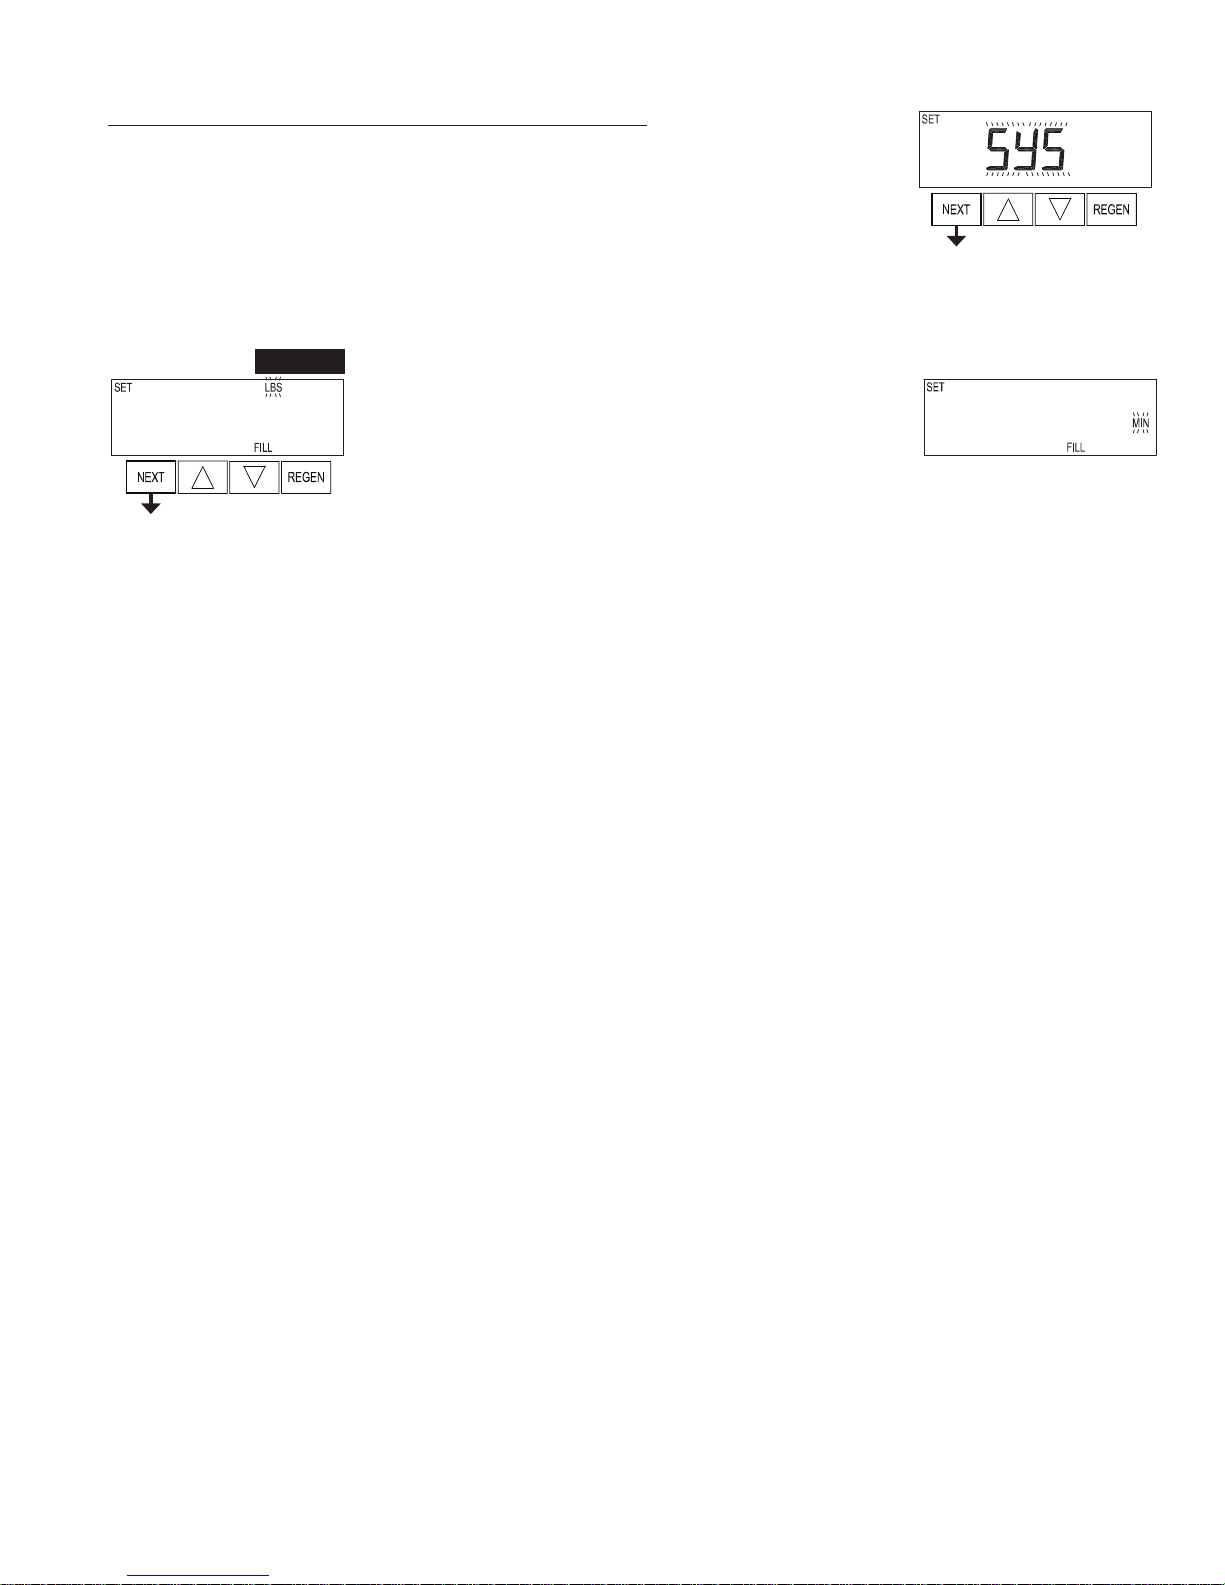
Configuring the Control Valve for System Controller Operation:
Select “SYS” to link control valve to System Controller. For communication between control valve and
System Controller, a three-wire communication cable is required.
Selection requires that a connection to a Watts No Hard Water Bypass (V3070FF or V3070FM) be
made to the two-pin connector labeled MAV located on the printed circuit board for PWSRTA control
valves. For valve types PWSRTA15 and PWSRTA2, a connection from a Watts No Hard Water Bypass
(V3097/ BSPT or V3098/ BSPT) to the two pin connector labeled MAV located on the printed circuit
board is required.
Press NEXT to go to Step 6CS. Press REGEN to return to previous step.
Step 6CS
EXIT TO DISPLAY SCREENS
Step 6CS – Fill Units: If set as a softener, if Step 2CS is set to 1.5, and FILL is part of the Regeneration
Cycle Sequence, FILL UNITS of MIN or LBS can be selected. Press
NEXT to exit OEM Configuration Setup. Press REGEN to return to previous step.
PWSRTA Twin Alternating Series Softeners 13
Page 14
OEM Softener System Setup
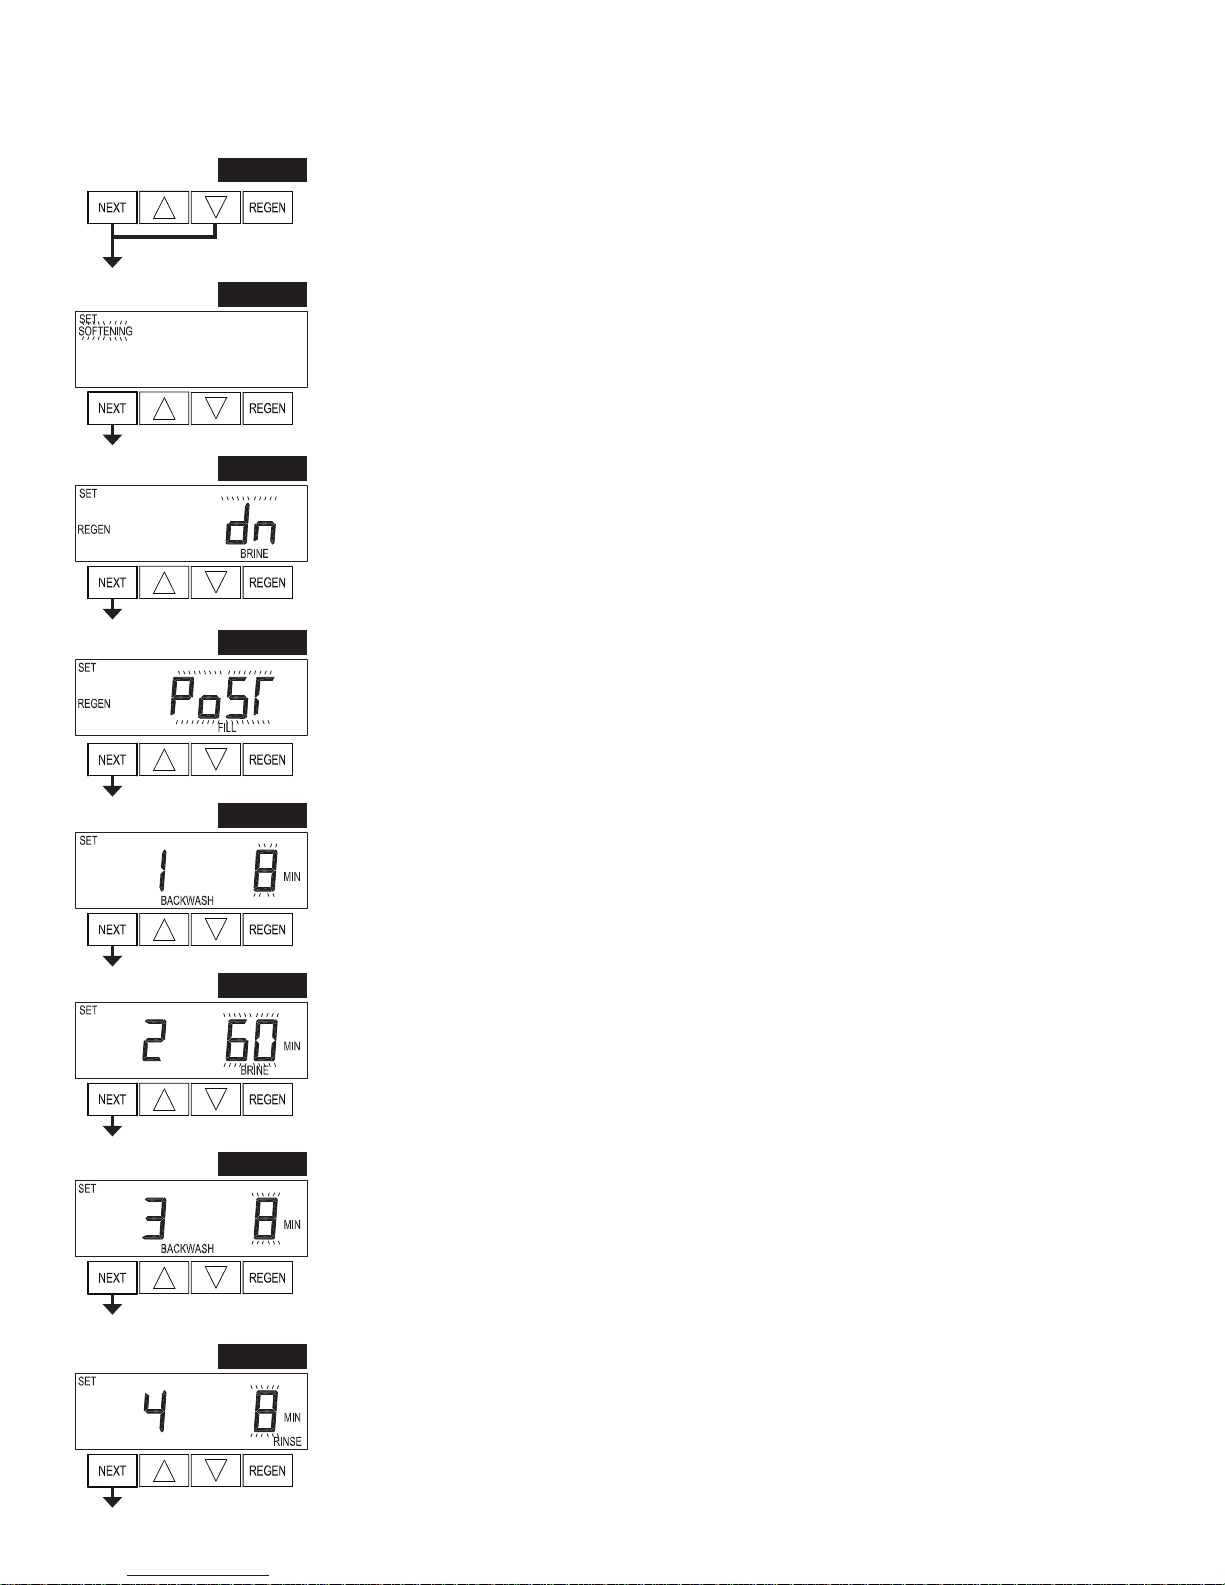
Step 1S
Step 2S
Step 3S
Step 4S
Step 1S - Press NEXT and simultaneously for 5 seconds and release. If screen in Step 2S does not
appear, the lock on valve programming has been activated. To unlock press , NEXT, , REGEN in
sequence, then press NEXT and simultaneously for 5 seconds and release.
Step 2S – Choose SOFTENING using or . Press NEXT to go to Step 3S. Press REGEN to exit OEM
Softener System Setup.
Step 3S – Choose Brining Direction using or . This screen is not viewed when Step 2S is set to
Filtering. Press NEXT to go to Step 4S. Press REGEN to return to previous step.
Step 4S – Set Refill location using or :
• “PoST” to refill the brine tank after the final rinse; or
• “PrE” to refill the brine tank four hours before the regeneration time set.
This screen is not viewed when Step 2S is set to Filtering.
Press NEXT to go to Step 5S. Press REGEN to return to previous step.
Step 5S
Step 6S
Step 7S
Step 8S
Step 5S – Select the time for the first cycle using or . For valve types 1.5 and 2.0, “oFF” is also
available.
Press NEXT to go to Step 6S. Press REGEN to return to previous step.
Step 6S – Select the time for the second cycle using or . For valve types 1.5 and 2.0, “oFF” is also
available.
NOTE: The display will flash between cycle number and time, and brine direction (UP or dn).
Press NEXT to go to Step 7S. Press REGEN to return to previous step.
Step 7S – Select the time for the third cycle using or . For valve types 1.5 and 2.0, “oFF” is also
available.
Press NEXT to go to Step 8S. Press REGEN to return to previous step.
Step 8S – Select the time for the fourth cycle using or . For valve types 1.5 and 2.0, “oFF” is also
available.
Press NEXT to go to Step 9S. Press REGEN to return to previous step.
14 PWSRTA Twin Alternating Series Softeners
Page 15

Step 9S
Step 9S – Select the pounds for the fifth cycle using or . For valve types 1.5 and 2.0, “oFF” is also
available.
NOTE: if Step 2CS is set to 2.0 or Step 7CS is set to MIN, Fill will be in minutes.
Press NEXT to go to Step 10S. Press REGEN to return to previous step.
Step 10S
Step 11S
Step 12S
Step 10S – Set System Capacity using or . The System Capacity setting should be based on the
volume of resin and LBS of salt fill set in Step 9S. Press NEXT to go to Step 11S. Press REGEN to
return to previous step.
Step 11S – Set Volume Capacity using or . If value is set to:
• “AUTO” capacity will be automatically calculated and reserve capacity will be automatically estimated;
• “oFF” regeneration will be triggered solely by the day override setting (see Installer Display/Settings
Step 4I);
• a number, regeneration will be triggered by the value specified (in Gallons).
If “oFF” or a volume is used, the hardness display will not be allowed to be set in Installer Display
Settings Step 2I. See Setting Options Table for more detail. Press NEXT to go to Step 12S. Press
REGEN to return to previous step.
Step 12S – Set Regeneration Time Options using or . If value is set to:
• “NORMAL” means regeneration will occur at the preset time;
• “on 0” means regeneration will occur immediately when the volume capacity reaches 0 (zero); or
• “NORMAL + on 0” means regeneration will occur at one of the following:
— the preset time when the volume capacity falls below the reserve or the specified number of days
between regenerations is reached whichever comes first; or
— immediately after 10 minutes of no water usage when the volume capacity reaches 0 (zero).
“NORMAL” is the default if Step 5CS is set to ALT A or ALT B, and “NORMAL + on 0” is not
available.
“on 0” is the default if Step 2CS is set to 1.0
This step will not appear if Step 11S is set to oFF or Step 5CS is set to “SYS”.
See Setting Options Table for more detail. Press NEXT to go to Step 13S. Press REGEN to return to
previous step.
, and “NORMAL + on 0” is not available.
Step 13S
• Gallons Softening Regen on: Relay activates after a set number of gallons have been used while in
service, or during regeneration, and then deactivates after the meter stops registering flow and the set
time period has expired.
• ERROR: Relay closes whenever the valve enters error mode, and immediately deactivates when error
mode is exited. If set to ERROR, Steps 14S and 15S will not be shown.
• Off: If set to Off, Steps 14S and 15S will not be shown.
Press NEXT to go to Step 14S. Press REGEN to return to previous step.
Step 13S – Set Relay Operation using or . The choices are:
• Time on: Relay activates after a set time at the beginning of a regen-
• Gallons Softening on: Relay activates after a set number of gallons
PWSRTA Twin Alternating Series Softeners 15
eration and then deactivates after a set period of time. The start of
regeneration is defined as the first backwash cycle or Dn brine cycle,
whichever comes first.
have been used while in service and then deactivates after the meter
stops registering flow and the set time period has expired.
Page 16

Step 14S
Step 14S – Set Relay Actuation Time or Gallons using or . The choices are:
• Relay Actuation Time: After the start of a regeneration the amount of time that should pass prior to activating the relay. The start of regeneration is defined as the first backwash cycle, Dn brine cycle or UP brine
cycle whichever comes first. Ranges from 1 second to 200 minutes.
• Relay Actuation Gallons: Relay activates after a set number of gallons has passed through the meter.
Ranges from 1 to 200 gallons.
Press NEXT to go to Step 15S. Press REGEN to return to previous step.
Step 15S
Step 15S – Set Relay Deactivate Time using or .
• If Set Time on is selected in Step 13S the relay will deactivate after the time set has expired. Ranges from
1 second to 200 minutes.
• If Set Gallons Softening on or Set Gallons Softening Regen on is selected in Step 13S the relay will deactivate after the time set has expired or after the meter stops registering flow, whichever comes first. Ranges
from 1 second to 20 minutes.
Press NEXT to exit OEM Softener System Setup. Press REGEN to return to previous step.
EXIT OEM SOFTENER SYSTEM SETUP
16 PWSRTA Twin Alternating Series Softeners
Page 17

Filters should only use shaded options
Volume
Capacity
AUTO NORMAL oFF
AUTO NORMAL Any number
Any
number
oFF NORMAL Any number
Any
number
AUTO On 0 oFF
Any
number
Regeneration Time
Option
NORMAL oFF
NORMAL Any number
On 0 oFF
Day
Override
Setting Options Table
1
Result
Reserve capacity automatically estimated.
Regeneration occurs when volume capacity falls below the reserve capacity at the
next Regen Set Time.
Reserve capacity automatically estimated.
Regeneration occurs at the next Regen Set Time when volume capacity falls below
the reserve capacity or the specied number of days between regenerations is
reached.
Reserve capacity not automatically estimated.
Regeneration occurs at the next Regen Set Time when volume
capacity reaches 0.
Reserve capacity not automatically estimated.
Regeneration occurs at the next Regen Set Time when the specied number of
days between regenerations is reached.
Reserve capacity not automatically estimated.
Regeneration occurs at the next Regen Set Time when volume
capacity reaches 0 or the specied number of days between regenerations is
reached.
Reserve capacity NOT automatically estimated.
Regeneration occurs immediately when volume capacity reaches 0. Time of
regeneration will not be allowed to be set because regeneration will always occur
when volume capacity reaches 0.
Reserve capacity NOT automatically estimated.
Regeneration occurs immediately when volume capacity reaches 0. Time of
regeneration will not be allowed to be set because regeneration will always occur
when volume capacity reaches 0.
AUTO NORMAL on 0 oFF
AUTO NORMAL on 0 Any number
Any
number
NORMAL on 0 Any number
Reserve capacity automatically estimated.
Regeneration occurs when volume capacity falls below the reserve capacity at the
next Regen Set Time or regeneration occurs after 10 minutes of no water usage
when volume capacity reaches 0.
Reserve capacity automatically estimated.
Regeneration occurs at the next Regen Set Time when volume capacity falls below
the reserve capacity or the specied number of days between regenerations is
reached or regeneration occurs after 10 minutes of no water usage when volume
capacity reaches 0.
Reserve capacity not automatically estimated.
Regeneration occurs at the next Regen Set Time when the specied number of
days between regenerations is reached or regeneration occurs after 10 minutes of
no water usage when volume capacity reaches 0.
PWSRTA Twin Alternating Series Softeners 17
Page 18

OEM Filter System Setup
Cycle Sequence, Adjustable Default Times (minutes)
Type Backwash Draw Backwash Rinse Backwash* Fill
Filtering Backwash 8 4
Filtering Regen 8 60 8 8 0:30 .95 GAL
Filtering Regen (2.0”) 8 60 8 8 0:30 6
*Cycle is non-adjustable, not shown in cycle sequence programming.
Step 1F
Step 2F
Step 3F
Step 4F
Step 1F -
not appear, the lock on the valve is activated. To unlock press , NEXT, , REGEN in sequence, then
press NEXT and simultaneously for 5 seconds and release.
Press NEXT and simultaneously for 5 seconds and release. If screen in Step 2CS does
Step 2F – Choose FILTERING BACKWASH or FILTERING REGEN (see table) using or . Press NEXT
to go to Step 3F. Press REGEN to exit OEM Filter System Setup.
Step 3F – Select the time for the first cycle using or .
Press NEXT to go to Step 4F. Press REGEN to return to previous step.
Step 4F – Select the time for the second cycle using or .
If Step 2F is set to FILTERING REGEN, press NEXT to program the rest of the cycle times. If Step 2F is
set to FILTERING BACKWASH, press NEXT to go to Step 5F. Press REGEN to return to previous step.
Step 5F
Step 6F
Step 5F – Set Regeneration trigger using or . If value is set to:
• “oFF” regeneration will be triggered solely by the day override setting (see Installer Display/Settings Step
4I);
• a number, regeneration will be triggered by the value specified (in gallons).
See Setting Options Table for more detail.
Press NEXT to go to Step 6F. Press REGEN to return to previous step.
Step 6F – Set Regeneration Time Options using or . If value is set to:
• “NORMAL” means regeneration will occur at the preset time;
• “on 0” means regeneration will occur immediately when the volume capacity reaches 0 (zero); or
• “NORMAL + on 0” means regeneration will occur at one of the following:
— the preset time when the volume capacity falls below the reserve or the specified number of days
between regenerations is reached whichever comes first; or
— immediately after 10 minutes of no water usage when the volume capacity reaches 0 (zero).
“NORMAL” is the default if Step 5CS is set to ALT A or ALT B, and “NORMAL + on 0” is not
available.
“on 0” is the default if Step 2CS is set to 1.0
This step will not appear if Step 5F is set to off or Step 5CS is set to “SYS”.
See Setting Options Table for more detail. Press NEXT to go to Step 7F. Press REGEN to return to
previous step.
, and “NORMAL + on 0” is not available.
18 PWSRTA Twin Alternating Series Softeners
Page 19

Step 7F
Step 7F – Set Relay Operation using or . The choices are:
• Time on: Relay activates after a set time at the beginning of a
regeneration and then deactivates after a set period of time. The start
of regeneration is defined as the first backwash cycle or Dn brine
cycle, whichever comes first.
• Gallons Filtering on: Relay activates after a set number of gallons
have been used while in service and then deactivates after the meter
stops registering flow and the set time period has expired.
• Gallons Filtering Regen on: Relay activates after a set number of gallons have been used while in service, or during regeneration, and then deactivates after the meter stops registering flow and the set time
period has expired.
•ERROR: Relay closes whenever the valve enters error mode, and immediately deactivates when error
mode is exited. If set to ERROR, Steps 8F and 9F will not be shown.
• Off: If set to Off, Steps 8F and 9F will not be shown.
Press NEXT to go to Step 8F. Press REGEN to return to previous step.
Step 8F
Step 9F
Step 8F –
• Relay Actuation Time: After the start of a regeneration the amount of time that should pass prior to activating the relay. The start of regeneration is defined as the first backwash cycle or brine cycle, whichever
comes first. Ranges from 1 second to 200 minutes.
• Relay Actuation Gallons: Relay activates after a set number of gallons has passed through the meter.
Ranges from 1 to 200 gallons.
Press NEXT to go to Step 9F. Press REGEN to return to previous step.
Step 9F – Set Relay Deactivate Time using or .
• If Set Time on is selected in Step 7F the relay will deactivate after the time set has expired. Ranges
from 1 second to 200 minutes.
• If Set Gallons Filtering on or Set Gallons Filtering Regen on is selected in Step 7F the relay will deactivate after the time set has expired or after the meter stops registering flow, whichever comes first.
Ranges from 1 second to 20 minutes.
Press NEXT to exit OEM Filter System Setup. Press REGEN to return to previous step.
EXIT OEM FILTER SYSTEM SETUP
Set Relay Actuation Time or Gallons using or . The choices are:
PWSRTA Twin Alternating Series Softeners 19
Page 20

Installer Display Settings
Step 1I
Step 2I
Step 3I
Step 4I
Step 1I - To enter Installer Display press NEXT and simultaneously for about 5 seconds and
release.
Step 2I – Hardness: Set the amount of influent hardness using or . This display will not be viewed
if FILTERING BACKWASH or FILTERING REGEN is selected in Step 2F or if “oFF” or a number was
selected in Step 11S.
Press NEXT to go to step 3I. Press REGEN to exit Installer Display Settings.
Step 3I – Day Override: When volume capacity is set to “oFF”, sets the number of days between
regenerations. When volume capacity is set to AUTO or to a volume, sets the maximum number of days
between regenerations. If value set to “oFF”, regeneration initiation is triggered solely by volume used.
If value is set in days (allowable range from 1 to 28) regeneration initiation will be called for on that day
regardless of actual water usage. Set Day Override using or :
• number of days between regeneration (1 to 28); or
• “oFF”.
See Setting Options Table for more detail on setup.
Press NEXT to go to step 4I. Press REGEN to return to previous step.
Step 4I – Next Regeneration Time (hour): Set the hour of day for regeneration using or . The default
time is 2:00. This display will show “REGEN on 0 GAL” if “on 0” is selected in Set Regeneration Time
Option in OEM Softener System Setup or OEM Filter System Setup.
Press NEXT to go to step 5I. Press REGEN to return to previous step.
Step 5I
Step 5I – Next Regeneration Time (minutes): Set the minutes of day for regeneration using or . This
display will not be shown if “on 0” is selected in Set Regeneration Time Option in OEM Softener System
Setup or OEM Filter System Setup.
Press NEXT to exit Installer Display Settings. Press REGEN to return to previous step.
EXIT INSTALLER DISPLAY SETTINGS
20 PWSRTA Twin Alternating Series Softeners
Page 21

Diagnostics
Step 1D
Step 2D
Step 3D
Step 4D
Step 1D - Press and simultaneously for 5 seconds and release. If screen in Step 2D does not
appear the lock on the valve is activated. To unlock press , NEXT, , REGEN in sequence, then
press and simultaneously for 5 seconds and release.
Step 2D – Software Version. Press NEXT to go to Step 3D. Press REGEN to exit Diagnostics.
Step 3D – Volume, total used since start-up: This display shows the total gallons treated since startup.
This display will equal zero if a water meter is not installed. Press the NEXT button to go to Step 4D.
Press REGEN to return to previous step.
Step 4D – Days, total since start-up: This display shows the total days since startup. Press the NEXT
button to go to Step 5D. Press REGEN to return to previous step.
Step 5D
Step 6D
Step 7D
Step 8D
Step 5D – Regenerations, total number since start-up: This display shows the total number of regenera-
tions that have occurred since startup. Press the NEXT button to go to Step 6D. Press REGEN to return
to previous step.
Step 6D – Error Log: This display shows a history of the last 10 errors generated by the control
during operation. Press or to view each recorded error.
Press NEXT to go to Step 7D. Press REGEN to return to previous step.
Step 7D – Days, since last regeneration: This display shows the days since the last regeneration
occurred. Press NEXT to go to Step 8D. Press REGEN to return to previous step.
Step 8D – Volume, since last regeneration: This display shows the volume of water that has been
treated since the last regeneration. This display will equal zero when a water meter is not installed. Press
NEXT to go to Step 9D. Press REGEN to return to previous step.
PWSRTA Twin Alternating Series Softeners 21
Page 22

Step 9D
Step 9D – Volume, reserve capacity used for last 7 days: If the valve
is set up as a softener, a meter is installed, and Set Volume Capacity
is set to “Auto,” this display shows day 0 (for today) and flashes the
reserve capacity. Pressing will show day 1 (which would be yesterday) and flashes the reserve capacity used. Pressing again will
show day 2 (the day before yesterday) and the reserve capacity. Keep
pressed to move backwards in the day series. This display does not appear if 1.0
pressing to show the capacity for days 3, 4, 5 and 6. can be
if ALT A or ALT B are selected in Step 5CS, or anytime the reserve capacity is not determined by the
control.
Press NEXT at any time to go to Step 10D. Press REGEN to return to previous step.
is set in Step 2CS,
Step 10D
Step 11D
Step 12D
Step 10D – Volume, 63-day usage history: This display shows day
0 (for today) and flashes the volume of water treated today. Pressing
will show day 1 (which would be yesterday) and flashes the volume
of water treated on that day. Continue to press to show the maximum volume of water treated for the last 63 days. If a regeneration
occurred on the day the word “REGEN” will also be displayed. This
Press NEXT at any time to go to Step 11D. Press REGEN to return to previous step.
display will show dashes if a water meter is not installed.
Step 11D – Twin Tank Valve transfer history: only displays when
was selected in Step 2CS. Use or to scroll through the last
1.0
10 tank transfers. The first position in the display ranges from 0 to 9
with the lowest number being the most recent transfer. The second
position in the display will be either “A” or “b”. If “A” then the tank with
the valve on it was in service, if “b” the tank with the in/out head on
ago that the transfer occurred. The display alternates with the volume that was treated before the tank
transferred. Press NEXT at any time to go to Step 12D. Press REGEN to return to previous step.
it was in service. The next three digits represent the number of hours
Step 12D – MAV Drive History in the direction of retracted piston rod
position. Display will only be shown if 1.0
or OFF is not selected in Step 5CS. Up to a four digit number will
appear after the “L” which stands for latest and “A” which stands for
average. Drive time is measured in 1/100 of a second; i.e., a 17.10
second move is displayed as “1710”. Press NEXT at any time to go
to Step 13D. Press REGEN to return to previous step.
is selected in Step 2CS,
Press and hold and buttons for 3 seconds while in Step 12D to
reset the MAV drive history in both the retracted and extended piston
rod position. To view the old MAV drive history data for retracted
and extended rod position press and hold REGEN and while in
Step 12D. Press NEXT to advance display to the old MAV drive history.
Step 13D
the extended and retracted piston rod position. To view the old MAV drive history data see Step 12D.
Press NEXT at any time exit Diagnostics. Press REGEN to return to previous step.
EXIT DIAGNOSTICS
22 PWSRTA Twin Alternating Series Softeners
Step 13D – MAV Drive History in the direction of extended piston
rod position. Display will only be shown if 1.0
2CS, or OFF is not selected in Step 4CS. Up to a four digit number
will appear after the “L” which stands for latest and “A” which stands
for average. Drive time is measured in 1/100 of a second; i.e., a
17.15 second move is displayed as “1715”. Press and hold and
for 3 seconds while in Step 13D to reset the MAV drive history in both
is selected in Step
Page 23

PWSRTA Part List and Drawings
Front Cover and Drive Assembly
Drawing No. Order No. Description Quantity
1 V3175EE-01 PWSRTA Front Cover Assembly 1
2 V3107-01 PWSRTA Motor 1
3 V3106-01 PWSRTA Drive Bracket & Spring Clip 1
4 V3408EE-03BOARD PWSRTA THRU 2L/2 EEPCBRD MAV/ALT REPL 1
5 V3110 PWSRTA Drive Gear 12x36 3
6 V3109 PWSRTA Drive Gear Cover 1
Not Shown
Not Shown V3178 PWSRTA Drive Back Plate 1
Refer to Control Valve Service Manual for other drawings and part numbers.
V3186 PWSRTA AC ADAPTER 120V-12V
V3186-01 PWSRTA AC ADAPTER CORD ONLY
AC Adapter U.S. International
Supply Voltage 120 V AC 230V AC
Supply Frequency 60 Hz 50 Hz
Output Voltage 12 V AC 12 V AC
Output Current 500 mA 500 mA
1
When replacing the battery, align
positives and push down to fully seat.
Battery Fully Seated
Correct
Battery
Orientation
Battery replacement is 3 volt
lithium coin cell type 2032.
4
1
PC Board Relay
Terminal Block
5
6
PWSRTA Twin Alternating Series Softeners 23
3
2
Page 24

Valve Body Compliance Table
Application Injector and/or Plug(s) Main Piston
1” Downflow Softener or
Regenerating Filter
1” Backwash Only Filter
1” Upflow Softener
Injector in “DN” hole, Plug
in “UP” hole
Plug in “DN” and “UP”
holes, Install Refill Port Plug
Injector in “UP” hole, Plug
in unlabeled hole
V3011 V3174 V3005 V3031
V3011 None V3005 V3031
V3011-01 V3174 V3005 V3031
Regenerant
Piston
Stack Body*
PWSRTA with 1.050" Distributor Tube Opening Identification
Spacer Color:
Grey
1.25"
1.25"
NOTICE
The downflow piston is a solid amber color. The upflow piston is black and amber.
24 PWSRTA Twin Alternating Series Softeners
Page 25

Drive Cap Assembly, Downfl ow Piston, Upfl ow Piston, Regenerant
Piston and Spacer Stack Assembly
Drawing No. Order No. Description Quantity
1 V3005 PWSRTA Spacer Stack Assembly 1
2 V3004 Drive Cap ASY 1
3a V3011* PWSRTA Piston Downfl ow ASY
3b V3011-01* PWSRTA Piston Upfl ow ASY
4 V3174 PWSRTA Regenerant Piston 1
5 V3135 O-ring 228 1
*V3011 is labeled with DN and V3011-01 is labeled with UP. Upfl ow option is not applicable to
EA, EE or EI control valves.
NOTICE
The regenerant piston is not used in backwash only applications.
Refer to programming and Cover Drawing Manual
1
1
3b
2
4
3a
5
PWSRTA Twin Alternating Series Softeners 25
Page 26

22
21
17
20
19
18
15
16
1
2
7
12
Twin Transfer
13
4
14
5
6
10
11
10
7
9
8
6
5
4
3
2
1
26 PWSRTA Twin Alternating Series Softeners
Page 27

Twin Transfer (continued)
Drawing No. Order No. Description Quantity
1 V3470 SCREW BHC 1/4-20 X 1 SS 12
2 V3724 WASHER FLAT SS 1/4 12
3 V4005-01 T1 TRANSFER CAP ASY 1
4 V4029 O-RING 236 2
5 V4015 T1 TRANSFER SPRING 2
6 V4014 T1 TRANSFER SPRING SUPPORT 2
7 V4036 T1 ROTOR DISK ASY 2
8 V3105 O-RING 215 (DISTRIBUTOR TUBE) 1
9 V3180 O-RING 337 1
10 V4016 T1 TRANSFER SEAL 6
11 V3031 T1 BODY SFT WTR REGEN 1
12 V4023 T1 TRANSFER DRIVE SHAFT ASY 1
13 V3287 O-RING 110 2
14 V4006-01 T1 TRANSFER DRIVE CAP ASY 1
15 V4011-01 T1 TRANSFER DRIVE GEAR ASY 1
16 V4012 T1 TRANSFER DRIVE GEAR AXLE 1
17 V4013 T1 TRANSFER REDUCTION GEAR 1
18 V3264 CWS200 BYPASS REDUCTION GEARAXLE 3
19 V3110 PWSRTA DRIVE REDUCING GEAR 12X36 3
20 V3262-01 1.5” & 2” ALT/2BY REDUCGEARCVRASY 1
21 V3592 SCREW #8-1 PHPN T-25 SS 3
22 V4049 T1 COVER ASSEMBLY 1
NOT SHOWN V4043 T1 TRANSFER MOTOR ASY 1
NOT SHOWN V3151 PWSRTA NUT 1 QC 1
NOT SHOWN V4055* TWIN TANK METER ASY 1
NOT SHOWN V4017-01 T1 INTERCONNECT FITTING ASY 1
NOT SHOWN D1400 1191 IN/OUT HEAD 1
!
WARNING
*THIS WATER METER SHOULD NOT BE USED
AS THE PRIMARY MONITORING DEVICE FOR
CRITICAL OR HEALTH EFFECT APPLICATIONS.
PWSRTA Twin Alternating Series Softeners 27
Page 28

Injector Cap, Injector Screen, Injector, Plug and O-Ring
Drawing No. Order No. Description Quantity
1 V3176 INJECTOR CAP 1
2 V3152 O-RING 135 1
3 V3177-01 INJECTOR SCREEN CAGE 1
4 V3010-1Z PWSRTA INJECTOR ASY Z PLUG 1
V3010-1A PWSRTA INJECTOR ASY A BLACK
V3010-1B PWSRTA INJECTOR ASY B BROWN
V3010-1C PWSRTA INJECTOR ASY C VIOLET
V3010-1D PWSRTA INJECTOR ASY D RED
V3010-1E PWSRTA INJECTOR ASY E WHITE
5
Not Shown
Not Shown
* The injector plug and the injector each contain one 011 (lower) and 013 (upper) o-ring.
NOTICE
For upflow position, injector is located in the up hole and injector plug is in the other hole.
Upflow option is not applicable to EA, EE or EI control valves.
For a filter that only backwashes, injector plugs are located in both holes.
V3010-1F PWSRTA INJECTOR ASY F BLUE
V3010-1G PWSRTA INJECTOR ASY G YELLOW
V3010-1H PWSRTA INJECTOR ASY H GREEN
V3010-1I PWSRTA INJECTOR ASY I ORANGE
V3010-1J PWSRTA INJECTOR ASY J LIGHT BLUE
V3010-1K PWSRTA INJECTOR ASY K LIGHT GREEN
V3170 O-RING 011
V3171 O-RING 013
1
*
*
1
2
4
3
5
28 PWSRTA Twin Alternating Series Softeners
Page 29

Injector Order Information
Injector Order Number Injector Color
V3010-1A Black 6" 8"
V3010-1B Brown 7" 9"
V3010-1C Violet 8" 10"
V3010-1D Red 9" 12"
V3010-1E White 10" 13"
V3010-1F Blue 12" 14"
V3010-1G Yellow 13" 16"
V3010-1H Green 14" 18"
V3010-1I Orange 16" 21"
V3010-1J Light Blue 18"
V3010-1K Light Green 21"
Actual tank size used may vary depending on the design and application of the system. Tank diameter is an approximation for the following:
1. Downflow softener using standard mesh synthetic cation exchange media regenerating with sodium chloride.
2. Upflow softener using standard mesh synthetic cation exchange media regenerating with sodium chloride, an inlet water pressure of 30
to 50 psi (2.1 to 3.4 bar) and water temperature of 60°F (15.6°C) water or warmer. Higher pressures or lower temperatures would need
smaller injectors to avoid lifting the bed.
Typical Tank Diameter
Down Up*
*Not applicable for EA, EE or EI control valves.
PWSRTA Twin Alternating Series Softeners 29
Page 30

Refill Flow Control Assembly and Refill Port Plug
Drawing No. Order No. Description Quantity
1 V3195-01 PWSRTA Refill Port Plug Asy
2 H4615 Elbow Locking Clip 1
3 JCP-P-6 Polytube insert 3/8” 1
4 JCPG-6PBLK Nut 3/8” 1
5 H4613 Elbow Cap 3/8” 1
6 V3163 0-ring 019 1
7 V3165-01* PWSRTA RFC Retainer Asy (0.5 gpm) 1
8 V3182 PWSRTA RFC 1
9 V3330-01 PWSRTA Brine Elbow Asy w/RFC 3/8" 1
Not Shown V3552 PWSRTA Brine Elbow Asy w/RFC 1/2" Option
Not Shown H4650 Elbow ½” with nut and insert Option
*Assembly includes V3182 PWSRTA (0.5 gpm) RFC.
This part is required for backwash only
systems
4
5
3
1
6
7
8
9
Water
Flow
Proper RFC orientation
directs rell water ow
towards the washer face
with rounded edge and text.
2
30 PWSRTA Twin Alternating Series Softeners
Page 31

Drain Line – 3/4”
Drawing No. Order No. Description Quantity
1 H4615 Elbow Locking Clip 1
2 PKP10TS8-BULK Polytube insert 5/8 Option
3 V3192 PWSRTA Nut ¾ Drain Elbow Option
4* V3158-01 PWSRTA Drain Elbow ¾ Male 1
5 V3163 O-ring 019 1
6* V3159-01 PWSRTA DLFC Retainer ASY 1
V3162-007 PWSRTA DLFC 0.7 gpm for ¾
V3162-010 PWSRTA DLFC 1.0 gpm for ¾
V3162-013 PWSRTA DLFC 1.3 gpm for ¾
V3162-017 PWSRTA DLFC 1.7 gpm for ¾
V3162-022 PWSRTA DLFC 2.2 gpm for ¾
V3162-027 PWSRTA DLFC 2.7 gpm for ¾
7
*4 and 6 can be ordered as a complete assembly - V3331 PWSRTA Drain Elbow and Retainer Asy
Valves are shipped without drain line flow control (DLFC) - install DLFC before using. Valves are shipped without ¾ nut for drain elbow (polytube
installation only) and 5/8" polytube insert (polytube installation only).
V3162-032 PWSRTA DLFC 3.2 gpm for ¾
V3162-042 PWSRTA DLFC 4.2 gpm for ¾
V3162-053 PWSRTA DLFC 5.3 gpm for ¾
V3162-065 PWSRTA DLFC 6.5 gpm for ¾
V3162-075 PWSRTA DLFC 7.5 gpm for ¾
V3162-090 PWSRTA DLFC 9.0 gpm for ¾
V3162-100 PWSRTA DLFC 10.0 gpm for ¾
One DLFC must
be used if ¾
fitting is used
Water
Flow
Proper DLFC orientation
directs water ow towards
the washer face with
rounded edge.
2
3
5
4
6
7
1
PWSRTA Twin Alternating Series Softeners 31
Page 32

Drain Line - 1”
Drawing No. Order No. Description Quantity
1 H4615 Elbow Locking Clip 1
2 V3008-02 PWSRTA Drain FTG 1 Straight 1
3* V3166 PWSRTA Drain FTG Body 1 1
4* V3167 PWSRTA Drain FTG Adapter 1 1
5* V3163 0-ring 019 1
6* V3150 PWSRTA Split Ring 1
7* V3151 PWSRTA Nut 1” QC 1
8* V3105 O-ring 215 1
V3190-090 PWSRTA DLFC 9.0 gpm for 1
V3190-100 PWSRTA DLFC 10.0 gpm for 1
V3190-110 PWSRTA DLFC 11.0 gpm for 1
9
* Can be ordered as a set. Order number V3008-02, description: PWSRTA Drain FTG 1 Straight.
V3190-130 PWSRTA DLFC 13.0 gpm for 1
V3190-150 PWSRTA DLFC 15.0 gpm for 1
V3190-170 PWSRTA DLFC 17.0 gpm for 1
V3190-200 PWSRTA DLFC 20.0 gpm for 1
V3190-250 PWSRTA DLFC 25.0 gpm for 1
One DLFC must
be used if 1” fitting
is used
Water
Flow
Proper DLFC orientation
directs water ow towards
the washer face with
rounded edge.
3
9
8
2
6
7
4
5
1
32 PWSRTA Twin Alternating Series Softeners
Page 33

V4017-01 T1 Interconnect Fitting Assembly
4
1
2
3
Drawing No. Order No. Description Quantity
1 V3151 PWSRTA Nut 1" Quick Connect 4
2 V3150 PWSRTA Split Ring 4
3 V3105 O-Ring 215 4
4 V4017 T1 Interconnect Fitting 2
A. Fitting Installation Instructions:
• Installation fittings are designed to accommodate minor plumbing misalignments, but are not designed to support the weight of a system
or the plumbing.
• Slide nut on first, then the split ring and o-ring.
• Hand tighten the nut only.
The V4017-01 can be used on tanks up to 10” in diameter.
If using 12” diameter tanks or larger V4052 PIPE PVC SCH 80 1-1/4X 20
(36 pieces per box) may be purchased and combined with two V3007-07 W100T FTG 1.25&1.5 PVC SLVNT ASY. The V4052 PIPE
PVC SCH 80 1-1/4X 20 can be cut to the desired length.
PWSRTA Twin Alternating Series Softeners 33
Page 34

D1400 1191 In/Out Head
1
2
Drawing No. Order No. Description Quantity
1 V3180 O-Ring 337 1
2 V3105 O-Ring 215 (Distributor Tube) 1
34 PWSRTA Twin Alternating Series Softeners
Page 35

PWSRTA Control Valve System Description
The PWSRTA control valves consist of the following components:
1. Drive Assembly
2. Drive Cap Assembly, Main Piston and Regenerant Piston
3. Spacer Stack Assembly
4. Injector Cap, Screen, Injector Plug and Injector
Drive Assembly
The drive assembly consists of the following parts:
• Drive Bracket
• Printed Circuit (PC) Board
• Motor
• Drive Gears
• Drive Gear Cover
The drive bracket holds the PC board, the motor, the drive gears and the drive gear cover in place.
The PC board receives and retains information, displays the information, determines when to regenerate and initiates regeneration. The display
shows different types of information in the initial system set up (for softeners or filters), installer display settings, diagnostics, valve history or
user display settings.
The PC board powers the motor. The PC board’s two-prong jack connects wires to the direct current (DC) motor. The motor is held in place on
the drive bracket by a spring-loaded clip and a small bulge in the plastic, which fits in one of the slots on the motor housing. The motor turns
drive gears that drive the piston to cycle positions for backwashing, regeneration, rinsing, refill or service. The motor is fully reversible (turns
both ways) and changes direction of rotation to change the direction of piston motion. The motor is easily replaced if necessary.
5. Refill Flow Control Assembly or Refill Port Plug
6. Drain Line Flow Control and Fitting Assembly
7. Water Meter
8. Twin Transfer Valve
There are three drive gears held in place by the drive gear cover. All three drive gears are the same size. A reflective coating is applied to the
gears. As the center drive gear turns a light shines on the coating and a light sensing diode determines if a light pulse was returned. The PC
board counts the pulses and determines when to stop driving the motor.
Drive Cap Assembly, Main Piston and Regenerant Piston
The drive gears turn the main gear of the drive cap assembly, which moves the piston. The screw-driven, horizontally moving piston stops at
specific positions to direct the flow of water to backwash, regenerate, rinse or refill. The PC board determines the position of the piston by
counting pulses produced when the piston is moved. An optical sensor looking at one of the reduction drive gears generates these pulses.
Each cycle position is defined by a number of pulses. The counter is zeroed each time the valve goes to the service position. The PC board
finds the service position by noting the increase in current delivered to the motor when the mechanical stop at the service position is reached.
This method of controlling piston position allows for greater flexibility and requires no switches or cams (U.S. Patent 6444127).
One of two main pistons is always used:
1. A 1.25" diameter downflow piston is used when the PWSRTA control valve is used as a downflow softener, regenerating filter or nonregenerating filter.
2. A 1.25" diameter upflow piston is used when the PWSRTA control valve is used as an upflow softener. Upflow option not applicable for EA,
EE or EI control valves.
If the control valve is used as a softener or a regenerating filter, a regenerant piston must be attached to the main piston. If the control valve is
to be used on a system that does not require a regenerant to be added, the regenerant piston must be removed.
PWSRTA Twin Alternating Series Softeners 35
Page 36

Spacer Stack Assembly
The spacer stack assembly provides the necessary flow passage for water during the different cycles. The all-plastic spacer stack assembly
(U.S. Patent 6402944) is a one-piece design which allows the stack to be removed using your fingers.
The exterior of the stack is sealed against the body bore with self lubricating EPDM o-rings, while the interior surface is sealed against the
piston using slippery self cleaning directional (one-way) silicone lip seals. The lip seals are clear in color and have a special slippery coating so
that the piston does not need to be lubricated.
Injector Cap, Screen, Injector Plug and Injector
The screen, injector and/or injector plug(s) are installed under the injector cap in an easy to access location on top of the valve. The injector cap
contains four slots so no water accumulates in the cap. The injector cap is designed to be hand tightened.
Under the injector cap there is an easy to clean removable screen to prevent fouling of the injector. There are two holes under the injector cap
labeled “DN” and “UP”. The holes will be filled with a plug or an injector.
The plug (Order # V3010-1Z) prevents water from traveling a certain pathway. The injector lets water pass through the pathway. The selfpriming injector increases the velocity of the water, creating a zone of negative pressure that draws in the concentrated liquid regenerant, such
as sodium chloride (brine), potassium permanganate, etc. The regenerant blends with the stream of water, which passes through the media to
regenerate the bed.
The injector provides a consistent regenerant/water mixture ratio over the entire operating pressure range of the control valve. The injector
provides good performance in a variety of applications, which may involve elevated drain lines and long regenerant draw lengths. Injectors
are chosen by knowing the type, amount, and regenerant flow rate for a particular type of media. Guidelines can be found in the media
manufacturer’s literature. The color coded injectors give different regenerant draw, slow rinse and total flow rates over the pressure range.
See injector graphs (pages 25-28) for total, slow rinse and draw flow rates.
The control valve has been manufactured to be one of the following:
• regeneration downflow PWSRTA (for softeners or regenerating filters install injector in DN location, plug in UP location)
• regeneration upflow PWSRTA (upflow option is for softeners only, which are not EA, EE or EI control valves. Install injector in UP location,
plug in other hole location)
• no regenerant PWSRTA (both the DN and UP holes have injector plugs installed) and plug installed for the refill elbow
NOTICE
It is okay to field convert valves from upflow to downflow and
vice versa with the PWSRTA valve as long as software supports
upflow brine.
Refill Flow Control Assembly or Refill Port Plug
The refill flow control assembly consists of a refill flow elbow, refill flow control retainer assembly, refill flow control, polytube insert and nut
assembly. The refill flow control retainer fits in the refill elbow. The refill flow control retainer houses the refill flow control which controls the flow
rate when the regenerant tank is being refilled. The refill flow control is a flexible washer-like part with a small orifice and a precision molded
contour that delivers a steady 0.5 gpm regenerant tank refill rate at varying inlet pressures. Refill is accomplished with treated water.
The refill flow control assembly is installed in an easy to access refill elbow located on top of the control valve. The refill flow control assembly is
attached to the control valve with a locking clip. The locking clip allows the elbow to rotate 270 degrees so the outlet can be orientated towards
the regenerant tank.
The control valve has a standard refill elbow to which a 3/8” flexible tube can be connected. An optional elbow can be ordered which
accommodates a ½” flexible tube for a high regenerant draw rate situation. Both elbows use the same refill flow control and retainer.
If the control valve is to be used as a non-regenerant filter control valve, the refill elbow is removed and replaced with a refill port plug P/N V3195-01.
36 PWSRTA Twin Alternating Series Softeners
Page 37

Drain Line Flow Control and Fitting Assembly
The drain line flow control assembly includes a drain line flow control and a fitting. The drain line flow control allows proper media bed
expansion by regulating the flow rate to the drain. The drain line flow control is a flexible washer-like part with an orifice and a precision molded
contour. The flow rates are within ± 10% over the pressure range of 20 psi to 125 psi (1.4 bar to 8.6 bar). See table for flow rate information.
A. Drain Line Flow Control and Fitting Assembly Information
Drain Line Fitting
¾” V3162-007 007 0.7 2.6
¾” V3162-010 010 1.0 3.8
¾” V3162-013 013 1.3 4.9
¾” V3162-017 017 1.7 6.4
¾” V3162-022 022 2.2 8.3
¾” V3162-027 027 2.7 10.2
¾” V3162-032 032 3.2 12.1
¾” V3162-042 042 4.2 15.9
¾” V3162-053 053 5.3 20.1
¾” V3162-065 065 6.5 24.6
¾” V3162-075 075 7.5 28.4
¾” V3162-090 090 9.0 34.1
¾” V3162-100 100 10.0 37.9
1” V3190-090 090 9.0 34.1
1” V3190-100 100 10.0 37.9
1” V3190-110 110 11 41.6
1” V3190-130 130 13 49.2
1” V3190-150 150 15 56.8
1” V3190-170 170 17 64.3
1” V3190-200 200 20 75.7
1” V3190-250 250 25 94.6
Drain Line Flow Control Order
No.
Number on Drain Line Flow Control
Backwash Flow Rate
(gpm)
Backwash Flow Rate
(lpm)
1. The drain line flow control and fitting are located on top of the control valve and replaceable without the use of special tools.
2. The drain line flow control can be installed in the standard ¾” drain line elbow, which accommodates 5/8” polytube or ¾” NPT drain line
connections. The optional nut and polytube insert for the ¾” drain line elbow is designed for use with flexible polytube only. The ¾” drain
line elbow can be rotated 180 degrees so the outlet can be orientated to the nearest drain. The same retainer is used for all drain line
flow controls for the ¾” fitting. Drain line flow controls designed for the 3/4” fitting are available for flow rates ranging from 0.7 to 10 gpm
(2.6 to 37.9 lpm).
3. An optional 1” straight drain line fitting is available to accommodate drain line flow rates ranging from 9 to 25 gpm (34.1 to 94.6 lpm).
This fitting is straight but still connects to the control valve using the same locking clip. The drain line flow control is located between two
fitted parts (i.e. the fitting acts as the retainer). The nut is unscrewed to access the drain line flow control.
PWSRTA Twin Alternating Series Softeners 37
Page 38

Troubleshooting
Problem Possible Cause Solution
1. No Display on PC Board
2. PC Board does not display correct time of day
a. No power at electric outlet a. Repair outlet or use working outlet
b. Control valve Power Adapter not plugged
into outlet or power cord end not
connected to PC board connection
c. Improper power supply c. Verify proper voltage is being delivered
d. Defective Power Adapter d. Replace Power Adapter
e. Defective PC Board e. Replace PC Board
a. Power Adapter plugged into electric outlet
controlled by light switch
b. Tripped breaker switch and/or tripped GFI b. Reset breaker switch and/ or GFI
c. Power outage c. Reset time of day. If PC Board has
d. Defective PC Board d. Replace PC Board
a. Meter is not connected to meter
connection on PC Board
b. Restricted/ stalled meter turbine c. Remove meter and check for rotation
b. Plug Power Adapter into outlet or
connect power cord end to PC Board
connection
to PC Board
a. Use uninterrupted outlet
switch
battery back up present the battery
may be depleted. See Front Cover
and Drive Assembly drawing for
instructions.
a. Connect meter to three pin connection
labeled METER on PC Board
or foreign material
4. Control valve regenerates at wrong time of day
5. Time of day flashes on and off
6. Control valve does not regenerate
automatically when the REGEN button is
depressed and held.
7. Control valve does not regenerate
automatically but does when the REGEN
button is depressed and held.
c. Meter wire not installed securely into three
pin connector
d. Defective meter d. Replace meter
e. Defective PC Board e. Replace PC Board
a. Power outage a. Reset time of day. If PC Board has
b. Time of day not set correctly b. Reset to correct time of day
c. Time of regeneration set incorrectly c. Reset regeneration time
d. Control valve set at “on 0” (immediate
regeneration)
e. Control valve set at “NORMAL + on 0”
(delayed and/ or immediate)
a. Power outage a. Reset time of day. If PC Board has
a. Broken drive gear or drive cap assembly a. Replace drive gear or drive cap
b. Broken Piston Rod b. Replace piston rod
c. Defective PC Board c. Defective PC Board
a. Meter is not connected to meter
connection on PC Board
b. Restricted/ stalled meter turbine b. Remove meter and check for rotation
c. Incorrect programming c. Check for programming error
d. Meter wire not installed securely into three
pin connector
e. Defective meter e. Replace meter
f. Defective PC Board f. Replace PC Board
c. Verify meter cable wires are installed
securely into three pin connector
labeled METER
battery back up present the battery
may be depleted. See Front Cover
and Drive Assembly drawing for
instructions.
d. Check programming setting and reset
to NORMAL (for a delayed regen time)
e. Check programming setting and reset
to NORMAL (for a delayed regen time)
battery back up present the battery
may be depleted. See Front Cover
and Drive Assembly drawing for
instructions.
assembly
a. Connect meter to three pin connection
labeled METER on PC Board
or foreign material
d. Verify meter cable wires are installed
securely into three pin connector
labeled METER
38 PWSRTA Twin Alternating Series Softeners
Page 39

Problem Possible Cause Solution
8. Hard or untreated water is being delivered
9. Control valve uses too much regenerant
10. Residual regenerant being delivered to
service
11. Excessive water in regenerant tank
12. Control valve fails to draw in regenerant
13. Water running to drain
a. Media is exhausted due to high water
usage
a. Check program settings or diagnostics
for abnormal water usage
b. Meter not registering b. Remove meter and check for rotation
or foreign material
c. Water quality fluctuation c. Test water and adjust program values
accordingly
d. No regenerant or low level of regenerant in
d. Add proper regenerant to tank
regenerant tank
e. Control fails to draw in regenerant e. Refer to Trouble Shooting Guide
number 12
f. Insufficient regenerant level in regenerant
tank
f. Check refill setting in programming.
Check refill flow control for restrictions
or debris and clean or replace
g. Damaged seal/stack assembly g. Replace seal/stack assembly
h. Control valve body type and piston type
mix matched
h. Verify proper control valve body type
and piston type match
i. Fouled media bed i. Replace media bed
a. Improper refill setting a. Check refill setting
b. Improper program settings b. Check program setting to make sure
they are specific to the water quality
and application needs
c. Control valve regenerates frequently c. Check for leaking fixtures that may
be exhausting capacity or system is
undersized
a. Low water pressure a. Check incoming water pressure
– water pressure must remain at
minimum of 25 psi
b. Incorrect injector size b. Replace injector with correct size for
the application
c. Restricted drain line c. Check drain line for restrictions or
debris and clean
a. Improper program settings a. Check refill setting
b. Plugged injector b. Remove injector and clean or replace
c. Drive cap assembly not tightened in
c. Re-tighten the drive cap assembly
properly
d. Damaged seal/ stack assembly d. Replace seal/ stack
e. Restricted or kinked drain line e. Check drain line for restrictions or
debris and or straighten drain line
f. Plugged backwash flow controller f. Remove backwash flow controller and
clean or replace
g. Missing refill flow controller g. Replace refill flow controller
a. Injector is plugged a. Remove injector and clean or replace
b. Faulty regenerant piston b. Replace regenerant piston
c. Regenerant line connection leak c. Inspect regenerant line for air leak
d. Drain line restriction or debris cause excess
back pressure
d. Inspect drain line and clean to correct
restriction
e. Drain line too long or too high e. Shorten length and or height
f. Low water pressure f. Check incoming water pressure
– water pressure must remain at
minimum of 25 psi
a. Power outage during regeneration a. Upon power being restored control will
finish the remaining regeneration time.
Reset time of day.
b. Damaged seal/ stack assembly b. Replace seal/ stack assembly
c. Piston assembly failure c. Replace piston assembly
d. Drive cap assembly not tightened in
d. Re-tighten the drive cap assembly
properly
PWSRTA Twin Alternating Series Softeners 39
Page 40

Problem Possible Cause Solution
14. E1, Err – 1001, Err – 101 = Control unable to
sense motor movement
15. E2, Err – 1002, Err – 102 = Control valve
motor ran too short and was unable to find
the next cycle position and stalled
16. E3, Err – 1003, Err – 103 = Control valve
motor ran too long and was unable to find the
next cycle position
a. Motor not inserted full to engage pinion,
motor wires broken or disconnected
a. Disconnect power, make sure motor is
fully engaged, check for broken wires,
make sure two pin connector on motor
is connected to the two pin connection
on the PC Board labeled MOTOR.
Press NEXT and REGEN buttons for 3
seconds to resynchronize software with
piston position or disconnect power
supply from PC Board for 5 seconds
and then reconnect.
b. PC Board not properly snapped into drive
bracket
b. Properly snap PC Board into drive
bracket and then Press NEXT and
REGEN buttons for 3 seconds to
resynchronize software with piston
position or disconnect power supply
from PC Board for 5 seconds and
then reconnect.
c. Missing reduction gears c. Replace missing gears
a. Foreign material is lodged in control valve a. Open up control valve and pull out
piston assembly and seal/ stack
assembly for inspection. Press NEXT
and REGEN buttons for 3 seconds
to resynchronize software with piston
position or disconnect power supply
from PC Board for 5 seconds and
then reconnect.
b. Mechanical binding b. Check piston and seal/ stack
assembly, check reduction gears,
check drive bracket and main drive
gear interface. Press NEXT and
REGEN buttons for 3 seconds to
resynchronize software with piston
position or disconnect power supply
from PC Board for 5 seconds and then
reconnect.
c. Main drive gear too tight c. Loosen main drive gear. Press NEXT
and REGEN buttons for 3 seconds
to resynchronize software with piston
position or disconnect power supply
from PC Board for 5 seconds and
then reconnect.
d. Improper voltage being delivered to PC
Board
d. Verify that proper voltage is
being supplied. Press NEXT and
REGEN buttons for 3 seconds to
resynchronize software with piston
position or disconnect power supply
from PC Board for 5 seconds and
then reconnect.
a. Motor failure during a regeneration a. Check motor connections then Press
NEXT and REGEN buttons for 3
seconds to resynchronize software
with piston position or disconnect
power supply from PC Board for 5
seconds and then reconnect.
b. Foreign matter built up on piston and
stack assemblies creating friction and drag
enough to time out motor
b. Replace piston and stack assemblies.
Press NEXT and REGEN buttons for
3 seconds to resynchronize software
with piston position or disconnect
power supply from PC Board for 5
seconds and then reconnect.
c. Drive bracket not snapped in properly and
out enough that reduction gears and drive
gear do not interface
c. Snap drive bracket in properly then
Press NEXT and REGEN buttons for 3
seconds to resynchronize software with
piston position or disconnect power
supply from PC Board for 5 seconds
and then reconnect.
40 PWSRTA Twin Alternating Series Softeners
Page 41

Problem Possible Cause Solution
17. Err – 1004, Err – 104 = Control valve motor
ran too long and timed out trying to reach
home position
18. Err -1006, Err – 106,
Err - 116 = MAV/ SEPS/ NHBP/ AUX MAV
valve motor ran too long and unable to find
the proper park position
Motorized Alternating Valve = MAV
Separate Source = SEPS
No Hard Water Bypass = NHBP
Auxiliary MAV = AUX MAV
a. Drive bracket not snapped in properly and
out enough that reduction gears and drive
gear do not interface
a. Control valve programmed for ALT A or b,
nHbP, SEPS, or AUX MAV with out having
a MAV or NHBP valve attached to operate
that function
b. MAV/ NHBP motor wire not connected to
PC Board
c. MAV/ NHBP motor not fully engaged with
reduction gears
d. Foreign matter built up on piston and
stack assemblies creating friction and drag
enough to time out motor
a. Snap drive bracket in properly then
Press NEXT and REGEN buttons for
3 seconds to resynchronize software
with piston position or disconnect
power supply from PC Board for 5
seconds and then reconnect.
a. Press NEXT and REGEN buttons for
3 seconds to resynchronize software
with piston position or disconnect
power supply from PC Board for 5
seconds and then reconnect. Then reprogram valve to proper setting
b. Connect MAV/ NHBP motor to
PC Board two pin connection
labeled DRIVE. Press NEXT and
REGEN buttons for 3 seconds to
resynchronize software with piston
position or disconnect power supply
from PC Board for 5 seconds and
then reconnect.
c. Properly insert motor into casing,
do not force into casing Press NEXT
and REGEN buttons for 3 seconds
to resynchronize software with piston
position or disconnect power supply
from PC Board for 5 seconds and
then reconnect.
d. Replace piston and stack assemblies.
Press NEXT and REGEN buttons for
3 seconds to resynchronize software
with piston position or disconnect
power supply from PC Board for 5
seconds and then reconnect.
19. Err – 1007, Err – 107,
Err - 117 = MAV/ SEPS/ NHBP/ AUX MAV
valve motor ran too short (stalled) while
looking for proper park position
Motorized Alternating Valve = MAV
Separate Source = SEPS
No Hard Water Bypass = NHBP
Auxiliary MAV = AUX MAV
a. Foreign material is lodged in MAV/ NHBP
valve
a. Open up MAV/ NHBP valve and check
piston and seal/ stack assembly for
foreign material. Press NEXT and
REGEN buttons for 3 seconds to
resynchronize software with piston
position or disconnect power supply
from PC Board for 5 seconds and
then reconnect.
b. Mechanical binding b. Check piston and seal/ stack
assembly, check reduction gears,
drive gear interface, and check MAV/
NHBP black drive pinion on motor
for being jammed into motor body.
Press NEXT and REGEN buttons for
3 seconds to resynchronize software
with piston position or disconnect
power supply from PC Board for 5
seconds and then reconnect.
PWSRTA Twin Alternating Series Softeners 41
Page 42

NOTES
42 PWSRTA Twin Alternating Series Softeners
Page 43

Page 44

LIMITED WARRANTY: Certain Watts products come with a limited warranty from Watts Regulator Co. Other products may have no warranty or are covered by the original manufacturer’s
warranty only. For specific product warranty information, please visit www.watts.com or the published literature that comes with your product. Any remedies stated in such warranties are exclusive and
are the only remedies for breach of warranty. EXCEPT FOR THE APPLICABLE PRODUCT WARRANTY, IF ANY, WATTS MAKES NO OTHER WARRANTIES, EXPRESS OR IMPLIED. TO THE FULLEST EXTENT
PERMITTED BY APPLICABLE LAW, WATTS HEREBY SPECIFICALLY DISCLAIMS ALL OTHER WARRANTIES, EXPRESS OR IMPLIED, INCLUDING BUT NOT LIMITED TO THE IMPLIED WARRANTIES
OF MERCHANTABILITY AND FITNESS FOR A PARTICULAR PURPOSE, AND IN NO EVENT SHALL WATTS BE LIABLE, IN CONTRACT, TORT, STRICT LIABILITY OR UNDER ANY OTHER LEGAL THEORY,
FOR INCIDENTAL, INDIRECT, SPECIAL OR CONSEQUENTIAL DAMAGES, INCLUDING, WITHOUT LIMITATION, LOST PROFITS OR PROPERTY DAMAGE, REGARDLESS OF WHETHER IT WAS INFORMED
ABOUT THE POSSIBILITY OF SUCH DAMAGES.
IOM-WQ-PWSRTA 1806 EDP# 2915217 © 2018 Watts
WARNING: This product contains chemicals known
to the State of California to cause cancer and birth
defects or other reproductive harm.
For more information: www.watts.com/prop65
USA: Tel: (800) 224-1299 • Fax: (978) 794-1848 • Watts.com/PureWater
Canada: Tel: (905) 332-4090 • Fax: (905) 332-7068 • Watts.ca/PureWater
Latin America: Tel: (52) 81-1001-8600 • Watts.com/PureWater
 Loading...