

Page 1
Mu s t a n g se r i e s
1
X
XX
Y/FC
(AOS)
P/L
2
3
4
CLOSES VALVE
OPENS VALVE
FLOW
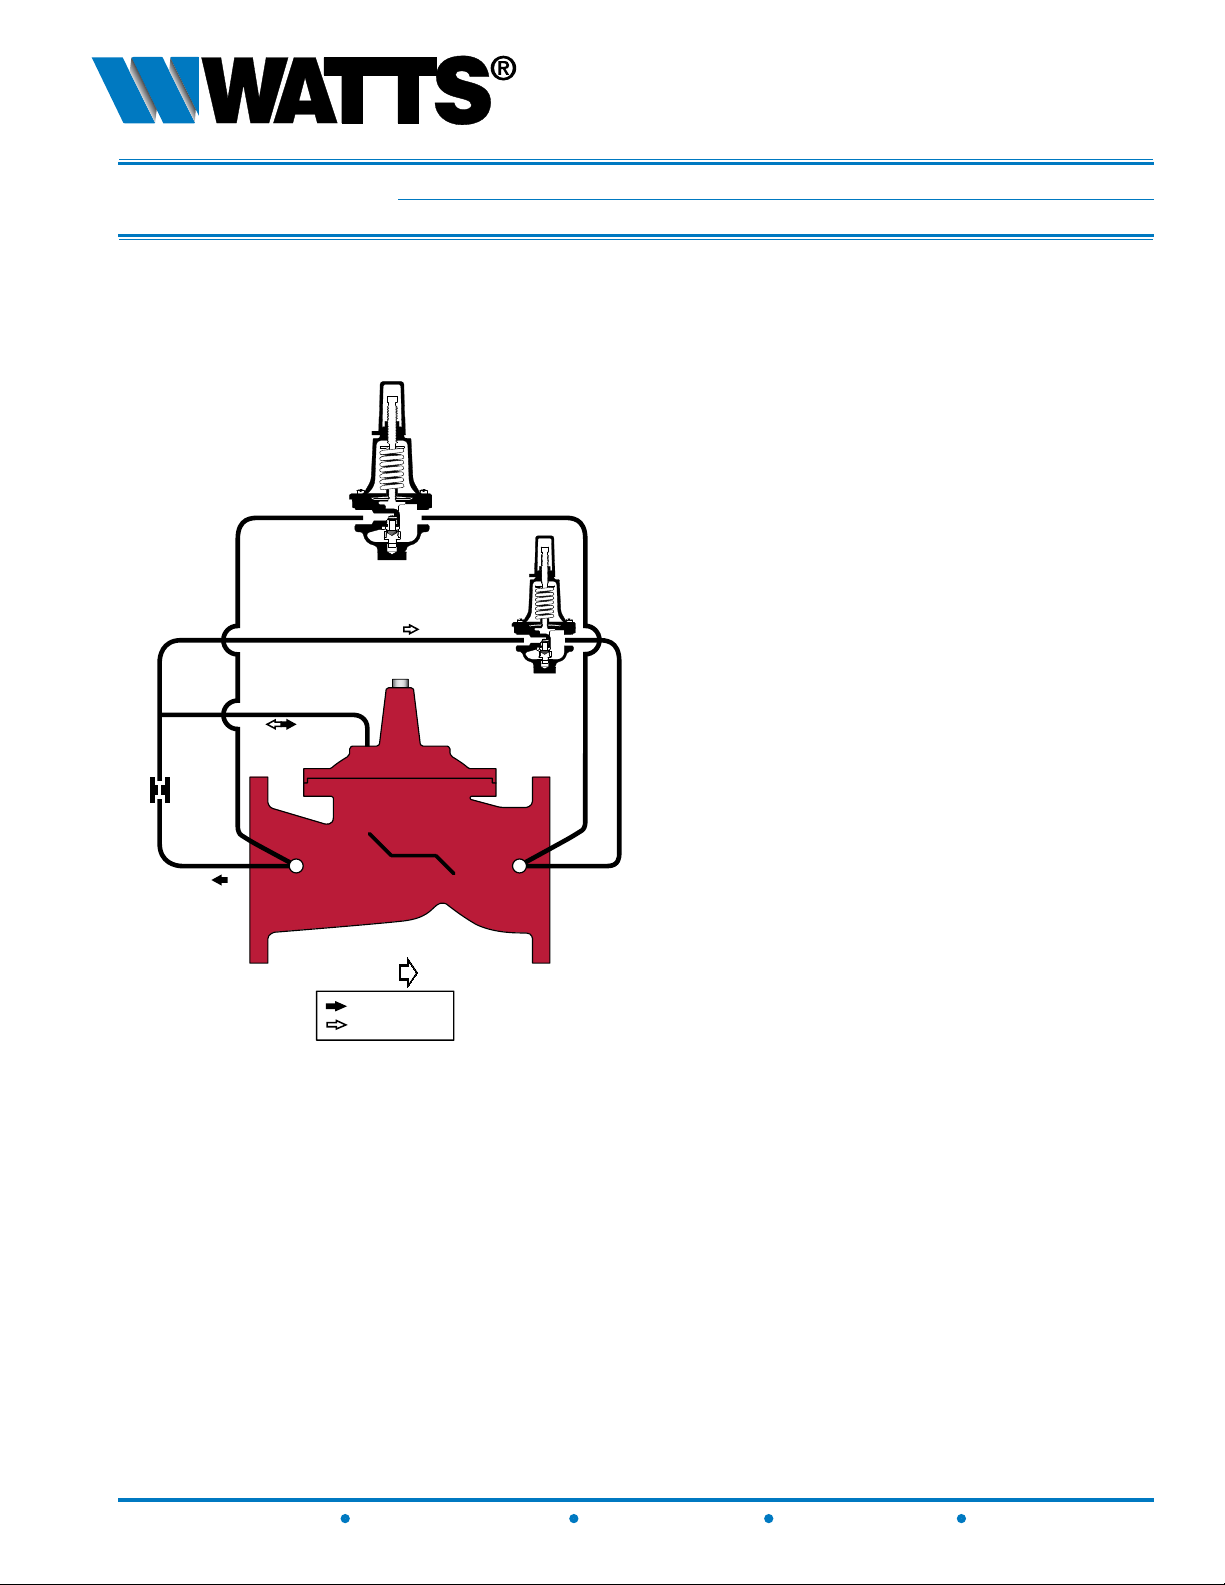
Schematic
PRESSURE REDUCING VALVE
w i t h LOW-FLOW BY-PASS FEATURE
06/08
M6115-74 (Globe)
M61115-74 (Angle)
Throttles to reduce high upstream pressure to •
constant lower downstream pressure
Low Flow By-Pass controls at low ows•
Main Line valve controls at high ows•
Reducing and Low Flow By-Pass setpoints are •
separately adjustable
Standard Components
1 – Main Valve (Single Chamber)
2 – Pressure Reducing Control
3 – Fixed Orice
4 – Low Flow By-Pass
Options & Accessories
X – Isolation Cocks ○
FC – Flo-Clean Strainer ○
Y – Y-Strainer (Replaces Flo-Clean) ○
ACS – Adjustable Closing Speed ○
(Replaces Fixed Orice)
AOS – Adjustable Opening Speed ○
P – Position Indicator ○
L – Limit Switch ○
(2)
(1)
(3)
(3)
(1)
Standard 3” & Smaller
(2)
Standard 4” & Larger
(3)
Optional All Sizes
(2)
(3)
(1)
Operations
The Watts ACV Pressure Reducing Control Valve with Low Flow By-Pass is designed to automatically reduce a
uctuating higher upstream pressure to a constant lower downstream pressure regardless of varying ow rates. It
is controlled by a normally open, pressure reducing pilot designed to: 1) Open (allowing uid out of the main valve
cover chamber) when downstream pressure is below the adjustable setpoint, and 2) Close (allowing uid to ll the
main valve cover chamber) when downstream pressure is above the adjustable setpoint. A decrease in downstream
pressure causes the valve to modulate toward an open position, raising downstream pressure. An increase in
downstream pressure causes the valve to modulate toward a closed position, lowering downstream pressure.
A Low Flow By-Pass Valve is piped parallel to the Main Pressure Reducing Valve, and is set approximately 10 PSI
higher. The Low Flow By-Pass handles ow requirements below the range of the Main Pressure Reducing Valve.
During “off peak” demand conditions, the Low Flow By-Pass provides ow and pressure to the downstream zone.
As ow requirements increase beyond the capacity of the Low Flow By-Pass, downstream pressure falls below the
setpoint of the Main Pressure Reducing Valve allowing it to throttle toward open, supplementing ow and pressure.
As ow requirements decrease, downstream pressure rises above the setpoint of the Main Pressure Reducing Valve,
causing it to throttle toward closed, allowing the Low Flow By-Pass to resume command of ow and pressure.
8550 Hansen Road • Houston, Texas 77075 • (Ph) 713.943.0688 • (Fx) 713.944.9445 • www.watts.com
Page 2
Mu s t a n g se r i e s
I
H
C
H
F G
D
E
A
B
H
M6115-74 (Globe)
M61115-74 (Angle)
Materials
Body & Cover: Ductile Iron ASTM A536
Coating: NSF Listed Fusion Bonded
Epoxy Lined and Coated
Trim: 316 Stainless Steel
Elastomers: Buna-N (standard)
EPDM
Viton
Stem, Nut & Stainless Steel
Spring:
Operating Pressure
Threaded = 400 psi
150 Flanged = 250 psi
300 Flanged = 400 psi
Operating Tempera-
Operating Temperature
ture
Buna-N: 160°F Maximum
EPDM: 300°F Maximum
Viton: 250°F Maximum
Globe
Pilot System
Reducing Control
30-300 psi (Standard)
0-30 psi (Optional)
Low-Flow By-Pass
20-200 psi (Standard)
Angle
Tubing & Fittings
Copper / Brass (Standard)
Stainless Steel (Optional)
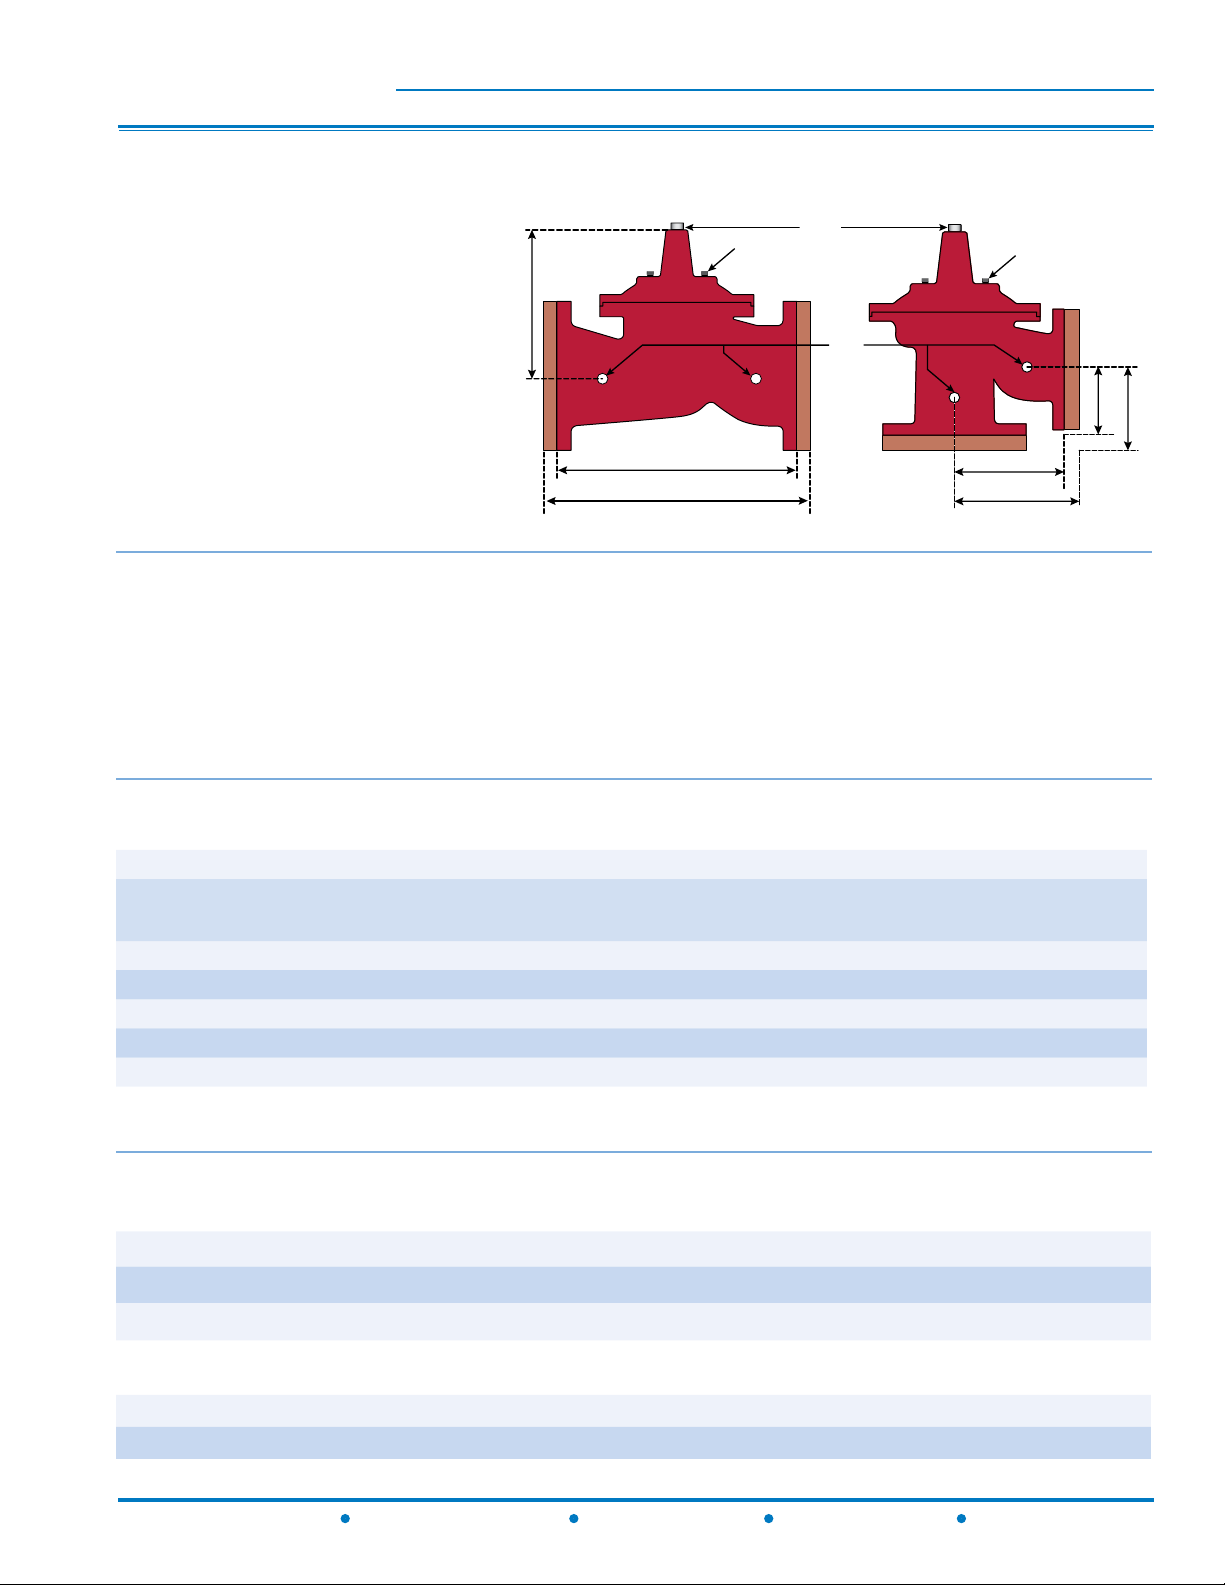
Dimensions
A B C D E F G H I
VALVE
SIZE
3 10-1/4 11 7 - - - - 3/8 1/2 21
4 13-7/8 14-1/2 8-5/8 6-15/16 7-1/4 5-1/2 5-13/16 1/2 1/2 39
6 17-3/4 18-5/8 11-5/8 8-7/8 9-3/8 6-3/4 7-1/4 3/4 3/4 89
8 21-3/8 22-3/8 15 10-11/16 11-3/16 7-1/4 7-3/4 3/4 3/4 150
10 26 27-3/8 17-7/8 - - - - 1 1 283
GLOBE
150#
GLOBE
300#
COVER TO
CENTER
ANGLE
150#
ANGLE
300#
ANGLE
150#
ANGLE
300#
PORT
SIZE
PORT
SIZE
SHIPPING
WEIGHTS*
For larger sizes consult factory
Valve Cover Chamber Capacity
Valve Size (in) 3 4 6 8 10
.oz. 4 10 22 70
U.S. Gal
- - - -
-
1-1/4
Valve Travel
Valve Size (in) 3 4 6 8 10
(in) 1/2 3/4 1 1-1/2 2
8550 Hansen Road • Houston, Texas 77075 • (Ph) 713.943.0688 • (Fx) 713.944.9445 • www.watts.com
Page 3

M6115-74 (Globe)
CAVITATION ZONE
INLET PRESSURE - PSI
OUTLET PRESSURE - PSI
300
280
260
240
220
200
180
160
140
120
100
80
60
40
20
0 10 20 40 50 60 70 80 90
130 14012011 0100
30
CAVITATION CHART
Pressure Drop
Flow
20
3/4”
15105
0
0
10
20
30
40
Mu s t a n g se r i e s
Sizing
Size (in) 3 4 6 8 10
Maximum Continuous (GPM) 260 580 1025 2300 4100
Minimum Continuous (GPM) 1 30 50 115 200
Maximum continuous ow based on velocity of 20 ft. per second.
Minimum continuous ow based on velocity of 1 ft. per second.
NOTE: The above chart is a suggested guide. Inlet pressure, outlet pressure, minumum, normal and maximum ow rates should
be considered for specic valve sizing. Contact Watts ACV for details.
Low-Flow By-Pass
Size (in) Adjustment Range
3/4 20-200 psi
M61115-74 (Angle)
Cavitation Chart
After selecting the valve size, locate
inlet and outlet pressures on this
chart. If the intersection point falls
in the shaded area, cavitation can
occur. Operation of valves continually in the cavitation zone should be
avoided. Consult Watts ACV for alternatives.
8550 Hansen Road • Houston, Texas 77075 • (Ph) 713.943.0688 • (Fx) 713.944.9445 • www.watts.com
Page 4

Mu s t a n g se r i e s
2
3
4
5
6
7
8
9
1
10
11
12
13
14
15
16
17
Cross-Sectional Detail
Main Valve
M6115-74 (Globe)
M61115-74 (Angle)
ITEM DESCRIPTION MATERIAL
1 Cover ASTM A536 65-45-12 Epoxy Coated Ductile Iron
2 Cover Bearing ASTM A276 304 Stainless Steel
3 Shaft / Stem ASTM A276 304 Stainless Steel
4 Stud ASTM A570 Gr.33 Zinc Plated Steel
5 Cover Nut ASTM A570 Gr.33 Zinc Plated Steel
6 Diaphragm* Buna-N (Nitrile)
7 Body ASTM A536 65-45-12 Epoxy Coated Ductile Iron
8 Seat Disc* Buna-N (Nitrile)
9 Seat Ring ASTM A743 CF8M (316) Stainless Steel
10 Spring ASTM A276 302 Stainless Steel
11 Stem Nut ASTM A276 304 Stainless Steel
12 Spring Washer ASTM A276 304 Stainless Steel
13 Diaphragm Washer ASTM A536 65-45-12 Epoxy Coated Ductile Iron
14
15 Spacer Washer* Fiber*
16 Disc Guide ASTM A743 CF8M (316) Stainless Steel
17 Seat Gasket* Buna-N (Nitrile)
Disc Retainer
ASTM A536 65-45-12 Epoxy Coated Ductile Iron
* Contained in Main Valve Repair Kit
8550 Hansen Road • Houston, Texas 77075 • (Ph) 713.943.0688 • (Fx) 713.944.9445 • www.watts.com
Page 5

Mu s t a n g se r i e s
Controls and Accessories
Model CP-15
Pressure Reducing Pilot
M6115-74 (Globe)
M61115-74 (Angle)
1
2
3
4
5
6
7
8
10
11
12
13
14
15
16
Front View Side View
ITEM
NUMBER
1 Adjusting Screw
2 Jam Nut
3 Spring Housing
4 Spring
5 Cap Screw
6 Body
7 Seat
8 O-Ring*
9 Bottom Cap
10 Spring Guide
DESCRIPTION
9
ITEM
NUMBER
11 Nut
12 Belleville Washer
13 Diaphragm Washer
14 Diaphragm *
15 Yoke
16 Disc and Retainer Assembly*
DESCRIPTION
* Included in Repair Kit
8550 Hansen Road • Houston, Texas 77075 • (Ph) 713.943.0688 • (Fx) 713.944.9445 • www.watts.com
Page 6

M6115-74 (Globe)
Mu s t a n g se r i e s
Installations
Prior to installation, ush line to remove debris.•
Install valve horizontally “in line” (cover facing UP), so ow arrow matches ow through the line. • Avoid install-
ing valves 6” and larger vertically. Consult factory prior to ordering if installation is other than described.
Install inlet and outlet isolation valves. • NOTE: When using buttery valves, insure disc does not contact control
valve. Damage or improper valve seating may occur.
Provide adequate clearance for valve servicing and maintenance.•
Install pressure gauges to monitor valve inlet and outlet pressure.•
If installation is subjected to very low ow or potentially static conditions, it is recommended a pressure relief •
valve (1/2” minimum) be installed downstream of the Pressure Reducing Valve for additional system protection.
Start-Up
Proper Automatic Control Valve start‑up requires bringing the valve into service in a controlled manner. All
adjustments to control pilots and speed controls should be made slowly, allowing the valve to respond and the
system to stabilize. NOTE: Control Valves should be set‑up in a dynamic (owing) condition for proper
start‑up. Provisions for ow must be made to insure proper settings.
For proper operation, the Low Flow By• ‑Pass is set 10 PSI higher than the Main Pressure Reducing
Valve.
M61115-74 (Angle)
Close upstream and downstream valves to isolate the valve from line pressure. Release spring tension on 1.
Pressure Reducing Control and Low Flow By-Pass by turning adjustment screws out (counterclockwise),
decreasing setpoints. Open all Isolation Ball Valves, if so equipped. If valve is tted with adjustable speed
controls, turn needle(s) in (clockwise) until seated, and return out (counterclockwise) 1‑1/2 to 2‑1/2 turns.
These are approximate settings, and should be ne tuned to suit system requirements after pressure
adjustments have been made.
Slowly open upstream isolation valve to allow controlled lling of the valve. Vent entrapped air by carefully 2.
loosening control tubing or pipe plug at the highest point possible. If valve is equipped with a Position
Indicator, open Air Bleed Petcock to vent air. Water will be milky in appearance and will begin to clear as
air is vented. Carefully loosen enough cover screws on control pilot(s) to vent entrapped air. Re‑tighten
when water vents clearly.
Setting Reducing Control:3. Slowly open downstream isolation valve. Gradually turn adjustment screw on
the Pressure Reducing Control in (clockwise) to raise downstream pressure. Allow valve and system to
stabilize. Observe inlet and outlet pressure gauges. Continue to adjust as needed, pausing approximately
every 1‑1/2 turns, allowing valve and system to stabilize. Turning adjustment screw clockwise raises outlet
pressure. Turning adjustment screw counterclockwise lowers outlet pressure. Set Pressure Reducing
Control approximately 10 PSI lower than desired downstream pressure. Tighten locknut on Reducing
Pilot.
Fine tune Speed Controls to suit system requirements. Adjust Closing Speed Control (if equipped) 4.
clockwise for slower closure, and counterclockwise for faster closure. Adjust Opening Speed Control (if
equipped) clockwise for slower opening, and counterclockwise for faster opening.
Setting Low Flow By-Pass:5. Gradually turn adjustment screw on Low Flow By‑Pass in (clockwise) to
raise downstream pressure. Observe outlet pressure gauge. Continue to adjust Low Flow By‑Pass,
pausing approximately every 1‑1/2 turns, allowing valve and system to stabilize, until desired downstream
pressure is reached. Low Flow By‑Pass is now set approximately 10 PSI higher than the Main Pressure
Reducing Valve, and will handle low ow requirements. Tighten locknut on Low Flow By‑Pass Pilot.
8550 Hansen Road • Houston, Texas 77075 • (Ph) 713.943.0688 • (Fx) 713.944.9445 • www.watts.com
Page 7

M6115-74 (Globe)
Mu s t a n g se r i e s
Specications
The Pressure Reducing Control Valve with Low Flow By-Pass shall be a pilot operated diaphragm valve
designed to automatically reduce a uctuating higher upstream pressure to a constant lower downstream
pressure regardless of varying ow rates. Flow requirements below the normal range of the main line
Pressure Reducing Control Valve shall be handled by a valve mounted, direct acting, Low Flow By-Pass
valve.
The main valve shall be a hydraulically operated, single diaphragm actuated, globe or angle pattern valve.
Y-pattern valves shall not be permitted. The valve shall contain a disc and diaphragm assembly that forms
a sealed chamber below the valve cover, separating operating pressure from line pressure. The diaphragm
shall be constructed of nylon reinforced Buna-N, and shall not seal directly against the valve seat and shall
be fully supported by the valve body and cover. Rolling diaphragm construction will not be allowed and there
shall be no pistons operating the main valve or any pilot controls.
The main valve body and cover shall be Ductile Iron ASTM A536, and all internal cast components shall
be Ductile Iron or CF8M (316) Stainless Steel. All Ductile Iron components, including the body and cover,
shall be lined and coated with an NSF 61 Certied Epoxy Coating applied by the electrostatic heat fusion
process. All main valve trim and throttling components (cover bearing, valve seat and disc guide) shall
be Stainless Steel. The valve body and cover must be machined with a 360-degree locating lip to assure
proper alignment.
M61115-74 (Angle)
The disc and diaphragm assembly shall contain a Buna-N synthetic rubber disc with a rectangular cross-
section that is securely retained on 3-1/2 sides by a disc retainer and disc guide. Diaphragm assemblies
utilizing bolts or cap screws for component retention will not be permitted.
The exposed portion of the seat disc shall contact the valve seat and seal drip-tight. The disc and diaphragm
assembly must be guided by two separate bearings, one installed in the valve cover and one concentrically
located within the valve seat, to avoid deection and assure positive disc-to-seat contact. Center guided
valves will not be permitted. All necessary repairs shall be made from the top of the valve while the body
remains in line.
Pilot control systems for 3” valves shall contain a Flow Clean Strainer, Fixed Orice Closing Speed,
Adjustable Opening Speed Control, Low Flow By-Pass and Pressure Reducing Pilot. Pilot control systems
for valves 4” and larger shall contain an external Y-Strainer, Fixed Orice Closing Speed, Low Flow By-Pass
and Pressure Reducing Pilot. All pilot control systems shall utilize copper tubing and brass ttings and must
be equipped with Isolation Ball Valves on all body connections regardless of valve size. The adjustment
range of the Low Flow By-Pass shall be 20-200 psi and the pressure reducing pilot shall be 30-300 psi.
The valve shall be Watts ACV Model M6115-74 (Globe) or M61115-74 (Angle) pattern Pressure Reducing
Control Valve with Low Flow By-Pass.
Other Watts ACV Pressure Reducing Control Valves
M6115 / M61115 Pressure Reducing Valve
M6115-3 / M61115-3 Pressure Reducing Valve with Hydraulic Check Feature
M6115-7 / M61115-7 Pressure Reducing Valve with Surge Control Feature
8550 Hansen Road • Houston, Texas 77075 • (Ph) 713.943.0688 • (Fx) 713.944.9445 • www.watts.com
 Loading...