

Page 1
Mustang series
Schematics
• Opens when oat reaches low level stop
• Closes when oat reaches high level stop
• Low and High Level stop collars are adjustable
ON-OFF FLOAT CONTROL VALVE
(4” and Smaller)
02/09
M110-14 (Globe)
M1110-14 (Angle)
Standard Components
1 – Main Valve (Single Chamber)
2 – On-Off Float Control
3A – High Level Adjustment Stop
3B – Low Level Adjustment Stop
Options & Accessories
○ X – Isolation Cocks
○ FC – Flo-Clean Strainer
○ Y – Y-Strainer (Replaces Flo-Clean)
○ ACS – Adjustable Closing Speed
(Replaces Fixed Orice)
○ AOS – Adjustable Opening Speed
○ P – Position Indicator
○ L – Limit Switch
(2)
(1)
(3)
(3)
(1)
Standard 3” & Smaller
(2)
Standard 4” & Larger
(3)
Optional All Sizes
(3)
(2)
(3)
X
Y/FC
P/L
X
1
FLOW
CLOSES VALVE
OPENS VALVE
2
3A
3B
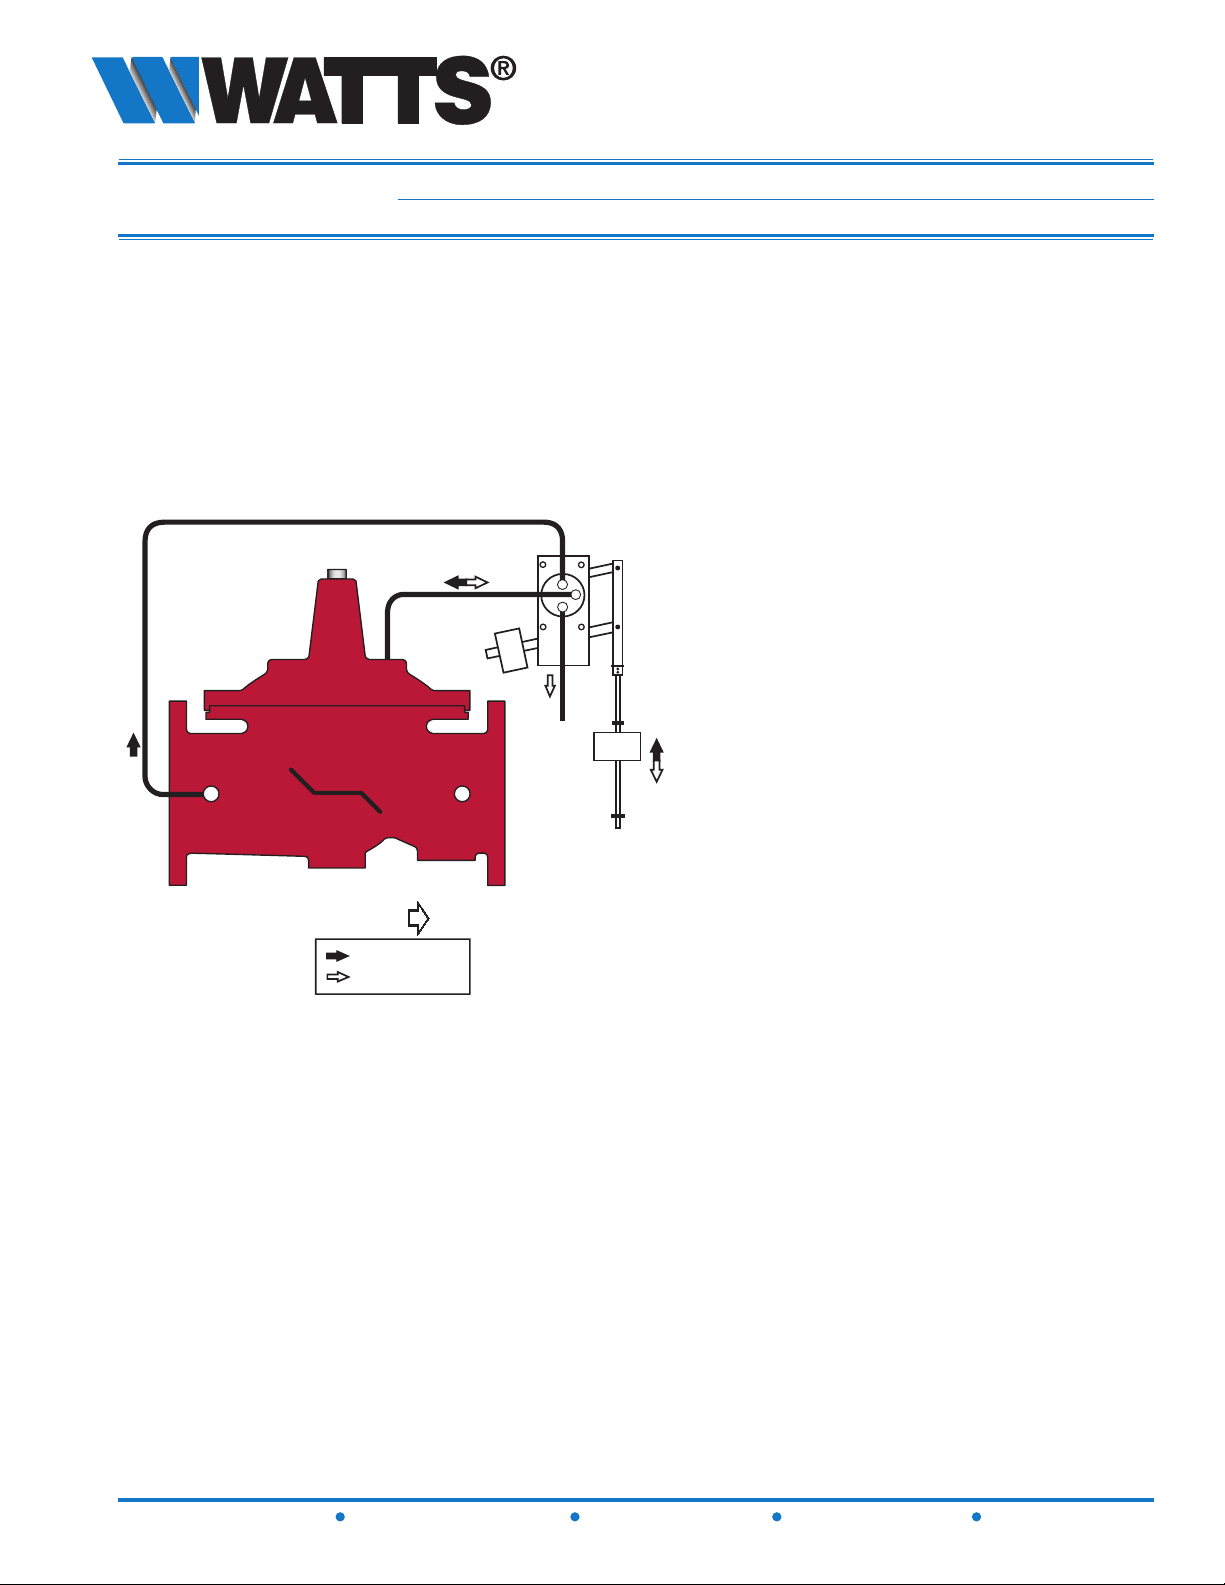
Operations
The On-Off Float Control Valve is designed to open fully or close drip-tight as commanded by the Float
Control Pilot. The Float Pilot may be either valve or remote mounted. The valve closes drip tight when water
level reaches the adjustable high-level setpoint, and opens fully when water level is below the adjustable
low-level setpoint, allowing a calculated “draw-down” of water level to increase tank circulation. The On-Off
Float Pilot commands the routing of uid and pressure into and out of the cover chamber of the main valve.
When water level reaches the adjustable high-level setpoint, the Float Pilot connects the cover chamber
of the valve to upstream pressure, closing the valve drip tight. The valve remains closed as water level
decreases. When water level reaches the adjustable low-level setpoint, the Float Pilot connects the cover
chamber of the valve to atmosphere (wet drain), opening the valve fully. High and low levels are separately
adjustable by positioning stop collars on the oat rod(s) at desired opening and closing setpoints.
If desired, the on-off action of the valve can be “reversed” by modifying the hydraulic connections of the OnOff Float Pilot.
12541 Gulf Freeway • Houston, Texas 77034 • (Ph) 713.943.0688 • (Fx) 713.944.9445 • www.watts.com
Page 2
Mustang series
M110-14 (Globe)
M1110-14 (Angle)
Materials
Body & Cover: Ductile Iron ASTM A536
Coating: NSF Listed Fusion Bonded
Epoxy Lined and Coated
Trim: 316 Stainless Steel
Elastomers: Buna-N (standard)
EPDM
Viton
Stem, Nut & Stainless Steel
Spring:
Operating Pressure
Threaded = 400 psi
150 Flanged = 250 psi
300 Flanged = 400 psi
Operating Temperature
Buna-N: 160°F Maximum
EPDM: 300°F Maximum
Viton: 250°F Maximum
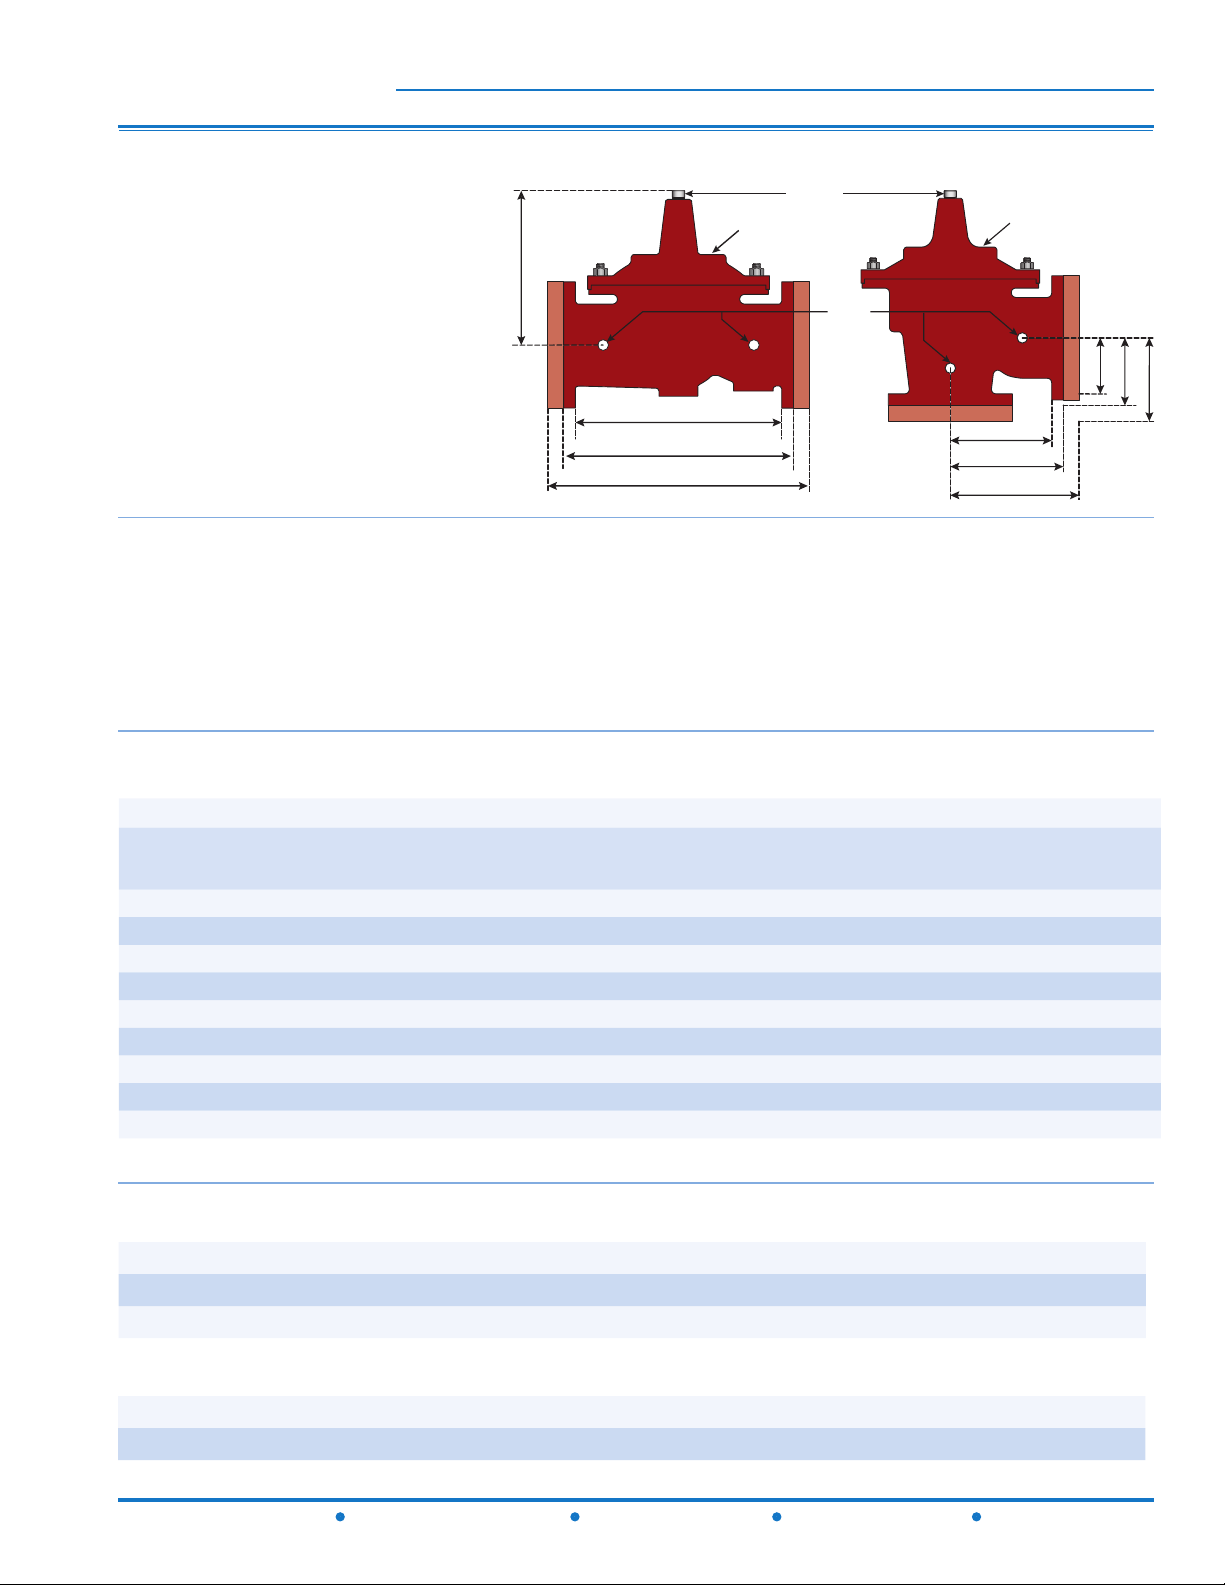
Globe
L
D
A
B
C
K
K
Pilot System
Float Control
Brass (Standard)
Angle
K
H
I J
E
F
G
Tubing & Fittings
Copper / Brass (Standard)
Stainless Steel (Optional)
Float Ball
Polyethylene (6” dia.)
Float Rods
(2) 12” Rods (Standard)
Dimensions
A B C D E F G H I J K L
VALVE
GLOBE
SIZE
1-1/4 7-1/4 - - 5-1/2 3-1/4 - - 1-7/8 - - 3/8 1/4 20
1-1/2 7-1/4 8-1/2 9 5-1/2 3-1/4 4 4-1/4 1-7/8 4 4-1/4 3/8 1/4 25
2-1/2 11 11 11-5/8 7-1/2 5-1/2 5-1/2 5-7/8 4 4 4-5/16 1/2 1/2 65
THRD.
2 9-3/8 9-3/8 10 6-1/2 4-3/4 4-3/4 5 3-1/4 3-1/4 3-1/2 3/8 1/2 40
3 12-1/2 12 13-1/4 8-1/4 6-1/4 6 6-3/8 4-1/2 4 4-3/8 1/2 1/2 95
4 - 15 15-5/8 10-5/8 - 7-1/2 7-7/8 - 5 5-5/16 3/4 3/4 190
6 - 20 21 13-3/8 - 10 10-1/2 - 6z 6-1/2 3/4 3/4 320
8 - 25-3/8 26-3/8 16 - 12-3/4 13-1/4 - 8 8-1/2 1 1 650
10 - 29-3/4 31-1/8 17-1/8 - 14-7/8 15-9/16 - 8-5/8 9-5/16 1 1 940
GLOBE
150#
GLOBE
300#
COVER TO
CENTER
ANGLE
THRD.
ANGLE
150#
ANGLE
300#
ANGLE
THRD.
ANGLE
150#
ANGLE
300#
PORT
For larger sizes consult factory
SIZE
PORT
SIZE
SHIPPING
WEIGHTS*
Valve Cover Chamber Capacity
Valve Size (in) 1-1/4 1-1/2 2 2-1/2 3 4 6 8 10
.oz. 4 4 4 10 10 22 70
U.S. Gal - - - - - - -
- -
1-1/4 2-1/2
Valve Travel
Valve Size (in) 1-1/4 1-1/2 2 2-1/2 3 4 6 8 10
Travel (in) 3/8 3/8 1/2 5/8 3/4 1 1-1/2 2 2-1/2
12541 Gulf Freeway • Houston, Texas 77034 • (Ph) 713.943.0688 • (Fx) 713.944.9445 • www.watts.com
Page 3

Mustang series
Maximum continuous flow based on velocity of 20 ft. per second.
Maximum intermittent flow based on velocity of 25 ft. per second.
Sizing
M110-14 (Globe)
M1110-14 (Angle)
Size (in)
Maximum Continuous (GPM) 95 130 210 300 485 800 1850 3100 5000
Maximum Intermittent (GPM) 119 161 265 390 590 1000 2300 4000 6250
CV Factor GPM (Globe) 25 30 45 75 100 175 490 770 1200
CV Factor GPM (Angle) 26 27 57 91 125 215 571 990 1530
NOTE: The above chart is a suggested guide. Inlet pressure, outlet pressure, minumum, normal and maximum ow rates should
be considered for specic valve sizing. Contact Watts ACV for details.
1-1/4 1-1/2 2 2-1/2 3 4 6 8 10
Maximum continuous ow based on velocity of 20 ft. per second.
Maximum intermittent ow based on velocity of 25 ft. per second.
Headloss
Angle
100
80
60
Globe
1-1/4
1-1/4
1-1/2
1-1/2
2-1/2
2
2-1/2
2
4
3
4
3
6
8
6
8
10
10
12
14
12
16
14
16
40
30
20
10
8
6
Pressure Drop (p.s.i.)
4
3
2
2 4 6 8 10 20 40 60 80 100 200 500 1000 2000 5000 10000 20000 100000
Flow Rate - Gallons per minute
The Cv Factor of a value is the flow rate in US GPM at 60° F that will cause a 1 psi drop in pressure.
The factors stated are based upon a fully open valve.
Cv factor can be used in the following equations to determine Flow (Q) and Pressure Drop (∆ P):
Q (Flow) = Cv ∆ P ∆ P (Pressure Drop) = (Q/CV)2
12541 Gulf Freeway • Houston, Texas 77034 • (Ph) 713.943.0688 • (Fx) 713.944.9445 • www.watts.com
Page 4

Mustang series
Cross-Sectional Detail
Main Valve
M110-14 (Globe)
M1110-14 (Angle)
1
2
3
4
5
6
7
10
11
12
13
14
15
16
8
9
17
ITEM DESCRIPTION MATERIAL
1 Cover ASTM A536 65-45-12 Epoxy Coated Ductile Iron
2 Cover Bearing ASTM A276 304 Stainless Steel
3 Shaft / Stem ASTM A276 304 Stainless Steel
4 Stud ASTM A570 Gr.33 Zinc Plated Steel
5 Cover Nut ASTM A570 Gr.33 Zinc Plated Steel
6 Diaphragm* Buna-N (Nitrile)
7 Body ASTM A536 65-45-12 Epoxy Coated Ductile Iron
8 Seat Disc* Buna-N (Nitrile)
9 Seat Ring ASTM A743 CF8M (316) Stainless Steel
10 Spring ASTM A276 302 Stainless Steel
11 Stem Nut ASTM A276 304 Stainless Steel
12 Spring Washer ASTM A276 304 Stainless Steel
13 Diaphragm Washer ASTM A536 65-45-12 Epoxy Coated Ductile Iron
14
15 Spacer Washer* Fiber*
16 Disc Guide ASTM A743 CF8M (316) Stainless Steel
17 Seat Gasket* Buna-N (Nitrile)
Disc Retainer
ASTM A536 65-45-12 Epoxy Coated Ductile Iron
* Contained in Main Valve Repair Kit
12541 Gulf Freeway • Houston, Texas 77034 • (Ph) 713.943.0688 • (Fx) 713.944.9445 • www.watts.com
Page 5

M110-14 (Globe)
Mustang series
Installations
• Prior to installation, ush line to remove debris.
• Install valve horizontally “in line” (cover facing UP), so ow arrow matches ow through the line. Avoid installing
valves 6” and larger vertically. Consult factory prior to ordering if installation is other than described.
• Install inlet and outlet isolation valves. NOTE: When using buttery valves, insure disc does not contact control
valve. Damage or improper valve seating may occur.
• Provide adequate clearance for valve servicing and maintenance.
• Install pressure gauge to monitor valve inlet pressure.
• Provide adequate drain for cover chamber discharge. Consult “Valve Cover Capacity” chart on appropriate main
valve Engineering Bulletin.
• If On‑Off Float Pilot is remotely mounted it should be eld connected with 3/8” minimum copper tubing in accordance
with factory piping schematic.
• Float Pilot, Rods, and Ball should be mounted in a eld installed “stilling well” for protection against surface turbulence and interference.
• Additional 12” Float Rods available. Consult Factory.
Start-Up
Proper Automatic Control Valve start-up requires bringing the valve into service in a controlled manner. All adjustments
to control pilots and speed controls should be made slowly, allowing the valve to respond and the system to stabilize.
NOTE: Control Valves should be set‑up in a dynamic (owing) condition for proper start‑up. Provisions for
ow must be made to insure proper settings.
M1110-14 (Angle)
• If Float Control is remote mounted, eld installed control lines should be 3/8” minimum copper tubing for dis-
tances no greater than 10 feet. For greater distances use 1/2” minimum copper tubing or pipe.
• Remote mount – without Accelerator (4” and smaller): Port 1 = Supply Pressure
Port C = Valve Cover
Port 2 = Atmosphere
• Remote Mount – with Accelerator (6” and larger): Port 1 = Atmosphere
Port C = Accelerator Cover
Port 2 = Supply
1. Close upstream and downstream valves to isolate the valve from line pressure. Open all Isolation Ball Valves,
if so equipped. If valve is tted with adjustable speed controls, turn needle(s) in (clockwise) until seated, and
return out (counterclockwise) 1‑1/2 to 2‑1/2 turns. These are approximate settings, and should be ne tuned to
suit system requirements after level adjustments have been made.
2. Slowly open upstream isolation valve to allow controlled lling of the valve. Vent entrapped air by carefully
loosening control tubing or pipe plug at the highest point possible. If valve is equipped with a Position Indicator,
open Air Bleed Petcock to vent air. Water will be milky in appearance and will begin to clear as air is vented.
Re-tighten when water vents clearly.
3. Setting Float Control: Install desired number of Float Rods and Low and High Level Stop Collars (less Float).
Manually position Float Control to the center point in its travel and balance by positioning Counterweight “in” or
“out” until Float Control holds in position. Proper balance is achieved when Float Control moves to the “down/
on” or “up/off” position with minimal force or drag. The position of Counterweight on the Counterweight Rod
will vary based upon the number and material of Float Rods being used. Install Float.
4. Position Low and High Level Stop Collars on Float Rods to match desired valve opening and closing levels.
Slowly open downstream isolation valve.
5. Fine tune Speed Controls (if equipped) to suit system requirements. Adjust Closing Speed Control clockwise
for slower closure and counterclockwise for faster closure. Adjust Opening Speed Control clockwise for slower
opening and counterclockwise for faster opening.
12541 Gulf Freeway • Houston, Texas 77034 • (Ph) 713.943.0688 • (Fx) 713.944.9445 • www.watts.com
Page 6

M110-14 (Globe)
Mustang series
Specications
The On-Off Float Control Valve shall be a pilot operated diaphragm valve designed to open fully or close drip-tight
as commanded by the Float Control Pilot. The Float Pilot may be either valve or remote mounted. The valve shall
close drip tight when water level reaches the adjustable high-level setpoint, and open fully when water level is below the adjustable low-level setpoint, allowing a calculated “draw-down” of water level to increase tank circulation.
The main valve shall be a hydraulically operated, single diaphragm actuated, globe or angle pattern valve. Ypattern valves shall not be permitted. The valve shall contain a disc and diaphragm assembly that forms a sealed
chamber below the valve cover, separating operating pressure from line pressure. The diaphragm shall be constructed of nylon reinforced Buna-N, and shall not seal directly against the valve seat and shall be fully supported
by the valve body and cover. Rolling diaphragm construction will not be allowed and there shall be no pistons
operating the main valve or any pilot controls.
The main valve body and cover shall be Ductile Iron ASTM A536, and all internal cast components shall be Ductile Iron or CF8M (316) Stainless Steel. All Ductile Iron components, including the body and cover, shall be lined
and coated with an NSF 61 Certied Epoxy Coating applied by the electrostatic heat fusion process. All main
valve trim and throttling components (cover bearing, valve seat and disc guide) shall be Stainless Steel. The
valve body and cover must be machined with a 360-degree locating lip to assure proper alignment.
M1110-14 (Angle)
The disc and diaphragm assembly shall contain a Buna-N synthetic rubber disc with a rectangular cross-section
that is securely retained on 3-1/2 sides by a disc retainer and disc guide. Diaphragm assemblies utilizing bolts or
cap screws for component retention will not be permitted.
The exposed portion of the seat disc shall contact the valve seat and seal drip-tight. The disc and diaphragm assembly must be guided by two separate bearings, one installed in the valve cover and one concentrically located
within the valve seat, to avoid deection and assure positive disc‑to‑seat contact. Center guided valves will not
be permitted. All necessary repairs shall be made from the top of the valve while the body remains in line.
Pilot control systems for valves 3” and smaller shall contain a Flow Clean Strainer, On-Off Float Pilot, (2) 12” Float
Rods and a Float Ball. Pilot control systems for 4” valves shall contain an On-Off Float Pilot, (2) 12” Float Rods,
Float Ball, an external Y-Strainer and Isolation Ball Valves on all body connections. All pilot control systems shall
utilize copper tubing and brass ttings regardless of valve size.
The valve shall be Watts ACV Model M110-14 (Globe) or M1110-14 (Angle) On-Off Float Control Valve.
Other Watts ACV Float Control Valves
M110-14 / M1110-14 On-Off Float Control Valve (6” and Larger)
12541 Gulf Freeway • Houston, Texas 77034 • (Ph) 713.943.0688 • (Fx) 713.944.9445 • www.watts.com
 Loading...