

Page 1
Watts IntelliFlow
®
Automatic Washing Machine Shutoff Valve
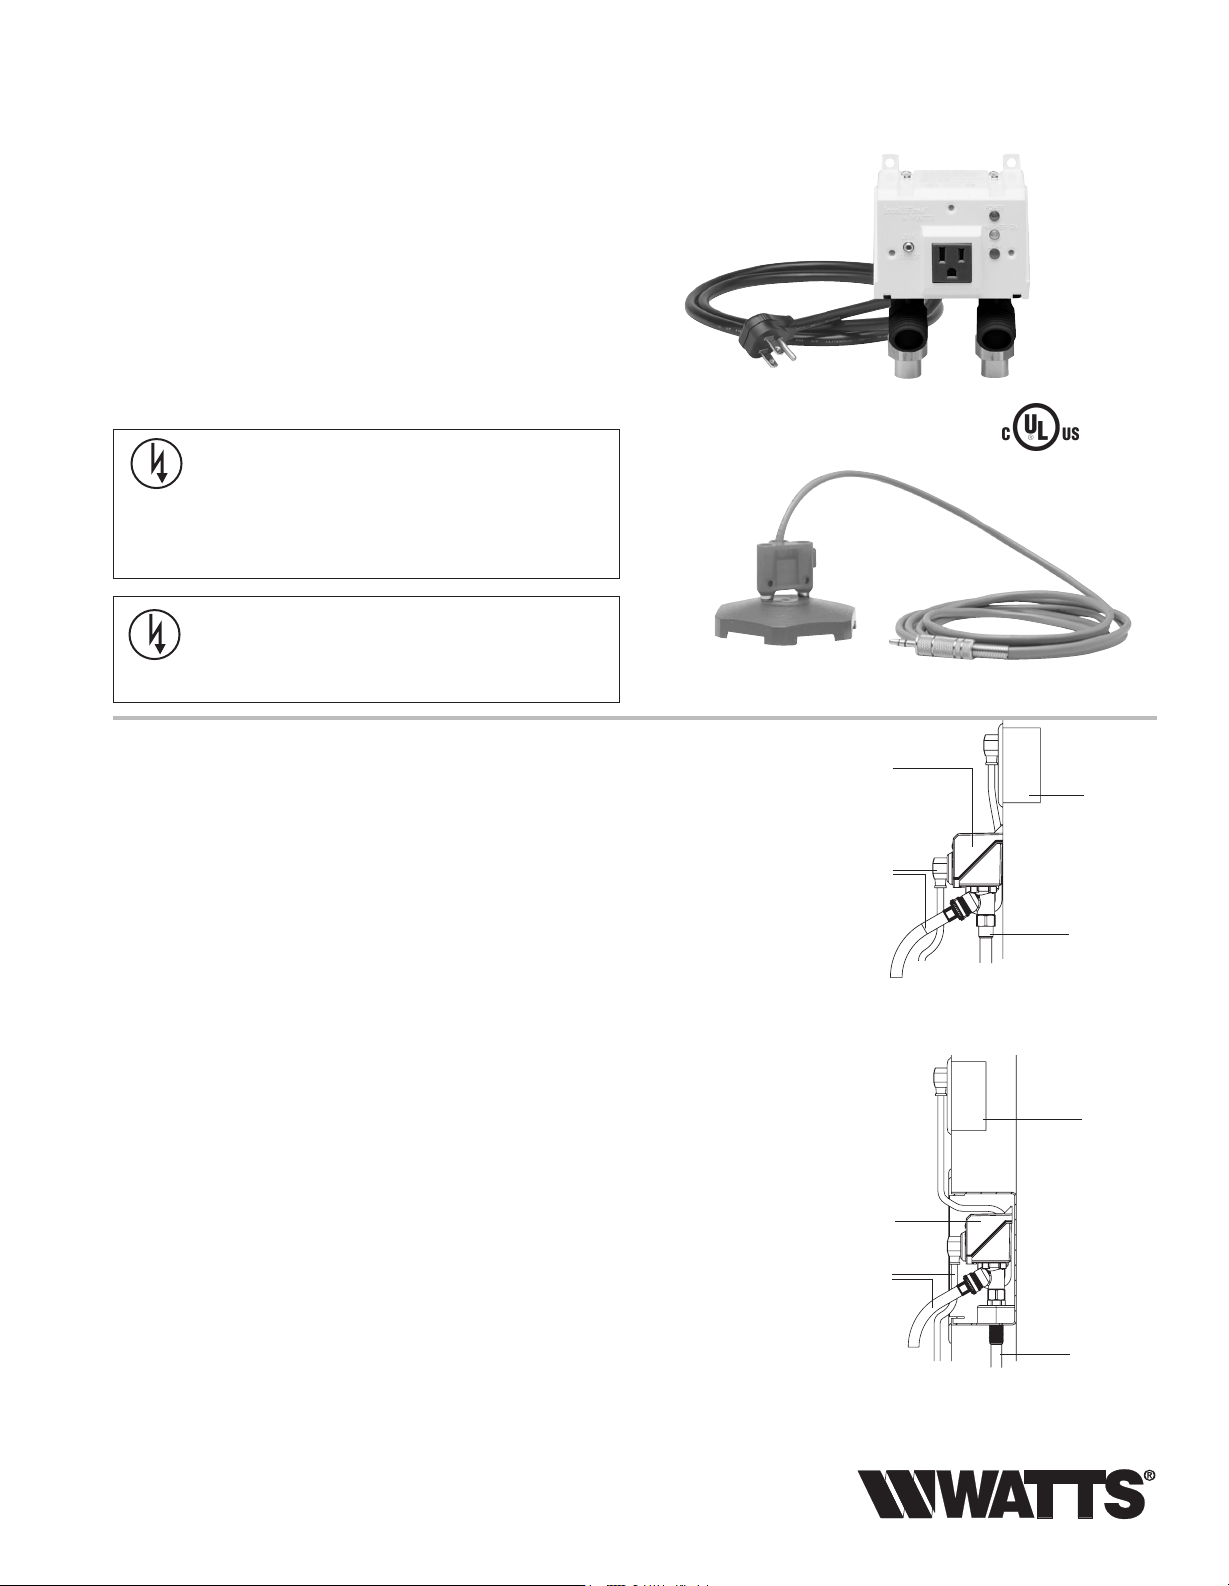
Model A2C-M1, A2C-WB-M1
Important! Read instructions completely before proceeding.
Note: This unit is not compatible with 240VAC powered wash-
ing machines or combination washer/dryers that are 240VAC
powered. A Watts A2-IntelliTimer (purchased separately) may be
used with the IntelliFlow
ers that are 240VAC powered. (See page 5)
®
with washing machines or washer/dry-
IS-A2C-M1/A2C-WB-M1
*This valve requires a 120VAC, 60 Hz,
20 amp ground fault protected circuit.
*Ground Fault Interrupter – A GFI circuit is not required for
proper operation of the IntelliFlow®, but is strongly recommended as a safety device.
Surge Protection – Although a surge protector is not
required for proper operation of the IntelliFlow®, it is strongly
recommended, especially in areas where power surges or
lightning strikes frequently occur.
Operating Instructions
The Watts IntelliFlow®Automatic Washing Machine Shutoff Valve is equipped with a
state-of-the-art electric current sensing device. When the washing machine is turned
on, the device senses current flow to the washing machine. This causes it to actuate
its solenoid water valves, allowing water to flow to the washing machine. When the
washing machine shuts off upon completion of the full wash cycle, the device senses
the lack of current and closes the water valves. The IntelliFlow
®
remains closed until
the next time you turn the washer on.
The leak sensor provides additional protection from water damage while the washing
machine is in operation. Water detected at the sensor results in immediate shut off of
water flow to the washing machine hose.
By installing an IntelliFlow
®
, you are protecting your home from potential major water dam-
age from a burst or leaking washing machine inlet hose.
Operating Specifications
Electrical Rating: 120VAC, 60 Hz
Circuit Breaker Requirements: 20A GFI*
Max. Appliance Current Rating: 15A
Current Draw: 20mA (with appliance off)
Electrical Cord: 6 ft. type SJT 14 AWG
*Ground Fault Interrupter – A GFI circuit is not required for proper operation of the
IntelliFlow
®
, but is strongly recommended as a safety device. In accordance with National
Electric Code, NFPA 70, Section 210.11 Branch Circuits Required, at least one 20-ampere
branch circuit shall be provided to supply the laundry receptacle outlets(s) required by
Section 210.52(F). This circuit shall have no other outlets.
*Surge Protection – Although a surge protector is not required for proper operation of the
IntelliFlow
®
, it is strongly recommended, especially in areas where power surges or lightning
strikes frequently occur.
Max. Temperature: 180°F (82°C)
Max. Pressure: 150psi (10.3 bar)
Valve Body: Reinforced Polysulfone
Rubber Goods: Buna-N, EPDM
A2C-M1 IntelliFlow
Patent Number 6,003,536
®
Leak Sensor
Model
A2C-M1
from
washing
machine
1
⁄2" solder connectors for exposed piping
Standardly furnished with 1⁄2" solder copper
adapters. Either connection may be used for the
hot or cold water supply.
Model
A2C-WB
from
washing
machine
Model A2C-M1
Electrical
power source
ground fault
protected
Water supply
One for cold
One for hot
Electrical
power source
ground fault
protected
Water supply
One for cold
One for hot
Model A2C-WB-M1
Includes wall mount box. Wall mount box has water
inlet connection holes spaced 23⁄8" center to center.
Furnished with
tion may be used for the hot or cold water supply.
1
⁄2" solder connectors. Either connec-
Page 2
Installing the A2C-M1 IntelliFlow
®
WARNING:
Power MUST be off during installation or
servicing of the valve!
IMPORTANT: Do not plug valve into supply circuit
until completion of assembly.
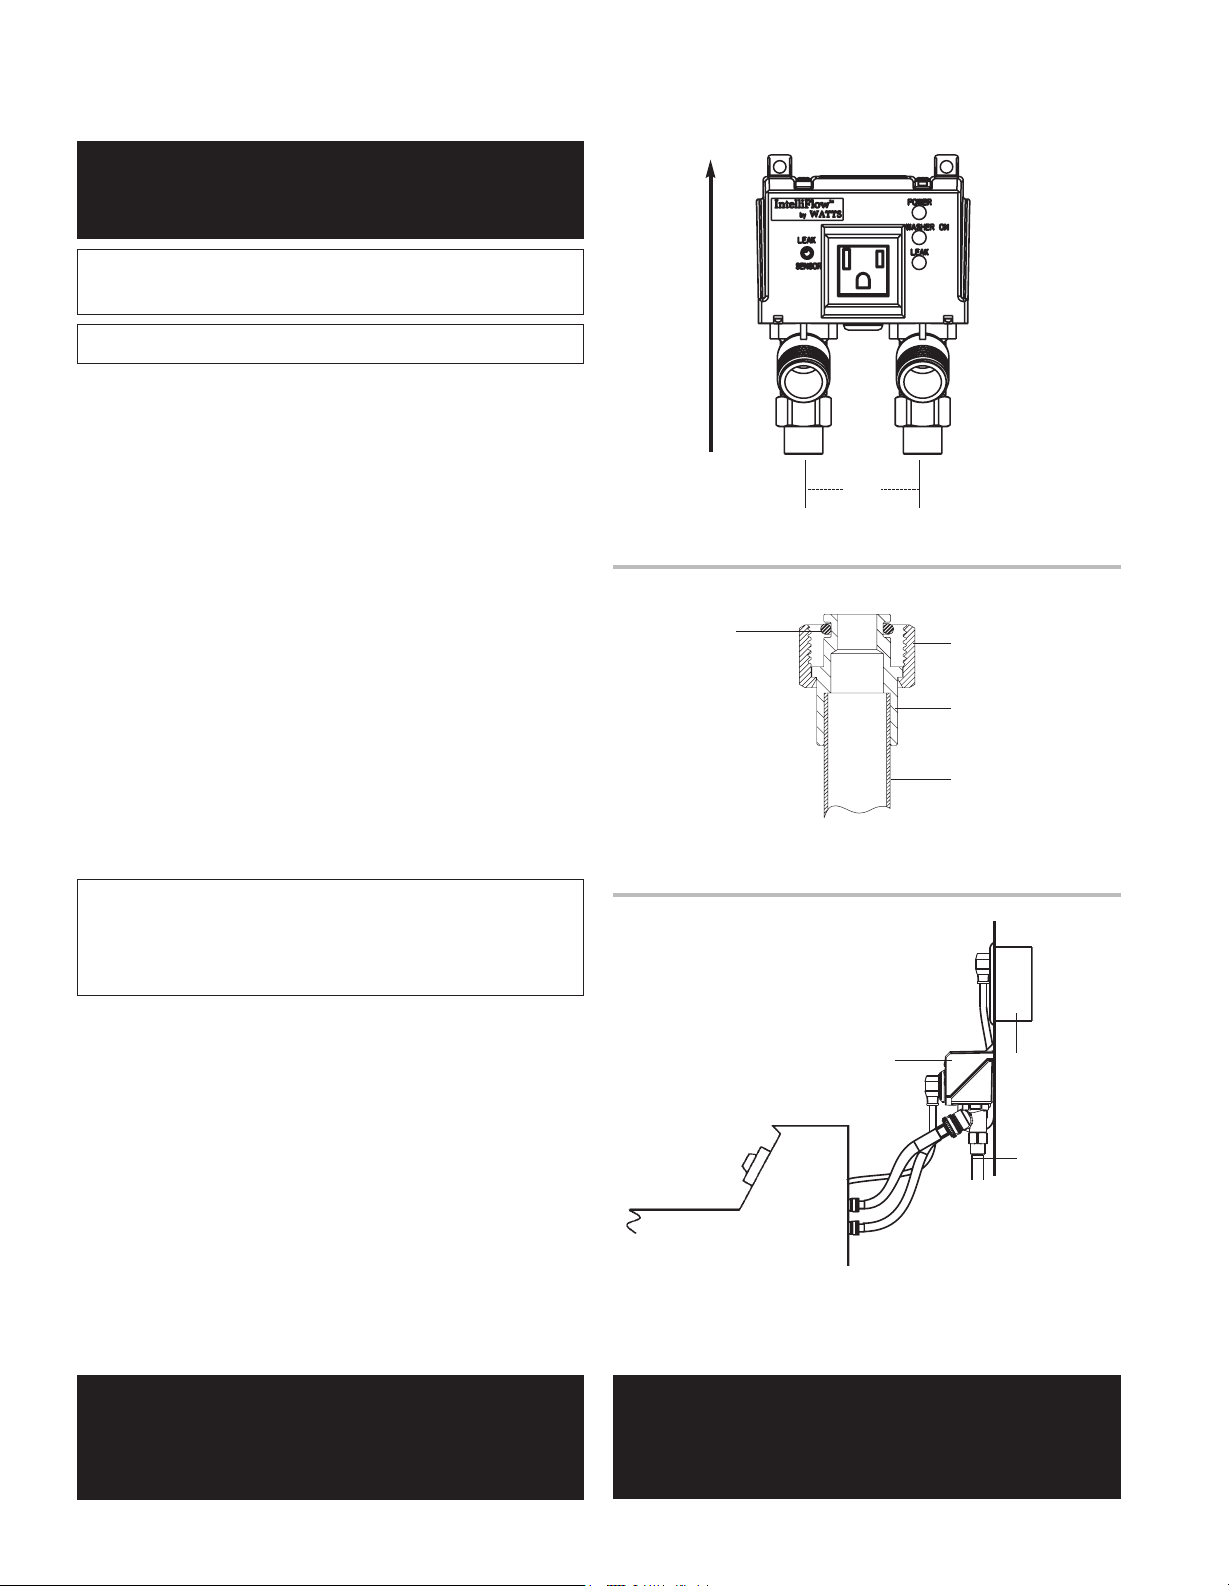
For Vertical Installation Only!
1. Shut off electrical power supply.
2. Shut off both hot and cold water supply lines.
3. If retrofitting to an existing installation, disconnect the washing machine hoses from the existing shutoff valve(s).
4. Loosen the two (2) adapter nuts and remove both adapters
from IntelliFlow
5. Place adapter nuts over piping prior to soldering adapters.
6. Solder adapters onto piping.
Note: Piping must be 23⁄8" on center (Figure 3).
7. Place O-rings on adapter grooves (Figure 3A).
8.
Align and slip the valve body over adapters. Tighten adapter nuts.
Caution: Do not over-tighten nuts.
Caution: To avoid cross threading, check thread alignment.
9. Connect the washing machine hoses to the IntelliFlow
and cold water outlets.
10. Plug the washing machine into the IntelliFlow
Note: Appliance current rating must not exceed 15 amps.
11. Plug the IntelliFlow
receptacle (Figure 4).
Note: The IntelliFlow®requires a 120VAC, 60Hz, 15 amp
ground-fault protected receptacle.*
IMPORTANT: The IntelliFlow®will detect any current flow to
the washing machine when the washing machine is off. The
IntelliFlow
®
threshold required to activate the shutoff valves. To calibrate
the IntelliFlow
®
valve body.
®
’s electrical outlet.
®
’s power cord into a house electrical
must be calibrated to adjust the current flow
®
see Calibration: (Startup) on page 4.
®
’s hot
Install Upright
O-Ring
21⁄2"
Figure 3
Adapter Nut
Adapter
Water Supply Piping
Figure 3A
12.
Turn on both hot and cold water supply lines, and check for leaks.
13. If there are no leaks, turn on the electrical power. Installation
of the A2C-M1 IntelliFlow
®
is now complete.
*Ground Fault Interrupter – A GFI circuit is not required
for proper operation of the IntelliFlow
®
, but is strongly
recommended as a safety device.
CAUTION:
Use of the Watts Automatic Washing Machine Valve
outlet for appliances other than a washing machine
is not recommended and voids the warranty.
Watts
A2C-M1
Washer
Power supply
Water supply
Figure 4
IMPORTANT:
Do not plug valve into electrical supply circuit until
you have completed installing the unit and
reconnecting the water supply lines.
2
ground fault
protected
Page 3
U
L
R
LISTED
3P47
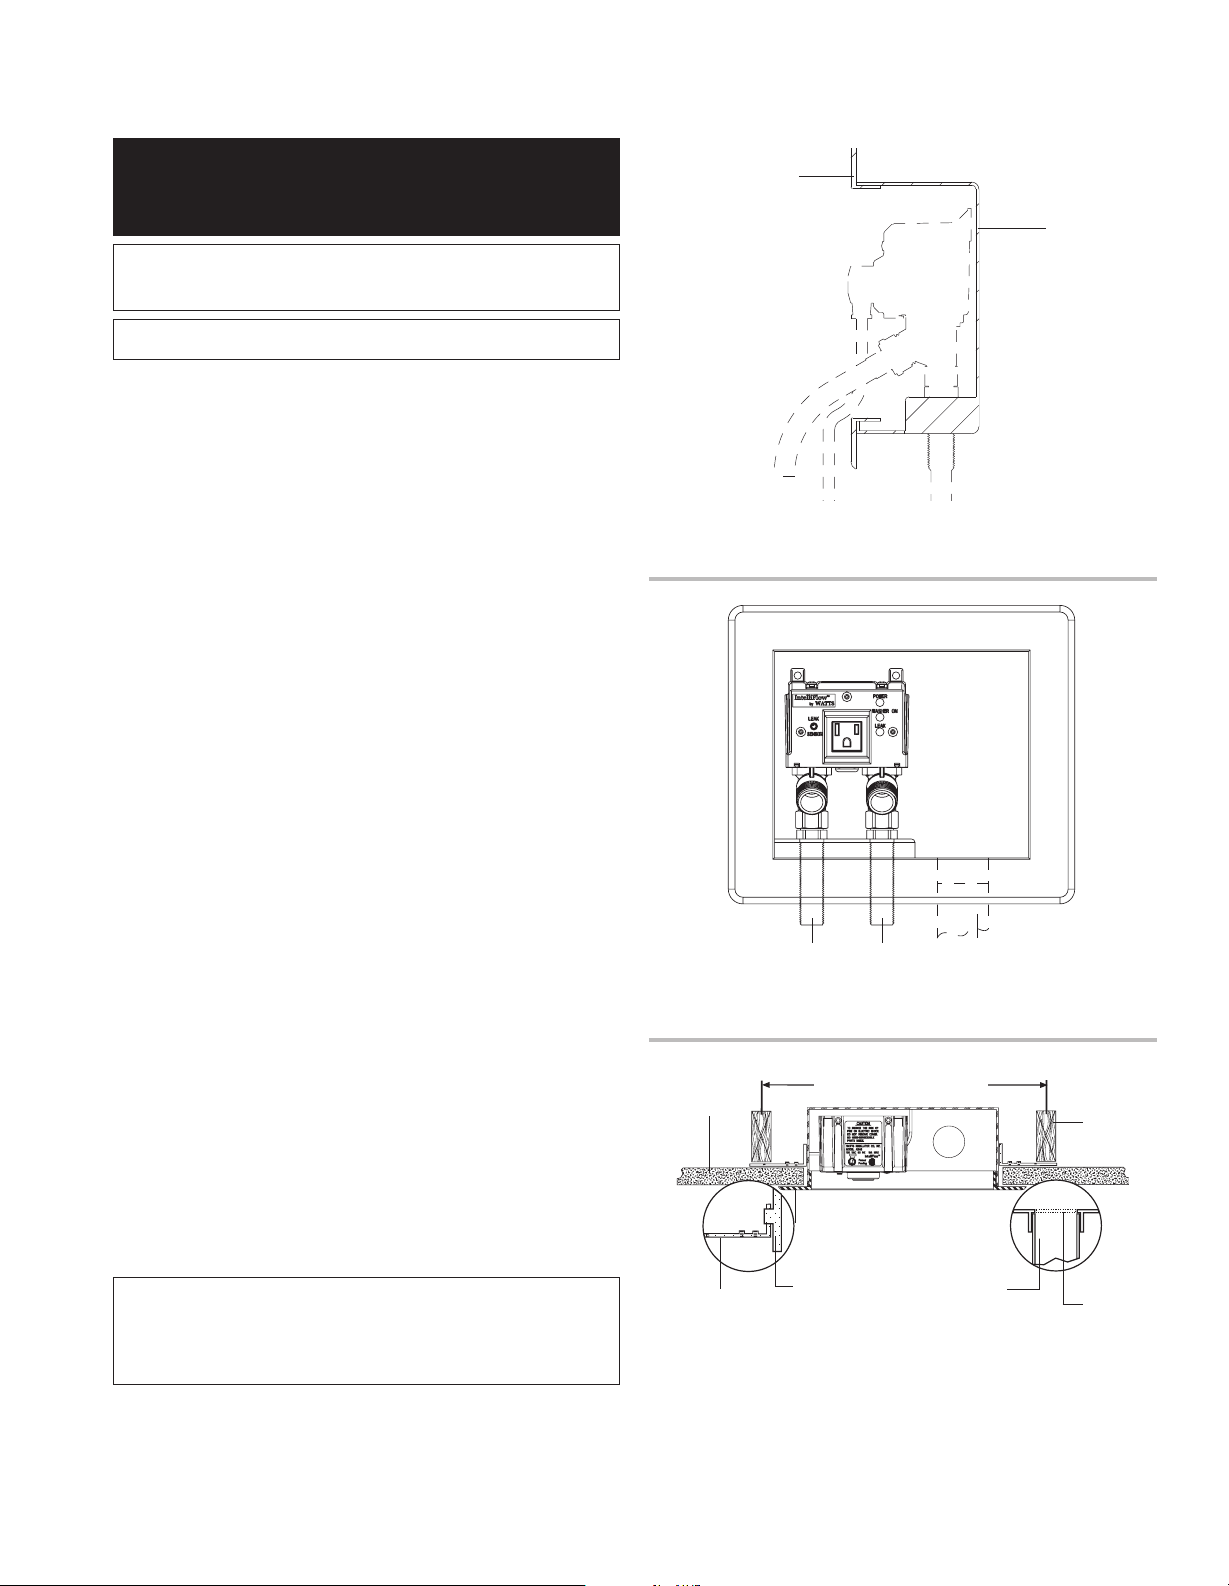
Installing the IntelliFlow®Wall Box Unit (A2C-WB-M1)
WARNING:
Power MUST be off during installation or
servicing of the valve!
IMPORTANT: Do not plug valve into supply circuit
until completion of assembly.
For Vertical Installation Only!
1. Shut off electrical power supply.
2. Shut off both hot and cold water supply lines.
3. Remove trim plate (Figs. No.5 & 6) and set aside until
you’ve completed wall finishing (painting, wall papering,
paneling, etc.).
4. Install the four mounting tabs provided in slots on the sides
of the wall box enclosure (Fig. No. 7).
5. Position the A2C-WB-M1 between the wall studs as shown
in Fig. No. 7. Check that it is level and fasten the mounting
tabs to the studs.
6. Remove drain plug knock out. Install drain piping and water
supply piping to the appropriate IntelliFlow
Either IntelliFlow
®
connection may be used for the hot or
cold water supply.
Caution: Excessive heat from soldering can damage plastic
components. Use a heat sink to prevent damage.
7. Place O-rings on adapter grooves (Figure No. 3A).
8.
Align and slip the valve body over adapters. Tighten adapter nuts.
Caution: Do not over tighten nuts.
Caution: To avoid cross threading, check thread alignment.
9. Prior to installing wall materials, turn on water supply (both
hot and cold) and test for leaks. Test drain piping for leaks.
10. Turn off water supply until you’ve completed installing
wall materials.
Note: Installation must comply with local codes and ordinances. Inspection and approval of installation by local
authorities may be required prior to installation of wall material. Check with local plumbing authorities for requirements.
11. Once you’ve finished the wall, install trim plate, connect
washing machine water supply hoses to the IntelliFlow
valve and to the washing machine.
12. Plug washing machine into the IntelliFlow
Note: Appliance current rating must not exceed 15 amps.
13. Insert the IntelliFlow
®
’s power cord into a house
electrical outlet.
Note: The IntelliFlow®requires a 120VAC, 60Hz, 15 amp
ground-fault protected receptacle.*
IMPORTANT: The IntelliFlow®will detect any current flow to
the washing machine when the washing machine is off. The
IntelliFlow
threshold required to activate the shutoff valves. To calibrate
the IntelliFlow
®
must be calibrated to adjust the current flow
®
see Calibration: (Startup) on page 4.
14. Turn on both hot and cold water supply lines, and check for
leaks.
15. If there are no leaks, turn on the electrical power. Installation of
the IntelliFlow
®
A2C-WB-M1 Wall Box Unit is now complete.
®
connection.
®
®
’s electrical outlet.
Trim Plate
Wall Box
Figure 5
(side view)
Trim Plate
Water supply connections
Drain connection
Figure 6
(front view)
Finished
Wall
Mounting
Tabs (4)
16" on center – Typical
Trim Plate
Mounting
Slots (4)
Drain
Figure 7
(top view)
*Ground Fault Interrupter – A GFI circuit is not required
for proper operation of the IntelliFlow
recommended as a safety device.
®
, but is strongly
Wall
Studding
Drain
Knockout
3
Page 4

Installing the Watts Model A2-LS Leak Sensor
Description:
The Watts Model A2-LS Leak Sensor plugs into the receptacle
on the front panel of the Watts IntelliFlow
WB-M1. The base of the sensor is placed on the floor close to
the washing machine. Upon detection of water at the sensor the
IntelliFlow
®
immediately shuts off the water supply to the wash-
ing machine hoses preventing catastrophic water damage.
®
Series A2C-M1 or A2-
Installation:
1. Insert the leak sensor contacts into the two holes on the top
of the sensor base until the plug comes to a stop (Figure 2).
2. Place the sensor base on the floor behind the washing machine
as close to the fill hoses as possible. Insure that the sensor base
is lying flat with all feet in contact with the floor surface.
3. Insert the leak sensor plug (Figure 1) into the leak sensor
receptical on front panel (Figure 2).
IntelliFlow®Calibration Procedure
Some washing machine models include circuitry that causes a
slight current draw at all times. These models when connected
to the IntelliFlow
continuously (Yellow LED: on). Calibration allows the IntelliFlow
to “learn” the off or standby current draw of the washing
machine to prevent this condition.
Calibration: (Startup)
Calibration must be performed with the washing machine in the
off position.
1. Before plugging in the IntelliFlow
cal receptacle, ensure that the leak sensor plug (Figure 1) is
unplugged from the IntelliFlow
2. Plug the IntelliFlow
The green LED lamp should be on and stay on continuously.
The red LED lamp should light for a few seconds then start
to blink on and off, as an indication that the leak sensor is
not plugged in.
3. Be sure that the washing machine is
machine into the IntelliFlow
4. Plug the leak sensor plug into the leak sensor receptacle on
the front panel. This will calibrate the IntelliFlow
ing machine's off or standby position current draw. During the
calibration sequence, the red LED lamp will remain lit for
approximately 3-5 seconds. When calibration is complete the
red LED lamp will blink four (4) times and shut off.
®
can cause the water supply to be energized
®
power cord into an electri-
®
unit (Figure 2).
®
power cord into an electrical receptacle.
off. Plug the washing
®
’s electrical outlet.
®
to the wash-
®
Calibration using IntelliTimer Accessory:
Calibration must be performed with the washing machine in the
off position.
To calibrate the IntelliFlow
that the washing machine is off and ensure that the power supply to the IntelliTimer is plugged into the IntelliFlow
Remove the leak sensor plug (Figure 1) from the receptacle, wait
5 seconds, then reinstall the sensor plug. During the calibration
sequence, the red LED lamp will remain lit for approximately 3-5
seconds. When calibration is complete the red LED lamp will
blink four (4) times and shut off.
Notes:
The IntelliFlow®is designed to maintain its calibration in the
event of a power failure. Should calibration ever be required, follow the procedure below.
Recalibration:
Calibration must be performed with the washing machine in the
off position.
To recalibrate the IntelliFlow
is off. Remove the leak sensor plug (Figure 1) from the receptacle, wait 5 seconds, then reinstall the leak sensor plug. During
the calibration sequence, the red LED lamp will remain lit for
approximately 3-5 seconds. When calibration is complete the
red LED lamp will blink four (4) times and shut off.
Figure 2
Figure 1
Sensor Plug
Sensor Contacts
Sensor Base
®
for use with the IntelliTimer be sure
®
®
, be sure that the washing machine
unit.
4
Page 5

Accessories: Watts A2-IntelliTimer
The Watts A2-IntelliTimer is an optional accessory used in conjunction with the Watts IntelliFlow
Shutoff Valve. It is a remote timer which allows the IntelliFlow
be used in applications where the washing machine or a combination washer/dryer is 240VAC powered. (The IntelliFlow
®
Automatic Washing Machine
®
®
is not
to
compatible with 240VAC powered appliances). The timer initiates a two-hour cycle when the button is depressed.
The A2-IntelliTimer low voltage power supply is plugged into
the IntelliFlow
®
power outlet. The remote solid-state timer is
installed in a location that is convenient to the user and connected to the low voltage power supply.
Activation of the push button on the timer causes current flow,
which is detected by the IntelliFlow
®
. The IntelliFlow®then actuates the solenoid valves, allowing water to flow to the washing
machine. This also begins a timing sequence of two hours,
which, upon its completion de-energizes the IntelliFlow
®
, shutting off the flow of water to the washing machine. The timing
sequence can be interrupted by activating the push button a
second time.
A Green LED is illuminated whenever the A2-IntelliTimer is energized.
Note: For calibration procedure see Page 4, “Calibration using
IntelliTimer Accessory”.
IntelliFlow
®
IntelliTimer
IntelliFlow
Power Outlet
®
Low Voltage
Power Supply
Power Lamp
Power Jack
Push On
Push Off
Power Cord
Typical Installation
IntelliFlow
Low Voltage
Power Supply
IntelliTimer
®
Wall Box
Washer Hoses
Washing
Machine
Power to
IntelliFlow
120
VAC
Power to
Washing
®
Machine
240
VAC
5
Page 6

Troubleshooting Guide
PROBLEM SOLUTION
1. No water flow from either hot or cold water supply hose: 1. Plug IntelliFlow®into electrical outlet.
GREEN LED: OFF 2. Check electrical outlet for power (reset ground fault).
GREEN LED:
YELLOW LED:
RED LED:
GREEN LED: ON 1. Leak sensor has detected water.
YELLOW LED:
RED LED:
GREEN LED:
YELLOW LED:
RED LED: BLINKING 2. Turn on washing machine.
2. No water flow from one hose - (either Hot or Cold): 1. Service strainers on washing machine hoses.
GREEN LED:
YELLOW LED: ON Caution prior to servicing strainers, first remove power to
RED LED:
ON 1. Plug washing machine into IntelliFlow®and turn on
OFF washing machine.
OFF / FAINT BLINK 2. Confirm operation of washing machine by plugging it into a
separate electrical outlet.
OFF 2. Check for broken or leaking hoses.
ON 3. Unplug IntelliFlow®from electrical outlet, correct problem,
ON 1. IntelliFlow®internal timing circuit has timed out.
OFF Turn off washing machine to reset timing circuit.
ON 2. Service strainers on IntelliFlow®(see figure 1).
OFF / FAINT BLINK IntelliFlow®by unplugging, then shut off both hot and cold
then re-insert plug into outlet to reset valve.
4. Turn on washing machine.
water supply to IntelliFlow
Strainer
®
.
O-Ring
Figure 1
3. Yellow LED Remains On Some washing machine models include circuitry that causes a
GREEN LED:
YELLOW LED: ON to the IntelliFlow®can cause the water supply to be energized
RED LED:
4. Unit feels warm: This condition is normal. Internal operating temperatures may
5. Unit cycles ON/OFF: Installation in a horizontal position can cause abnormal overheat-
ON slight current draw at all times. These models when connected
OFF / FAINT BLINK continuously (Yellow LED: ON). The IntelliFlow®requires
calibration, see page 4 for calibration instructions.
cause unit to feel warm to the touch.
ing of the unit which causes this cycling condition. Unit must be
installed in an upright position as shown on pages 2 and 3.
6
Page 7

Front Panel Status Indicators
GREEN LED: ON: Unit powered This lamp is illuminated whenever the IntelliFlow®is plugged into
a powered wall outlet.
YELLOW LED:
ON: Water supply Open. This lamp is illuminated whenever the IntelliFlow® senses
OFF: Water Supply Closed. current flow (the washing machine is turned on).
It is off when the washing machine is turned off.
NOTE: Some washing machine models include circuitry that
causes a slight current draw at all times. These models when
connected to the IntelliFlow
energized continuously (Yellow LED: ON). The IntelliFlow
®
can cause the water supply to be
®
requires calibration, see page 4 for callibration instructions.
RED LED:
ON: Leak Sensed. This lamp is illuminated when the leak sensor is installed and
Sensor Plug
water has been detected at the sensor. The water supply to the
washing machine hoses are interrupted when a leak is detected.
BLINKING: Unit Timed Out – This lamp blinks whenever the internal timing circuit has timed
out and has shut off the water supply to the washing machine
hoses. Turning the washing machine Off then On will reset the
timing circuit.
FAINT BLINK: (3-5 seconds) – This condition indicates the leak sensor is unplugged. To provide
the maximum level of protection, it is recommended that the leak
sensor be installed at all times.
What is Surge Protection?
In many locations, changes in the AC voltage supply to the home by the
electrical utility company can occur. Both lower voltage (brownouts) and
high voltage (surges) can occur. Lightning strikes can also cause high
voltage spikes to occur.
All electronic equipment is designed to operate properly within a
voltage range. However, high voltage surges or spikes can damage sensitive circuitry within electronic equipment.
Surge protectors prevent voltage spikes from reaching
electronic equipment.
What is Ground Fault Protection?
In many locations, an electrical differential between an electrical ground
and a water pipe ground can exist. A person touching both grounds
could receive a shock that may cause injury or death. A ground fault
interrupter circuit (GFI) detects the differential and removes electrical
power before injury can occur.
The IntelliFlow®does not cause or change the electrical differential that exists.
7
Page 8

IntelliFlow® Retrofit Kit Options
IntelliFlow
Retrofit Installation Kit KA2-BD
Order No. 0004800
If Your Current Installation
Looks Like:
®
These mounting kits are specifically used to install the Watts Model A2C-M1 IntelliFlow®automatic
washing machine shutoff valve to existing drain valves.
Final Installation Will
Look Like:
If Your Current Installation
Looks Like:
Final Installation Will
Look Like:
KA2-BD
left or right drain
IntelliFlow
Retrofit Kit KA2-R
Order No. 0004805
®
This kit is used to replace the following Watts IntelliFlow®Models: A2-WB,
A2C-WB, A2C-WB-M with the new IntelliFlow®Model A2C-M1.
If Your Current Installation Looks Like:
or
Wall box style with #2 Style, A2-WB, A2C-WB or A2C-WB-M
IntelliFlow
Retrofit Kit KA2-A
Order No. 0004804
®
This kit is used to replace the following Watts washing machine shutoff valves: the wall mounted
Watts Models #2 Duo-Cloz valve and the wall mounted IntelliFlow
the new Watts IntelliFlow
If Your Current Installation Looks Like:
or
center drain
®
Model A2C-M1.
KA2-R
KA2-A
KA2-BD
Final Installation Will Look Like:
A2C-M1
®
Models: A2, A2C, A2C-M with
Final Installation Will Look Like:
Wall box style with #2 Style, A2, A2C or A2C-M
Limited Warranty: Watts Regulator Co. (the “Company”) warrants each product to be free from defects in material and workmanship under normal usage for a period of one year from the date of
original shipment. In the event of such defects within the warranty period, the Company will, at its option, replace or recondition the product without charge.
THE WARRANTY SET FORTH HEREIN IS GIVEN EXPRESSLY AND IS THE ONLY WARRANTY GIVEN BY THE COMPANY WITH RESPECT TO THE PRODUCT. THE COMPANY MAKES NO OTHER WARRANTIES,
EXPRESS OR IMPLIED. THE COMPANY HEREBY SPECIFICALLY DISCLAIMS ALL OTHER WARRANTIES, EXPRESS OR IMPLIED, INCLUDING BUT NOT LIMITED TO THE IMPLIED WARRANTIES OF
MERCHANTABILITY AND FITNESS FOR A PARTICULAR PURPOSE.
The remedy described in the first paragraph of this warranty shall constitute the sole and exclusive remedy for breach of warranty, and the Company shall not be responsible for any incidental, special
or consequential damages, including without limitation, lost profits or the cost of repairing or replacing other property which is damaged if this product does not work properly, other costs resulting from
labor charges, delays, vandalism, negligence, fouling caused by foreign material, damage from adverse water conditions, chemical, or any other circumstances over which the Company has no control.
This warranty shall be invalidated by any abuse, misuse, misapplication, improper installation or improper maintenance or alteration of the product.
Some States do not allow limitations on how long an implied warranty lasts, and some States do not allow the exclusion or limitation of incidental or consequential damages. Therefore the above
limitations may not apply to you. This Limited Warranty gives you specific legal rights, and you may have other rights that vary from State to State. You should consult applicable state laws to
determine your rights.
MERCHANTABILITY AND FITNESS FOR A PARTICULAR PURPOSE, ARE LIMITED IN DURATION TO ONE YEAR FROM THE DATE OF ORIGINAL SHIPMENT.
A Watts Water Technologies Company
IS-A2C-M1/A2C-WB-M1 0927 EDP# 1911430 © 2009 Watts
SO FAR AS IS CONSISTENT WITH APPLICABLE STATE LAW, ANY IMPLIED WARRANTIES THAT MAY NOT BE DISCLAIMED, INCLUDING THE IMPLIED WARRANTIES OF
USA: 815 Chestnut St., No. Andover, MA 01845-6098; www.watts.com
Canada: 5435 North Service Rd., Burlington, ONT. L7L 5H7; www.wattscanada.ca
A2C-M1
 Loading...