

Page 1
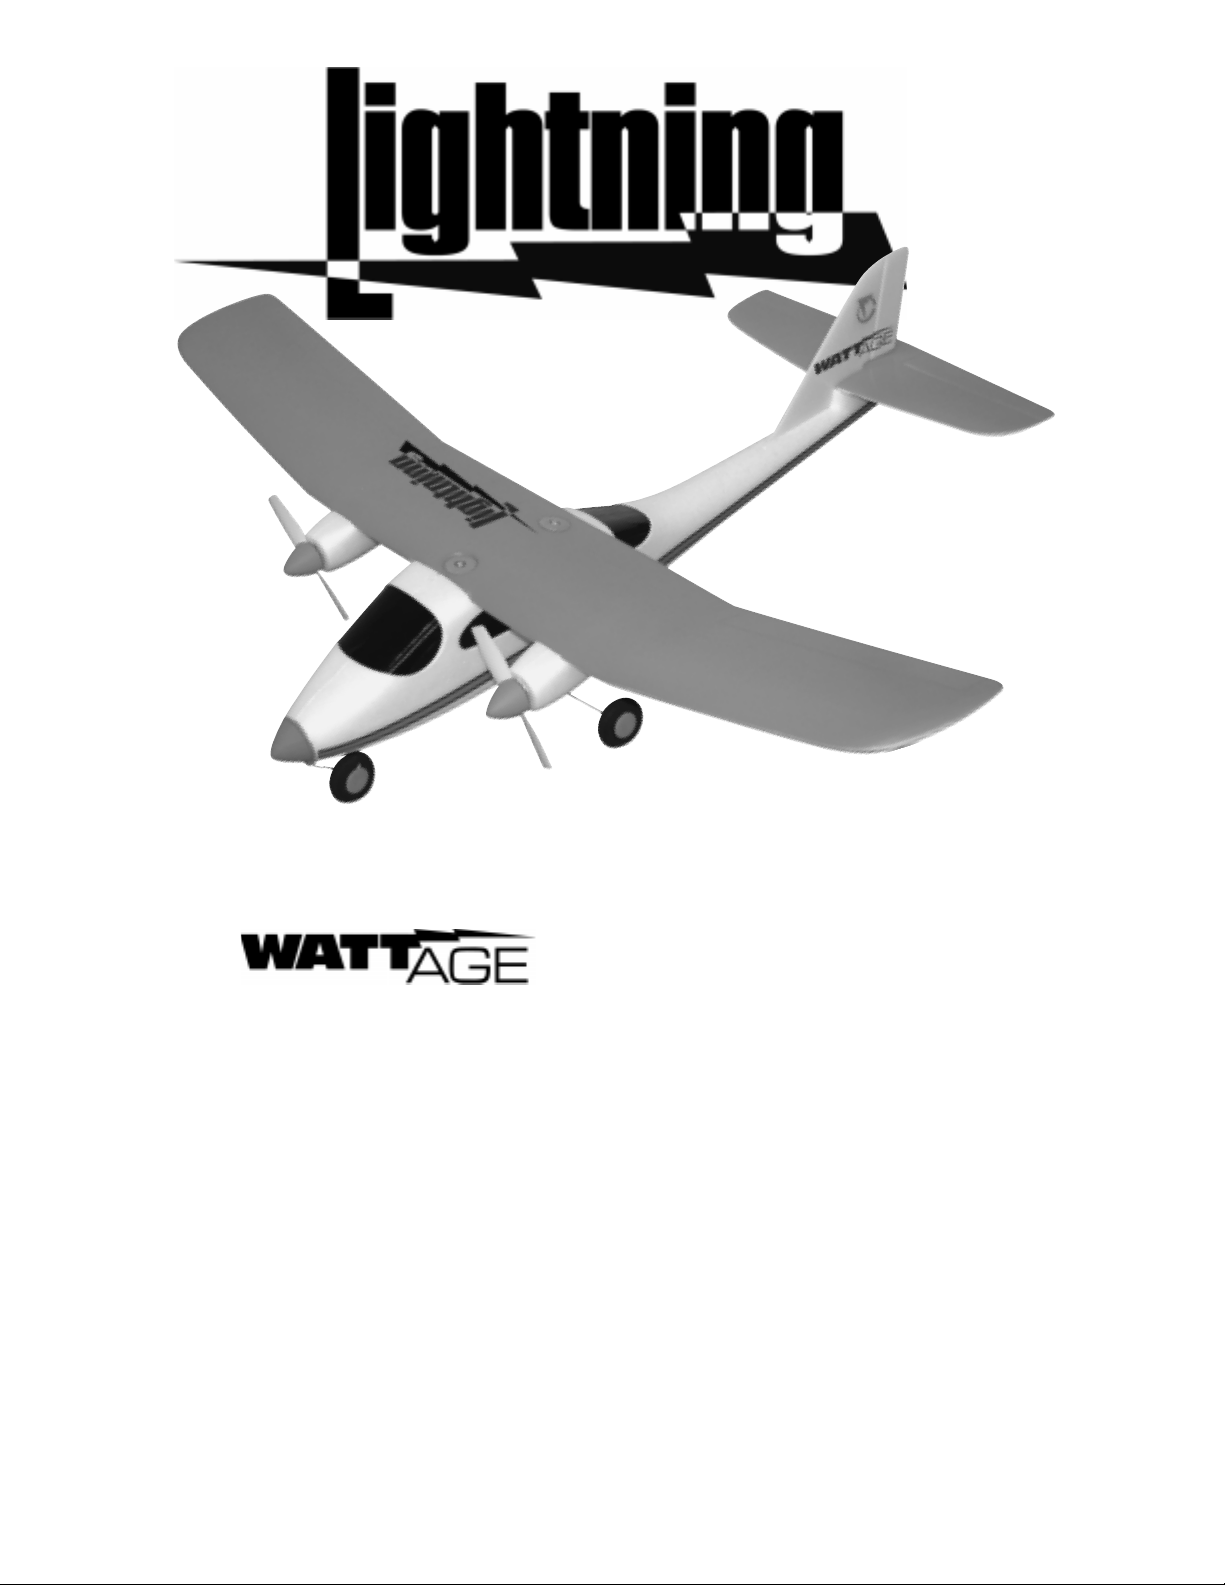
OPERATING INSTRUCTIONS
Lightning EP Features:
Completely Ready-to-Fly
Solid State Electronic Motor Control
Kit Product Number:
128301 - Red
128302 - Yellow
128303 - Silver
Thank you for purchasing the Wattage Lightning EP. These Operating Instructions are provided to help you
learn to fly and enjoy your new airplane without any of the hassles you might expect. Please read through these
operating instructions in their entirety before starting. Doing so will help you become familiar with how your
airplane and radio system operate.
IMPORTANT
Before beginning assembly, please read and understand the warnings listed on the next page. Failure
to do so could lead to bodily harm and/or injury. The Wattage Lightning EP is not intended for those
under 12 years of age, unless closely supervised by an adult.
Twin Electric Motors
2 Channel Radio Control w/Auto Pilot
5 Cell Nickel Metal Hydride Flight Pack
Makes Learning to Fly Easy
The Wattage Lightning EP is distributed exclusively by Global Hobby Distributors 18480 Bandilier Circle, Fountain Valley , CA 92728
All contents copyright © 2001, Global Hobby Distributors Version V1.0 September 2001
Visit our website at http://watt-age.globalhobby.com for information on other Wattage products
1
Page 2

FOR YOUR SAFETY - PLEASE READ THESE WARNINGS!
GENERAL WARNINGS
●
Do not fly your airplane if another airplane is on the
same frequency as you. The frequency number is printed
on a sticker on the bottom of the airplane.
●
Never fly your airplane from the str eet or a t ni ght .
Always fly in an open area free of obstructions.
●
When flying, make sure any spectators are behind you.
●
Always be conscious of the spinning propellers. Be
careful not to allow loose clothing to be drawn into the
propellers.
●
Because your airplane is operated by radio control, it
is important to make sure you are always using fresh
and/or fully charged batteries. Never allow the batteries
to run low or you could lose control of the model.
●
Never attempt to disassemble any of the airplane's
components, especially the transmitter and battery.
●
Do not allow any of the components to get wet or
electrical damage may occur.
●
Y ou should complete a successful range check of your
radio equipment prior to each new day of flying, or prior
to the first flight of a new or repaired model.
●
If your airplane gets dirty, do not use any solvents to
clean it. Solvents will damage the foam. Use a dry cloth
to clean any dirt from the outside of the model.
BATTERY WARNINGS
●
Never charge the flight battery longer than 5 minutes
or damage to the battery may occur.
●
Never leave the flight battery unattended while
charging.
●
To prevent the flight battery from overheating during
the charging process, allow the battery to completely cool
before recharging.
RADIO SYSTEM WARNINGS
●
Always turn on the transmitter before turning on the
airplane.
●
Always turn off the airplane before turning off the
transmitter.
●
Always unplug the flight battery when not flying the
airplane.
●
Never cut the receiver antenna shorter or you could
lose control of the airplane during flight.
●
When flying the airplane, make sure the transmitter
antenna is completely extended.
● Never attempt to disassemble any of the radio system
components.
For Your Information
If you should have any trouble with any of the steps listed in these Operating Instructions, we have provided a Troubleshooting Guide on page # 18. The troubleshooting guide is provided to help you find a quick and immediate resolution
to any number of problems that might occur. If you cannot solve a problem using the troubleshooter, or if you have any
other questions or concerns, please contact us below:
Wattage Customer Service
18480 Bandilier Circle
Fountain Valley CA 92728
Phone (714) 963-0329
Fax (714) 964-6236
Email: [email protected]
2
Need help or have any questions? Call us at 1-714-963-0329 or send us an email to service@globalhobby.net
Page 3
Section 1: Our Recommendations
This section lists the items you will need to fly your new airplane. As you can see, there's not much to it!
●
8 Pack AA Alkaline batteries for the transmitter
Section 2: Parts Identification
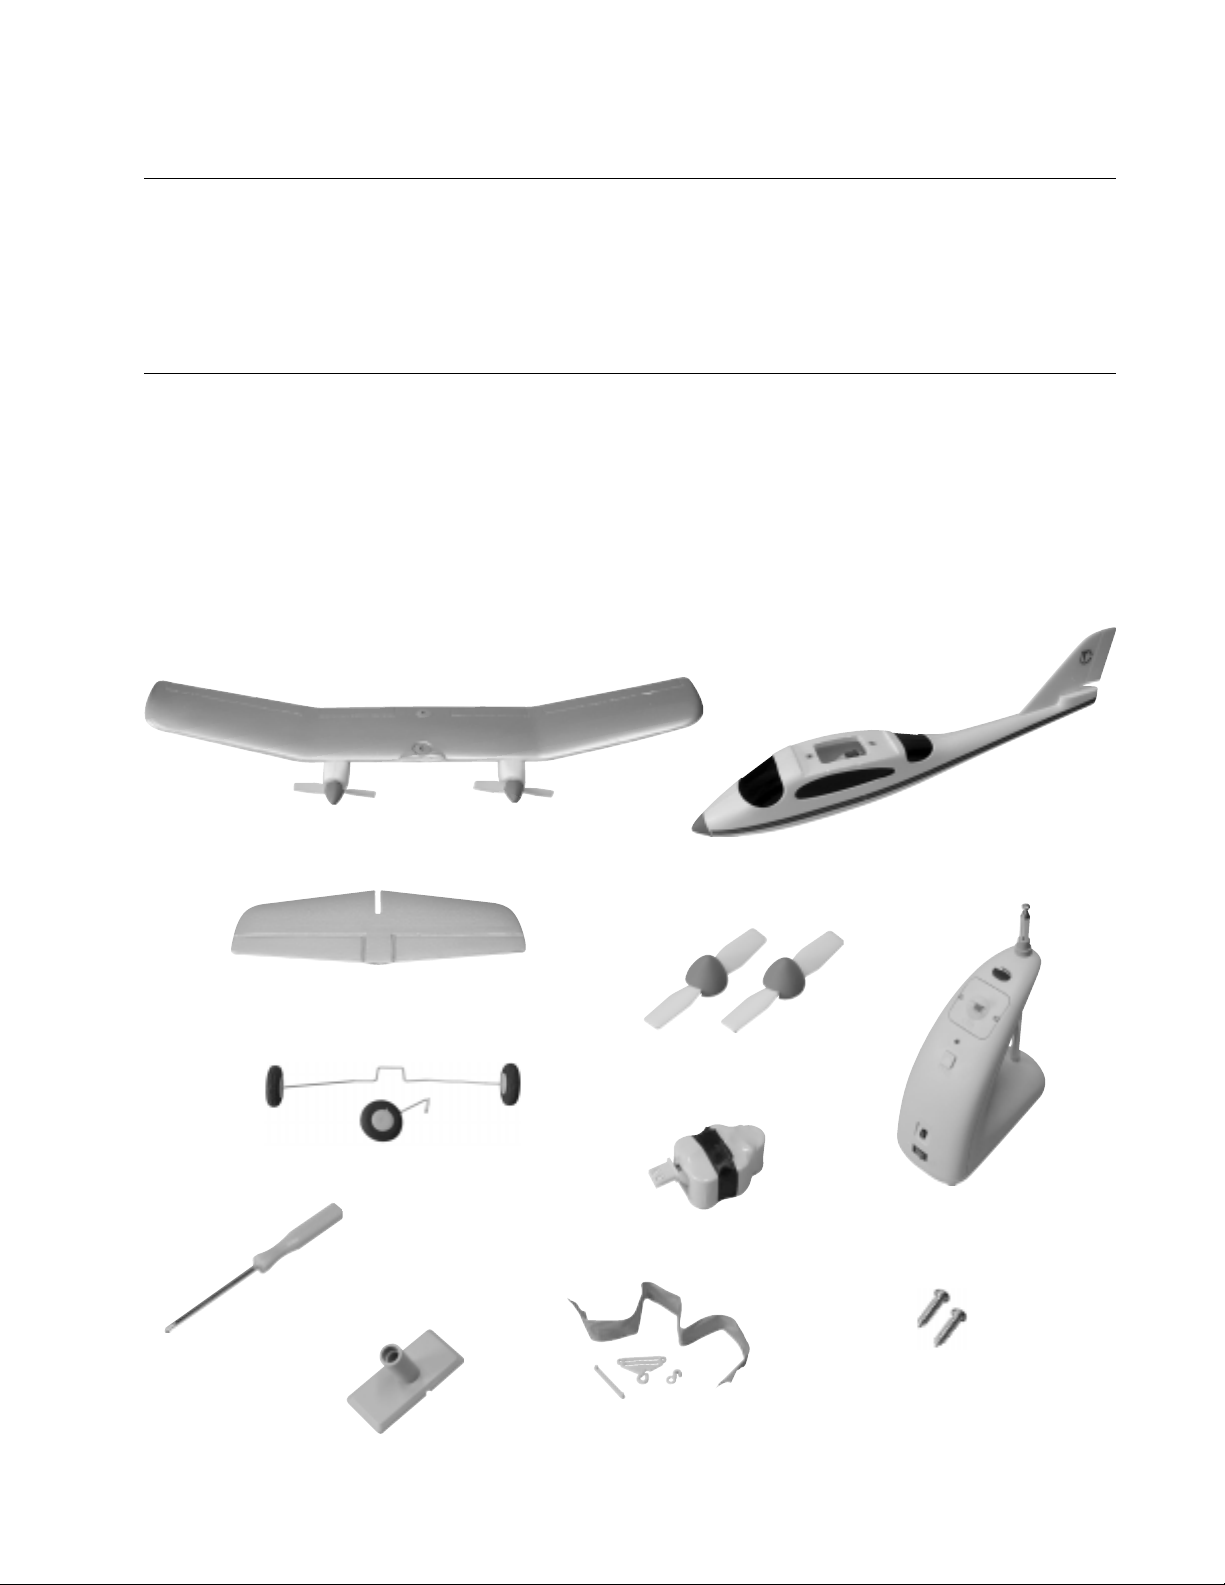
Before beginning assembly, remove the different parts from the box and use the photos below to verify that your kit
contains all of the correct parts. If your kit is missing a part, please contact us immediately at the address shown below:
Wattage Customer Service
18480 Bandilier Circle
Fountain Valley CA 92728
Phone (714) 963-0329
Fax (714) 964-6236
Email: [email protected]
Wing Assembly
Horizontal Tail
Landing Gear Assembly
Screwdriver
Training Stand
Spare Propellers
Flight Battery
Transmitter
Flag Assembly
Fuselage Assembly
Transmitter
Wing Mounting
Screws
Visit our website at http://watt-age.globalhobby.com for information on other Wattage products
3
Page 4
Section 3: Becoming Familiar with Your Airplane
Each airplane kit comes with a sticker on the bottom of the airplane showing which channel the radio operates on . No two
radio systems can operate nearby each other if they are on the same channel. Listed below are the three different channels
the airplane is available on:
Channel # Airplane Color
01 Red
27Mhz
If you want to fly your airplane with a friend, both
airplanes must be a different color to be able to
fly at the same time.
02 Yellow
03 Silver
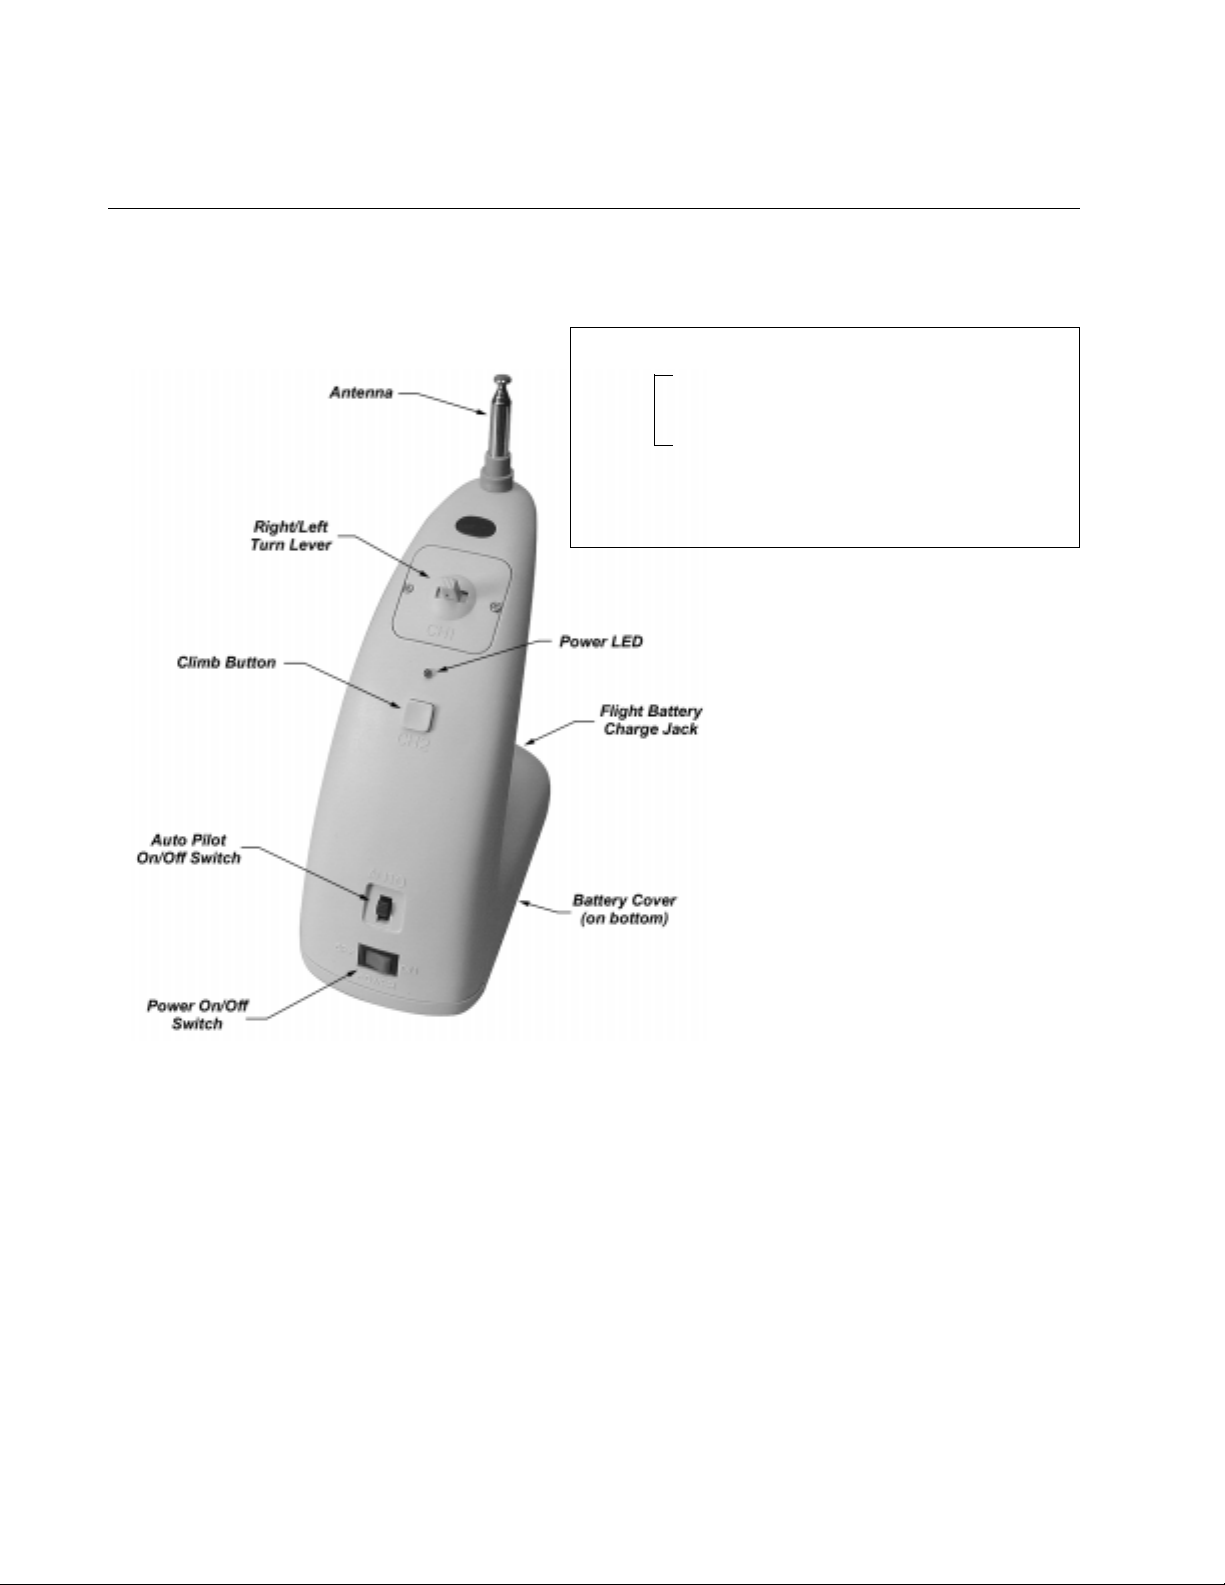
Antenna: Transmits the signal from the transmitter to the receiver inside the airplane.
Auto Pilot On/Off Switch: Turns the auto pilot function on and off.
Battery Cover: Plastic cover that holds the 8 AA Alkaline batteries in place.
Climb Button: Used to make the airplane climb. Pushing the button powers both motors fully so that the airplane will
climb steadily.
Flight Battery Charge Jack: Used to charge the airplane's flight battery.
Power LED: Glows red to show that the transmitter is turned on.
Power On/Off Switch: Turns the transmitter on and off. When the transmitter is on, the battery LED will glow red.
Right/Left Turn Lever: Used to steer the airplane. Pushing the lever left or right causes the airplane to turn left or right.
4
Need help or have any questions? Call us at 1-714-963-0329 or send us an email to [email protected]
Page 5
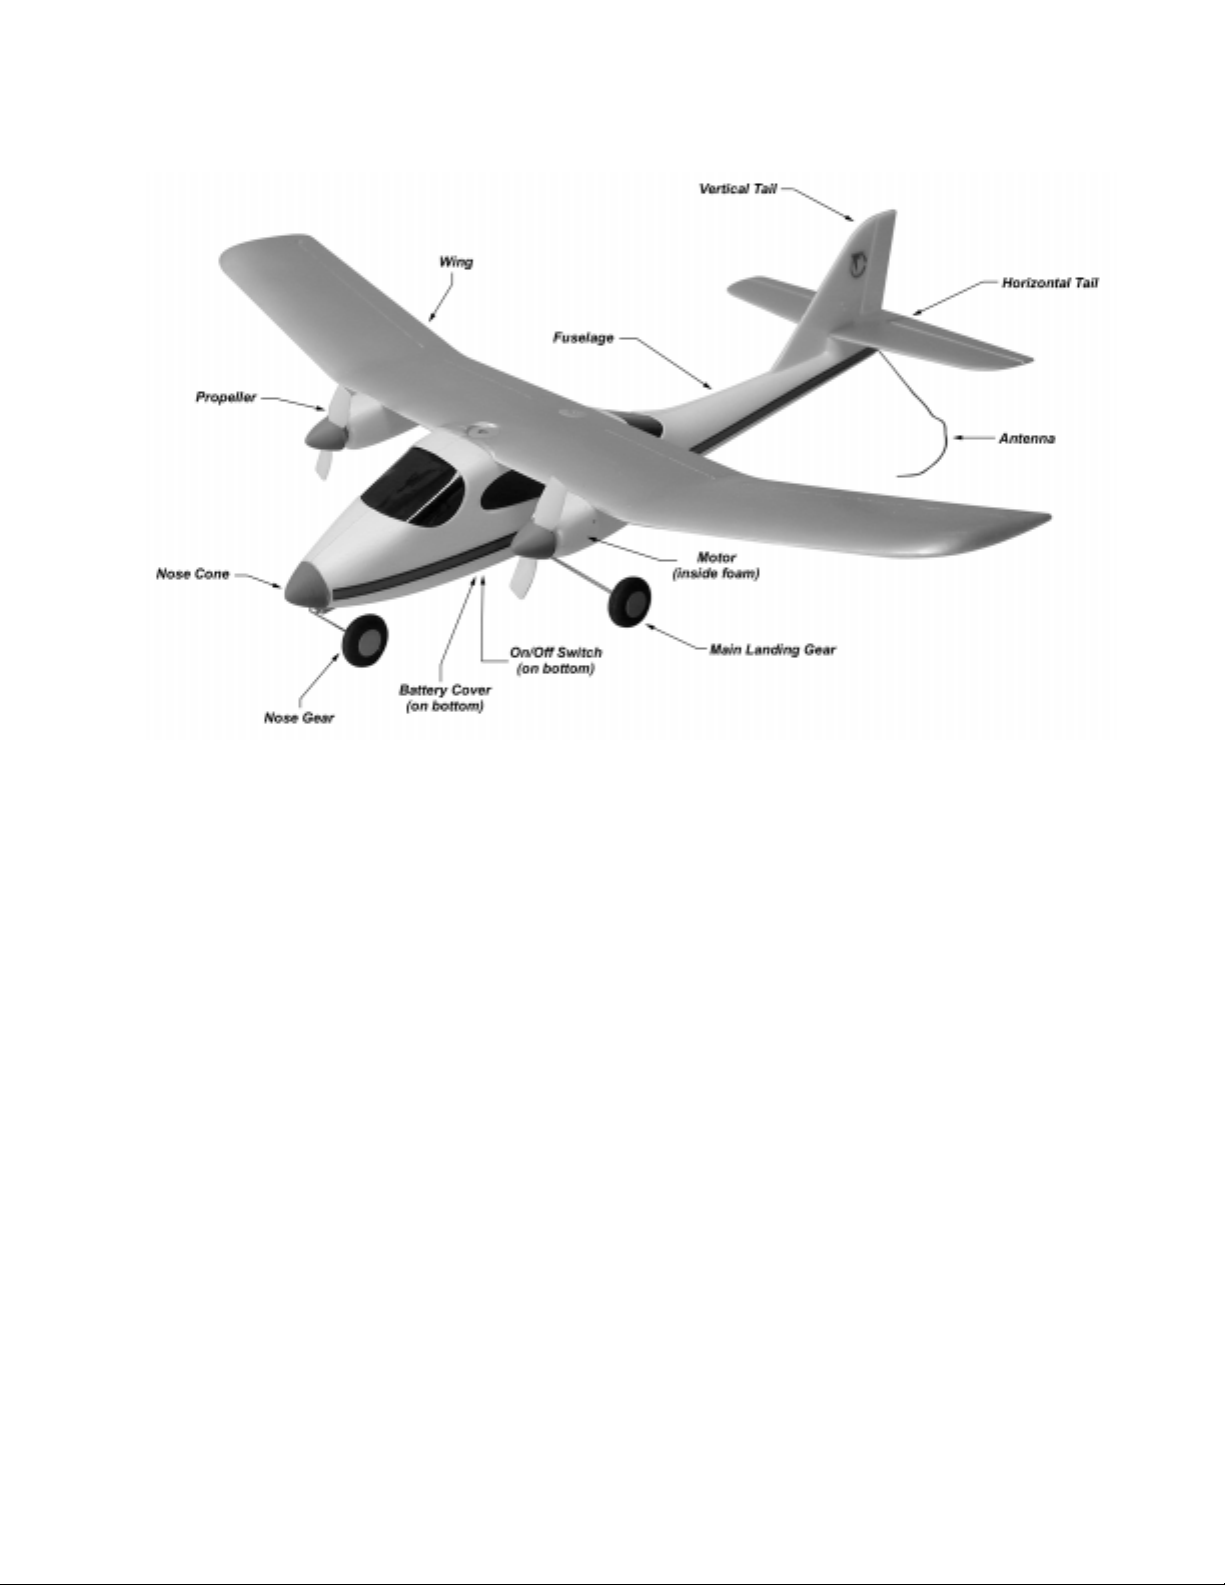
Antenna: A thin wire connected to the receiver. The antenna receives the signal from the transmitter.
Battery Cover: A plastic cover that holds the flight battery in place.
Fuselage: The main body of the airplane. All of the main airplane assemblies are attached to the fuselage.
Horizontal Tail: Provides stability for the airplane during level flight.
Main Landing Gear: Comprised of a length of wire and two wheels, the main landing gear supports the middle of the
airplane while on the ground.
Motor: The motor provides power to the propeller, which in turn creates thrust and makes the airplane fly. The Lightning
has two motors.
Nose Cone: Made of foam rubber, the nose cones helps prevent damage to the front of the fuselage.
Nose Gear: Consisting of a wire and one wheel, the nose gear supports the front of the airplane while on the ground.
The nose gear and main landing gear allow the airplane to take off from the ground.
On/Off Switch: When turned on, the switch allows power to the motors and the electronics inside the fuselage.
Propeller: The propeller is attached to the front of the motor . When spinning, the propeller creates forward thrust which
pulls the airplane forward.
Vertical Tail: Provides stability for the airplane during turns.
Wing: The wing has a special airfoil shape and provides the main source of lift for the airplane.
Visit our website at http://watt-age.globalhobby.com for information on other Wattage products
5
Page 6
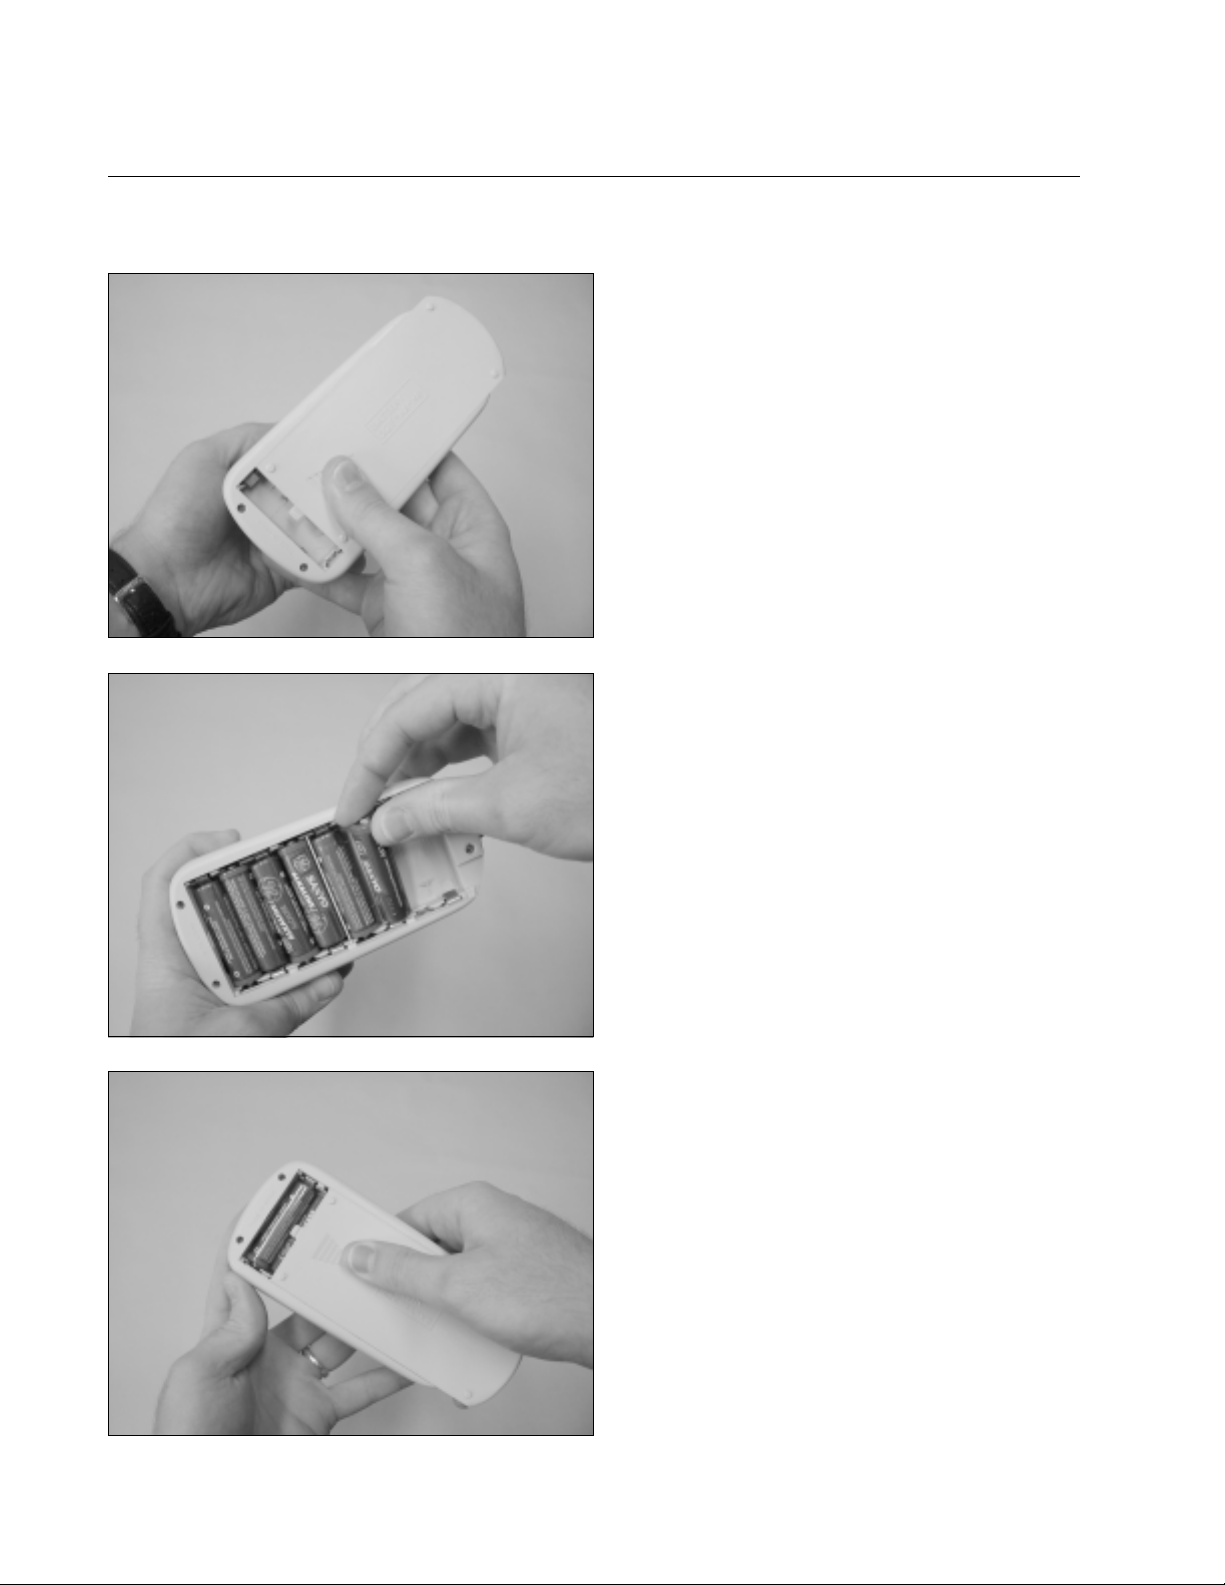
Section 4: Assembling Your Airplane
Step 1: Installing the Transmitter Batteries
❑ Remove the battery cover by pushing with your thumb
at the mark on the bottom of the battery cover.
❑ Install 8 fresh AA Alkaline batteries, being careful to
watch that the polarity is correct for each battery.
❑ Push the battery cover back into place until you hear
it "click" into position.
6
Need help or have any questions? Call us at 1-714-963-0329 or send us an email to [email protected]
Page 7
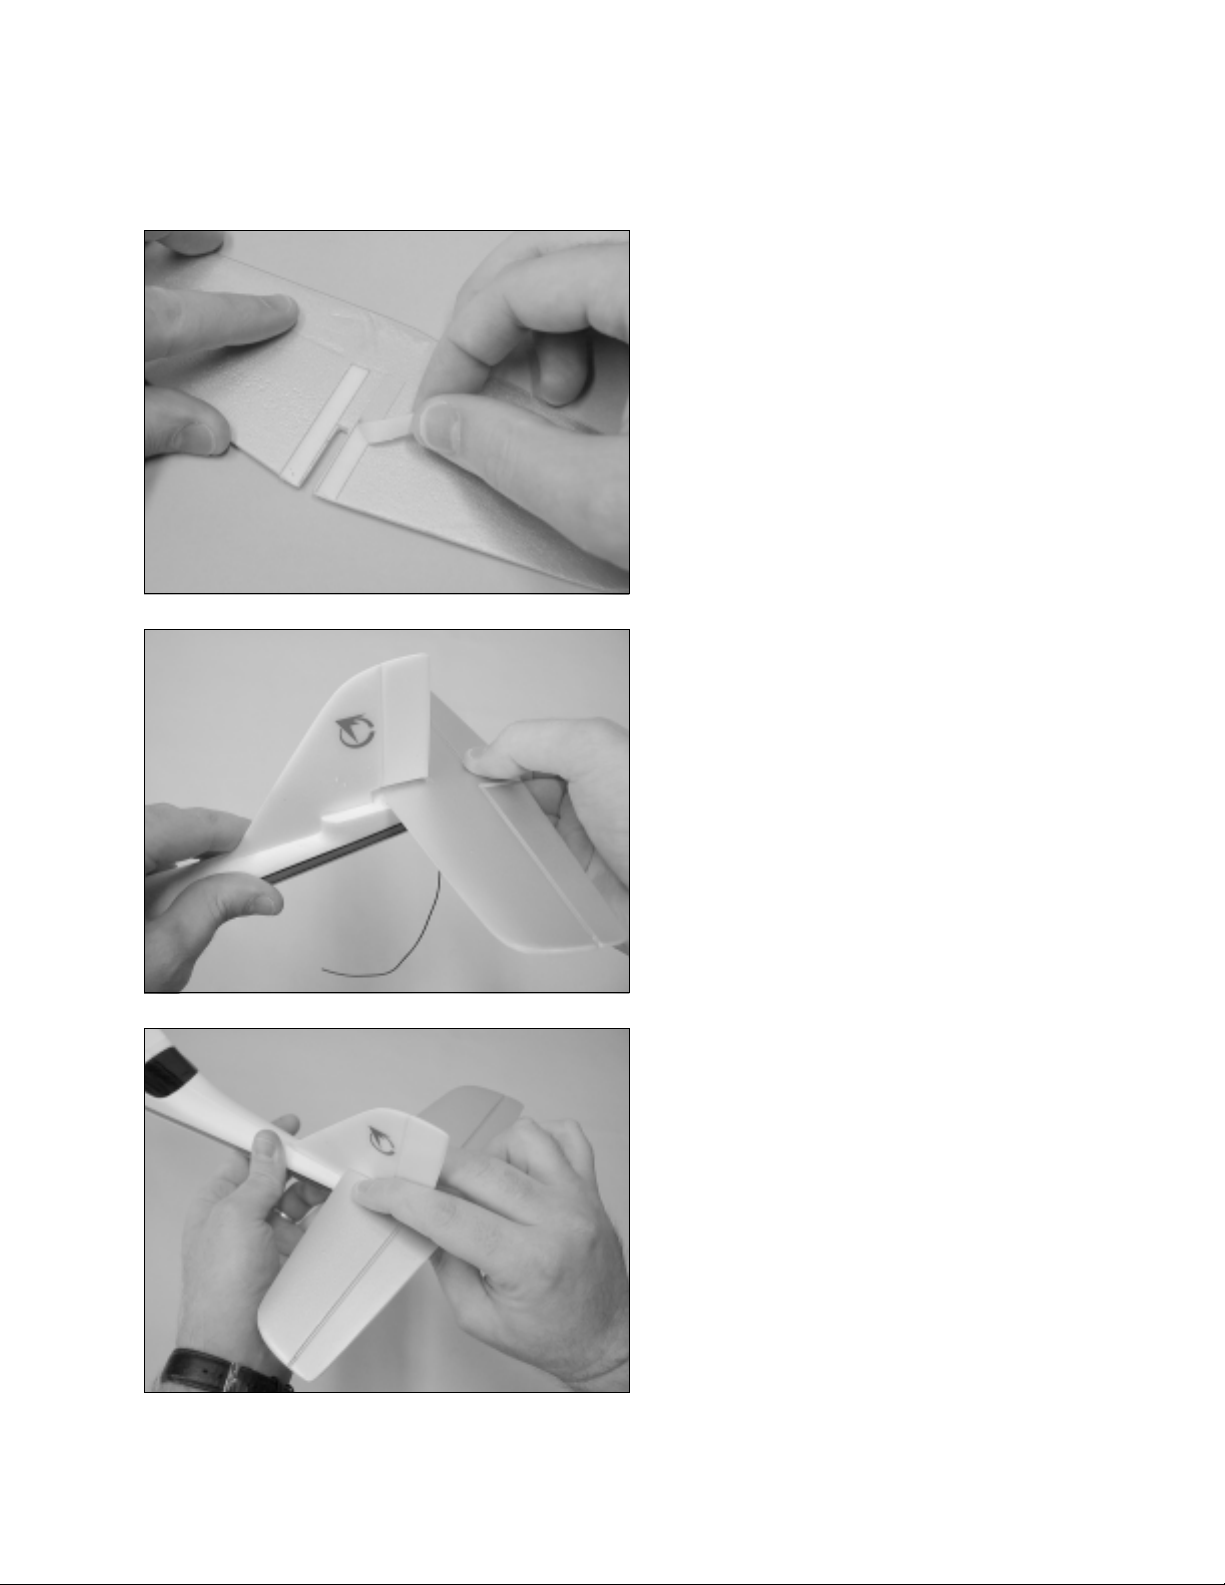
Step 2: Installing the Horizontal Tail
❑ Carefully remove the protective backing from the two
pieces of double-sided tape on the bottom of the tail.
❑ When you install the tail, the tail should face the
direction shown.
The cutout in the front of the horizontal tail fits around
☛
the base of the vertical tail.
IMPORTANT
The side of the tail with the double-sided tape should face
down.
❑ Slide the tail completely forward.
❑ With the tail completely forward, carefully push down
on the tail to secure it to the fuselage.
Visit our website at http://watt-age.globalhobby.com for information on other Wattage products
7
Page 8
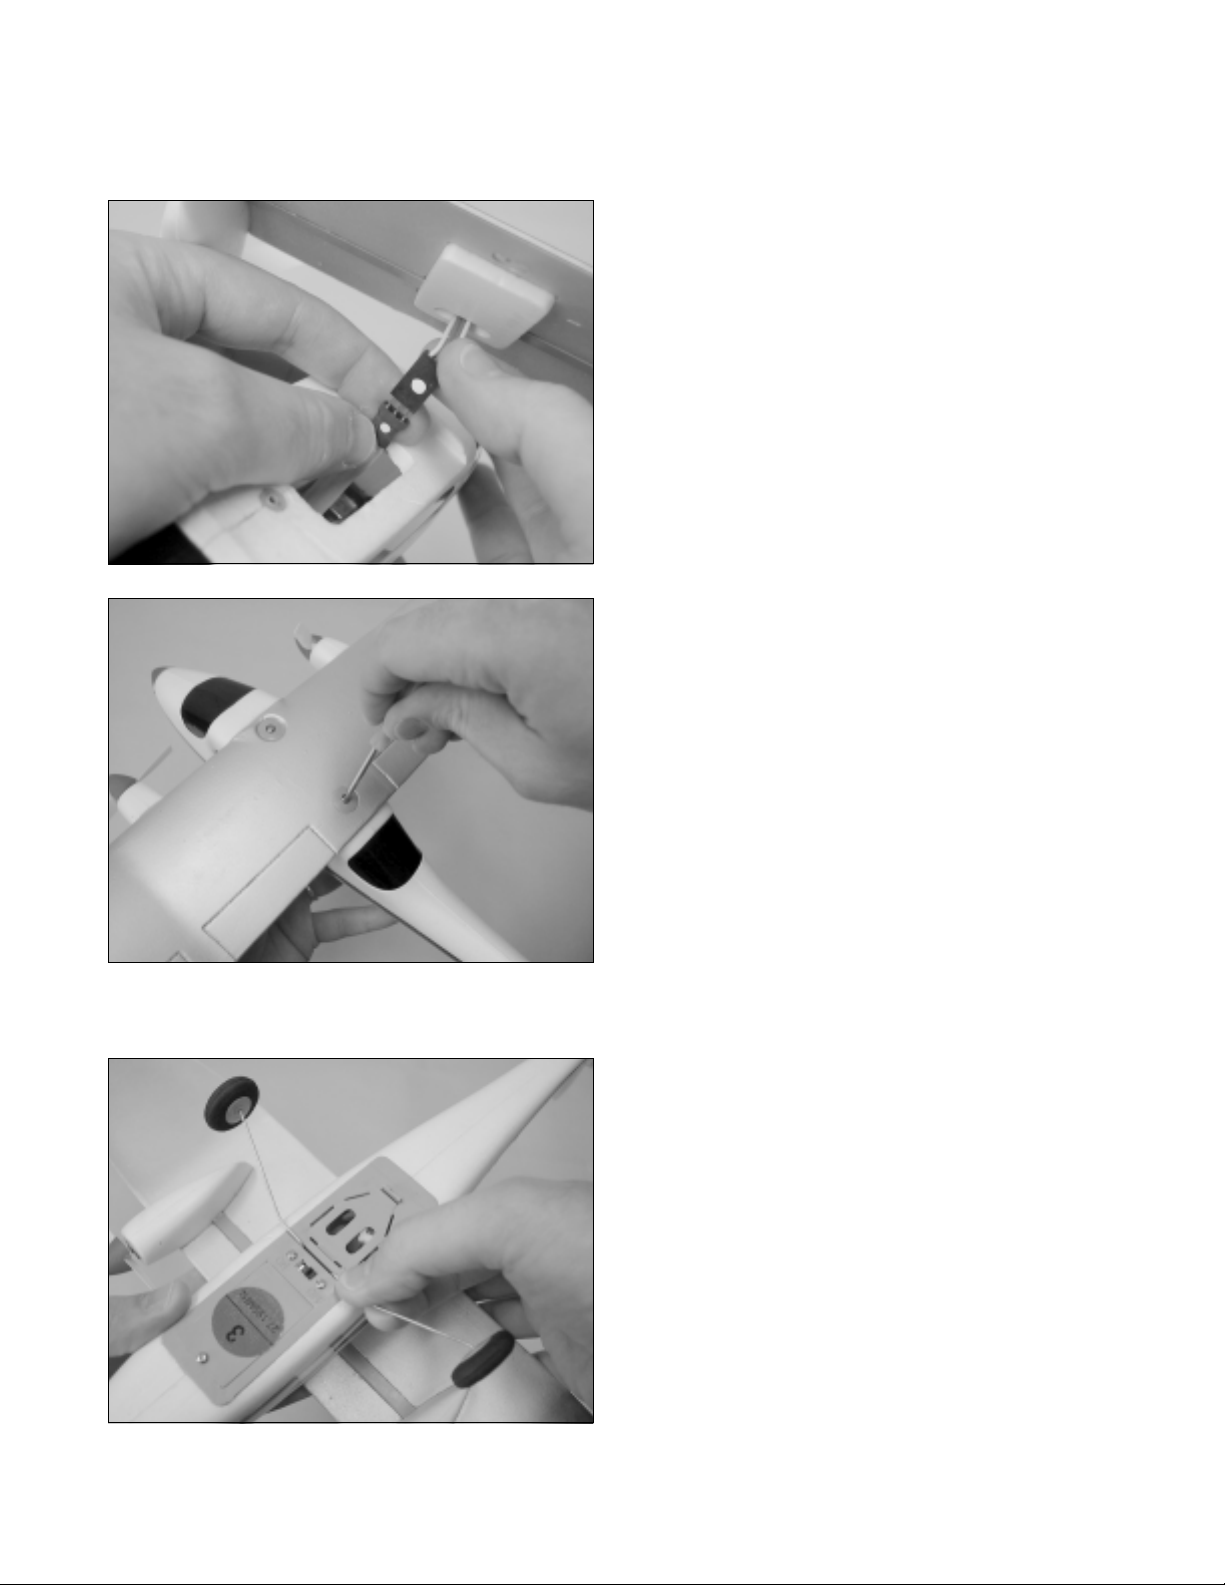
Step 3: Installing the Wing
❑ Plug the wire lead from the wing into the wire lead
inside the fuselage.
IMPORTANT
There are white dots on each wire lead. When plugged in
properly, the white dots should be matched together as
shown.
❑ Carefully push the wire lead down and set the wing
on top of the fuselage.
❑ Push the wing down into place
Step 4: Installing the Landing Gear
IMPORTANT
The propellers should point toward the front of the fuselage.
❑ Install and tighten the two wing mounting screws
using the screwdriver provided.
❑ Line up the bend in the main landing gear wire with
the plastic slot in the bottom of the fuselage (right behind
the on/off switch).
❑ Push the landing gear wire firmly down into the slot.
IMPORTANT
When looking from the side of the fuselage, the landing
gear should be angled back. It should not be angled
forward.
8
Need help or have any questions? Call us at 1-714-963-0329 or send us an email to [email protected]
Page 9
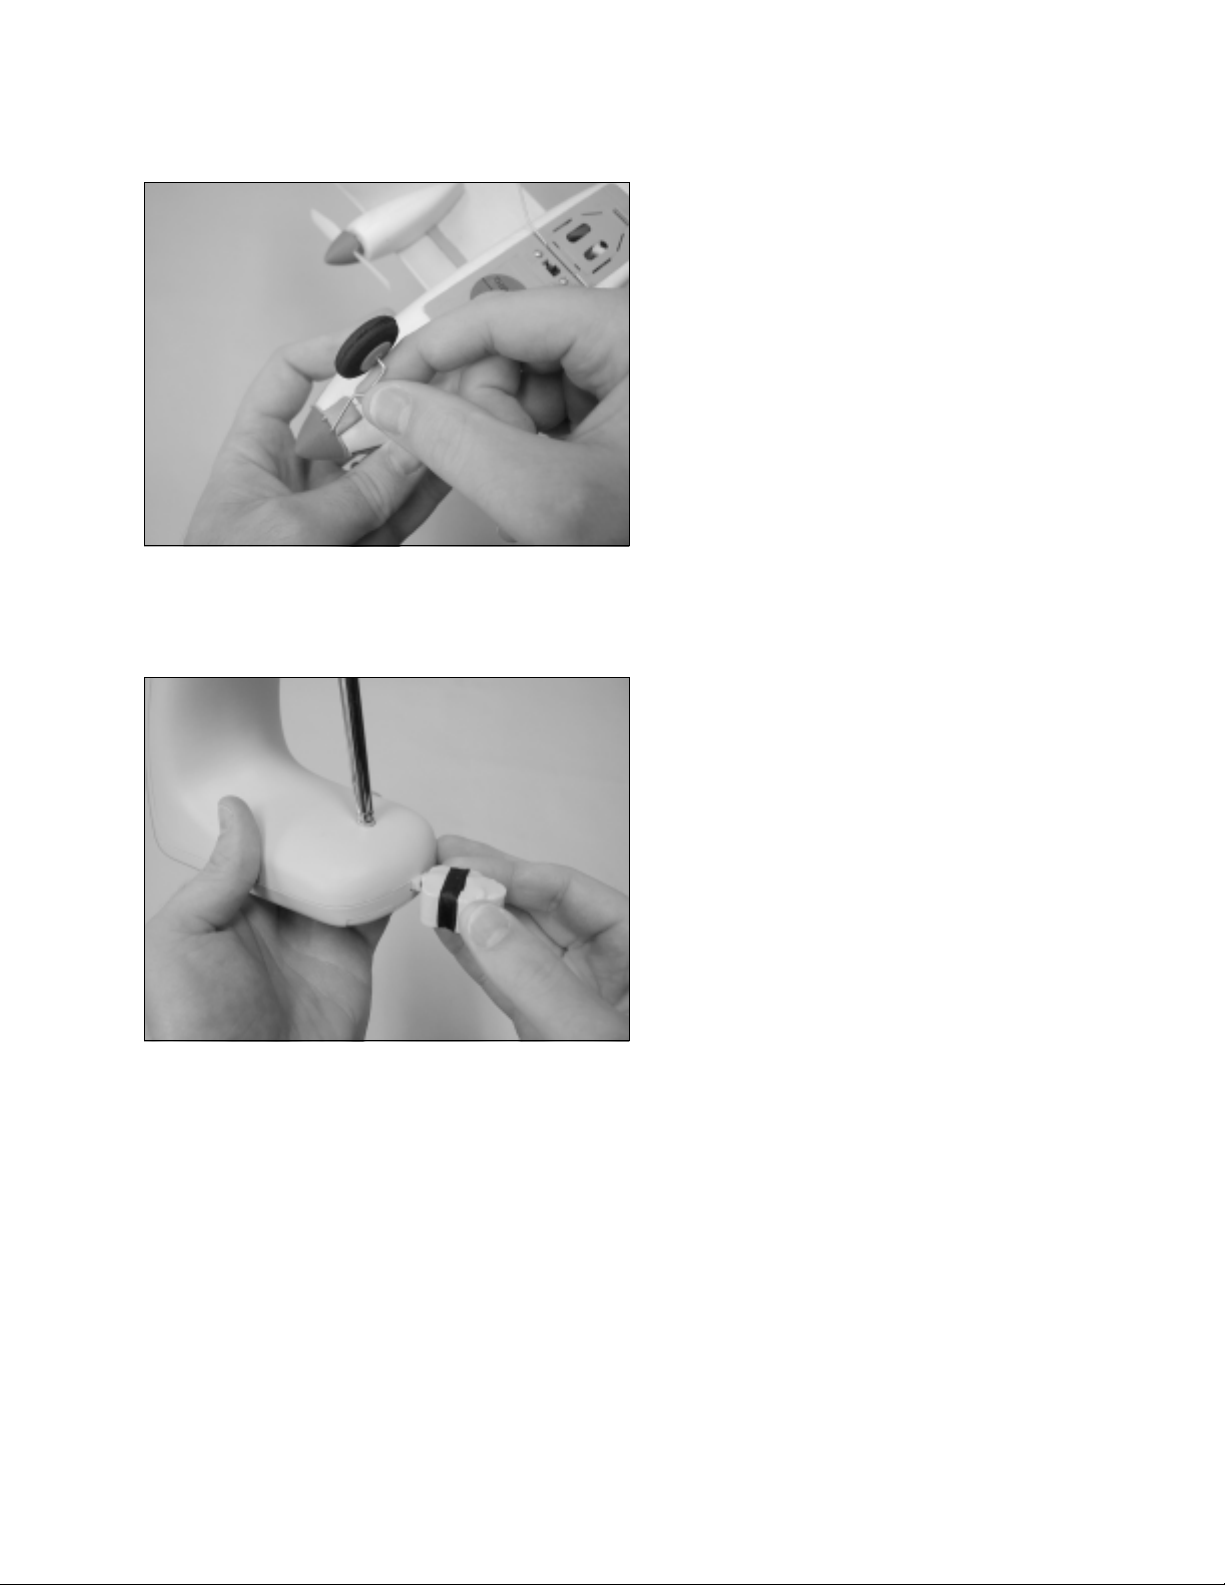
❑ Line up the bend in the nose gear with the slot in the
front of the fuselage.
❑ Firmly push the nose gear wire into the slot.
Step 5: Charging the Flight Battery
❑ Double-check that the on/off switch on the transmitter is "off."
❑ Plug the flight battery connector firmly into the
charging jack on the back of the transmitter.
☛
❑ Allow the battery to charge until the battery is warm
to hot to the touch (about 2 - 3 minutes).
Note that the plug can be plugged in only one way.
IMPORTANT
When the battery is hot, it is fully charged and should be
unplugged from the transmitter immediately.
Important Battery Charging Tips
●
The flight battery must be fully charged (hot) for the airplane to fly properly.
●
Never leave the flight battery unattended during the charging process.
●
Never charge the flight battery for more than 5 minutes.
●
If the transmitter batteries are low, the flight battery may not reach a full charge. If, after 5 minutes the flight battery
is not fully charged (hot), you should replace the 8 AA batteries in the transmitter with fresh ones.
●
Always allow the flight battery to cool between charges.
●
The transmitter must be turned off to charge the flight battery. If the transmitter is on when you plug the flight battery
into the charge jack, the transmitter will sound a tone to remind you to turn it off.
●
With fresh AA Alkaline batteries, the flight battery can be fully charged approximately 10 times.
Visit our website at http://watt-age.globalhobby.com for information on other Wattage products
9
Page 10
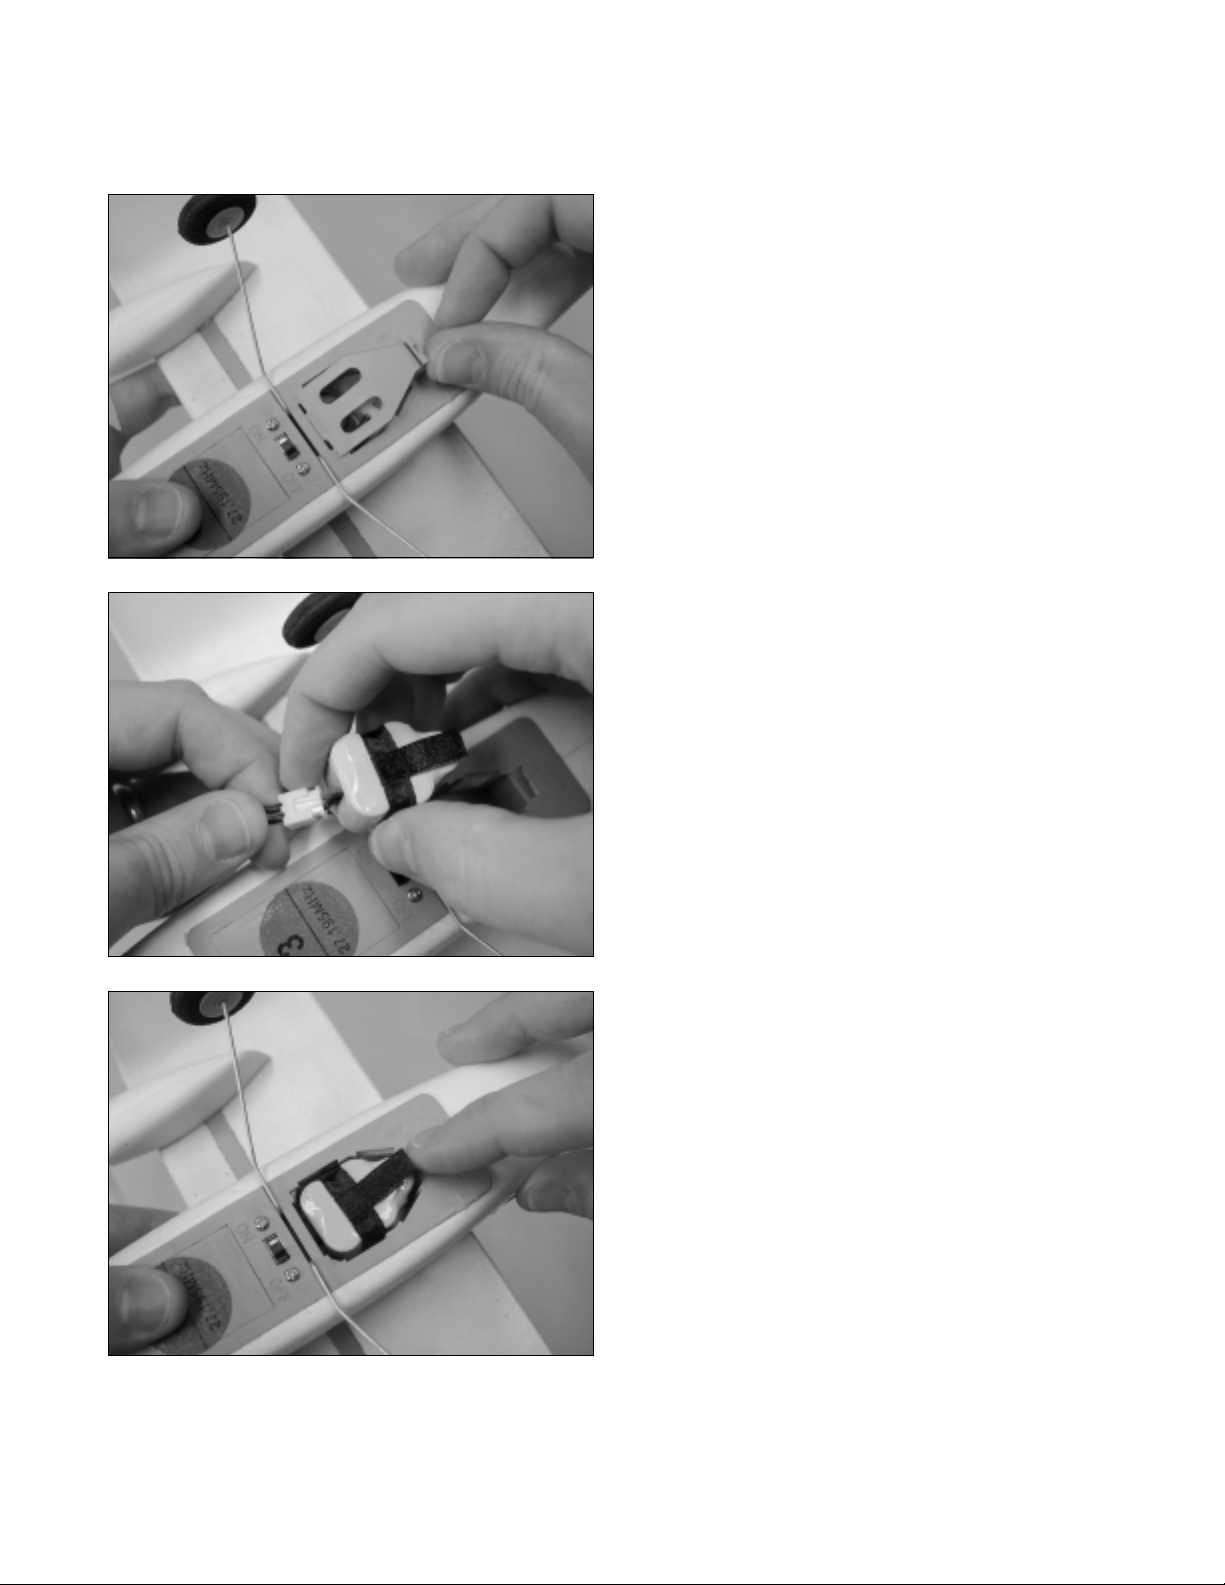
Step 6: Installing the Flight Battery
WARNING
Before installing the flight battery, verify that the on/off
switch on both the transmitter and the bottom of the
fuselage are in the "off" position.
❑ Remove the plastic battery cover on the bottom of
the fuselage by carefully pulling back, then up, on the tab
on the back of the cover.
❑ Plug the connector on the flight battery firmly into
the connector that is inside the battery tray.
Note that the plugs can be plugged in only one way.
☛
❑ Push the wires and connectors down into the fuselage,
then slide the flight battery into place.
The battery will only fit one way. It's the same shape
☛
as the battery tray.
IMPORTANT
There is a cloth tab on the flight battery to grab onto when
removing the battery. When installing the battery, this
tab should be toward the bottom of the fuselage so you
can grab it easily.
❑ Slide the tab in the front of the battery cover under the lip in the battery tray.
❑ Push the back of the battery cover down until you hear it "snap" into place.
10
Need help or have any questions? Call us at 1-714-963-0329 or send us an email to [email protected]
Page 11
Section 5: Ground School
Now that you've assembled the airplane, you're ready to learn how the airplane operates. In this section, you'll also learn
to control the airplane using the special transmitter-top training device.
Basic Operation:
Before actually flying your airplane you should understand how the airplane is controlled. Below we list the four basic
flight modes.
Climb: Climbing is controlled by pressing the climb button on the transmitter. When you press the climb button, both
motors turn on at high speed and the airplane climbs.
Descent: Descent is also controlled by the climb button. When the climb button is released, the motors turn off
completely and the airplane begins to descend gradually.
Right Turn: A right turn is done by moving the turn lever on the transmitter to the right. When you do this, the right
motor slows down and the left motor stays at high speed. This makes the airplane turn right.
Left Turn: A left turn is done by moving the turn lever on the transmitter to the left. When you do this, the left motor
slows down and the right motor stays at high speed. This makes the airplane turn left.
IMPORTANT
The transmitter includes an auto pilot function switch. This switch adjusts the ratio of motor power during turns to make
the airplane much easier to fly. All flying should be done with the auto pilot switched "on" until you are very familiar with
the way the airplane flies.
Assembling the Training Stand:
Now that you understand the basic operation of the airplane and transmitter, you're ready for flight training using the
transmitter-top training device.
WARNING
When turning on the airplane in the next few steps, both propellers will spin
for a few seconds. Always be sure to keep your hands or any loose clothing
away from the propellers.
❑ Turn the on/off switch on the transmitter to the "on" position.
❑ Turn the on/off switch on the bottom of the airplane to the "on" position.
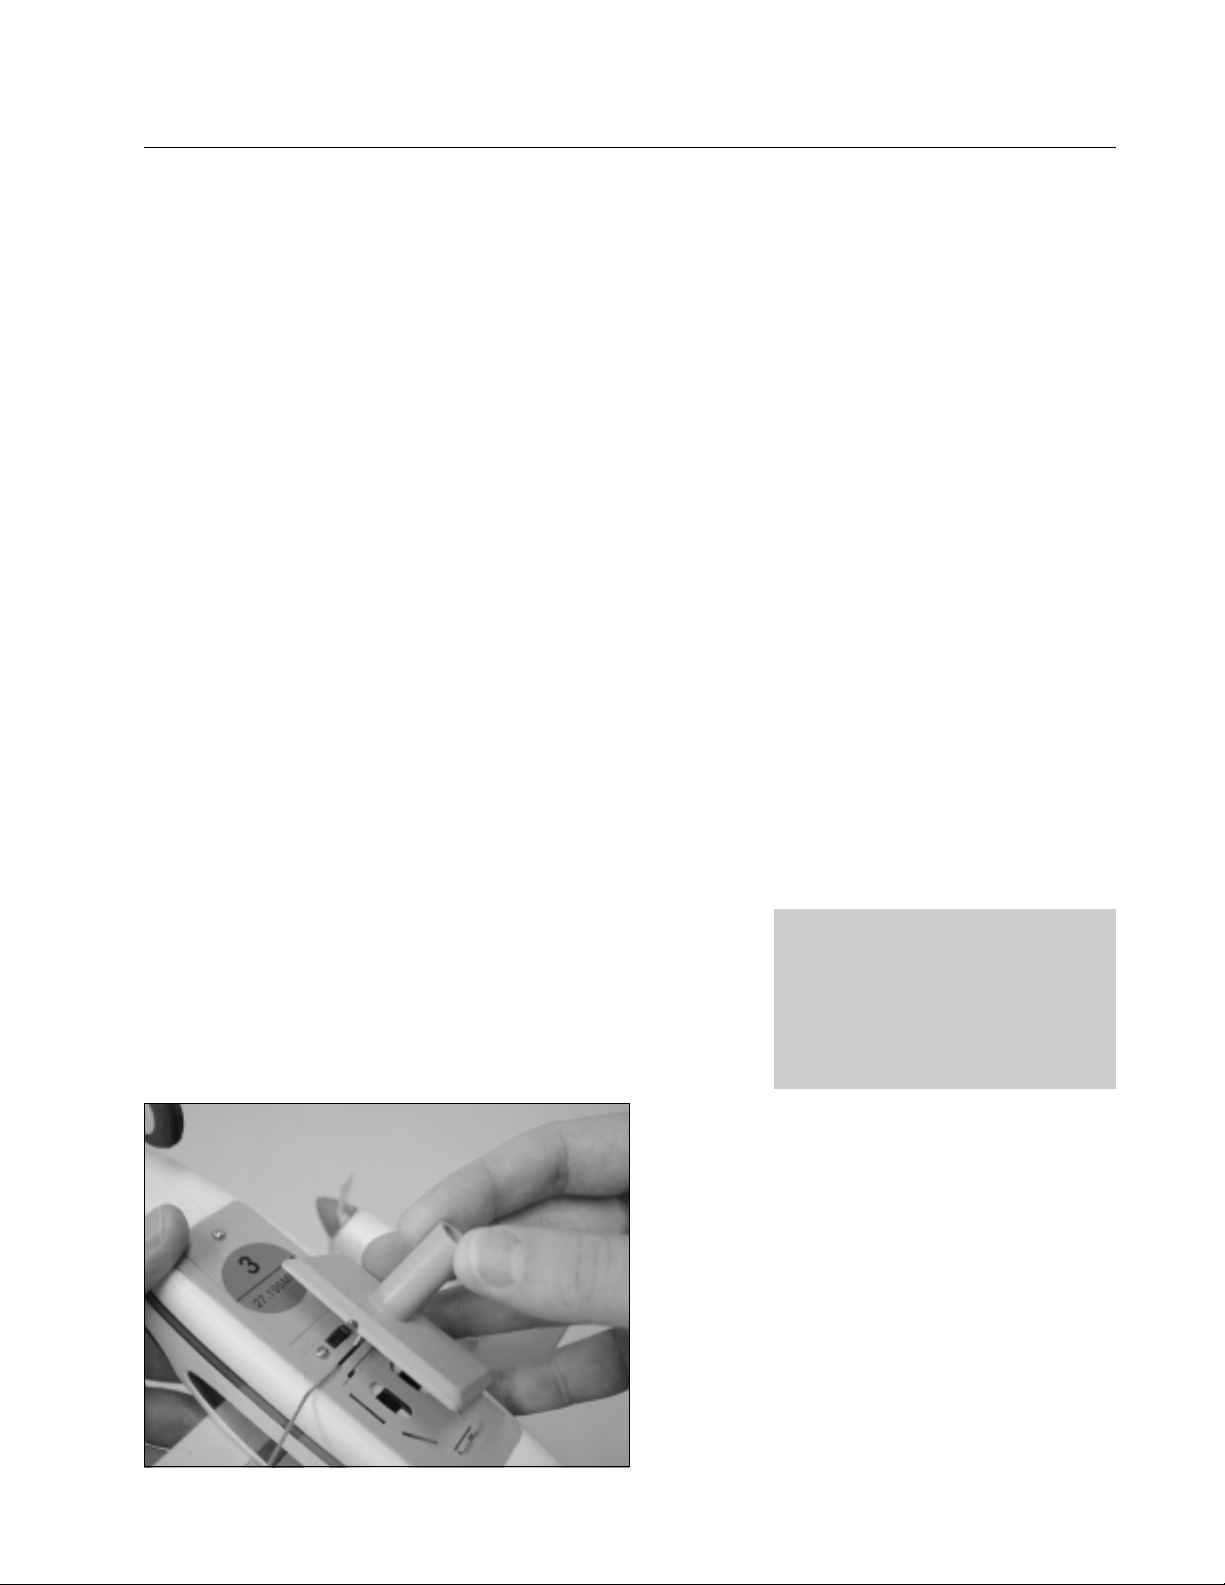
❑ Slide the tab in the plastic training stand into the slot
between the main landing gear legs. Notice there are little
slots on the edges of the stand that fit over the landing
gear wire.
IMPORTANT
The longer portion of the training stand should face
toward the back of the airplane. This will ensure the
airplane stays stable on the training stand.
IMPORTANT
When turning on the airplane, always
turn on the transmitter first before turning on the airplane. When turning off
the airplane, always turn the airplane off
first, then turn off the transmitter.
Visit our website at http://watt-age.globalhobby.com for information on other Wattage products
11
Page 12
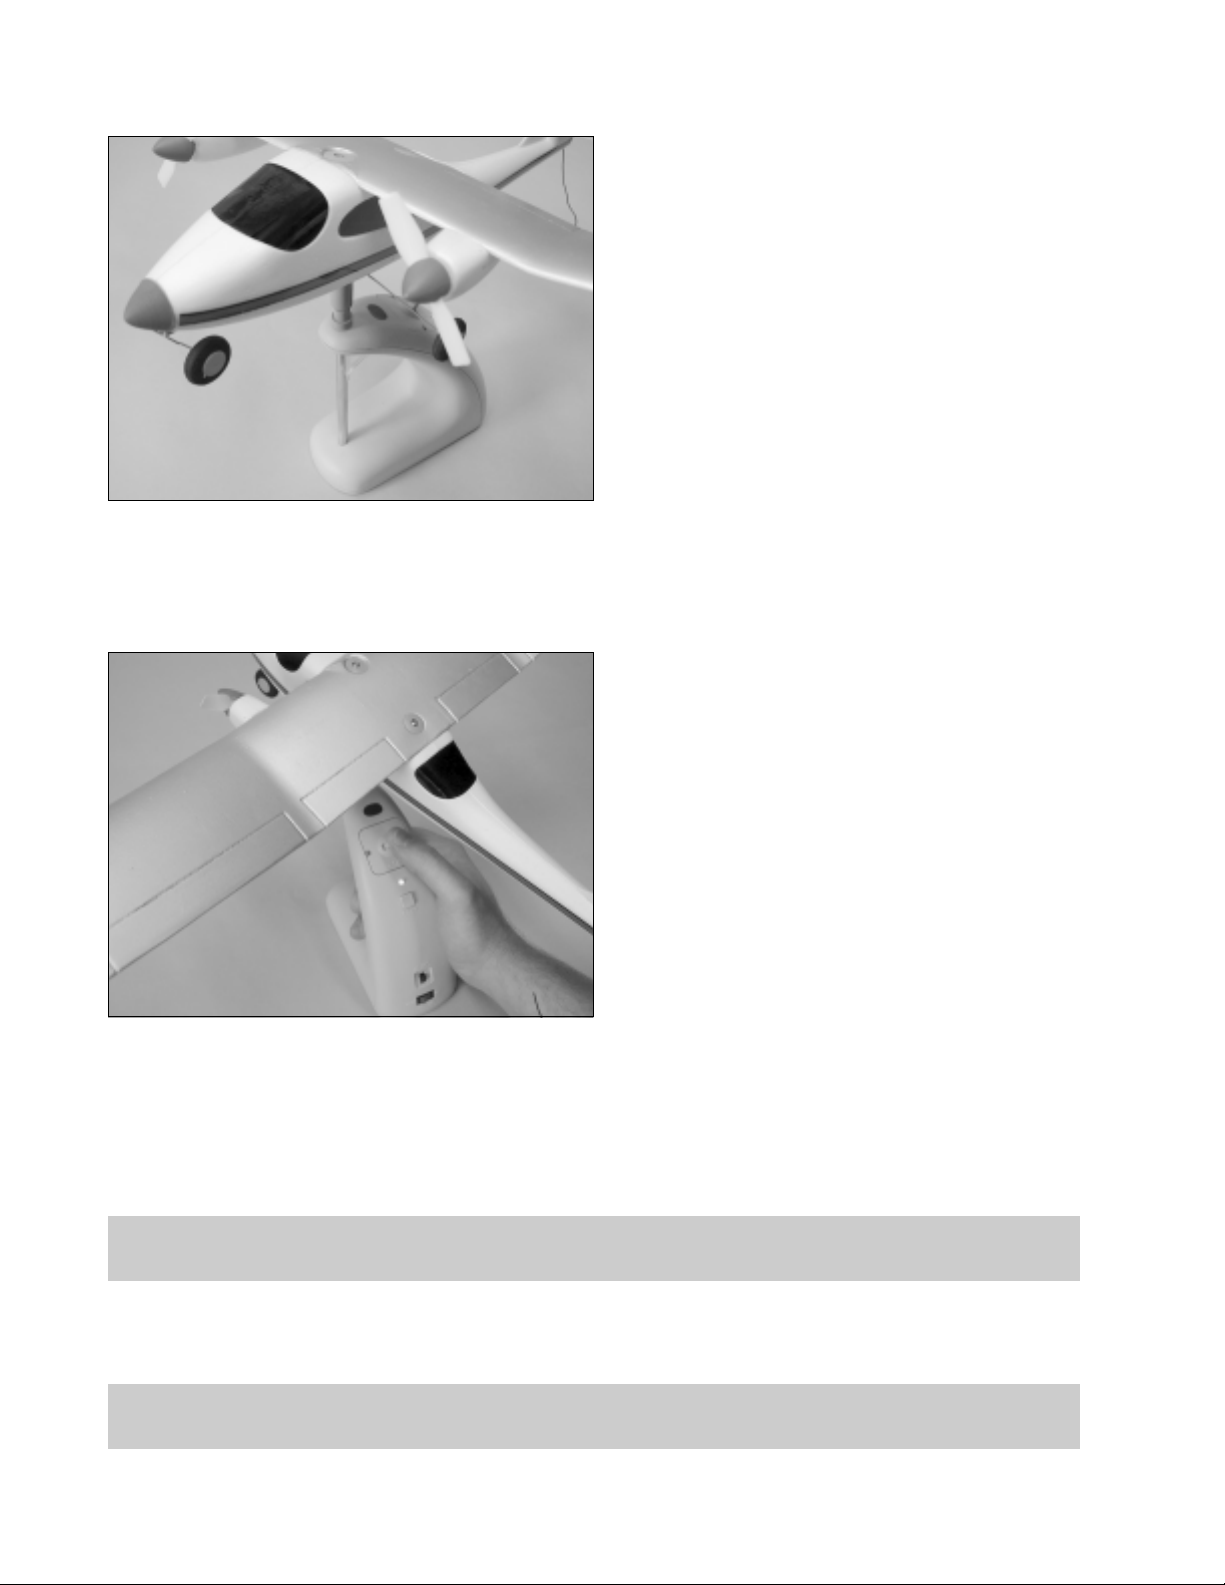
❑ While holding the training stand in place, turn the
airplane over and slide the end of the stand over the end
of the transmitter antenna.
WARNING
Be careful not to press the climb button or push the turn
lever while doing this.
Flight Training:
Y ou should practice the techniques listed in the section until you are comfortable with how to control the airplane and how
the airplane responds to your commands. You'll probably have to recharge the flight battery once or twice during practice.
❑ With the transmitter on a table, grab the transmitter
handle as shown. You will use your thumb to move the
turn lever right and left.
❑ To start, make sure that the auto pilot switch is in the down (off) position.
❑ While holding the transmitter, move the turn lever to the right and hold it. The left propeller will spin and the airplane
will turn to the right. Letting go of the turn lever will stop the propeller spinning.
❑ Now move the turn lever to the left. The right propeller will spin and the airplane will turn to the left. Practice
moving the turn lever back and forth to get used to the way the airplane reacts.
Training Note: If you hold the turn lever over for a few seconds the airplane will turn fast. Moving the lever for just
a split second makes the airplane turn more slowly.
❑ When you're comfortable making left and right turns, use your thumb to press and hold down the climb button. Both
propellers will spin very fast and the airplane will stay relatively straight on the training stand. This is how the airplane
climbs. When you want to descend, let go of the climb button. Both motors will turn off and the airplane will glide down.
Training Note: As long as you want to climb, you should hold the climb button down. Don't climb too high, though,
because you'll waste flight battery power.
12
Need help or have any questions? Call us at 1-714-963-0329 or send us an email to [email protected]
Page 13
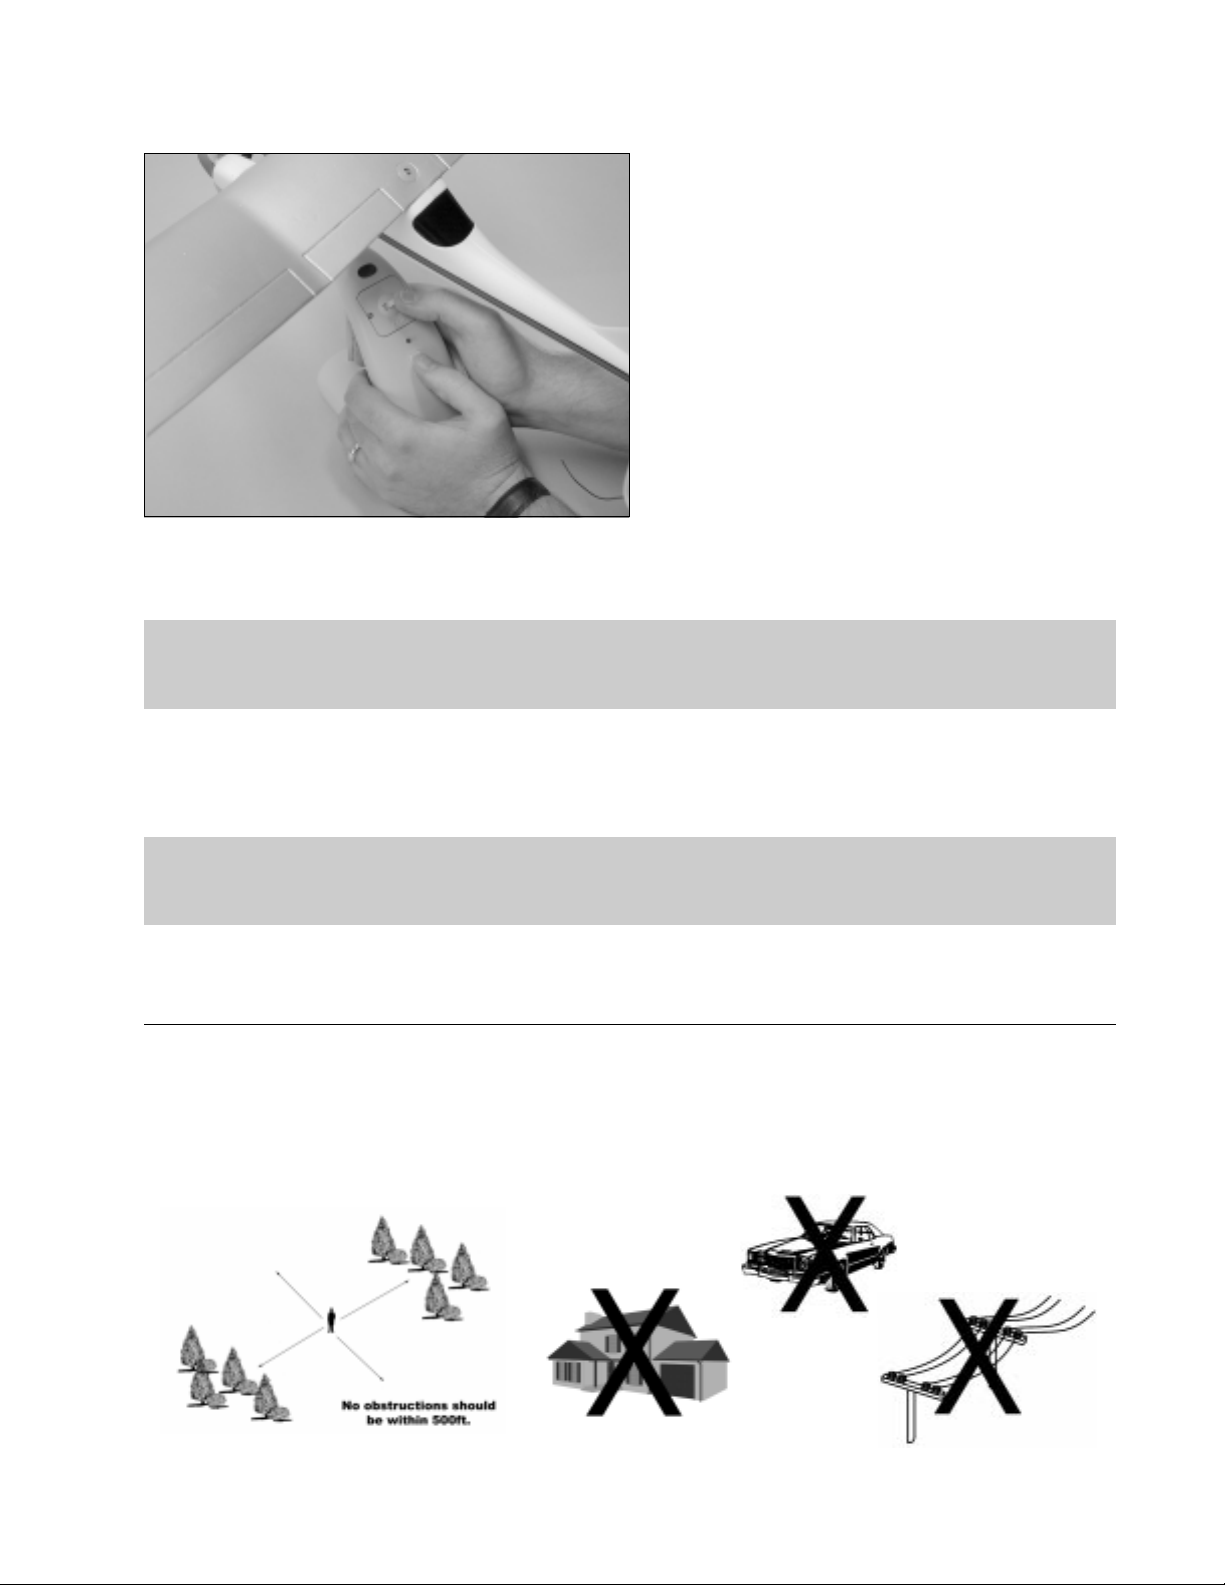
❑ Now practice holding the climb button down and
moving the turn lever back and forth to keep the airplane
going straight.
❑ When you're comfortable with keeping the airplane
straight, practice making turns while holding the climb
button down.
❑ Push the auto pilot switch to the up (auto) position. Move the turn lever back and forth and you will notice the
airplane turns right and left, but the motors also go into climb mode. Practice making turns with the auto pilot on until you
are confident.
Training Note: When you fly the airplane for the first time you will use the auto pilot. The auto pilot adds climb
power during turns. This will prevent the airplane from getting out of control and will make it smoother and easier to
fly. You can still use the climb button to climb if you aren't turning.
❑ Push the auto pilot switch off. Hold the transmitter as usual, but turn the airplane so it's facing you. Now practice
making right and left turns with the airplane facing you. You will quickly notice that now the controls are reversed. You
must move the turn lever left to make the nose of the airplane move right and move the turn lever right to make the nose
move left. Continue to practice this until you are comfortable with making turns coming toward you.
Training Note: When the airplane is flying toward you the right and left control inputs are reversed. For a beginner,
this is hard to get used to. T o help, try imagining yourself in the cockpit of the airplane at all times. This usually helps
you visualize which way to move the stick during your turns.
Section 6: Getting Ready to Fly
Step 1: Choosing Your Flying Field
❑ The flying field you choose should be a large, open field with grass. There should not be any vehicles, buildings,
power lines, trees, large rocks or anything else that your airplane can crash into. Until you are very proficient with the
airplane, we don't recommend taking off or landing from hard surfaces like asphalt or concrete.
Visit our website at http://watt-age.globalhobby.com for information on other Wattage products
13
Page 14
Step 2: Choosing a Day to Fly
❑ Until you become a proficient flyer you should always plan on flying your airplane when there's no wind. We
strongly suggest waiting for a calm day. Do not fly in more than a 5 m.p.h. wind.
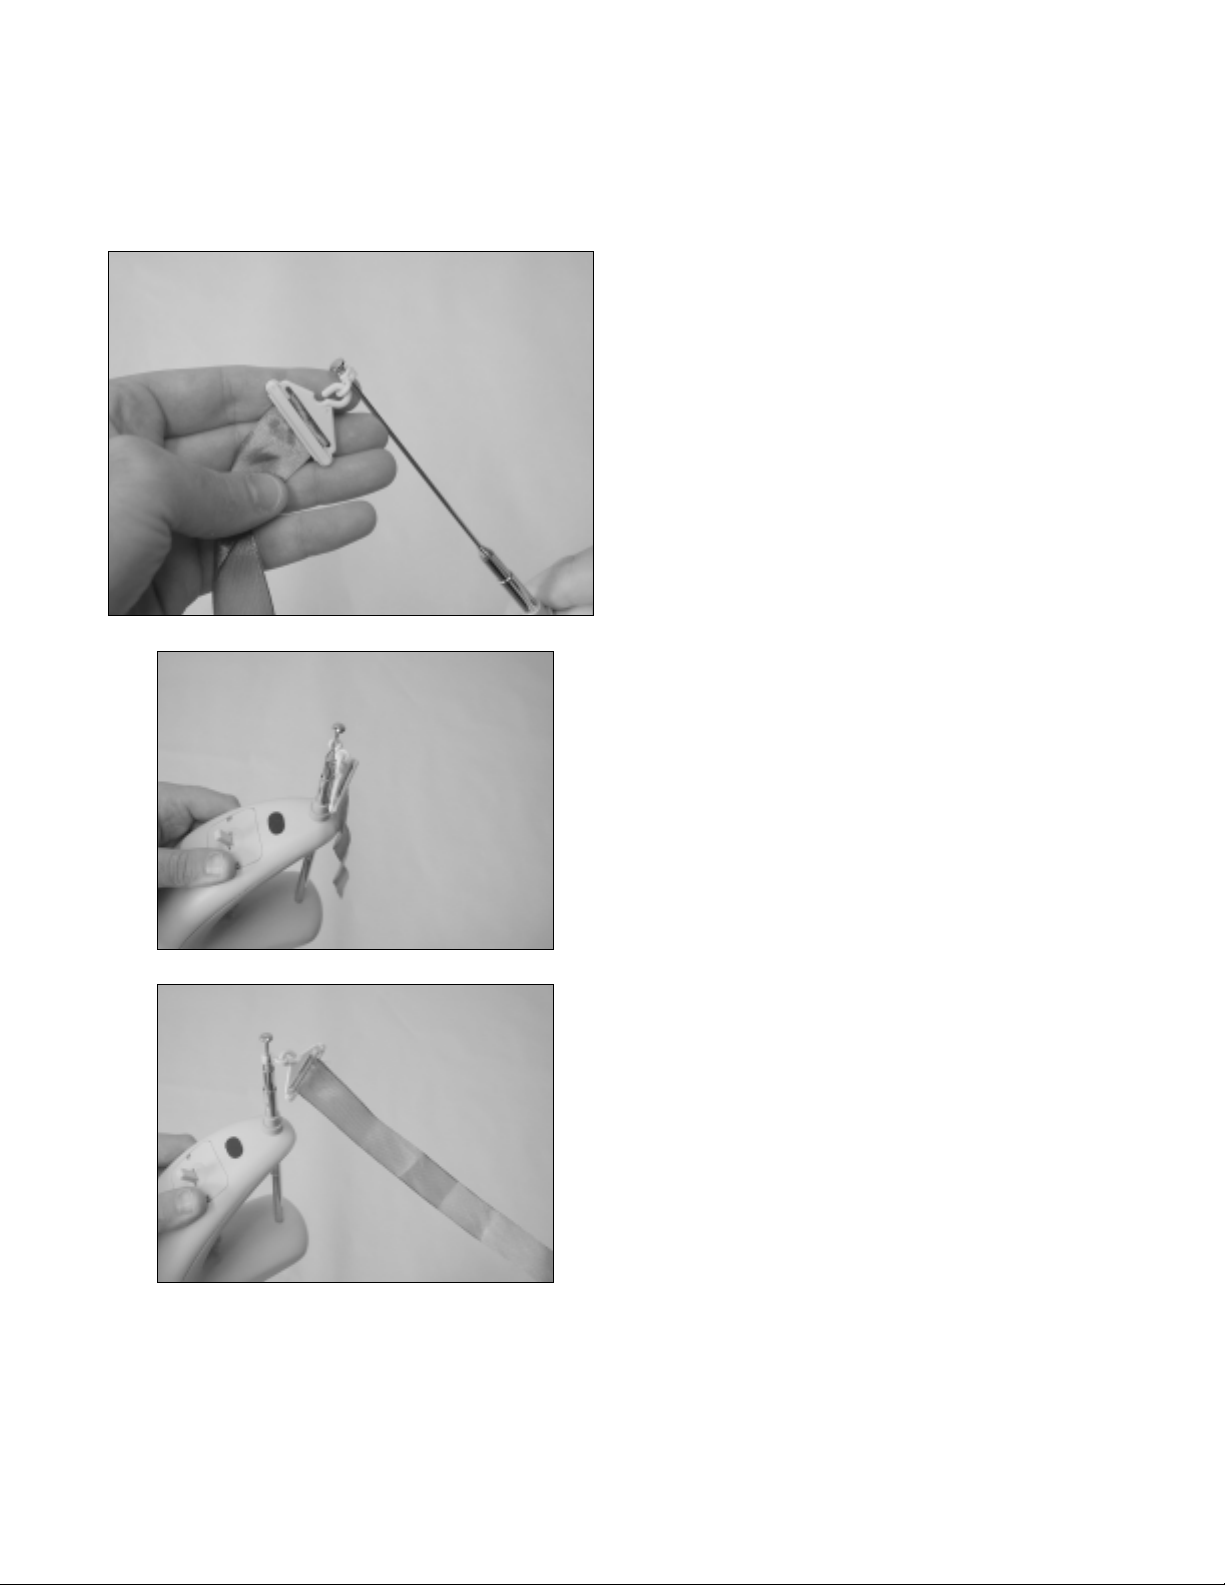
❑ Assemble the transmitter flag assembly as shown.
❑ Snap the flag assembly to the end of the transmitter
antenna.
Less than a 5 m.p.h. wind.
It's okay to fly.
More than a 5 m.p.h. wind.
Wait for a calmer day.
Step 3: Range Testing the Radio System
❑ At the flying field, hold the transmitter straight up. If the
flag hangs down, go ahead and fly.
❑ If the flag hangs at a 45º angle or more, don't fly. Wait for
a calmer day.
❑ Turn on the transmitter.
❑ Plug in and install the flight battery. Turn on the airplane's on/off switch and set the airplane on the ground.
14
Need help or have any questions? Call us at 1-714-963-0329 or send us an email to [email protected]
Page 15

❑ Extend the transmitter's antenna completely. Move the turn lever back and forth once to check the motors. They
should turn on and operate smoothly.
❑ Walk approximately 150ft. from the airplane and move the turn lever back and forth once. Check to make sure that
the motors are operating smoothly at this distance. You may need a friend to help you with this step.
If the airplane does not range check, don't fly! Please refer to the troubleshooting guide on page # 18.
☛
Section 7: Your First Flight
After all this, I bet you're ready to actually go flying! If you've skipped anything prior to this section, we suggest going
back through the instructions. Doing so will ensure your success.
WARNING WARNING WARNING WARNING WARNING WARNING
If at any time during your flight, the airplane gets stuck up in a tree, in power lines or on a roof top, DO NOT attempt
to retrieve the model yourself. The airplane is not worth the risk. We strongly suggest contacting your local fire
department for assistance. Attempting to retrieve the model yourself in any of these cases could potentially result is
extreme harm or even death.
Some Things to Remember:
●
With the flight battery fully charged, you can expect anywhere from 2 to 4 minutes flight time, so plan your landing
accordingly.
●
Make sure your flying field has no obstructions you can fly into.
●
The flying field should be large enough that you can land anywhere if you get into trouble. Until you are proficient
with the airplane, you don't want to have to worry about landing in a small, localized area.
●
There should be no wind during your first few flights.
Before your first flight, you should do the following:
●
Charge and install the flight battery.
●
Make sure the auto pilot switch is in the "auto" position.
●
Turn on the transmitter, then turn on the airplane.
Hand Launching:
Carefully grasp the fuselage with your thumb and forefingers, right behind the main landing gear. While holding the
transmitter in your other hand, press the climb button once to check that the motors power up.
❑ If there is any wind, turn to face it. While holding the climb button down (the propellers will spin very fast), hold the
airplane just above shoulder level and gently toss the airplane straight ahead and level. Allow the airplane to fly straight
and continue to hold the climb button down so that the airplane climbs.
❑ Before the airplane gets too far away, push and hold the turn lever (while still holding the climb button) in the
direction you want to turn. The airplane will slowly start to turn. Once the airplane has turned the direction you want,
release the turn lever. During this time, the airplane has most likely climbed to a safe height.
Visit our website at http://watt-age.globalhobby.com for information on other Wattage products
15
Page 16

Flying In the Air:
❑ With the auto pilot switched on, and with the airplane at a safe height, you can release the climb button.
❑ Continue to make turns, holding the turn lever in the direction you want the airplane to turn. You will notice that
when you turn, the airplane will climb, too. Make a series of S-turns and circles to practice getting the hang of flying. If
the airplane is descending more than you would like, press and hold the climb button to gain more height.
Flight Tip: Because of the design of the airplane and for ease of flying, you will find that it may take a second or two
for the airplane to start turning after you've moved the turn lever. This will keep you from overcontrolling the airplane
and getting into trouble. Just remember to hold the turn lever in the direction you want to turn and release it only after
the airplane is flying in the direction you want it to.
❑ You should continue to fly, making circles and S-turns for about 2 minutes or so. This will give you plenty of time for
landing. Remember, with the climb button released the airplane will descend, but when you make a turn the airplane will
turn and climb again. If the airplane gets lower than you want, either turn to climb or press the climb button.
Flight Tip: If there is any wind when you are flying, you will notice that when the airplane turns into the wind it will
slow down and climb steeper. When this happens, you can release the climb button if you don't want the airplane to
climb. When the airplane turns down-wind (with the wind), it will speed up and descend. You should press and hold
the climb button to keep the airplane from descending too much while flying down-wind.
Landing:
❑ Landing should always be done into the wind with the wing level.
❑ To prepare for landing from normal flight, make a shallow turn so that the airplane is now flying into the wind. Make
small turns to level the wing, then let go of both the climb button and the turn lever. When you do this, the airplane will
descend.
❑ If you need to make a slight turn, push the turn lever over, but only for a second. Make small turns like this to keep
the airplane flying straight. Do not try to make large turns.
❑ When the airplane is about 4 feet off the ground, press the climb button for just a second or two, then release it. Doing
this will level the airplane so it doesn't nose into the ground.
Flight Tip: When landing, you should just try to land anywhere on your field, as long as it's into the wind. Don't try
to land in a particular spot. You can do that once you've mastered flying the airplane.
Flying with The Auto pilot Off:
After you've learned to fly the airplane with good control, you will probably want to fly the airplane with the auto pilot off.
In this mode, the airplane is more responsive in the air, and you also have the added ability of taxiing and taking of f from
the ground. Landing without the auto pilot is also essential if you want to land the airplane in a very small area.
Flight Tip: When flying with the auto pilot off you must remember that when you turn, the airplane will not climb at
all. You must control the climb throughout the entire flight using the climb button.
❑ Hand-Launch the airplane with the auto pilot on just as you did before. When you get up to a safe height, carefully
turn the auto pilot off. Have a friend flip the switch if they're with you.
❑ Now that the auto pilot is off you will notice that when you make a turn without holding the climb button down, the
airplane will start to descend. To prevent this, as soon as you start the turn, press and hold the climb button to keep the
airplane flying level during the turn. After the turn you can release the climb button.
16
Need help or have any questions? Call us at 1-714-963-0329 or send us an email to [email protected]
Page 17
❑ When flying with the auto pilot off, flight will be a series of coordinated controls using the turn lever and the climb
button together. After some practice, you will be able to make controlled sharp turns and keep the airplane flying level at
all times.
Taking Off From the Ground:
Taking off from the ground (ROG) should only be done when you are proficient at flying the airplane with the auto pilot
off. You should also be able to land the airplane in a small confined spot.
Keep These Things In Mind:
●
It's important to make sure the flight battery is fully charged. The airplane will not ROG with a less than fully-charged
flight battery.
●
Always take off into the wind.
●
The runway area should be very hard packed dirt, asphalt or concrete. The airplane will not take off from grass or
sand.
●
The take-off area should be at least 50 feet long and 15 feet wide.
❑ With the airplane pointed directly into the wind, press and hold the climb button to begin accelerating. Use the turn
lever to steer the airplane and keep it rolling straight. After about 25 feet the airplane will begin to lift off and it will go
into a shallow climb. For safety, you should allow the airplane to climb out straight to a safe altitude before making any
turns.
Flight Tip: The transmitter and airplane have a built-in fail-safe system. If for any reason you should fly the airplane
beyond the range of the radio system the airplane will go into fail-safe mode and spiral to land. If you fly the airplane
beyond your controlled sight, rather than crash into the ground, simply turn off the transmitter and the airplane will
spiral to land.
Caution: It is possible that the airplane may break during the fail-safe descent and landing. Don't expect the airplane
to land perfectly if you turn off the transmitter. Remember that the fail-safe will do a better job than just crashing into
the ground.
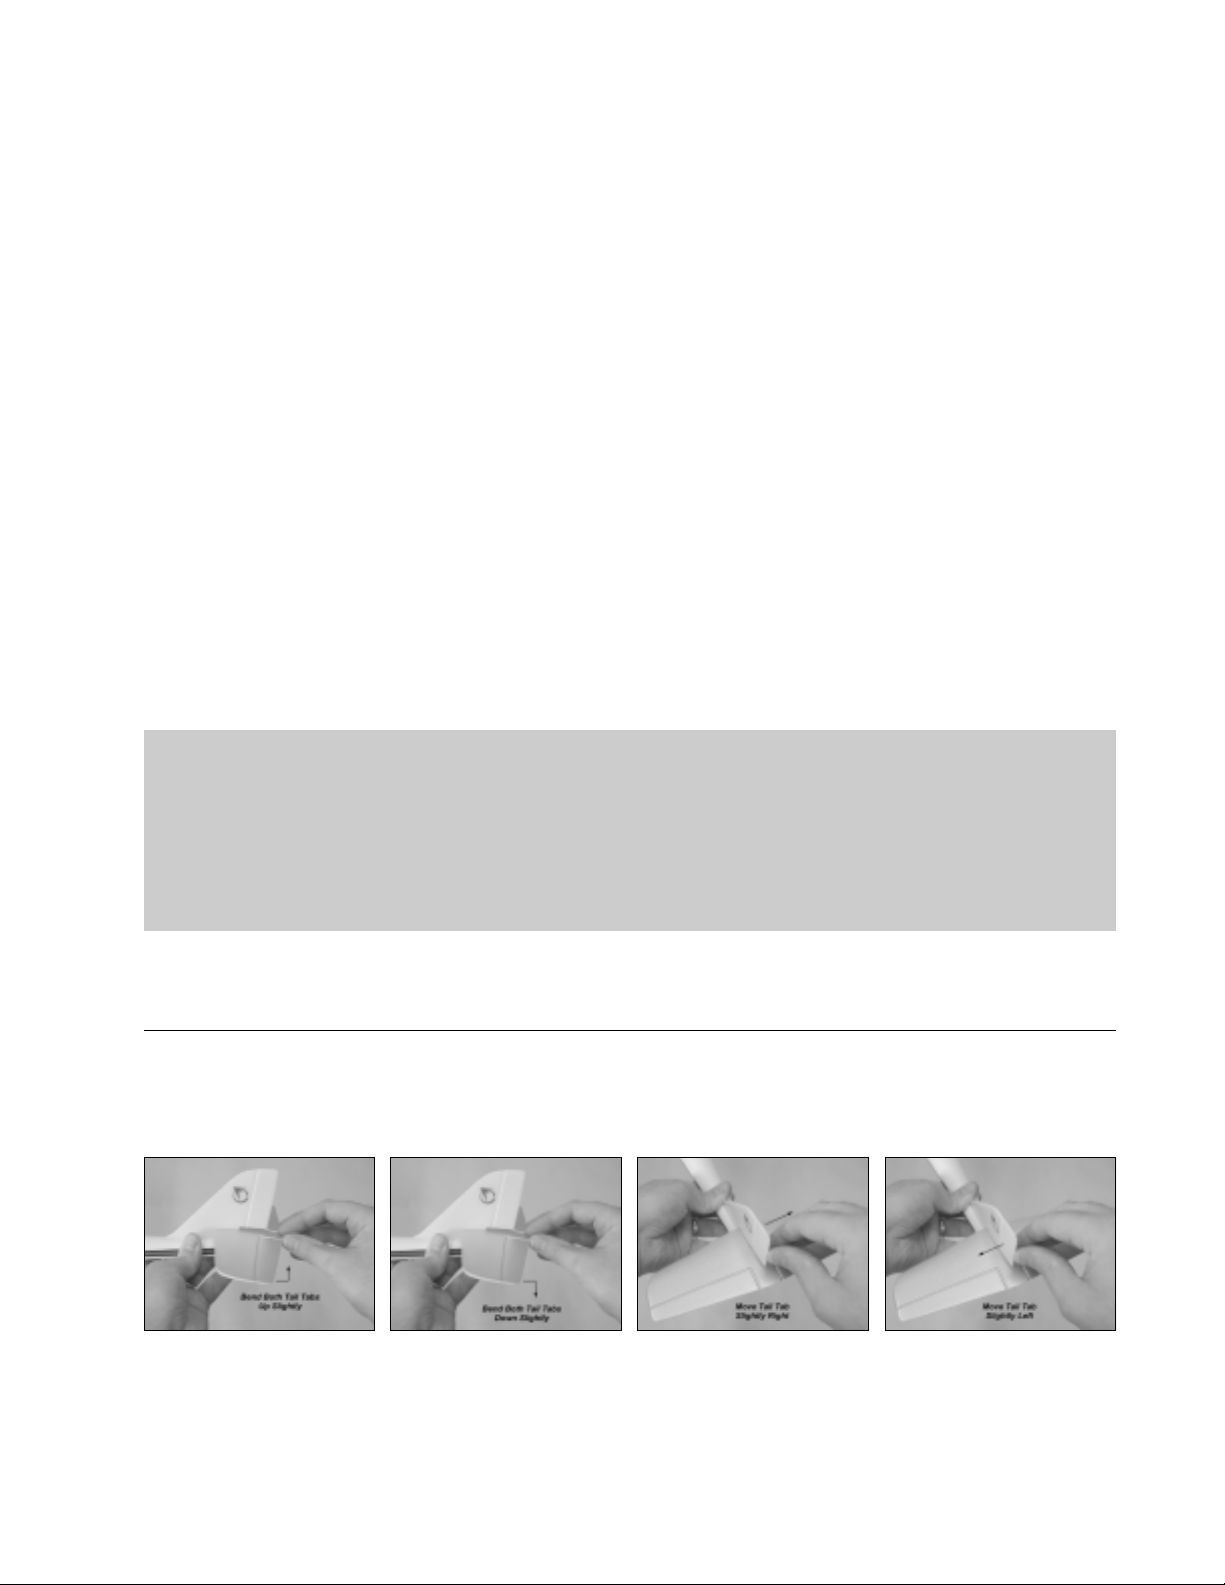
Section 8: Trimming the Airplane
If the airplane climbs or descends drastically, or constantly veers to the right or left, there may be a problem with the trim
settings of the tail assembly. This can be corrected as shown below:
If airplane pitches up excessivelyIf airplane pitches down excessively If airplane turns left excessively If airplane turns right excessively
Bend both tail tabs up slightly Bend both tail tabs down slightly Bend tail tab slightly right Bend tail tab slightly left
WARNING
Do not mistake the normal up and down characteristics of the airplane for trim problems. Chances are, you will never
have to make an adjustment to the up and down tail tabs.
Visit our website at http://watt-age.globalhobby.com for information on other Wattage products
17
Page 18

Section 9: Troubleshooting Guide
This troubleshooting guide has been provided to help you diagnose and solve most problems that you may encounter
with your airplane. Most problems encountered can be solved by carefully following the problem-cause-solution
sections below. If you cannot solve the problem using this troubleshooting guide, please feel free to contact us at the
address or phone number listed throughout these operating instructions.
PROBLEM CAUSE SOLUTION
1) Transmitter does not turn on A) Transmitter batteries depleted
B) Transmitter batteries not installed
properly
2) Motors do not turn on A) Flight battery depleted
B) Transmitter batteries depleted
C) Transmitter not turned on
D) Flight battery not plugged in
securely
E) A crash has damaged an internal
component
3) Airplane's controls are reversed A) Motor wires plugged in backwards A) Plug the motor wires together so
4) Airplane is difficult to control A) You are flying in too much wind
B) Flight battery depleted
C) Transmitter batteries depleted
D) Transmitter antenna not extended
A) Replace batteries with new ones
B) Reinstall the batteries, double-
checking for correct polarity
A) Recharge Flight Battery
B) Replace batteries with new ones
C) Turn on transmitter
D) Plug flight battery in securely
E) Return airplane to Wattage Service
following the instructions on the
back page of these instructions
that the white dots match
A) Fly when there is no wind
B) Recharge the flight battery
C) Replace batteries with new ones
D) Extend transmitter antenna fully
5) Airplane is difficult to control on the
ground
6) Flight battery does not charge fully A) Transmitter batteries depleted
18
Need help or have any questions? Call us at 1-714-963-0329 or send us an email to [email protected]
A) Nose gear is out of alignment
B) Main gear is installed backwards
C) Transmitter is in auto pilot mode
B) Transmitter power turned on
C) Flight battery bad
A) Bend nose gear straight
B) Install main gear so it is angled
toward the back of the fuselage
C) Turn the auto pilot off
A) Replace batteries with new ones
B) Turn off transmitter power
C) Replace flight battery with new one
Page 19
Section 10: Fixing Minor Crash Damage
While you are learning to fly, there comes a time when you might crash. If the crash isn't too bad, most damage can be
repaired quickly and easily. If the damage is beyond repair, spare parts are available for purchase. If a part is going to
break during a crash the foam parts will usually break cleanly. To repair a clean break, follow the procedures below:
❑ Glue the broken parts together using a thin layer of 5 minute epoxy or white glue, following the directions on the glue
bottle. Hold the parts together and in alignment until the glue fully cures.
❑ Apply a strip of clear Scotch® tape over the seams to strengthen the joint even more.
WARNING
It is very important that you use no solvents or Cyanoacrylate (C/A) glue that can damage foam. If any of these chemicals
come in contact with the foam parts, the parts will be destroyed. Use only epoxy or white glue to repair damaged parts.
Section 11: Replacement Parts
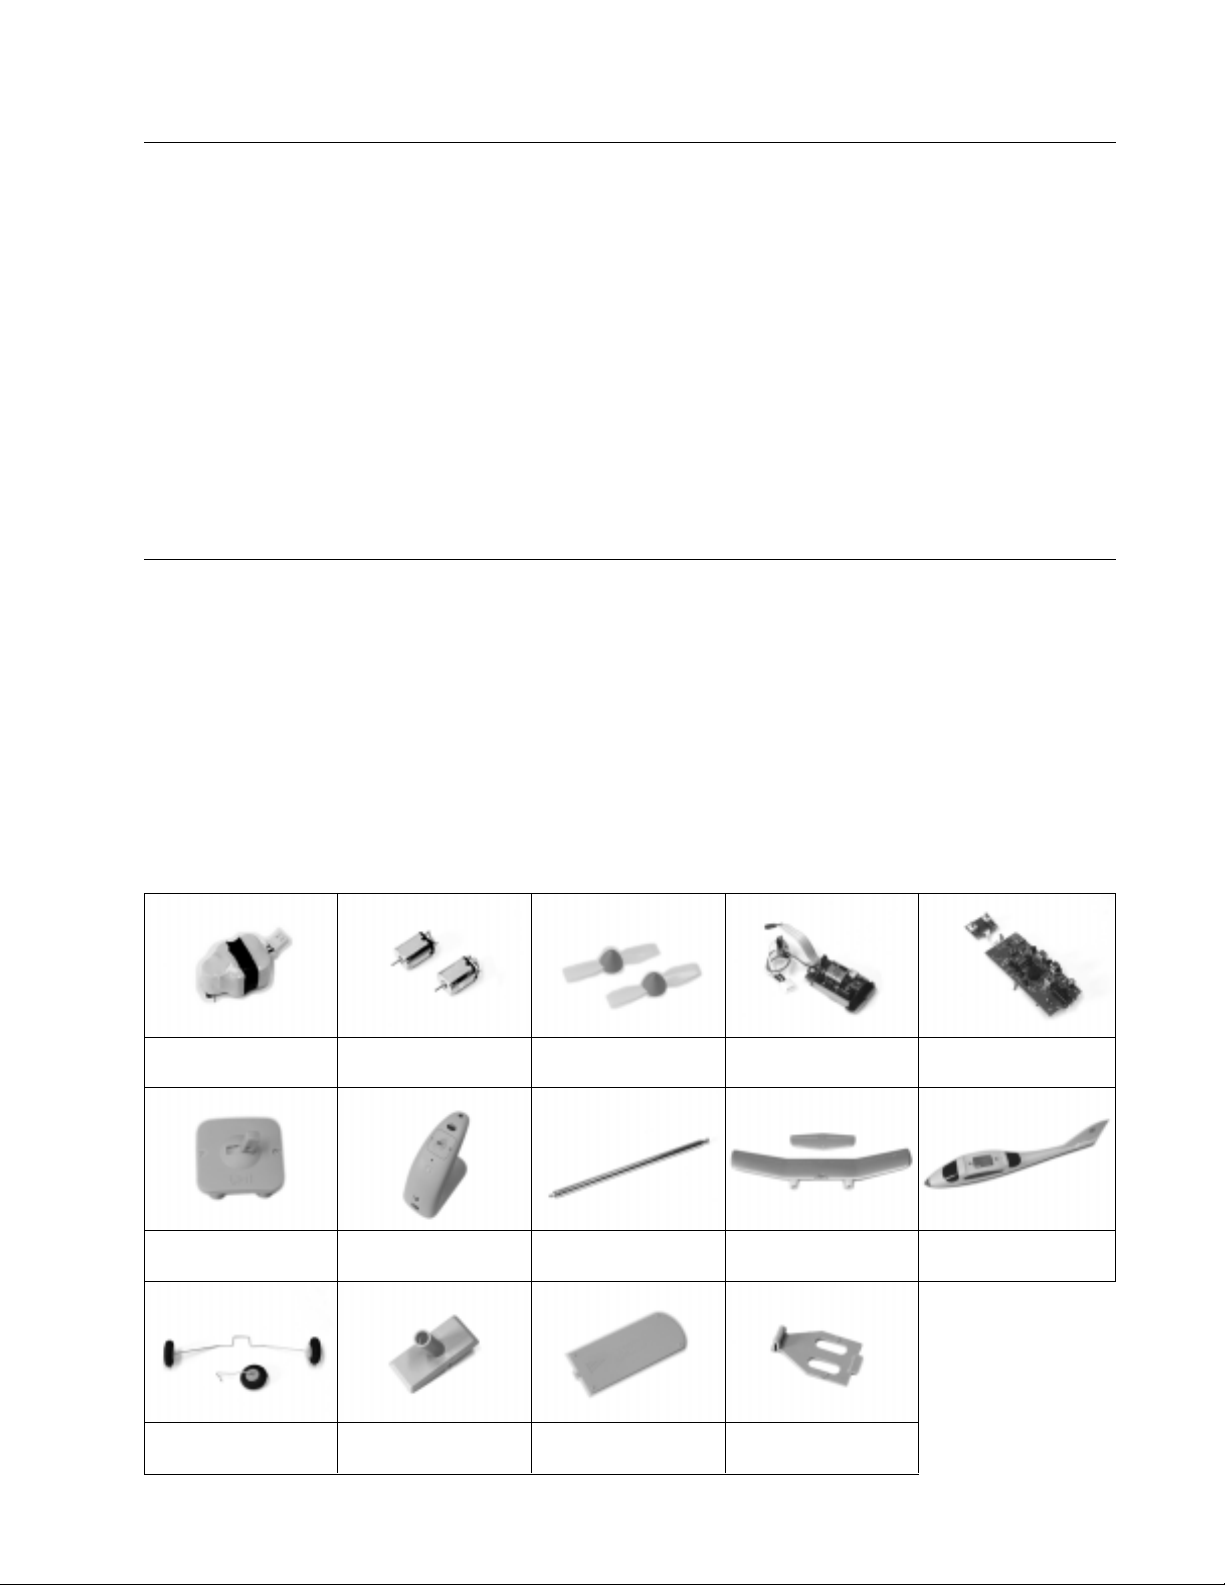
Listed below are the replacement parts that are available. The part numbers for each part are provided for ordering
convenience. Replacement parts are available through your local authorized Wattage dealer or directly from us.
First, Visit Your Local Dealer:
To locate the dealer nearest you, please call us at (714) 963-0133 or visit our dealer directory on the Internet at
www.globalhobby.com/where2buy.htm
Wattage Customer Service ● 18480 Bandilier Circle ● Fountain Valley, CA 92728
144050
5 Cell Flight Battery
144055
Turn Lever Assembly
or Order Directly From Us:
Phone (714) 963-0329 ● Fax (714) 964-6236
144051
Electric Motors (2)
144056
Transmitter Case Only
144052
Propellers (2)
144057
Transmitter Antenna
144053
Receiver PC Board
144058
Wing Set - No Motors
144054
Transmitter PC Board
144059
Fuselage Body Set
144060
Landing Gear Set
144061
Training Stand
Visit our website at http://watt-age.globalhobby.com for information on other Wattage products
144062
Trans. Battery Cover
144063
Fuselage Battery Cover
19
Page 20

Warranty Service
Before returning your airplane for warranty consideration, the status of the unit must be within the guarantee as stated
at the bottom of this page. Do not return your airplane to the place of purchase. They are not authorized or equipped to
perform warranty work on Wattage products. When requesting warranty service, please observe the following:
●
Crash damage will not be covered under warranty. Do not request warranty service for a crash-damaged product.
●
Always send the airplane complete with the transmitter. Please unplug and/or remove the batteries from both the
transmitter and the airplane.
●
Include a note detailing the problem or service you are requesting. Service cannot be provided without this
information. Include your daytime phone number, shipping address and/or email address in the event we need more
details pertaining to the service requested.
●
You may request an estimate of services at the time you return your airplane for service. An omission of this request
implies permission for Wattage to service your airplane at our discretion.
●
Include a method of payment for any service charges.
●
Send the unit to us by United Parcel Service, Federal Express or by Insured Mail. Postage is non-refundable. Send
your package to:
Wattage Customer Service
18480 Bandilier Circle
Fountain Valley, CA 92728
Phone (714) 963-0329
Fax (714) 964-6236
Email: [email protected]
Our Guarantee
W attage guarantees this kit to be free from defects in both material and workmanship, at the date of purchase. This does
not cover any component parts damaged by use, misuse or modification. In no case shall Wattage's liability exceed
the original cost of the purchased kit.
In that Wattage has no control over the final assembly or material used for final assembly, no liability shall be assumed
for any damage resulting from the use by the user of the final user-assembled product. By the act of using the final userassembled product, the user accepts all resulting liability.
IMPORTANT WARRANTY INFORMATION
Your Wattage Lightning EP is warranted against manufacturer defects in materials and workmanship for a period of 90
days from the date of purchase. Warranty service will be provided within 90 days of the date of purchase only if you are
able to provide the original (or a copy of) the original dated sales receipt.
20
Need help or have any questions? Call us at 1-714-963-0329 or send us an email to service@globalhobby.net
 Loading...