Watlow Electric 142 User Manual

Series 142
User’s Manual
Safety High Limit or
On-Off Heat Controller
1241 Bundy Boulevard, P.O. Box 5580, Winona, Minnesota USA 55987-5580
Phone: +1 (507) 454-5300, Fax: +1 (507) 452-4507,
Internet: http://www.watlow.com
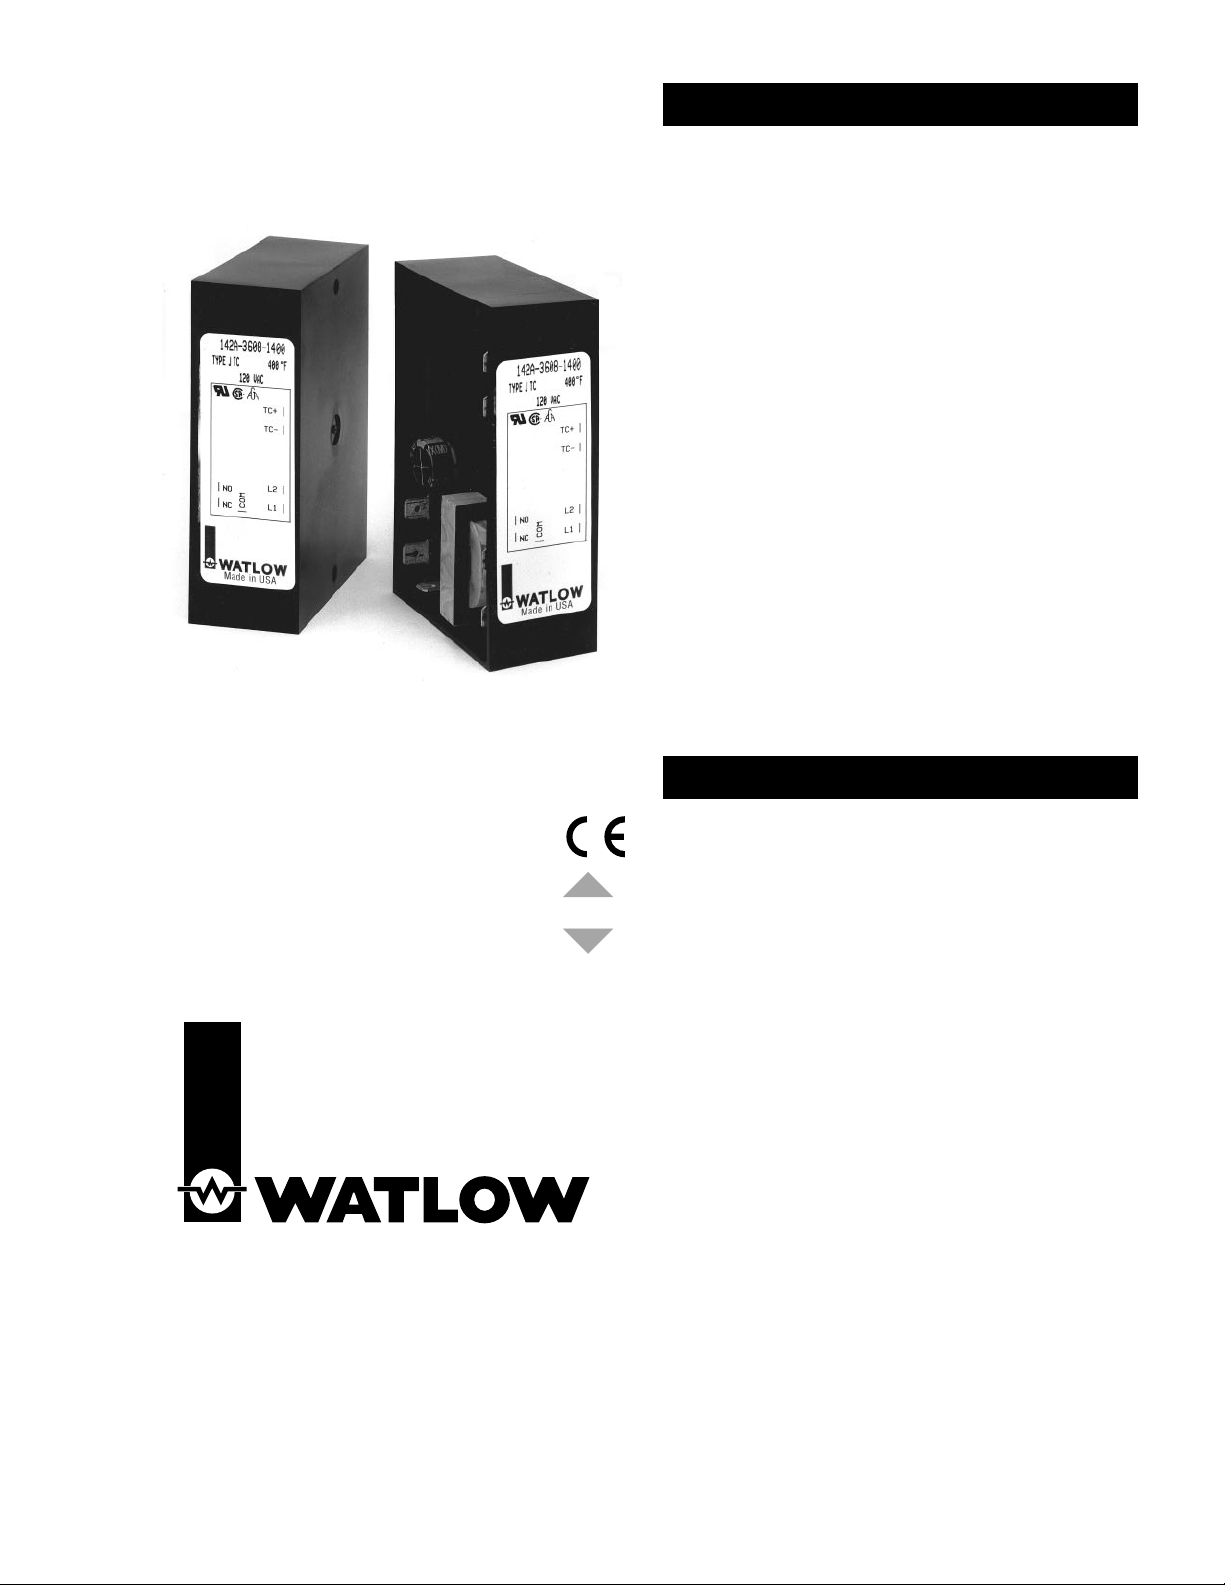
The Watlow Series 142 Safety Limit is a compact,
environmentally protected safety limit or temperature
controller. The limit has a single thermocouple input and
is available in several common ranges.
The Series 142 Safety Limit has a single mechanical
relay output, and operates as a high limit, latching control
with manual and/or auto-power reset. Fixed set points are
available.
The Series 142 Safety Limit controller is ideally
suited for limit applications requiring tamper-proof operation, agency approvals and immunity to hostile environments.
• The factory-fixed set point cannot be altered by operator
action or neglect.
• Agency approvals ensure compliance with recognized
standards.
• Epoxy potting makes the Series 142 resistant to envi-
ronments with vibration or humid/corrosive conditions.
Compact size and sub-panel mounting make the
Series 142 readily adaptable to many applications. Its
single, factory-fixed set point thermocouple input and
Form C, 3 amp electromechanical relay output provides
simplicity and reliability for many applications. Sensor
break protection ensures fail-safe process shut down upon
input failure.
We use note, caution and warning symbols throughout this manual to draw your attention to important operational and safety information.
A “NOTE” marks a short message to alert you to an
important detail.
A “CAUTION” safety alert appears with information
that is important for protecting your equipment and performance. Be especially careful to read and follow all
cautions that apply to your application.
A “WARNING” safety alert appears with information
that is important for protecting you, others and equipment
from damage. Pay very close attention to all warnings that
apply to your application.
The safety alert symbol, ç, (an exclamation point in
a triangle) precedes a general CAUTION or WARNING
statement.
The electrical hazard symbol, Ó, (a lightning bolt in a
triangle) precedes an electric shock hazard CAUTION or
WARNING safety statement.
Safety Information
General Description
0600-0023-0000 Rev E
March 2002
Supersedes
0600-0023-0000 Rev D
$5.00
Made in the U.S.A.
TOTAL
CUSTOMER
SATISFACTION
3 Year Warranty

2 ■ User’s Manual Watlow Series 142
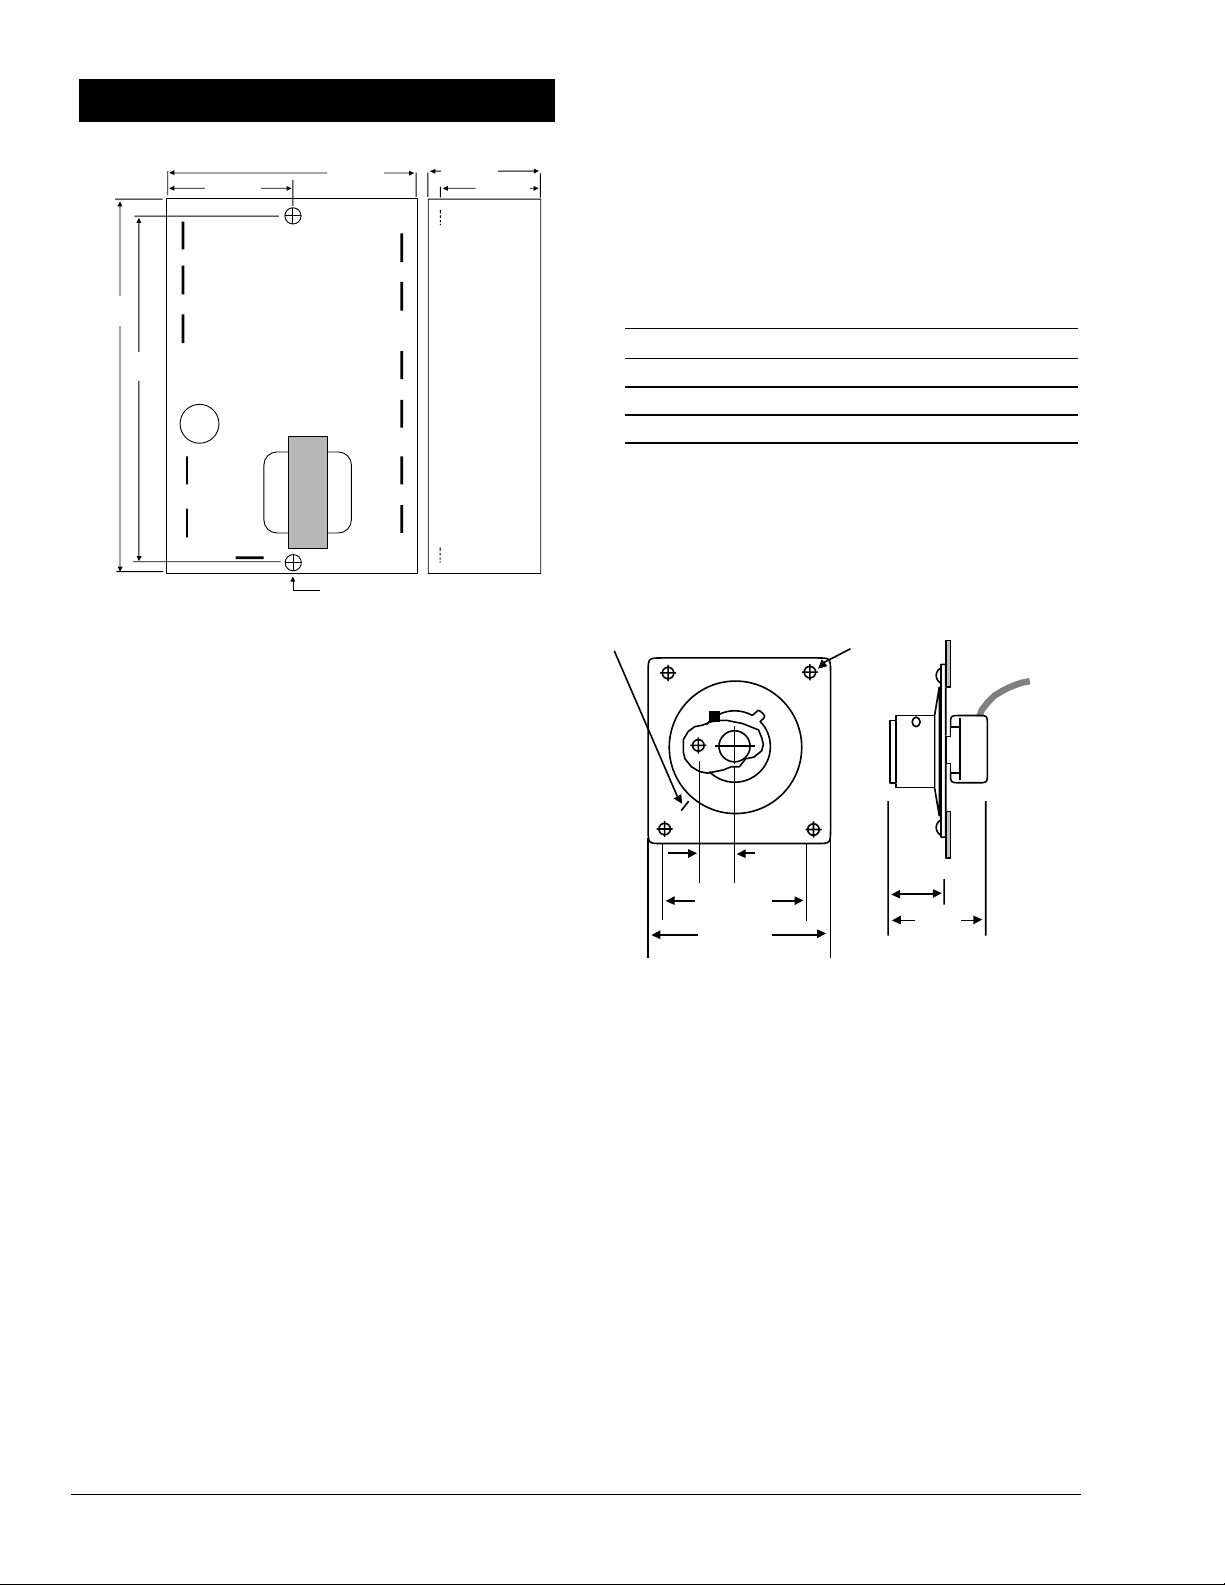
Figure 2a — Series 142 dimensions.
Installation Procedure
1. Drill two 5mm (0.187 in.) diameter holes in the desired
panel location.
2. Mount the unit with two 6-32 screws, 6mm (0.25 in.) hex
nut and #6 internal tooth lock washer.
3. Use the correct thermocouple type per the model number on the unit sticker. See the side of the case.
• Use correct thermocouple polarity. Red is negative.
• Insulate the thermocouple mounting from the mount-
ing surface to prevent heat migration input errors.
• Thermocouple leads should be twisted pair wire and
routed separately from any other lines.
• In electrically-noisy environments (heavy switching
contactors, motors, solenoids, etc.), use shielded thermocouple lead wire with the shield connected at the
sensor end only.
• Use a separate thermocouple to maintain the limit
function of this controller; do not parallel thermocouple input from the primary
controller.
4. All wiring and fusing must conform to the National
Electric Code (NEC) NFPA70 and any other locally
applicable codes.
5. Fuse the independent load voltage on the L1 (hot) side
and connect it to the common (C) side of the relay.
NOTE: For applications where the CE mark is required, all quick
connect and spade terminals must be pre-insulated to meet IEC
730 specifications.
Units With Remote Setpot Assembly
1. Drill two 51mm (2.0 in.) diameter holes in the desired
remote setpot assembly location. See Figure 2b.
2. Using the dial scale as a location template, center and
mark all four mounting holes on the dial scale with a
center punch.
3. For bolted dial scale assembly, drill four 3mm (0.125 in.)
diameter clearance holes. If you are using a screw
assembly, use a tap drill. Tap drill sizes used are:
Tap Drill Size Screw/Thread Size
#44 - 2mm dia. (0.086 in.) #4.36
#43 - 2mm dia. (0.089 in.) #4.40
#42 - 2mm dia. (0.093 in.) #4.48
4. Drill four 5mm (0.189 in.) diameter holes in desired
panel location. See Figure 2b.
5. Mount the Series 142 with four screws.
6. Connect sensor, load and remote setpot assembly per
Wiring Diagram. See the wiring pages.
Figure 2b — Setpot dimensions and mechanical zero
location.
Dial Scale Alignment to Mechanical Zero
1. Turn the dial scale knob completely counterclockwise (to
mechanical zero).
2. If the “Indicator” line on the setpot knob skirt, and
“Mechanical Zero” (represented by a small line beyond
the low end of the scale) are not aligned, loosen both set
screws on the setpot knob, and rotate the knob until
both lines meet.
3. Tighten both set screws.
(1.38 in.)
Installation
103mm
(
4.05 in.
)
89mm
3.50 in.
)
(
Use a 6mm (0.25 in.) hex nut
for proper clearance.
35mm
Two 5mm (0.187 in.) dia.
70mm
(2.76 in.)
mounting holes
35mm
(
1.38 in.
)
29mm.
(1.13 in)
13mm
4 mounting holes
23mm
(0.9 in.)
43mm.
(1.72 in)
Mechanical Zero
(2.69 in. sq.)
(3.00 in. sq.)
(0.53 in.)
68mm
76mm

Watlow Series 142 User’s Manual ■ 3
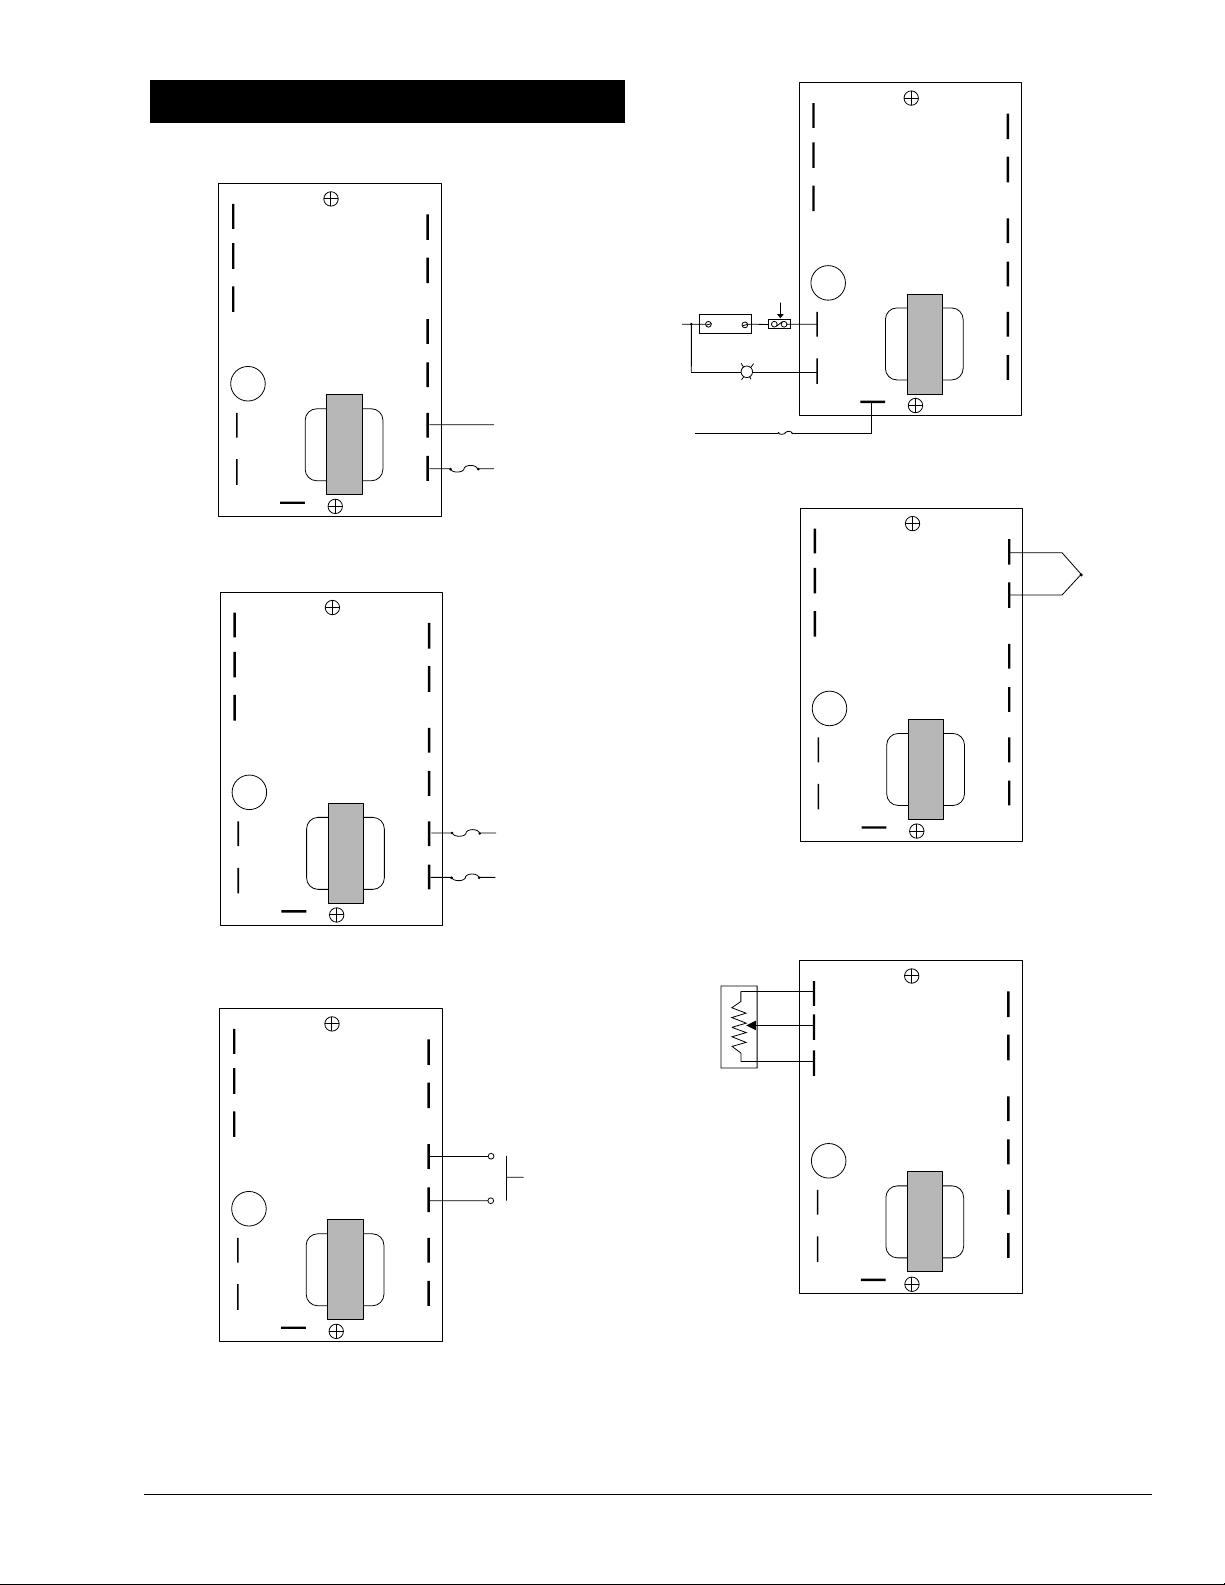
NOTE: All terminals are 4mm (1/4 in.) quick connects.
Figure 3a — 120V~ power wiring (142A - _ _ _ _ - 1 _ 00).
Figure 3b — 208/240V~ power wiring
(142A - _ _ _ _ - 2 _ 00).
Figure 3c — Reset switch.
NOTE: Jumpering the reset terminals does not convert from limit
to an on-off control mode.
Figure 3d — 3A mechanical relay wiring.
Figure 3e — Thermocouple wiring.
NOTE: Extension wire for thermocouples must be of the same alloy
as the thermocouple itself to limit errors.
Figure 3f — Remote setpot (142A - 2 _ _ _ - _ _ 00).
Remote Setpot
Green
Black
Red
P3
P2
P1
N.O.
N.C.
Reset
L2
L1
COM
Thermocouple +
Thermocouple -
P3
P2
P1
N.O.
N.C.
Reset
L2
L1
Red
COM
Thermocouple +
Thermocouple -
P3
P2
P1
N.O.
N.C.
Reset
L2
L1
Temperature
Control Output
Fuse
L1
External
Load
L2
COM
Thermocouple +
Thermocouple -
P3
P2
P1
N.O.
N.C.
Reset
L2
L1
Customer Supplied
N.O. Momentary Switch
COM
Thermocouple +
Thermocouple -
P3
P2
P1
N.O.
N.C.
Reset
L2
L1
Fuses
208/240V~
COM
Thermocouple +
Thermocouple -
P3
P2
P1
N.O.
N.C.
Thermocouple +
Thermocouple -
Reset
L2
L1
120V~
Fuse
COM
Neutral
Hot
Wiring
 Loading...