

Page 1
WATLOW
Optimizing Your Process System
with the Series 988 Controller
AN APPLICATION GUIDE
THE WATLOW
FOR
SERIES 988 FAMILY
Page 2

Watlow Mission Statement
To Become the Preferred Source of
Industrial Heaters, Sensors and
Controls by Totally Satisfying Our
Customers with Superior Products,
Quick Delivery on Specials, as well as
Standards, and Intelligent Sales
Support.
Copyright Watlow Winona, Inc., © 1994, with all rights reserved.
Page 3

Introduction
Welcome to the Watlow Series 988 application guide: Optimizing Your Process
System with the WATLOW Series 988. This application guide describes all the
features of the Series 988 and how they can be applied to your system. In
addition, this guide will walk you through the process of determining the optimal Series 988 for your application. Once you have purchased the controller, the Series 988 Users Manual will guide you through installation and setup
of the controller.
Start with Chapter One of this book, where “test drives” show the thought
process used for determining the correct Series 988 feature set for a specific
application. Chapter Two consists of a glossary and a question-and-answer
section that provides more details to help choose the right control. Chapters
Three through Five describe the features of the controller with a sample application for each feature. Chapter Six outlines the controllers’ specifications.
Use this chapter to ensure that the controller interfaces correctly with other
system components. Finally, Chapter Seven walks you through the feature
set selection for your specific application. Once you have used the guide a few
times, you will be able to skip to Chapter Seven and use the previous chapters
for reference.
The purpose of this technical guide is to assist you in the system design process. The final responsibility for the system design must remain with the system design engineer.
Watlow manufactures heaters, sensors and controls. We can provide a complete thermal system. For more information concerning the Series 988, contact your local sales representative listed on the back cover. Literature on the
Series 988 includes:
• Series 988/989 Users Manual
• Calibrating Watlow Process Controls
• How to Use Data Communications with the Watlow Series 988/989
or How to Use Data Communications with the Watlow Process Controls
Disclaimer of Warranty
The information presented here is of a general nature. Because of the diversity of conditions and hazards under which control products may be applied
and because of the differences in components and methods of installation,
representation or warranty of any kind, express or implied, is hereby made,
that the applications discussed herein will be effective in any particular application or set of circumstances, or that additional or different precautions will
not be reasonably necessary for a particular application.
no
We will be pleased to consult with you regarding a specific application, upon
request.
Page 4

Table of Contents
Table of Contents
Watlow Mission
Introduction
Chapter 1 Test Drives 1.1
Controlling an Extruder 1.2
Drying Grain 1.4
Melting Aluminum 1.6
Mixing Urethane 1.8
Chapter 2 Basic Control Strategies and Terms 2.1
Glossary 2.2
Questions and Answers 2.5
Control Strategies 2.8
Chapter 3 General Software Features 3.1
Auto-tune 3.2
Burst fire 3.3
Communications 3.4
Dead band 3.5
Digital event 3.6
Heater current 3.7
Input filter 3.8
Input linearization 3.9
Ramp to set point 3.10
Remote set point 3.11
Retransmit (master/remote) 3.12
Slidewire feedback 3.13
Chapter 4 Enhanced Software Features 4.1
Cascade 4.2
Differential 4.4
Dual PID sets 4.5
Duplex 4.6
Ratio 4.7
Optimizing Your Process System with the WATLOW Series 988
Page 5

Table of Contents
Chapter 5 Standard Features 5.1
Alarms 5.2
Auto/Manual 5.4
Diagnostics 5.5
Input errors 5.6
Lockout 5.7
Transmitter power supply 5.8
Chapter 6 Specifications 6.1
Input Table 6.2
Output Table 6.3
Dimensions 6.4
Displays and Keys Chart 6.5
Setup Requirements 6.6
User's Manual 6.7
Product Specifications 6.8
Warranty 6.9
Chapter 7 Select the 988 That Fits Your Application 7.1
Overview 7.2
Input 7.3
Output 7.4
Software 7.5
Standard Features 7.6
Hardware 7.7
Review and Optimize 7.8
Application Worksheet 7.10
Series 988 Model Number Worksheet 7.11
Index 8.1
Prompts, parameters and menus 8.4
Watlow Sales Offices back cover
Optimizing Your Process System with the WATLOW Series 988
Page 6

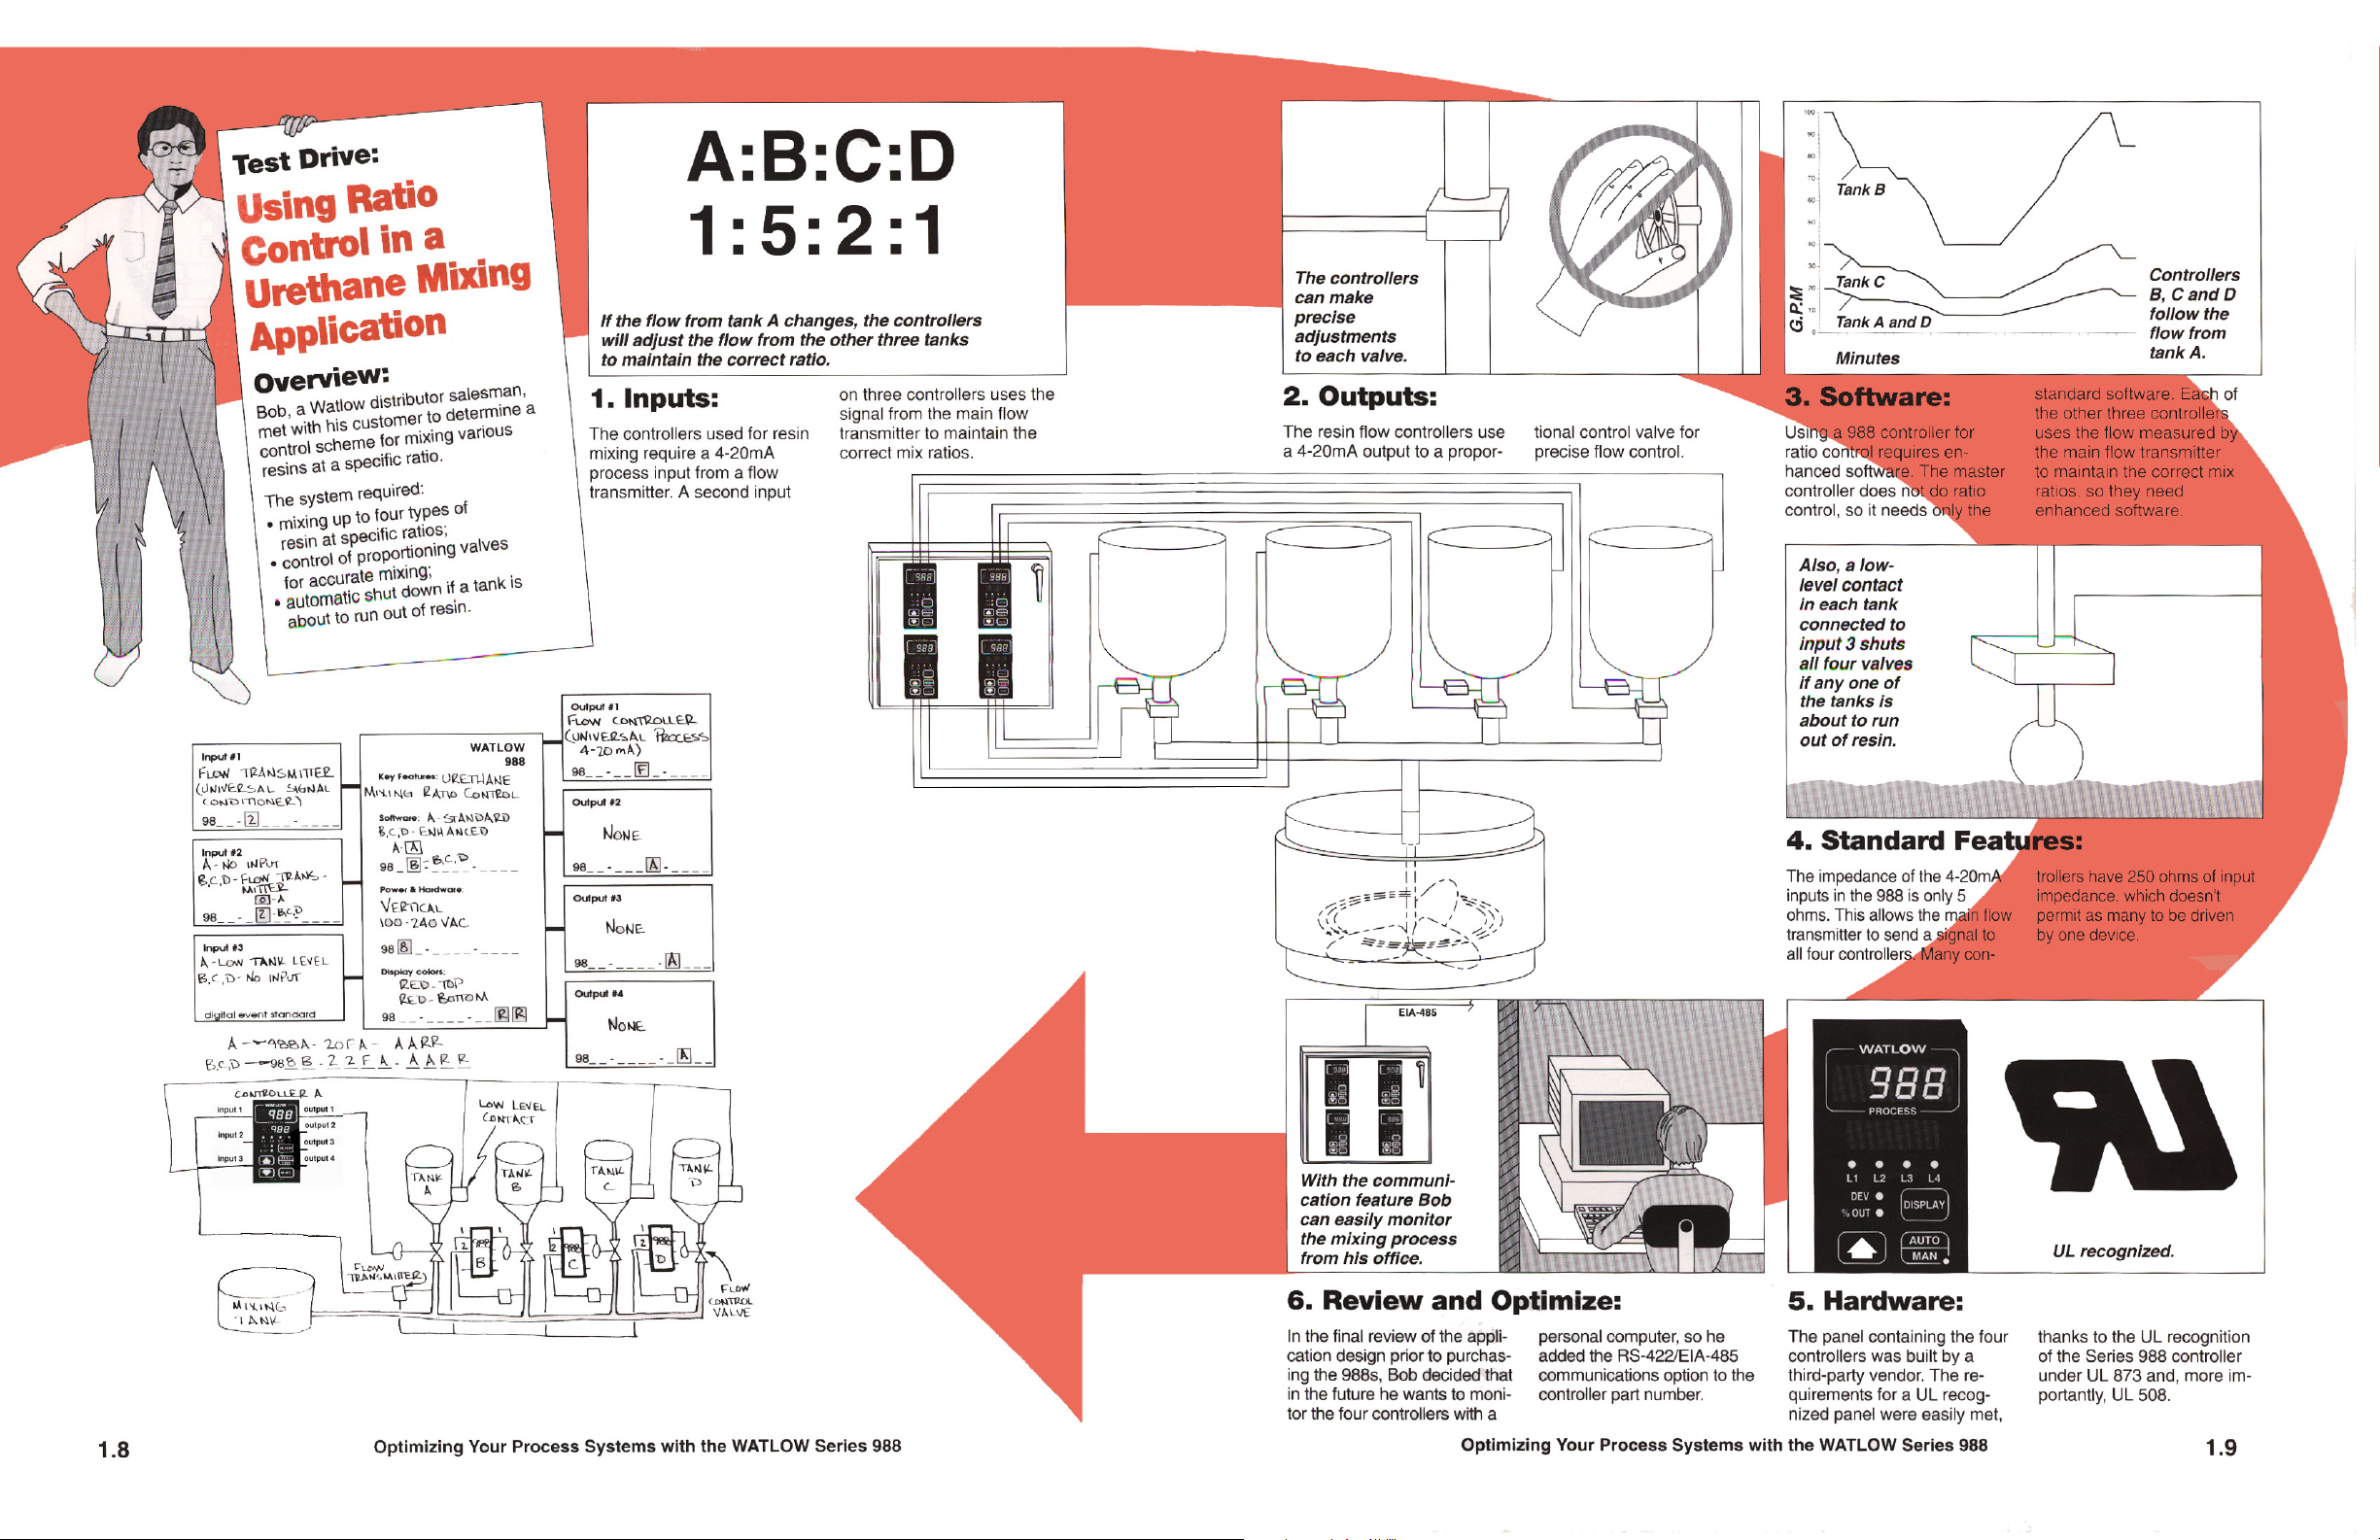
Test Drives
Chapter One
Test Drives
Controlling an Extruder 1.2
Drying Grain 1.4
Melting Aluminum 1.6
Mixing Urethane 1.8
How to use this chapter:
This chapter describes four actual applications in which processes are optimized
by using Watlow Series 988 controllers.
Optimizing Your Process System with the WATLOW Series 988
1.1
Page 7
Page 8
Page 9
Page 10
Page 11

Basic Control Strategies and Terms
Chapter Two
Basic Control Strategies and Terms
Control Strategies 2.2
Questions and Answers 2.5
Glossary 2.8
How to use this chapter:
This chapter explains control terms and
strategies, especially as they apply to the
Watlow Series 988 family of controllers.
It will help you identify issues specific to
your application, and allow you to implement the Series 988 controller in the
most cost effective manner, giving you
optimal control of your specific system.
Many of the decisions for system components are limited by factors not associated with the Series 988. The strategy
presented here is designed to get you
thinking of all the different parameters
associated with your system and how the
Series 988 fits in.
Optimizing Your Process System with the WATLOW Series 988
2.1
Page 12
Basic Control Strategies and Terms
Control Strategies
Process Control
Process controls are of two basic types: open
loop and closed-loop. An open-loop control
device has no self-correcting feedback information. The closed loop system uses feedback
information from a sensor to adjust the system.
As the process changes, the feedback loop
provides up-to-date status information that the
controlling device uses to make self-correcting
adjustments. The closed-loop control device
provides much better process control.
Control Modes
A variety of control modes offer various degrees
of controllability. The most common modes are
on-off and PID control. The PID control category includes varying degrees of complexity
that provide accurate, stable control under a
variety of conditions.
ON/OFF Control
The operation of the ON/OFF control, as the
name implies, turns the output device full ON
or full OFF. Temperature or process sensitivity
(hysterisis) is designed into the control action
between the ON and OFF switching points to
prevent switching the output device ON and
OFF within a span that is too narrow. Switching repeatedly within such a narrow span will
create a condition of intermittent, rapid switching, known as output “chattering.” The process
is always controlled “about set point,” dictated
by the switching hysterisis of the ON/OFF
control. This form of control action further
dictates that there will always be a certain
amount of overshoot and undershoot. The
degree of overshoot and undershoot will be
dependent on the characteristics of the entire
system.
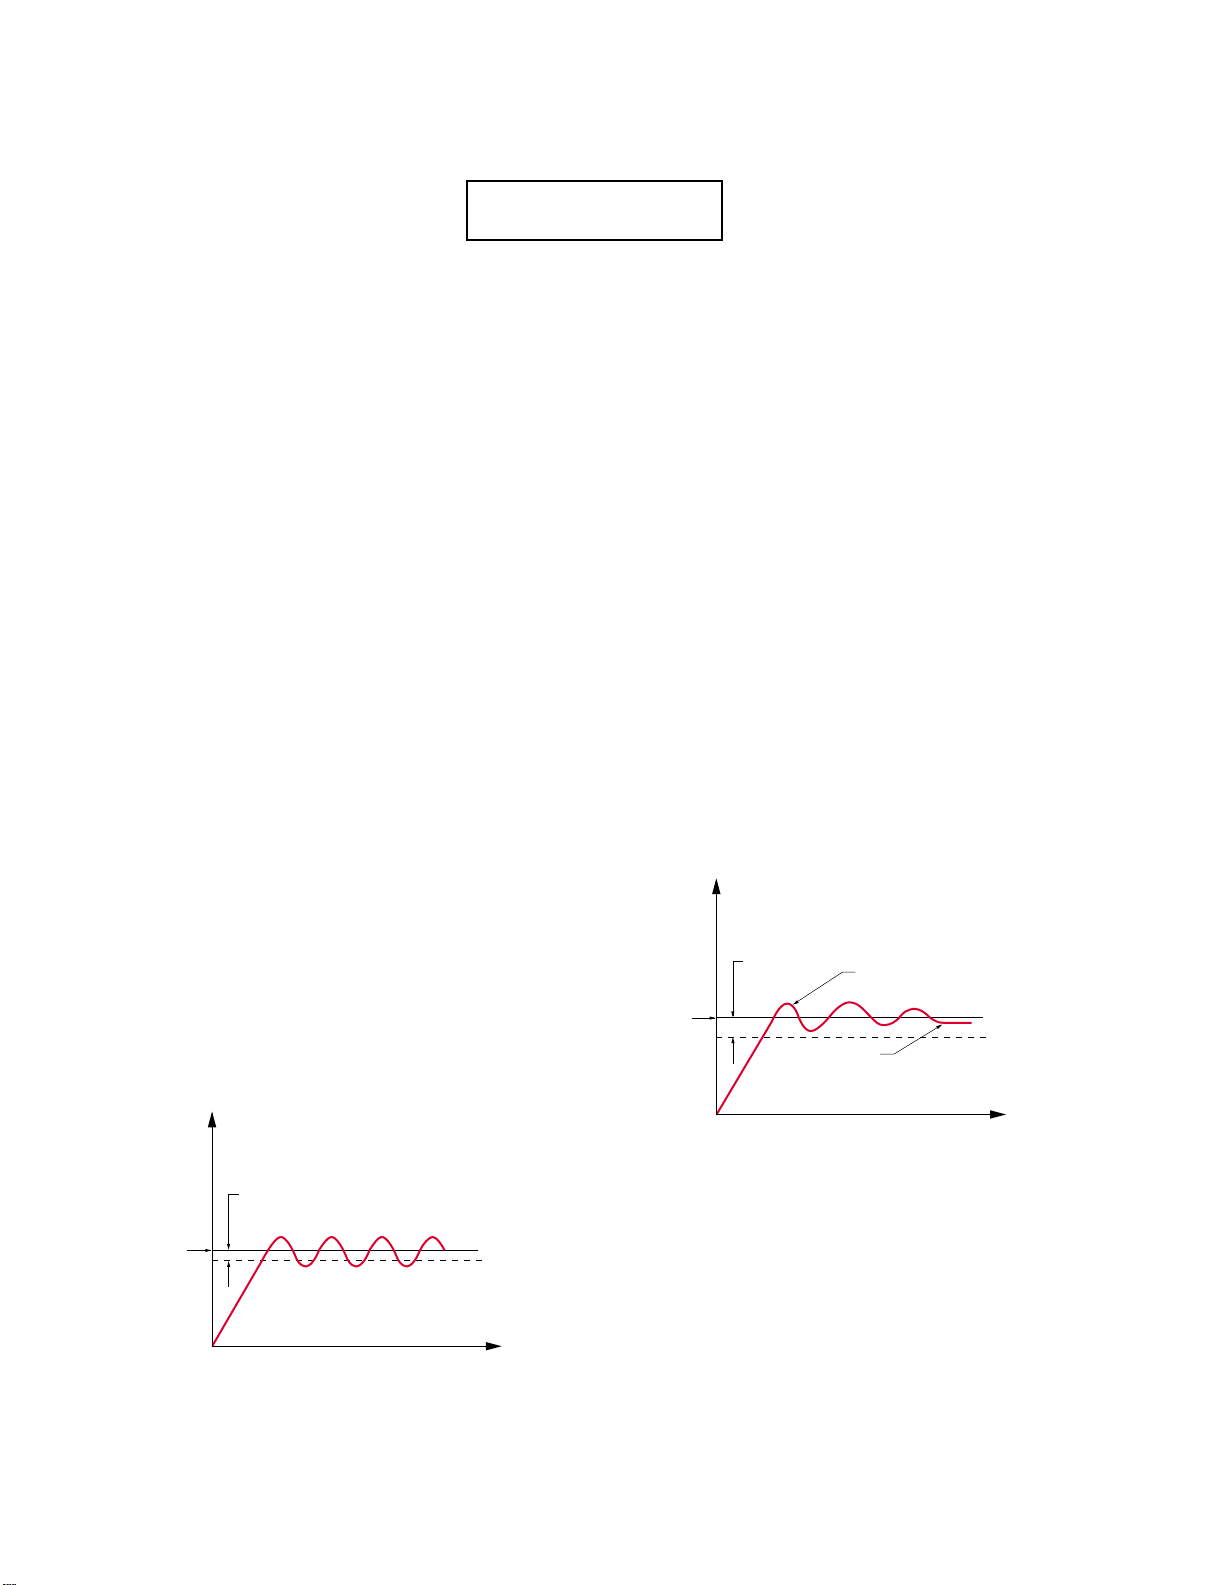
Time Proportioning
Time-proportioning control provides more
precise control of a process. A time-proportioning control operates in the same way as an ON/
OFF control, when the process is far enough
away from set point to be outside the proportional band. When the process approaches set
point and enters the proportional band, the
output device is switched ON and OFF at the
established cycle time. At the lower limit of the
band, the ON time is considerably greater than
the off time. As the process more closely
approaches set point, the ratio of ON to OFF
time changes: the amount of ON time decreases
as the OFF time increases. This change in
effective power to the load provides a throttlingback effect, resulting in less overshoot.
The ON and OFF cyclic action continues until a
stable relationship is achieved. At that time,
the system will be stabilized such that the
Time Proportioning
Temperature
Set
Point
Proportional
Band
Overshoot
Droop
On - Off
Switching
Sensitivity
Temperature
Set
Point
Time
Profile produced by ON-OFF control
Optimizing Your Process System with the WATLOW Series 9882.2
Time
Profile developed by proportioning control
process is controlled at a point below set point.
The process stabilizes with a resultant droop.
This condition will remain providing there are
no work-load changes in the system.
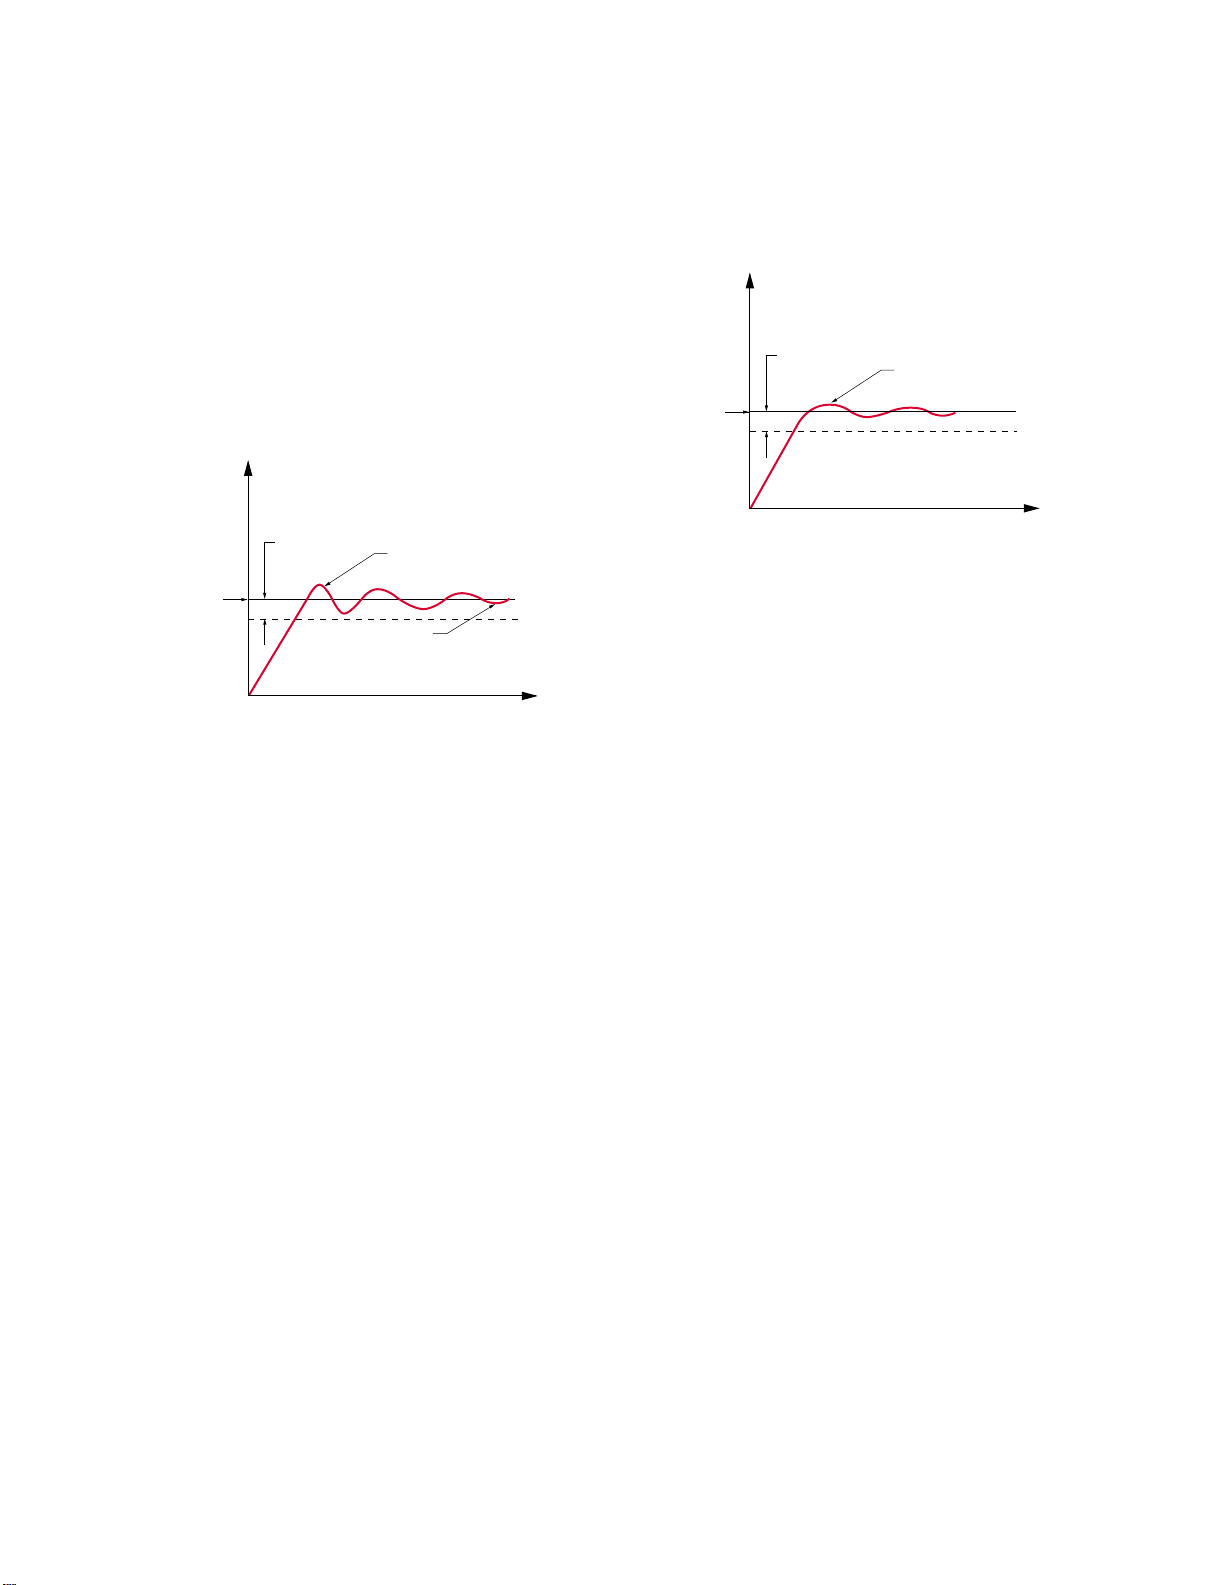
Integral
If the droop cannot be tolerated, there are ways
to compensate for it. Integral (automatic reset)
is an automatic adjustment to compensate for
Page 13
Basic Control Strategies and Terms
a droop condition before it exists. An integration function takes place that automatically
compensates for the difference between set
point and the actual process. This integration
automatically drives the process toward set
point. Integration action is prevented until the
process enters the proportional band. If it was
Time Proportioning
With Automatic Reset
Proportional
Temperature
Set
Point
Profile developed by a proportional plus
integral control
Band
Overshoot
Droop
Time
allowed to take place at any point, it would
cause a condition of extreme overshoot. This
function of eliminating the integration outside
of the proportional band is referred to as “antireset windup.”
Derivative
As all of the graphs have illustrated, overshoot
occurs with any of the previous control methods. Overshoot may be hazardous to certain
processes. It is preventable with a control
function known as “derivative” (rate).
Derivative is an anticipatory function in a
process control that measures the rate of
change of the process and forces the control
into a proportioning action on an accelerated
basis to slow that change. This action prevents
a large degree of overshoot on start-up and also
functions to prevent overshoot when system
disturbances would tend to drive the process
up or down. A proportioning control with
integral and derivative (PID) control provides
the type of control required for difficult processes with frequent system disturbances or
applications that need precision control.
PID -Time Proportioning
With Auto Reset & Rate
Proportional
Temperature
Set
Point
Profile developed by a proportional plus
integral plus derivative (PID) control
Band
Reduced Overshoot
Time
Control System Tuning
In this phase of making the system work, we
will focus on the process controller as the
primary component of a closed-loop system
that must be adjusted for optimum performance. These adjustments provide a means to
compensate for system problems. For instance,
when the sensor cannot be placed in the most
desirable location because of physical limitations, a PID controller can compensate for the
sensor’s resulting thermal lag problem.
Tuning Methods
Process controls are tuned manually or automatically. Manual tuning requires manually
setting each of the controller’s operating parameters. Automatic tuning, or auto-tuning, is
accomplished by the 988’s digital, microprocessor-based, electronic circuitry. The controller
uses a program inside its memory that will
calculate the correct setting for each of the
controller parameters. For more information on
auto-tuning with the Series 988 refer to page
3.2.
Manual Tuning
The following steps are generally applicable to
most manually set process controllers. Please
take note of a few precautions:
• Take your time in tuning the control system.
If you do it right, it will work a long time
without further attention.
• Do not change more than one control adjustment at a time, allowing the system to settle
Optimizing Your Process System with the WATLOW Series 988
2.3
Page 14

Basic Control Strategies and Terms
down to a state of equilibrium before making
another change.
• Remember that the time you need to spend
tuning the electronic controller system is
relative to the precision of control you need.
Proportional Band
The proportional band adjustment is the means
of selecting the response speed (gain) or sensitivity of a proportioned controller to achieve
stability in the system. The proportional band
— whether measured in degrees, percent of
range or other units — must be wider than the
natural oscillations of the system and yet not
wide enough to dampen the system response.
The time proportioning output must be set to
switch faster than the natural oscillation of the
system, sometimes called, “system cycle time.”
The tuning procedure is very simple, if you can
use a recorder to monitor the actual process
variable. If a recorder is not available, observe
the process response and record readings over
a defined time period.
If the system oscillates when the proportional
band is at its narrowest setting (not zero), the
adjustment of the proportional band should be
increased in small increments until the oscillation stops. Because the proportional band has
been tuned (adjusted) to have the controller
seek stability of the system, very often an offset
(droop) from the set point occurs. At this point
in tuning the system, the process variable
should be in a state of equilibrium, but not
right on the desired set point.
Integral (Reset)
The reset adjustment is tuned at this point to
correct for the droop caused by the proportional output. While it does automatically
correct for offset errors, automatic reset has to
be tuned to each system. Each system has its
own characteristic response time (system cycle
time), thus, the auto reset time constant
(repeats per minute) must be tuned to match
the overall system response time.
small increments, allowing the system to settle
down (stabilize) before making additional
changes, until the system just starts to oscillate. Then back the setting off enough to reestablish system equilibrium.
Derivative (Rate)
Rate is the last control parameter adjustment
to be made. Rate’s function is to reduce or
eliminate overshoot (excursions above or below
set point). It has a time base (measured in
minutes) that must be tuned to work with the
overall system response time (system cycle
time). The initial setting for rate should be at
the smallest integer of minutes possible (least
corrective action). Increase the integer in small
increment, then after each adjustment increase
the set point moderately. Observe the approach
of the actual process to set point. If it overshoots, continue to increase the rate integer in
small increments. Then increase the set point
moderately until optimum approach to set
point is achieved. If at some point the system
becomes very sluggish or cannot reach the new
set point at all, too much rate (corrective
action) has been adjusted into the control
system. To reduce this “damping” effect,
decrease the number of minutes of rate.
Recommended Tuning Reference
There are many reference books on the art of
tuning electronic controllers to the systems
they control. If you are not an instrument
technician qualified to tune thermal systems,
we suggest that you become familiar with the
following reference before attempting to tune
your system:
Tuning of Industrial Control Systems
by Armando B. Corripio
Published by the Instrument Society of America
(ISA)
Member $48.00, list $60.00 (approx.).
Phone: (919) 549-8411
Initially auto reset should be set at the lowest
number of repeats per minute (least corrective
action). Increase the repeats per minute in
Optimizing Your Process System with the WATLOW Series 9882.4
Page 15

Basic Control Strategies and Terms
Questions and Answers
System Diagram
No matter what your application, you must
start with an accurate system diagram. A
blueprint of the system wiring is typically not a
faxable document. When consulting the factory,
it’s helpful to be able to fax a system diagram
similar to the hand drawings shown in the Test
Drives in Chapter One. This diagram should
include all inputs, outputs, the controller, the
load, any alarms and any connections to other
systems or equipment. This diagram should
show the expected signal types and ranges at
each interface point to allow you to properly
order and set up your 988 controller. For the
advanced user of the Series 988 this will be
second nature. For the less experienced operator, putting together a diagram including all
system components will allow a Watlow sales
rep or factory applications engineer to review
the system for correctness.
Inputs
The 988 controller accepts a wide variety of
input signals and ranges, covering most temperature and process applications. Ask yourself
the following questions about your inputs:
What accuracy is required for each input?
(page 6.8)
• RTD’s will provide the most accurate measurement in a temperature-related system.
• The accuracy of a process sensor for flow, level,
pressure, etc. will depend strictly on the sensor
manufacturers specifications.
• The Series 988 measures the input and updates
the output 10 times per second with one input.
With 2 inputs, each input is measured five
times per second.
What is the wire length required to reach
controller? (page 6.8)
• When designing a system using thermocouple
or RTD sensors, if the lead length is excessive,
errors may be introduced into the system. By
using a signal transmitter to convert the
thermocouple or RTD signal to a process signal
the errors can be avoided.
RTD sensor. However, it almost never pays to
spend less on a sensor, which is arguably the
most important part of the thermal system.
• Process sensors can vary widely in cost. Other
factors, such as accuracy, response time and
durability, must be weighed.
Will this be a grounded or ungrounded application? (page 5.8)
• Although inputs are electrically isolated from
outputs in the 988, you must determine if
other sources of ground loops in the system
may affect the sensor. This can occur, in the
Series 988, if there are two grounded inputs or
if an output is tied to an input, such as using a
transmitter power supply output to power a
thermocouple transmitter.
Is the process relatively fixed or widely varying — what is the range? (page 6.8)
• Make sure you check (and re-check) the ranges
of the input options available in the 988.
Although the 988 can operate outside the ANSI
ranges for specific thermocouples and RTD’s, it
is not recommended and will shorten the life of
the sensor.
Are there concerns over electrical noise
immunity?
• Although the Series 988 is thoroughly tested for
electrical noise immunity, it is paramount that
you follow good engineering practices when
designing the placement of the sensor and
power wires. Refer to the Series 988 Users
Manual and the Watlow Catalog.
Outputs
The outputs command the system to heat, cool,
turn ON and OFF, and also trigger other
actions in this system or related systems.
It is very important that you maintain total
control over the process. External limits or
other devices to disable the outputs can protect
system components and provide an added layer
of safety. Consider the following:
Is cost a factor in the sensor selection?
• Typically, a thermocouple costs less than an
Optimizing Your Process System with the WATLOW Series 988
How frequently will the output need to cycle
to control the process? (page 6.8)
2.5
Page 16

Basic Control Strategies and Terms
• What is frequent? In order to tightly control a
process, the more frequent the better. Unless
absolutely necessary, mechanical relays should
not be used as the control output. A typical
mechanical relay application cycles ON and
OFF 86,400 times over a period of one month
(30 second cycle time, 24 hours per day). The
mechanical relay option is only warranted for
100,000 cycles.
• With a solid-state output a variable-time-base
burst fire option can provide the tightest load
control. Make sure the power control is compatible with the burst-fire output. (page 3.3)
What actuator interfaces are required? (page
6.8)
• Typically the output of the Series 988 does not
directly control the load. Instead it acts as a
pilot-duty output interfacing with another
device that actually controls the load. If this is
the case in your application, make sure that
the output of the Series 988 is compatible with
the input of the external device.
What alarm or annunciation outputs are
required? (page 5.1)
• The alarm options in the Series 988 can be
used to alert an operator to a system malfunction. These outputs should not be used as
safety limits to protect system components or
personnel. A separate safety limit device should
be used in any system where damage or injury
could occur due to a system component failure.
How should the alarms operate? (page 5.1)
• The alarm options can be field-configured to
function in any fashion. A process alarm can
be used to warn the operator of impending
equipment damage. A deviation alarm can be
used to warn that the system is operating
outside of the desired specifications. Each
alarm can be set for latching or non-latching,
silencing and reverse or normal logic.
process output (4-20mA, 0-5VDC, etc.). Also, it
limits the minimum on-time of the output.
Does the process require a retransmit output?
(page 3.12)
• Output 3 can be used as either a 4-20 or 020mA output or as a 0-5, 1-5 or 0-10VDC
output to retransmit the process value of either
of the inputs or the set point value. It allows
the controller to function as a master controller
in a master-remote application or to retransmit
a process value to a chart recorder.
What types of monitoring of the outputs is
required? (page 3.4)
• The retransmit option is one way to monitor the
system status.
• A serial communications option can be used to
monitor and/or change all the parameters in
the controller. With the EIA-485 option up to
32 controllers can be monitored from a single
communications port on a personal computer,
over distances of 4000 feet. The RS-422 option
can address up to 10 controllers over 4000
feet, and the RS-232 option can address a
single control over a distance of 50 feet. Make
sure the computer or other monitoring device is
equipped with the correct serial communications card and that the baud rate and other
capabilities are compatable.
Controller Environment
There are several factors to consider concerning the environment that the Series 988 controller operates in:
What are the physical dimensions of the
enclosure? (page 6.4)
• The Series 988 family of controls has a behindpanel depth of 4.06 inches, allowing the control
to fit an enclosure with a depth of 6.0 inches.
When mounting more than one controller in a
panel we recommend a minimum spacing of
1.66 inches between controllers.
Should you monitor the load current? (page
3.7)
• While this option is available as an input, it is
important to note that this feature in the Series
988 is not currently available when using a
Optimizing Your Process System with the WATLOW Series 9882.6
What is the ambient temperature inside the
enclosure? (page 6.8)
• The Series 988 can operate in ambient temperatures as low as 32°F (0°C) and as high as
150°F (65°C). The enclosure requires a non-
Page 17

Basic Control Strategies and Terms
condensing atmosphere, because the vented
case is susceptible to dripping water. If necessary, include an enclosure heater in your
system to maintain the proper environment.
Is the front panel subject to spray or hosedown conditions? (page 6.8)
• The Series 988 has a NEMA 4X-rated front
panel. This rating allows the controller to be
hosed down directly without damaging the
controller. Two gaskets protect the controller:
one seals the bezel of the control while the
other seals the controller face plate and the
panel cutout. When installing the controller be
sure that these gaskets are not twisted.
What are the agency requirements for the
controller and the system? (page 6.8)
• The Series 988 has a UL 873 and UL 508
recognition. CSA recognition is pending. Also,
the NEMA 4X rating was certified independently by UL under UL 50X.
Controller Operation
Operation of the Series 988 can be broken
down into three concerns: setup; operation;
and maintenance. The questions you ask
yourself should examine each of these areas.
Does the system have any interactive process
variables? (Chapter 4)
• Interactive process variables include ratio,
differential or cascade control or slidewire
feedback of valve position. Also, heater current
measurements can be used to detect system
faults.
Is an event input useful in this application?
(page 3.6)
• Before finalizing the design check out this basic
option. The event input can expand the userfriendliness and/or security of your system.
Is ramp to set point required? On start up?
On set point change? (page 3.10)
• Many systems are susceptible to damage if the
process changes too rapidly. The ramp to set
point feature can minimize system stress.
How should the controller respond to an
error? (page 5.6)
• In the event of an error, system response is
critical. Some systems might require that the
control output turn full ON to provide cooling.
Other systems would require that the control
outputs be turned OFF. The design of some
systems might allow the control to continue
operating in the manual mode without operator
action. All of these options are available with
the Series 988.
Are you shipping products overseas? (page 2.3)
• In some countries and in certain markets in the
U.S. the default units may be either degrees C
or degrees F and the PID parameters might use
proportional (in percent of span), integral and
derivative or proportional (in degrees), reset
and rate. The 988 can switch between these
default sets to suit the user's preference.
What level of operator security do you need?
(page 5.7)
• The Series 988 provides numerous levels of
both software and hardware lockout. Refer to
page 4.5 for more information on lockout.
What do you do if a system component fails?
(page 5.5)
• When investigating a system failure, the Series
988’s Diagnostics menu can be used to monitor
inputs and selectively activate outputs. The
menu also shows the software revision and the
I/O types.
What about field calibration?
• All Watlow microprocessor-based controls can
be field calibrated with the right equipment.
The calibration manual for the Series 988
family of controllers is available upon request.
Putting It All Together
You should now have a good idea of what types
of questions to ask when designing your system
with the Series 988. We suggest that you read
through the rest of this chapter and Chapters
Three through Seven for more detailed information on the features available in the Series 988.
If you are already familiar with the 988, skip to
Chapter Seven to select the 988 that fits your
application.
Optimizing Your Process System with the WATLOW Series 988
2.7
Page 18

Basic Control Strategies and Terms
Glossary
annunciator — a device that uses pilot lamps to
indicate the former or existing condition of a
system being monitored.
ANSI — American National Standards Institute.
burst fire — output that switches full AC cycles
ON and OFF repeatedly. Zero-cross burst fire
switches only at the zero-voltage point of the
AC sine wave. Variable-time-base burst fire
would switch ON and OFF 30 times a second to
achieve a 50-percent power level with a 60cycle AC power supply. Also see “zero switching.”
calibration offset — adjustment to the actual
process input and to the process values the
Series 988 uses for display and control.
cascade — control algorithm in which the output
of an outer control loop is the set point for an
inner loop. The inner loop, in turn, determines
the control action.
closed loop — control system that uses a sens-
ing device for process variable feedback.
derivative — anticipatory action that senses the
rate of change of the process, and compensates
to minimize overshoot and undershoot. Also
see “rate.”
differential control — With enhanced software,
the Series 988 controller can control one
process in relation to the difference of a second
process. A set point is added to the measured
value of the second process. This sum is used
as the set point for the input 1 process value.
DIN — Deutsche Industrial Norms, a widely
recognized German standard for engineering
units.
droop — difference between the set point and
stabilized process value.
duplex control — With enhanced software,
duplex control splits a single process output
into two individual outputs. For example, a 420mA output is split into a 4-12mA direct
acting (cooling) output and a 12-20mA reverse
acting (heating) output, thus allowing one
control output to function as two.
cold junction — point of connection between
thermocouple metals and the electronic instrument.
cold junction compensation — electronic
means to compensate for the effective temperature at the cold junction.
current transformer — a transformer, designed
for measuring electrical current, with its
primary winding connected in series with a
circuit carrying the current to be measured.
dead band — The dead band setting determines
the amount of interaction between heat (reverse
acting) and cool (direct acting) control outputs.
default parameters — the parameters, or pro-
grammed instructions, permanently stored in
the microprocessor software.
Optimizing Your Process System with the WATLOW Series 9882.8
duty cycle — percentage of load-ON time relative
to total-cycle time.
external transmitter power supply — a DC
voltage source of power for external devices.
filter — as applied to the Series 988, a low-pass
filter designed to minimize display or process
input fluctuations.
form A — single-pole, single-throw relay that
only utilizes the normally open (N.O.) and
common contacts. These contacts close when
the relay coil is energized. The contacts open
when power is removed from the coil.
form B — single-pole, single-throw relay that
only utilizes the normally closed (N.C.) and
common contacts. These contacts will open
when the relay coil is energized. The contacts
will close when power is removed from the coil.
Page 19

Basic Control Strategies and Terms
form C — single-pole, double-throw relay that
utilizes the normally open (N.O.), normally
closed (N.C.) and common contacts. The user
has the option of wiring for a form A or form B
contact. Refer to the form A and form B above
for more information.
hunting — oscillation or fluctuation of the
process between the set point and process
variable.
hysteresis — in ON/OFF control, the process
change necessary to change the output from
full on to full off.
input linearization — For thermocouple and
RTD inputs, the process variable is automatically linearized. Certain flow transmitters
generate a non-linear signal corresponding to
the flow being measured. The square root of the
signal is calculated to generate a linear signal.
integral — control action that automatically
eliminates the offset, or “droop,” between the
set point and actual process value. Also see
“reset.”
isolation — Electrical separation of sensor from
high voltage circuitry. Allows use of grounded
or ungrounded sensing element.
JIS — Joint Industrial Standards. Also Japanese
Industrial Standards Committee (JISC). Establishes standards for equipment and components.
open loop — control system without sensory
feedback.
output — action in response to difference be-
tween the set point and process variable.
overshoot — condition in which the process
exceeds set point due to initial power up or
process changes.
P control — proportioning control.
PD control — proportioning control with deriva-
tive (rate) action.
PDR control — proportional derivative control
with manual reset is used in fast responding
systems where the reset causes instabilities.
With PDR control, an operator can enter a
manual reset value that will eliminate any
droop in the system. The option requires
enhanced software.
PI control — proportioning control with integral
(auto-reset) action.
PID control — proportioning control with inte-
gral (auto-reset) and derivative (rate) action.
process variable — regulated system parameter,
such as time, temperature, flow, humidity, etc.
proportional band — span of the process from
the set point within which time proportional
control action takes place.
linearization — the extraction of a linear signal
from the non-linear signal of a flow transmitter.
Also see “input linearization.”
NEMA 4X — a front-panel rating that certifies
the control as washdown capable and corrosion
resistant.
ON/OFF control — control of a process by
turning the output full ON below set point and
full off above set point.
Optimizing Your Process System with the WATLOW Series 988
proportioning control — See "time proportion-
ing control."
rate band —
where the rate (derivative) function begins. The
Series 988 rate band centers on the set point
and is twice the width of the proportional band.
ratio — application in which the flow of an
uncontrolled stream is measured and used to
maintain the flow of a controlled stream at a
ratio to the uncontrolled stream.
a thermal control band that defines
2.9
Page 20

Basic Control Strategies and Terms
reference junction — synonymous with cold
junction. Also see “cold junction.”
retransmit — an analog signal representing a
control variable, either the process values or
the set point values.
RTD — resistance temperature detector. Resistive
temperature-sensing device that displays a
positive temperature coefficient.
slidewire feedback — closed-loop, valve-actuator
control using a potentiometer to indicate valve
position.
switching sensitivity — in ON/OFF control, the
process value change necessary to change the
output from full on to full off.
thermal system — a regulated environment
consisting of a heat source, heat transfer
medium, sensing device and a process variable
control instrument.
thermocouple — temperature-sensing device
constructed of two dissimilar metals that
generates a measurable, predictable voltage
that corresponds to its temperature.
supply power to external signal conditioners,
transducers or transmitters. With internal DIP
switches, the user selects between 5, 12 or
20VDC at 30mA ratings.
zero-cross — Action that provides output switch-
ing only at the zero-voltage crossing points of
the AC sine wave. Also see “burst fire.”
thermocouple break protection — fail-safe
operation that assures output shutdown upon
an open thermocouple condition.
three-mode control — proportioning control
with integral (reset) and derivative (rate). Also
see “PID.”
time proportioning control — action that varies
the amount of on and off time when “close” to
the set point, i.e., in the proportional band.
This variance is proportional to the difference
between the set point and the actual process.
In other words, the amount of time the output
relay is energized depends on the system
process value.
transmitter power supply — When Option “T” is
ordered for output 2, 3 or 4, the Series 988 can
Optimizing Your Process System with the WATLOW Series 9882.10
Page 21

General Software Features
Chapter Three
General Software Features
Auto-tune 3.2
Burst fire 3.3
Communications 3.4
Dead band 3.5
Digital event 3.6
Heater current 3.7
Input filter 3.8
Input linearization 3.9
Ramp to set point 3.10
Remote set point 3.11
Retransmit (master/remote) 3.12
Slidewire feedback 3.13
How to use this chapter:
This chapter describes the software
features that are available in Watlow
Series 988 controllers. Enhanced software options provide additional features
that are described in Chapter Four.
3.1Optimizing Your Process System with the WATLOW Series 988
Page 22
General Software Features
TL
Overview:
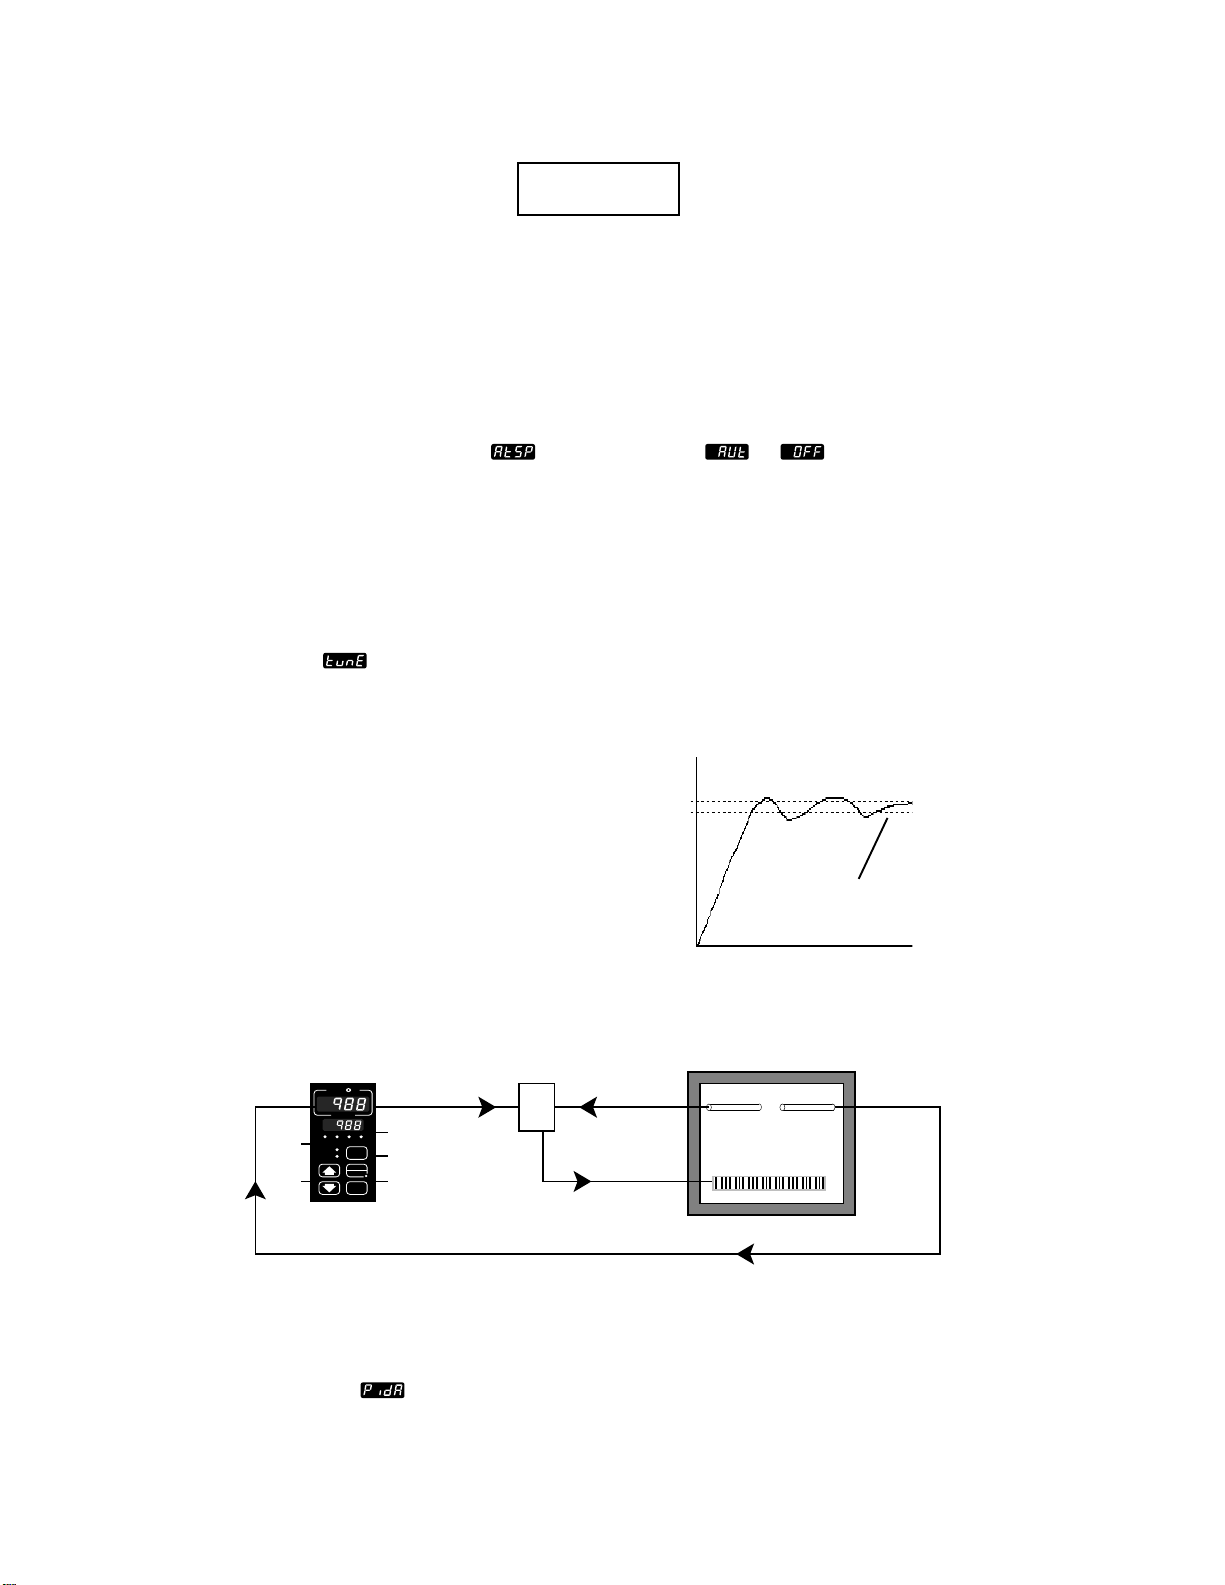
The auto-tune feature allows the controller to
manipulate the process and calculate PID
values based on the process response. This
relieves the operator from the tedious task of
manually tuning the PID parameters to match
the characteristics of the thermal system.
Auto-tune
During an auto-tune the controller monitors
how fast the process increases and decreases,
and from this information calculates proportional band, reset and rate values and automatically enters them into non-volatile
memory.
The point at which the auto-tune takes place is
determined by the auto-tune set point
parameter. It is adjustable from 50 percent to
150 percent of the current set point, with 90
percent being the factory default setting. If the
auto-tune set point is 90 and the current
setpoint is 300 degrees, the control goes into
ON/OFF mode of control at 270 degrees (300
deg. x 0.9). The displayed setpoint is unchanged and the bottom display information
alternates with tune
at a one-second rate
until the auto-tune is completed. Any changes
to the set point during an auto-tune will cause
the auto-tune sequence to start over, based on
the new set point.
To abort an auto-tune, set the auto-tune
prompt
to or press the AUTO/MAN
key twice, or cycle the power OFF and ON. The
previous PID parameters will be restored.
Requirements
The Series 988 can be ordered with two complete sets of heat/cool PID sets. This requires
the enhanced software option. A single set of
PID parameters is available with the standard
software option.
350°
315°
auto-tune
complete
temperature →
time →
Oven
heater
input 1
A
TL
W
PROCESS
L1 L2 L3 L4
DEV
% OUT
SERIES 988
DISPLAY
AUTO
MODE
W
MAN
output 1
limit
limit
sensor
Sample Application:
In this example the oven needs to hold at 350 degrees F. To complete the
tuning sequence set the set point for 350 degrees and auto-tune by setting
the auto-tune prompt to
3.2
Optimizing Your Process System with the WATLOW Series 988
.
temperature
sensor
Page 23
General Software Features
TL
Overview
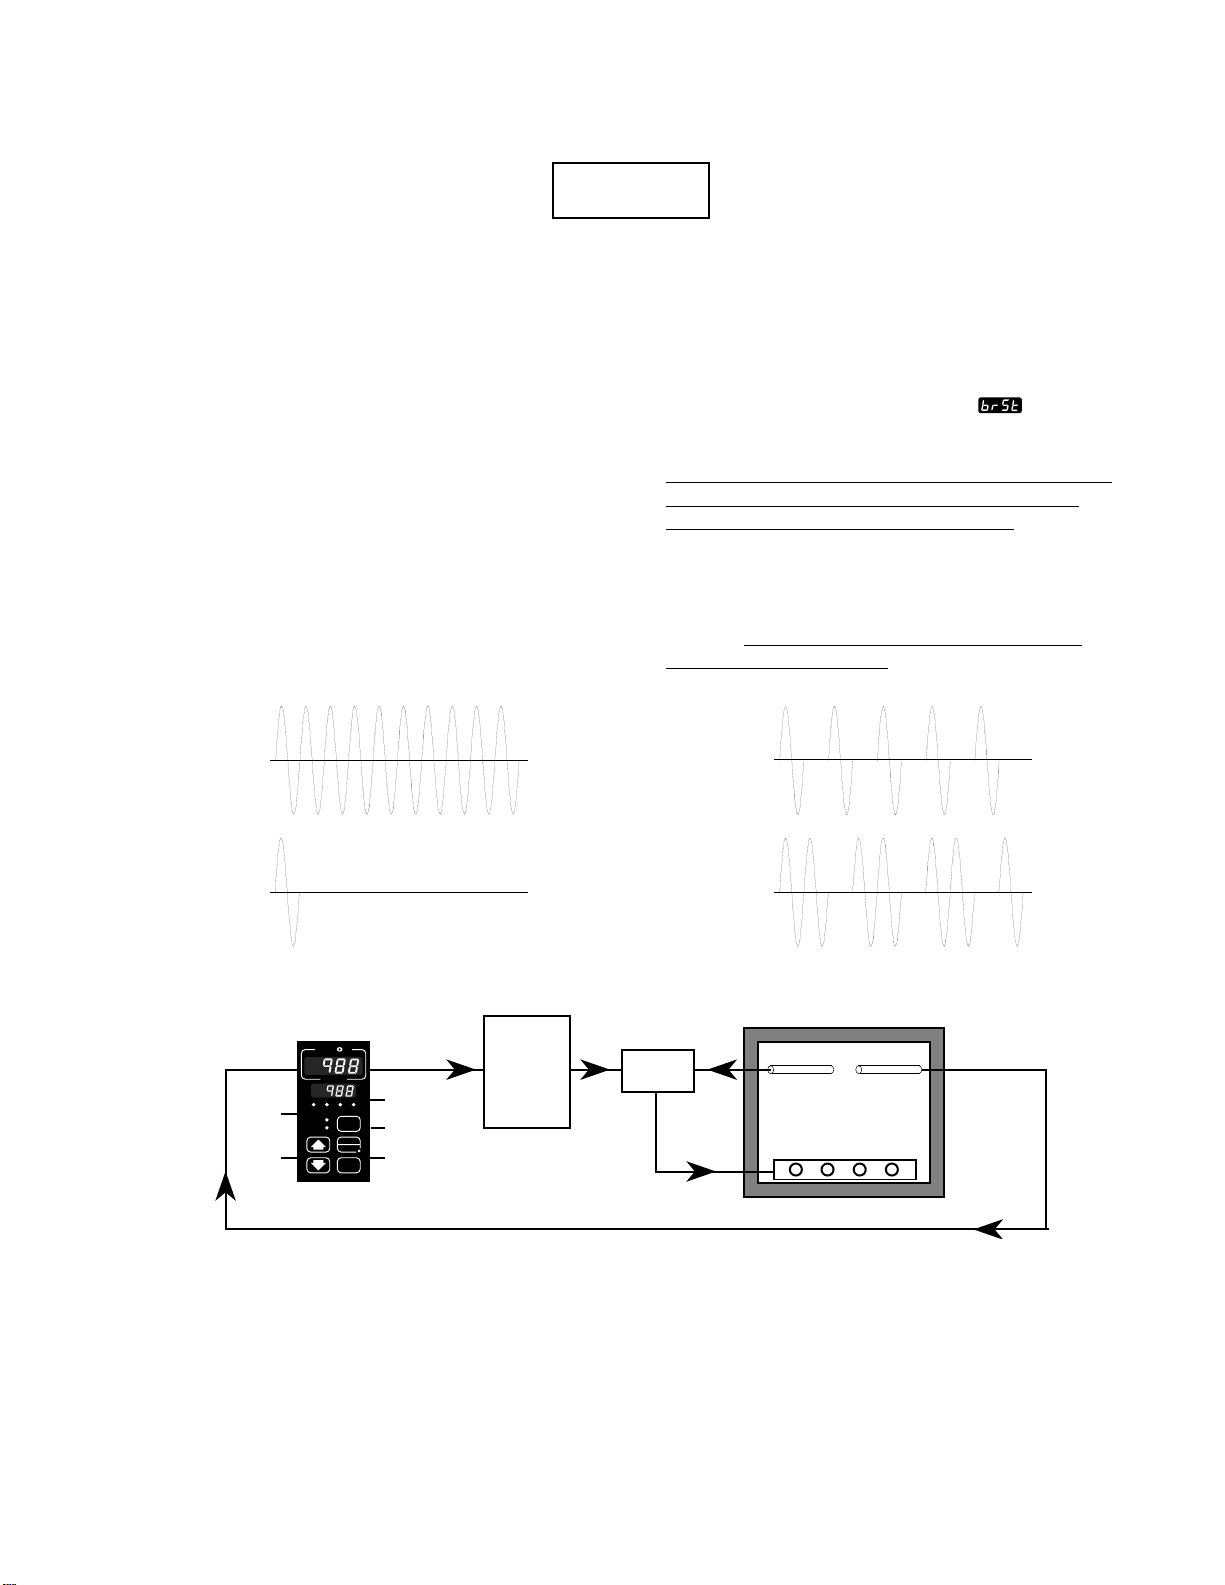
Variable, time-base burst firing from the 988
provides a command signal to an SSR or SCR
firing card that translates into a burst of AC
cycles. The output is zero-cross fired and
always allows at least one AC cycle to pass
within the variable time base. The fact that we
are zero-cross switching the power device
means we enjoy the benefits of low radio
frequency (RFI) noise. Burst firing is the preferred mode to control resistive loads.
The burst fire time base in the 988 varies from
a maximum 1.66-second time base (1-percent
output) down to a 33.3-millisecond time base
(50-percent output). The examples below show
how the time base varies depending on the
percent output.
Burst Fire
Requirements
The 988 family has built in zero-cross detection
circuitry. Therefore special firing circuitry is
normally not required for triggering SCR’s. To
enable burst fire the 988 must have an open
collector or solid-state relay output. The feature
is enabled by selecting burst fire
cycle time prompt for the appropriate output.
You should note that the short time bases used
by burst fire makes it incompatible with the
heater current feature (see page 3.7). The
heater current option requires a minimum of
300 msec. ON-time to get a reading.
Only the 988 and 989 can use the burst fire
feature.
cannot use burst firing.
at the
The low-voltage units (986 and 987)
50% Output100% Output
10 ON, 0 OFF 1 ON, 1 0FF
10% Output
1 ON, 9 OFF 2 ON, 1 OFF
input 1
A
TL
W
PROCESS
L1 L2 L3 L4
DEV
% OUT
SERIES 988
W
DISPLAY
AUTO
MAN
MODE
output 1
QPAC
with
QCD
input
66% Output
Semiconductor Oven
limit
limit
sensor
Sample Application
The 988 is being used to control a heated platen in a semiconductor oven.
Previously it required a power control requiring a 4-20mA signal to implement
burst-fire control. We have replaced the power control with a Watlow Loyola
QPAC with a QCD card that accepts a signal directly from an open-collector
output of the 988. This gives smooth control at a lower overall system cost.
temperature
sensor
heated platen
3.3Optimizing Your Process System with the WATLOW Series 988
Page 24
General Software Features
TL
TL
TL
TL
TL
Communications
Overview
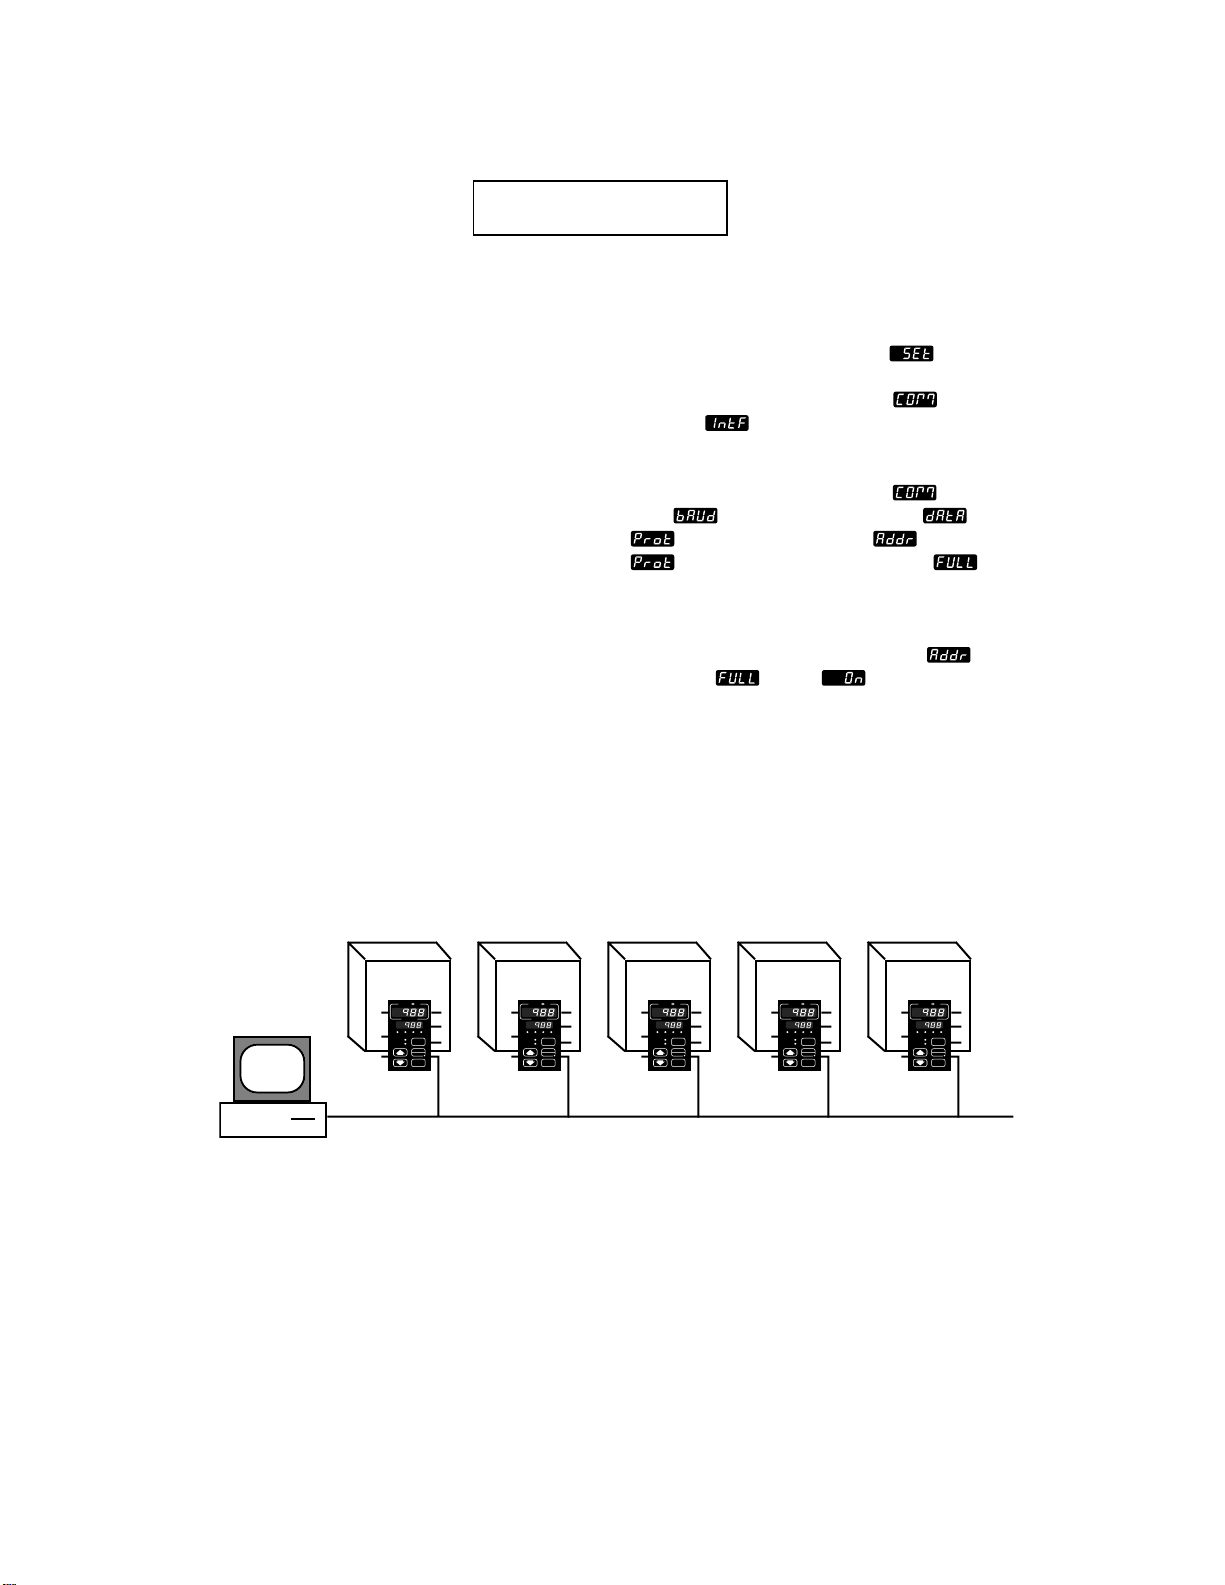
The serial communications feature allows the
Series 988 family to receive commands from
and transmit data to a master device, usually a
computer. Any function that can be performed
via the front panel, can also be accomplished
using the serial communications port, allowing
you to operate the controller from a computer
and to store process data on a computer.
The 988 is available with a choice of serial
hardware interfaces. An RS-232 interface
allows for one master (computer) and one
controller, with a maximum network length of
50 feet (15 meters).
The EIA-485/RS-422 option equips the controller for a multi-drop interface: up to 32 total
network devices with EIA-485 and up to 10
total network devices with RS-422. Each
controller will have its own unique address.
The total maximum network length is 4,000
feet (1,219 meters). These are isolated interfaces.
To select between EIA-485 or RS-422, enter the
setup prompts by holding the increment (uparrow) and decrement (down-arrow) keys
simultaneously until setup
appears in the
bottom display. Use the decrement key to select
the Communications menu
prompt
selects between 485 or 422.
. The interface
Other parameters that must be configured in
the Communications menu
rate
, data bits and parity , protocol
are the baud
, and device address . The protocol
prompt must be set to full (ANSI
X3.28 2.2-A3) if multiple devices are used with
the EIA-485 or RS-422 interface. If the full
protocol is selected, a device address must be
selected at the address prompt
232, full
or on (XON/XOFF) protocol
. For RS-
may be selected.
Requirements
Choose which interface your application will
use: RS-232 serial communications; EIA-485;
or RS-422 serial communications. The computer must have a compatible serial port.
Personal Computer
with RS-422 port
Test
Chamber 1
W
A
TL
W
PROCESS
L1 L2 L3 L4
DEV
DISPLAY
% OUT
AUTO
MAN
MODE
SERIES 988
Test
Chamber 2
W
A
TL
W
PROCESS
L1 L2 L3 L4
DEV
DISPLAY
% OUT
AUTO
MAN
MODE
SERIES 988
Test
Chamber 3
W
A
TL
W
PROCESS
L1 L2 L3 L4
DEV
DISPLAY
% OUT
AUTO
MAN
MODE
SERIES 988
Test
Chamber 4
W
A
TL
W
PROCESS
L1 L2 L3 L4
DEV
DISPLAY
% OUT
AUTO
MAN
MODE
SERIES 988
output 4 output 4 output 4 output 4 output 4
Sample Application
A test engineer uses 988’s to control the temperatures of several automated
test chambers. His computer is linked to the controllers through its RS-422
serial communications port. His computer program monitors the temperatures of the 988’s and initiates automatic test sequences when certain program parameters have been met. After completing a sequence, the computer
loads the next temperature to the controller. The computer periodically
interrogates each controller for its process temperature, set point and alarm
status. This information is stored on a disk to provide test verification data for
the completed products.
3.4
Optimizing Your Process System with the WATLOW Series 988
Test
Chamber 5
W
A
TL
W
PROCESS
L1 L2 L3 L4
DEV
DISPLAY
% OUT
AUTO
MAN
MODE
SERIES 988
Page 25
General Software Features
TL
Dead band
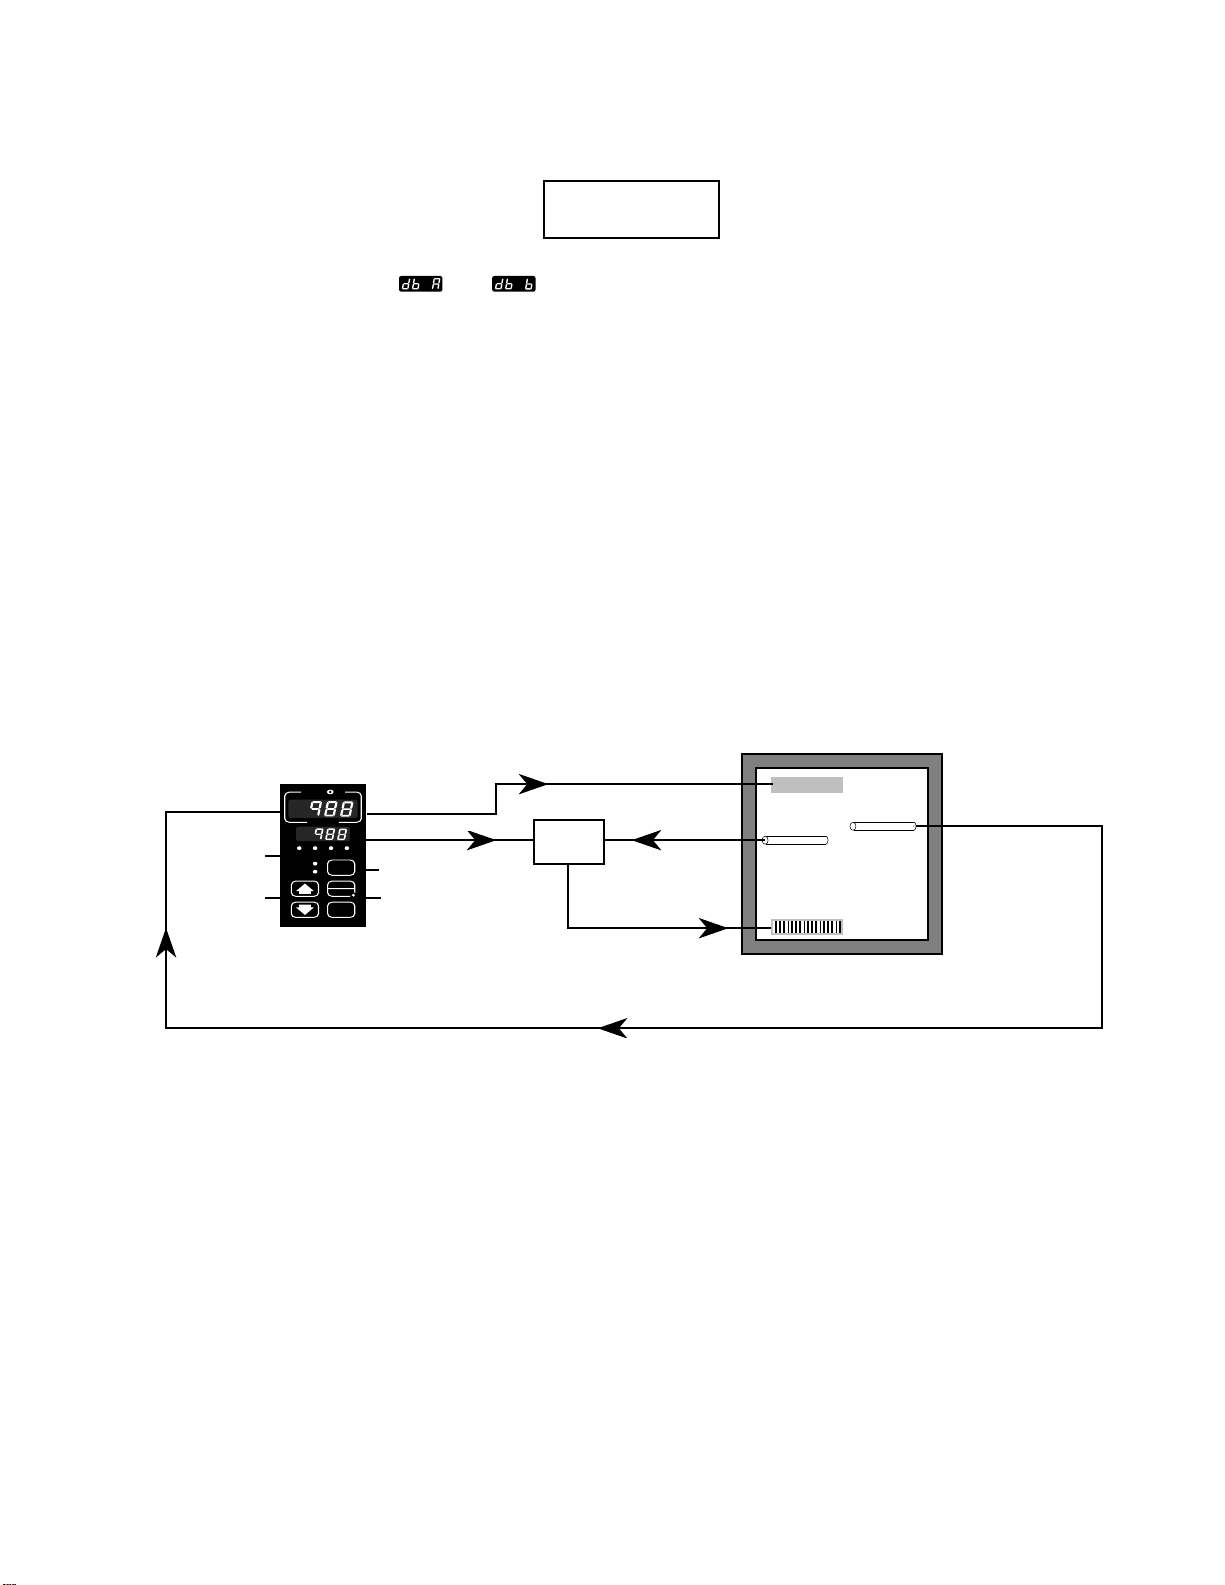
Overview
The dead band prompts,
located in the PID menus, determine the
amount of interaction between heat (reverse
acting) and cool (direct acting) control outputs.
The dead band directly offsets the target set
point of the cool control output.
With a positive dead band, both control outputs will never be on at the same time. With
the process in a positive dead band, the output
value is determined by adding the percent heat
output to the percent cool output and only
applying the result to the correct output —
cooling action if the sum is negative and
heating action if it is positive.
and ,
If the dead band is set to a negative value, the
heat and cool outputs can both be ON at the
same time.
Requirements
The dead band feature is standard on any
Series 988 controller with two control outputs.
The dead band prompts will appear if the
control outputs are configured for heat/cool or
cool/heat.
Environmental Chamber
W
A
TL
input 1
W
PROCESS
L1 L2 L3 L4
DEV
% OUT
SERIES 988
DISPLAY
AUTO
MAN
MODE
output 1
output 2
limit
chiller
limit
sensor
heater
Sample Application
An engineer for an environmental chamber manufacturer, who is designing the heating and cooling system for a new chamber, wants to minimize
the energy costs of operating the chamber. She has chosen the 988 and
will configure the heat and cool outputs with a positive dead band.
When the chamber temperature is near ambient the cooling and heating
systems had a tendency to buck one another, resulting in inefficient use
of energy. The engineer started with a dead band of five degrees, but in
the process of tuning the system for optimal control, the setting was
reduced to two degrees. This made the system more energy efficient and
reduced wear on the refrigeration system.
temperature sensor
3.5Optimizing Your Process System with the WATLOW Series 988
Page 26

General Software Features
TL
Digital Event
Overview
The digital event input options on the Series
988 controller allow the operator to select one
of several software functions with the close of a
customer-supplied switch or by a change in DC
voltage.
The list below outlines the functions that can
be controlled with the digital event input.
Idle set point
with the close of a switch, a second (idle) set
point.
Turn control outputs OFF
closed input to inhibit the control outputs.
Alarm reset
lets the operator select,
allows a
resets alarms from a remote
location with a momentary closed input.
Switch PID sets
selects between PID set
A or B (requires enhanced software).
Remote set point
switches between local
and remote set points.
Front panel lockout
locks out the front
panel keys to prevent tampering.
Control output action
switches the
control action of Output 1 from heating to
cooling, or vise versa.
Requirements
A single digital event input is standard on all
controls. A second digital input is available as
an option for Input 2.
Incubator
W
A
TL
input 1 output 1
W
PROCESS
L1 L2 L3 L4
DEV
DISPLAY
% OUT
AUTO
MAN
MODE
SERIES 988
input 3
(event input 1)
switch
limit
limit
sensor
heater
Sample Application
A manufacturing engineer is building an application that needs to switch to
an idle temperature at the end of a batch and maintain that temperature until
the next batch is loaded, with minimum operator interaction.
By connecting an external switch to the digital event input, he can select
either the operating temperature or the idle temperature with the flip of a
switch. The idle set point prompt is enabled by setting the event input 1
prompt
, in the Global menu, to the idle set point . The idle set point
value is accessed by pressing the MODE key from anywhere in the display
loop. When the switch closes, the lower display will indicate the idle set point,
and the controller will maintain this new set point.
temperature
sensor
3.6
Optimizing Your Process System with the WATLOW Series 988
Page 27

General Software Features
TL
Heater Current
Overview
The heater current feature measures and
responds to heater current in a system. This is
an ideal method for detecting heater loss in
multiple heater applications. The current is
measured when output 1 is ON. For instance, if
a system has five, 10-amp heaters, the heater
current input measures 50 amps regardless of
the percent output.
To view the heater current press the DISPLAY
key and advance to the process 2 prompt
The upper display indicates the last valid
current reading.
The input 2 prompt
menu
error detect
can be set to current or loop
. Current allows you to
monitor heater current and set alarm set
points based on high and low heater current
values. Alarms can only be configured as
process alarms (see Alarms, page 5.2). Setting
to loop error detect
and alarm functions, and also triggers an error
and shuts OFF all outputs if current is present
with output 1 OFF or when no current is
present and output 1 power is more than zero.
under the Input
enables monitoring
There are limits associated with this feature:
•
To obtain a reading, the output ON-time must
be a minimum of 0.3 seconds. To calculate
this, multiply the percent output by the cycle
time setting. Example: With 30-percent output
and a 2.0 second cycle time, the on-time would
be: 0.30 x 2.0 = 0.6 seconds. This would yield a
valid reading. If a valid reading is not possible,
the 988 will display the last valid reading.
•
It will not function with burst-fire outputs. This
.
does not necessarily apply to the loop error
detect feature. If enabled, any current detected
with no output triggers an error.
•
It will not function when the 988 has a process
output for output 1. A known cycle time is
required to detect the current. There is no cycle
time associated with process outputs.
The maximum signal the input can accept from
the current transformer secondary is 50mA.
So, you must calculate the output range of the
current transformer before wiring the system.
Requirements
Choose the heater current option for input 2.
Output 1 cannot be used as a process output.
Heater current monitors only output 1.
input 1
input 2
W
PROCESS
L1 L2 L3 L4
DEV
% OUT
SERIES 988
DISPLAY
AUTO
MAN
MODE
output 1
current
transformer
limit
Compression Molding Press
limit
sensor
10A heaters
temperature
sensor
W
A
TL
Sample Application
The Series 988 controls the lower platen of a compression molding press that contains five, 10ampere heaters. A 50A:50mA current transformer is used to monitor heater current.
Set the input 2 prompt
prompt
range high 2 =
The application uses a Watlow current transformer (CT) part# 16-0233, which has a maximum input of 50 amperes, which corresponds to a maximum output of 50mA.
range high 2 =
(maximum output from CT secondary (input))
50mA
to 50. Find the range high 2 value with the following equation:
(maximum CT primary current (load current))
(50Amps)
x 50mA
to current , the range low 2 prompt to 0 and the range high 2
x 50mA
Solving for rH2 gives you 50. This is the range high 2 setting.
3.7Optimizing Your Process System with the WATLOW Series 988
Page 28

General Software Features
Overview
In certain applications the process being
measured can be unstable, which makes it
difficult to control and also makes the constantly changing display difficult to read. The
Series 988 input filter can solve these problems
by smoothing out just the display or the display
and the input signal.
You can set a time constant, in seconds, for a
Input Filter
low-pass filter that will affect the display only,
or you can configure the option to filter the
input signal itself. Use this feature with caution, because a large time constant could hide
system upsets.
Requirements
This feature is standard on all Series 988
controllers.
input 1
input 2
A
TL
W
PROCESS
L1 L2 L3 L4
DEV
% OUT
SERIES 988
W
DISPLAY
AUTO
MAN
MODE
Display readings with input
filter off
%RH →
output 1
limit
Display readings with input
filter on
%RH →
time →time →
Humidity Chamber
limit
sensor
heater
temperature
sensor
humidity
transmitter
Sample Application
A Series 988 controls the humidity in an environmental chamber. The
relative humidity (RH) sensor provides a 4-20mA signal over a 0-100% RH
range. The sensor is very sensitive to changes caused by air flow in the
chamber. The turbulence in the chamber has the 988 display jumping two
to three percent. To remove this display dithering the filter time constant
for input 1 is set to 2 seconds. This will smooth the display and
provide a more realistic reading.
3.8
Optimizing Your Process System with the WATLOW Series 988
Page 29

General Software Features
TL
Input Linearization
Overview:
In many flow applications the output signal
from a flow transmitter represents a squared
value of the actual flow. The square root must
be extracted from the signal to make it useful
to the operator. Many flow transmitters offer
this feature in the transmitter itself, but this
can add significantly to the cost. Using the
square root extraction option in the Series 988
controller can save the operator money. The
feature is enabled simply by setting input 1
linearization
to square root extraction .
input 1
or input 2 linearization
W
A
TL
W
PROCESS
L1 L2 L3 L4
DEV
% OUT
SERIES 988
DISPLAY
AUTO
MAN
MODE
output 1
Flow in gallons
transmitter
per minute
flow
Requirements:
The square root extraction feature is standard
on any Series 988 controller with universal
signal conditioner inputs. The linearization
prompt will appear if a process input is selected via the universal signal conditioner DIP
switches.
16
14
12
10
8
6
4
2
0
J
4 6 8 101214161820
J
J
linearized signal
J
J
J
J
J
J
J
non-linearized signal
J
J
J
4-20mA input signal
Water Treatment Pond
J
J
J
J
Sample Application:
A waste water process engineer needs to control the flow of a solution to be
mixed with waste water for treatment of the water. The transmitter provides a
4-20mA output without square root extraction. The engineer used the Series
988 with a universal signal conditioner input and a 4-20mA process output to
control the flow. The input signal was linearized using the square root extraction feature of the 988.
The above system has a flow range of 0 to 16 gallons per minute. The range
low and range high parameters for input 1 would be set to 0 and 16 respectively. The input 1 linearization prompt
extraction
extraction to linearize the signal it would not be useful for controlling the
. You can see from the above graph that without square root
would then be set to square root
process.
3.9Optimizing Your Process System with the WATLOW Series 988
Page 30

General Software Features
Ramp To Set Point
Overview
Ramp to set point enables the 988 to ramp the
set point at a user defined rate. This allows the
988 to start up a system or change between set
points at a rate that will not stress the product
or system components. The ramp rate is
defined in degrees per minute. Ramp to set
point can be initiated at start up only, or at
start up and also on any set point changes.
When a ramp is initiated, the starting point for
the ramp is the current process value. If the
ramp is initiated on start up, the 988 looks at
the process value upon power up, and uses
that value as the starting point for the ramp. If
a set point change initiates the ramp to set
point function, the 988 looks at the process
value when the change is made and uses that
value as the starting point for the ramp. If the
set point is changed during a ramp, the process
value at the time of the change becomes the
starting point for the new ramp.
Requirements
This feature is standard on all units.
From start up to set point without ramping
1200
1000
800
600
°C
400
200
0
0246810121416
hours after startup
W
A
TL
input 1
W
PROCESS
L1 L2 L3 L4
DEV
% OUT
SERIES 988
DISPLAY
AUTO
MAN
MODE
output 1
limit
From start up to set point with 1°/min. ramping
1200
1000
800
600
°C
400
200
0
0246810121416
hours after startup
limit
sensor
Sample Application
An engineer needs to control the temperature of a muffle furnace. The furnace set
point must be ramped up at a defined rate to prevent stressing the muffle and
other system components. By enabling the ramp to set point function in the 988,
the engineer can control the rate at which the set point will rise. Ramp to set point
is enabled in the Global menu using the ramping function prompt
on start up only, select start
changes, select set point
. To ramp on start up and on any set point
. The ramp rate is in degrees per minute.
. To ramp
heaters
temperature
sensor
heaters
For further protection of the system, output 2, 3 or 4 can be configured as a rate
alarm, monitoring the rate of increase or decrease in the process variable on input
1. The alarm low
and alarm high prompts (The "2" in these examples
refer to output 2.) establish the ramp-down and ramp-up rate set points, respectively, in degrees per minute.
3.10
Optimizing Your Process System with the WATLOW Series 988
Page 31

General Software Features
TL
TL
TL
TL
TL
TL
TL
TL
Remote Set Point
Overview
The remote set point feature allows the 988 to
use a thermocouple, RTD or process signal at
input 2, to establish the set point. This feature
gives the 988 the ability to have its set point
value manipulated by an external source. A
common application would use one ramping
controller with a set-point retransmit output to
ramp multiple 988’s using the remote set point.
Or you could use an analog output from a PLC
to send set point values to a 988.
Requirements
Input 2 must be either a thermocouple or
universal signal conditioner, options 1 or 2.
If the application uses a master controller,
choose one of the retransmit options — M (020, 4-20mA) or N (0-5, 1-5 or 0-10VDC) — for
output 3 of the master.
Match input and output impedances.
zone 1
Master
W
A
TL
W
PROCESS
L1 L2 L3 L4
DEV
DISPLAY
% OUT
AUTO
MAN
MODE
SERIES 988
output 3
zone 2 zone 3 zone 4 zone 5 zone 6 zone 7 zone 8
Remote
W
A
TL
W
PROCESS
L1 L2 L3 L4
DEV
DISPLAY
% OUT
AUTO
MAN
MODE
SERIES 988
Remote
W
A
TL
W
PROCESS
L1 L2 L3 L4
DEV
DISPLAY
% OUT
AUTO
MAN
MODE
SERIES 988
Remote
W
A
TL
W
PROCESS
L1 L2 L3 L4
DEV
DISPLAY
% OUT
AUTO
MAN
MODE
SERIES 988
Remote
W
A
TL
W
PROCESS
L1 L2 L3 L4
DEV
DISPLAY
% OUT
AUTO
MAN
MODE
SERIES 988
Remote
W
A
TL
W
PROCESS
L1 L2 L3 L4
DEV
DISPLAY
% OUT
AUTO
MAN
MODE
SERIES 988
input 2 input 2 input 2 input 2 input 2 input 2
Sample Application
An engineer has a machine with eight independent zones of heat. He wants to
to change set points on all zones without having to adjust each control individually. This can be achieved using a 988 with a 0-5VDC retransmit output
as the master controller. The seven remote 988’s will use the 0-5VDC signal
on input 2 as a remote set point. When the set point is changed on the master
controller, the retransmit output changes the set points of the seven remote
controllers. By enabling the ramp to set point feature in the master 988, all
eight zones are ramped up to set point at a user-defined rate on power up.
The retransmit output from the master 988 is set so that 0VDC represents
0°F and 5VDC represents 800°F. On the remote controllers, set the input 2
DIP switch to the position for the 0-5, 1-5, 0-10VDC process input. In the
Input menu, under the input 2 prompt
prompt
low 2
should be set to ON and decimal 2 set to 0. The range
and the range high 2 parameters will establish the scaling for
, select 0-5. The remote set point
the remote set point input. Range low 2 should be set to 0 and range high 2
should be set to 800. To operate a specific zone ten degrees hotter than the
others, increase the range low 2
to 10 and the range high 2 to 810.
Remote
W
A
TL
W
PROCESS
L1 L2 L3 L4
DEV
DISPLAY
% OUT
AUTO
MAN
MODE
SERIES 988
Remote
A
TL
W
PROCESS
L1 L2 L3 L4
DEV
% OUT
SERIES 988
input 2
W
DISPLAY
AUTO
MAN
MODE
With remote set point
remote prompt
in the System menu, the set point is adjusted using the
enabled and local selected under the local-
increment (up-arrow) and decrement (down-arrow) keys. Selecting remote
under the local-remote prompt , disables the increment and decrement
keys, allowing the set point value to be manipulated via the input 2 signal.
3.11Optimizing Your Process System with the WATLOW Series 988
Page 32

General Software Features
Overview:
The retransmit output can be used to transmit
an analog signal representing the value of
either input process variable or the target set
point variable. The retransmit signal is factory
configured as either a milliamp or a voltage
signal. In choosing the type of retransmit signal
the operator must take into account the input
impedance of the device to be retransmitted to
and the required signal type, either voltage or
milliamps.
Retransmit
chart recorder or to generate a set point for
other controls in a multi-zone application (see
page 3.11).
Requirements:
Output 3 is used for the retransmit option.
Choose output type M (0-20, 4-20mA) or N (05, 1-5 or 0-10VDC), depending on the signal
type. Select the output range in the Output
menu.
Typically applications might use the retransmit
option to record one of the variables with a
W
A
TL
input 1
W
PROCESS
L1 L2 L3 L4
DEV
% OUT
SERIES 988
DISPLAY
AUTO
MAN
MODE
output 1
output 3
limit
Chart
Recorder
Enhanced software is not required for this
feature.
Heat-treat Oven
limit
sensor
heaters
Sample Applications:
The 988 is being used to control the temperature of a heat-treat oven. The
temperature of the process must be recorded on a chart recorder. The
oven temperature range stays between 600 to 900 degrees F. The chart
recorder requires a 4-20mA signal.
temperature
sensor
In the Output menu
set analog output to to tag the input
1 process value as the parameter to be retransmitted. Set retransmit low
limit
retransmit high limit
signal to 900. Set retransmit calibrate offset
to 600 to set the low range for the retransmit signal to 600. Set
to 900 to set the high range for the retransmit
to 0, assuming there is
no calibration offset required.
The retransmit output will be 4mA until the oven temperature is greater
than 600 degrees F, at which point the signal will increase with temperature to 20mA at 900 degrees F and will not exceed 20mA.
3.12
Optimizing Your Process System with the WATLOW Series 988
Page 33
General Software Features
TL
Slidewire Feedback
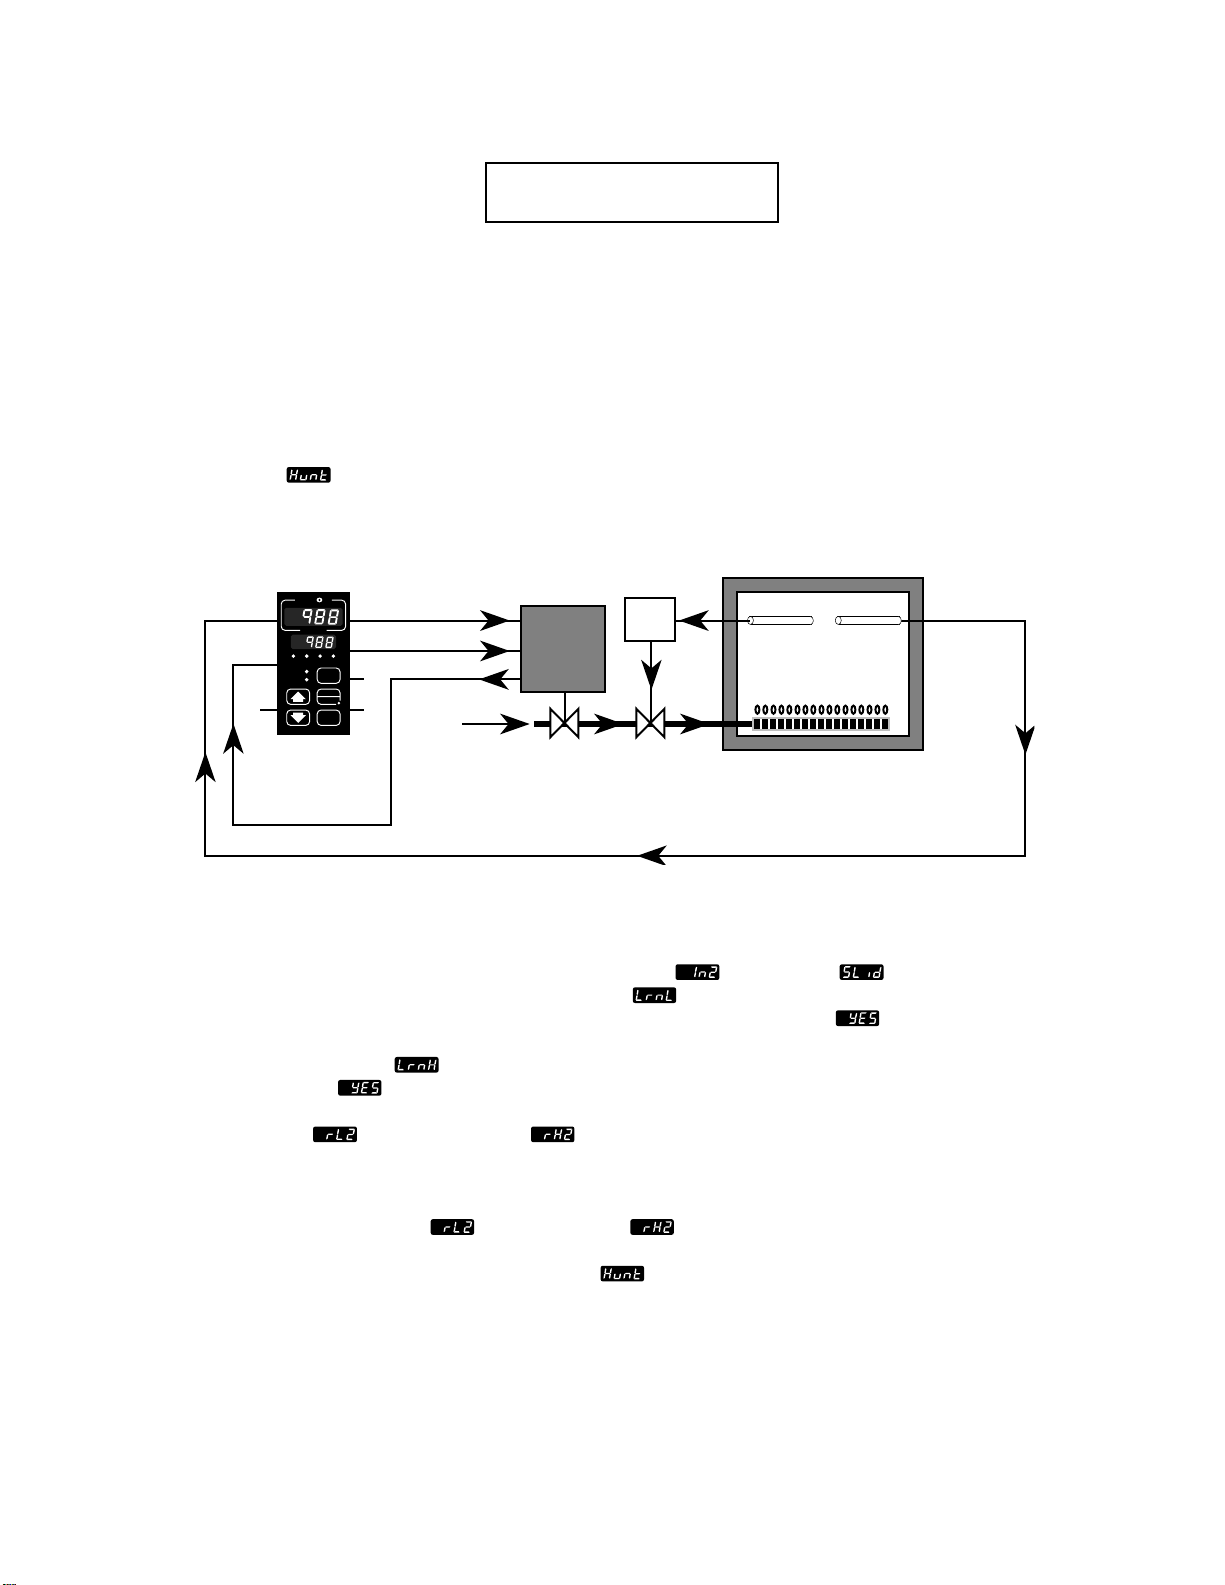
Overview
The 988 can control the position of a valve with
a slidewire feedback position indicator. The 988
senses the resistance of the slidewire and
compares it to the range low and range high
settings to determine the valve position. The
controller compares this to the percent output
and takes action to match the two by opening
or closing the valve.
Set the hunt
hunting. The value is set for the percent of
output (0.0 to 100.0). When the valve is within
input 1 output 1 (close)
input 2
parameter to limit valve
W
A
TL
W
PROCESS
output 2 (open)
L1 L2 L3 L4
DEV
DISPLAY
% OUT
AUTO
SERIES 988
MAN
MODE
gas
flow
Valve Actuator
gas
valve
this dead band, a change in output greater
than half the hunt parameter is required to
trigger action. Output 1 responds to “close”
commands and output 2 responds to “open”
commands.
Requirements
A slidewire configuration uses at least two
inputs and two control outputs. Input 2 must
be a slidewire input. Outputs must be compatible with the slidewire valve actuators.
Gas-fired Furnace
limit
limit
sensor
cut-off
valve
temperature
sensor
slidewire input
Sample Application
The 988 controls the gas valve for a gas-fired furnace to heat treat large metal
parts. First the 988 must be “married” to the slidewire feedback from the
valve actuator. To do this, first set the input 2 prompt
Advance to the learn low resistance value prompt
to slidewire .
. Close the valve
manually to the minimum resistance reading from the slidewire. Select
in the upper display and press the MODE key to advance to the learn high
resistance value prompt
resistance). Select
. Manually open the valve (maximum slidewire
in the upper display and press the MODE key. At this
point both the high and low resistance values have been learned and stored in
the range low 2
and range high 2 prompts.
You can also manually set the range low and range high values. From the
slidewire specifications, determine the low and high resistance values and
enter these at the range low
Once the control is operating, adjust the hunt
valve oscillations. The hunt parameter sets up a dead band on both sides of
the current valve position. The desired valve position is then compared to the
and range high prompts.
parameter, to minimize
actual position. If the difference is greater than the one-half of the hunt value,
the 988 repositions the valve to achieve the temperature set point. Once repositioning is complete, the dead band is recalculated for the new valve position.
3.13Optimizing Your Process System with the WATLOW Series 988
Page 34

Enhanced Software Features
Chapter Four
Enhanced Software Features
Cascade 4.2
Differential 4.4
Dual PID sets 4.5
Duplex 4.6
Ratio 4.7
How to use this chapter:
This chapter describes the software
features that are available in the 988
family of Watlow controllers equipped
with the enhanced software option.
4.1Optimizing Your Process System with the WATLOW Series 988
Page 35
Enhanced Software Features
Cascade
Overview
Cascade control can handle a difficult process
with minimal overshoot, while reaching the set
point quickly. This minimizes damage to
system components and allows for oversizing
heaters for optimal heat-up rates.
Systems with long lag times between the energy
source (heater, steam, etc.) and the measured
process value cannot be controlled accurately
or efficiently with a single control loop, because
a lot of energy can build up before a response
is detected. This can cause the system to
overshoot the set point, which could damage
the heater, product or heat transfer medium,
such as a heat transfer fluid.
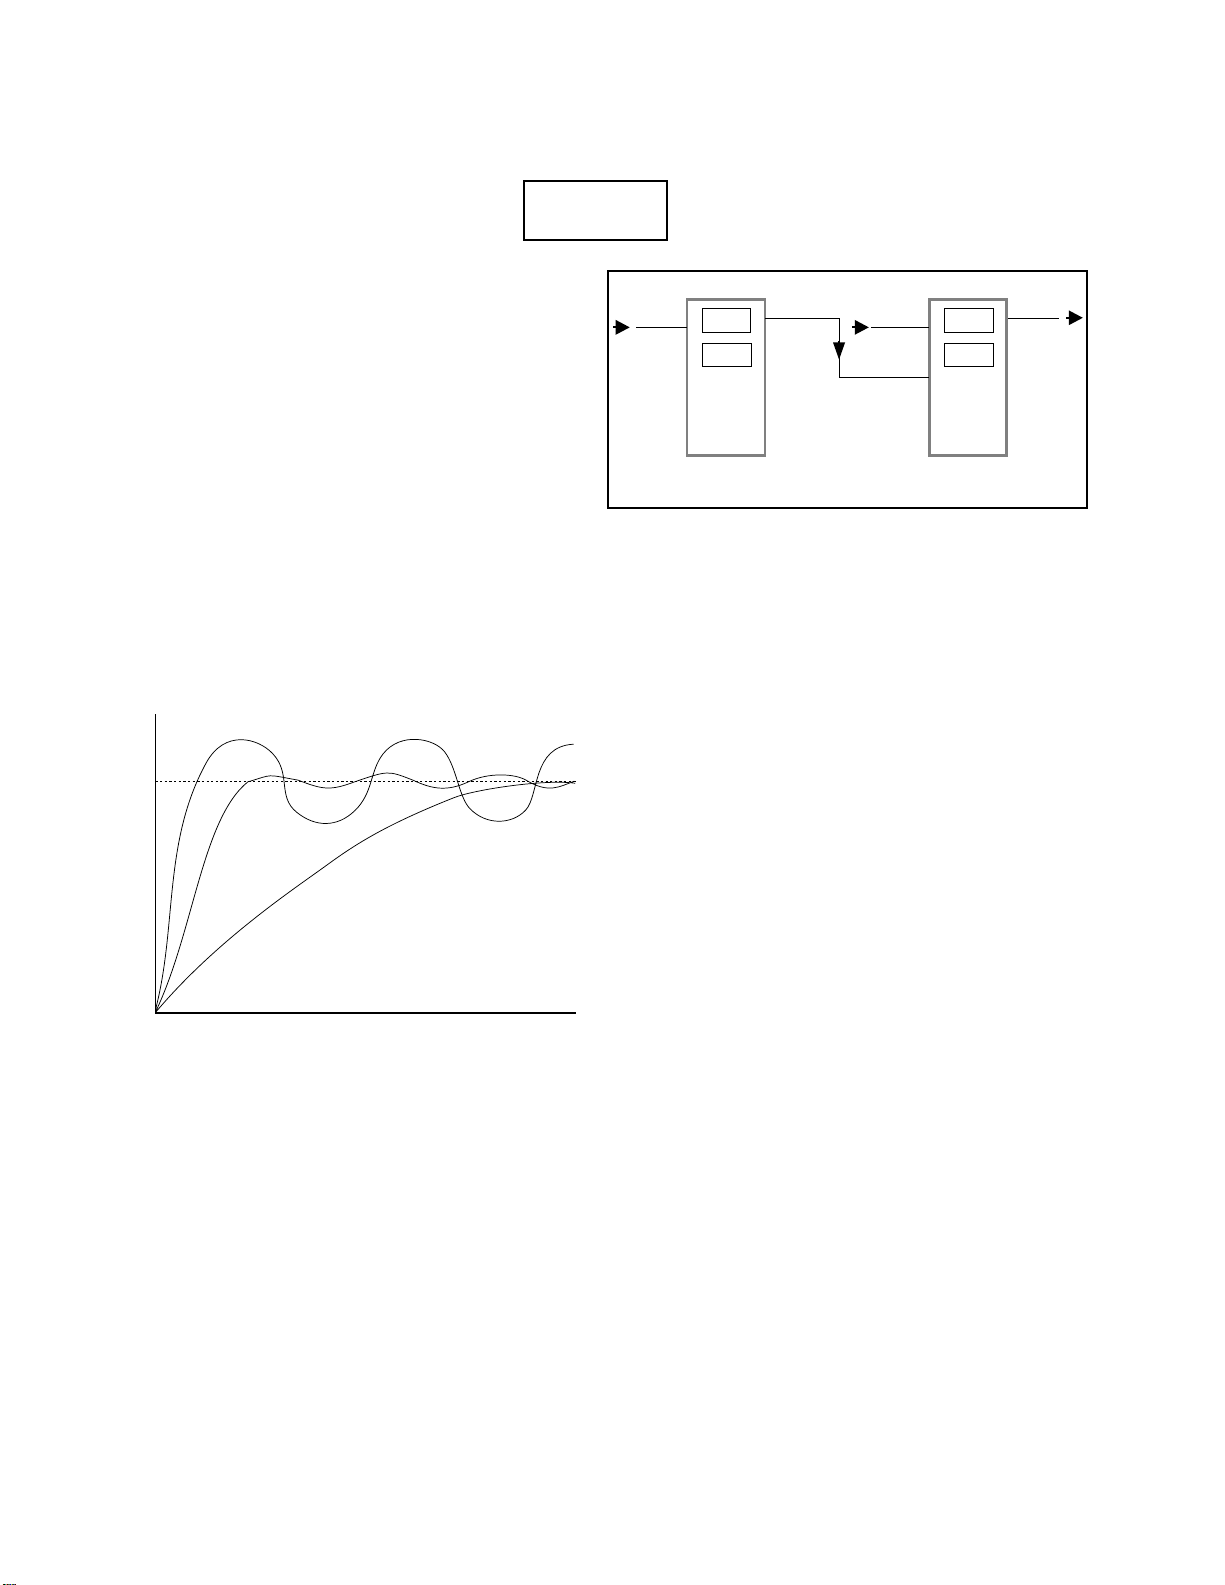
This graph illustrates a system with a long lag
time. Curve A represents a single-control
A
set point
B
C
Two controllers in one
input 1 input 2
The cascade feature allows the Series 988 to internalize the functions of two controllers
In1
SP
Outer-loop
Controller
%
int
Inner-loop
Controller
In2
SP
int
output 1
%
out
generates the internal set point. The Series 988
effectively combines both controllers into a
single package.
The primary controller measures the process in
the outer, or primary, loop with input 1 and
compares the value to the desired set point.
The difference between the set point and the
process temperature generates an internal
percent output value for the second controller.
This value cannot be seen by the operator. This
internal percent (%
) output generates the
int
internal set point for the secondary, or inner
loop. The secondary loop uses this set point
and the value of input 2 (typically attached to
the heater sheath) to control the heater temperature.
time →
system with PID parameters that allow a
maximum heat-up rate. Too much energy is
introduced and the set point is overshot. In
most long-lag-time systems the process value
may never settle out to an acceptable error.
Curve C represents a single-control system
tuned to minimize overshoot. This results in
unacceptable heat-up rates, with the final
value taking hours to reach. Curve B shows a
cascade system that limits the energy introduced into the system, allowing an optimal
heat-up rate with minimal overshoot.
This drawing shows two controllers configured
as a cascade system. The second controller
4.2
Optimizing Your Process System with the WATLOW Series 988
Algorithm
The following formulas show how the primary
control sends a set point (based on input 2
range-high and range-low values) to the secondary control. The secondary control uses this
set point (SP
(%
) to the heater.
out
1.) %
2.) SP
3.) %
) to generate a percent output
int
= PID Set A[In1 - SP]
int
= (rH2 - rL2) * %
int
= PID Set B[In2 - SP
out
+ rL2
int
]
int
The critical parameters are the range settings
for input 2 of the second controller. The rangehigh value (rH2) is the maximum allowed set
point for the secondary loop. The range-low
value (rL2) is the minimum allowed set point.
Page 36
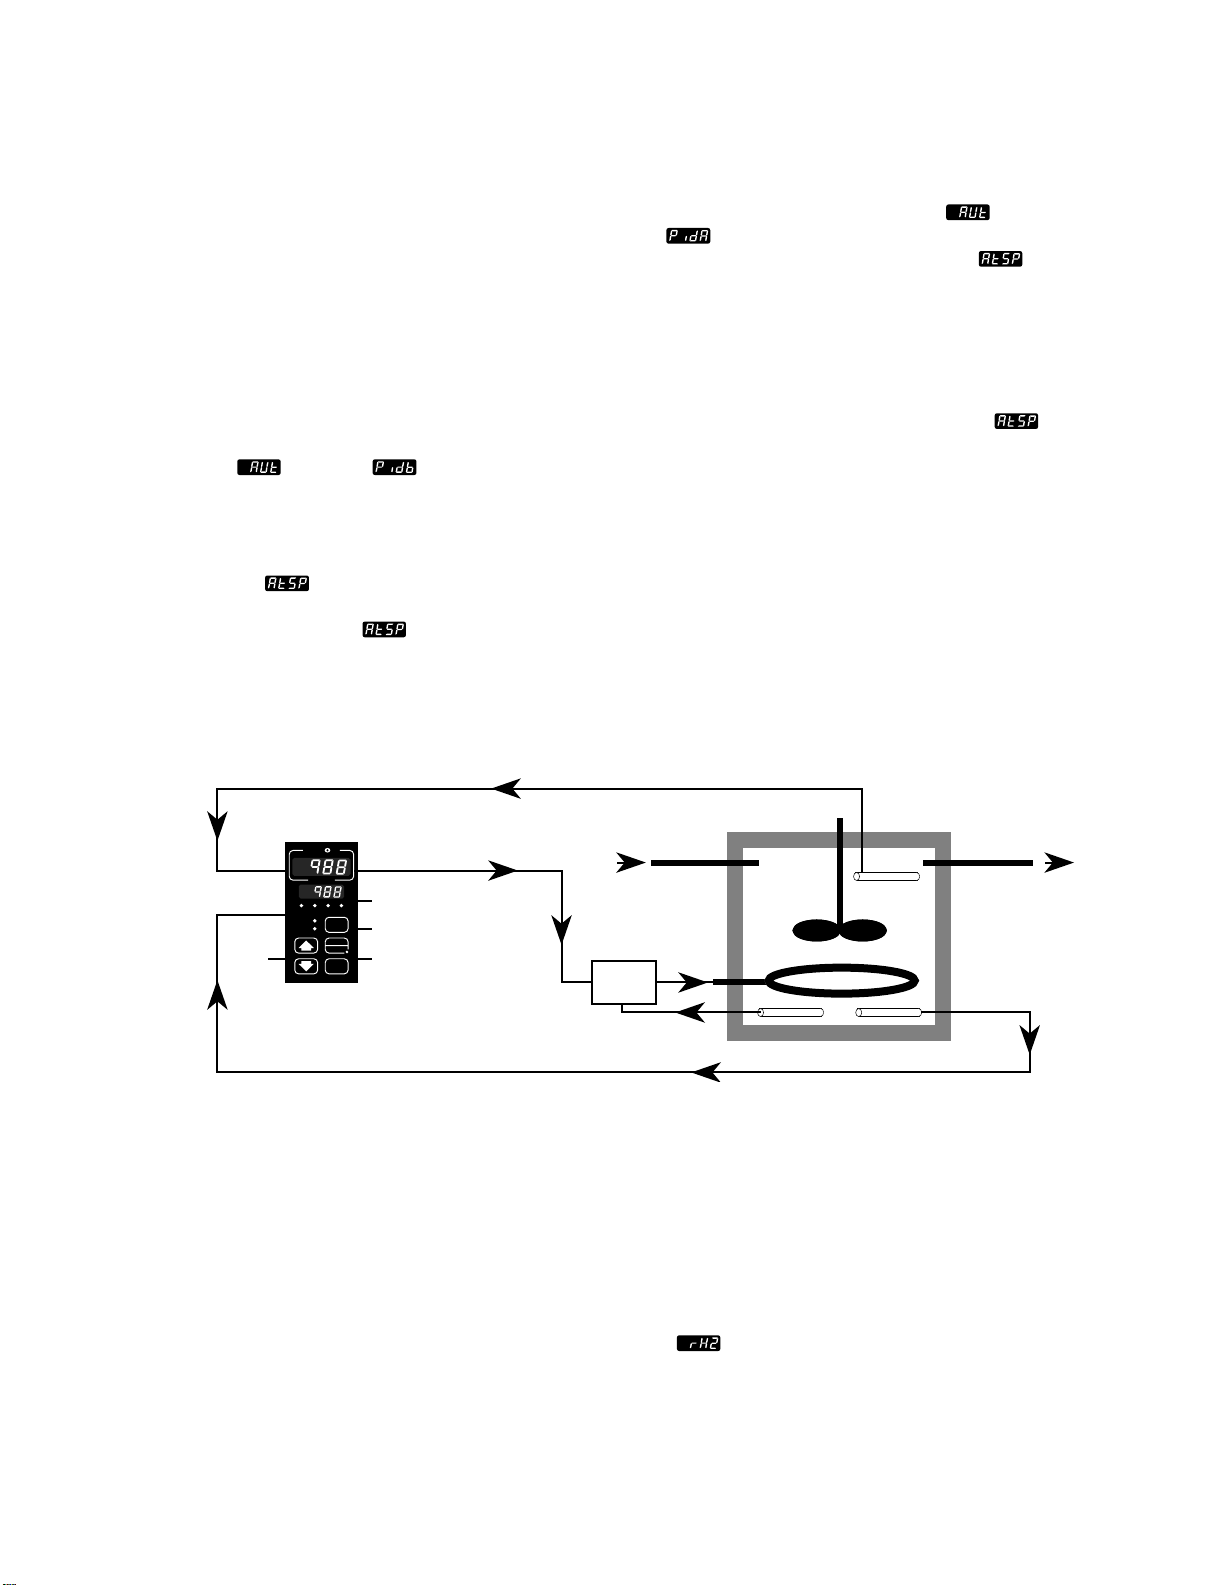
Enhanced Software Features
TL
In a system controlling a heater this would be
the maximum and minimum desired sheath
temperatures of the heater. Typically the rangelow term is set below the ambient temperature.
Otherwise the system could never fully cool
down.
Setup
The PID parameters for the two PID sets, PID A
and PID B, are determined with the auto-tune
function. First the PID B settings (inner loop)
are determined by setting the auto-tune
prompt
to PID B , which allows for
tight control of the energy source at the set
point determined by the primary loop. During
the tuning process the internal percent (%
value is determined by the auto-tune set point
parameter
. The default is 90%. This
generates a set point for the heater equal to the
range high times the
value. The PID A
settings (outer loop) are then determined by
setting the auto-tune prompt
to PID A
. During the tuning process the set point
is determined by multiplying the
value by
the set point (SP) entered via the front panel.
Once the system is stable the heater will
operate at a value greater than the final process value (input 1). If this value is significantly
different than the set point at which the secondary loop was tuned, adjust the
parameter so that the tuning set point is near the
value at which the heater is controlling.
Requirements
)
int
Cascade control requires enhanced software.
Two analog inputs are required to monitor the
inner and outer loops. At least one control
output is required to control the process.
outer-loop
thermocouple
W
A
TL
input 1
input 2
W
PROCESS
L1 L2 L3 L4
DEV
% OUT
SERIES 988
DISPLAY
AUTO
MAN
MODE
output 1
limit
limit sensor
Sample Application
A Series 988 is used to heat lube oil to 125°F with a screw-plug-style
heater. To protect the oil from breaking down and maximize its life, it is
desirable to limit the maximum heater sheath temperature to 250° F.
The 988 is ordered with two thermocouple inputs. Input 2, the inner loop
in the cascade configuration, measures the heater sheath. Input 1, the
outer loop, measures the lube oil temperature before it leaves the tank.
The external set point is 125°. By setting range high 2
set point for the heater sheath will be limited, thus extending the lube oil
to 250° the
life.
heater
Lube Oil Tank
oil outoil in
inner-loop
thermocouple
4.3Optimizing Your Process System with the WATLOW Series 988
Page 37
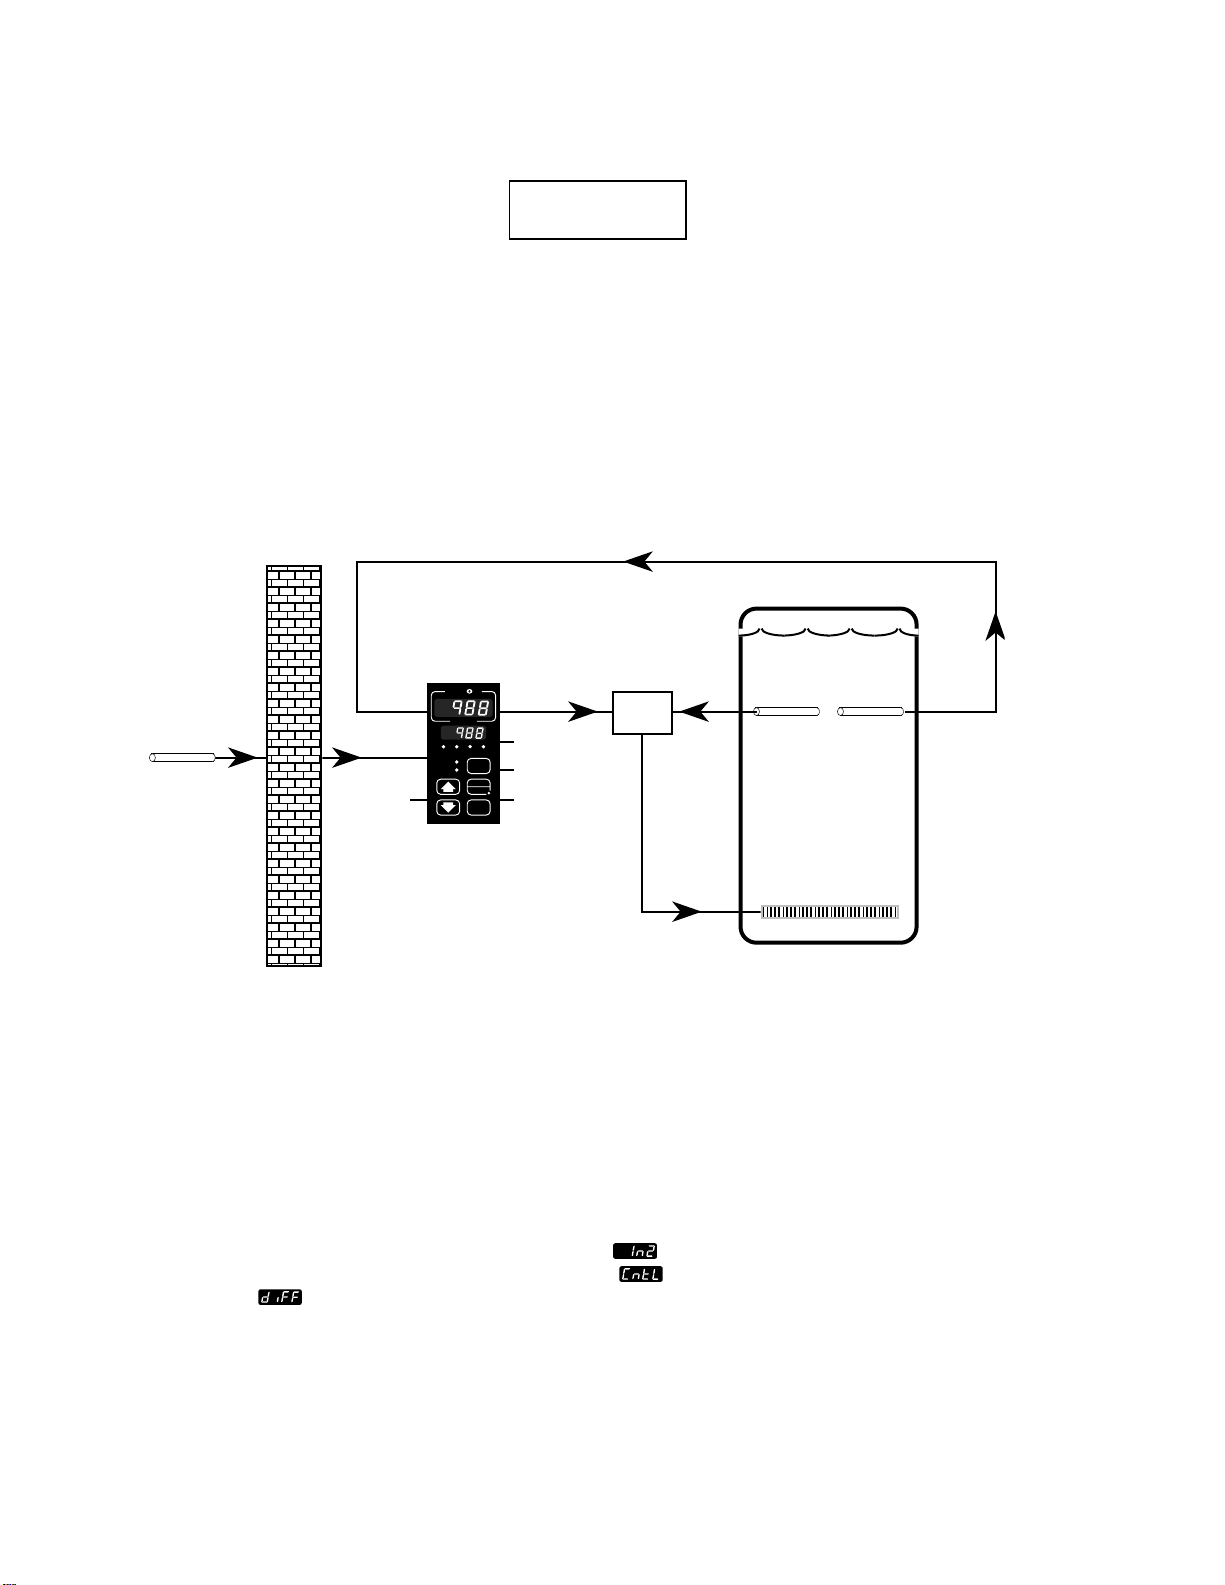
Enhanced Software Features
TL
Overview
Differential control allows the Series 988 to
control one process at a difference to another
process. Input 2 acts as a remote set point
input. However the displayed set point indicates the desired difference between input 1
and input 2. The set point to which input 1 will
control to is determined by the equation:
Differential
point, which can be adjusted with the increment (up-arrow) and decrement (down-arrow)
keys.
Please note that while in the differential control
mode the set point for input 1 cannot be viewed
and must be calculated with the equation.
internal set point = input 2 + differential set point
Requirements
Two inputs and the enhanced software option
The lower display shows the differential set
W
A
TL
outside
temperature
sensor
input 1
input 2
W
PROCESS
L1 L2 L3 L4
DEV
% OUT
SERIES 988
DISPLAY
AUTO
MAN
MODE
output 1
are required.
Water Boiler
limit
limit
sensor
heating element
Sample Application
The most common application using differential control is to maintain water
temperature in a boiler at a differential to the outside air temperature. A
thermocouple at input 2 senses the outside air temperature and adjusts the
internal set point to maintain the boiler water temperature 120 degree higher.
Substituting values we have: boiler temperature = outside temperature + 120
temperature
sensor
°
.
In this application the system uses two, type J thermocouples: one to sense
boiler water temperature (input 1) and one to sense the outside air temperature (input 2).
To configure the controller, first enable input 2 (set
differential control algorithm set the control prompt
to differential
indicating no differential between input 1 and input 2. Adjust the set point to
. Press the DISPLAY key. The lower display will read 0,
to J). To enable the
in the Global menu
120. The internal set point for input 1 is now equal to the input 2 value plus
120, which will maintain the boiler water temperature 120 degrees higher
than the outside air temperature.
4.4
Optimizing Your Process System with the WATLOW Series 988
Page 38
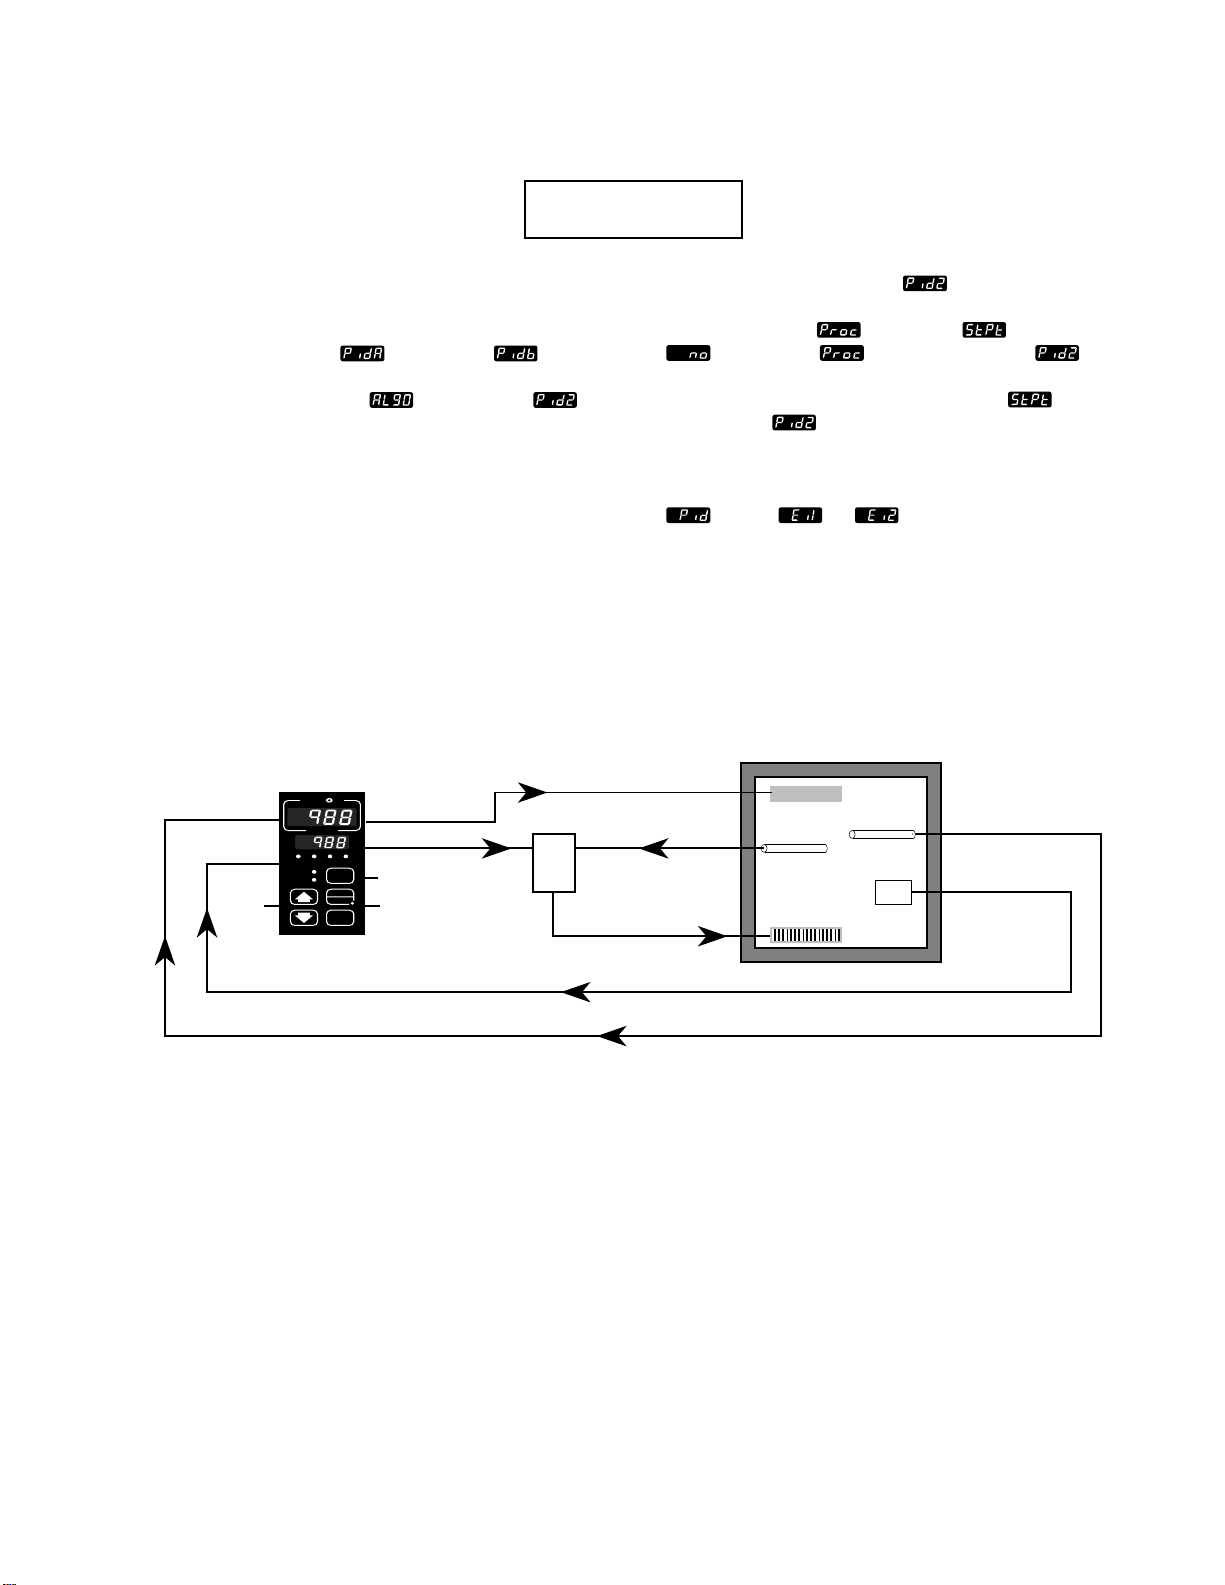
Enhanced Software Features
TLTL
W
W
A
PROCESS
L1 L2 L3 L4
DEV
% OUT
DISPLAY
MODE
AUTO
MAN
SERIES 988
Dual PID sets
Overview:
Standard software units have a single set of
PID parameters. Units with enhanced software
can use two independent sets of heat/cool PID
parameters, PID A
enable dual PID, enter the Global menu and set
the algorithm prompt
This second set of PID parameters enables the
controller to switch between two sets of PIDs,
to compensate for changes in the system
characteristics. This need can arise from a
variety of circumstances, such as significant
set point changes (controlling at 250, then
controlling at 750), operating a furnace with
half a load versus a full load of steel, changing
the speed of a conveyor through a curing oven
or using different materials in an extruder.
The 988 family can be configured to switch
between PID A and PID B based on a process
value, a set point value or the event input
input 1
input 2
and PID B . To
to dual PID .
output 1
output 2
limit
status. Use the dual PID
prompt in the
Global menu, to select what will cause the
switch: process
; set point ; or none
. If process is selected at the
prompt, the PID’s will switch based on the
crossover process value. If set point
selected at
, the PIDs will switch at the
is
crossover set point value, PID A used below the
crossover point and PID B above. PID crossover
can also be selected via event input by selecting
at the or prompt. PID A is used
when the event input switch is open, PID B
when closed. (Note : One event input is standard on all units, a second event input is an
option)
Requirements:
The 988 family controller needs the enhanced
software option to use dual PID sets.
Test Chamber
chiller
limit
sensor
heater
temperature
sensor
pressure
switch
Sample Application:
A test engineer needs to control the temperature in a test chamber that can
be operated at normal atmosphere or under vacuum conditions. If he tunes
the controller for normal atmospheric conditions, when he reaches the portion
of his test that requires a vacuum, he must stop the test and enter new PID
parameters to maintain stable temperatures. The system characteristics are
so very different, that one set of PID’s will not give satisfactory results under
both normal and vacuum conditions.
The 988 solves this problem with the dual PID option. Auto-tuning PID A under normal atmospheric conditions, then auto-tuning PID B under vacuum
conditions, establishes PID values for two sets of system characteristics. A
pressure switch connected to the event input tells the controller when to
switch between PID A and PID B, eliminating the need to change PID values
manually.
4.5Optimizing Your Process System with the WATLOW Series 988
Page 39

Enhanced Software Features
Overview
Certain systems require that a single process
output control both heating and cooling outputs. A Series 988 controller configured with
enhanced software and a process output can
function as two separate outputs. With a 4 to
20mA output the heating output will operate
from 12 to 20mA (0 to +100 percent) and the
cooling output will operate from 12 to 4mA (0
to -100 percent). In some cases this type of
output is required by the device that the 988
Duplex
controls, such as a three-way valve that opens
one way with a 12 to 20mA signal and opens
the other way with a 4 to 12mA signal. This
feature reduces the overall system cost by
using a single output to act as two outputs.
Requirements
The duplex control feature requires the enhanced software and a process output. Duplex
applications require a special valve.
Fluid Sample Container
W
A
TL
input 1 output 1
W
PROCESS
L1 L2 L3 L4
DEV
% OUT
SERIES 988
DISPLAY
AUTO
MAN
MODE
hot water
cold water
Sample Application
The system outlined below uses a three-way valve for heating and cooling a
fluid sample. Coils surround the container holding the fluid. When the temperature needs to be raised, the signal to the valve will be between 12 and
20mA, sending hot water through the coils. When cooling is required, the
signal will be between 12 and 4mA, sending cold water through the coils.
temperature transmitter
4.6
Optimizing Your Process System with the WATLOW Series 988
Page 40
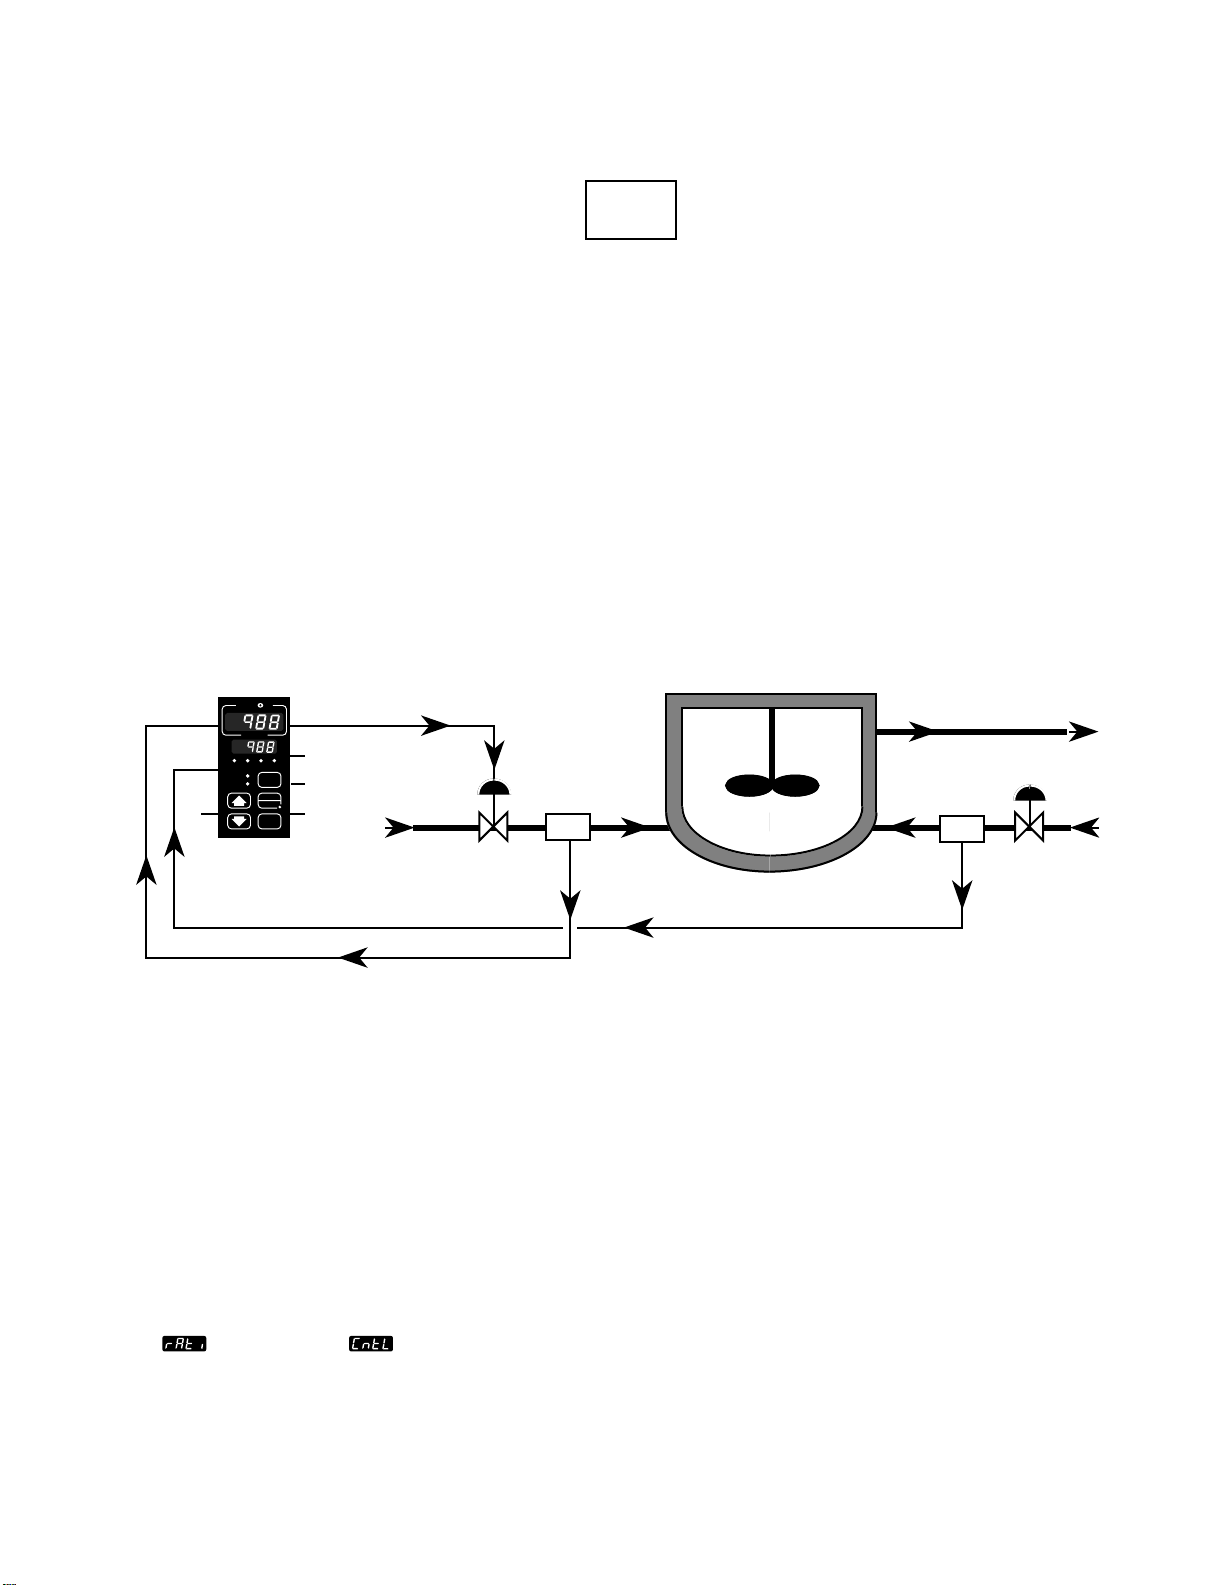
Enhanced Software Features
TL
Overview
This feature allows the 988 to control one
process as a ratio of another process. This is
especially useful in applications that mix two
materials, whether steam, paint or food ingredients.
Input 2 of the 988 measures the part of the
process that is either uncontrolled or controlled
by another device. The part of the process
controlled by the 988 will be maintained at a
W
A
TL
input 1
input 2
W
PROCESS
L1 L2 L3 L4
DEV
% OUT
SERIES 988
DISPLAY
AUTO
MAN
MODE
output 1
controlled
flow of pigment
flow
transmitter
motorized
valve
Ratio
level equal to the quantity measured at input 2
multiplied by the ratio term set by the user.
Input 1 monitors the controlled part of the
process.
Requirements
Ratio control requires enhanced software. Two
analog inputs are required to monitor the
process, and at least one output adjusts the
controlled part of the process.
Mixing Tank
mixed paint
flow
transmitter
uncontrolled
flow of
unmixed paint
Sample Application
Blue pigment must be added to paint at a ratio of one part per 100 to
create a mixed paint of the desired color. The uncolored paint flows into
the mixer in an uncontrolled stream that is set manually and sensed by
input 2. A motorized valve controls the flow of pigment, which is monitored by the flow sensor to input 1. The flow rate of the uncolored paint
determines the set point for the motorized valve that controls the pigment
flow. If an operator needs to change the rate of flow for the uncolored
paint, the set point will shift accordingly to maintain the correct ratio in
the mixing tank.
The application engineer set up this feature in software by choosing ratio
as the control parameter in the Global menu. The set point
value displayed was then a ratio value. He entered 0.01 to maintain an
input 1:input 2 ratio of 1:100.
4.7Optimizing Your Process System with the WATLOW Series 988
Page 41

Standard Features
Chapter Five
Standard Features
Alarms 5.2
Auto/Manual 5.4
Diagnostics 5.5
Input errors 5.6
Lockout 5.7
Transmitter power supply 5.8
How to use this chapter:
This chapter describes features that,
with the exception of transmitter power
supply, are included in every controller
in Watlow's Series 988 family.
5.1Optimizing Your Process System with the WATLOW Series 988
Page 42

Standard Features
Overview
Outputs 2, 3 and 4 can be configured as
alarms. To configure an alarm the operator
makes several decisions. First we’ll show the
difference between a form A, B and C relay.
COM
(common)
Alarms
alarm is a deviation, process or rate alarm.
Selecting process 1
or deviation 1
references the input 1 value against the alarm 2
low
Selecting process 2
and alarm 2 high settings.
or deviation 2
references the input 2 value against the alarm 2
low
and alarm 2 high settings. Input
2 hardware must be connected and enabled.
NC
COM
NO
Form A Relay
Form B Relay
NO
(normally open)
NC
(normally closed)
COM
Form C Relay
The relays are shown in the “shelf state,” with
no power applied. Note that the form C option
allows the operator to configure it as either a
form A or a form B output. For the purposes of
this discussion we will use the form C version,
available in outputs 2 and 4 (Output 3 is
selected, via a hardware jumper, as either a
form A output or a form B output).
You need to make five decisions to configure an
alarm output. In the following explanations
only output 2 will be configured:
1-Output Type
First, choose the type of alarm: either normally
energized
or normally de-energized .
This means that when there is no alarm condition, the alarm output is energized if normally
energized
normally de-energized
is selected and de-energized if
is selected.
Selecting rate
references the rate of
change of the input 1 value in degrees per
minute.
defines a negative rate and
defines a positive rate of change limit.
A process alarm sets an absolute process value
independent of the set point. When the process
exceeds that value an alarm occurs. The process value is independent of the set point.
A deviation alarm alerts the operator when the
process strays too far from the set point. The
operator can enter both high and low alarm
settings referenced to the set point. A change in
set point causes a corresponding shift in the
deviation alarm. Low alarms are set at a negative deviation, and high alarms are set at a
positive deviation.
3-Hysteresis
This selects the switching hysteresis for the
alarm. Once an alarm has occurred it will not
clear until the process value is above the alarmlow setting or below the alarm-high settings by
a margin equal to the hysteresis.
Example: An alarm starts when the process
value reaches the alarm high setting. The alarm
will not clear until it is below the high setting by
an amount equal to or greater than the alarm
hysteresis.
Example: With normally energized
selected for output 2 the output will be energized
in the non-alarm state. Therefore the normally
closed (NC) contact will be open.
2-Alarm Type
This prompt allows you to select which input
variable will trigger the alarm and whether the
5.2
Optimizing Your Process System with the WATLOW Series 988
4-Latching
Alarms can be latching or non-latching. When
the alarm condition is removed, a non-latching
alarm automatically clears the alarm output
and alarm message, if one is present. You must
manually clear a latched alarm by pressing the
AUTO/MAN key once.
Page 43

Standard Features
TL
TL
5-Silencing
Alarm silencing overrides the alarm at power
up, and it allows the operator to silence an
alarm with the system still in an alarm condition. The silencing is active until the process
has entered the safe region located between the
W
A
TL
input 1 output 1
W
PROCESS
L1 L2 L3 L4
DEV
% OUT
SERIES 988
DISPLAY
AUTO
MAN
MODE
output 2
Alarm
form C relay
low and high alarm settings. Any future deviation outside the safe region triggers an alarm. If
the alarm occurs at this point, the output can
be silenced by pressing the AUTO/MAN key
once, but the alarm message is still displayed.
Oven
limit
limit
sensor
heaters
temperature
sensor
The temperature is within the normal range.
Output 2 is inactive.
W
A
TL
input 1
W
PROCESS
L1 L2 L3 L4
DEV
% OUT
SERIES 988
DISPLAY
AUTO
MAN
MODE
output 1
output 2
limit
Alarm
form C relay
An over-temperature condition activates output 2,
which turns the alarm on.
Sample Application
An operator is using a deviation alarm to keep a process within +/- 5°F of
the set point. Output 2 is set up as a deviation alarm that activates a
buzzer. However, when the process powers up in the morning, the process
temperature is below the low deviation alarm set point, causing the buzzer
to sound until the process reaches the low alarm set point. Selecting ON
at the silencing prompt in the Output menu, disables the alarm
output controlling the buzzer until the process gets within the deviation
alarm set points. It also allows the operator to silence the buzzer by
pressing the AUTO/MAN key once, if an alarm does occur.
limit
sensor
heaters
Oven
temperature
sensor
5.3Optimizing Your Process System with the WATLOW Series 988
Page 44

Standard Features
TL
Auto/Manual
Overview:
When it operates automatically the controller
uses an input signal (from a thermocouple,
RTD, transmitter, etc.) to determine how best
to adjust the output power level to match a set
point. This constant monitoring of process
variables and the corresponding adjustments
in the output power level is referred to as
closed-loop control. This is the normal mode of
operation for most applications.
Manual operation does not use feedback from
the input signal to determine a power level. The
power level must be adjusted manually by the
operator. The controller may or may not be
monitoring the process variable. This open-loop
control is used for applications in which
closed-loop control is not desired, for instance
as a diagnostic tool or when the controller
detects a sensor break (see Input Errors, page
5.6).
Manual operation provides open-loop control of
the outputs from a range of -100 percent to
+100 percent power (-100 percent for full cool,
+100 percent for full heat). The Series 988
controller allows a negative output value only if
one of the control outputs is configured for
cool.
If the LED in the corner of the AUTO/MAN key
is off, the controller is in the automatic mode
and the bottom display is a set point value in
degrees or units. If the LED is on, the controller
is in the manual mode, and the bottom display
indicates the percent power output.
To toggle between auto and manual operation,
press the AUTO/MAN key twice. When you
press the AUTO/MAN key once, the LED in the
lower right hand corner of the AUTO/MAN key,
begins to flash. To complete the change, press
the AUTO/MAN key again while the LED is
flashing. The transition from automatic to
manual is a “bumpless transfer,” the control
will switch to manual mode maintaining the
last power level it used in automatic mode.
Requirements:
Automatic/manual operation is a standard
feature on all units.
W
TL
W
A
PROCESS
L1 L2 L3 L4
DEV
% OUT
SERIES 988
DISPLAY
AUTO
MAN
MODE
AUTO/MAN Key
Auto/Manual LED
Sample Application:
An engineer has a process that needs to be brought on-line at a low power
level, until a predetermined process value is achieved. At this point, the
controller can be allowed to take control of the output power level. Utilizing
the automatic/manual function, the engineer manipulates the power level in
manual mode until it is safe to allow the controller to take control. At that
point, he switches the 988 to the automatic mode, letting the controller
maintain the output power level.
5.4
Optimizing Your Process System with the WATLOW Series 988
Page 45

Standard Features
Diagnostics
Overview:
The Series 988 Diagnostics menu allows you to
read the software revision, ship date, hardware
configuration and ambient temperature without
removing power from the control.
To access the Diagnostics menu press the
increment (up-arrow) and decrement (downarrow) keys simultaneously for six seconds.
The factory prompt
display and panel lockout prompt
upper display. Press the increment key until
diagnosis
Then press the MODE key.
The list below explains the menu prompts:
Date provides the date of the final control
test. The first two numbers indicate the week
(01 through 52) and the last two show the year.
Soft signifies the control software revision.
The serial number follows “Sn” in the upper
display. The six-digit number begins with
the last two digits in the upper display and
wraps around to the lower display.
Ambient temperature indicates the temperature at the input 1 terminals, in degrees F.
Ambient counts is for factory use only.
Ground counts is for factory use only.
Input 1 counts is for factory use only.
Input 2 counts is for factory use only.
Depending on the modules installed and the
DIP switch settings, some of the following input
and output type displays will appear:
Types for Inputs 1
no module
thermocouple only
current detect
slidewire
universal OFF
universal RTD
universal tc high gain
universal tc low gain
universal millivolts
universal process
event input 2
Types for Outputs 1
no module
0.5A SSR
appears in the upper display.
appears in the lower
in the
and 2
through 4
0.5A SSR w/ suppression
2.0A SSR
switched DC
form C relay
form C relay w/ suppression
form A/B Relay
process
voltage retransmit
current retransmit
power supply
RS-232 communications
EIA-485/422 communications
Display tests each display and LED. If any
display or LED is absent contact the factory.
The test output prompt can be used to
activate the available outputs on the unit, with
the exception of process outputs, transmitter
power supply or communications output. To
select an output, use the increment or decrement key to advance from OFF
desired output (output 1 active
output 4 active
corresponding load LED will light and the
output will be energized. This output will
remain energized until you select another
output or off, or exit the Diagnostic menu.
The open loop prompt enables the openloop error function. The error message open
loop
full on and no temperature change has occurred over a period of time, based on system
characteristics. This prompt only functions in
the proportional control mode.
Requirements:
The Diagnostics menu is a standard feature on
all Series 988 controllers. When asking the
factory for technical assistance, have the
information from the above prompts on hand.
All prompts in this menu are read only.
Sample Application:
An engineer needed to figure out why an oven
was malfunctioning. She used test output
to force ON output 1 , which controlled the
heaters. A quick check with a meter revealed a
burned out heater element.
flashes in the lower display when ON
is selected and a heat or cool output is
). After three seconds the
to the
through
5.5Optimizing Your Process System with the WATLOW Series 988
Page 46

Standard Features
Overview
When the 988 receives input information it
cannot interpret or finds a problem with one of
its internal functions, it generates an error
code to help identify the problem. The controller switches to manual mode and operates at a
fixed power output level, depending upon the
type of error code and the selections made in
the Global menu.
If an input related error occurs, four dashes
appear in the upper display and the
bottom display indicates the output power
level. Press the AUTO/MAN key once to display
the error code in the upper display for five
seconds.
The failure mode prompt
the 988 output power level will be when an
input error occurs. The bumpless transfer
selection allows the 988 to switch from automatic to manual mode at the percent power
level the controller was at when the input error
occurred. However, certain conditions must be
met: the process must have stabilized at a
power level between -70 percent and +70
percent, with no more than plus or minus five
percent variation for two minutes prior to the
sensor break. If these conditions have been
met, the 988 switches to manual mode at that
determines what
Input Errors
last stable power level. If not, the 988 transfers
to manual mode with no power output.
Preselect a power level at the failure mode
prompt
decrement (down-arrow) keys. If the unit is
configured for heat only, the fail power level is
adjustable from 0 (off) to 100 percent (full
heat). If it controls heat and cool outputs, the
power level is adjustable from -100 (full cool) to
+100 percent (full heat).
If the error code is related to internal functions
of the 988 (
* remains in auto mode with both control
outputs off;
* switches all alarm outputs to the shelf state
(power OFF);
* lower display is blank and the upper display
indicates the error code;
* keys are all inactive.
The above conditions will occur regardless of
which menu is active at the time or what
failure mode value was selected. If
all Setup menu parameters will return to
factory default values. To clear any one of these
errors, turn the 988 OFF for a few seconds
then turn it back ON. If the error remains,
contact the factory.
with the increment (up-arrow) and
or ), the controller:
occurs,
Series 988 error codes
input 1 input 2 A/D underflow error
input 1 input 2 sensor under-range error
input 1 input 2 sensor over-range error
input 1 input 2 A/D overflow error
non-volatile checksum error
configuration error
Sample Application
An engineer has many applications throughout his plant requiring controllers. He wants to know what the controller will do if the sensor fails. In
some of his processes, for instance a gas valve, the outputs must go full
OFF (0 percent), others, such as a valve controlling water to a cooling
jacket, should go to full open (-100 percent), while others need the
outputs to go to an intermediate power level. With the 988 the user can
determine what the output will do if a sensor fails.
5.6
Optimizing Your Process System with the WATLOW Series 988
Page 47

Standard Features
Overview:
An array of hardware and software lockout
features gives you tremendous flexibility in
configuring various levels of user access. The
Factory
locked out by setting a DIP switch behind the
panel. Four levels of lockout can be set from
the front panel. A simple switch or a keylock
switch can be connected to a digital event input
to lock or unlock access to the front panel.
The 988 leaves the factory with DIP switch 2 in
the off position, allowing access to the Setup
and Factory menus.
and Setup menus can be
Lockout
levels can be selected. Full lockout does
not allow the selected menu to be viewed or
altered. Read only
viewed but not altered. No lockout
the selected menu to be viewed and changed.
The lock prompt
select several levels of front-panel lockout:
increment+decrement combination
allows a menu to be
allows
allows the operator to
= 0 enables all keys
= 1 disables the MODE key
= 2 disables MODE and AUTO/MAN keys
= 3 disables all keys except the
The front panel can be locked out via digital
events at input 2 or 3. This lockout function is
enabled by selecting lock
input prompt (
or ) in the Global
under an event
Requirements:
All 988 Family controllers are equipped with
software and hardware lockout features.
menu.
The software lockout functions appear under
the Factory prompt, in the Panel Lockout
menu. For each menu, one of three lockout
You can lock out the front
panel with the digital event
input.
Sample Application:
During the initial configuration and start-up an engineer will need access to
all the parameters. Once the process is configured, he will give the operator
access to only the process and alarm set points. Security is also an issue, and
he wants only authorized operators to have access to these parameters.
1
↑
O
N
2
You can lockout the Setup
and Factory menus with a
DIP switch behind the front
panel.
Lockout menus let you
configure access to menus
and settings.
The Panel Lockout
menu gives him access to all parameters during the
start-up. Once the process is online, all Panel lockout menus except System
are set to full lockout
. The System menu is set to no lockout , giving
the operator access to the alarm set points. Process security is achieved with
a keylock switch connected to event input 2. Event input 2
menu, is set to lock
. Without a key, nothing is accessible from the front
in the Global
panel. With a key, process and alarm set points are accessible.
5.7Optimizing Your Process System with the WATLOW Series 988
Page 48

Standard Features
TL
TL
TL
Transmitter Power Supply
Overview
In an electrically noisy environment or when
you have to use a long sensor lead, you may
need to use a transmitter to convert the sensor
signal to a 4-20mA signal. Normally you would
have to buy and install a separate power
supply for the transmitter or for other signal
conditioning devices, but you can order a
Series 988 with a 30mA power supply as one of
Control Room
Heater ControllerEvaporator ControllerPump Controller
A
TL
W
PROCESS
L1 L2 L3 L4
DEV
% OUT
SERIES 988
W
DISPLAY
AUTO
MAN
MODE
output 1
output 2
input 1input 1
A
TL
W
PROCESS
L1 L2 L3 L4
DEV
% OUT
SERIES 988
DISPLAY
AUTO
MODE
W
MAN
input 1output 1
output 3
A
TL
W
PROCESS
L1 L2 L3 L4
DEV
% OUT
SERIES 988
its outputs. The factory sets the power supply
voltage to 20VDC, but you can use DIP
switches to change it to 5 or 12VDC as well.
Requirements
A transmitter power supply can be ordered for
output 2, 3 or 4.
W
output 1
DISPLAY
AUTO
MAN
output 4
MODE
heater
RTD transmitter power
RTD transmitter
evaporator
humidity transmitter pwr
humidity transmitter
pump
process flow transmitter power
process flow transmitter
Sample Application
An engineer at a food processing plant needs to control several processes from
a central control room, which is more than 100 feet away from some of the
machines being controlled. Because of the distance and the noisy electrical
environment, thermocouples cannot provide dependable readings.
The engineer has installed several Series 988 controllers with power supplies
matched to a variety of transducers. DIP switch settings configure the output
voltages for 5, 12 or 20VDC.
5.8
Optimizing Your Process System with the WATLOW Series 988
Page 49

Specifications
Chapter Six
Specifications
Input Table 6.2
Output Table 6.3
Dimensions 6.4
Displays and Keys Chart 6.5
Setup Requirements 6.6
User's Manual 6.7
Product Specification 6.8
Warranty 6.9
How to use this chapter:
This chapter contains charts and lists
describing specifications of the Watlow's
988 family of controllers.
Optimizing Your Process System with the WATLOW Series 988 6.1
Page 50

Specifications
Input Table
988 FAMILY INPUT TYPES Input 1 Input 2 Input 3
0-none
1-basic signal conditioner
type: J, K, T, N, C, D, Pt 2
high temperature
moderate sensor accuracy and stability
low and high range
low sensor cost
2-universal signal conditioner
process input
0-5VDC, 1-5VDC, 0-10VDC, 0-50mVDC,
0-100mVDC, 0-20mA, 4-20mA
non-thermal applications
sensor determines accuracy and stability
long leads of transducer output
low and high range
best sensor noise immunity
moderate to high sensor cost
resistance temperature detector (RTD)
100-ohm platinum
type: 1° JIS or DIN, 0.1° JIS or DIN
high sensor accuracy and stability
low range, moderate sensor cost
thermocouple
type: J, K, T, N, R, S, B, C, D, Pt 2
high temperature
moderate sensor accuracy and stability
low and high range
low sensor cost
3-slidewire feedback
0- to 1200-ohm range
determines valve position
sensor determines accuracy and stability
moderate sensor cost
4-heater current transformer
50mA transformer secondary maximum
reads heater current
moderate sensor accuracy and stability
additional ranges may be available
moderate sensor costs
5-digital event
dry switch or DC volts input standard
0-3VDC (open) to 14-36VDC (closed) input 2
0-3VDC (closed) to 14-36VDC (open) input 3
no to low cost
Optimizing Your Process System with the WATLOW Series 9886.2
option available if shaded
Page 51

Specifications
Output Table
988-FAMILY OUTPUT TYPES Output 1 Output 2 Output 3 Output 4
none
A
solid-state relay
good life/low cost
B- 0.5A, w RC suppression
K- 0.5A, w/o RC suppression
open collector
best life/low cost
C- switched DC
electromechanical relay
shortest life/high cost (w maintenance)
D- form C, 5A, w RC suppression
E- form C, 5A, w/o RC suppression
electromechanical relay
shortest life/high cost (w maintenance)
J- form A or B, 5A, w/o RC suppression
universal process types
best life/low cost
F- 0-5VDC, 1-5VDC, 0-10VDC,
0-20mA, 4-20mA
transmitter power supply
T- 5, 12, 20VDC @ 30mA
process retransmit
chart recorder or data-logging device
M- 0-20mA, 4-20mA
N- 0-5VDC, 1-5VDC, 0-10VDC
communications
with a computer
R- RS-232
S- EIA-485, RS-422
option available if shaded
Optimizing Your Process System with the WATLOW Series 988 6.3
Page 52
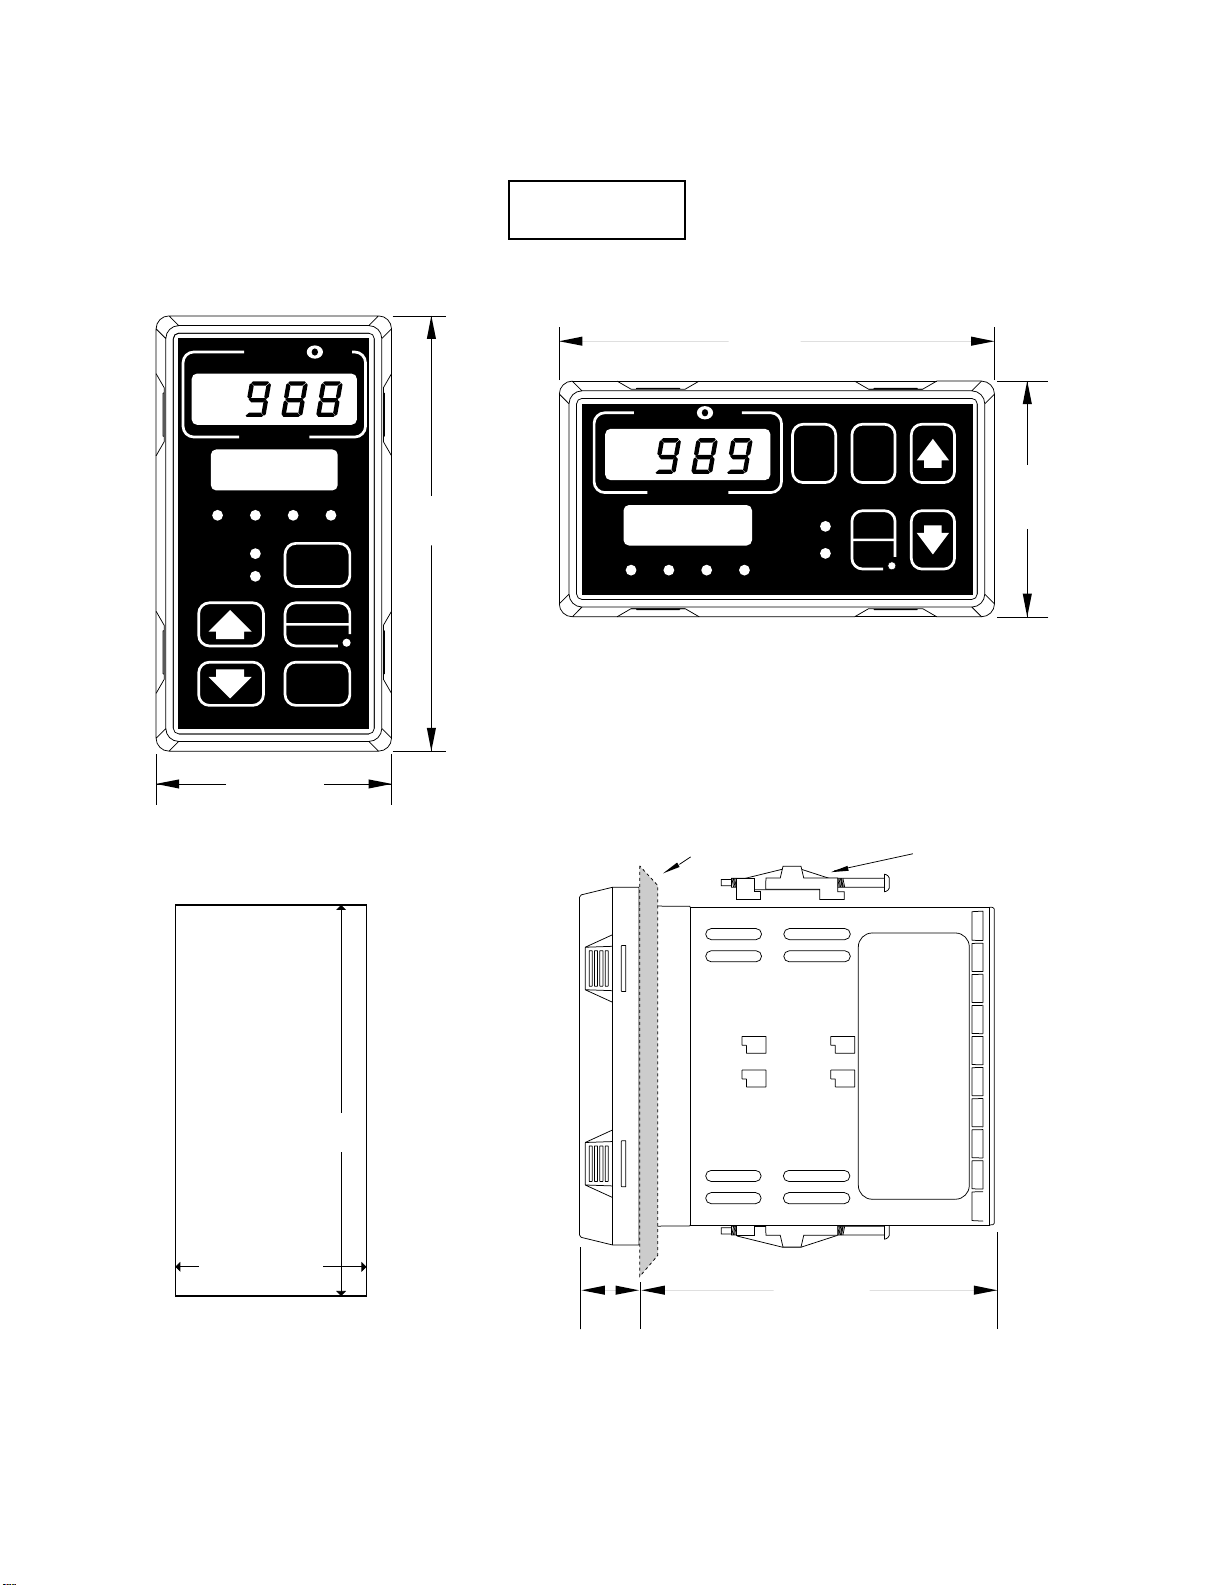
Specifications
TL
Dimensions
A
W
PROCESS
L1 L2 L3 L4
DEV
% OUT
SERIES 988
2.18"
(55 mm)
W
TL
DISPLAY
AUTO
MAN
MODE
4.03"
(102mm)
(102mm)
W
A
TL
W
PROCESS
L1 L2 L3 L4
Panel
4.03"
DSPY
DEV
% OUT
MODE
2.18"
(55 mm)
AUTO
MAN
SERIES 989
Adjustable
Mounting Bracket
Panel Cutout
Maximum Panel
Thickness
0.38" (9.65mm)
3.62" + 0.03 -0.00
(92mm + 0.8)
1.77 + 0.02 -0.00
(45mm + 0.6)
0.68"
(17 mm)
Note: A minimum of 1.66 inches (42.2 mm) spacing between panel cutouts is recommended.
Optimizing Your Process System with the WATLOW Series 9886.4
4.06"
(103 mm)
Page 53

Specifications
Displays and Keys Chart
Upper Display
Reads actual process
value or operating
paramenter value or error
code — red or green.
DEV (Deviation) LED
Indicates that the lower
display now reads a
deviation-from-the-setpoint value.
% OUT (percent output)
LED
Indicates that the lower
display now reads the
percent-output value.
Increment (up-arrow) Key
Increases the value or
changes the selection in
the upper display.
Decrement (down-arrow) Key
Decreases the value or
changes the selection in the
upper display.
TL
W
A
PROCESS
L1 L2 L3 L4
DEV
% OUT
DISPLAY
AUTO
MAN
MODE
W
Lower Display
Reads Display Loop
information, menu or
prompt names, or alarm
codes — red or green
hardware.
L1, L2, L3, L4 LEDs
Shows the active
output(s).
DISPLAY Key
Takes the control "home"
to the Display Loop
(current process values
and set point information) from any menu
location.
AUTO/MAN Key
Clears or silences alarms
with one press, or toggles
between Auto and
Manual control with two
presses.
AUTO/MAN LED
Indicates Manual control;
or, when blinking,
indicates that another
press will toggle control
state.
Incr. + Decr. Combination
Press for three seconds to
reach the Setup menu;
press for three more
seconds to reach the
Calibration menu.
Optimizing Your Process System with the WATLOW Series 988 6.5
SERIES 988
MODE + Incr. Combination
Press to move backwards
through prompts in a menu.
Press and hold the MODE
key and use the increment
key to move backwards until
you reach the top of the
menu.
MODE Key
Steps through the
menus. In Auto control,
enters data selected less
than five seconds previously.
Page 54

Specifications
Setup Requirements
Controllers from the Series 988 family require six
steps to set up — from system design to system
operation.
1 — Build the Part Number
This booklet helps with the first step, selecting
the features your application will need. The
features are recorded in a part number, which
Watlow uses to custom build each controller.
2 — Set the DIP Switches
The Series 988/989 User’s Manual explains how
to set the DIP switches inside the controller
chassis. You can set DIP switches to lock out the
Factory and Setup menus. Other DIP switches
allow you to select some of the input, output and
power needs of your application.
3 — Mount and Wire the Controller
The Series 988/989 User’s Manual clearly ex-
plains and illustrates the process of correctly
mounting and wiring your controller.
4 — Configure the Controller for Your Application
The next step involves determining settings and
values, then entering them from the front panel of
the 988. Chapter Seven of this book will help you
chose the software and parameters to best control
your application. The Series 988/989 User’s
Manual will guide you through the menus and
prompts you will use to configure the controller’s
software.
5 — Startup and System Operation
For the final setup step carefully review the
previous steps, then turn on the system. Some
parameters, such as slidewire feedback, can be
auto-tuned after startup. Then system performance and alarms should be thoroughly tested.
6 — Documentation
Once the system is operating corrcctly, make
photocopies of the menu flow diagrams in the
user's manual and document all your settings.
Optimizing Your Process System with the WATLOW Series 9886.6
Page 55

Specifications
User's Manual
The Series 988/989 User’s Manual provides the
information you will need to install, wire, configure and operate the Series 988 controller, in most
applications. Detailed drawings illustrate DIP
switch settings, panel mounting and proper
wiring of the 988. Easy to use charts and instructions explain how to use the menus and prompts
to configure the 988 to your application.
A communications manual and a calibration
manual are also available for the Series 988.
Optimizing Your Process System with the WATLOW Series 988 6.7
Page 56

Specifications
Product Specifications
Control Mode
•Dual input, quad output, optional retransmit of
set point or process variable.
•Programmable direct and reverse acting control
outputs.
•One step auto-tuning.
Operator Interface
•Local/Remote set point capability.
•Dual, 4-digit LED displays. Upper: 0.4” (10mm),
Lower: 0.3” (8mm).
•Mode, Auto/Man, Display, Up and Down keys.
Input
•Contact input for software function select.
•Type J, K, T, N, C(W5), D(W3), E, R, S, B, Pt 2
thermocouple, 100Ω platinum 1° or 0.1° RTD, or
0-50mV, 0-100mV, 0-20mA, 4-20mA, 0-5VDC, 15VDC, 0-10VDC, slidewire, digital event input or
heater current options.
•Sensor break protection de-energizes control output to protect system or selectable bumpless
transfer to manual operation. Latching or nonlatching.
•°F or °C display or process units, user selectable.
Sensor Ranges
J t/c: 32 to 1500°F or 0 to 816°C
K t/c: -328 to 2500°F or -200 to 1371°C
T t/c: -328 to 750°F or -200 to 399°C
N t/c: 32 to 2372°F or 0 to 1300°C
R t/c: 32 to 3200°F or 0 to 1760°C
S t/c: 32 to 3200°F or 0 to 1760°C
B t/c: 1598 to 3300°F or 870 to 1816°C
E t/c: -328 to 1470°F or -200 to 799°C
C t/c: 32 to 4200°F or 0 to 2316°C
D t/c: 32 to 4200°F or 0 to 2316°C
Pt 2: 32 to 2543°F or 0 to 1395°C
1°RTD (JIS):-328 to 1166°F or -200 to 630°C
1°RTD (DIN):-328 to 1472°F or -200 to 800°C
0.1°RTD (JIS
and DIN):-99.9 to 999.9°F or -73.3 to 537.7°C
0-5VDC: -999 to 9999
1-5VDC: -999 to 9999
0-10VDC: -999 to 9999
0-20mA: -999 to 9999
4-20mA: -999 to 9999
0-50mVDC: -999 to 9999
0-100mVDC:-999 to 9999
Slidewire: 100 to 1200Ω
Current: 0 to 50mA
Potentiometer: 0 to 1200Ω
Output Options
•Solid state relay, 0.5A @ 24VAC min., 253VAC
max., opto-isolated, zero cross switching. With or
without contact suppression.
•Open collector, switched DC signal provides a
minimum turn ON voltage of 3VDC into a minimum 500Ω load; maximum ON voltage not
greater than 32VDC into an infinite load.
•Electromechanical relay*, Form C, 5A @ 120/
240VAC, 6A @ 28VDC, 1/8 hp. @ 120VAC, 125VA
@ 120VAC. With or without contact suppression.
•Process, 0-20mA, 4-20mA, 0-5VDC, 1-5VDC, or 010VDC.
•Electromechanical relay*, Form A/B, 5A @ 120/
240VAC, 6A @ 28VDC, 1/8 hp. @ 120VAC, 125VA
@ 120VAC. Without contact suppression.
•External transmitter power supply, 5V ±5% @
30mA, 12V ±5% @ 30mA, or 20V ±5% @ 30mA.
•RS-232 communications or EIA-485/RS-422 communications, opto-isolated.
Accuracy
•Calibration accuracy & sensor conformity: ± 0.1%
of span, ±1 LSD, 77°F ± 5°F (25°C ± 3°C) ambient
& rated line voltage ±10%.
•Accuracy span: 1000°F/540°C minimum.
•Temperature stability: ± 0.2°F/°F (0.1°C/°C)
change in ambient.
•Voltage stability: (± 0.01% of span) / (% of rated
line voltage).
Agency Approvals
•UL873 and UL508, File #E43684; CSA pending;
NEMA 4X.
Terminals
•#6 compression universal head screws, accepts
20-14 gauge wire.
Power
•100 - 240VAC +10%/-15%, 50/60Hz, ± 5%.
•16VA maximum.
•Data retention upon power failure via non-volatile
memory.
Operating Environment
•32 to 149°F (0 to 65°C), 0 to 90% relative humidity, non-condensing.
* Electromechanical relays are not recommended for PID control.
They are warranted for only 100,000 contact closures.
Optimizing Your Process System with the WATLOW Series 9886.8
Page 57

Specifications
Warranty
The Watlow Series 988 family of controllers is
warranted to be free of defects in material and
workmanship for 36 months after delivery to the
first purchaser for use, providing that the units
have not been misapplied. Since Watlow has no
control over their use, and sometimes misuse, we
cannot guarantee against failure. Watlow’s
obligations hereunder, at Watlow’s option, are
limited to replacement, repair or refund of purchase price, and parts which upon examination
prove to be defective within the warranty period
specified. This warranty does not apply to damage
resulting from transportation, alteration, misuse
or abuse.
Optimizing Your Process System with the WATLOW Series 988 6.9
Page 58

How to Choose the Right 988 to Fit Your Application
Chapter Seven
How to Choose the Right 988 to Fit Your Application
Overview 7.2
Input 7.3
Output 7.4
Software 7.5
Standard Features 7.6
Hardware 7.7
Review and Optimize 7.8
Faxable System Description 7.10
Model Number Information 7.11
How to use this chapter:
The Watlow 988 family of controllers
can be used in an almost infinite
variety of applications, in part because the inputs, outputs and many
other attributes can be factory configured to match the requirements of
many different processes. A controller's model number contains this
factory configuration information.
This chapter will guide you through
the process of optimizing your application with a Series 988 controller
and determining the correct model
number.
When you finish, you will have a
completed diagram showing how your
application can be controlled by a
Series 988 controller and a model
number for the proper controller
configuration.
Experts who are familiar with the
Series 988 controller may want to go
directly to the Faxable System Description on page 7.10.
Make one or more copies of the worksheet on page 7.10 and any other
pages you want to write on. Then sit
down with scratch paper and a pencil
and carefully work through the steps
to determine the best configuration
for your application. Use the "Helpful
References" listed in the left column
of each page.
7.1Optimizing Your Process System with the WATLOW Series 988
Page 59

How to Choose the Right 988 to Fit Your Application
Step 1: Overview
A. Describe the process that the 988 will control.
HELPFUL REFERENCES
Chapter 1, Test Drives,
provides diagrams and explanations of several different types of
applications.
Chapter 2, Basic Control Strategies and Terms, explains the
basic concepts and vocabulary of
control applications.
W
A
TL
input 1
input 2
input 3
W
PROCESS
L1 L2 L3 L4
DEV
% OUT
SERIES 988
DISPLAY
AUTO
MAN
MODE
output 1
output 2
output 3
output 4
B. What raw materials go into the process?
C. What product does the process create?
D. List the sensors, switches and controls used in
the process.
E. List the heaters, motors, valves and other devices
used in the process.
F. List ambient conditions, performance requirements and safety concerns involving the process.
G. Make a rough sketch of the process including all
of the elements listed above. Be sure to label all of
the parts.
7.2
Optimizing Your Process System with the WATLOW Series 988
Page 60

How to Choose the Right 988 to Fit Your Application
Input #1
98_ _ - _ _ _ - _ _ _ _
Input #2
98_ _ - _ _ _ - _ _ _ _
Input #3
digital event standard
WATLOW
988
Key Features:
Software:
98 _ - _ _ _ _ - _ _ _ _
Power & Hardware:
98 _ - _ _ _ _ - _ _ _ _
Display colors:
98 _ _ - _ _ _ _ - _ _
98__ __ - __ __ __ __ - __ __ __ __
Step 2: Input
A. List all the input devices in your process sketch
(Refer to your answer to 1D.).
HELPFUL REFERENCES
Use the complete input table in
Chapter 6, Specifications.
See the filled in worksheets in
Chapter 1, Test Drives.
0-none
1-basic signal conditioner
2-universal signal conditioner
process input
resistance temp. detector
thermocouple
3-slidewire feedback
4-heater current transformer
5-digital event
B. List all of the parameters and specifications that
apply to each of the above items.
C. Input types must match the appropriate input of
the 988. Use the input chart on page 6.2 to assign
each input device to one of the 988’s inputs.
D. Use the information on your list to fill out the
input boxes in your photocopy of the worksheet
from page 7.10.
Inputs
123
option available if shaded
Fill in input device
information and codes
from page 6.2.
7.3Optimizing Your Process System with the WATLOW Series 988
Page 61

How to Choose the Right 988 to Fit Your Application
Output #1
98_ _ - _ _ _ - _ _ _ _
Output #3
98_ _ - _ _ _ _ - _ _ _
Output #2
98_ _ - _ _ _ - _ _ _ _
Output #4
98_ _ - _ _ _ _ - _ _ _
WATLOW
988
Key Features:
Software:
98 _ - _ _ _ _ - _ _ _ _
Power & Hardware:
98 _ - _ _ _ _ - _ _ _ _
Display colors:
98 _ _ - _ _ _ _ - _ _
Step 3: Output
A. List all the output devices in your process sketch
(Refer to your answer to 1F.).
HELPFUL REFERENCES
Use the complete output table in
Chapter 6, Specifications.
Alarms and, transmitter power
supply are explained in Chapter
5, Other Features.
See the filled in worksheets in
Chapter 1, Test Drives.
A-none
solid-state relay
B-0.5A w RC suppression
K-0.5A w/o RC suppression
open collector
C-switched DC
electromechanical relay
D-form C, 5A w RC supp
E-form C, 5A w/o RC supp
electromechanical relay
J-form A or B, 5A w/o RC spp
universal process types
F-0-5VDC, 1-5VDC, 0-10VDC;
transmitter power supply
T-5, 12, 20VDC @ 30 mA
process retransmit
M-0-20mA, 4-20mA
N-0-5VDC, 1-5VDC, 0-10VDC
communications
R-RS-232
S-EIA485, RS-422
1234
0-20mA, 4-20mA
options available if shaded
B. List all of the parameters and specifications that
apply to each of the above items.
C. Output types must match the appropriate output
of the 988. Use the Output Chart on page 6.3 to
assign each output device to one of the 988’s outputs.
D. Use the information on your list to fill in the
output boxes in your photocopy of the worksheet
from page 7.10.
Outputs
E. Make a sketch of your application on your photocopy of the worksheet. Make sure the appropriate
devices are connected to the appropriate inputs and
outputs.
Fill in output devices
and codes from page
6.3.
7.4
Optimizing Your Process System with the WATLOW Series 988
Page 62

How to Choose the Right 988 to Fit Your Application
_
_
_
_
Step 4: Software
A. Determine what software features your process
will require.
HELPFUL REFERENCES
General Software Features
auto-tune 3.2
burst fire 3.3
communications 3.4
dead band 3.5
digital event 3.6
heater current 3.7
input filter 3.8
input linearization 3.9
ramp to set point 3.10
remote set point 3.11
retransmit 3.12
slidewire feedback 3.13
Enhanced Software Features
cascade 4.2
differential 4.4
dual PID sets 4.5
duplex 4.6
ratio 4.7
See the filled in worksheets in
Chapter 1, Test Drives.
B. Determine the process range or ranges that the
software must maintain in the process.
C. Determine what conditioning, if any, is needed
for your input data.
D. Will you use any enhanced software features?
E. Use the information you have just gathered to fill
in the software box in your photocopy of the
worksheet from page 7.10.
Outp
WATLOW
988
Key Features:
Check the software
features you will use.
If you will use any
enhanced software
features fill in a "B",
otherwise fill in an
"A".
_ _
_ _
Software:
98 _ - _ _ _ _ - _ _ _ _
Power & Hardware:
98 _ - _ _ _ _ - _ _ _ _
Display colors:
98
Outp
98
Outp
98
Outp
- __ __ __ __ - __ __ __ __
98 _ _ - _ _ _ _ - _ _
98
7.5Optimizing Your Process System with the WATLOW Series 988
Page 63

How to Choose the Right 988 to Fit Your Application
Step 5: Standard Features
A. This section lists features that may be important
to your application that are built into all of the 988
HELPFUL REFERENCES
calibration 5.3
diagnostics 5.4
factory settings 5.5
errors (input) 5.6
lockout 5.7
moisture resistance 5.8
displays and keys 6.5
setup 6.6
isolation 6.7
training 6.8
manual 6.9
spec chart 6.10
warranty 6.11
family of controllers. None of this information is
needed on your worksheet, but you might want to
take some time to learn about these features.
calibration
diagnostics
factory settings
errors (input)
lockout
water- and corrision-resistant front panel
display and keys
setup
isolation
user's manual
product specifications
three-year limited warranty
7.6
Optimizing Your Process System with the WATLOW Series 988
Page 64

How to Choose the Right 988 to Fit Your Application
_
Power & Hardware:
98 _ - _ _ _ _ - _ _ _ _
Display colors:
98 _ _ - _ _ _ _ - _ _
_ __ __ __ - __ __ __ __
Step 6: Hardware
A. Would the controller fit your applications panel
HELPFUL REFERENCES
lockout 5.7
dimensions 6.4
display & key chart 6.5
specifications 6.8
better in its vertical configuration (986 or 988) or
horizontal configuration (987 or 989)? Be sure to
check all dimensions for fit.
B. Will you connect your controler to a 100- 240volt power supply (988 or 989) or a 24-28-volt power
supply (986 or 987)? (Either configuration works
with either AC or DC power.)
C. Each of the two displays in the 988 family can be
either red (R) or green (G). Choose a color for each
display.
vertical horizontal
100-240 V 988 989
24-28 V 986 987
D. You can lockout access to controller settings with
software, hardware switches or with an digital event
input. All of these are standard features.
E. Fill in the appropriate spaces in your photocopy
of the worksheet from page 7.10. You should have
all the information you need to fill in the part number.
Use the table to choose and fill
in your power and hardware
configuration.
Choose the upper and lower
display colors.
RR - red upper, red lower
RG - red upper, green lower
GG - green upper, green lower
GR - green upper, red lower
7.7Optimizing Your Process System with the WATLOW Series 988
Page 65

How to Choose the Right 988 to Fit Your Application
Step 7: Review and Optimize
A. Review the last six steps looking for errors and
opportunities to optimize your application’s use of
HELPFUL REFERENCES
Chapter 1, Test Drives,
provides diagrams and explanations of several different types of
applications.
Chapter 2, Basic Control Strategies and Terms, explains the
basic concepts and vocabulary of
control applications.
the Series 988 controller..
B. If any of the inputs or outputs are not used by
your application, check whether they could be used
to enhance your application, perhaps with the addition of an alarm or the communications option.
C. How might your needs change in the future? It's
more efficient and economical to order options now.
D. Make several copies of the worksheet on the next
page and “test drive” your application through different conditions. What happens if conditions exceed limits? What happens if a device breaks down?
E. Go over your work with a colleague and/or a
Watlow sales rep to check whether you have overlooked anything.
F. If you made any changes on your worksheet,
revise your model number.
7.8
Optimizing Your Process System with the WATLOW Series 988
Page 66

How to Choose the Right 988 to Fit Your Application
Notes Page
7.9Optimizing Your Process System with the WATLOW Series 988
Page 67

TL
Faxable Series 988 System Description
How to Choose the Right 988 to Fit Your Application
date: # of pages:
to: from:
comp/dept: comp/dept:
phone: phone:
fax: fax:
Output #1
Input #1
98_ _ - _ _ _ - _ _ _ _
Input #2
98_ _ - _ _ _ - _ _ _ _
Input #3
digital event standard
WATLOW
Key Features:
Software:
98 _ - _ _ _ _ - _ _ _ _
Power & Hardware:
98 _ - _ _ _ _ - _ _ _ _
Display colors:
98 _ _ - _ _ _ _ - _ _
988
98_ _ - _ _ _ - _ _ _ _
Output #2
98_ _ - _ _ _ - _ _ _ _
Output #3
98_ _ - _ _ _ _ - _ _ _
Output #4
98__ __ - __ __ __ __ - __ __ __ __
Sketch your application in this space.
W
A
TL
input 1
input 2
input 3
Make photocopies of this page. Do not write on the original. Use the information you gathered in the previous pages to fill in the boxes and model number.
7.10
W
PROCESS
L1 L2 L3 L4
DEV
% OUT
SERIES 988
DISPLAY
AUTO
MAN
MODE
output 1
output 2
output 3
output 4
Optimizing Your Process System with the WATLOW Series 988
98_ _ - _ _ _ _ - _ _ _
Page 68

How to Choose the Right 988 to Fit Your Application
Series 988/989 Model Number Information
98 _ _ - _ _ _ _ - _ _ _ _
Hardware
6 = Vertical mounting, 24-28 V
7 = Horizontal mounting, 24-28 V
8 = Vertical mounting, 100-240 V
9 = Horizontal mounting, 100-240 V
Software
A = Standard
B = Enhanced (with cascade, ratio, dual PID, differential)
#1 Input
1 = Basic thermocouple signal conditioner
2 = Universal signal conditioner
#2 Input
0 = None
1 = Basic thermocouple signal conditioner
2 = Universal signal conditioner
3 = Slidewire feedback
4 = Current transformer
5 = Second digital event (one digital event is standard on all units)
#1 Output
B = Solid state relay, Form A, 0.5A, with RC suppression
C = Switched DC, open collector, isolated
D = *Electromechanical relay, Form C, 5A, with RC supression
E = *Electromechanical relay, Form C, 5A, without RC suppression
F = Universal process, 0-5VDC, 1-5VDC, 0-10VDC, 0-20mA, 4-20mA
K = Solid state relay, Form A, 0.5A, without RC suppression
#2 Output
A = None
B = Solid state relay, Form A, 0.5A, with RC suppression
C = Switched DC, open collector, isolated
D = *Electromechanical relay, Form C, 5A, with RC suppression
E = *Electromechanical relay, Form C, 5A, without RC suppression
F = Universal process, 0-5VDC, 1-5VDC, 0-10VDC, 0-20mA, 4-20mA
K = Solid state relay, Form A, 0.5A, without RC suppression
T = External signal conditioner power supply, 5, 12 or 20VDC @ 30mA
#3 Output
A = None
B = Solid state relay, Form A, 0.5A, with RC suppression
C = Switched DC, open collector, isolated
J = *Electromechanical relay, Form A or B, 5A, without RC suppression
K = Solid state relay, Form A, 0.5A, without RC suppression
M = Retransmit, 0-20mA, 4-20mA
N = Retransmit, 1-5VDC, 0-10VDC, 0-5VDC
T = External signal conditioner power supply, 5, 12 or 20VDC @ 30mA
#4 Output
A = None
B = Solid state relay, Form A, 0.5A, with RC suppression
C = Switched DC, open collector, isolated
D = *Electromechanical relay, Form C, 5A, with RC suppression
E = *Electromechanical relay, Form C, 5A, without RC suppression
K = Solid state relay, Form A, 0.5A, without RC suppression
R = Isolated RS-232 communications
S = Isolated EIA-485/RS-422 communications
T = External signal conditioner power supply, 5, 12 or 20VDC @ 30mA
Display Color (Upper/Lower)
GG = Green/Green
GR = Green/Red
RG = Red/Green
RR = Red/Red
(excluding Type R, S and B)
(excluding Type R, S and B)
*Electromechanical relays are not recommended for PID control. They are warranted
for only 100,000 contact closures
Sensor Ranges
J t/c: 32 to 1500° F
K t/c: -328 to 2500°F
T t/c: -328 to 750° F
N t/c: 32 to 2372°F
R t/c: 32 to 3200°F
S t/c: 32 to 3200°F
B t/c: 1598 to 3300°F
E t/c: -328 to 1470°F
C t/c: 32 to 4200°F
D t/c: 32 to 4200°F
Pt 2: 32 to 2543°F
1°RTD (JIS): -328 to 1166°F
1°RTD (DIN): -328 to 1472°F
0.1°RTD (JIS
100Ω platinum
and DIN): -99.9 to 999.9°F
0-5VDC: -999 to 9999
1-5VDC: -999 to 9999
0-10VDC: -999 to 9999
0-20mA: -999 to 9999
4-20mA: -999 to 9999
0-50mVDC: -999 to 9999
0-100mVDC: -999 to 9999
Slidewire: 100 to 1200Ω
Current: 0 to 50mA
Potentiometer: 0 to 1200Ω
0 to 816°C
-200 to 1371°C
-200 to 399°C
0 to 1300°C
0 to 1760°C
0 to 1760°C
870 to 1816°C
-200 to 799°C
0 to 2316°C
0 to 2316°C
0 to 1395°C
-200 to 630°C
-200 to 800°C
-73.3 to 537.7° C
7.11Optimizing Your Process System with the WATLOW Series 988
Page 69

Index
Index
A
A/D overflow error 5.6
A/D underflow error 5.6
accuracy 6.8
actuator interfaces 2.6
address prompt 3.4
agency approvals 6.8
alarm 2 high 5.2
alarm 2 low 5.2
alarm high 3.10
alarm low 3.10
alarm reset 3.6
alarm silencing 1.5, 1.7
alarms 2.6, 5.2, 6.6
algorithm prompt 4.5
aluminum melting furnace 1.6
ambient counts 5.5
ambient temperature 2.6, 5.5
analog output 3.12
annunciation output 2.6
annunciator 2.8
auto mode 5.6
auto reset 2.4
auto-tune 1.3, 2.3, 3.2, 4.3, 4.5,
6.6
auto-tune prompt 3.2, 4.3
auto-tune set point 3.2
auto-tune set point parameter
4.3
auto-tuning 2.3, 4.5
AUTO/MAN key
3.2, 5.2, 5.3, 5.4, 5.6, 5.7, 6.5
AUTO/MAN LED 6.5
auto/manual 5.4
automatic mode 5.4
automatic reset 2.2, 2.4
automatic tuning 2.3
B
Barber Coleman 560 1.4
basic signal conditioner 6.2
baud rate 2.6, 3.4
boiler 4.4
break protection 2.10
bumpless transfer 5.4, 5.6
burst fire 2.6, 2.8, 3.3, 3.7
buzzer 5.3
C
calibration manual 2.7
Calibration menu 6.5
calibration offset 2.8
cascade 1.6, 1.7, 2.7, 2.8, 4.2
case 2.7
chart recorder 2.6, 3.12
chattering 2.2
closed loop 2.2, 2.8, 5.4
cold junction 2.8, 2.10
communications 2.6, 3.4, 6.3
Communications menu 3.4
compression molding press 3.7
computer 3.4
configuration error 5.6
configure 6.6
control mode 2.2, 6.8
control output action 3.6
control parameter 4.7
control prompt 4.4
control room 5.8
control software revision 5.5
control strategies 2.2
controller environment 2.6
controller operation 2.7
CSA 2.7, 6.8
current 3.7
current monitor 2.6, 5.5
current retransmit 5.5
current transformer 2.8
D
damping 2.4
data bits and parity 3.4
dead band 2.8, 3.5
decimal 2 3.11
decrement key
3.11, 4.4, 5.6, 6.5
default parameters 2.8
defects 6.9
derivative
2.3, 2.4, 2.8, 2.10, 3.2
derivative 1 5.2
derivative 2 5.2
Deutsche Industrial Norms 2.8
DEV (deviation) LED 6.5
deviation alarm 1.5, 2.6, 5.2, 5.3
device address 3.4
diagnostics 5.4, 5.5
Diagnostics menu 2.7, 5.5
differential 2.7, 2.8, 4.4
digital event 3.6, 5.7, 6.2
dimensions 2.6, 6.4
DIN 2.8
DIP switch 3.11, 5.7, 6.6, 6.7
display 5.5
DISPLAY key 3.7, 4.4, 6.5
display loop 6.5
displays 6.5, 7.8
documentation 6.6
down-arrow key, see decrement
key
droop 2.2, 2.3, 2.4, 2.8
drying grain 1.4
dual PID 1.3, 4.5
duplex 2.8, 4.6
duty cycle 2.8
E
EIA-485/422 1.9, 2.6, 3.4, 5.5,
6.3
electrically noisy environment
5.8
electromechanical relays 6.3, 6.8
enclosure heater 2.7
enhanced software 3.2, 4.1-
4.7, 7.6
environmental chamber 3.5, 3.8
error 2.7
error code 5.6
event input 2.7, 4.5
event input 1 prompt 3.6
event input 2 5.5, 5.7
external transmitter power supply
2.8
extruder 1.2
F
factory menu 5.7, 6.6
factory prompt 5.5, 5.7
failure mode prompt 5.6
field calibration 2.7
filter 2.8
filter time constant 3.8
Optimizing Your Process System with the WATLOW Series 988
8.1
Page 70

Index
fixed power output 5.6
flow transmitter 1.8, 3.9
form A relay 2.8, 5.2, 6.3
form A/B relay 5.5
form B relay 2.8, 5.2, 6.3
form C relay 2.9, 5.2, 5.5, 6.3
four dashes 5.6
front panel 2.7
front panel lockout 3.6
full lockout 5.7
G
gas valve 5.6
gas-fired furnace 3.13
gaskets 2.7
Global menu
3.6, 3.10, 4.4, 4.5, 4.7, 5.6, 5.7
ground counts 5.5
ground loops 2.5
H
hardware 7.8
heat-treat oven 3.12
heater current 1.2, 2.7, 3.3, 3.7
heater current transformer 6.2
horizontal version (989) 1.7, 7.8
hose-down 2.7
hunting 1.5, 2.9, 3.13
hysteresis 2.2, 2.9, 5.2
I
idle set point 3.6
idle temperature 3.6
increment key
3.11, 4.4, 5.6, 6.5
incubator 3.6
input 1 counts 5.5
input 1 linearization 3.9
input 2 counts 5.5
input 2 linearization 3.9
input 2 prompt 3.7, 3.11, 3.13
input devices 7.4
input errors 5.6
input filter 3.8
input linearization 2.9, 3.9
Input menu 3.7, 3.11
Input Table 6.2
inputs 2.5, 5.5, 6.8
integral 2.2, 2.4, 2.9, 2.10, 3.2
integration function 2.3
interactive process variables 2.7
interface prompt 3.4
internal percent 4.3
internal set point 4.2, 4.4
isolation 2.9
J
JIS 2.9
Joint Industrial Standards 2.9
K
keylock switch 5.7
keys 6.5
L
latching alarm 2.6, 5.2
learn high resistance value 3.13
learn low resistance value 3.13
LED 5.4, 5.5, 6.5
limits 1.7, 2.5, 2.6
linearization 2.9
local 3.11
local-remote prompt 3.11
lockout 3.6, 5.7
long lag times 4.2
long sensor lead 5.8
loop error detect 3.7
louver 1.4, 1.5
low-level contact 1.9
low-pass filter 3.8
lower display 6.5
M
manual mode 5.4, 5.6
manual tuning 2.3
master-remote 2.6, 3.11
mechanical relays 2.6
MODE key
3.6, 3.13, 5.5, 5.7, 6.5
model number 7.1
motorized valve 4.7
mounting 6.4, 6.6, 6.7
muffle furnace 3.10
multi-zone application 3.12
N
natural oscillation 2.4
NEMA 4X 2.7, 2.9, 6.8
no lockout 5.7
no module 5.5
noise immunity 2.5
non-latching alarm 2.6, 5.2
non-volatile checksum error 5.6
normally de-energized 5.2
normally energized 5.2
O
offset 2.4
ON/OFF control 2.2, 2.9
open collector 3.3, 6.3
open loop 2.2, 2.9, 5.4
open loop prompt 5.5
operating environment 6.8
operator interface 6.8
optimize 7.9
output 1 active 5.5
output 4 active 5.5
output devices 7.5
Output menu 3.12, 5.3
Output Table 6.3
outputs 2.5, 2.9, 5.5, 6.8
outputs, turn off 3.6
overshoot 2.3, 2.4, 2.9
P
P control 2.9
paint 4.7
panel cutouts 6.4
Panel Lockout menu 5.7
panel lockout prompt 5.5
part number 6.6
PD control 2.9
PDR control 2.7, 2.9
percent power output 5.4
percent power output (%OUT)
LED 6.5
personal computer 2.6
PI control 2.9
PID 2.2, 2.3, 2.7, 2.9,
2.10, 3.2, 4.2, 4.3, 4.5
PID A 4.3, 4.5
PID B 4.3, 4.5
PID menus 3.5
PLC 3.11
power 6.8, 7.7
power supply 5.5, 5.8, 7.8
pressure switch 4.5
process 2.2, 4.5, 5.5
process 1 5.2
8.2
Optimizing Your Process System with the WATLOW Series 988
Page 71

Index
process 2 5.2
process 2 prompt 3.7
process alarms 2.6, 3.7, 5.2
process input 6.2
process retransmit 6.3
process variable 2.9
product specifications 6.8
proportional band 2.4, 2.9, 3.2
proportional control mode 5.5
proportional derivative control
with manual reset 2.9
proportional-integral control 2.3
proportional-integral-derivative
(PID) 2.3
proportioning control
2.2, 2.9, 2.10
proportioning control with deriva-
tive 2.9
protocol 3.4
Q
QCD 3.3
QPAC 3.3
questions and answers 2.5
R
radio frequency interference 1.7
radio frequency noise 3.3
ramp rate 3.10
ramp to set point 1.3, 2.7, 3.10
ramping function prompt 3.10
range 2.5
range high 2 3.11, 3.13, 4.3
range high 2 prompt 3.7
range low 2 3.11, 3.13
range low 2 prompt 3.7
rate 2.3, 2.4, 2.10, 5.2
rate alarm 3.10
rate band 2.9
ratio control 1.8, 1.9,
2.7, 2.9, 4.7
read only 5.7
reference junction 2.10
relative humidity 3.8
remote set point 3.6, 3.11, 4.4
reset 2.4, 2.10
resistance temperature detector
(RTD) 2.5, 2.10, 6.2
retransmit 2.6, 2.10, 3.12
retransmit calibrate offset 3.12
retransmit high limit 3.12
retransmit low limit 3.12
retransmit options 3.11
RFI 3.3
RS-232 3.4, 5.5, 6.3
RS-422 1.9, 2.6, 3.4, 6.3
RTD 2.5, 2.10, 6.2
S
safety limits 2.6
SCR firing card 3.3
security 2.7, 5.7
semiconductor oven 3.3
sensor break 5.4, 6.8
sensor cost 2.5
sensor fails 5.6
sensor over-range error 5.6
sensor ranges 6.8
sensor under-range error 5.6
serial communications 3.4
serial number 5.5
serial port 3.4
Series 988/989 User’s Manual
6.6, 6.7
set point 3.10, 4.5
setup 3.4, 6.6
Setup menu 5.6, 5.7, 6.5, 6.6
ship date 5.5
shipping overseas 2.7
signal transmitter 2.5
silencing alarm 2.6, 5.3
sketch 7.1-7.11
slidewire feedback
1.4, 2.7, 2.10, 3.13, 6.2, 5.5
slidewire valve actuators 3.13
software features 7.6
software revision 5.5
solid-state output 2.6
solid-state relay 3.3, 6.3
spacing between controllers 2.6
specifications 6.8
square root extraction 3.9
SSR firing card 3.3
standard features 5.1-5.8, 7.7
start 3.10
startup 2.7, 6.6
switch PID sets 3.6
switched DC 5.5
switching sensitivity 2.10
system cycle time 2.4
system diagram 2.5
System menu 3.11, 5.7
system response time 2.4
system stress 2.7
system tuning 2.3
T
terminals 6.8
test chamber 3.4, 4.5
test output prompt 5.5
thermal lag 2.3
thermal system 2.10
thermocouple 2.10, 6.2
thermocouple only 5.5
three-mode control 2.10
three-way valve 4.6
time proportioning control 2.2,
2.10
transmitter power supply
2.10, 6.3
tune 3.2
Tuning of Industrial Control
Systems 2.4
tuning reference 2.4
tuning the system 2.4
U
UL 1.9, 2.7, 6.8
UL recognized 1.9
uncontrolled stream 4.7
universal millivolts 5.5
universal off 5.5
universal process types 5.5, 6.3
universal RTD 5.5
universal signal conditioner
3.9, 6.2
universal tc high gain 5.5
universal tc low gain 5.5
up-arrow key, see increment key
updates 2.5
upper display 6.5
urethane mixing 1.8
user's manual 6.7
V
vacuum 4.5
valve oscillations 3.13
variable-time-base 2.6, 2.8, 3.3
vertical configuration 7.8
Optimizing Your Process System with the WATLOW Series 988
8.3
Page 72

Index
voltage retransmit 5.5
W
warranty 6.9
waste water process 3.9
wire length 2.5
wiring 6.6, 6.7
Z
zero-cross fired 1.7, 3.3
zero-cross switching 3.3
zero-switching 2.8, 2.10
Prompst, parameters and
menus
RS-232 5.5
EIA-485/422 5.5
A
alarm 2 high 3.10, 5.2
alarm 2 low 3.10, 5.2
retransmit calibrate offset 3.12
ambient counts 5.5
control action output 3.6
address 3.4
alarm 2 energized 5.2
alarm 2 de-energized 5.2
algorithm 4.5
alarm reset 3.6
ambient temperature 5.5
analog output 3.12
retransmit high limit 3.12
retransmit low limit 3.12
auto-tune set point 3.2, 4.3
auto-tune 3.2, 4.3
B
baud rate 3.4
bumpless transfer 5.6
burst fire 3.3
C
input 1 counts 5.5
input 2 counts 5.5
control 4.4, 4.7
communications 3.4
current 3.7, 5.5
D
data bits and parity 3.4
date 5.5
dead band A 3.5
dead band B 3.5
switched dc 5.5
deviation 1 5.2
deviation 2 5.2
decimal 2 3.11
diagnostics 5.5
differential 4.4
8.4
Optimizing Your Process System with the WATLOW Series 988
Page 73

Index
display test 5.5
E
error 1-1 5.6
error 1-2 5.6
error 1-3 5.6
error 1-4 5.6
error 2-1 5.6
error 2-2 5.6
error 2-3 5.6
error 2-4 5.6
event input 1 3.6, 4.5, 5.7
event input 2 4.5, 5.5, 5.7
error 5 5.6
error 9 5.6
F
failure 5.6
factory 5.5, 5.7
filter time constant 1 3.8
full 5.7
G
ground counts 5.5
H
learn low resistance 3.13
N
no module 5.5, 5.7
O
open loop 5.5
output 3.12
output 1 type 5.5
output 4 type 5.5
output 1 active 5.5
output 4 active 5.5
P
switch PID sets 3.6, 4.5
PID 2 4.5
PID A 3.2, 4.3, 4.5
PID B 4.3, 4.5
panel lockout 5.5, 5.7
process 1 5.2
process 2 3.7, 5.2
process value 1 3.12
process 4.5, 5.5
protocol 3.4
serial number lower 5.5
error output 5.6
software 5.5
power supply 5.5
solid state 0.5A surppress
5.5
solid state 0.5A 5.5
solid state 2A 5.5
set point 3.10, 4.5
start 3.10
T
thermocouple only 5.5
test output 5.5
tune 3.2
U
universal millivolts 5.5
universal OFF 5.5
universal process 5.5
voltage retransmit 5.5
universal RTD 5.5
universal tc high 5.5
universal tc low 5.5
hunt 3.13
hysteresis 5.2
I
idle set point 3.6
input 2 3.7, 3.11, 3.13
input 3.7
communications interface
3.4
current retransmit 5.5
input 1 type 5.5
input 2 type 5.5
L
local 3.11
local-remote 3.11
latching 2 5.2
linearization 1 3.9
linearization 2 3.9
front panel lockout 3.6, 5.7
loop error detect 3.7
learn high resistance 3.13
R
remote 3.11
ramp rate 3.10
rate 5.2
ratio 4.7
read 5.7
range high 2 3.7, 3.11, 3.13
range low 2 3.7, 3.11, 3.13,
4.3
relay A/B 5.5
relay C surppress 5.5
relay C 5.5
root extraction 3.9
ramping 3.10
remote set point 3.6, 3.11
S
setup 3.4, 4.5, 5.7
silencing 2 5.3
slidewire 3.13, 5.5
serial number upper 5.5
Optimizing Your Process System with the WATLOW Series 988
8.5
Page 74

Watlow maintains a worldwide network of stocking distributors.
Designer and Manufacturer of
Watlow St. Louis • 12 0 01 Lackland Road • St. Louis, MO 6 3146 USA • Phone: 314 - 8 7 8-4600 • FAX: 314 - 87 8 - 6814
WATLO W
Watlow Products and Technical Support Delivered Worldwide
Your Authorized Watlow Distributor is:
W988-AGV2-9444
North American Sales Offices
Region 1
Boston 508-655-2225
Region 2
New York, Upstate 716-438-0454
Region 3
New York/New Jersey 908-549-0060
Region 4
Philadelphia 215-345-8130
Region 5
Atlanta/Greenville 404-908-9164
Charlotte/Columbia 704-847-4000
Nashville 615-833-2636
Orlando 407-351-0737
Winston Salem 910-945-5957
Region 6
Baltimore 410-788-6400
Virginia 804-589-5611
Region 7
Cincinnati 513-398-5500
Region 8
Cleveland 216-838-5522
Pittsburgh 412-322-5004
Region 9
Detroit 810-651-0500
Region 10
Chicago 708-490-3900
Indianapolis 317-575-8932
Milwaukee 414-255-7725
Region 11
St. Louis 314-878-4600
Region 12
Dallas 214-422-4988
Houston 713-440-3074
Region 13
Denver 303-440-9345
Kansas City 913-897-3973
Tulsa 918-496-2826
Region 14
Minneapolis 612-431-5700
Region 15
Portland 206-253-5855
San Francisco 408-980-9355
Seattle 206-546-6817
Region 16
Los Angeles 714-935-2999
Phoenix 602-258-9206
San Diego 619-728-9188
Asian Sales Offices
Korea 82-2-5635777
Singapore 65-777-5488
Taiwan 886-7-3719586
European Sales Offices
France 33-1-30732425
Germany 49-725394000
Italy 39-2-55185161
Printed on Recycled Paper, 10% Postconsumer Waste.
Made in the USA
15
16
14
13
12
1
9
10
11
2
3
4
8
6
7
5
 Loading...