

Page 1
MINICHEFTM2000
97
Registered Company
Winona, Minnesota USA
ISO 9001
TOTAL
CUSTOMER
SATISFACTION
Applications 10 - 19
Deepfat Fryer
Applications Guide
Programming & Operating Steps
Watlow Controls
1241 Bundy Blvd.
P.O. Box 5580
Winona, Minnesota U.S.A. 55987-5580
(507) 454-5300, Fax (507) 452-4507
WMC2-XAGN-0003-Rev A
May 1997
$5.00
Made in the U.S.A.
Page 2

Table of Contents
Application 10
Automatic Deepfat Fryer with Autolift Control . . . . 1
Application 11
Automatic Deepfat Fryer with Autolift Control . . . 11
Application 12
Manual Deepfat Fryer with Autolift Control. . . . . 23
Application 13
Pressurized Automatic Deepfat Fryer . . . . . . . . 35
Application 14
Pressurized Automatic Deepfat Fryer . . . . . . . . 45
Application 15
Pressurized Manual Deepfat Fryer . . . . . . . . . . 55
Application 16
Automatic Deepfat Fryer . . . . . . . . . . . . . . . . . 65
Application 17
Automatic Deepfat Fryer . . . . . . . . . . . . . . . . . 75
Application 18
Automatic Deepfat Fryer . . . . . . . . . . . . . . . . . 83
Application 19
Manual Deepfat Fryer . . . . . . . . . . . . . . . . . . 95
Ordering Information . . . . . . . . . . . . . . . . . . 106
© The Watlow MINICHEF™ 2000 Deepfat Fryer Applications Guide is copyrighted by Watlow Winona,
Inc., May 1997, with all rights reserved. (1009)
Page 3

10
Application 10
Automatic Deepfat Fryer
with Autolift Control
Single Heat Channel, Four Menus
Introduction to Application 10 . . . . . . . . . . . . . . 1
Configuration Mode Quick Reference . . . . . . . . . 3
Program Mode Quick Reference . . . . . . . . . . . . 4
Step 7 Design a Faceplate Overlay. . . . . . . . . . . 5
Step 8 Operate the Controller . . . . . . . . . . . . . . 6
Application 10 allows you to program as many as four menu keys, each of which can control one
heat channel, one cooking time, a mid-point alarm and autolift capability. The application
includes up to four menus that control fryer temperatures and cooking time.
Overview of Key Steps
1. Install the MINICHEF 2000.
2. Wire the controller.
3. Configure the controller.
4. Program the menus.
5. Set the controller security.
6. Set the Real-time Clock.
For instructions on Steps 1, 2, 3, 4, 5 and 6, see the Hardware & Software Setup Guide.
7. Design, manufacture and apply faceplate overlay for end-users. (For a suggested design to
suit this application, see this section. For overlay dimensions and guidelines, see the
Hardware & Software Setup Guide.)
8. Operate the controller. (See this application guide.)
Page 4
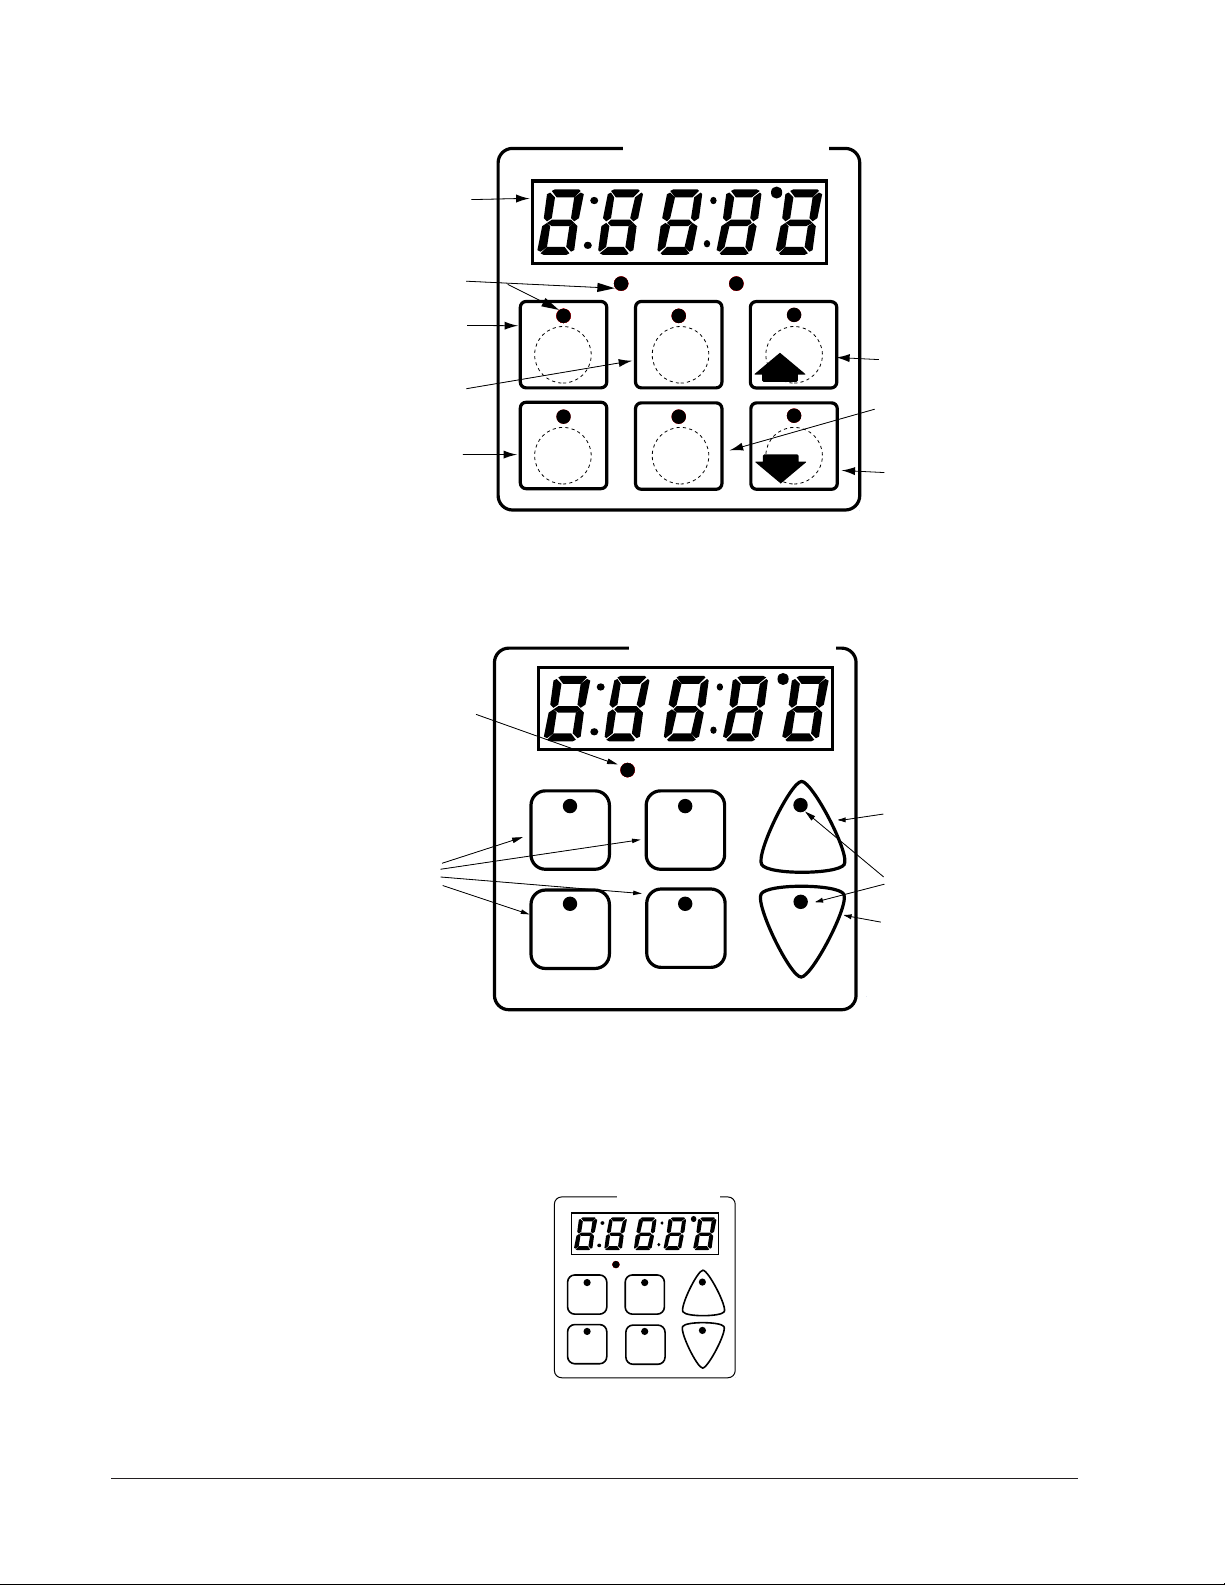
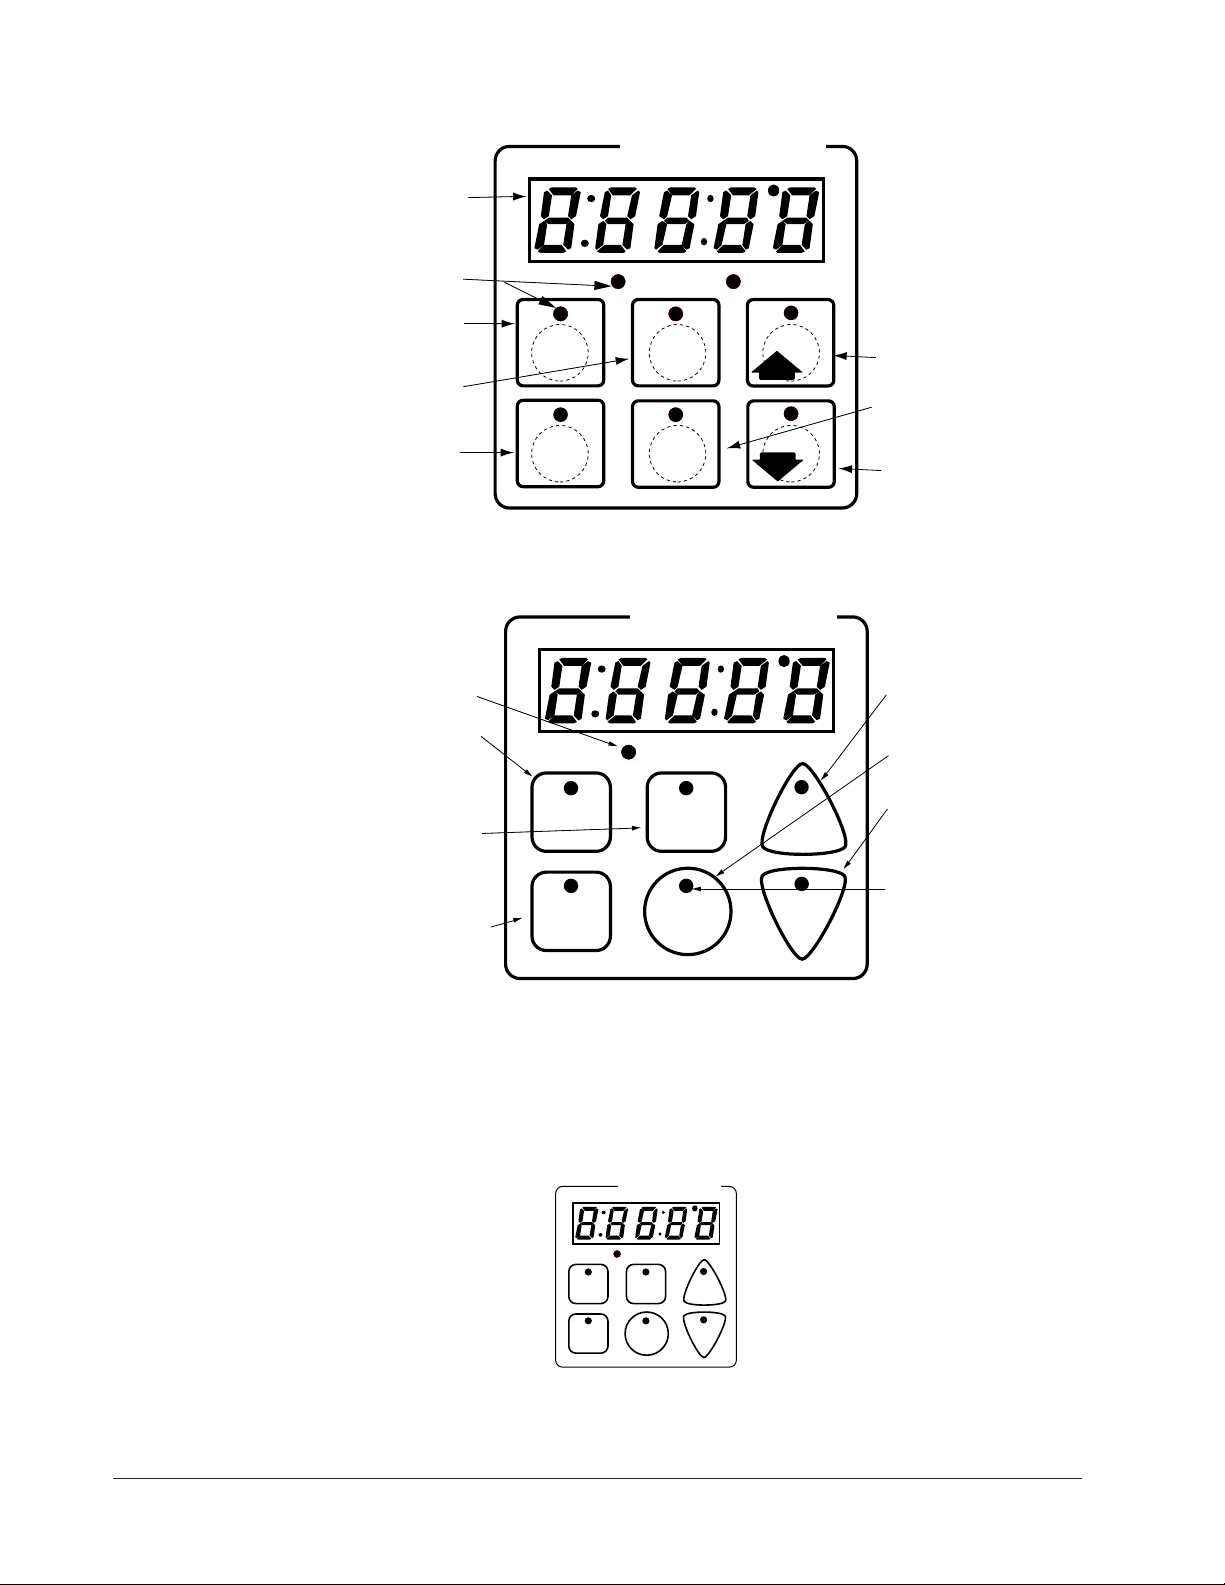
Key Functions in Configuration Mode
Heat
Menu
1
Menu
2
Menu
4
Down
Your Company Logo
Up
Input 1 Fryer Temp →
Input 2 not used →
Event Input 1 not used →
Event Input 2 not used →
→Output 1 Heat
→Output 2 not used
→Event Output 1 Lift Basket
→Event Output 2 Drop Basket
→Output 5 Audible Alarm
Menu
3
Heat
Menu
1
Menu
2
Menu
4
Down
Your Company Logo
Up
Menu
3
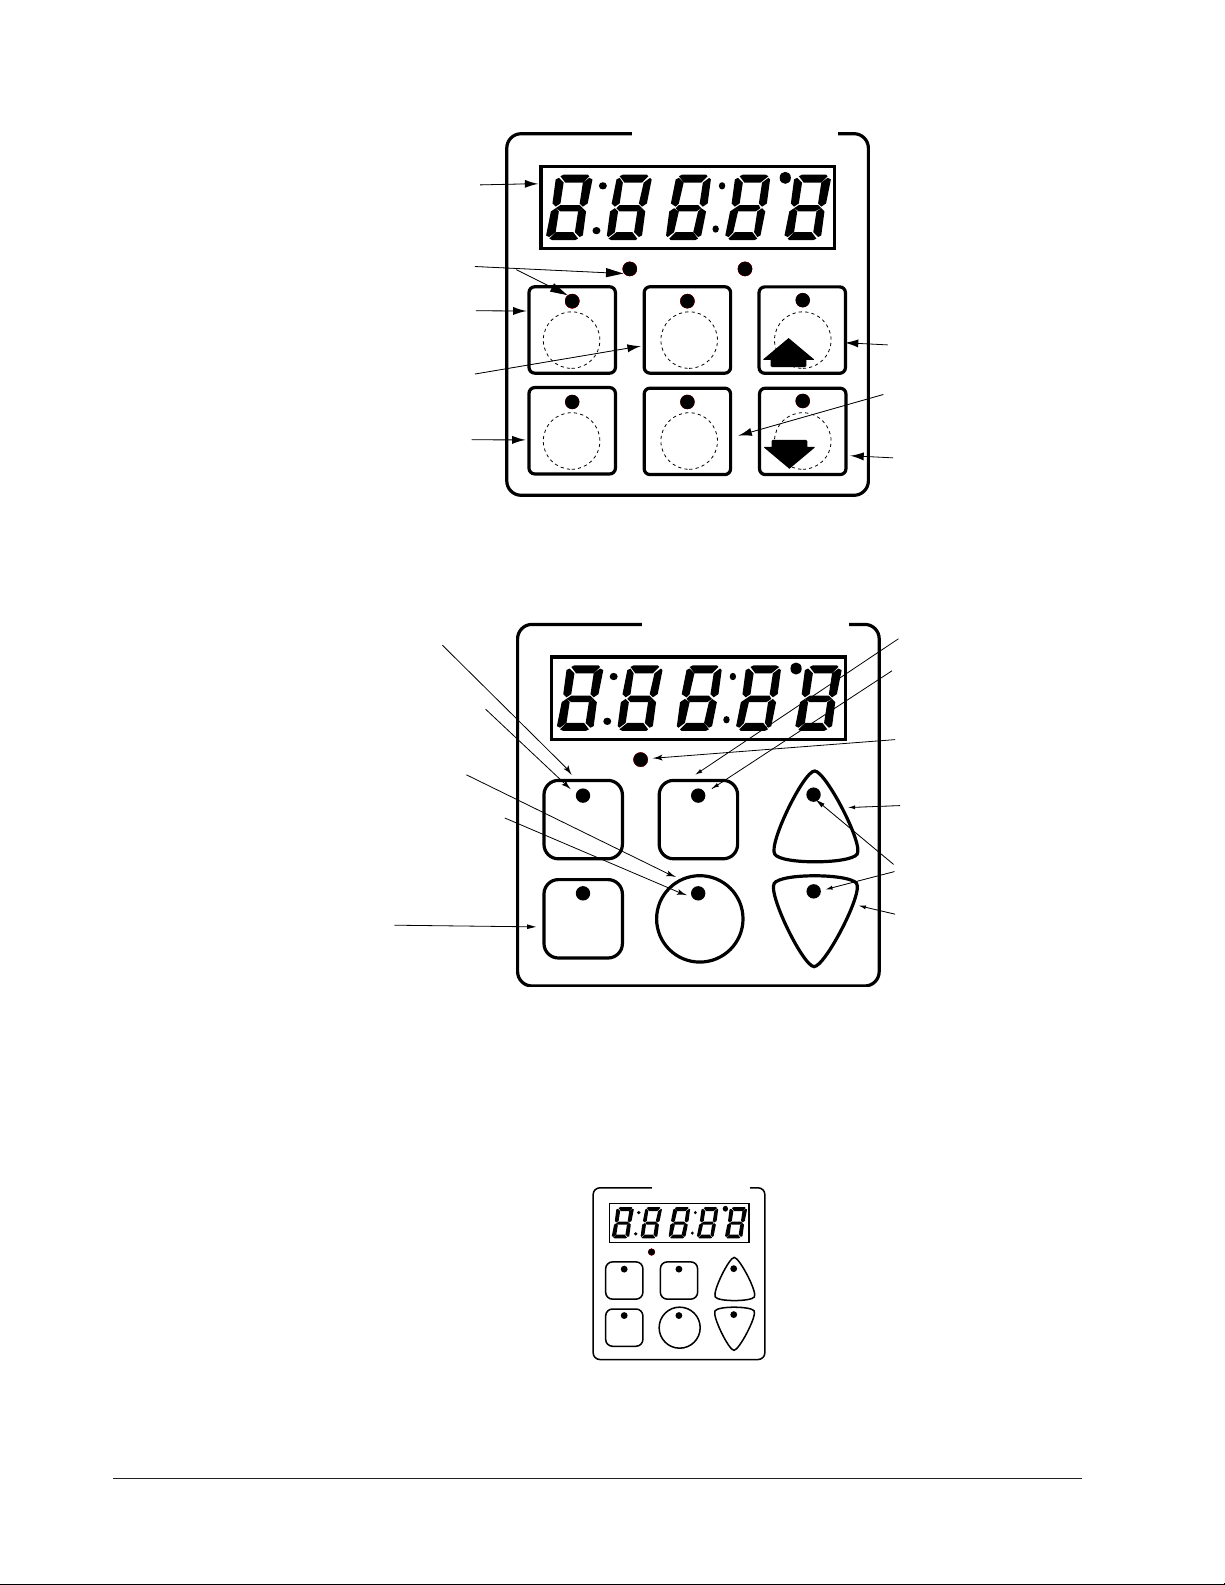
Heat indicator light Lit
when heat output is on.
Menu Keys Activate and
cancel menus, activate
cook cycle when
preheating, and
acknowledge alarms.
Increment and Basket Up
Lift basket.
Up and Down Indicator
Lights Lit when up or
down outlets are
energized.
Decrement and Basket
Down Lower basket.
AB
DE
GH
Enter
EscapeHome
Edit
C
F
MINICHEF 2000
Display five-digit, sevensegment numeric LED
display.
Indicator lights
(1 for each key, 2 for heat
channels).
Edit key (A) Access the
next level of parameters or
values.
Enter key (B) Enter the
value and return to
previous level.
Home key (D) Move to
Operation Mode with a
two-second key press.
Up key (C) Move up the
lists.
Escape key (E) Return to
original value when editing
a parameter value.
Down key (F) Move down
the lists.
Key Functions in Operation Mode
ç
WARNING: The Basket Up and Basket Down Keys cause or initiate motion. Appropriate reasonable care should be
taken to prevent personal injury or machine damage as a result of operator initiated or unexpected machine motion.
Summary of Input/Output Functions
Note: For details, see wiring instructions in the
2 ■ Watlow MINICHEF 2000 Application 10
Hardware & Software Setup Guide.
Page 5

Configuration Mode Quick Reference
These are the functions, parameters and values included in the Configuration Mode for
this application. You must select Application 10 to access them. For directions, see the
Hardware & Software Setup Guide. The Appendix of that guide includes an explanation
of all parameters and values.
Function Parameter Value Your settings
[Etype] Equipment-Type [appl`] Application Number 1 - 28 10
[a_Loc] Application Number Yes, No
Security Lock
[Sound] Audible Alarm 0 - 5
[btine] Basket Travel Time 0 - 30 seconds
[preHt] Initial Preheat Range low to range high
[melt] Oil Melt Cycle On, Off
[SEtUP] Setup [`Ç_Ï`] Temperature Display Format
[time] Time Display Format MMM:SS, HH:MM, H:MM:SS
[Chirp] Key Chirp On, Off
[loc``] Menu Security Lock Yes, No
[tc```] Thermocouple Type J, K (shown as [````H]), E
[rtd``] RTD Curve DIN, JIS
[tconp] WatCurveTMTemperature
Compensation On, Off
[Ofst1] Temperature Offset, Channel 1 -99 to 99ºF (-55 to 55ºC)
[tr`lo] Temperature Range Low 0º F (-18º C) for RTD inputs,
[tr`Hi] Temperature Range High [tr`lo] to 1200ºF (649ºC)
[ready] Preheat Ready Feature Yes, No
[rband] Ready Band 1 to 1200ºF (649ºC)
[Cloc`] Real Time Clock Display Yes, No
[plOSS] Power Loss Menu Resume Yes, No
[al``1] Alarms for Channel 1 None, Dev, Proc, Both
[aL`P1] Absolute Process Alarm 1 100 to 1200ºF (649ºC)
[aLdL1] Low Deviation Alarm 1 -999 to 0ºF (-555 to 0ºC)
[aLdH1] High Deviation Alarm 1 0 to 999ºF (0 to 555ºC)
[tHErl] Thermal [tyPE`] Type of Temperature Control PID, On-Off
[HYSt1] Hysteresis 1* 1 to 99ºF (1 to 55ºC)
[PiD`U] PID Units SI, US
[tune1] Auto-tuning 1 on, OFF
[ProP1] Proportional Band 1 1 to 999ºF (1 to 555ºC)
[rSEt1] Reset (integral) Gain 1** 0.00 to 9.99 repeats/minute
[int1`] Integral Gain 1 0.00 to 99.99 minutes/repeat
[rAtE1] Rate (derivative) Gain 1** 0.00 to 9.99 minutes
[dEr`1] Derivative Gain 1 0.00 to 9.99 minutes
[CYcL1] PID Cycle Time 1 1 to 60 seconds
º
C or ºF
32ºF (0ºC) for tc inputs to [tr`Hi]
[`diag] WatHelp Used for equipment troubleshooting and testing. Not used when programming. See the Hardware
Diagnostics & Software Setup Guide.
*Note: Available only when controller is on/off.
**Note: Available only when PID units are set to US.
Application 10 Watlow MINIC HEF 2000 ■ 3
Page 6

Program Mode Quick Reference
These are the functions, parameters and values included in the Program Mode for this
application. You must select Application 10 to access them. For menu programming directions, see the Hardware & Software Setup Guide. The Appendix of that guide includes a
detailed explanation of all parameters and values.
Function Parameter Value Your Settings
[M`__] Menu [Stpt1] Set point 1 Format varies based on configuration.
Numbers 1 - 4 Temperature of channel 1.
[TiNe1] Time 1 Format varies based on configuration.
Menu run time. Setting at 0 invalidates selected menu.
[alarn] Mid-menu alarm setting. [Stir], [Add], [Flip],
[Turn], [Alert], [None]
[atine] Mid-menu alarm time.* 0 to [TiNe1].
*Note: Applies only when the alarm is not set to [`none].
Auto-tuning note:
Before auto-tuning Application 10, Set Point 1 of Menu 1 must first be set to a value that
is typical of your application. (See the Hardware & Software Setup Guide for information
on programming menus.) Then set [tHErL] / [tunE1] to [```on]. After you accept this
[```on] setting, the display will present [`tunE] when the auto-tuning is taking place.
The controller will cancel the auto-tuning process if it cannot be completed in 80 minutes. You can cancel the auto-tuning process at any time be pressing either key C or Key
D and accepting [``Off] when it appears.
4 ■ Watlow MINICHEF 2000 Application 10
Page 7

Step 7 Design a Faceplate Overlay
AB
DE
GH
Enter
EscapeHome
Edit
C
F
MINICHEF 2000
Heat
Menu
1
Menu
2
Menu
4
Down
Your Company Logo
Up
Menu
3
To complete the installation, you must apply a graphic membrane to the front panel of
the controller. The following artwork will help you design and create a membrane for
this application. For more dimensions and guidelines, see the Hardware & Software
Setup Guide.
Suggested End-user Overlay:
This Prototyping and Training Membrane Overlay will help you with the configuration and programming steps. To order it, see the Ordering Information
at the back of this guide.
Application 10 Watlow MINIC HEF 2000 ■ 5
Page 8
Step 8 Operate the Controller
AB
DECF
GH
MINICHEF 2000
[idle`]
Edit Accept
Back-UpExit
SLOW
FLASH
AT OPERATING TEMPERATURE
(PREHEAT CONDITION MET)
RAPID
FLASH
B
DECF
MINICHEF 2000
[100f`]
Edit Accept
Back-UpExit
B
DECF
MINICHEF 2000
[ready]
Edit Accept
Back-UpExit
G H GH
A A
[pre-`] [`Heat]
DECF
MINICHEF 2000
[`50`f]
Edit Accept
Back-UpExit
DECF
MINICHEF 2000
[ready]
Edit Accept
Back-UpExit
AB
GH
AB
GH
DECF
MINICHEF 2000
[`idle]
Edit Accept
Back-UpExit
AB
GH
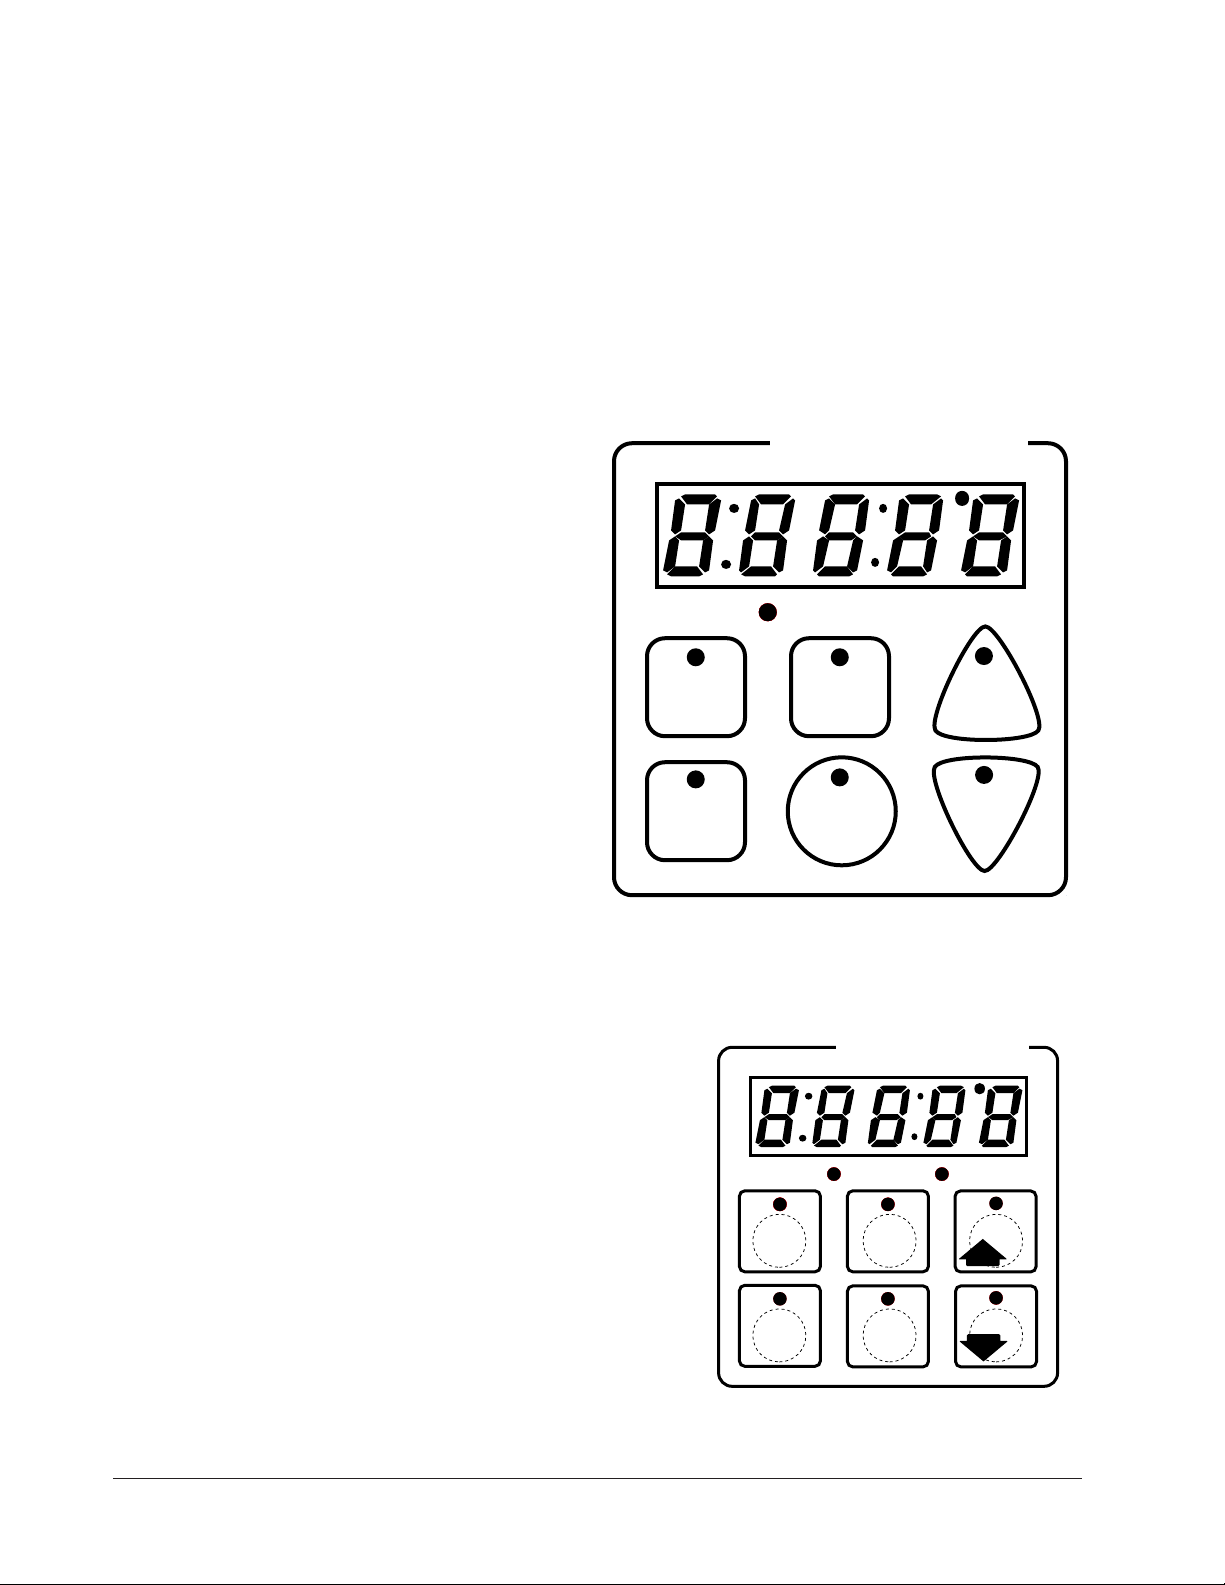
Summary of Key Functions in Operation Mode
Key Function
A Menu 1
B Menu 2
C Basket up
D Menu 3
E Menu 4
F Basket down
Startup
Apply power to the fryer and add cooking oil if necessary.
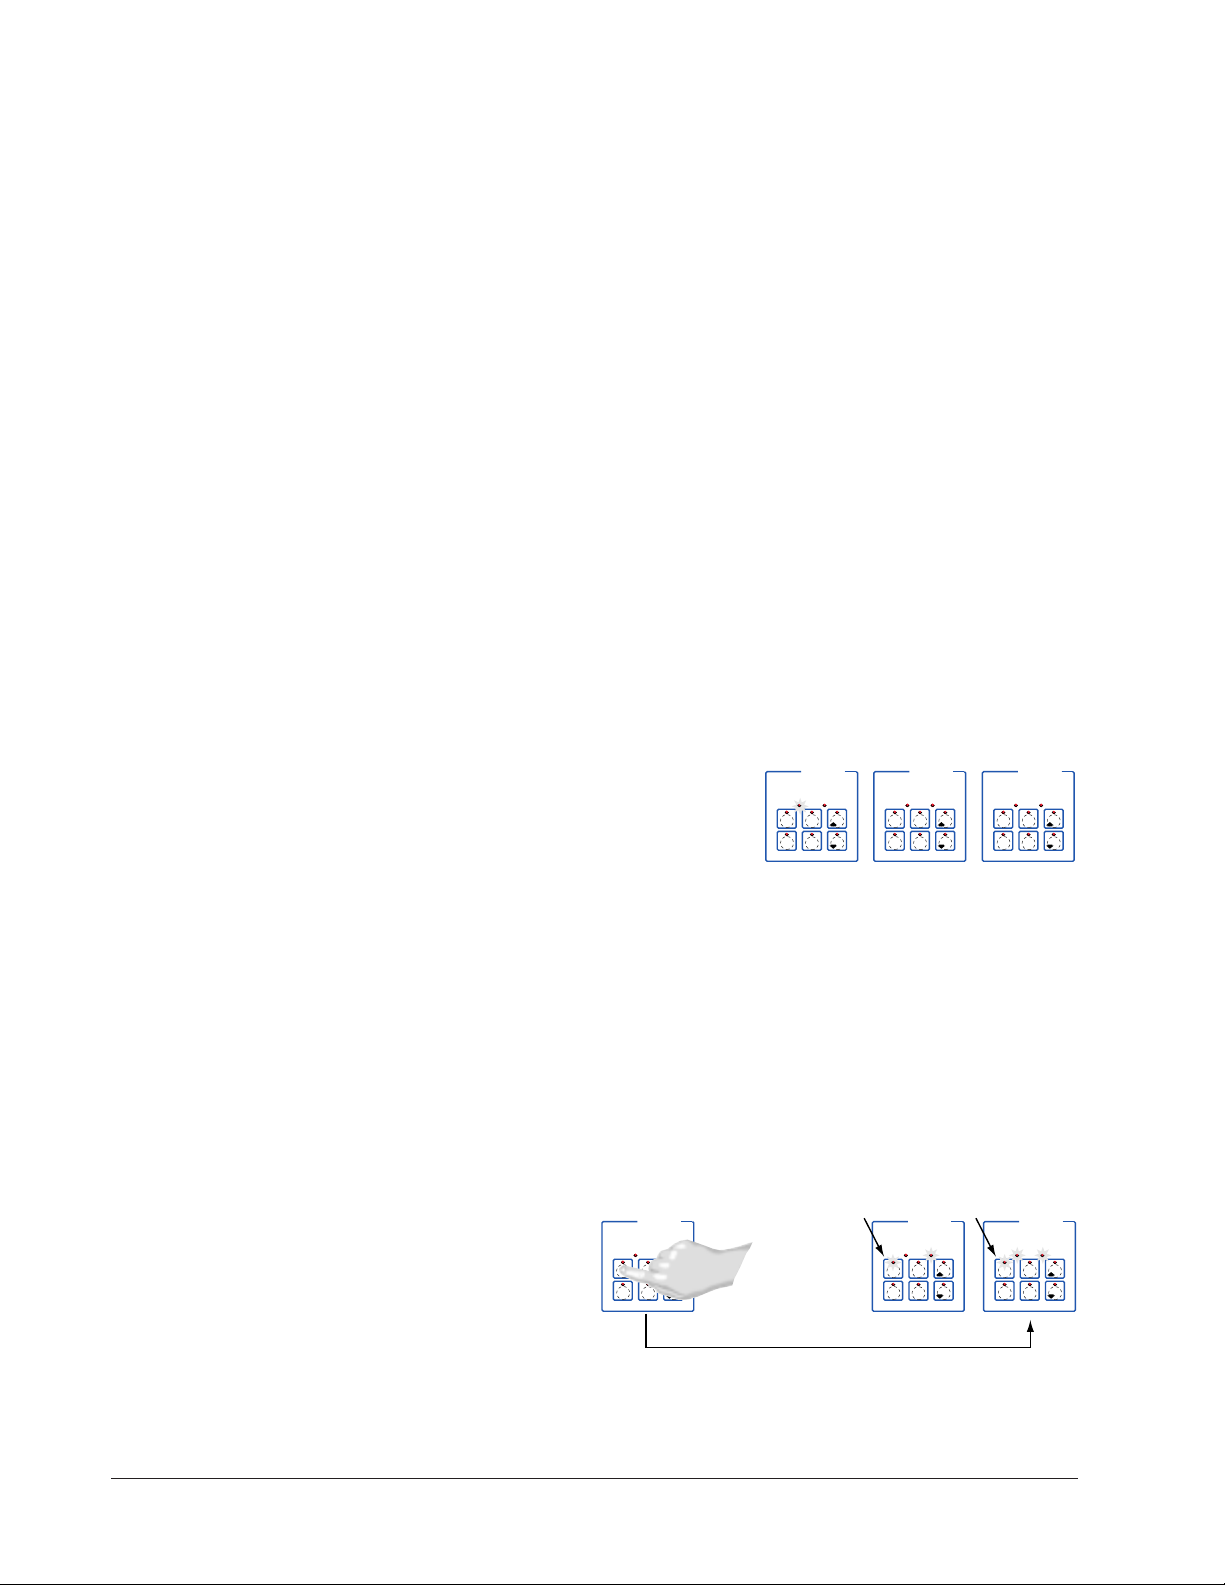
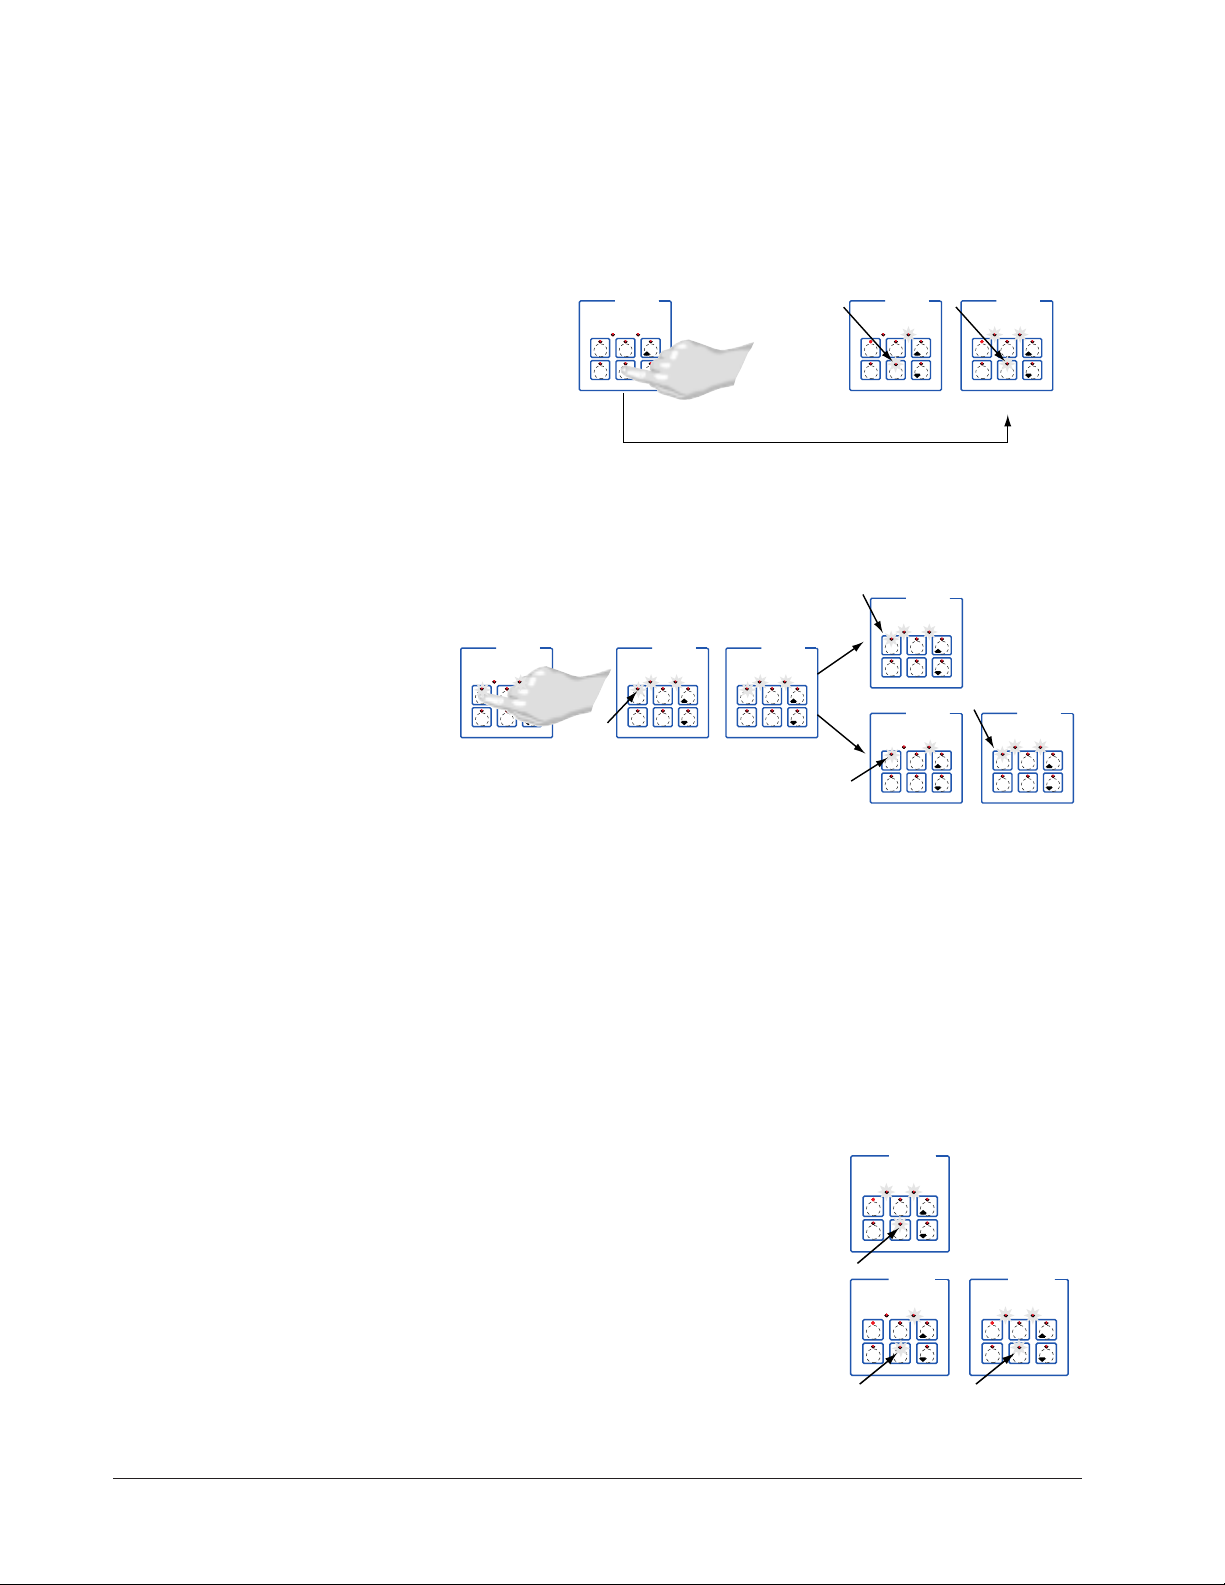
Initial Preheat
At power-up, the unit will preheat to the temperature value set in the Configuration
Mode [Etype] / [preHt]. The display will show [prE-`] [`Heat] followed by oil
temperature as the oil heats up.
When the unit reaches initial preheat temperature, [ready] will flash once on the display and an audible tone will sound for 2 seconds. Then [`idle] will appear on the display. If the Real-time Clock option is installed and [SEtUp] / [Cloc`] is set to
[``yes], the time of day will appear on the display.
If the preheat condition is met before power-up, the controller goes directly to idle, and
does not display [rEAdy] or sound an audible tone.
Preheat
If in the Configuration Mode [SEtUP] / [ready] has been set to yes, the controller will
detect temperatures and preheat to operating temperature (above relative set point
minus the ready band) as required.
• Activate the menu by pressing the Start/Stop key.
If the fryer is not at operating temperature, it will preheat. Meanwhile:
The word [Pre-`] [`Heat] will appear on the display for a few moments. The
6 ■ Watlow MINICHEF 2000 Application 10
Page 9
Start/Stop key indicator light will flash slowly. The temperature of Channel 1 will
DECF
MINICHEF 2000
[ready]
Edit Accept
Back-UpExit
DECF
MINICHEF 2000
[`0009]
Edit Accept
Back-UpExit
B
DECF
MINICHEF 2000
[`idle]
Edit Accept
Back-UpExit
G H
A
AB
GH
AB
GH
DECF
MINICHEF 2000
[alert]
Edit Accept
Back-UpExit
AB
GH
STEADY
ON
SLOW
FLASH
DECF
MINICHEF 2000
[``EnD]
Edit Accept
Back-UpExit
B
DECF
MINICHEF 2000
[`idle]
Edit Accept
Back-UpExit
G H
AAB
GH
RAPID
FLASH
IF PROGRAMMED
SLOW
FLASH
AB
DECF
GH
MINICHEF 2000
[idle`]
Edit Accept
Back-UpExit
SLOW
FLASH
AT OPERATING TEMPERATURE
(PREHEAT CONDITION MET)
RAPID
FLASH
B
DECF
MINICHEF 2000
[100f`]
Edit Accept
Back-UpExit
B
DECF
MINICHEF 2000
[ready]
Edit Accept
Back-UpExit
G H GH
A A
[pre-`] [`Heat]
be displayed until the operating temperature is reached.
The heat output indicator light - G, just below the display- will light up whenever
the controller is calling for heat.
When the fryer is at operating temperature (above relative set point minus the
ready band) [ready] will appear on the display and the Start/Stop key indicator
light will flash rapidly. You are now ready to cook with the active menu.
If the fryer is at operating temperature, the display goes directly to [ready] without indicating preheat or temperature.
The Melt Cycle
To avoid burning congealed oil (shortening), a slow heating action may be necessary. If
this is desired, be sure that in the Configuration Mode [etype] / [melt] has been set
to [```on]. Then, when the oil temperature is below 212 °F the heat output will be limited to 10% of full power. This reduces the chance of burning congealed oil while it is
heating.
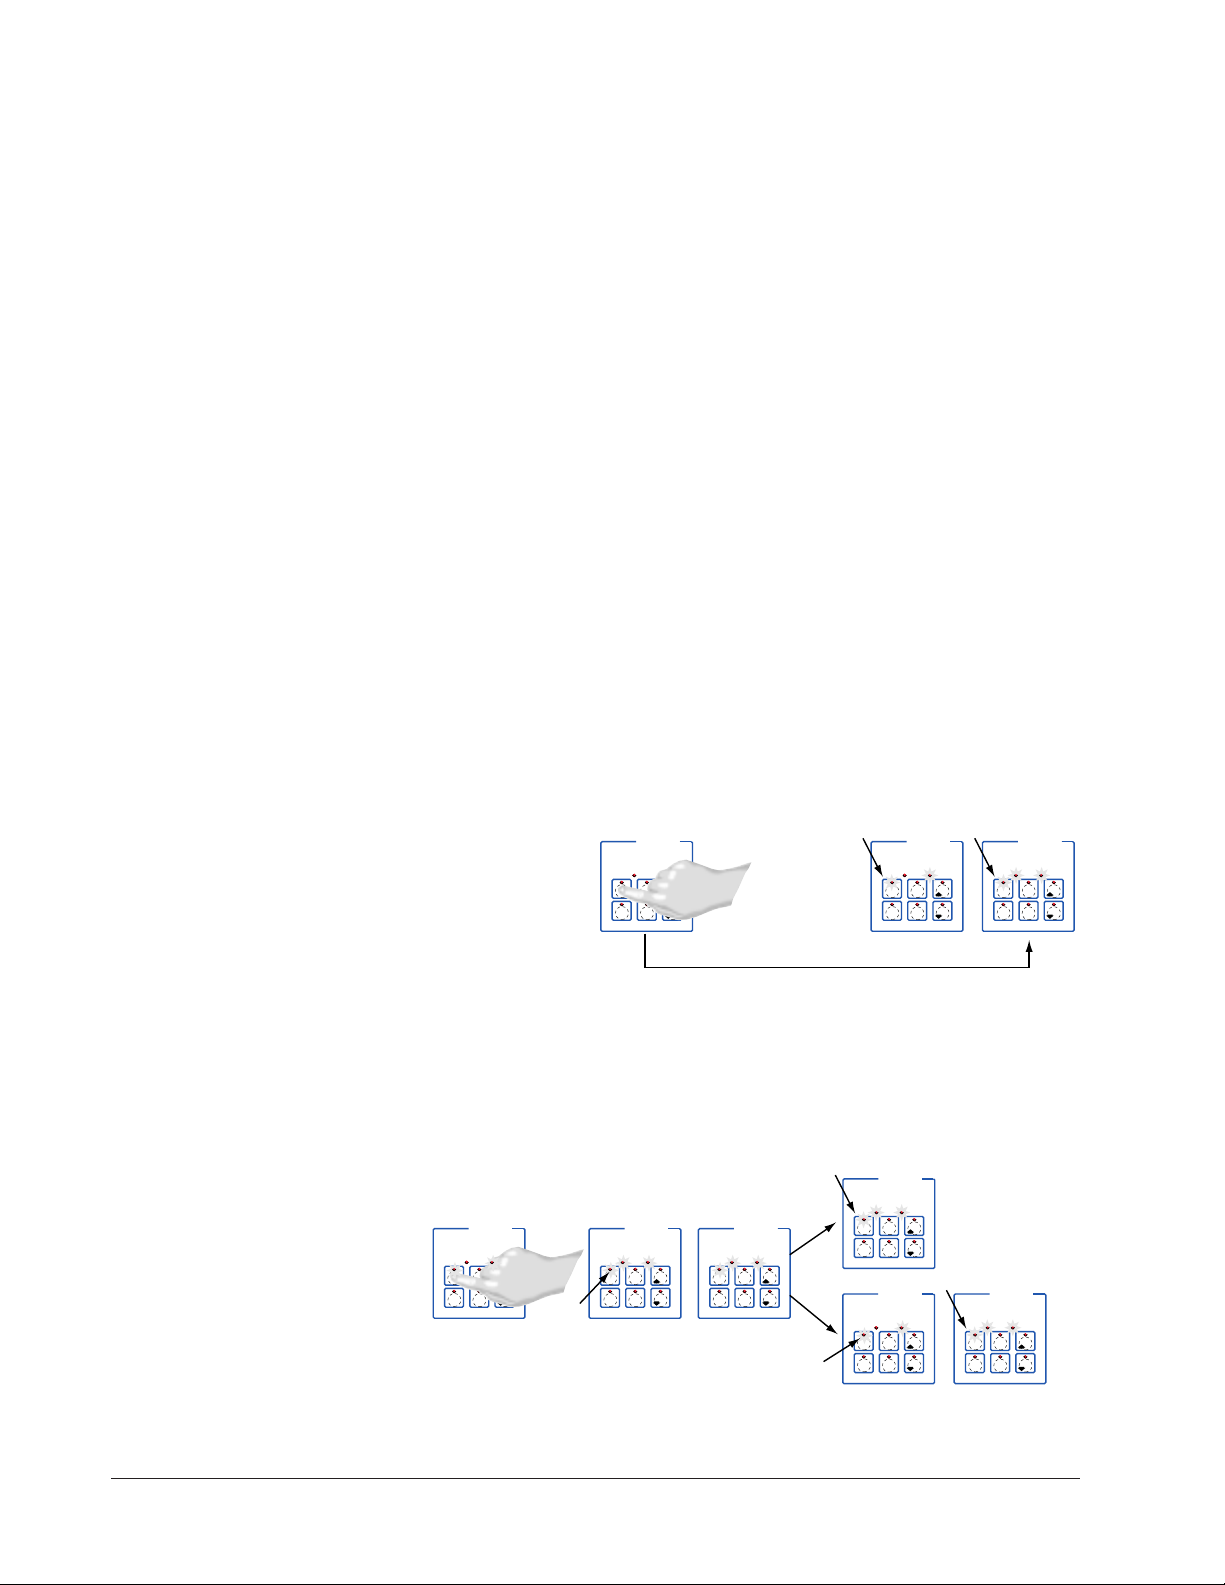
Run a Menu (with preheat feature)
This procedure describes how to run an active menu when the preheat feature is inactive — in other words, when the [ready] parameter in the [setUp] function of the
Configuration Mode is set to [``yes].
1. With [`idle] on the display (or time of day displayed if available), press the key
for the menu you want to run.
If the selected menu’s preheat condition (setpoint minus the ready band) has not
been met, the fryer will preheat until [Ready] appears on the display. If the fryer is
at operating temperature [Ready] will immediately appear on the display.
2. With [Ready] on the display, place the food in the basket and press the action
menu key (indicated by the flashing red light.) The menu key indicator light will
light up, the basket will lower automatically. Time will count down on the display.
Application 10 Watlow MINIC HEF 2000 ■ 7
3 If programmed, as the time counts down, a mid-menu alarm message will appear on
Page 10
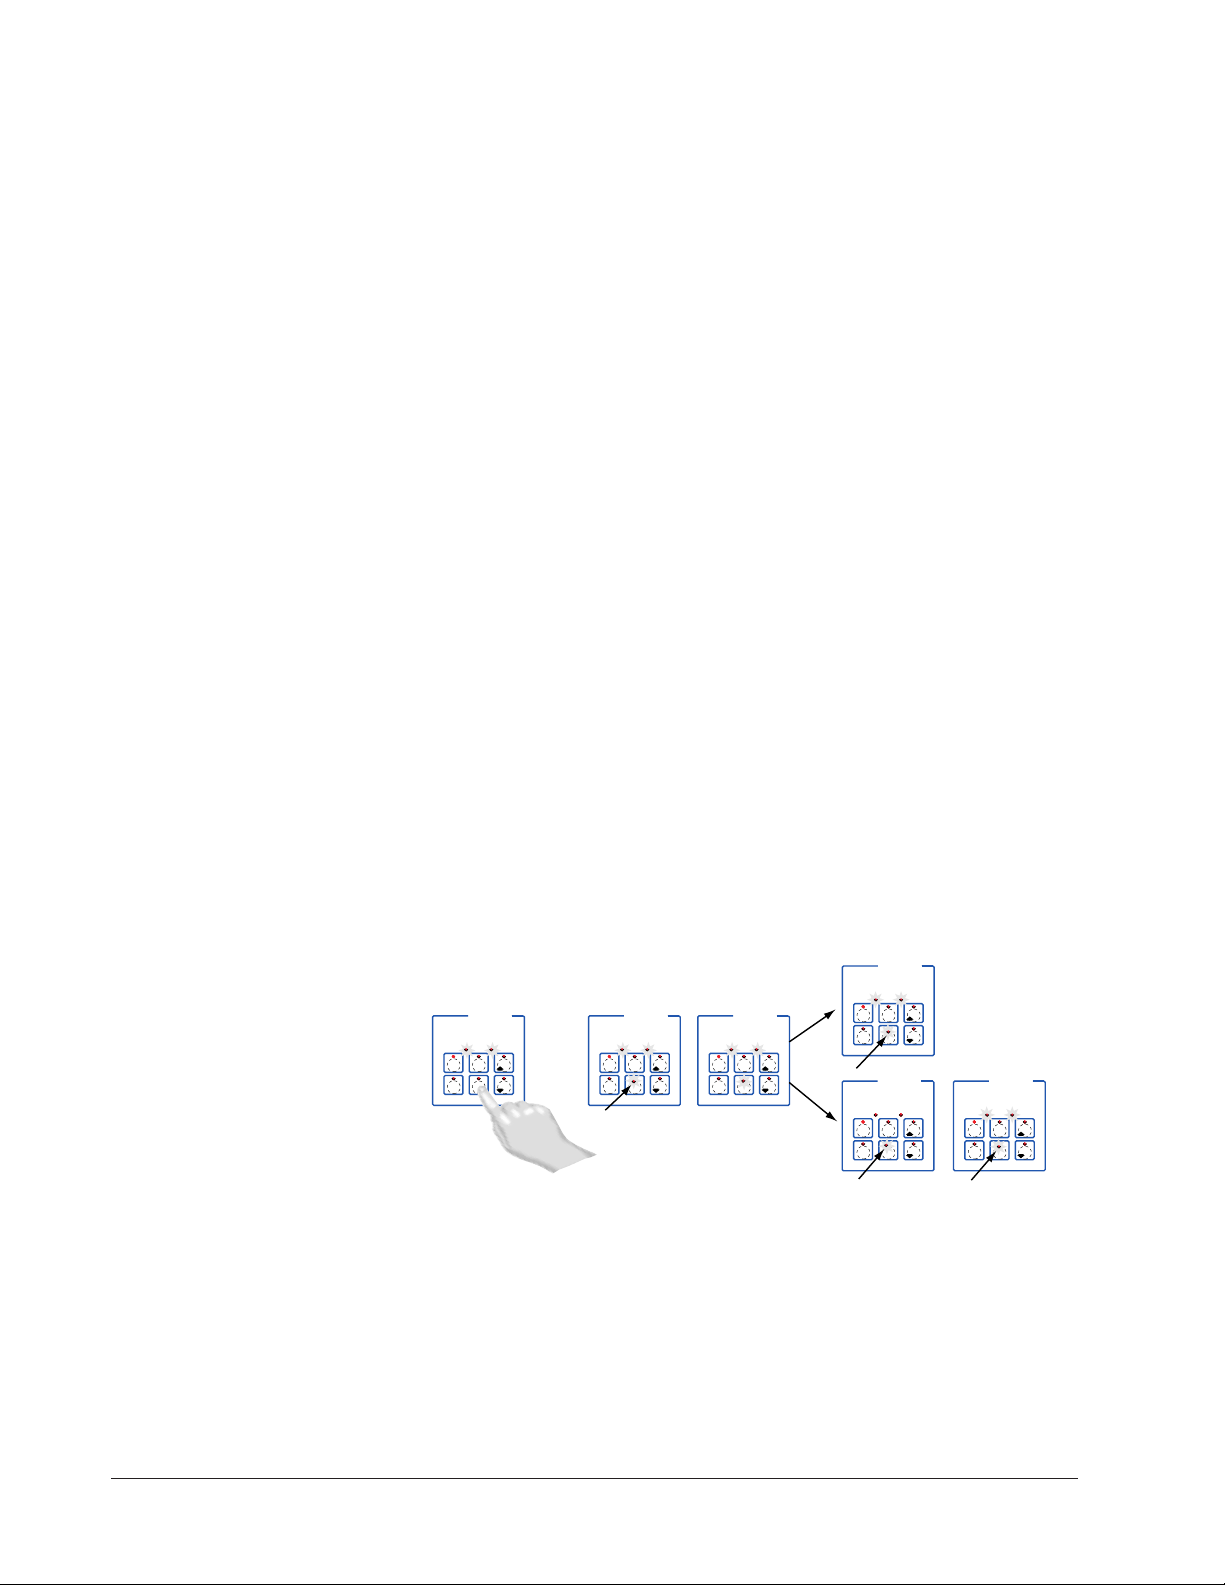
the display. (The message, which varies based on programming at [M`__] /
DECF
MINICHEF 2000
[`idle]
Edit Accept
Back-UpExit
DECF
MINICHEF 2000
[`0009]
Edit Accept
Back-UpExit
B
DECF
MINICHEF 2000
[`idle]
Edit Accept
Back-UpExit
G H
A
AB
GH
AB
GH
DECF
MINICHEF 2000
[alert]
Edit Accept
Back-UpExit
AB
GH
STEADY
ON
SLOW
FLASH
DECF
MINICHEF 2000
[``EnD]
Edit Accept
Back-UpExit
B
DECF
MINICHEF 2000
[`idle]
Edit Accept
Back-UpExit
G H
AAB
GH
RAPID FLASH
IF PROGRAMMED
SLOW FLASH
[ALArn] will appear for ten seconds.)
An audible tone will sound for five seconds. Time will continue to count down on the
display.
4. When the cooking cycle is finished the basket will rise automatically. One of the following will happen, depending on the way the controller was programmed at
[EtypE] / {Sound]:
With Sound set to 0: The controller automatically switches to idle, where the controller maintains the temperatures at set point and does not run time. [`idle] or
time of day will appear on the display. The menu key indicator light will flash slowly.
With Sound set to 1, 2, or 3, [``End] will appear on the display and an audible tone
will be emitted. The menu key indicator light will flash rapidly. You can acknowledge and silence the tone by pressing the active menu key or it will time out in 1 to
20 seconds and go into idle. The menu key indicator light will flash slowly.
With Sound set to 4 or 5, [``End] will appear on the display and the menu key
indicator light will flash rapidly. You must acknowledge the audible tone by pressing
the active menu key. Once acknowledged, the tone is silenced and the controller
goes into idle. The menu key indicator light will flash slowly.
5 Remove the food from the basket. The controller will continue to regulate to the last
set point. The menu key indicator light will flash slowly.
6. To repeat cooking, repeat steps 1 through 5.
Run a Menu (without preheat feature)
This procedure describes how to run a menu when the preheat function is inactive —
that is, when the [Ready] parameter in the [SetUp] function of the Configuration
Mode is set to [```no] — and initial preheat power-up has been completed.
1. With [`idle] on the display, place the food in the basket.
2. Press the key for the menu you want to run. The menu key will light up, the basket
will lower automatically, and then time will count down on the display.:
3. If programmed, as the time counts down, a mid-menu alarm message [M`__] /
[ALArn] will appear on the display.
The alarm message, which varies based on programming, will appear for ten seconds.
8 ■ Watlow MINICHEF 2000 Application 10
An audible tone will sound for five seconds. Time will continue to count down on the
display.
4. When the cooking cycle is finished, the basket will rise automatically. One of the fol-
Page 11

5 Remove the food from the basket. The controller will continue to regulate at the last
6. To repeat cooking, repeat steps 1 through 5.
Cancel a Menu
Canceling a menu stops controller operation completely. The controller does not maintain set point temperatures or run time. Users may cancel a menu in order to run
another one, to stop menu operation for any reason, or when preparing to shut off the
fryer.
• Press the active menu key for 2 seconds.
lowing will happen, depending on the way the controller was programmed at
[EtypE] / {Sound]:
With Sound set to 0: The controller automatically switches to idle, where the controller maintains the temperatures at set point and does not run time. [`idle] or
time of day will appear on the display. The menu key indicator light will flash slowly.
With Sound set to 1, 2, or 3: [``End] will appear on the display and an audible tone
will be emitted. The menu key indicator light will flash rapidly. You can acknowledge and silence the tone by pressing the active menu key or it will time out in 1 to
20 seconds and go into idle. The menu key indicator light will flash slowly.
With Sound set to 4 or 5: [``End] will appear on the display and the menu key
indicator light will flash rapidly. You must acknowledge the audible tone by pressing
the active menu key. Once acknowledged the tone is silenced and the controller goes
into idle. The menu key indicator light will flash slowly.
set point. The menu indicator light will flash slowly.
Heat outputs will switch off. Heat output indicator lights will switch off. The display
presents [`idle] or the time of day will appear on the display.
Change or Restart Menus
• With the controller in idle , press the key for the menu you want to run.
Manual Basket Lift
You can raise or lower the basket manually at any time by pressing the Down-arrow key
(to lower) or the Up-arrow key (to raise). If you raise the basket while cooking, the timer
will pause. Countdown time will resume when you lower the basket or when you press
the active menu key.
ç
WARNING: The Basket Up and Basket Down Keys cause or initiate motion. Appropriate reasonable care should be
taken to prevent personal injury or machine damage as a result of operator initiated or unexpected machine motion.
Event Outputs
While running a menu:
Event output 1 is activated to lift the basket for the length of time programmed in
Configuration Mode [EtyPE] / [btinE].
Event output 2 is activated to lower the basket for the length of time programmed in
Configuration Mode [EtyPE] / [btinE].
Only one output can be on at a time.
Application 10 Watlow MINIC HEF 2000 ■ 9
Page 12

Temperature Alarms
The controller will alert you to temperature alarm conditions if they occur. If an alarm
occurs, take action as determined by your supervisor. See the Appendix in the Hardware
& Software Setup Guide for a Troubleshooting Chart and a summary of temperature
alarms.
Errors
The controller will alert you to errors if they occur. Errors are critical problems that
shut down the unit. If an error occurs, an error message will appear on the display. You
should switch off the power and call for service.
See the Appendix in the Hardware & Software Setup Guide for a Troubleshooting Chart
and a summary of errors.
10 ■ Watlow MINICHEF 2000 Application 10
Page 13

11
Application 11
Automatic Deepfat Fryer
with Autolift Control
Single Heat Channel, 40 Menus
Introduction to Application 11 . . . . . . . . . . . . . 11
Configuration Mode Quick Reference . . . . . . . . 13
Program Mode Quick Reference. . . . . . . . . . . . 14
Step 7 Design a Faceplate Overlay . . . . . . . . . . 15
Step 8 Operate the Controller . . . . . . . . . . . . . 16
Application 11 is designed for the operation of a deep fat fryer. It includes one heat
channel, one cooking time, a mid-point alarm and autolift capability. The application
includes up to forty menus that control fryer temperatures and cooking time.
Overview of Key Steps
1. Install the MINICHEF 2000.
2. Wire the controller.
3. Configure the controller.
4. Program the menus.
5. Set the controller security.
6. Set the Real-time Clock.
For instructions on Steps 1, 2, 3, 4, 5 and 6, see the Hardware & Software Setup Guide.
7. Design, manufacture and apply faceplate overlay for end-users. (For a suggested
design to suit this application, see this section. For overlay dimensions and guidelines, see the Hardware & Software Setup Guide.)
8. Operate the controller. (See this application guide.)
Application 11 Watlow MINICHEF 2000 ■ 11
Page 14
Key Functions in Configuration Mode
Heat
1
Idle 1
Temp
2
Idle 2
Time
4
5
Start/
Stop
6
Down
Your Company Logo
3
Up
Input 1 Fryer Temp →
Input 2 not used →
Event Input 1 not used →
Event Input 2 not used →
→Output 1 Heat
→Output 2 not used
→Event Output 1 Lift Basket
→Event Output 2 Drop Basket
→Output 5 Audible Alarm
Menu
Select
Heat
1
Idle One
Temp
2
Idle Two
Temp
5
Start/
Stop
6
Down
Your Company Logo
3
Up
4
Menu
Select
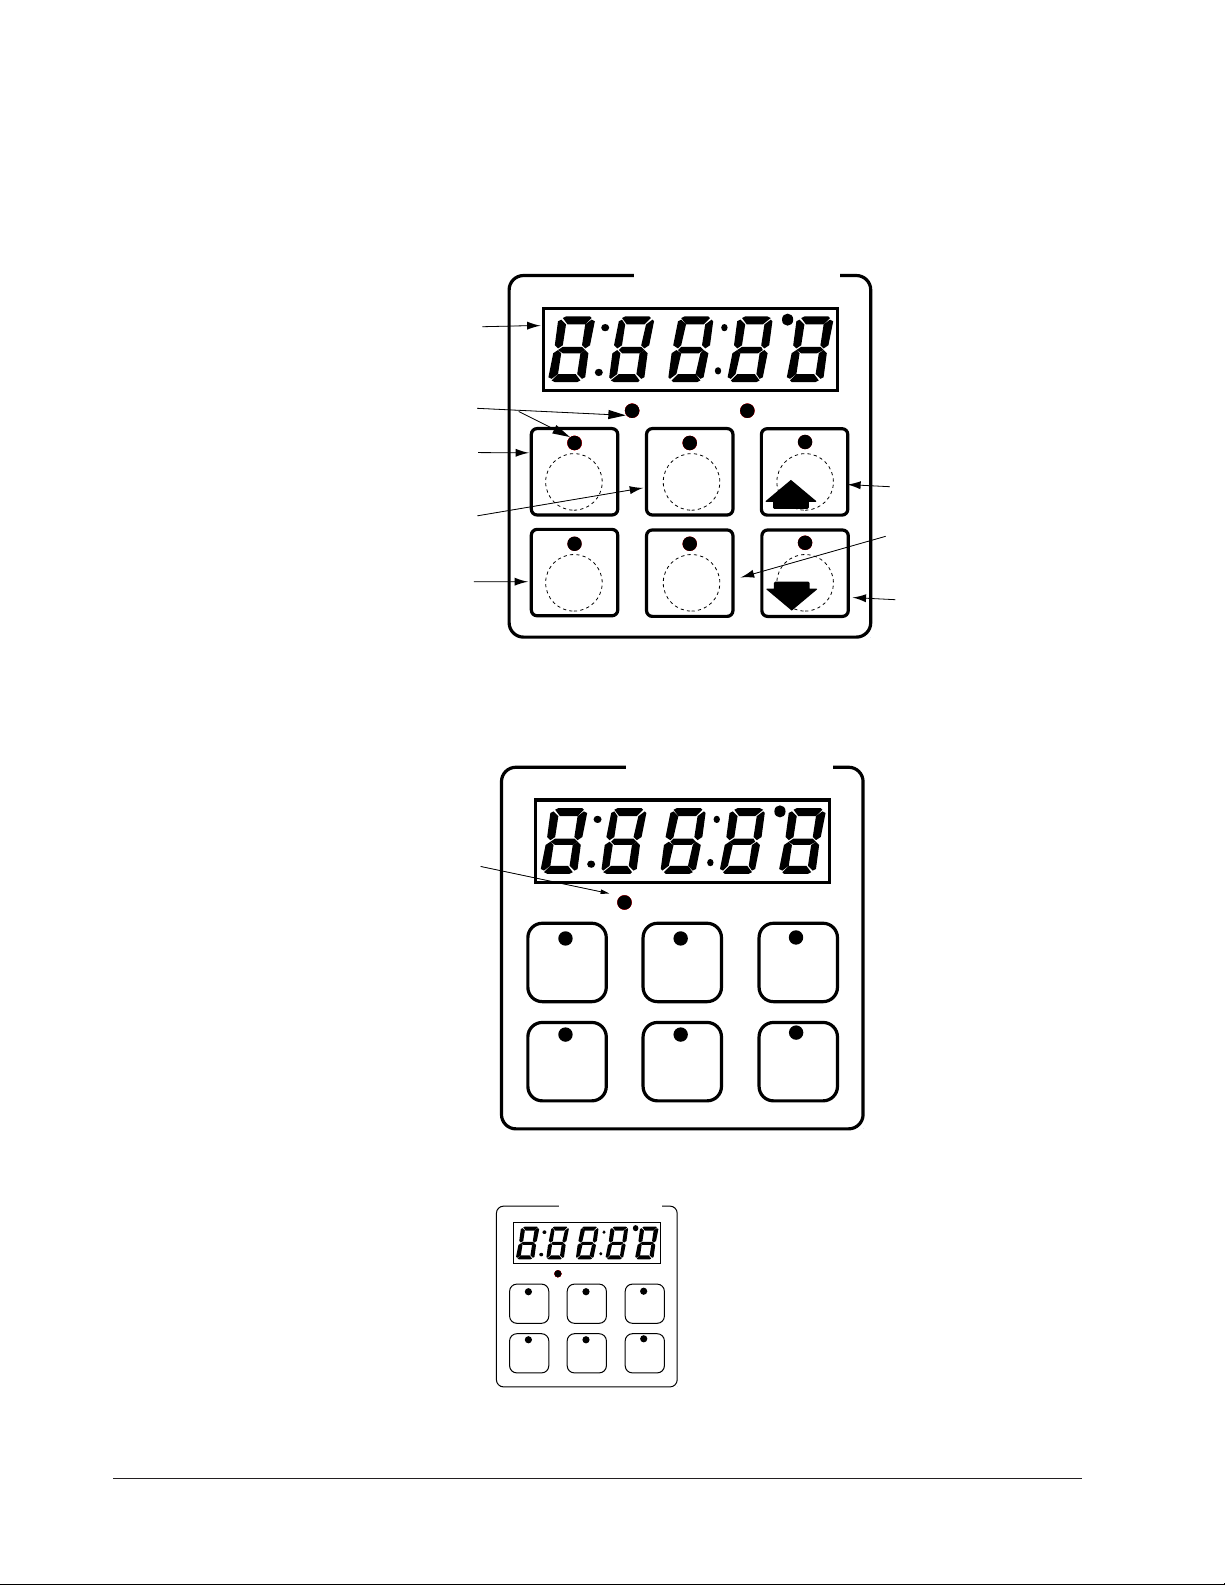
Heat indicator light Lit
when heat output is on.
Idle One Temp View or
program idle set point 1.
Indicator light will flash
slowly when controlling to
set point.
Idle Two Temp View or
program idle set point 2.
Indicator light will flash
slowly when controlling to
set point.
Menu Select Enter menu
mode or select menu.
Increment/Basket Up
Scroll through valid menus
or lift basket while
operating.
Start/Stop Activate or
cancel active menu.
Decrement/Basket Down
Scroll through valid menus
or drop basket while
operating.
Start/Stop Indicator Light
Slow flash...Preheating
Rapid flash...Ready
Lit...Cooking
Off...Done
AB
DE
GH
Enter
EscapeHome
Edit
C
F
MINICHEF 2000
Display five-digit, sevensegment numeric LED
display.
Indicator lights
(1 for each key, 2 for heat
channels).
Edit key (A) Access the
next level of parameters or
values.
Enter key (B) Enter the
value and return to
previous level.
Home key (D) Move to
Operation Mode with a
two-second key press.
Up key (C) Move up the
lists.
Escape key (E) Return to
original value when editing
a parameter value.
Down key (F) Move down
the lists.
Key Functions in Operation Mode
ç
WARNING: The Basket Up and Basket Down Keys cause or initiate motion. Appropriate reasonable care should be
taken to prevent personal injury or machine damage as a result of operator initiated or unexpected machine motion.
Summary of Input/Output Functions
Note: For details, see wiring instructions in the
12 ■ Watlow MINIC HEF 2000 Application 11
Hardware & Software Setup Guide.
Page 15

Configuration Mode Quick Reference
These are the functions, parameters and values included in the Configuration Mode for
this application. You must select Application 11 to access them. For directions, see the
Hardware & Software Setup Guide. The Appendix of that guide includes an explanation
of all parameters and values.
Function Parameter Value Your Settings
[Etype] Equipment-Type [appl`] Application Number 1 - 28 11
[a_Loc] Application Number Yes, No
Security Lock
[Sound] Audible Alarm Sound 0 - 5
[btine] Basket Travel Time 0 - 30 seconds
[idle1] Channel 1 Idle Temperature Temperature range low to
range high
[idle2] Channel 2 Idle Temperature Temperature range low to
range high
[Melt] Oil Melt Temperature On, Off
[SEtUP] Setup [`Ç_Ï`] Temperature Display Format ºC or ºF
[time] Time Display Format MMM:SS, HH:MM, H:MM:SS
(H=Hours, M=Minutes, S=Seconds)
[Chirp] Key Chirp On, Off
[loc``] Menu Security Lock Yes, No
[tc```] Thermocouple Type J, K (shown as [````H]), E
[rtd``] RTD Curve DIN, JIS
[tconp] WatCurveTMTemperature On, Off
Compensation
[Ofst1] Temperature Offset, Channel 1 -99 to 99ºF (-55 to 55ºC)
[tr`lo] Temperature Range Low 0ºF (-18º C) for RTD inputs,
32ºF (0ºC) for tc inputs to [tr`HI]
[tr`HI] Temperature Range High [tr`lo] to 1200ºF (649ºC)
[ready] Preheat Ready Feature Yes, No
[rband] Ready Band 1 to 1200ºF (649ºC)
[Cloc`] Real Time Clock Display Yes, No
[plOSS] Power Loss Menu Resume Yes, No
[al``1] Alarms for channel 1 None, Dev, Proc, Both
[aL`P1] Absolute Process Alarm 1 100 to 1200ºF (38º to 649ºC)
[aLdL1] Low Deviation Alarm 1 -999 to 0ºF (-555 to 0ºC)
[aLdH1] High Deviation Alarm 1 0 to 999ºF (0 to 555ºC)
[tHErl] Thermal [tyPE`] Temperature Control Type PID, On-Off
[HYSt1] Hysteresis 1 1 to 99ºF (1 to 55ºC)
[Pid`U] PID Units SI, US
[tune1] Auto-tuning 1 on, OFF
[ProP1] Proportional Band 1 1 to 999ºF (1 to 555ºC)
[rSEt1] Reset (integral) Gain 1 0.00 to 9.99 repeats/minute
[int`1] Integral Gain 1 0.00 to 99.99 minutes/repeat
[rAtE1] Rate (derivative) Gain 1 0.00 to 9.99 minutes
[dEr`1] Derivative Gain 1 0.00 to 9.99 minutes
[CYcL1] PID Cycle Time 1 1 to 60 seconds
[`diag] WatHelp Used for equipment troubleshooting and testing. Not used when programming. See the Hardware
Diagnostics & Software Setup Guide..
Application 11 Watlow MINICHEF 2000 ■ 13
Page 16

Program Mode Quick Reference
These are the functions, parameters and values included in the Program Mode for this
application. You must select Application 11 to access them. For menu programming
directions, see the Hardware & Software Setup Guide. The Appendix of that guide
includes a detailed explanation of all parameters and values.
Function Parameter Value
[M`__] Menu [stpt1] Set point 1 Temperature range low
Numbers 1 - 40 Temperature for set point 1 to range high
[TiNe1] Time 1 Setting Time 1 to 0 invalidates
Run time of set point 1 selected menu. Format varies
[ALArn] Mid-menu alarm Stir, Add, Flip, Turn, Alert,
setting None
[AtinE] Mid-menu alarm time 0 to Time 1
(not visible when alarm set to None)
Auto-tuning note:
Before auto-tuning Application 11, Setpoint 1 must first be set to a value that is typical
of your application. (See the Hardware & Software Setup Guide for information on programming menus.) Then set [tHErL] / [tunE1] to [```on]. After you accept this
[```on] setting, by pressing “Enter,” the display will present [`tunE] when the autotuning is taking place.
The controller will cancel the auto-tuning process if it cnnot be completed in 80 minutes.
You can cancel the auto-tuning process at any time be pressing either key C or Key D
and accepting [``Off], by pressing “Enter,” when it appears.
based on configuration.
14 ■ Watlow MINIC HEF 2000 Application 11
Page 17

Step 7 Design a Faceplate Overlay
AB
DE
GH
Enter
EscapeHome
Edit
C
F
MINICHEF 2000
Heat
1
Idle One
Temp
2
Idle Two
Temp
5
Start/
Stop
6
Down
Your Company Logo
3
Up
4
Menu
Select
To complete the installation, you must apply a graphic membrane to the front panel of
the controller. The following artwork will help you design and create a membrane for
this application. For more dimensions and guidelines, see the Hardware & Software
Setup Guide.
Suggested End-user Overlay:
This Prototyping and Training Membrane Overlay will help you with the configuration and programming steps. To order it, see the Ordering Information at
the back of this guide.
Application 11 Watlow MINICHEF 2000 ■ 15
Page 18
Step 8 Operate the Controller
DECF
MINICHEF 2000
[````1]
Edit Accept
Back-UpExit
DECF
MINICHEF 2000
[````9]
Edit Accept
Back-UpExit
AB
GH
AB
GH
DECF
MINICHEF 2000
[`idle]
Edit Accept
Back-UpExit
AB
GH
Summary of Key Functions in Operation Mode
Key Operation Function
A Idle Temperature Number One
B Idle Temperature Number Two
C Increment and Basket Up
D Menu Select
E Start/Stop
F Decrement and Basket Down
Start-up
Apply power to the fryer and add cooking oil if necessary.
Select a Menu
1. Press the Menu Select key.
The controller will display the currently selected menu. If no menus have been pro-
grammed the word [`nonE] will appear on the display.
2. Press the Up-arrow or Down-arrow key until the menu you want appears on the display.
The controller will only display valid menus (those for which Time 1 for the menu is
set to greater than 0).
3. Press the Menu Select key again.
The menu you have chosen becomes the current menu for controller operation.
16 ■ Watlow MINIC HEF 2000 Application 11
Page 19
Initial Preheat
AB
DECF
GH
MINICHEF 2000
[`idle]
Edit Accept
Back-UpExit
SLOW
FLASH
AT OPERATING TEMPERATURE
(PREHEAT CONDITION MET)
RAPID
FLASH
B
DECF
MINICHEF 2000
[100f`]
Edit Accept
Back-UpExit
B
DECF
MINICHEF 2000
[ready]
Edit Accept
Back-UpExit
G H GH
A A
[pre-`] [`Heat]
DECF
MINICHEF 2000
[`50`f]
Edit Accept
Back-UpExit
DECF
MINICHEF 2000
[ready]
Edit Accept
Back-UpExit
AB
GH
AB
GH
DECF
MINICHEF 2000
[`idle]
Edit Accept
Back-UpExit
AB
GH
At power-up, the unit will preheat to the temperature value set in the Configuration
Mode [Etype] / [preHt]. The display will show [Pre-`] [`HEat] followed by oil temperature as the oil heats.
When the unit reaches initial preheat temperature, [Ready] will flash once on the display and an audible tone will sound for 2 seconds. Then [`idle] will appear on the display. If Real Time Clock option is installed and [setUp] / [Cloc`] is set to [``yes],
the time of day will appear on the display.
Preheat
If in the Configuration Mode [SEtUP] / [ready] has been set to yes, the controller will
detect temperatures and preheat to operating temperature (above relative set point
minus the ready band) as required.
• Activate the menu by pressing the Start/Stop key.
If the fryer is not at operating temperature, it will preheat. Meanwhile:
The word [Pre-`] [`Heat] will appear on the display for a few moments. The
Start/Stop key indicator light will flash slowly. The temperature of Channel 1 will be
displayed until the operating temperature is reached.
The heat output indicator light - G, just below the display- will light up whenever
the controller is calling for heat.
When the fryer is at operating temperature (above relative set point minus the
ready band) [ready] will appear on the display and the Start/Stop key indicator
light will flash rapidly. You are now ready to cook with the active menu.
If the fryer is at operating temperature, the display goes directly to [ready] without indicating preheat or temperature.
The Melt Cycle
To avoid burning, congealed oil requires a slow heating action. If, in the Configuration
Mode, [etype] / [melt] has been set to on, when the oil temperature is below 212ºF
the heat output will be limited to 10% of full power.
Run a Menu (with preheat feature)
This procedure describes how to run an active menu when the preheat feature is inactive — in other words, when the [ready] parameter in the [setUp] function of the
Configuration Mode is set to [``yes].
Application 11 Watlow MINICHEF 2000 ■ 17
Page 20
1. Select the menu you want to run as shown earlier in “Select a Menu”.
B
DE
C
F
MINICHEF 2000
[idle`]
Edit Accept
Back-UpExit
G H
A
SLOW
FLASH
DECF
MINICHEF 2000
[EnD``]
Edit Accept
Back-UpExit
B
DE
C
F
MINICHEF 2000
[idle`]
Edit Accept
Back-UpExit
G H
AAB
GH
RAPID
FLASH
SLOW
FLASH
DECF
MINICHEF 2000
[ready]
Edit Accept
Back-UpExit
DECF
MINICHEF 2000
[`0009]
Edit Accept
Back-UpExit
B
DECF
MINICHEF 2000
[`idle]
Edit Accept
Back-UpExit
G H
A
AB
GH
AB
GH
DECF
MINICHEF 2000
[alert]
Edit Accept
Back-UpExit
AB
GH
STEADY
ON
SLOW
FLASH
DECF
MINICHEF 2000
[``EnD]
Edit Accept
Back-UpExit
B
DECF
MINICHEF 2000
[`idle]
Edit Accept
Back-UpExit
G H
AAB
GH
RAPID
FLASH
IF PROGRAMMED
SLOW
FLASH
AB
DECF
GH
MINICHEF 2000
[`idle]
Edit Accept
Back-UpExit
SLOW
FLASH
AT OPERATING TEMPERATURE
(PREHEAT CONDITION MET)
RAPID
FLASH
B
DECF
MINICHEF 2000
[100f`]
Edit Accept
Back-UpExit
B
DECF
MINICHEF 2000
[ready]
Edit Accept
Back-UpExit
G H GH
A A
[pre-`] [`Heat]
2. With [`idle] or time of day on the display, press the Start/Stop key.
If the preheat condition has not been met, the fryer will preheat until [ready] appears
on the display. If the fryer is at operating temperature [ready] will immediately
appear on the display.
3. With ready on the display, place the food in the basket.
4. Press the Start/Stop key. The basket will lower automatically for the amount of time
set in the Configuration Mode under [Etype] / [Btine].
The Start/Stop key indicator light will light up. Time will count down on the display.
5. If programmed, as the time counts down, a mid-point alarm will appear on the display.
The alarm messages which varies based on programming will appear for ten seconds.
An audible will sound for five seconds. Time will continue to count down on the display
6. When the cooking cycle is finished one of the following will happen, depending on
the way the controller was programmed at [Etype] / [sound]::
18 ■ Watlow MINIC HEF 2000 Application 11
Page 21

With Sound set to 0: The controller automatically switches to idle. [`idle] or cur-
DECF
MINICHEF 2000
[`idle]
Edit Accept
Back-UpExit
DECF
MINICHEF 2000
[`0009]
Edit Accept
Back-UpExit
B
DECF
MINICHEF 2000
[`idle]
Edit Accept
Back-UpExit
G H
A
AB
GH
AB
GH
DECF
MINICHEF 2000
[alert]
Edit Accept
Back-UpExit
AB
GH
STEADY
ON
SLOW
FLASH
DECF
MINICHEF 2000
[``EnD]
Edit Accept
Back-UpExit
B
DECF
MINICHEF 2000
[`idle]
Edit Accept
Back-UpExit
G H
AAB
GH
RAPID FLASH
IF PROGRAMMED
SLOW FLASH
rent time will appear on the display. The Start/Stop key indicator light will flash
slowly. The controller will maintain temperature at the programmed set point.
With Sound set to 1, 2, or 3: [``End] will appear on the display and an audible tone
will be emitted. The Start/Stop key indicator light will flash rapidly. You can
acknowledge and silence the tone by pressing the Start/Stop key or it will automatically time out within 2 seconds for setting 1 or 20 seconds for settings 2 or 3 and
then go into idle. The Start/Stop key indicator light will flash slowly. The controller
will maintain temperature at the programmed set point.
With sound set to 4 or 5: [``End] will appear on the display and the Start/Stop key
indicator light will flash rapidly. You must acknowledge the audible tone by pressing
the Start/Stop key. Once acknowledged the audible tone is silenced and the controller goes into idle. The Start/Stop key indicator light will flash slowly. The controller will maintain temperature at the programmed set point.
7. The basket will raise automatically based on the value programmed in the
Configuration Mode [Etype] / [Btine].
8. To repeat cooking, repeat steps 1 through 7.
Run a Menu (with no preheat feature)
This procedure describes how to run an active menu when the preheat feature is inactive - in other words, when the [ready] parameter in the [setUp] function of the
Configuration Mode is set to [```no].
1. Select the menu you want to run as shown earlier in “Select a Menu”.
2. With [`idle] or time of day on the display, place the food in the basket.
3. Press the Start/Stop key. The basket will lower automatically for the amount of time
set in the Configuration Mode under [Etype] / [Btine].
The Start/Stop key indicator light will light up. Time will count down on the display.
4. If programmed, as the time counts down, a mid-point alarm will appear on the display.
The alarm message which varies based on programming will appear for ten seconds.
An audible will sound for five seconds. Time will continue to count down on the dis-
play
5. When the cooking cycle is finished one of the following will happen, depending on
Application 11 Watlow MINICHEF 2000 ■ 19
the way the controller was programmed at [EtyPE] / [Sound]:
With Sound set to 0: The controller automatically switches to idle. [`idle] or cur-
Page 22

rent time will appear on the display. The Start/Stop key indicator light will flash
DECF
MINICHEF 2000
[`idle]
Edit Accept
Back-UpExit
DECF
MINICHEF 2000
[`0009]
Edit Accept
Back-UpExit
AB
GH
AB
GH
STEADY
ON
SLOW
FLASH
slowly. The controller will maintain temperature at the programmed set point.
With Sound set to 1, 2, or 3: [``End] will appear on the display and an audible tone
will be emitted. The Start/Stop key indicator light will flash rapidly. You can
acknowledge and silence the tone by pressing the Start/Stop key or it will automatically time out within 2 seconds for setting 1 or 20 seconds for settings 2 or 3 and
then go into idle. The Start/Stop key indicator light will flash slowly. The controller
will maintain temperature at the programmed set point.
With sound set to 4 or 5: [``End] will appear on the display and the Start/Stop key
indicator light will flash rapidly. You must acknowledge the audible tone by pressing
the Start/Stop key. Once acknowledged the audible tone is silenced and the controller goes into idle. The Start/Stop key indicator light will flash slowly. The controller will maintain temperature at the programmed set point.
6. The basket will raise automatically based on the value programmed in the
Configuration Mode [Etype] / [Btine].
7. To repeat cooking, repeat steps 1 through 6.
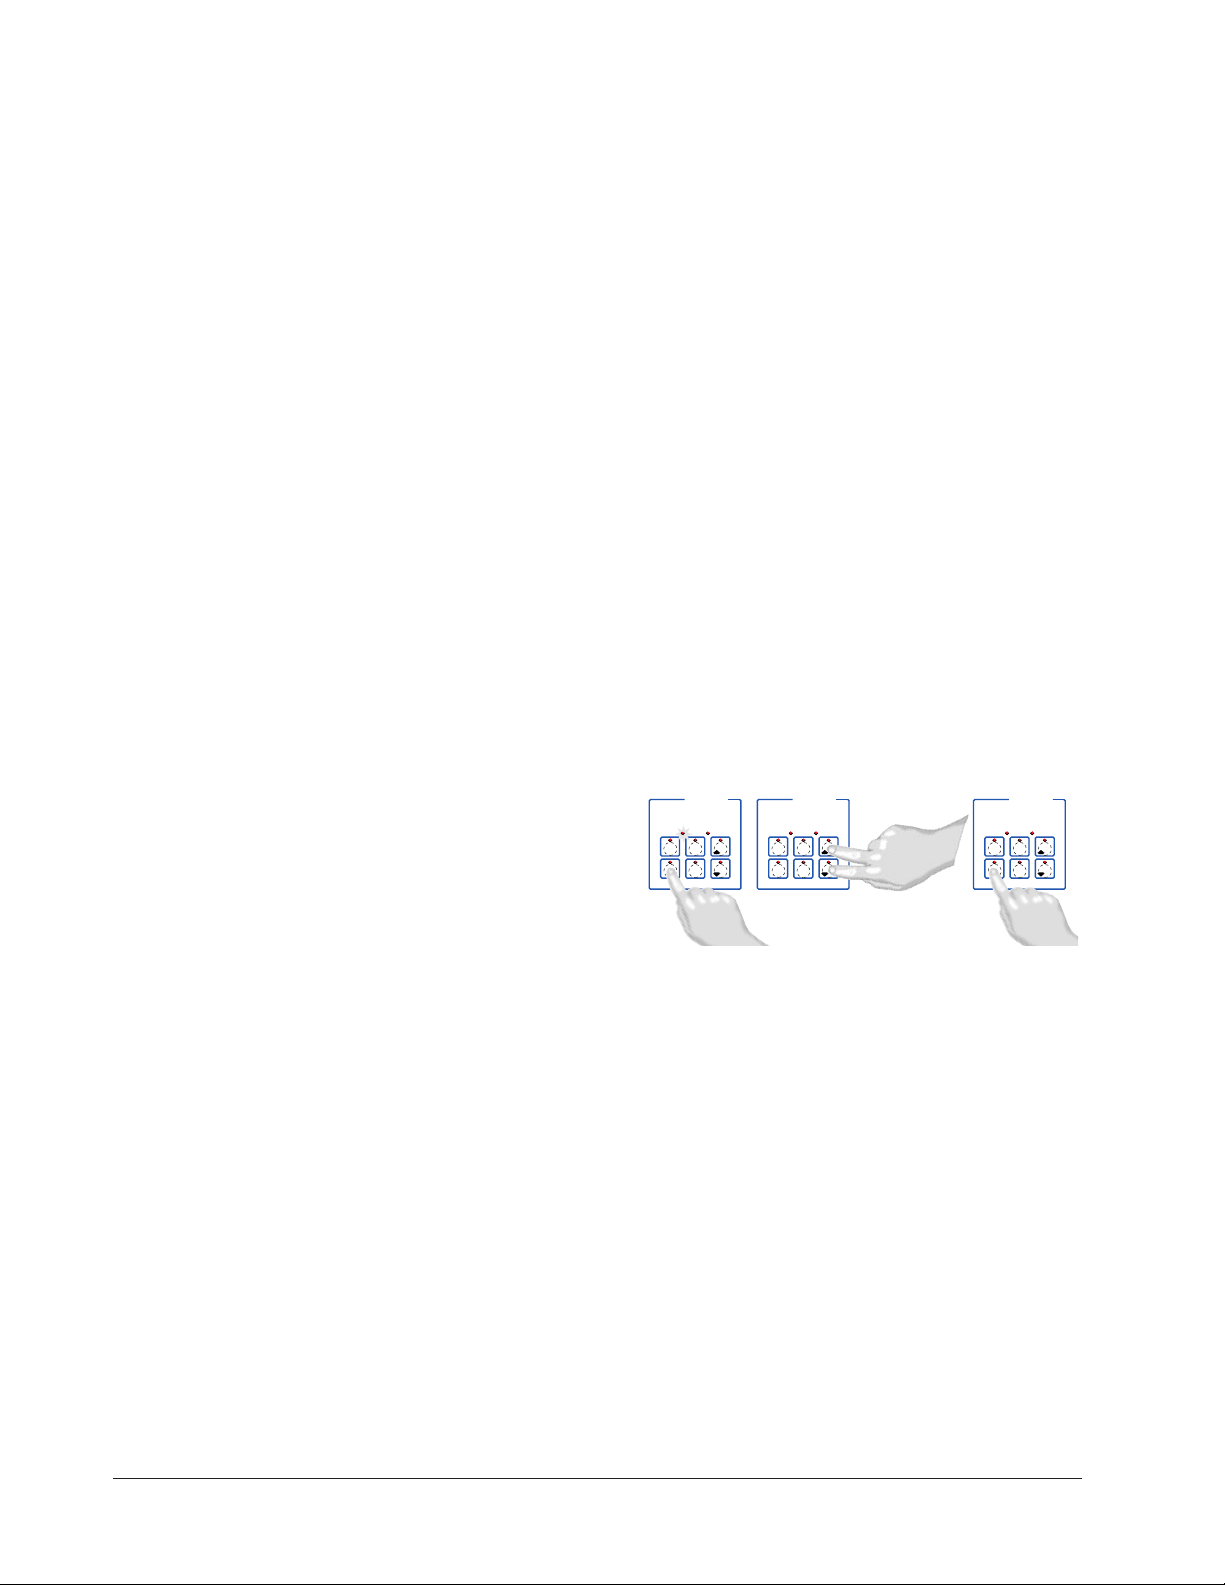
Auxiliary Idle Set Points
In some cases you may want to control at some non-cooking temperature such as during
cleaning, preheating or to preserve the life of the oil. The controller is equipped with the
capability of two auxiliary idle set points: Idle 1 and Idle 2.
To program either of the set points:
1. Press and hold down the Idle 1 Temp or Idle 2 Temp key.
2. While holding down the key, use the Up-arrow or Down-arrow key to adjust the set
point temperature.
3. Release all of the keys.
The idle temperature has been set.
4. Program the other Idle temperature if desired by repeating 1 through 3 using the
other Idle Temp key.
To run the fryer at an auxiliary idle set point:
• With the fryer in idle (not running a menu) press either the Idle1Temp or Idle2
Temp key.
The indicator light over the Idle Temp key will flash slowly.
The fryer will run at the idle set point until you run a menu by pressing the
Start/Stop key or you press the other Idle Temp key.
20 ■ Watlow MINIC HEF 2000 Application 11
Page 23

Manual Basket Lift
At any time you can raise or lower the basket manually by using the Down-arrow key
(to lower) or the Up-arrow key (to raise). If you raise the basket manually while cooking,
the timer will pause. Countdown time will resume when you manually lower the basket
or when you press the active menu key.
ç
WARNING: The Basket Up and Basket Down Keys cause or initiate motion. Appropriate reasonable care should be
taken to prevent personal injury or machine damage as a result of operator initiated or unexpected machine motion.
Event Outputs
While running a menu:
Event output 1 is activated to lift the basket for the length of time programmed in
Configuration Mode [Etype] / [Btine].
Event output 2 is activated to lower the basket for the length of time programmed in
Configuration Mode [Etype] / [Btine].
Only one output can be on at a time.
Cancel a Menu
Canceling a menu stops controller completely. The controller does not maintain set point
temperatures or run time. You cancel a menu to run another menu, stop menu operation
for any reason, or are preparing to shut off the oven.
• Press the Start/Stop key for 2 seconds. Heat outputs will switch off. The heat output
indicator light will switch off. IdLE or time of day will be on the display.
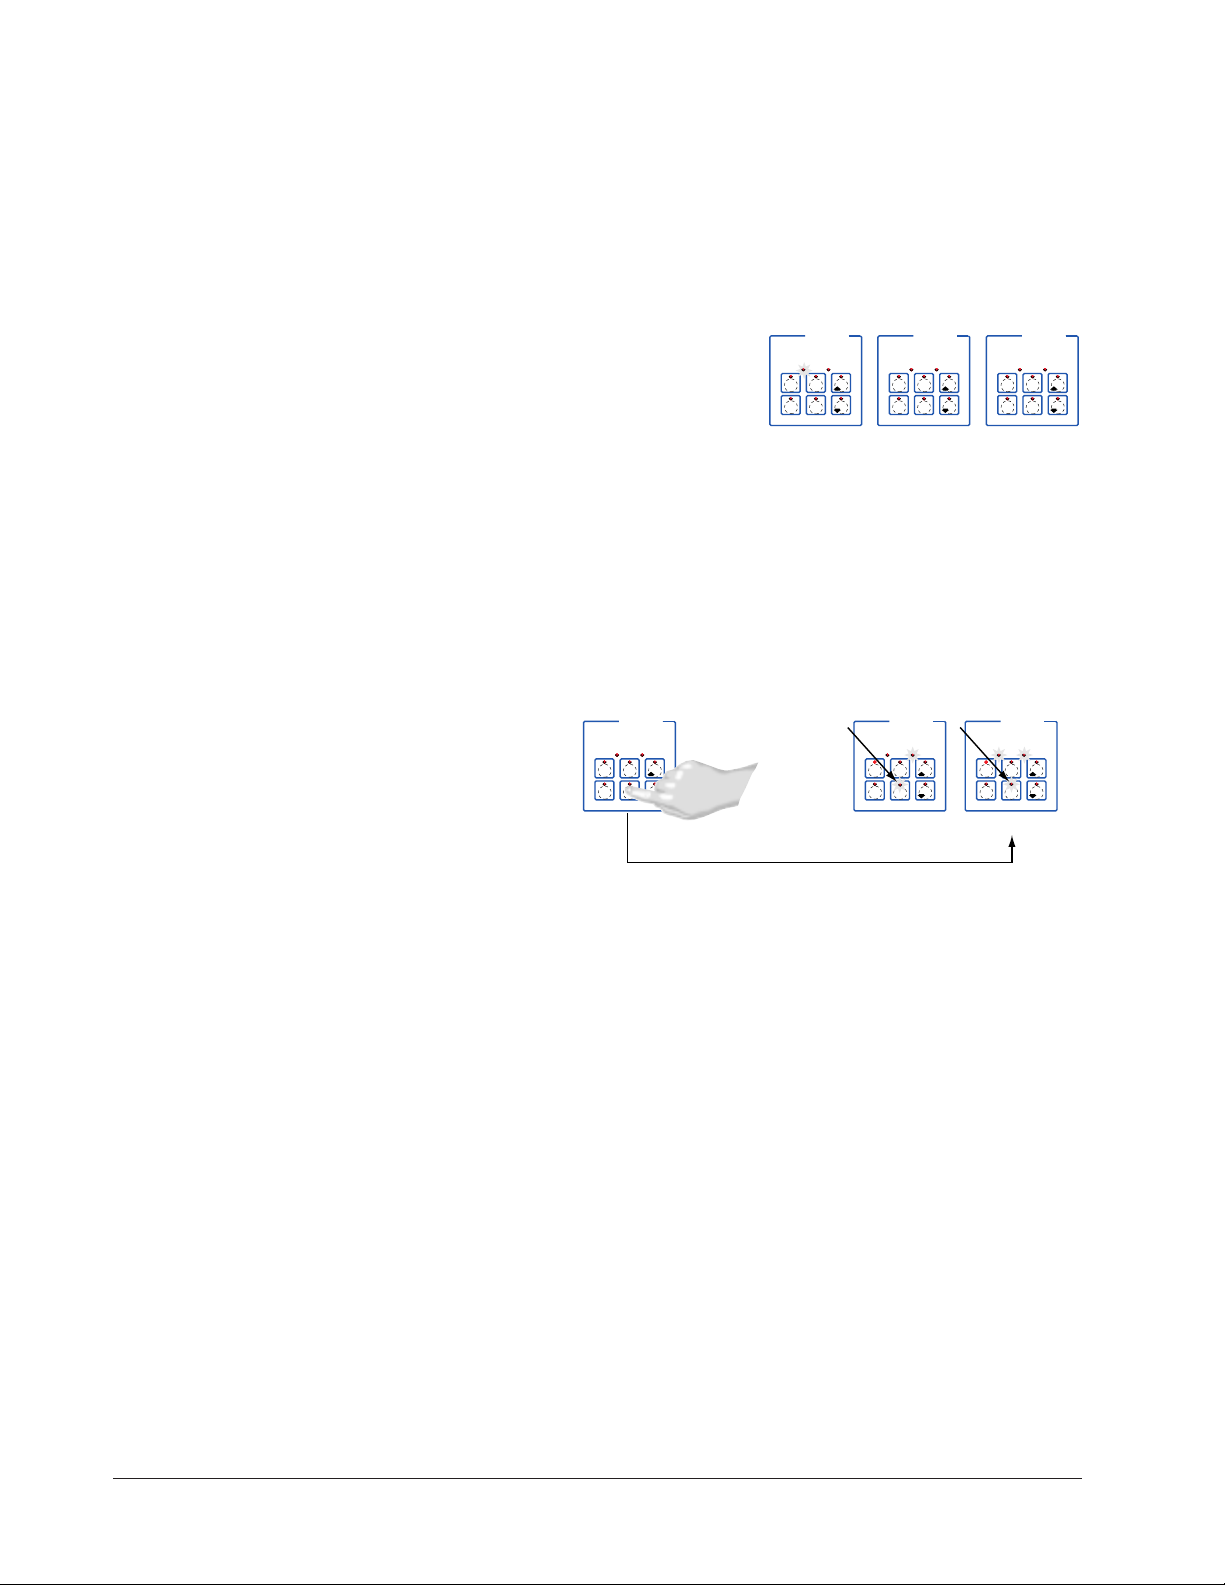
Restart a Menu
1. If the controller is preheating or running a menu, cancel the menu by pressing and
holding the Start/Stop key for 2 seconds. If the controller is in [`idle], go to 2.
2. Press the Start/Stop key.
Based on its programming, the unit will run the menu in one of the ways described
earlier.
Change Menus
1. With the controller in idle, select the menu you want to run by performing the procedure under “Select a Menu” earlier in this section.
2. Press the Start/Stop key.
Based on its programming, the unit will run the menu in one of the ways described
earlier.
Temperature Alarms
The controller will alert you to temperature alarm conditions if they occur. If an alarm
occurs, take action as determined by your supervisor. See the Appendix in the Hardware
& Software Setup Guide for a Troubleshooting Chart and a summary of temperature
alarms.
Application 11 Watlow MINICHEF 2000 ■ 21
Page 24

Errors
The controller will alert you to errors if they occur. Errors are critical problems that
shut down the unit. If an error occurs, an error message will appear on the display. You
should switch off the power and call for service.
See the Appendix in the Hardware & Software Setup Guide for a Troubleshooting Chart
and a summary of errors.
22 ■ Watlow MINIC HEF 2000 Application 11
Page 25

12
Application 12
Manual Deepfat Fryer
with Autolift Control
Single Heat Channel, One Menu
Introduction to Application 12 . . . . . . . . . . . . . 23
Configuration Mode Quick Reference . . . . . . . . 25
Step 7 Design a Faceplate Overlay . . . . . . . . . . 27
Step 8 Operate the Controller . . . . . . . . . . . . . 28
Application 12 allows you to program a menu to control one temperature channel and
cooking time for a manual deepfat fryer.
Overview of Key Steps
1. Install the MINICHEF 2000.
2. Wire the controller.
3. Configure the controller.
4. Program the menu.
5. Set the controller security.
6. Set the Real-time Clock.
For instructions on Steps 1, 2, 3, 4, 5 and 6, see the Hardware & Software Setup Guide.
7. Design, manufacture and apply faceplate overlay for end-users. (For a suggested
design to suit this application, see this section. For overlay dimensions and guidelines, see the Hardware & Software Setup Guide.)
8. Operate the controller. (See this application guide.)
Application 12 Watlow MINICHEF 2000 ■ 23
Page 26
Key Functions in Configuration Mode
Heat
1
Temp
2
Time
4
5
Start/
Stop
6
Down
Your Company Logo
3
Up
Input 1 Fryer Temperature →
Input 2 not used →
Event Input 1 not used →
Event Input 2 not used →
→ Output 1 Heat
→ Output 2 not used
→ Event Output 1 Lift Basket
→ Event Output 2 Drop Basket
→ Output 5 Audible Alarm
Heat
1
Temp
2
Time
4
5
Start/
Stop
6
Down
Your Company Logo
3
Up
Time Set Time 1
Time Indicator Light
Rapid flash when editing
parameters during menu
operation.
Heat Indicator Light Lit
when heat output is on.
Increment and Basket Up
Lift basket.
Up and Down Indicator
Lights Lit when up or
down outlets are
energized.
Decrement and Basket
Down Lower basket.
Temp Set Point 1
Temperature.
Temp Indicator Light
Rapid flash when editing
parameters during menu
operation.
Start/Stop Activate or
cancel active menu.
Start/Stop Indicator Light
Full on...Preheating
Flashing...Ready or
Paused
Full on...Cooking
Off...Done
Not Used
AB
DE
GH
Enter
EscapeHome
Edit
C
F
MINICHEF 2000
Display five-digit, sevensegment numeric LED
display.
Indicator lights
(1 for each key, 2 for heat
channels).
Edit key (A) Access the
next level of parameters or
values.
Enter key (B) Enter the
value and return to
previous level.
Home key (D) Move to
Operation Mode with a
two-second key press.
Up key (C) Move up the
lists.
Escape key (E) Return to
original value when editing
a parameter value.
Down key (F) Move down
the lists.
Key Functions in Operation Mode
ç
WARNING: The Basket Up and Basket Down Keys cause or initiate motion. Appropriate reasonable care should be
taken to prevent personal injury or machine damage as a result of operator initiated or unexpected machine motion.
Summary of Input/Output Functions
Note: For details, see wiring instructions in the
24 ■ Watlow MINIC HEF 2000 Application 12
Hardware & Software Setup Guide
.
Page 27

Configuration Mode Quick Reference
These are the functions, parameters and values included in the Configuration Mode for
this application. You must select Application 12 to access them. For directions, see the
Hardware & Software Setup Guide. The Appendix of that guide includes an explanation
of all parameters and values.
Function Parameter Value Your Settings
{Etype} Equipment-Type [appl`] Application Number 1 - 28 12
[a_Loc] Application Number Yes, No
Security Lock
[btine] Basket Travel Time 0 - 30
[melt] Oil Melt Cycle On, Off
[SEtUP] Setup [`Ç_Ï`] Temperature Display Format ºC or ºF
[time] Time Display Format MMM:SS, HH:MM, H:MM:SS
(H=Hours, M=Minutes, S=Seconds)
[Chirp] Key Chirp On, Off
[tc```] Thermocouple Type J, K (shown as [````H]), E
[rtd``] RTD Curve DIN, JIS
[tconp] WatCurveTMTemperature On, Off
Compensation
[Ofst1] Temperature Offset, Channel 1 -99 to 99ºF (-55º to 55ºC)
[tr`lo] Temperature Range Low 0ºF (-18ºC) for RTD inputs,
32ºF (0ºC) for tc inputs to [tr`Hi]
[tr`Hi] Temperature Range High [tr`lo] to 1200ºF (649ºC)
[ready] Preheat Ready Feature Yes, No
[rband] Ready Band 1 to 1200ºF (649ºC)
[Cloc`] Real Time Clock Display Yes, No
[plOSS] Power Loss Menu Resume Yes, No
[al``1] Alarms for channel 1 None, Dev, Proc, Both
[aL`P1] Absolute Process Alarm 1 100 to 1200ºF (38 to 649ºC)
[aLdL1] Low Deviation Alarm 1 -999 to 0ºF (-555 to 0ºC)
[aLdH1] High Deviation Alarm 1 0 to 999ºF (0 to 555ºC)
[tHErl] Thermal [tyPE`] Temperature Control Type PID, On-Off
[HYSt1] Hysteresis 1 1 to 99ºF (1 to 55ºC)
[Pid`U] PID Units SI, US
[tune1] Auto-tuning 1 on, OFF
[ProP1] Proportional Band 1 1 to 999ºF (1 to 555ºC)
[rSEt1] Reset (integral) Gain 1 0.00 to 9.99 repeats/minute
[int`1] Integral Gain 1 0.00 to 99.99 minutes/repeat
[rAtE1] Rate (derivative) Gain 1 0.00 to 9.99 minutes
[dEr`1] Derivative Gain 1 0.00 to 9.99 minutes
[CYcL1] PID Cycle Time 1 1 to 60 seconds
[`diag] WatHelp Used for equipment troubleshooting and testing. Not used when programming. See the Hardware
Diagnostics & Software Setup Guide.
Application 12 Watlow MINICHEF 2000 ■ 25
Page 28

Auto-tuning Note:
Before auto-tuning Application 12, [teNp1] in the operations menu must first be set to
a value that is typical of your application. (See the Hardware & Software Setup Guide
for information on programming menus.) Then set [tHerl] / [tunE1] to [```on].
After you accept [```on], by pressing “Enter,” the controller will display [`tunE]
while auto-tuning is taking place.
The controller will cancel the auto-tuning process if it cannot be completed in 80 minutes. You can cancel the auto-tuning process at any time by pressing either key C or key
D and accepting [``Off], by pressing “Enter,” when it appears.
26 ■ Watlow MINIC HEF 2000 Application 12
Page 29
Step 7 Design a Faceplate Overlay
AB
DE
GH
Enter
EscapeHome
Edit
C
F
MINICHEF 2000
Heat
1
Temp
2
Time
4
5
Start/
Stop
6
Down
Your Company Logo
3
Up
To complete the installation, you must apply a graphic membrane to the front panel of
the controller. The following artwork will help you design and create a membrane for
this application. For more dimensions and guidelines, see the Hardware & Software
Setup Guide.
Suggested End-user Overlay:
This Prototyping and Training Membrane Overlay will help you with the configuration and programming steps. To order it, see the Ordering Information
at the back of this guide.
Application 12 Watlow MINICHEF 2000 ■ 27
Page 30

Step 8 Operate the Controller
DECF
MINICHEF 2000
[tENP1]
Edit Accept
Back-UpExit
DECF
MINICHEF 2000
[650°f]
Edit Accept
Back-UpExit
AB
GH
AB
GH
DECF
MINICHEF 2000
[`idle]
Edit Accept
Back-UpExit
AB
GH
[500°F]
Summary of Key Functions in Operation Mode
Key Function
A Temp
B Time
C Increment & Basket Up
D Not Used
E Start/Stop
F Decrement & Basket Down
Startup
Apply power to the fryer and add cooking oil if necessary.
Set the Menu
Set the cooking temperature.
1. Press the Temp key [teNp1] and then the cooking temperature value will appear
on the display.
2. Press the Up-arrow or Down-arrow key until the value you want appears on the display.
3. Press the Temp key again.
The cooking temperature has been set.
[`idle] will appear on the display.
Set the cooking time.
1. Press the Time key [tiNE1] and then the cooking time value will appear on the
display.
2. Press the Up-arrow or Down-arrow key until the value you want appears on the display.
3. Press the Time key again.
The cooking time has been set.
[`idle] will appear on the display.
28 ■ Watlow MINIC HEF 2000 Application 12
Page 31

Five Second Timeout
AB
DECF
GH
MINICHEF 2000
[`idle]
Edit Accept
Back-UpExit
SLOW
FLASH
AT OPERATING TEMPERATURE
(PREHEAT CONDITION MET)
RAPID
FLASH
B
DECF
MINICHEF 2000
[100f`]
Edit Accept
Back-UpExit
B
DECF
MINICHEF 2000
[ready]
Edit Accept
Back-UpExit
G H GH
A A
[pre-`] [`Heat]
DECF
MINICHEF 2000
[`50`f]
Edit Accept
Back-UpExit
DECF
MINICHEF 2000
[ready]
Edit Accept
Back-UpExit
AB
GH
AB
GH
DECF
MINICHEF 2000
[`idle]
Edit Accept
Back-UpExit
AB
GH
When using the up or down keys to change a value, if you do not press any key for 5
seconds, the controller will automatically be set to the last value on the display and
return to [`idle].
Initial Preheat
At power-up, the unit will preheat to the temperature value set in the Configuration
Mode [Etype] / [preHt]. The display will show [prE-`] [`Heat] followed by oil
temperature as the oil heats up.
When the unit reaches initial preheat temperature, [ready] will flash once on the display and an audible tone will sound for 2 seconds. Then [`idle] will appear on the display. If the Real-time Clock option is installed and [SEtUp] / [Cloc`] is set to
[``yes], the time of day will appear on the display.
If the preheat condition is met before power-up, the controller goes directly to idle, and
does not display [rEAdy] or sound an audible tone.
Preheat
If in the Configuration Mode [SEtUP] / [ready] has been set to yes, the controller will
detect temperatures and preheat to operating temperature (above relative set point
minus the ready band) as required.
• Activate the menu by pressing the Start/Stop key.
If the fryer is not at operating temperature, it will preheat. Meanwhile:
The word [Pre-`] [`Heat] will appear on the display for a few moments. The
Start/Stop key indicator light will flash slowly. The temperature of Channel 1 will
be displayed until the operating temperature is reached.
The heat output indicator light - G, just below the display- will light up whenever
the controller is calling for heat.
When the fryer is at operating temperature (above relative set point minus the
ready band) [ready] will appear on the display and the Start/Stop key indicator
light will flash rapidly. You are now ready to cook with the active menu.
If the fryer is at operating temperature, the display goes directly to [ready] without indicating preheat or temperature.
Application 12 Watlow MINICHEF 2000 ■ 29
Page 32

The Melt Cycle
DECF
MINICHEF 2000
[`idle]
Edit Accept
Back-UpExit
DECF
MINICHEF 2000
[`0009]
Edit Accept
Back-UpExit
B
DECF
MINICHEF 2000
[`idle]
Edit Accept
Back-UpExit
G H
A
AB
GH
AB
GH
STEADY
ON
SLOW
FLASH
DECF
MINICHEF 2000
[``EnD]
Edit Accept
Back-UpExit
B
DECF
MINICHEF 2000
[`idle]
Edit Accept
Back-UpExit
G H
AAB
GH
RAPID FLASH
SLOW FLASH
AB
DECF
GH
MINICHEF 2000
[`idle]
Edit Accept
Back-UpExit
SLOW
FLASH
AT OPERATING TEMPERATURE
(PREHEAT CONDITION MET)
RAPID
FLASH
B
DECF
MINICHEF 2000
[100f`]
Edit Accept
Back-UpExit
B
DECF
MINICHEF 2000
[ready]
Edit Accept
Back-UpExit
G H GH
A A
[pre-`] [`Heat]
To avoid burning congealed oil (shortening), a slow heating action may be necessary. If
this is desired, be sure that in the Configuration Mode [etype] / [melt] has been set
to [```on]. Then, when the oil temperature is below 212 ºF the heat output will be limited to 10% of full power. This reduces the chance of burning congealed oil while it is
heating.
Run a Menu (with preheat feature)
This procedure describes how to run an active menu when the preheat feature is inactive — in other words, when the [ready] parameter in the [setUp] function of the
Configuration Mode is set to [``yes].
1. Set the cooking time and temperature as shown earlier.
2. With [`idle] or time of day on the display, press the Start/Stop key.
If the control’s preheat condition has not been met, the fryer will preheat until
[Ready] appears on the display. If the fryer is at operating temperature [Ready]
will immediately appear on the display.
3. With [Ready] on the display, place the food in the basket and press the Start/Stop
key (indicated by the flashing red light). The Start/Stop indicator will light up, the
basket will lower automatically. Time will count down on the display.
4. When the cooking cycle is finished the basket will rise automatically. One of the following will happen, depending on the way the controller was programmed at
[EtypE] / {Sound]:
With Sound set to 0: The controller automatically switches to idle, where the controller maintains the temperatures at set point and does not run time. [`idle] or
time of day will appear on the display. The Start/Stop indicator light will flash slowly.
30 ■ Watlow MINIC HEF 2000 Application 12
Page 33

With Sound set to 1, 2, or 3, [``End] will appear on the display and an audible tone
DECF
MINICHEF 2000
[ready]
Edit Accept
Back-UpExit
DECF
MINICHEF 2000
[`0009]
Edit Accept
Back-UpExit
B
DECF
MINICHEF 2000
[`idle]
Edit Accept
Back-UpExit
G H
A
AB
GH
AB
GH
STEADY
ON
SLOW
FLASH
DECF
MINICHEF 2000
[``EnD]
Edit Accept
Back-UpExit
B
DECF
MINICHEF 2000
[`idle]
Edit Accept
Back-UpExit
G H
AAB
GH
RAPID FLASH
SLOW FLASH
will be emitted. The Start/Stop indicator light will flash rapidly. You can acknowledge and silence the tone by pressing the Start/Stop key or it will time out in 1 to 20
seconds and go into idle. The Start/Stop indicator light will flash slowly.
With Sound set to 4 or 5, [``End] will appear on the display and the Start/Stop
indicator light will flash rapidly. You must acknowledge the audible tone by pressing
the Start/Stop key. Once acknowledged, the tone is silenced and the controller goes
into idle The Start/Stop indicator light will flash slowly.
5. Remove the food from the basket. The controller will continue to regulate to the last
set point. The Start/Stop indicator light will flash slowly.
6. To repeat cooking, repeat steps 1 through 6.
Run a Menu (without preheat feature)
This procedure describes how to run the control when the preheat function is inactive —
that is, when the [Ready] parameter in the [SetUp] function of the Configuration
Mode is set to [```no] — and initial preheat power-up has been completed.
1. Set the cook time and temperature as shown earlier.
2. With [`idle] or time of day on the display, press the Start/Stop key
The Start/Stop will light up, the basket will lower automatically, and then time will
count down on the display.
3. When the cooking cycle is finished, the basket will rise automatically. One of the fol-
lowing will happen, depending on the way the controller was programmed at
[EtypE] / {Sound]:
With Sound set to 0: The controller automatically switches to idle, where the controller maintains the temperatures at set point and does not run time. [`idle] or
time of day will appear on the display.
With Sound set to 1, 2, or 3: [``End] will appear on the display and an audible tone
will be emitted. The Start/Stop indicator light will flash rapidly. You can acknowledge and silence the tone by pressing the Start/Stop key or it will time out in 1 to 20
seconds and go into idle.
With Sound set to 4 or 5: [``End] will appear on the display and the Start/Stop key
indicator light will flash rapidly. You must acknowledge the audible tone by pressing
the Start/Stop key. Once acknowledged the tone is silenced and the controller goes
into idle.
4. Remove the food from the basket. The controller will continue to regulate at the last
Application 12 Watlow MINICHEF 2000 ■ 31
set point.
Page 34

5. To repeat cooking, repeat steps 1 through 5.
Adjust a Menu While Cooking
You can adjust the temperature and time settings during the cooking and hold
sequences by performing the actions shown under “Set the Menu” earlier in this section.
Changes can be made to temperature and time only during the portion of the cooking
sequence in which they are active. For example: a change to the first cooking temperature [tENP1] can be made only when the first cooking temperature is being run during
the cooking sequence.
Temperature changes made while cooking are saved and become part of the permanent
menu. Time changes are not saved and do not become part of the permanent menu.
Cancel a Menu
Canceling the menu stops controller operation completely. The controller does not maintain set point temperatures or run time. Users may cancel the control operation in order
to run another one, to stop control operation for any reason, or when preparing to shut
off the fryer.
• Press the Start/Stop key for 2 seconds.
Heat outputs will switch off. Heat output indicator lights will switch off. The display presents [`idle] or the time of day will appear on the display.
Change or Restart Menus
1. Set time and temperature as shown earlier.
2. Press the Start/Stop key.
Manual Basket Lift
You can raise or lower the basket manually at any time by pressing the Down-arrow key
(to lower) or the Up-arrow key (to raise). If you raise the basket while cooking, the timer
will pause. Countdown time will resume when you lower the basket or when you press
the active menu key.
ç
WARNING: The Basket Up and Basket Down Keys cause or initiate motion. Appropriate reasonable care should be
taken to prevent personal injury or machine damage as a result of operator initiated or unexpected machine motion.
Event Outputs
While running a menu:
Event output 1 is activated to lift the basket for the length of time programmed in
Configuration Mode [EtyPE] / [btinE].
Event output 2 is activated to lower the basket for the length of time programmed in
Configuration Mode [EtyPE] / [btinE].
Only one output can be on at a time.
Temperature Alarms
The controller will alert you to temperature alarm conditions if they occur. If an alarm
occurs, take action as determined by your supervisor. See the Appendix in the Hardware
32 ■ Watlow MINIC HEF 2000 Application 12
Page 35

Errors
& Software Setup Guide for a Troubleshooting Chart and a summary of temperature
alarms.
The controller will alert you to errors if they occur. Errors are critical problems that
shut down the unit. If an error occurs, an error message will appear on the display. You
should switch off the power and call for service.
See the Appendix in the Hardware & Software Setup Guide for a Troubleshooting Chart
and a summary of errors.
Application 12 Watlow MINICHEF 2000 ■ 33
Page 36

Notes
34 ■ Watlow MINIC HEF 2000 Application 12
Page 37

13
Application 13
Pressurized Automatic
Deepfat Fryer
Single Heat Channel, Six Menus
Introduction to Application 13 . . . . . . . . . . . . . 35
Configuration Mode Quick Reference . . . . . . . . 37
Program Mode Quick Reference . . . . . . . . . . . . 38
Step 7 Design a Faceplate Overlay . . . . . . . . . . 39
Step 8 Operate the Controller . . . . . . . . . . . . . 40
Application 13 allows you to program as many as six menus, each of which will control
one heat channel, one cooking time and a pressure release time.
Overview of Key Steps
1. Install the MINICHEF 2000.
2. Wire the controller.
3. Configure the controller.
4. Program the menus.
5. Set the controller security.
6. Set the Real-time Clock.
For instructions on Steps 1, 2, 3, 4, 5 and 6, see the Hardware & Software Setup Guide.
7. Design, manufacture and apply faceplate overlay for end-users. (For a suggested
design to suit this application, see this section. For overlay dimensions and guidelines, see the Hardware & Software Setup Guide.)
8. Operate the controller. (See this application guide.)
Application 13 Watlow MINICHEF 2000 ■ 35
Page 38
Key Functions in Configuration Mode
Input 1 Fryer Temperature →
Input 2 not used →
Event Input 1 not used →
Event Input 2 not used →
Heat
Menu 1
Menu 4
Menu 3
Menu 6
1
Menu 2
2
3
4
Menu 5
5
6
Your Company Logo
→ Output 1 Heat
→ Output 2 not used
→ Event Output 1 Close Pressure Valve
→ Event Output 2 not used
→ Output 5 Audible Alarm
Heat
Menu
Menu
Menu
Menu
Menu
Menu
123
456
Your Company Logo
Menu Key Indicator
Lights
Slow flash.........Preheating
Rapid flash...............Ready
Lit..........................Cooking
Rapid flash.................Done
Slow flash..............Idle and
regulating temp to
previous set point
Not lit.....No menu selected
Heat Indicator Light Lit
when heat output is on.
Menu Keys Activate and
cancel menus, activate
cook cycle when
preheating, and
acknowledge alarms.
AB
DE
GH
Enter
EscapeHome
Edit
C
F
MINICHEF 2000
Display five-digit, sevensegment numeric LED
display.
Indicator lights
(1 for each key, 2 for heat
channels).
Edit key (A) Access the
next level of parameters or
values.
Enter key (B) Enter the
value and return to
previous level.
Home key (D) Move to
Operation Mode with a
two-second key press.
Up key (C) Move up the
lists.
Escape key (E) Return to
original value when editing
a parameter value.
Down key (F) Move down
the lists.
Key Functions in Operation Mode
Summary of Input/Output Functions
Note: For details, see wiring instructions in the
36 ■ Watlow MINICHEF 2000 Application 13
Hardware & Software Setup Guide.
Page 39

Configuration Mode Quick Reference
These are the functions, parameters and values included in the Configuration Mode for
this application. You must select Application 13 to access them. For directions, see the
Hardware & Software Setup Guide. The Appendix of that guide includes an explanation
of all parameters and values.
Function Parameter Value Your settings
[Etype] Equipment-Type [appl`] Application Number 1 - 28 13
[a_Loc] Application Number Yes, No
Security Lock
[Sound] Audible Alarm Sound 0 - 5
[ptine] Pressure Release Time 1 - 120 seconds
[preHt] Initial Preheat Temperature Range low to range high
[melt] Oil Melt Cycle On, Off
[SEtUP] Setup [`Ç_Ï`] Temperature Display Format ºC or ºF
[time] Time Display Format MMM:SS, HH:MM, H:MM:SS
(H=Hours, M=Minutes, S=Seconds)
[Chirp] Key Chirp On, Off
[loc``] Menu Security Lock Yes, No
[tc```] Thermocouple Type J, K (shown as [````H]), E
[rtd``] RTD Curve DIN, JIS
[tconp] WatCurveTMTemperature On, Off
Compensation
[Ofst1] Temperature Offset, Channel 1 -99 to 99ºF (-55 to 55ºC)
[tr`lo] Temperature Range Low 0ºF (-18ºC) for RTD inputs
32ºF (0ºC) for tc inputs to [tr`Hi]
[tr`Hi] Temperature Range High [tr`lo] to 1200ºF (649ºC)
[ready] Preheat Ready Feature Yes, No
[rband] Ready Band 1 to 1200ºF (649ºC)
[Cloc`] Real Time Clock Display Yes, No
[plOSS] Power Loss Menu Resume Yes, No
[al``1] Alarms for channel 1 None, Dev, Proc, Both
[aL`P1] Absolute Process Alarm 1 100 to 1200ºF (38 to 649ºC)
[aLdL1] Low Deviation Alarm 1 -999 to 0ºF (-555 to 0ºC)
[aLdH1] High Deviation Alarm 1 0 to 999ºF (0 to 555ºC)
[tHErl] Thermal [tyPE`] Temperature Control Type PID, On-Off
[HYSt1] Hysteresis 1 1 to 99ºF (1 to 55ºC)
[Pid`U] PID Units SI, US
[tune1] Auto-tuning 1 on, OFF
[ProP1] Proportional Band 1 1 to 999ºF (1 to 555ºC)
[rSEt1] Reset (integral) Gain 1 0.00 to 9.99 repeats/minute
[int`1] Integral Gain 1 0.00 to 99.99 minutes/repeat
[rAtE1] Rate (derivative) Gain 1 0.00 to 9.99 minutes
[dEr`1] Derivative Gain 1 0.00 to 9.99 minutes
[CYcL1] PID Cycle Time 1 1 to 60 seconds
[`diag] WatHelp Used for equipment troubleshooting and testing. Not used when programming. See the Hardware
Diagnostics & Software Setup Guide..
Application 13 Watlow MINICHEF 2000 ■ 37
Page 40

Program Mode Quick Reference
These are the functions, parameters and values included in the Program Mode for this
application. You must select Application 13 to access them. For menu programming
directions, see the Hardware & Software Setup Guide. The Appendix of that guide
includes a detailed explanation of all parameters and values.
Function Parameter Value Your Settings
[M`__] Menu [Stpt1] Setpoint 1 Temp range low
Numbers 1-6 Temperature of channel 1. to temp range high
[TiNe1] Time 1 Format varies based
Menu run time. on configuration. Setting at 0
invalidates selected menu.
Auto-tuning Note:
Before auto-tuning Application 13, Set Point 1 of Menu 1 must first be set to a value
that is typical of your application. (See Hardware & Software Setup Guide for information on programming menus.). Then set [tHerL] / [tunE1] to [```on]. After you
accept [```on],, by pressing “Enter,” the controller will display [`tunE] while autotuning is taking place.
The controller will cancel the auto-tuning process if it cannot be completed in 80 minutes. You can cancel the auto-tuning process at any time by pressing either key C or key
D and accepting [``Off], by pressing “Enter,” when it appears.
38 ■ Watlow MINICHEF 2000 Application 13
Page 41

Step 7 Design a Faceplate Overlay
AB
DE
GH
Enter
EscapeHome
Edit
C
F
MINICHEF 2000
Heat
Menu
Menu
Menu
Menu
Menu
Menu
123
456
Your Company Logo
To complete the installation, you must apply a graphic membrane to the front panel of
the controller. The following artwork will help you design and create a membrane for
this application. For more dimensions and guidelines, see the Hardware & Software
Setup Guide.
Suggested End-user Overlay:
This Prototyping and Training Membrane Overlay will help you with the configuration and programming steps. To order it, see the Ordering Information
at the back of this guide.
Application 13 Watlow MINICHEF 2000 ■ 39
Page 42

Step 8 Operate the Controller
AB
DECF
GH
MINICHEF 2000
[`idle]
Edit Accept
Back-UpExit
SLOW
FLASH
AT OPERATING TEMPERATURE
(PREHEAT CONDITION MET)
RAPID
FLASH
B
DECF
MINICHEF 2000
[100f`]
Edit Accept
Back-UpExit
B
DECF
MINICHEF 2000
[ready]
Edit Accept
Back-UpExit
G H GH
A A
[pre-`] [`Heat]
DECF
MINICHEF 2000
[`50`f]
Edit Accept
Back-UpExit
DECF
MINICHEF 2000
[ready]
Edit Accept
Back-UpExit
AB
GH
AB
GH
DECF
MINICHEF 2000
[`idle]
Edit Accept
Back-UpExit
AB
GH
Summary of Key Functions in Operation Mode
Key Function
A Menu 1
B Menu 2
C Menu 3
D Menu 4
E Menu 5
F Menu 6
Startup
1. Apply power to the fryer and add cooking oil if necessary.
Initial Preheat
At power-up, the unit will preheat to the temperature value set in the Configuration
Mode [Etype] / [preHt]. The display will show [Pre-`] [`HEat] followed by oil temperature as the oil heats.
When the unit reaches initial preheat temperature, [Ready] will flash once on the display and an audible tone will sound for 2 seconds. Then [`idle] will appear on the
display. (If Real Time Clock option is installed and [setUp] / [Cloc`] is set to
[``yes], the time of day will appear on the display).
Preheat
If in the Configuration Mode [SEtUP] / [ready] has been set to yes, the controller will
detect temperatures and preheat to operating temperature (above relative set point
minus the ready band) as required.
• Activate the menu by pressing the Start/Stop key.
If the fryer is not at operating temperature, it will preheat. Meanwhile:
The word [Pre-`] [`Heat] will appear on the display for a few moments. The
Start/Stop key indicator light will flash slowly. The temperature of Channel 1 will
be displayed until the operating temperature is reached.
40 ■ Watlow MINICHEF 2000 Application 13
Page 43

The heat output indicator light - G, just below the display- will light up whenever
DECF
MINICHEF 2000
[ready]
Edit Accept
Back-UpExit
DECF
MINICHEF 2000
[`0009]
Edit Accept
Back-UpExit
B
DECF
MINICHEF 2000
[`idle]
Edit Accept
Back-UpExit
G H
A
AB
GH
AB
GH
STEADY
ON
SLOW
FLASH
DECF
MINICHEF 2000
[``EnD]
Edit Accept
Back-UpExit
B
DECF
MINICHEF 2000
[`idle]
Edit Accept
Back-UpExit
G H
AAB
GH
RAPID FLASH
SLOW FLASH
AB
DECF
GH
MINICHEF 2000
[idle`]
Edit Accept
Back-UpExit
SLOW
FLASH
AT OPERATING TEMPERATURE
(PREHEAT CONDITION MET)
RAPID
FLASH
B
DECF
MINICHEF 2000
[100f`]
Edit Accept
Back-UpExit
B
DECF
MINICHEF 2000
[ready]
Edit Accept
Back-UpExit
G H GH
A A
[pre-`] [`Heat]
the controller is calling for heat.
When the fryer is at operating temperature (above relative set point minus the
ready band) [ready] will appear on the display and the Start/Stop key indicator
light will flash rapidly. You are now ready to cook with the active menu.
If the fryer is at operating temperature, the display goes directly to [ready] without indicating preheat or temperature.
The Melt Cycle
To avoid burning congealed oil (shortening), a slow heating action may be necessary. If
this is desired be sure that in the Configuration Mode [etype] / [melt]has been set
to [```on]. Then, when the oil temperature is below 212ºF the heat output will be limited to 10% of full power. This reduces the chance of burning congealed oil while it is
melting.
Run a Menu (with preheat feature)
This procedure describes how to run an active menu when the preheat feature is inactive — in other words, when the [ready] parameter in the [setUp] function of the
Configuration Mode is set to [``yes]
1. With [`idle] on the display, press the key for the menu you want to run.
If the selected menu’s preheat condition has not been met, the fryer will preheat
until [ready] appears on the display. If the fryer is at operating temperature,
[ready] will immediately appear on the display.
2. With [ready] on the display, place the food in the pressure fryer and secure the lid
on the pressure vessel.
3. Press the active menu key (indicated by the rapidly flashing indicator light).
The menu key indicator light will light up. Time will count down on the display.
When the menu cycle nears completion, pressure will be released from the fryer
based on the time programmed in Configuration Mode, [etype] / [Ptine]
Application 13 Watlow MINICHEF 2000 ■ 41
4. When the cooking cycle is finished, one of the following will happen, depending on
Page 44
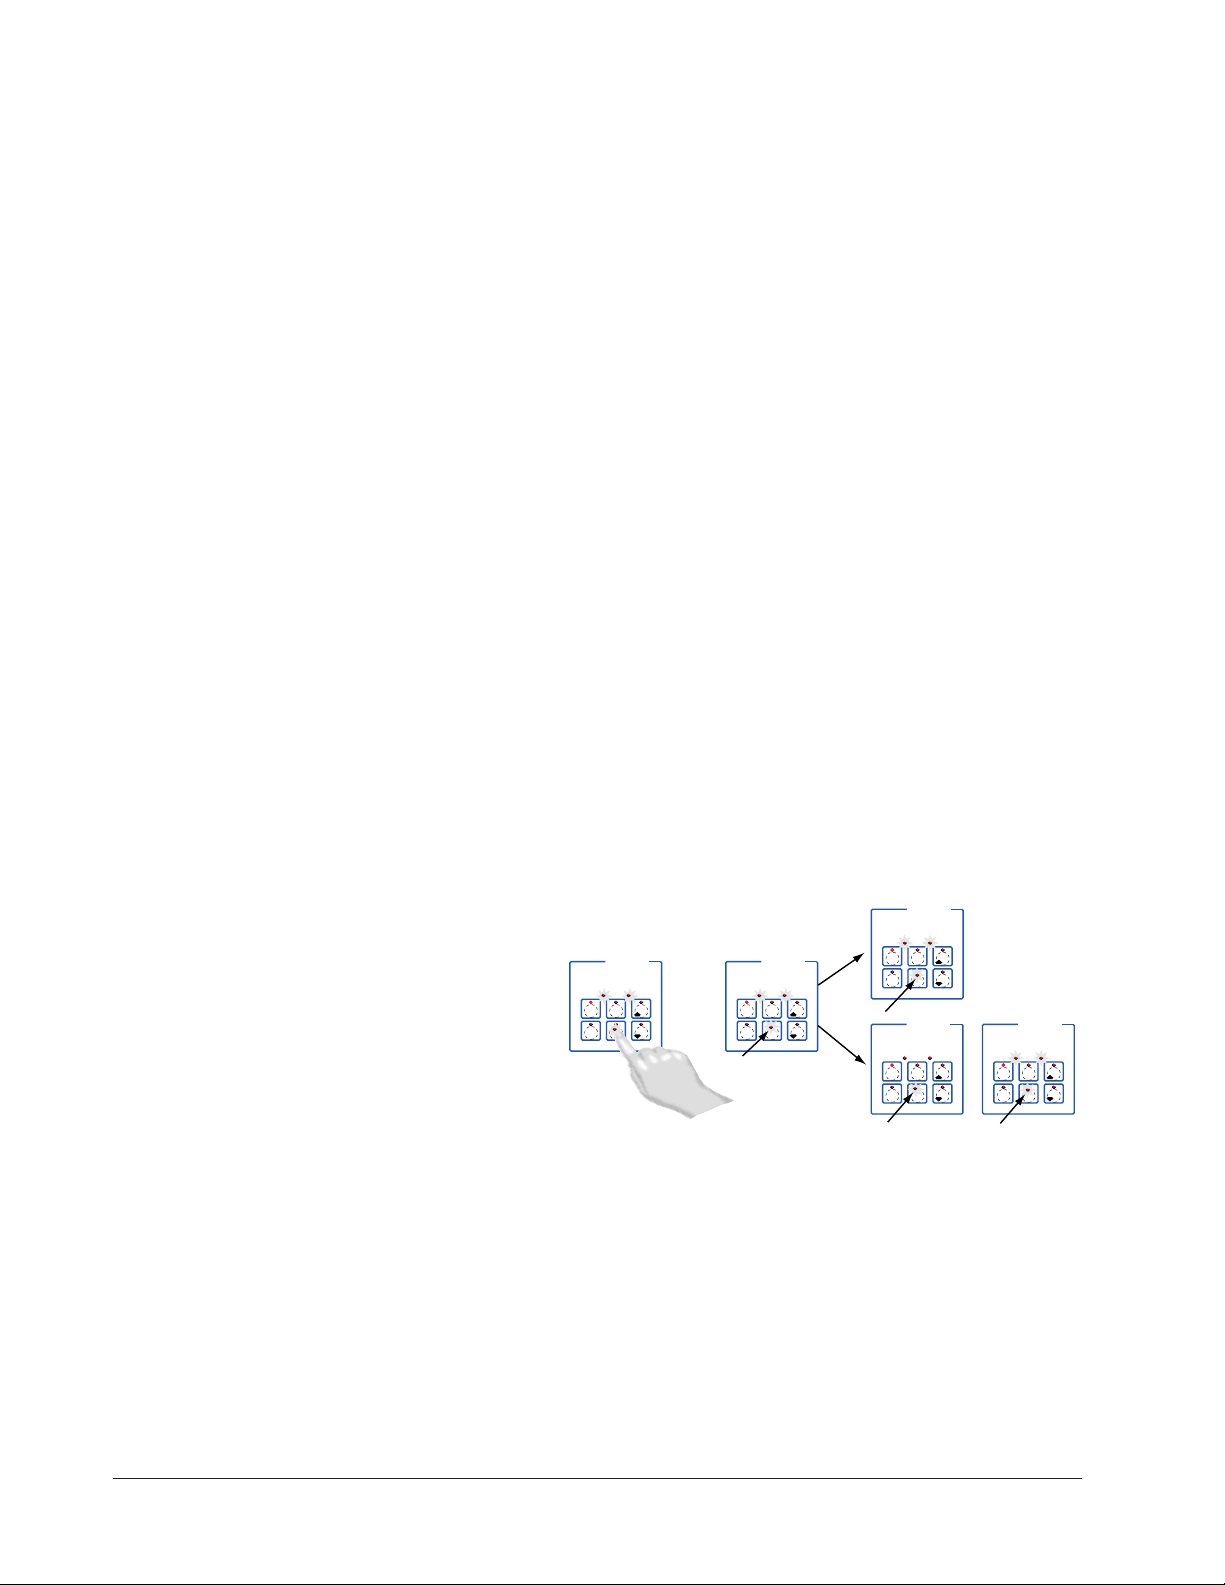
the way the controller was programmed at [etype] / [sound]:
DECF
MINICHEF 2000
[`idle]
Edit Accept
Back-UpExit
DECF
MINICHEF 2000
[`0009]
Edit Accept
Back-UpExit
B
DECF
MINICHEF 2000
[`idle]
Edit Accept
Back-UpExit
G H
A
AB
GH
AB
GH
STEADY
ON
SLOW
FLASH
DECF
MINICHEF 2000
[``EnD]
Edit Accept
Back-UpExit
B
DECF
MINICHEF 2000
[`idle]
Edit Accept
Back-UpExit
G H
AAB
GH
RAPID FLASH
SLOW FLASH
With Sound set to 0: The controller automatically switches to [`idle], where the
controller maintains the temperatures at set point and does not run time. [`idle]
or current time of day will appear on the display. The menu key indicator light
flashes slowly.
With Sound set to 1, 2, or 3, [``end] will appear on the display and an audible tone
will be emitted. The menu key indicator light will flash rapidly. You can acknowledge and silence the tone by pressing the active menu key or it will time out in 1 to
20 seconds and go into idle. The menu key indicator light will flash slowly.
With Sound set to 4 or 5, [``end] will appear on the display and the menu key
indicator light will flash rapidly. You must acknowledge the audible tone by pressing
the active menu key. Once acknowledged, the tone is silenced and the controller
goes into idle. The menu key indicator light will flash slowly.
5. After pressure release time is complete, open lid and carefully and safely remove the
food. The controller will continue to regulate at the last setpoint. The menu key
indicator light will flash slowly.
6. To repeat cooking, repeat steps 1 through 5.
Run A Menu (without preheat feature)
This procedure describes how to run a menu when the preheat function is inactive — in
other words, when the [Ready] parameter in the [SetUp]function of the
Configuration Mode is set to [```no] — and initial preheat power-up has been completed.
1. With [`idle] on the display, place the food in the pressure fryer and secure the lid
on the pressure vessel.
The menu key indicator light will light up. Time will count down on the display.
2. Press the key for the menu you want to run.
The indicator above the selected menu key will light up. Time will countdown on the
display.
When the menu cycle nears completion, pressure will be released from the fryer
based on the time programmed in Configuration Mode [etype] /[Ptine].
3. When the cooking cycle is finished, one of the following will happen, depending on
the way the controller was programmed at [etype] / [sound]:
With Sound set to 0: The controller automatically switches to [`idle], where the
controller maintains the temperatures at set point and does not run time. [`idle]
or current time of day will appear on the display. The menu key indicator light
42 ■ Watlow MINICHEF 2000 Application 13
Page 45

4. Remove the food carefully and safely.
5. To repeat cooking, repeat steps 1 through 3.
Event outputs
Event output 1 assists in controlling pressure.
Event output 1 will switch on when a menu starts and switch off when the time remain-
ing is equal to the value programmed in Configuration Mode under [Etype] /
[PtinE].
If a menu is cancelled, Event output 1 switches off immediately.
Cancel a menu
Canceling a menu stops controller operation completely. The controller does not maintain set point temperatures or run time. Users may cancel a menu in order to run
another one, to stop menu operation for any reason, or when preparing to shut off the
fryer.
Press the active menu key for 2 seconds.
Heat outputs will switch off. Heat output indicator lights will switch off. The display
presents [`idle] or the time of day will appear on the display.
flashes slowly.
With Sound set to 1, 2, or 3: [``end] will appear on the display and an audible tone
will be emitted. The menu key indicator light will flash rapidly. You can acknowledge and silence the tone by pressing the active menu key or it will time out in 1 to
20 seconds and go into [`idle]. The menu key indicator light will flash slowly.
With Sound set to 4 or 5: [``end] will appear on the display and the menu key
indicator light will flash rapidly. You must acknowledge the audible tone by pressing
the active menu key. Once acknowledged, the tone is silenced and the controller
goes into [`idle]. The menu key indicator light will flash slowly.
The controller will continue to regulate at the last set point. The menu key indicator
light will flash slowly.
Change menus or restart
With the controller in idle, close pressure vessel or ensure pressure vessel is closed.
Press the key for the menu you want to run.
Temperature Alarms
The controller will alert you to temperature alarm conditions if they occur. If an alarm
occurs, take action as determined by your supervisor. See the Appendix in the Hardware
& Software Setup Guide for a Troubleshooting Chart and a summary of temperature
alarms.
Errors
The controller will alert you to errors if they occur. Errors are critical problems that
shut down the unit. If an error occurs, an error message will appear on the display. You
should switch off the power and call for service.
See the Appendix in the Hardware & Software Setup Guide for a Troubleshooting Chart
and a summary of errors.
Application 13 Watlow MINICHEF 2000 ■ 43
Page 46

Notes
44 ■ Watlow MINICHEF 2000 Application 13
Page 47

14
Application 14
Pressurized Automatic
Deepfat Fryer
One Heat Channel, 40 Menus
Introduction to Application 14 . . . . . . . . . . . . . 45
Configuration Mode Quick Reference . . . . . . . . 47
Program Mode Quick Reference . . . . . . . . . . . . 48
Step 7 Design a Faceplate Overlay . . . . . . . . . . 49
Step 8 Operate the Controller . . . . . . . . . . . . . 50
Application 14 allows you to program as many as forty menus to control one temperature channel, a fan and cooking time for a pressurized automatic deepfat fryer.
Overview of Key Steps
1. Install the MINICHEF 2000.
2. Wire the controller.
3. Configure the controller.
4. Program the menus.
5. Set the controller security.
6. Set the Real-time Clock.
For instructions on Steps 1, 2, 3, 4, 5 and 6, see the Hardware & Software Setup Guide.
7. Design, manufacture and apply faceplate overlay for end-users. (For a suggested
design to suit this application, see this section. For overlay dimensions and guidelines, see the Hardware & Software Setup Guide.)
8. Operate the controller. (See this application guide.)
Application 14 Watlow MiniChef 2000 ■ 45
Page 48

Key Functions in Configuration Mode
Heat
1
Idle 1
Temp
2
Idle 2
Time
4
5
Start/
Stop
6
Down
Your Company Logo
3
Up
Input 1 Fryer Temp →
Input 2 not used →
Event Input 1 not used→
Event Input 2 not used →
→Output 1 Heat
→Output 2 not used
→Event Output 1 Close Pressure Valve
→Event Output 2 not used
→Output 5 Audible Alarm
Menu
Select
Heat
1
Idle One
Temp
2
Idle Two
Temp
5
Start/
Stop
6
Down
Your Company Logo
3
Up
4
Menu
Select
Heat indicator light Lit
when heat output is on.
Idle One Temp View or
program idle set point 1.
Indicator light will flash
slowly when controlling to
set point.
Idle Two Temp View or
program idle set point 2.
Indicator light will flash
slowly when controlling to
set point.
Menu Select Enter menu
mode or select menu.
Increment Scroll through
valid menus.
Start/Stop Activate or
cancel active menu.
Decrement Scroll through
valid menus.
Start/Stop Indicator Light
Slow flash...Preheating
Rapid flash...Ready
Lit...Cooking
Off...Done.
AB
DE
GH
Enter
EscapeHome
Edit
C
F
MINICHEF 2000
Display five-digit, sevensegment numeric LED
display.
Indicator lights
(1 for each key, 2 for heat
channels).
Edit key (A) Access the
next level of parameters or
values.
Enter key (B) Enter the
value and return to
previous level.
Home key (D) Move to
Operation Mode with a
two-second key press.
Up key (C) Move up the
lists.
Escape key (E) Return to
original value when editing
a parameter value.
Down key (F) Move down
the lists.
Key Functions in Operation Mode
Summary of Input/Output Functions
Note: For details, see wiring instructions in the
46 ■ Watlow MiniChef 2000 Application 14
Hardware & Software Setup Guide.
Page 49

Configuration Mode Quick Reference
These are the functions, parameters and values included in the Configuration Mode for
this application. You must select Application 14 to access them. For directions, see the
Hardware & Software Setup Guide. The Appendix of that guide includes an explanation
of all parameters and values.
Function Parameter Value Your Settings
{Etype} Equipment-Type [appl`] Application Number 1 - 28 14
[a_Loc] Application Number Yes, No
Security Lock
[Sound] Audible Alarm Sound 0 - 5
[ptine] Pressure Release Time 1 - 120 seconds
[preht] Preheat Temperature range low to range high
[idle1] Channel 1 Idle Temperature range low to range high
[idle2] Channel 2 Idle Temperature range low to range high
[melt] Oil Melt Cycle On, Off
[SEtUP] Setup [`Ç_Ï`] Temperature Display Format ºC or ºF
[time] Time Display Format MMM:SS, HH:MM, H:MM:SS
(H=Hours, M=Minutes, S=Seconds)
[Chirp] Key Chirp On, Off
[loc``] Menu Security Lock Yes, No
[tc```] Thermocouple Type J, K (shown as [````H]), E
[rtd``] RTD Curve DIN, JIS
[tconp] WatCurveTMTemperature On, Off
Compensation
[Ofst1] Temperature Offset, Channel 1 -99 to 99ºF (-55 to 55ºC)
[tr`lo] Temperature Range Low 0ºF (-18ºC) for RTD inputs,
32ºF (0ºC) for tc inputs to [tr`Hi]
[tr`Hi] Temperature Range High [tr`lo] to 1200ºF (649ºC)
[ready] Preheat Ready Feature Yes, No
[rband] Ready Band 1 to 1200ºF (649ºC)
[Cloc`] Real Time Clock Display Yes, No
[plOSS] Power Loss Menu Resume Yes, No
[al``1] Alarms for channel 1 None, Dev, Proc, Both
[aL`P1] Absolute Process Alarm 1 100 to 1200ºF (38 to 649ºC)
[aLdL1] Low Deviation Alarm 1 -999 to 0ºF (-555 to 0ºC)
[aLdH1] High Deviation Alarm 1 0 to 999ºF (0 to 555ºC)
[tHErl] Thermal [tyPE`] Temperature Control Type PID, On-Off
[HYSt1] Hysteresis 1 1 to 99ºF (1 to 55ºC)
[Pid`U] PID Units SI, US
[tune1] Auto-tuning 1 on, OFF
[ProP1] Proportional Band 1 1 to 999ºF (1 to 555ºC)
[rSEt1] Reset (integral) Gain 1 0.00 to 9.99 repeats/minute
[int`1] Integral Gain 1 0.00 to 99.99 minutes/repeat
[rAtE1] Rate (derivative) Gain 1 0.00 to 9.99 minutes
[dEr`1] Derivative Gain 1 0.00 to 9.99 minutes
[CYcL1] PID Cycle Time 1 1 to 60 seconds
[`diag] WatHelp Used for equipment troubleshooting and testing. Not used when programming. See the Hardware
Diagnostics & Software Setup Guide.
Application 14 Watlow MiniChef 2000 ■ 47
Page 50

Program Mode Quick Reference
These are the functions, parameters and values included in the Program Mode for this
application. You must select Application 14 to access them. For menu programming
directions, see the Hardware & Software Setup Guide. The Appendix of that guide
includes a detailed explanation of all parameters and values.
Function Parameter Value Your Settings
[M`__] Menu Numbers 1 - 40 [Stpt1] Set point 1 Temp range low
Temperature of set point 1. to temp range high.
[TiNe1] Time 1 Format varies based
Run time of set point 1. on configuration.
Auto-tuning Note:
Before auto-tuning Application 14, the Set Point 1 of Menu 1 must first be set to a value
that is typical of your application. (See Hardware & Software Setup Guide for information on programming menus.) Then set [tHerl] / [tunE1] to [```on]. After you
accept [```on], by pressing “Enter,” the controller will display [`tunE] while autotuning is taking place.
The controller will cancel the auto-tuning process if it cannot be completed in 80 minutes. You can cancel the auto-tuning process at any time by pressing either key C or key
D and accepting [``Off], by pressing “Enter,” when it appears.
48 ■ Watlow MiniChef 2000 Application 14
Page 51

Step 7 Design a Faceplate Overlay
AB
DE
GH
Enter
EscapeHome
Edit
C
F
MINICHEF 2000
Heat
1
Idle One
Temp
2
Idle Two
Temp
5
Start/
Stop
6
Down
Your Company Logo
3
Up
4
Menu
Select
To complete the installation, you must apply a graphic membrane to the front panel of
the controller. The following artwork will help you design and create a membrane for
this application. For more dimensions and guidelines, see the Hardware & Software
Setup Guide.
Suggested End-user Overlay:
This Prototyping and Training Membrane Overlay will help you with the configuration and programming steps. To order it, see the Ordering Information
at the back of this guide.
Application 14 Watlow MiniChef 2000 ■ 49
Page 52
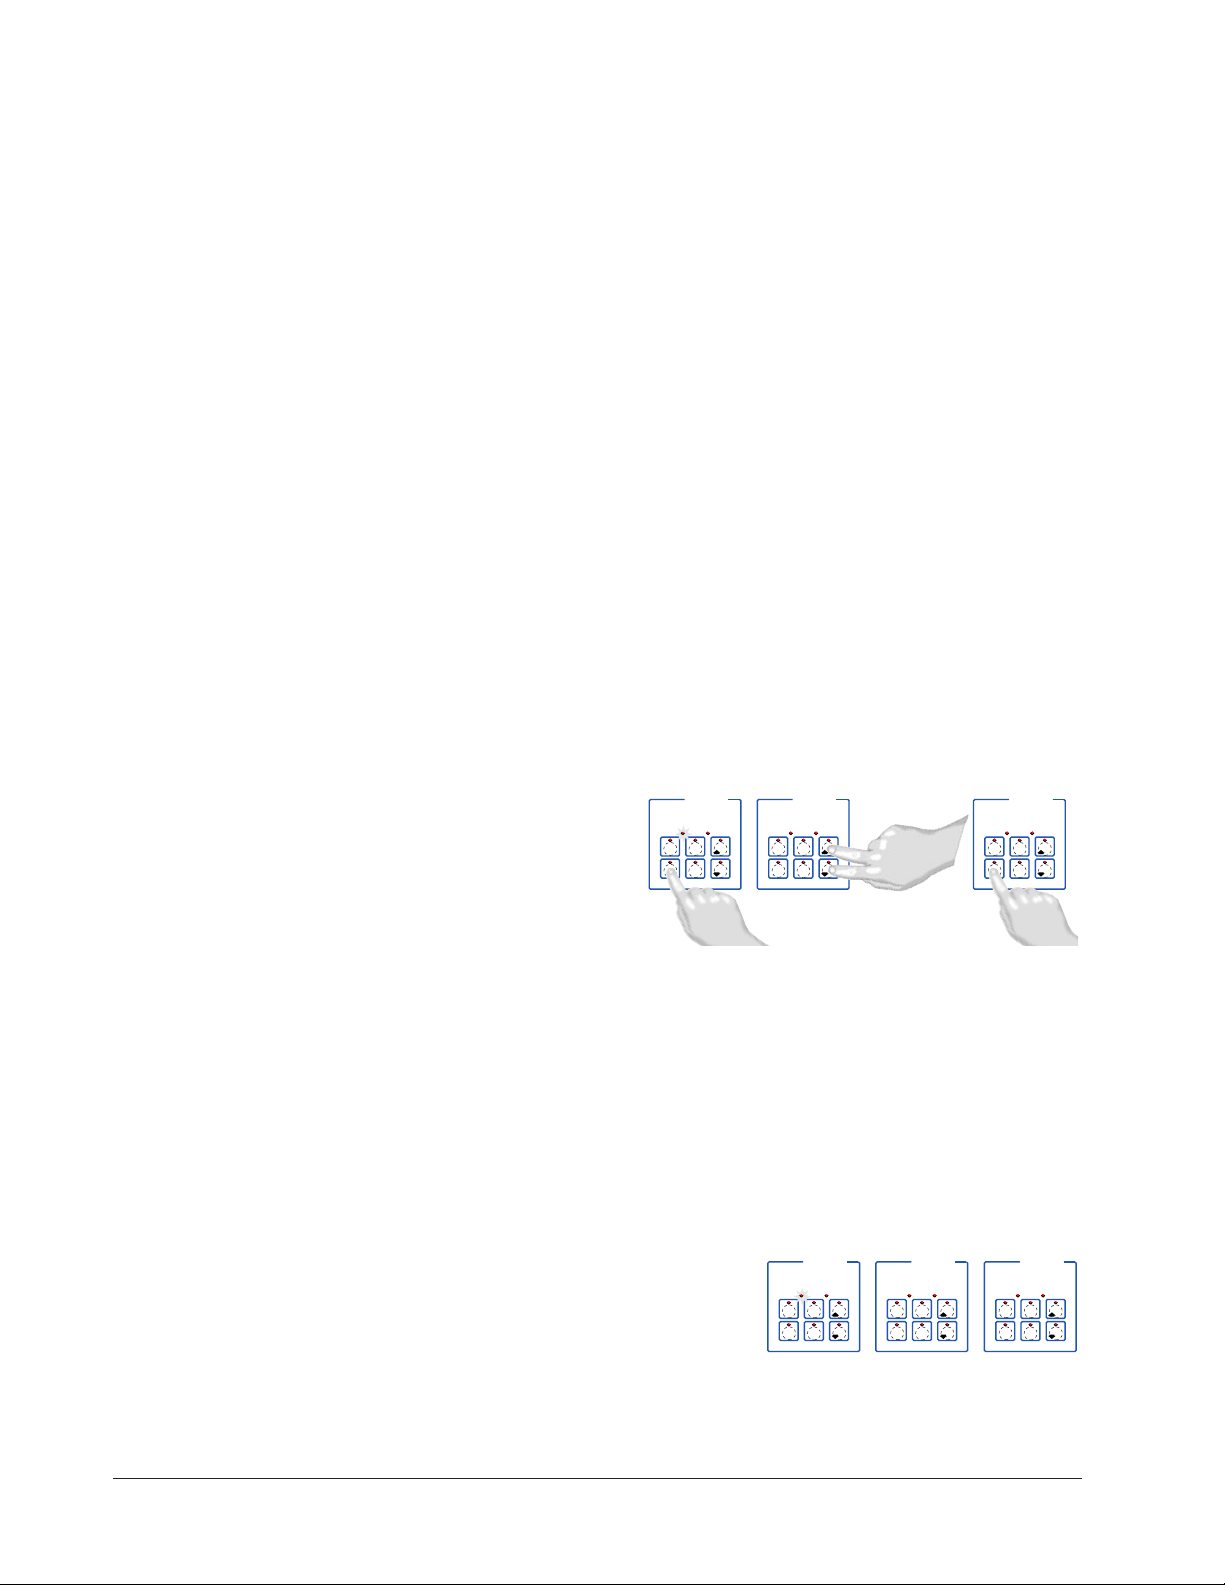
Step 8 Operate the Controller
DECF
MINICHEF 2000
[`50`f]
Edit Accept
Back-UpExit
DECF
MINICHEF 2000
[ready]
Edit Accept
Back-UpExit
AB
GH
AB
GH
DECF
MINICHEF 2000
[`idle]
Edit Accept
Back-UpExit
AB
GH
DECF
MINICHEF 2000
[````1]
Edit Accept
Back-UpExit
DECF
MINICHEF 2000
[````9]
Edit Accept
Back-UpExit
AB
GH
AB
GH
DECF
MINICHEF 2000
[`idle]
Edit Accept
Back-UpExit
AB
GH
Summary of Key Functions in Operation Mode
Key Function
A Idle one temperature
B Idle two temperature
C Increment
D Menu select
E Start/Stop
F Decrement
Start-up
Apply power to the fryer and add cooking oil if necessary.
Select a Menu
1. Press the Menu Select key.
The controller will display the currently selected menu. If no menus have been pro-
grammed the word [`none] will appear on the display.
2. Press the Up-arrow or Down-arrow key until the menu you want appears on the display.
The controller will only display valid menus (those for which Time1 for the menu is
set to greater than 0).
3. Press the Menu Select key again.
The menu you have chosen becomes the current menu for controller operation.
Initial Preheat
At power-up, the unit will preheat to the temperature value set in the Configuration
Mode [Etype] / [preHt]. The display will show [prE-`] [`Heat] followed by oil
temperature as the oil heats up.
50 ■ Watlow MiniChef 2000 Application 14
Page 53

Preheat
AB
DECF
GH
MINICHEF 2000
[`idle]
Edit Accept
Back-UpExit
SLOW
FLASH
AT OPERATING TEMPERATURE
(PREHEAT CONDITION MET)
RAPID
FLASH
B
DECF
MINICHEF 2000
[100f`]
Edit Accept
Back-UpExit
B
DECF
MINICHEF 2000
[ready]
Edit Accept
Back-UpExit
G H GH
A A
[pre-`] [`Heat]
When the unit reaches initial preheat temperature, [ready] will flash once on the display and an audible tone will sound for 2 seconds. Then [`idle] will appear on the display. (If the Real-time Clock option is installed and [SEtUp] / [Cloc`] is set to
[``yes], the time of day will appear on the display.)
If the preheat condition is met before power-up, the controller goes directly to idle, and
does not display [rEAdy] or sound an audible tone.
If in the Configuration Mode [sEtUP] / [ready] has been set to yes, the controller will
detect temperatures and preheat to operating temperature (above relative set point
minus the ready band) as required.
• Activate the current menu by pressing the Start/Stop key.
If the fryer is not at operating temperature, it will preheat. Meanwhile:
The word [pre-`] [`Heat] will appear on the display for a few moments. The
Start/Stop key indicator light will flash slowly. The temperature of Channel 1 will
be displayed until the operating temperature is reached.
The heat output indicator light - G, just below the display- will light up whenever
the controller is calling for heat.
When the fryer is at operating temperature (above relative set point minus the
ready band) [ready] will appear on the display and the Start/Stop key indicator
light will flash rapidly. You are now ready to cook with the active menu.
If the fryer is at operating temperature, the display goes directly to [ready] without indicating preheat or temperature.
The Melt Cycle
To avoid burning, congealed oil requires a slow heating action. If in the Configuration
Mode, [etype] / [melt] has been set to on, when the oil temperature is below 212ºF
the heat output will be limited to 10% of full power.
Run a Menu (with preheat feature)
This procedure describes how to run an active menu when the preheat feature is active
— in other words, when the [ready] parameter in the [setUp] function of the
Configuration Mode is set to [``yes].
1. Select the menu you want to run as shown earlier in “Select a Menu”.
2. With [`idle] or time of day on the display, press the Start/Stop key.
Application 14 Watlow MiniChef 2000 ■ 51
Page 54
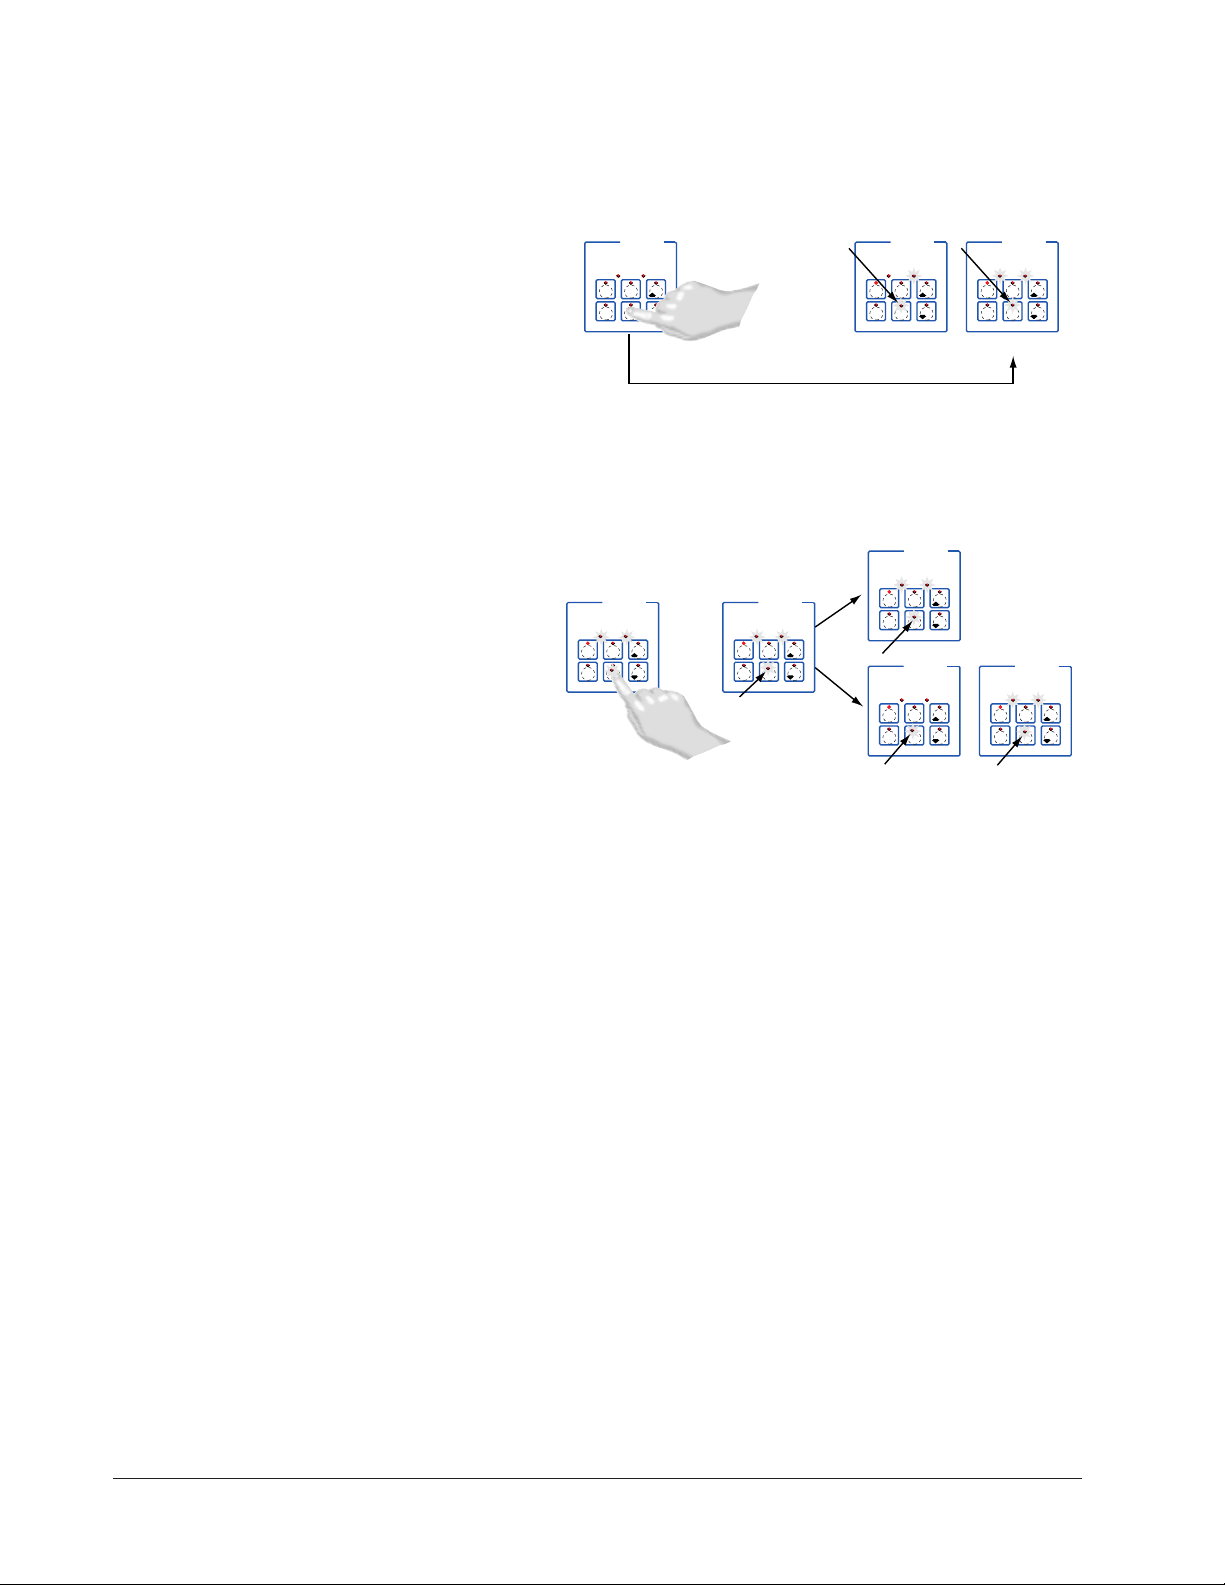
DECF
MINICHEF 2000
[ready]
Edit Accept
Back-UpExit
DECF
MINICHEF 2000
[`0009]
Edit Accept
Back-UpExit
B
DECF
MINICHEF 2000
[`idle]
Edit Accept
Back-UpExit
G H
A
AB
GH
AB
GH
STEADY
ON
SLOW
FLASH
DECF
MINICHEF 2000
[``EnD]
Edit Accept
Back-UpExit
B
DECF
MINICHEF 2000
[`idle]
Edit Accept
Back-UpExit
G H
AAB
GH
RAPID FLASH
SLOW FLASH
AB
DECF
GH
MINICHEF 2000
[`idle]
Edit Accept
Back-UpExit
SLOW
FLASH
AT OPERATING TEMPERATURE
(PREHEAT CONDITION MET)
RAPID
FLASH
B
DECF
MINICHEF 2000
[100f`]
Edit Accept
Back-UpExit
B
DECF
MINICHEF 2000
[ready]
Edit Accept
Back-UpExit
G H GH
A A
[pre-`] [`Heat]
If the preheat condition has not been met, the fryer will preheat until [ready] appears
on the display. If the fryer is at operating temperature [ready] will immediately appear
on the display.
3. With [ready] on the display, place the food in the pressure fryer and secure the lid
on the pressure vessel.
4 Press the Start/Stop key. The Start/Stop key indicator light will light up. Time will
count down on the display.
When the menu cycle nears completion, pressure will be released from the fryer
based on the time programmed in Configuration Mode, [etype] / [Ptine]
5. When the cooking cycle is finished, one of the following will happen, depending on
the way the controller was programmed at [etype] / [sound]:
With Sound set to 0: The controller automatically switches to [`idle], where the
controller maintains the temperatures at set point and does not run time. [`idle]
or current time of day will appear on the display. The Start/Stop Key(E) indicator
light flashes slowly.
With Sound set to 1, 2, or 3, [``end] will appear on the display and an audible tone
will be emitted. The menu key indicator light will flash rapidly. You can acknowledge and silence the tone by pressing the active menu key or it will time out in 1 to
20 seconds and go into idle. The start/stop key indicator light will flash slowly.
With Sound set to 4 or 5, [``end] will appear on the display and the menu key
indicator light will flash rapidly. You must acknowledge the audible tone by pressing
the active menu key. Once acknowledged, the tone is silenced and the controller
goes into idle. The Start/Stop key indicator light will flash slowly.
6. Carefully and safely remove the food. The controller will continue to regulate at the
last setpoint. The Start/Stop key indicator light will flash slowly.
7. To repeat cooking, repeat steps 1 through 6.
52 ■ Watlow MiniChef 2000 Application 14
Page 55

Run A Menu (without preheat feature)
DECF
MINICHEF 2000
[`idle]
Edit Accept
Back-UpExit
DECF
MINICHEF 2000
[`0009]
Edit Accept
Back-UpExit
B
DECF
MINICHEF 2000
[`idle]
Edit Accept
Back-UpExit
G H
A
AB
GH
AB
GH
STEADY
ON
SLOW
FLASH
DECF
MINICHEF 2000
[``EnD]
Edit Accept
Back-UpExit
B
DECF
MINICHEF 2000
[`idle]
Edit Accept
Back-UpExit
G H
AAB
GH
RAPID FLASH
SLOW FLASH
This procedure describes how to run a menu when the preheat function is inactive — in
other words, when the [Ready] parameter in the [SetUp]function of the
Configuration Mode is set to [```no] — and initial preheat power-up has been completed.
1. Select the menu you want to run as shown earlier in “Select a Menu.”
2. With [`idle] or time of day on the display, place food in the pressure fryer and
secure the lid on the pressure vessel.
3. Press the Start/Stop key. The Start/Stop key will light up and time will count down
on the display.
When the menu cycle nears completion, pressure will be released from the fryer
based on the time programmed in Configuration Mode [etype] / [Ptine].
4. When the cooking cycle is finished, one of the following will happen, depending on
the way the controller was programmed at [etype] / [sound].
With Sound set to 0: The controller automatically switches to [`idle], where the
controller maintains the temperatures at set point and does not run time. [`idle]
or current time of day will appear on the display. The Start/Stop key indicator light
flashes slowly.
With Sound set to 1, 2, or 3: [``end] will appear on the display and an audible tone
will be emitted. The menu key indicator light will flash rapidly. You can acknowledge and silence the tone by pressing the active Start/Stop key or it will time out in
1 to 20 seconds and go into [`idle]. The Start/Stop key indicator light will flash
slowly.
With Sound set to 4 or 5: [``end] will appear on the display and the menu key
indicator light will flash rapidly. You must acknowledge the audible tone by pressing
the active menu key. Once acknowledged, the tone is silenced and the controller
goes into [`idle]. The Start/Stop key indicator light will flash slowly.
5. Remove the food carefully and safely.
The controller will continue to regulate at the last set point. The Start/Stop key
indicator light will flash slowly.
6. To repeat cooking, repeat steps 1 through 5.
Application 14 Watlow MiniChef 2000 ■ 53
Page 56

Event outputs
Event output 1 assists in controlling pressure.
Event output 1 will switch on when a menu starts and switch off when the time remain-
ing is equal to the value programmed in the Configuration Mode under [Etype] /
[PtinE].
If a menu is cancelled, Event output 1 switches off immediately.
Cancel a menu
Canceling a menu stops the controller operation completely. The controller does not
maintain set point temperatures or run time. Users may cancel a menu in order to run
another one, to stop menu operation for any reason, or when preparing to shut off the
fryer.
• Press the active Start/Stop key for 2 seconds.
Heat outputs will switch off. Heat output indicator lights will switch off. Event 1 also
switches off, releasing pressure. The display presents [`idle] or the time of day will
appear on the display.
Change menus or restart
With the controller in idle, select a menu as shown earlier, and press the Start/Stop key.
Temperature Alarms
The controller will alert you to temperature alarm conditions if they occur. If an alarm
occurs, take action as determined by your supervisor. See the Appendix in the Hardware
& Software Setup Guide for a Troubleshooting Chart and a summary of temperature
alarms.
Errors
The controller will alert you to errors if they occur. Errors are critical problems that
shut down the unit. If an error occurs, an error message will appear on the display. You
should switch off the power and call for service.
See the Appendix in the Hardware & Software Setup Guide for a Troubleshooting Chart
and a summary of errors.
54 ■ Watlow MiniChef 2000 Application 14
Page 57

15
Application 15
Pressurized Manual
Deepfat Fryer
One Heat Channel
Introduction to Application 15 . . . . . . . . . . . . . 55
Configuration Mode Quick Reference . . . . . . . . 57
Step 7 Design a Faceplate Overlay . . . . . . . . . . 59
Step 8 Operate the Controller . . . . . . . . . . . . . 60
Application 15 allows you to program one temperature channel and cooking time for a
pressurized manual deepfat fryer.
Overview of Key Steps
1. Install the MINICHEF 2000.
2. Wire the controller.
3. Configure the controller.
4. Program the menu.
5. Set the controller security.
6. Set the Real-time Clock.
For instructions on Steps 1, 2, 3, 4, 5 and 6, see the Hardware & Software Setup Guide.
7. Design, manufacture and apply faceplate overlay for end-users. (For a suggested
design to suit this application, see this section. For overlay dimensions and guidelines, see the Hardware & Software Setup Guide.)
8. Operate the controller. (See this application guide.)
Application 15 Watlow MiniChef 2000 ■ 55
Page 58

Key Functions in Configuration Mode
Heat
1
Temp
2
Time
4
5
Start/
Stop
6
Down
Your Company Logo
3
Up
Input 1 Fryer Temperature →
Input 2 not used →
Event Input 1 not used →
Event Input 2 not used →
→Output 1 Heat
→Output 2 not used
→Event Output 1 Close Pressure Valve
→Event Output 2 not used
→Output 5 Audible Alarm
Heat
1
Temp
2
Time
4
5
Start/
Stop
6
Down
Your Company Logo
3
Up
Temp Set or display
temperature. Lights flash
rapidly if editing
parameters during menu
operation.
Time Set Time. Lights
flash rapidly if editing
parameters during menu
operation.
Not Used
Start/Stop Activate, pause
or cancel active menu.
Heat Indicator Light
Lit when heat output is on.
Increment
Start/Stop Indicator Light
Slow flash...Preheating
Rapid flash...Ready
Lit...Cooking
Off...Done
Decrement
AB
DE
GH
Enter
EscapeHome
Edit
C
F
MINICHEF 2000
Display five-digit, sevensegment numeric LED
display.
Indicator lights
(1 for each key, 2 for heat
channels).
Edit key (A) Access the
next level of parameters or
values.
Enter key (B) Enter the
value and return to
previous level.
Home key (D) Move to
Operation Mode with a
two-second key press.
Up key (C) Move up the
lists.
Escape key (E) Return to
original value when editing
a parameter value.
Down key (F) Move down
the lists.
Key functions in Operation Mode
Summary of Input/Output Functions
Note: For details, see wiring instructions in the
56 ■ Watlow MiniChef 2000 Application 15
Hardware & Software Setup Guide.
Page 59

Configuration Mode Quick Reference
These are the functions, parameters and values included in the Configuration Mode for
this application. You must select Application 15 to access them. For directions, see the
Hardware & Software Setup Guide. The Appendix of that guide includes an explanation
of all parameters and values.
Function Parameter Value Your Settings
{Etype} Equipment-Type [appl`] Application Number 1 - 28 15
[a_Loc] Application Number Yes, No
Security Lock
[ptine] Pressure Release Time 1 - 120 seconds
[melt] Oil Melt Cycle On, Off
[SEtUP] Setup [`Ç_Ï`] Temperature Display Format C or ºF
[time] Time Display Format MMM:SS, HH:MM, H:MM:SS
(H=Hours, M=Minutes, S=Seconds)
[Chirp] Key Chirp On, Off
[tc```] Thermocouple Type J, K (shown as [````H]), E
[rtd``] RTD Curve DIN, JIS
[tconp] WatCurveTMTemperature On, Off
Compensation
[Ofst1] Temperature Offset, Channel 1 -99 to 99ºF (-55 to 55ºC)
[tr`lo] Temperature Range Low 0ºF (-18ºC) for RTD inputs,
32ºF (0ºC) for tc inputs to [tr`Hi]
[tr`Hi] Temperature Range High [tr`lo] to 1200ºF (649ºC)
[ready] Preheat Ready Feature Yes, No
[rband] Ready Band 1 to 1200ºF (649ºC)
[Cloc`] Real Time Clock Display Yes, No
[plOSS] Power Loss Menu Resume Yes, No
[al``1] Alarms for channel 1 None, Dev, Proc, Both
[aL`P1] Absolute Process Alarm 1 100 to 1200ºF (38 to 649ºC)
[aLdL1] Low Deviation Alarm 1 -999 to 0ºF (-555 to 0ºC)
[aLdH1] High Deviation Alarm 1 0 to 999ºF (0 to 555ºC)
[tHErl] Thermal [tyPE`] Temperature Control Type PID, On-Off
[HYSt1] Hysteresis 1 1 to 99ºF (1 to 55ºC)
[Pid`U] PID Units SI, US
[tune1] Auto-tuning 1 on, OFF
[ProP1] Proportional Band 1 1 to 999ºF (1 to 555ºC)
[rSEt1] Reset (integral) Gain 1 0.00 to 9.99 repeats/minute
[int`1] Integral Gain 1 0.00 to 99.99 minutes/repeat
[rAtE1] Rate (derivative) Gain 1 0.00 to 9.99 minutes
[dEr`1] Derivative Gain 1 0.00 to 9.99 minutes
[CYcL1] PID Cycle Time 1 1 to 60 seconds
[`diag] WatHelp Used for equipment troubleshooting and testing. Not used when programming. See the Hardware
Diagnostics & Software Setup Guide.
Application 15 Watlow MiniChef 2000 ■ 57
Page 60

Auto-tuning Note:
Before auto-tuning Application 15, [teNp1] in the operations menu must first be set to
a value that is typical of your application. (See Hardware & Software Setup Guide for
information on programming menus.) Then set [tHerl] / [tunE1] to [```on]. After
you accept [```on], by pressing “Enter,” the controller will display [`tunE] while
auto-tuning is taking place.
The controller will cancel the auto-tuning process if it cannot be completed in 80 minutes. You can cancel the auto-tuning process at any time by pressing either key C or key
D and accepting [``Off], by pressing “Enter,” when it appears.
58 ■ Watlow MiniChef 2000 Application 15
Page 61

Step 7 Design a Faceplate Overlay
AB
DE
GH
Enter
EscapeHome
Edit
C
F
MINICHEF 2000
Heat
1
Temp
2
Time
4
5
Start/
Stop
6
Down
Your Company Logo
3
Up
To complete the installation, you must apply a graphic membrane to the front panel of
the controller. The following artwork will help you design and create a membrane for
this application. For more dimensions and guidelines, see the Hardware & Software
Setup Guide.
Suggested End-user Overlay:
This Prototyping and Training Membrane Overlay will help you with the configuration and programming steps. To order it, see the Ordering Information
at the back of this guide.
Application 15 Watlow MiniChef 2000 ■ 59
Page 62

Step 8 Operate the Controller
DECF
MINICHEF 2000
[tENP1]
Edit Accept
Back-UpExit
DECF
MINICHEF 2000
[650°f]
Edit Accept
Back-UpExit
AB
GH
AB
GH
DECF
MINICHEF 2000
[`idle]
Edit Accept
Back-UpExit
AB
GH
[500°F]
Summary of Key Functions in Operation Mode
Key Function
A Temp
B Time
C Increment
D Not Used
E Start/Stop
F Decrement
Startup
Apply power to the fryer and add cooking oil if necessary.
Set the Menu
Set the cooking temperature.
1. Press the Temp key [teNp1] and then the cooking temperature value will appear
on the display.
2. Press the Up-arrow or Down-arrow key until the value you want appears on the display.
3. Press the Temp key again.
The cooking temperature has been set.
[`idle] will appear on the display.
Set the cooking time.
1. Press the Time key [tiNE1] and then the cooking time value will appear on the
display.
2. Press the Up-arrow or Down-arrow key until the value you want appears on the display.
3. Press the Time key again.
The cooking time has been set.
[`idle] will appear on the display.
60 ■ Watlow MiniChef 2000 Application 15
Page 63

Five Second Timeout
AB
DECF
GH
MINICHEF 2000
[`idle]
Edit Accept
Back-UpExit
SLOW
FLASH
AT OPERATING TEMPERATURE
(PREHEAT CONDITION MET)
RAPID
FLASH
B
DECF
MINICHEF 2000
[100f`]
Edit Accept
Back-UpExit
B
DECF
MINICHEF 2000
[ready]
Edit Accept
Back-UpExit
G H GH
A A
[pre-`] [`Heat]
DECF
MINICHEF 2000
[`50`f]
Edit Accept
Back-UpExit
DECF
MINICHEF 2000
[ready]
Edit Accept
Back-UpExit
AB
GH
AB
GH
DECF
MINICHEF 2000
[`idle]
Edit Accept
Back-UpExit
AB
GH
When using the up or down keys to change a value, if you do not press any key for 5
seconds, the controller will automatically be set to the last value on the display and
return to [`idle].
Initial Preheat
At power-up, the unit will preheat to the temperature value set in the Configuration
Mode [seTUp] / [Ready]. The display will show [prE-`] [`Heat] followed by oil
temperature as the oil heats up.
When the unit reaches initial preheat temperature, [ready] will flash once on the display and an audible tone will sound for 2 seconds. Then [`idle] will appear on the display. If the Real-time Clock option is installed and [SEtUp] / [Cloc`] is set to
[``yes], the time of day will appear on the display.
If the preheat condition is met at power-up, the controller goes directly to idle, and does
not display [rEAdy] or sound an audible tone.
Preheat
If in the Configuration Mode [SEtUP] / [ready] has been set to yes, the controller will
detect temperatures and preheat to operating temperature (above relative set point
minus the ready band) as required.
• Activate the current menu by pressing the Start/Stop key.
If the fryer is not at operating temperature, it will preheat. Meanwhile:
The word [Pre-`] [`Heat] will appear on the display for a few moments. The
Start/Stop key indicator light will flash slowly. The temperature of Channel 1 will
be displayed until the operating temperature is reached.
The heat output indicator light - G, just below the display- will light up whenever
the controller is calling for heat.
When the fryer is at operating temperature (above relative set point minus the
ready band) [ready] will appear on the display and the Start/Stop key indicator
light will flash rapidly. You are now ready to cook with the active menu.
If the fryer is at operating temperature, the display goes directly to [ready] without indicating preheat or temperature.
Application 15 Watlow MiniChef 2000 ■ 61
Page 64

The Melt Cycle
DECF
MINICHEF 2000
[ready]
Edit Accept
Back-UpExit
DECF
MINICHEF 2000
[`0009]
Edit Accept
Back-UpExit
B
DECF
MINICHEF 2000
[`idle]
Edit Accept
Back-UpExit
G H
A
AB
GH
AB
GH
STEADY
ON
SLOW
FLASH
DECF
MINICHEF 2000
[``EnD]
Edit Accept
Back-UpExit
B
DECF
MINICHEF 2000
[`idle]
Edit Accept
Back-UpExit
G H
AAB
GH
RAPID FLASH
SLOW FLASH
AB
DECF
GH
MINICHEF 2000
[`idle]
Edit Accept
Back-UpExit
SLOW
FLASH
AT OPERATING TEMPERATURE
(PREHEAT CONDITION MET)
RAPID
FLASH
B
DECF
MINICHEF 2000
[100f`]
Edit Accept
Back-UpExit
B
DECF
MINICHEF 2000
[ready]
Edit Accept
Back-UpExit
G H GH
A A
[pre-`] [`Heat]
To avoid burning congealed oil (shortening), a slow heating action may be necessary. If
this is desired, be sure that in the Configuration Mode [etype] / [melt] has been set
to [```on. Then, when the oil temperature is below 212ºF the heat output will be limited to 10% of full power. This reduces the chance of burning congealed oil while it is
heating.
Run a Menu (with preheat feature)
This procedure describes how to run an active menu when the preheat feature is active
— in other words, when the [ready] parameter in the [setUp] function of the
Configuration Mode is set to [``yes].
1. Set the menu as shown earlier.
2. With [`idle] or time of day on the display, press the Start/Stop key.
If the menu’s preheat condition has not been met, the fryer will preheat until
[ready] appears on the display. If the fryer is at operating temperature, [ready]
will immediately appear on the display.
2. With [ready] on the display, place the food in the pressure fryer and secure the lid
on the pressure vessel.
3. Press the Start/Stop key (indicated by the rapidly flashing indicator light).
The Start/Stop indicator light will light up. Time will count down on the display.
When the menu cycle nears completion, pressure will be released from the fryer
based on the time programmed in Configuration Mode, [etype] / [Ptine].
4. When the cooking cycle is finished, the controller goes into idle and the Start/Stop
key indicator light and heat output will switch off.
5. After pressure release time is complete, open lid and carefully and safely remove the
food. The controller will continue to regulate at the last setpoint. The menu key
indicator light will flash slowly.
6. To repeat cooking, repeat steps 1 through 5.
62 ■ Watlow MiniChef 2000 Application 15
Page 65

Run A Menu (without preheat feature)
DECF
MINICHEF 2000
[`idle]
Edit Accept
Back-UpExit
DECF
MINICHEF 2000
[`0009]
Edit Accept
Back-UpExit
B
DECF
MINICHEF 2000
[`idle]
Edit Accept
Back-UpExit
G H
A
AB
GH
AB
GH
DECF
MINICHEF 2000
[alert]
Edit Accept
Back-UpExit
AB
GH
STEADY
ON
SLOW
FLASH
DECF
MINICHEF 2000
[``EnD]
Edit Accept
Back-UpExit
B
DECF
MINICHEF 2000
[`idle]
Edit Accept
Back-UpExit
G H
AAB
GH
RAPID FLASH
IF PROGRAMMED
SLOW FLASH
This procedure describes how to run a menu when the preheat function is inactive — in
other words, when the [Ready] parameter in the [SetUp]function of the
Configuration Mode is set to [```no] — and initial preheat power-up has been completed.
1. With [`idle] on the display, place the food in the pressure fryer and secure the lid
on the pressure vessel.
2. Press the Start/Stop key.
The Start/Stop indicator light will light up. Time will count down on the display.
When the menu cycle nears completion, pressure will be released from the fryer
based on the time programmed in Configuration Mode [etype] / [Ptine].
3. When the cooking cycle is finished, the controller goes into idle and the Start/Stop
key indicator light will switch off. The controller will continue to regulate the set
point temperature.
4. Remove the food carefully and safely.
5. To repeat cooking, repeat steps 1 through 4.
Adjust a Menu While Cooking
You can adjust the temperature and time settings during the cooking and hold
sequences by performing the actions shown under “Set the Menu” earlier in this section.
Changes can be made to temperature and time only during the portion of the cooking
sequence in which they are active. For example: a change to the first cooking temperature [tENP1] can be made only when the first cooking temperature is being run during
the cooking sequence.
Temperature changes made while cooking are saved and become part of the permanent
menu. Time changes are not saved and do not become part of the permanent menu.
Event outputs
Event output 1 assists in controlling pressure.
Event output 1 will switch on when a menu starts and switch off when the time remain-
ing is equal to the value programmed in the Configuration Mode under [Etype] /
[PtinE].
If a menu is cancelled, Event output 1 switches off immediately.
Application 15 Watlow MiniChef 2000 ■ 63
Page 66

Cancel a menu
Canceling the menu stops controller operation completely. The controller does not maintain set point temperatures or run time. Users may cancel the menu in order to run
another one, to stop menu operation for any reason, or when preparing to shut off the
fryer.
Press the Start/Stop for 2 seconds.
Heat outputs will switch off. Heat output indicator lights will switch off. The display
presents [`idle] or the time of day will appear on the display.
Change menus or restart
1. Set menu as shown earlier.
2. Press Start/Stop key.
Temperature Alarms
The controller will alert you to temperature alarm conditions if they occur. If an alarm
occurs, take action as determined by your supervisor. See the Appendix in the Hardware
& Software Setup Guide for a Troubleshooting Chart and a summary of temperature
alarms.
Errors
The controller will alert you to errors if they occur. Errors are critical problems that
shut down the unit. If an error occurs, an error message will appear on the display. You
should switch off the power and call for service.
See the Appendix in the Hardware & Software Setup Guide for a Troubleshooting Chart
and a summary of errors.
64 ■ Watlow MiniChef 2000 Application 15
Page 67

16
Application 16
Automatic Deepfat Fryer
One Heat Channel, Six Menus
Introduction to Application 16 . . . . . . . . . . . . . 65
Configuration Mode Quick Reference . . . . . . . . 67
Program Mode Quick Reference . . . . . . . . . . . . 68
Step 7 Design a Faceplate Overlay . . . . . . . . . . 69
Step 8 Operate the Controller . . . . . . . . . . . . . 70
Application 16 allows you to program as many as six menu keys to control one temperature channel and cooking time for an automatic deepfat fryer.
Overview of Key Steps
1. Install the MINICHEF 2000.
2. Wire the controller.
3. Configure the controller.
4. Program the menus.
5. Set the controller security.
6. Set the Real-time Clock.
For instructions on Steps 1, 2, 3, 4, 5 and 6, see the Hardware & Software Setup Guide.
7. Design, manufacture and apply faceplate overlay for end-users. (For a suggested
design to suit this application, see this section. For overlay dimensions and guidelines, see the Hardware & Software Setup Guide.)
8. Operate the controller. (See this application guide.)
Application 16 Watlow MiniChef 2000 ■ 65
Page 68
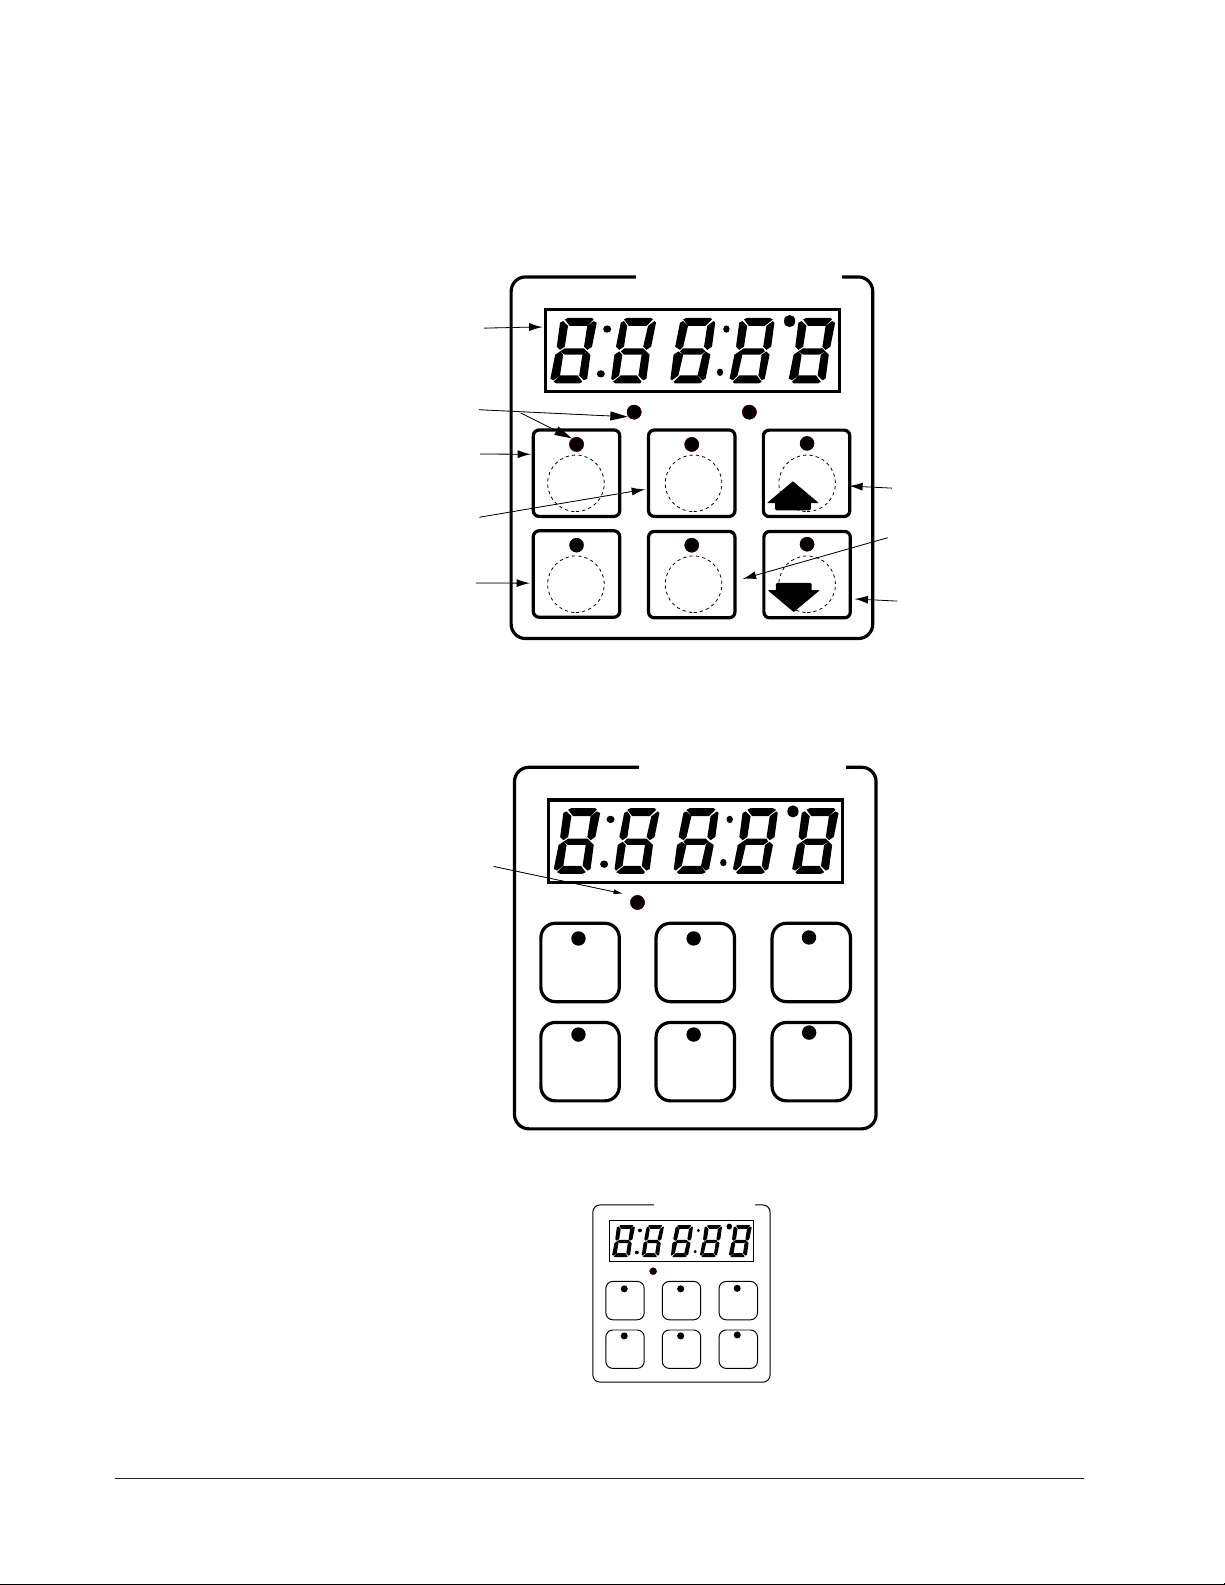
Key Functions in Configuration Mode
Input 1 Fryer Temperature→
Input 2 not used →
Event Input 1 not used →
Event Input 2 not used →
→ Output 1 Heat
→ Output 2 not used
→ Event Output 1 not used
→ Event Output 2 not used
→ Output 5 Audible Alarm
Heat
Menu 1
Menu 4
Menu 3
Menu 6
1
Menu 2
2
3
4
Menu 5
5
6
Your Company Logo
Heat
Menu
Menu
Menu
Menu
Menu
Menu
123
456
Your Company Logo
Menu Key Indicator
Lights
Slow flash.........Preheating
Rapid flash...............Ready
Lit..........................Cooking
Rapid flash.................Done
Slow flash..............Idle and
regulating temp to
previous set point
Not lit.....No menu selected
Heat Indicator Light Lit
when heat output is on.
Menu Keys Activate and
cancel menus, activate
cook cycle when
preheating, and
acknowledge alarms.
AB
DE
GH
Enter
EscapeHome
Edit
C
F
MINICHEF 2000
Display five-digit, sevensegment numeric LED
display.
Indicator lights
(1 for each key, 2 for heat
channels).
Edit key (A) Access the
next level of parameters or
values.
Enter key (B) Enter the
value and return to
previous level.
Home key (D) Move to
Operation Mode with a
two-second key press.
Up key (C) Move up the
lists.
Escape key (E) Return to
original value when editing
a parameter value.
Down key (F) Move down
the lists.
Key Functions in Operation Mode
Summary of Input/Output Functions
Note: For details, see wiring instructions in the
66 ■ Watlow MiniChef 2000 Application 16
Hardware & Software Setup Guide.
Page 69

Configuration Mode Quick Reference
These are the functions, parameters and values included in the Configuration Mode for
this application. You must select Application 16 to access them. For directions, see the
Hardware & Software Setup Guide. The Appendix of that guide includes an explanation
of all parameters and values.
Function Parameter Value Your Settings
{Etype} Equipment-Type [appl`] Application Number 1 - 28 16
[a_Loc] Application Number Yes, No
Security Lock
[Sound] Audible Alarm Sound 0 - 5
[preHt] Preheat Temperature Temperature range low to range hi
[melt] Oil Melt Cycle On, Off
[SEtUP] Setup [`Ç_Ï`] Temperature Display Format ºC or ºF
[time] Time Display Format MMM:SS, HH:MM, H:MM:SS
(H=Hours, M=Minutes, S=Seconds)
[Chirp] Key Chirp On, Off
[loc``] Menu Security Lock Yes, No
[tc```] Thermocouple Type J, K (shown as [````H]), E
[rtd``] RTD Curve DIN, JIS
[tconp] WatCurveTMTemperature On, Off
Compensation
[Ofst1] Temperature Offset, Channel 1 -99 to 99ºF (-55 to 55ºC)
[tr`lo] Temperature Range Low 0ºF (-18ºC) for RTD inputs,
32ºF (0ºC) for tc inputs to [tr`Hi]
[tr`Hi] Temperature Range High [tr`lo] to 1200ºF (649ºC)
[ready] Preheat Ready Feature Yes, No
[rband] Ready Band 1 to 1200ºF (649ºC)
[Cloc`] Real Time Clock Display Yes, No
[plOSS] Power Loss Menu Resume Yes, No
[al``1] Alarms for channel 1 None, Dev, Proc, Both
[aL`P1] Absolute Process Alarm 1 100 to 1200ºF (38 to 649ºC)
[aLdL1] Low Deviation Alarm 1 -999 to 0ºF (-555 to 0ºC)
[aLdH1] High Deviation Alarm 1 0 to 999ºF (0 to 555ºC)
[tHErl] Thermal [tyPE`] Temperature Control Type PID, On-Off
[HYSt1] Hysteresis 1 1 to 99ºF (1 to 55ºC)
[Pid`U] PID Units SI, US
[tune1] Auto-tuning 1 on, OFF
[ProP1] Proportional Band 1 1 to 999ºF (1 to 555ºC)
[rSEt1] Reset (integral) Gain 1 0.00 to 9.99 repeats/minute
[int`1] Integral Gain 1 0.00 to 99.99 minutes/repeat
[rAtE1] Rate (derivative) Gain 1 0.00 to 9.99 minutes
[dEr`1] Derivative Gain 1 0.00 to 9.99 minutes
[CYcL1] PID Cycle Time 1 1 to 60 seconds
[`diag] WatHelp Used for equipment troubleshooting and testing. Not used when programming. See the Hardware
Diagnostics & Software Setup Guide.
Application 16 Watlow MiniChef 2000 ■ 67
Page 70

Program Mode Quick Reference
These are the functions, parameters and values included in the Program Mode for this
application. You must select Application 16 to access them. For menu programming
directions, see the Hardware & Software Setup Guide. The Appendix of that guide
includes a detailed explanation of all parameters and values.
Function Parameter Value Your Settings
[M`__] Menu Numbers 1 - 6 [Stpt1] Set point 1 Temperature range low
Temperature of set point 1. to range high.
[TiNe1] Time 1 Format varies based
Run time of set point 1. on configuration.
[alarn] Mid-menu Stir, Add, Flip, Turn, Alert,
Alarm None
[atine] Mid-menu 0 to [TiNe1].
alarm time.
Auto-tuning Note:
Before auto-tuning Application 16, the Set Point 1 of Menu 1 must first be set to a value
that is typical of your application. (See Hardware & Software Setup Guide for information on programming menus.) Then set [tHerl] / [tunE1] to [```on]. After you
accept [```on], by pressing “Enter,” the controller will display [`tunE] while autotuning is taking place.
The controller will cancel the auto-tuning process if it cannot be completed in 80 minutes. You can cancel the auto-tuning process at any time by pressing either key C or key
D and accepting [``Off], by pressing “Enter,” when it appears.
68 ■ Watlow MiniChef 2000 Application 16
Page 71

Step 7 Design a Faceplate Overlay
AB
DE
GH
Enter
EscapeHome
Edit
C
F
MINICHEF 2000
Heat
Menu
Menu
Menu
Menu
Menu
Menu
123
456
Your Company Logo
To complete the installation, you must apply a graphic membrane to the front panel of
the controller. The following artwork will help you design and create a membrane for
this application. For more dimensions and guidelines, see the Hardware & Software
Setup Guide.
Suggested End-user Overlay:
This Prototyping and Training Membrane Overlay will help you with the configuration and programming steps. To order it, see the Ordering Information
at the back of this guide.
Application 16 Watlow MiniChef 2000 ■ 69
Page 72

Step 8 Operate the Controller
AB
DECF
GH
MINICHEF 2000
[idle`]
Edit Accept
Back-UpExit
SLOW
FLASH
AT OPERATING TEMPERATURE
(PREHEAT CONDITION MET)
RAPID
FLASH
B
DECF
MINICHEF 2000
[100f`]
Edit Accept
Back-UpExit
B
DECF
MINICHEF 2000
[ready]
Edit Accept
Back-UpExit
G H GH
A A
[pre-`] [`Heat]
DECF
MINICHEF 2000
[`50`f]
Edit Accept
Back-UpExit
DECF
MINICHEF 2000
[ready]
Edit Accept
Back-UpExit
AB
GH
AB
GH
DECF
MINICHEF 2000
[`idle]
Edit Accept
Back-UpExit
AB
GH
Summary of Key Functions in Operation Mode
Key Function
A Menu 1
B Menu 2
C Menu 3
D Menu 4
E Menu 5
F Menu 6
Startup
Apply power to the fryer and add cooking oil if necessary.
Initial Preheat
At power-up, the unit will preheat to the temperature value set in the Configuration
Mode [Etype] / [preHt]. The display will show [prE-`] [`Heat] followed by oil
temperature as the oil heats up.
When the unit reaches initial preheat temperature, [ready] will flash once on the display and an audible tone will sound for 2 seconds. Then [`idle] will appear on the display. If the Real-time Clock option is installed and [SEtUp] / [Cloc`] is set to
[``yes], the time of day will appear on the display.
If the preheat condition is met before power-up, the controller goes directly to idle, and
does not display [rEAdy] or sound an audible tone.
Preheat
If in the Configuration Mode [SEtUP] / [ready] has been set to yes, the controller will
detect temperatures and preheat to operating temperature (above relative set point
minus the ready band) as required.
• Activate the menu by pressing the menu key.
If the fryer is not at operating temperature, it will preheat. Meanwhile:
70 ■ Watlow MiniChef 2000 Application 16
Page 73
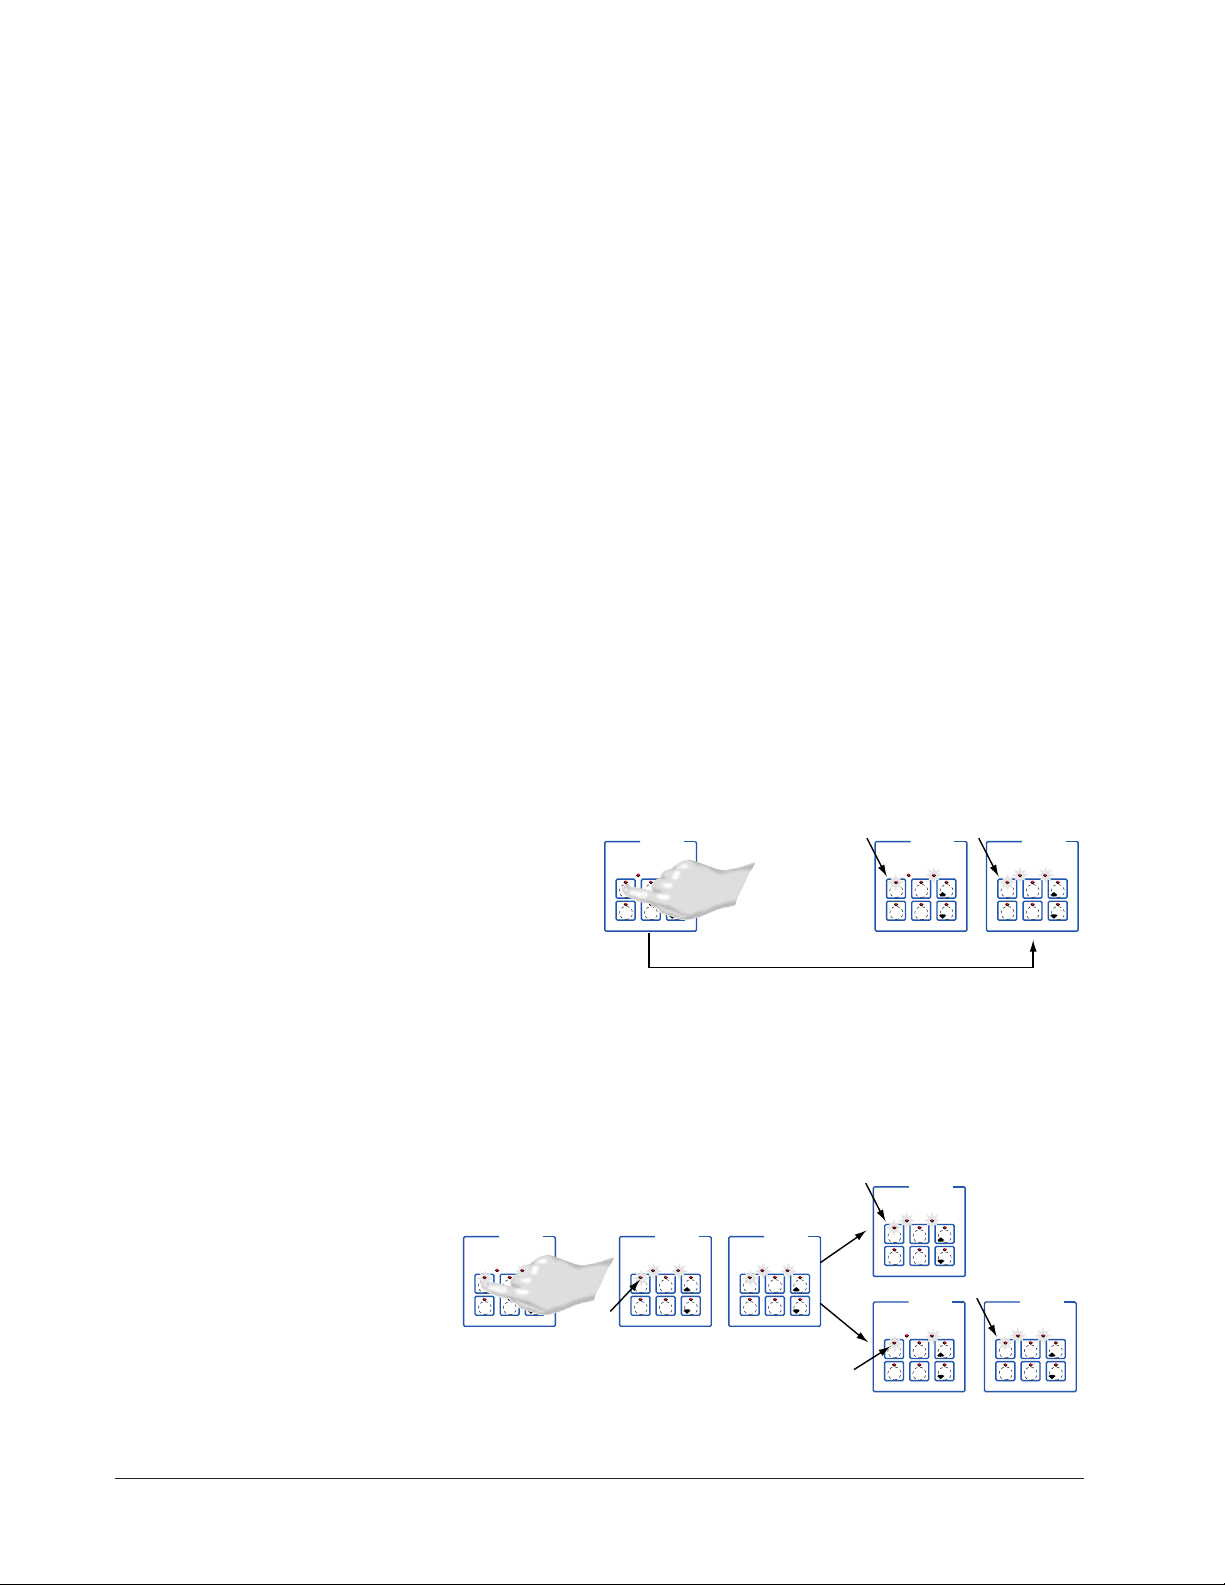
The word [Pre-`] [`Heat] will appear on the display for a few moments. The
DECF
MINICHEF 2000
[ready]
Edit Accept
Back-UpExit
DECF
MINICHEF 2000
[`0009]
Edit Accept
Back-UpExit
B
DECF
MINICHEF 2000
[`idle]
Edit Accept
Back-UpExit
G H
A
AB
GH
AB
GH
DECF
MINICHEF 2000
[alert]
Edit Accept
Back-UpExit
AB
GH
STEADY
ON
SLOW
FLASH
DECF
MINICHEF 2000
[``EnD]
Edit Accept
Back-UpExit
B
DECF
MINICHEF 2000
[`idle]
Edit Accept
Back-UpExit
G H
AAB
GH
RAPID
FLASH
IF PROGRAMMED
SLOW
FLASH
AB
DECF
GH
MINICHEF 2000
[idle`]
Edit Accept
Back-UpExit
SLOW
FLASH
AT OPERATING TEMPERATURE
(PREHEAT CONDITION MET)
RAPID
FLASH
B
DECF
MINICHEF 2000
[100f`]
Edit Accept
Back-UpExit
B
DECF
MINICHEF 2000
[ready]
Edit Accept
Back-UpExit
G H GH
A A
[pre-`] [`Heat]
menu key indicator light will flash slowly. The temperature of Channel 1 will then
be displayed until the operating temperature is reached.
The heat output indicator light - G, just below the display- will light up whenever
the controller is calling for heat.
When the fryer is at operating temperature (above relative set point minus the
ready band) [ready] will appear on the display and the menu key indicator light
will flash rapidly. You are now ready to cook with the active menu.
If the fryer is at operating temperature, the display goes directly to [ready] without indicating preheat or temperature.
The Melt Cycle
To avoid burning congealed oil (shortening), a slow heating action may be necessary. If
this is desired, be sure that in the Configuration Mode [etype] / [melt] has been set
to [```on]. Then, when the oil temperature is below 212 ºF the heat output will be limited to 10% of full power. This reduces the chance of burning congealed oil while it is
heating.
Run a Menu (with preheat feature)
This procedure describes how to run an active menu when the preheat feature is active
— in other words, when the [ready] parameter in the [setUp] function of the
Configuration Mode is set to [``yes].
1. With [`idle] on the display, press the key for the menu you want to run.
If the selected menu’s preheat condition has not been met, the fryer will preheat
until [Ready] appears on the display. If the fryer is at operating temperature
[Ready] will immediately appear on the display.
2. With [Ready] on the display, place the food in the fryer and press the action menu
key (indicated be the flashing red light.) The menu key indicator light will light up.
Time will count down on the display.
Application 16 Watlow MiniChef 2000 ■ 71
3 If programmed, as the time counts down, a mid-menu alarm message will appear on
Page 74

the display. (The message, which varies based on programming at [M```] /
DECF
MINICHEF 2000
[`idle]
Edit Accept
Back-UpExit
DECF
MINICHEF 2000
[`0009]
Edit Accept
Back-UpExit
B
DECF
MINICHEF 2000
[`idle]
Edit Accept
Back-UpExit
G H
A
AB
GH
AB
GH
DECF
MINICHEF 2000
[alert]
Edit Accept
Back-UpExit
AB
GH
STEADY
ON
SLOW
FLASH
DECF
MINICHEF 2000
[``EnD]
Edit Accept
Back-UpExit
B
DECF
MINICHEF 2000
[`idle]
Edit Accept
Back-UpExit
G H
AAB
GH
RAPID FLASH
IF PROGRAMMED
SLOW FLASH
[ALArn] will appear for ten seconds.)
An audible tone will sound for five seconds. Time will continue to count down on the
display.
4. When the cooking cycle is finished one of the following will happen, depending on
the way the controller was programmed at [EtypE] / {Sound].
With Sound set to 0: The controller automatically switches to idle, where the controller maintains the temperatures at set point and does not run time. [`idle] or
time of day will appear on the display. The menu key indicator light will flash slowly.
With Sound set to 1, 2, or 3, [``End] will appear on the display and an audible tone
will be emitted. The menu key indicator light will flash rapidly. You can acknowledge and silence the tone by pressing the active menu key or it will time out in 1 to
20 seconds and go into idle. The menu key indicator light will flash slowly.
With Sound set to 4 or 5, [``End] will appear on the display and the menu key
indicator light will flash rapidly. You must acknowledge the audible tone by pressing
the active menu key. Once acknowledged, the tone is silenced and the controller
goes into idle The menu key indicator light will flash slowly.
5 Remove the food from the fryer. The controller will continue to regulate to the last
set point. The menu key indicator light will flash slowly.
6. To repeat cooking, repeat steps 1 through 5.
Run a Menu (without preheat feature)
This procedure describes how to run a menu when the preheat function is inactive —
that is, when the [Ready] parameter in the [SetUp] function of the Configuration
Mode is set to [```no] — and initial preheat power-up has been completed.
1. With [`idle] on the display, place the food in the fryer.
2. Press the key for the menu you want to run. The menu key will light up and then
time will count down on the display.:
3. If programmed, as the time counts down, a mid-menu alarm message [M```] /
[ALArn] will appear on the display.
The alarm message, which varies based on programming, will appear for ten seconds.
An audible tone will sound for five seconds. Time will continue to count down on the
72 ■ Watlow MiniChef 2000 Application 16
display.
4. When the cooking cycle is finished one of the following will happen, depending on
Page 75

5. Remove the food from the fryer. The controller will continue to regulate at the last
6. To repeat cooking, repeat steps 1 through 5.
Cancel a Menu
Canceling a menu stops controller operation completely. The controller does not maintain set point temperatures or run time. Users may cancel a menu in order to run
another one, to stop menu operation for any reason, or when preparing to shut off the
fryer.
• Press the active menu key for 2 seconds.
the way the controller was programmed at [EtypE] / {Sound]:
With Sound set to 0: The controller automatically switches to idle, where the con-
troller maintains the temperatures at set point and does not run time. [`idle] or
time of day will appear on the display. The menu key indicator light will flash slowly.
With Sound set to 1, 2, or 3: [``End] will appear on the display and an audible tone
will be emitted. The menu key indicator light will flash rapidly. You can acknowledge and silence the tone by pressing the active menu key or it will time out in 1 to
20 seconds and go into idle. The menu key indicator light will flash slowly.
With Sound set to 4 or 5: [``End] will appear on the display and the menu key
indicator light will flash rapidly. You must acknowledge the audible tone by pressing
the active menu key. Once acknowledged the tone is silenced and the controller goes
into idle. The menu key indicator light will flash slowly.
set point. The menu indicator light will flash slowly.
Heat outputs will switch off. Heat output indicator lights will switch off. The display
presents [`idle] or the time of day will appear on the display.
Change or Restart Menus
• With the controller in idle, press the key for the menu you want to run.
Temperature Alarms
The controller will alert you to temperature alarm conditions if they occur. If an alarm
occurs, take action as determined by your supervisor. See the Appendix in the Hardware
& Software Setup Guide for a Troubleshooting Chart and a summary of temperature
alarms.
Errors
The controller will alert you to errors if they occur. Errors are critical problems that
shut down the unit. If an error occurs, an error message will appear on the display. You
should switch off the power and call for service.
See the Appendix in the Hardware & Software Setup Guide for a Troubleshooting Chart
and a summary of errors.
Application 16 Watlow MiniChef 2000 ■ 73
Page 76

Notes
74 ■ Watlow MiniChef 2000 Application 16
Page 77

17
Application 17
Automatic Deepfat Fryer
One Heat Channel, Four Menus
Introduction to Application 17 . . . . . . . . . . . . . 75
Configuration Mode Quick Reference . . . . . . . . 77
Program Mode Quick Reference . . . . . . . . . . . . 78
Step 7 Design a Faceplate Overlay . . . . . . . . . . 79
Step 8 Operate the Controller . . . . . . . . . . . . . 80
Application 17 allows you to program as many as four menu keys to control one temperature channel and dual cooking time for an automatic deepfat fryer.
Overview of Key Steps
1. Install the MINICHEF 2000.
2. Wire the controller.
3. Configure the controller.
4. Program the menus.
5. Set the controller security.
6. Set the Real-time Clock.
For instructions on Steps 1, 2, 3, 4, 5 and 6, see the Hardware & Software Setup Guide.
7. Design, manufacture and apply faceplate overlay for end-users. (For a suggested
design to suit this application, see this section. For overlay dimensions and guidelines, see the Hardware & Software Setup Guide.)
8. Operate the controller. (See this application guide.)
Application 17 Watlow MINICHEF 2000 ■ 75
Page 78

Key Functions in Configuration Mode
Input 1 Fryer Temperature →
Input 2 not used →
Event Input 1 not used →
Event Input 2 not used →
→Output 1 Heat
→Output 2 not used
→Event Output 1 not used
→Event Output 2 not used
→Output 5 Audible Alarm
Heat
Menu 1
Menu 2
Menu 3
Menu 4
123
456
Your Company Logo
Heat
Menu 1
Menu 2
Menu 3
Menu 4
123
456
Your Company Logo
Menu Key 1... Menu 1
Menu Key 3 ... Menu 3
Menu Key 4 ... Menu 2
Menu Key 6 ... Menu 4
Menu keys activate and
cancel menus, activate
cook cycles when
preheating, and
acknowledge alarms.
Menu Key Indicator
Lights
Slow flash...Preheating
Rapid flash...Ready
Full on...Cooking
Rapid flash... Done
Heat Indicator Lights
Lit when heat is on.
Not used
AB
DE
GH
Enter
EscapeHome
Edit
C
F
MINICHEF 2000
Display five-digit, sevensegment numeric LED
display.
Indicator lights
(1 for each key, 2 for heat
channels).
Edit key (A) Access the
next level of parameters or
values.
Enter key (B) Enter the
value and return to
previous level.
Home key (D) Move to
Operation Mode with a
two-second key press.
Up key (C) Move up the
lists.
Escape key (E) Return to
original value when editing
a parameter value.
Down key (F) Move down
the lists.
Key Functions in Operation Mode
Summary of Input/Output Functions
Note: For details, see wiring instructions in the
76 ■ Watlow MINIC HEF 2000 Application 17
Hardware & Software Setup Guide.
Page 79

Configuration Mode Quick Reference
These are the functions, parameters and values included in the Configuration Mode for
this application. You must select Application 17 to access them. For directions, see the
Hardware & Software Setup Guide. The Appendix of that guide includes an explanation
of all parameters and values.
Function Parameter Value Your Settings
{Etype} Equipment-Type [appl`]] Application Number 1 - 28 17
[a_Loc] Application Number Yes, No
Security Lock
[Sound] Audible Alarm Sound 0 - 5
[melt] Oil Melt Cycle On, Off
[setpt] Set point [tr`lo] to [tr`Hi]
[SEtUP] Setup [`Ç_Ï`] Temperature Display Format °C or °F
[time] Time Display Format MMM:SS, HH:MM, H:MM:SS
(H=Hours, M=Minutes, S=Seconds)
[Chirp] Key Chirp On, Off
[loc``] Menu Security Lock Yes, No
[tc```] Thermocouple Type J, K (shown as [````H]), E
[rtd``] RTD Curve DIN, JIS
[tconp] WatCurveTMTemperature On, Off
Compensation
[Ofst1] Temperature Offset, Channel 1 -99 to 99°F (-55 to 55°C)
[tr`lo] Temperature Range Low 0°F (-18° C) for RTD inputs
32°F (0°C) for tc inputs to [tr`Hi]
[tr`Hi] Temperature Range High [tr`lo] to 1200°F(649°C)
[ready] Preheat Ready Feature Yes, No
[rband] Ready Band 1 to 1200°F (649°C)
[Cloc`] Real Time Clock Display Yes, No
[plOSS] Power Loss Menu Resume Yes, No
[al``1] Alarms for channel 1 None, Dev, Proc, Both
[aL`P1] Absolute Process Alarm 1 100 to 1200°F (38 to 649°C)
[aLdL1] Low Deviation Alarm 1 -999 to 0°F (-555 to 0°C)
[aLdH1] High Deviation Alarm 1 0 to 999°F (0 to 555°C)
[tHErl] Thermal [tyPE`] Temperature Control Type PID, On-Off
[HYSt1] Hysteresis 1 1 to 99°F (1 to 55°C)
[Pid`U] PID Units SI, US
[tune1] Auto-tuning 1 on, OFF
[ProP1] Proportional Band 1 1 to 999°F (1 to 555°C)
[rSEt1] Reset (integral) Gain 1 0.00 to 9.99 repeats/minute
[int`1] Integral Gain 1 0.00 to 99.99 minutes/repeat
[rAtE1] Rate (derivative) Gain 1 0.00 to 9.99 minutes
[dEr`1] Derivative Gain 1 0.00 to 9.99 minutes
[CYcL1] PID Cycle Time 1 1 to 60 seconds
[`diag] WatHelp Used for equipment troubleshooting and testing. Not used when programming. See the Hardware
Diagnostics & Software Setup Guide.
Application 17 Watlow MINICHEF 2000 ■ 77
Page 80

Program Mode Quick Reference
These are the functions, parameters and values included in the Program Mode for this
application. You must select Application 17 to access them. For menu programming
directions, see the Hardware & Software Setup Guide. The Appendix of that guide
includes a detailed explanation of all parameters and values
Function Parameter Value Your Settings
[M`__] Menu Numbers 1 - 4 [TiNe1] Time 1 Format varies based
Run time of set point. on configuration.
[alarn] Mid-menu Stir, Add, Flip, Turn, Alert,
Alarm None
[atiNe] Mid-menu 0 to [TiNe1].
alarm time.
Auto-tuning Note:
Before auto-tuning Application 17, set point parameter at [Etype] / [Setpt] must first
be set to a value that is typical of your application. (See the Hardware & Software
Setup Guide for information on programming menus.) Then set [tHerl] / [tunE1] to
[```on]. After you accept [```on], by pressing “Enter,” the controller will display
[`tunE] while auto-tuning is taking place.
The controller will cancel the auto-tuning process if it cannot be completed in 80 minutes. You can cancel the auto-tuning process at any time by pressing either key C or key
D and accepting [``Off], by pressing “Enter,” when it appears.
78 ■ Watlow MINIC HEF 2000 Application 17
Page 81

Step 7 Design a Faceplate Overlay
AB
DE
GH
Enter
EscapeHome
Edit
C
F
MINICHEF 2000
Heat
Menu 1
Menu 2
Menu 3
Menu 4
123
456
Your Company Logo
To complete the installation, you must apply a graphic membrane to the front panel of
the controller. The following artwork will help you design and create a membrane for
this application. For more dimensions and guidelines, see the Hardware & Software
Setup Guide.
Suggested End-user Overlay:
This Prototyping and Training Membrane Overlay will help you with the configuration and programming steps. To order it, see the Ordering Information
at the back of this guide.
Application 17 Watlow MINICHEF 2000 ■ 79
Page 82

Step 8 Operate the Controller
AB
DECF
GH
MINICHEF 2000
[idle`]
Edit Accept
Back-UpExit
SLOW
FLASH
AT OPERATING TEMPERATURE
(PREHEAT CONDITION MET)
RAPID
FLASH
B
DECF
MINICHEF 2000
[100f`]
Edit Accept
Back-UpExit
B
DECF
MINICHEF 2000
[ready]
Edit Accept
Back-UpExit
G H GH
A A
[pre-`] [`Heat]
DECF
MINICHEF 2000
[`50`f]
Edit Accept
Back-UpExit
DECF
MINICHEF 2000
[ready]
Edit Accept
Back-UpExit
AB
GH
AB
GH
DECF
MINICHEF 2000
[`idle]
Edit Accept
Back-UpExit
AB
GH
Summary of Key Functions in Operation Mode
Key Function
A Menu 1
B Not Used
C Menu 2
D Menu 3
E Not Used
F Menu 4
Startup
Apply power to the fryer and add cooking oil if necessary.
Initial Preheat
At power-up, the unit will preheat to the temperature value set in the Configuration
Mode [Etype] / [setpt]. The display will show [prE-`] [`Heat] followed by oil
temperature as the oil heats up.
When the unit reaches initial preheat temperature, [ready] will flash once on the display and an audible tone will sound for 2 seconds. Then [`idle] will appear on the display. If the Real-time Clock option is installed and [SEtUp] / [Cloc`] is set to
[``yes], the time of day will appear on the display.
If the preheat condition is met before power-up, the controller goes directly to idle, and
does not display [rEAdy] or sound an audible tone.
Preheat
If in the Configuration Mode [SEtUP] / [ready] has been set to yes, the controller will
detect temperatures and preheat to operating temperature (above relative set point
minus the ready band) as required.
• Activate the menu by pressing the desired menu key.
80 ■ Watlow MINIC HEF 2000 Application 17
Page 83

The Melt Cycle
To avoid burning congealed oil (shortening), a slow heating action may be necessary. If
this is desired, be sure that in the Configuration Mode [etype] / [melt] has been set
to [```on]. Then, when the oil temperature is below 212 °F the heat output will be limited to 10% of full power. This reduces the chance of burning congealed oil while it is
heating.
Run a Menu
1. With [`idle] on the display, place the food in the fryer and press the key(s) for the
2 If programmed, as the time counts down, a mid-menu alarm message will appear on
3. When a menu cycle is finished one of the following will happen, depending on the
If the fryer is not at operating temperature, it will preheat. Meanwhile:
The word [Pre-`] [`Heat] will appear on the display for a few moments. The
menu key indicator light will flash slowly. The temperature of Channel 1 will be displayed until the operating temperature is reached.
The heat output indicator light – G, just below the display – will light up whenever
the controller is calling for heat.
When the fryer is at operating temperature (above relative set point minus the
ready band) [ready] will appear on the display and the menu key indicator light
will flash rapidly. You are now ready to cook with the active menu.
If the fryer is at operating temperature, the display goes directly to [ready] without indicating preheat or temperature.
menu(s) you want to run. The menu key indicator light(s) that you selected will
light up. You will be able to select only two menus to run simultaneously. Menu 1
can be active with either 3 or 4, or Menu 2 can be active with either 3 or 4. The
remaining time for the menu with the shortest countdown time will be shown on the
display.
If the preheat condition has not been met you will not be able to select a menu until
[Ready] flashes once on the display followed by [`idle]. If the fryer is at operating temperature [`idle] will immediately appear on the display.
the display. (The message, which varies based on programming at [M`__] /
[ALArn] will appear for ten seconds.)
An audible tone will sound for five seconds. Time will continue to count down on the
display.
way the controller was programmed at [EtypE] / {Sound]:
With Sound set to 0: The controller displays [``End] and the menu key indicator
light will flash rapidly until acknowledged, by pressing that key. The controller
maintains the temperatures at set point and displays the remaining time of the
menu with the shortest countdown time. If there are no running menus, [`idle] or
time of day will appear on the display.
With Sound set to 1, 2, or 3, [``End] will appear on the display and an audible tone
will be emitted. The menu key indicator light will flash rapidly. You can acknowledge and silence the tone by pressing the active menu key or it will time out in 1 to
20 seconds and go into idle.
Application 17 Watlow MINICHEF 2000 ■ 81
Page 84

With Sound set to 4 or 5, [``End] will appear on the display and the menu key
indicator light will flash rapidly. You must acknowledge the audible tone by pressing
the active menu key. Once acknowledged, the tone is silenced and the controller
goes into idle.
4. Remove the food from the fryer. The controller will continue to regulate to the set
point. The menu key indicator light will be off.
5. To repeat cooking, repeat steps 1 through 4.
Cancel a Menu
Canceling a menu stops controller timing for that menu. The controller may still be running time for another menu. Users may cancel a menu in order to run another one, to
stop menu operation for any reason, or when preparing to shut off the fryer.
• Press the active menu key for 2 seconds.
The display presents time remaining if another menu is active, otherwise [`idle]
or the time of day.
Change or Restart Menus
• With the controller in idle, press the key for the menu you want to run.
Temperature Alarms
The controller will alert you to temperature alarm conditions if they occur. If an alarm
occurs, take action as determined by your supervisor. See the Appendix in the Hardware
& Software Setup Guide for a Troubleshooting Chart and a summary of temperature
alarms.
Errors
The controller will alert you to errors if they occur. Errors are critical problems that
shut down the unit. If an error occurs, an error message will appear on the display. You
should switch off the power and call for service.
See the Appendix in the Hardware & Software Setup Guide for a Troubleshooting Chart
and a summary of errors.
82 ■ Watlow MINIC HEF 2000 Application 17
Page 85

18
Application 18
Automatic Deepfat Fryer
One Heat Channel, 40 Menus
Introduction to Application 18 . . . . . . . . . . . . . 83
Configuration Mode Quick Reference . . . . . . . . 85
Program Mode Quick Reference . . . . . . . . . . . . 86
Step 7 Design a Faceplate Overlay . . . . . . . . . . 87
Step 8 Operate the Controller . . . . . . . . . . . . . 88
Application 18 allows you to program as many as forty menus to control one temperature channel and cooking time for an automatic deepfat fryer.
Overview of Key Steps
1. Install the MINICHEF 2000.
2. Wire the controller.
3. Configure the controller.
4. Program the menus.
5. Set the controller security.
6. Set the Real-time Clock.
For instructions on Steps 1, 2, 3, 4, 5 and 6, see the Hardware & Software Setup Guide.
7. Design, manufacture and apply faceplate overlay for end-users. (For a suggested
design to suit this application, see this section. For overlay dimensions and guidelines, see the Hardware & Software Setup Guide.)
8. Operate the controller. (See this application guide.)
Application 18 Watlow MiniChef 2000 ■ 83
Page 86

Key Functions in Configuration Mode
Heat
1
Idle 1
Temp
2
Idle 2
Time
4
5
Start/
Stop
6
Down
Your Company Logo
3
Up
Input 1 Fryer Temp →
Input 2 not used →
Event Input 1 not used →
Event Input 2 not used →
→Output 1 Heat
→Output 2 not used
→Event Output 1 not used
→Event Output 2 not used
→Output 5 Audible Alarm
Menu
Select
Heat
1
Idle One
Temp
2
Idle Two
Temp
5
Start/
Stop
6
Down
Your Company Logo
3
Up
4
Menu
Select
Heat indicator light Lit
when heat output is on.
Idle One Temp View or
program idle set point 1.
Indicator light will flash
slowly when controlling to
set point.
Idle Two Temp View or
program idle set point 2.
Indicator light will flash
slowly when controlling to
set point.
Menu Select Enter menu
mode or select menu.
Increment Scroll through
valid menus.
Start/Stop Activate or
cancel active menu.
Decrement Scroll through
valid menus.
Start/Stop Indicator Light
Slow flash...Preheating
Rapid flash...Ready
Lit...Cooking
Off...Done
AB
DE
GH
Enter
EscapeHome
Edit
C
F
MINICHEF 2000
Display five-digit, sevensegment numeric LED
display.
Indicator lights
(1 for each key, 2 for heat
channels).
Edit key (A) Access the
next level of parameters or
values.
Enter key (B) Enter the
value and return to
previous level.
Home key (D) Move to
Operation Mode with a
two-second key press.
Up key (C) Move up the
lists.
Escape key (E) Return to
original value when editing
a parameter value.
Down key (F) Move down
the lists.
Key Functions in Operation Mode
Summary of Input/Output Functions
Note: For details, see wiring instructions in the
84 ■ Watlow MiniChef 2000 Application 18
Hardware & Software Setup Guide.
Page 87

Configuration Mode Quick Reference
These are the functions, parameters and values included in the Configuration Mode for
this application. You must select Application 18 to access them. For directions, see the
Hardware & Software Setup Guide. The Appendix of that guide includes an explanation
of all parameters and values.
Function Parameter Value Your Settings
{Etype} Equipment-Type [appl`] Application Number 1 - 28 18
[a_Loc] Application Number Yes, No
Security Lock
[Sound] Audible Alarm Sound 0 - 5
[preHt] Initial Preheat Temperature Temp range low to temp range high
[idle1] Channel 1 Idle Temperature Temp range low to temp range high
[idle2] Channel 2 Idle Temperature Temp range low to temp range high
[melt] Oil Melt Cycle On, Off
[SEtUP] Setup [`Ç_Ï`] Temperature Display Format °C or °F
[time] Time Display Format MMM:SS, HH:MM, H:MM:SS
(H=Hours, M=Minutes, S=Seconds)
[Chirp] Key Chirp On, Off
[loc``] Menu Security Lock Yes, No
[tc```] Thermocouple Type J, K (shown as [````H]), E
[rtd``] RTD Curve DIN, JIS
[tconp] WatCurveTMTemperature On, Off
Compensation
[Ofst1] Temperature Offset, Channel 1 -99 to 99°F (-55 to 55°C)
[tr`lo] Temperature Range Low 0ºF (-18ºC) for RTD inputs
32ºF (0ºC) for tc inputs to [tr`Hi]
[tr`Hi] Temperature Range High [tr`lo] to 1200ºF(649ºC)
[ready] Preheat Ready Feature Yes, No
[rband] Ready Band 1 to 1200°F (649°C)
[Cloc`] Real Time Clock Display Yes, No
[plOSS] Power Loss Menu Resume Yes, No
[al``1] Alarms for channel 1 None, Dev, Proc, Both
[aL`P1] Absolute Process Alarm 1 100 to 1200°F (38 to 649°C)
[aLdL1] Low Deviation Alarm 1 -999 to 0°F (-555 to 0°C)
[aLdH1] High Deviation Alarm 1 0 to 999°F (0 to 555°C)
[tHErl] Thermal [tyPE`] Temperature Control Type PID, On-Off
[HYSt1] Hysteresis 1 1 to 99°F (1 to 55°C)
[Pid`U] PID Units SI, US
[tune1] Auto-tuning 1 on, OFF
[ProP1] Proportional Band 1 1 to 999°F (1 to 555°C)
[rSEt1] Reset (integral) Gain 1 0.00 to 9.99 repeats/minute
[int`1] Integral Gain 1 0.00 to 99.99 minutes/repeat
[rAtE1] Rate (derivative) Gain 1 0.00 to 9.99 minutes
[dEr`1] Derivative Gain 1 0.00 to 9.99 minutes
[CYcL1] PID Cycle Time 1 1 to 60 seconds
[[`diag] WatHelp Used for equipment troubleshooting and testing. Not used when programming. See the Hardware
Diagnostics & Software Setup Guide.
Application 18 Watlow MiniChef 2000 ■ 85
Page 88

Program Mode Quick Reference
These are the functions, parameters and values included in the Program Mode for this
application. You must select Application 18 to access them. For menu programming
directions, see the Hardware & Software Setup Guide. The Appendix of that guide
includes a detailed explanation of all parameters and values.
Function Parameter Value Your Settings
[M`__] Menu Numbers 1 - 6 [Stpt1] Set point 1 Temperature range low
Temperature of set point 1. to range high.
[TiNe1] Time 1 Format varies based
Run time of set point. on configuration.
[alarn] Mid-menu Stir, Add, Flip, Turn, Alert,
Alarm None.
[atiNe] Mid-menu 0 to [TiNe1].
alarm time.
Auto-tuning Note:
Before auto-tuning Application 18, Set Point 1 of Menu 1 must first be set to a value
that is typical of your application. (See Hardware & Software Setup Guide for information on programming menus.) Then set [tHerl] / [tunE1] to [```on]. After you
accept [```on], by pressing “Enter,” the controller will display [`tunE] while autotuning is taking place.
The controller will cancel the auto-tuning process if it cannot be completed in 80 minutes. You can cancel the auto-tuning process at any time by pressing either key C or key
D and accepting [``Off], by pressing “Enter,” when it appears.
86 ■ Watlow MiniChef 2000 Application 18
Page 89

Step 7 Design a Faceplate Overlay
AB
DE
GH
Enter
EscapeHome
Edit
C
F
MINICHEF 2000
Heat
1
Idle One
Temp
2
Idle Two
Temp
5
Start/
Stop
6
Down
Your Company Logo
3
Up
4
Menu
Select
To complete the installation, you must apply a graphic membrane to the front panel of
the controller. The following artwork will help you design and create a membrane for
this application. For more dimensions and guidelines, see the Hardware & Software
Setup Guide.
Suggested End-user Overlay:
This Prototyping and Training Membrane Overlay will help you with the configuration and programming steps. To order it, see the Ordering Information
at the back of this guide.
Application 18 Watlow MiniChef 2000 ■ 87
Page 90

Step 8 Operate the Controller
DECF
MINICHEF 2000
[`50`f]
Edit Accept
Back-UpExit
DECF
MINICHEF 2000
[ready]
Edit Accept
Back-UpExit
AB
GH
AB
GH
DECF
MINICHEF 2000
[`idle]
Edit Accept
Back-UpExit
AB
GH
DECF
MINICHEF 2000
[````1]
Edit Accept
Back-UpExit
DECF
MINICHEF 2000
[````9]
Edit Accept
Back-UpExit
AB
GH
AB
GH
DECF
MINICHEF 2000
[`idle]
Edit Accept
Back-UpExit
AB
GH
Summary of Key Functions in Operation Mode
Key Operation Function
A Idle One Temp
B Idle Two Temp
C Increment
D Menu Select
E Start/Stop
F Decrement
Start-up
Apply power to the fryer and add cooking oil if necessary.
Select a Menu
1. Press the Menu Select key.
The controller will display the currently selected menu. If no menus have been pro-
grammed the word [`none] will appear on the display.
2. Press the Up-arrow or Down-arrow key until the menu you want appears on the display.
The controller will only display valid menus (those for which Time1 for the menu is
set to greater than 0).
3. Press the Menu Select key again.
The menu you have chosen becomes the current menu for controller operation.
Initial Preheat
At power-up, the unit will preheat to the temperature value set in the Configuration
Mode [Etype] / [preHt]. The display will show [Pre-`] [`HEat] followed by oil temperature as the oil heats.
When the unit reaches initial preheat temperature, [Ready] will flash once on the dis-
88 ■ Watlow MiniChef 2000 Application 18
Page 91

Preheat
AB
DECF
GH
MINICHEF 2000
[`idle]
Edit Accept
Back-UpExit
SLOW
FLASH
AT OPERATING TEMPERATURE
(PREHEAT CONDITION MET)
RAPID
FLASH
B
DECF
MINICHEF 2000
[100f`]
Edit Accept
Back-UpExit
B
DECF
MINICHEF 2000
[ready]
Edit Accept
Back-UpExit
G H GH
A A
[pre-`] [`Heat]
play and an audible tone will sound for 2 seconds. Then [`idle] will appear on the
display. If Real Time Clock option is installed and [setUp] / [Cloc`] is set to
[``yes], the time of day will appear on the display.
If in the Configuration Mode [SEtUP] / [ready]] has been set to yes, the controller will
detect temperatures and preheat to operating temperature (above relative set point
minus the ready band) as required.
• Activate the menu by pressing the Start/Stop key.
If the fryer is not at operating temperature, it will preheat. Meanwhile:
The word [pre-`] [`Heat] will appear on the display for a few moments. The
Start/Stop key indicator light will flash slowly. The temperature of Channel 1 will
be displayed until the operating temperature is reached.
The heat output indicator light – G, just below the display – will light up whenever
the controller is calling for heat.
When the fryer is at operating temperature (above relative set point minus the
ready band) [ready] will appear on the display and the Start/Stop key indicator
light will flash rapidly. You are now ready to cook with the active menu.
If the fryer is at operating temperature, the display goes directly to [ready] without indicating preheat or temperature.
The Melt Cycle
To avoid burning, congealed oil requires a slow heating action. If in the Configuration
Mode, [etype] / [melt] has been set to on, when the oil temperature is below 212°F
the heat output will be limited to 10% of full power.
Run a Menu (with preheat feature)
This procedure describes how to run an active menu when the preheat feature is active
— in other words, when the [ready] parameter in the [SetUp] function of the
Configuration Mode is set to [yes``].
1. Select the menu you want to run as shown earlier in “Select a Menu”.
2. With [`idle] or time of day on the display, press the Start/Stop key.
Application 18 Watlow MiniChef 2000 ■ 89
Page 92
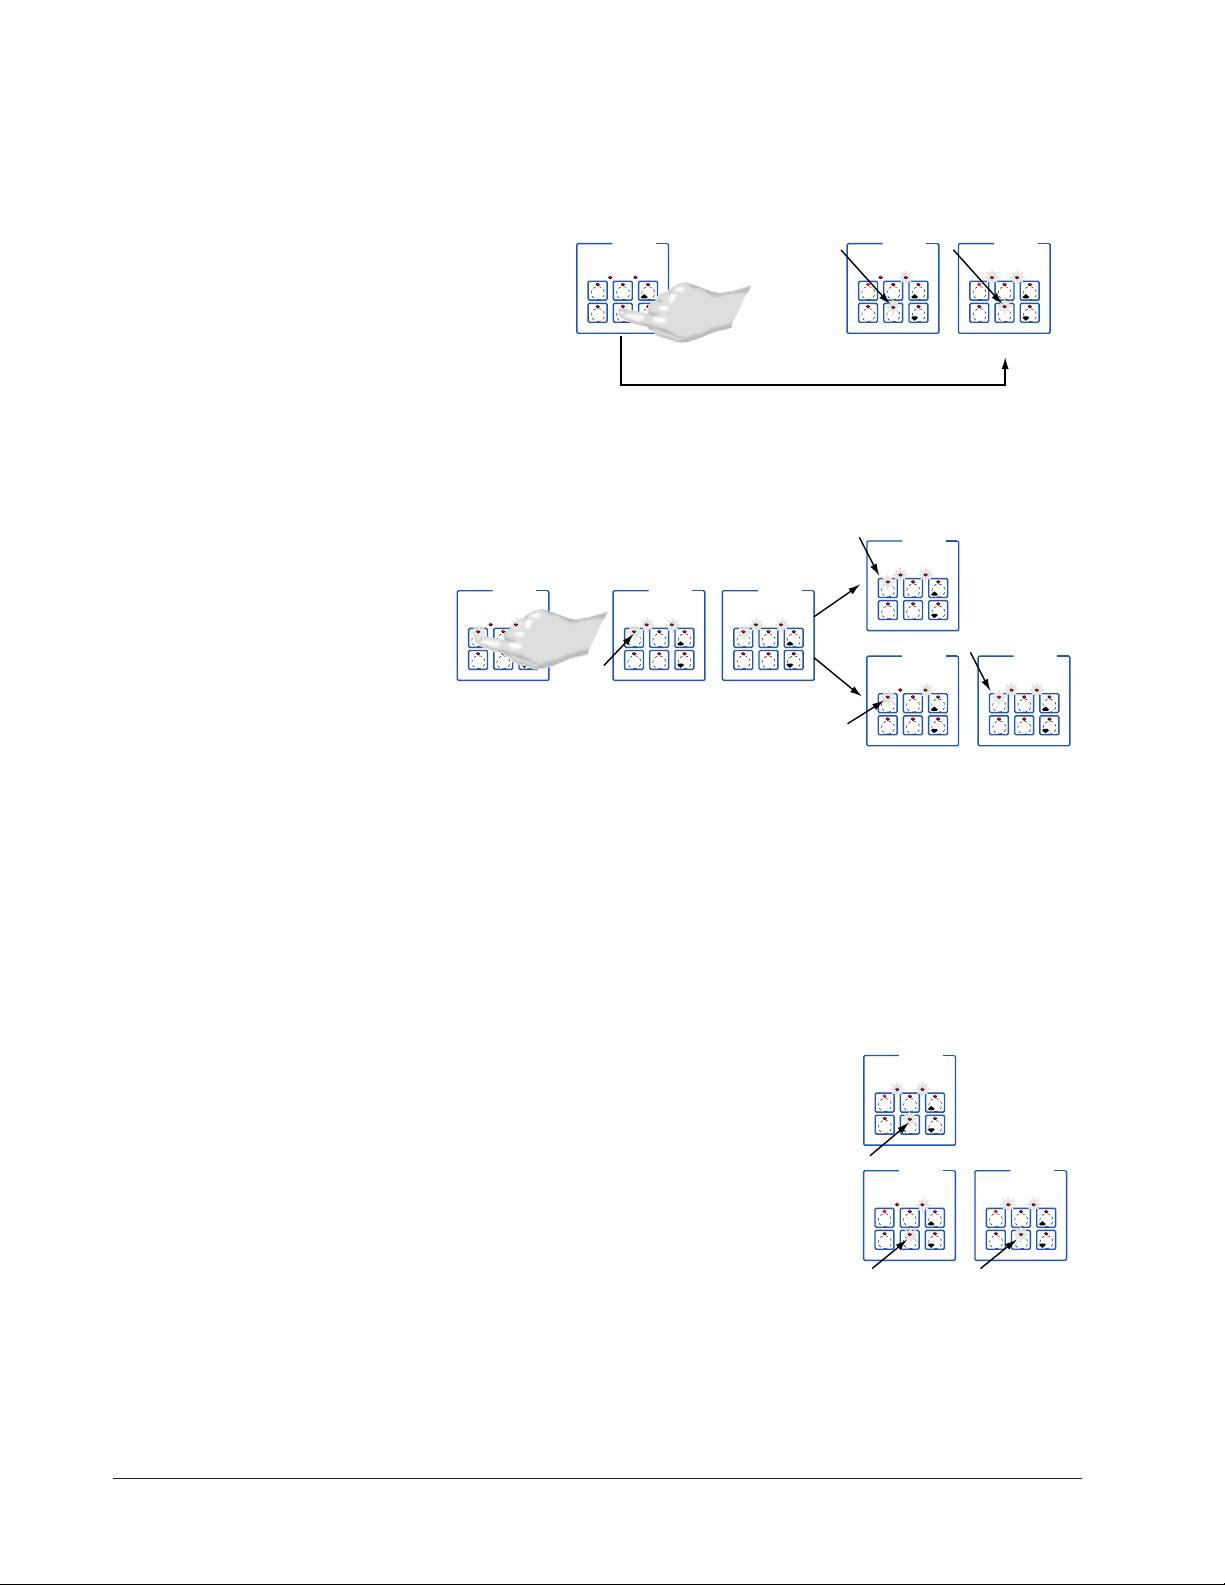
If the preheat condition has not been met, the fryer will preheat until [ready] appears
B
DECF
MINICHEF 2000
[idle`]
Edit Accept
Back-UpExit
G H
A
SLOW
FLASH
DECF
MINICHEF 2000
[EnD``]
Edit Accept
Back-UpExit
B
DECF
MINICHEF 2000
[idle`]
Edit Accept
Back-UpExit
G H
AAB
GH
RAPID
FLASH
SLOW
FLASH
DECF
MINICHEF 2000
[ready]
Edit Accept
Back-UpExit
DECF
MINICHEF 2000
[`0009]
Edit Accept
Back-UpExit
B
DECF
MINICHEF 2000
[`idle]
Edit Accept
Back-UpExit
G H
A
AB
GH
AB
GH
DECF
MINICHEF 2000
[alert]
Edit Accept
Back-UpExit
AB
GH
STEADY
ON
SLOW
FLASH
DECF
MINICHEF 2000
[``EnD]
Edit Accept
Back-UpExit
B
DECF
MINICHEF 2000
[`idle]
Edit Accept
Back-UpExit
G H
AAB
GH
RAPID
FLASH
IF PROGRAMMED
SLOW
FLASH
AB
DECF
GH
MINICHEF 2000
[`idle]
Edit Accept
Back-UpExit
SLOW
FLASH
AT OPERATING TEMPERATURE
(PREHEAT CONDITION MET)
RAPID
FLASH
B
DECF
MINICHEF 2000
[100f`]
Edit Accept
Back-UpExit
B
DECF
MINICHEF 2000
[ready]
Edit Accept
Back-UpExit
G H GH
A A
[pre-`] [`Heat]
on the display. If the fryer is at operating temperature [ready] will immediately
appear on the display.
3. With ready on the display, place the food in the fryer.
4. Press the Start/Stop key.
The Start/Stop key indicator light will light up. Time will count down on the display.
5. If programmed, as the time counts down, a mid-point alarm will appear on the display.
The alarm messages which varies based on programming will appear for ten seconds.
An audible will sound for five seconds. Time will continue to count down on the display.
6. When the cooking cycle is finished one of the following will happen, depending on
the way the controller was programmed at [Etype] / [sound]::
With Sound set to 0: The controller automatically switches to idle. [idle`] or current time will appear on the display. The Start/Stop key indicator light will flash
slowly. The controller will maintain temperature at the programmed set point.
With Sound set to 1, 2, or 3: [``End] will appear on the display and an audible tone
90 ■ Watlow MiniChef 2000 Application 18
will be emitted. The Start/Stop key indicator light will flash rapidly. You can
Page 93

acknowledge and silence the tone by pressing the Start/Stop key or it will automati-
DECF
MINICHEF 2000
[`idle]
Edit Accept
Back-UpExit
DECF
MINICHEF 2000
[`0009]
Edit Accept
Back-UpExit
B
DECF
MINICHEF 2000
[`idle]
Edit Accept
Back-UpExit
G H
A
AB
GH
AB
GH
DECF
MINICHEF 2000
[alert]
Edit Accept
Back-UpExit
AB
GH
STEADY
ON
SLOW
FLASH
DECF
MINICHEF 2000
[``EnD]
Edit Accept
Back-UpExit
B
DECF
MINICHEF 2000
[`idle]
Edit Accept
Back-UpExit
G H
AAB
GH
RAPID FLASH
IF PROGRAMMED
SLOW FLASH
cally time out within 2 seconds for setting 1 or 20 seconds for settings 2 or 3 and
then go into idle. The Start/Stop key indicator light will flash slowly. The controller
will maintain temperature at the programmed set point.
With sound set to 4 or 5: [``End] will appear on the display and the Start/Stop key
indicator light will flash rapidly. You must acknowledge the audible tone by pressing
the Start/Stop key. Once acknowledged the audible tone is silenced and the controller goes into idle. The Start/Stop key indicator light will flash slowly. The controller will maintain temperature at the programmed set point.
7. Remove the food from the fryer.
8. To repeat cooking, repeat steps 1 through 7.
Run a Menu (with no preheat feature)
This procedure describes how to run an active menu when the preheat feature is inactive - in other words, when the [ready] parameter in the [setUp] function of the
Configuration Mode is set to [```no].
1. Select the menu you want to run as shown earlier in “Select a Menu”.
2. With [idle`] or time of day on the display, place the food in the basket.
3. Press the Start/Stop key.
The Start/Stop key indicator light will light up. Time will count down on the display.
4. If programmed, as the time counts down, a mid-point alarm will appear on the display.
The alarm messages which varies based on programming will appear for ten seconds.
An audible will sound for five seconds. Time will continue to count down on the display
5. When the cooking cycle is finished one of the following will happen, depending on
the way the controller was programmed at [EtyPE] / [Sound]:
With Sound set to 0: The controller automatically switches to idle. [`idle] or current time will appear on the display. The Start/Stop key indicator light will flash
slowly. The controller will maintain temperature at the programmed set point.
With Sound set to 1, 2, or 3: [``End] will appear on the display and an audible tone
will be emitted. The Start/Stop key indicator light will flash rapidly. You can
acknowledge and silence the tone by pressing the Start/Stop key or it will automati-
Application 18 Watlow MiniChef 2000 ■ 91
cally time out within 2 seconds for setting 1 or 20 seconds for settings 2 or 3 and
then go into idle. The Start/Stop key indicator light will flash slowly. The controller
Page 94

will maintain temperature at the programmed set point.
DECF
MINICHEF 2000
[`idle]
Edit Accept
Back-UpExit
DECF
MINICHEF 2000
[`0009]
Edit Accept
Back-UpExit
AB
GH
AB
GH
STEADY
ON
SLOW
FLASH
With sound set to 4 or 5: [``End] will appear on the display and the Start/Stop key
indicator light will flash rapidly. You must acknowledge the audible tone by pressing
the Start/Stop key. Once acknowledged the audible tone is silenced and the controller goes into idle. The Start/Stop key indicator light will flash slowly. The controller will maintain temperature at the programmed set point.
6. Remove the food from the fryer.
7. To repeat cooking, repeat steps 1 through 6.
Auxiliary Idle Set Points
In some cases you may want to control at some non-cooking temperature such as during
cleaning, preheating or to preserve the life of the oil. The controller is equipped with the
capability of two auxiliary idle set points: Idle One and Idle Two.
To program either of the set points:
1. Press and hold down the Idle One Temp or Idle Two Temp key.
2. While holding down the key, use the Up-arrow or Down-arrow key to adjust the set
point temperature.
3. Release all of the keys.
The idle temperature has been set.
4. Program the other Idle temperature if desired by repeating 1 through 3 using the
other Idle Temp key.
To run the fryer at an auxiliary idle set point:
• With the fryer in idle (not running a menu) press either the Idle One Temp or Idle
Two Temp key.
The indicator light over the Idle Temp key will flash slowly.
The fryer will run at the idle set point until you run a menu by pressing the
Start/Stop key or you press the other Idle Temp key.
Cancel a Menu
Canceling a menu stops the controller completely. The controller does not maintain set
point temperatures or run time. You cancel a menu to run another menu, stop menu
operation for any reason, or are preparing to shut off the oven.
• Press the Start/Stop key for 2 seconds. Heat outputs will switch off. The heat output
indicator light will switch off. [`idLE] or time of day will be on the display.
Restart a Menu
1. If the controller is preheating or running a menu, cancel the menu by pressing and
holding the Start/Stop key for 2 seconds. If the controller is in [`idle], go to 2.
2. Press the Start/Stop key.
92 ■ Watlow MiniChef 2000 Application 18
Page 95

Based on its programming, the unit will run the menu in one of the ways described
earlier.
Change Menus
1. With the controller in idle, select the menu you want to run by performing the procedure under “Select a Menu” earlier in this section.
2. Press the Start/Stop key.
Based on its programming, the unit will run the menu in one of the ways described
earlier.
Temperature Alarms
The controller will alert you to temperature alarm conditions if they occur. If an alarm
occurs, take action as determined by your supervisor. See the Appendix in the Hardware
& Software Setup Guide for a Troubleshooting Chart and a summary of temperature
alarms.
Errors
The controller will alert you to errors if they occur. Errors are critical problems that
shut down the unit. If an error occurs, an error message will appear on the display. You
should switch off the power and call for service.
See the Appendix in the Hardware & Software Setup Guide for a Troubleshooting Chart
and a summary of errors.
Application 18 Watlow MiniChef 2000 ■ 93
Page 96

Notes
94 ■ Watlow MiniChef 2000 Application 18
Page 97

19
Application 19
Manual Deepfat Fryer
One Heat Channel
Introduction to Application 19 . . . . . . . . . . . . . 95
Configuration Mode Quick Reference . . . . . . . . 97
Step 7 Design a Faceplate Overlay . . . . . . . . . . 99
Step 8 Operate the Controller. . . . . . . . . . . . . 100
Application 19 allows you to program a menu to control one temperature channel and
cooking time for a manual deepfat fryer.
Overview of Key Steps
1. Install the MINICHEF 2000.
2. Wire the controller.
3. Configure the controller.
4. Program the menu.
5. Set the controller security.
6. Set the Real-time Clock.
For instructions on Steps 1, 2, 3, 4, 5 and 6, see the Hardware & Software Setup Guide.
7. Design, manufacture and apply faceplate overlay for end-users. (For a suggested
design to suit this application, see this section. For overlay dimensions and guidelines, see the Hardware & Software Setup Guide.)
8. Operate the controller. (See this application guide.)
Application 19 Watlow MINICHEF 2000 ■ 95
Page 98

Key Functions in Configuration Mode
Heat
1
Temp
2
Time
4
5
Start/
Stop
6
Down
Your Company Logo
3
Up
Input 1 Fryer Temperature →
Input 2 not used →
Event Input 1 not used →
Event Input 2 not used →
→Output 1 Heat
→Output 2 not used
→Event Output 1 not used
→Event Output 2 Timer Output
→Output 5 Audible Alarm
Heat
1
Temp
2
Time
4
5
Start/
Stop
6
Down
Your Company Logo
3
Up
Temp Set or display
temperature. Lights flash
rapidly if editing
parameters during menu
operation.
Time Set Time. Lights
flash rapidly if editing
parameters during menu
operation.
Not Used
Start/Stop Activate, pause
or cancel active menu.
Heat Indicator Light
Lit when heat output is on.
Increment
Start/Stop Indicator Light
Slow flash...Preheating
Rapid flash...Ready
Lit...Cooking
Off...Done
Decrement
AB
DE
GH
Enter
EscapeHome
Edit
C
F
MINICHEF 2000
Display five-digit, sevensegment numeric LED
display.
Indicator lights
(1 for each key, 2 for heat
channels).
Edit key (A) Access the
next level of parameters or
values.
Enter key (B) Enter the
value and return to
previous level.
Home key (D) Move to
Operation Mode with a
two-second key press.
Up key (C) Move up the
lists.
Escape key (E) Return to
original value when editing
a parameter value.
Down key (F) Move down
the lists.
Key Functions in Operation Mode
Summary of Input/Output Functions
Note: For details, see wiring instructions in the
96 ■ Watlow MINIC HEF 2000 Application 19
Hardware & Software Setup Guide
.
Page 99

Configuration Mode Quick Reference
These are the functions, parameters and values included in the Configuration Mode for
this application. You must select Application 19 to access them. For directions, see the
Hardware & Software Setup Guide. The Appendix of that guide includes an explanation
of all parameters and values.
Function Parameter Value Your Settings
{Etype} Equipment-Type [appl`] Application Number 1 - 28 19
[a_Loc] Application Number Yes, No
Security Lock
[melt] Oil Melt Cycle On, Off
[T`out] Timer Output No, Yes
[SEtUP] Setup [`Ç_Ï`] Temperature Display Format °C or °F
[time] Time Display Format MMM:SS, HH:MM, H:MM:SS
(H=Hours, M=Minutes, S=Seconds)
[Chirp] Key Chirp On, Off
[tc```] Thermocouple Type J, K (shown as [````H]), E
[rtd``] RTD Curve DIN, JIS
[tconp] WatCurveTMTemperature On, Off
Compensation
[Ofst1] Temperature Offset, Channel 1 -99 to 99°F (-55 to 55°C)
[tr`lo] Temperature Range Low 0ºF (-18ºC) for RTD inputs
32ºF (0ºC) for tc inputs to [tr`Hi]
[tr`Hi] Temperature Range High [tr`lo] to 1200°F (649°C)
[ready] Preheat Ready Feature Yes, No
[rband] Ready Band 1 to 1200°F (649°C)
[Cloc`] Real Time Clock Display Yes, No
[plOSS] Power Loss Menu Resume Yes, No
[al``1] Alarms for channel 1 None, Dev, Proc, Both
[aL`P1] Absolute Process Alarm 1 100 to 1200°F (38 to 649°C)
[aLdL1] Low Deviation Alarm 1 -999 to 0°F (-555 to 0°C)
[aLdH1] High Deviation Alarm 1 0 to 999°F (0 to 555°C)
[tHErl] Thermal [tyPE`] Temperature Control Type PID, On-Off
[HYSt1] Hysteresis 1 1 to 99°F (1 to 55°C)
[Pid`U] PID Units SI, US
[tune1] Auto-tuning 1 on, OFF
[ProP1] Proportional Band 1 1 to 999°F (1 to 555°C)
[rSEt1] Reset (integral) Gain 1 0.00 to 9.99 repeats/minute
[int`1] Integral Gain 1 0.00 to 99.99 minutes/repeat
[rAtE1] Rate (derivative) Gain 1 0.00 to 9.99 minutes
[dEr`1] Derivative Gain 1 0.00 to 9.99 minutes
[CYcL1] PID Cycle Time 1 1 to 60 seconds
[`diag] WatHelp Used for equipment troubleshooting and testing. Not used when programming. See the Hardware
Diagnostics & Software Setup Guide.
Application 19 Watlow MINICHEF 2000 ■ 97
Page 100

Auto-tuning Note:
Before auto-tuning Application 19, [teNp1] in the operations menu must first be set to
a value that is typical of your application. (See Hardware & Software Setup Guide for
information on programming menus.) Then set [tHerl] / [tunE1] to [```on]. After
you accept [```on], by pressing “Enter,” the controller will display [`tunE] while
auto-tuning is taking place.
The controller will cancel the auto-tuning process if it cannot be completed in 80 minutes. You can cancel the auto-tuning process at any time by pressing either key C or key
D and accepting [``Off], by pressing “Enter,” when it appears.
98 ■ Watlow MINIC HEF 2000 Application 19
 Loading...