

Page 1
Water-Tec.co.uk
Operation Manual
Page 2

Index
1. Cover
2. Index.
3. WT1-3 Installation.
4. WT4 Installation.
5. WT2-5 Installation.
6. WT RGB Driver Box wiring.
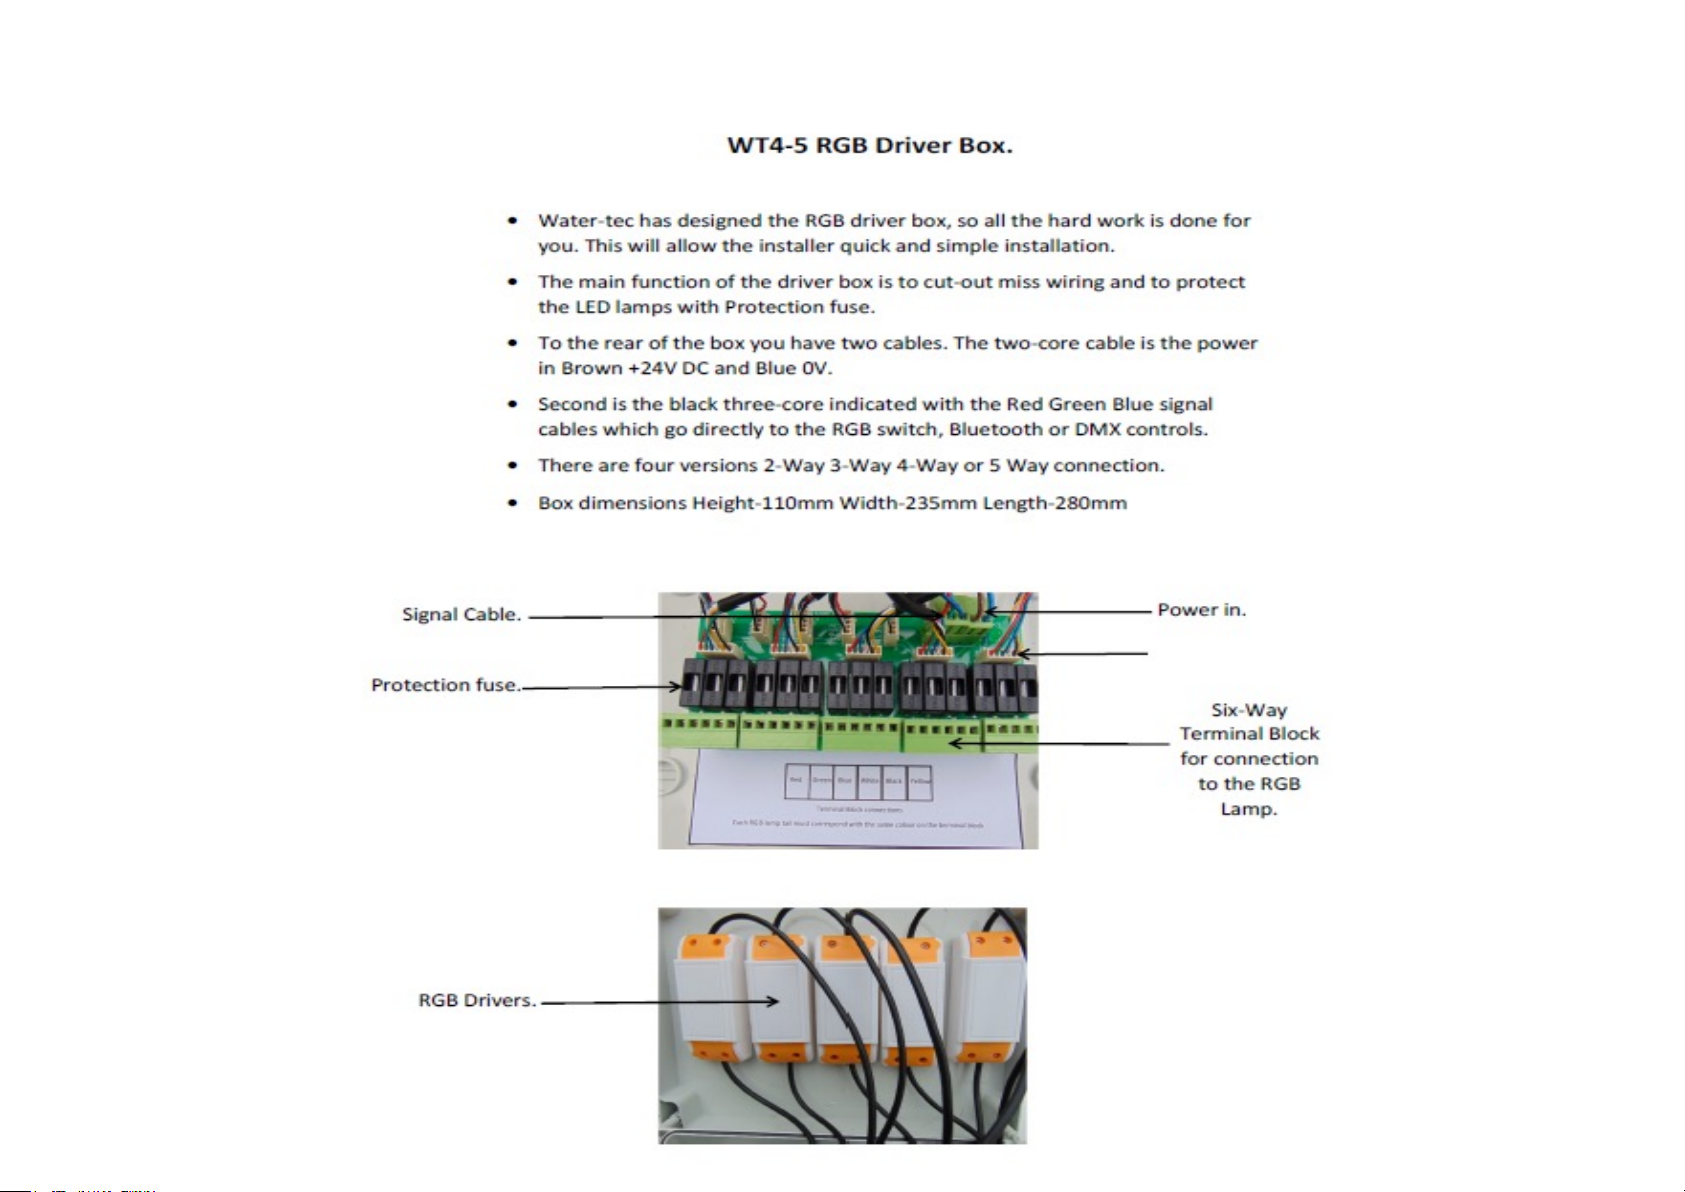
7. WT4-5 RGB Driver Box
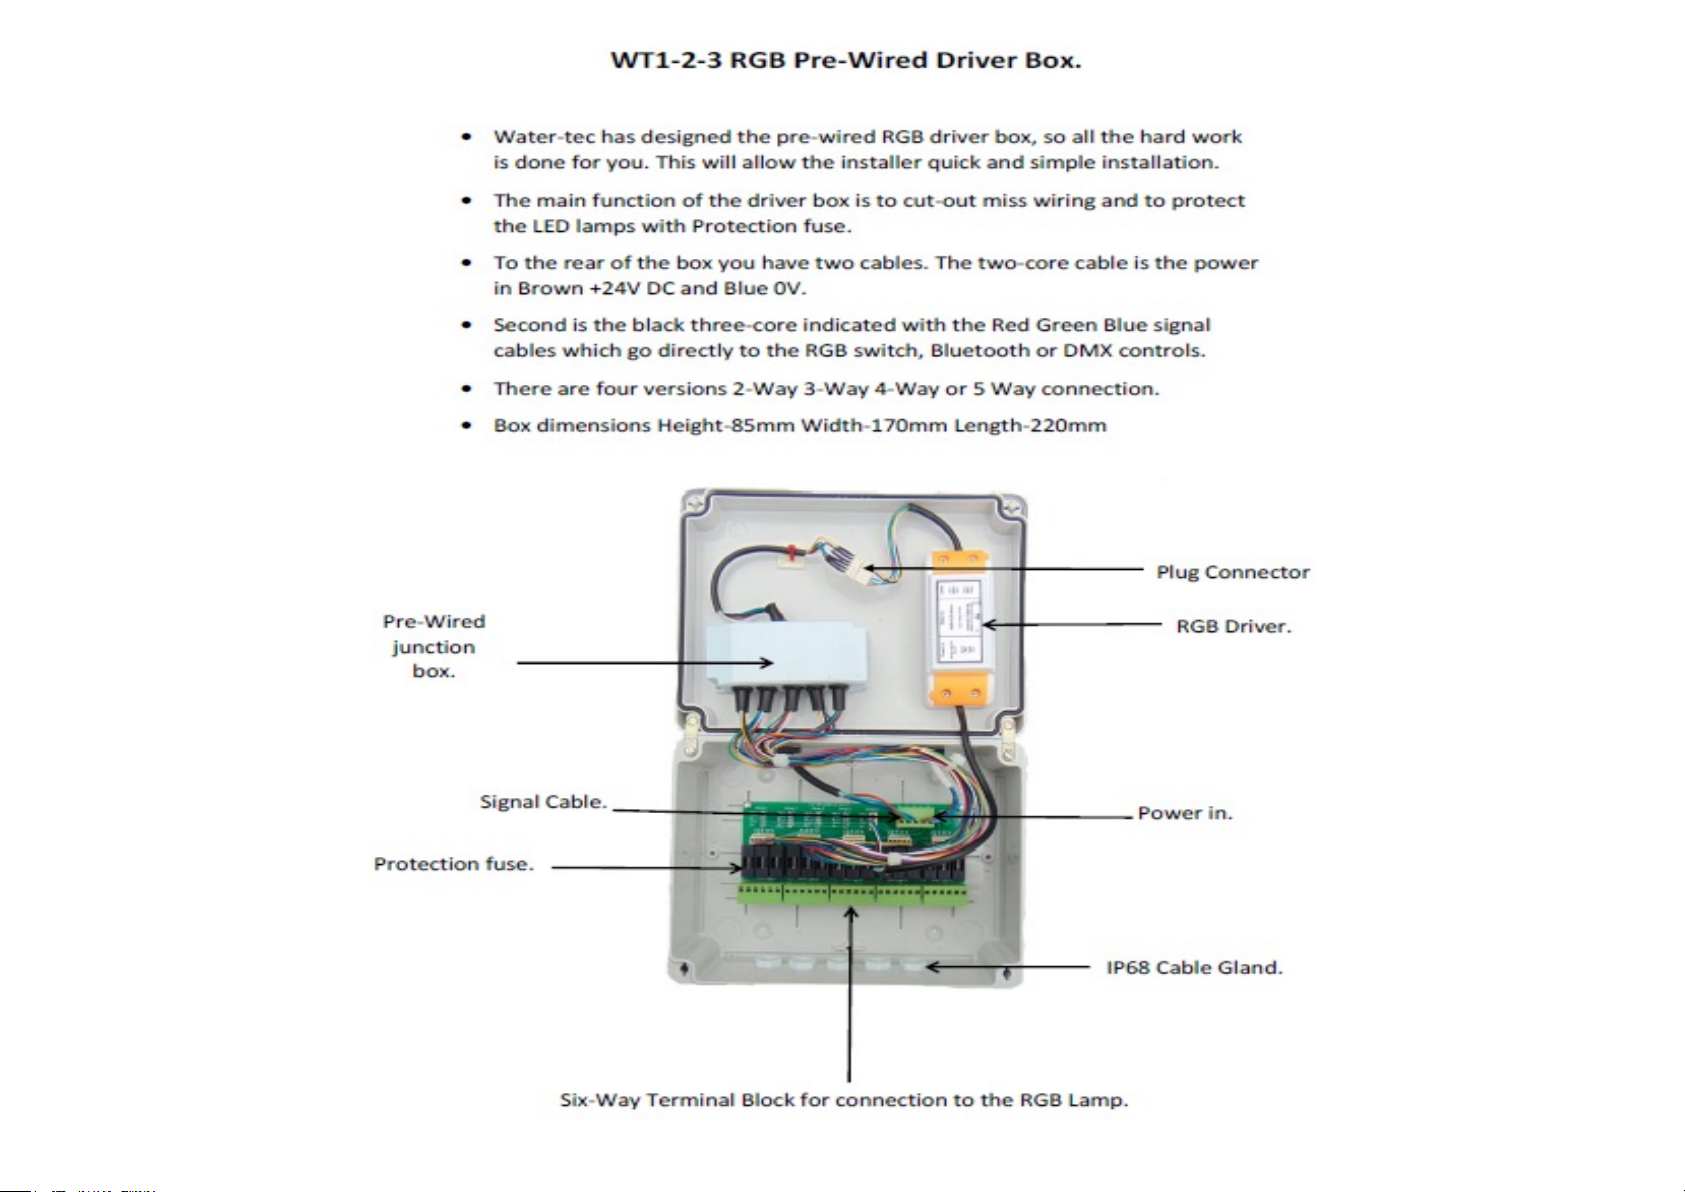
8. WT1-2 RGB Pre-Wired Driver Box
9. WT-RGB Lamp.
10. WT-Wiring to DMX/Switch/Bluetooth.
11. WT4-5 White Driver Box Wiring.
12. WT1-2 White Driver Box Wiring.
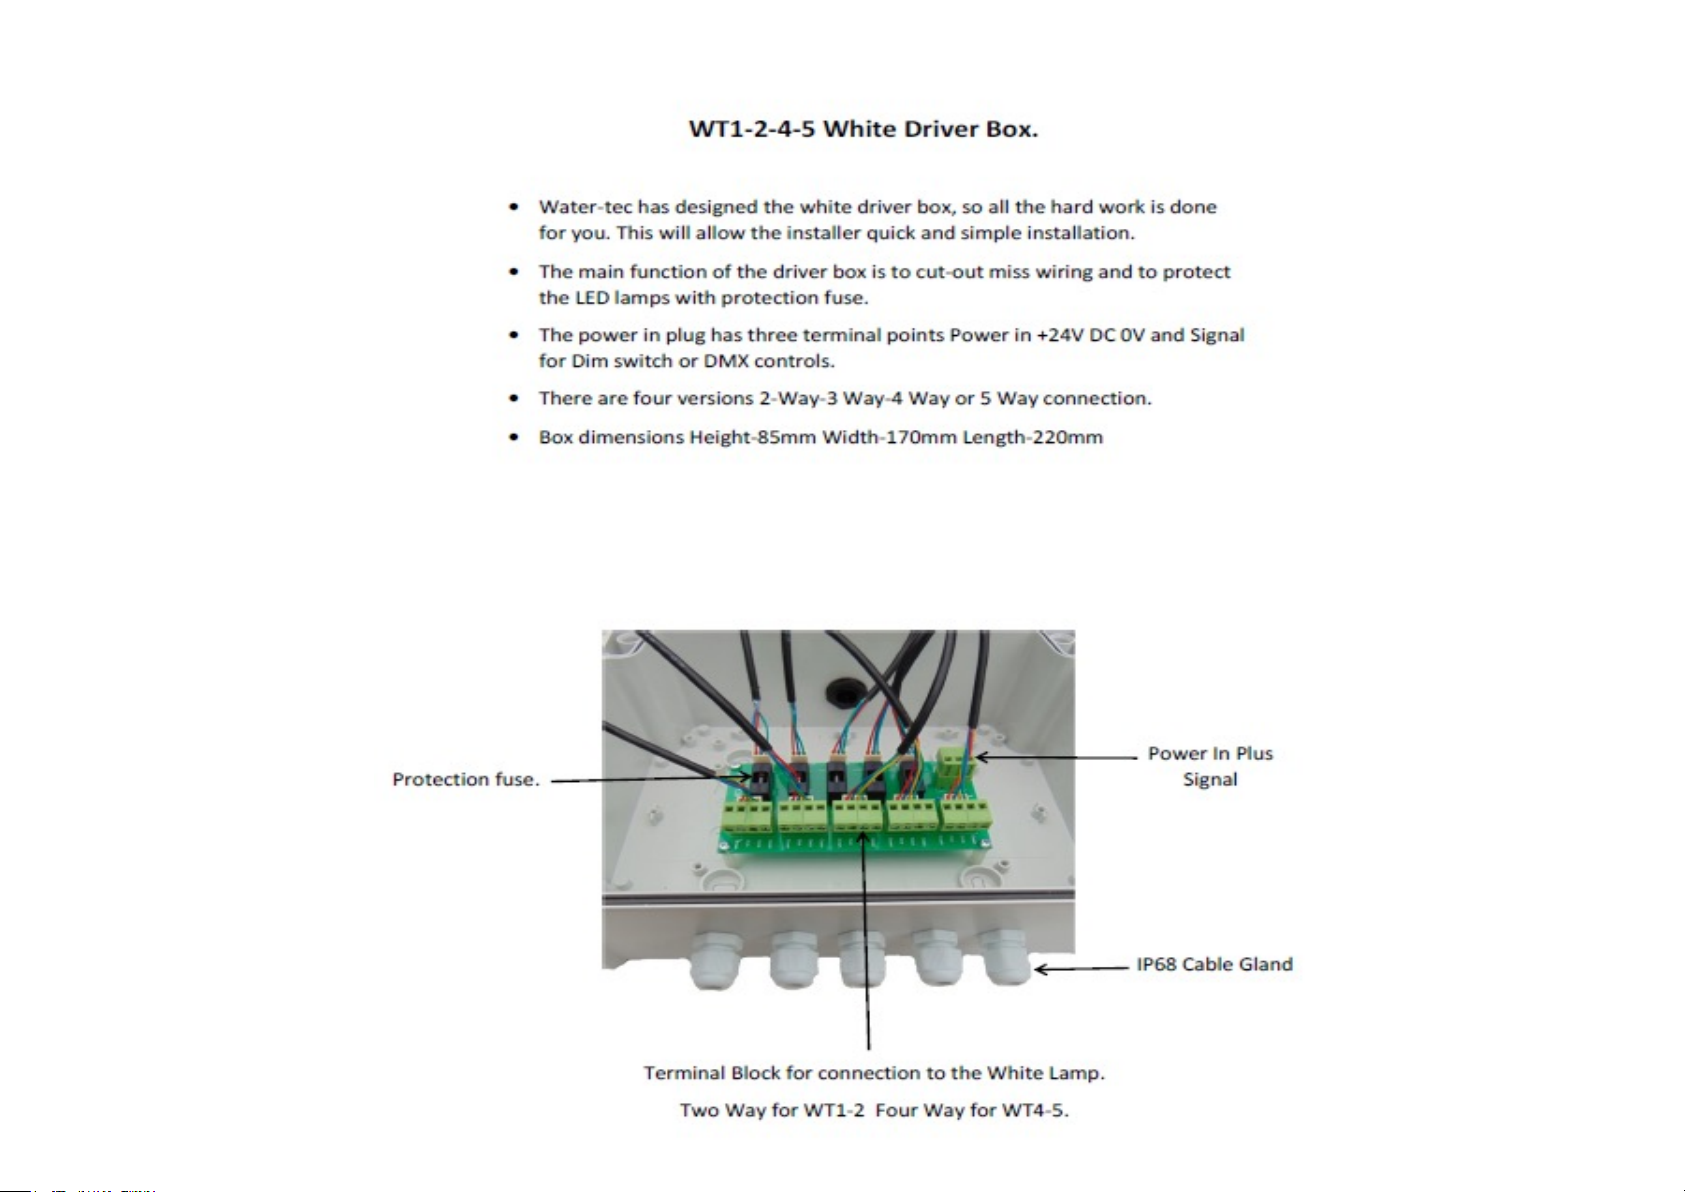
13. WT1-2-4-5 White Driver Box.
14. WT1-2 Single driver.
15. WT4-5 Single Driver.
16. WT3 White to Dim switch.
17. WT3 White Driver Box Wiring.
18. WT3 White Driver Box To Dim Switch Wiring.
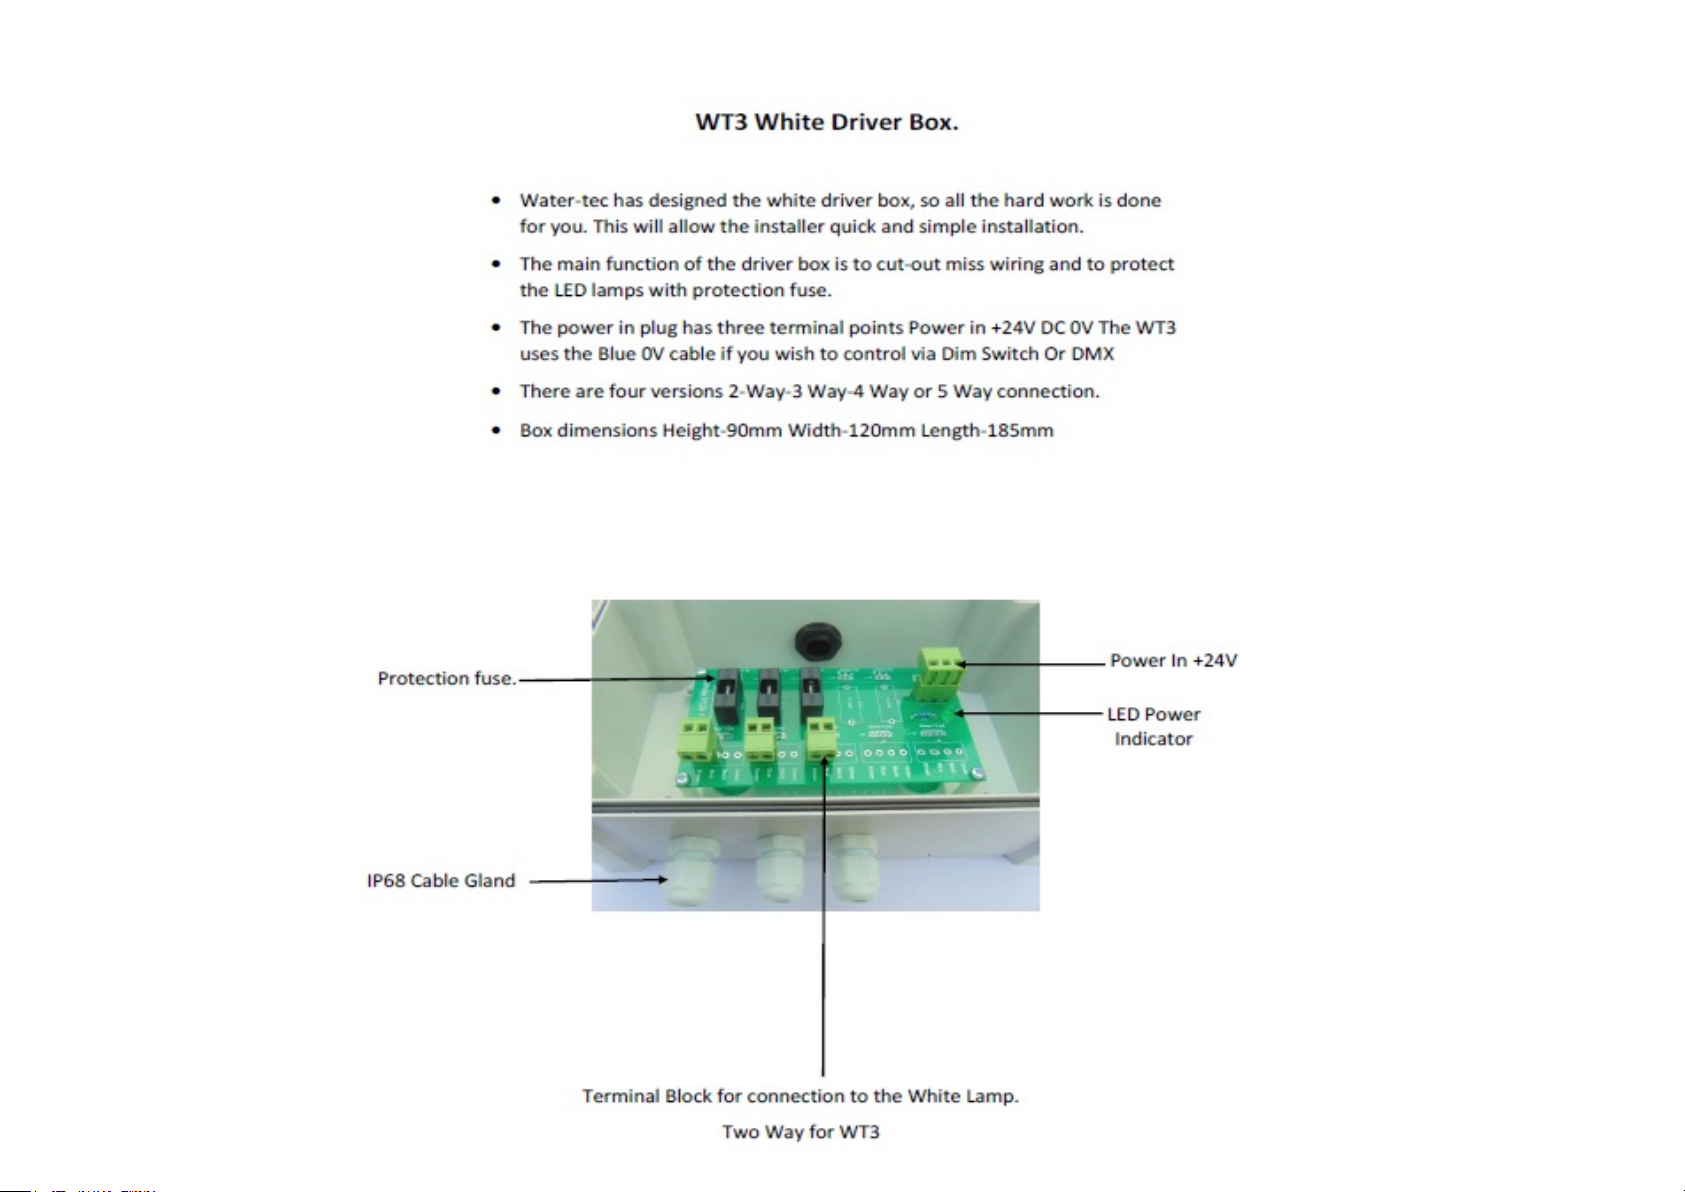
19. WT3 White Driver Box.
20. WT1-2-3 RGB spacing.
21. WT1-2-4-5 White spacing.
22. Joining cables.
23. 150W, 1 Output, Switch Mode Power Supply.
24. How to connect to Freecolour Phone App.
25. How to connect to Magic home App.
26. Bluetooth connection.
27. Remote Control.
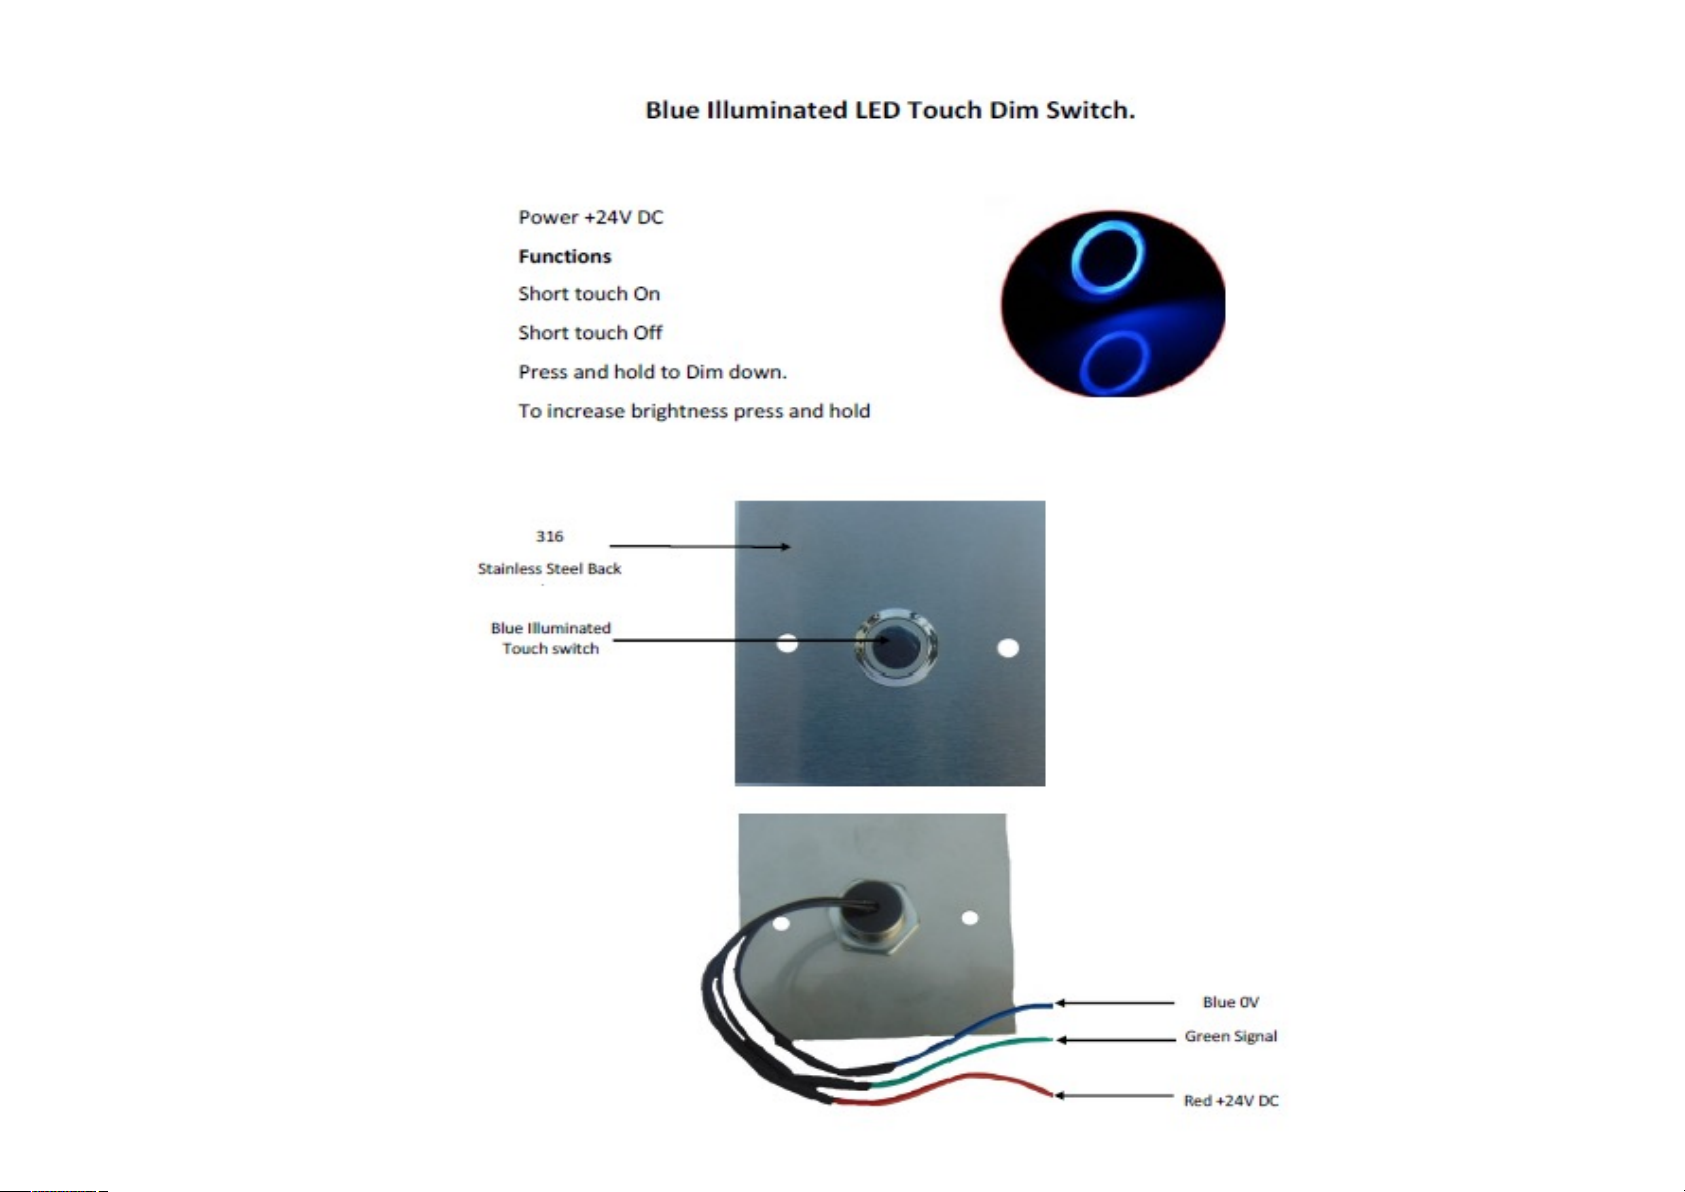
28. Tou ch Di m Sw it ch .
Index
29. RGB Touch Panel.
30. White Touch Panel.
31. Touch Panel installation.
32. WT1-Tec hi nca l in fo rm at i on .
33. WT2-Tec hi nca l in fo rm at i on .
34. WT3-Tec hi nca l in fo rm at i on .
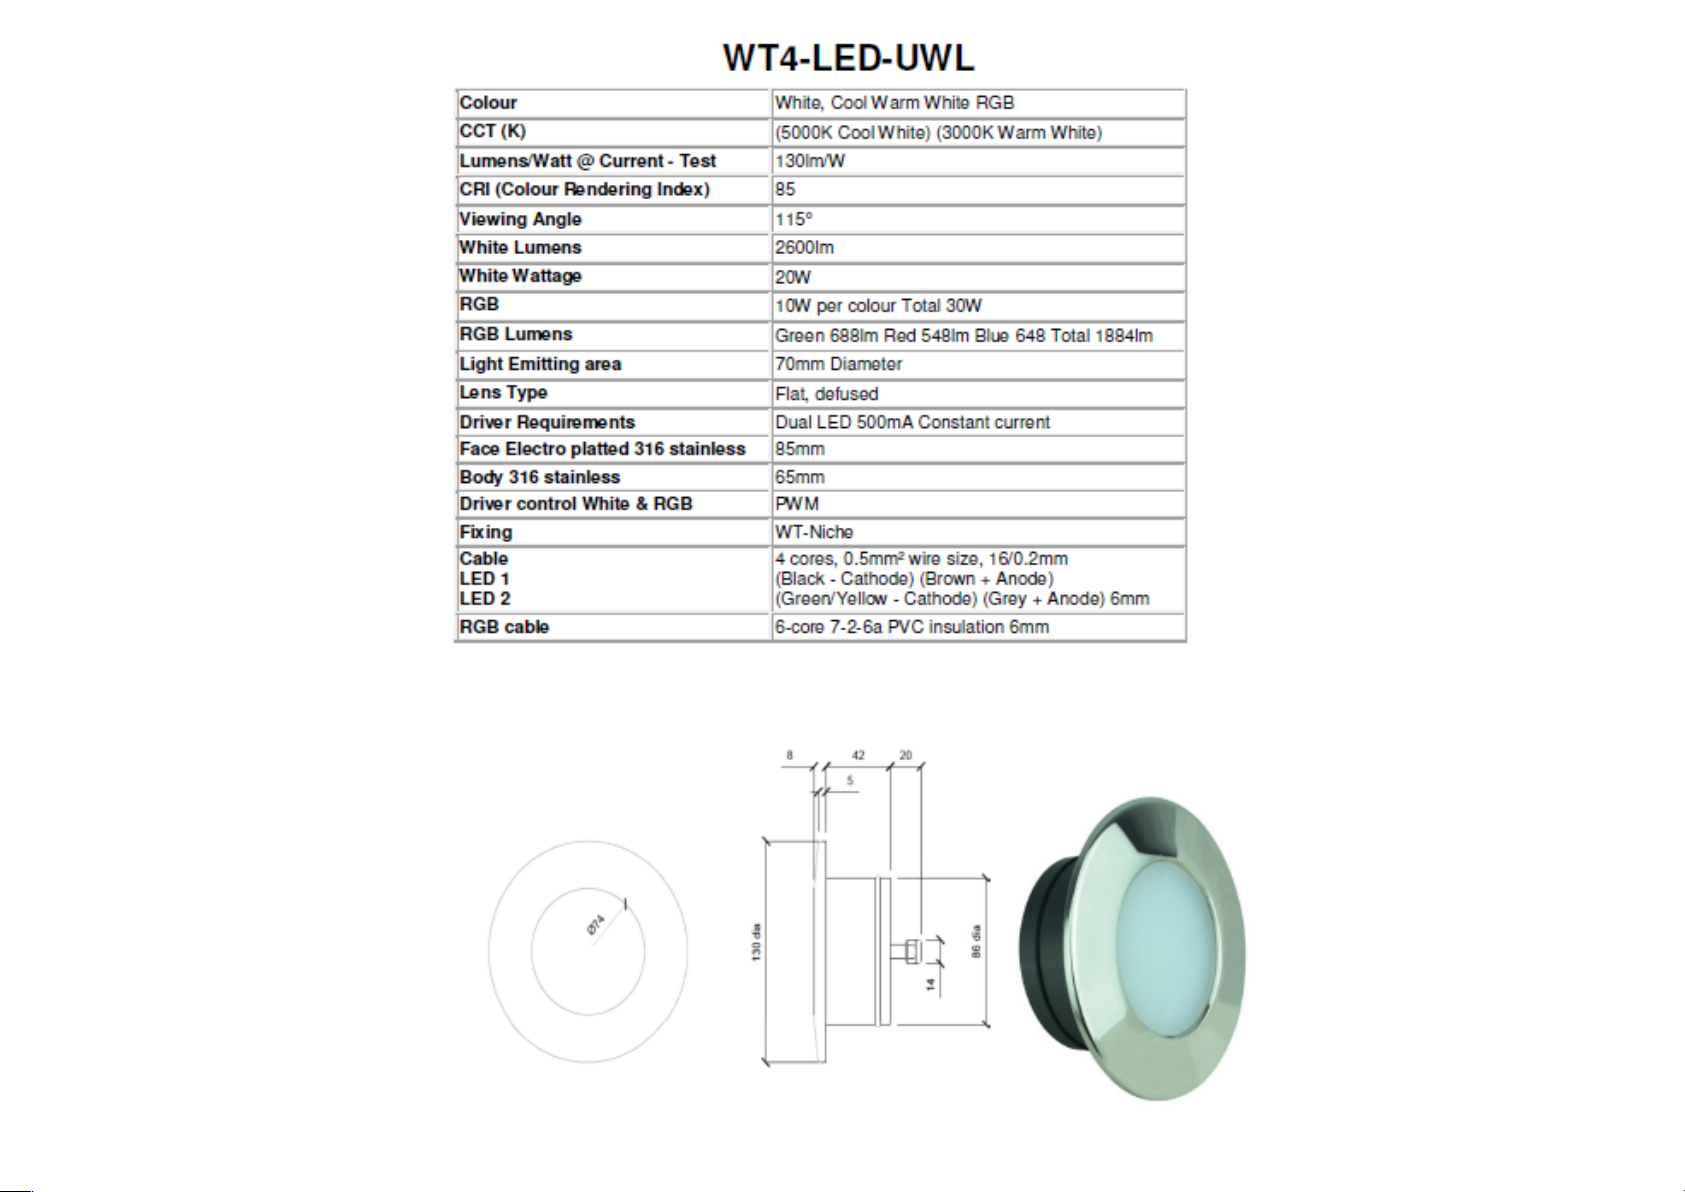
35. WT4-Tec hi nca l in fo rm at i on .
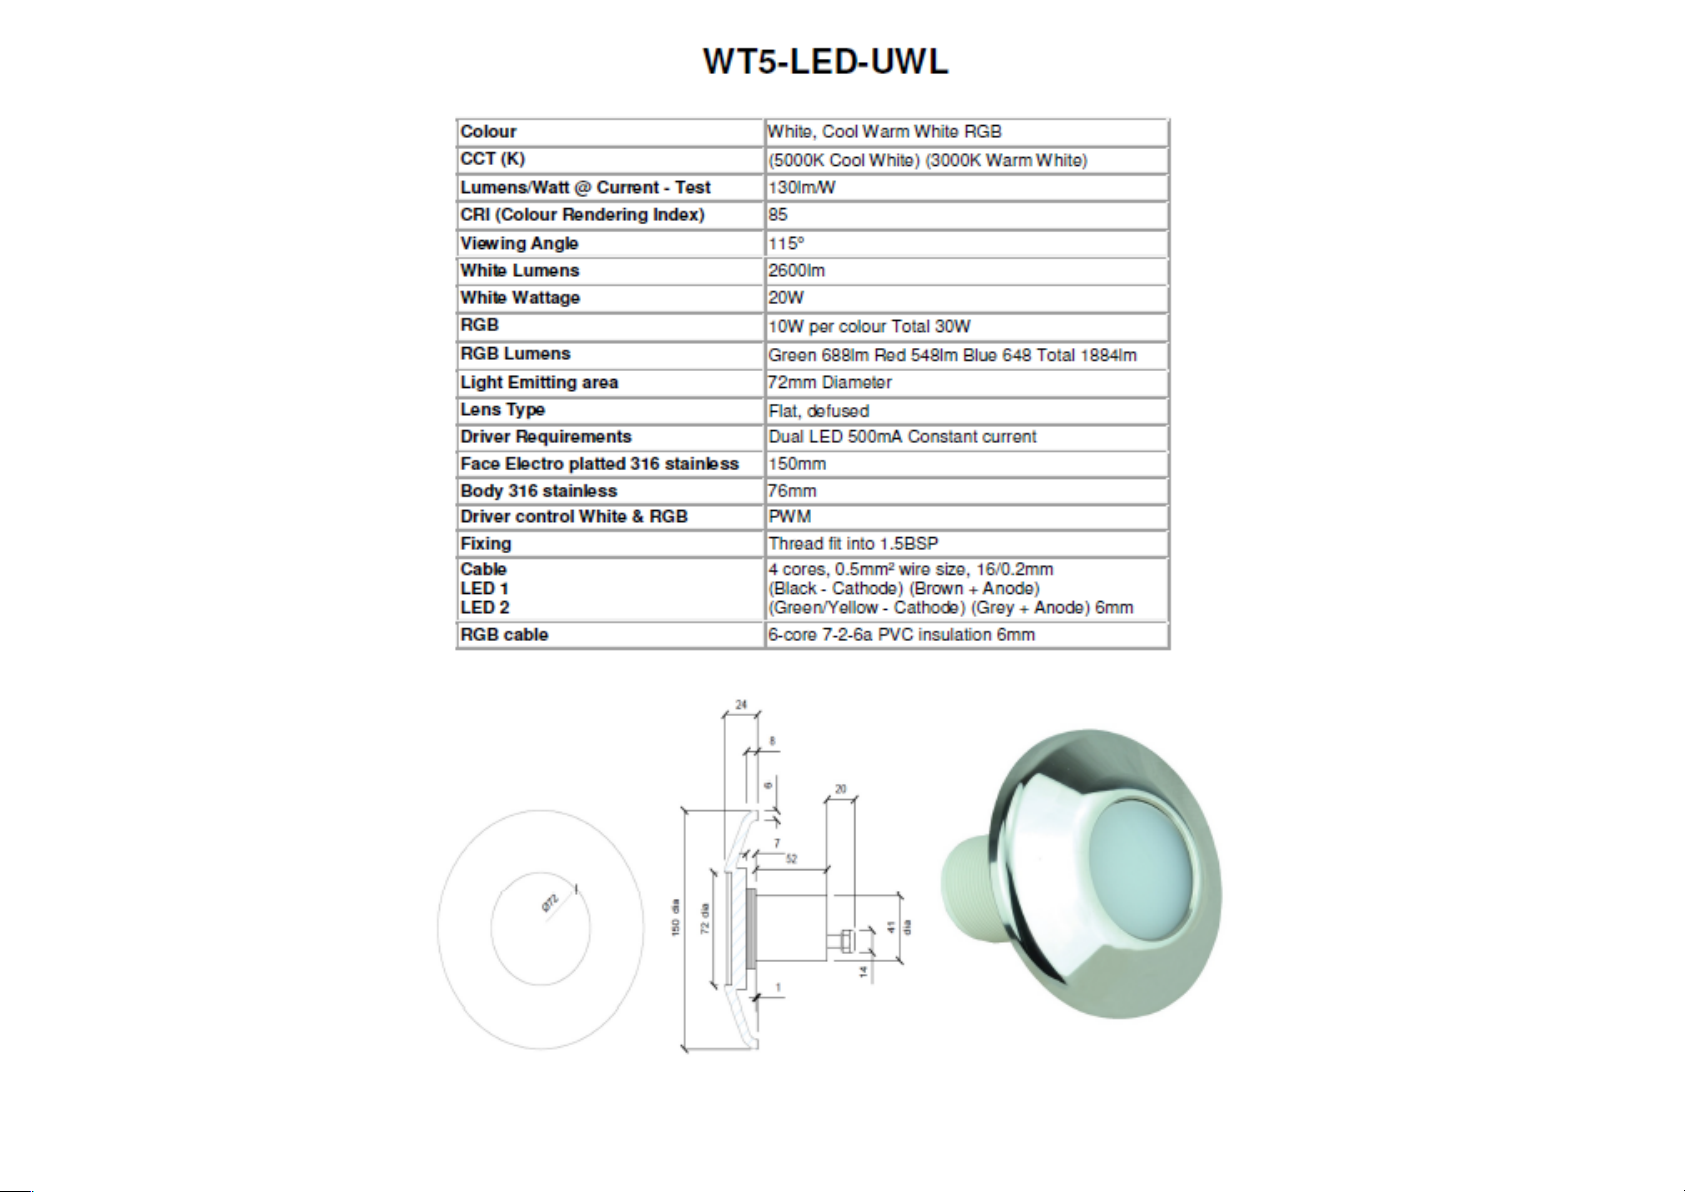
36. WT5-Tec hi nca l in fo rm at i on .
37. WT4-Niche.
38. Trouble shooting white.
39. Trouble shooting RGB.
40. RGB Test switch.
41. WT-Ter ms an d Co ndi t io ns .
42. WT-Ter ms an d Co ndi t io ns .
Page 3
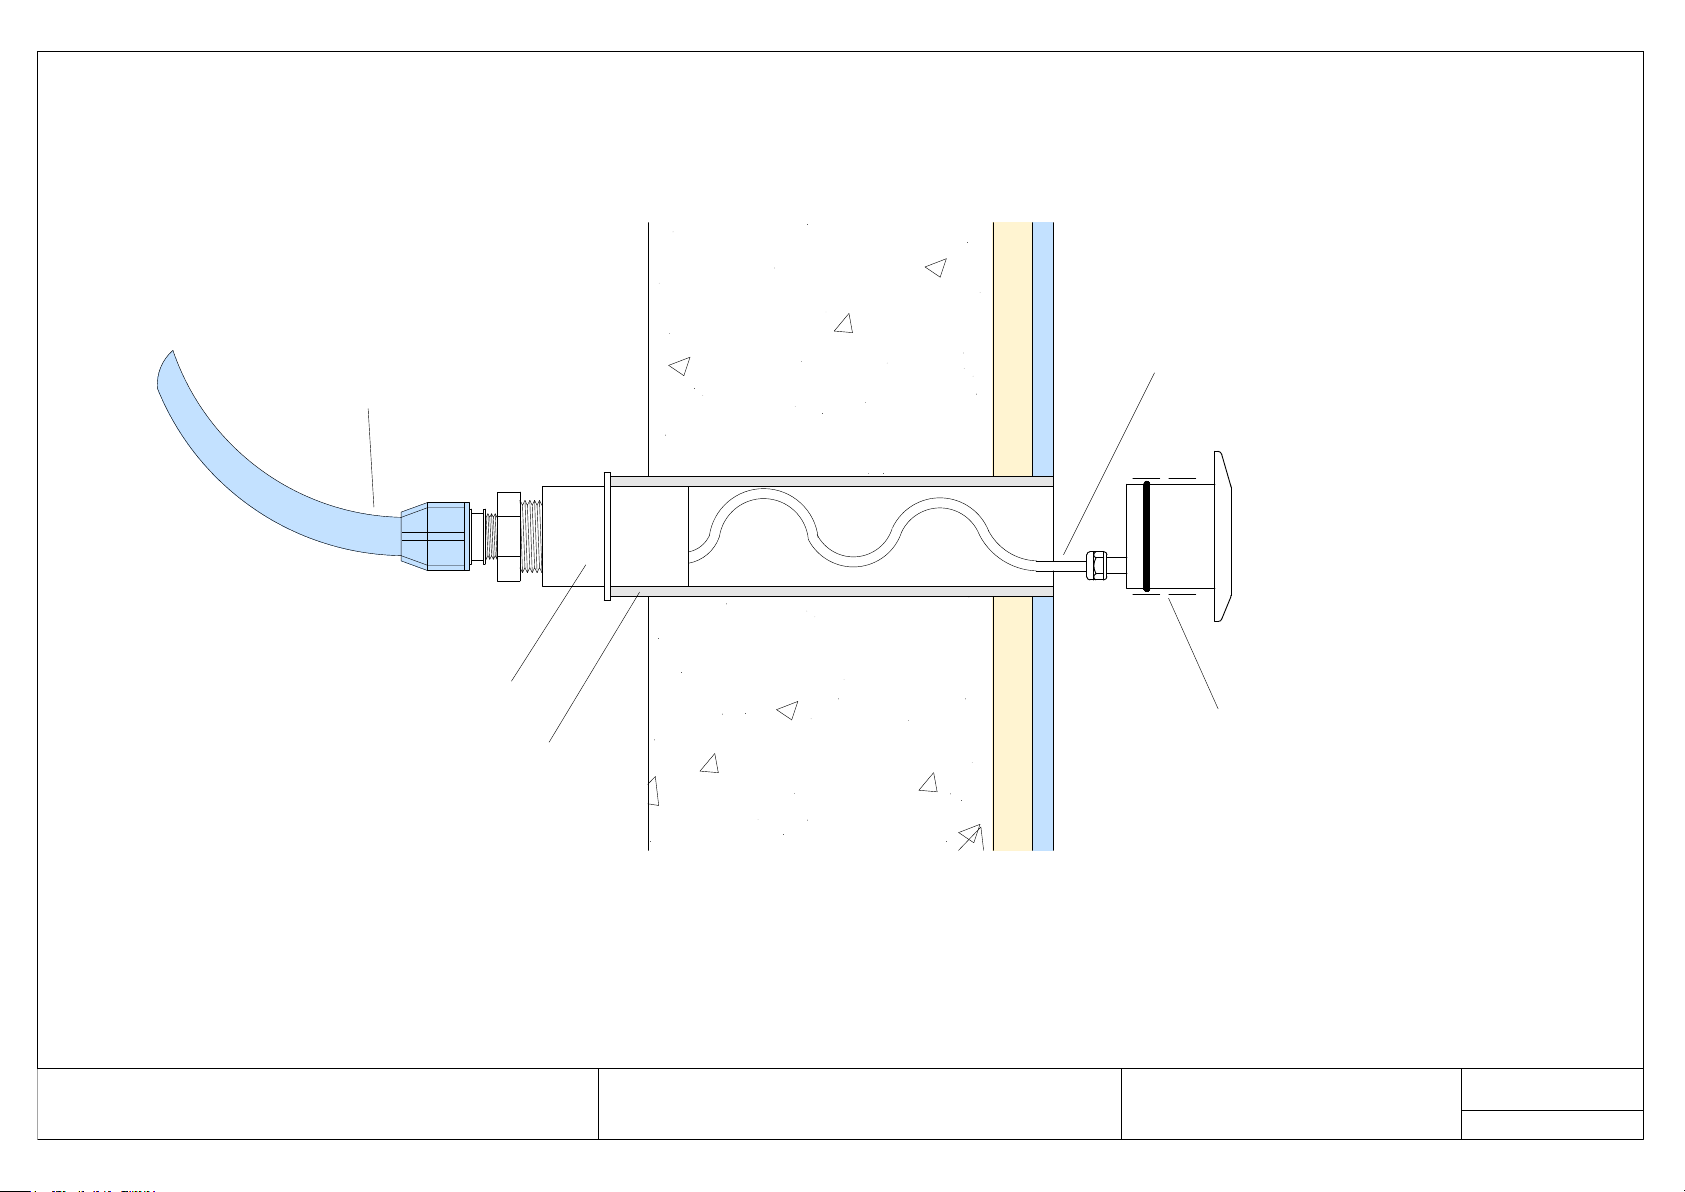
WT1 or WT3 light at
recomended depth
of 500 - 1000 mm
2" BSP plastic pipe
ID 2" 53 mm CP2/156
threaded reducer
welded into pipe
blue water pipe or
22mm ABS pipework.
All pipework must be
made water tight.
Pipework to be
installed ABOVE pool
water line
apply PTFE tape
around casing and
'O' ring to seal into
pipework
6mm dia light cable
WT1 & WT3 light installation
6/2/2019
Water-tec.co.uk
10 Crabtree Lane Drayton Abingdon OXON Tel 01235 536616
Page 4
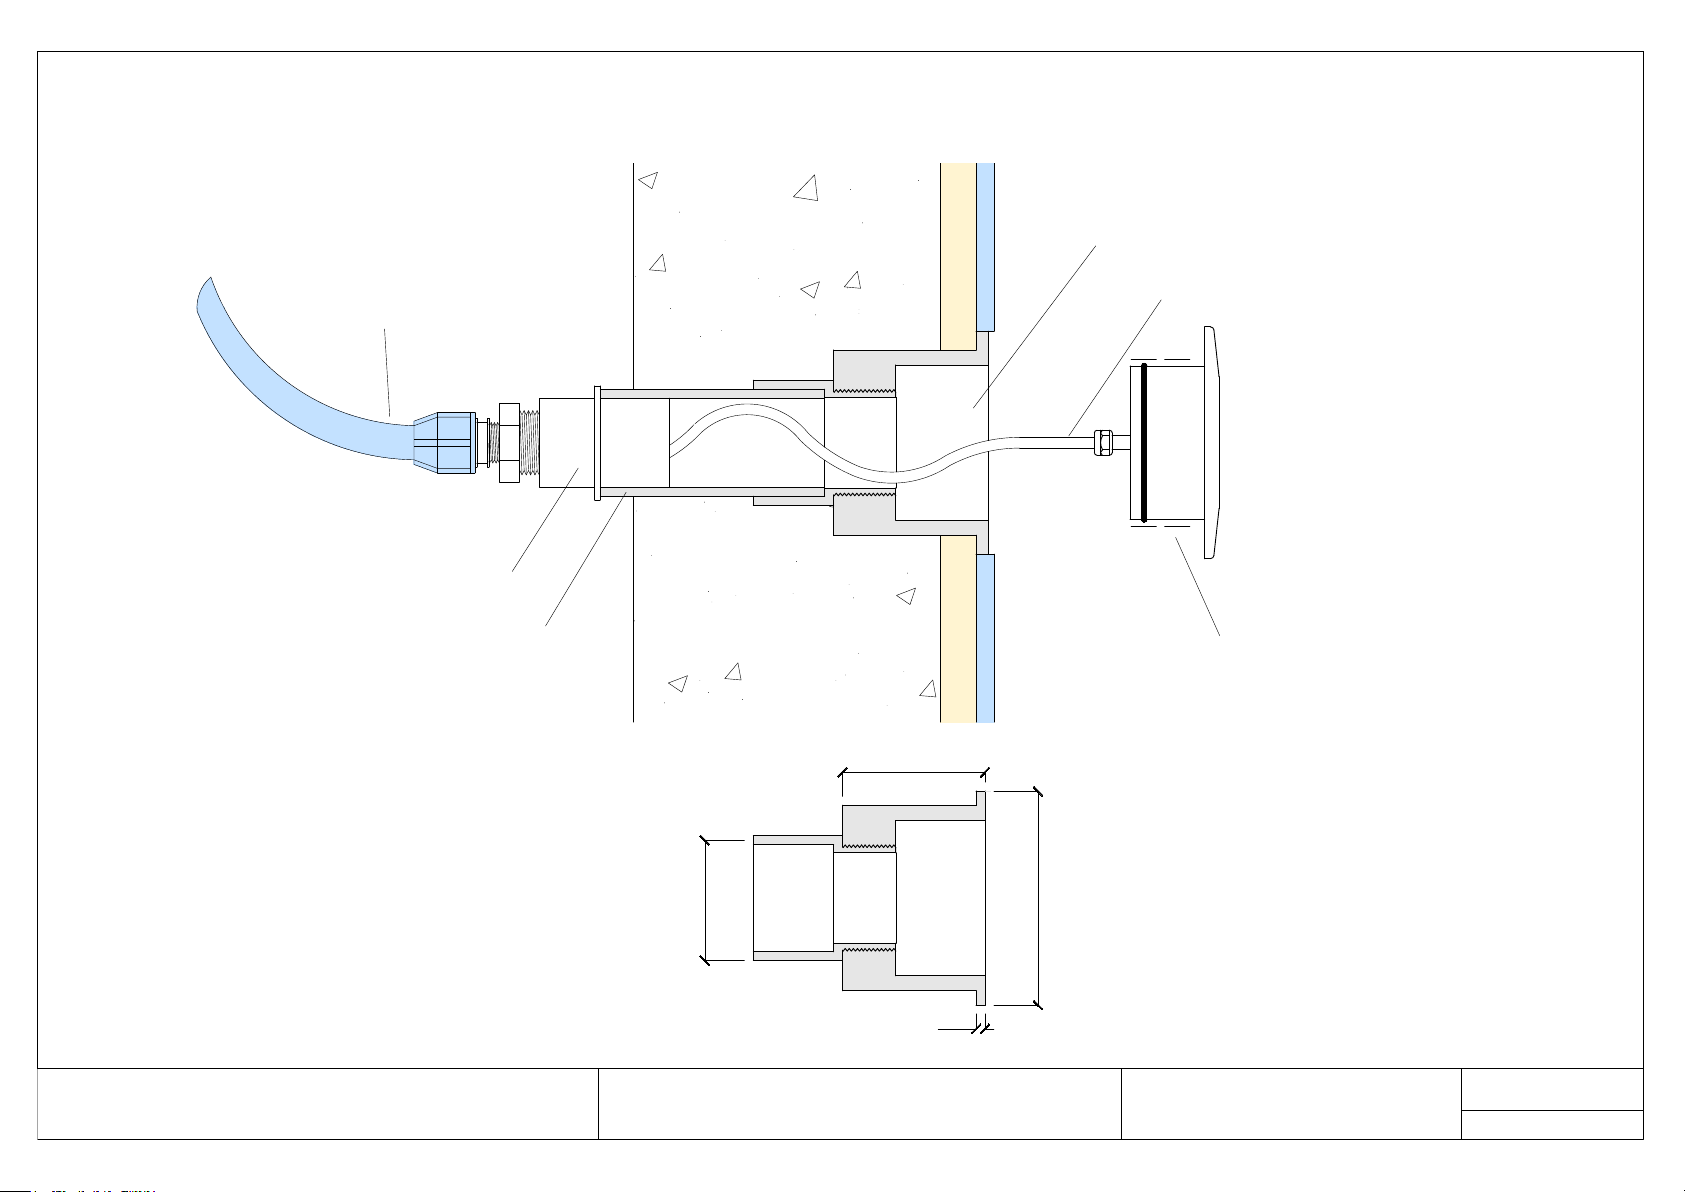
WT4 light at
recomended depth
of 500 - 1000 mm
2" BSP plastic pipe
ID 2" 53 mm CP2/156
threaded reducer
welded into pipe
blue water pipe or
22mm ABS pipework.
All pipework must be
made water tight.
Pipework to be
installed ABOVE pool
water line
apply PTFE tape
around casing and
'O' ring to seal into
pipework
6mm dia light cable
WT4 Niche fix with M6 csk screws
2" BSP socket
120
80
5
WT4 Niche
Water-tec.co.uk
10 Crabtree Lane Drayton Abingdon OXON Tel 01235536616
6/2/2019
WT 4 light installation
Page 5
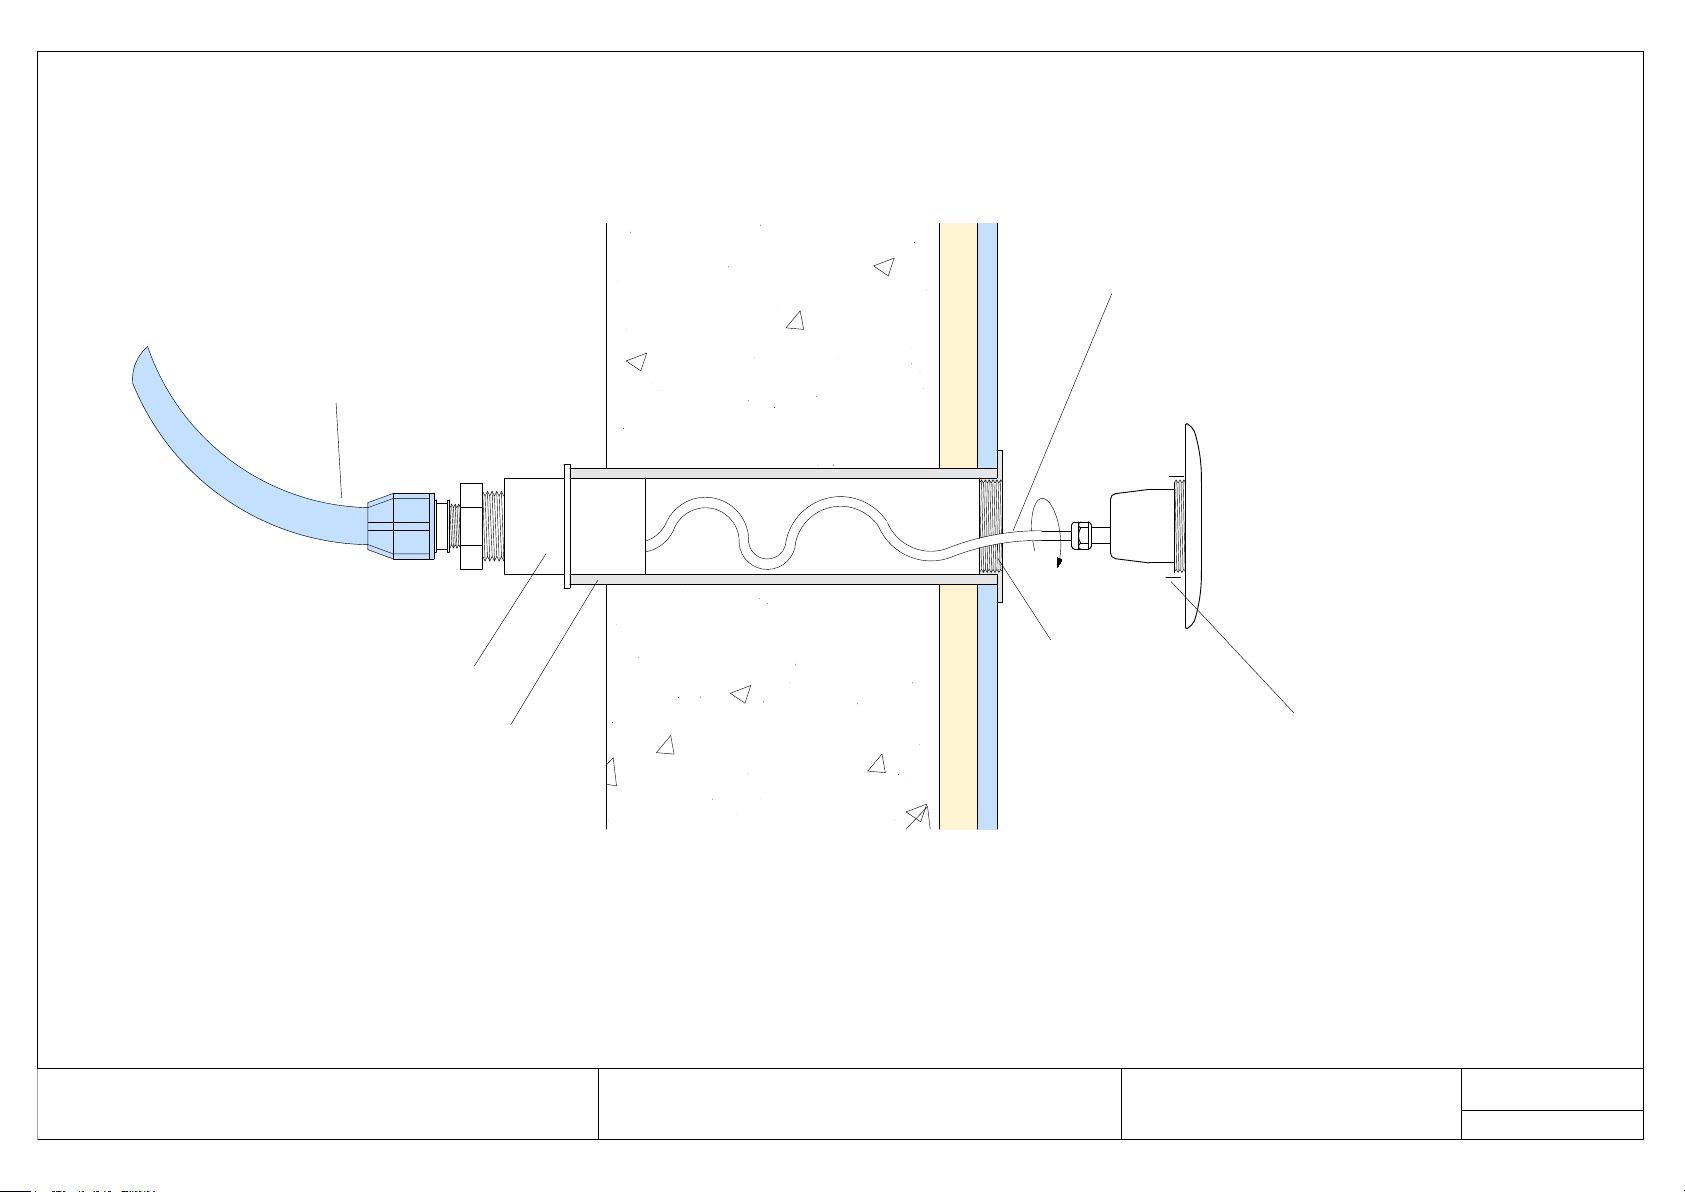
WT2 or WT5 light at
recomended depth
of 500 - 1000 mm
2" BSP plastic pipe
ID 2" 53 mm CP2/156
threaded reducer
welded into pipe
blue water pipe or
22mm ABS pipework.
All pipework must be
made water tight.
Pipework to be
installed ABOVE pool
water line
apply PTFE tape
around casing and
'O' ring to seal into
pipework
6mm dia light cable.
NOTE: coil cable ANTI-clockwise
before screwing into the inlet
1 1/2" threaded
insert welded into
pipe
6/2/2019
WT2 & WT5 light installation
Water-tec.co.uk
10 Crabtree Lane Drayton Abingdon OXON Tel 01235 536616
Page 6

Power
supply
unit
LED driver
yellow -
black -
white -
blue +
green +
red +
yellow -
black -
white -
blue +
green +
red +
yellow -
black -
white -
blue +
green +
red +
yellow -
black -
white -
blue +
green +
red +
yellow -
black -
white -
blue +
green +
red +
fuse
fuse
fuse
LED light LED light LED light LED light LED light
LED driver
LED driver
LED driver
LED driver
fuse
fuse
fuse
fuse
fuse
fuse
fuse
fuse
fuse
fuse
fuse
fuse
blue 0V
brown + 24V DC
DMX RGB
Switch
Phone App
blue signal
green signal
red signal
5 Way RGB Driver Box
5 Way RGB Driver Box Wiring Diagram
6/2/2019
Water-tec.co.uk
10 Crabtree Lane Drayton Abingdon OX144HS Tel 01235 536616
Page 7
Page 8
Power
supply
unit
yellow -
black -
white -
blue +
green +
red +
yellow -
black -
white -
blue +
green +
red +
yellow -
black -
white -
blue +
green +
red +
yellow -
black -
white -
blue +
green +
red +
yellow -
black -
white -
blue +
green +
red +
fuse
fuse
fuse
LED light LED light LED light LED light LED light
LED driver
fuse
fuse
fuse
fuse
fuse
fuse
fuse
fuse
fuse
fuse
fuse
fuse
blue 0V
brown + 24V DC
DMX RGB
Switch
Phone App
blue signal
green signal
red signal
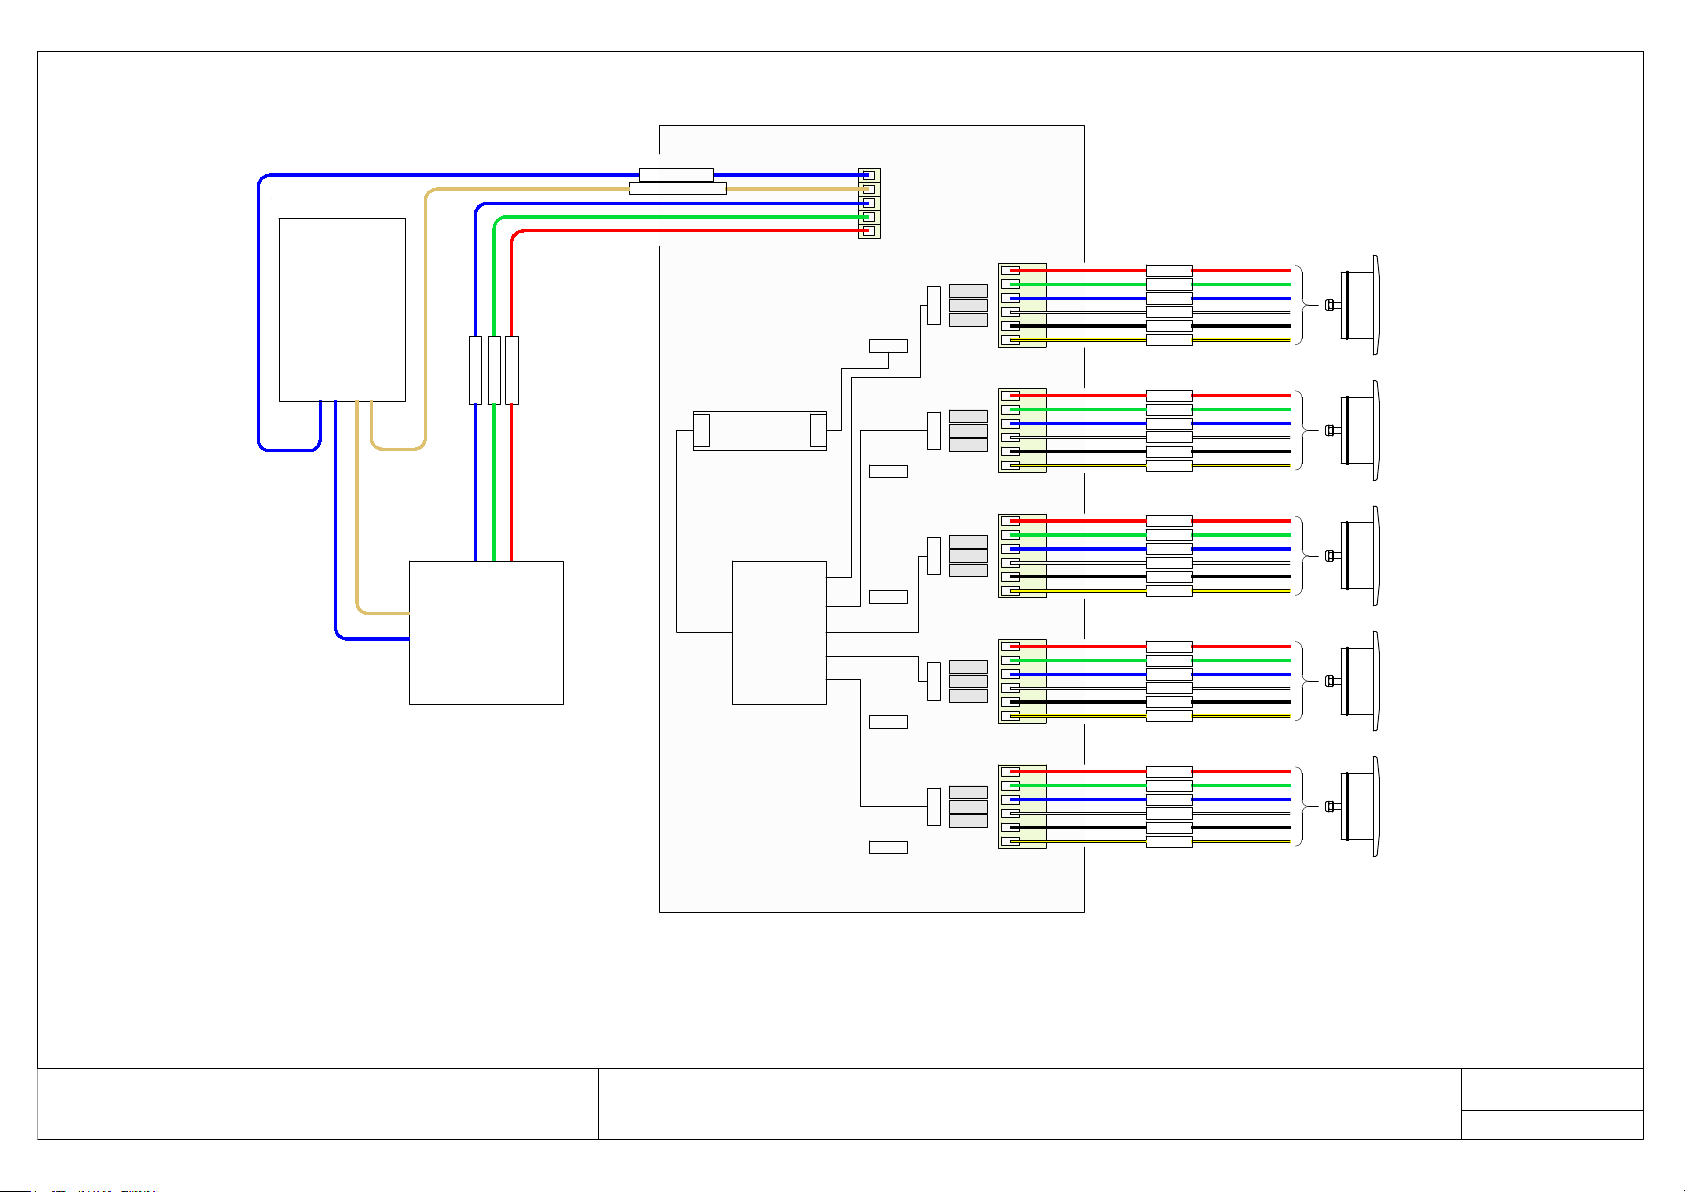
5 Way RGB Driver Box Wired in Series
Pre-Wired
Box
V-OV 24V DC
It is essential that all connections are waterproof
5 Way RGB Driver Box Wired in Series
6/2/2019
Water-tec.co.uk
10 Crabtree Lane Drayton Abingdon OX144HS Tel 01235 536616
Page 9
Page 10
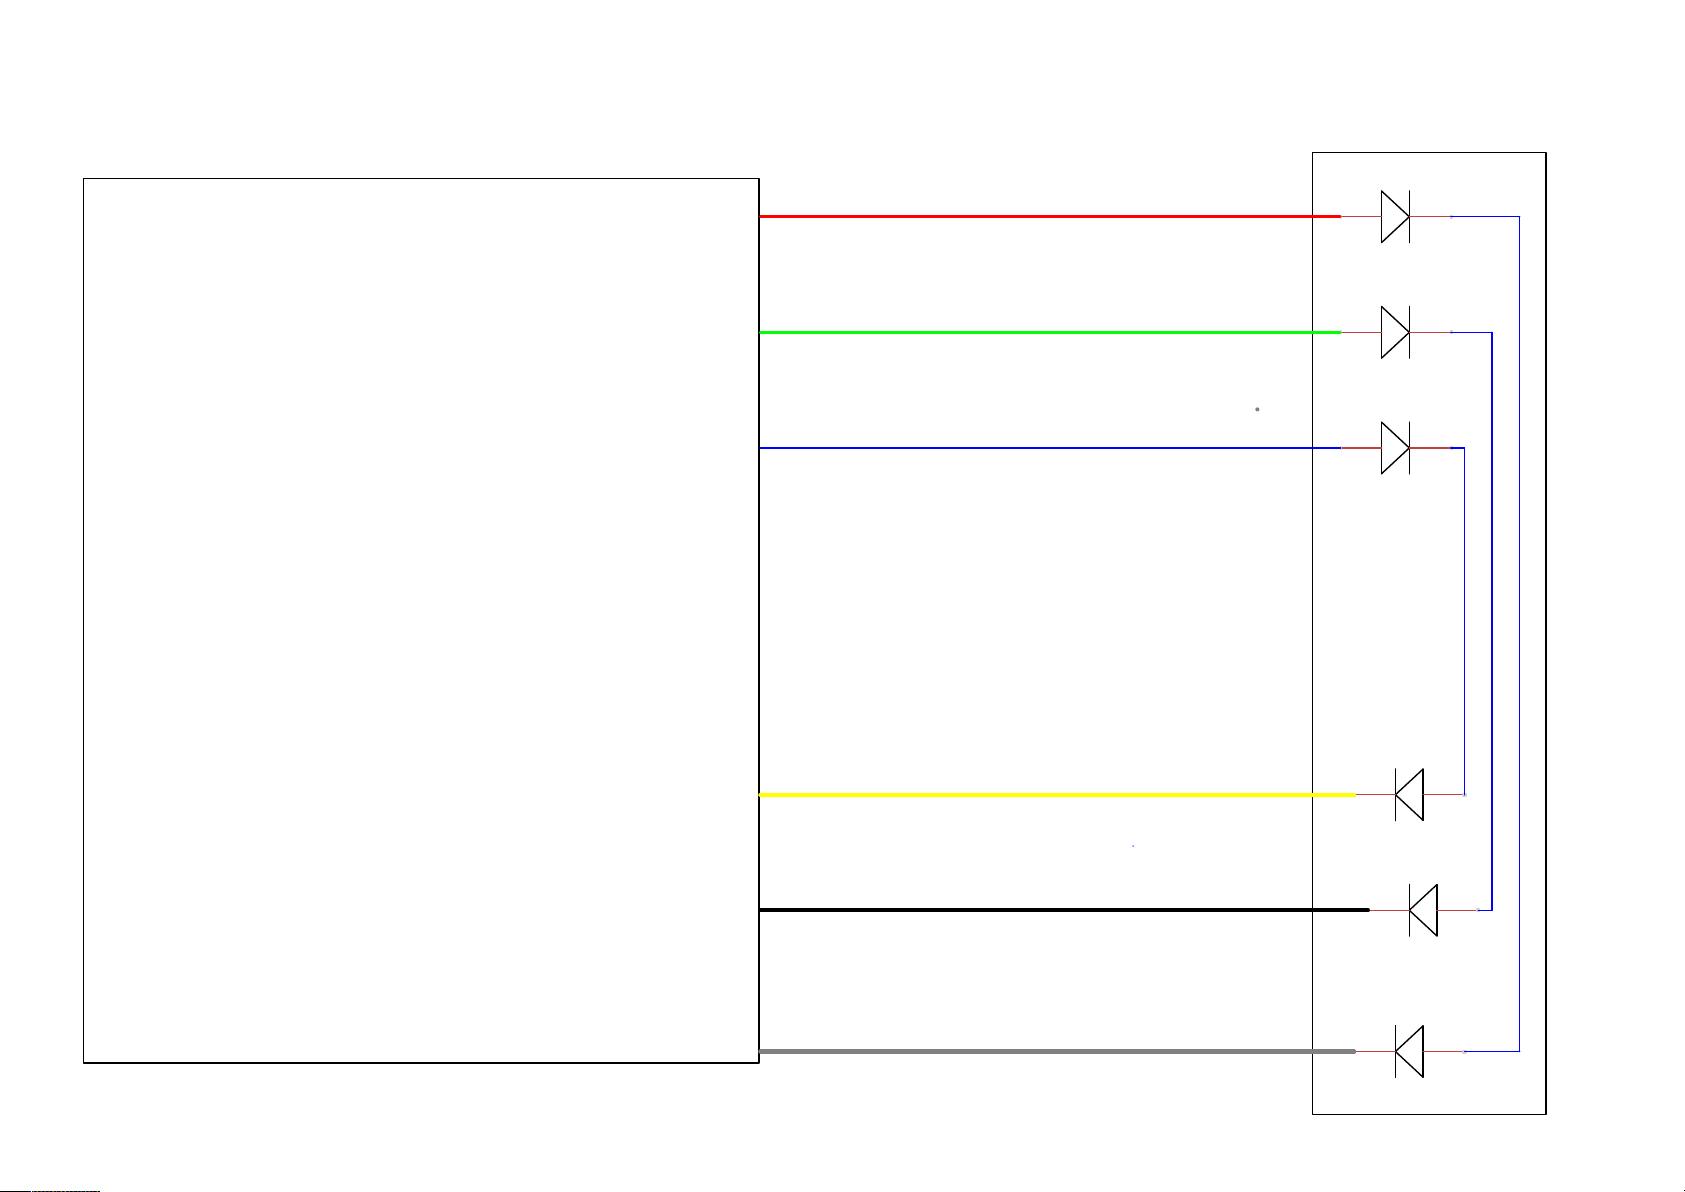
RGB Single Lamp
Black (-Green Cathode)
LED LUXEON Rebel
Green (+Anode)
Blue (+Anode)
WT3 Constant Current 350mA Max
Yellow (-Blue Cathode)
Forward Voltage 3.05V
Red (+Anode)
White (-Red Cathode)
Lamp 1
WT1-2-4-5 Constant Current 1000mA Max
Recommended Current 700mA
Page 11
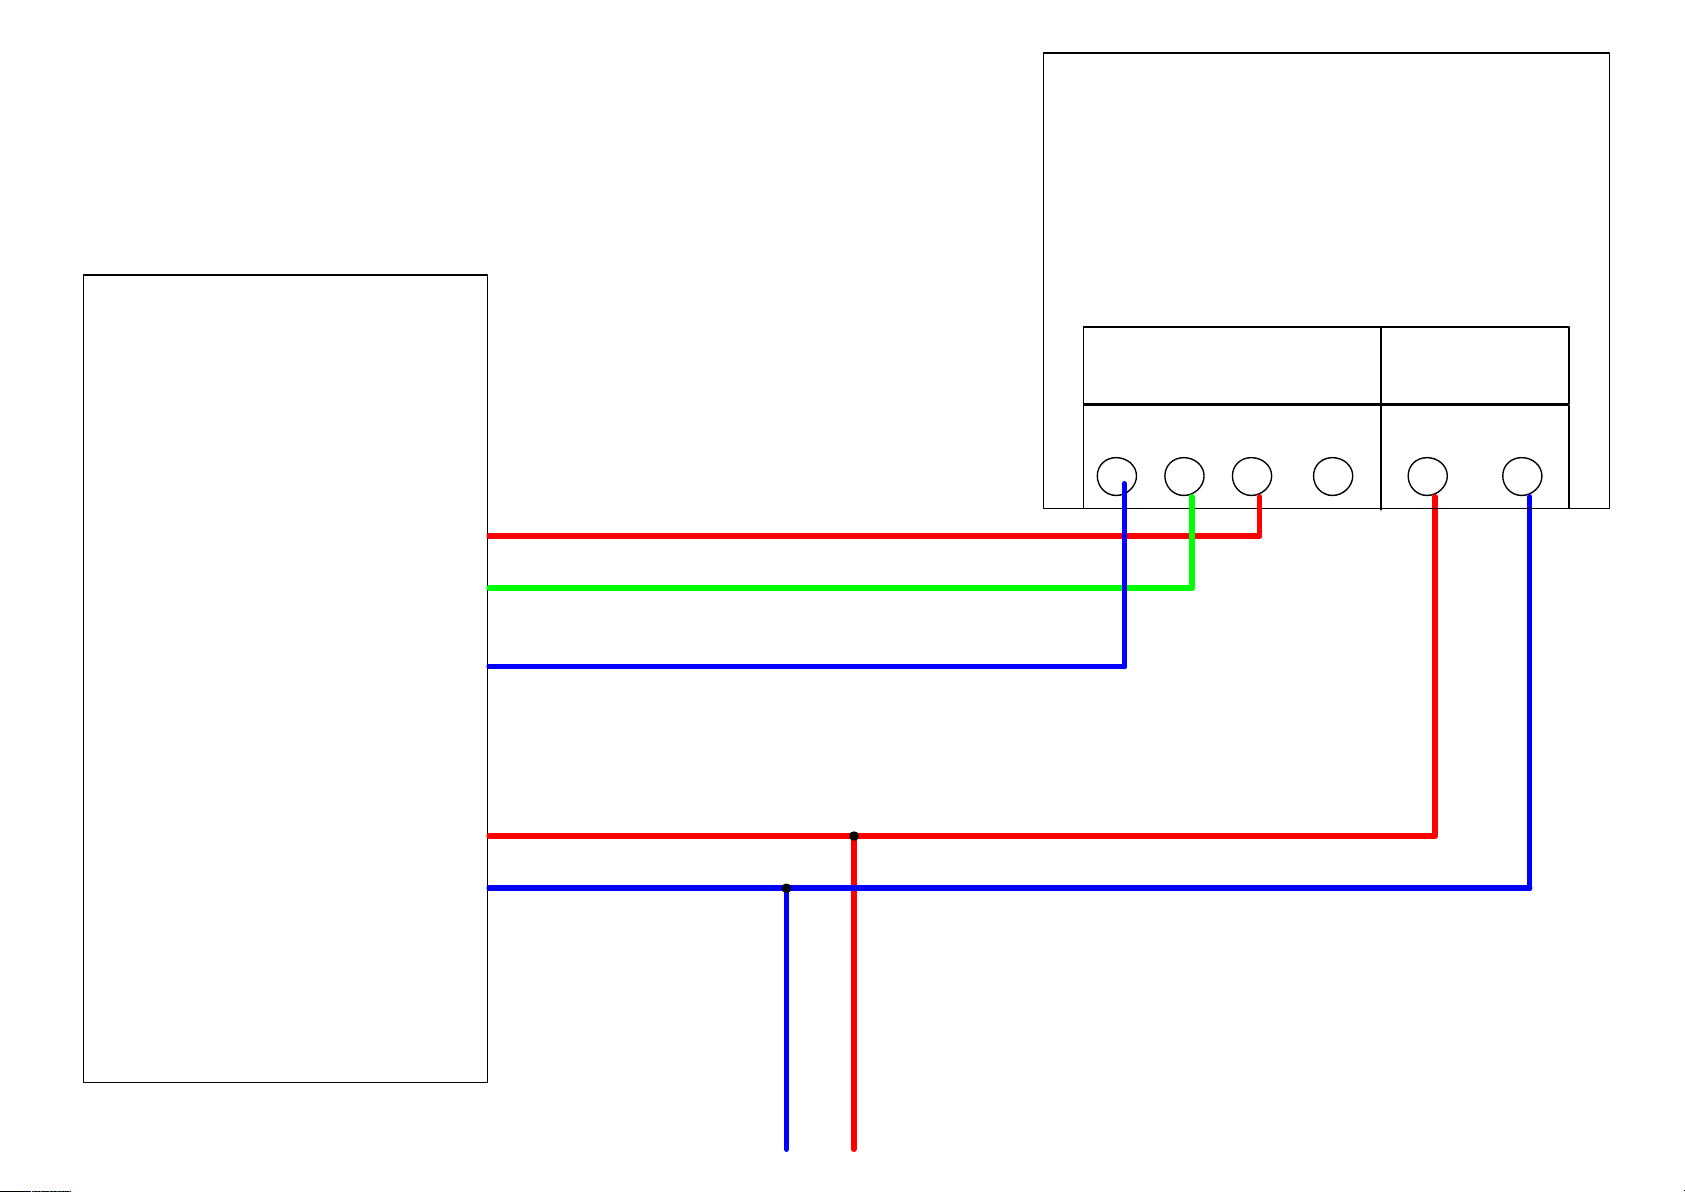
0vB G
0V
RGB Touch Switch
RGB Driver
+24V+
+24V DC
R
Green
0V
Blue
Output
+24V DC
Red
Input
Page 12
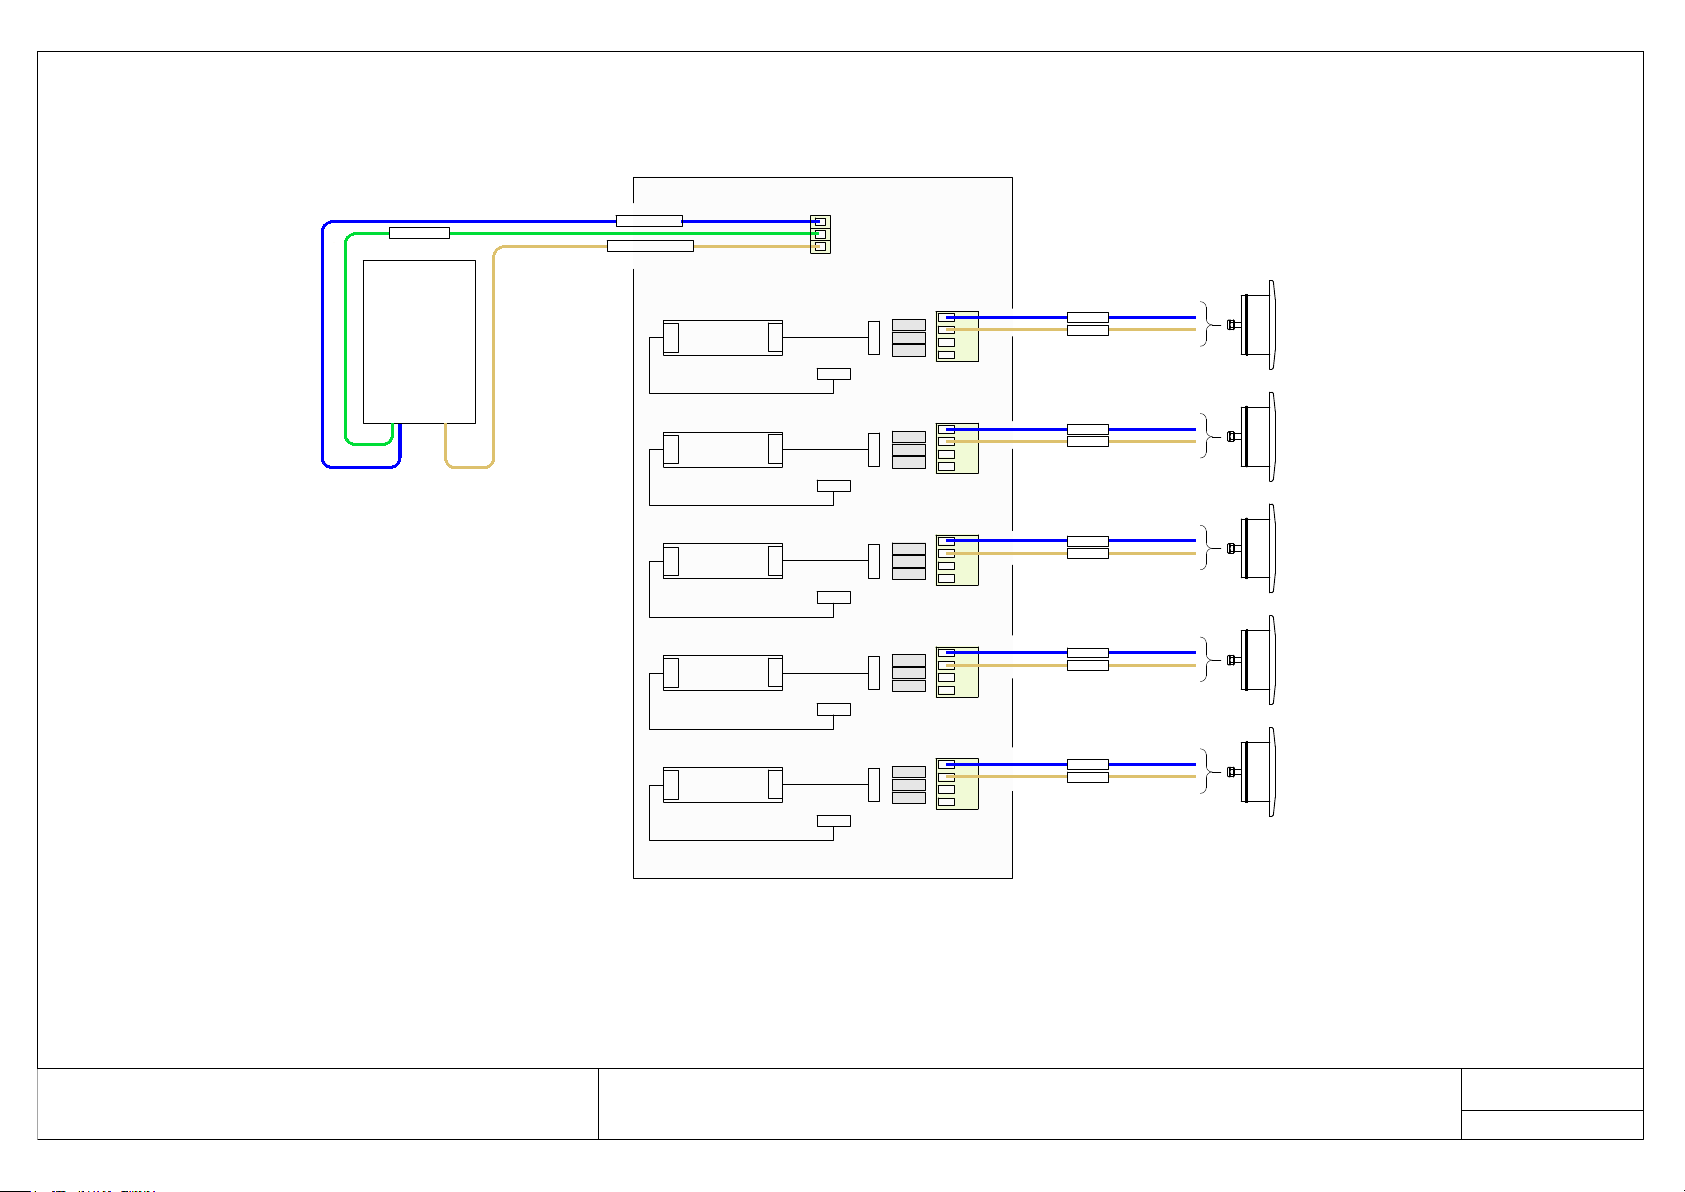
Power
supply
unit
LED driver
blue -
brown +
fuse
fuse
fuse
LED light
LED driver
LED driver
LED driver
LED driver
fuse
fuse
fuse
fuse
fuse
fuse
fuse
fuse
fuse
fuse
fuse
fuse
blue 0V
brown + 24V DC
green signal
WT1 & WT2 White Driver Box NO Control
LED lightLED lightLED lightLED light
V-OV 24V DC
Green Signal to OV when not using control
blue -
brown +
blue -
brown +
blue -
brown +
blue -
brown +
It is essential that all connections are waterproof
WT1 & WT2 White Driver Box NO Control
6/2/2019
Water-tec.co.uk
10 Crabtree Lane Drayton Abingdon OX144HS Tel 01235 536616
Page 13
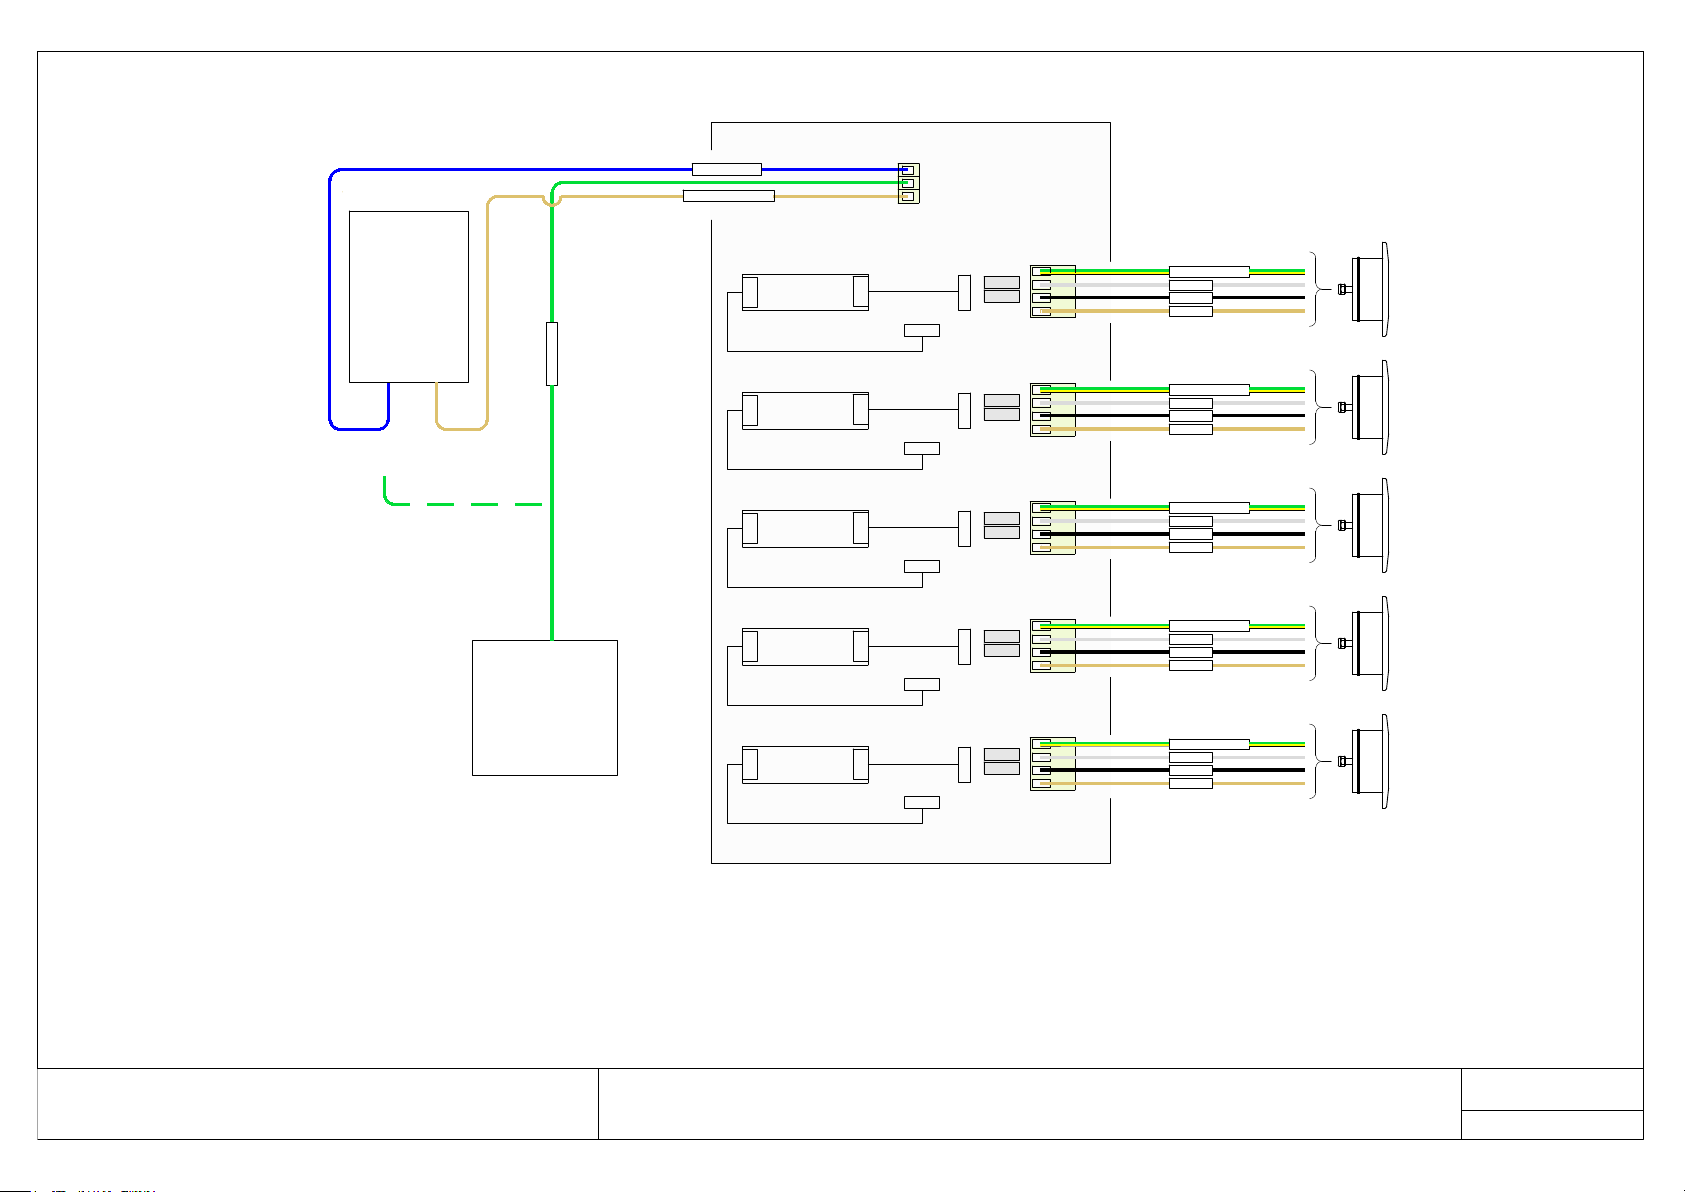
5 Way WHITE Driver Box WT4 & WT5
black -
green / yellow grey +
brown +
LED light
fuse
fuse
Power
supply
unit
LED driver
LED driver
LED driver
LED driver
LED driver
blue 0V
brown + 24V DC
DMX/DIM
Switch
Phone App
green signal
V-OV 24V DC
If not using any form
of control - put green
wire into V-OV
LED light
fuse
fuse
LED light
fuse
fuse
LED light
fuse
fuse
LED light
fuse
fuse
It is essential that all connections are waterproof
black -
green / yellow grey +
brown +
black -
green / yellow grey +
brown +
black -
green / yellow grey +
brown +
black -
green / yellow grey +
brown +
5 Way WHITE Driver Box WT4 & WT5
6/2/2019
Water-tec.co.uk
10 Crabtree Lane Drayton Abingdon OX144HS Tel 01235 536616
Page 14
Page 15
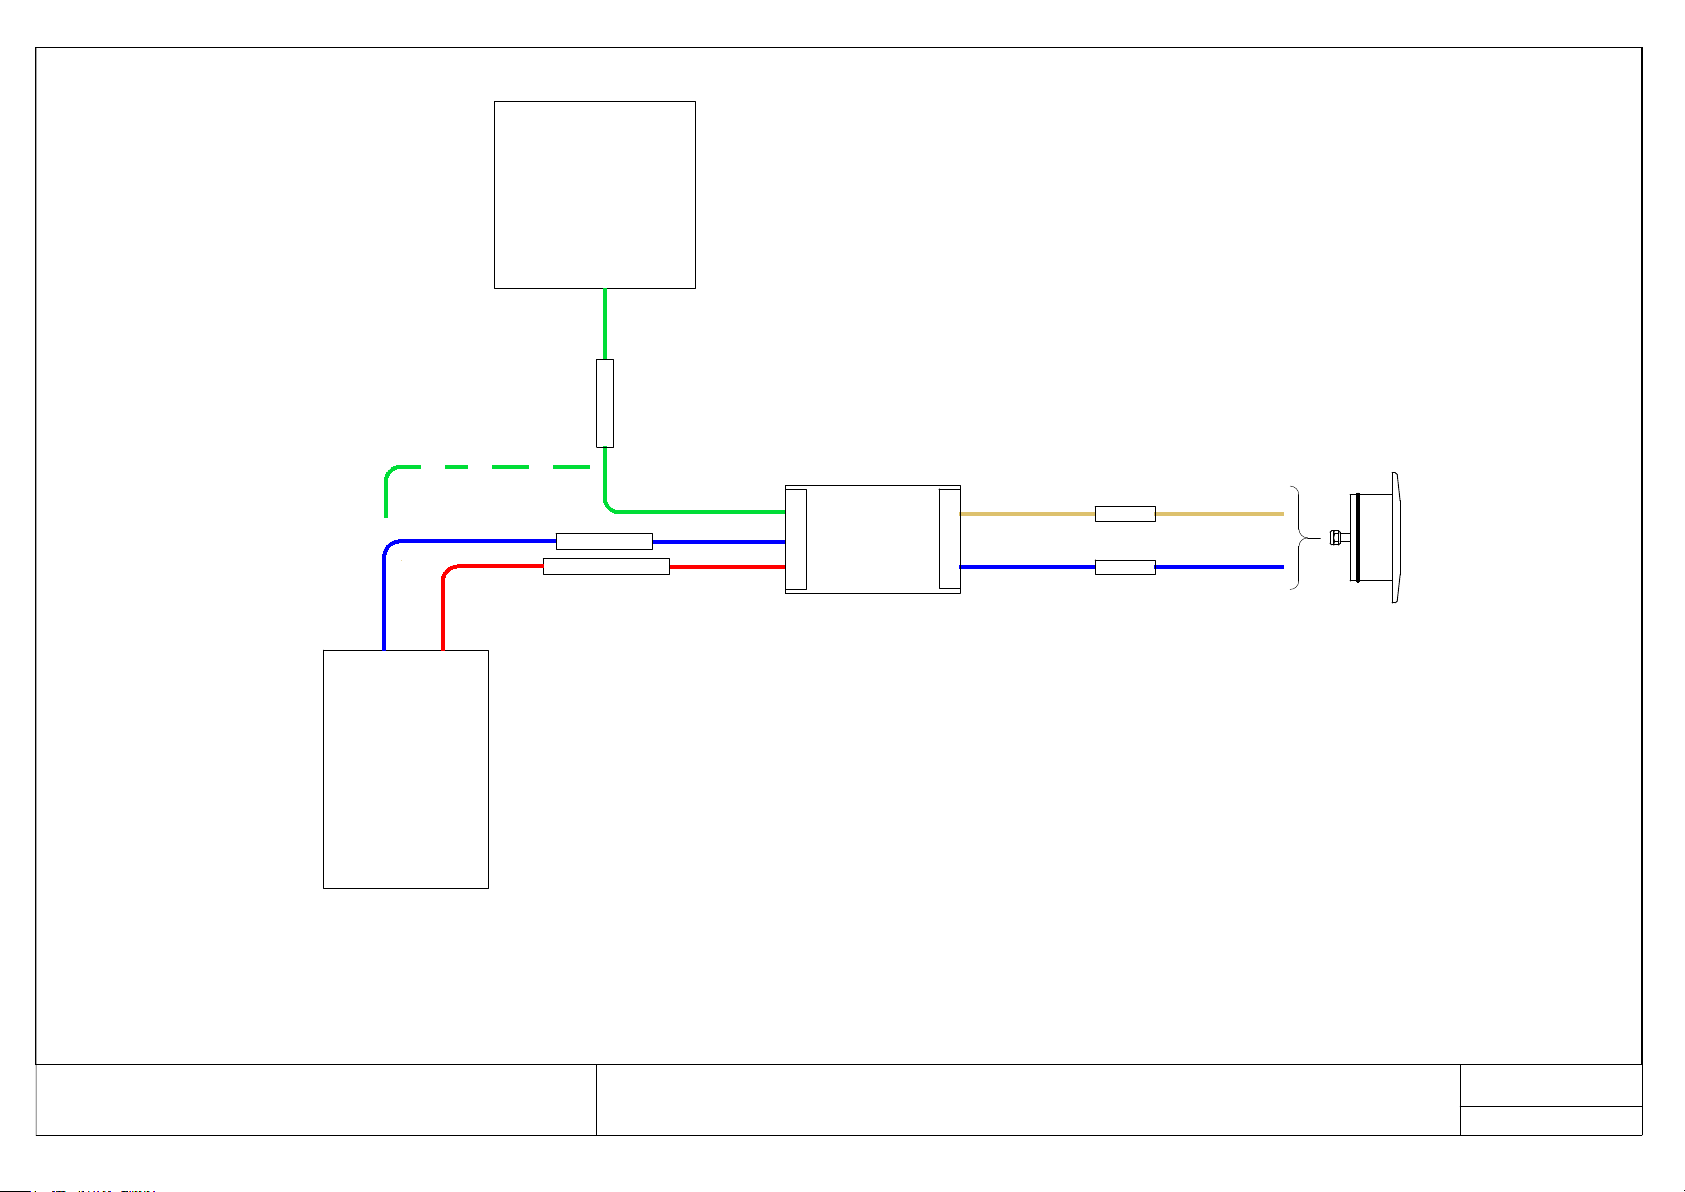
WT1 & WT2 White Lamp
Power
supply
unit
blue 0V
red + 24V DC
DMX/DIM
Switch
Phone App
green signal
V-OV
24V DC
If not using any form
of control - put green
wire into V-OV
blue -
brown +
LED light
LED driver
It is essential that all connections are waterproof
WT1 & WT2 WHITE Lamp External Driver
6/2/2019
Water-tec.co.uk
10 Crabtree Lane Drayton Abingdon OX144HS Tel 01235 536616
Page 16
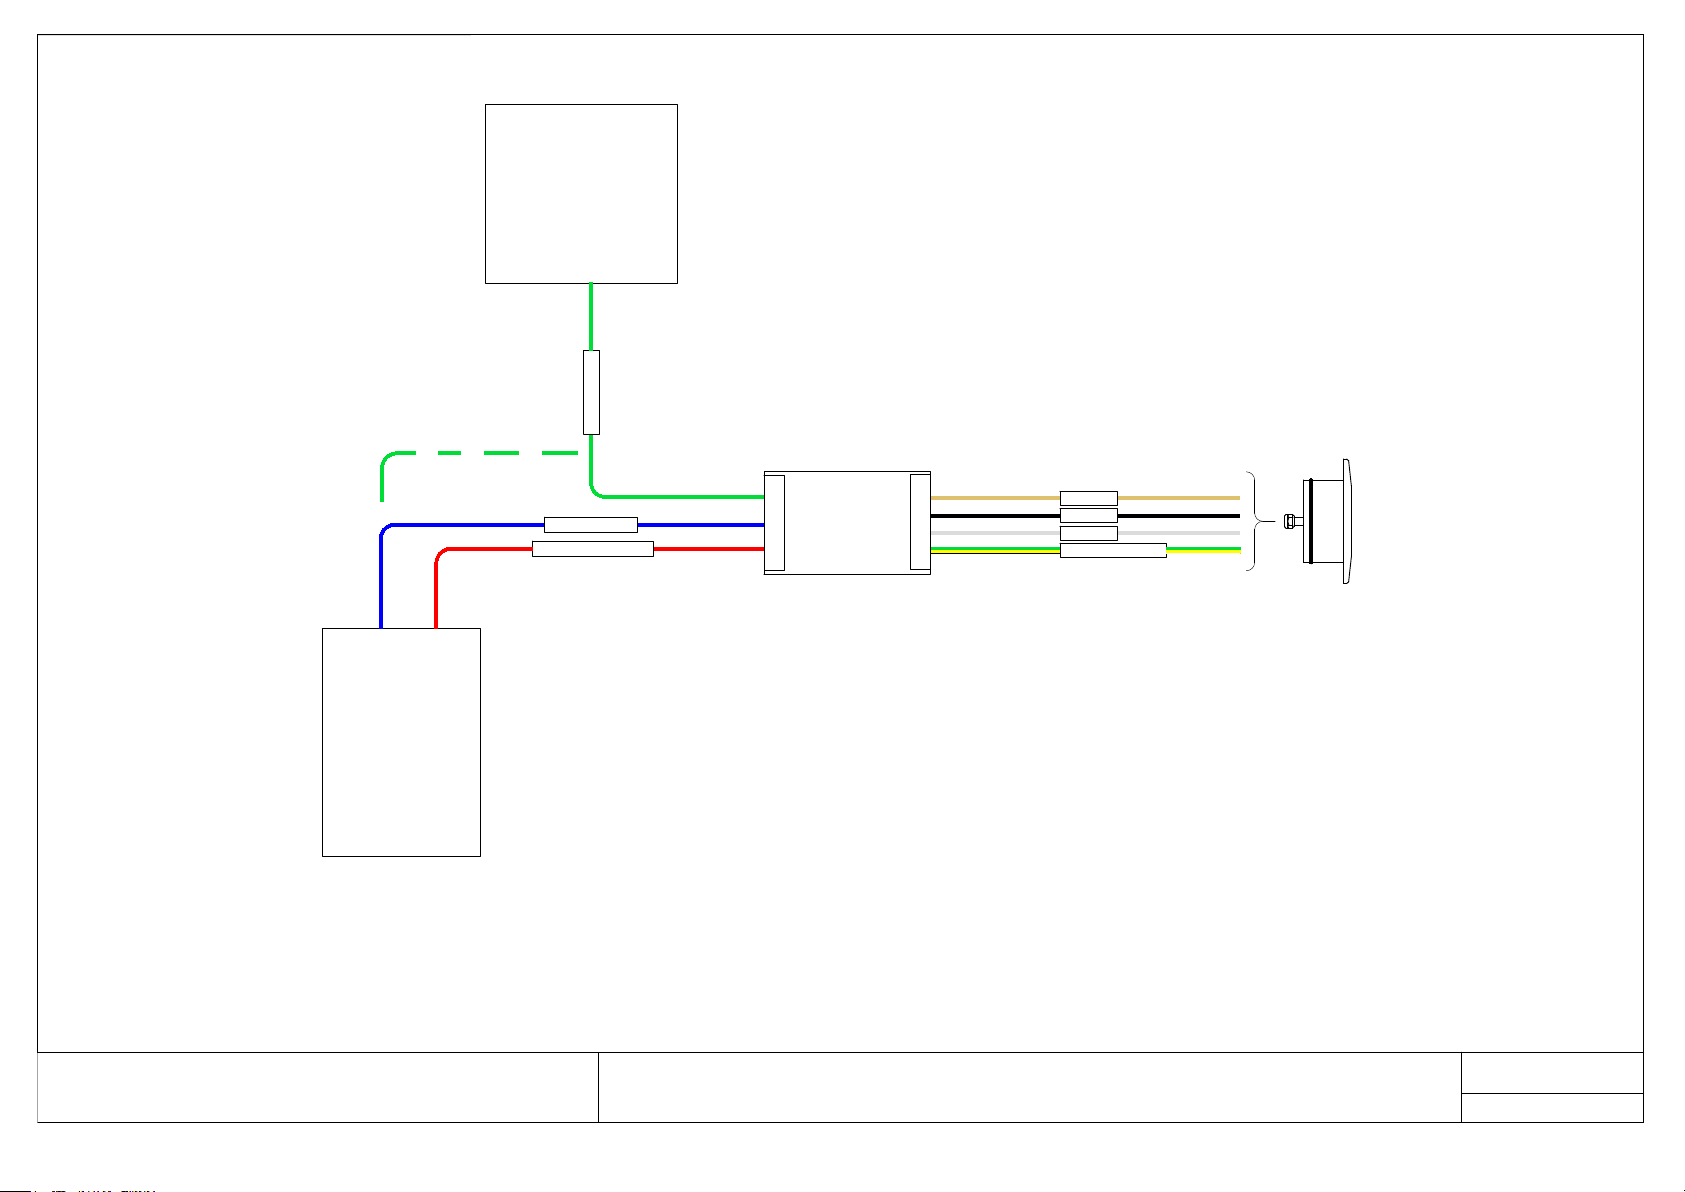
WT4 & WT5 White Lamp
Power
supply
unit
blue 0V
red + 24V DC
DMX/DIM
Switch
Phone App
green signal
V-OV
24V DC
If not using any form
of control - put green
wire into V-OV
black -
green / yellow -
grey +
brown +
LED light
LED driver
It is essential that all connections are waterproof
WT4 & WT5 WHITE Lamp External Driver
6/2/2019
Water-tec.co.uk
10 Crabtree Lane Drayton Abingdon OX144HS Tel 01235 536616
Page 17
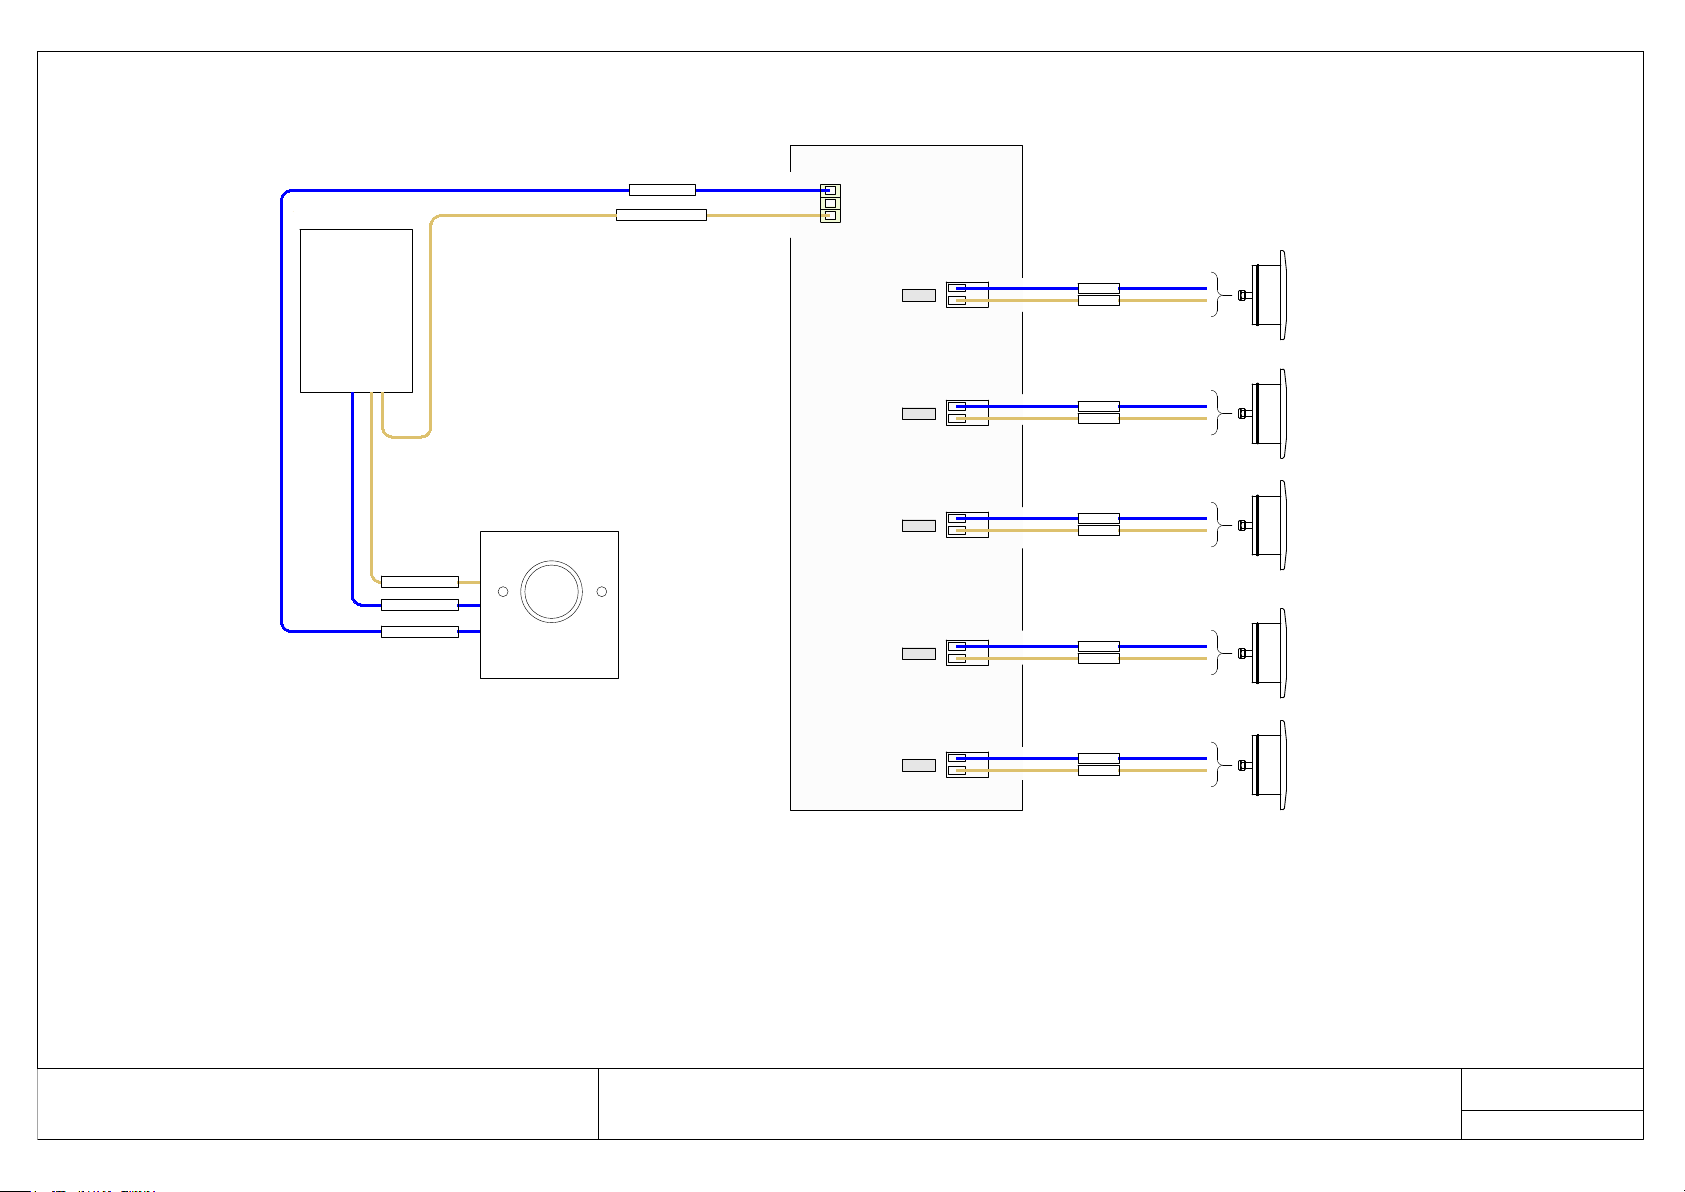
Power
supply
unit
fuse
blue V-
brown + 24V DC
WT3 White Driver Box with Control
blue -
brown +
LED light
V-OV
24V DC
blue V-
blue input 0V-
brown +24V DC
fuse
LED light
fuse
LED light
fuse
LED light
fuse
LED light
It is essential that all connections are waterproof
DIM switch
or DMX
blue -
brown +
blue -
brown +
blue -
brown +
blue -
brown +
WT3 White Driver Box with Control
6/2/2019
Water-tec.co.uk
10 Crabtree Lane Drayton Abingdon OX144HS Tel 01235 536616
Page 18
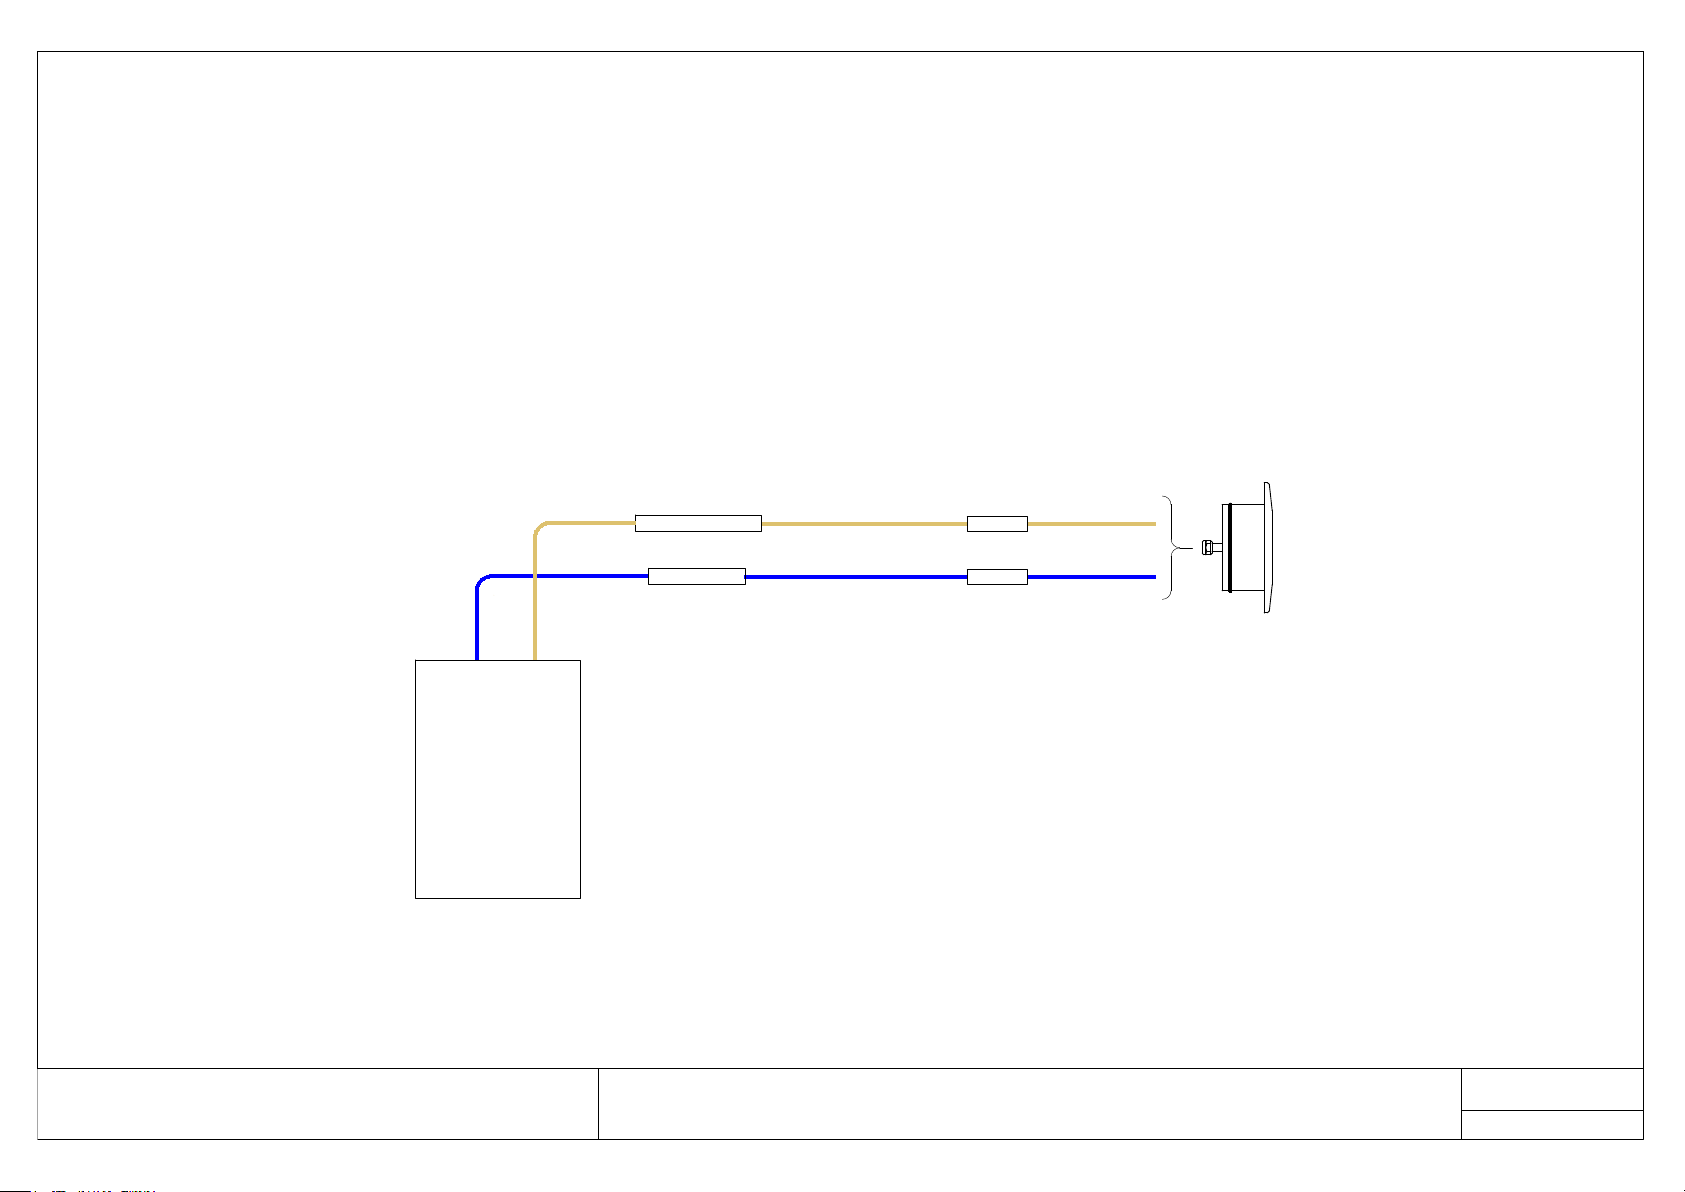
WT3 White Lamp
Power
supply
unit
blue 0V
brown + 24V DC
V-OV
24V DC
blue -
brown +
LED light
It is essential that all connections are waterproof
WT3 WHITE Lamp External Driver
6/2/2019
Water-tec.co.uk
10 Crabtree Lane Drayton Abingdon OX144HS Tel 01235 536616
Page 19
Page 20
PSU
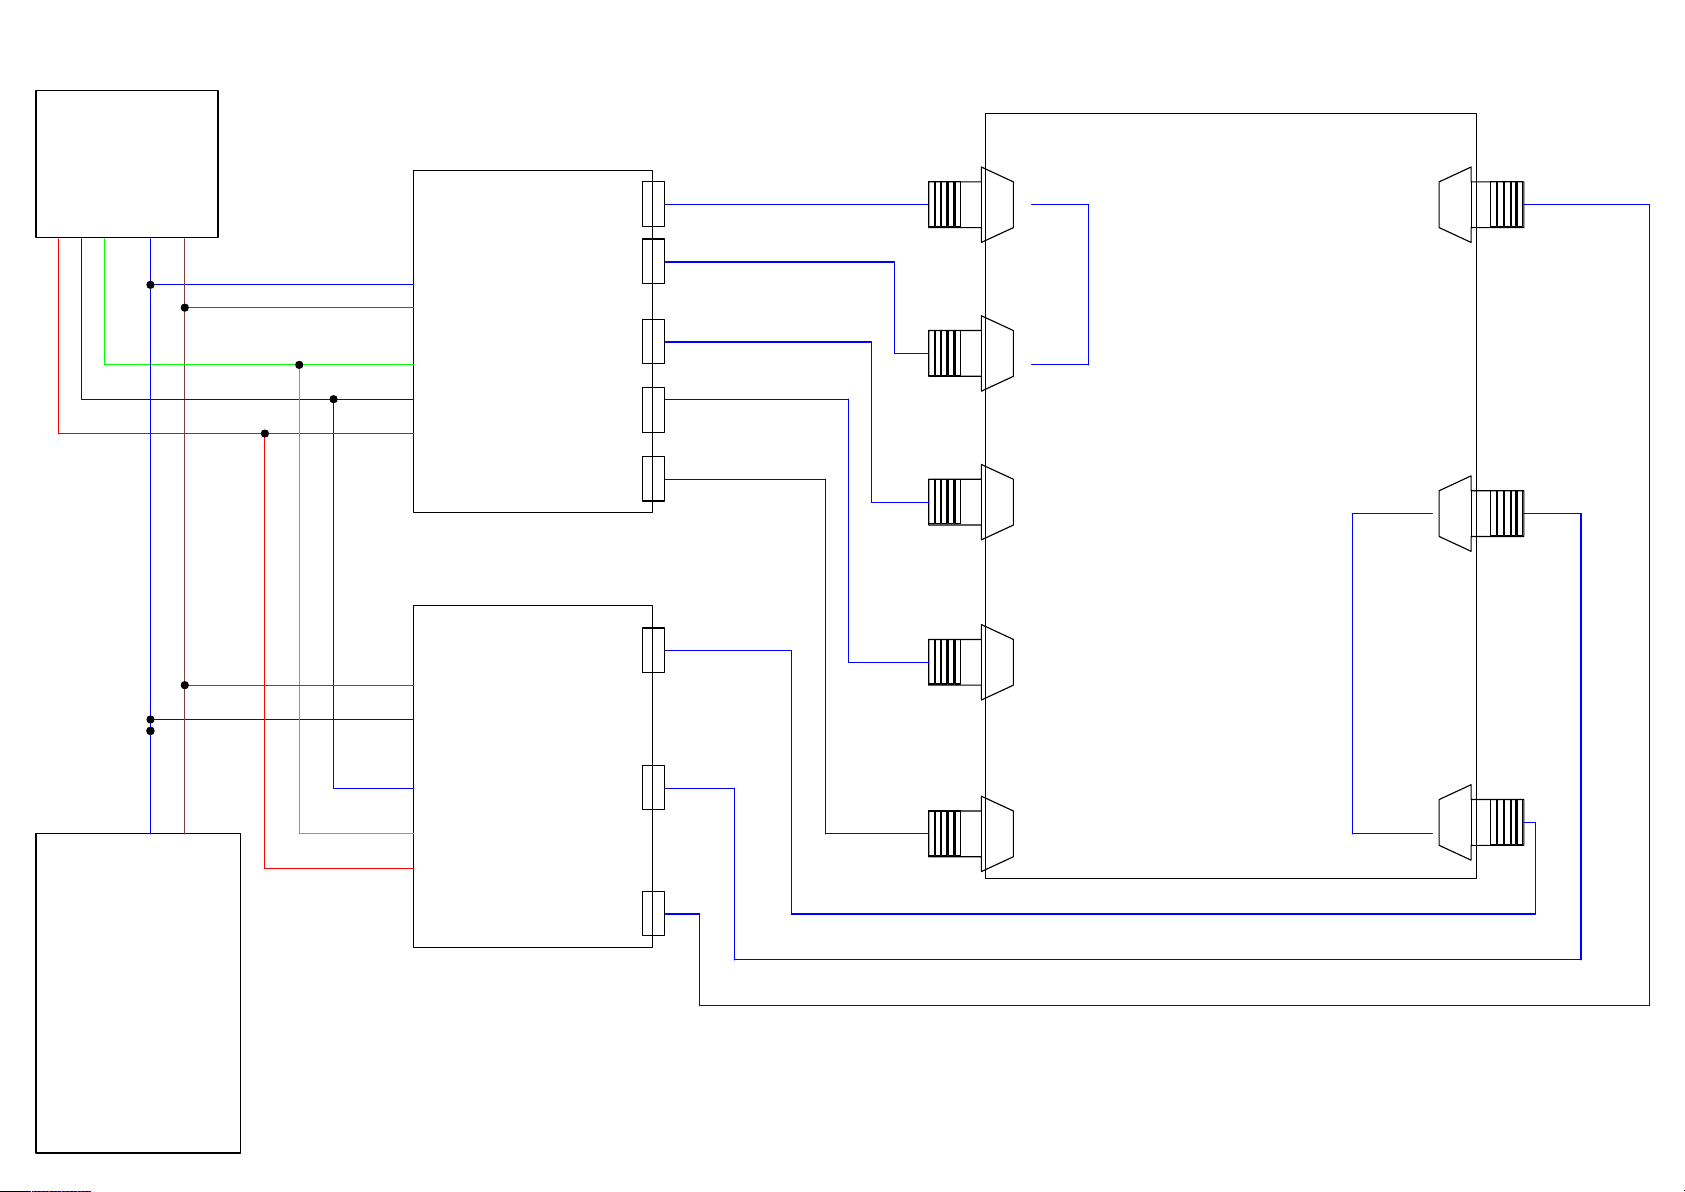
5 W AY RG B DRIVER BOX
Power in Blue 0V
3 W AY RG B DRIVER BOX
RGB Cable Six Core 20M run
0V V - 24V V+
WT1-2 Spacing 2M
WT4-5 Spacing 3M
RGB Sw it c h / DMX
Power in Brown +24V
Page 21
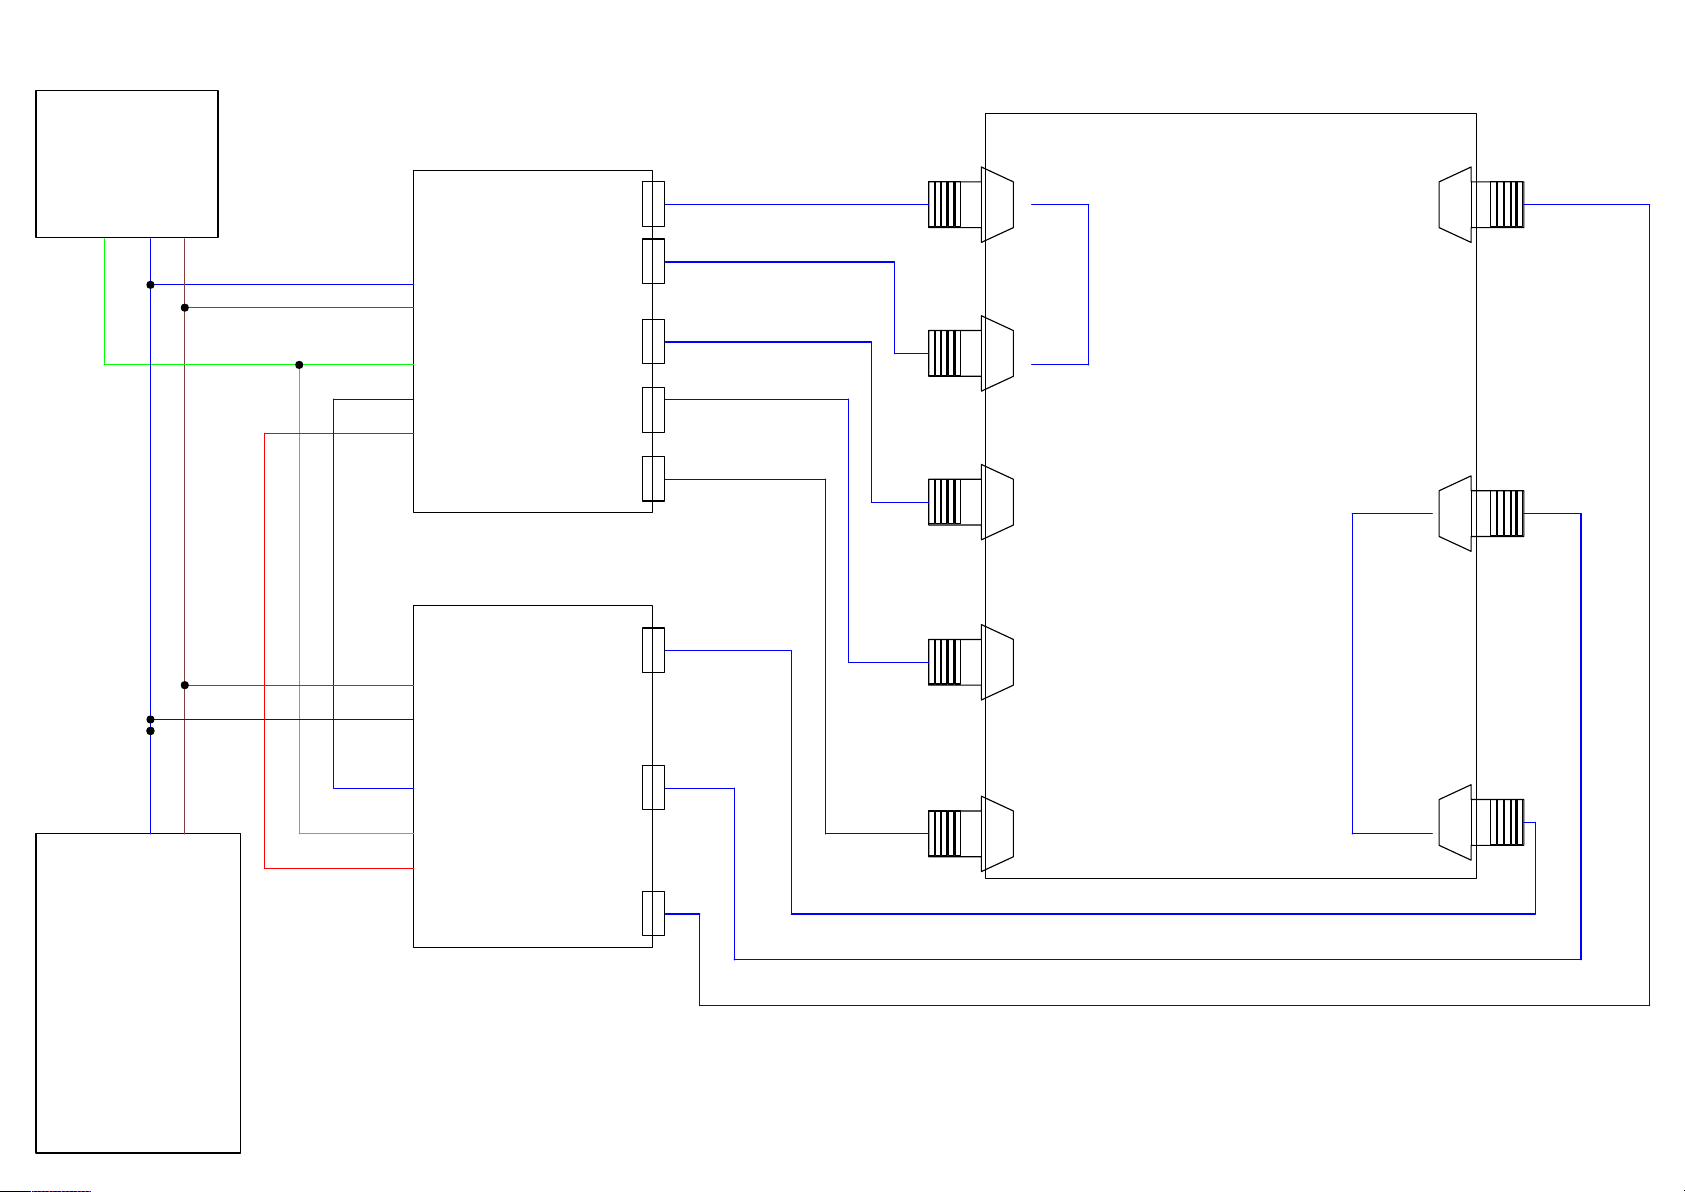
5 W AY W HITE D RIVER B OX
WT4-5 Spacing 4M
Dim Switc h / D MX
White Cable Two Core 20M run
PSU
3 W AY W HITE D RIVER B OX
0V V - 24V V+
Power in Blue 0V
Power in Brown +24V
WT1-2 Spacing 2M
Page 22
WT-Lamp
24V DC Supply
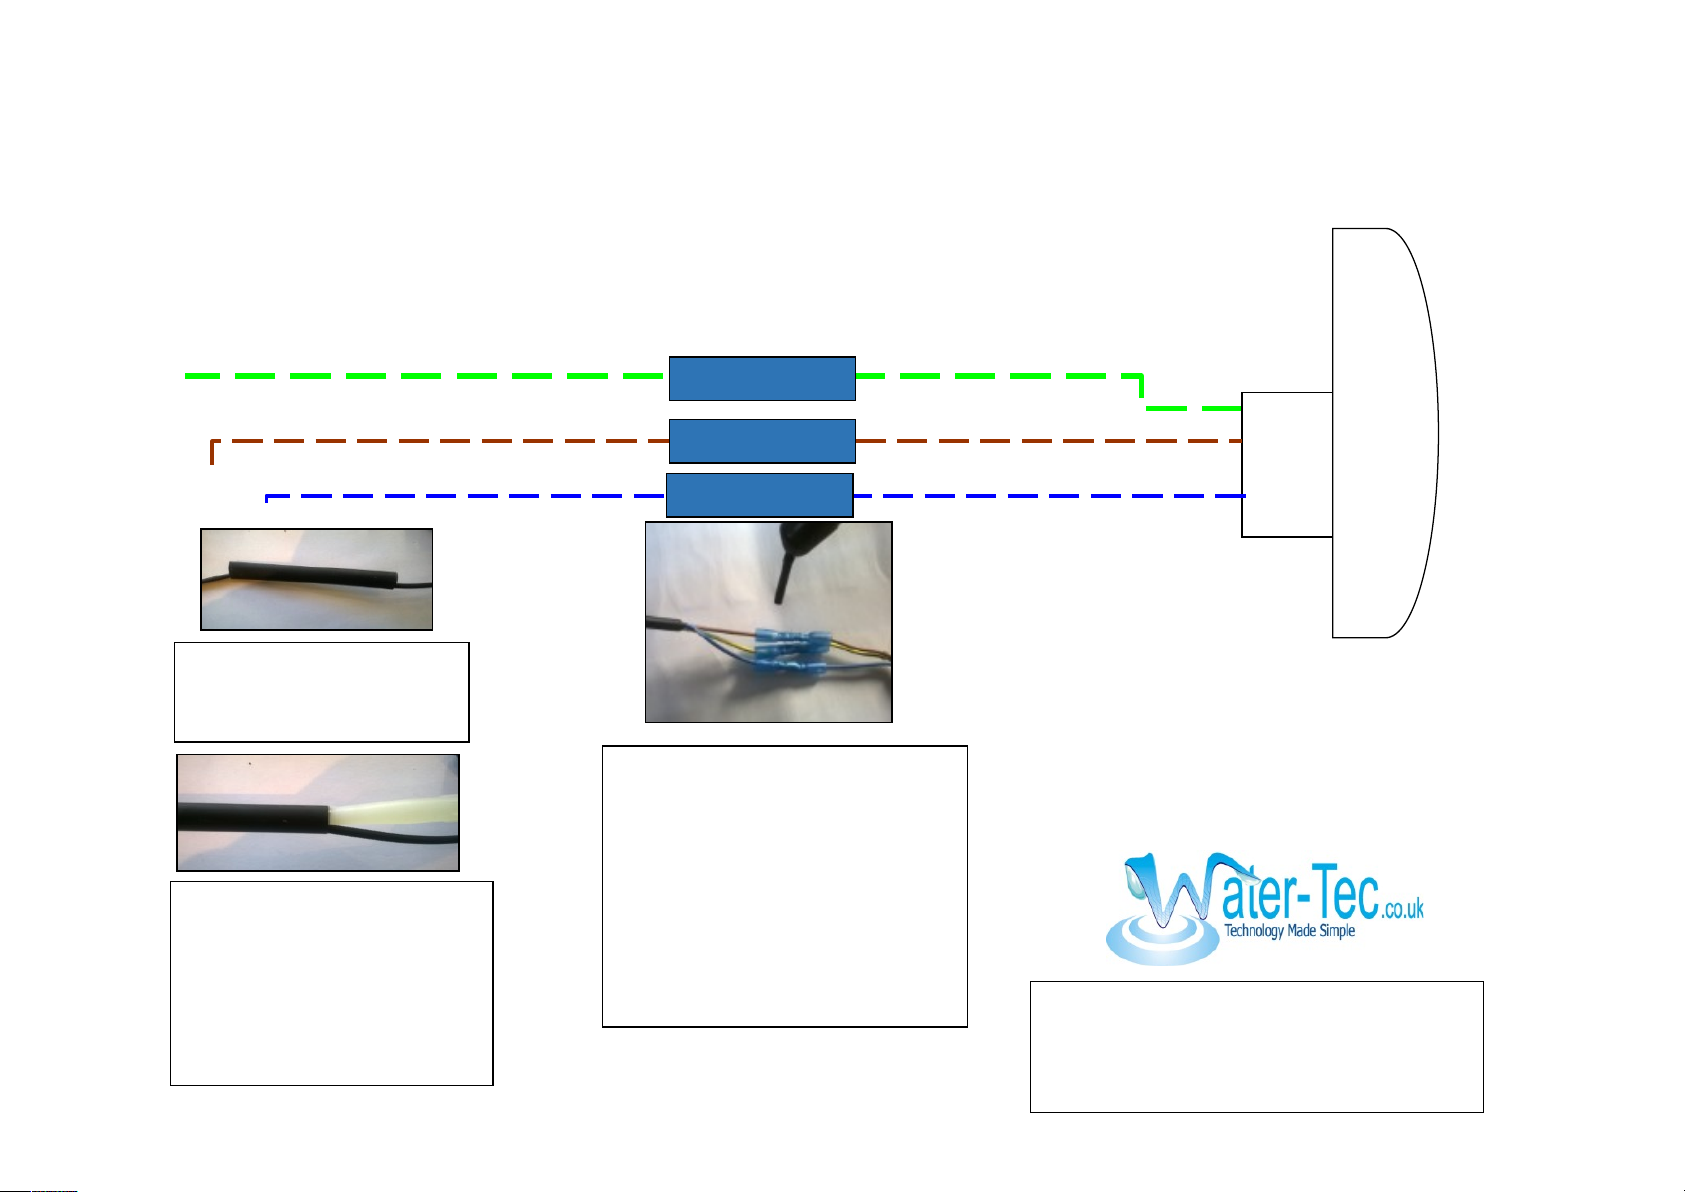
Make sure the terminals are protected against corrosion and they are water tight.
WT-Lamp
Joining connections
MAS Electronics UK Ltd
DRG No: 00013
Tel 01235 536616
Date 01-01-13
WT
Lamp
1. Cut cable and strip back black
insulation. The 3 exposed
wires can then be joined using
the heat shrink crimps. Strip
the end of each cable to
expose the copper cable place
the cable into the crimp, using
a crimping tool crimp the end.
Once all cable have been
joined heat shrink the crimps
2. Place the heat shrink tube
over the crimped cable and
also over the black insulation
3. Put silicon sealant into the end
of the heat shrink tube then heat
shrink the tube to cover the cable
ends, this will prevent water
being pulled up through the
cable to the lamp.
Page 23
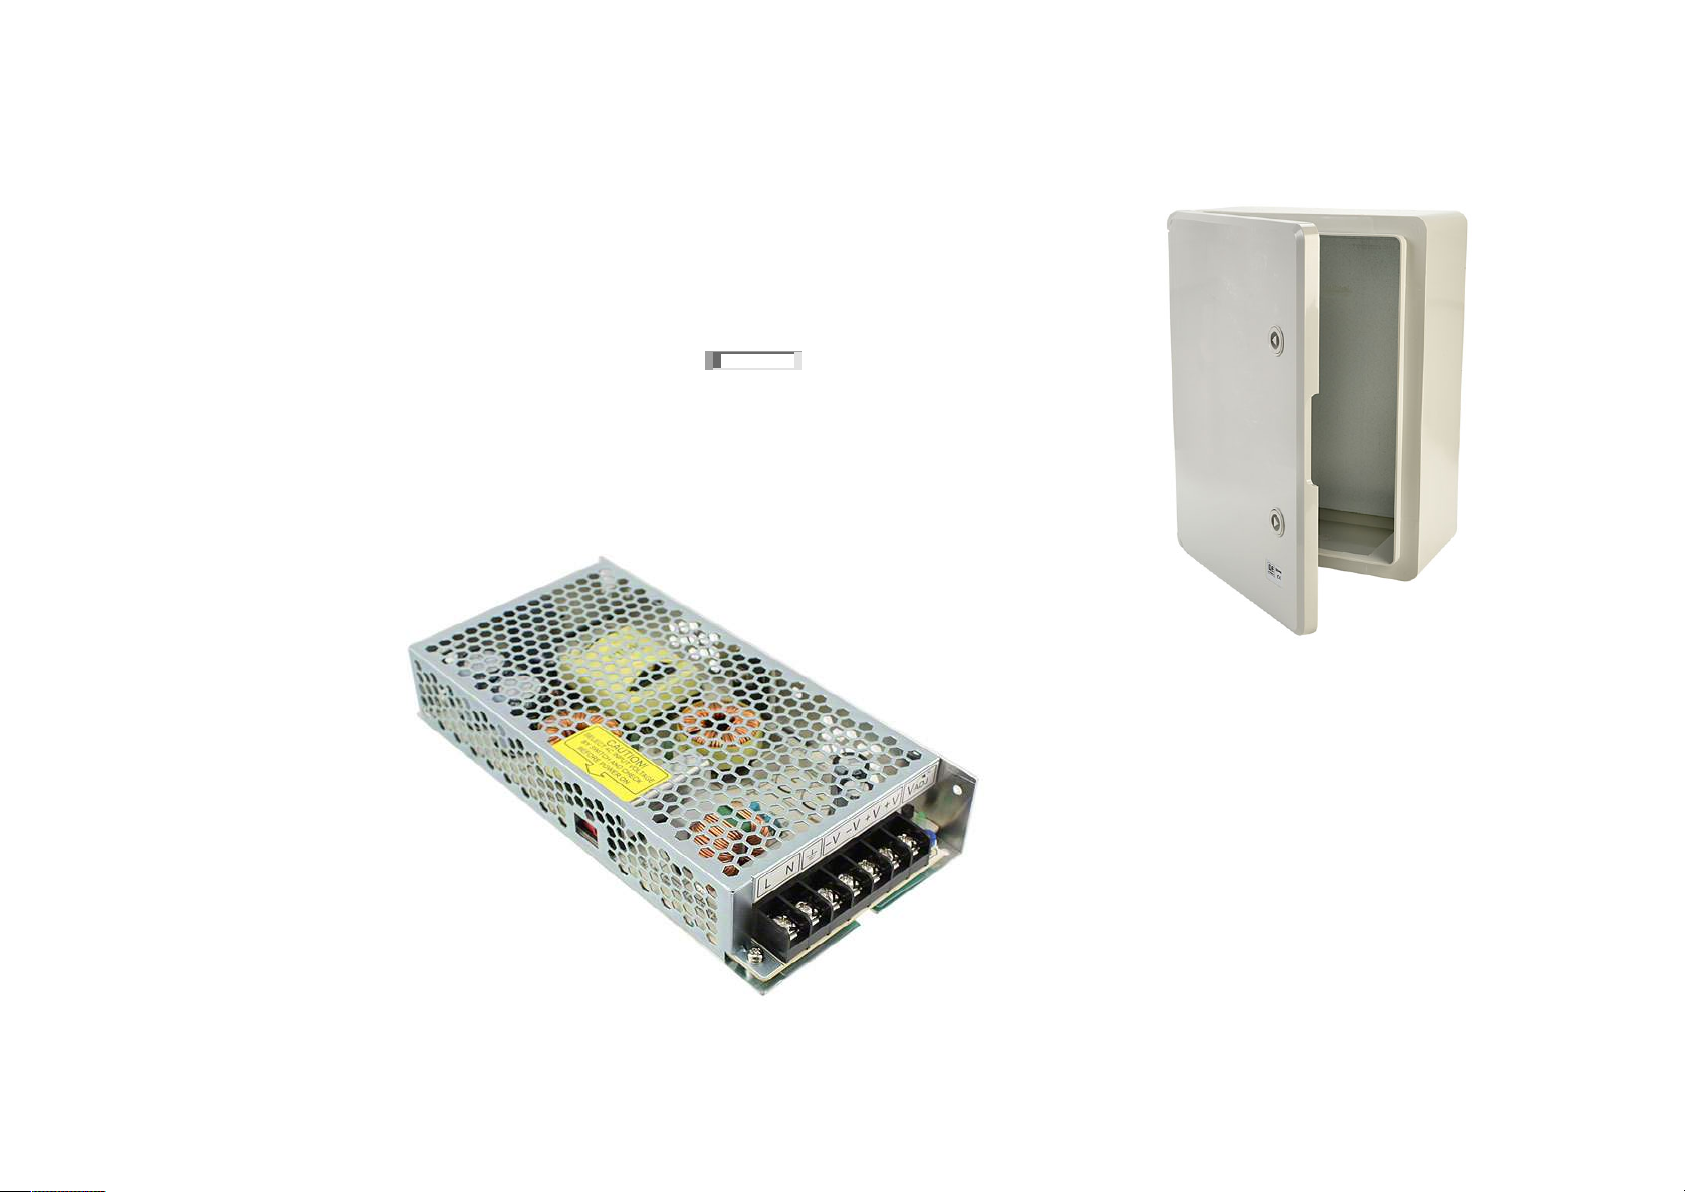
Product Details
150W, Universal Input, Single Output, LS Series
Universal AC input 88-264Vac, LS150 models are switch selectable for 115 or 230Vac
Overcurrent/Overvoltage protection
Power factor correction to EN 61000-3-2
Withstands 300Vac surges (minimum 5s)
Very High efficiency up to 87%
Conducted and radiated EMI: EN55011/EN55022-B, FCC-B
Note
Operating temperatures are with de-rating
MTBF to MIL-HDBK-217F
Approvals
UL recognised component
Standards
UL 60950-1, EN 60950-1, IEC 60950-1
Output Voltage 24 V
Output Current 6.5A
Power Rating 150W
Input Voltage 248 → 273V dc
Number of Outputs 1
Package Type Enclosed
Ripple And Noise 120mV
Load Regulation 192mV
Line Regulation 96mV
Minimum Temperature -25°C
Maximum Temperature +70°C
Efficiency 86%
MTBF 505393h
TDK-Lambda 150W, 1 Output, Embedded Switch Mode Power Supply
20 x 30 x 13cm door enclosure that is manufactured from ABS to
IP65. Supplied with a blank, lockable door this enclosure.
•Tough enclosures for a wide range of uses
•Supplied with lockable, blank doors
•Robust door hinges
•Fitted with galvanised steel back plate
•Door locks fitted as standard, key supplied
•Supplied with wall-mounting brackets
•Sealed to IP65
Page 24
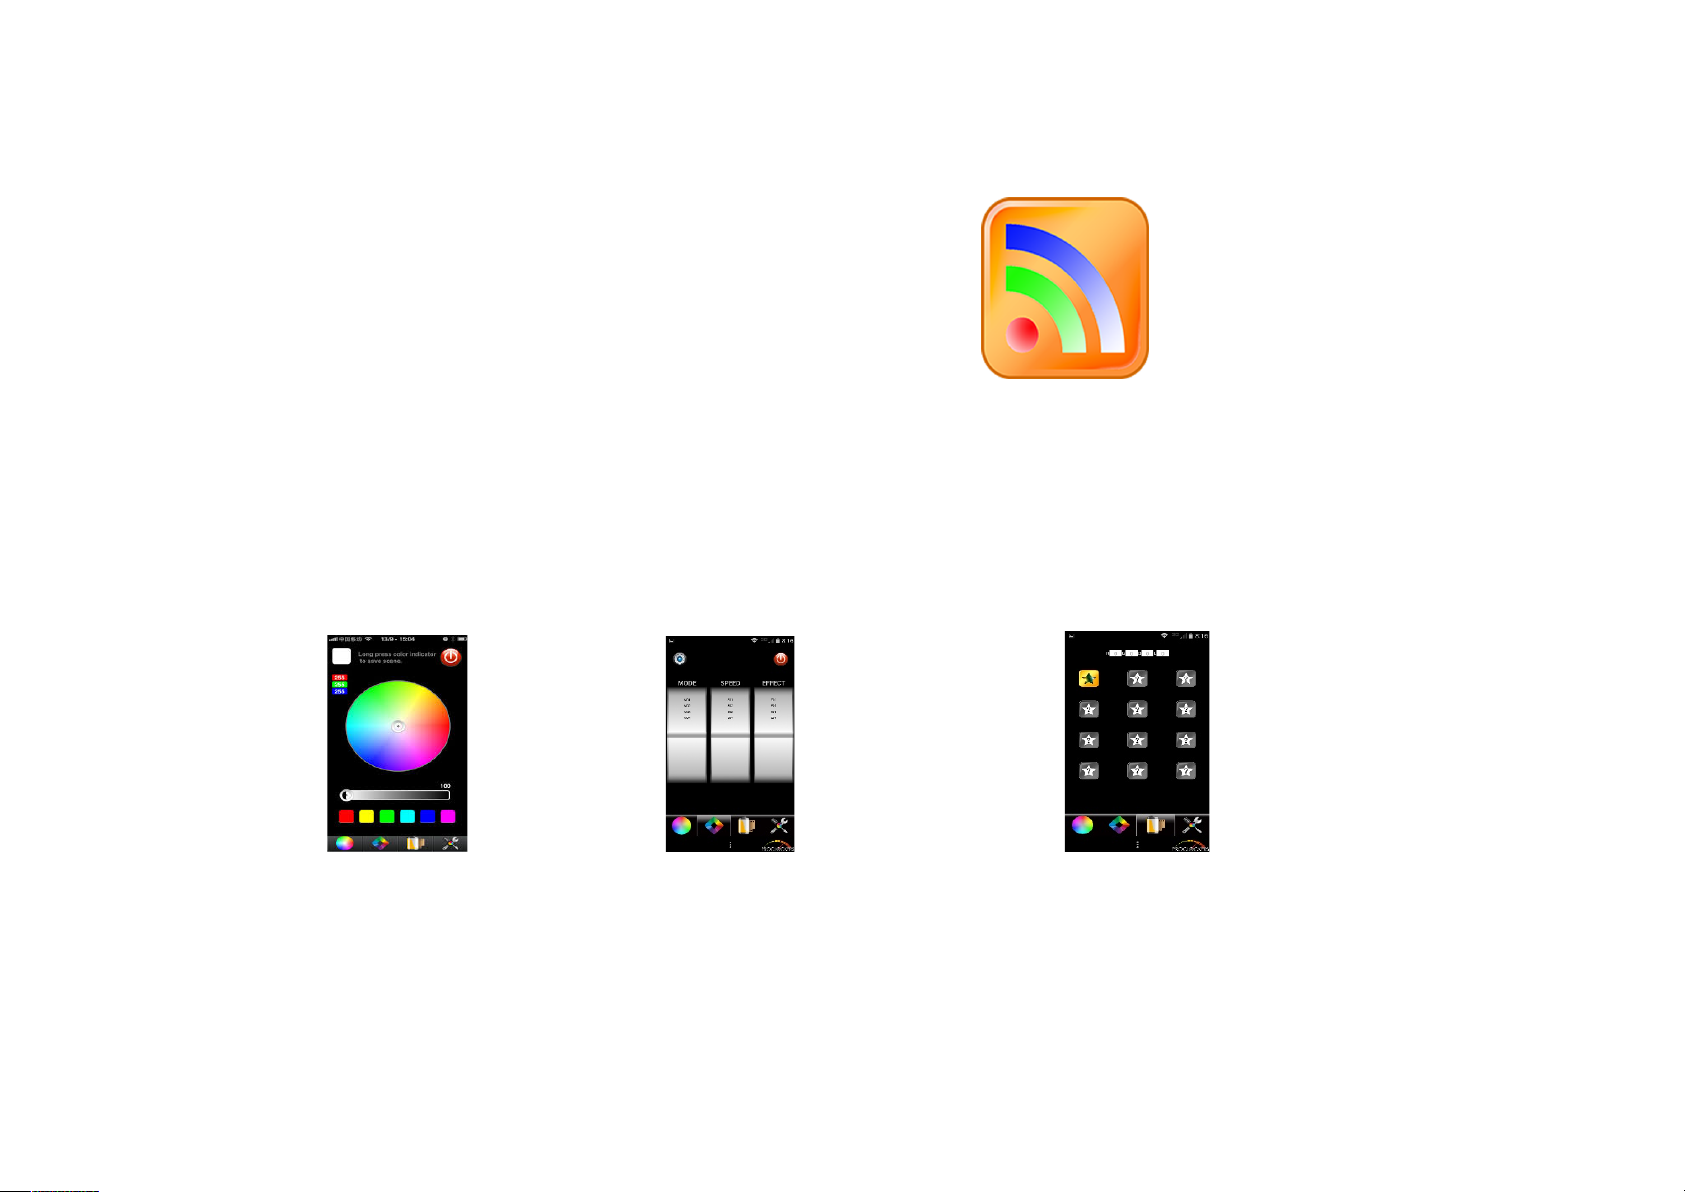
How to connect to RGB-WiFi
Step 1. First you need to download the App FreeColor
Step 2. You need to connect to the WiFi go to your WiFi settings find HX001 and connect.
Step 3. Open the FreeColor, the first page is your Color wheel second page is your mode settings
third page is your saved settings.
More information can be found in the booklet or online
About the Smart WiFi LED Controller:
"PPCS NEW WIFI-V01 controller appeared with the installation of controlling software on mobile devices with Android or IOS system, it can remote
control LED lighting products through WiFi, which makes LED control more intelligent and humanization. One WIFI-V01 controller can be used as
dimmer, CT controller, and RGB controller, only need to select the right control interface in the software. In addition, this model has DIY function. Users
can get any effect they want based on our controlling software. If you don't have any mobile devices with the controlling software at hand, you could
also use our RF remote control to control it. This model designed for constant voltage led products, such as led strip, led modules. For controlling more
led products, amplifier is available."
How to connect to FreeColor Phone App
Page 25
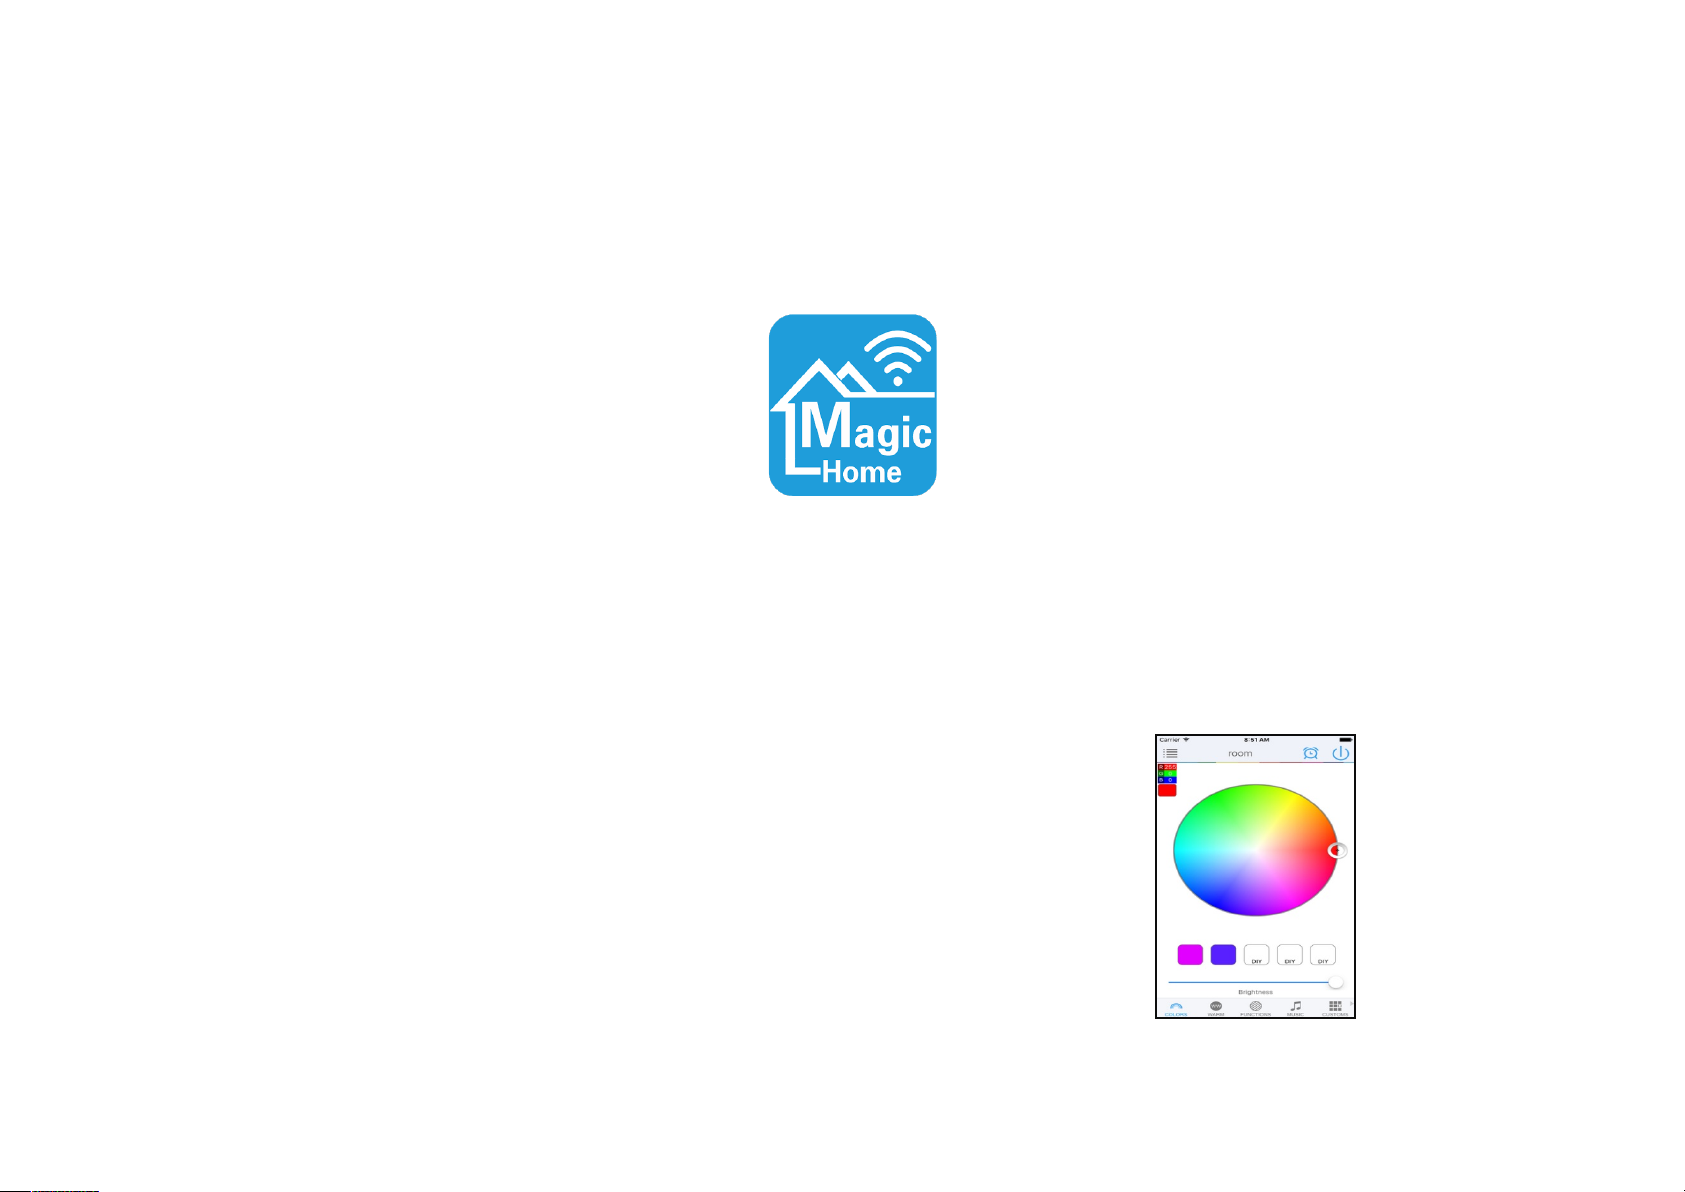
How to connect to RGB-Wi-Fi
Step 1. First you need to download the App Magic Home
Step 2. You need to connect to the Wi-Fi go to your Wi-Fi settings, find LEDnet994164 and
connect.
Step 3. Open the Magic Home App, the first page is your Colour
Along the bottom of the screen are the various functions.
Colours: for manual RGB colour change.
CCT: for white light dim control
Function: for auto colour change.
Music: for selecting the lights to work along with music.
Customs: for creating your own colour mode.
MIC: for sound application working with the lights.
Camera: to capture colours to change the lights.
How to connect to Magic Home Phone App
Page 26
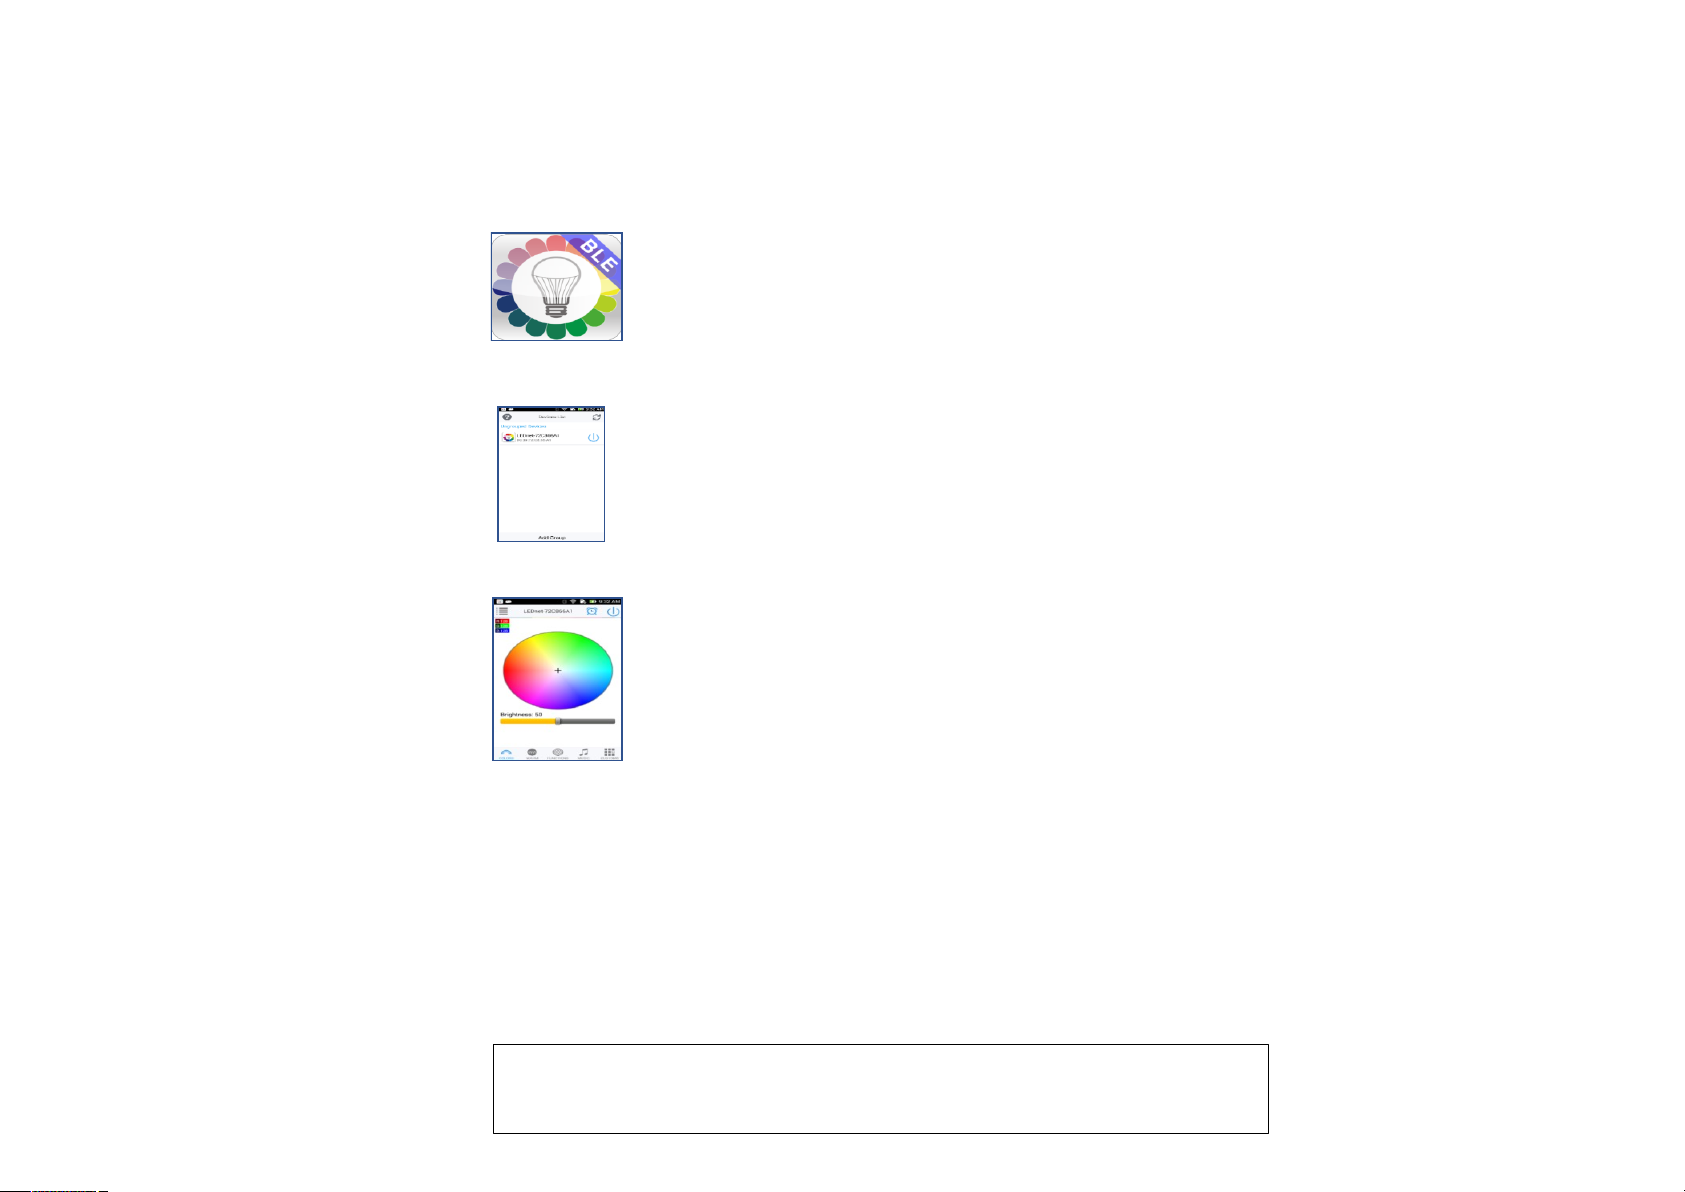
Bluetooth Magic Light – BLE Phone App
This is a application software with built-in Bluetooth, version 4.0 and android OS 4.3.
Step 1. Download the Magic light-BLE app from the play store onto your phone or tablet.
Step 2. Turn on your Bluetooth and open the Magic home app.
Step 3. Tap on the device and your colour wheel screen will show.
Step 4. You can pick a static colour from the colour wheel, alternatively scroll along the bottom to
choose Functions, Music, Customs, Disco, Camera, Scene.
This controller support iOS 6.0 version and Bluetooth version 4.0 or above.
There are 16 million colours and dozens of lights changing modes.
This controller is designed for LED strips, module etc. After easy installation and setting up, you can
use your Phone (iOS 6.0 or Android system for Samsung 4.3 version or above) to control.
The remote-control distance reach 8-10 meters.
Specifications:
Connection Methods: UFO Bluetooth Version 4.0
Suitable Phone OS: iOS version 6.0 above, Bluetooth version 4.0 or above
RGB
Please note: When using the touch switch with the WiFi or Bluetooth, you must turn off the RGB
switch to use the WiFi or Bluetooth.
Both cannot work together at the same time.
Page 27
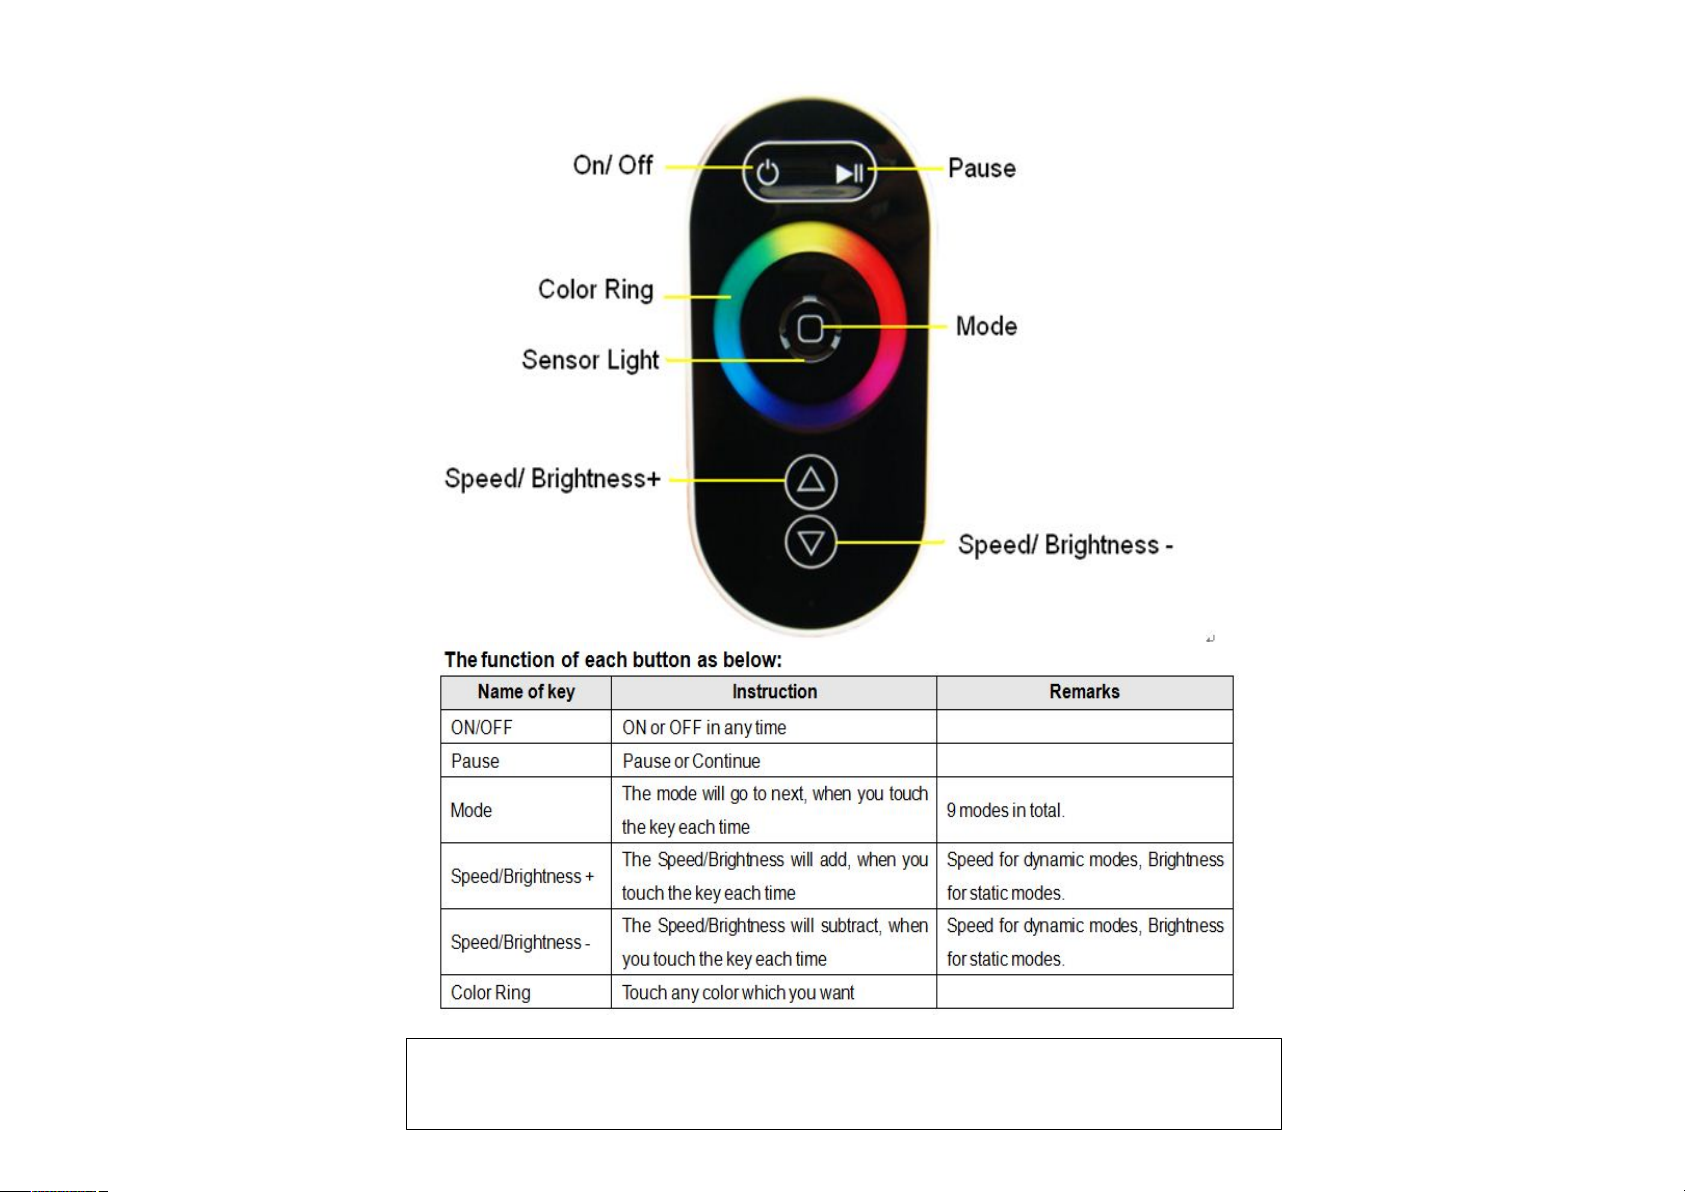
Please note: When using the touch switch with the WiFi remote, you must turn off the switch to
use the remote or turn off the remote to use the switch. Both cannot work at the same time.
Remote control
Page 28
Page 29
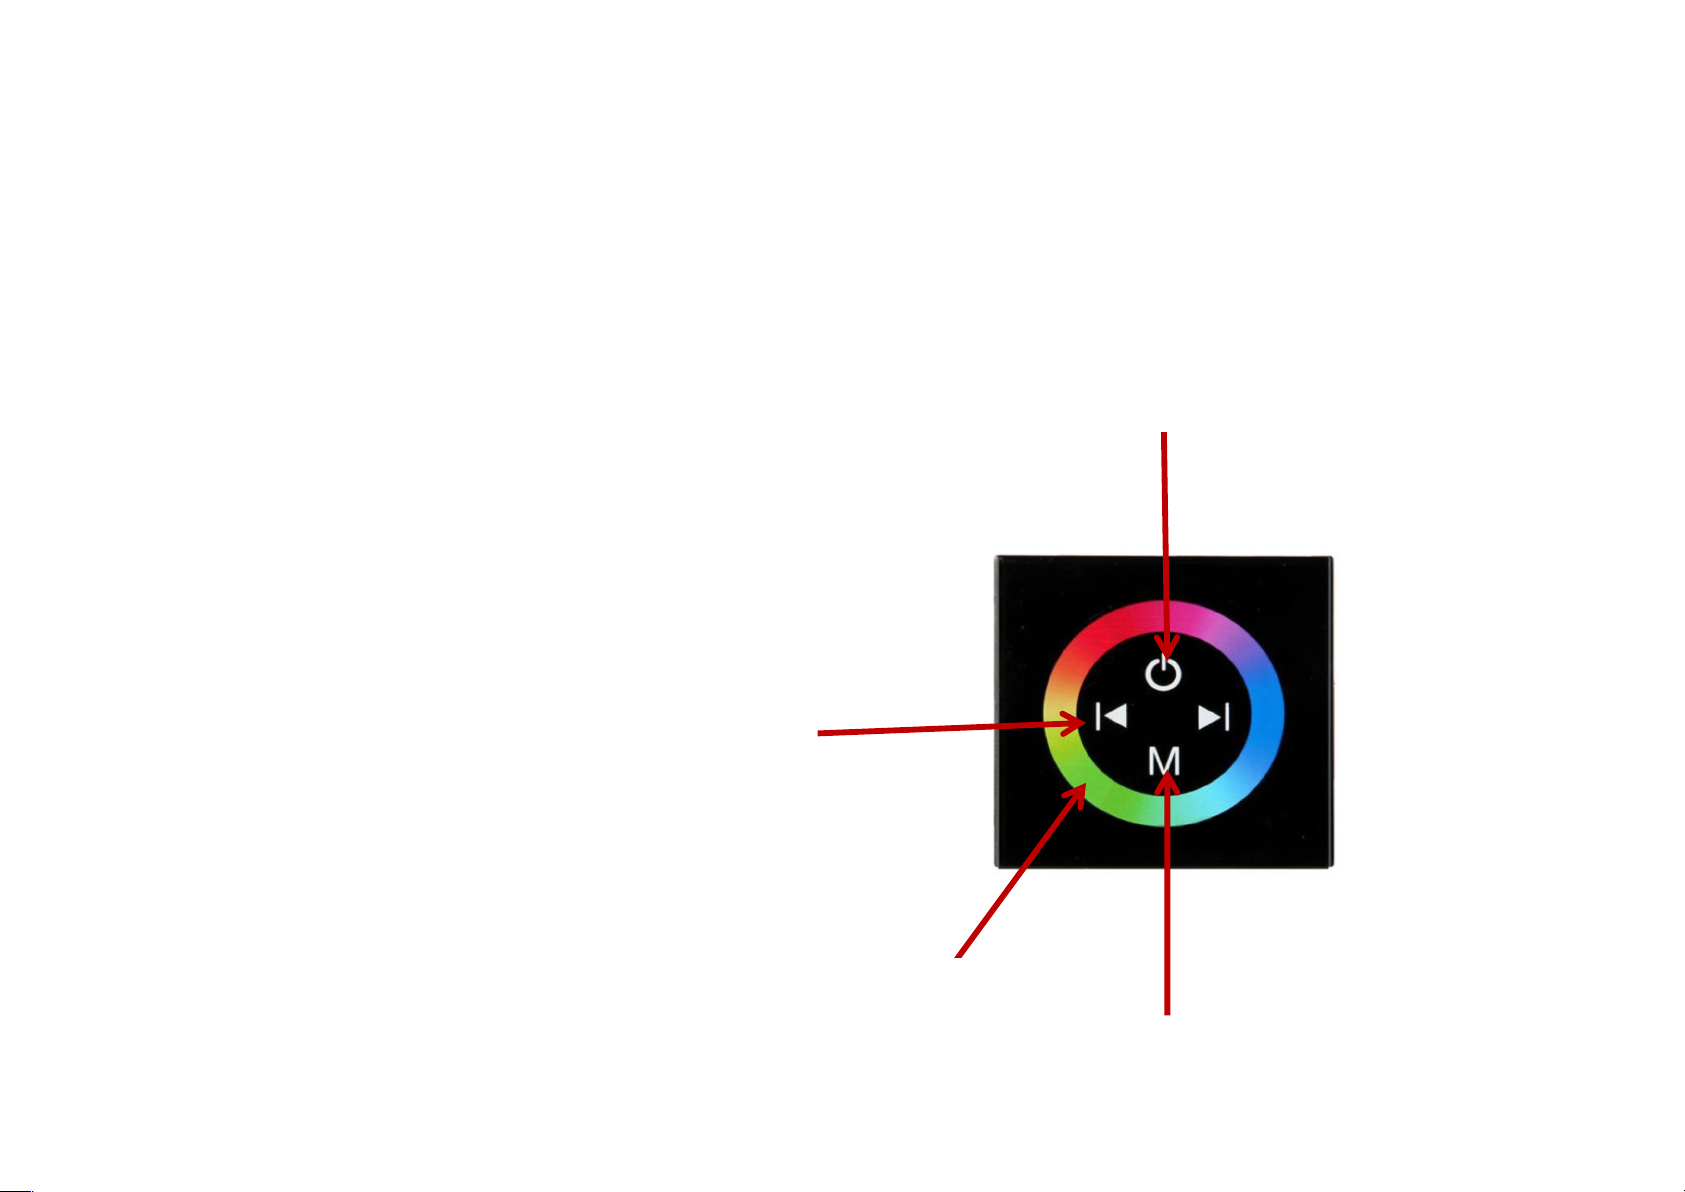
Mode
The Mode button offers multiple choice of
changing colour from scrolling to dancing
colour change.
Speed
The speed button controls the speed of the
scroll change.
On/Off
On/Off powers the lamps on and off
Specifications:
3 channels DC 12V-24V working voltage 8A
Lock lights to your favourite mode or brightness level immediately
Working voltage: DC 12V - 24V 4 functional buttons with a rainbow colour ring
for colours and modes controlling
Working temperature: -20-60℃
Supply voltage: DC 12-24V
Output: 3 channels
Connection type: common anode
External dimension: about 86 x 86 x 37 mm (L x W x H)
Static power consumption: less than 1W
Output current: less than 4A (each channel)
Output power: 12V <144W, 24V <288W.
Switchable power supply.
Adjustable lighting colour, brightness.
On/Off
Speed
Mode
Touch to
change colour
RGB Touch panel
Page 30
Features:
Touch panel controller is a new high-quality controller which adopts glass panel design, beautiful
and fashionable in appearance.
It adopts high precision capacitance touch control chip, increases the sensitivity of touch panel.
It is used for controlling a variety of LED Lamp, for instance, point source of light, flexible light strip,
panel lights, etc.
It has many advantages, such as convenient to connect, easy to use.
Specifications:
Working temperature: -20-60 °C
Supply voltage: DC12~24V
Connection mode: common anode
Static power consumption: <1W
Output current: <4A
Output power: 12V<96W, 24V<192W
Controller size: approx. 8.6 * 8.6 * 3.6cm / 3.3 * 3.3 * 1.4in
Controller weight: approx. 118g / 4.16oz
Package size: approx. 11.2 * 10.7 * 5.5cm / 4.4 * 4.2 * 2.2in
Package weight: approx. 155g / 5.48oz
Standard brightness change
Mode Function
1 10%
2 20%
3 30%
4 40%
5 50%
6 60%
7 70%
8 80%
9 90%
10 100%
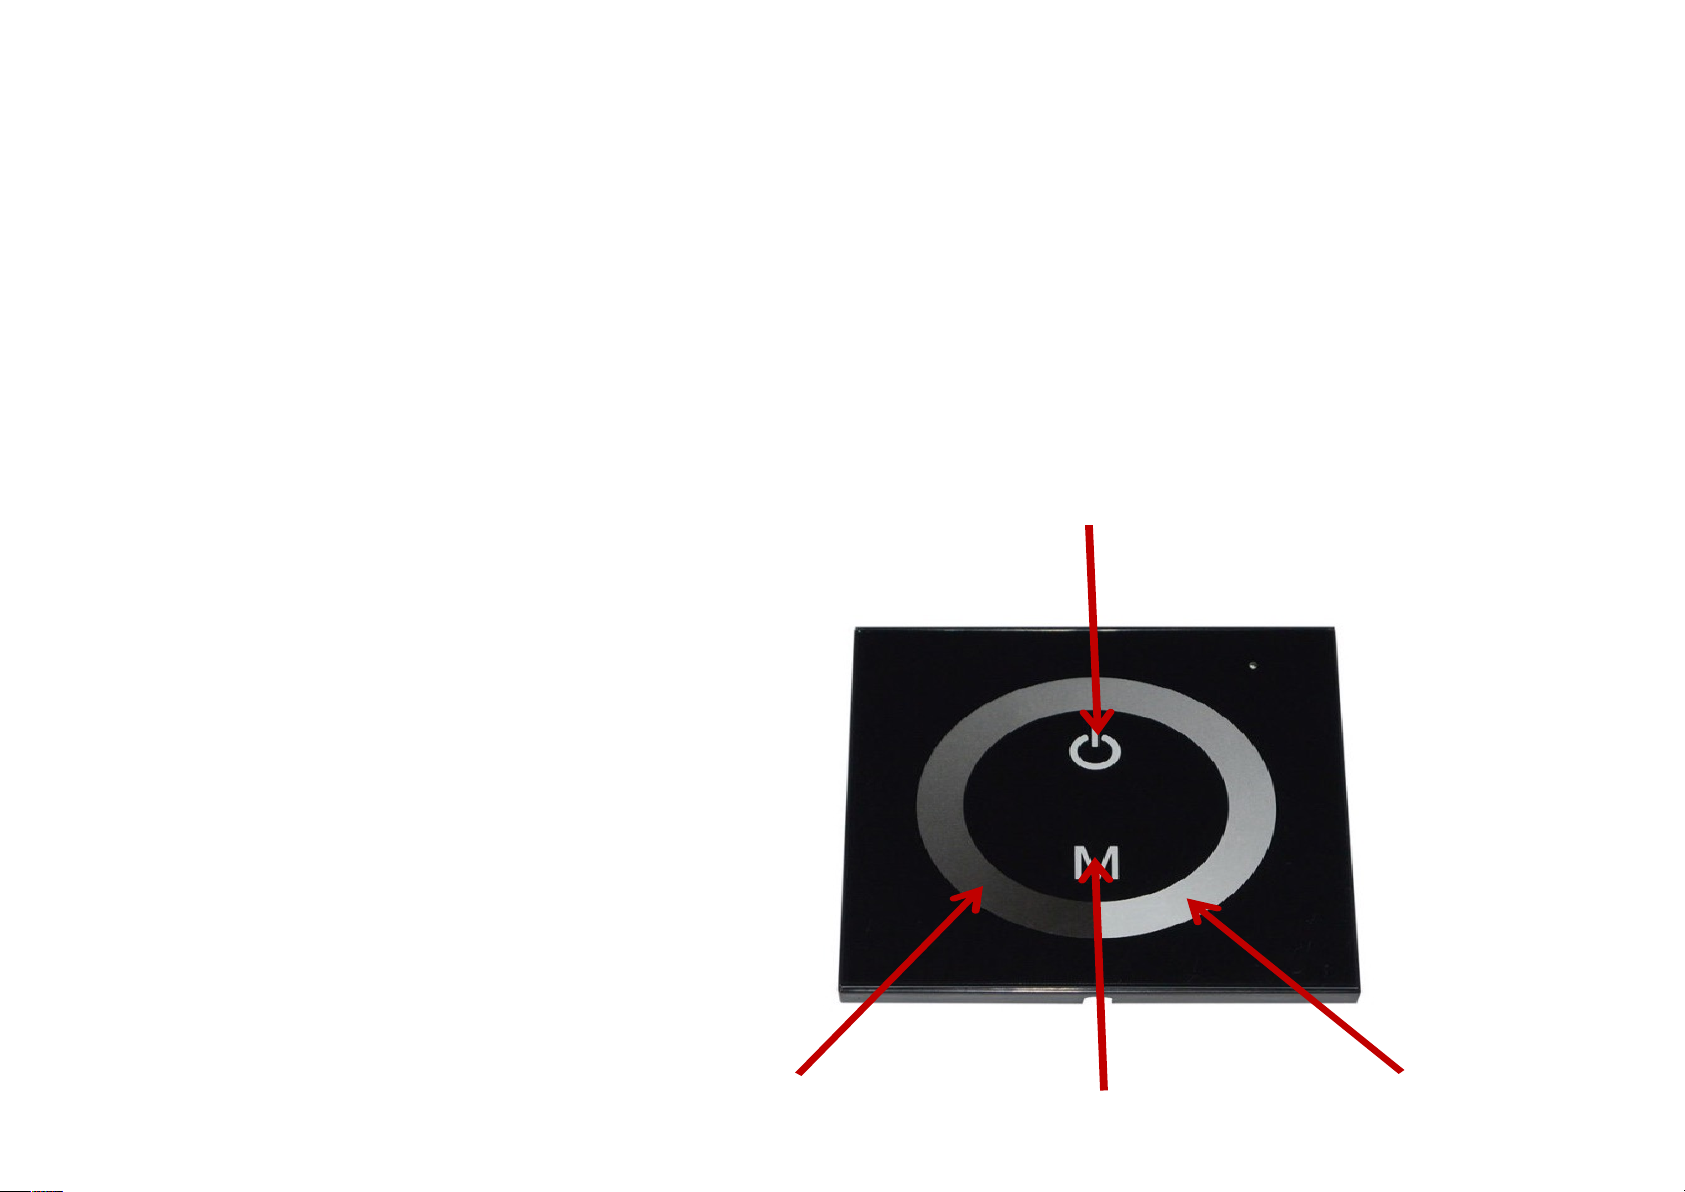
Mode
On/Off
Touch to Dim
Touch for full
brightness
White Touch panel
Page 31
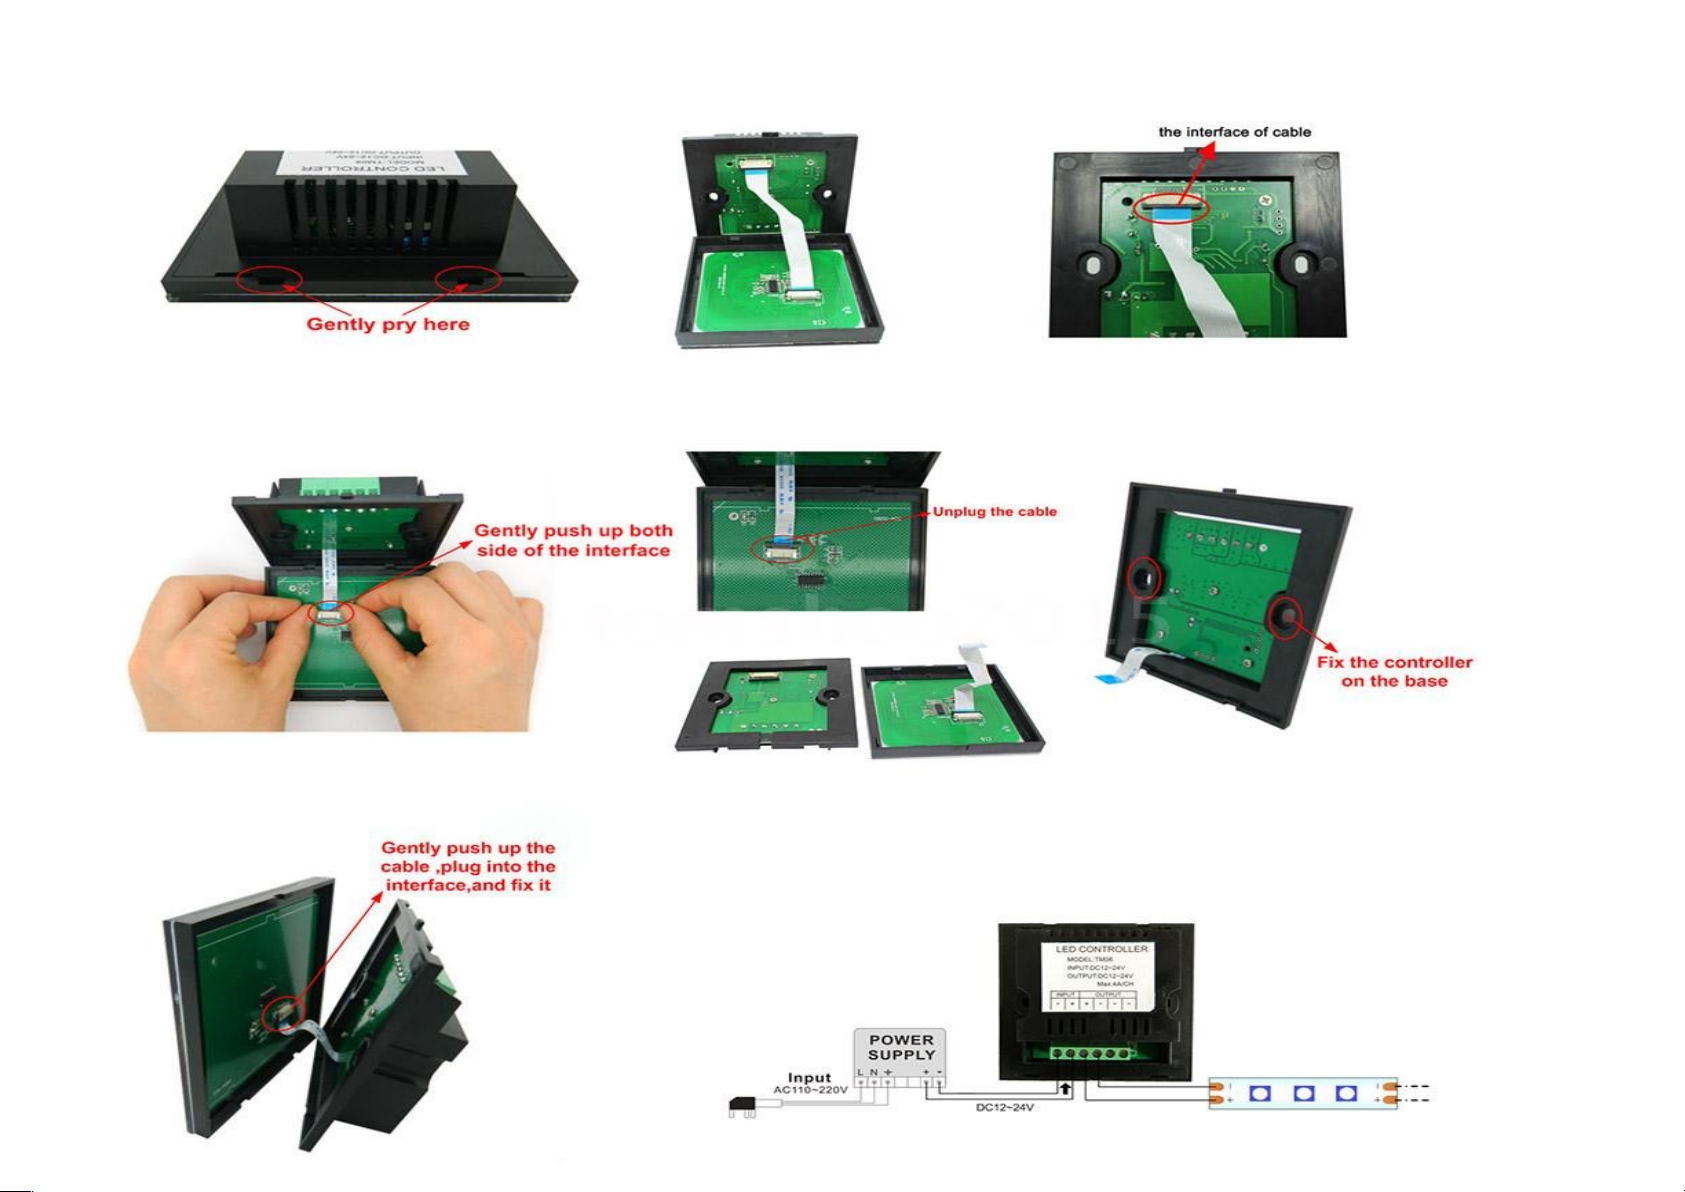
Tou ch pane l in stal la ti on
Page 32
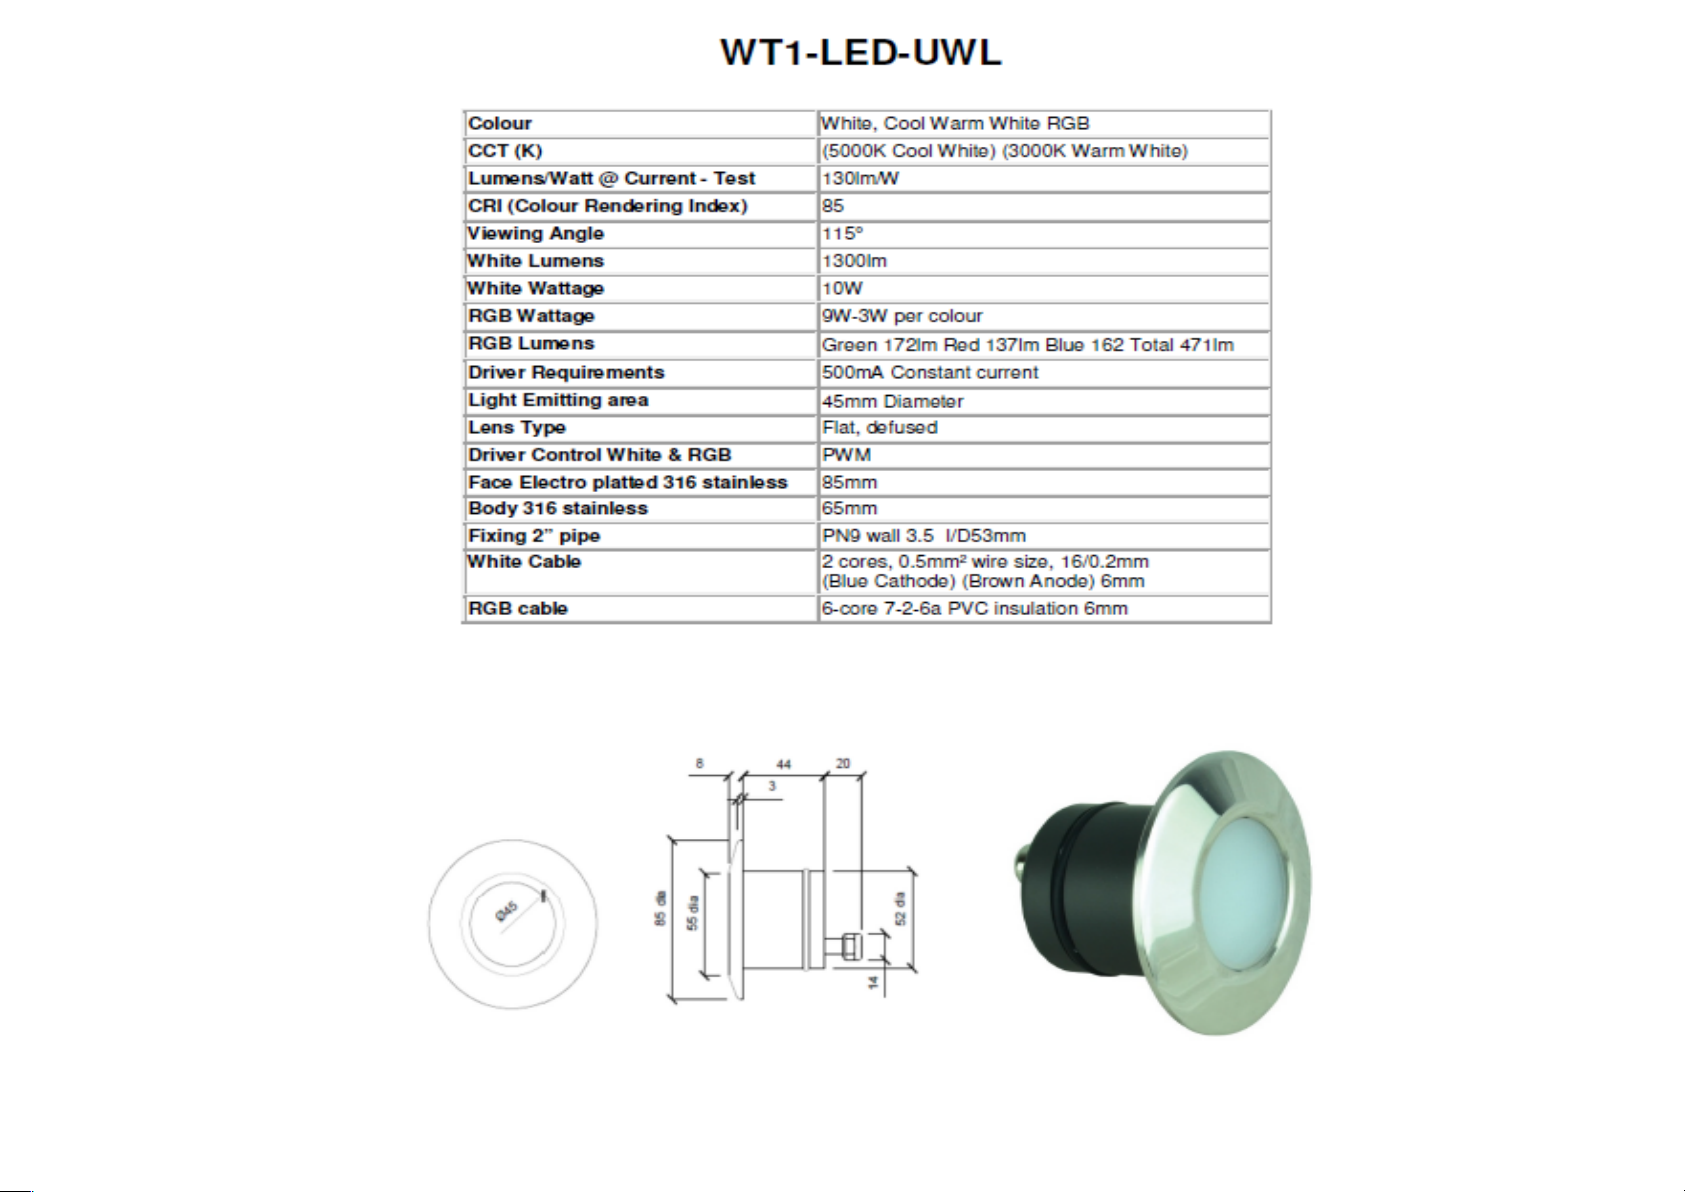
Page 33
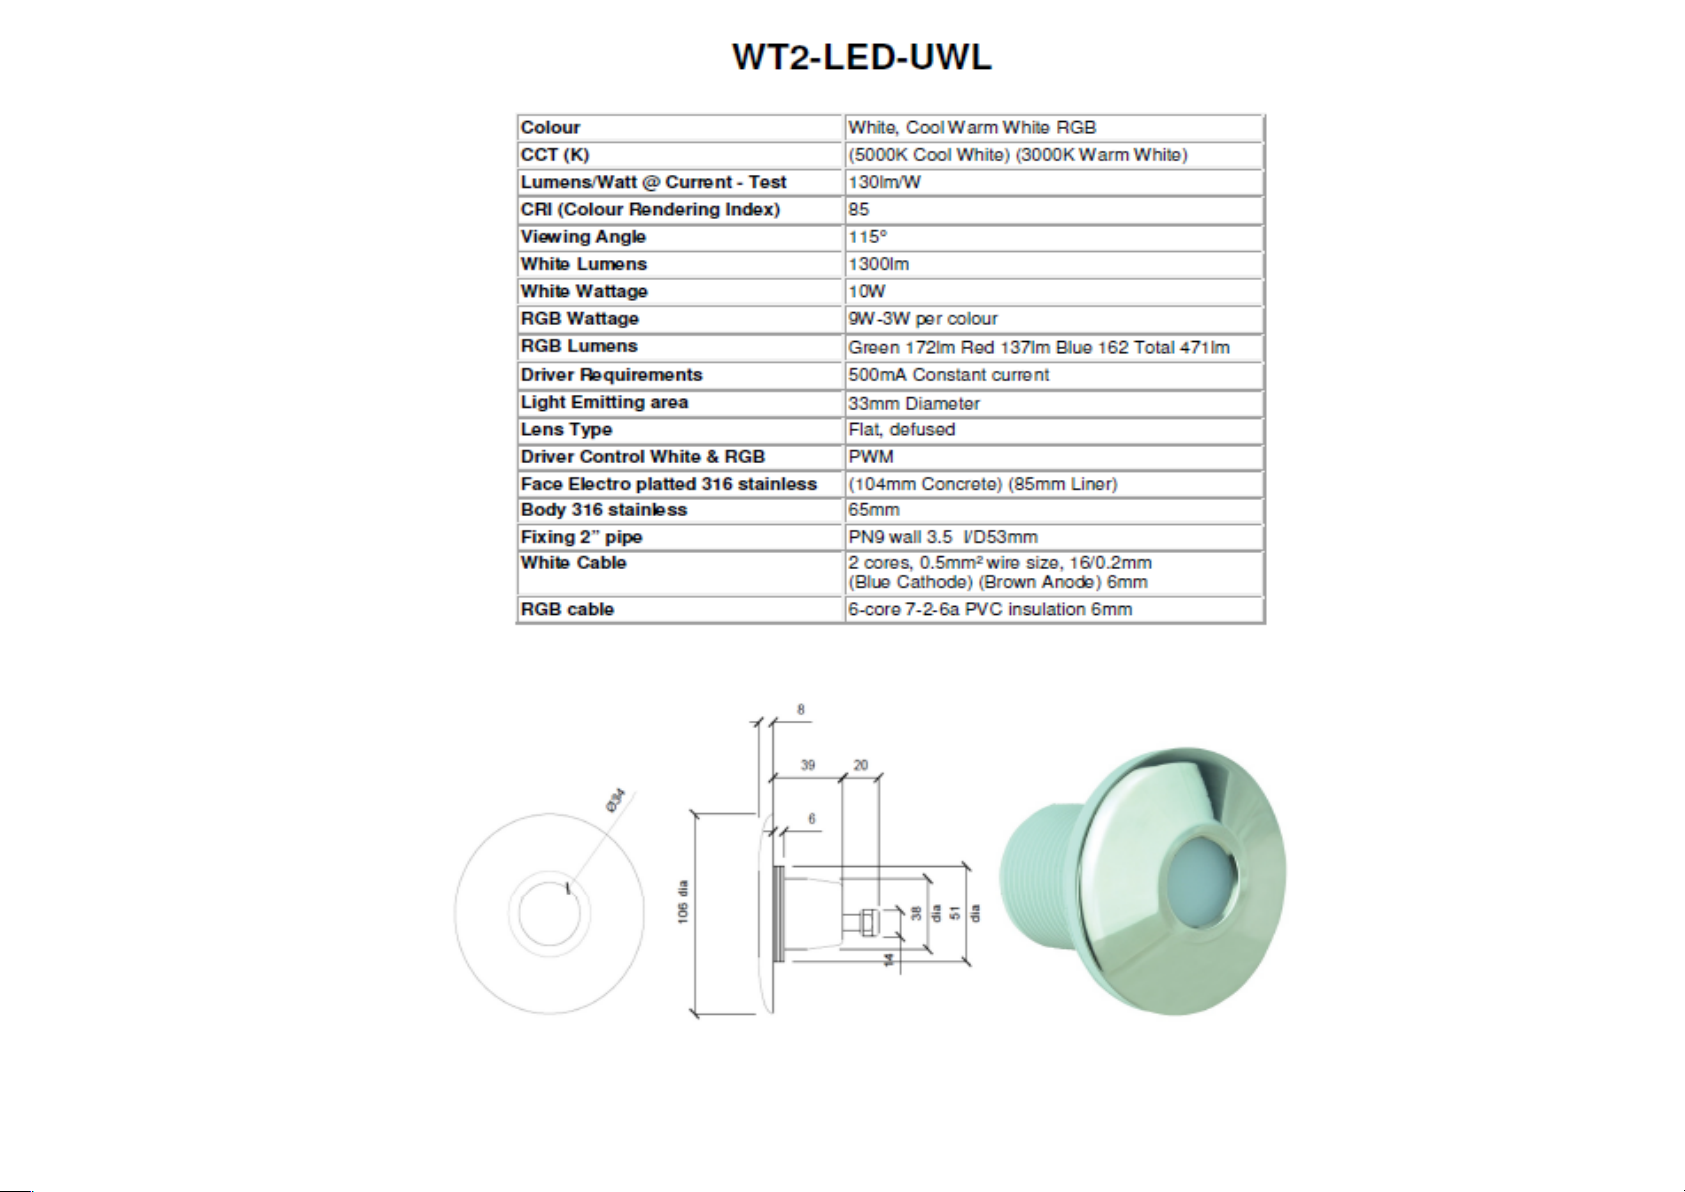
Page 34
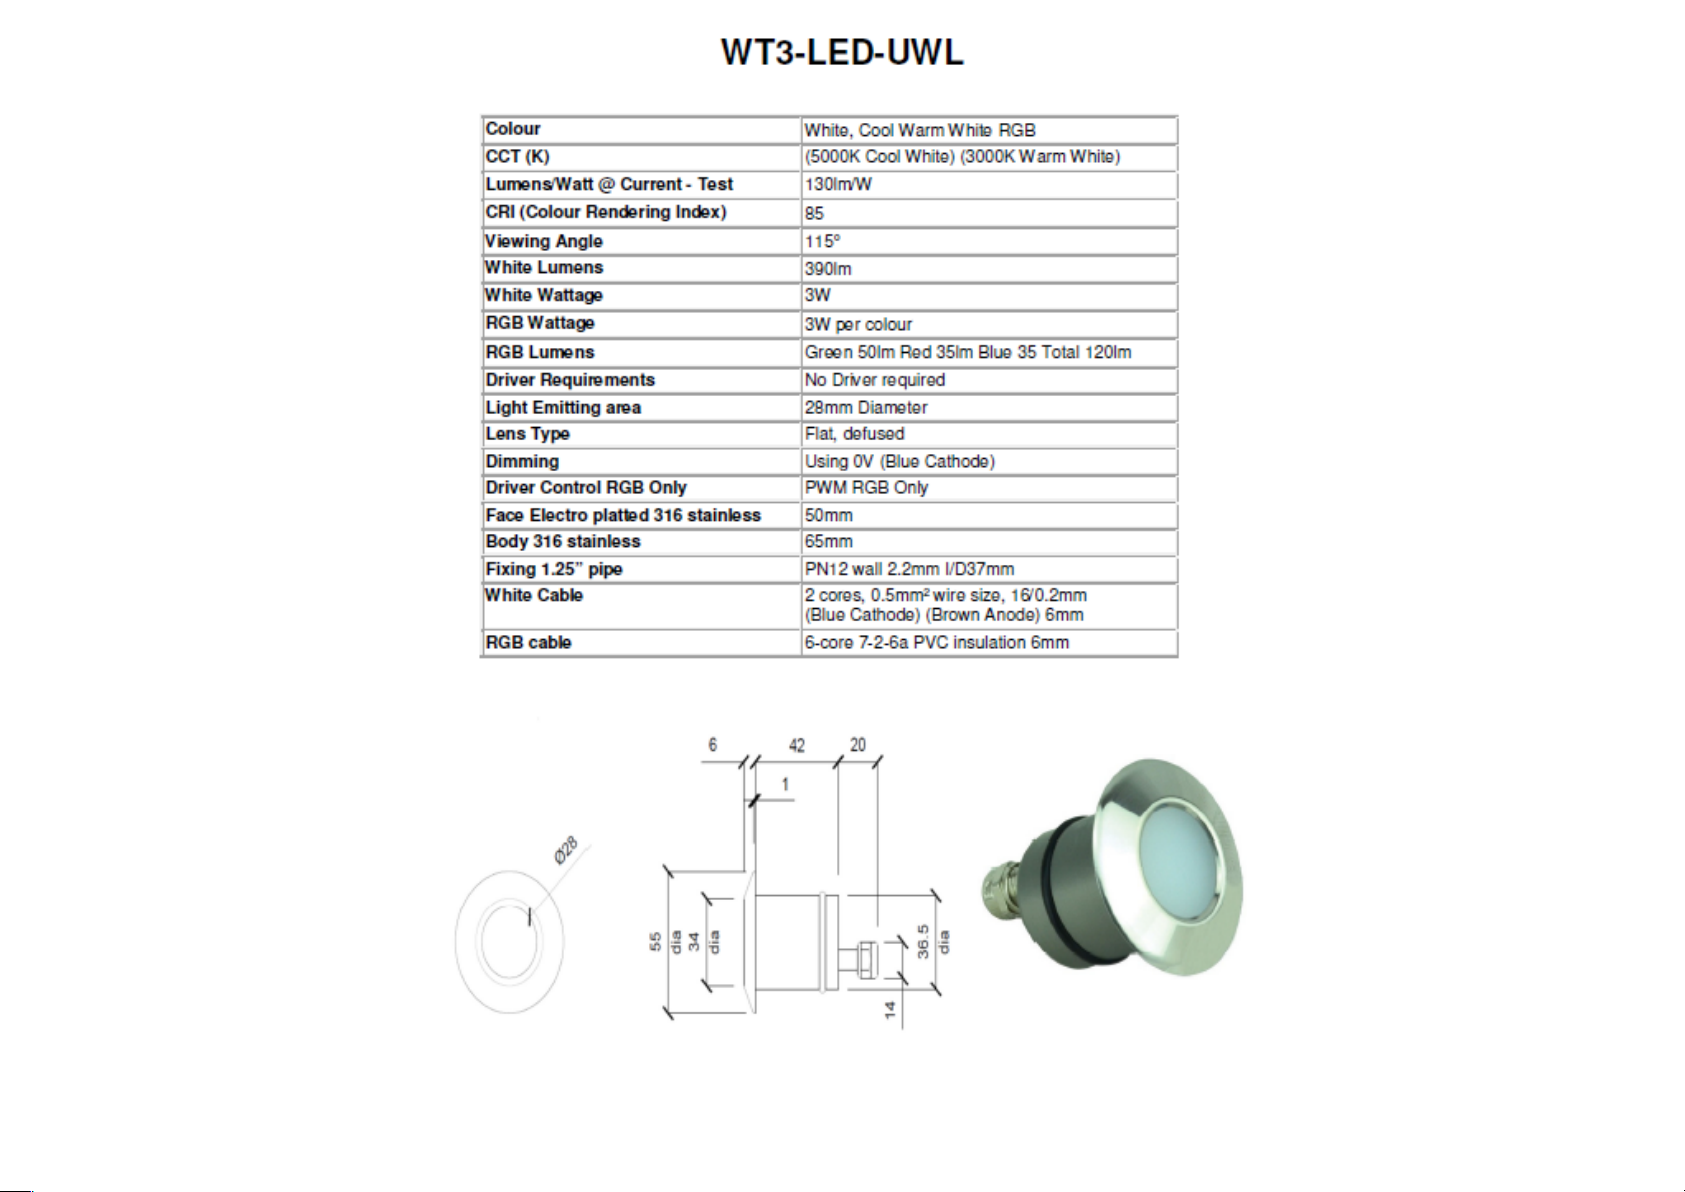
Page 35
Page 36
Page 37
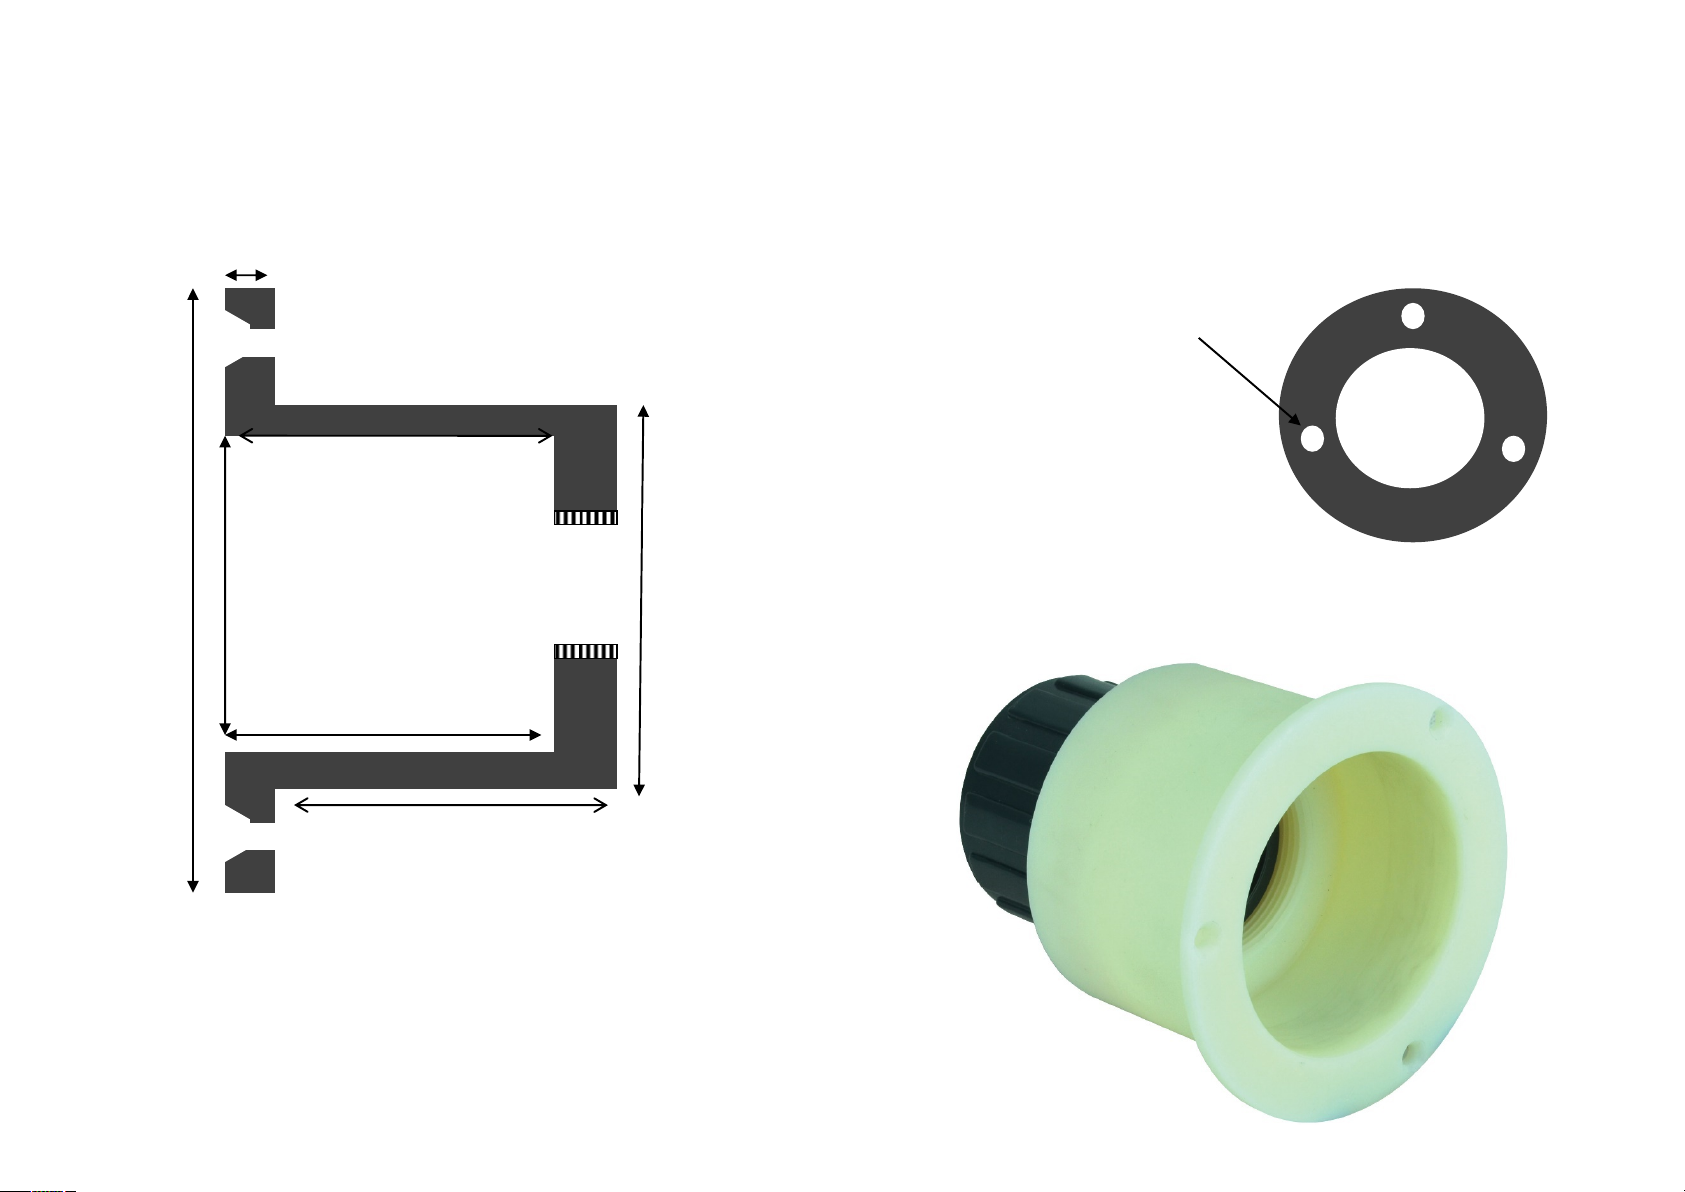
WT4-Niche
80mm
86mm
120mm
50mm
5mm
104mm
Front 3 x M6 counter
sunk holes
M6 Counter sunk holes
2” BSP thread
Page 38
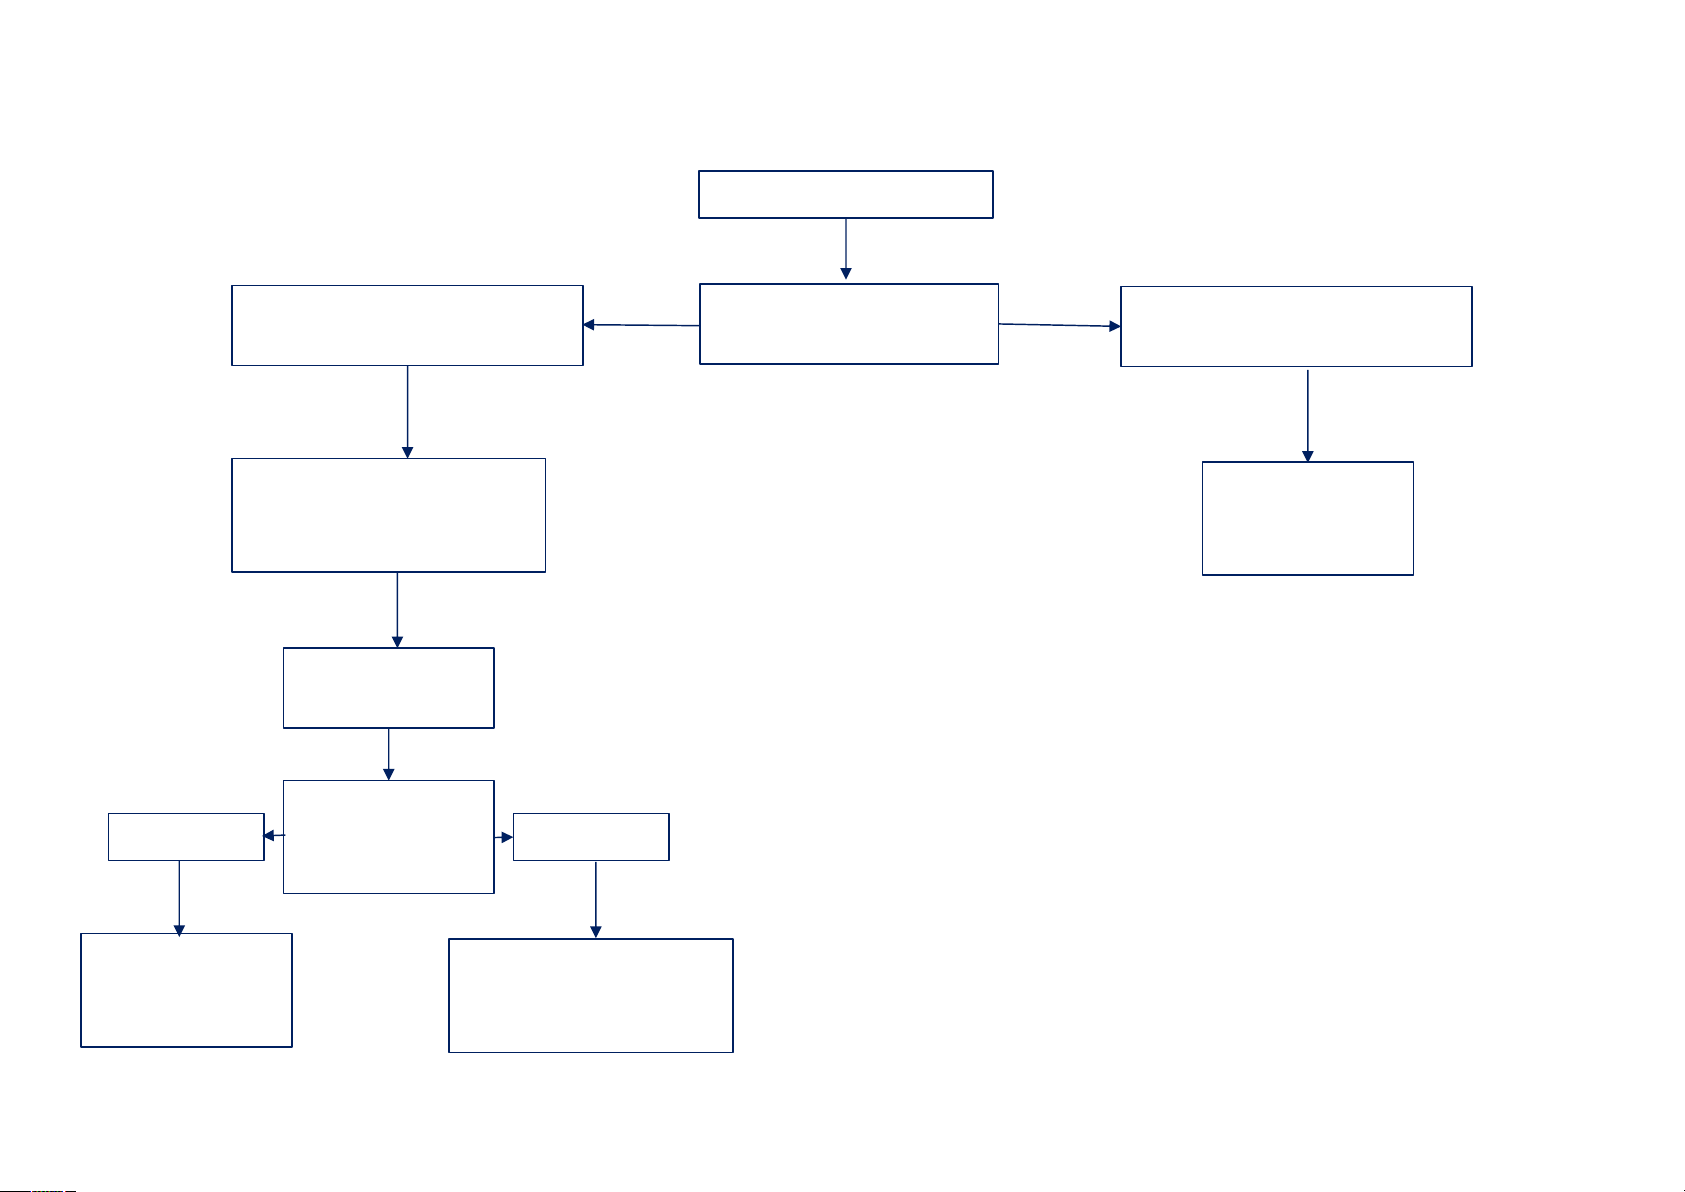
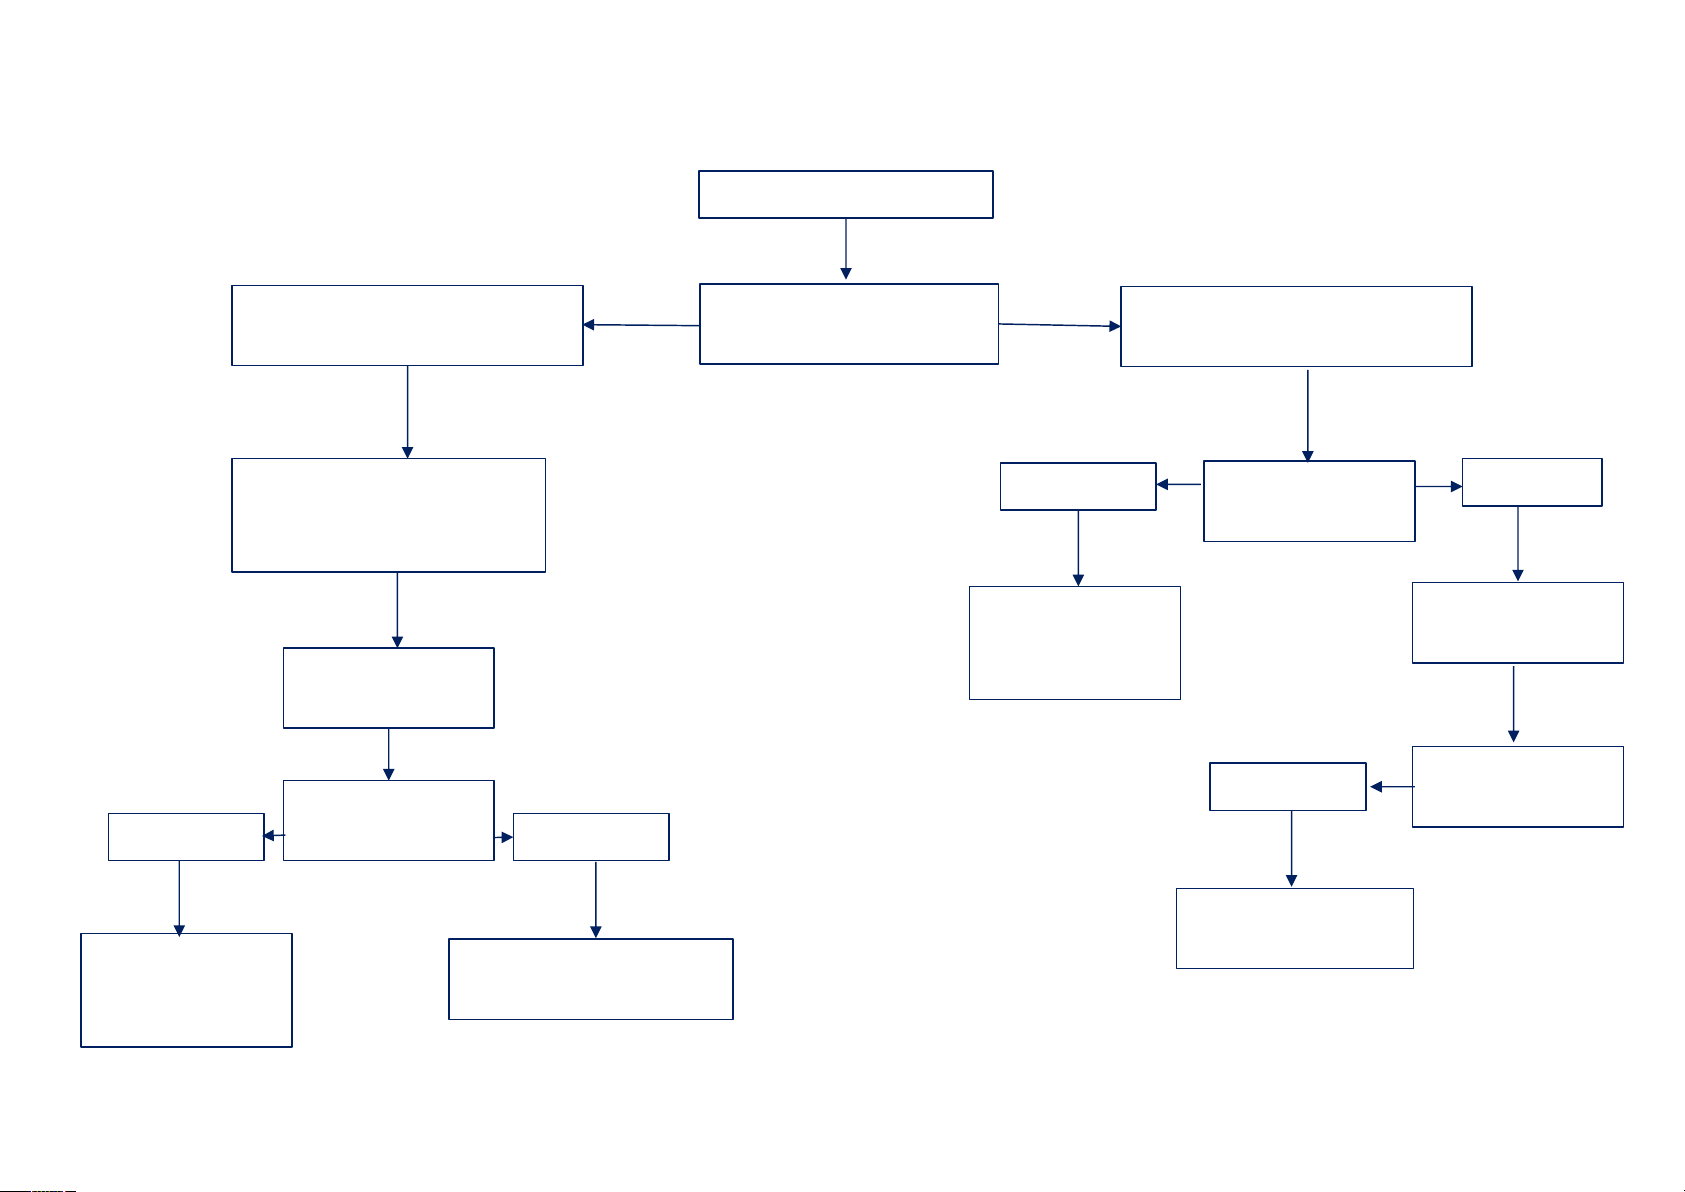
Trouble shooting White lights
Lights are not working
PSU showing the green light
and you have 24V DC Output
Check the PSU has
mains power
Check the +24V output
connections Blue 0V = V-
Brown + 24V = V+
Output
connection ok
Is the green
signal wire
being used
You hav e powe r bu t li ghts
are flashing
The PSU may
not be the
correct size
YesNo
Check the green
wire is
connected to 0V
Make sure the devise
you are using is
switched on
Page 39
Trouble shooting RGB lights
Lights are not working
WT1-2-3 are they correctly
wired in series
What lamps are you
using
Do you have any
colours missing
Te st t he w ir i ng us in g th e
RGB test switch
See page 33
Can not operate
the lamps
Do you have
WiFi connection
WT4-5 use one RGB driver
per lamp
Yes
No
Te st t he l amp
using the test
switch
Are the lamps in
sequence
YesNo
You mayb e to o
far away to get
connection
Make sure you are
using the correct App
Check the drives
are wired correctly
Do you have
WiFi connection
Yes
Page 40
RGB Test Switch.
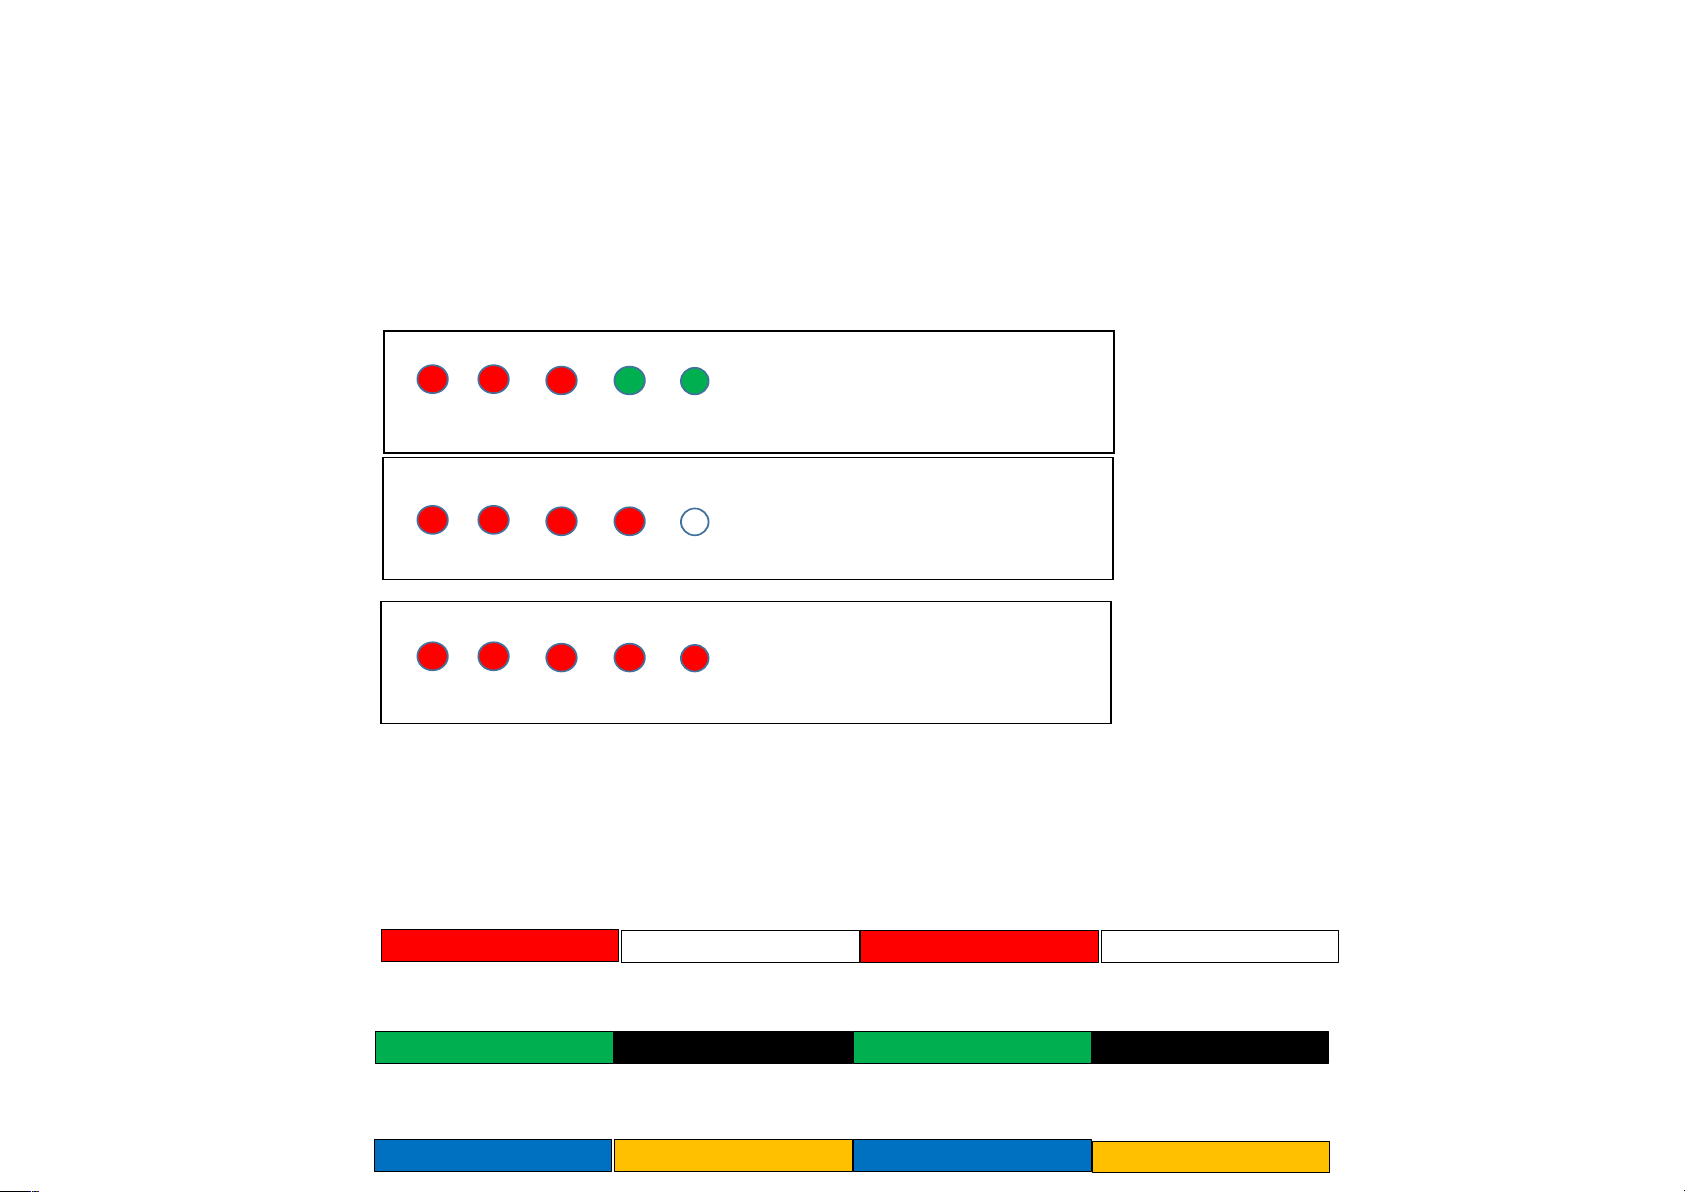
The RGB test switch is designed to test the wiring without subjecting the driver or LED lamp to incorrect
wiring and therefore leading to blowing the driver or lamp.
The prosses of wiring is the same as you would wire up the drivers, this is done in series following the
wiring diagram.
The RGB test switch is used in place of the driver to check that all the colours are in sink Before you
power up the drivers.
Trouble shooting
If the lamps are not correctly wired, then you can have a range of options.
Turn on the Red switch and you see this
Check the Green and blue Common are not swapped
Turn on the Red switch and you see this
Any one colour not working
Check lamp the cable wiring to the colour which is not working
Turn on the Red switch and only the reds work
Check the Blue and green wire at the end of the chain are connected correctly.
The above is a sample of what may occur if the lamps have been incorrectly wire, to sum up if you see a
missing colour then check the colour cable which is not working. If all the connections are correct, then
test the lamp on its own with the switch to make sure the lamp is functioning correctly
LED lamp in series
Red Line in series
Red line in series
Green Line in series
Blue Line in series
Red +
White -
Red
White -
Green +
Green -
Green +
Green -
Blue +
Blue -
Blue +
Blue -
Page 41

WT-Terms and conditions
Pool Care and maintenance.
You should avoid damage to the lamp by keeping the water at a neutral PH-value. Also the
water should be free from metal attacking ingredients to avoid discolouration any material
deposits on the lamp must be removed with a suitable non metallic cleaner.
The lamp must not come into contact with any metal effecting cleaners, or acids. Do not use
high pressure cleaners directly onto the lamp.
Installation
The Installation of the lamp must be carried out according to the instructions supplied. If any
modifications are made to the lamp, the manufacture is discharged from any liability. This
includes modifications to the cables; they should not be cut or re-joined. The cables are
supplied with the correct lengths specified. If any problems arise after installation by your
chosen installer and it is found that the fault was of poor installation the manufacture is
discharged from any liability.
The Company accepts no responsibility for any direct or indirect damage as a result, of poor
installation.
If the Buyer is overdue in payment for the goods or other goods supplied by the
Company, the Company may recover and sell the goods.
If you are not using the WT niche fitting, the manufactures is discharged from any liability.
The lamp is equipped with cable lengths requested; the installer must ensure suitable draw
wires are installed through the niche/pipe work and conduit.
Page 42

General
The installation depth should be between 500mm to 700mm. Sufficient cable should be
retained in the niche/pipe work to pull the lamp to the surface, and carry out any
repairs. The lamps O ring is not a water tight seal therefore we recommend a soft
sealant to be placed round the lip of the lamp prior to fitting.
If a lamp should fail then the replacement of an LED lamp should be carried out by a
qualified electrician.
WARRANTY AND LIABILITY
(a) Subject to the conditions set out below, the Company warrants that the goods will be
free from defects in material and workmanship for a period of 24 months from the date
of delivery and shall replace any goods which the Buyer proves to the satisfaction of the
Company to be faulty in accordance with this condition.
(b) The warranty given in paragraph (a) is subject to the following conditions.
(i) The Company shall be under no liability in respect of any defect arising from fair wear
and tear, wilful damage, negligence, abnormal working conditions, poor installation,
failure to follow the Company’s instructions, misuse or alteration or repair of the goods
without the Company’s written approval.
(ii) The Company shall be under no liability under the above warranty if the total price for
the goods has not been paid by the due date for payment.
(iii) The above warranty does not extend to parts, materials or equipment not
manufactured by the Company, in respect of which the Buyer shall only be entitled to
the benefit of any warranty or guarantee provided by the manufacturer thereof to the
Company.
(c) Subject as expressly provided in these conditions, all warranties, conditions or other
terms implied by statute or common law are expressly excluded to the extent permitted
by law.
(d) Except in respect of death or personal injury caused by the Company’s negligence
(or implied under the Consumer Safety Act 1987) the Company shall not be liable to the
Buyer by reason of any representation, implied warranty, condition or other term or
under the express terms of the contract for any consequential loss or damage (whether
for loss of profit or otherwise), costs, expenses or other claims for consequential
compensation whatsoever arising out of the supply of goods and the Company’s liability
for direct loss (otherwise than for death or personal injury) shall be limited to the value of
the invoice for the contract.
Page 43

WARRANTY AND LIABILITY
All our products are covered by your statutory rights, this warranty is in addition to
your statutory rights under either the Sale of Goods Act 1979 or the Supply of Goods
and Services Act 1982 .If you are unhappy with the service you receive from watertec.co.uk please contact us immediately in order that we can rectify the situation. We
will keep you informed of everything we are doing to correct the situation until the
problem has been resolved. This warranty covers a 24 month period from the date of
purchase. Conditions apply see below for details.
Warranty Disclaimer
• This warranty takes immediate effect from the date of purchase.
• Water-tec and MAS Electronics UK Ltd are not responsible for any items that have
been damaged due to misuse.
• We are not responsible for the installation of the items; installation must always be
carried out by a qualified electrician.
• General maintenance on the Lamps must be carried out at regular intervals, to
ensure the highest visibility. We do not take responsibility for any maintenance
issues.
• The water should be kept at a neutral Ph-value. The water should be free from
any metal attacking ingredients to avoid discolouration.
• Material deposits on the lamp must be removed with a suitable non metallic
cleaner.
• Items returned and are found to be damage by any misuse or incorrect fitting; the
manufactures are discharged from any liability. There will also be a charge to
replace the item.
• This is a water cooled device; therefore, the lamps should not be run dry for long
periods of time.
The warranty will be invalid if any modificat
 Loading...