

Water-Loo Portable Skid Toilet Operation Manual

Portable Skid Toilet
Patents Pending
Operations Manual
Revised 13 May 2005
STARTUP
Before using, turn on air compressor in the control
cabinet (shown on page 6) and fill water tank (page 3).
Flush a few times until water completely fills the system
(twice usually does the job). Flush by pushing and
momentarily holding the flush button at the rear of the
stool. Toilet is ready for use.
ABOUT THIS OPERATION MANUAL
The purpose of this manual is to familiarize you with how
FCM’s portable toilet system operates. This manual
contains information for the proper operation and
maintenance of the following:
Air Line Components
Microflush Air Operated Toilets
On-Board Sewage Treatment Systems
Chlorinators and Chlorine
Water Tank
Satellite “Blue Room”
To get familiar with this easy to use toilet system simply
page through this manual and read the instructions with
the accompanying photographs.
HOW THE MICROPHOR SYSTEM OPERATES
AIRLINE COMPONENTS FUNCTIONS
The Air Filter-Regulator (left bowl) removes moisture and
dirt from the air line to the toilet to prevent damage.
Regulator is preset to 60-65 psi of pressure.
screw is located on the top of the oiler. Turning
clockwise decreases the amount of oil, and counterclockwise increases the amount of oil.
NOTE: Make sure the air supply is shut off before the
air line lubricator is opened to fill with oil.
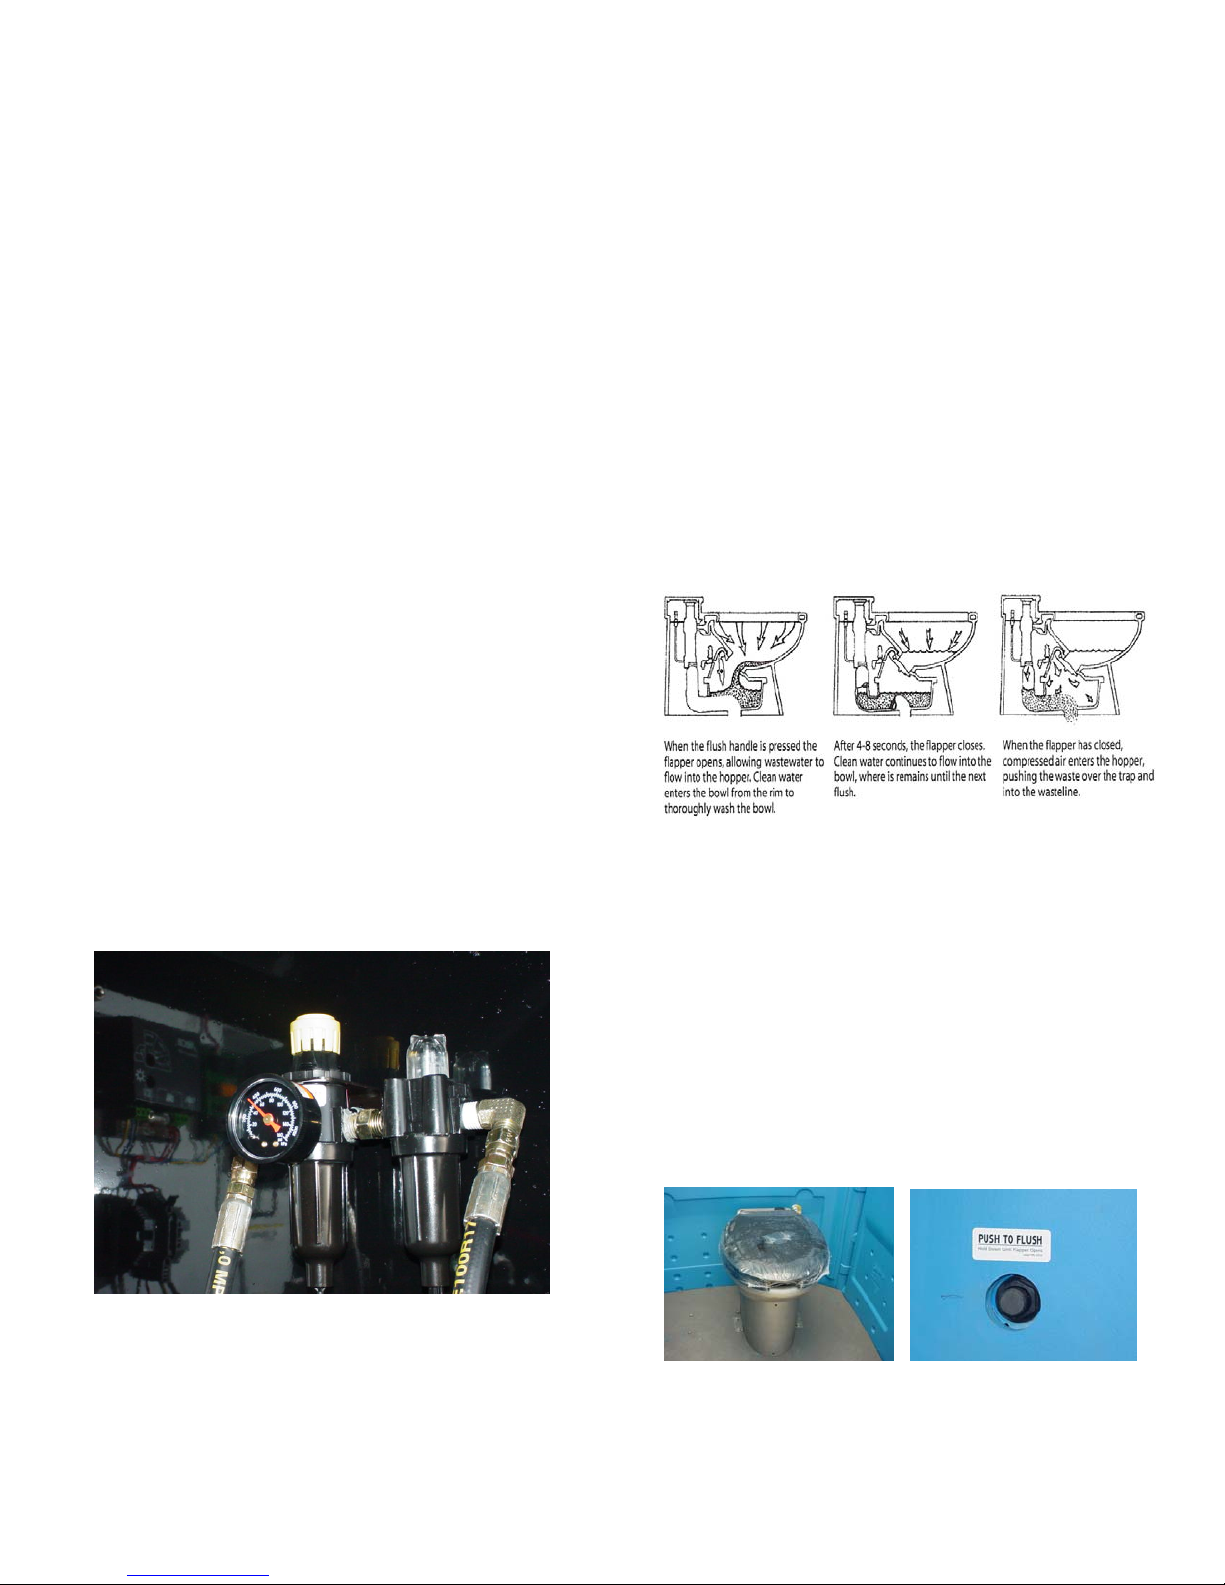
TOILET FUNCTION
Human waste enters the Microphor Air Operated Toilet.
When the toilet is flushed, the flapper at the bottom of
the bowel opens allowing the effluent (waste water) to
enter the hopper below. At the same time fresh water
from the rim washes the bowl. After about six seconds
the flapper closes and fresh water fills the bowl. At the
same time compressed air enters the hopper and
pushes the influent through the waste line into the
Treatment Tank.
TOILET REQUIREMENTS
Air: Supply compressed air at 60-65 psi at the
toilet.
Water: Gravity fed
Flush Activator: Toilet mounted at the rear.
Some units may have an optional remote
mounted flush activator button.
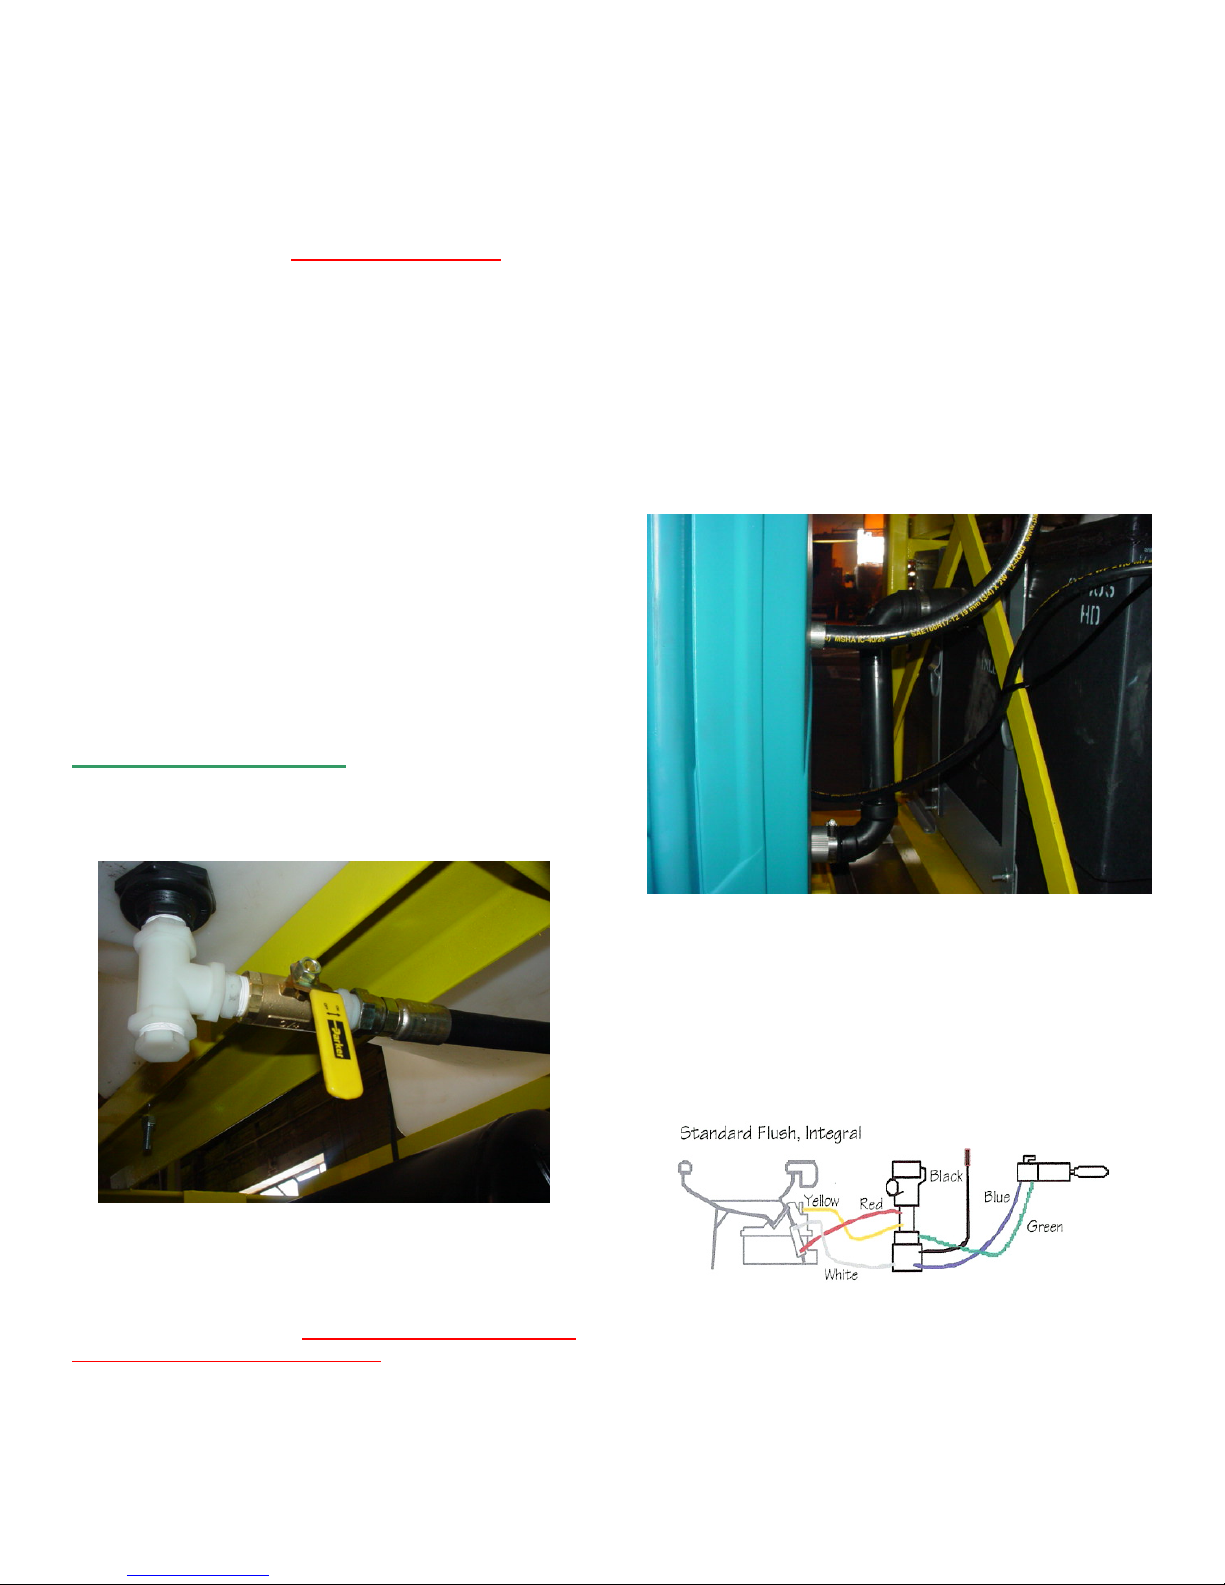
Air/Water Valve: The air and water (A/W)
sequence valve is the air controlled valve that
operates the toilet. The valve is mounted at the
rear of the toilet stool where the water line
enters the stool.
The Air Line Lubricator (right bowl) adds a small amount
of lubricant to the air system to help lubricate the moving
components of the toilet. Use a silicone based air tool
oil for best protection. A check should be made
periodically to determine if there is enough oil to
lubricate the toilet parts. The oiler should be adjusted to
add one drop of oil per flush. The slotted adjustment
Stainless Steel Stool Remote mounted flush activator
2
CLEANING the TOILET
Use Microphor’s Micro-Clean Organic Spray
Cleaner, P/N 24542 or equivalent.
NOTE: Sanitizers like Lysol, Pine-Sol, Hezol or
Ammonia base products
sanitizers when flushed into the treatment tank can stop
the biological action. Never use any anti-bacterial
product in the Microphor System.
WINTERIZING the TOILET
If the toilet system is taken out of service during freezing
conditions and propylene glycol has not be added to the
water supply, turn off water line to toilet, drain water
tank, flush toilet until no more water flows into bowl.
Flush once more to clear ejection chamber under toilet.
To reactivate: fill water tank, turn on water line and flush
toilet. When outside temperatures are consistently
above freezing use water only without any additives.
USING the TOILET in FREEZING CONDITIONS
For freeze protection during freezing conditions add
food grade propylene glycol to water supply. A 30%
mix protects to about 12˚F and a 60% mix protects to
about minus 40˚F. Food grade propylene glycol is
available through chemical dealers everywhere.
should never be used. These
UNPLUGGING the TOILET
The system can only decompose human waste and
tissue. Heavy paper towels will not decompose and will
eventually clog the passages in the treatment tank. If
the toilet becomes plugged, a standard plunger can be
used to help unplug the unit. If the toilet is plugged, shut
off the water supply and disconnect the air supply.
Press the flush button several times to bleed off the air
pressure. When air pressure is out of the valve, the
flapper in the bottom of the toilet can be pushed open.
Use the plunger as with any standard toilet. If this does
not clear the toilet the waste line to the treatment tank
may be plugged. To clear the waste line remove flexible
junction just outside toilet cabana and clear with a wire
or flush with a stream of water.
Water shut-off valve and tank drain
Note: Never use ethylene glycol based products in
place of the propylene glycol. The alcohol based
products will shut down the bacteria action when flushed
into the treatment tank.
RV water systems cannot be used.
Products advertised to protect
Waste line and water supply line
TOILET AIR LINE COLOR CODE
TROUBLESHOOTING the A/W SEQUENCE VALVE
3

(Microphor #39014 bare or #95008 valve w/fittings)
If the A/W sequence valve becomes erratic the following
trouble shooting action can be taken:
A. Flush Button Sticks: If the flush button becomes
sticky and does not press down and return
freely, apply silicone lubricant directly onto the
shaft, press up and down until free.
B. Flapper Stays Open and Will Not Close: clean or
replace Bleed-Off Plug, Lubricate Air Cylinder
Rod.
C. Flapper will open and close rapidly, not allowing
unit to go through full cycle:
1. Check for air leaks
2. Hole in Bleed Plug could be oversized
due to wear or damage, replace plug.
3. Check valve in bottom cap of A/W is
malfunctioning:
a. Remove hoses attached to bottom of
valve (#1 & #2).
b. Unscrew bottom (#6) from valve.
c. Using a 7/16 nut driver, remove spring
retainer nut (#3) from inside of bottom
cap. Do not lose spring (#4) when
removing small check valve with rubber
O-ring (#5).
d. Clean all parts – blow out air passages
in bottom cap and needle before
reassembly.
e. Re-assemble in reverse order of above.
Note: these are Microphor part numbers
TREATMENT TANK FUNCTION
In the treatment tank, solid waste and toilet paper is
broken down by bacteria into liquid and gas. The gas
escapes out the tank vent. The liquid then flows through
the filters to the bottom of the treatment tank, then into
the chlorinator. Microphor recommends adding a cup of
Micro Culture monthly to insure proper operation.
TOILET HOPPER and COMPONENTS
Shown left to right to left are the following components:
Top Row:
1. Hopper Top w/Flapper, P/N 90040
2. Hopper, bottom only, P/N 90041
3. Hopper, complete, P/N 90039 (does not include
air cylinder)
4. Crank Assembly only, P/N 90042
5. Air Cylinder, P/N 94560
6. Flapper Assembly only, P/N 90048
7. Hopper O-Ring Seal, P/N 27270
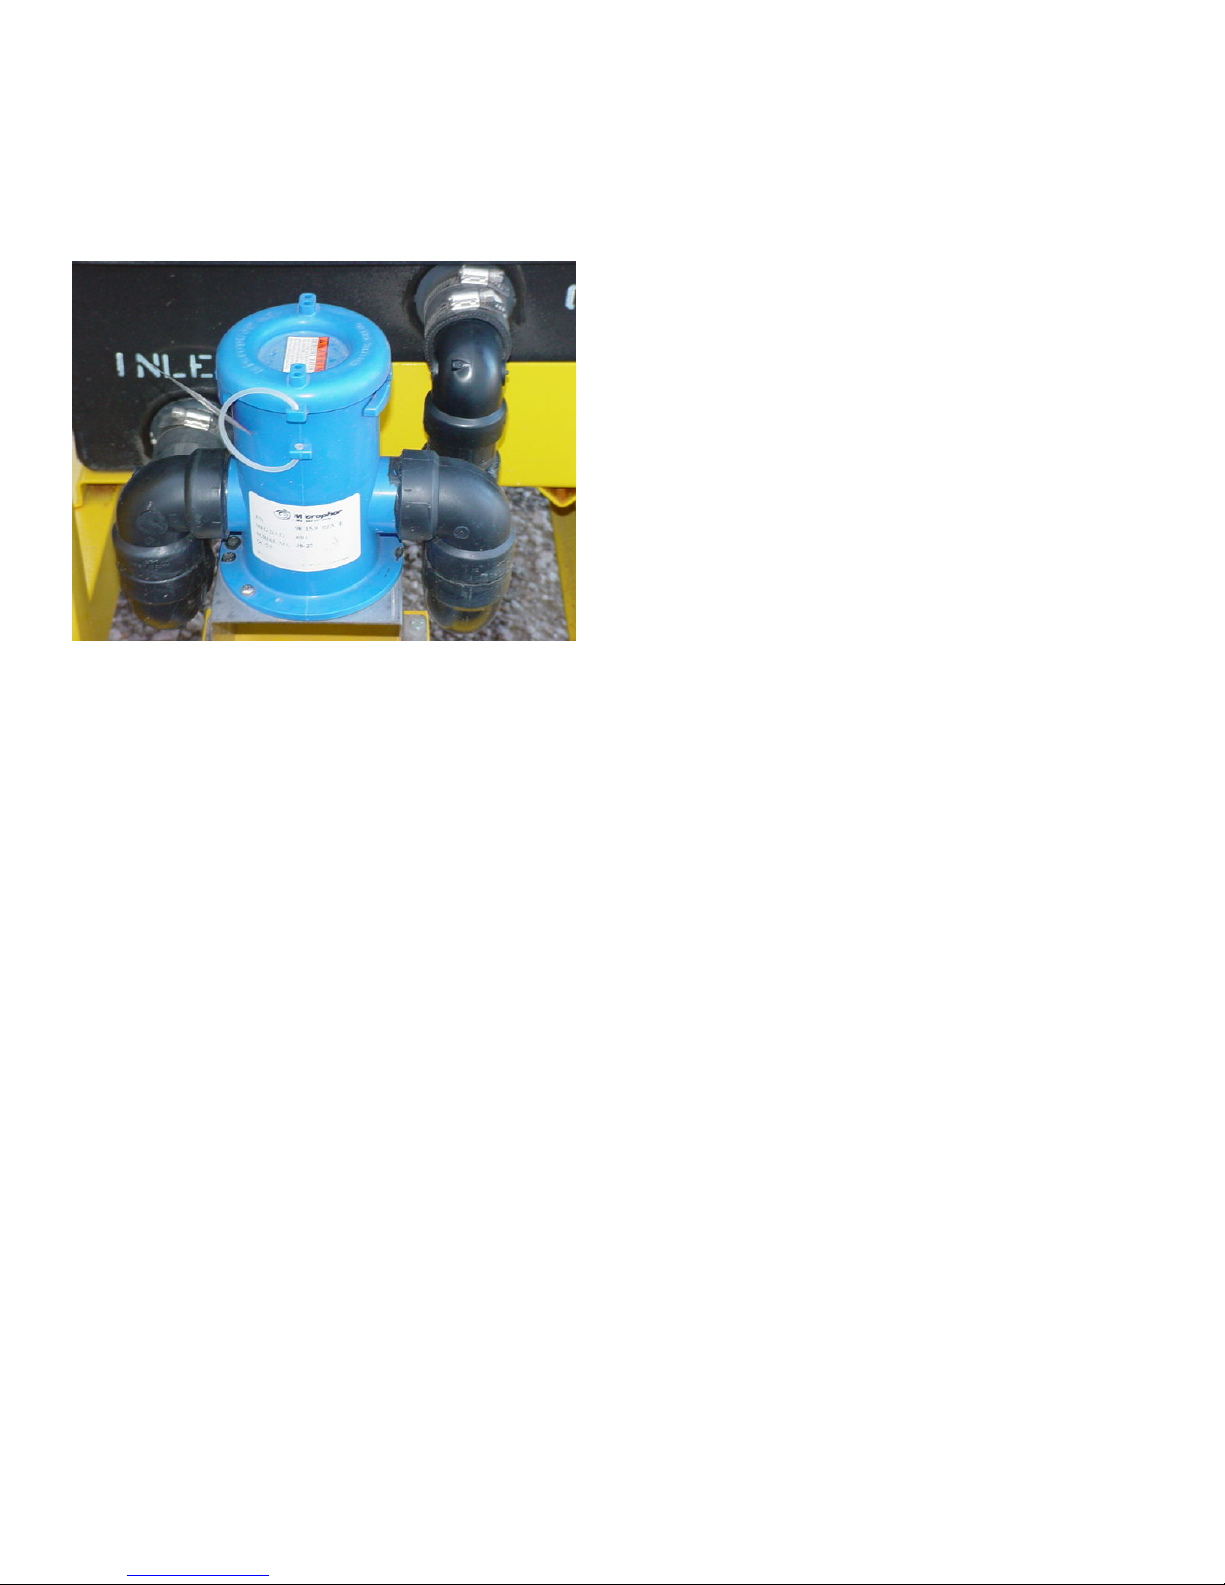
TREATMENT TANK VENT
The vent in the treatment tank is a key part of the
Microphor treatment process. The vent allows oxygen
into the tank and also allows co
2
gas out of the tank.
This exchange is critical to the decomposition process.
Treatment Tank Vent
4
CHLORINATOR
In the Microphor process, the effluent from the treatment
tank flows through the chlorinator which is to be kept full
of chlorine slugs. The chlorinator is located on the side
of the treatment tank.
Chlorinator
The chlorinator should be filled as full as possible with
chlorine slugs while making a tight seal. Consumption of
chlorine is dependent upon frequency of use of the
system. Use product similar or equal to Microphor
Chlorinating Slugs (P/N 94135). Lubricate chlorinator lid
O-Ring before replacement.
CHLORINATOR FILLING INSTRUCTIONS –
Maintenance and Safety Procedure
1. Microphor recommends using rubber gloves and
goggles or a face shield. High ambient heat can
cause higher levels of chlorine vapor and may
require the use of a respirator, depending on
ventilation at chlorinator. (Refer to Material
Safety Data Sheet [MSDS] )
2. Inspect chlorinator for chlorine slugs by pressing
downward on cap while turning counter-
clockwise ¼ turn and then lift cap off very slowly.
If water is seen coming out around the cap,
replace cap immediately. Rectify blockage in
outlet of system.
3. If chlorinator is full of slugs, replace cap by
placing on the chlorinator body and, while
pressing down, turn clockwise until locking lugs
on cap engage chlorinator and it is sealed.
4. If slugs must be added, make sure any residual
chlorine at bottom is not blocking opening on
lower portion of chlorinator. If residual chlorine
is caked, carefully probe with a screwdriver or
similar tool to break up.
5. Add slugs until chlorinator is full. Lay slugs flat,
one on top of another, not on their edges. Refill
as much as possible with slugs, but do not
overfill, as this will put undue pressure on cap
and possibly cause damage or packing of slugs.
6. The chlorinator unit is designed to hold slugs
and seal off chlorine odors. Inspect the unit
carefully to make sure rubber cap seal or o-ring
on chlorinator body is in place and is lubricated
with silicone lubricant only. Inspect hoses,
clamps, etc. to make sure they are tight and in
good condition.
7. Chlorine is highly corrosive, causes skin and eye
damage, is irritating to nose and throat and may
be fatal if swallowed. Avoid breathing dust or
vapor.
8. ENVIRONMENTAL HAZARDS: Chlorine is toxic
to fish. Do Not dispose into lakes, ponds,
streams, estuaries, oceans or public waters
unless this product is identified and addressed in
a NPDES Permit. For guidance, contact the
regional office of the EPA.
9. PHYSICAL and CHEMICAL HAZARDS: Strong
oxidizing agent! Mix only with water. Do Not add
this product to any dispensing device containing
remnants of any other product. Such use may
cause violent reaction leading to fire or
explosion.
10. STORAGE and DISPOSAL: Keep this product
dry in a tightly closed container when not in use.
Store in a cool, dry, well ventilated area away
from heat or open flame. Shelf life is one year
from manufacturing date. Refer to MSDS for
disposal.
11. PRACTICAL TREATMENT (First Aid):
Eye/Skin Contact – Flush with plenty of water
for at least 15 minutes, while removing
contaminated clothing and shoes. For eye
contact seek immediate medical attention. If skin
irritation occurs, seek medical attention.
Inhalation – Relocate to fresh air. If signs of
irritation or discomfort occur, take immediately to
a hospital or physician. Swallowing – If
conscious, drink large quantities of water. Do
Not induce vomiting. Take immediately to a
hospital or physician. If vomiting occurs,
administer additional water. If unconscious or in
convulsions, take immediately to a hospital.
5
 Loading...