

Waterite VECTAPURE 360 Installation And Owner's Manual
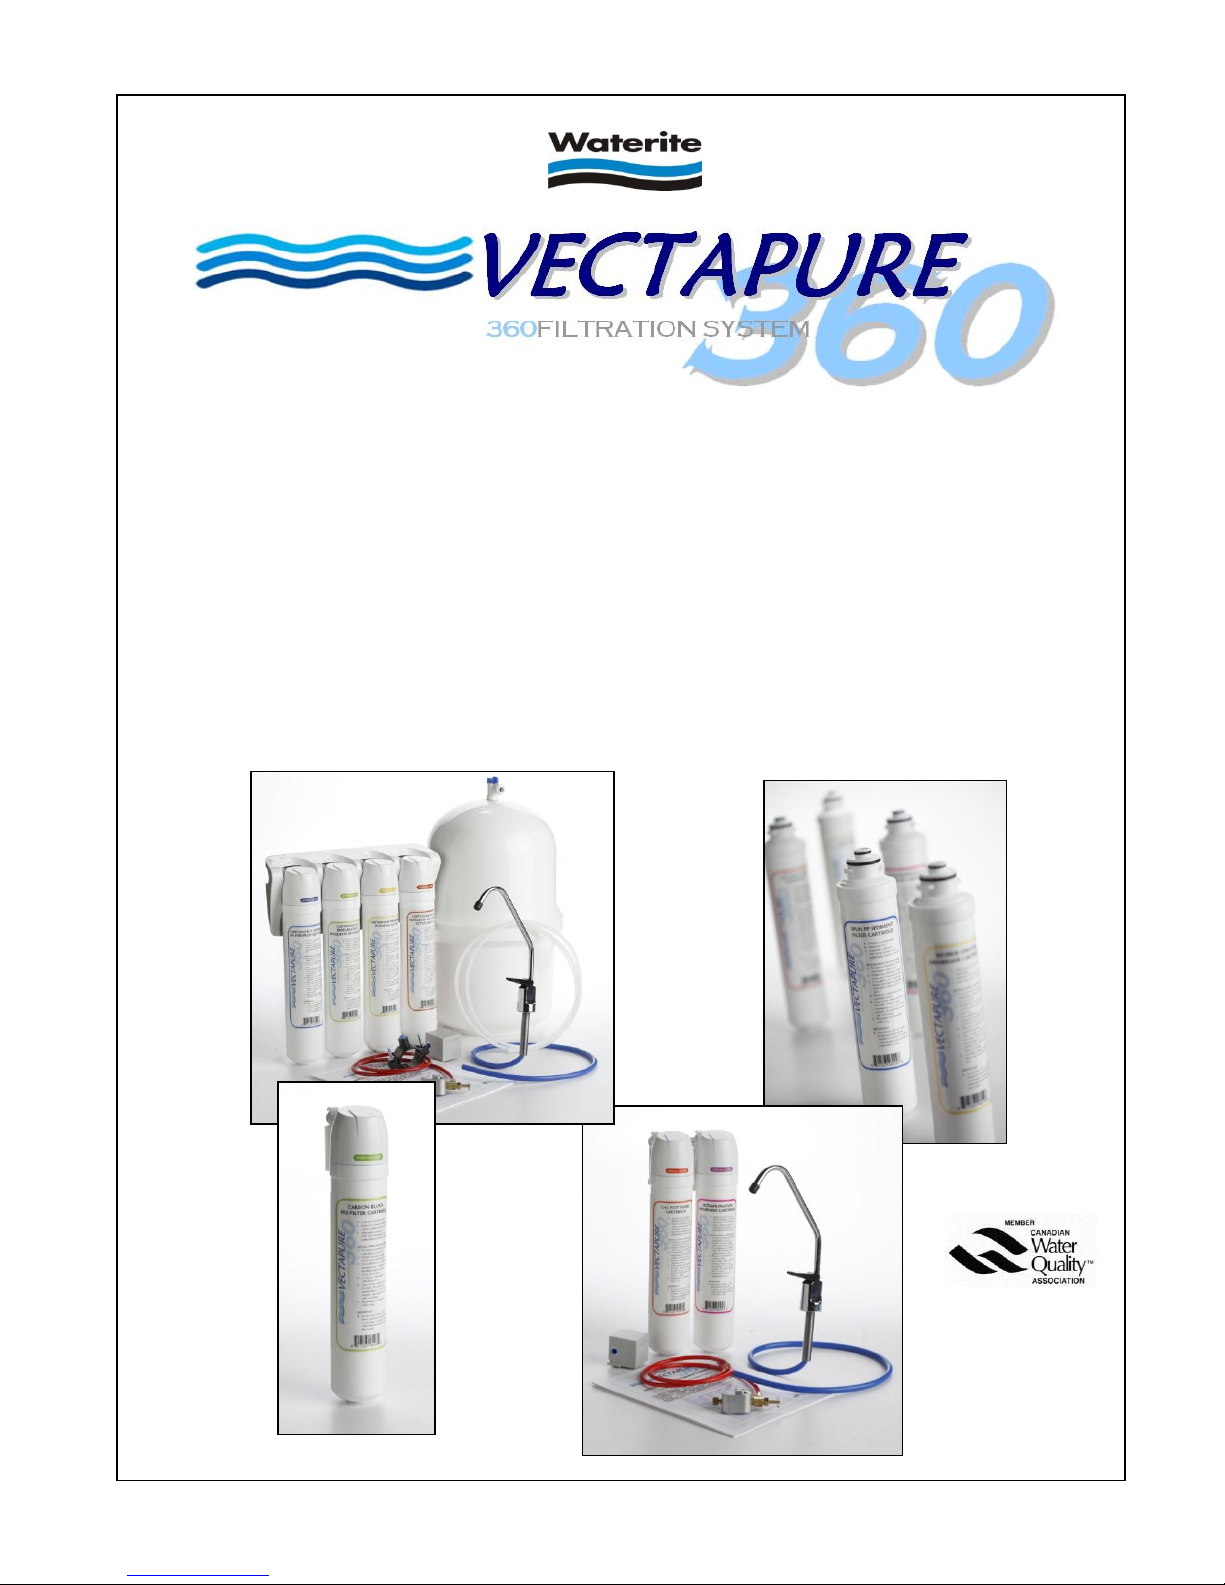
INSTALLATION AND OWNER’S MANUAL
For
VECTAPURE 360
™ Drinking Water Systems
THIS MANUAL IS TO BE LEFT WITH THE OWNER OF THE EQUIPMENT FOR
REFERENCE PURPOSES AND TECHNICAL GUIDANCE. IT IS STRONGLY
RECOMMENDED THAT QUALIFIED DEALER SERVICE PERSONNEL BE
CONTACTED IN THE EVENT OF AN UNKNOWN INTERRUPTION OF SERVICE OR
APPARENT PRODUCT MALFUNCTION. AN ANNUAL PREVENTATIVE
MAINTENANCE INSPECTION BY A WATER PROFESSIONAL IS RECOMMENDED TO
ENSURE TROUBLE-FREE AND CONTINUOUS OPERATION.
R2

2
Congratulations!
You have purchased the finest residential drinking water
system available for your home. It will provide you years of
reliable service if properly installed, operated and maintained.
Please read this entire manual before attempting installation
and operation.
Section 1. Frequently Asked Questions
Before getting started, take the time to familiarize yourself with your new Waterite
VECTAPURE 360
system by reading some FAQs listed below. Call us or ask your dealer if
you have any other questions about your system’s operation.
Q: How does your
VECTAPURE 360
™ Drinking Water System differ from an ordinary water
filter?
Ordinary water filters use a cartridge or membrane contained in a sump or housing to filter your
drinking water. Cartridge or membrane changes require housing wrenches and manual insertion
of the cartridges into the housings.
VECTAPURE 360
systems use a convenient quarter-turn
bayonet style cartridge that may be easily changed without any system disassembly. Your system
will deliver pure, bottled water quality water to a faucet conveniently located at your kitchen sink or
any other designated area.
Q: What is a membrane and how does it work?
An ultrafiltration (UF) membrane element consists of hollow capillaries or filaments, bundled
together and packed in a plastic tube. Each capillary has tiny pores that will allow water to pass to
its interior. As the raw water passes across the surface of the filaments, only clean water is
allowed to pass through and collect in the filaments and continue on in the system, while sediment
and other contaminants are rejected and retained by the cartridge. A reverse osmosis (RO)
membrane is a semi-permanent synthetic film that is spiral wound and separates raw water from
product water (permeate). Water containing dissolved contaminants and salts is forced though the
membrane by water pressure, with pure water being collected in the storage tank and rejected
contaminants flushed to waste.
Q: What processes does the
VECTAPURE 360
systems use?
VECTAPURE 360
™ systems use combinations of 5 types of treatment to produce your drinking
water. 5-micron polypropylene (PP) particle filters remove dirt, rust and other sediment. Activated
carbon cartridges (granular carbon in GAC and moulded briquettes in CBC) remove chlorine,
colour, taste, odours and other contaminants. UF membranes are used to reduce very fine
suspended particles, bacteria, cysts and viruses, in combination with PP and CBC cartridges. RO
membranes will reduce concentrations of dissolved ions in the water by up to 99.9%.
Q: Will membranes remove minerals and salts from the water?
Reverse Osmosis (RO) membranes will remove up to 99.9% of common salts in solution. UF
does not remove minerals from the product water, leaving calcium and other naturally occurring
minerals normally found in spring water to remain in your drinking water.
Q: Does membrane filtration remove bacteria? Cryptosporidium? Viruses?
3
Yes. RO and UF membranes will eliminate most bacteria, viruses and parasites such as
Cryptosporidium from the water. However, where these conditions exist, pre-filters and other
system components located before the membrane will become contaminated from exposure to
them. Cross contamination of the entire system may occur when the membrane or filters are
changed or disturbed.
!
VECTAPURE 360
™ DRINKING WATER SYSTEMS ARE DESIGNED ONLY TO IMPROVE
AESTHETIC PROPERTIES AND IS NOT DESIGNED TO ACT AS A PRIMARY BARRIER TO
WATERBORNE MICROBIOLOGICAL OR TOXIC CHEMICAL CONTAMINATION. WHERE
THESE CONDITIONS MAY EXIST CONSULT A WATER PROFESSIONAL TO ENSURE
SUFFICIENT RAW WATER PRE-TREATMENT AND DISINFECTION.
Q: Where is the system installed?
Typically, the system is installed under the kitchen sink. This will be handy for most homeowners,
for
VECTAPURE 360
™ systems are compact and take up very little space. Some homeowners or
installers prefer the basement or crawlspace, as this conserves storage in the kitchen and may
allow for easier access to the system for maintenance purposes. If you install the system more
that 20’ from your faucet, you may need a booster pump to ensure adequate pressure at the
faucet. Your dealer can provide you with this optional equipment.
Q: Can the
VECTAPURE 360
™ system be connected to an extra faucet?
Yes. Many installations may include an optional ¼” tee and line to connect refrigerator icemakers
or additional sink faucets. See your dealer for advice and parts.
Q: How much water does the
VECTAPURE 360
™ system produce?
A
VECTAPURE 360
RO system will nominally produce 75 US gallons (285 litres) of product water
per day. This output will be affected by system pressure, concentration of dissolved salts in the
raw water, raw water temperature and other localized factors. Normally, you can expect the
system to produce 7 or 8 litres of water per hour.
VECTAPURE 360
™ UF systems and inline
filtration systems operate continuously and will produce about 3 to 5 litres of drinking water per
minute. No storage tank is required.
Q: What is the standard warranty with
VECTAPURE 360
™ systems?
Every
VECTAPURE 360
™ system comes with a standard one-year limited warranty on all parts
and repair labour. A detailed warranty card is included with the unit. You may purchase an
extended consumer warranty if you wish - see the enclosed Extended Warranty Program
information sheet and enrolment form included in your package. Call your dealer or go to
www.waterite.com to apply. Normal filter cartridge replacement is excluded from your warranty.
Q: What is the cartridge replacement schedule for a
VECTAPURE 360
™ system?
A good rule of thumb is to replace filter cartridges (red, green and blue cartridges) every three to
six months. Dependent upon local water conditions, your UF membrane (violet cartridge) should
have a life expectancy of 6 months to a year. More severe water conditions (iron, hardness or the
presence of polyphosphate additives to municipal water) may shorten this life significantly. RO
membranes (yellow cartridge) have a life usually ranging from one year to as much as five to
seven years, dependent upon local water conditions. Falling UF system flow rates or slow storage
tank refill rates on RO systems are indicators that the membrane requires replacement.
4
Section 2. Unpacking and Installation
Your system includes:
The V360 filtration unit assembly with colour-coded cartridge(s). Depending on the model,
you will have a single, dual or triple UF filtration unit or a four-stage RO unit. The
cartridge(s) have been pre-inserted into the filter body.
Also included with Dual Filter and Triple Filter UF systems and 4 -Stage RO systems:
One cold water supply adapter;
One low-lead (stainless is optional), long reach faucet and related mounting hardware
including threaded push-on tube adapter and tube stiffener insert;
Three (3) #10 X1” wall mounting screws;
One only 1-meter length (clear) of tube for connecting the filtration system to the faucet;
One Owner’s package including owner’s manual, warranty certificate, Extended Warranty
Plan enrolment form, Waterite Parts Program enrolment form.
Also included with 4-Stage RO System:
An RO water storage tank;
One storage tank valve (included in RO hardware kit);
One only 1-meter length (clear) of tube for connecting RO system to the storage tank;
One drain pipe saddle (included in RO hardware kit);
The waste water drain tube has been factory attached to the RO membrane.
One preassembled blue coded 90 elbow with Drain Line Flow Control (DLFC) built in a the
base of the yellow (RO membrane) cartridge.
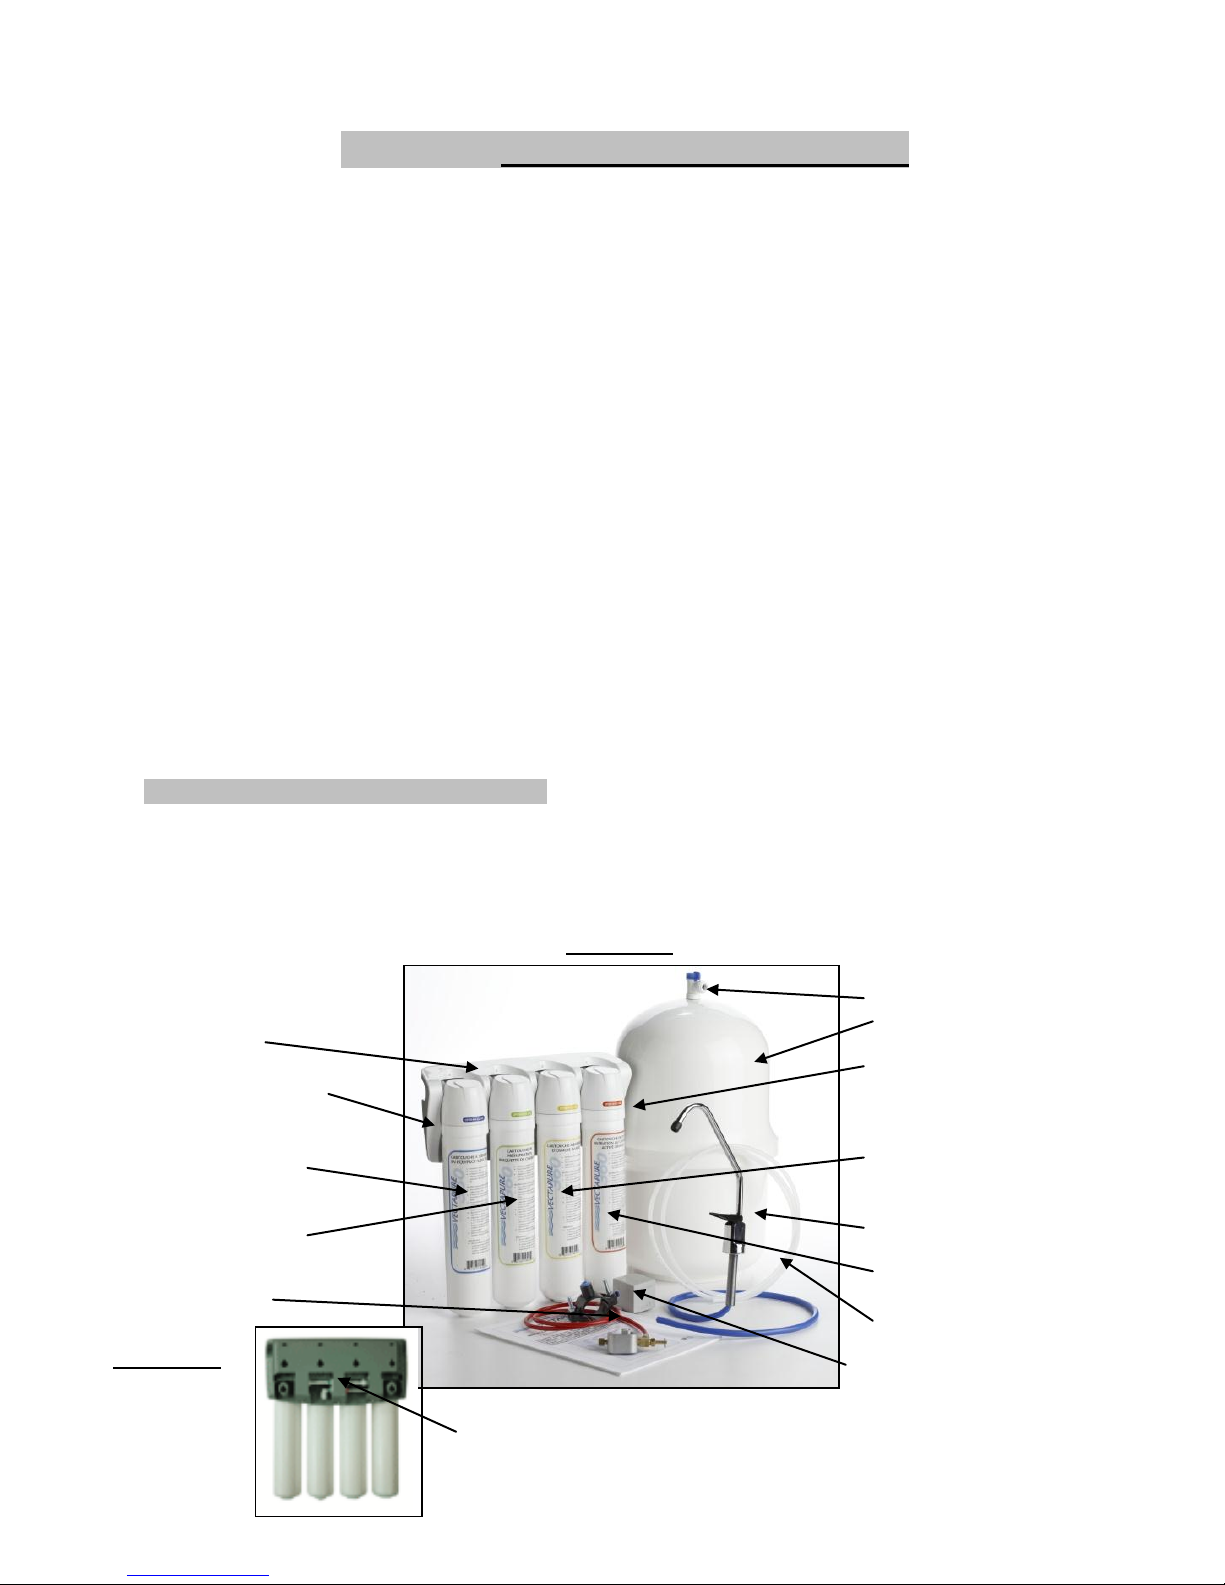
Step 1. Selecting the System Location
1. Your V360 filtration system is designed for installation under a sink. It can however, be
mounted anywhere within 20 feet of the faucet, such as the basement or adjoining utility
room. Keep in mind that filter cartridges will need periodic replacement and that easy
access must be maintained. Do not install in a location with high humidity, heat or direct
sun.
Figure 1A.
Storage tank valve (RO only)
Storage tank (RO system only)
Mounting bracket
Push-on outlet to faucet
Push-on cold water inlet
PP Sediment cartridge RO membrane (yellow)
(blue) UF membrane (violet)
Carbon block cartridge Faucet
(green)
Granular carbon cartridge (red)
Water supply adapter
PE tube
Drain pipe saddle (RO only)
V360 four-stage RO shown above
Figure 1B.
Push-on storage tank connection (RO system only)

5
Keep in mind that you may install a tube tee on the line to the faucet to connect icemakers
or other faucets to the system. If you locate your system farther than 20 feet from the
faucet, you will need to add a pressure booster pump to your system. See your dealer for
parts and details.
Step 2. Getting Ready
1. Clear working area. Unpack all components and check for visual damage. Ensure all
listed components are included.
2. Inspect the cold water supply line and the condition of the pipe. The water supply adapter
included is intended to be installed between the supply valve and the faucet connector,
under the kitchen sink. If the cold water supply valve is not available at the installation
location, you will need to consult your plumber or plumbing supply store to purchase an
appropriate cold water connection.
3. You will need the following tools: An electric drill, a 5/8” drill bit, a 1/8” drill bit, a pencil, a
small adjustable (crescent) wrench, a sharp knife (X-Acto type knife is best), adjustable
pliers, a Phillips-head screwdriver, a rat-tail file, a center punch. V360 RO installers will
also need a ¼” drill bit. Always wear eye protection when using an electric drill.
Step 3. Install the Cold Water Supply Faucet Adapter
1. Turn OFF the COLD water supply valve to your kitchen faucet.
2. Turn ON the COLD water on your kitchen faucet to release all the pressure, and completely
drain the cold water until the water flow stops.
3. Place some towels underneath the cold water supply valve and then disconnect the faucet
supply tube from the cold water supply valve.
4. Wrap male threads on both cold water supply valve and the water supply adapter 4 to 5
times with plumber’s (Teflon) tape.
5. Install the water supply adapter on the cold water supply valve. Do not over-tighten.
6. Install the faucet supply tube to the water supply adapter.
7. Connect the white ¼” tube to the water supply adapter by inserting the tube firmly and
pushing until the tube end contacts the stop. Gently tug the tube backwards to assure a
secure connection. In the same way, connect the other end of the tube to the RO system
water inlet.
8. Keep the COLD water supply valve OFF until the RO system installation has been
completed; turn the COLD water supply valve ON and check for leaks around the water
supply adapter. Tighten, reseal or reinstall if necessary.
 Loading...