

Page 1
MADE IN FRANCE
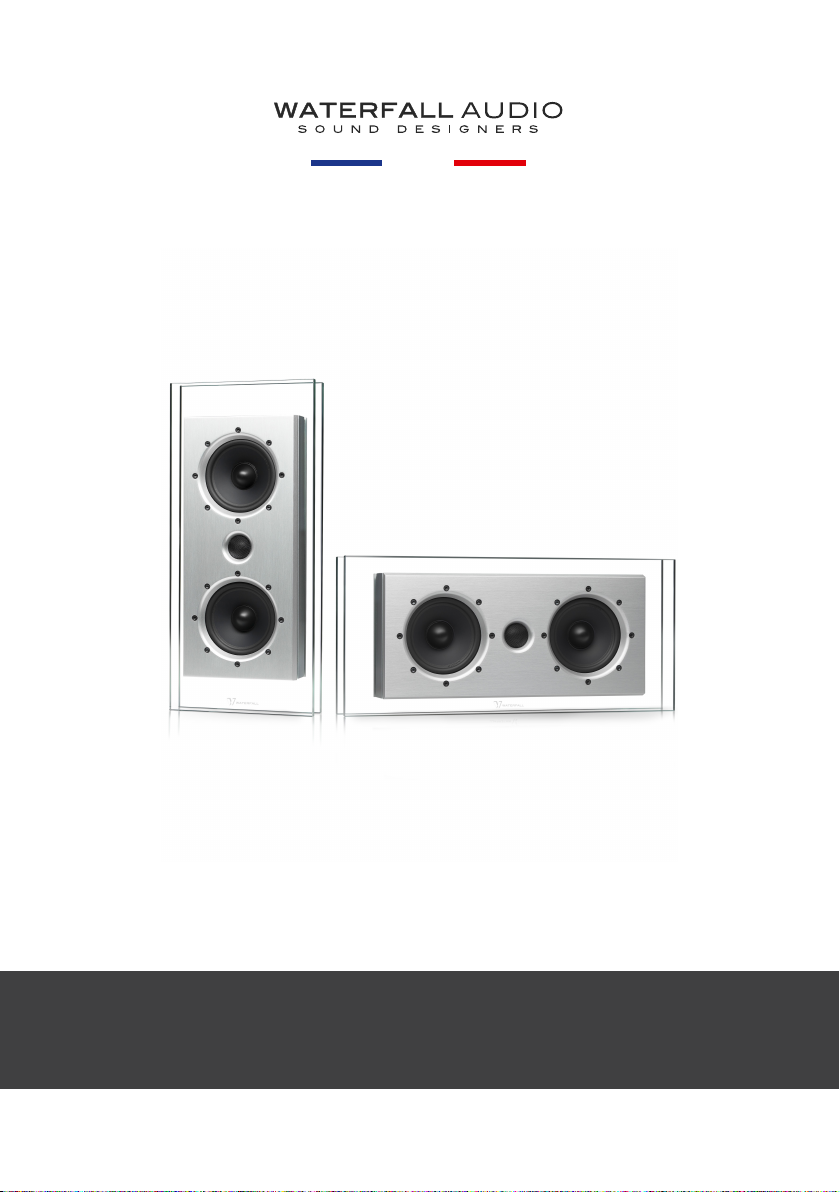
Elora Evo LR Elora Evo Center
INSTRUCTIONS MANUAL
COMPACT SPEAKER
ELORA EVO - CENTER & LR
Page 2

INFORMATIONS & OPERATING INSTRUCTIONS
MUST BE CONSULTED BEFORE USE.
TO BE KEPT AND PASSED ON IN THE EVENT OF RESALE.
Thank you for choosing Waterfall Audio speakers. Our deliberate choice
for aesthetics and performance constantly guides us towards
cutting-edge technologies and design combined with major
innovations.
• The Elora Evo loudspeaker is available in a Center (horizontal) or LR
(vertical) version. Each speaker is supplied with its own wall bracket.
• If the speakers are to be placed high up, they will need to be
oriented towards the listening area. The rear of the Elora Evo has a
VESA75 footprint, making it compatible with various mounts that
allow this function (please consult us for recommendations). The
speakers can also be placed on a flat surface using a special stand
(optional).
The Elora Evo is designed to work in perfect symbiosis with all Waterfall
Audio loudspeakers, and is strongly recommended for use with a
Waterfall Audio subwoofer.
Warning: The speaker in your possession is fitted with glass
panels. Any impact could cause irreparable damage. This
product is fragile, so please bear this in mind when unpacking,
installing and using it. It is recommended that you are assisted by
a second person, particularly during the final wiring and wall
mounting phase.
ACCESSORIES
Wall bracket
(included)
Spacer for VESA bracket
(optional)
- 1 -
Shelf stand
(optional)
Page 3
ELORA EVO CENTER
INSTALLATION WITH WALL BRACKET (included)
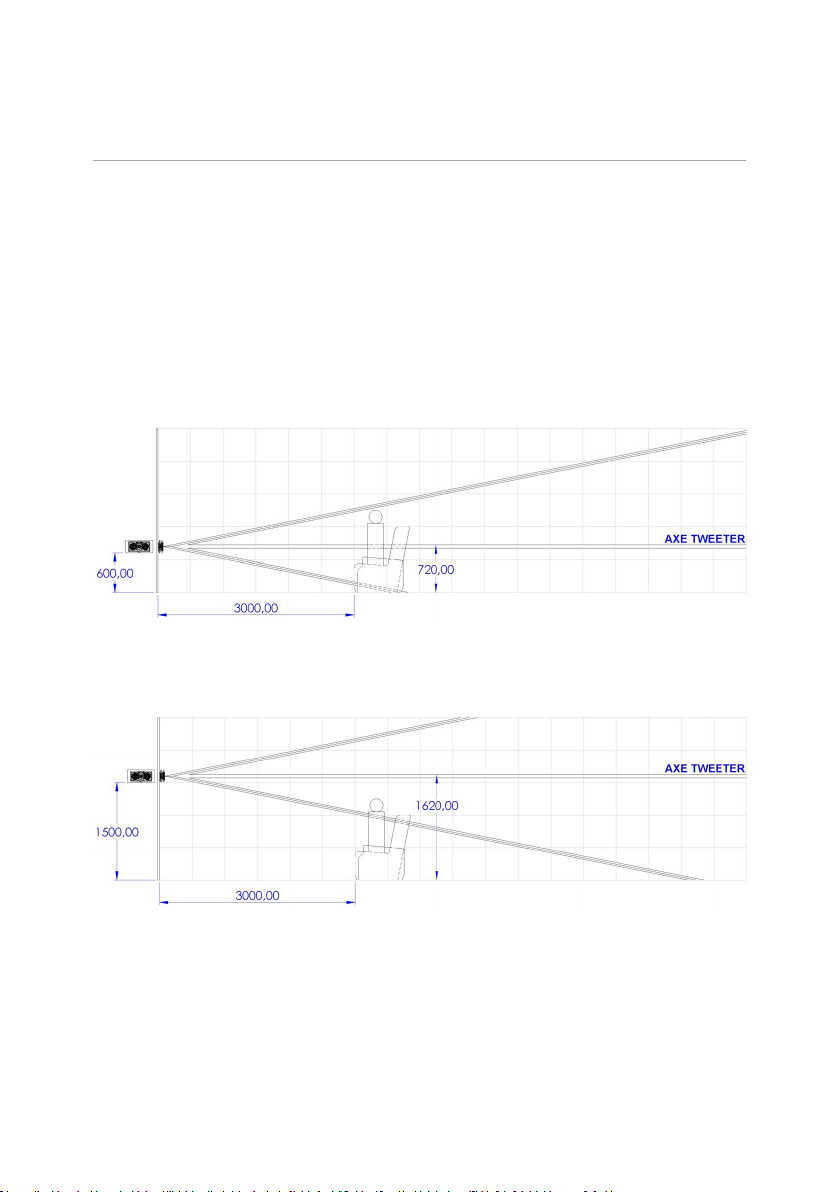
The speaker's diffusion parameters allow it to be installed at different
heights depending on your installation and integration criteria.
The minimum possible height of the bottom of the speaker in relation to
the floor is 600mm, the maximum is 1500mm (see next page for the
positioning of the wall bracket).
Minimum height : bottom of speaker at 600mm from floor
Maximum height : bottom of speaker at 1500mm from floor
Before installing, check that there is no risk of cutting an electrical cable
or damaging a pipe in the wall.
- 2 -
Page 4
Distance bottom of
speaker / floor
(in mm)
X = distance floor/
fixing holes
(in mm)
600
700
Wall bracket
x
Floor
800
900
1000
1100
1200
1300
1400
1500
757
857
957
1057
1157
1257
1357
1457
1557
1657
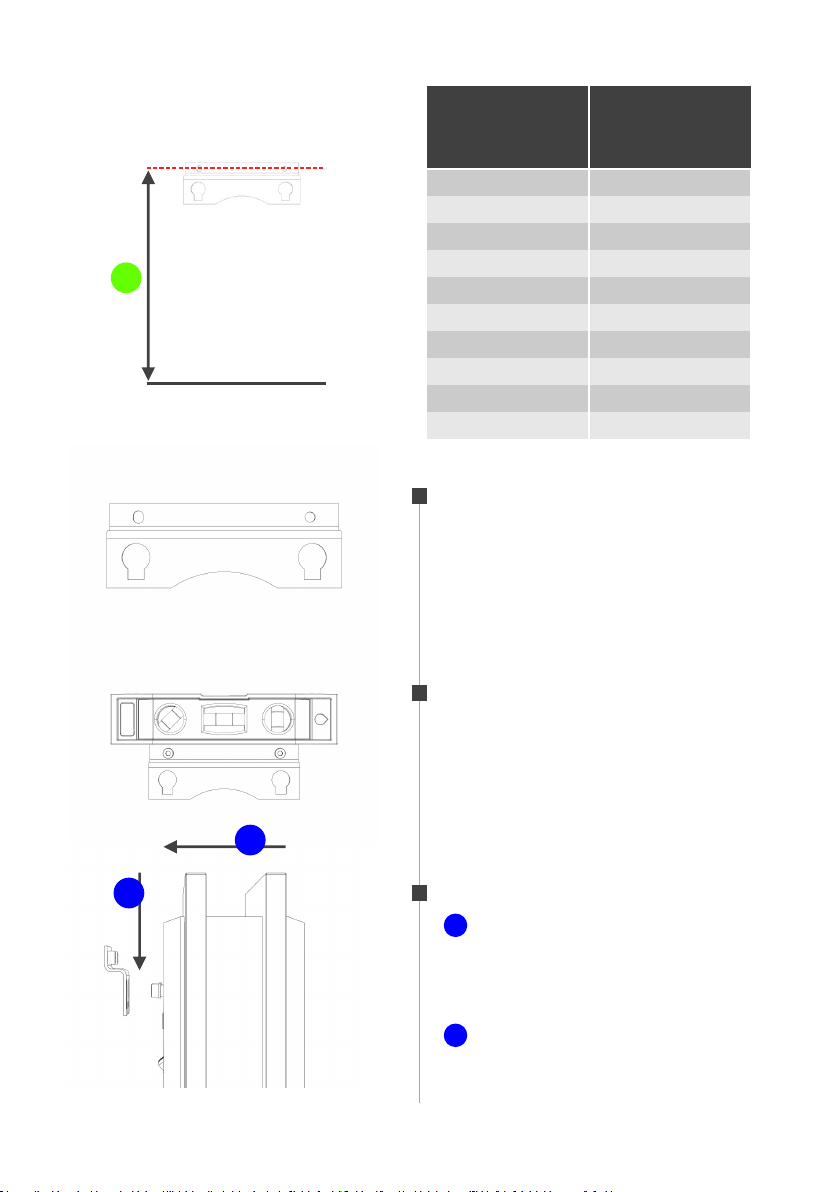
STEP 1
The speaker weighs 7kg. It is your
responsibility to ensure that this
load can be accepted and to define
the appropriate technical solution
for fixing the speaker to the wall.
STEP 2
Hang the bracket on the wall using
4mm diameter screws (not
supplied).There is a small amount of
play on the wall bracket to adjust
the level. Make sure it is firmly
1
attached to the wall.
2
STEP 3
1
Wire the loudspeaker (make sure
that the + and - polarity are correct).
Place the screws provided in the
bracket.
2
Lower the speaker so that the
screws stop. Make sure it is perfectly
in place.
- 3 -
Page 5
ELORA EVO CENTER
ON WALL INSTALLATION WITH VESA SUPPORT 75cm (not included)
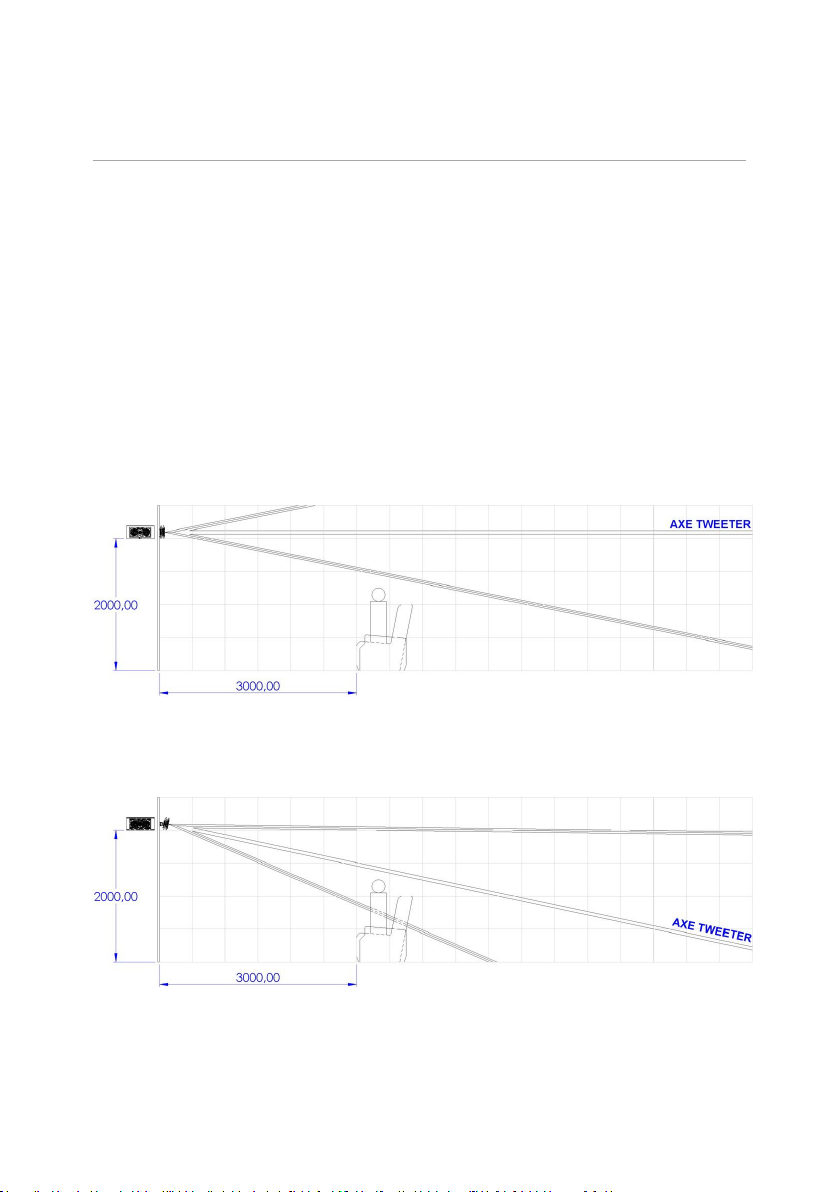
If the speaker is to be positioned at a height (over 2 m), we recommend
using a compatible VESA75 stand to orientate it towards the listener and
maintain optimum frequency response.
The rear of the Elora Evo Center speaker has a VESA75 footprint.
Example shown here with a Lindy 40875 bracket and a 12° angle.
Depending on the type of bracket, it may be necessary to use the
optional spacer for cable routing (consult us if necessary).
Mounting not recommended
Speaker 2000mm from the floor with wall bracket
Recommended mounting
Speaker 2000mm from the floor at a 12° angle with VESA75 support
Before installation, check that there is no risk of cutting an electrical
cable or damaging a pipe in the wall.
- 4 -
Page 6
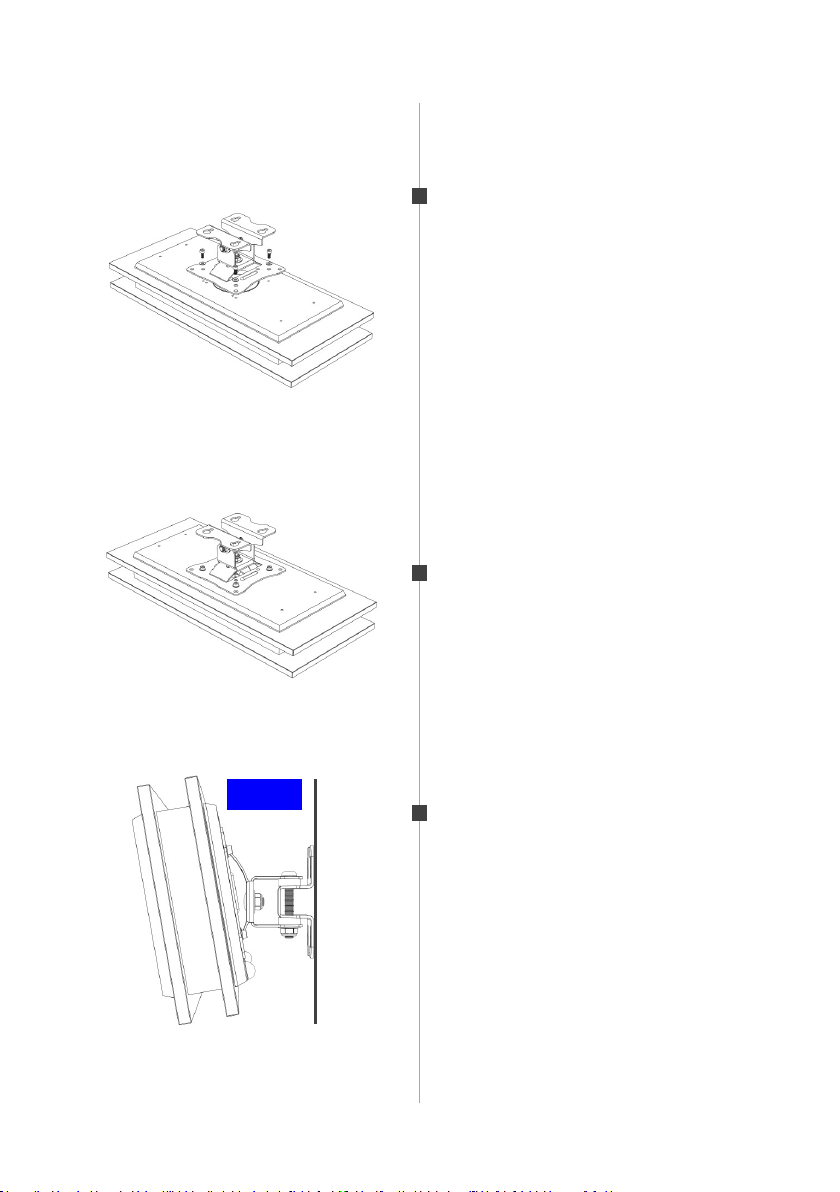
STEP 1
Insert the screws into the wall to
attach the bracket.
Wire up the loudspeaker (make sure
to respect the + and - polarities).
Attach it to the VESA bracket using
the 4 screws on the back of the
speaker, Make sure that the speaker
cable is not trapped and that the
cables do not come into contact
with a metal surface.
STEP 2
Check that the stand is firmly
attached to the speaker.
8 à 12°
STEP 3
Hang the unit on the wall.
Position and adjust the angle in
relation to your listening distance
(generally between 8° and 12°).
- 5 -
Page 7
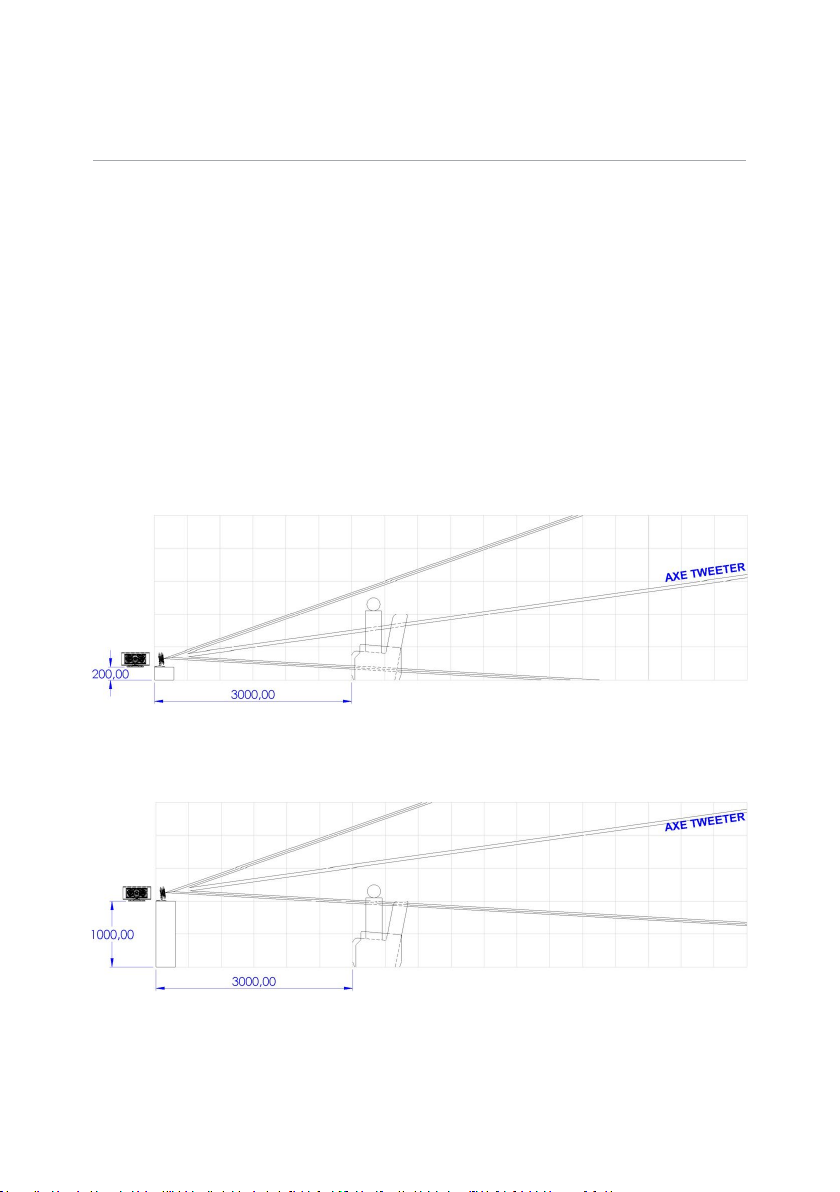
ELORA EVO CENTER
INSTALLATION ON SHELF STAND (optional)
The Elora Evo Center has an optional shelf stand for installation on a flat
surface such as a low cabinet or shelf.
The diffusion parameters allow positioning at different heights
depending on your installation and integration criteria.
The minimum possible height from the bottom of the shelf stand to the
floor is 200mm; the maximum is 1000mm.
Minimum height : bottom of shelf stand at 200mm from floor
Maximum height : bottom of shelf stand at 1000mm from floor
- 6 -
Page 8
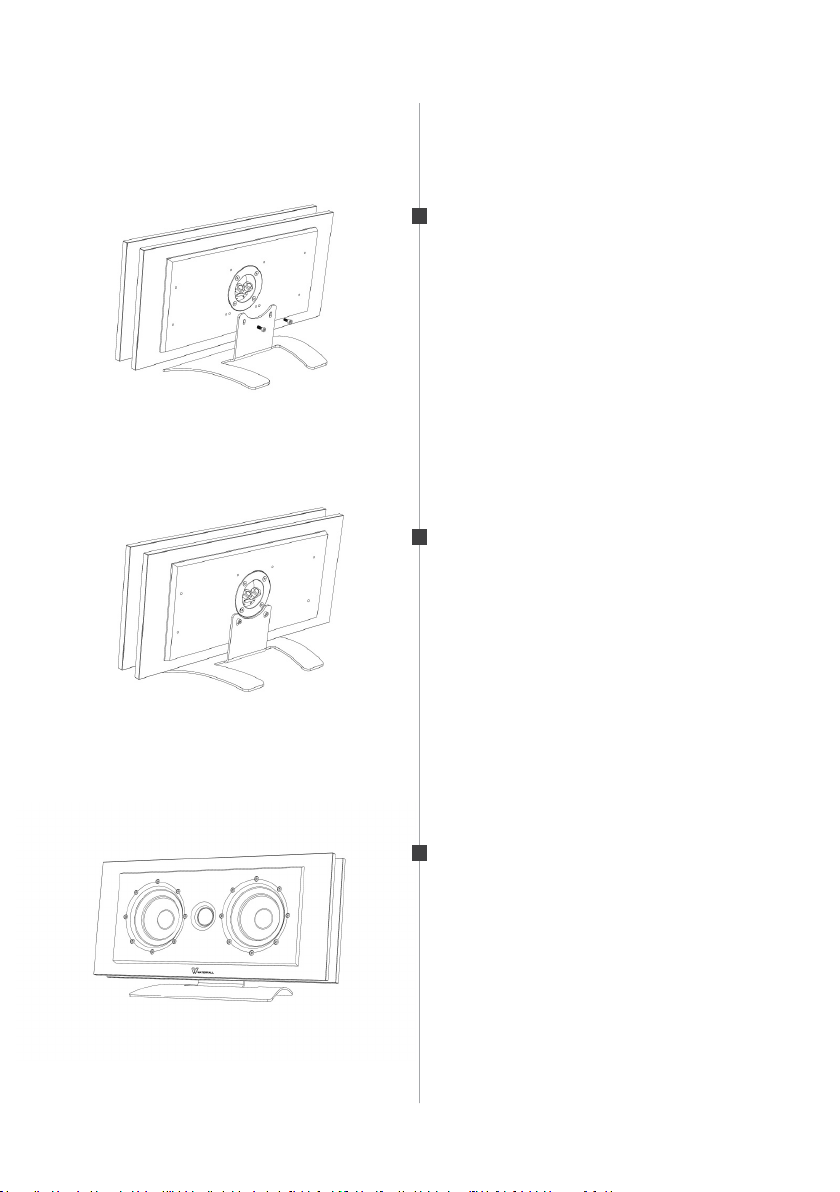
STEP 1
Remove the 2 screws at the back of
the speaker.
Place the shelf stand in front of the
2 holes and replace the screws.
Make sure it is firmly attached to the
speaker.
STEP 2
Wire the loudspeaker (make sure
that the + and - polarity are correct).
STEP 3
Place the speaker in its final position.
- 7 -
Page 9
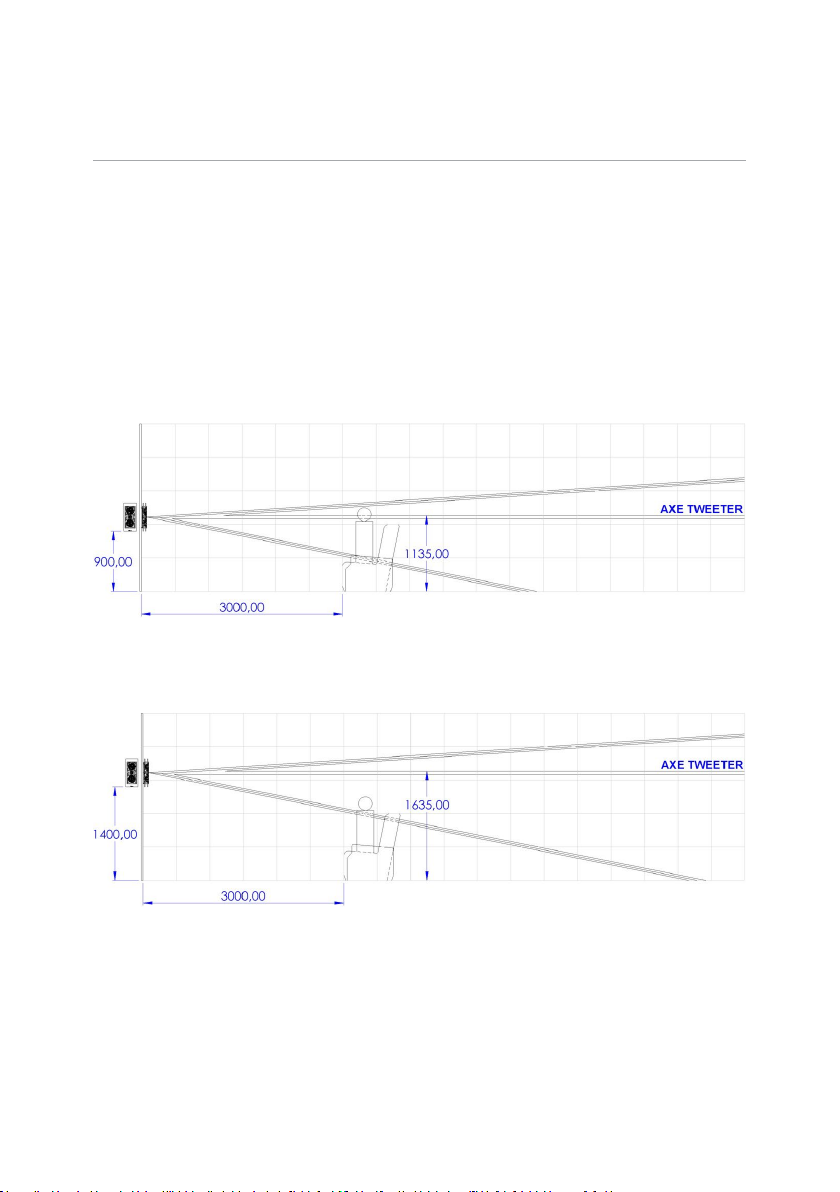
ELORA EVO LR
ON WALL INSTALLATION WITH WALL BRACKET (INCLUDED)
The speaker's diffusion parameters allow it to be installed at different
heights depending on your installation and integration criteria.
The minimum possible height from the bottom of the speaker to the
floor is 900mm; the maximum is 1400mm (see next page for the
positioning of the wall bracket).
Minimum height : bottom of speaker at 900mm from floor
Maximum height : Bottom of speaker at 1400mm from floor
Before installing, check that there is no risk of cutting an electrical cable
or damaging a pipe in the wall.
- 8 -
Page 10
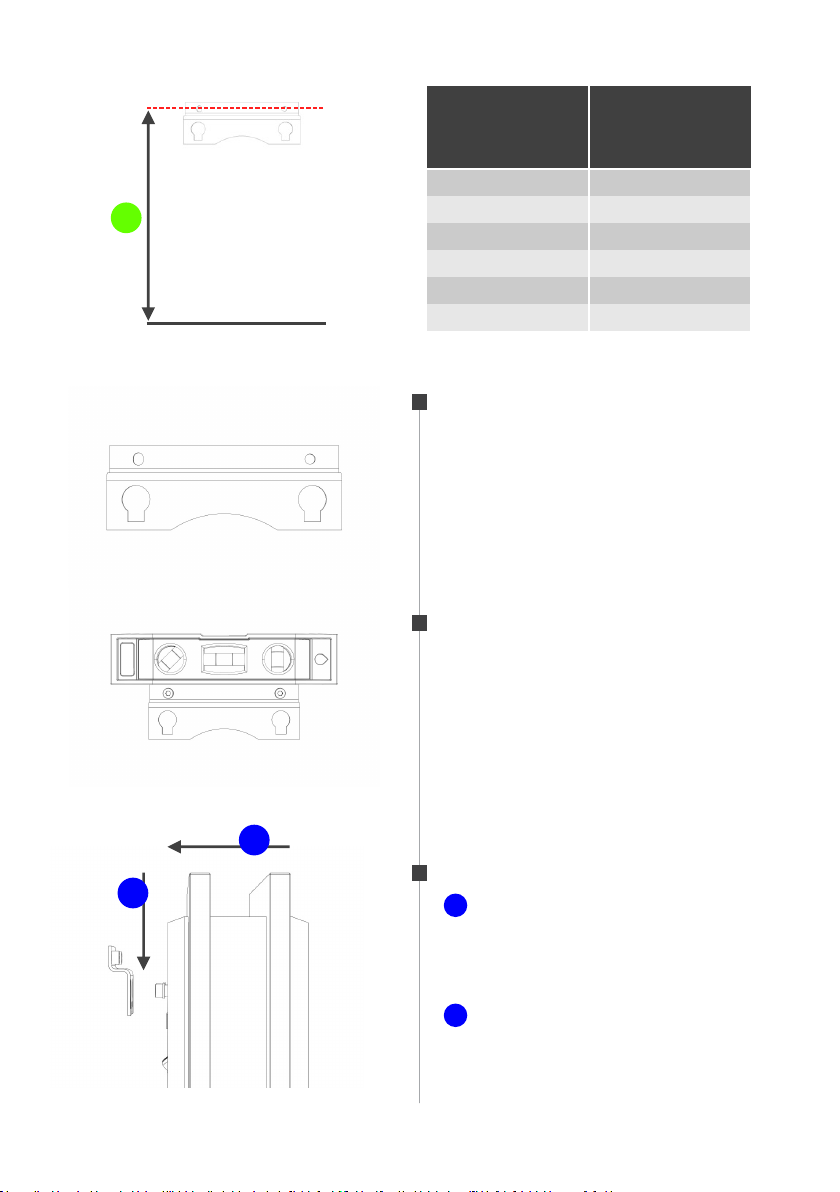
Distance bottom of
speaker/floor
Wall Bracket
x
(in mm)
900
1000
1100
1200
1300
1400
X = distance
floor/mounting holes
(in mm)
1269
1369
1469
1569
1669
1769
Floor
STEP 1
The speaker weighs 7 kg. It is your
responsibility to ensure that this
load can be accepted and to define
the appropriate technical solution
for fixing the speaker to the wall.
STEP 2
Hang the bracket on the wall using
4mm diameter screws (not
supplied). There is a small amount
of play on the wall bracket to adjust
the level. Make sure it is firmly
attached to the wall.
1
STEP 3
2
1
Wire the loudspeaker (make
sure that the + and - polarity are
correct). Place the screws provided
in the bracket.
2
Lower the speaker so that the
screws stop. Make sure it is
perfectly in place.
- 9 -
Page 11
ELORA EVO LR
ON WALL INSTALLATION WITH VESA SUPPORT 75cm (not included)
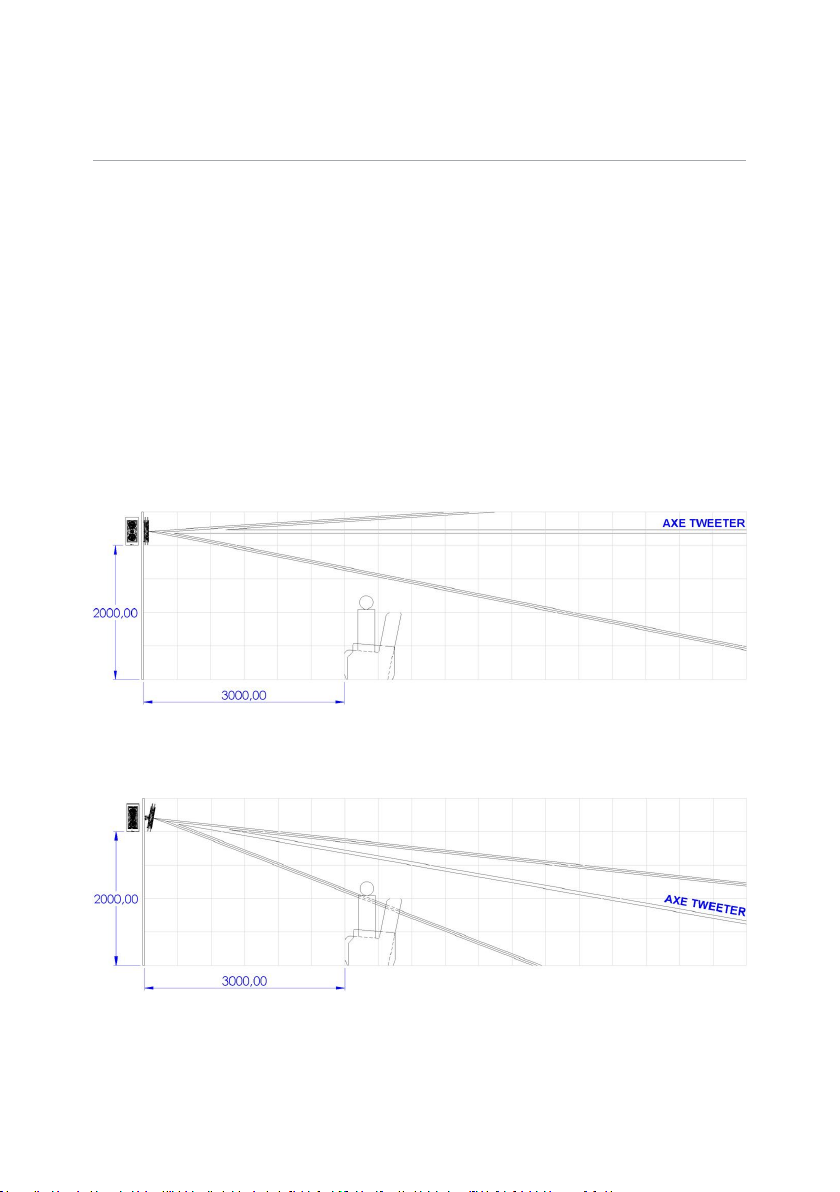
If the loudspeaker is to be positioned at a height (over 2 m), we
recommend using a compatible VESA75 support to orientate it towards
the listener and maintain optimum frequency response.
The rear of the Elora Evo LR speaker has a VESA75 footprint. Example
shown here with a Lindy 40875 bracket and a 12° angle. Depending on
the type of bracket, it may be necessary to use the optional spacer for
cable routing (consult us if necessary).
Mounting Not recommended
Speaker at 2000mm from floor with wall bracket
Recommended Mounting
Speaker at 2000m from floor at a 10° angle with VESA 75 support
Before installation, check that there is no risk of cutting an electrical
cable or damaging a pipe in the wall.
- 10 -
Page 12
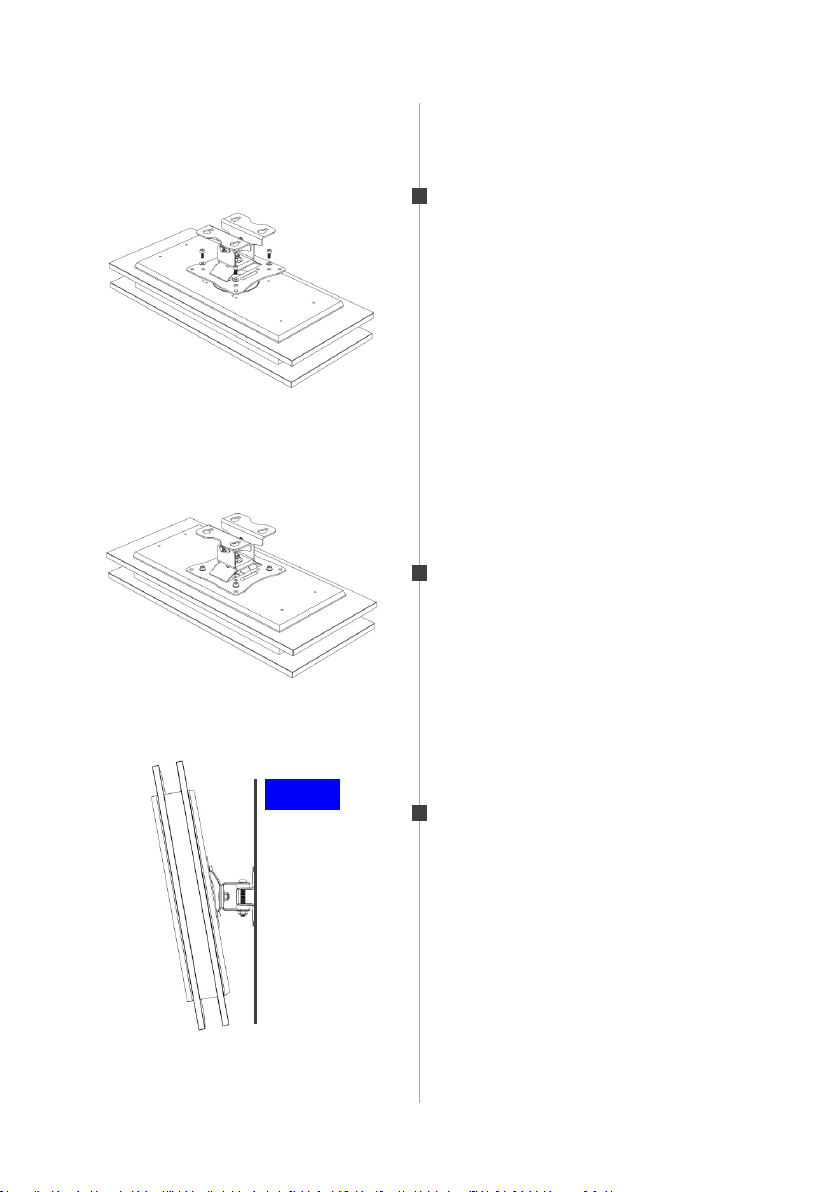
STEP 1
Insert the screws into the wall to
attach the bracket.
Wire up the loudspeaker (make
sure to respect the + and polarities). Attach it to the VESA
bracket using the 4 screws on the
back of the speaker.
Make sure that the speaker cable is
not trapped and that the cables do
not come into contact with a metal
surface.
STEP 2
Check that the bracket is firmly
attached to the speaker.
8 à 12°
STEP 3
Hang the unit on the wall.
Position and adjust the angle in
relation to your listening distance
(generally between 8° and 12°).
- 11 -
Page 13
ELORA EVO LR
INSTALLATION ON SHELF STAND (optional)
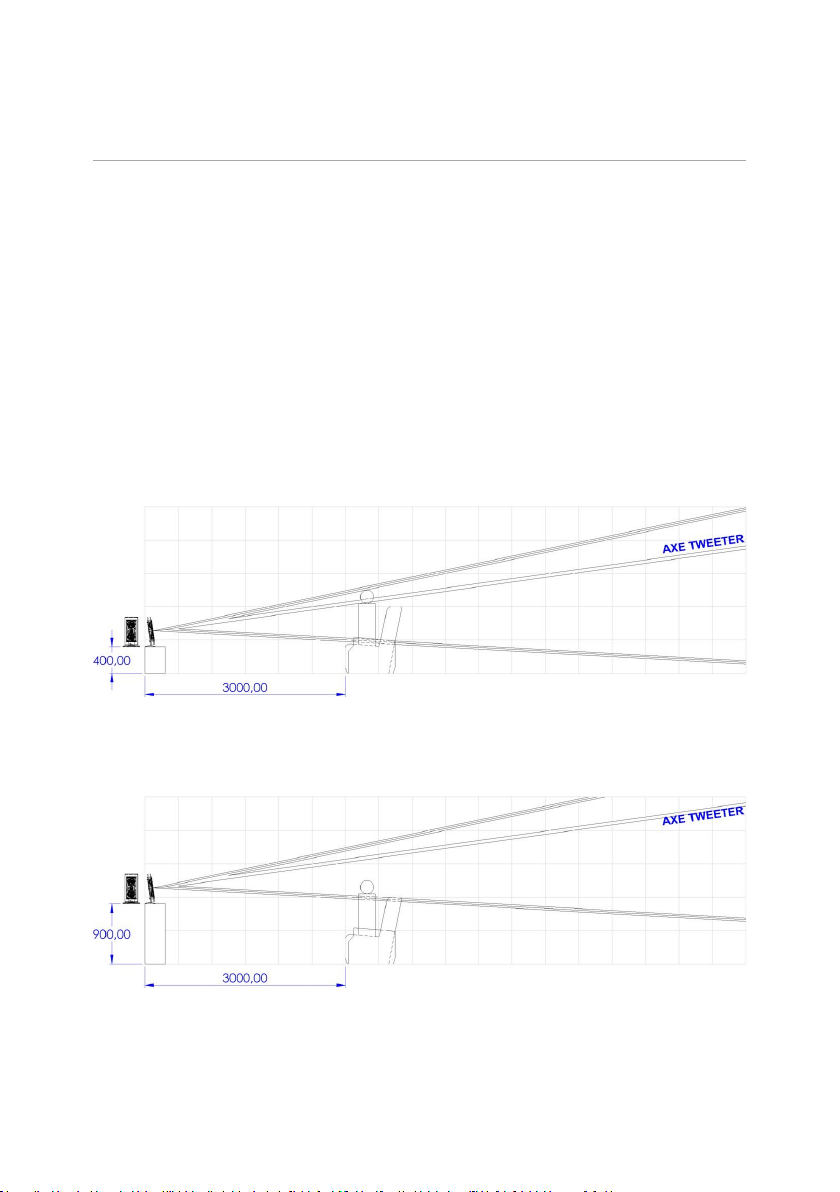
The Elora Evo LR has an optional shelf stand for placement on a flat
surface such as a low cabinet or shelf.
The diffusion parameters allow positioning at different heights
depending on your installation and integration criteria.
The minimum possible height from the bottom of the shelf stand to the
floor is 400mm; the maximum is 900mm.
Minimum height : bottom of shelf stand at 400mm from floor
Maximum height : bottom of shelf stand at 900mm from floor
- 12 -
Page 14
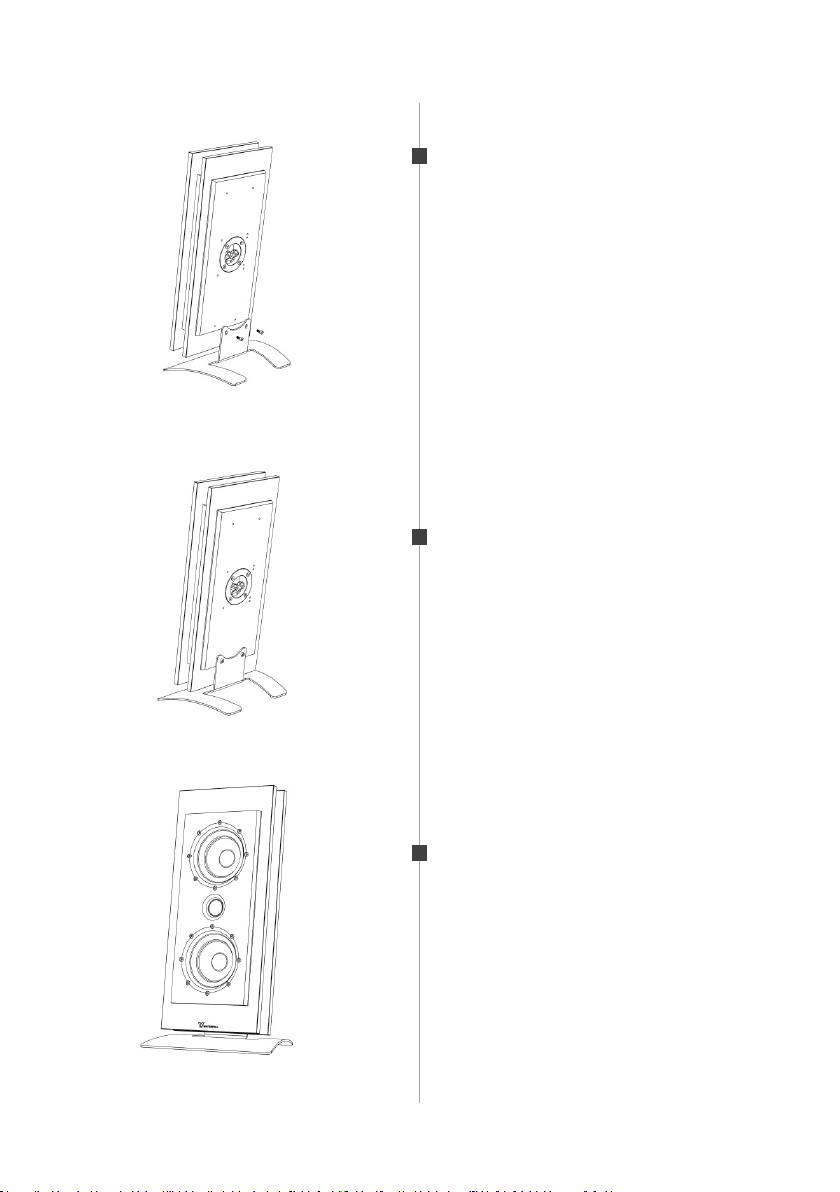
STEP 1
Remove the 2 screws at the back of
the speaker.
Place the shelf stand in front of the
2 holes at bottom of speaker and
replace the screws
Make sure it is firmly attached to the
speaker.
STEP 2
Wire the loudspeaker (make sure
that the + and - polarity are correct).
STEP 3
Place the speaker in its final position.
- 13 -
Page 15

ACOUSTIC SET UP AND CONFIGURATION
Despite its compact size, the Elora Evo can handle a lot of power thanks
to its 'Heatstream' technology. Your choice of amplifier should be a
quality model with between 50 Watts and 200 Watts per channel.
We strongly recommend that you combine the Elora Evo with a
Waterfall subwoofer, which has been specifically developed to ensure
perfect timbre coherence.
The Elora Evo can be used in a 2.1 stereo configuration with a
conventional amplifier or in a 5.1 (and higher) home cinema
configuration.
Whether in stereo installations or in multi-channel mode, the subwoofer
should be as close as possible to the front channels to obtain the best
possible blending. The final listening result depends on the quality of the
settings during the initial installation.
Don't hesitate to ask your authorized dealer for advice when setting up
your installation.
CONNECTION TO YOUR AMPLIFIER
The Elora Evo is connected directly to the speaker outputs of your
amplifier or audio video processor.
Make sure that the + and - polarity are correct.
Never connect two speakers in parallel (or in series) on the same
channel. Never connect your speakers to the mains
The "Waterfall Audio" cable is made from very high quality
deoxygenated copper that is particularly well suited to your speakers. It
is available from your dealer.
- 14 -
Page 16
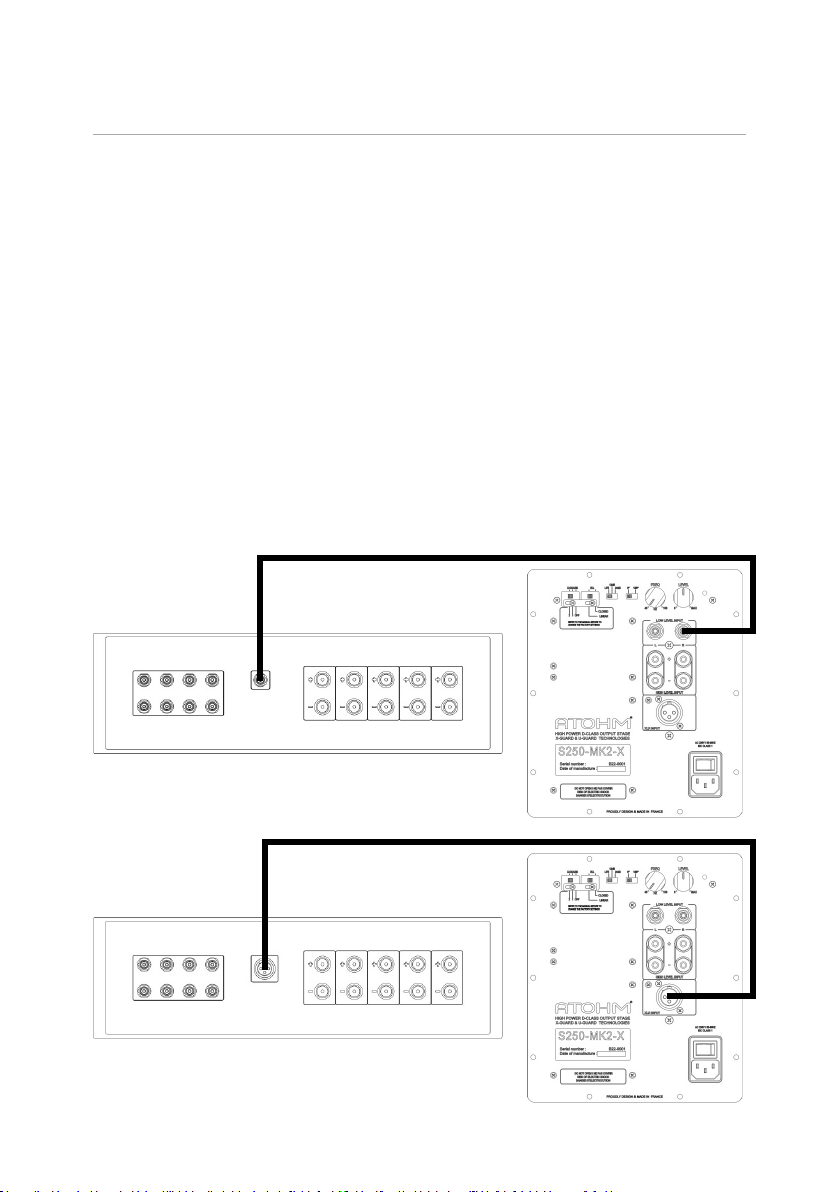
SET UP & CONFIGURATION IN HOME CINEMA MODE
Your A/V processor has a "Sub Pre Out" output, connect it via the
modulation cable (not supplied) to one of the two "Low level Input"
inputs on your subwoofer (either L or R). If it has an XLR output, connect
it via an XLR cable (not supplied) to the XLR input on your subwoofer.
Hi Level Inputs must not be used. Input switching is automatic.
Do not connect the 2 inputs (XLR and Low Level Input) at the same time.
Setting up your Audio Video processor
• Configure all speakers in "small" mode
• Choose 120Hz as the crossover frequency
• Adjust levels and distances
In the case of "auto set up" configurations with microphones, check the
consistency of the settings afterwards.
- 15 -
Page 17

SET UP OF YOUR WATERFALL SUBWOOFER
• Switch "24-12-LFE" to the LFE position (note: on LFE the FREQ button
is inactive, the crossover frequency is generated by the processor).
• Adjust the volume ("LEVEL") as required
• PHASE: depending on the processor's bass management settings
and certain distance parameters, phase inversion (180°) may be
necessary.
A good phase connection will give a dense, homogenous sound
reproduction. A poor phase match is characterised by a lack of energy in
the lower midrange and an overly present high midrange.
- 16 -
Page 18
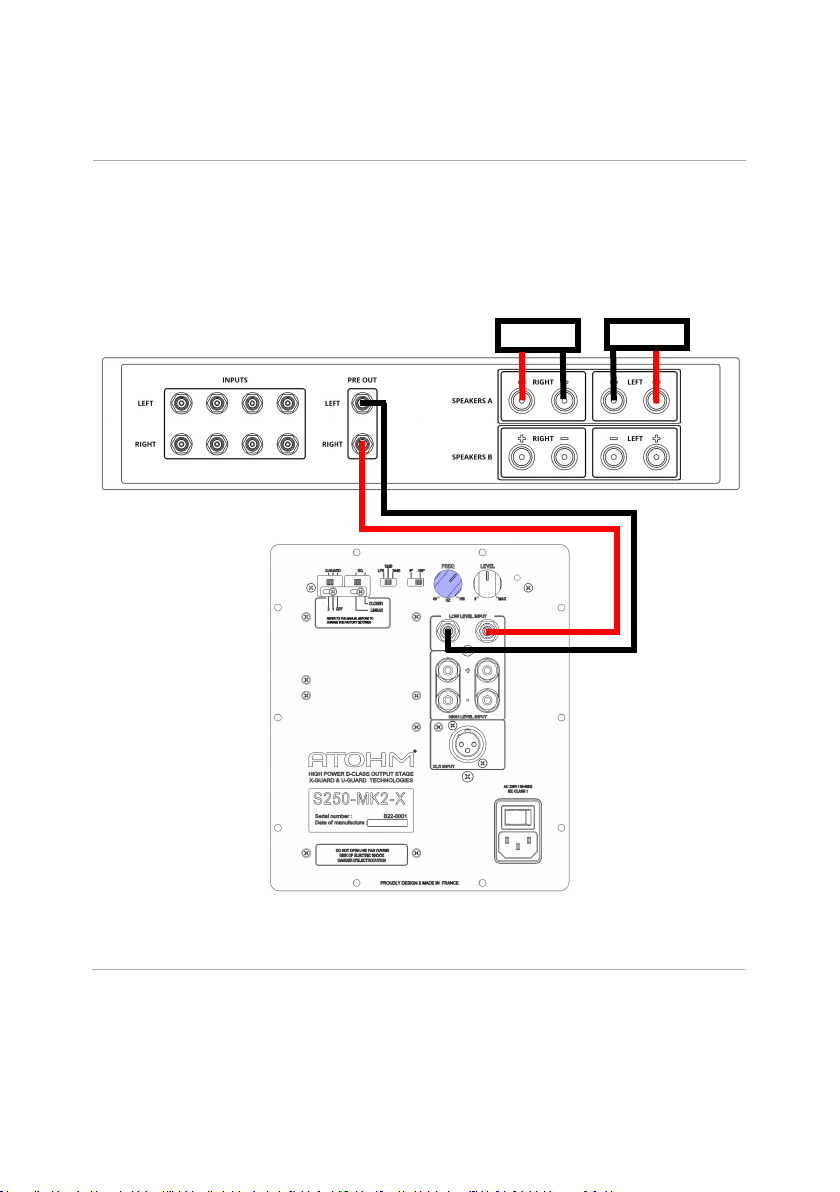
HIFI SET-UP AND CONFIGURATION
(amp with PRE-OUT outputs)
Connect the PRE OUT outputs of your stereo amplifier to the two "Low
Level Input" inputs of the subwoofer amplifier.
Do not use the Hi Level Inputs.
Connect the speakers, making sure that the polarity is correct.
Never connect two speakers in parallel on the same channel.
Speaker
Speaker
SET UP OF YOUR WATERFALL SUBWOOFER
• Switch "24-12-LFE" to position 12dB
• Adjust the FREQ knob towards 2H as shown in the diagram
• PHASE: 180° position
• Adjust the volume LEVEL to your liking
•
- 17 -
Page 19
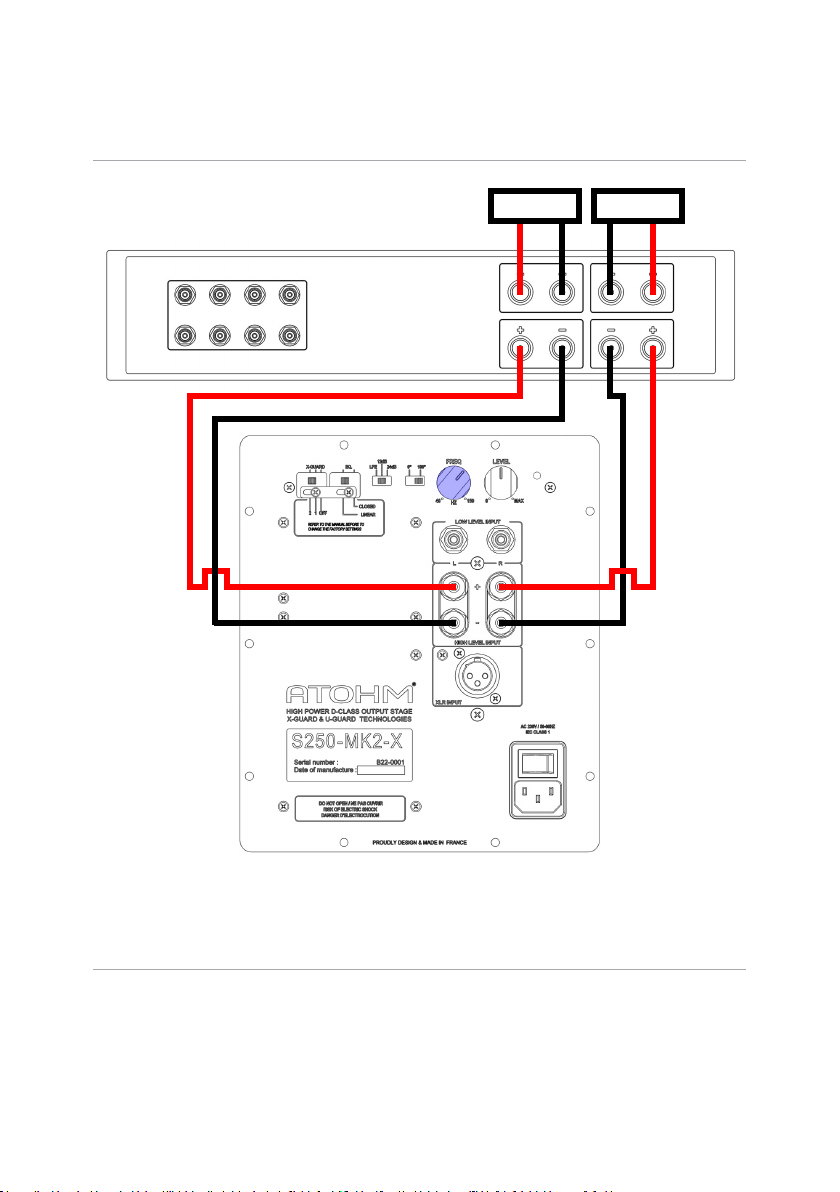
HIFI SET-UP AND CONFIGURATION
(amplifier without PRE-OUT outputs)
Speaker Speaker
SET UP OF YOUR WATERFALL SUBWOOFER
• Switch "24-12-LFE" to position 12dB
• Adjust the FREQ knob towards 2H as shown in the diagram
• PHASE: 180° position
• Adjust the volume (”LEVEL”) to your liking
- 18 -
Page 20

WARRANTY
Waterfall speakers have a 5 years warranty (parts & service) except
amplifiers. Waterfall amplifiers have a 2 years warranty (parts & service).
Check more on www.waterfallaudio.com (warranty section).
THIS DOCUMENT MUST BE PROVIDED IN THE EVENT OF RESALE
WATERFALL AUDIO
ZA les praderies - 83 570 Carcès - France
We operate a policy of continuous improvement and reserve the right to amend designs and specifications without prior notice
Made in France, 5 years warranty on speakers, 2 years warranty on amplifiers (parts& service).
All drivers and amplifiers are developed and manufactured by ATOHM (France).
waterfallaudio.com
 Loading...