

Water Depot PLATINUM SERIES, REFINEOSOFT SERIES: Owner's Manual
OWNER’S MANUAL
INTENANCE INSPECTION BY A WATER DEPOT
FOR ALL PLATINUM & REFINEOSO FT SYSTEMS
THIS MANUAL IS TO BE LEFT WITH THE OWNER OF THE EQUIPMENT FOR REFERENCE AND PURPOSES AND
TECHNICAL GUIDANCE. IT IS STRONGLY RECOMMEN DED THAT QUALIFIED DEALER SERVICE PERSONNEL
BE CONTACTED IN THE EVENT OF AN UNKNOWN INTERRUPTION OF SERVICE OR APPARENT PRODUCT
MALFUNCTION. AN ANNUAL PREVENTATIVE MA
PROFESSIONAL IS RECOMMENDED TO ENSURE TROUBLE-FREE AND CONTINUOUS OPERATION.
www.waterdepot.com

TABLE OF CONTENTS
Water Depot
Introduction ......................................................................................................................... ................. ........... 3
General Warnings........................................... ................................................................................................ . 3
Set Time of Day ............................................................................................................................................... 4
User Display Settings ....... ....................................... ....................................................................................... 4
Installer Display Settings ...................................... ................... ........................................... ............................ 6
Softener System Setup ..................................................................................................... ............................ .. 6
Softener Setting Options .......... .................... .................................................................................................. 8
Diagnostics ...................... ................................................... ................... ........................................................ 9
Troubleshooting ................................ ...... ....... ................................................. .............................................. 10
Installation ........................ .................. ...........................................................................................................12
Bypass Valve ................................................................................................................................................. 14
Specifications.............................................................. .................................................................................. 15
Quick Reference Specifications .................................................................................................... ............... . 15
92 Commerce Park Drive, unit 2
Barrie, ON
L4N 8W8
www.watredepot.com
Page 2

INTRODUCTION
This manual is specifically designed for the Platinum and Refineosoft water softeners systems from Water
Depot. The manual is designed to aid in installation, setting up and trouble shooting the unit. Certain parts of
the manual will serve as aids to installers and service personnel.
GENERAL WARNINGS
All cities are subject to different plumbing codes. It is the purchasers or Installers responsibility to
adhere to local codes when installing a water softener.
The following general warnings and the specifications in Table 1 must appear in the System Manual.
The control valve, fittings and/or bypass are designed to accommodate minor plumbing misalignments but
are not designed to support the weight of a system or the plumbing.
Do not use Vaseline, oils, other hydrocarbon lubricants or spray silicone anywhere. A silicone lubricant may
be used on black o-rings but is not necessary. Avoid any type of lubricants, including silicone, on the
clear lip seals.
The nuts and caps are designed to be unscrewed or tightened by hand or with the special plastic wrench. If
necessary a pliers can be used to unscrew the nut or cap. Do not use a pipe wrench to tighten or loosen
nuts or caps. Do not place a screwdriver in the slots on caps and/or tap with a hammer.
Do not use pipe dope or other sealants on threads. Use Teflon tape on the threaded inlet, outlet and drain
fittings. Teflon tape is not necessary on the nut connection or caps because of o-ring seals.
After completing any valve maintenance involving the drive assembly or the drive cap assembly and pistons,
press and hold NEXT and REGEN buttons for 3 seconds or unplug power source jack from the printed
circuit board (black wire) and plug back in. This resets the electronics and establishes the service piston
position. The display should flash all wording, then flash the software version and then reset the valve to the
service position.
All plumbing should be done in accordance with local plumbing codes. The pipe size for the drain line should
be a minimum of ½”. Backwash flow rates in excess of 7 gpm or length in excess of 20’ require ¾” drain line.
Solder joints near the drain must be done prior to connecting the drain line flow control fitting. Leave at least
6” between the drain line control fitting and solder joints when soldering pipes that are connected on the
drain line control fitting. Failure to do this could cause interior damage to the drain line flow control fitting.
When assembling the installation fitting package (inlet and outlet), connect the fitting to the plumbing system
first and then attach the nut, split ring and o-ring. Heat from soldering or solvent cements may damage the
nut, split ring or o-ring. Solder joints should be cool and solvent cements should be set before installing the
nut, split ring and o-ring. Avoid getting primer and solvent cement on any part of the o-rings, split rings,
bypass valve or control valve.
Plug into an electrical outlet. Note: All electrical connections must be connected according to local codes.
(Be certain the outlet is uninterrupted.)
Install grounding strap on metal pipes.
Page 3
SET TIME OF DAY
me of day. Time of day should only need to be set after extended power outages or when daylight
General Operation
USER DISPLAY SETTINGS
The user can also set the ti
saving time begins or ends. If an extended power outage occurs, the time of day will flash on and off which indicates the time
of day should be reset.
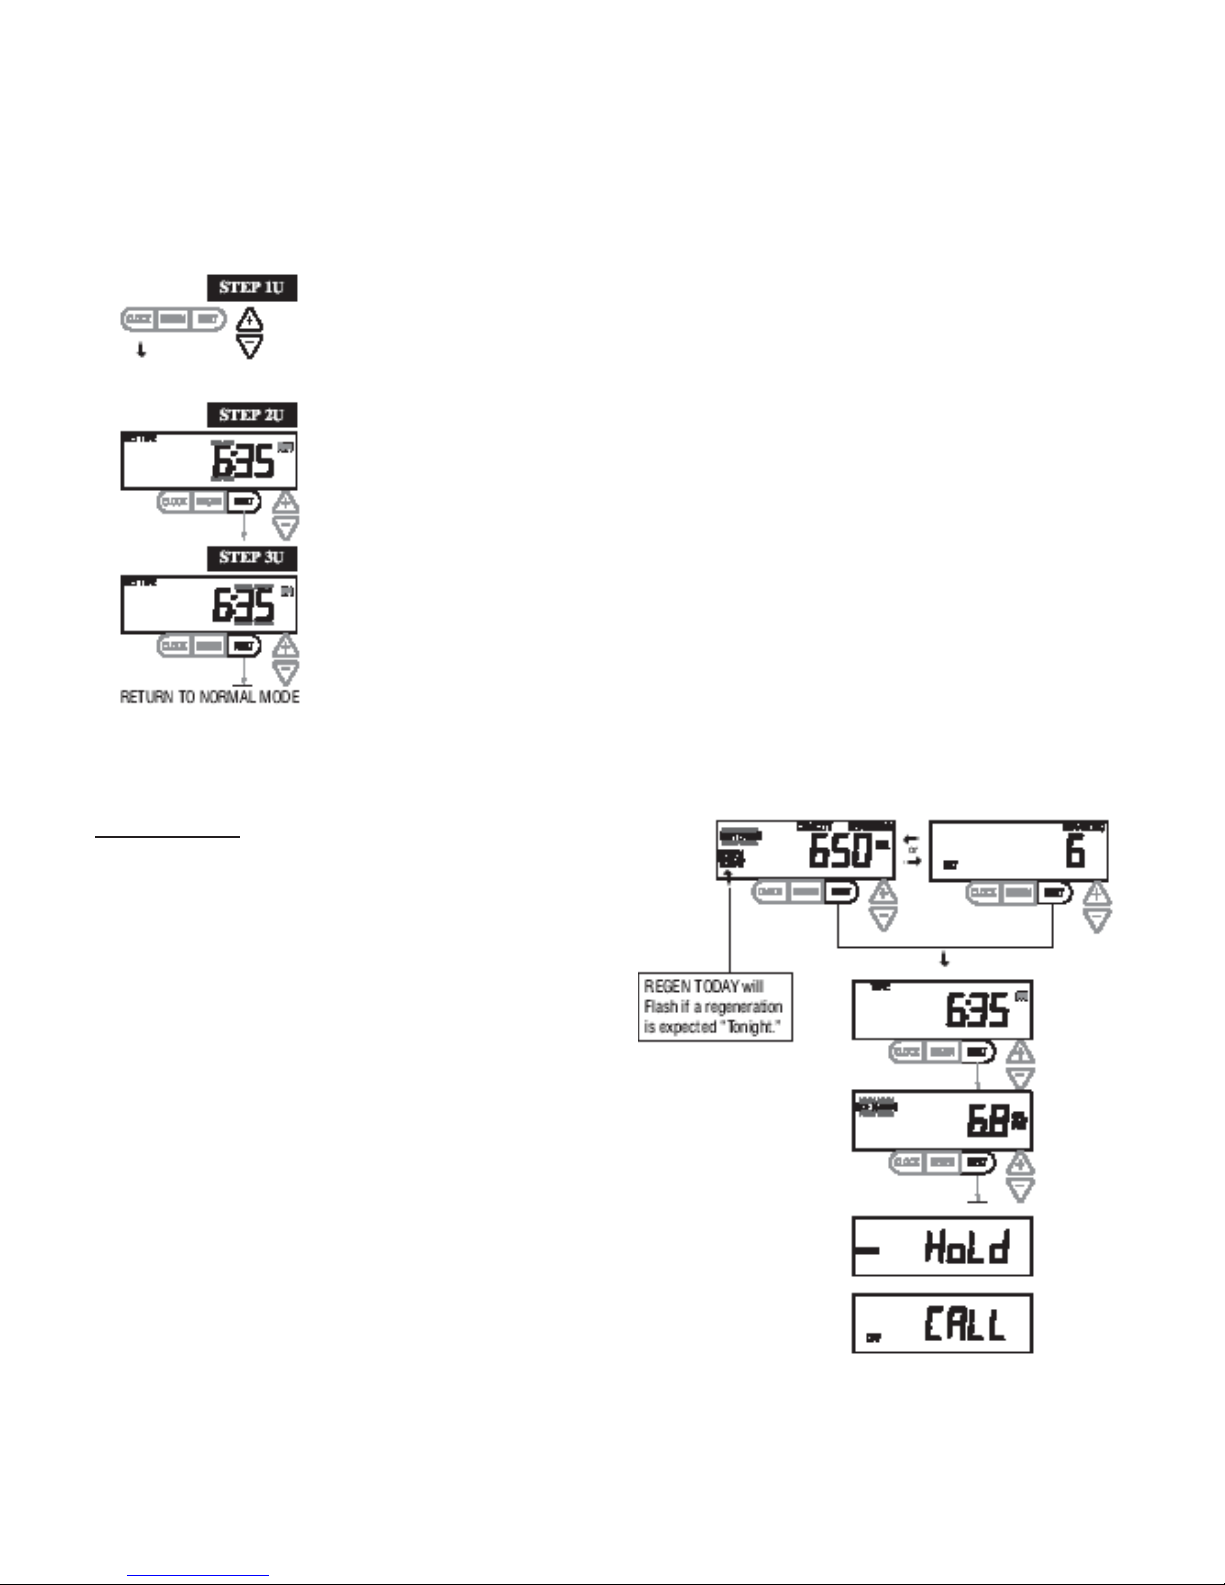
STEP 1U – Press CLOCK.
STEP 2U - Current Time (hour): Set the hour of the day using or buttons. AM/PM
toggles after 12.
Press NEXT to go to Step 3U.
STEP 3U - Current Time (minutes): Set the minutes of the day using or buttons. Press
NEXT to exit
Set Time of Day. Press REGEN to return to previous step.
STEP 2U
STEP 3U
When the system is operating, one of five displays may be
shown. The displays normally rotate, however pressing NEXT
will pause on the selected display for 5 minutes. Pressing NEXT
will alternate between the displays. One of the displays is
always the current time of day. The second display is one of the
following: days remaining or volume remaining. Days remaining
is the number of days left before the system goes through a
regeneration cycle. Capacity remaining is the gallons that will
be treated before the system goes through a regeneration cycle.
Pressing the button while in the Capacity Remaining display
will decrease the capacity remaining in 10 gallon increments and
will also increase the volume used impacting the recorded values
in Diagnostics Steps 3D, 4D and 5D and Valve History, Step 4VH.
The third display shows the current treated water flow rate
through the system. The fourth display will show either dP or
hold if the dP switch is closed. The fifth display indicates the
user should call for service. The fifth display will not appear if
OFF is selected in Step 13S of Softener System Setup or
Step 12F of Filter System Setup. To clear the Service Call
reminder, press the and buttons simultaneously while
CALL
is displayed.
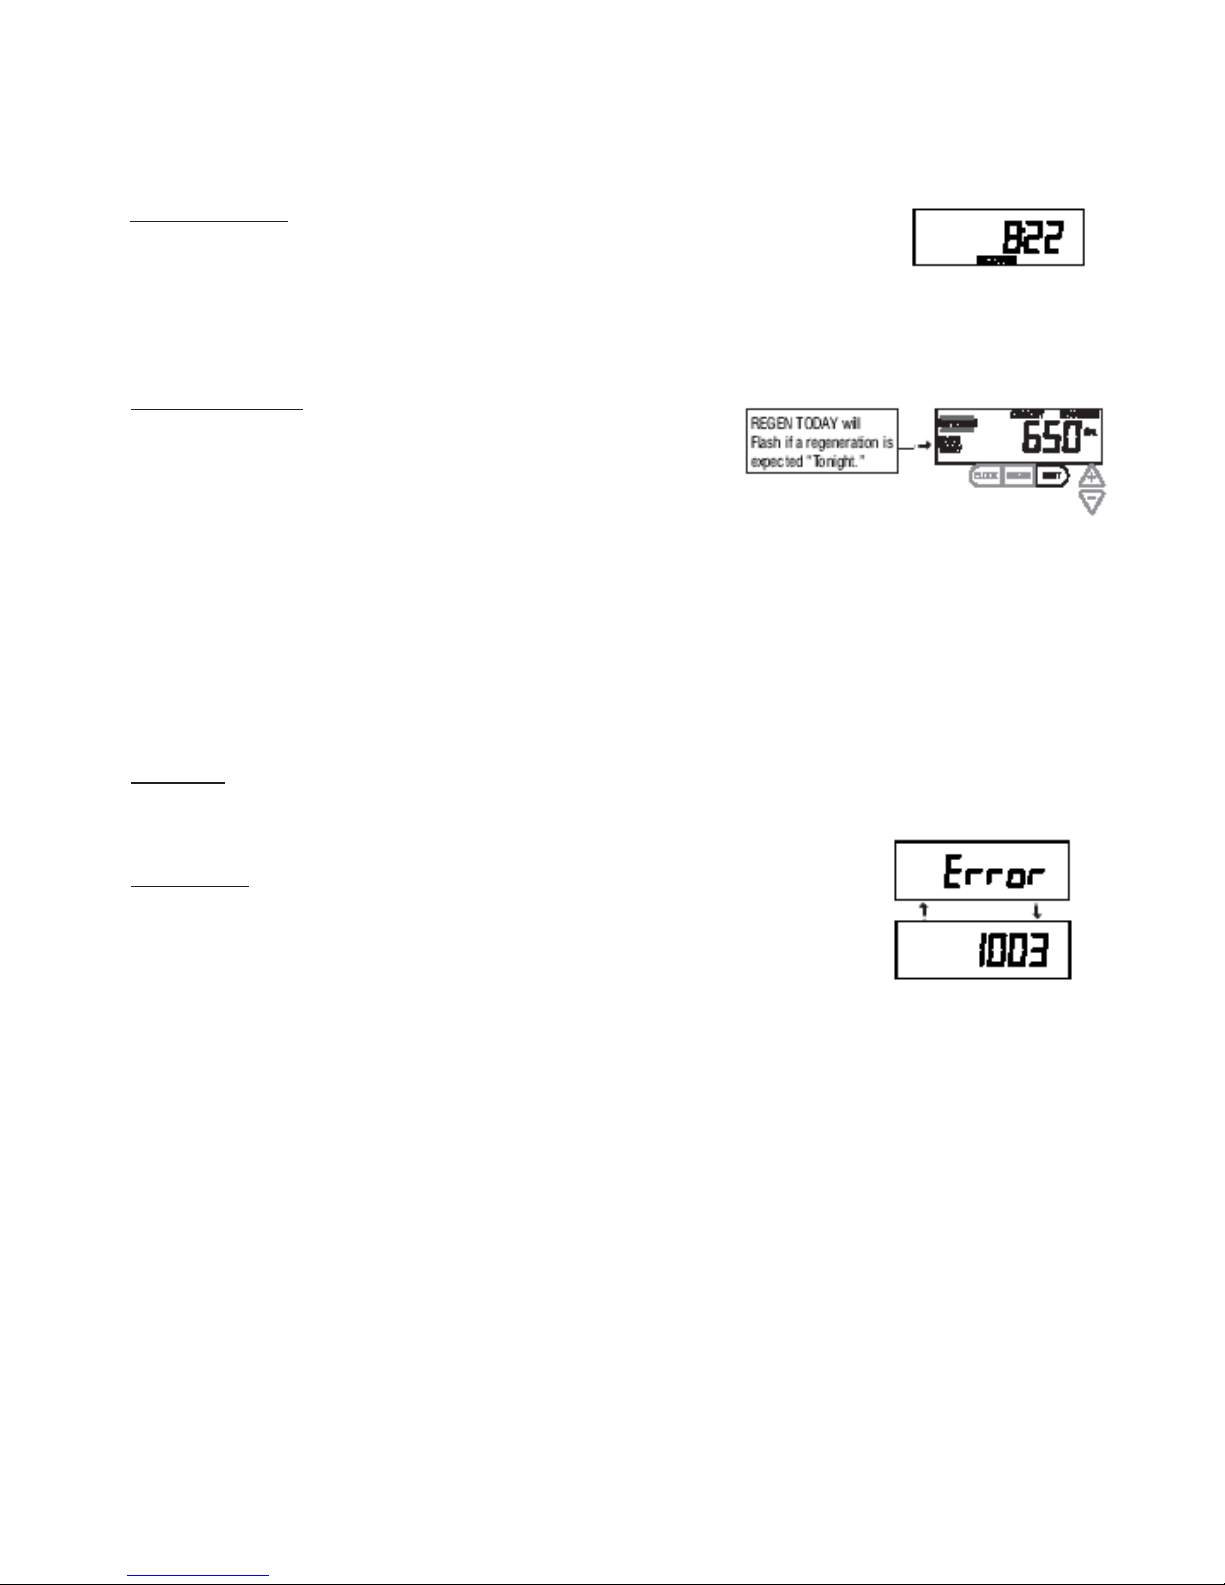
If the system has called for a regeneration that will occur at the
preset time of regeneration, the words REGEN TODAY will
appear on the display.
If a water meter is installed, the word “Softening” or “Filtering”
flashes on the display when water is being treated (i.e. water is
Page 4
Regeneration Mode
When the system begins to regenerate, the display will change to include information about the step of the regeneration
reset itself to provide treated water when the regeneration has been completed.
Manual Regeneration
be a period of heavy water usage because of guests or a heavy laundry
To initiate a manual regeneration at the preset delayed regeneration time, when
display to indicate that the system will regenerate at the preset delayed regeneration time. If you pressed the “REGEN”
Power Loss
help. This indicates that the valve was not able to funct ion pr oper ly.
Typically a system is set to regenerate at a time of low water usage. An example of a time with
low water usage is when a household is asleep. If there is a demand for water when the system
is regenerating, untreated water will be used.
process and the time remaining for that step to be completed. The system runs through the steps automatically and will
Sometimes there is a need to regenerate the system sooner than when the
system calls for it, usually referred to as manual regeneration. There may
the regeneration time option is set to “NORMAL” or “NORMAL + on 0”,
press and release “REGEN”. The words “REGEN TODAY” will flash on the
button in error, pressing the button again will cancel the request. Note: If the regeneration time option is set to “on 0” there
is no set delayed regeneration time so “REGEN TODAY” will not activate if “REGEN” button is pressed.
To initiate a manual regeneration immediately, press and hold the “REGEN” button for three seconds. The system will
begin to regenerate immediately. The request cannot be cancelled.
Note: For softeners, if the brine tank does not contain salt, fill with salt and wait at least two hours before regenerating.
If the power goes out for less than two hours, the system will automatically reset
itself. If an extended power outage occurs, the time of day will flash on and off which
indicates the time of day should be reset. The system will remember the rest.
Error Message
If the word “ERROR” and a number are alternately flashing on the display contact the for
Page 5
 Loading...