

WaterCop PRO Owners And Installation Manual
Owner’s Manual / Installation Guide
System Description
The WaterCop® PRO System is designed to detect
leaks in your plumbing system at predetermined
locations, and automatically shut off the water supply
to help effectively reduce the chances of major water
damage associated with a leak.
System Components
Brass Valve: Full Port, brass, 125psi cold water,
designed for placement on incoming water main.
WaterCop Actuator: NEMA 4 (weatherproof)
Polycarbonate enclosure for indoor/outdoor installation,
AC/DC power converter with 20’ cord included, Liquid
crystal display with back light for sensor/trouble status,
ambient temperature 35°F to 105°F, for cold water
applications. Manual override, Local open/close water
control.
Flood Sensor: Power using 2 AA Alkaline Batteries
NEED NEW PHOTO
or optional AC/DC power converter (sold separately).
Batteries will provide back up power upon loss of
electricity. Wireless sensors are addressable and
supervised for conditions such as water detection,
power lost, sensor short/open and low battery. Ten foot
sensor cord allows optimal sensor placement. Flood
sensors can support one or two sensor wires. Each
WaterCop® PRO actuator valve can support up to 45
wireless sensors.
Range Enhancing Repeater: Enhances transmission
range of wireless sensors. Plugs into any standard wall
outlet. Receives and re-transmits sensor signals from
outlying sensors to the WaterCop® PRO actuator.
Monitoring Station-Standard: LCD display with back
light provides instant feedback of sensor alarm and
trouble conditions as well as open/close status of water
supply. Local push button water controls for instant on/
off of water supply. Audible alarm sounds when any
sensor detects flooding. Internal mounting bracket
mounts to standard wall boxes for aesthetics and cord
management. AC/DC power converter with 20’ cord
included.
Monitoring Station-Hardwired (pictured above):
Accommodates up to 8 zones for WPSC hardwired
flood sensors (sold separately).
www.watercop.com
800-545-3636

Hard Wired Sensors: Ten foot white cord with single
sensor. PRO sensors are easily secured to floor using
mounting holes. Sensors provide the same feedback
to monitoring station as the wireless WaterCop® PRO
sensors. Use hardwired censors for convenience or if
conditions prevent wireless communication. Sensors
sold individually and can be wired with up to 200 feet
of 22/24 AWG 2-conductor cord (not included).
General Safety Information
Warning
Do not apply electrical power to the unit unless the
unit is fully assembled. Failure to do so could result in
personal injury and/or damage to the unit.
Warning
Disconnect power source before working on or servicing
the unit. Failure to do so could result in personal injury.
Caution
It is strongly recommended that eye
protection be worn while servicing the
system. Failure to do so could result
in personal injury.
How the System Works
Flood sensors constantly
monitor their selected
areas for accumulating
moisture. When a leak
is detected, a sensor will
send a radio frequency
signal to the WaterCop®
PRO unit instructing it
to shut off the water
supply to the home. The
WaterCop® PRO valve
will remain closed until it
is manually reset.
The flood sensors are
a battery powered device enabling it to be located
anywhere a leak is likely to occur, or where water
might cause damage. The WaterCop® PRO requires
household electrical power (common 115 VAC,
grounded outlet) and will not operate during a power
outage.
Selection of WaterCop® PRO Installation
Sites
The WaterCop® PRO valve should be installed in the
main water line just downstream from the main shutoff valve in your home. The front control panel of
the WaterCop® PRO should be easily visible in order
to see what position the valve is in (open/closed). It
should also be easily accessible for resetting after
a leak has been detected and the water supply
has been shut off. While the WaterCop® PRO is
completely supported by the piping in your plumbing
system when it is installed, placement of the valve
should ensure that the housing is protected from
use as a step or from other excessive loads. The
WaterCop® PRO requires household electrical power,
and the provided power cord must be plugged into a
properly grounded power source (115 VAC). Do not
use an extension cord.
The shut-off valve must be
installed
In the main water line;
•
In place of or just
•
downstream from the main
water shut-off valve;
Where it is accessible
•
Where the case is protected
•
from use as a step or from
other excessive loads.
Local electrical and plumbing
codes should be consulted
to ensure that the installation is in complete
compliance. (See Installation section for details.)
127,&(
,QVWDOODWLRQPXVWEHPLQLPXPRILQFKHVGRZQVWUHDP
RIDZDWHUPHWHULIZDWHUPHWHULVLQVLGHWKHSUHPLVHV
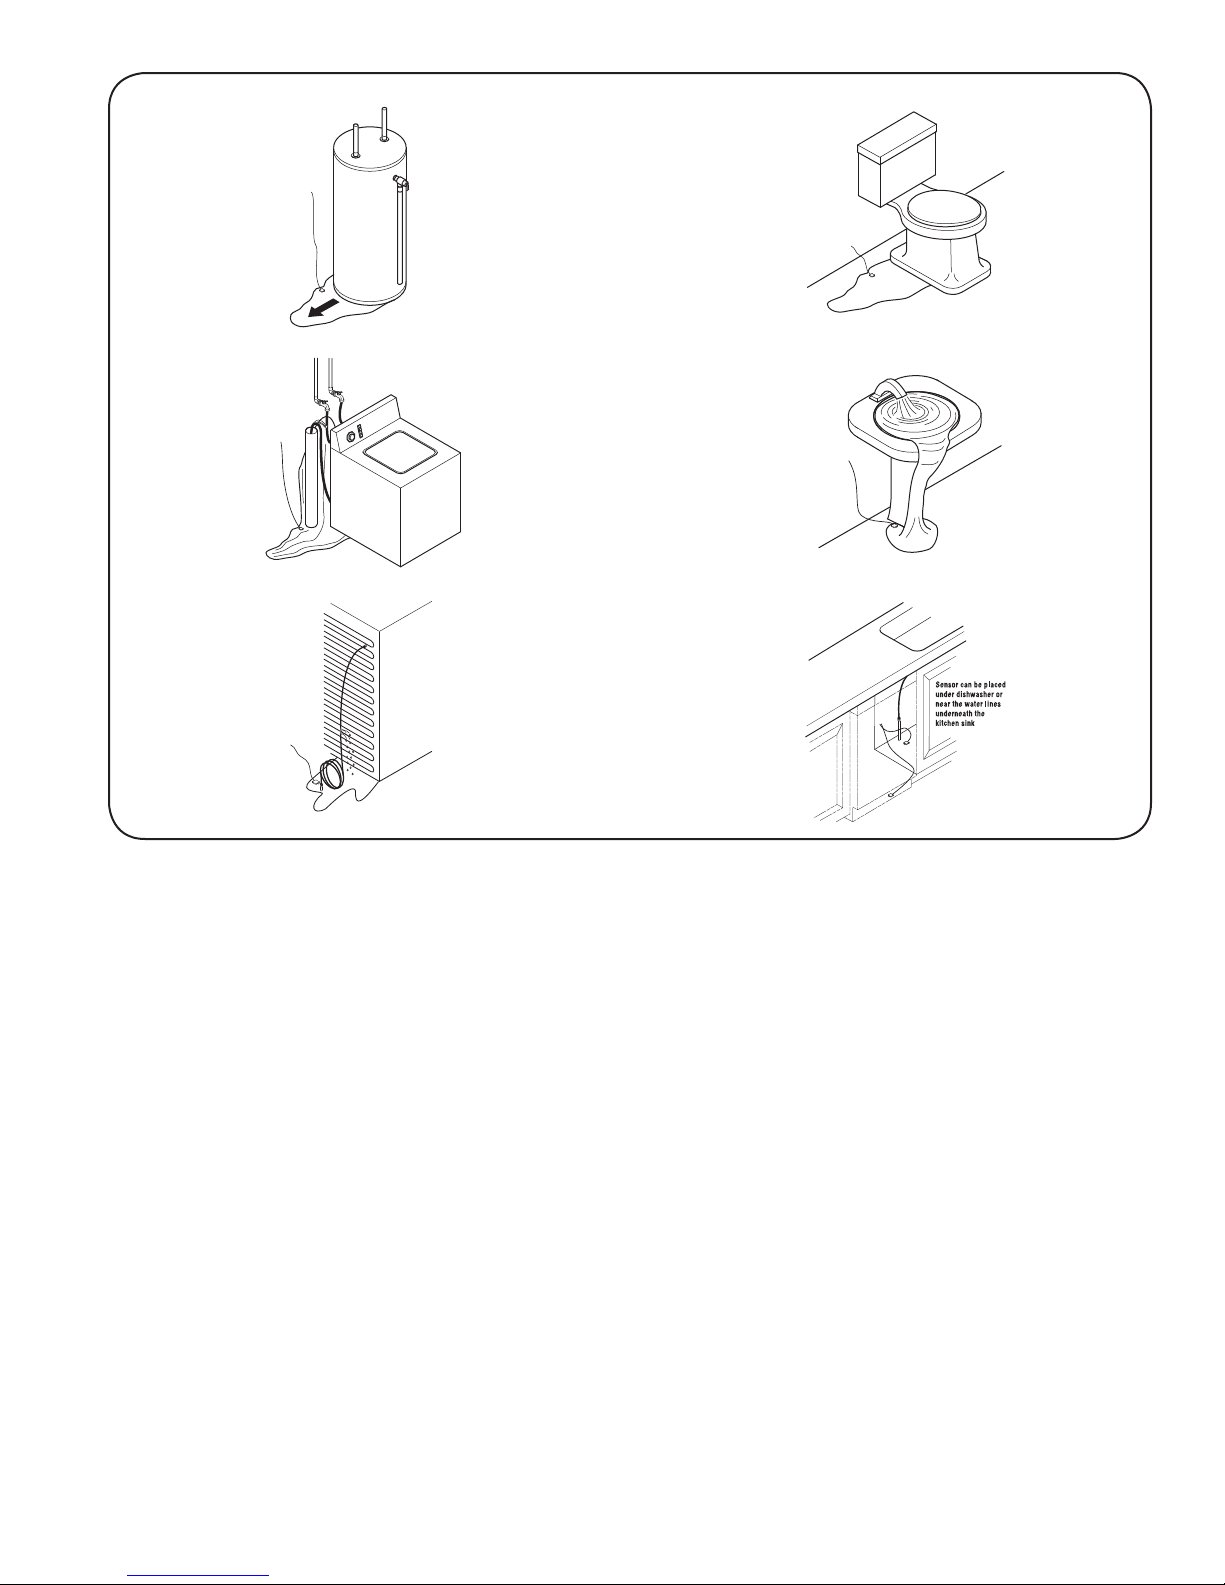
Placement of Flood Sensors
Each WaterCop® PRO can support an unlimited
number of flood sensors. Additional sensors may be
added at any time. A sensor consists of a transmitter
and a sensor probe (a small disc at the end of the wire,
with two short gold prongs protruding from one side).
Flood sensors should be placed in locations where
leaks are most likely to occur.
Suggested Locations
Washing Machines • Toilets
•
Dishwashers
•
Kitchen Sinks
•
Bathroom Sinks
•
Pipes that are prone to freezing (Freeze sensors are
•
also available)
The transmitter in the flood sensors and the receiver in
the WaterCop
The smaller the distance between them, the stronger
the signal will be. Transmission distance is somewhat
dependent upon the building layout and type of
construction. The transmitter (attached to the sensor)
must be kept dry. It is NOT splash proof. Sensors
should never be placed outdoors. The sensor probe
detects the water from a leak and is completely
waterproof. Sensor probes should be placed on the
floor or in areas where water would tend to accumulate
rapidly in common leak or overflow situations. Make
sure that any water from a leak will drain toward
the sensor probe, not away from it. Avoid high traffic
areas where the cord or sensor could be stepped on
or kicked and where children or pets may disturb
The sensor probe should be placed FLAT on the
floor so water can be detected as soon as it begins
to accumulate. The sensor probe may be secured to
the floor with screws. To avoid damage to transmitters
and to provide for the strongest signal possible, the
transmitter portion of the flood sensor should be
mounted in a convenient location (on the wall, in a
cabinet, closet, etc.) two to three feet above the floor
(see illustration). (See Installation section for details on
sensor installation.)
2
®
PRO communicate by radio frequency.
Icemakers/Refrigerators
•
Automatic Humidifiers
•
Water Heaters
•
it.
Flood Sensor Battery Life
High quality alkaline “AA” batteries are recommended.
Under normal conditions (standby mode) the batteries
should last about one year. Each transmitter has a
low battery signal. Replace batteries at least annually
or when low battery signal is detected. Re-test each
unit in its regular location (see installation manual).
If you are away from home for long periods of time,
transmitters should be tested upon your return to
ensure proper function.
Operating the WaterCop® PRO System
The normal position of the valve is open to allow full
flow throughout the plumbing system. WaterCop®
PRO is a full port ball valve which does not restrict the
flow capacity of your plumbing system. The indicator
lights on the face of the WaterCop® PRO will show the
position of the valve.
If the valve is in the closed position (the red light will be
lit), press “open” and the valve will move to the open
position (green indicator will light).
When water comes in direct contact with a flood
sensor, an RF (radio frequency) signal is transmitted to
the WaterCop® PRO and the valve closes, turning off
the water source to protect the building from additional
water damage. The red indicator light will signal that
the valve is now in the closed position. The valve will
remain closed until the unit is manually reset on the
WaterCop
®
PRO panel. After the plumbing problem
is fixed, reset the WaterCop® PRO by pressing “open
valve” (green circle) on the face of the WaterCop®
PRO. Valve will open and green indicator will be lit.
See illustration at left.
Note: If major repairs are needed to correct the
plumbing system, it is recommended that the manual
shut-off valve upstream of the WaterCop® PRO also
be closed during the repairs. Close the main water
shut-off valve and unplug the WaterCop® PRO before
making repairs on the plumbing system.
Note: In case of a power failure, the WaterCop® PRO
use the manual shut-off valve to turn the water off in
case of an emergency. When power is restored, the
WaterCop® PRO will remain in its last known position
indicated by the red or green lights on the face of the
unit.
WaterCop® PRO Specifications
Max. working pressure ......125 PSIG
Ambient temperature ......... 35° to 105° F
Enclosure........................... Polycarbonate NEMA 4
Voltage ..............................12 VDC
Current............................... 1.3 Amps
Valve.................................. Full-Port, Brass, NPT
Valve Seals ....................... RTFE
3
 Loading...