


Gemini / Filterking Water Purifiers
Inst Manual Layout - Front Page (A4 size) Date : 29 June 2004
Gemini / Filterking Water Purifiers
Fitting and Operating Instructions
Clean,
Healthy Water
at the Touch of a tap!
(W99151) 06/ 2004
Distributed By :
Damage caused during installation can void your warranty. Find an installer who
is prepared to guarantee their workmanship.
Your warranty covers faulty parts, but does not cover leaks that appear during
or after installation and does not cover any water damage that may result from
such leaks.
Please Use a Skilled Installer
Waterco 12 month warranty. Void if correct fitting and operating instructions are
not observed.
Warranty
Replacement Intervals
The replacement intervals of both cartridges are dependent on water quality
and the volume of water passing through the filter:
If flow is affected, it is time to change the Sediment Cartridge in the first
housing. As a general guideline the Sediment Cartridge should be changed
every 6-12 months.
If taste/ odour is affected, it is time to change the Purifying Cartridge in the
second housing. As a general guideline the Purifying Cartridge should be
changed every 8-12 months.
If you have installed a Filterking, if either flow or taste/ odour is affected please
change the carbon cartridge. If the flow is affected within a short time period, Waterco
recommends the installation of a Gemini Undersink Unit with a 5 micron pre-filter.
Sediment Cartridges
Purifying Cartridges
5 Micron Sediment Cartridge
(3651993)
Extruded Carbon Block 1 micron
(3651970)
Ceramic Cartridge 1 micron
(3649020)
CZR/ Carbon Cartridge
(3651919)
Extruded Carbon Block 5 micron
(3651971)
Troubleshooting
Problem Reason Solution
Water has an
offensive odour
Not enough
water
No water
Under sink
is wet
Sediment/ Carbon filter
are depleted
Low water pressure
Water supply is blocked
Clogged pre-filter cartridge
Water supply is turned off
Leak from valve,
faucet or fitting
Replace filters, clean system.
If line pressure is below 30psi
install a booster pump.
Clear restriction.
Replace prefilter.
Turn on water.
Dry everything to isolate the leak.
Before replacing any fitting, re-cut
the tubing and re-insert into the
fitting to see if that solves the leak.
If pipe threads are leaking, remove
and retape with Teflon tape.
Waterco stocks an extensive range of water filtration products,
contact your local Waterco stockist for more information.
Or visit our website at www.waterco.com
Waterco Limited ABN 62 002 070 733
MALAYSIA
Kuala Lumpur
Tel : +60 3 6250 8169
Fax : +60 3 6250 8175
CHINA
Guangzhou
Tel : +8620 8335 1107
Fax : +8620 8335 1114
QLD
Brisban
e
Tel : +61 7 3299
9900
Fax : +61 7 3299 9911
SA/ NT
Adelaide
Tel : +61 8 8244 6000
Fax : +61 8 8244 6011
WA
Perth
Tel : +61 8 9344 5533
Fax : +61 8 9344 5506
DISTRIBUTOR ACT
Canberra
Tel : +61 2 6280 647
6
F
ax : +61 2 6239 1
395
NEW ZEALAND
Auckland
Tel : +64 9 525 7570
Fax : +64 9 525 6580
NSW
(
HEAD OFFICE
)
Sydne
y
Tel : +61 2
9898 8686
Fax : +61 2
9898
175
4
O
FFICES - AUSTRALI
A
VIC/ TAS
Melbourne
Tel : +61 3 9879 514
1
Fax : +61 3 9879 514
3
UNITED STATES OF AMERICA
Phoenix
Tel : +1 623 434 4703
Fax : +1 623 434 4704
O
FFICES - OVERSEA
S
EUROPE
Lacron (UK) Ltd
Kent, United Kingdom
Tel : +44(0) 1795 521 733
Fax : +44(0) 1795 522 085
✽
✽
✽
✽
To Ensure the Purest Water Possible
Restrict the flow rate to 1-3 litres per minute. If the resulting flow rate is
more than 3 litres per minute, use a flow inhibitor.
Flush your purifier for 5-10 seconds each time you use it.
Regularly maintain the filter and purifying cartridges.
If filter is not in use for more than 24 hours, flush filter for a minimum
of 1 minute prior to using.
Please read this entire guide prior to beginning installation.
The Gemini/ Filterking drinking water purifier has been designed for quick and
simple installation and maintenance. By carefully reading this instruction manual
and following the operational guidelines you will ensure a successful installation
and reliable operation.
Do not use on water that is microbiologically unsafe or of unknown quality. The
Gemini/ Filterking is normally installed under a sink or basin, but can also be
plumbed-in or wall-mounted. In all cases you need a pressurised, sterilised and
drinkable cold water supply.
Your Gemini/ Filterking is supplied with an installation kit that allows connection
to a dishwasher type cold tap with a 3/4" BSP male thread. If a convenient tap
is not available, you may either have one installed or purchase the suitable inlet
fittings from your supplier.
Fitting and Operating Instructions
G
g
emini/ Filterkin
g
W
ater Purifier
s
Plumbing the system
1. Locate the water shut-off valve for the cold water feed line you choose to use
for the supply. To assure you are using the cold water line, turn on both the hot
and cold faucet. After the water is warm to touch, feel the pipes under the sink.
It will be easy to identify the hot and cold pipes.
2. Close the cold water valve. Turn on the cold water faucet to assure that the line
is completely shut off and the line is drained. If no shut off valve is located
underneath the sink, turn off the main supply at the entry to the house.
3. The Gemini/ Filterking is supplied with an installation kit that allows connection
to a dishwasher type cold tap with a 3/4" BSP male thread. If a convenient tap
is not available, you may either have one installed or purchase the suitable inlet
fittings from your supplier. Connecting to the cold water main will require a
qualified plumber. There must be a tap to turn off the water for maintenance.
Use cold water only.
Activating the system
Once the Gemini/ Filterking is connected, open the faucet before turning on
the tap to displace air inside the filters. Let the water run for at least 5 to 10
minutes to flush the filter of fines (these particles are harmless). Turn the faucet
off and check for leakage. Recheck overnight.
Components
Check the following list of components to ensure that all parts are packed with
your system.
5, 6, 7, 8 & 11 are factory fitted.
1. Faucet set.
2. 1/4" BSP nut with brass olive.
3. 6mm blue tube x 1m.
4. 1/4" BSP John Guest Straight
Adaptor (3 sets).
5. 1/4" x 1/4" BSP nipple.
6. Filter Housing with Purifying
Cartridge.
7. Filter housing with Sediment Cartridge.
8. Mounting bracket.
9. 3/4" x 1/4" BSP brass reducing coupling.
10. 6mm yellow tube x 1m.
11. Filter housing's mounting screws
(8 supplied).
12. Wall mounting screws with plugs
(2 supplied).
Gemini Plus
TWIN U/SINK UNIT
Sink or
Bench top
4
9
10
4
8
7
1
6
4
5
11
&
12
2
3
* Filterking consists of only one filter housing with an extruded carbon block
and a single mounting bracket.
Gemini / Filterking Water Purifiers
Inst Manual Layout - Inner Page (A4 size) Date : 30 June 2004
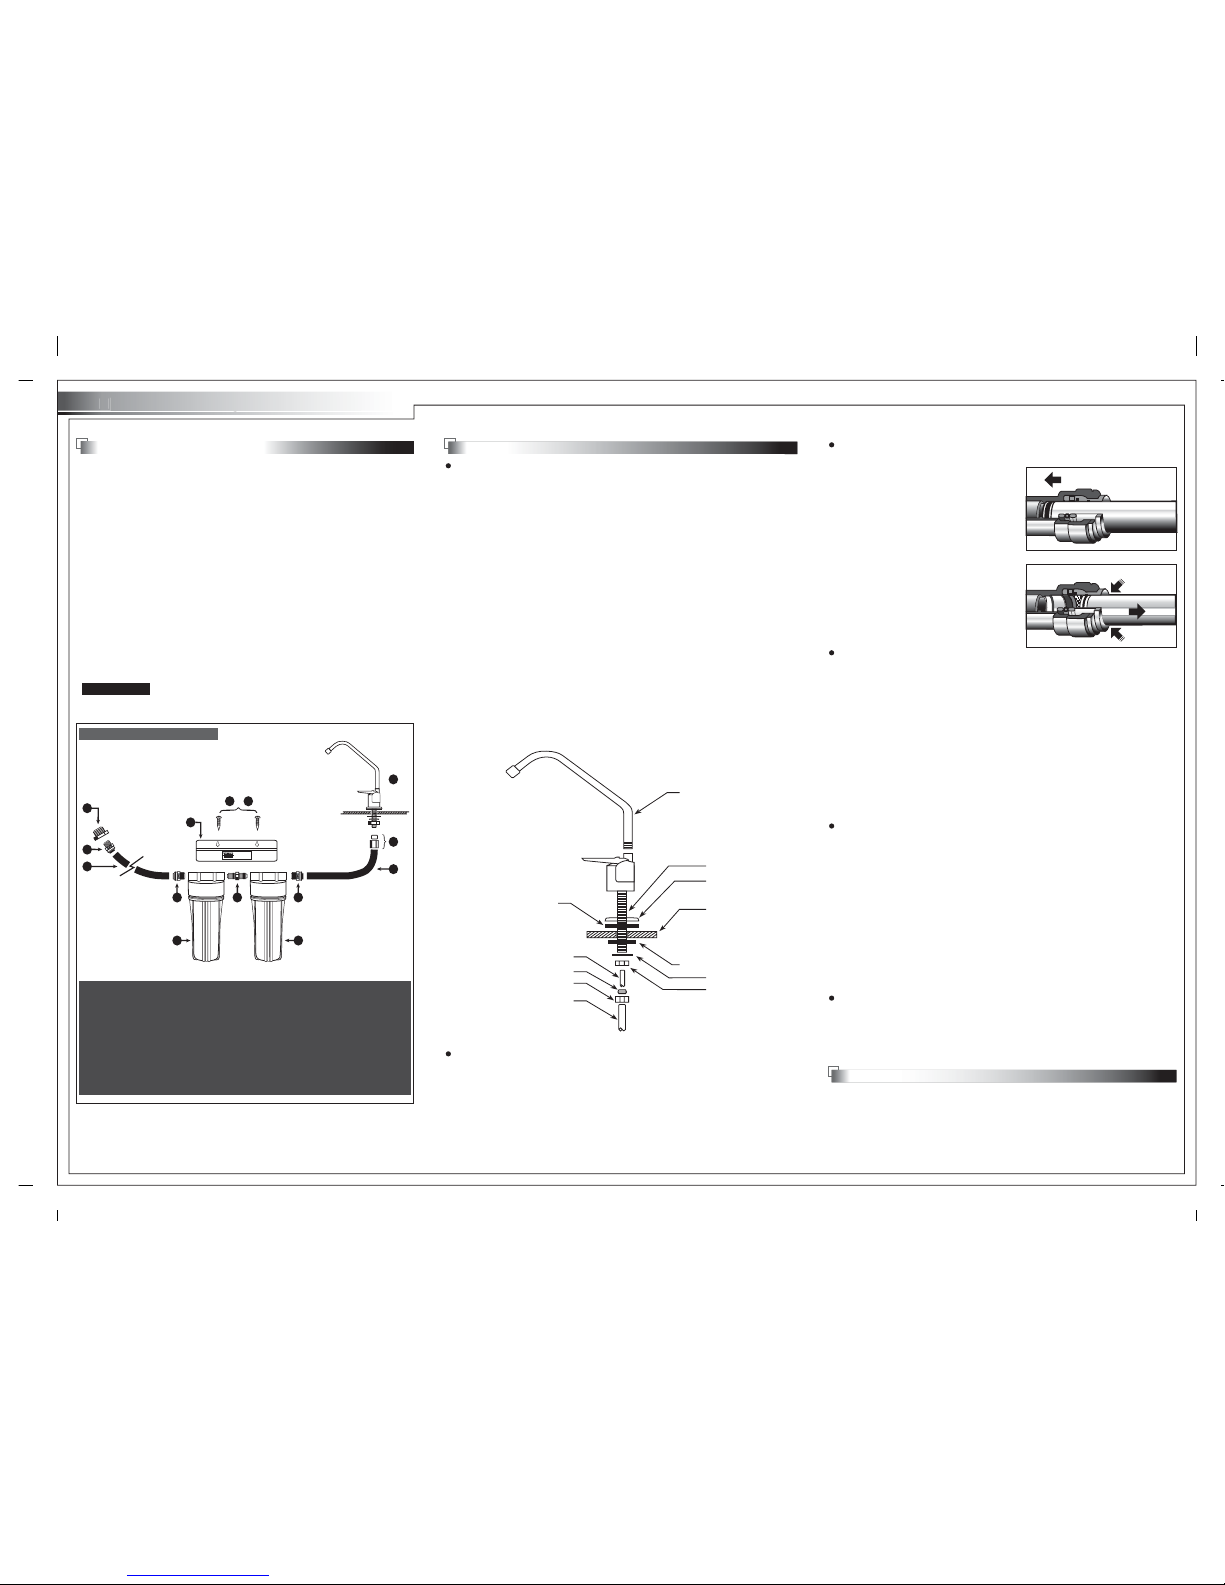
Escutcheon
Plate
Mounting
Surface
Lock Washer
Lock Nut
Tube Insert
Spout
Shank
Black Locating Washer
Ferrule
Compression Nut
Black Rubber Washer
Blue Tubing
1. Decide the location of the faucet on top of the bench top or sink top. This should
not be more than 1.8m from the cold water supply. Make sure that drilling a 7/16"
diameter hole in that location will not damage pipes or wires running under the sink.
2. Place a piece of masking tape or duct tape on the determined location where hole
is to be drilled.
3. Use a variable speed drill at slow speed with 1/8" (3mm) drill and drill a centering
hole in the center of the desired faucet location. Use lubricating oil to keep the drill
bit cool while drilling.
4. Enlarge the hole using a 1/4" (6.4mm) drill bit.
5. Enlarge the hole to 7/16" (11mm) diameter. Keep bit well oiled and drill slowly.
6. Pass the Escutcheon Plate (chrome base plate) and the Black Rubber Washer in
that order onto the shank on the base of the faucet.
7. From under the sink, install the Black Locating Washer and the Lock Washer over
the threaded shank. Screw on the Lock Nut and tighten.
8. Sleeve the Compression Nut and the Ferrule over the Blue tube, insert the Tube
Insert and push to the end of the threaded stem. Screw on the Compression Nut
and tighten with a spanner.
Installation
Faucet Installation.
John Guest Fittings and Tubing
John Guest fittings are used throughout the system.
1.
To install the tube, push it through the
collet until it seats firmly. The collet
has stainless steel teeth which grip
the pipe whilst the o-ring provides a
permanent leak-proof seal. Pull on
the pipe to check it is secure. It is
good practice to test the system prior
to leaving the site and/ or before use.
2.
To remove the tube, please ensure the
system is depressurised. Push in the
collet squarely against the face of
fitting. With the collet held in this
position, the tube can be removed.
Push Pipe To Stop
Push In Collet
Remove Pipe
Housing Installation
1. Using the filter housing assembly to mark the position of the 2 mounting screws,
making sure there is room for maintenance, drill 2 x 3mm holes for the mounting
screws. Insert the wall plugs; screw the screws in the gap for the Mounting
Bracket.
2.
Apply 2 turns of Teflon tape to the nipple side of the John Guest Adaptors (items 4).
Screw the nipples into the inlet and outlet of the filter housing assembly. Connect
the blue tube to the outlet side and the yellow tube to the inlet side. Screw the
nipple on the other end of the yellow tube into the 3/4" x 1/4" BSP brass reducing
coupling (item 9).
The spout can be rotated through 360˚ for added convenience.
When small amounts of water are required from the faucet, push down or gently
pull up on the faucet handle.
For large amounts of water delivered hands-free from the faucet, pull up on the
faucet handle until it locks into the open position.
Operation
Warning !
Excessive pressure or water hammer can damage plumb-in systems. Do not,
under any circumstances, connect to a pressurised water supply without testing
pressure with an accurate gauge. If pressure is above 125 psi (875 kPa) day
or night, or if any water hammer problems exist, a high quality pressure limiting
/ anti-hammer valve must be installed.
A non-return valve must be installed in the water supply line or between the
supply line and the first filter housing. This will ensure no water returns to the
supply.
The responsibility must always lie with the installer to check the water-tightness
of all fittings and connections after the product is subjected to full line pressure.
The installation must be checked last thing at night and again early the next
morning after the day of installation, to make sure there are no drips from
inadequately sealed connections.
 Loading...