

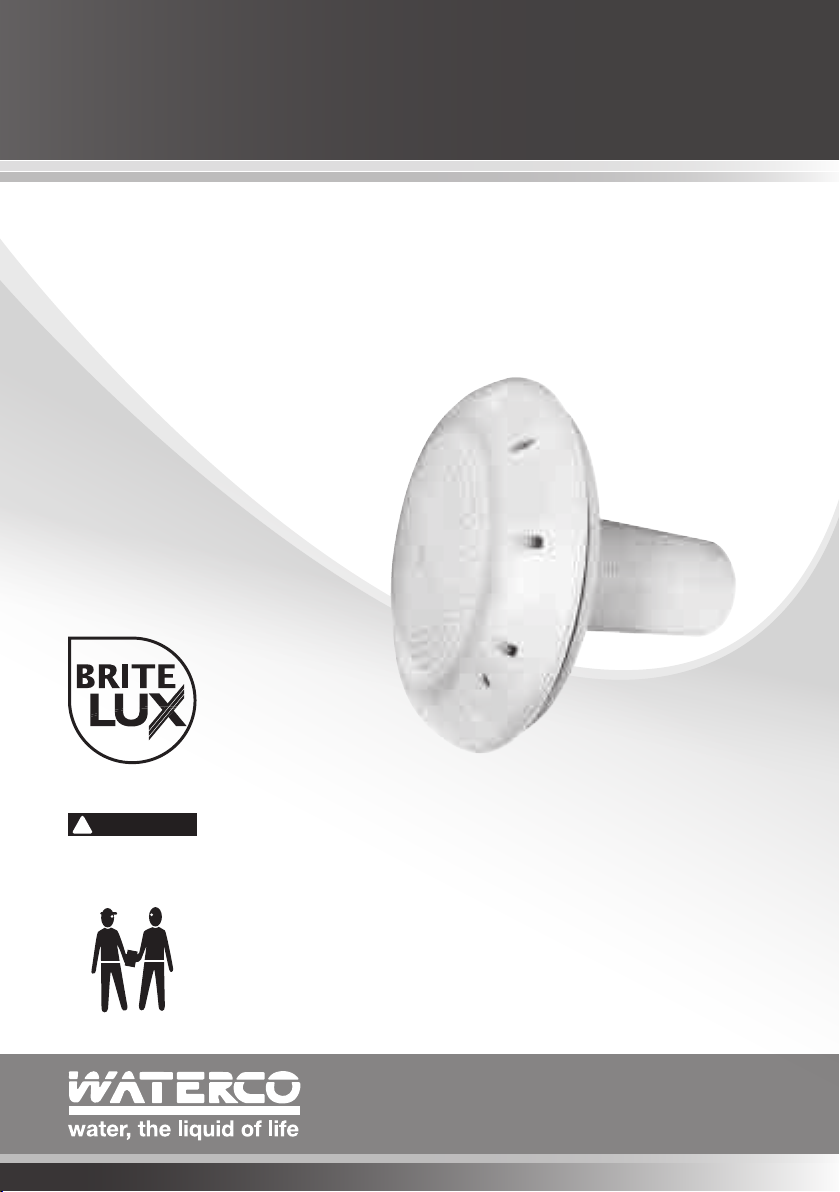
BRITESTREAM LED FIBREGLASS
NICHE POOL LIGHTS MK5
Owner’s Manual
WARNING
!
SAFETY INSTRUCTIONS: - Read prior to Installing or using Waterco Pool Light
Transformer for LED pool lights. This equipment must be installed and serviced
by a qualified technician.
Improper installation can create electrical hazards which could result in property
damage, serious injury or death. Improper installation will void the warranty.
If the electrical supply cord of this product is damaged, return to supplier for
repair to avoid hazards.
Notice to Installer
This manual contains important information about the installation, operation and safe use
of this product. Once the product has been installed this manual must be given to the
owner/operator of this equipment.
www.waterco.com
LED FIBREGLASS NICHE POOL LIGHT INTRODUCTION
144
The Waterco LED Niche berglass pool light has been specically designed for easy installation
into breglass pools. Features include the following:
• Flush mounted with a minimal 28mm projection into pool.
• Super bright LED’s capable of delivering 352 lumens (White LED).
• 180° illumination.
• Operates on only 15% of the electrical power of a halogen light.
Available in multicoloured RGB, blue and white models.
CAUTION
• Ensure all pool lights are installed by a suitably qualified persons (e.g. registered pool builder and/or
qualified electrician), in accordance with AS/NZS 3000:2007 standards.
• This pool light is supplied with a 20m power cable and should not be modified. Cutting an underwater
section of power cable will void the warranty unless done so in conjunction with the underwater light
replacement kit.
• The pool light must be installed not more than 600mm below top of coping, to allow for removal from
pool for servicing.
• The recommended length of power cable that is stored within the light niche is 1m. This enables easy
access without the need for entering the pool water.
• Ensure the light is submerged in water before switching on, to avoid overheating.
• Surrounding area has to be clear and unencumbered to allow for adequate space to service the light.
• When switched off, the light should be left to cool for two minutes before switching on again.
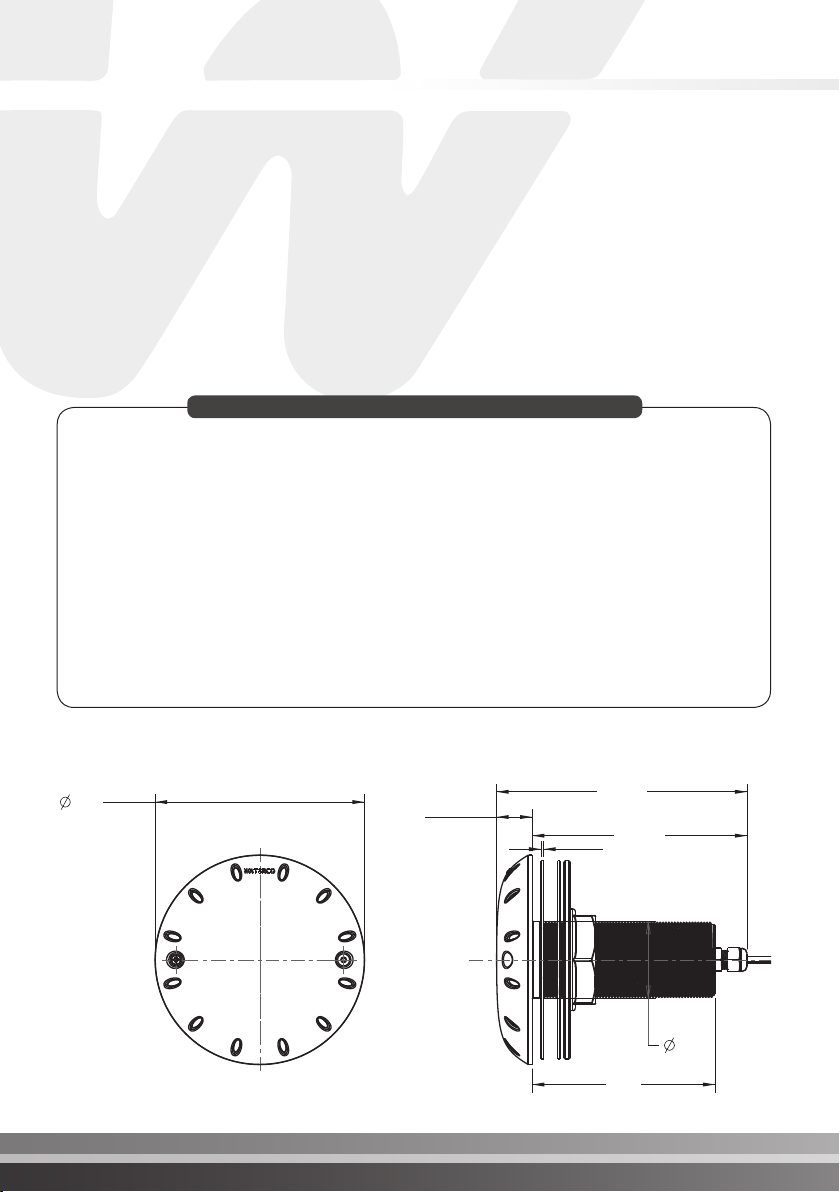
LED FIBREGLASS NICHE POOL LIGHT SPECIFICATIONS
197.3
169.3
2
60
165
Note: Specication size in Millimeters (mm).
28
Waterco Britestream LED Fibreglass Niche Pool Lights MK5
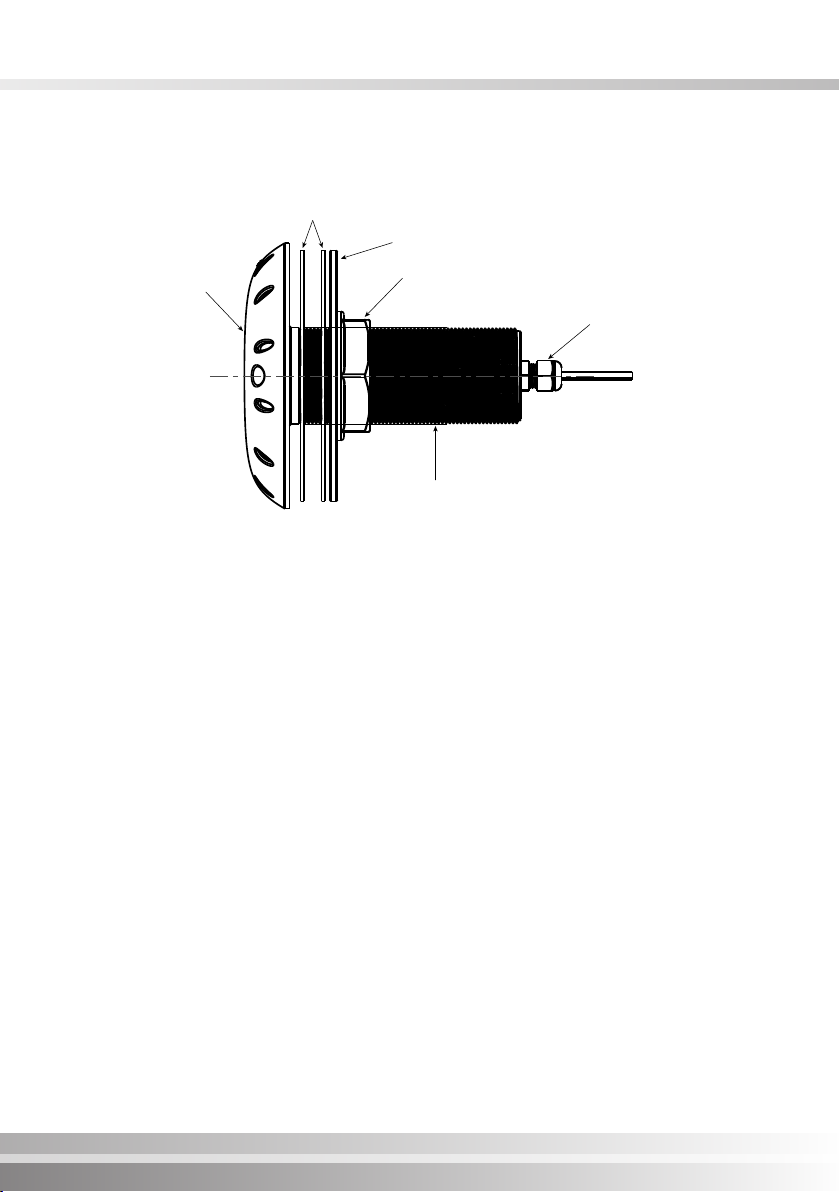
LED FIBREGLASS NICHE POOL LIGHT COMPONENT
IDENTIFICATION
2 x Gaskets
1 x Flange (outer)
I pg 02
Light Lens
1 x 2” BSP Threaded Nut
Gland Nut & Fitting
Flanged Light
Niche Body
INSTALLATION
• Locate the ideal position within the breglass pool wall surface that best suits the lights
installation ensuring this location is not more than 600mm below top of coping.
• Mark this position and using a 2.5” (63.5mm) holesaw drill a hole in the breglass pool wall
that will allow the light to be tted.
• Remove the 2” BSP threaded nut, ange (outer) & outer gasket from the lights niche body and
the 20m power cable.
• Thread the 20m power cable from the inside of the breglass pool through to the outside of
the pool and insert the pool light niche body into the 2.5” (63.5mm) hole.
Note: The inner gasket must be positioned between the pool light lens and the breglass pool
surface.
• Thread the 20m power cable into the outer gasket, ange and 2” BSP nut and install on
the exposed threaded light niche body. Tighten the 2” nut sufciently to ensure the light
assembly is properly secured to the breglass pool wall and will not leak water.
Note: Inspect and repair as necessary the breglass pool walls to ensure the inner & outer
gaskets are able to provide a water tight seal.
Note: It is recommended that the pool light be fully immersed in water & the installation is
inspected for leaks prior to back lling the pool light/s installation area.
• The 20m power cable is now ready for connection to a Waterco single or multi connect pool
light transformer.
Note: For further protection of the power cable the use conduit is an option.

LED REPLACEMENT LIGHT INSTALLATION
15
11
10
13
7
89
14
123456
12
Disconnecting the LED light
• Disconnect power to light at the circuit breaker.
• Remove the 2 screws (12) securing the light lens (1) to the outer ange niche body (3). This
will allow the lens assembly to be removed from the pool water, but will still be connected to
the niche body (3) via the 1m coiled power cord that is stored within the niche body (3).
• Remove the black power cable gland nut and Black gland (11) and slide back along power
cable. Unscrew (turn to left) the gland mount cap (2) exposing the two power wires.
Note: These two wires are connected to the LED light assembly via two quick connect electrical
spade connectors (8 & 9). These can be either disconnected by pulling apart or simply cutting
the two power wires.
You have know successfully disconnected the existing LED light assembly and are ready to
reconnect a new LED light assembly.

Connecting replacement LED light
The replacement LED lights are available as white, tricolour or multicolour RGB models and are
supplied as a complete light assembly with the additional components as follows:
2 x Quick connect spade electrical connectors (8 & 9).
1 x gland mount cap (4) with black power cable gland nut and black gland (11).
2 x “o” rings (10 & 14).
1 x Bottle of natural lanoline.
• If not removed, inspect the two existing quick connect electrical connectors (8 & 9) on the
two exposed wires of the power cable. These should be replaced if there is any suspicion of
damage.
• If required remove the two quick connect electrical connectors (8 & 9) and replace with the 2
x replacements supplied with the LED replacement light.
Note: The exposed wires from the power cable conduit required length is approx 50mm.
Note: The electrical components inspection and installation of the pool lights should be carried
out by a suitably qualified persons (e.g. registered pool builder and/or qualified electrician), in
accordance with AS/NZS 3000:2007 standards.
• Remove the gland mount cap (2) from the rear of the LED replacement light (unscrew to left).
The black power cable gland nut and black gland (14) are tted into the gland mount cap (2).
Unscrew the black power cable gland nut (2) and place over the power cable and push the
power cable through the black gland (11) and gland cap (14).
I pg 04Waterco Britestream LED Fibreglass Niche Pool Lights MK5
Note: Gland nut (14) should not be fully tightened. This will allow for adjustment of power cable.
• If necessary, ensure the 2 x exposed power wires to the replacement LED pool light are
approximately 50mm and then strip the blue and brown wires insulations approximately
10mm. Crimp the two quick connect spade connectors (8 & 9) to the stripped 10mm section
of the blue and brown wires.
• Connect the two quick connect spade connectors (8 & 9) to connectors provided in the rear
cup section of replacement LED light.
• Squeeze natural lanoline from supplied bottle into rear cap of replacement LED light
completely covering the two quick connect spade connectors and ll to top.
Hint: Submerge the bottle of lanoline into a suitable size vessel and add temperate/warm
water, this will help to soften the lanoline for easier ow and ensure the rear cap is completely
full of lanoline for proper protection of the two quick connect spade connectors.
Slide gland mount cap (2) with black gland (11) to the correct position on the power cable
conduit. Ret the two new “o” rings (10 & 13) to the rear of the replacement LED light and
internally of the gland mount cap (2).
Note: Ensure that both “o’ rings are properly tted into the gland mount cap (4) “o” ring seats/
grooves.

• Secure gland mount cap (2) to the replacement LED light by turning to the right and tighten
to ensure there is a water tight seal, and once again check “o” ring is proper tting.
• Ret black power cable gland nut (11) and tighten to ensure proper sealing and locking the
gland mount cap (4) to correct position.
The replacement LED light is now ready to be retted to the outer ange niche body (3) already
secured into the breglass pool wall. Ensure to carefully push the 1m coiled power cable into
the outer ange niche body (3) and ret the new replacement LED light assembly and secure
with the 2 screws (12).
Congratulations, reconnect power to your light at the circuit breaker and your new Waterco
replacement LED light is ready for use.
TROUBLE SHOOTING
FAULT POSSIBLE CAUSE REMEDY
Light not operating
Light very dim and
pulsating
Main house fuse
blows when light
switched on
- Fuse in transformer blown.
- No power to transformer.
- Fault in electrical wiring.
- Mismatch of lamp and
transformer ratings.
- Damaged wiring/ connectors.
- Faulty transformer
- Damaged cable
- Incorrect electrical installation.
- Replace fuse.
- Check main fuses in switchboard.
- Electrician to check.
- Fit correctly rated transformer*.
- Replace wiring/ connectors.
- Call electrician to check
installation.

Waterco Britestream LED Fibreglass Niche Pool Lights MK5
GENERAL SAFETY RULES
1. The installation of the Waterco LED Pool Light should be carried out in accordance to the
safety instructions of swimming pools especially Standard HD 60364-7-702:2010, Install &
protection output circuit in accordance with AS/NZS61558.2.6, AS/NZS 3000:2007 or as
amended and the specic instructions for each facility.
2. The rules enforced on accident prevention should be carefully followed.
3. Any modication of the Waterco LED Pool Light requires the prior consent of the
manufacturer.
4. Original replacement parts and accessories authorized by the manufacturer ensure a high
level of safety.
5. The manufacturer accepts no liability for the damage and injuries caused by unauthorised
replacement parts and accessories.
6. During operation, some parts of the Waterco LED Pool Light are subject to dangerous
electric voltage.
7. Work may only be performed on the Waterco LED Pool Light or on the equipment connected
to it after disconnecting from the mains power.
8. The user should make sure that assembly and maintenance tasks are carried out by
qualied authorised persons and that these persons have rst carefully read the owner
manual.
9. The operating safety of the Waterco LED Pool Light is only guaranteed if the owner manual
instructions are correctly followed.
10. In the event of defective operation or fault, contact the manufacturer’s Technical Support
Department or its nearest Authorised Agent.
11. If the supply cord is damaged, it must be replaced by the manufacturer or its service agent
or a similarly qualied person.
12. This appliance is not intended for use by persons (including children) with reduced
physical, sensory or mental capabilities, or lack of experience and knowledge, unless they
have been given supervision or instruction concerning use of the appliance by a person
responsible for their safety.
I pg 06
WARRANTY
BriteStream LED lights are covered by a comprehensive 2 years warranty. Please refer to the
Waterco Warranty Booklet for further details.

Offices - AustrAliA
NSW - SYDNEY
(HEAD OFFICE)
Tel: +61 2 9898 8600
QLD - BRISBANE
Tel: +61 7 3299 9900
Offices - OVerseAs
WATERCO (EUROPE) LIMITED
Sittingbourne, Kent, UK
Tel: +44 (0) 1795 521 733
WATERCO FRANCE
Saint Priest, France
Tel: +33 4 72 79 33 30
VIC/TAS - MELBOURNE
Tel: +61 3 9764 1211
WATERCO (USA) INC
Augusta, Georgia, USA
WA - PERTH
Tel: +1 706 793 7291
Tel: +61 8 9273 1900
WATERCO CANADA
SA/NT - ADELAIDE
Tel: +61 8 8244 6000
ACT DISTRIBUTION
Tel: +61 2 6280 6476
Longueuil, Quebec, Canada
Tel: +1 450 748 1421
WATERCO (NZ) LIMITED
Auckland, New Zealand
Tel: +64 9 525 7570
Waterco Limited ABN 62 002 070 733
(W63495) 10/2016
WATERCO © LIMITED
Guangzhou, China
Tel: +86 20 3222 2180
WATERCO (FAR EAST) SDN BHD
Selangor, Malaysia
Tel: +60 3 6145 6000
PT WATERCO INDONESIA
Jakarta, Indonesia
Tel: +62 21 4585 1481
WATERCO SINGAPORE INTL PTE LTD
Nehsons Building, Singapore
Tel: +65 6344 2378
 Loading...