

Page 1
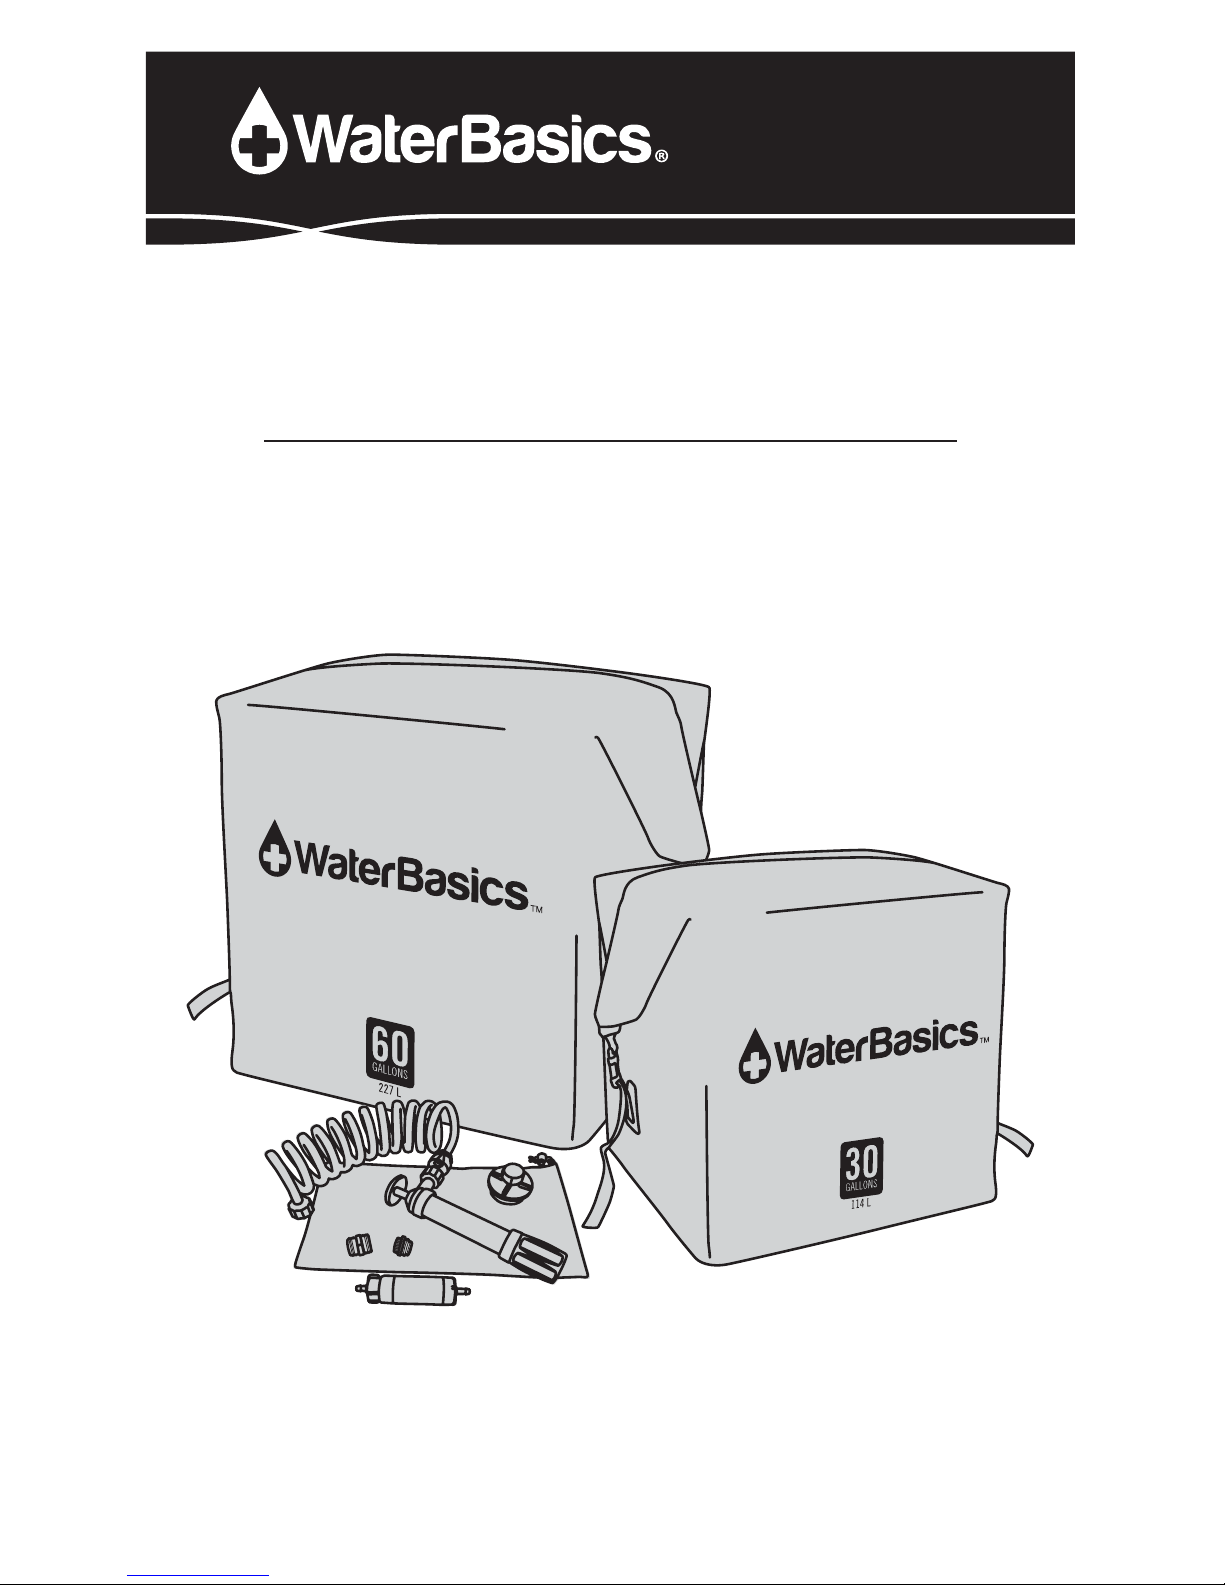
WATER STORAGE KIT
30 GALLON TANK + PUMP & FILTER
60 GALLON TANK + PUMP & FILTER
USER MANUAL
Model Number 67260 and 67262
EPA Establishment #71766-UT-001
Page 2

TABLE OF CONTENTS
Introduction
Features
Emergency Water Storage Tips
Notices, Cautionary Statements, and Warnings
Limited Warranty and Disclaimer
Components and Parts List
How to Set Up and Fill Tank
How to Pump and Dispense Water
How to Pump and Filter Water from Rigid Container
How to Pump and Filter Water to 5 Gallon Container
How to Pump and Filter Water From 5 Gallon Container
How to Drain Storage Tank
Hot to Use Filter as an Emergency Straw
Maintenance and Storage
Technical Information
Replacement Parts
Certifications and Patents
2
2
3
3–4
4
5–6
7
8
9
10
11
11
12
12
13
14
14
1
Page 3

INTRODUCTION
KIT FEATURES
Thank you for purchasing The WaterBasics® Emergency Water Storage
Kit! You have taken an important step toward being prepared for any
water emergency that compromises the safety of your drinking water
supply. Your fully collapsible kit allows you to easily transport your water
security during any crisis that requires a home evacuation. The system
can also be relied upon in oce environments, during RV or long
distance travel, and for recreational camping.
Unlike bulky plastic water barrels, the WaterBasics Emergency Water
Storage Kit requires little space to store and is fully collapsible for easy
transport in an emergency. The collapsible tank stows neatly, sets up
easily, and is perfect for home, recreation, and emergency use.
We welcome you to the growing family of WaterBasics owners, who have
made life-saving water a priority.
• Quick and easy set-up
• Small footprint
• Easy to transport and store
• Ideal for emergencies or recreational use
• Double-wall food-grade LDPE liner
• Easy open and close, 100% waterproof shell provides a second level
of protection
• Patented Bung Adapter provides access to liner and works with 55/30
gallon drums
• Easy to operate hand pump can be used with or without a filter
• Telescoping draw tubes adapt to a variety of container sizes
• Fitting kit has multiple adapters for easy filling and draining options
WATER STORAGE KIT
2
Page 4

EMERGENCY WATER STORAGE TIPS
Water is necessary for survival and an essential component of emergency preparedness. Most likely, clean drinking water will not be available
immediately following a disaster. Municipal water supplies may be cut
o or compromised because of damage or contamination. You may not
be where your stored water is located when an emergency occurs. Be
prepared to supply water for yourself and others by having a water
system that can go with you and be quickly set up to provide an
adequate supply of life-saving water wherever you are.
PLAN AHEAD - BE PREPARED
• Plan for 1 gallon of water per person per day for drinking and sanitation
• Store or provide capacity for a 3-6 day supply of water per person
• The elderly, children, and nursing mothers require more water
• Water requirements double in hot temperatures
• Medical situations will require more water
NOTICES
• Use only on a flat stable ground surface
• Never leave unattended while filling tank
• Do not fill unit on tables, shelves or counter tops
• Do not attempt to move the storage tank when full
• Avoid freezing temperatures
• Avoid direct sunlight for extended periods
• Avoid contact with sharp objects
• Only fill tank with fresh water (no salt water)
• To avoid cross contamination: Do not handle filter with wet hands
that have been exposed to contaminated water. Do not submerge
filter in water
IMPORTANT SAFETY INFORMATION
3
Page 5

CAUTIONARY STATEMENTS
WARNINGS
LIMITED WARRANTY AND DISCLAIMER
CAUTION — Keep away from small children. The tank liner film may cling
to nose and mouth and prevent breathing.
CAUTION — Pump and hose kit contain small parts. Keep away from
Children.
CAUTION — Only fill with water. Overfilling may result in damage to
liner, tank or surrounding items. Never leave unattended while filling.
CAUTION — Do not connect pump directly to a pressurized water
source, such as an inside or outside faucet. Incorrect use may result in
damage or injury.
CAUTION — When using the faucet adaptor kit to connect directly to
indoor or outdoor faucets: install an approved backflow prevention
device (not-included) in accordance with the local code.
WARNING — Even though all of the water is enclosed within the liner,
children can fall into storage container. Keep liner capped, tank closed,
and straps clipped when filled with water to prevent injury or drowning.
Aquamira warrants all products to be free from defects in workmanship and
materials for one year from the date of purchase by the consumer, or for the
duration of the imprinted shelf life. Filter clogging or normal wear is not a defect.
If you are not satisfied with the performance of an Aquamira product, Aquamira
will repair or replace the product.
Aquamira Technologies, Inc. (Aquamira) hereby excludes any expressed or
implied warranties of fitness for a particular purpose. The following is made in
lieu of any such warranties: The information and specifications supplied by
Aquamira are based on industry standards and are tested using standard
laboratory test conditions which are accepted in the industry to be reliable.
Aquamira does not guarantee that any result shown or claimed will be obtained.
Before using any Aquamira product, the user shall determine the suitability and
the fitness of the products for their intended use. The eectiveness of Aquamira
products may be limited by environmental or hygienic conditions, such as use
with contaminated hands, recontamination after filtration or treatment, failure to
maintain a sterile mouthpiece or downstream equipment, sharing with multiple
users, exposure to extreme environmental conditions such as heat, freezing,
severe shock such as drops or other impact that may damage the integrity of
filters, seals or connections. The user assumes all risk and liability in connection
with its own tests and use. Aquamira shall not be liable for any injury, loss or
damage, direct or consequential, resulting by or from the use, misuse, or inability
to use Aquamira products.
4
Page 6
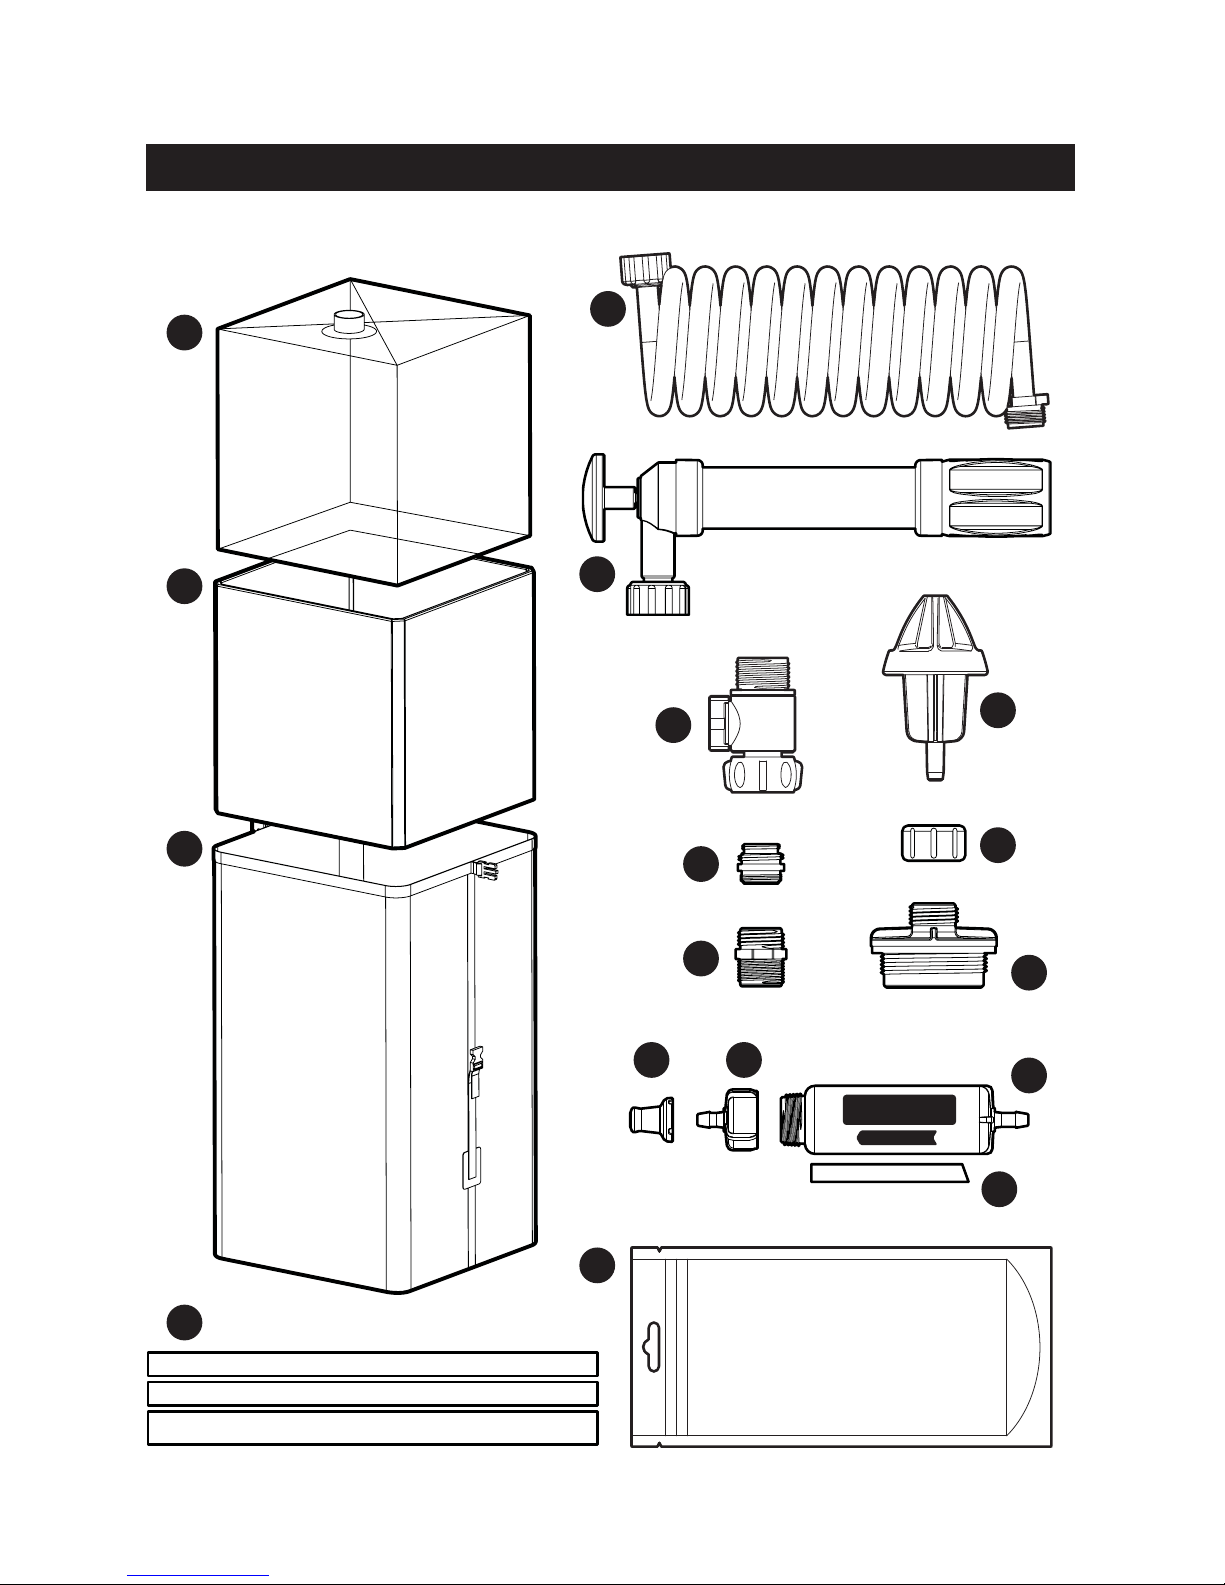
COMPONENTS
WATER STORAGE KIT
3
4
5
6
7
8
9
10
11
12
13
14
15
16
17
2
1
5
RED LINE
WATER FLOW
Page 7
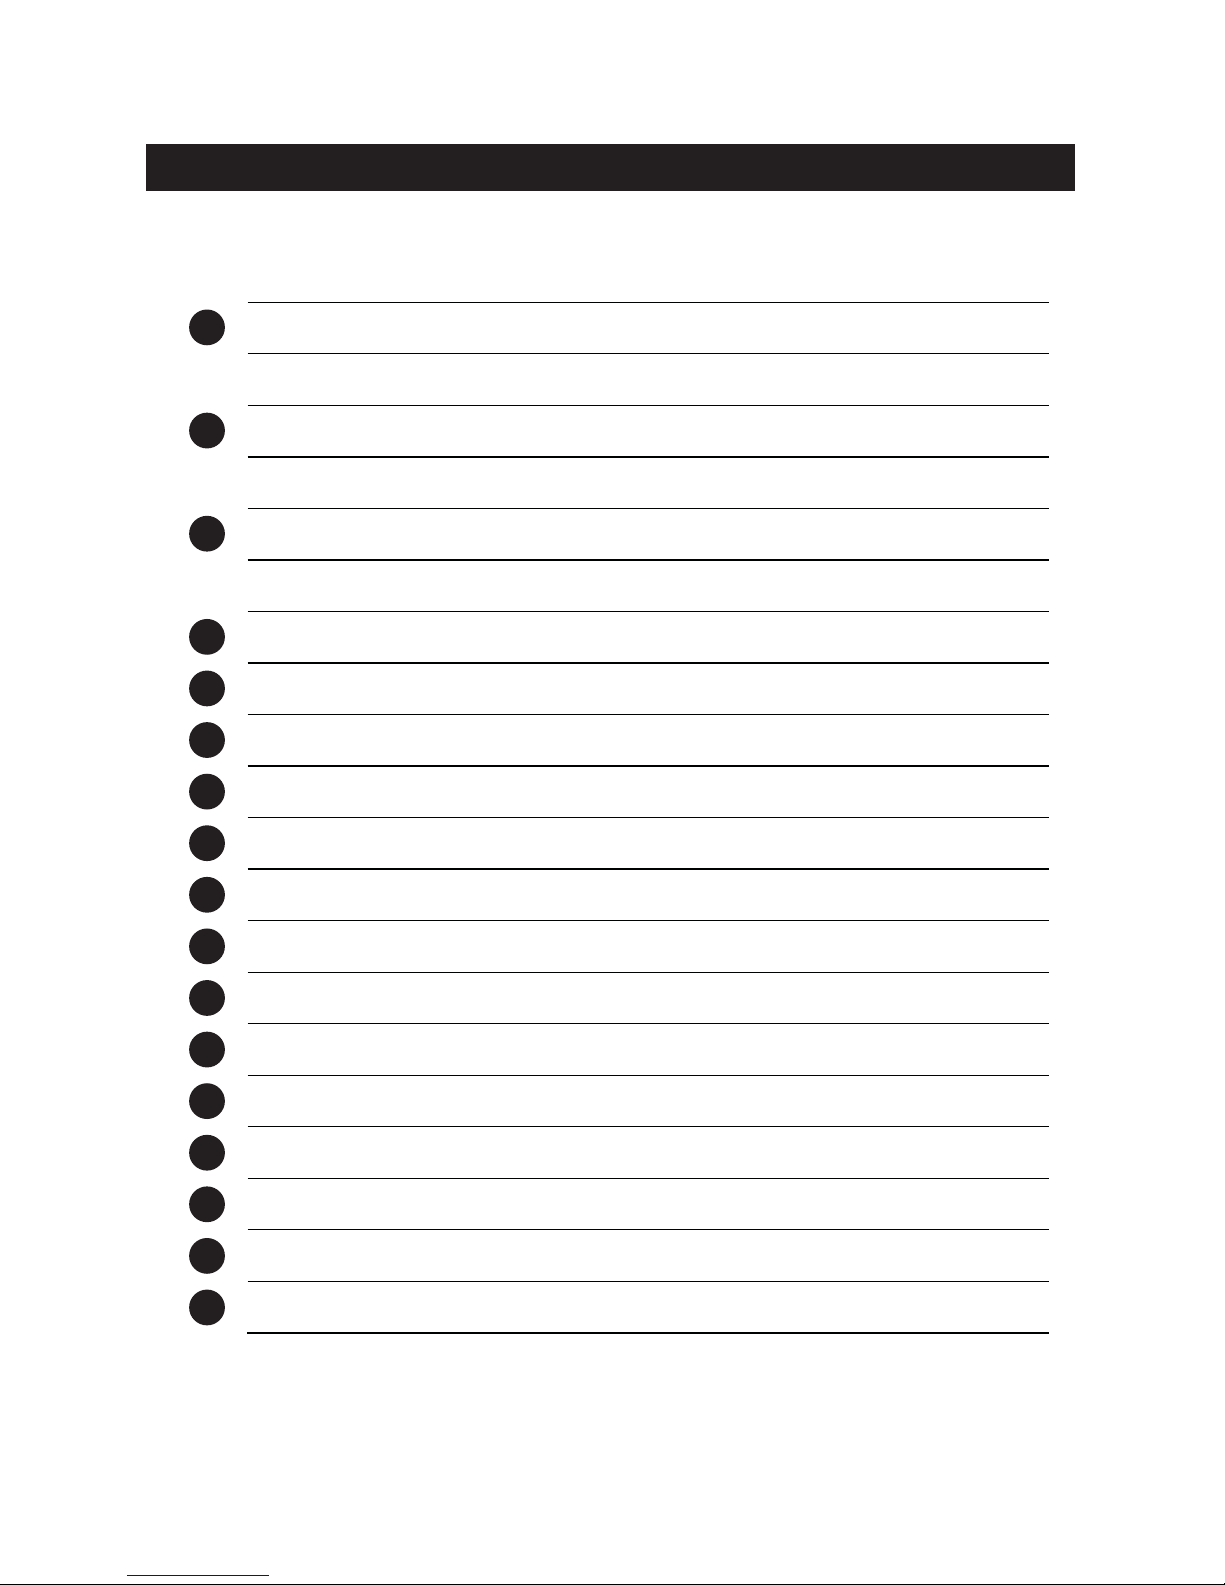
PARTS LIST
PART # ITEM NAME
Tank Liner (60 gallon)
Tank Liner (30 gallon)
Support Panel Set (60 gallon)
Support Panel Set (30 gallon)
Tank Shell (60 gallon)
Tank Shell (30 gallon)
Hose
Pump
Faucet Adapter
3/4” Pipe Thread to Garden Hose Adapter
Garden Hose Cap
Adapter Cap
WaterBasics RED Line Series II Filter
Telescoping Tubes
Valve
Nozzle
Barbed Adapter
Straw
Mouthpiece
Pouch
67270
67271
055168
055169
055039
055040
071452
071451
071453
071453
071453
071400
67259
050120, 050121
045719
045268
045294
050110
047570
016666
3
4
5
6
7
8
9
10
11
12
13
14
15
16
17
2
1
6
Page 8
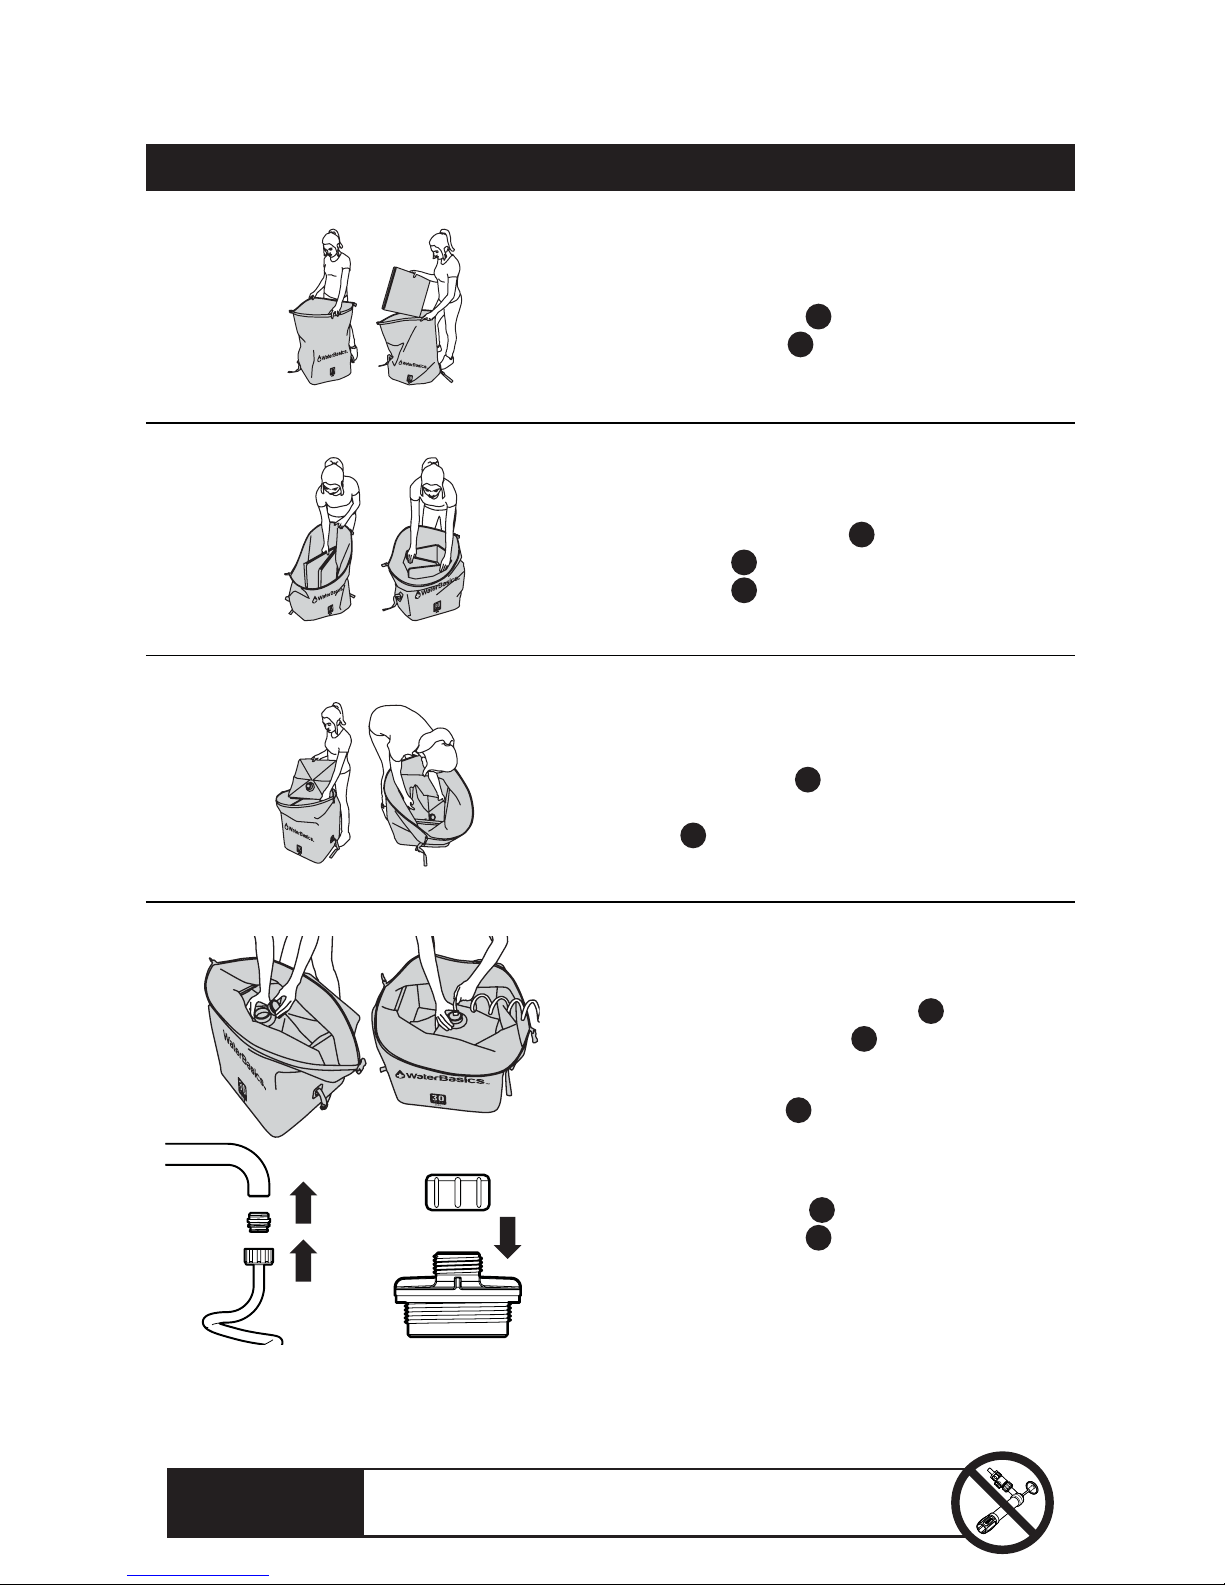
HOW TO SET-UP AND FILL STORAGE TANK
PRODUCT INSTRUCTIONS
STEP 4
Remove cap from tank liner spout
and place filling hose into spout.
Remove faucet aerator and thread on
faucet adapter . Connect female end
of filling hose and begin to fill tank.
When done filling, replace liner cap
with adapter cap and close o with
garden hose cap .
CAUTION — Only fill with fresh water. Overfilling
may result in damage to liner, tank, or surrounding
items. Never leave unattended while filling.
CAUTION — When using the faucet adaptor kit to
connect directly to indoor or outdoor faucets:
install an approved backflow prevention device
(not-included) in accordance with the local code.
7
STEP 1
Unfold tank shell and insert
support panels .
3
2
STEP 2
Place support panels into corner of
tank shell and unfold into sides of
tank shell .
2
3
3
STEP 3
Insert tank liner and align corners of
tank liner with the corners of the tank
shell .
1
3
1
4
6
9
8
CAUTION!
DO NOT connect pump directly to a pressurized water source, such as an
inside or outside faucet. Incorrect use may result in damage or injury.
Page 9
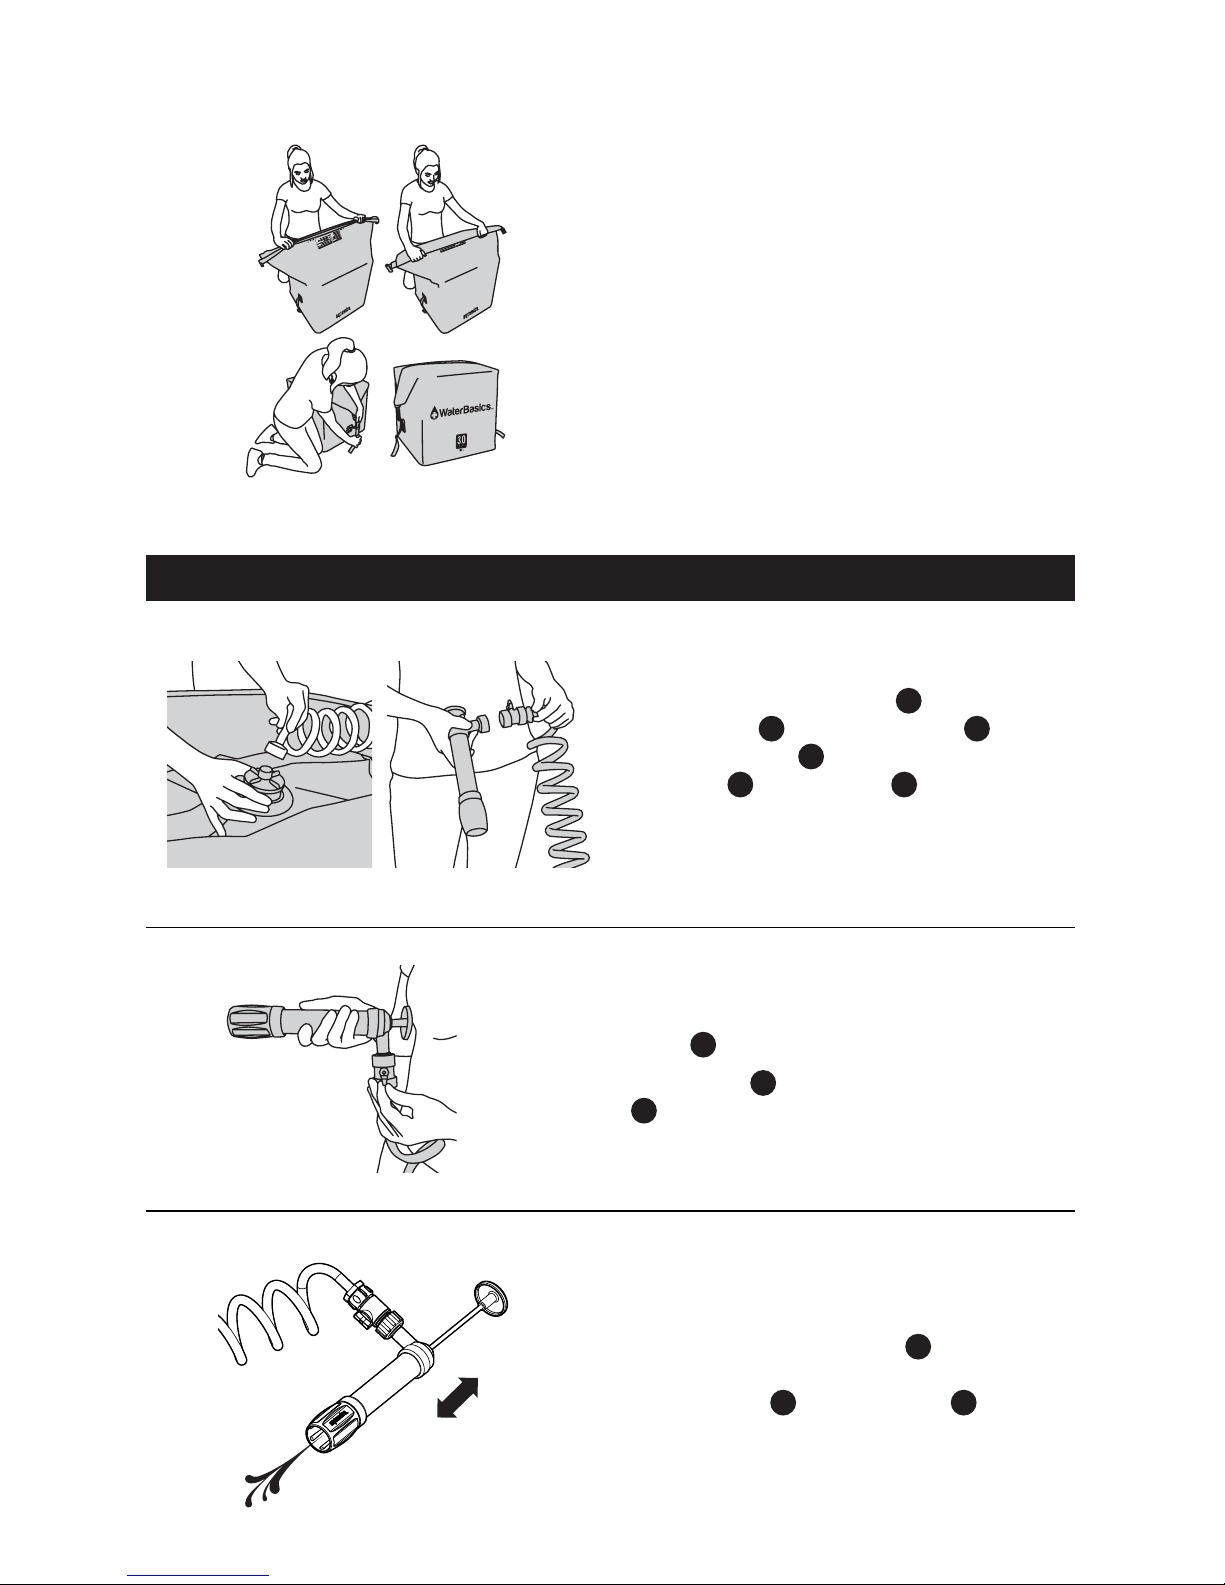
HOW TO PUMP AND DISPENSE WATER
STEP 5
Close top and roll down 2 times.
Clip buckles and tighten straps to
secure top.
8
STEP 6
Remove garden hose cap from
adapter cap . Attach the hose to
the adapter cap and the end with
the valve to the pump inlet.
CAUTION — Do not connect pump directly to a
pressurized water source, such as an inside or
outside faucet. Incorrect use may result in
damage or injury.
4
9
9
12
5
8
STEP 7
Valve Operation Notice:
Open valve before use, close valve
- after use.
(Valve is shown in OPEN position)
12
12
12
STEP 8
Flush and prime the pump by
pumping until all air is evacuated from
the tank liner and the pump . Each
stroke should expel a steady stream of
water without bubbles or spurts.
5
1
5
Page 10
9
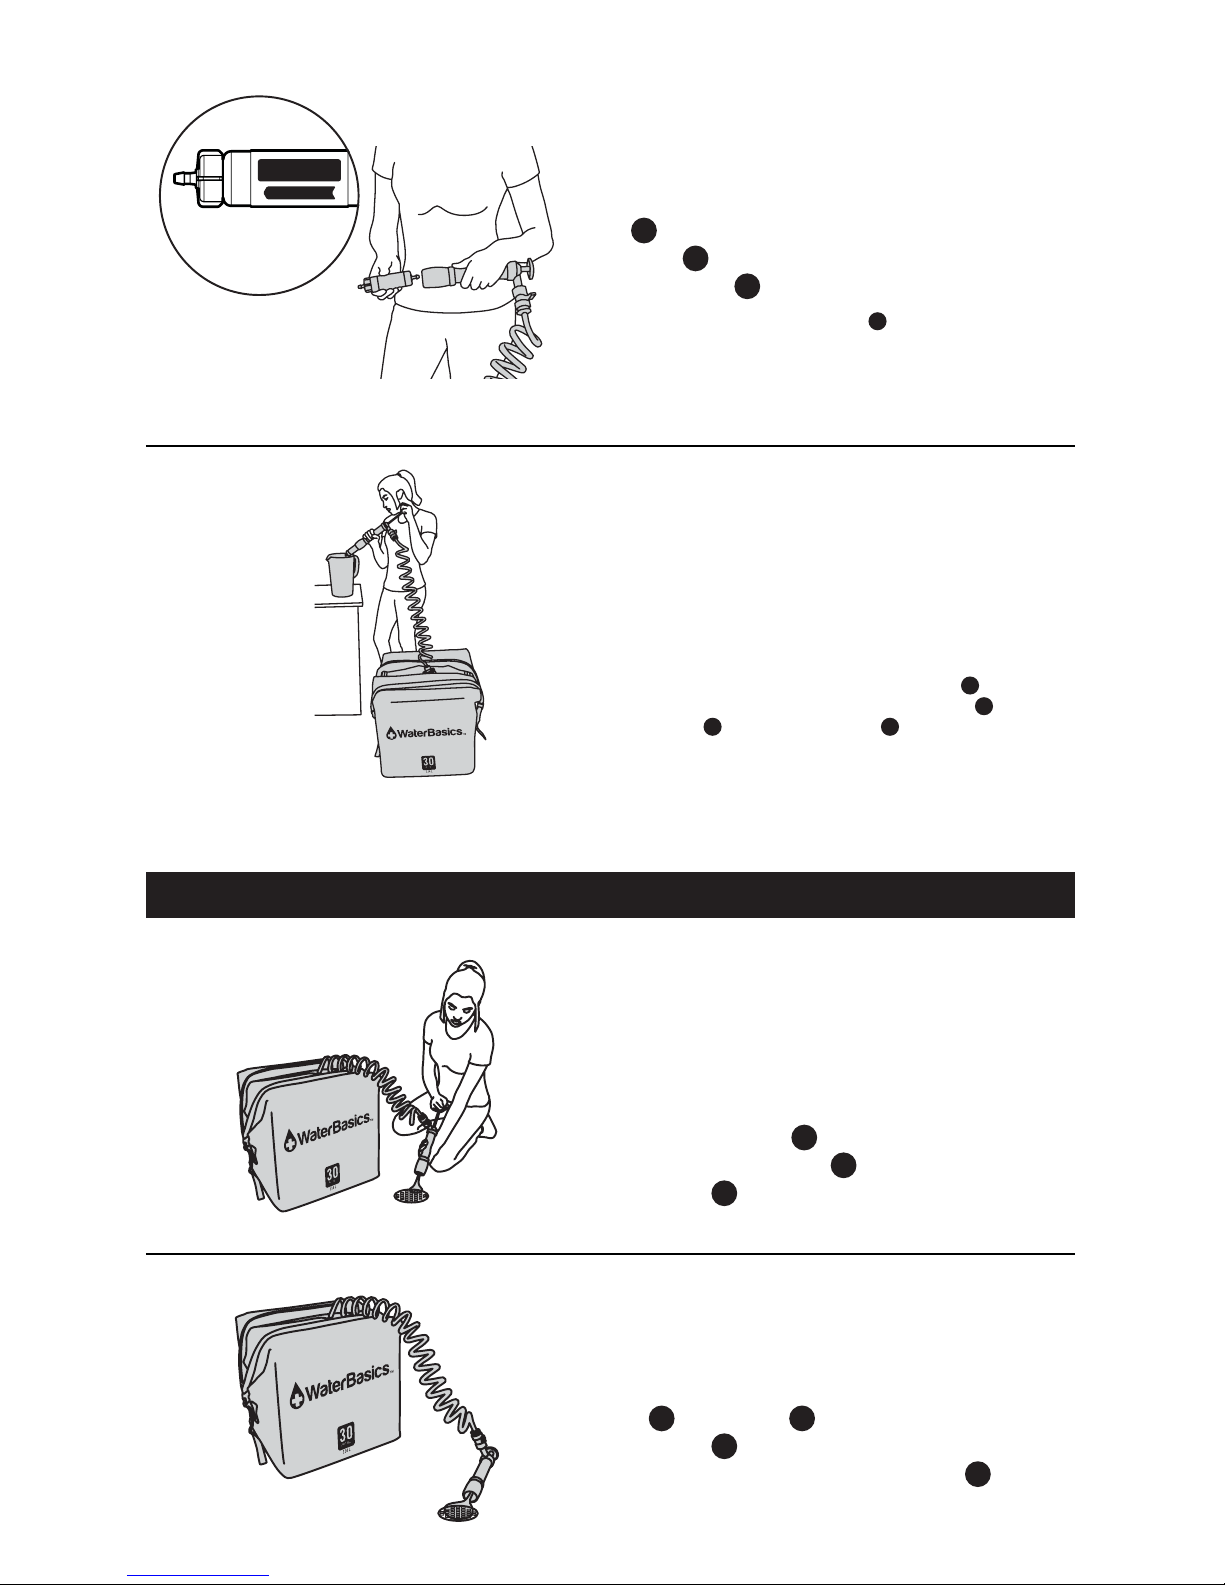
STEP 10
Pump with steady strokes to dispense
filtered water into clean containers
for use.
When not dispensing water, turn the valve
to the CLOSED position and store the pump
and hose inside the tank shell to prevent
contamination.
12
5
3
4
STEP 9
Locate the flow direction on the filter
- and press the INLET end of the
filter firmly into the OUTLET end of
the pump .
When using a new or dry filter the filter media
will trap some air slowing the flow until the media
is thoroughly wetted and the air is expelled. Allow
several minutes of pumping to purge the air from
the filter.
10
10
5
10
RED LINE
WATER FLOW
WATER
FLOWS AWAY
FROM PUMP
HOW TO DRAIN STORAGE TANK
Locate floor drain or other suitable drain
location, such as a bathroom tub or
outside drain. (Note that the drain must
be below the level of the tank). Confirm
that the valve is in the OPEN position
and that the filter is removed from the
pump .
STEP 11
Pump several strokes to prime the hose
- and pump . Once primed, set the
pump down near the drain. The siphon
eect will empty the tank liner .
STEP 12
12
10
5
4
5
5
1
Page 11
10
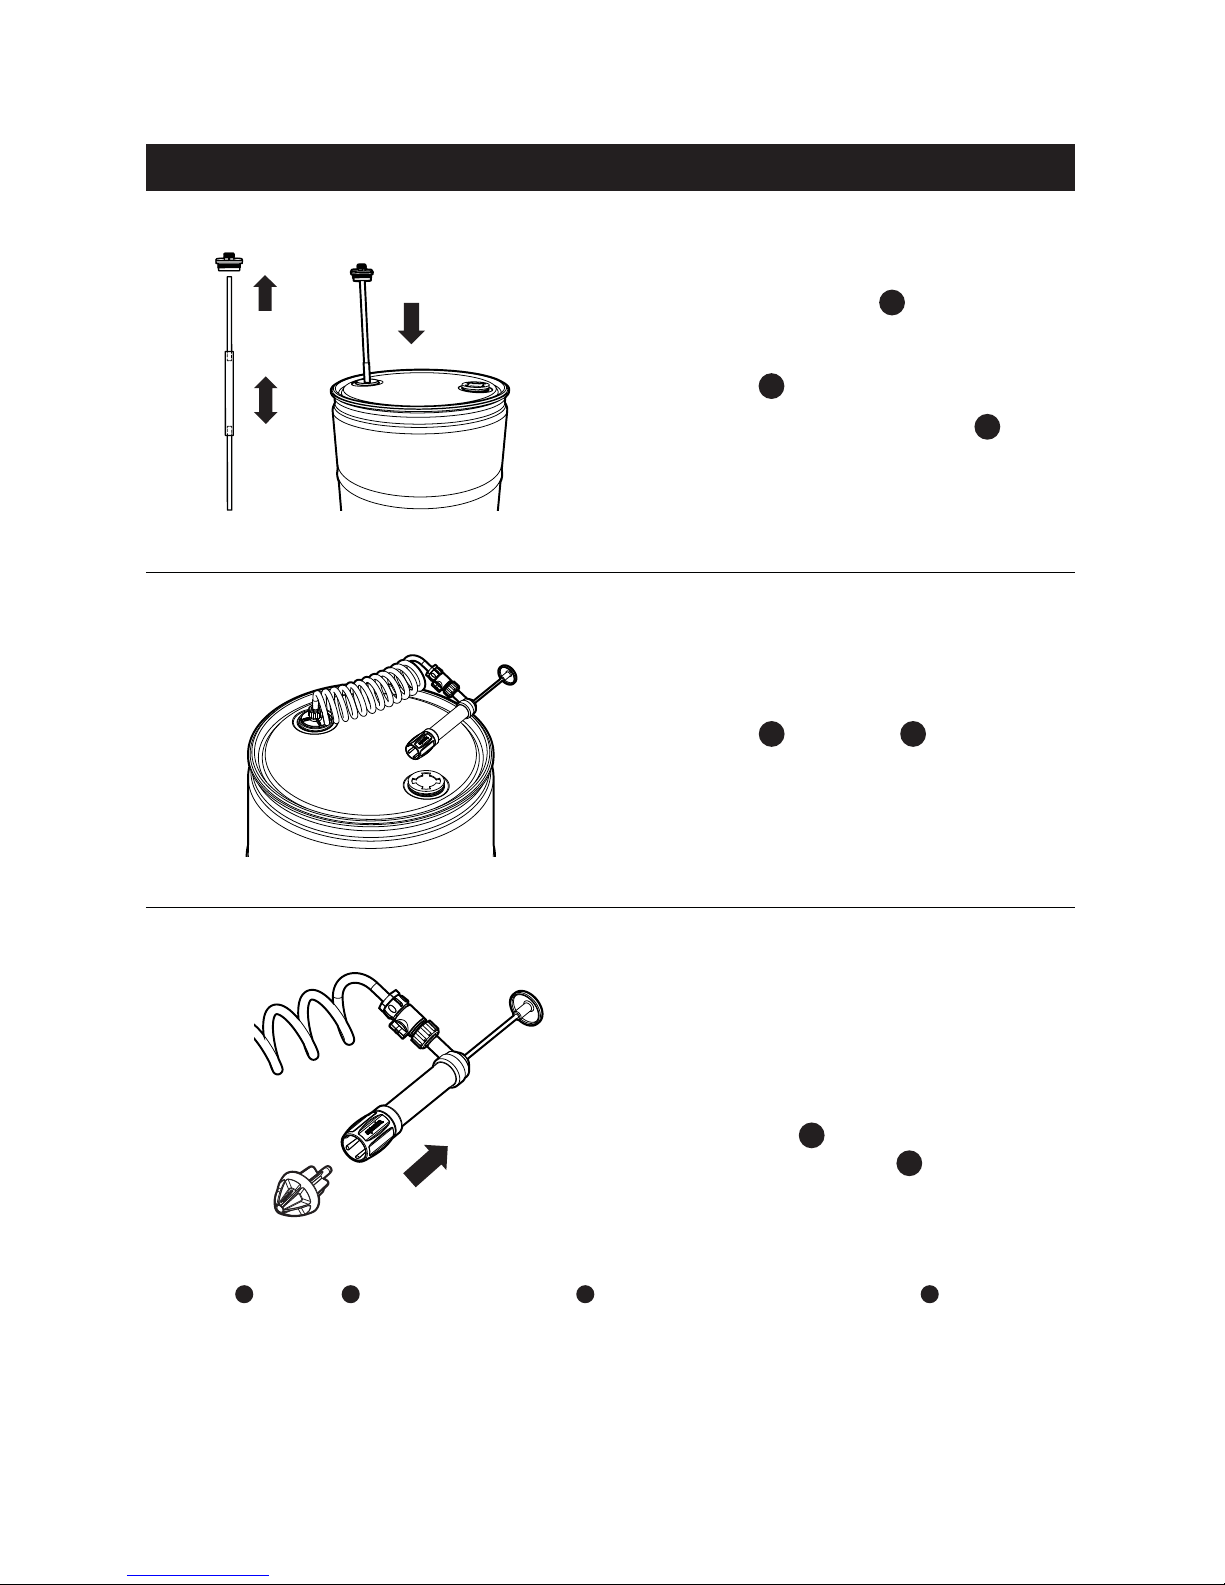
STEP 15
If filtering water, follow the directions
found in STEP 9.
If dispensing water without filtering,
Press the nozzle firmly into the
OUTLET end of the pump . Pump
with steady strokes.
13
5
Note: To drain container using a siphon method see DRAIN STORAGE TANK section. When not in use, leave
Hose and Pump connected to Adapter Cap and store on top of container. Turn Valve to
CLOSED position when not in use.
12
4
5
9
ADDITIONAL USES
HOW TO PUMP AND FILTER WATER FROM RIGID CONTAINER
STEP 14
Attach hose and pump to
the adapter cap as shown. Prime
pump as shown in STEP 8.
4
5
STEP 13
Adjust telescoping tube length to
extend to the bottom of the water storage
container, then attach to inside of the
adapter cap .
Thread the patented adapter cap into
the bung fitting on the container.
Note: barrels have one fine and one coarse thread
fitting. Use the fine threaded fitting.
9
11
9
Page 12
11
HOW TO PUMP AND FILTER WATER FROM 5 GAL CONTAINER
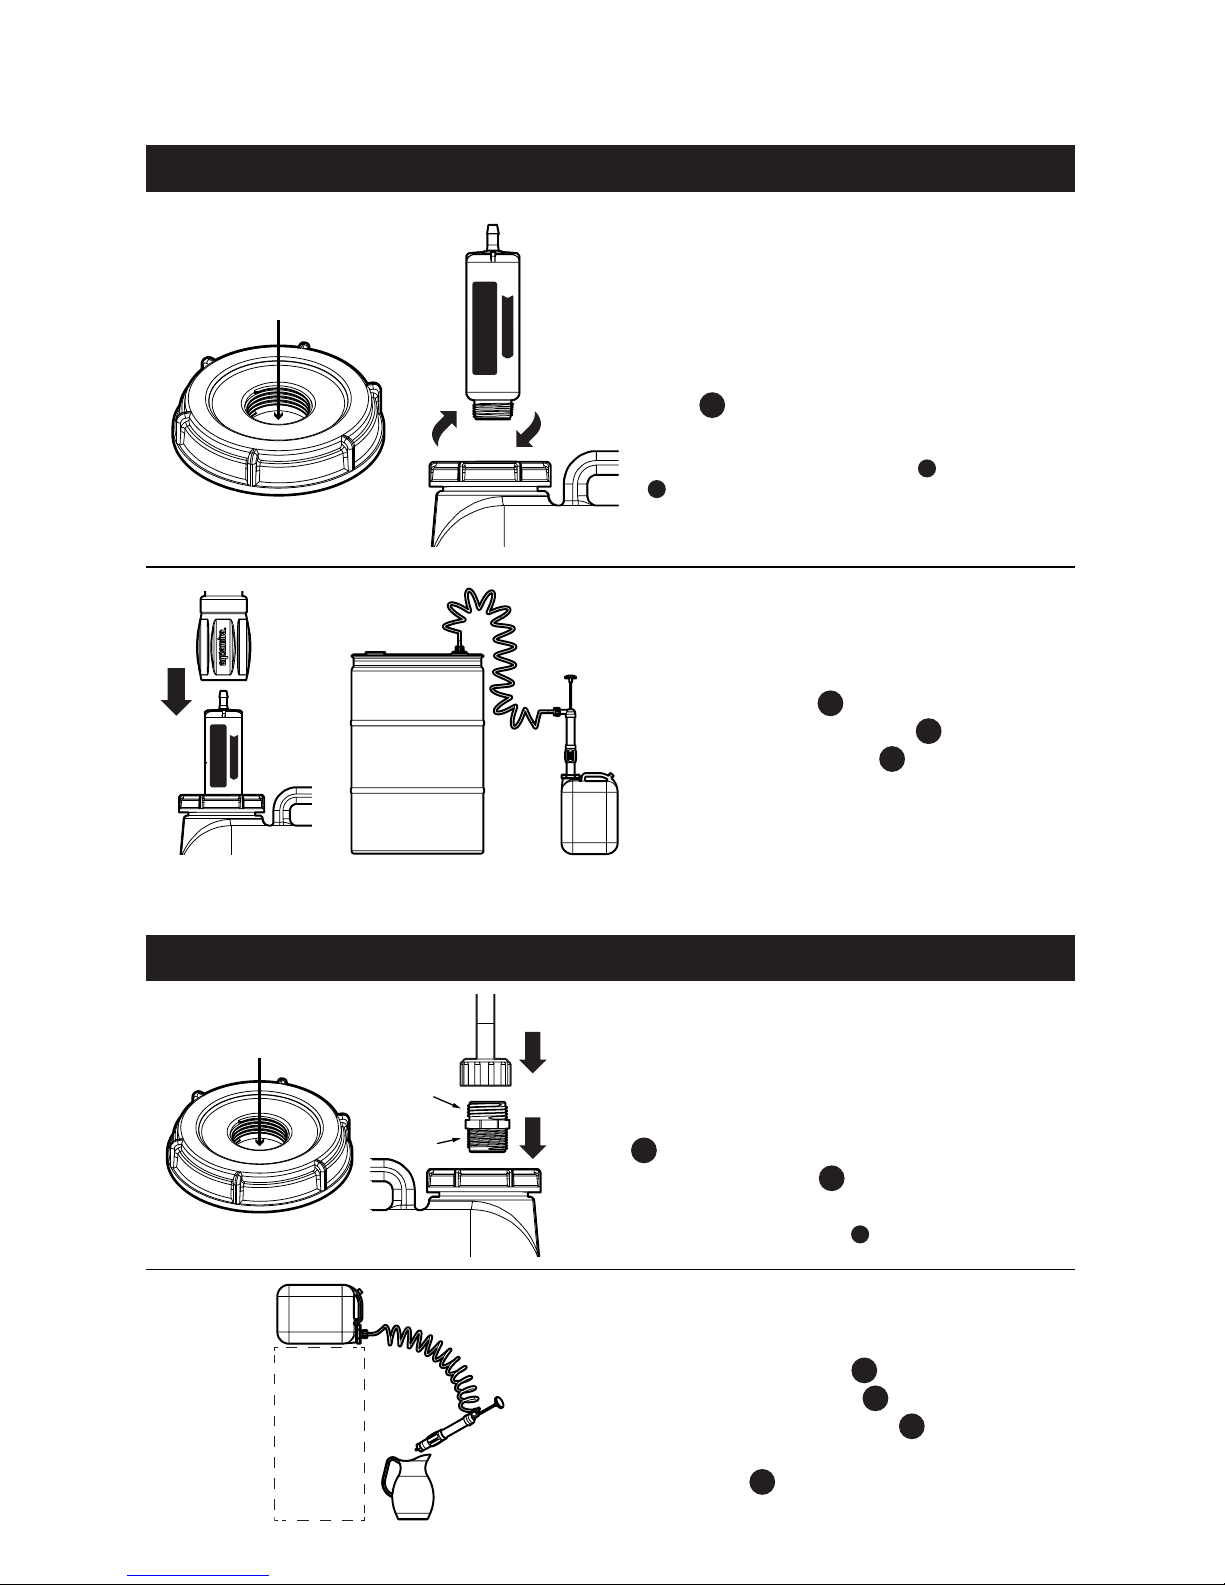
STEP 19
Purge the pump of air, locate the flow
direction on the filter and press the
INLET end of the filter firmly into the
OUTLET end of the pump . Begin
pumping water into container as shown.
Use Nozzle if dispensing water
without filtering.
10
10
5
13
STEP 18
Remove the plug at the bottom of the
inner threaded opening of the container
cap as shown. Attach garden hose adapter
- to the cap of the container and the
INLET of the hose .
Note: the fine thread connects to the cap and the coarse
thread connects to the hose as shown.
7
4
4
REMOVE PLUG
COARSE
FINE
HOW TO PUMP AND FILTER WATER TO 5 GAL CONTAINER
Purge the pump of air, then press the
OUTLET end of the pump onto the
INLET end of the filter as shown.
Begin pumping water into container.
STEP 17
5
5
10
RED LINE
WATER FL OW
Remove the plug at the bottom of the
inner threaded adapter and thread the
filter into the cap of the 5 gallon
container as shown.
Note: Remove the barbed adapter from the filter
- to reveal threads.
STEP 16
10
14
10
REMOVE PLUG
RED LINE
WATER FLOW
Page 13
12
WATER FLOW
WATER FLOW
RED LINE
RED LINE
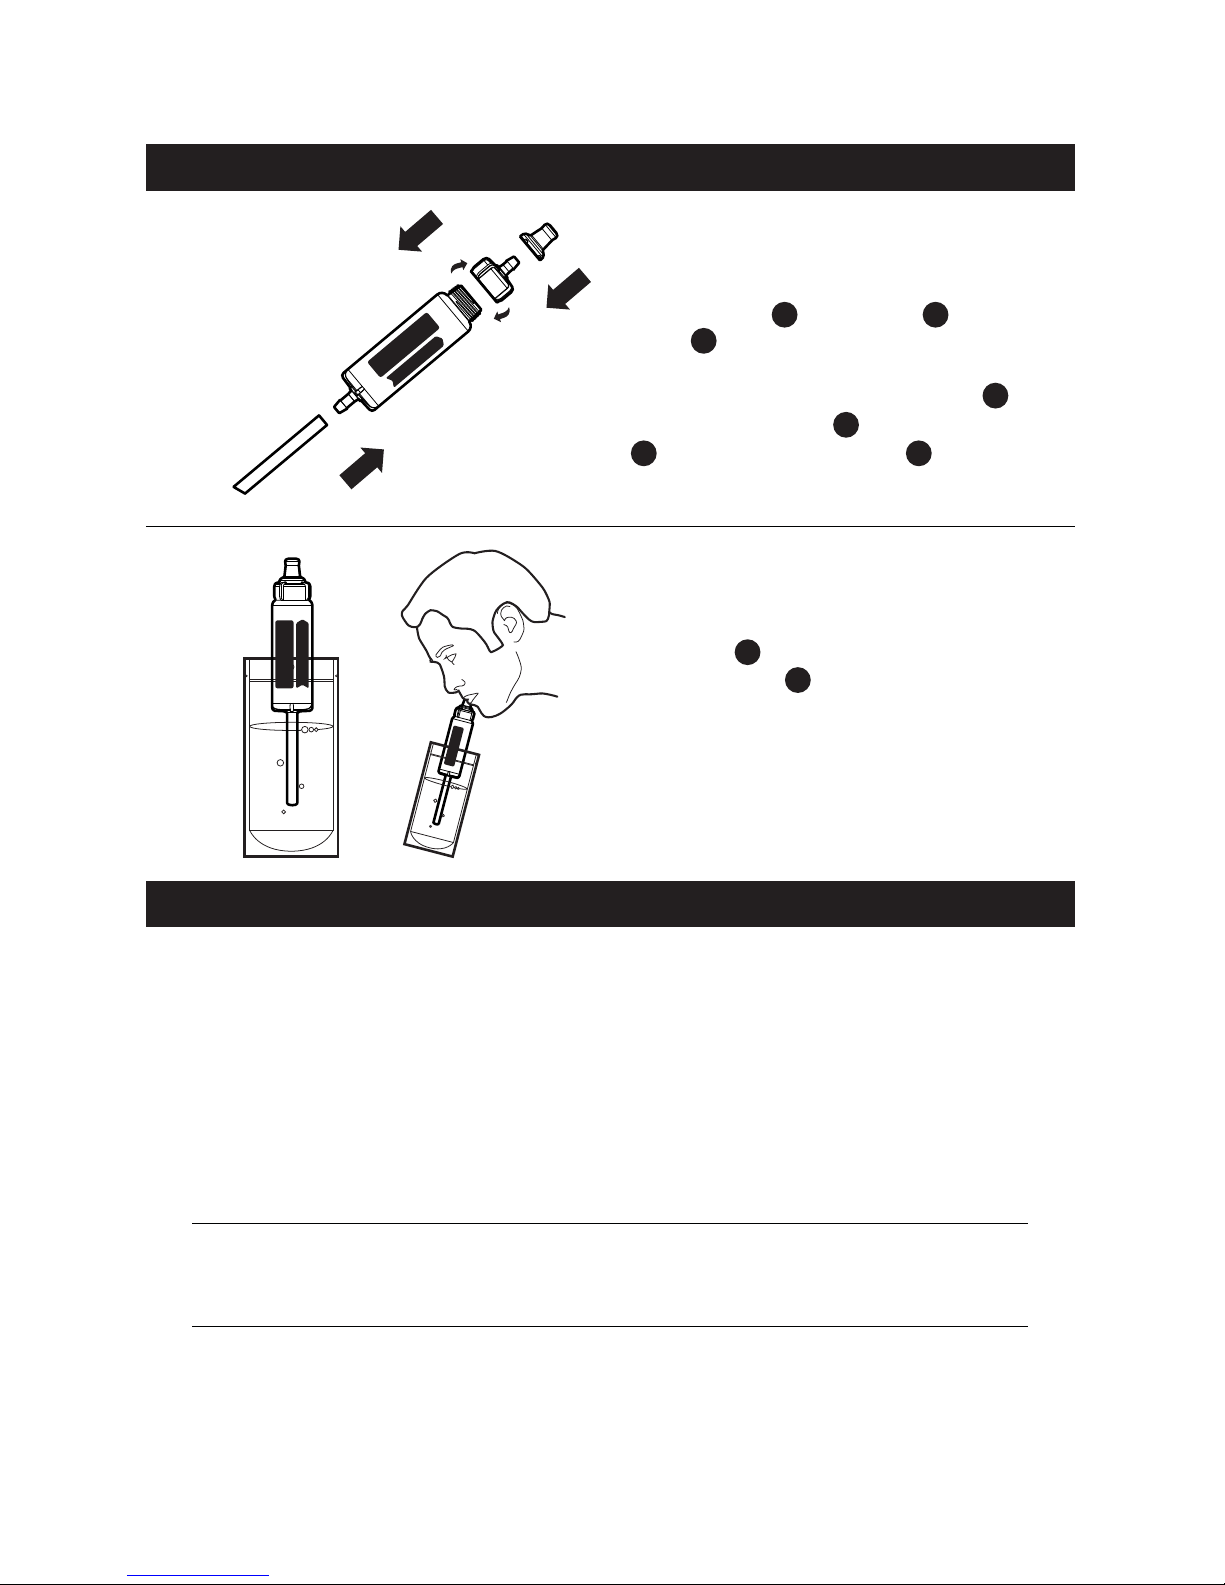
HOW TO USE FILTER AS AN EMERGENCY STRAW
MAINTENANCE AND STORAGE
• Filter may be stored wet for short periods of time (<30 days).
For long term storage (>30 days), remove filter from pump,
remove adapter from OUTLET end of filter, shake out excess
water, and allow to dry at room temperature for a minimum
of 48 hours.
• Store in a cool, dry location.
• Do not store used filter in a sealed container.
• Do not freeze filter or expose filter to extreme temperatures.
Filter Storage
• Store tank and liner in original container if possible, away
from direct sunlight and extreme temperatures.
Tank and Liner
Storage
• Remove residual water from pump, hose, and fittings then
allow to air dry.
• Store in a dry location away from direct sunlight and
extreme temperatures.
Pump, Hose, and
Fittings Storage
STEP 21
Fill pouch (filter package) with water,
immerse straw into water and suck on
mouthpiece to drink.
CAUTION — To avoid cross contamination: Do not
handle filter with wet hands that been exposed to
contaminated water. Do not submerge filter or
mouthpiece in contaminated water.
5
10
10
15
16
14
10
17
15
RED LINE
STEP 20
Remove filter from pump . To attach
straw , dip straight cut end of straw 1"
deep into hot water. After 10-15 seconds
remove and push over INLET barb .
Attach mouthpiece to barbed adapter
- on the OUTLET of filter .
Page 14
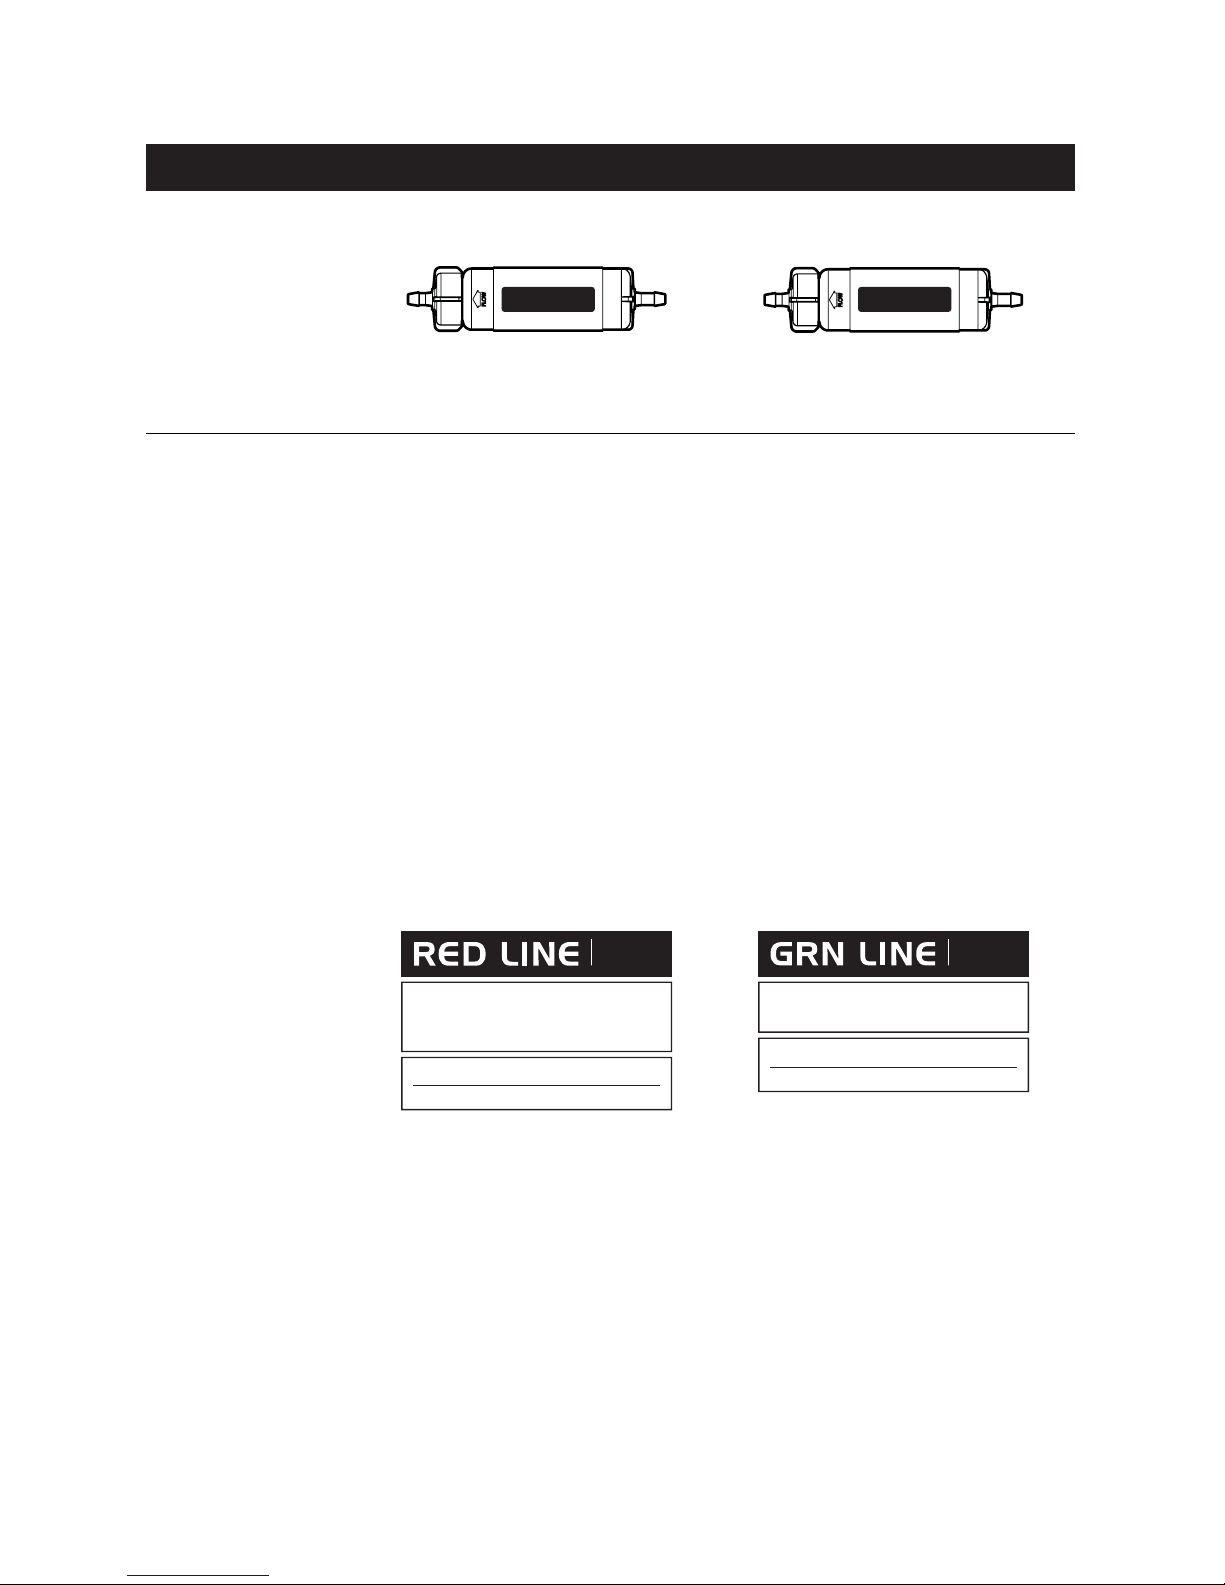
VIRUS
PROTECTION
MEETS OR EXCEED S ANSI/NSF 42
Chlorine, Chemical, Taste & Odor Removal
Virus Removal
Bacteria Removal
Cyst Removal
≥99.99%
≥99.9999%
≥99.95%
BACTERIA
PROTECTION
MEETS OR EXCEED S ANSI/NSF 42
Chlorine, Chemical, Taste & Odor Removal
Bacteria Removal
Cyst Removal
≥99.9999%
≥99.95%
13
TECHNICAL INFORMATION
FILTER CARTRIDGES
Service Life
Flow Rate
Operating
Temperatures
Operating
Pressures
Use Conditions
Removal
120 Gal. (454 L)
up to 500 ml/min
35–120 F (1.6–49 C)
0–3 psi (0-0.211 kg f/cm)
80 Gal. (303 L)
up to 800 ml/min
35–120 F (1.6–49 C)
0–3 psi (0-0.211 kg f/cm)
PARAMETER
RED LINE
(INCLUDED)
RED Line Series II Filter
GRN LINE
(SOLD SEPARATELY)
GRN Line Series II Filter
Use best water source available, quality of the source water
may vary, use only Aquamira RED Line or GRN Line Series II
filters. Use only Aquamira RED Line Series II filters if biological quality of source water is uncertain.
*Sold separately
Page 15
14
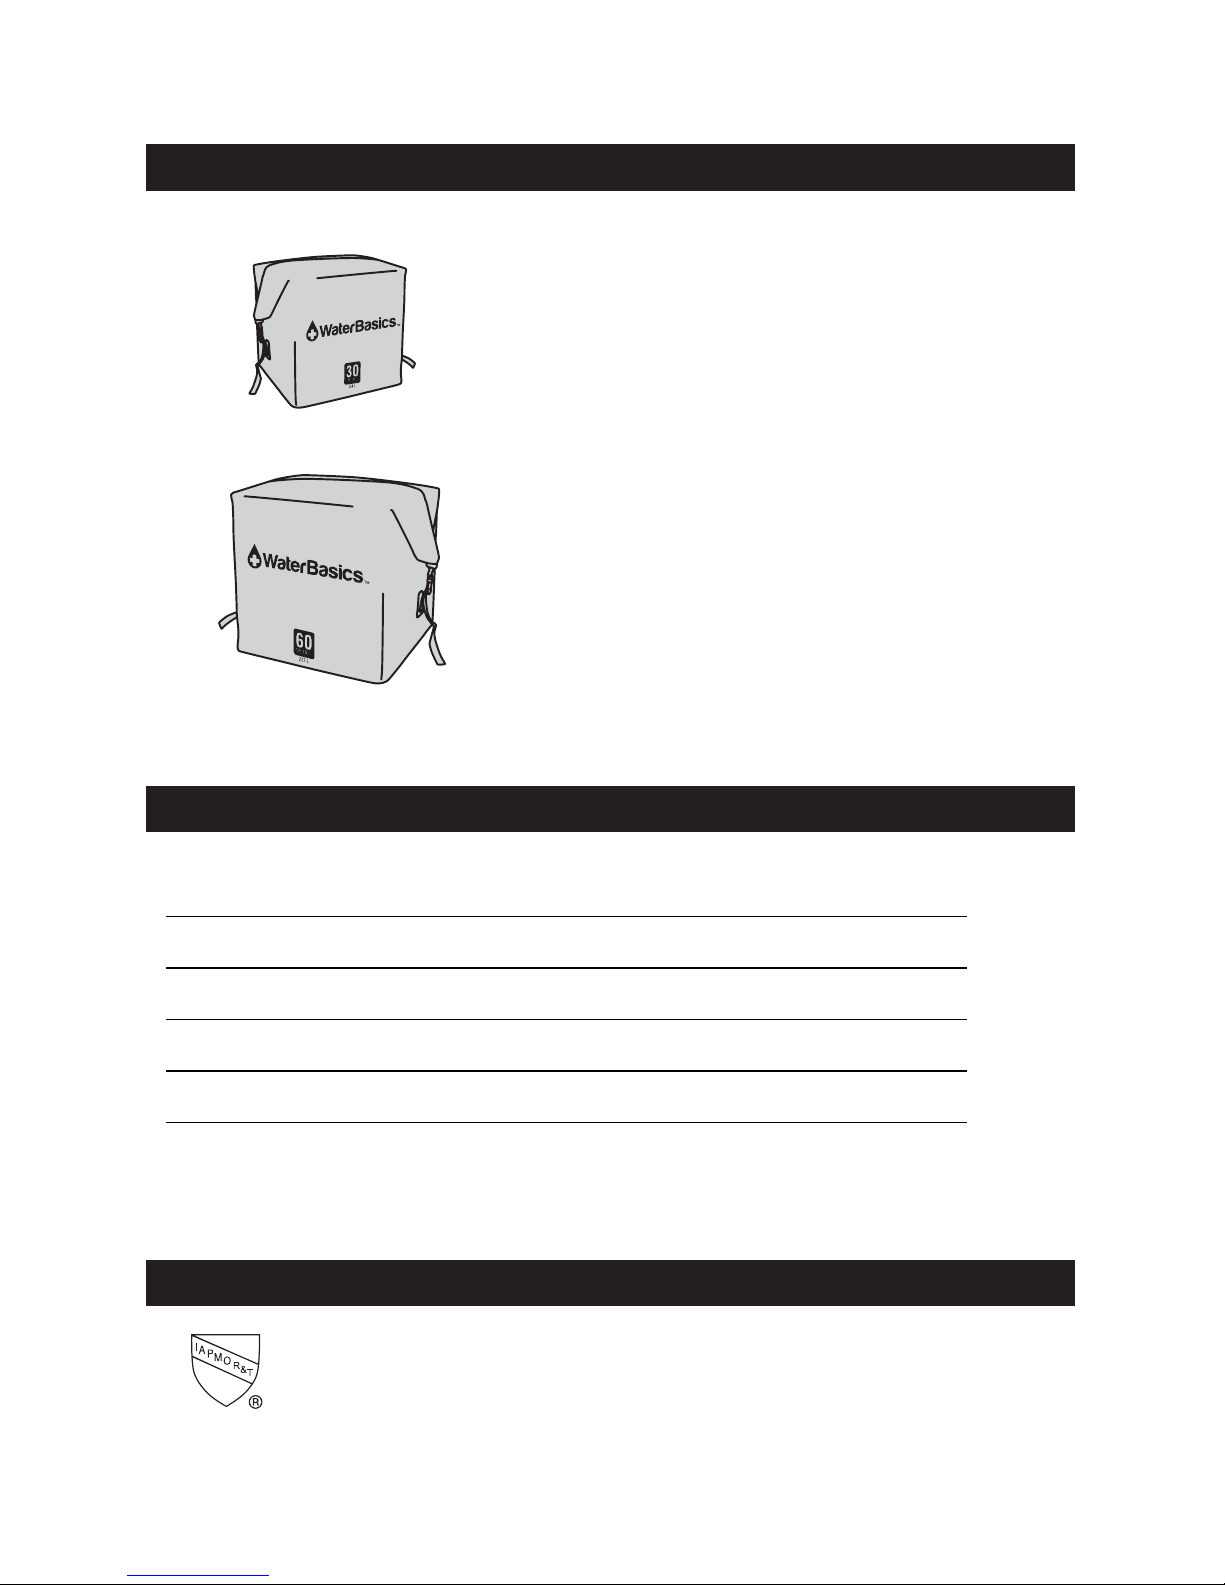
WATER STORAGE TANK
30 GALLON WATER STORAGE TANK
Size: 21 x 21 x 21 inches
Volume: 30 Gallons (114 Liters)
Empty Weight: 14 lbs. (6.4 kg)
Filled Weight: 260 lbs. (118 kg)
Operating Pressure: Atmospheric Pressure Only
60 GALLON WATER STORAGE TANK
Size: 25 x 25 x 23 inches
Volume: 60 Gallons (227 Liters)
Empty Weight: 18 lbs. (8.2 kg)
Filled Weight: 518 lbs. (235 kg)
Operating Pressure: Atmospheric Pressure Only
REPLACEMENT & COMPATIBLE PARTS
PART # ITEM NAME
GRN Line All-in-One Emergency Water Kit (Replacement Filter)
RED Line All-in-One Emergency Water Kit (Replacement Filter)
WaterBasics 60 Gallon Water Storage Liner
WaterBasics 30 Gallon Water Storage Liner
WaterBasics Emergency Pump and Hose Kit
67254
67259
67270
67271
67276
CERTIFICATIONS AND PATENTS
Certified by IAPMO R&T to NSF/ANSI 53 for cyst reduction and NSF/ANSI 372 for
lead free content. Certified to US EPA Microbiological Purifier test standard for
the reduction of cysts, bacteria and viruses.
Protected by the following US Patents #D733847 #D741,593 #9,162,167
Other patents pending.
Page 16
917 West 600 North, Logan, UT 84321
ph: (877) 644– 4650
www.aquamira.com
© Copyright 2016 Aquamira Technologies, Inc.
015016D
 Loading...