

Waterax VERSAX-6/9 Quick Start Manual
VERSAX-6/9 Quick Guide
This Quick Guide shows the basic operation of the
WATERAX VERSAX-6/9 2-stage self-priming pump.
The WATERAX VERSAX-6/9 pairs a WATERAX self-
priming 2-stage pump end with a Honda GX200 or
GX270 gasoline engine. For instructions regarding the
engine, as well as for oil and fuel recommendations,
please refer to the engine manufacturer’s manual.
For detailed instructions on using and troubleshooting
your pump, as well as full service and maintenance
instructions, refer to our website to download the
VERSAX Owner’s Manual.
For full specifications and performance curves, see the
VERSAX Data Sheet.
Warnings and Safety Precautions
This warning label appears on all WATERAX pumps to identify safety
hazards as follows:
READ YOUR ENGINE MANUAL!
Before proceeding further, locate and read the engine
manufacturer’s manual. It contains very important safety
information that MUST be read, understood and followed to
safeguard you and your equipment from harm, as well as for
the proper use and care of your engine. Use only fuel and
oil type recommended in the engine manufacturer’s manual.
Always check oil level in crankcase before use.
WEAR EAR AND EYE PROTECTION.
Always wear eye and ear protection when operating the
pump unit. Sound level of the unit: 92 dB(A).
GENERAL WARNINGS:
Do not operate if mentally or physically fatigued.
Inspect hoses and piping to avoid burst injuries.
No modifications and/or alterations may be made to the
pump. Any such modifications void the pump warranty
and can endanger pump operators.
Do not operate the pump above the maximum rated
pressure. Use only pipe, hose, and fittings rated at or
above the maximum pressure rating of the pump or
system design.
Slowly close valves. Use slow close valves wherever
possible to safeguard operators and prevent damage
from water hammer.
Dry weight of the unit: 57-84 lbs (weight varies
according to options).
READ THE PUMP OWNER’S MANUAL!
The improper use of this pump could result in serious injuries
as well as damage to the unit. Read the VERSAX Owner’s
Manual before using your VERSAX pump unit and follow the
safety instructions in this Quick Guide.
NEVER RUN THE ENGINE IN A CLOSED
OR CONFINED AREA. Exhaust gas contains
carbon monoxide which is poisonous to humans.
Avoid inhalation of exhaust gas.
REFUEL ENGINE WITH CARE. Gasoline is
extremely flammable, and gasoline vapor can
explode. Refuel in a well-ventilated area, with the
engine stopped.
NEVER TOUCH ANY EXHAUST SYSTEM
PARTS WHILE ENGINE IS RUNNING. Always
allow enough time, after stopping the unit, for proper
cooling of these parts and surrounding areas.
EQUIPMENT DAMAGE PREVENTION:
Flush the pump with fresh water if the pump has been
used to pump salty, brackish, high mineral content
water, water containing debris, or foam injected water.
Check that debris is cleared before using the pump
again.
Always draft water using a suction hose strainer.
Plumbing installed on a fixed pump MUST be self-
supported.
01/2015 1
VERSAX-6/9 Quick Guide
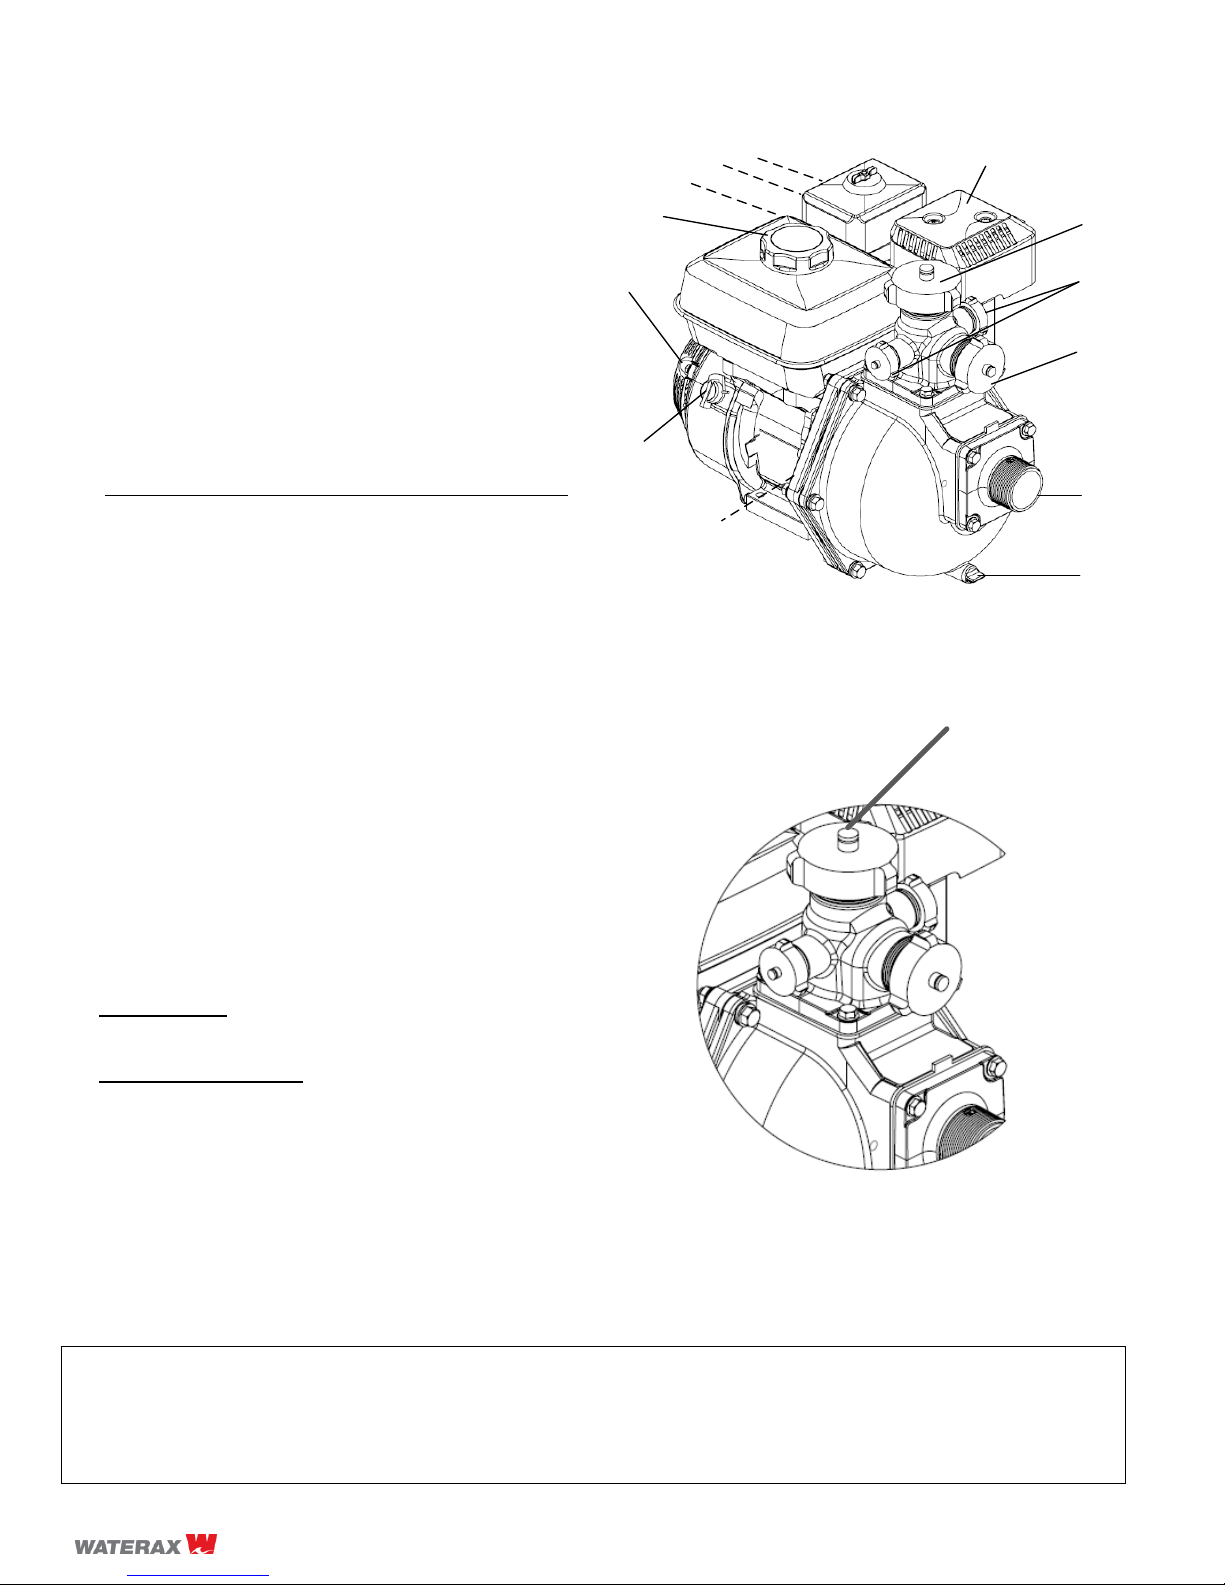
Parts Identification
A. Priming port (2” BSP)
B. Pump discharge (1” NPT)
C. Pump discharge (1-1/2” NPT)
D. Pump intake - suction (2” NPT)
E. Pump drain
F. Oil fill (not shown)
G. Ignition switch
H. Recoil starter*
I. Fuel cap
J. Throttle (not shown)
K. Fuel valve (not shown)
L. Choke (not shown)
M. Muffler
Note: VS2-6 model shown with GX200 engine. Carry handle
available on portable models.
* Electric starter available on GX270E engine models
A
B
C
D
F
G
H
J
K
L
E
M
I
1. Fill fuel tank with recommended fuel grade and
securely replace cap. Check oil level (see engine
manual).
Fill pump
end to
prime
2. Fill the pump end to prime the pump.
a. Remove the priming cap.
b. Using clean water, fill the pump end completely, via
the vertical 2” BSP priming port.
c. Replace the priming cap and screw it down tightly to
seal.
3. Connect the suction hose, using a universal hose
coupling wrench to tighten coupling firmly.
Drafting Mode: Connect footvalve strainer to male end of
suction hose, then fill suction hose with water and connect
to pump intake.
Flooded Suction Mode: Connect female end of suction
hose to pump intake and connect male end to hydrant or
other supply.
a. Slowly open the pump inlet valves allowing the water
into the pump body.
b. Slowly open the discharge valves to allow for
entrapped air in the piping to escape.
c. Once all the air has escaped, slowly close any
discharge and/or drain valves so that the unit may be
started.
! DO NOT allow the strainer to rest on bottom of lake or riverbed. Check strainer frequently to make sure that it is not
clogged with moss, leaves, etc.
! DO NOT lift strainer from water while the pump is operating. Use a rope or other means to keep strainer at proper
height, approximately 1 foot (30 cm) below water surface. If strainer is too close to the water surface, it will draw air
and pump may lose prime.
To operate the VERSAX-6/9 unit:
2 01/2015
 Loading...