

Waterax STRIKER-2/3 Owner's Manual
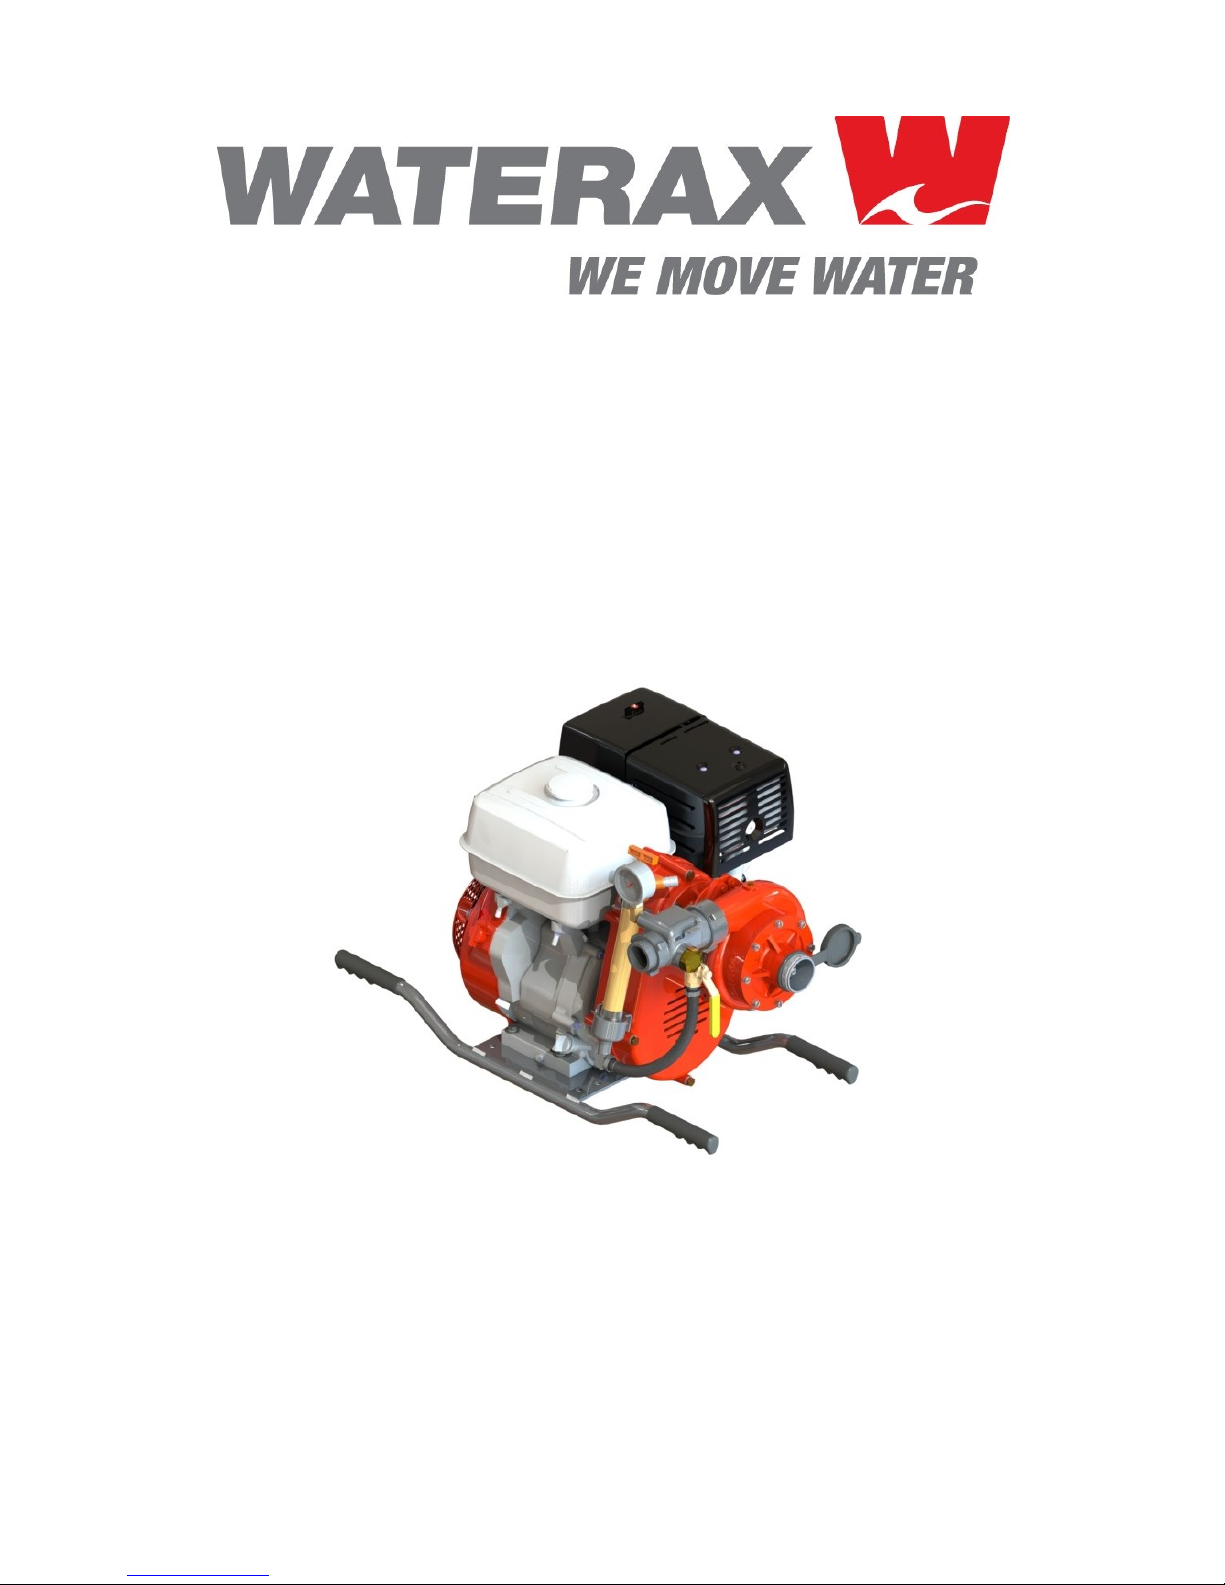
STRIKER-2/3
Owner's Manual
Publication Date: 09/2015
Publication Number: 701223, Rev. 3

This document provides information proprietary to WATERAX Inc. and cannot be used
or disclosed without WATERAX’s written authorization.
WATERAX Inc. reserves the right to make changes without notice in its products or
components as research and development or marketing conditions warrant. Changes
affecting the operation of any component in this manual will be reflected in a subsequent
revision. WATERAX Inc. assumes no responsibility for any omissions or errors that may
appear in this document or for any damages that may result from the use of information
contained herein.
The following are trademarks or brand names of WATERAX Inc.: WATERAX, ‘WE
MOVE WATER’. All other trademarks used in this manual are the exclusive property of
their owner.
STRIKER-2/3 Owner's Manual
Publication No.: 701223, Rev. 3
Publication Date: 09/2015
First Edition: March 2015
Published by:
WATERAX Inc.
6635 Henri-Bourassa W.
Montreal, Quebec, CANADA
H4R 1E1
Copyright © 2015 WATERAX Inc.
All rights reserved
Printed in Canada

WATERAX STRIKER-2/3 Owner's Manual
Contents
Important Safety Instructions ............................................................................................ 2
Personal Safety Advisory .................................................................................................................. 2
Warnings ........................................................................................................................................... 2
Preventing Damage to Equipment .................................................................................... 3
Introduction ........................................................................................................................ 4
About this Manual ............................................................................................................................. 4
Abbreviations and Terms .................................................................................................................. 4
About the STRIKER-2/3 Series ......................................................................................................... 5
Parts Identification ............................................................................................................................. 6
Installation .......................................................................................................................... 6
Plumbing ........................................................................................................................................... 6
Pump End Mounting .......................................................................................................................... 6
Fastening to Truck/Apparatus ........................................................................................................... 7
Installing a Control Panel .................................................................................................................. 7
Using a Battery for Electric Starters and Control Panels .................................................................. 7
Operating STRIKER-2/3 Series Pumps ............................................................................. 8
Pre-Operation Checklist .................................................................................................................... 8
Flooded Suction ................................................................................................................................ 8
Drafting .............................................................................................................................................. 9
Priming the Pump ............................................................................................................................ 10
Startup and Discharge .................................................................................................................... 11
Shutdown ........................................................................................................................................ 11
Cold Weather Operation ................................................................................................................. 12
Basic Care and Storage .................................................................................................................. 12
Troubleshooting .............................................................................................................................. 13
Service .............................................................................................................................. 15
Drive Assembly Parts Breakdown ................................................................................................... 15
Installing the Drive Assembly .......................................................................................................... 16
Removal of Pulley Assembly ........................................................................................................... 19
Removing or Attaching the Pump End ............................................................................................ 19
Pump Tool Kit .................................................................................................................................. 20
Disassembly Procedure for Pump End 18-16S .............................................................................. 20
Assembly Procedure for Pump End 18-16S ................................................................................... 21
Pump Clamp.................................................................................................................................... 22
STRIKER-2/3 Wiring ....................................................................................................................... 23
FastWire Wiring Diagrams .............................................................................................................. 24
Pump End Technical Data................................................................................................ 25
Warranty............................................................................................................................ 29
09/2015 1
WATERAX STRIKER-2/3 Owner's Manual
Important Safety Instructions
It is recommended that all information provided in this manual be carefully read and
understood before performing any operation of or maintenance to the pump.
The procedures listed in this manual are general operating and maintenance procedures.
They should be taken in addition to any procedures, policies and guidelines established
by the authority having jurisdiction or the apparatus manufacturer. Where conflicts arise,
all parties (authority having jurisdiction, the apparatus manufacturer, and WATERAX Inc.)
will need to be contacted to determine the best resolution. The solution will need to
address the safety of the operator along with the proper performance and life expectancy
of the unit.
Personal Safety Advisory
READ YOUR ENGINE MANUAL FIRST!
Before proceeding further, locate and read the engine manufacturer’s manual. It contains
very important safety information that MUST be read, understood and followed to
safeguard you and your equipment from harm, as well as specific information on the
proper use and care of your engine.
READ THIS MANUAL BEFORE OPERATING YOUR PUMP!
The improper use of the WATERAX pump could result in serious injuries as well as
damage to the pump. Any operator should familiarize himself with the apparatus and its
capabilities before trying to operate the equipment in an emergency situation. Please read
this entire manual before using your WATERAX pump and follow all Personal Safety
Advisories.
Warnings
Always wear eye and ear protection when operating the pump unit.
Do not operate if mentally or physically fatigued.
Always inspect hoses and piping to avoid burst injuries.
Use only pipe, hose, and fittings that are rated at or above the maximum pressure
No modifications and/or alterations may be made to the pump. Any such modifications
Do not operate the pump higher than the maximum rated pressure. Always run the unit
Slowly close valves and use slow close valves wherever possible to prevent danger to
Relieve all system pressure before doing any service work on the pump.
Never run the pump in a closed or confined area. Exhaust gas contains carbon
Refuel engine with care. Gasoline and diesel are flammable, and gasoline vapor can
Be alert and never touch any part of the engine exhaust system (muffler, shield,
rating of the pump shown below, or according to what maximum pressure the system
was designed for, whichever is lower.
Maximum Allowable Pressure STRIKER-2/3: 600 PSI (41 bar)
Maximum Allowable Pump Intake Pressure STRIKER-2/3: 150 PSI (10 bar)
not only void the pump warranty but can make the unit dangerous to anyone operating
the pump.
at the lowest pressure required for the application to enhance operator and equipment
safety.
other line operators and to prevent water hammer which could damage the pump and
its piping components.
monoxide which is poisonous to humans. Avoid inhalation of exhaust gas.
explode. Refuel in a well-ventilated area, with the engine stopped.
header pipes, etc.) while the engine is running. Always allow enough time, after
stopping the unit, for proper cooling of the muffler and surrounding parts.
2 09/2015

WATERAX STRIKER-2/3 Owner's Manual
Do not ground the battery (if applicable) through the pump’s frame members; always
ground to a bare metal (unpainted) part of the engine block to ensure proper ground.
Preventing Damage to Equipment
The following recommendations will help avoid damage to your equipment:
Flush the pump with fresh water if the pump has been used to pump salty, brackish,
high mineral content water, water containing debris, or foam injected water. Check that
debris is cleared before using pump again.
Always draft water using a suction hose strainer.
During freezing weather, drain the pump, manifolds, and lines of all water. You can
also pour some antifreeze into the pump and circulate it through the pump and
plumbing system.
Let the engine warm up before using the unit at full speed.
Always use the proper unleaded gasoline or diesel fuel as recommended in the engine
manufacturer’s manual.
Always check for sufficient oil quantity in the engine crankcase before use (see engine
manual for details on checking the oil level, as well as for the type of oil to use).
If applicable, always check for sufficient coolant quantity in the engine radiator before
use (see engine manual for details on checking the coolant level, as well as for the
type of coolant to use).
Pumps should not be operated without water for any extended period of time or without
discharging water. Operating the pump in such a manner can overheat the pump
causing damage to seals, or pump internals.
It is recommended that all fasteners be replaced with genuine WATERAX parts.
When mounting manifolds to the pump, the manifolds must be self-supporting and
coupled to the pump by means of a flex coupling such as a Victaulic® coupling or flex
hose.
When hoisting the pump onto an apparatus, take care when using lifting hooks (if
applicable) and avoid any contact with components adjacent to the fixation points.
Never disconnect the battery (if applicable) while the engine is running, as this may
damage the control panel’s electrical components.
09/2015 3

WATERAX STRIKER-2/3 Owner's Manual
Pump designation
Engine used
STRIKER-2
Honda GX390 13HP gasoline engine
STRIKER-3
Honda GX390 13HP gasoline engine
Cavitation
Formation of air bubbles in a liquid inside a centrifugal pump,
causing low pressure points and loss of pump capacity.
Dead-heading
Also called shut-off. Leaving the pump running with all the
discharge valves closed. The pump should not be left in this
mode for more than a minute since the pump can overheat and
become damaged. To avoid this, a re-circulation line (if
provided) should be opened or a discharge line left slightly open
to allow fresh water to continue to enter the pump.
Drafting
Process of using vacuum (suction) to take water from a stream
or impoundment.
NH
National Hose. This is a type thread specified in NFPA 1963.
Formerly known as NST (National Standard Thread).
NPSH
National Pipe Straight Hose. This is a type of thread that is
slightly smaller in diameter than NH, with more threads per inch
than the same nominal size of NH thread. NPSH is also called
IPT (Iron Pipe Thread).
RPM
Revolutions Per Minute.
Introduction
About this Manual
This manual contains general operation, care and servicing procedures for the following
WATERAX STRIKER-2/3 high pressure centrifugal pumps:
These instructions cover most wildland and municipal pump applications. If the application
the pump is being used for does not fall into these general guidelines, consult WATERAX
Inc. for any additional safeguards, operating, or maintenance considerations that may be
required.
For full service and maintenance instructions regarding the pump, please refer to the
Service section. For maintenance instructions regarding the engine, as well as for oil and
fuel recommendations, refer to the engine manufacturer’s manual.
Please see www.waterax.com additional documentation related to this product such as
the WATERAX product guide, technical notes, links to the engine manufacturer’s
manuals, news and other updates about WATERAX and its goods and services.
Abbreviations and Terms
The following terms and abbreviations are used in this manual:
4 09/2015

WATERAX STRIKER-2/3 Owner's Manual
About the STRIKER-2/3 Series
Features
For full specifications and performance curves, see the Product Data Sheet for your
pump end model.
Applications of the WATERAX STRIKER-2/3 series include:
Slip-on units
Attack line firefighting
Long hose lay for remote watering during firefighting operations
High elevation firefighting in mountainous areas
Accuracy in flow trajectory when structure firefighting
Tandem pumping over long distances
Parallel pumping for higher volumes
Features and Benefits of the WATERAX STRIKER-2/3 series include:
Quick release clamp and swappable pump ends for minimal equipment downtime and
inventory
Sealed bearing to eliminate pump end greasing in the field
Belt drive system for reliable, low maintenance performance
Aluminum alloy pump components and anodized parts for lighter weight and greater
resistance to corrosion
Compatible with foam applications
Blister resistant mechanical rotary seal
Comprehensive manuals
EPA Certified
Configurations
The STRIKER-2/3 series is used for a variety of wildland and municipal firefighting
applications. Your model may be configured as a portable, standalone pump installed on
a carry frame, or it may be purchased in the vehicle-mount configuration which includes
a mounting frame or legs to fasten the pump onto a fire apparatus.
09/2015 5
WATERAX STRIKER-2/3 Owner's Manual
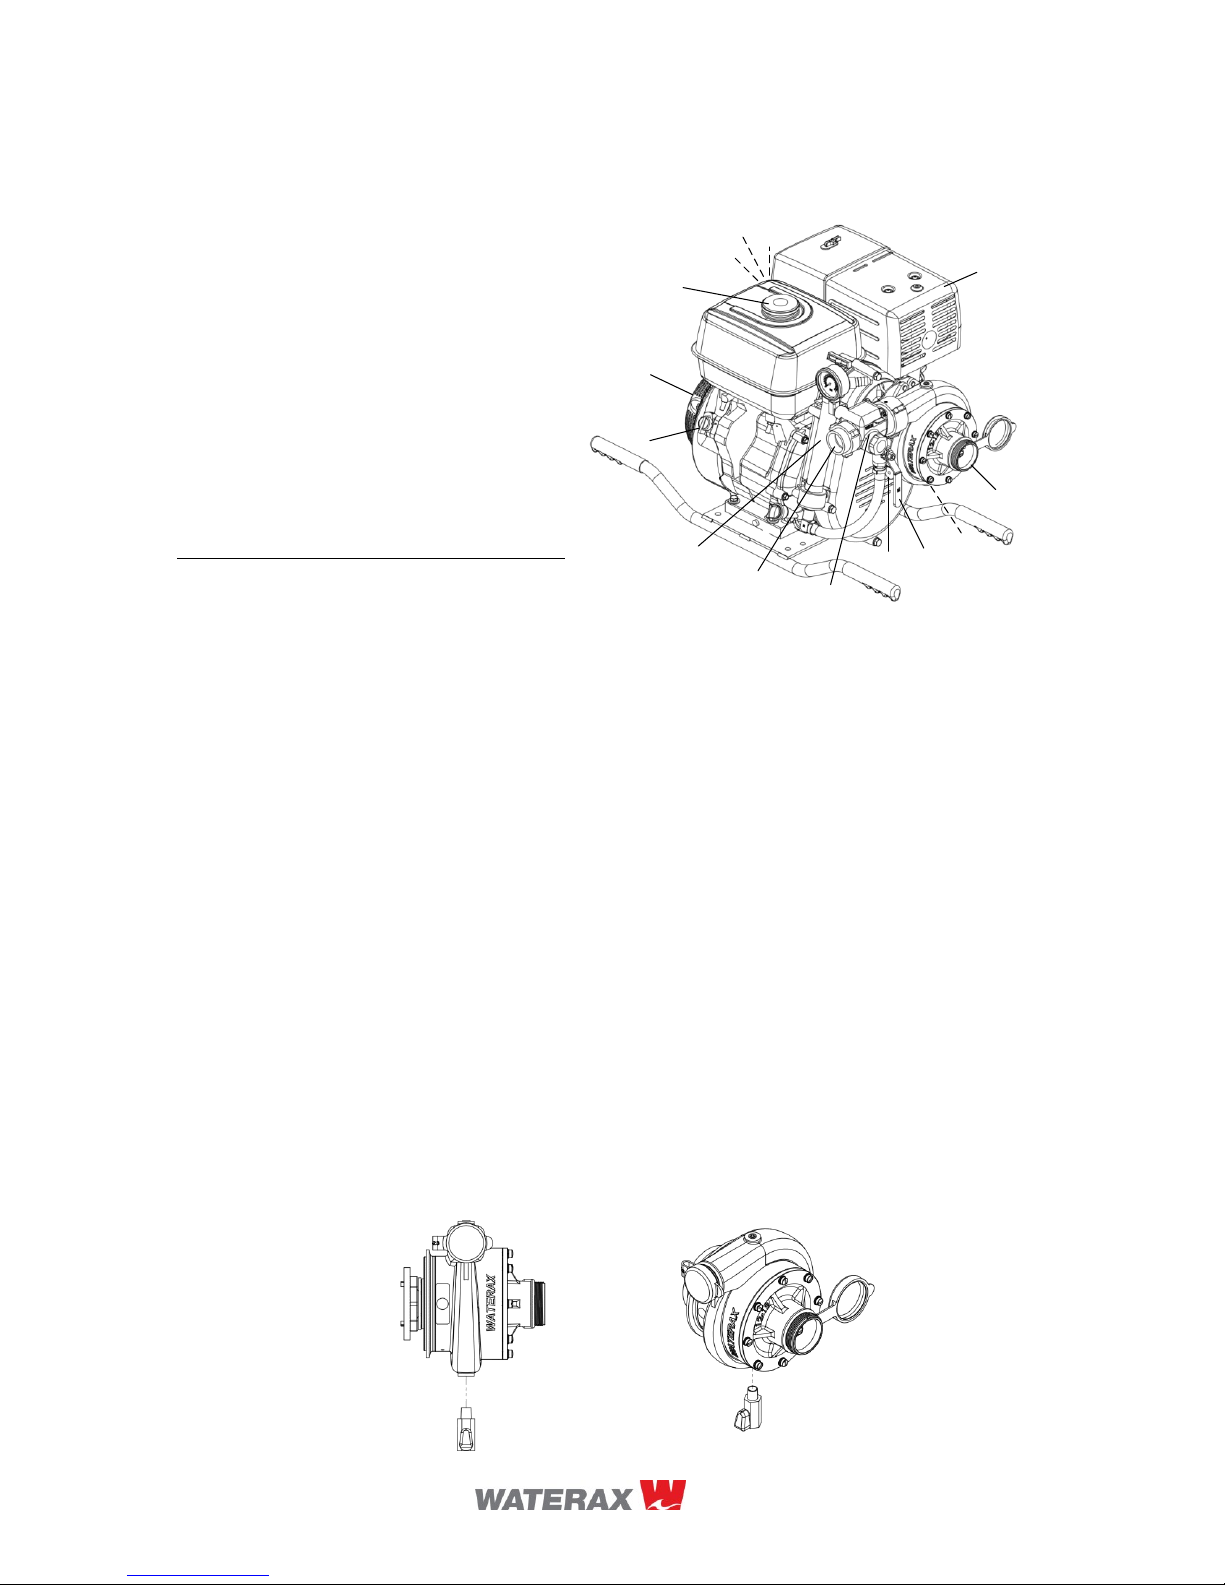
STRIKER-2/3
A. Pump intake (suction)
B. Pump drain port (not shown)
C. Priming valve
D. Quick release pump clamp
E. Discharge check valve*
F. Pump discharge
G. Hand primer*
H. Ignition switch
I. Recoil starter
J. Fuel cap
K. Throttle (not shown)
L. Fuel valve (not shown)
M. Choke (not shown)
N. Muffler
Note: Portable 2-stage STRIKER-2 pump model
shown. Other configurations available for both 2stage STRIKER-2 and 3-stage STRIKER-3 pumps.
* Available on portable models.
C
A
F
H
K
L
N
E
G
M
I
J
D
B
Parts Identification
Installation
Depending on your model and configuration ordered, you may require additional
accessories from WATERAX or from third-party vendors, for example, control panels,
batteries, and fuel lines. You will also require hoses and nozzles as well as other fire
apparatus plumbing which can be purchased through your WATERAX representative.
Follow the instructions and heed all warnings in any documentation that you receive with
the accessories you purchase.
Plumbing
When mounting manifolds to the pump, the manifolds must be self-supporting and
coupled to the pump by means of a flex coupling such as a Victaulic® coupling or flex
hose.
Pump End Mounting
6 09/2015
The pump end can be rotated to aid with the apparatus piping connections. The quick
release pump clamp securely holds the pump end in the desired position. Always ensure
that the water can be drained from the pump end to keep it from cracking in freezing
weather. A drain valve is available from WATERAX (item no 801104).

WATERAX STRIKER-2/3 Owner's Manual
Fastening to Truck/Apparatus
When adding any equipment to a vehicle, follow all instructions and heed all warnings
provided by manufacturers of the apparatus and any third-party accessories. WATERAX
provides certain accessories used in vehicle-mount configurations of the STRIKER-2/3
series pumps. Follow all documentation that ships with any accessories you have ordered
such as vibration mounts or rails. Your company’s internal policies and guidelines must
also be followed.
Before installing the pump in a vehicle, plan for adequate access to any fill caps such as
those for oil and fuel, as well as any other part of the pump or engine that is frequently
accessed or inspected (valves, panels, primers, filters, etc.). Make note of components
that become hot when operating such as mufflers and engine blocks, and always ensure
a safe clearance around them.
Installing a Control Panel
See User Instructions shipped with the specific model of control panel you ordered for
your pump.
Using a Battery for Electric Starters and Control Panels
Some STRIKER-2/3 pumps require a battery to power electrical and electronic
components such as; starters, pump primers and control panels. Make sure to follow all
instructions and heed all warnings provided by your battery manufacturer. Refer to the
engine manual for battery requirements. Always follow safety guidelines set out by your
company. Never connect or disconnect a battery to a pump that is operating.
09/2015 7

WATERAX STRIKER-2/3 Owner's Manual
Operating STRIKER-2/3 Series Pumps
Pre-Operation Checklist
Before using your pump, follow this verification procedure:
1. Visually inspect product
When you first receive your STRIKER-2/3 pump, inspect the product and check for any
damage. Notify the supplier if any damage is found.
2. Check all fluid levels regarding the pump and any related equipment. Before first use,
you must prepare the engine which is shipped dry. Before each subsequent use, check
levels and top up as needed.
Engine/apparatus fuel level
Engine/apparatus oil level
All batteries electrolyte level (not required for sealed batteries)
Refer to the engine manufacturer’s manual for specific instructions
regarding the engine.
3. Check that all suction and discharge hoses are structurally sound and do not leak.
4. Visually inspect any electrical or electronic components for damage.
5. Inspect all safety features and verify that they are in good order before using the pump.
6. Visually inspect the pump’s drive belt and ensure it is in good condition without cracks
or excessive wear.
7. Each time you plan to use the pump, check for damage that may have occurred during
previous use. Notify your manager that the equipment requires repair. Remember that
damaged equipment can expose you to safety hazards.
Flooded Suction
Use this procedure if you are taking water from a hydrant, another pump, or a closed tank.
Be sure to understand and follow all related equipment, apparatus, departmental, and
governmental procedures, policies, recommendations, and guidelines concerning hydrant
connecting and operation before performing this mode of operation.
1. Connect the intake hose to the pump intake or intake piping.
2. Connect opposing end of the hose to the hydrant or water source (a tank may already
be connected). Make sure that all connections are strong and tight and that all pump
valves are closed.
3. Check that all equipment is rated to the proper pressure limits that they will be exposed
to during this mode of operation. DO NOT exceed the maximum intake pressure of the
pump (150 PSI).
4. Slowly open the pump inlet valves allowing the water into the pump body.
5. Slowly open the discharge valves to allow for entrapped air in the piping to escape.
6. Once all the air has escaped, close any opened valves so that the unit may be started.
7. Go to the Startup and Discharge section of this manual to begin pumping water.
The pump will not discharge more water than the capacity of the water source
(hydrant). The pressure reading on the pump’s master intake gauge should never
fall below 0 PSI during the pump operation in this mode.
8 09/2015
 Loading...