

Water Ace RSP7, RSP10, RSP15 Installation Manual

INSTALLATION MANUAL Pgs. 2–8
SWIMMING POOL PUMPS
CONSUMER HOT-LINE: 1-800-942-3343
Monday–Friday 7 AM to 5 PM EST
www.waterace.com
MANUEL D’INSTALLATION Pgs. 9–16
POMPES POUR PISCINES
MANUAL DE INSTALACIÓN Pgs. 17–24
BOMBAS PARA PISCINAS
RSP7
3/4 HP
RSP10
1 HP
RSP15
1-1/2 HP
Read and follow all safety warning notices and instructions before installing or using this product. Failure
to follow safety warnings and instructions can result in severe injury, death, or property damage. Please call the Water
Ace Consumer Hot Line at 1-800-942-3343 for any questions about safe installation, operation, use, or maintenance, or for
additional free copies of these instructions. You may also visit the Water Ace website at www.waterace.com.
Lire et observer toutes les consignes de sécurité et tous les avertissements avant d’installer ou d’utiliser ce produit,
sinon on risque de subir des blessures corporelles graves, mortelles, ou causer des dommages matériels importants. Pour toute
question concernant l’installation, le fonctionnement, l’utilisation, l’entretien ou pour obtenir des exemplaires supplémentaires de ces
instructions, appeler le Service à la clientèle Ace au 800 942-3343. On peut aussi visiter le site Web Ace au www.waterace.com.
Lea y siga todas las advertencias e instrucciones sobre seguridad antes de instalar o usar este producto. El no seguir
las advertencias e instrucciones sobre seguridad puede ocasionar lesiones graves, muerte o daño a la propiedad. Sírvase llamar a la
Línea de Información al Consumidor de Water Ace al 1-800-942-3343 si tiene preguntas sobre la instalación, funcionamiento, uso o
mantenimiento seguros o para obtener copias adicionales gratis de estas instrucciones. También puede visitar el sitio web de Water Ace
en www.waterace.com.
WATER ACE PUMP COMPANY | 1101 MYERS PARKWAY | ASHLAND, OHIO 44805-1969 (USA ONLY)
23833A157 (Rev. 7/9/08)
IMPORTANT INSTRUCTIONS BEFORE INSTALLATION
B
od
y
F
or
e
A
r
m
Up
p
e
r
A
rm
L
eg
J
o
i
n
t
L
eg
J
oi
nt
Leg
J
oi
nt
L
eg
Jo
i
n
t
Failure to follow these instructions may cause serious bodily injury and/or property damage.
Save this manual for future reference.
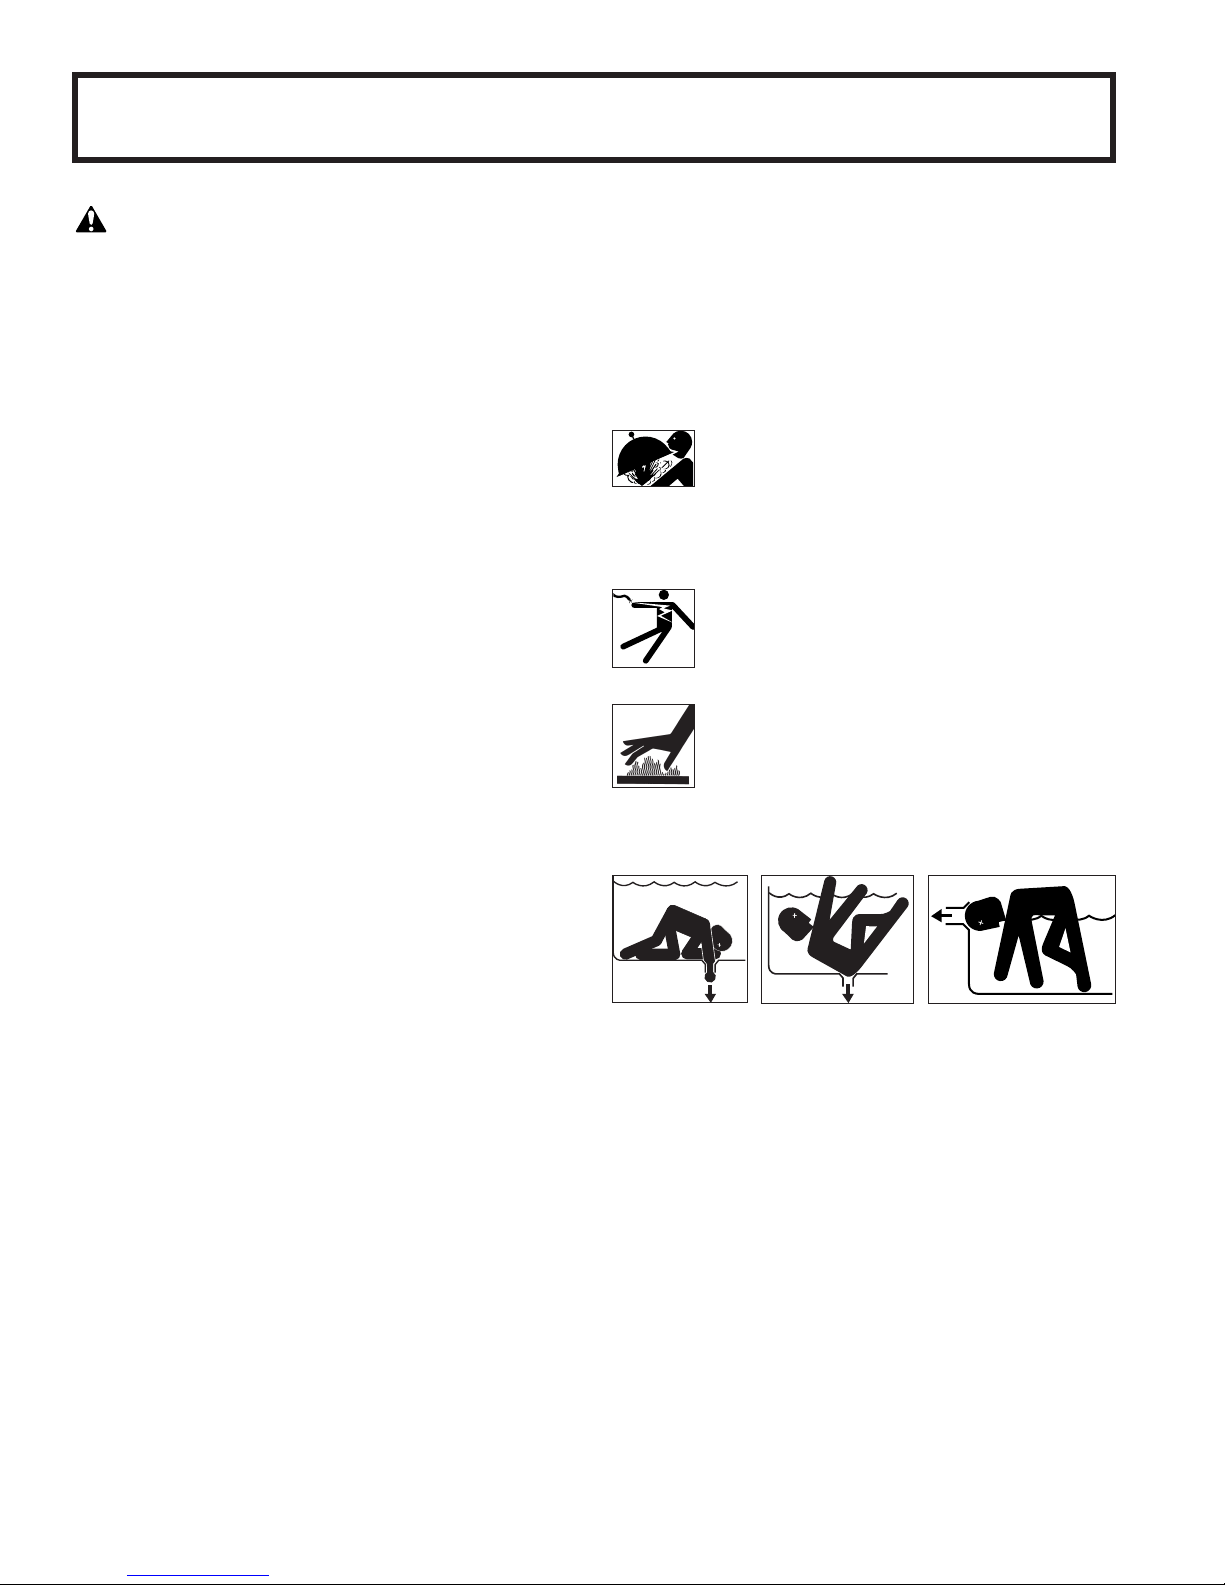
This is the safety alert symbol. When you see this symbol
on your pump or in this manual, look for one of the following
signal words and be alert to the potential for personal injury:
DANGER warns about hazards that will cause serious personal
injury, death or major property damage if ignored.
WARNING warns about hazards that can cause serious personal
injury, death or major property damage if ignored.
CAUTION warns about hazards that will or can cause minor
personal injury or property damage if ignored.
The label NOTICE indicates special instructions which are
important but not related to hazards.
Carefully read and follow all safety instructions in this manual
and on pump.
Keep safety labels in good condition.
Replace missing or damaged safety labels.
WARNING. Severe personal injury or death could result from
improperly sizing the pump, or from using it for any purpose
other than as an in-ground pool pump. Hazards may include,
but are not limited to, electrical shock, fire, flooding, suction
entrapment, or structural failure of the pump or other system
component.
WARNING. Pressure testing hazards.
• Do not allow people to work around components under test.
• Post appropriate warnings and barriers around pressurized
equipment.
• Test for the minimum time allowed by local codes.
• If the equipment is located in a separate room, close and lock
the door and post warning signs.
GENERAL
Pool main drain installation must comply with current local and
national building, electrical, plumbing and pool/spa codes, as
applicable.
Prime the pump (fill the pump and piping system with water)
before starting it for the first time. If you do not get satisfactory
circulation within 5 minutes, stop the pump and reprime it. Do
not allow the pump to run for an extended period of time with no
water moving. In these conditions, the pump may overheat and
start a fire or possibly explode.
WARNING. Explosion hazard, with risk of severe
injury or death. Always stop the pump and relieve all
pressure in the system before adjusting or releasing
any fastenings. Make sure there is no air in the system (use the
air bleed valve on the pool filter to release any trapped air in the
system). NEVER adjust, loosen or tighten any lid clamps or bolts
while the system is pressurized.
WARNING. Risk of electrical shock – can burn or
kill. Always disconnect power to the pump at the
circuit breaker before servicing or working on the
pump. Make sure that no one can connect the power
without your knowledge and consent.
WARNING. Fire and burn hazard. Do not allow leaves
and debris to collect around the pump. Do not allow
children around the pump and filter areas. Allow the
pump motor to cool for 20 minutes before working
on it.
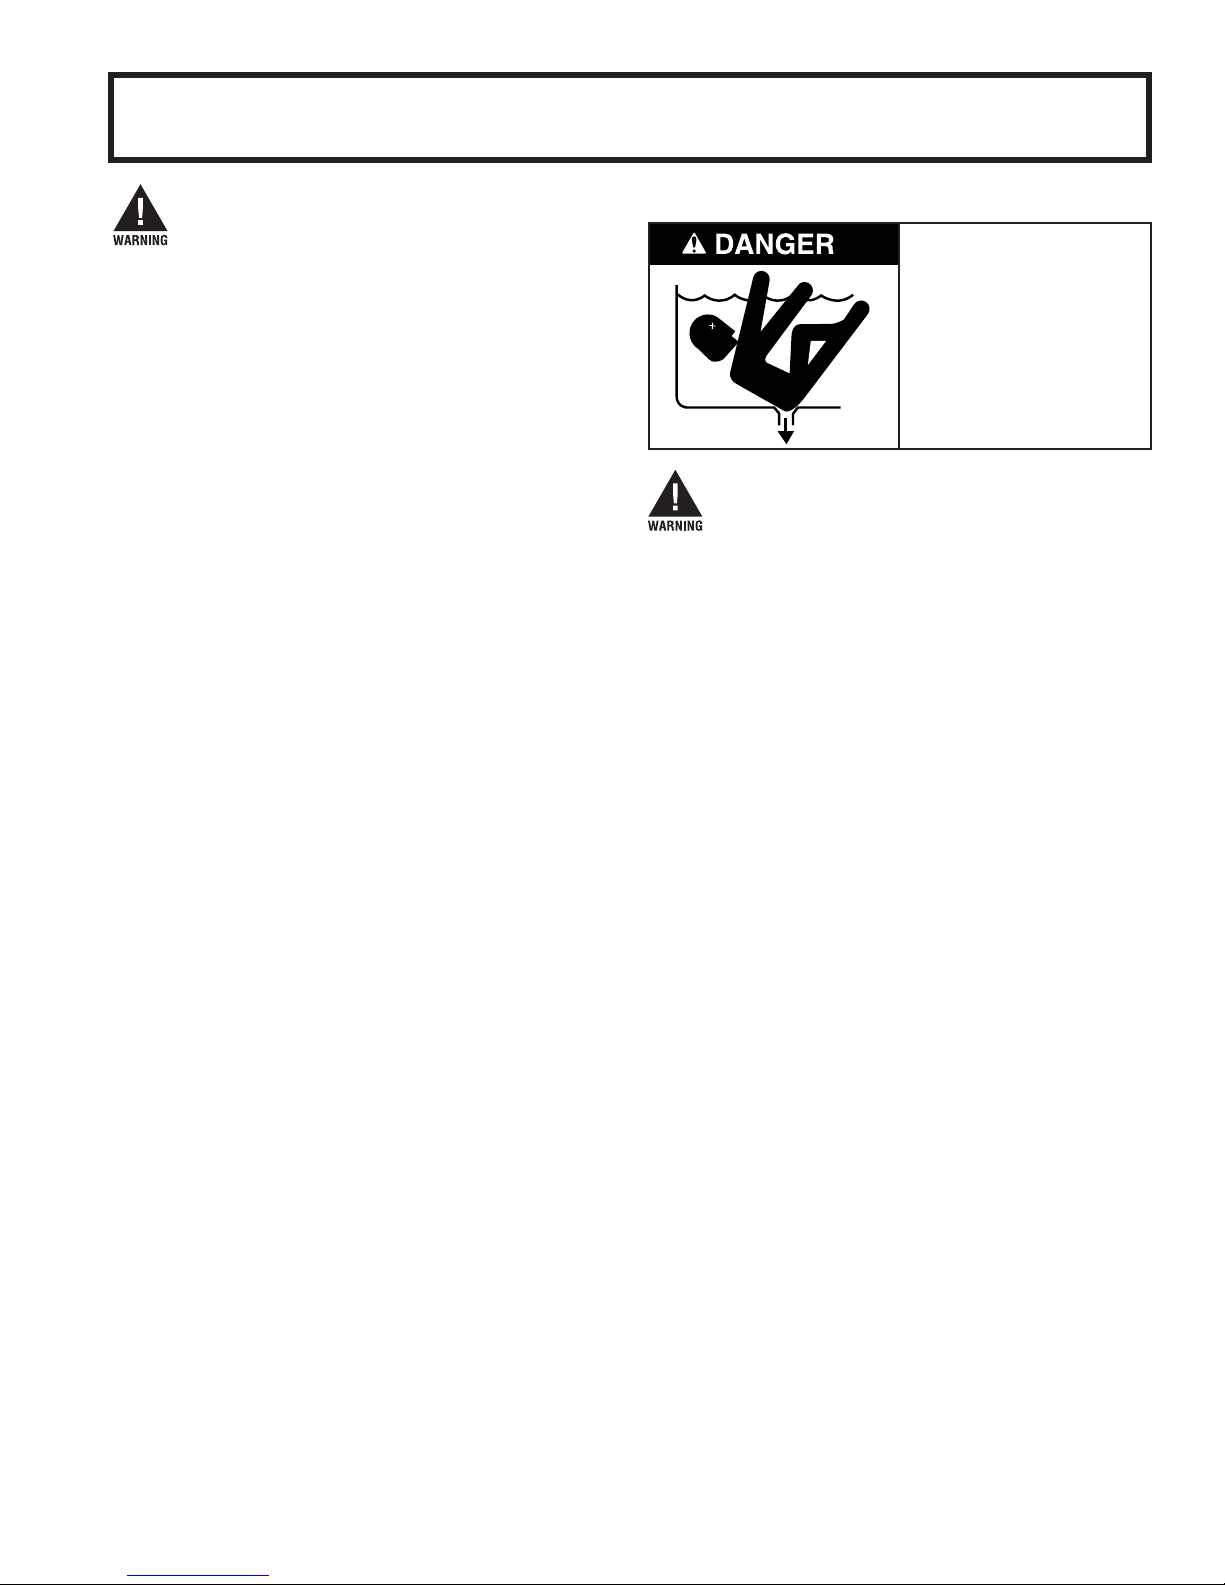
DANGER. Hazardous Suction. Can trap hair or body, causing
severe injury or death.
ELECTRICAL
This pump must be wired through a Ground Fault Circuit
Interrupter (GFCI) to protect the circuit. To reduce the risk of
electrical shock, connect the green terminal on the pump to the
grounding terminal of your electrical service or supply panel. Use
a conductor at least as large as the wires conducting power to the
pump. Refer to local or national codes for details.
Installations must comply with the National Electrical Code or the
Canadian Electrical Code, as applicable, and all applicable local
codes and ordinances.
23833A157
• Do not block circulation pump suction. MAKE SURE that all main
drains are correctly installed, with anti-entrapment covers,
listed to ASME A112.19.8, screw-fastened in place, and that
any vacuum outlets are protected by self-closing, self-latching
vacuum covers listed to IAPMO SPS-4 2000.
• Keep small children under close adult supervision around the
pool at all times.
• NEVER allow anyone (adult or child) to sit on a pool main drain.
• Very small children sometimes think that a main drain is really
a place to “go potty”. Don’t let them do this!
2
IMPORTANT INSTRUCTIONS BEFORE INSTALLATION
Hazardous Suction.
Can trap hair or body,
causing severe injury
or death.
• Do not block suction.
• Keep small children
under close adult
supervision at all times.
Failure to follow these instructions may cause serious bodily injury and/or property damage.
Warranty void if product modified, drilled, painted,
or altered in any way; if used to pump hot water, or
to pump liquids other than water (such as but not
limited to chemicals, fertilizers, flammable liquids, herbicides,
mud, tar, cement, wood chips); or otherwise abused.
Rules for Safe Installation and Operation
When installing and using this electrical equipment, basic safety
precautions should always be followed, including the following:
1. READ THESE RULES AND INSTRUCTIONS CAREFULLY.
Failure to follow them could cause serious bodily injury and/or
property damage.
2. WARNING. To reduce the risk of injury, do not permit children
to use or operate this product.
3. WARNING. Risk of electric shock. Connect only to a circuit
protected by a ground fault circuit interrupter (GFCI). Contact a
qualified electrician if you cannot verify that the receptacle is
protected by a GFCI.
4. Check National Electric Code and state and local codes before
installing. You must comply with these rules.
5. Before installing pump, have the electrical circuit checked by
an electrician to make sure it is properly grounded.
6. Before installing or servicing your pump, BE CERTAIN pump
power source is disconnected.
7. Match supply voltage to nameplate voltage. Wrong voltage can
cause fire or motor damage and voids warranty. If in doubt, consult
a licensed electrician.
8. Complete pump and piping system must be protected against
below-freezing temperatures. Failure to do so could cause severe
damage and will void the warranty.
9. WARNING. Do not pump chemicals or corrosive liquids with
this pump. To do so will shorten the life of pump seals and moving
parts, voiding the warranty.
10. After carefully removing your pump from the carton, make a
visual inspection for any apparent shipping damage.
11. Do not use extension cords.
12. Do not pump gasoline or other flammable liquids.
13. If you need to close the valve on the discharge side of the
pump, shut the valve slowly. Rapid closing of the valve could cause
a water hammer effect and damage the pump.
14. SAVE THESE INSTRUCTIONS.
Pump must be primed! Make sure pump is full of water before
running! Failure to do so will cause damage to mechanical seal,
leakage and flooding.
WARNING. Explosion hazard. Never run pump against closed
discharge valve! To do so can cause high temperatures, pump
damage, personal injury and property damage.
WARNING. Hazardous voltage! Can shock, burn or cause death.
Read instructions before installing. To avoid dangerous or fatal
shock hazard, turn off power and ground motor before connecting
motor to electrical power supply. Do not ground to a gas supply
line.
Pump may be HOT to touch. Use caution.
POOL PUMP SUCTION REQUIREMENTS
Pump suction is hazardous and can trap and drown or
disembowel bathers. Do not use or operate swimming
pools, spas, or hot tubs if a suction outlet cover is
missing, broken, or loose. Follow the guidelines below
for a minimimum risk installation.
Suction Outlet Covers
All suction outlet covers must be maintained, and replaced if
cracked, broken, or missing. See “Testing/Certification”, below, for
outlet cover certification requirements.
All suction outlets must have correctly installed, screw-fastened
covers in place.
Suction Outlets Per Pump
Provide at least two hydraulically balanced main drains, with
covers, as suction outlets for each circulating pump suction
line. The centers of the main drains (suction outlets) on any one
suction line must be at least three feet apart.
The system must be built so that it has at least two main drains
connected to the pump whenever it is running (see “Typical
Installation Drawing”, Page 4). However, if two main drains
run into a single suction line, that line may be equipped with a
valve to shut off both main drains from the pump (see “Typical
Installation Drawing”).
More than one pump can be connected to a single suction line as
long as the requirements above are met.
Testing/Certification
Suction outlet covers must have been tested by a nationally
recognized testing laboratory and found to comply with the latest
ASME/ANSI A112.19.8 Standard Specification for Suction Fittings
For Use in Swimming Pools, Spas, Hot Tubs, and Whirlpool Bathtub
Applications.
3
23833A157
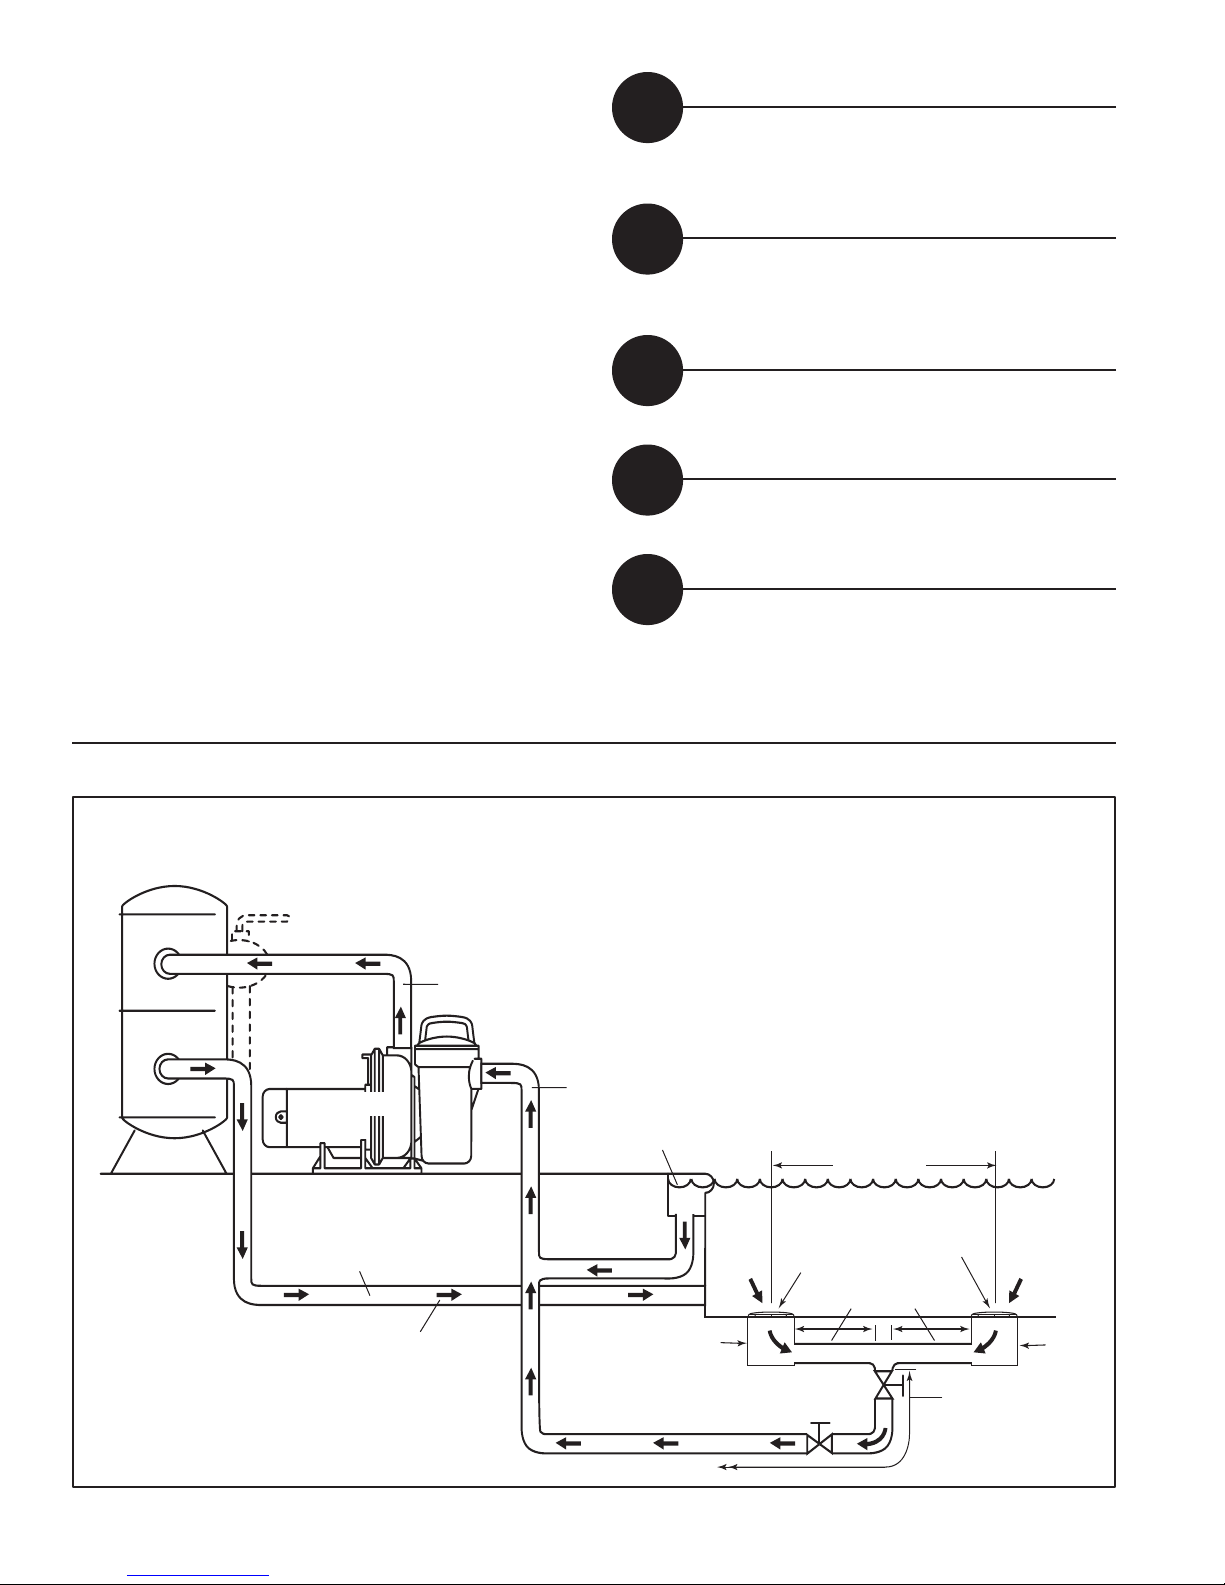
SWIMMING POOL PUMP INSTALLATION
Filter: Cartridge filters require no backwash valve.
Sand or diatomaceous earth filters require a
backwash valve.
Backwash Valve
Pump Discharge Line
Pump Suction Line
Circulation
Pump
Optional Shut-O Valves
can be installed in the
lter inlet and outlet lines
to allow isolation of the
lter for service.
Skimmer
Return Line
Inlet Line
from Skimmer
At Least 3 Feet
Suction Outlets (Main Drains)
with
IAPMO Certified Antientrapment Covers or Suction
Fittings, screw-fastened.
Valves OK
between Tee
and Pump
No valves between
Tee and Main Drains
Main Drain Sump
Main
Drain
Sump
Direction of Flow
STEP
General Tools and Materials Needed
• Electrical cable with ground wire
• Ground fault circuit breaker
• Rigid 1-1/2" PVC pipe and fittings or reinforced flex hose and
hose clamps
• Pump
• Filter
• Backwash valve (not required on cartridge filter)
• Shut-off valves
• Hacksaw with 24-tooth blade for cutting plastic pipe
• Knife or round file for smoothing inside of plastic pipe connections
• Screwdriver, pipe wrench, adjustable wrench
• PVC cleaner and adhesive
• Hose clamp fittings (required only for flex hose)
1
Locate pump and filter on a solid level ground. Make
sure pump is protected from the weather and pool
splash. (Water should not come in contact with motor.)
STEP
2
Connect the suction line from the pool skimmer and/or
drain to the pump inlet. A shut-off valve is required on
above ground pools.
STEP
3
Connect the discharge line from the pump to the
filter inlet.
STEP
4
Connect the return line from the filter outlet to the
swimming pool return inlet.
STEP
5
Connect the electrical cable from the pump to a ground
fault circuit breaker. Make sure power is off before
connecting the wires. (SEE ELECTRICAL INFORMATION,
PAGE 5).
TYPICAL INSTALLATION DRAWING
23833A157
4

ELECTRICAL INFORMATION
NAME- FUSE OR
PUMP MOTOR PLATE
MAX. WIRE LENGTH USING AWG WIRE SIZE
CIRCUIT
MODEL HP VOLTAGE AMPS
14 12 10 8 6
RSP7
BREAKER
3/4 115 11.8 100 160 250 385 600
RSP7
15
3/4
230 5.9 400 630 990 1545 2405
RSP10
10
1 115 14.4 — 128 200 310 485
RSP10
20
1 230 7.2 300 475 660 1030 1650
RSP15
10
1-1/2 115 20.8 — — 142 222 345
RSP15
25
1-1/2 230 10.4 220 350 545 860 1325 15
Installation Instructions
Wiring to this pump must be installed and maintained in
accordance with the National Electric Code, state and local codes.
If more information is needed, call your local licensed electrician
or your power company.
Grounding the Motor: Permanently ground the motor in
accordance with the National Electric Code Article 250 and
applicable local codes and ordinances. It is recommended that
permanent ground connection be made to the unit using a
conductor no smaller than No. 8 AWG (8.4 mm2). This ground
conductor should be connected from the accessible wire connector
on the motor to all metal parts of the swimming pool structure
and to all electrical equipment, metal conduit, and metal piping
within 5 feet (1.5 m) of the inside walls of a swimming pool, when
the motor is installed within 5 feet of the inside walls of the
swimming pool. This permanent ground should be from a metal
underground water pipe or a grounded lead in the service panel. A
metal underground water pipe or well casing at least 10 feet long
makes the best ground electrode.
If plastic pipe or insulated fittings are used, run the ground wire
directly to the ground electrode furnished by the power company.
Caution: Do not ground to a gas supply line and do not connect
to an electric power supply until unit is permanently grounded.
Connect the ground wire to the approved ground and then connect
to the terminal provided.
Important: For your safety, be sure electrical circuit to pump is
shut off (disconnected) before attempting to wire pump. Pump
should be connected to a separate electrical circuit directly from
main switch. A fuse box or circuit breaker must be used in this
line (see fuse chart). Plugging into existing outlets can cause
low voltage at motor, resulting in blown fuses, tripping of motor
overload, or burned-out motor. All wiring must follow local codes.
Note: If ever in doubt, call a licensed electrician.
Motor Voltage: The pumps are wired for 230 volts, but may
be converted to 115 volts by referring to instructions printed
on motor. If motor is converted to 115 volts, have a qualified
electrician check the entire electrical and power leads system to
be sure they can handle the higher amps.
To Wire Pump: Make electrical connections with ground. First
connect bare copper ground to ground screw on back of motor.
Next make power connections.(See chart for wire size.)
SWIMMING POOL WIRE & FUSE SELECTION CHART
MAINTENANCE AND SERVICE
Priming the Pump
To prime the pump, remove the lid from the strainer and fill the
pump and basket with water. Turn cover counterclockwise to
remove. CAUTION: Be sure pump has been shut off and pressure
relieved before removing cover.
POOL WINTERIZING
In areas where freezing temperatures occur, protect pump and
pipes from freezing. When water freezes, it expands and damages
the pump and piping.
WARNING. Do not use commonly available antifreeze solutions.
Automotive antifreeze solutions are commonly made up of
ethylene glycol, which is highly poisonous and does not evaporate.
Methyl alcohol is also highly poisonous, but will evaporate if given
enough exposure to the atmosphere. Many windshield washer
solutions are compounded with methylhydrate, which is very
poisonous. All of these above-mentioned antifreezes have a strong
deteriorating effect on some plastic materials commonly found in
pool pumps, valves, and filter components. Some plastics, such as
those used in pump impellers, will become crystalline and brittle
when in contact with antifreeze solutions or are exposed to the
fumes. Other materials, such as clear trap lids can become milky in
appearance, soften or lose rigidity when exposed to the fumes of
antifreeze compounds.
When basket and pump are filled with water, replace strainer lid.
Lubricate O-ring each time with petroleum jelly. Be sure O-ring
seal is in place before tightening cover. Turn clockwise to tighten.
The pump will now prime, with the priming time depending on the
suction lift and the horizontal distance of the suction piping.
The recommended procedures for winterizing pool piping
are as follows:
1. Use low pressure air flow to blow accumulated water from
the piping system after the water level has been pumped down
below all inlets to the pool. Drained inlet piping may be capped to
prevent re-entry of water into the pipes.
2. There is one antifreeze solution that is compatible with
plastics and is nontoxic. Preliminary investigations show that
DOWFROSTTM, a product of Dow Chemical Company, is safe and
effective for use in pools and all types of fresh water piping
systems for winterizing, including solar systems. It is compounded
of propyleneglycol, and has a very low evaporation rate.
A solution of 40% Dowfrost and 60% water will protect pipes from
bursting to –50° F. A unique property of Dowfrost is that it contracts
as it approaches its freezing point, counteracting the expansion
characteristics of water and preventing bursting of pipes.
5
23833A157
PUMP SERVICE
CAUTION: Always turn power off and drain the pump before
servicing. If pump is below the water level of the pool, close
shut-off valve on both suction and discharge lines.
Step 1: Disconnect the power and remove drain plugs.
Step 2: Remove strainer lid; let drain.
Step 3: Disconnect piping.
Step 4: Remove clamp by turning tee handle.
CAUTION: Be sure pump is drained and pressure has been
released before removing clamp.
Step 5: Remove the case.
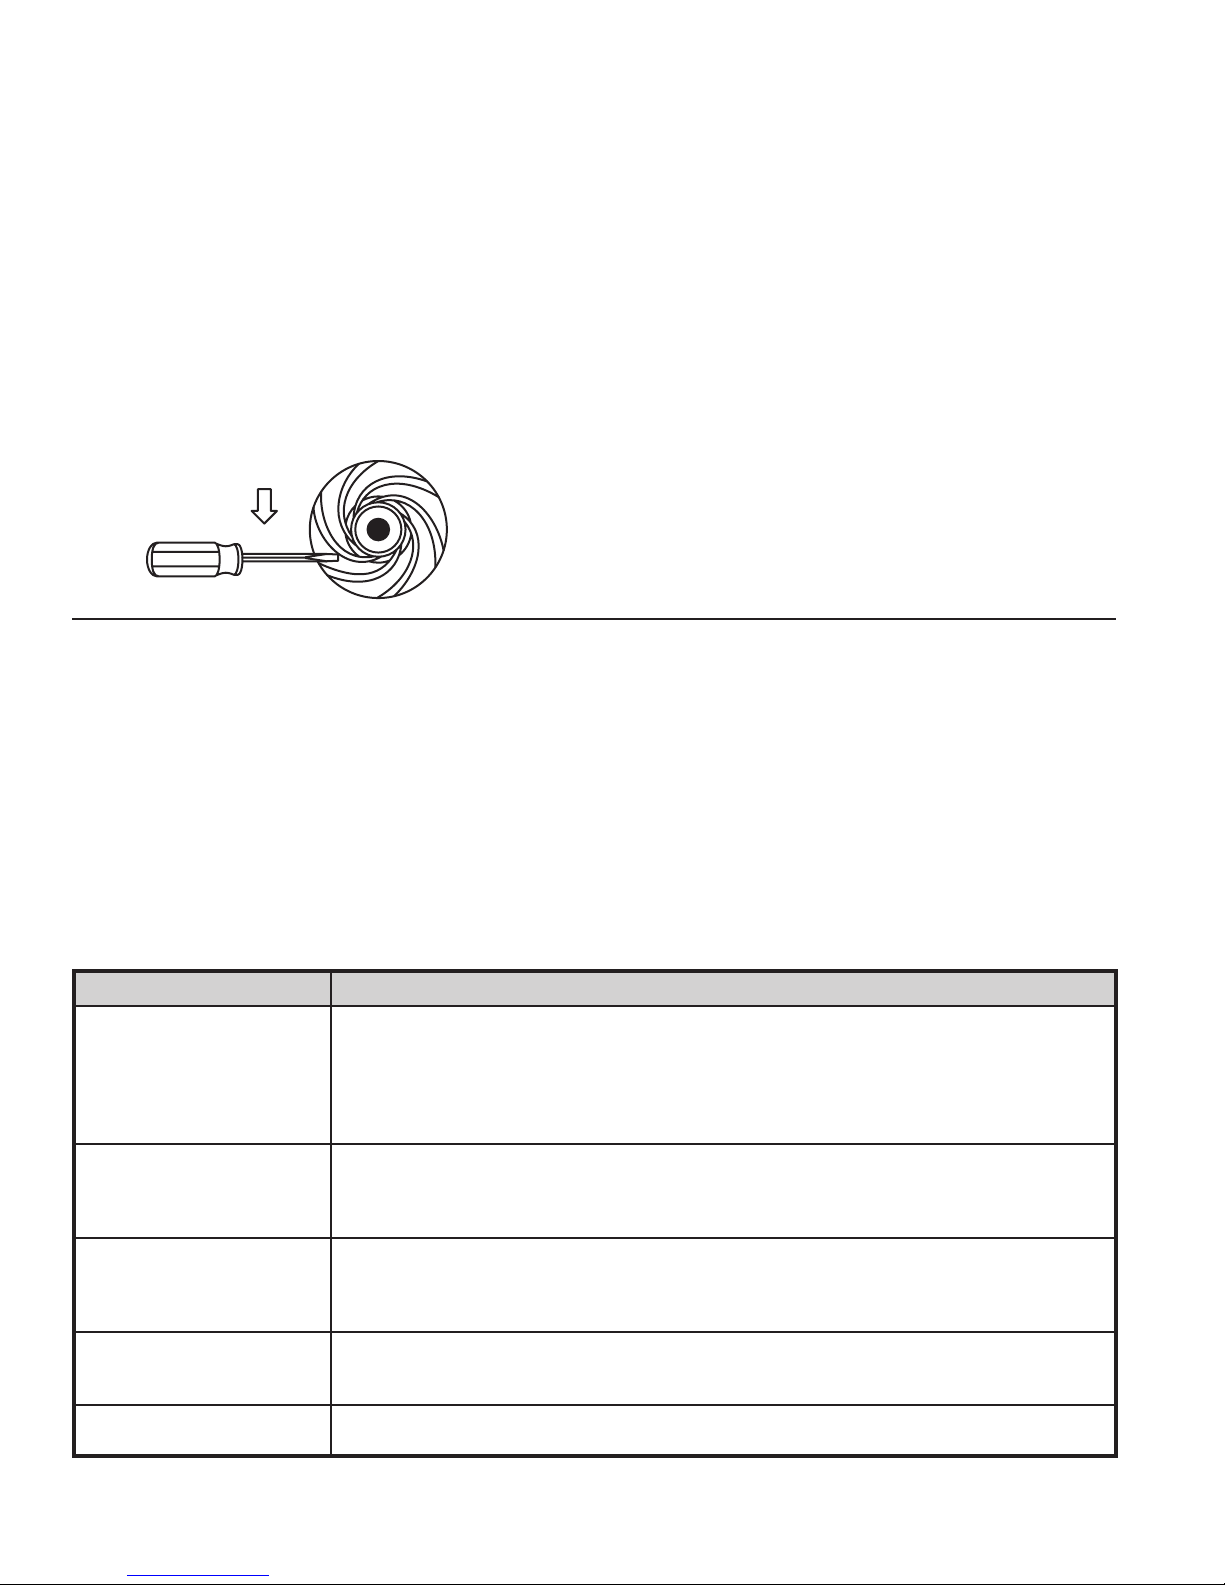
Step 6: Remove the impeller by turning counterclockwise. The
best way to remove impeller is by inserting a screwdriver in the
blade area and sharply hitting screwdriver with a rubber hammer.
Step 7: The motor can be removed by unscrewing 4 bolts.
Step 8: Install new seal following instructions in seal
repair package.
Step 9: Inspect O-rings for knicks and cuts. If damaged,
replace with new ones.
Step 10: Clean O-ring seat area. Lubricate O-rings with
petroleum jelly.
Step 11: Attach motor to seal plate and base.
Step 12: Attach case to seal plate with clamp.
Step 13: Install pipe plugs.
Step 14: Connect piping.
Step 15: Fill pump with water.
Step 16: Replace strainer lid.
Step 17: Reconnect power.
TROUBLESHOOTING CHECKLIST (CAUTION: SHUT OFF POWER TO PUMP)
This information is for checking pool pump installations that are
not operating properly. It is based on the premise that the installed
system will consist of a swimming pool pump taking water from a pool
and forcing it through a filter and back to the pool.
Warning: To guard against accidental personal injury,
the electric power to the pump must be turned off when
conducting the checking procedures outlined herein.
There are obvious exceptions, however, and authorized service
personnel should take necessary safeguards against the hazard of
electrical shock.
PROBLEM POSSIBLE CAUSES
Pump will not prime. • Stop motor, remove strainer lid, and fill case with water.
• Make sure suction line has no leaks, and that it slopes gradually from pump to pool with no high or
low spots.
• Make sure pump shaft turns clockwise when viewed from motor end opposite shaft.
• Check for plugged impeller.
• Make sure the check valve is not sitting in sand or mud, and that it is not stuck shut.
Pump delivers water for a period
of time, then stops pumping.
Pump does not deliver
rated capacity.
Motor overheats and shuts
off (overload).
Motor fails or does not
operate properly.
• Check for plugged impeller.
• Check for a suction leak.
• Check for blocked suction line.
• Check to see if impeller is rubbing.
• Check for plugged impeller.
• Check for a suction leak.
• Check for a blocked suction line.
• Check to see if impeller is rubbing.
• Make sure motor is properly wired for the correct voltage.
• Check wire size - wire may be too small. See selection chart on page 3.
• Make sure the impeller is not rubbing against the pump case.
• If within warranty, return pump/motor unit to place of purchase (with proof of purchase) for exchange.
23833A157
6
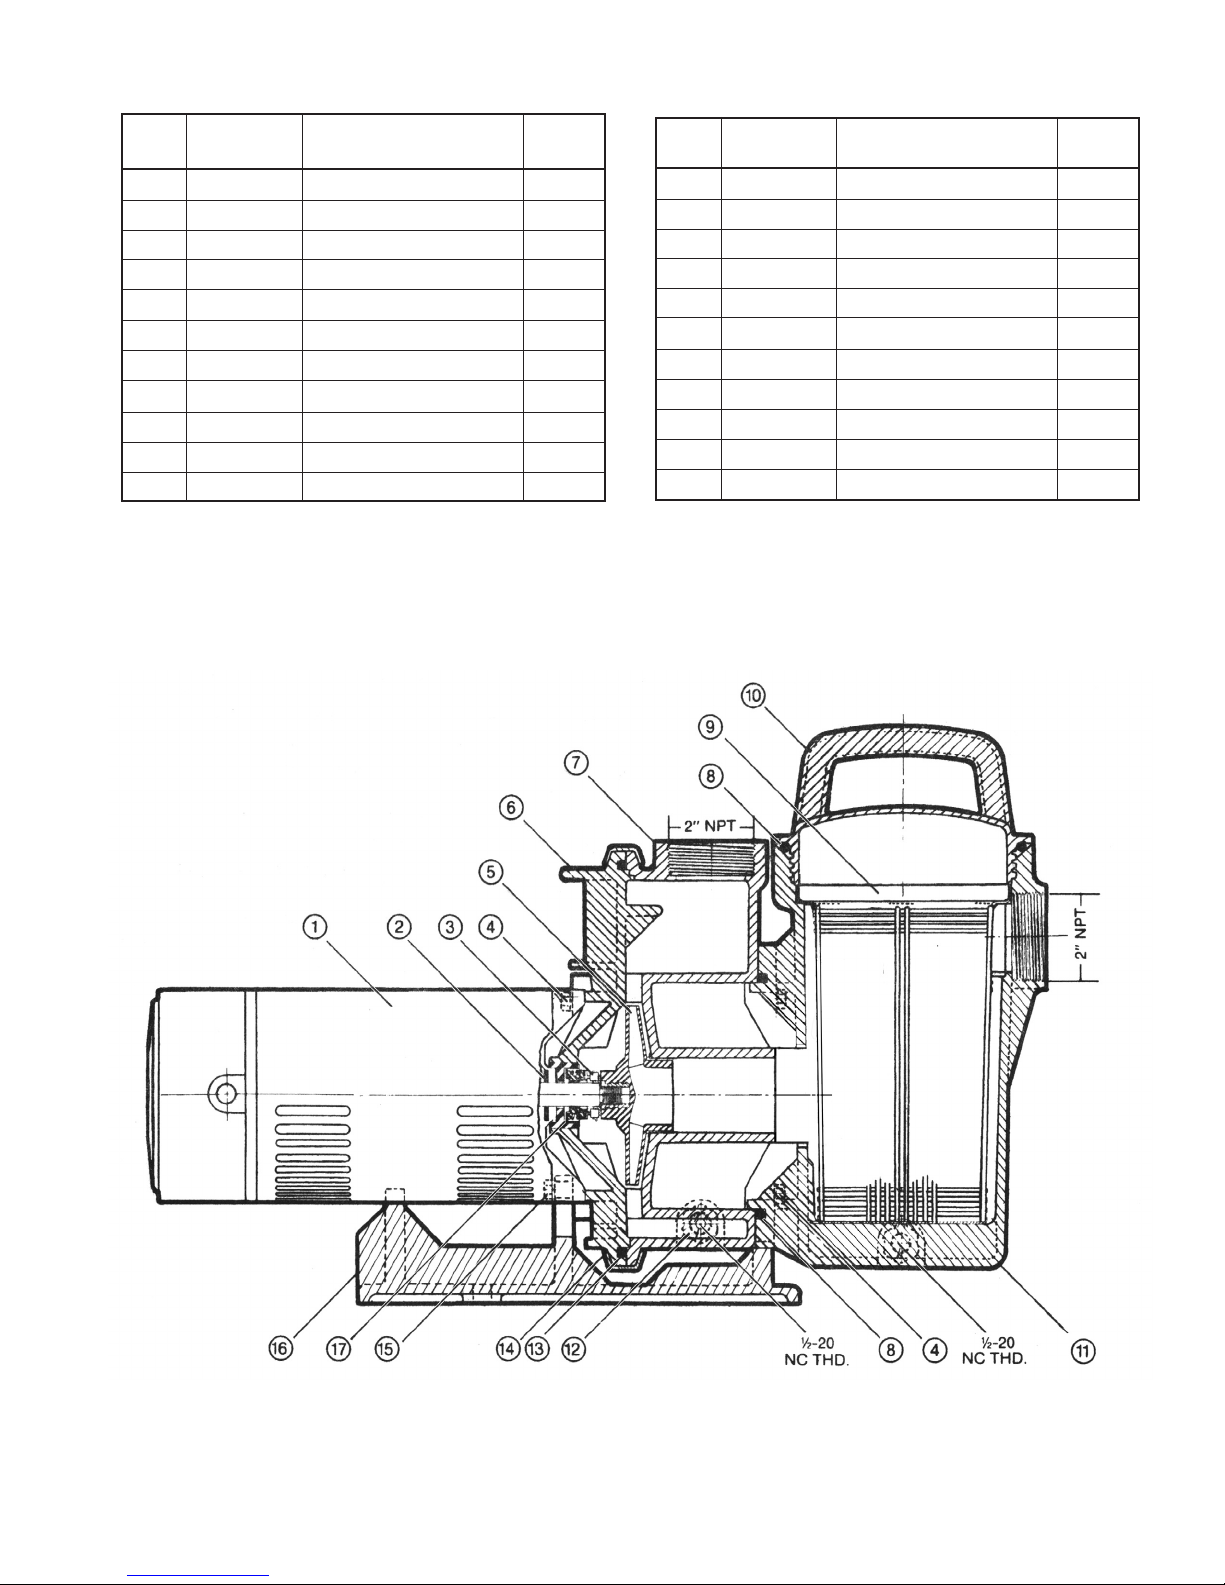
Ref. Part Qty.
No. No. Description Req'd.
8 05876A169 O-Ring 2
9 25061C000 Strainer Basket, B.G. 1
10 25062C000 Lid, B.G. 1
11 25063D000 Strainer Housing, B.G. 1
12 25064A000 Drain Plug 2
2
13 05876A170 O-Ring 1
14 25058C000 Clamp 1
15 19101A021 Cap Screw, 3/8" x 1-1/2"
16 25065C000 Foot, Mtg. 1
*17 25198A000 Seal Cup 1
— 25281A007 Seal Repair Kit** 1
Ref. Part Qty.
No. No. Description Req'd.
1 25051A008 3/4 HP Motor, RSP7 1
1 25051A009 1 HP Motor, RSP10 1
1 25051A010 1-1/2 HP Motor, RSP15 1
2 05059A318 Slinger 1
*3 25053A000 Shaft Seal 1
4 19101A010 Cap Screw, 3/8" x 1" 6
5 25054B001 Impeller, RSP7 1
5 25054B002 Impeller, RSP10 1
5 25054B003 Impeller, RSP15 1
6 25059D000 Seal Plate 1
7 25060D000 Diffuser Housing 1
B.G. = Below Ground
* If shaft seal (3) is replaced, also replace seal cup (17).
** Seal Repair Kit (25281A007) contains seal, seal cup and all O-rings.
Use only Water Ace Pump Co. approved components.
POOL PUMP PARTS LIST
7
23833A157

LIMITED WARRANTY
WATER ACE warrants to the original consumer purchaser (“Purchaser”) of its products that they are free from defects in material or
workmanship.
If within twelve (12) months from the date of the original consumer purchase any such product shall prove to be defective, it shall be
repaired or replaced at WATER ACE’s option, subject to the terms and conditions set forth below. Your original receipt of purchase is
required to determine warranty eligibility.
Exceptions to the Twelve (12) Month Warranty
Product Warranty Period
R106, R107 Non-Submersible Utility 90 Days
RES Submersible Utility
R33SP Submersible Sump Pump
R50SP Submersible Sump Pump
R3S Submersible Sump Pump 3 Years
R7PBS Pressure Booster Pump
R5V Submersible Sump Pump 5 Years
R50VLT, R75VLT Sump/Effluent Pumps
R5PILT Pedestal Sump Pump
R7W Submersible Sewage Pump
General Terms and Conditions
Purchaser must pay all labor and shipping charges necessary to replace product covered by this warranty. This warranty shall
not apply to acts of God, nor shall it apply to products which, in the sole judgement of WATER ACE, have been subject to negligence,
abuse, accident, misapplication, tampering, alteration; nor due to improper installation, operation, maintenance or storage; nor to
other than normal application, use or service, including but not limited to, operational failures caused by corrosion, rust or other
foreign materials in the system, or operation at pressures in excess of recommended maximums.
Requests for service under this warranty shall be made by returning the defective product to the Retail outlet or to WATER ACE as soon
as possible after the discovery of any alleged defect. WATER ACE will subsequently take corrective action as promptly as reasonably
possible. No requests for service under this warranty will be accepted if received more than thirty (30) days after the term of the
warranty.
2 Years
Lifetime
This warranty sets forth WATER ACE’s sole obligation and purchaser’s exclusive remedy for defective products.
WATER ACE SHALL NOT BE LIABLE FOR ANY CONSEQUENTIAL, INCIDENTAL, OR CONTINGENT DAMAGES WHATSOEVER.
THE FOREGOING WARRANTIES ARE EXCLUSIVE AND IN LIEU OF ALL OTHER EXPRESS WARRANTIES. IMPLIED WARRANTIES, INCLUDING
BUT NOT LIMITED TO THE IMPLIED WARRANTIES OF MERCHANTABILITY AND FITNESS FOR A PARTICULAR PURPOSE, SHALL NOT EXTEND
BEYOND THE DURATION OF THE APPLICABLE EXPRESS WARRANTIES PROVIDED HEREIN.
Some states do not allow the exclusion or limitation of incidental or consequential damages or limitations on how long an implied
warranty lasts, so the above limitations or exclusions may not apply to you. This warranty gives you specific legal rights and you may
also have other rights which vary from state to state.
Water Ace Pump Co. | 1101 Myers Parkway | Ashland, Ohio 44805-1969
23833A157
1-800-942-3343 (U.S.A. only)
8
 Loading...