

Watec WAT-2200, WAT-2300 Operation Manuals
Danger
Danger
5020Z00-Y2000001
Danger
Full HD Compact Camera
WAT-2200
Operation Manual
This Operation Manual covers safety, camera functions, installation and the
correct operating procedure for the WAT-2200. First, we ask you to read this
Operation Manual thoroughly, then install and operate the WAT-2200 as advised.
In addition, for future reference, we also advise safekeeping of this manual.
If you do not understand the installation, operation or safety instructions
expressed in this manual, please contact the distributor or dealer from where the
WAT-2200 was purchased. Not understanding the contents of the Operation
Manual sufficiently may cause damage to the camera, personal belongings
and/or result in injury.
Guide to the Safety Symbols
Symbols used in this operation manual:
“Danger”, may lead to a serious accident such as death or injury
caused by fire or electric shock.
“Warning”, may cause severe damage such as a physical injury.
“Caution”, may incur injury and cause damage to peripheral objects
in the immediate surroundings.
Cautions for Safety
The WAT-2200 is designed to be used safely. If not used safely, it may lead to a
physical accident caused by fire and electric shock. Therefore, please keep and
read the, “Cautions for safety” below for protection against accidents.
• Do not disassemble and/or modify the WAT-2200.
• Do not operate the WAT-2200 with wet hands.
• Use a stabilized power adaptor designed for DC+12V±
±±
±10%,
with a current capacity of more than 250mA
for the WAT-2200.
The recommended voltage is DC+12V±10%. Also, we advise the
Use of an “inline fuse” power line to protect the camera and
peripheral equipment, where applicable.
• Do not expose the WAT-2200 to wetness or high moisture
conditions.
The WAT-2200 is designed and approved for indoor use only. The
WAT-2200 is not water-resistant or waterproof. If the location of the
camera is outdoors or in an outdoor like environment, we
recommend that you use an outdoor camera housing.
• Protect the WAT-2200 from condensation.
Keep the WAT-2200 dry at all times during storage and operation.
• Should the camera not work properly, unplug the power
immediately. Then check the camera according to the “Problems
and Trouble shooting” section.
• Avoid the striking of hard objects or dropping the WAT-2200.
The WAT-2200 uses high quality electrical parts and precision
components and may inadvertently be damaged if not cared for
properly.
•
Do not connect any power supply directly to the video
out terminal of the unit.
Do not connect the WAT-2200 with any monitor using a video/
power single transmission terminal. The WAT-2200 utilizes
HD-SDI output and is not designed for use with this type of
equipment. We also advise you to read the operation manual of
the monitor you plan to use before any connections are made.
• Do not install the WAT-2200 in a position subject to direct
sunlight.
Sunlight shinning directly onto the WAT-2200 lens can cause
damage to the sensor.
• Select a stable place for installation of the WAT-2200.
Use an appropriately rated mount durable and strong for all
installation position.
• Do not move the WAT-2200 with the cables connected.
Before moving the WAT-2200, always remove the video cable and
power cable from the rear of the camera first.
• Avoid using the WAT-2200 near any XXX (“strong” deleted)
electro-magnetic field.
In the event of exposure to electromagnetic waves (causing the
monitored image to become distorted) we recommend the camera
be shielded by an appropriate protective casing.
Problems and Trouble Shooting
Trouble Shooting:
Disconnect the camera immediately should any of the following occur:
•
An optimal picture cannot be obtained, after checking that all the cables and
connections are correctly in place
•
Smoke or any unusual odor emerges from the WAT-2200
•
An object becomes embedded or a quantity of liquid seeps into the camera
housing
•
More than the recommended voltage or/and amperage has been applied to the
WAT-2200 by mistake
•
Anything unusual occurring to any equipment connected to the WAT-2200
Required Action:
①①①①Switch off the main power supply to the camera.
②Remove the power and video cables connected to the WAT-2200.
③Contact the distributor or dealer from which the WAT-2200 was purchased.
About EMC
The WAT-2200 is in conformity with EMC test standards carried out by
authorized organizations in Japan.
FCC Part15 class B
EN61000-6-3/EN50130-4
※
Please use an auxiliary power supply (eg: UPS) to this camera to comply
with EN50130-4 of EMC standards.
Do not modify the WAT-2200. A modified camera may not
conform to EMC test standards.
Contents
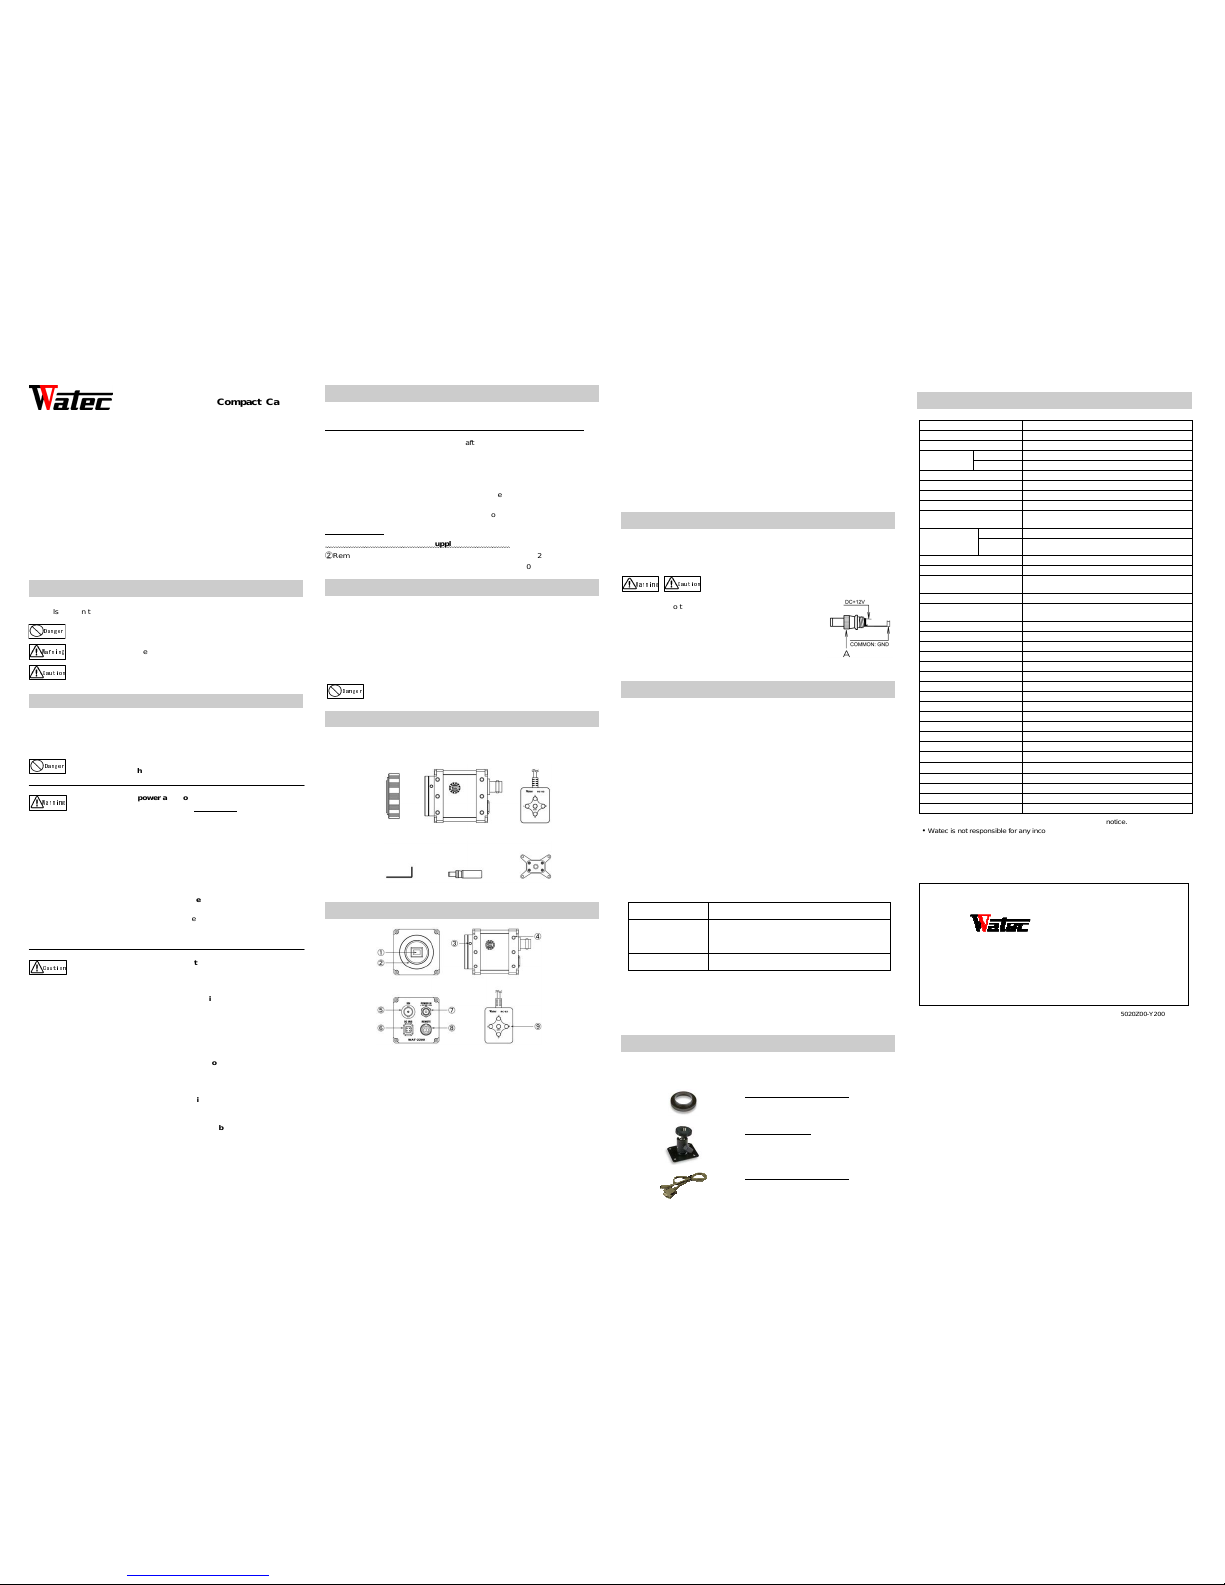
Referring to the illustration below, confirm all parts are present upon receipt of
camera.
Hex. wrench DC Plug Tripod adaptor
Description of Parts
①IMAGE SENSOR/Sensor Window
・・・・
The light receiving face of the image sensor
(Dirt, water or oil deposits on the image sensor will cause an unclear picture on
the monitor. Attach the lens cap to protect the lens and the sensor from
contamination and damage.)
②LENS MOUNT
・・・・Mount for the lens (CS-mount)
③CS Mount Set SCREWS (Consider using “BACK FOCUS” screws instead)
・・・・There are 3 adjustable hexagonal screws. Each screw is placed at intervals of
120゜around the housing for fine focusing of the lens.
④CAMERA MOUNTING FEATURES
・・・・These mounting features are used to mount the camera. Bolt Size : M3, Depth
4mm. If utilizing a tripod, please attach the supplied tripod adaptor by fixing the
4 bolt locations. There are a total of 24 mounting features encompassing the
sides, top and bottom of the camera.
⑤VIDEO OUT (BNC)
・・・・The terminal for SDI signal output
⑥DC-IRIS SOCKET
・・・・This socket is for the DC auto-iris lens cable connector.
⑦POWER IN Terminal (with a lock)
・・・・Connection for DC power plug to power the camera.
⑧REMOTE CONTROL TERMINAL
・・・・The terminal designed for connection with the remote control for setting the
function on the screen.
⑨Remote Control Unit
・・・・Remote control unit providing access to adjustments, settings the functions on
the screen (OSD).
Power Supply
Use a stabilized power adaptor designed for DC+12V, with a current capacity of
more than 250 mA. Use the optional DC plug if the shape or polarity of the DC
plug of the power adaptor to be used is not compatible with the camera (See the
drawing below).
The wiring of the connector must be exact.
Be careful not to touch the other terminal while wiring.
Protect the wiring portion by using insulation tape or
shrink tubing after wiring.
To prevent inadvertent disconnection while in use, please
secure the connector to the power terminal on the camera
by turning “A” in the figure to the right in the clockwise
direction. If the above care and attention is not adhered to,
damage to the WAT-2200 and power adaptor may occur and may also cause fire.
Set-up and Operation
1) Ensure that the power to the WAT-2200 and the peripheral equipment is
turned off before making any connections.
2) Remove the lens mount cap from the WAT-2200 and attach the CS-mount
lens. Use the optional C-mount adaptor (34CMA-R) when a C-mount lens is
used.
3) Connect the iris control cable to ⑥DC-IRIS SOCKET on the WAT-2200 when
a DC auto-iris lens is being used. If the aperture is not stable, please adjust by
using the camera setting adjustment software.
4) Connect ⑤VIDEO OUT on the WAT-2200 with the monitor, using a highfrequency coaxial cable with 75Ω impedance.
5) Insert the power plug of the power adaptor into ⑦POWER IN on the back
panel of the WAT-2200. Confirm that the power adaptor is not connected to
the power supply before insertion of the power plug into ⑦POWER IN.
6)
Turn on the power to the WAT-2200, monitor and all other allied equipment.
When a picture cannot be obtained on the monitor, or a problem occurs,
check and follow the procedure mentioned in the【Problems and Trouble
Shooting】section.
7) Adjust the focus and iris until optimal image clarity though the lens is
achieved. If the picture is still out of focus, open the iris fully and loosen
③CS Mount Set SCREWS with the hex wrench and move the lens forwards
until a fully focused and clear picture is obtained.
Manual Lens
Adjust the focus and iris to the best position on the
lens.
Motorized Zoom Lens
Back focus is required via CS Mount. Set Screw
adjustment as well as possible. Adjust the iris level on
the camera, then adjust the focus on the lens. See
below.
DC Auto-iris Lens
Adjust the iris level on the camera, then adjust the
focus on the lens. See below.
8) When detailed settings are required or a clear image is not obtained, connect
the remote control to ⑧REMOTE CONTROL TERMINAL, then set the
functions on the screen by ⑨OPERATION BUTTON
※Please connect the optional serial communication cable to ⑧REMOTE
CONTROL TERMINAL to change the camera settings with the software
if needed.
Options
To purchase these options, please contact the distributor or dealer from which
you purchased the WAT-2200.
Specifications
Model WAT-2200
Pick-up Element 1/2.8-inch CMOS image sensor
Number of total pixels 1952(H) × 1236(V)
Number of
Effective Pixels
1080i/1080p
1920(H) × 1080(V)
720p 1280(H) × 720(V)
Unit cell size 2.8µm × 2.8µm
Imaging system RGB+W array mosaic filters on chip
Sync. System Internal
Scanning System Progressive
Video Output
3G-SDI (Level A, SMPTE424M, Compatible)
HD-SDI (SMPTE292M, Compatible)
Output format
3G-SDI 1080p60, 1080p50, 1080p59.94
HD-SDI
1080i60, 1080i50, 1080i59.94, 1080p30, 1080p25,
1080p29.97, 720p60, 720p50, 720p59.94
Minimum Illumination 0.1 lx. F1.2
S/N More than 50dB
Function settings
OSD(On Screen Display) operated by remote
controller / RS-232(Compatible)
AE mode AUTO / MANUAL
Shutter speed
OFF, 1/100, 1/120, 1/200, 1/500, 1/1000,
1/2000, 1/5000, 1/10000 sec.
Flickerless mode ON / OFF
AGC HIGH / MEDIUM / LOW
MGC 0 - 30dB
White balance ATW / PWB / Preset
Noise reduction 2DNR ON / OFF
Privacy mask 16 areas (RS-232)
Mirror image OFF / ON (H-FLIP, V-FLIP)
Back light compensation ON / OFF
Defog ON / OFF
White blemish correction 1023 pixels
Lens iris DC
Power Supply DC+12V±10%
Power Consumption 2.22W (185mA)
Operating Temperature
-10 - +50℃
Storage Temperature
-30 - +70℃
Operating/Storage Humidity 95% RH or less (Without condensation)
Lens mount CS mount (Back focus adjustable)
Size
48(W)×48(H)×69.5(D) (mm)
Weight Approx. 130g
Contact information
Watec Co., Ltd.
Add.: 254-2 Nihonkoku, Daihoji, Tsuruoka- Shi,
YamagataKen, 997-0017 Japan
TEL: +81-235-23-4400 FAX: +81-235-23-4409
Email: info-o@watec.co.jp
URL: http://www.watec.co.jp
Warning
Caution
Warning
Caution
Warning
Caution
•
Design and specifications are subject to change without notice.
• Watec is not responsible for any inconvenience or the attendant damages to the
video and monitoring recording equipment caused by misuse, miss-operation or
improper wiring of our equipment.
• If for any reason the WAT-2200 does not work properly, or if you have any questions
regarding installation or operation, please contact the distributor or dealer from
which it was purchased.
RC-02
Lens Mount Cap
WAT-2200
Mini Stand (MS50)
A convenient stand for the WAT-2200. With
this stand, the camera can be adjusted to any
de
sired angle.
Serial Communication Cable
The cable for changes the camera settings
with the software.
C-mount Adaptor (34CMA
-R)
This lens mount adaptor is used to convert a
CS-mount to a C-mount.
5020Z00-Y2000103
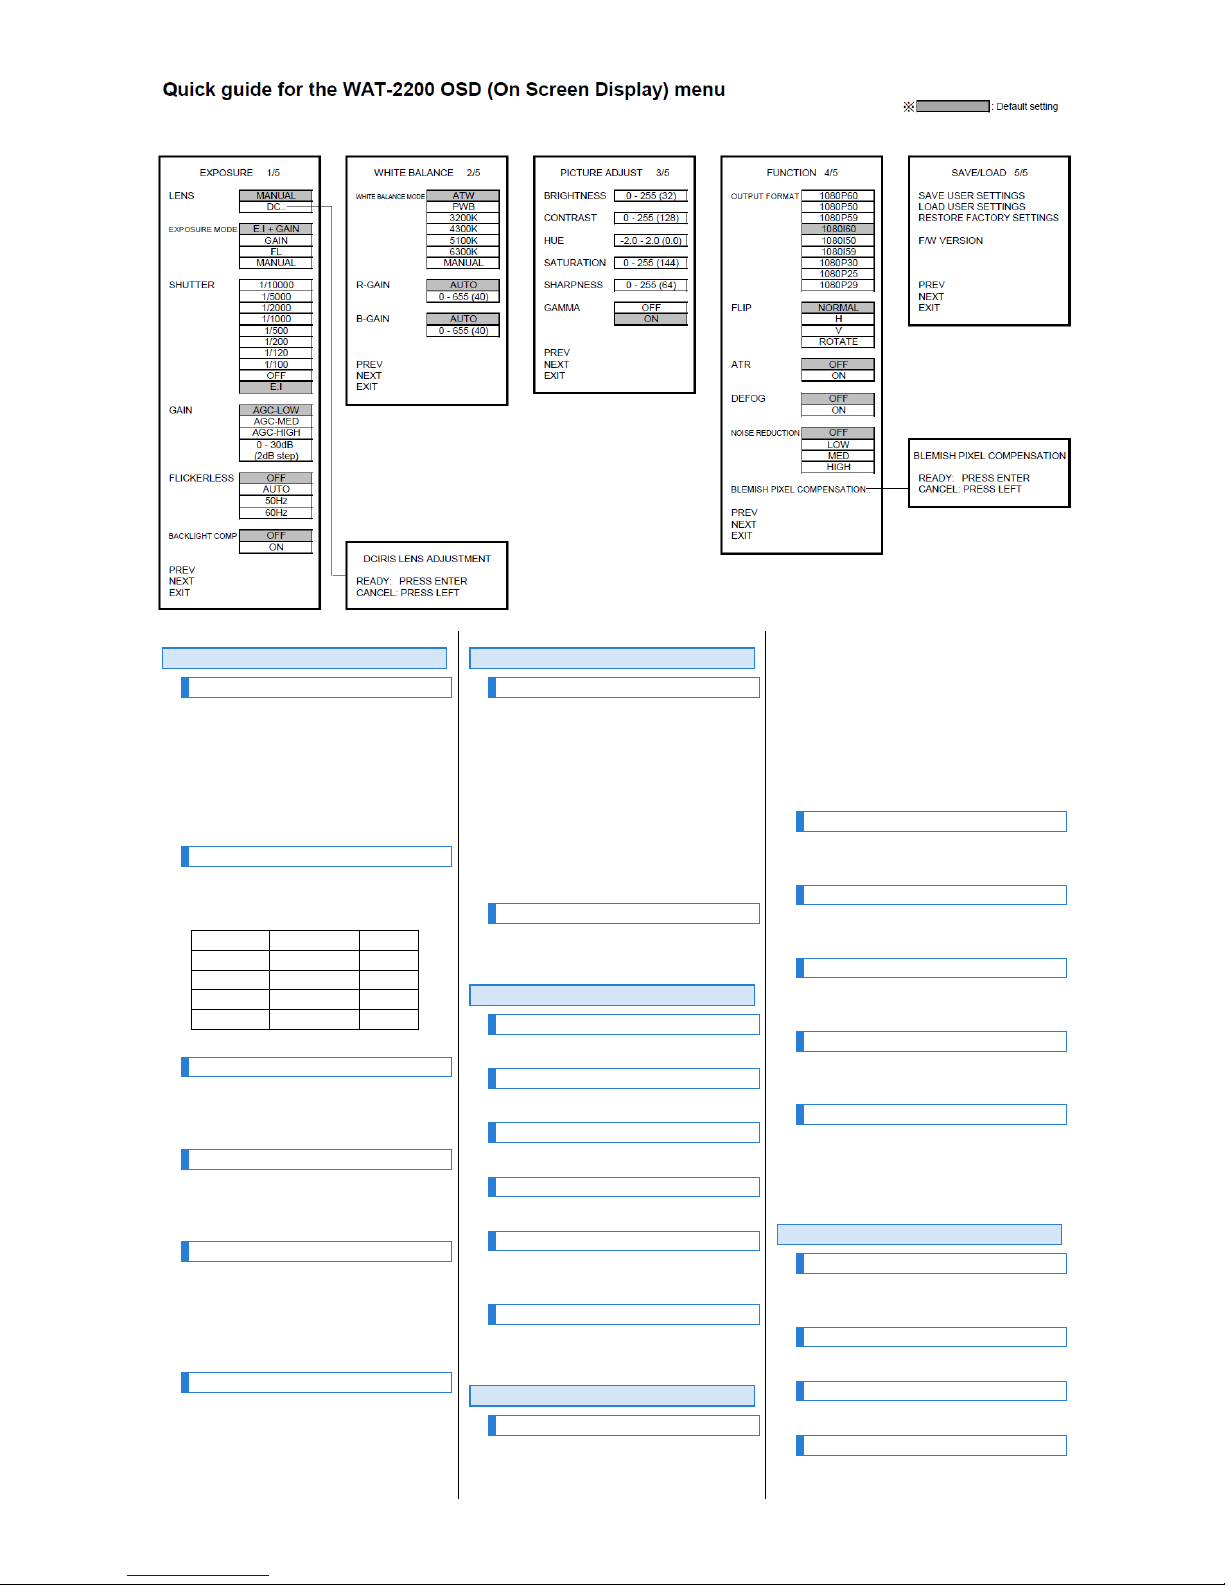
EXPOSURE
LENS
Select the item according to the using lens.
After selecting the DC, when the [Enter] is pressed, lens
adjustment mode is set. By imaging the bright object
(like a light box) with full screen, perform the adjustment.
When mounting the DC IRIS lens, the aperture is opened
by choosing the MNUAL. When using the MANUAL
lens, DC cannot be selected.
EXPOSURE MODE
Set the EXPOSURE MODE. Each mode functions by the
combination the following.
MANUAL lens, FL cannot be selected.
MODE
SHUTTER
GAIN
E.I+GAIN
AUTO
AUTO
GAIN
Arbitrary
AUTO
FL
AUTO(*)
AUTO
MANUAL
Arbitrary
Arbitrary
*1/100(1/120) or OFF
SHUTTER
In EXPOSURE MODE, when choosing the GAIN or
MANUAL, you can choose the shutter speed by your
preference.
GAIN
In EXPOSURE MODE, when choosing the MANUAL,
you can choose the gain by your preference. At other
modes, need to select the operating range of AGC.
FLICKERLESS
When FL is chosen in EXPOSURE MODE, need to
choose the frequency commercial power supply
considering the FLICKERLES. By setting the AUTO,
50/60Hz is automatically detected. Other than the FL
mode, OFF setting is fixed.
BACKLIGHT COMP.
BACKLIGHT COMPENSATION is performed by
center-weighted exposure. When choosing the
MANUAL in EXPOSURE MODE, OFF setting is fixed.
WHITE BALANCE
WHITE BALANCE MODE
Switch the WHITE BALANCE MODE.
ATW:Automatically follows and adjusts to the changing
color temperature of the illumination of the object.
PWB:Set the corrected value following the actual color
temperature of the illumination of the object.
Imaging the object that color is achromatic at the
full screen, and press the [Enter]. The corrected
value is set.
Each Preset:Correct at the fixed color temperature.
MANUAL:SET the R Gain or B Gain by your choice.
R-GAIN・B-GAIN
When choosing the MANUAL above, you can set the R
gain and B gain by your preference.
PICTURE ADJUST
BRIGHTNESS
Adjust the brightness of image.
CONTRAST
Adjust the contrast of the image.
HUE
Adjust the hue.
SATURATION
Adjust the color strength.
SHARPNESS
By emphasizing the contoured part, resolution is
improved.
GAMMA
Switch the GAMMA correction.
The correction coefficient is ON≒0.45.
FUNCTION
OUTPUT FORMAT
Select the OUTPUT FORMAT.
Select the format following the monitor (Receiver
equipment).
If you change the output format, it is active after the
camera is restarted.
Note.. If a selected format is not supported by the
monitor, a defective image may appear.
In this case, turn off the power of the camera first,
then turn on the power while pressing the right and
left buttons of the remote controller to start by
default.
FLIP
Flip the image at left/right (H), up/down (V) and Rotate
(left/right/up/down).
ATR
Correct the contrast, and reduce the whitening-out/ black
defects.
DEFOG
Correct the image that the contrast is not clear by fog. In
parallel, the ATR is ON.
NOISE REDUCTION
By image processing, noise under the dark site is
reduced.
BLEMISH PIXEL COMPENSATION
By automatically detection, blemish pixel is corrected.
Press the [Enter] at the light-shielding state (by narrowing
the lens focus). When using DC IRIS LENS, the aperture
is full opened automatically.
SAVE/LOAD
SAVE USER SETTINGS
Save the present setting menu. When the power is ON at
next time, the saved menu is started.
LOAD USER SETTINGS
The above saved setting is read out.
RESTORE FACTORY SETTINGS
Back to the factory default
F/W VERSION
Show the version of the firmware.
 Loading...