


WAT-1200CS
Rev. 1.00
OSD User's Manual
2017/4/18
Watec Co., Ltd.
1

Change History
Remarks
Rev. No.
Date
Changes
1.00
Initial Release
2017/4/18
2

1. Introduction
・・・・・・・・・・・・・・・・・・・・・・・・・・・・・・・・・・・・・・・
5
2. OSD Menu Operation
・・・・・・・・・・・・・・・・・・・・・・・・・・・・・・・・・・
6
3. MAIN MENU/SETUP MENU
・・・・・・・・・・・・・・・・・・・・・・・・・・・・・・
8
OSD Menu
・・・・・・・・・・・・・・・・・・・・・・・・・・・・・・・・・・・・・・
8
Save Settings(SAVE ALL)
・・・・・・・・・・・・・・・・・・・・・・・・・・・・・・・・
8
Lens Settings(LENS)
・・・・・・・・・・・・・・・・・・・・・・・・・・・・・・・・・・
9
3.3.1 DC Iris Lens Setting(LENS)
・・・・・・・・・・・・・・・・・・・・・・・・・・・・・・
9
DC Iris Lens Control Mode(MODE)
・・・・・・・・・・・・・・・・・・・・・・・・
10
DC Iris Lens Control Speed(SPEED)
・・・・・・・・・・・・・・・・・・・・・・・・
11
Shutter/Gain Settings
・・・・・・・・・・・・・・・・・・・・・・・・・・・・・・・・
12
3.4.1 Automatic Exposure Control(AUTO)
・・・・・・・・・・・・・・・・・・・・・・・・・・・
12
Shutter Speed(SHUTTER)
・・・・・・・・・・・・・・・・・・・・・・・・・・・・
12
Brightness Settings, High Luminance Side(AE LEVEL)
・・・・・・・・・・・・・・・・・・
13
Auto Gain Control(AGC)
・・・・・・・・・・・・・・・・・・・・・・・・・・・・・
13
Brightness Settings, Low Luminance Side ((AE LEVEL)
・・・・・・・・・・・・・・・・・・
14
3.4.2 Manual Exposure Control(MANUAL)
・・・・・・・・・・・・・・・・・・・・・・・・・・
15
Shutter Speed (SHUTTER)
・・・・・・・・・・・・・・・・・・・・・・・・・・・
15
Gain Value Settings(AGC)
・・・・・・・・・・・・・・・・・・・・・・・・・・・・
15
White Balance(WHITE BAL)
・・・・・・・・・・・・・・・・・・・・・・・・・・・・・
16
3.5.1 Auto Trace White Balance(ATW)
・・・・・・・・・・・・・・・・・・・・・・・・・・・・
17
3.5.2 Push White Balance(PUSH)
・・・・・・・・・・・・・・・・・・・・・・・・・・・・・・
17
3.5.3 Preset White Balance(USRE1 5100K/USER2 6300K)
・・・・・・・・・・・・・・・・・・・・
18
3.5.4 Manual White Balance(MANUAL)
・・・・・・・・・・・・・・・・・・・・・・・・・・・・
19
3.5.5 Push Lock White Balance(PUSH LOCK)
・・・・・・・・・・・・・・・・・・・・・・・・・・
20
Back Light Compensation (BACKLIGHT)
・・・・・・・・・・・・・・・・・・・・・・・・
21
Picture Adjust(PICT ADJUST)
・・・・・・・・・・・・・・・・・・・・・・・・・・・・・・
22
3.7.1 Image Flip(FLIP)
・・・・・・・・・・・・・・・・・・・・・・・・・・・・・・・・・・・
22
3.7.2 Brightness(BRIGHTNESS)
・・・・・・・・・・・・・・・・・・・・・・・・・・・・・・・
22
3.7.3 Contrast(CONTRAST)
・・・・・・・・・・・・・・・・・・・・・・・・・・・・・・・・・
23
3.7.4
Edge Enhancement(SHARPNESS)
・・・・・・・・・・・・・・・・・・・・・・・・・・・・
23
3.7.5 Chroma Settings(HUE,COLOR GAIN)
・・・・・・・・・・・・・・・・・・・・・・・・・・
24
Defog(DEFOG)
・・・・・・・・・・・・・・・・・・・・・・・・・・・・・・・・・・・・
25
Wide Dynamic Range / Tone Correction (WDR / ATR)
・・・・・・・・・・・・・・・・・
26
3.9.1 Adaptive Tone-Curve Reproduction (ATR)
・・・・・・・・・・・・・・・・・・・・・・・・
27
3.9.2
Wide Dynamic Range (WDR)
・・・・・・・・・・・・・・・・・・・・・・・・・・・・・・
28
Day & Night function (DAY/NIGHT)
・・・・・・・・・・・・・・・・・・・・・・・・・・
29
3.10.1 Automatic Switching Mode (AUTO)
・・・・・・・・・・・・・・・・・・・・・・・・・・・
29
Day / Night Switching Control (DELAY CNT / DAY→NIGHT / NIGHT→DAY)
・・・・・・・
30
3.10.2 Manual Switching Mode (MANUAL)
・・・・・・・・・・・・・・・・・・・・・・・・・・・
32
Day / Night Setting (DAY/ NIGHT)
・・・・・・・・・・・・・・・・・・・・・・・・
32
Burst Signal (BURST)
・・・・・・・・・・・・・・・・・・・・・・・・・・・・・
32
3.10.2.2
3.8
3.10
3.9
3.5
3.4.1.2
3.4.1.3
3.10.1.1
3.4
3.7
3.4.1.4
3.4.2.1
3.10.2.1
【Contents】
3.1
3.3
3.6
3.3.1.1
3.3.1.2
3.4.2.2
3.4.1.1
3.2
3

IR LED Control(IR LED)
・・・・・・・・・・・・・・・・・・・・・・・・・・・・・・・・
33
Noise Reduction(DNR)
・・・・・・・・・・・・・・・・・・・・・・・・・・・・・・・・
34
Privacy Mask(PRIVACY)
・・・・・・・・・・・・・・・・・・・・・・・・・・・・・・
35
CAMERA ID Setting(CAMERA ID)
・・・・・・・・・・・・・・・・・・・・・・・・・・・・
38
LANGUAGE
・・・・・・・・・・・・・・・・・・・・・・・・・・・・・・・・・・・・・・
42
Factory Reset(CAMERA RESET)
・・・・・・・・・・・・・・・・・・・・・・・・・・・・・
42
EXIT MENU(EXIT)
・・・・・・・・・・・・・・・・・・・・・・・・・・・・・・・・・・・
43
4. OSD Menu Tree
・・・・・・・・・・・・・・・・・・・・・・・・・・・・・・・・・・・・
44
3.14
3.17
3.15
3.12
3.13
3.11
3.16
4

1. Introduction
・The WAT-1200CS user's manual describes the functions and the adjustment methods using the On Screen
Display (OSD).
・When the settings of the WAT-1200CS is changed according to the WAT-1200CS user's manual, check to see
that the operation and the effects of the changes made to the camera are acceptable.
・The WAT-1200CS user's manual is subject to change by design and the specifications of the product without notice.
・The copyright of the WAT-1200CS user's manual shall belong to Watec Co., Ltd.
Copying in whole or in part without the authorization of the holders permission is prohibited.
5
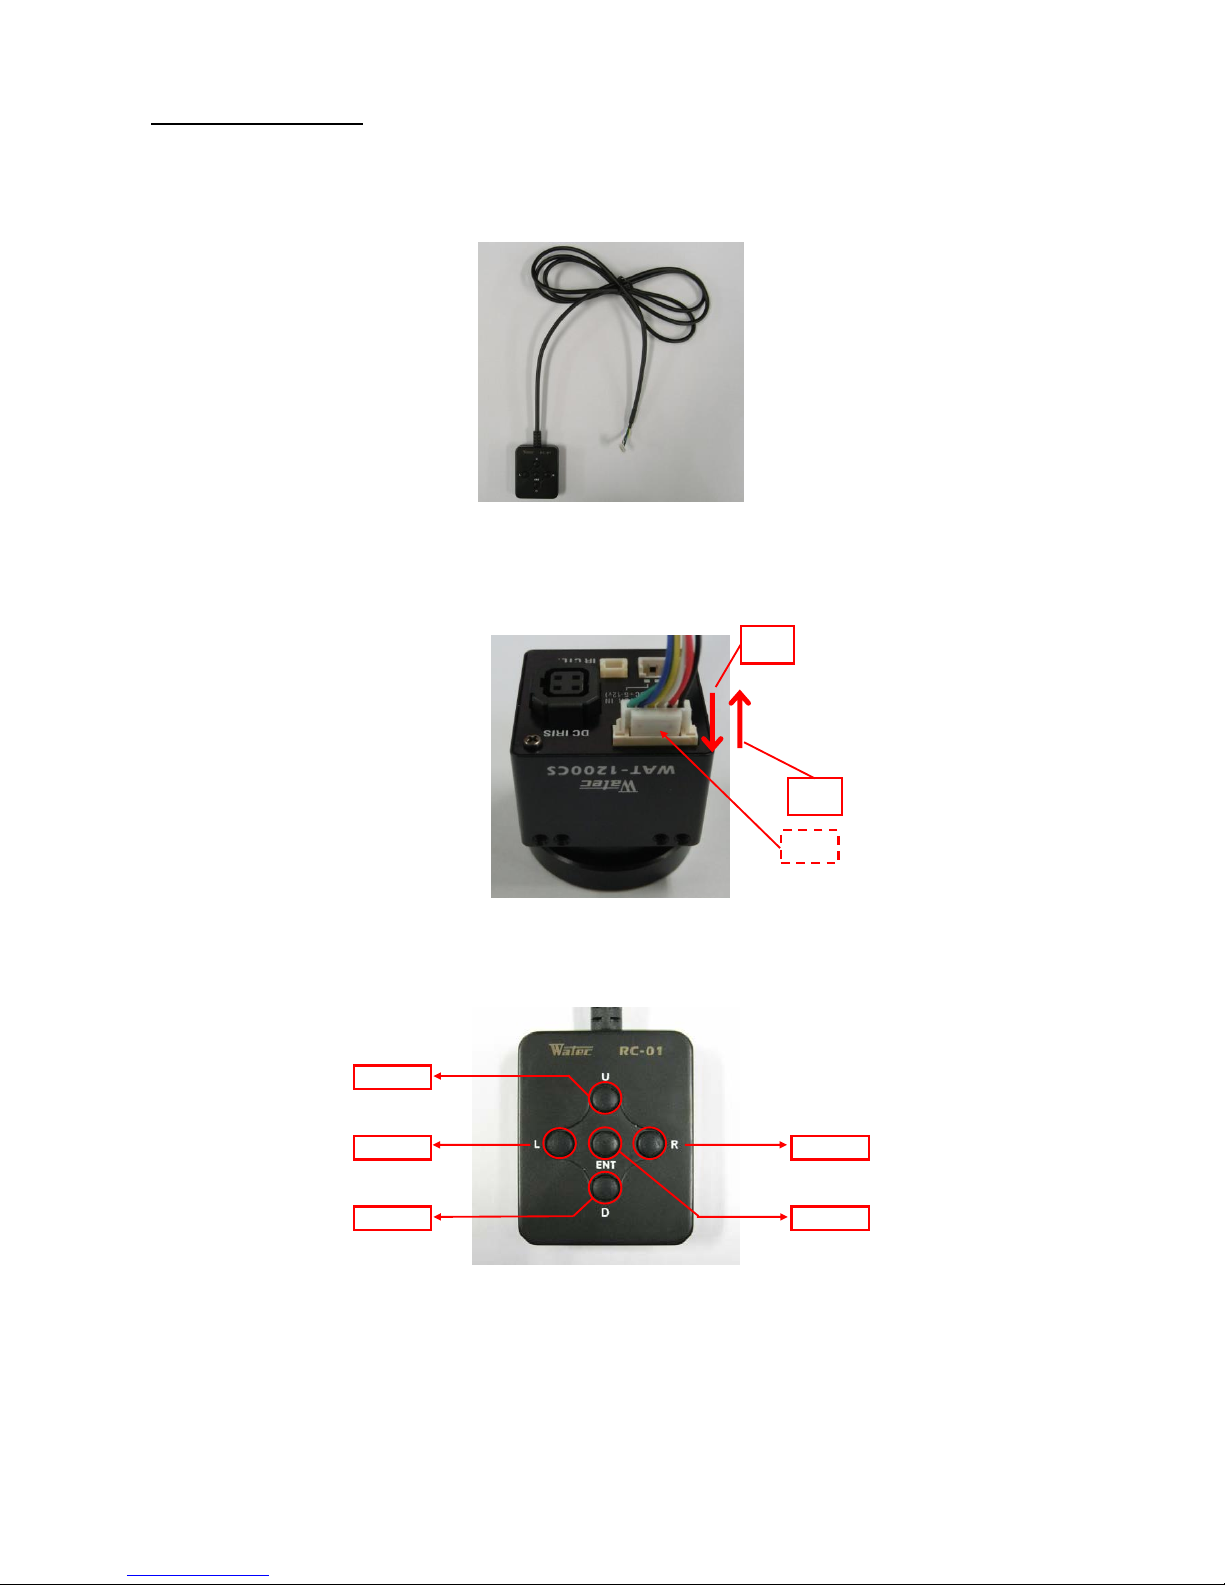
2.OSD MENU OPERATION
The functions and parameter settings of WAT-1200CS can be changed by OSD(On Screen Display).
Operate OSD with the controller.
a)When using the controller,vertically insert the connector fully until it clicks.
b)When disconnecting the controller, pull the connector while pinching the Lock.
The controller has 5 buttons, UP/DOWN/LEFT/RIGHT/ENTER.
1)UP
3)LEFT 4)RIGHT
2)DOWN 5)ENTER
Use 5 buttons above to operate the OSD menu.
1)UP/2)DOWN : Mainly to move the cursor up and down to select an item on the lists on the OSD menu.
3)LEFT/4)RIGHT : Mainly to adjust and change the functions on each list on the OSD menu.
5)ENTER : Mainly to execute the selected list and function on the OSD menu.
The symbol "↵" will be on some lists on the OSD menu to indicate that there are sub menus or selectable options by pressing 5)Enter.
The operation portion of the Controller
Controller Overview
How to Connect Controller
b)
Lock
a)
6
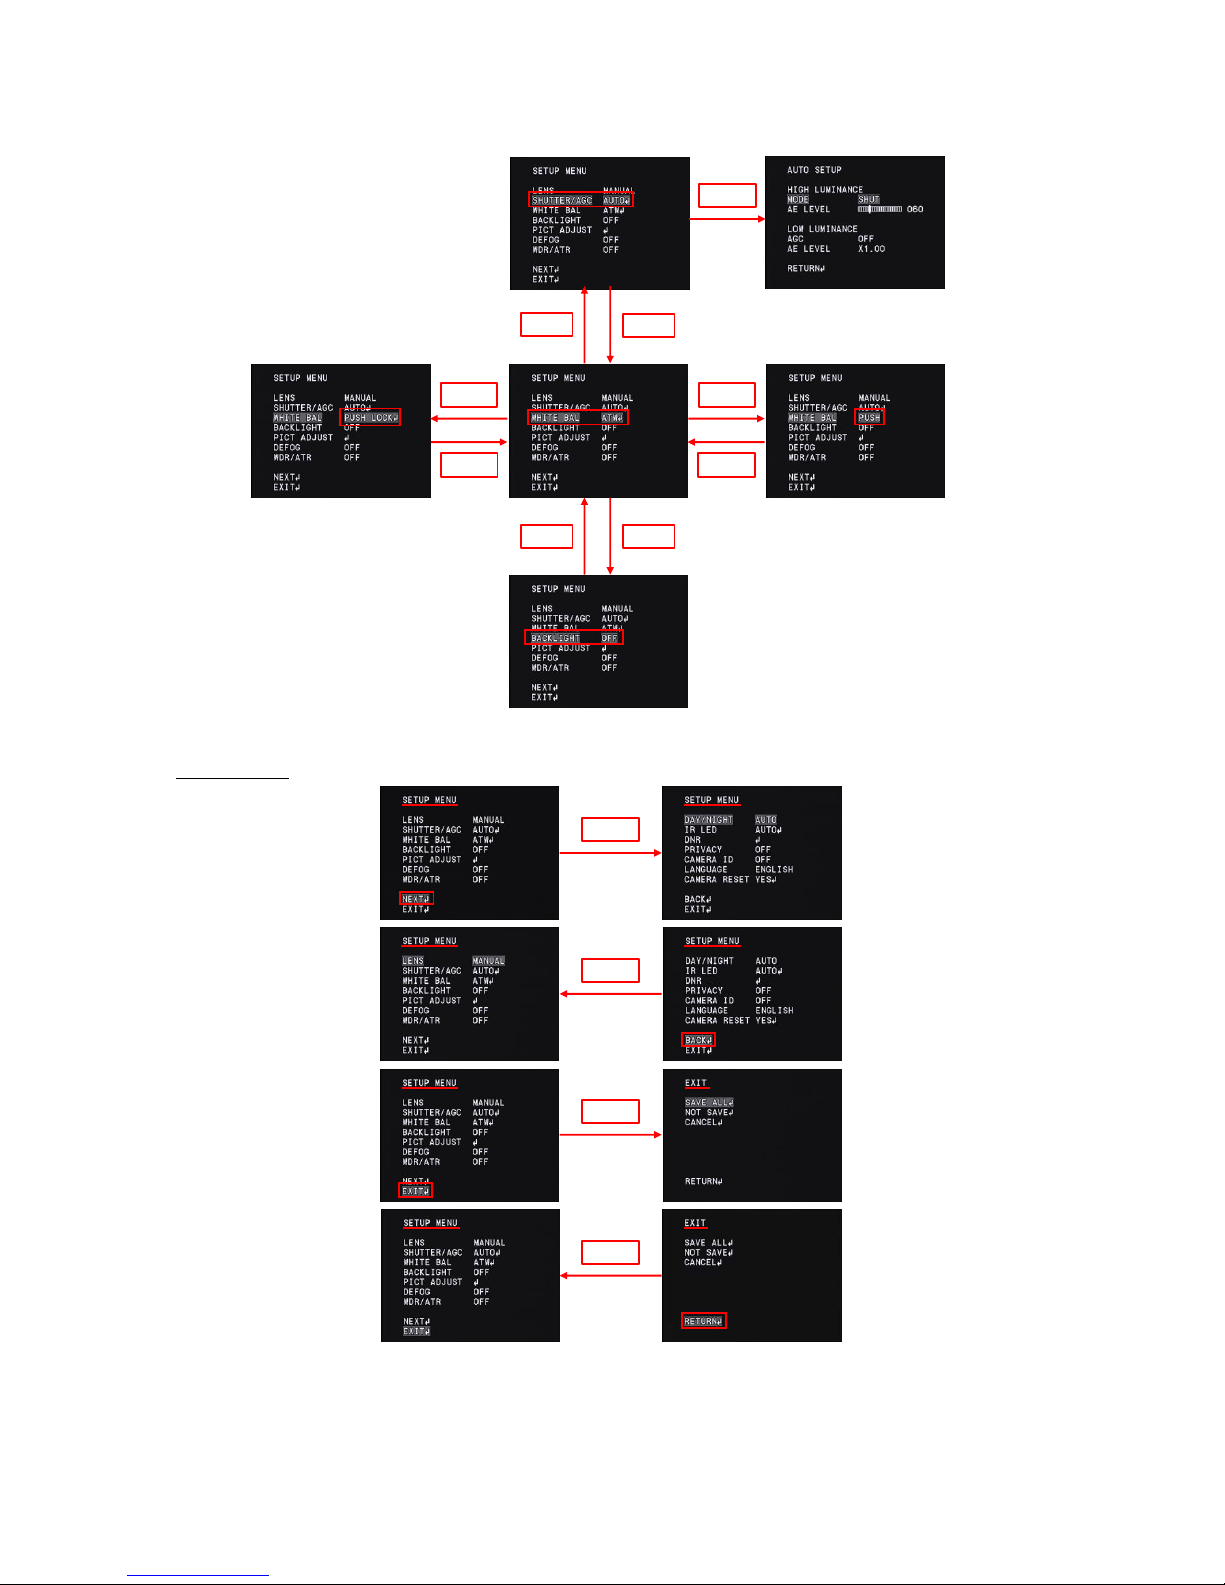
Please refer to the following model operation pictures on the basic controller usage.
The below picture shows the OSD operation when WHITE BAL(ATW) is selected as the defaulf position.
↑
*Default setting
Switching the Menu
* From the next page, each button is written as follows.
1)UP key is written as "UP" 2)DOWN key is written as "DOWN"
3)LEFT key is written as "LEFT" 4)RIGHT key is written as "RIGHT"
5)ENTER key is written as "ENTER"
Next Page
Previous Page
Going to
Go to EXIT
SETUP MENU
Going to
Going to
SUB MENU
ENTER
ENTER
ENTER
ENTER
ENTER
RIGHT
UP
DOWN
UP
DOWN
RIGHT
LEFT
LEFT
7
3. MAIN MENU/SETUP MENU
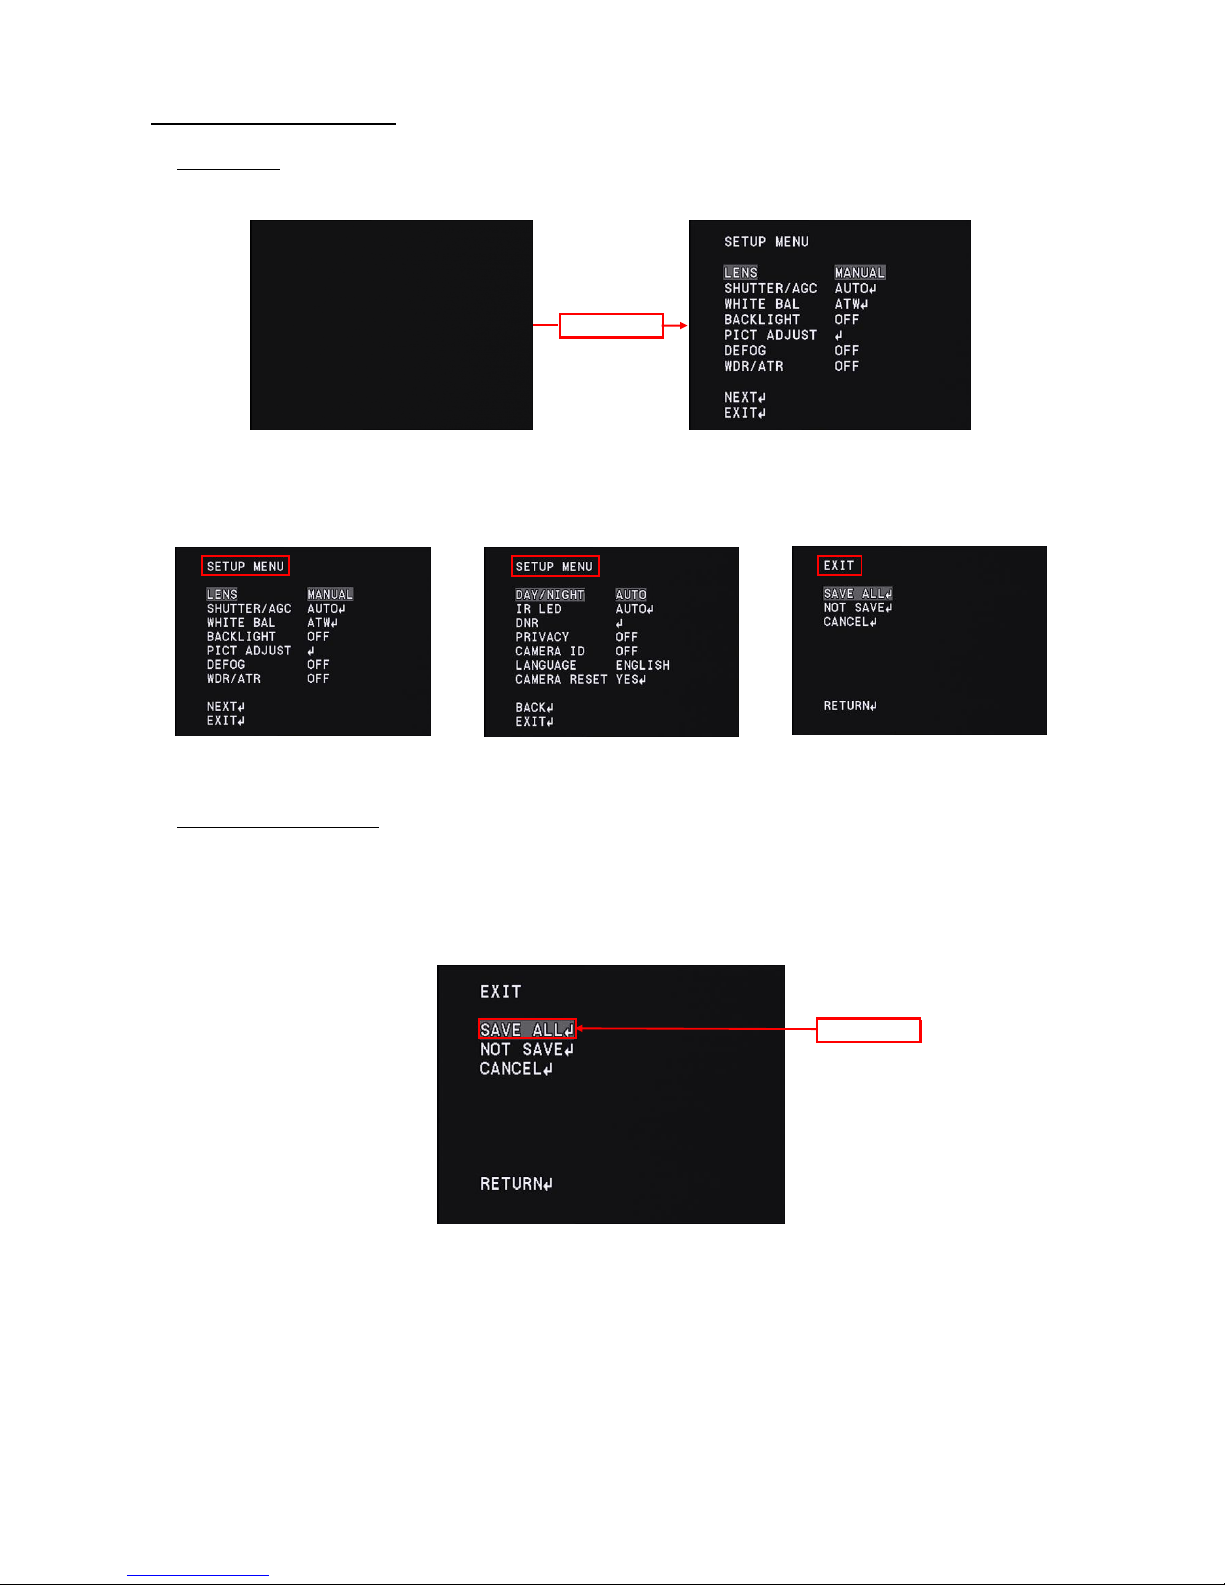
3.1 OSD Menu
SETUP menu will appear on the screen when pressing ENTER,
Move the cursor to EXIT with UP/DOWN buttoms and press the ENTER to display the EXIT page.
OSD Menu is consist of 3 pages (SETUP MENU1/2-2/2 and EXIT).
3.2 Save settings (SAVE ALL)
Saving (SAVE ALL) the changes in camera settings. After changing camera settings, you can save the changed set values by executing
SAVE ALL on the EXIT page. Move the cursor to SAVE ALL with UP / DOWN / LEFT / RIGHT and press ENTER to save the set value.
The saved settings are kept even after the camera is powered off.
*Please note that when you turn off the power without saving the setting values after changing the setting or execute CANCEL
on the EXIT page, the changed setting will not be saved.
OSD = ON
OSD = OFF
EXIT
ENTER
SETUP MENU 2/2
ENTER
SETUP MENU 1/2
8
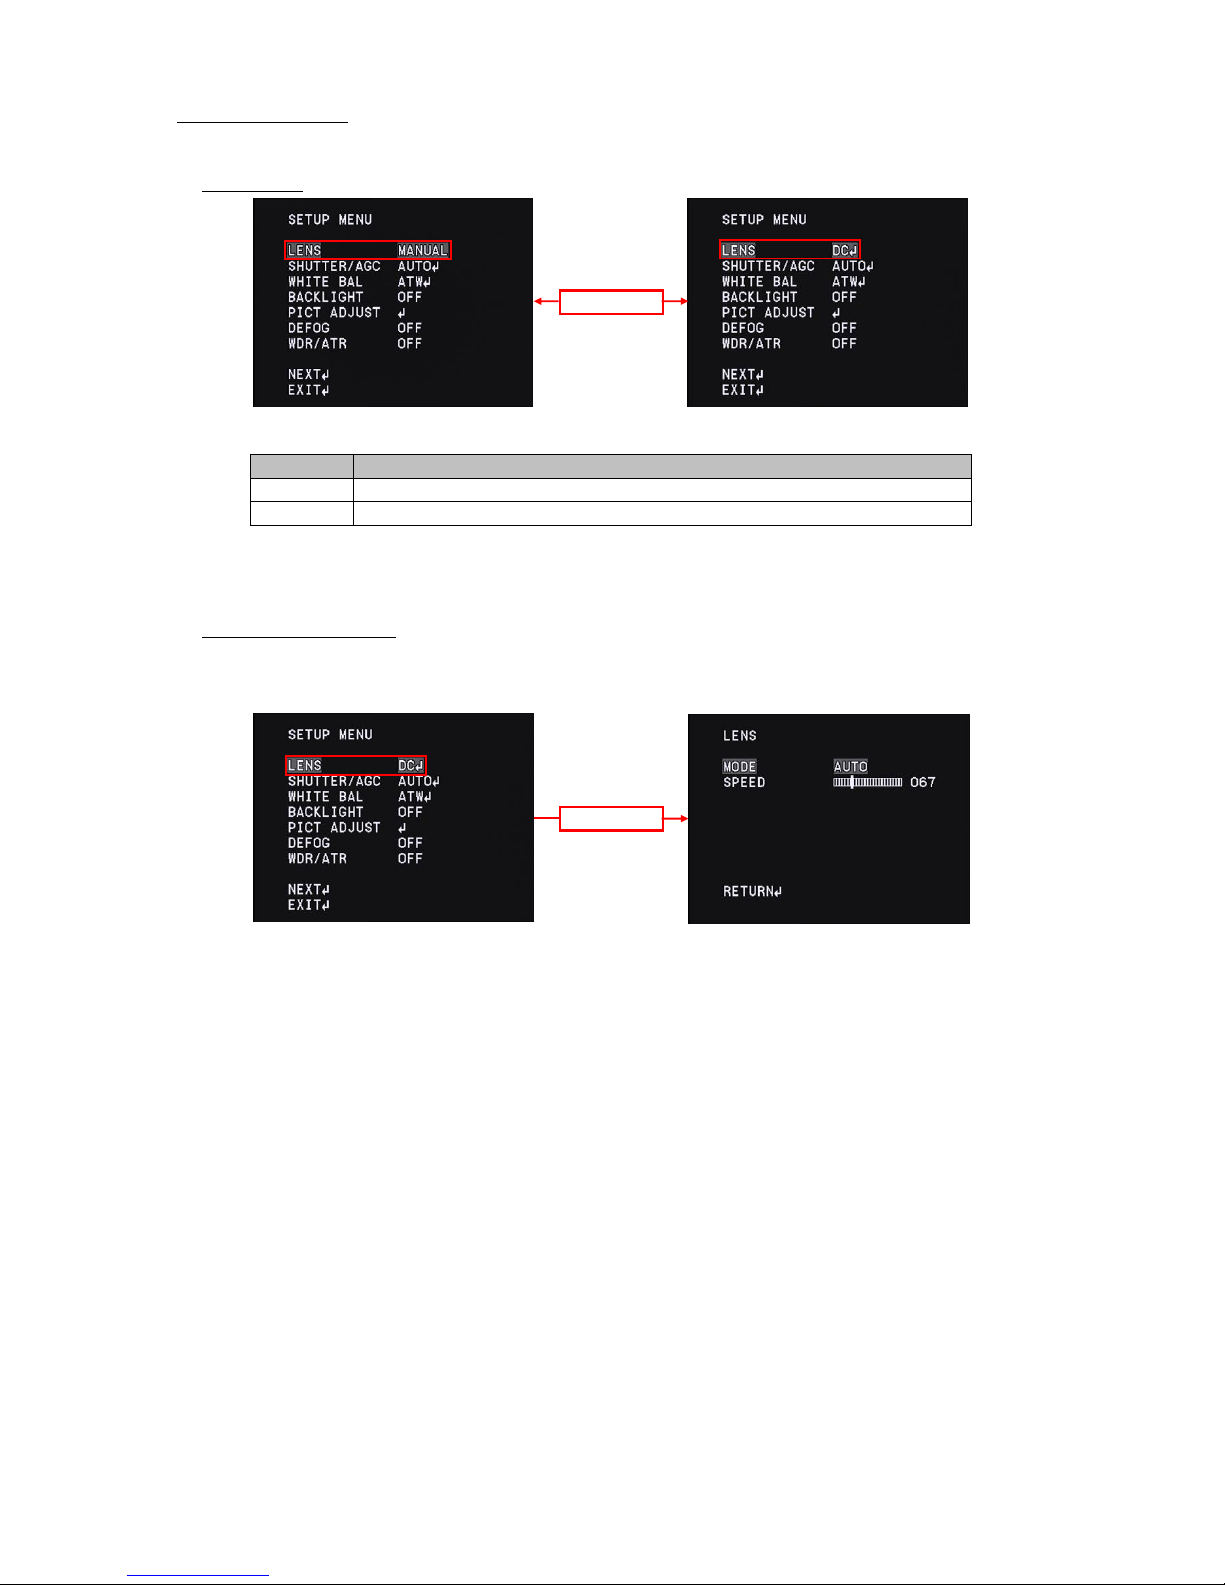
3.3 Lens Settings (LENS)
Change the lens setting according to the lens to be used. Move the cursor to LENS with UP/DOWN and use the
LEFT/RIGHT to switch MANUAL and DC.
Default : MANUAL
*When you select DC in the LENS setting while using a manual lens, ordinary exposure control may not be available.
Please change the LENS setting according to the lens to be used.
3.3.1 DC Iris Lens Setting (LENS)
Display the setting menu of the DC iris lens. Move the cursor to LENS and use the LEFT/RIGH to select DC.
After selecting DC, press ENTER to display the LENS menu. Move the cursor up and down and adjust items with LEFT/RIGHT.
Select this mode when using a DC iris lens.
MANUAL
DC
LENS
Select this mode when using a manual iris lens.
LEFT/RIGHT
MANUAL
LENS MENU
OPERATION
DC
ENTER
9
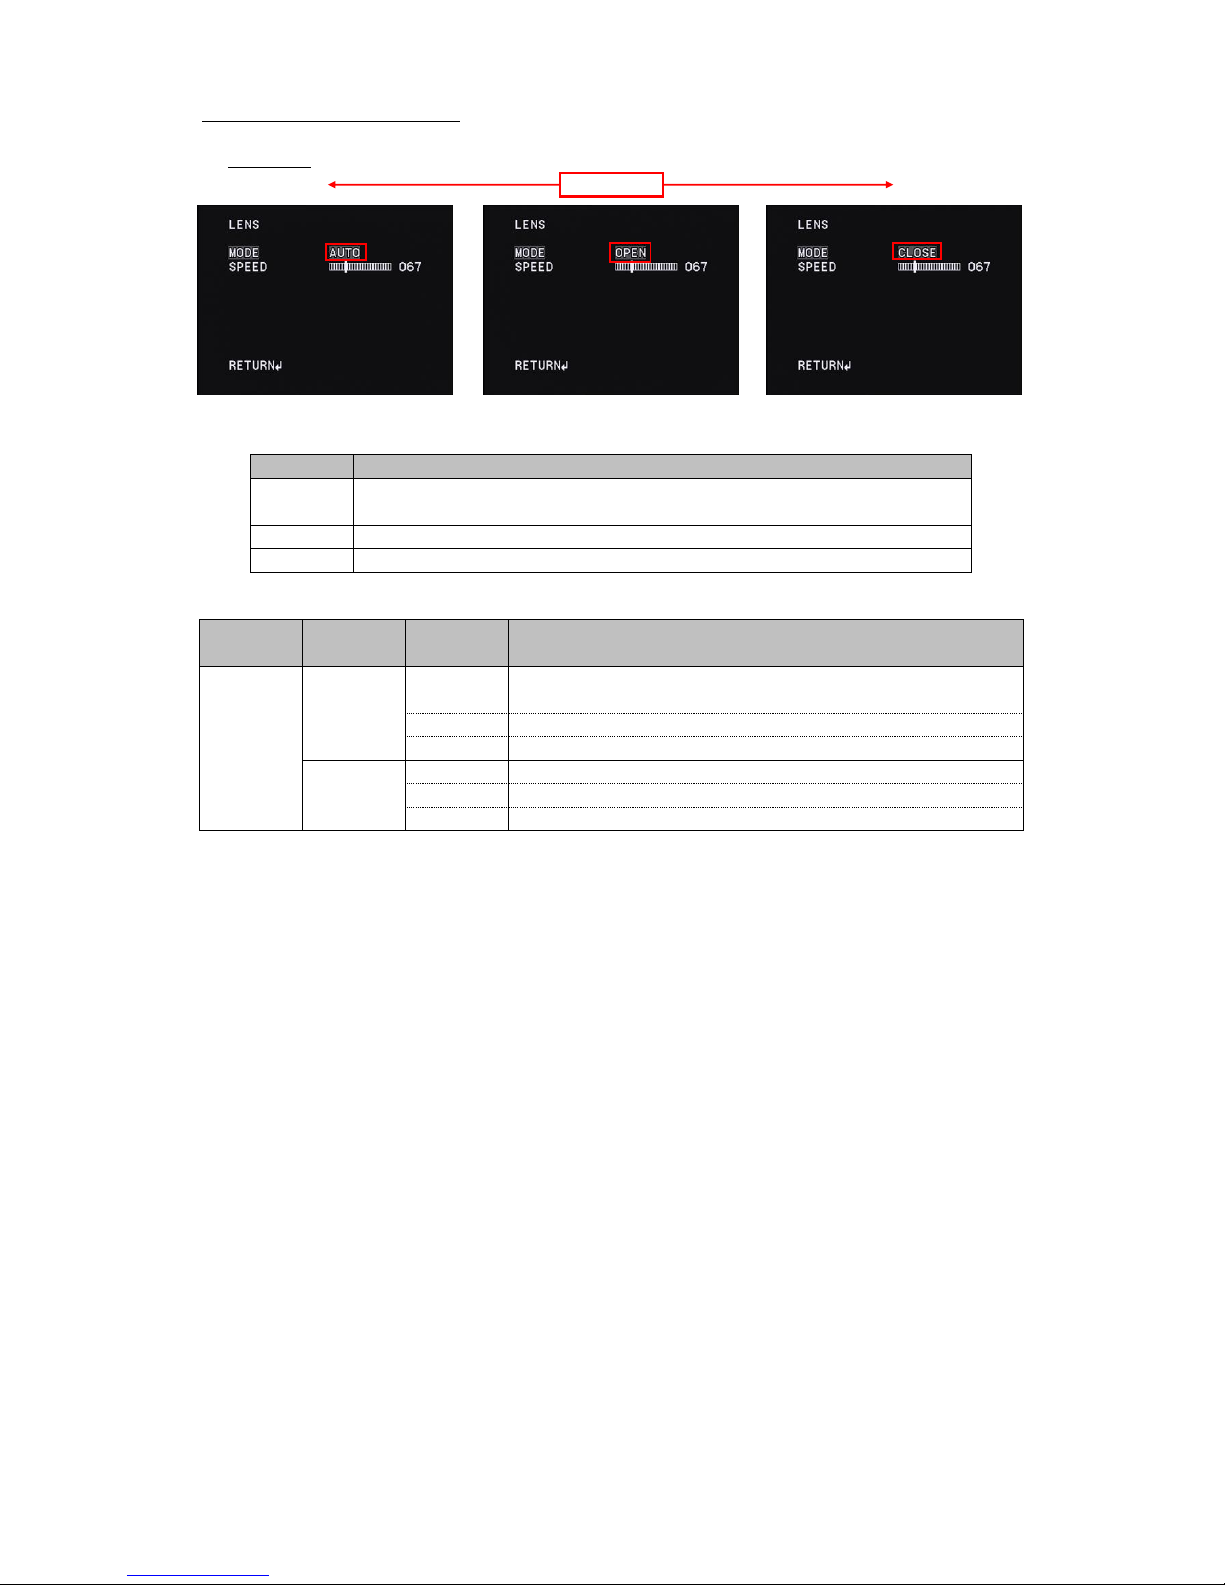
3.3.1.1 DC Iris Lens Control Mode (MODE)
Set the DC iris lens control mode (MODE). Use LEFT/RIGHT to select the MODE (lens aperture control)
Default : AUTO
* This function will be the following control state by combining with SHUTTER/AGC of "3.4 SHUTTER /AGC setting( SHUTTER / AGC)"
OPEN
OPEN
DC Iris lens
Controls the lens aperture automatically.
Open the lens aperture fully.
OPEN
Control the lens aperture automatically.
AUTO
CLOSE
Open the lens aperture fully.
Control the lens aperture automatically.
Close the lens aperture fully.
SHUTTER/AGC
(LENS)
AUTO
Close the lens aperture fully.
*For ordinary imaging, use AUTO mode.
Close the lens aperture fully.
CLOSE
*AUTO is recommended for using DC iris lens.
Open the lens aperture fully.
LEFT/RIGHT
AUTO
OPERATION
CLOSE
MANUAL
CLOSE
AUTO
MODE
Lens in use
MODE
OPERATION
OPEN
AUTO
10
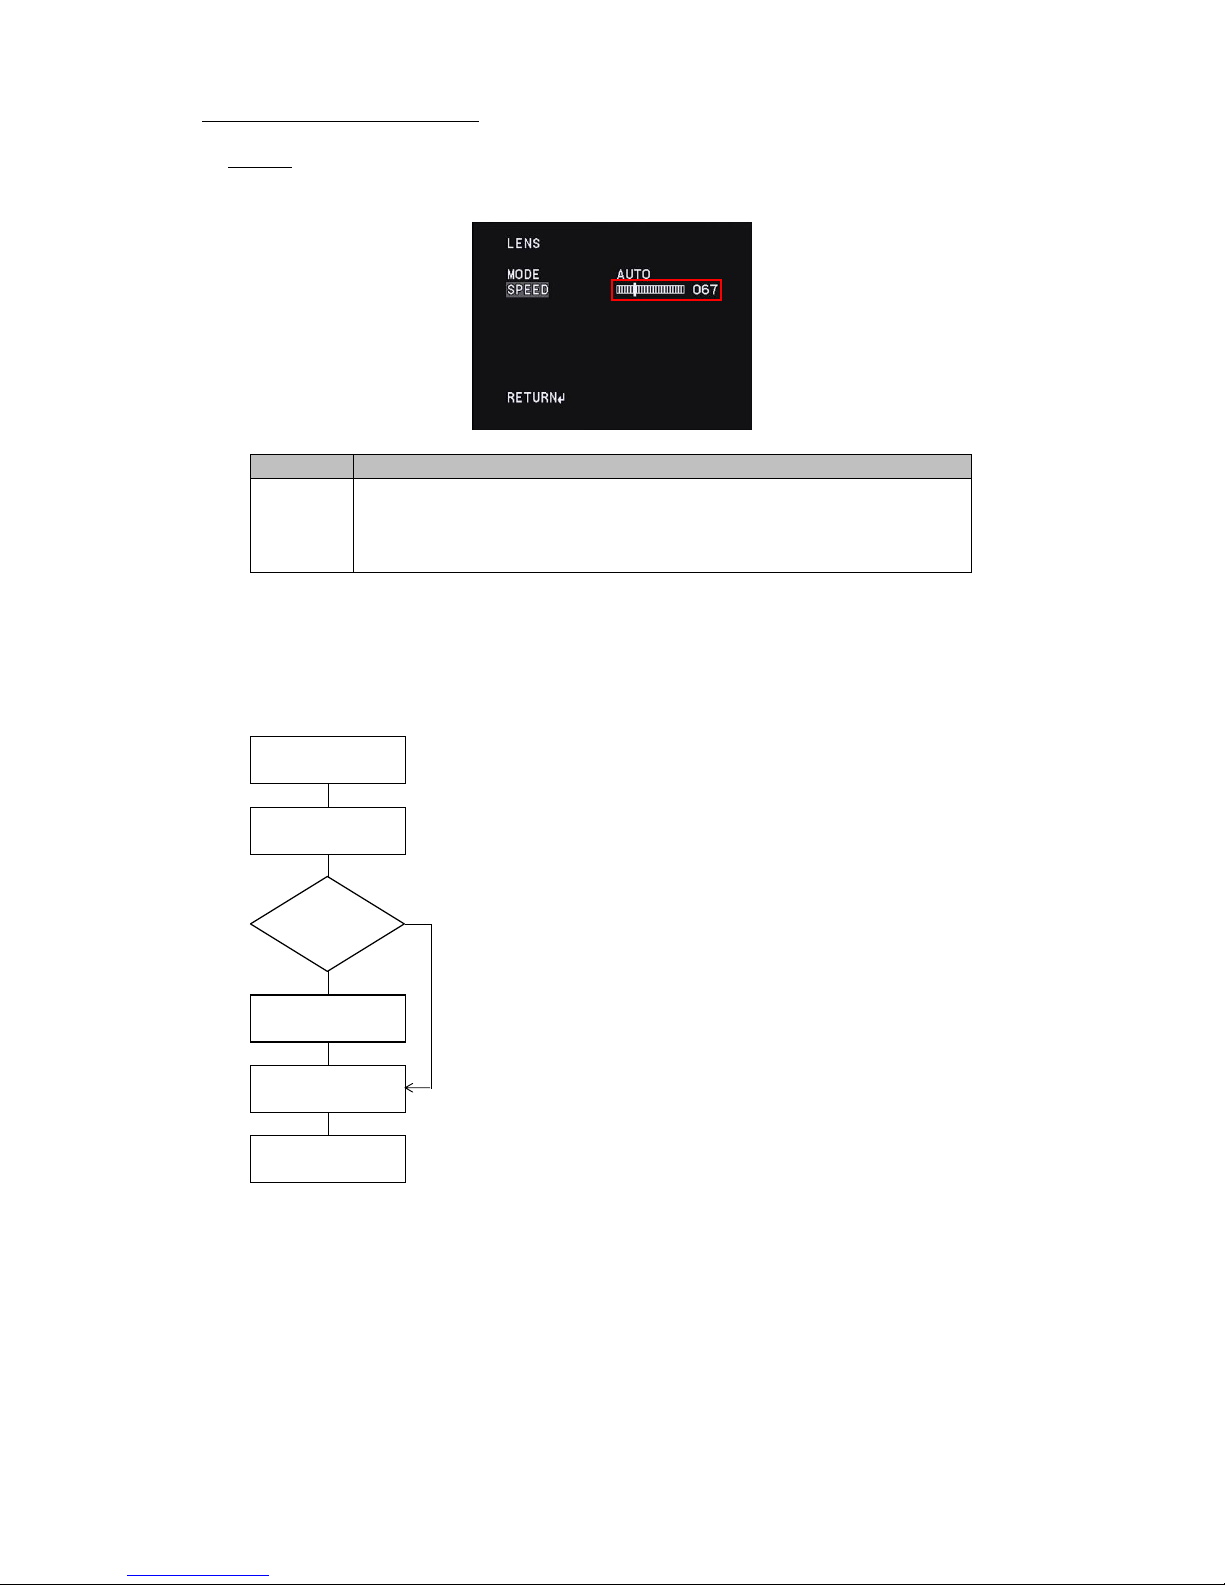
3.3.1.2 DC Iris Lens Iris Control Speed(SPEED)
Set the lens apperture control speed of auto iris lens(SPEED). Use LEFT/RIGHT to adjust the control speed of the lens apperture by moving the cursor.
Default : 67
○DC iris lens adjustment procedures
When mounting the DC iris lens, adjust the lens apperture according to the following procedures.
The procedures for adjusting the DC iris lens is as follows.
(1) Mount the DC iris lens to the 1200CS
(2) Set the OSD settings as follows;
· Set 『3.3 Lens setting (LENS)』 settings to DC
· Set 『3.4 Shutter / gain setting (SHUTTER / AGC)』settings to AUTO.
· Set 『3.4.1.1 Shutter speed (SHUT)』 settings to DC IRIS.
(3) When hunting occurs in which the screen continually brightens or darkens in the actual
imaging environment, proceed to step(4). When you get the image properly, please proceed to step(5).
OK (4) When hunting occurs, the control speed of the lens aperture might be too fast, reduce
the set value of 『3.3.1.2 auto iris lens aperture control speed (SPEED)』 until the hunting stops.
NG
(5) Adjust the lens aperture. Adjust the lens aperture with 『3.4.1.2 Brightness Setting (AE LEVEL)』.
Adjust 『3.4.1.2 Brightness Setting (AE LEVEL)』 to optimumize brightness while checking the monitor.
(6) The adjustment is completed. Save the setting.
(5)Lens aperture
setting
The smaller the set value, the slower the control speed, and the larger the set value, the faster the control
(3) Hunting
speed.
SPEED
OPERATION
000-255
(1)Mount the DC iris lens
(4) Lens aperture control
speed setting
(2) camera
configuration
*When the set value is too large, the control speed will be faster, but it will cause hunting and overshoot.
(6) Adjustment
Completed
And please note that when the set value is too small, the operation will be delayed and it may stop.
11

3.4 Shutter/Gain Settings(SHUTTER/AGC)
Set the exposure control. There are two modes of exposure control: the automatic exposure control (AUTO) and the manual exposure control (MANUAL).
When AUTO is selected, shutter speed and gain are automatically controlled according to the imaging environment. When MANUAL is selected, shutter
speed and gain can be set to arbitrary fixed values. Move the cursor to SHUTTER/AGC with UP/DOWN and use the LEFT/RIGHT to select AUTO or
MANUAL. After selecting the mode, press ENTER to open each advanced setting sub menu.
3.4.1 Automatic exposure control(AUTO)
3.4.1.1 Shutter Speed(SHUTTER)
Set the shutter speed (SHUTTER). Use the LEFT/RIGHT to select the shutter mode.
*Default : SHUT
* In this function, selectable MODE deffers by combining with LENS setting of『3.3 DC iris lens control setting (LENS)』. When the LENS
setting is MANUAL, the selectable MODE is only SHUT. When the LENS setting is DC, select from either SHUT + DC IRIS or DC IRIS.
AUTO
DC iris lens. *Electric iris does not operate in this mode.
Automatic exposure control by electric iris. Depending on the brightness of the shooting
object, exposure will be controlled within the range of 1/60s(1/50s) to 1/100000s
for getting the appropriate brightness. *(1/50s) : Defalt in PAL
MANUAL
electric iris preferentially and when it is still too bright, it will controlled by DC iris lens.
DC
Automatic exposure control by combining electric iris and DC iris. This mode uses
ENTER
DC IRIS
OPERATION
MODE
SHUT+DC IRIS
Automatic exposure control by DC iris. The exposure is only controlled with aperture of
LENS
SHUTTER/AGC
SHUT
AUTO
MANUAL SETUP Menu
LEFT/RIGHT
AUTO SETUP Menu
ENTER
12
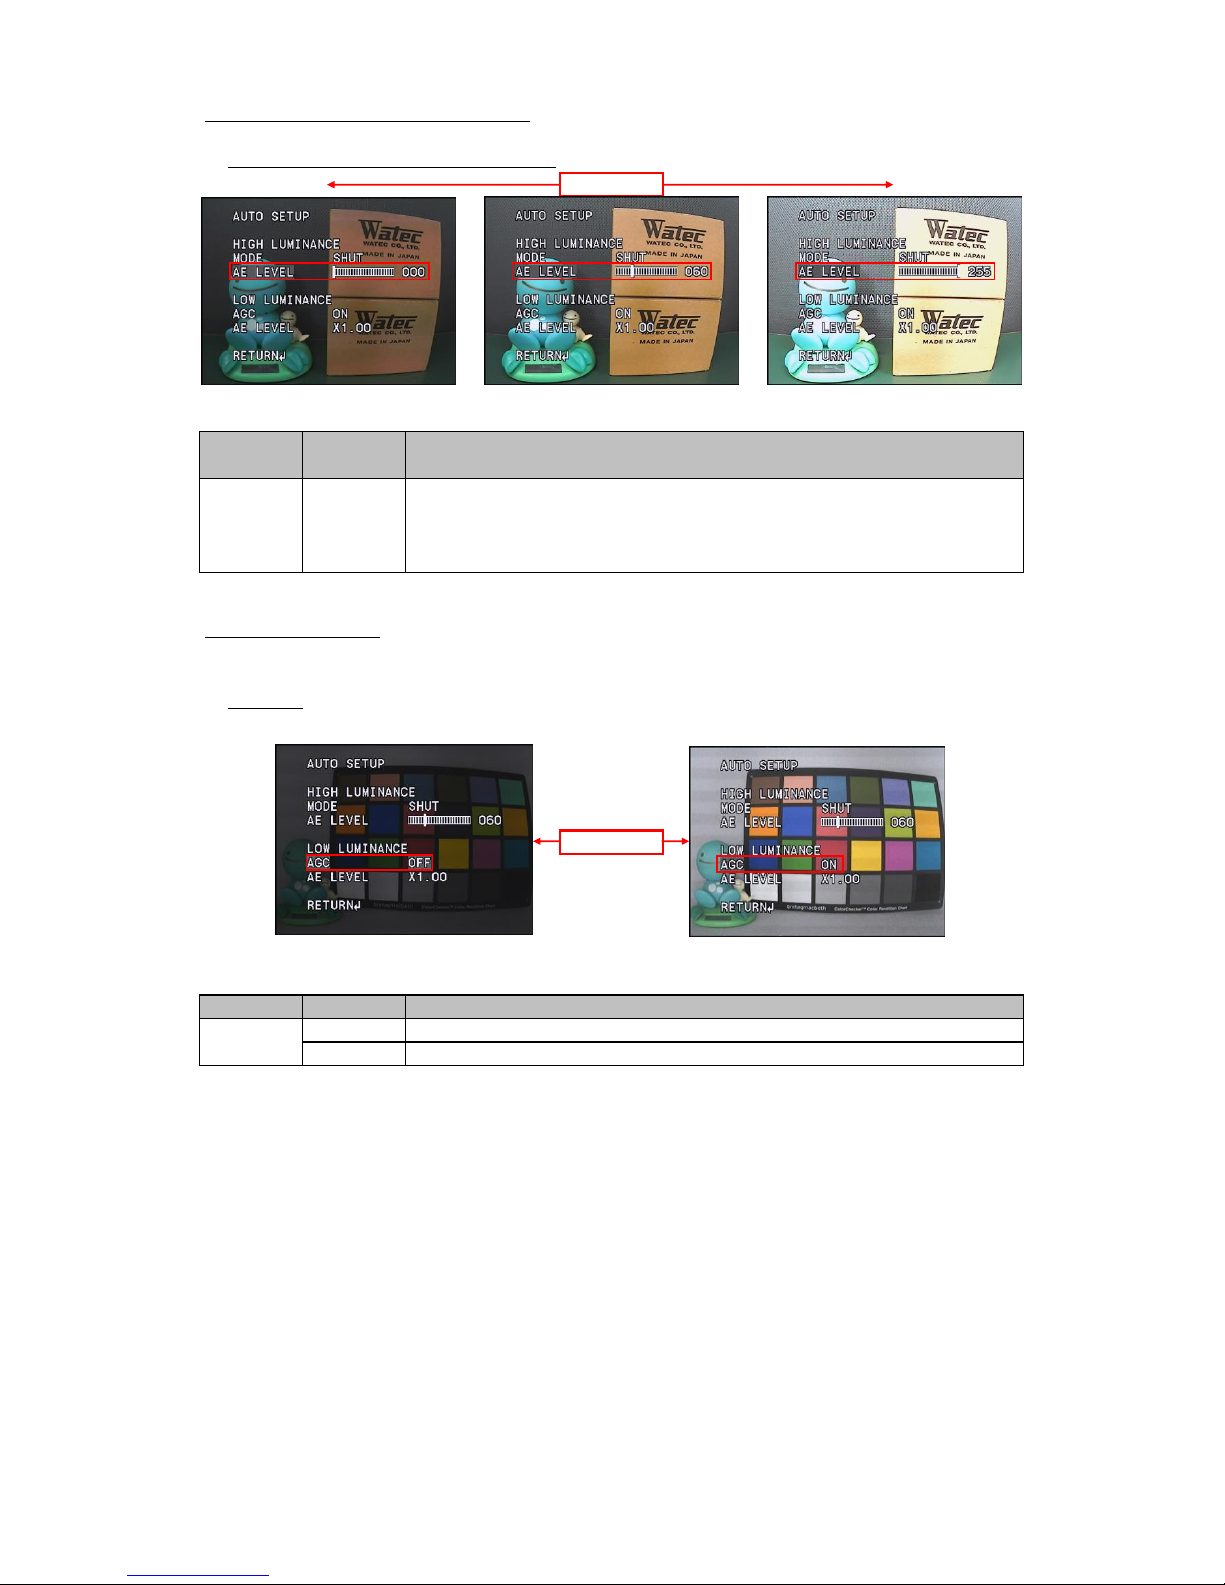
3.4.1.2 Brightness settings, high luminance side(AE LEVEL)
Set the brightness in the screen (AE LEVEL). Use the LEFT / RIGHT to adjust the brightness.
*Default: Vary depending on the fine adjustment at factory
3.4.1.3 Auto Gain Control(AGC)
Set the auto gain control setting (AGC). Gain controls exposure at low luminance when electric shutter and DC Iris lens could not acheieve
the full exposure. Use the LEFT / RIGHT to select AGC ON or OFF.
*Default : ON
OPERATION
speed (SPEED)』
OFF
SHUTTER/AGC
AUTO
(HIGH LUMINANCE)
LEFT/RIGHT
AGC = ON
AE LEVEL = 0
LEFT/RIGHT
AE LEVEL = 255
*When the auto iris lens is mounted, we will use the AE LEVEL to adjustment the lens aperture.
Default*
AE LEVEL
Brightness can be set within the range of 0 (dark) -255 (bright).
0-255
ON
For the details, see the auto iris lens adjustment procedures in 『3.3.2 Auto iris lens aperture control
AGC = OFF
AGC
AUTO
SHUTTER/AGC
Automatic exposure control with gain at low luminance. *Gain range is 0 to 54 dB.
OPERATION
Exposure control at low luminance does not operate.
13

3.4.1.4 Brightness Settings, Low Luminance Side (AE LEVEL)
Set the brightness of exposure control at low luminace side(AE LEVEL) . Apart from 『3.4.1.2 Brightness Adjustment (AE LEVEL)』, the brightness at
the time of gain operation can be set independently. For dark subjects, you could reduce the noise instead of darkening the image.
Use the LEFT / RIGHT to select from x0.25, x0.5, x0.75, x1.0.
*Default : x1.0
○AGC Operation
Small Large
Low High
The lower the value, the lower the sensitivity, the S/N ratio improves instead.
SHUTTER/AGC
x1.0
(LOW LUMINANCE)
x0.75
AUTO
x0.5
x0.25
The higher the value, the lower the S/N ratio, the sensitivity improves instead.
x0.25
Sensitivity
OPERATION
x0.25
x1.0
S/N ratio
LEFT/RIGHT
x0.75
AE LEVEL
x0.5
14
3.4.2 Manual Exposure Control(MANUAL)
3.4.2.1 Shutter Speed (SHUTTER)
Set the shutter speed (SHUTTER) settings. Use the LEFT/RIGHT to select the shutter speed.
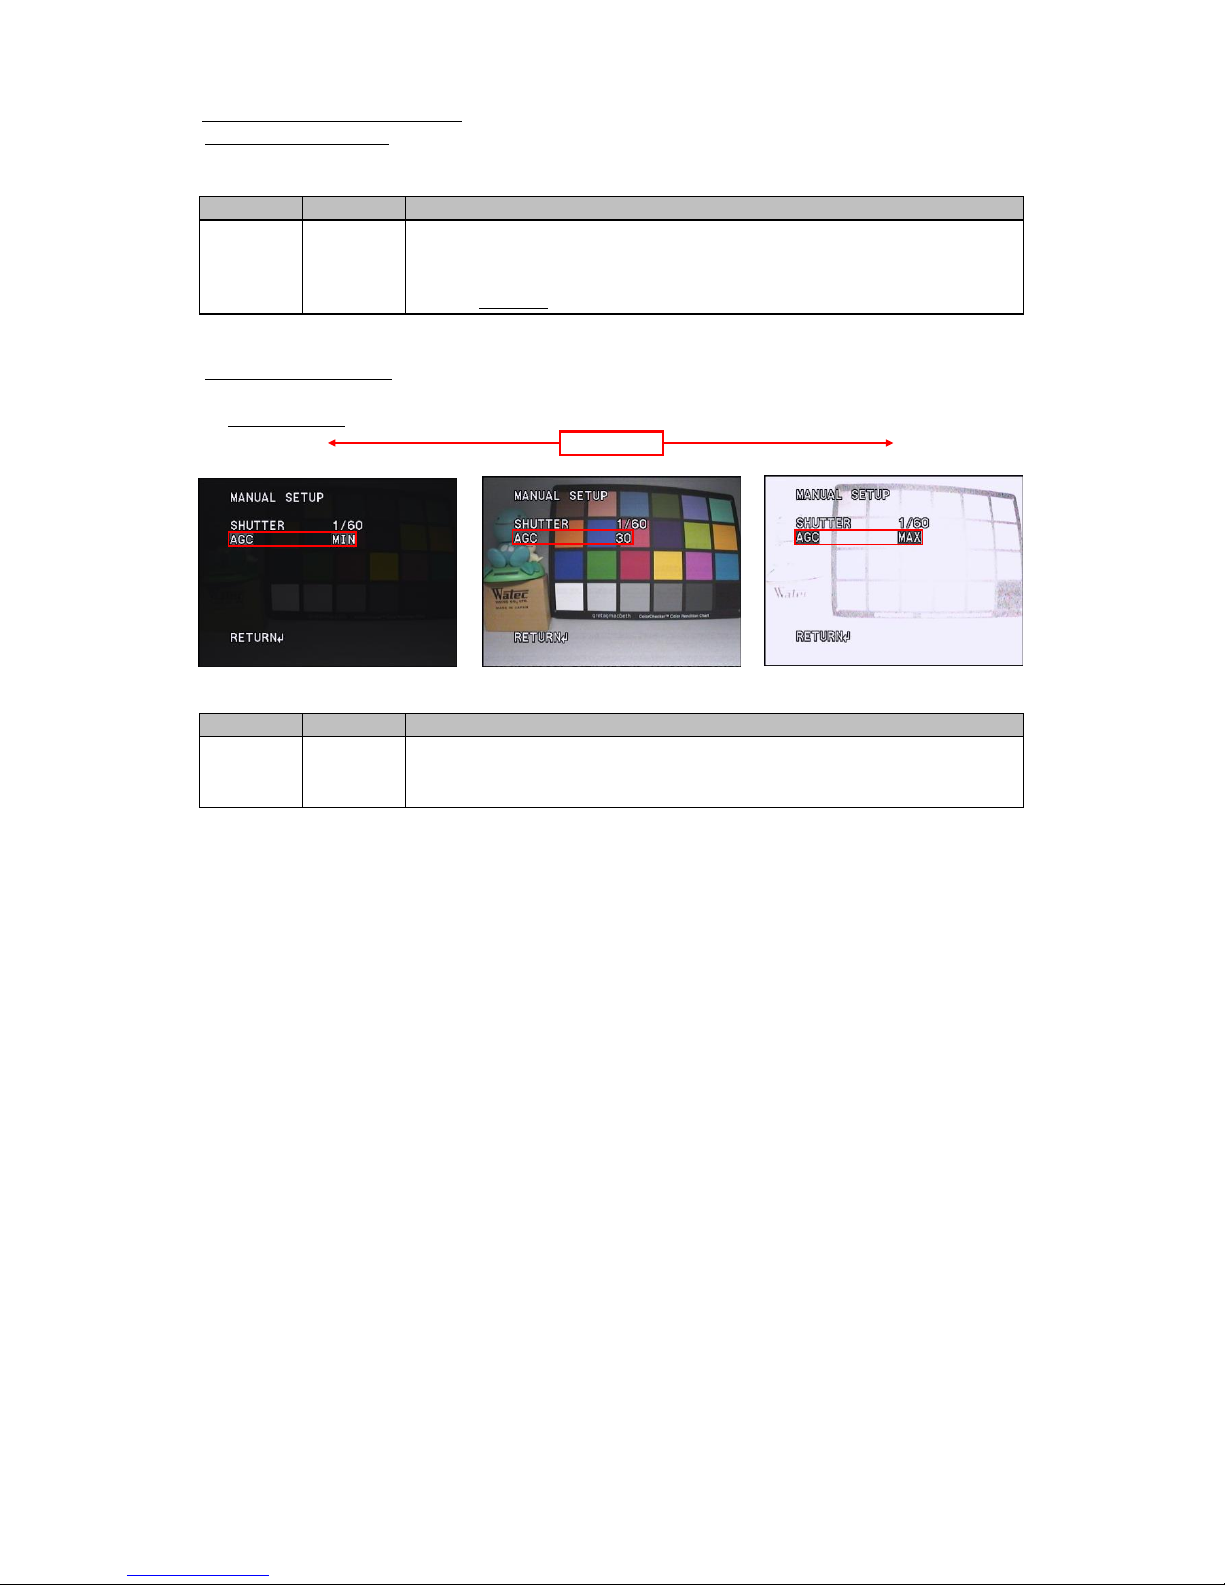
3.4.2.2 Gain value settings (AGC)
Set the gain value (AGC) settings. Use the LEFT/RIGHT to set the gain value.
*Default : MIN (0dB)
OPERATION
LEFT/RIGHT
*(1/50s) : PAL setting
Fix the gain to an arbitrary value regardless of the brightness of the subject. The setting value can be
MANUAL
SHUTTER/AGC
1/4000s, 1/8000s, 1/10000s, 1/20000s, 1/50000s, 1/100000s
OPERATION
the image. The smaller the setting value, the darker the image.
MODE
AGC = MIN (0dB)
*Default : 1/60s(1/50s)
SHUTTER/AGC
AGC
MIN-MAX
SHUT
AGC = 30dB
Selectable shutter speed : 1/60s(1/50s), 1/100s,1/120s, 1/125s, 1/250s, 1/500s, 1/1000s, 1/2000s,
MANUAL
AGC = MAX (54dB)
selected from 18dB, 24dB, 30dB, 36dB, 42dB, 48dB, MAX(54dB). The higher the setting value, the brighter
15

3.5 White Balance(WHITE BAL)
Set the white balance (WHITE BAL) settings. This function is to correct white colored subjects to be shown as white under the illumination
environment of various color temperatures . Use the LEFT / RIGHT to select the WHITE BAL from ATW, PUSH, USER1, USER2, MANUAL, PUSH LOCK.
*Default : ATW
scenes where monochrome occupies a large proportion in the screen.
ATW
even if the color temperature is unknown.
PUSH LOCK
range than ATW, but the pull-in control operates even in the imaging scene where monochrome
USER1 (5100K):(Fluorescent mode 2)Correct and fix the white balance based on the white
operates regardless of the preset pull-in range, the pull-in operates in a wider color temperature
LEFT/RIGHT
change in surrounding color temperature. Pull-in range is set in advance, it controls only when the
the lighting environment close to sunlight and fix it.
deterioration of color reproduction can be reduced without taking in pull-in operation in imaging
PUSH
under the lighting environment close to the bluish fluorescent light and fix it.
While pressing the ENTER, PUSH LOCK corrects the white balance according to the color temperature
ATW automatically controls the white balance and maintains color reproducibility by following the
USER2 (6300K):(Sunlight mode) Correct and fix the white balance based on white under
It is effective if the color temperature of illumination to be used is known beforehand.
MANUAL corrects the white balance with arbitrary setting values. Adjust the setting according to the
PRESET
MANUAL
PUSH controls the white balance irrespective of subject conditions. Since the pull-in control always
The correction value of each preset white balance can be changed arbitrarily and respectively.
WB
ATW
PUSH
USER1 (5100K)
the predetermined color temperature of USER 1 (5100 K) or USER 2 (6300).
OPERATION
surrounding color temperatures judged to be within the pull-in frame.By setting the pull-in frame,
For the preset white balance, you can select the white balance correction value from
occupies a large proportion on the screen and color reproduction may be impaired.
When it is necessary to change, adjust the set value according to the usage environment.
under the use environment and fixes the operation with the white balance correction amount at that
moment of the Enter is released.Since it matches the actual lighting, it can correct accurately
PUSH LOCK
LEFT/RIGHT
USER2 (6300K)
MANUAL
usage environment.
16

3.5.1 Auto Trace White Balance(ATW)
ATW maintains color reproducibility even when the color temperature of the light source changes.
When ATW is selected, press the ENTER to display the WHITE BAL menu. Move the cursor up or down with the UP / DOWN and
use the LEFT / RIGHT to adjust items.
3.5.2 Push White Balance(PUSH)
PUSH controls the white balance over a wider color temperature range than ATW and maintains color reproducibility regardless of subject conditions.
*Speed control setting is not available.
ENTER
DELAY CTL
Set the time from the changes in color temperature to the start of white balance control.
*Default : 128
Set the pull-in speed. The lead-in speed can be set in the range 1-255.
LEFT/RIGHT
ATW
Light source color temperature = 2800K
SPEED
*Default : 008
WB
Light source color temperature = 4700K
The lower the set value, the faster the pull-in speed, and the larger the set value, the slower the pull-in speed.
OPERATION
(ATW SETUP Menu)
Light source color temperature = 6600K
Selectable in the range 1-255. The lower the set value, the faster to start WB control, the higher the set
*Note : Color oscillation is likely to occur if the pull-in speed is set too fast.
value, the slower to start WB control.
17

3.5.3 Preset White Balance(USRE1 5100K/USER2 6300K)
For the preset white balance, you can select the white balance correction value from the predetermined color temperature of USER 1 (5100 K) or
USER 2 (6300 K). When selecting either USER 1 (5100 K) or USER 2 (6300 K), pressing the ENTER will display the SETUP menu for each WB.
Move the cursor up or down with the UP / DOWN and use the LEFT / RIGHT to adjust items.
○B-GAIN
○R-GAIN
Set B-GAIN of the white balance correction value. B-GAIN can be set in the range of 000-255.
When the set value is decreased, the screen will be corrected to the yellow side, and when it is increased
the screen will be corrected to the blue side.
*The factory default value may vary.
Set the R-GAIN of the white balance correction value. R-GAIN can be set in the range of 000 - 255.
When the set value is decreased, the screen will be corrected to the cyan side, and when it is increased
R-GAIN = 208
*The factory default value may vary.
LEFT/RIGHT
R-GAIN = 150
OPERATION
the screen will be corrected to the red side.
B-GAIN
5100K/6300K
(SUB MENU)
PRESET WB
B-GAIN = 030
R-GAIN
LEFT/RIGHT
R-GAIN = 220
B-GAIN = 190
B-GAIN = 149
18

3.5.4 Manual White Balance(MANUAL)
MANUAL WB enables to set the white balance correction value arbitrarily.
When MANUAL is selected, press the ENTER to display the manual white balance setting menu. Please use the LEFT / RIGHT to adjust items.
POSITION = 46
POSITION = 60
When the set value is decreased, the screen will be corrected to the blue side, and when it is increased
the screen will be corrected to the red side.
*Default : 41
LEFT/RIGHT
OPERATION
Set the manual white balance correction value POSITION. POSITION can be set in the range of 000-063.
WHITE BAL
MANUAL
POSITION
(SUB MENU)
POSITION = 30
19

3.5.5 Push Lock White Balance(PUSH LOCK)
PUSH LOCK adjusts the white balance under actual illumination and it can be corrected accurately even if the color temperature is unknown.
○PUSH LOCK adjustment method
Image a achromatic object such as white paper under the actual lighting in the entire screen and press the ENTER.
Confirm the correction and release the ENTER. It will be completed when the paper is corrected to white.
Step (1) Before
Step (2) Place the white paper in the entire screen
Step (3) Press the ENTER to start the correction
Step (4) Confirm the correction and release the ENTER
(*When it is succeeded, the white paper becomes white in the screen.)
Step (5) After
Before
ENTER
ENTER
After
20

3.6 Back Light Compensation (BACKLIGHT)
Set the backlight compensation mode (BACKLIGHT). Backlight compensation mode can be selected from Backlight Compensation (BLC) and
Highlight Correction (HLC). Move the cursor on BACKLIGHT and use LEFT / RIGHT to select OFF, BLC or HLC.
*Default : OFF
○Back light compensation(BLC)
○Highlight compensation (HLC)
When there is a dark subject, the BLC operates such that the correct brightness will be obtained.
HLC
OPERATION
No operation
BLC
BLC
OFF
OFF
HLC = OFF
LEFT/RIGHT
BLC = OFF
HLC = ON
screen such that the subject that is blackened by backlight will have the proper brightness.
Backlight compensation(BLC) operates. BLC is performed by increasing the brightness of the entire
*When the 『3.9.2 Wide Dynamic Range 』function is ON, BLC can not be selectable.
BLC = ON
Highlight compensation(HLC) operates. HLC reduces the burden on the observer's eyes by masking
a strong light source in the dark and improves the deteriorated visibility with a strong light source.
BACKLIGHT
HLC
21

3.7 Picture Adjust(PICT ADJUST)
Adjust image quality. Move the cursor to PICT ADJUST and press the ENTER to display the PICT ADJUST menu. Move the cursor up or down with
UP / DOWN and select the item you want to adjust.
3.7.1 Image Flip(FLIP)
Set the image Flip(FLIP) processing. Use the LEFT/RIGHT to select from normal (OFF), horizontal flip (H - FLIP), vertical flip (V - FLIP)
and horizontal - vertical image flip. (HV - FLIP).
*Default : OFF
3.7.2 Brightness(BRIGHTNESS)
Set the brightness(BRIGHTNESS)settings, Use the LEFT/RIGHT to adjust the brightness.
*Default : 128
BRIGHTNESS = 100
LEFT/RIGHT
MIRROR
HV-FLIP
Normal image
OPERATION
Horizontal image flip
000-255
The smaller the setting value, the darker the image, and the larger the setting value the brighter the image.
CONTRAST
V-FLIP
V-FLIP
ENTER
BRIGHTNESS = 128
BRIGHTNESS = 150
HV-FLIP
OFF
OPERATION
H-FLIP
OFF
H-FLIP
Horizontal and vertical image flip. Rotating the image by 180 degrees.
LEFT/RIGHT
Vertical image flip
22

3.7.3 Contrast(CONTRAST)
Set the contrast (CONTRAST) settings. Use the LEFT/RIGHT to adjust the contrast.
*Default : 128
3.7.4 Edge Enhancement(SHARPNESS)
Sets the intensity of edge enhancement (SHARPNESS). It enhances the visual effects of resolution by emphasizing the outline portion
of the image. Use the LEFT / RIGHT to set SHARPNESS.
*Default : 64
LEFT/RIGHT
The smaller the setting value, the lower the contrast. The larger the setting value, the higher the contrast.
LEFT/RIGHT
CONTRAST
CONTRAST = 50
CONTRAST = 170
CONTRAST = 128
000-255
OPERATION
000-255
SHARPNESS = 255
SHARPNESS = 64
SHARPNESS
OPERATION
the sharper the image, but the noise become marked.
The larger the setting value, the higher the edge enhancement level of the entire screen,
SHARPNESS = 0
23

3.7.5 Chroma Settings(HUE,COLOR GAIN)
Set the chroma level (HUE, COLOR GAIN). You can set your arbitrary color by adjusting color gain (COLOR - GAIN) and color hue (HUE).
Use the LEFT / RIGHT to adjust the chroma.
○HUE
○COLOR GAIN
* The above explanation is a guide only, make adequate evaluation in the use environment.
HUE = 180
*The factory default value may vary.
COLOR GAIN
(ADJUST Menu)
Default
COLOR GAIN can be set in the range of 000 - 255. Adjust the color gain.
HUE can be set in the range of 000-180. Adjust the hue.
*The factory default value may vary.
COLOR GAIN = 0
Default
HUE
OPERATION
LEFT/RIGHT
LEFT/RIGHT
COLOR GAIN = 255
HUE = 0
24

3.8 Defog(DEFOG)
Set the defog (DEFOG) settings. When fog or smoke occurs, the contrast of the screen decreases and the visibility deteriorates.
The defog function can improve the contrast of visually impaired images with fog and or smoke and improve visibility.
Selectable from OFF or AUTO. Pressing the ENTER when AUTO is selected displays the DEFOG Menu.
Use the LEFT / RIGHT to select the DEFOG setting.
*Default : OFF
LOW
ENTER
DEFOG Menu
DEFOG automatically opetates when foggy condtion is detected.
*Default : MID
AUTO
LOW : Fog detection sensitivity low, contrast correction low
No operation
MID : Fog detection sensitivity mid, contrast correction low
SUB MENU
LEFT/RIGHT
OPERATION
The larger that set value, the higher the constact. It improves the visibility.
OFF
HIGH : Fog detection sensitivity high, contrast correction high
MID
MID
LOW
LEFT/RIGHT
HIGH
HIGH
-
DEFOG
25

3.9 Wide Dynamic Range / Tone Correction (WDR / ATR)
Set the wide dynamic range / tone correction function. When you take a subject with a large contrast difference such as a backlight condition,
some of the subjects will be overexposure or underexposure. The wide dynamic range / tone correction (WDR / ATR) suppresses overexposure
or underexposure of the subject under the conditions and corrects it to a natural image. Use the LEFT / RIGHT to select from OFF, ATR or WDR.
*Default : OFF
ATR
WDR
LEFT/RIGHT
OFF
26

3.9.1 Adaptive Tone-Curve Reproduction (ATR)
Press the ENTER when ATR is selected to display the ATR menu.
You can select the correction amount of brightness and contrast of tone correction from LOW, MID, HIGH.
*Default : MID
○BRIGHTNESS
○CONTRAST
LEFT/RIGHT
Set the brightness correction amount of the tone correction function. The larger the setting value,
ENTER
CONTRAST
LEFT/RIGHT
ATR Menu
the brighter the image, the smaller the setting value, the darker the image.
Set the contrast correction amount of the tone correction. Increasing the setting value improves
will result in a natural image with overall contrast.
WDR/ATR
OPERATION
BRIGHTNESS
SUB MENU
BRIGHTNESS = LOW
BRIGHTNESS = MID
BRIGHTNESS = HIGH
CONTRAST = MID
the visibility and can capture the bright and dark areas at the same time. Decreasing the set value
CONTRAST = HIGH
CONTRAST = LOW
ATR
27

3.9.2 Wide Dynamic Range (WDR)
Press the ENTER when WDR is selected to display the WDR menu.
You can select the correction amount of wide dynamic range brightness and contrast from LOW, MID, HIGH.
*Default : MID
○BRIGHTNESS
○CONTRAST
CONTRAST
Set the contrast correction amount of the wide dynamic range. Increasing the setting value improves
Decreasing the set value will result in a natural image with overall contrast.
the brighter the image, the smaller the setting value, the darker the image.
WDR/ATR
SUB MENU
LEFT/RIGHT
the visibility and can capture the bright and dark areas at the same time.
BRIGHTNESS
OPERATION
WDR
Set the brightness correction amount of the wide dynamic range function. The larger the setting value,
CONTRAST = LOW
CONTRAST = MID
CONTRAST = HIGH
BRIGHTNESS = LOW
WDR Menu
BRIGHTNESS = MID
BRIGHTNESS = HIGH
LEFT/RIGHT
ENTER
28

3.10 Day & Night Function (DAY/NIGHT)
Set the Day / Night (DAY / NIGHT) function.It is a new type of mechaless Day & Night function that does not use the ICR (Infrared Cut filter Removal)
mechanism.When the ambient illuminance decreases like a nighttime, imaging with near-infrared wavelengths enables to improve the sensitivity of
the camera and improve visibility at night.Moreover, combining with an external infrared emitter enables further improvement of the sensitivity of
the camera.Use the LEFT / RIGHT to select between AUTO and MANUAL.
*Default : AUTO
3.10.1 Automatic Switching Mode(AUTO)
Set the automatic switching mode (AUTO). This mode enables to switch between Day mode and Night mode automatically according to the ambient
brightness.When AUTO is selected, press the ENTER to display the DAY / NIGHT menu. Move the cursor up or down and use LEFT / RIGHT to adjust the
items.
LEFT/RIGHT
ENTER
29

3.10.1.1 Day⇔Night Switching Control(DELAY CNT / DAY→NIGHT / NIGHT→DAY)
Set the threshold and transition determination time of the Day / Night switching control. Illuminance is used for judgment of brightness.
Use the LEFT / RIGHT to move the cursor to adjust the threshold and transition judgment time of Day⇔Night. A:DAY→NIGHT
B:NIGHT→DAY
Light Brightness Dark
Light
DAY MODE
Dark
NIGHT MODE
DAY MODE
NIGHT MODE
DAY/NIGHT
(DAY/NIGHT
OPERATION
MENU)
AUTO
DELAY CTL
Set the transition judgment time between Day mode and Night mode.When you keep the Day mode or
*Default : 001
DAY→NIGHT
Set the brightness to transition from Day mode to Night mode.When ambient illuminance decreases
Please set as DAY → NIGHT <NIGHT → DAY.
*Default : 064
NIGHT→DAY
Set the birghtness to transition from Night mode to Day mode.When the ambient illuminance rises
and exceeds the set value, it switches to Day mode.NIGHT → DAY can be set in the range 0-255.
Please set as DAY → NIGHT <NIGHT → DAY.
*Default : 110
Night mode continuously during the period set by DELAY CTL, you will make Day ⇔ Night transitions.
DELAY CTL can be set in the range of 000 - 255. The unit is "seconds".
and falls below the set value, it switches to Night mode. DAY → NIGHT can be set in the range 0-255.
30

○Day ⇔ Night switching threshold adjustment procedure
The procedures for adjusting DAY → NIGHT and NIGHT → DAY is as follows.
(1) Set DAY → NIGHT = 255 (Max. value)
NIGHT → DAY = 0 (Min. value), DELAY CTL = 001.
(2) Adjust the lighting and reproduce the brightness you want to
switch to the Night mode while checking the monitor.
(3) Lower the set value of DAY → NIGHT one by one until it switches
from the Day mode to the Night mode.
(4) Jump to (6) if the hunting that the Day mode and the Night mode
switch countinuously does not occur.
If the hunting occurs, go to (5).
(5) It may be impossible to respond by switching using the threshold of
Day/Night mode.Please change the object and lighting.
NG (6) Adjust the lighting and reproduce the brightness you want to switch
to Day mode while checking the monitor.
(7) Higher the set value of NIGHT → DAY one by one until it switches
OK
from the Night mode to the Day mode.
(8) If the hunting does not occur, go to (11).
If the hunting occurs, go to (9).
(9) Lower the set value of NIGHT → DAY until the hunting stops.
(10)If you are not satisfied with the adjustment result
of NIGHT →DAY, back to (5).
(11) Make change of lighting and confirm the switching
of Day / Night is done without problems
(12)If there is no problem with the above setting, the adjustment is
OK
completed. Please save the setting.
*Illuminance is used for judgment of brightness.
Therefore, we recommend to readjust the Day / Night switching
NG threshold when changing the aperture of the lens.
NG
OK
(1)Default
(2)DAY→NIGHT
(3)DAY→NIGHT setting
(5)Review of imaging
environment
(4)Hunting
Adjustment environment
settings
(6)NIGHT→DAY
(7)NIGHT→DAY setting
(8)Hunting
(9)NIGHT→DAY resetting
Adjustment environment
settings
(10)Adjustment result
(11)Operation check
(12)Adjusted
31

3.10.2 Manual Switching Mode(MANUAL)
Set the manual switching mode (MANUAL). The manual switching mode can be fixed to Day mode or Night mode regardless of ambient brightness.
When MANUAL is selected, press the ENTER to display the DAY / NIGHT menu. Move the cursor up or down and use LEFT / RIGHT to adjust items.
3.10.2.1 Day / Night setting(DAY/NIGHT)
Select the Day / Night setting from the Day mode or the Night mode.
*Default : DAY
Day mode is to be set. In a bright environment it works as an ordinary color camera.
As the light intensity lower, it will smoothly switch to the monochrome image.
* Even under the environment of low illumination, the night mode interlocking function
of IR LED control can not be used.
3.10.2.2 Burst signal(BURST)
Select ON / OFF of the burst signal in the Night mode.
*Default : ON
Add a burst signal. Please turn it ON if some monitors and image capture boards may not accept
video signals without color burst.
* We recommend that you turn off BURST when using a displayable device even without a color burst.
No burst signal is added.
* When COLOR is selected with the DAY / NIGHT, the burst signal is always added, regardless of BURST
setting.
OFF
B/W
Night mode is to be set. Imaging will always be monochrome even in a bright environment.
COLOR
BURST
OPERATION
ON
ENTER
DAY/NIGHT
OPERATION
32

3.11 IR LED Control(IR LED)
Set the IR LED control (IR LED) function. It is a function that modulates the infrared emitter by combining the PWM signal from the IR LED control
connector and the infrared emitter equips the digital input. Use the LEFT/RIGHT to select AUTO, FIX, OFF.
When AUTO or FIX is selected, press the ENTER to display the setting menu.
*Default : AUTO
is high and decreases when it is low.
In FIX mode, DUTY ratio always outputs fixed PWM signal regardless of DAY / NIGHT judgement.
LEVEL
FIX
OFF
AUTO
-
The PWM signal does not output from the IR LED control connector.
LEVEL MAX
of the PWM signal changes according to the illuminance. The DUTY ratio increases when the illuminance
IR LED
(SUB MENU)
OPERATION
the DUTY ratio will be 100%.
The higher the LEVEL, the greater the DUTY ratio of the PWM signal and when LEVEL 255 is selected
Set the level of the IR LED control PWM signal. The level of the IR LED control PWM signal can be set
Set the limit level of the IR LED control PWM signal. Limit level of IR LED control PWM signal can be set
within the range 0-255. When LEVEL 0 is selected, the DUTY ratio of the PWM signal will be 0%.
within the range of 006 - 255. The higher the LEVEL, the greater the duty ratio of the PWM signal.
The IR LED control function is turned OFF.
When LEVEL 255 is selected, the DUTY ratio will be 100%.
In AUTO mode, PWM signal outputs only when DAY / NIGHT switches to NIGHT mode. The DUTY ratio
LEFT/RIGHT
33

3.12 Noise Reduction(DNR)
Set the noise reduction (DNR) function. Noise reduction is a function to reduce image noise to improve the image quality of the camera. Especially,
it reduces the noise that occurs when the gain becomes high in low illumination environment.
Move the cursor to DNR and press the ENTER to display the DNR menu. Move the cursor up or down with UP / DOWN to adjust items.
○DNR MODE setting
Set the operation mode of noise reduction.
*Default : OFF
○LEVEL setting
Set the correction level of noise reduction.
Use the LEFT / RIGHT to move the cursor and adjust the noise reduction correction level
noise reduction.
LEFT/RIGHT
Y LEVEL = 1, C LEVEL = 1
noise reduction.
No operation
Y
*Default : 004
OFF
Y/C
001 - 007
MODE
OFF
Noise reduction operates on C component independently.
Set Y component correction level of noise reduction. The greater the set value, the stronger the effect of
DNR MENU
(SUB MENU)
C
OPERATION
DNR Menu
LEFT/RIGHT
Y LEVEL
Y/C
Noise reduction operates on Y component and C compoent while using the 2 filters.
C LEVEL
*Default : 004
Set C component correction level of noise reduction. The greater the set value, the stronger the effect of
001 - 007
ENTER
Y
Noise reduction operates on Y component independently.
C
Y LEVEL = 7, C LEVEL = 7
34

3.13 Privacy Mask(PRIVACY)
Set the privacy mask (PRIVACY). The privacy mask can hide areas that you do not want to display on the screen. Up to 16 masks can be displayed
on the screen. You can set the display area, color, darkness and mosaic processing for each mask independently.
Move the cursor to PRIVACY and select ON or OFF with LEFT / RIGHT. Press the ENTER when ON is selected displays the PRIVACY menu.
Move the cursor up and down with UP/DOWN and adjustment the item you want to adjust while using the LEFT / RIGHT.
*Default : OFF
1.00 will completely mask the masking area.
*When TRANSP is set to 1.00, mosaic processing not available.
Set the left side of the masked area. It can be set within the range of 000 - 1184 (1174).
Set the masking color. You can select the color from the following 8 colors.
LEFT/RIGHT
ENTER
(PRIVACY Menu)
COLOR
*(576) : Set value in PAL
Set the bottom side of the masked area. It can be set within the range of 000 - 480 (576).
Set the right side of the masked area. It can be set within the range of 000 - 1184 (1174).
Set the top side of the masked area. It can be set within the range of 000 - 480 (576)
1 (RED), 2 (GREEN), 3 (BLUE), 4 (YELLOW), 5 (CYAN), 6 (MAGENTA), 7 (WHITE), 8 (BLACK)
TRANSP
BOTTOM
MOSAIC
*Default : 1 (RED)
OPERATION
Set ON/OFF of mosaic processing. Mosaic processing on the masking area available when ON is selected.
*Default : OFF
*Default : 1.00
Set the transparency of the masking. The masking transparency can be selected from
0.00, 0.50, 0.75 and 1.00. The higher the set value, the lower the transparency of the masking,
RIGHT
*(1174) : Set value in PAL
AREA SEL
*Default : 1/16
*(576) : Set value in PAL
Select the mask number to be set. The masking number is selected from 1/16 to 16/16.
It can not be set to a smaller value than LEFT
It can not be set to a smaller value than TOP.
TOP
*(1174) : Set value in PAL
LEFT
35

○AREA SEL settings
Select the masking area number to be set.
○ Masking area settings
Use the UP/DOWN/LEFT/RIGHT to select the maksing area.
(1) Move the cursor to TOP with UP/DOWN and use LEFT/RIGHT to adjust the
the position of the top side of the masking area.
*When you set the TOP value close to 000, the masking area will move to the top of
the screen and set the value close to the limit, it will move to the bottom of the screen.
(2) Move the cursor to TOP with UP/DOWN and use LEFT/RIGHT to adjust the
the position of the bottom side of the masking area.
*When you set the BOTTOM value close to 000, the masking area will move to the top of
the screen and set the value close to the limit, it will move to the bottom of the screen.
(3) Move the cursor to TOP with UP/DOWN and use LEFT/RIGHT to adjust the
the position of the left side of the masking area.
*When you set the LEFT value close to 000, the masking area will move to the left side of
the screen and set value to the limit, it will move to the right side of the screen.
(4) Move the cursor to TOP with UP/DOWN and use LEFT/RIGHT to adjust the
the position of the right side of the masking area.
*When you set the RIGHT value close to 000, the masking area will move to the left side of
the screen and set value to the limit, it will move to the right side of the screen.
*Default setting of the masking area is masking number 1 in the center of the screen. For the masking number 2 to 16, TOP, BOTTOM, LEFT and RIGHT
are set to 000 in the default setting and NO masking area is specfied. Set the masking area according to above procedures.
*NOTE : When the same value is set for TOP and BOTTOM or LEFT and RIGHT, the masking area is not displayed.
・・・・・・・・・
LEFT/RIGHT
Masking number:16/16
Masking number:1/16
36

○Masking COLOR setting
Set the masking color.
○TRANSPARENCY setting.
Set the transparency setting.
○MOSAIC setting
Set the mosaic processing ON / OFF
1.00
0.00
1 (RED)
4 (YELLOW)
LEFT/RIGHT
LEFT/RIGHT
8 (BLACK)
3 (BLUE)
LEFT/RIGHT
MOSAIC:OFF
MOSAIC:ON
7 (WHITE)
LEFT/RIGHT
0.75
6 (MAGENTA)
2 (GREEN)
5 (CYAN)
0.50
37

3.14 Camera ID(CAMERA ID)
Set the camera ID (CAMERA ID). This function displays arbitrary characters on the screen. It is effective for identifying the camera on the screen when
using multiple cameras. Move the cursor to CAMERA ID with UP/DOWN and use the LEFT/RIGHT to select ON / OFF.
*Default : OFF
When ON is selected, press ENTER to desplay CAMERA ID menu. Use the UP/DOWN/LEFT/RIGHT
to select the character to be displayed and use the ENTER to enter the characters.
LEFT/RIGHT
Up to 52 characters such as alphabet (capital), numbers, and symbols can be entered.
*Default : blank
OFF
(input)
OPERATION
The characters that can be entered are displayed in the CAMERA ID SETUP menu.
CAMERA ID is hidden.
CAMERA ID
ON
(CAMERA ID
ENTER
ON
←→↑↓
OFF-CLR
SETUP Menu)
POS
*Default position : Upper left of the screen.
to display a window for setting the display position of the character.
Set the position of the cursor when entering characters. After entering a character, you can change
the character by moving the cursor to the character you want to change and entering another character.
Delete the entered characters.
Set the display position of the input character. Move the cursor to POS and press the ENTER
38

○Character entering setting
Use the UP/DOWN/LEFT/RIGHT/ENTER to set the CAMERA ID.
(4) Move the cursor to CAMERA ID and (1) Move the cursor to CAMERA ID and press the ENTER.
press the ENTER so that the CAMERA
ID menu will be displayed again.
(2) Use the UP/DOWN/LEFT/RIGHT to select the
charater you want to display and use the ENTER to
enter the characters.
(3) After entering characters, move the cursor to "RETURN"
and press the ENTER to return to SETUP MENU.
ENTER
ENTER
39

○Display position setting
Move the cursor to POS and press the ENTER to display the display position setting menu.
Use the UP/DOWN/LEFT/RIGHT to set the display postion. After setting, press the ENTER to return to the CAMERA ID menu.
UP
DOWN
DOWN
ENTER
UP
*Default position
LEFT
LEFT
RIGHT
RIGHT
ENTER
40

*CAMERA ID will be displayed when the OSD menu screen is turned off. While the OSD menu is displayed, CAMERA ID does not show up.
To turn off the OSD menu, move the cursor to EXIT with UP/ DOWN and press the ENTER to display the EXIT menu.
Move the cursor to SAVE ALL or NOT SAVE with the UP / DOWN, hide the OSD menu by pressing the ENTER.
(1) Select EXIT and press the ENTER.
(2) Select SAVE ALL or NOT SAVE and press the ENTER.
(3) The OSD menu is turned off and the camera ID is displayed.
ENTER
ENTER
41

3.15 Language(LANGUAGE)
Set the language of the OSD menu. You can choose from English, German, French, Russian, Portuguese, and Spanish.
Move the cursor to LANGUAGE with UP/DOWN and use the LEFT / RIGHT to select from ENGLISH, DEUTSCH, FRANCAIS, русский, PORTUGUÊS and ESPAÑOL.
*Default : ENGLISH
3.16 Factory Reset(CAMERA RESET)
This function returns the camera setting to factory default (CAMERA RESET) function. Even after changing camera settings, you can return the camera to the
factory default by executing camera reset. Move the cursor to CAMERA RESET with UP/DOWN and press the ENTER to excecute the camera reset.
*When you want to save the default setting value after executing the camera reset, save the setting value according to 『3.2 Save setting (SAVE ALL)』
NOTE : When you do not save the setting value prior to turning off the power, the settings will return to the setting value before executing the camera reset.
LEFT/RIGHT
ENGLISH
FRANCAIS
LEFT/RIGHT
ESPAÑOL
DEUTSCH
русский
PORTUGUÊS
42

3.17 EXIT Menu (EXIT)
Exit the OSD menu. Move the cursor to EXIT with UP / DOWN and press the ENTER so that the EXIT menu will be displayed.
In EXIT MENU, you can select SAVE ALL, NOT SAVE, CANCEL, RETURN. Move the cursor with the UP / DOWN and press the ENTER to execute.
EXIT MENU
ENTER
Save the OSD setting in ROM and close the OSD menu. After turning on the power again, the camera starts with the saved settings.
EXIT
SAVE ALL
OPERATION
Set the camera setting back to the state before displaying the OSD menu and close the OSD menu.
Return to SETUP MENU
CANCEL
RETURN
with the setting before the new modification was nade.
Close the OSD menu without saving the OSD setting in ROM. After turning on the power again, the camera starts
NOT SAVE
43

4.OSD Menu Tree
Legend:
Represents OSD menu item
Represents the operation by UP, DOWN and ENTER key of the remote control
Represents the operation by RIGHT, LEFT and ENTER key of the remote control
Represents a selectable mode and setting value of each menu item
Represents the title on the OSD and not a setting item
※LANGUAGE:ENGLISH
○SETUP MENU
SETUP MENU
LENS
-> to LENS MENU(for auto iris lens advanced settings)
SHUTTER/AGC
-> to SHUTTER/AGC MENU(for Shutter speed & AGC advanced settings)
WHITE BAL
-> to WB MENU(for White balance fuction advanced settings)
BACKLIGHT
-> to BACKLIGHT(for setting of HLC function)
PICT ADJUST
-> PICT ADJUST MENU(for picture image advanced settings)
DEFOG
-> DEFOG MENU(for defog control advanced settings)
WDR/ATR
-> WDR/ATR MENU(for Wide Dynamic Range & Adaptive Tone Reproduction advanced settings)
NEXT
-> NEXT: to display the next page
EXIT
-> EXIT MENU
○SETUP MENU
SETUP MENU
DAY/NIGHT
-> DAY/NIGHT MENU(for DAY/NIGHT fuction advanced settings)
IR LED
-> to IR LED MENU(for IR LED fuction advanced settings)
DNR
-> to DNR MENU(for noise reduction function advanced settings)
PRIVACY
-> to PRIVACY MENU(for privacy masking function advanced settings)
CAMERA ID
-> to the CAMERA ID MENU (for Camera ID advanced settings)
LANGUAGE
-> to Language Menu (for Language switching)
CAMERA RESET
-> to reset all settings to the factory default settings
BACK
-> BACK (display the previous page)
EXIT
-> EXIT MENU
○EXIT MENU
EXIT MENU
SAVE ALL
-> Exit OSD Menu and save all the configuration item
NOT SAVE
-> Exit OSD Menu without saving the configuraition item
CANCEL
-> Exit OSD Menu without reflecting the configuration item
RETURN
-> BACK to SETUP MENU
44

Default : in Red
○LENS(SETUP MENU)
LENS
MANUAL
DC
LENS
MODE
AUTO, OPEN, CLOSE
SPEED
000-255(Default:067)
RETURN
○SHUTTER/AGC(SETUP MENU)
SHUTTER/AGC
AUTO
AUTO SETUP
HIGH LUMINANCE
MODE
SHUT, SHUT+DC IRIS, DC IRIS
*Except for SHUT, the others can be set only when the DC LENS is selected in the LENS Menu
AE LEVEL
000-255(Default:*)
*The factory default value may vary.
LOW LUMINANCE
AGC
ON, OFF
AE LEVEL
x0.25, x0.5, x0.75, x1.0
RETURN
MANUAL
MANUAL SETUP
1/60(1/50), 1/100
1/120, 1/125, 1/250, 1/500
SHUTTER
1/1000, 1/2000, 1/4000, 1/8000
1/10000, 1/20000, 1/50000, 1/100000
AGC
MIN, 6, 12, 18, 24, 30, 36, 42, 48, MAX
RETURN
45

○WHITE BAL(SETUP MENU)
WHITE BAL
ATW
WHITE BAL
SPEED
001-255(Default:128)
DELAY CNT
001-255(Default:008)
RETURN
PUSH
USER1
USER1 WB
B-GAIN
000-255(Default:*)
*The factory default value may vary.
R-GAIN
000-255(Default:*)
*The factory default value may vary.
RETURN
USER2
USER2 WB
B-GAIN
000-255(Default:*)
*The factory default value may vary.
R-GAIN
000-255(Default:*)
*The factory default value may vary.
RETURN
MANUAL
MANUAL WB
POSITION
000-063(Default:041)
RETURN
PUSH LOCK
○BACKLIGHT(SETUP MENU)
BACKLIGHT
OFF
HLC
BLC
*BLC only selectable when the WDR is OFF
46

○PICT ADJUST(SETUP MENU)
PICT ADJUST
PICT ADJUST
FLIP
OFF, H-FLIP, V-FLIP, HV-FLIP
BRIGHTNESS
000-063(Default:128)
CONTRAST
000-015(Default:128)
SHARPNESS
000-255(Default:064)
HUE
000-180(Default:*)
*The factory default value may vary.
COLOR GAIN
000-255(Default:*)
*The factory default value may vary.
RETURN
○DEFOG(SETUP MENU)
DEFOG
OFF
AUTO
DEFOG
LEVEL
LOW, MID, HIGH
RETURN
○WDR/BLC(SETUP MENU)
WDR/ATR
WDR
WDR
BRIGHTNESS
LOW, MID, HIGH
CONTRAST
LOW, MID, HIGH
RETURN
ATR
ATR
BRIGHTNESS
LOW, MID, HIGH
CONTRAST
LOW, MID, HIGH
RETURN
OFF
47

○DAY/NIGHT(SETUP MENU)
DAY/NIGHT
AUTO
DAY/NIGHT AUTO
DELAY CNT
000-255(Default:1)
DAY→NIGHT
000-255(Default:64)
NIGHT→DAY
000-255(Default:110)
MANUAl
DAY/NIGHT MANUAL
DAY/NIGHT
COLOR, B/W
BURST
ON, OFF
* OFF is valid only when day / night is in night mode.
○IR LED(SETUP MENU)
IR LED
AUTO
IR LED AUTO
LEVEL MAX
006-255(Default:240)
RETURN
FIX
IR LED FIX
LEVEL
000-255(Default:255)
RETURN
OFF
○DNR(SETUP MENU)
DNR
DNR
MODE
Y/C, Y, C, OFF
Y LEVEL
1-7(Default:4)
C LEVEL
1-7(Default:4)
RETURN
48

○PRIVACY(SETUP MENU)
PRIVACY
OFF
ON
PRIVACY
AREA SEL
1/16-16/16
NTSC :
000-480(Default:Mask 1:160, Mask 2-16:000)
TOP
PAL:
000-576(Default:Mask 1:192, Mask 2-16:000)
NTSC :
000-480(Default:Mask 1:320, Mask 2-16:000)
BOTTOM
PAL:
000-576(Default:Mask 1:384, Mask 2-16:000)
LEFT
NTSC :
000-1184(Default:Mask 1:396, Mask 2-16:000)
PAL:
000-1174(Default:Mask 1:392, Mask 2-16:000)
RIGHT
NTSC :
000-1184(Default:Mask 1:788, Mask 2-16:000)
PAL:
000-1174(Default:Mask 1:782, Mask 2-16:000)
COLOR
1-8(Default:1)
TRANSP
0.00, 0.50, 0.75, 1.00
MOSAIC
OFF, ON
RETURN
○CAMERA ID(SETUP MENU)
CAMERA ID
ON
CAMERA ID
RETURN
OFF
○LANGUAGE(SETUP MENU)
ENGLISH, DEUTSCH, FRANCAIS
LANGUAGE
РУССКИЙ, PORTUGUÉS, ESPAÑOL
○CANERA RESET(SETUP MENU)
CAMERA RESET
YES
49

○OSD factory settings
■LENS
■WDR/ATR
Name
Default setting
Name
Default setting
LENS
MANUAL
WDR/ATR
OFF
BRIGHTNESS
MID
■SHUTTER/AGC
CONTRAST
MID
Name
Default setting
SHUTTER/AGC
AUTO
■DAY/NIGHT
MODE
SHUT
Name
Default setting
AE LEVEL
(HIGH LUMINANCE)
*Vary depending on the
fine adjustment at factory
DAY/NIGHT
AUTO
DELAY CNT
1
AGC
ON
DAY→NIGHT
64
AE LEVEL
(LOW LUMINANCE)
x1.00
NGIHT→DAY
110
■IR LED
■WHITE BAL
Name
Default setting
Name
Default setting
IR LED
AUTO
WHITE BAL
ATW
LEVEL MAX
240
SPEED
128
DELAY CNT
008
■DNR
Name
Default setting
■BACKLIGHT
MODE
OFF
Name
Default setting
Y LEVEL
0
BACKLIGHT
OFF
C LEVEL
0
■PICT ADJUST
■PRIVACY
Name
Default setting
Name
Default setting
FLIP
OFF
PRIVACY
OFF
BRIGHTNESS
128
CONTRAST
128
■CAMERA ID
SHARPNESS
64
Name
Default setting
HUE
*Vary depending on the
fine adjustment at factory
CAMERA ID
OFF
COLOR GAIN
*Vary depending on the
fine adjustment at factory
■LANGUAGE
Name
Default setting
LANGUAGE
ENGLISH
■DEFOG
Name
Default setting
DEFOG
OFF
50
 Loading...