


Watec USB Camera
User’s Manual
Rev. 3.02
Watec Co., Ltd.
September 5, 2018

2
Revision Record
Rev. Date Changes Remarks
1.00 August 28, 2013
-
Initial Release
2.00
- -
3.00 August 29, 2016
・Correction to “Watec USB Camera” of The title
・Add WAT-02U2D and WAT-03U2
・Add 5. Operation on Mac OS
3.01 April 17, 2017
・Add WAT-03U2D
3.02 September 5, 2018
・Add WAT-05U2M

3
Table of Contents
Table of Contents -----------------------------------------------------------------------------------------------------------------3
1. About this User’s Manual ------------------------------------------------------------------------------------------------4
2. Connecting the Watec USB Camera with a PC ---------------------------------------------------------------------5
3. Functions and Settings ---------------------------------------------------------------------------------------------------7
3.1. Preview ------------------------------------------------------------------------------------------------------------------------- 8
3.2. Video Capture Pin ---------------------------------------------------------------------------------------------------------- 9
3.2.1. Color Space/Compression (Compression Mode) ------------------------------------------------------------ 10
3.2.2. Output Size (Image Size) ------------------------------------------------------------------------------------------ 10
3.2.3. Frame Rate ------------------------------------------------------------------------------------------------------------ 11
3.3. Video Capture Filter Image Adjustment (Video Proc Amp) -------------------------------------------------- 14
3.3.1. Brightness ------------------------------------------------------------------------------------------------------------- 15
3.3.2. Contrast ---------------------------------------------------------------------------------------------------------------- 15
3.3.3. Hue ---------------------------------------------------------------------------------------------------------------------- 16
3.3.4. Saturation ------------------------------------------------------------------------------------------------------------- 17
3.3.5. Sharpness -------------------------------------------------------------------------------------------------------------- 17
3.3.6. Gamma ----------------------------------------------------------------------------------------------------------------- 18
3.3.7. White Balance -------------------------------------------------------------------------------------------------------- 18
3.3.8. Backlight Compensation ------------------------------------------------------------------------------------------ 19
3.3.9. Gain --------------------------------------------------------------------------------------------------------------------- 20
3.3.10. PowerLine Frequency(Anti Flicker) -------------------------------------------------------------------------- 21
3.4. Video Capture Filter Camera Control ------------------------------------------------------------------------------ 22
3.4.1. Exposure (Shutter) -------------------------------------------------------------------------------------------------- 23
3.4.2. Low Light Compensation (SlowShutter) --------------------------------------------------------------------- 25
3.5. Camera Control ------------------------------------------------------------------------------------------------------------ 25
3.5.1. Sensor Sense ---------------------------------------------------------------------------------------------------------- 25
4. GPIO Connection --------------------------------------------------------------------------------------------------------- 26
4.1. Snapshot Function -------------------------------------------------------------------------------------------------------- 26
4.1.1. Method to Confirm Operation (saving of static image) ------------------------------------------------------ 26
4.1.2. Image File Setting ------------------------------------------------------------------------------------------------------ 27
4.1.2.1. Color Space/Compression (CompressionMode) ----------------------------------------------------------- 28
4.1.2.2. Output Size (ImageSize) ---------------------------------------------------------------------------------------- 28
5. Remarks: Operation on Mac OS ----------------------------------------------------------------------------------------- 29

4
1. About this User’s Manual
This User’s Manual consists of instructions to connect the WAT-01U2 / WAT-02U2D / WAT-03U2 /
WAT-03U2D / WAT-05U2M (the following is the Watec USB Camera) to a PC and describes and
explains the settings for the Video Capture Pin/Video Capture Filter and describes the Snapshot
feature which utilizes the GPIO connection.
When the settings of the Watec USB Camera is changed according to the Watec USB Camera user’s
manual, check to see that the operation and the effects of the changes made to the camera are
acceptable.
The Watec USB Camera user’s manual is subject to change by design and the specifications of the
product without notice.
The copyright of the Watec USB Camera user’s manual shall belong to Watec Co., Ltd. Copying in
whole or in part without the authorization of the holders permission is prohibited.
5
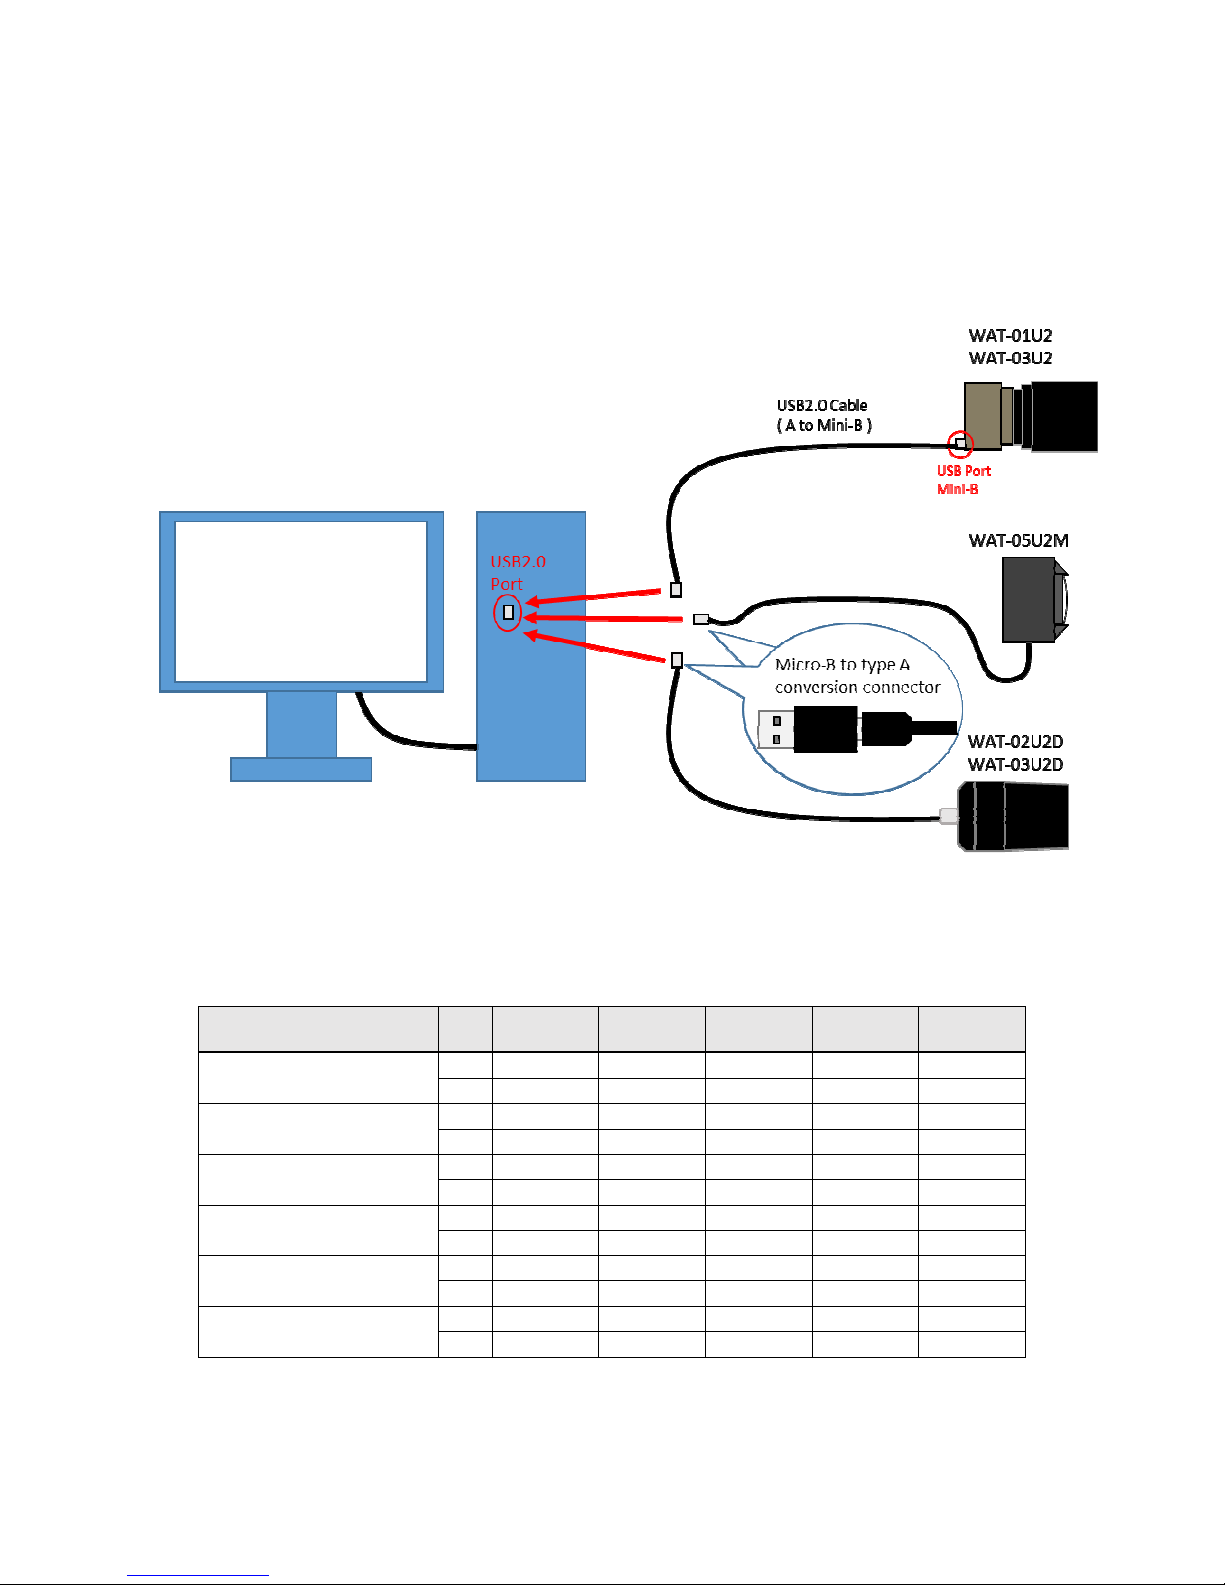
2. Connecting the Watec USB Camera with a PC
The diagram below shows the connections between the Watec USB Camera and a PC.
When connecting the WAT-02U2D / WAT-03U2D / WAT-05U2M, prepare a Micro-B to type A conversion
connector separately and use it.
Fig.1
Fig.1Fig.1
Fig.1
Watec USB Camera - PC
Connection Diagram
Connection DiagramConnection Diagram
Connection Diagram
Please use the following OS with USB2.0 port about a connected PC.
OS Bit
WAT01U2
WAT-
02U2D
WAT03U2
WAT-
03U2D
WAT-
05U2M
Windows XP (Since SP2)
32
○ ○ × × ×
64
○ ○ × × ×
Windows Vista
32
○ ○ × × ×
64
○ ○ × × ×
Windows 7
32
○ ○ ○ ○ ○
64
○ ○ ○ ○ ○
Windows 8
32
○ ○ ○ ○ ○
64
○ ○ ○ ○ ○
Windows 8.1
32
○ ○ ○ ○ ○
64
○ ○ ○ ○ ○
Windows 10
32
○ ○ ○ ○ ○
64
○ ○ ○ ○ ○

6
The Watec USB Camera is compatible with USB Video Class.
When the Watec USB Camera is connected to a PC for the first time, the driver will be installed
automatically. If the driver installation does not occur, and the Watec USB Camera is not recognized by
the PC, please check to make sure that the connection is correct, and please check that the PC
requirements are met.
It is recommended that a version of Windows Vista or newer (and inclusive) be used. With Windows XP, it
is possible to obtain video, however, there are some limitations to select functions. Please refer to Section
3 “Functions and Settings” for details.
Please connect the camera to the PC, and after confirming that the camera is recognized, please start the
viewer software and begin the Preview/Capture of video.
7
3. Functions and Settings
The Watec USB Camera settings are separated into Video Capture Pin, which is used to set the output
image size, and the Video Capture Filter, which is used to set the image brightness and color.
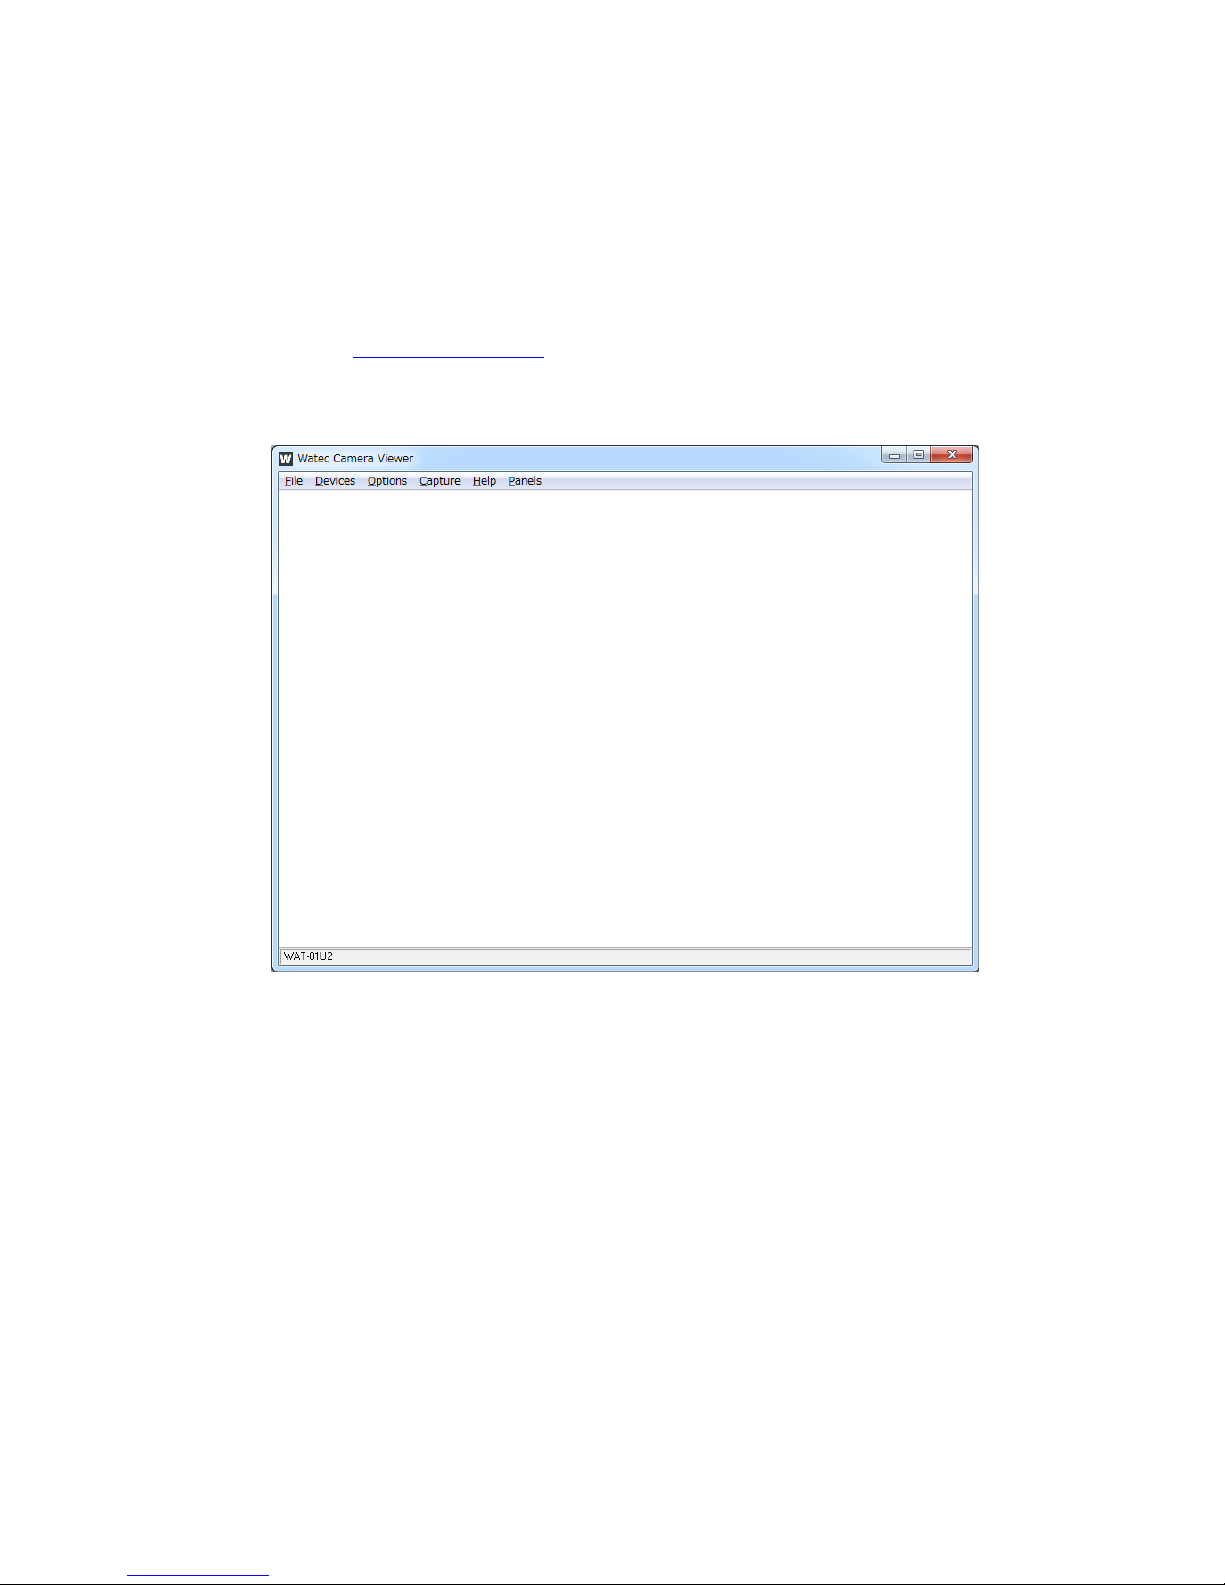
This section explains each of the functions of the Watec USB Camera and their respective setting methods
using the WatecCameraViewer (Watec USB Camera Capture Software which can be downloaded from our
company’s website, http://www.watec.co.jp/ ) as an example.
(For details on how to install the software, please refer to the readme.txt file included with the
WatecCameraViewer software.)
Fig.2
Fig.2Fig.2
Fig.2 WatecCameraViewer
WatecCameraViewerWatecCameraViewer
WatecCameraViewer Window
WindowWindow
Window
8
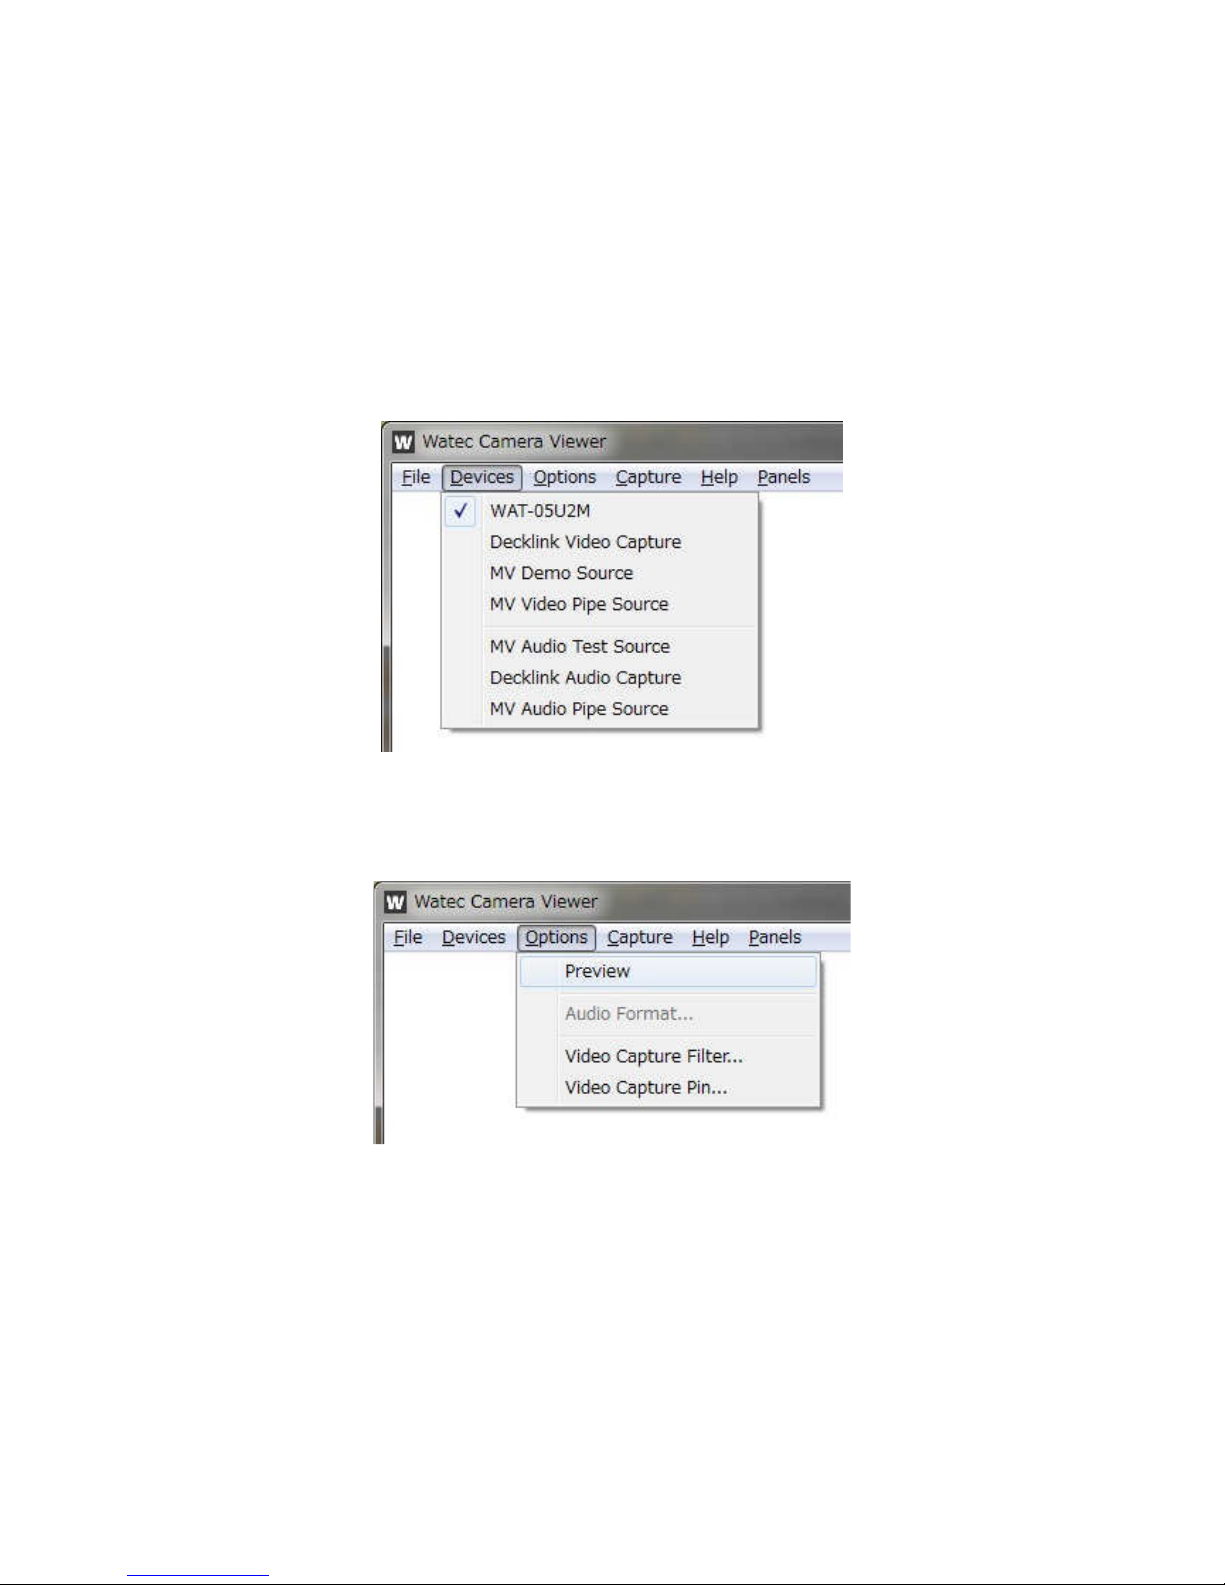
3.1.Preview
Please operate the menu at the top of the window to output an image on the window.
1. Selection of the device
The list of connected devices is shown when the “Devices” is clicked.
Please select the camera that outputs the image.
2. Start of preview
Please click the “Options -> Preview”.
Then the preview begins.
9
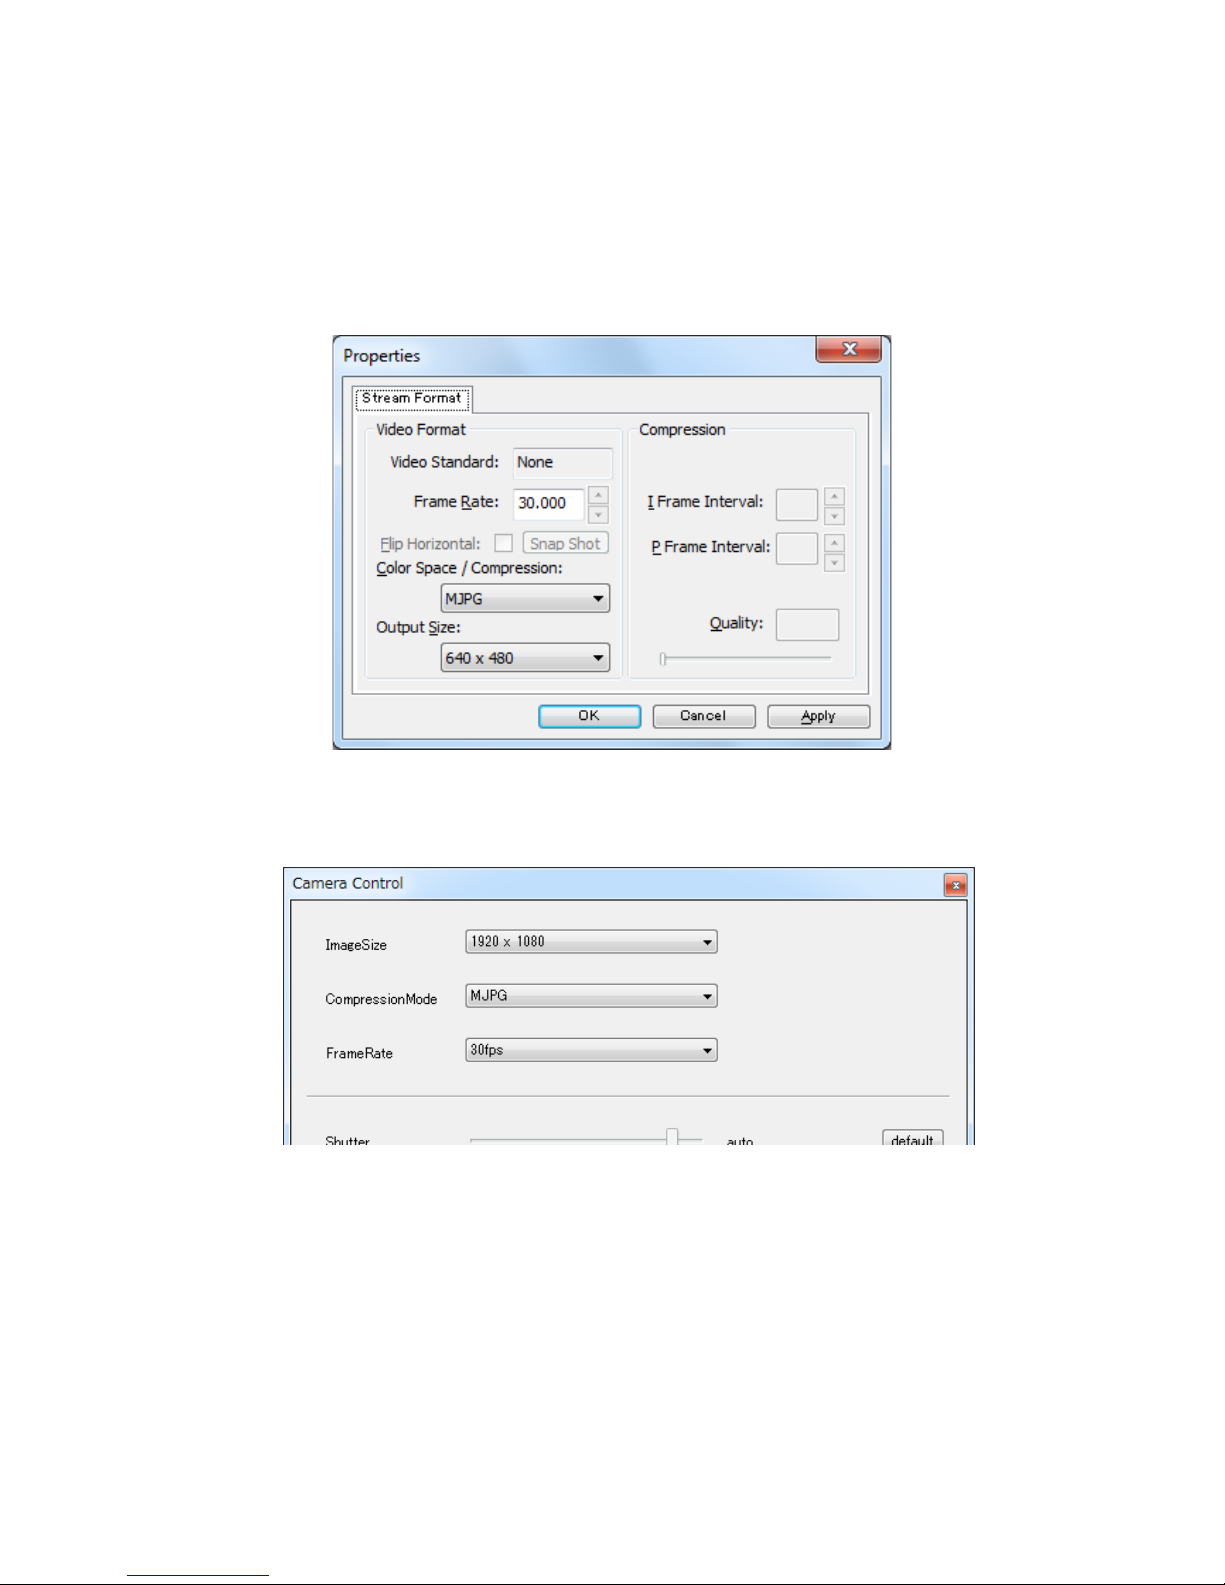
3.2.Video Capture Pin
The Color Space and Video Format can be set in the Video Capture Pin. The setting can be
accessed from the menu at the top of the window (Options -> Video Capture Pin).
Fig.3
Fig.3Fig.3
Fig.3 Video Capture Pin
Video Capture Pin Video Capture Pin
Video Capture Pin Window
WindowWindow
Window
The same setting is accessible from the Panels -> Camera Control menu at the top of the window.
Fig.4
Fig.4Fig.4
Fig.4 Camera Control
Camera ControlCamera Control
Camera Control Window
WindowWindow
Window

10
3.2.1.Color Space/Compression (Compression Mode)
Can be selected from YUY2 and MJPG.
YUY2: Uncompressed video output using YUY2(YUV422) format as Color Space.
The resolution is higher than MJPG, however, the frame rate is limited as described in the
later section.
MJPG: Output video is compressed with MJPG(Motion-JPEG) format. The resolution will
decrease, however, the frame rate will be maintained even at the maximum image size.
3.2.2.Output Size (Image Size)
The video image output size of the WAT-01U2 / WAT-02U2D is selected from the following 8
selections.
Image size (H x V) Aspect Ratio No. of Pixels Resolution *
1920 x 1080 16 : 9 2,073,600 HD 1080p
160 x 120 4 : 3 19,200 Quarter-Quarter-VGA
176 x 144 11 : 9 25,344 Quarter-CIF
320 x 240 4 : 3 76,800 Quarter-VGA
640 x 480 4 : 3 307,200 VGA
1280 x 1024 5 : 4 1,310,720 SXGA
1280 x 720 16 : 9 921,600 HD 720p
1280 x 800 16 : 10 1,024,000 WXGA
The video image output size of the WAT-03U2 / WAT-03U2D is selected from the following 4
selections.
Image size (H x V) Aspect Ratio No. of Pixels Resolution *
1280 x 960 4:3 1,228,800 Quad-VGA
320 x 240 4:3 76,800 Quarter-VGA
640 x 480 4:3 307,200 VGA
1280 x 720 16:9 921,600 HD 720p
The video image output size of the WAT-05U2M is selected from the following 4 selections.
Image size (H x V) Aspect Ratio No. of Pixels Resolution *
1920 x 1080 16:9 2,073,600 HD 1080p
320 x 240 4:3 76,800 Quarter-VGA
640 x 480 4:3 307,200 VGA
1280 x 720 16:9 921,600 HD 720p
*Resolution :
HD 1080p : Full-HD
VGA : Video Graphics Array
SXGA : Super-XGA
WXGA : Wide-XGA

11
3.2.3.Frame Rate
The frame rate will be fixed by the Color Space/Compression mode and image size settings.
The frame rate of WAT-01U2 / WAT-02U2D is as follows.
Color Space/
Compression
Image Size Frame Rate (fps) *
YUY2
1920 x 1080
5
160 x 120
30
176 x 144
30
320 x 240
30
640 x 480
30
1280 x 1024
7.5
1280 x 720
10
1280 x 800
10
MJPG
1920 x 1080
30
160 x 120
30
176 x 144
30
320 x 240
30
640 x 480
30
1280 x 1024
30
1280 x 720
30
1280 x 800
30
The frame rate of WAT-03U2 / WAT-03U2D is as follows.
Color Space/
Compression
Image Size Frame Rate (fps) *
YUY2
1280 x 960 7.5
320 x 240 30
640 x 480 30
1280 x 720 7.5
MJPG
1280 x 960 30
320 x 240
60
30
640 x 480
60
30
1280 x 720 30

12
The frame rate of WAT-05U2M is as follows.
Color Space/
Compression
Image Size Frame Rate (fps) *
YUY2
1920 x 1080 5
320 x 240
30
15
640 x 480
30
15
1280 x 720 7.5
MJPG
1920 x 1080
30
15
320 x 240
30
15
640 x 480
30
15
1280 x 720
30
15
*fps:
Frames per Second, the number of frames processed per second in a video image, the higher
frame rates produce smoother, more fluid video.

13
On the WAT-03U2 / WAT-03U2D, the frame rate is selectable from 30fps or 60fps when the
MJPG is set with 320x240 or 640x480.
It cuts and outputs a read area from the image sensor when 60fps is selected. In order to cut and
output the central part of the screen, the angle of view is different from other frame rates.
1280×960(30fps) 640×480(30fps)
640×480(60fps)
On the WAT-03U2 / WAT-03U2D / WAT-05U2M, please note that the “Use Frame Rate” (Capture
-> Set Frame Rate…) setting differs depending on frame rate selection methods. Choose “OFF”
when selecting the frame rate from the “Video Capture Pin”. Choose “ON” when selecting the
frame rate from “Camera Control”.
Fig.
Fig.Fig.
Fig.5555 Set Frame Rate
Set Frame RateSet Frame Rate
Set Frame Rate Window
WindowWindow
Window

14
3.3.Video Capture Filter Image Adjustment (Video Proc Amp)
The functions can be adjusted. The setting is accessed by selecting the Options -> Video Capture
Filter from the menus at the top.
Fig.
Fig.Fig.
Fig.6666 Video Capture
Video Capture Video Capture
Video Capture Filter
Filter Filter
Filter Video Proc Amp
Video Proc AmpVideo Proc Amp
Video Proc Amp window
windowwindow
window
The same setting is accessible from the Panels -> Camera Control menu at the top of the window.
Fig.7
Fig.7Fig.7
Fig.7 Camera Control
Camera ControlCamera Control
Camera Control window
windowwindow
window

15
3.3.1.Brightness
Increasing the value will increase the image brightness.
Default: “0”. (WAT-01U2 / WAT-02U2D) / “10” (WAT-03U2 / WAT-03U2D) / “30” (WAT-05U2M).
Adjustment is made in the range of "-128" - "127".
Brightness@-128 Brightness@0 Brightness@127
※The pictures were taken by WAT-01U2.
3.3.2.Contrast
Increasing the value will increase the contrast.
Default: “85”. (WAT-01U2 / WAT-02U2D) / “95” (WAT-03U2 / WAT-03U2D) / “64” (WAT-05U2M).
The adjustment is made in the range of "0" - "255".
Contrast@0 Contrast@85 Contrast@255
※The pictures were taken by WAT-01U2.

16
3.3.3.Hue
The image hue can be adjusted.
Default: “0”. The adjustment is made in the range between “-40” - “40”.
The hue is varied so as to change in a hue circle and will have same hue at “±40”.
Hue@0
Hue@-20 Hue@20
Hue@±40
※The pictures were taken by WAT-01U2.

17
3.3.4.Saturation
Increase in this value increases the color saturation of the image.
Default: “94”. (WAT-01U2 / WAT-02U2D) / “100” (WAT-03U2 / WAT-03U2D) / “80” (WAT-05U2M).
The adjustment is made in the range of "0" - "255".
Saturation@0 Saturation@94 Saturation@255
※The pictures were taken by WAT-01U2.
3.3.5.Sharpness
Increase in this value will emphasize the edges of inside the image and increase the Sharpness.
Default: “1”. Adjustment is made in the range of "0" - "4".
Sharpness@0 Sharpness@4
※The pictures were taken by WAT-01U2.

18
3.3.6.Gamma
The function is for the adjustment of the gradation characteristics curve of the image to
compensate for the Gamma characteristics (image gradation response characteristics) of the
display.
Default: “100”. Adjustment is made in the range of "48" - "300".
Gamma@48 Gamma@100 Gamma@300
※The pictures were taken by WAT-01U2.
3.3.7.White Balance
The White Balance function is used to calibrate “white” color under varying color temperature
lighting conditions.
Default: “auto”. The default value in manual adjustment mode is “4600”.
The adjustment is made in the range of "2800" - "6500".
The White Balance of the image will be optimally adjusted per the value selected for the
particular color temperature environment.
When Auto is “ON”, the camera will automatically adjust the White Balance by judging the
lighting conditions in the image being shot.
Auto White Balance Manual White Balance@4600
※The pictures were taken by WAT-01U2.

19
3.3.8.Backlight Compensation
The Backlight Compensation function adjusts the exposure of the center of the image to
compensate for the dark shadow created due to lighting from the back of the object.
”0” (Backlight Compensation OFF) or “1” (Backlight Compensation ON) can be selected.
Default: “0”.
Backlight Compensation OFF Backlight Compensation ON
※The pictures were taken by WAT-01U2.

20
3.3.9.Gain
Higher the value set, the higher the gain (amplification) of the signal, which will increase the
brightness of the image. However, the noise element of the image will also be amplified.
Default: “0”. The setting is accessed by manually setting the Exposure in the Camera Control
menu as described in the proceeding section of this manual.
The adjustment of WAT-01U2 / WAT-02U2D is made in the range of "0" - "24" (dB). The
adjustment of WAT-03U2 / WAT-03U2D / WAT-05U2M is made in the range of "0" - "72" (dB).
*This function is not adjustable with Windows XP and older OS.
Gain@0 Gain@6 Gain@12
Gain@18 Gain@24
※The pictures were taken by WAT-01U2, and the exposure was fixed to "-8".

21
Gain@0 Gain@6 Gain@12
Gain@36 Gain@48 Gain@72
※The pictures were taken by WAT-03U2, and the exposure was fixed to "-8".
3.3.10.PowerLine Frequency(Anti Flicker)
Proper setting of this feature is used to compensate for flicker caused by environments such as
lighting with fluorescent lighting.
Default: “50Hz”. Selection is made between either "50Hz" or "60Hz".
Please select the frequency which matches the power mains frequency of the environment which
the camera is used.
This function is active only when the Exposure function is set to "Auto".
※This function is not available with Windows XP and older OS.
FlickerLess@50Hz FlickerLess@60Hz
※The pictures were taken by WAT-01U2.
※The mains power frequency at the location of the captured images is “50Hz”.

22
3.4.Video Capture Filter Camera Control
The settings related to shutter speed is adjusted from the Camera Control of the Video Capture Filter
menu.
The settings window is accessed from the Options -> Video Capture Filter: Camera Control menu at
the top of the window.
Fig.
Fig.Fig.
Fig.8888 Video Capture Filter
Video Capture Filter Video Capture Filter
Video Capture Filter Camera Control
Camera ControlCamera Control
Camera Control window
windowwindow
window
The same setting is accessible from Panels->Camera Control menu at the top of the window.
Fig.9
Fig.9Fig.9
Fig.9 Camera Control
Camera ControlCamera Control
Camera Control window
windowwindow
window

23
3.4.1.Exposure (Shutter)
When the exposure value is x, the shutter speed is 2 raised to the power of x.
As the exposure value increases, the image becomes brighter.
The default is set to “Auto”. The default value for Manual Control is “-7”.
Adjustment of the WAT-01U2 / WAT-02U2D is made in the range of "-13" - "-4" (1/8192 - 1/16
seconds). The adjustment of WAT-03U2 / WAT-03U2D is made in the range of "-13" - "1" (1/8192 2 seconds). The adjustment of WAT-05U2M is made in the range of "-13" - "-2" (1/8192 – 1/4
seconds).The frame rate will be reduced if the Color Space / Compression and Image Size were
set to 30fps or 60fps. For example, the frame rate will be reduced to approximately 15fps at
Exposure@-4.
Exposure @-13 Exposure @-10
Exposure @-7 Exposure @-4
※The pictures were taken by WAT-01U2, and the gain was fixed to "0".

24
Exposure @-13 Exposure @-10
Exposure @-7 Exposure @-4
Exposure @-1 Exposure @1
※The pictures were taken by WAT-03U2, and the gain was fixed to "0".

25
3.4.2.Low Light Compensation (SlowShutter)
The default setting is "ON" (checked box). When Low Light Compensation is "ON", the camera
will decrease the shutter speed to increase sensitivity, if the camera judges that there is not
enough illumination. In this mode, the frame rate will decrease.
*The shutter speed does not change due to Low Light Compensation when the frame rate is
7.5fps on WAT-03U2 / WAT-03U2D.
*The shutter speed does not change due to Low Light Compensation when the frame rate is 5fps
or 7.5fps on WAT-05U2M.
*This function is not available with Windows XP and older OS.
3.5.Camera Control
The setting window is accessed from the Panels -> Camera Control at the top of the
WatecCameraViewer window.
Almost all functions are set from the Video Capture Pin or Video Capture Filter, and Camera Control.
However, “Sensor Sense” can be set only from the Camera Control window.
3.5.1.Sensor Sense
The default setting is “HIGH”. When the setting is “LOW”, the sensitivity of the image censor is half
in the “HIGH” setting. “LOW” setting is effective in the very bright areas, such as in the sunlight.
Fig.
Fig.Fig.
Fig.10
1010
10 Sensor
SensorSensor
Sensor Sense
SenseSense
Sense
SensorSense @HCG SensorSense @LCG
*The exposure was fixed to “-12”, and the gain was “0”.
*This function doesn’t work on Windows 8 or Windows 8.1.

26
4. GPIO Connection
The WAT-01U2 / WAT-03U2 has a 2 pin GPIO (General Purpose Input/Output) connector at the back of
the camera. Currently, an external trigger for capturing Snapshot is assigned to this connection.
*The WAT-02U2D / WAT-03U2D / WAT-05U2M doesn't have this function.
4.1.Snapshot Function
To use the GPIO Snapshot function, refer to the figure below to connect the 2 pin cable to the
WAT-01U2 / WAT-03U2 GPIO connector and use a push button switch as the trigger is recognized by
closing of the circuit.
When the button is pressed (circuit is closed), the camera will stop the video capture and switch to the
static image capture. A static image approximately 1 second after the button is pressed will be
output. Thereafter, the camera will revert back to the video capture.
From the time when the button is pressed until the Snapshot is output, the camera will adjust the
exposure and white balance. During this time, if the environment changes, such as lighting conditions,
a good Snapshot may not be captured.
Please heed caution
4.1.1.Method to Confirm Operation (saving of static image)
The saving of the image file captured by the Snapshot function is done by using the
WatecCameraViewer (available for download from our website: http://www.watec.co.jp/).
While the WatecCameraViewer is open, and the video image can be previewed, shorting the GPIO
circuit will save a Snapshot to an image file (.jpg or .bmp).
(The image file will be saved in the same folder as where the WatecCameraViewer is operating)
The same Snapshot function can be operated from the WatecCameraViewer.
(Capture->Trigger for Still Capture)
*Please heed caution to the following when using the WatecCameraViewer in the Windows
Vista/7/8/8.1/10 OS environments:
・When starting the program from C:¥ProgramFiles¥.. with UAC (User Account Control) enabled,
make sure to start up the WatecCameraViewer with Administrator rights, as creating and saving of
new files in this folder/directory tree is not permitted without Administrator rights. (Right Click on
WatecCameraViewer executable file -> Run as administrator)
Please refer to the following section for setting of the image file to be saved.

27
4.1.2.Image File Setting
The image file format and size can be changed in the Options -> Still Capture Pin setting.
Fig.1
Fig.1Fig.1
Fig.11111 Still
Still Still
Still Capture
Capture Capture
Capture Pin
PinPin
Pin window
windowwindow
window
*The “Snap Shot” button in this menu is not active. Please trigger the Snapshot from the menu.
(Capture -> Trigger for Still Capture)
*In Windows XP, the Still Capture Pin setting is fixed.
Setting of WAT-01U2 / WAT-02U2D is MJPG and 1920x1080. Setting of WAT-03U2 / WAT-03U2D is
MJPG and 1280x960.
(A window as shown below will appear, however the settings cannot be changed)
Fig.1
Fig.1Fig.1
Fig.12222 Still Capture Pin
Still Capture Pin Still Capture Pin
Still Capture Pin window
windowwindow
window ((((in Windows
in Windowsin Windows
in Windows XP)
XP)XP)
XP)

28
4.1.2.1.Color Space/Compression (CompressionMode)
Same as Video Capture Pin, select from YUY2 and MJPG.
YUY2: Snapshot image file is saved as .bmp file.
MJPG: Snapshot image file is saved as .jpg file.
*In Windows XP, MJPG (.jpg file) setting is fixed.
4.1.2.2.Output Size (ImageSize)
Image file will be saved at the image size selected.
The still image output size of the WAT-01U2 / WAT-02U2D is selected from the following 8 selections.
Image size (H x V) Aspect Ratio No. of Pixels
Resolution ※
1920 x 1080 16 : 9 2,073,600 HD 1080p
160 x 120 4 : 3 19,200 Quarter-Quarter-VGA
176 x 144 11 : 9 25,344 Quarter-CIF
320 x 240 4 : 3 76,800 Quarter-VGA
640 x 480 4 : 3 307,200 VGA
1280 x 1024 5 : 4 1,310,720 SXGA
1280 x 720 16 : 9 921,600 HD 720p
1280 x 800 16 : 10 1,024,000 WXGA
The still image output size of the WAT-03U2 / WAT-03U2D is selected from the following 4 selections.
Image size (H x V) Aspect Ratio No. of Pixels
Resolution ※
1280 x 960 4:3 1,228,800 Quad-VGA
320 x 240 4:3 76,800 Quarter-VGA
640 x 480 4:3 307,200 VGA
1280 x 720 16:9 921,600 HD 720p
*Resolution:
HD 1080p: Full-HD
VGA: Video Graphics Array
SXGA: Super-XGA
WXGA: Wide-XGA
*In Windows XP, the setting is fixed.
Setting of WAT-01U2 / WAT-02U2D is 1920x1080. Setting of WAT-03U2 / WAT-03U2D is
1280x960.
*Still images will be saved as the angle of view of 30fps when the frame rate is set with 60fps on
WAT-03U2 / WAT-03U2D.

29
5. Remarks: Operation on Mac OS
We suppose that the Watec USB Camera is mainly used under Windows OS environment, however, it is
possible to operate under the Mac OS X environment with various limitations of the function if you meet the
following conditions. (Note: WatecCameraViewer cannot be operated on Mac OS X)
Since Mac OS X version 10.4.9
Equipped USB2.0 port
*Please note that even if the prescribed conditions is satisfied, it cannot always be operated.
The limitations of function under Mac OS X are as follows.
Video Capture Pin
Color Space/Compression: Settings are unchangeable.
Output Size: Output size is changeable depending on the capture software.
Video Capture Filter
The settings cannot be changed at all items. Each item will be the default value.
Snapshot Function
The snapshot functions cannot be operated.
We verified operations under following environments.
OS: Mac OS X 10.8.4
Processor: 2.7GHz Intel Core i7
Memory: 16GB 1600MHz DDR3
Capture software: QuickTime Player
 Loading...