

Page 1

WatchGuard
®
Firebox
®
SSL VPN
Gateway Administration Guide
Firebox SSL VPN Gateway
Page 2

Notice to Users
Information in this guide is subject to change without notice. Companies, names, and data used in examples
herein are fictitious unless otherwise noted. No part of this guide may be reproduced or transmitted in any
form or by any means, electronic or mechanical, for any purpose, without the express written permission of
WatchGuard Technologies, Inc.
Copyright, Trademark, and Patent Information
Use of the product documented in this guide is subject to your prior acceptance of the WatchGuard End User
License Agreement applicable to this product. You will be prompted to read and accept the End User License
Agreement when you register your Firebox on the WatchGuard website.
Copyright© 2008 Citrix Systems, Inc. All rights reserved.
Copyright© 2008 WatchGuard Technologies, Inc. All rights reserved
WatchGuard, Firebox, LiveSecurity and any other word listed as a trademark in the “Terms of Use” portion of
the WatchGuard website that is used herein are registered trademarks or trademarks of WatchGuard
Technologies, Inc. in the United States and/or other countries.
Citrix is a registered trademark of Citrix Systems, Inc in the U.S.A. and other countries.
Microsoft, Windows, and Windows NT are either registered trademarks or trademarks of Microsoft
Corporation in the United States and/or other countries.
All other trade names referred to are the Servicemark, Trademark, or Registered Trademark of the respective
manufacturers.
The Firebox SSL Firebox SSL VPN Gateway software is distributed with source code covered under the GNU
General Public License (GPL). To obtain source code covered under the GPL, please contact WatchGuard
Technical Support at:
877.232.3531 in the United States and Canada
+1.206.613.0456 in all other countries
This source code is free to download. There is a $35 charge to ship the CD.
See Appendix E, “Legal and Copyright Information” on page 173 of this guide for the complete text of the
GPL.
VPN Gateway Software: 5.5
Document Version: 352-2784-001
ADDRESS:
505 Fifth Avenue South
Suite 500
Seattle, WA 98104
SUPPORT:
www.watchguard.com/support
support@watchguard.com
U.S. and Canada +877.232.3531
All Other Countries +1.206.613.0456
SALES:
U.S. and Canada +1.800.734.9905
All Other Countries +1.206.521.8340
ABOUT WATCHGUARD
WatchGuard is a leading provider of network security solutions for small- to midsized enterprises worldwide, delivering integrated products and services that are
robust as well as easy to buy, deploy and manage. The company’s Firebox X family of
expandable integrated security appliances is designed to be fully upgradeable as an
organization grows and to deliver the industry’s best combination of security,
performance, intuitive interface and value. WatchGuard Intelligent Layered Security
architecture protects against emerging threats effectively and efficiently and provides
the flexibility to integrate additional security functionality and services offered
through WatchGuard. Every WatchGuard product comes with an initial LiveSecurity
Service subscription to help customers stay on top of the security landscape with
vulnerability alerts, software updates, expert security instruction and superior
customer care. For more information, please call (206) 521-8340 or visit
www.watchguard.com
.
ii Firebox SSL VPN Gateway
Page 3

Contents
CHAPTER 1 Getting Started with Firebox SSL VPN Gateway .................................................... 1
Audience ..................................................................................................................................................... 1
Operating System Requirements ...................................................................................................... 1
Document Conventions ........................................................................................................................ 2
LiveSecurity Service Solutions ............................................................................................................ 2
LiveSecurity Service Broadcasts ......................................................................................................... 3
Activating LiveSecurity Service .......................................................................................................... 4
LiveSecurity Service Self Help Tools ................................................................................................. 4
WatchGuard Users Forum ..................................................................................................................... 5
Online Help ................................................................................................................................................ 6
Product Documentation ....................................................................................................................... 6
Technical Support ................................................................................................................................... 6
LiveSecurity Service technical support ............................................................................................. 6
LiveSecurity Gold .................................................................................................................................. 7
Firebox Installation Service ................................................................................................................. 7
VPN Installation Service ...................................................................................................................... 7
Training and Certification ..................................................................................................................... 7
CHAPTER 2 Introduction to Firebox SSL VPN Gateway ............................................................... 9
Overview .................................................................................................................................................... 9
New Features .......................................................................................................................................... 11
Authentication and one-time passwords ......................................................................................11
New versions of the Secure Access Client ....................................................................................... 11
Configurable symmetric encryption ciphers .................................................................................11
Automatic detection of proxy server settings ...............................................................................11
Secure Access Client connections ....................................................................................................12
Automatic port redirection ...............................................................................................................12
Disable desktop sharing ....................................................................................................................12
Additional control over Secure Access Client connections .........................................................12
Admin Guide iii
Page 4

Disable kiosk mode ............................................................................................................................12
Specify multiple ports and port ranges for network resources ..................................................12
Voice over IP softphone support ......................................................................................................12
Editable HOSTS file .............................................................................................................................12
NTLM authentication and authorization support. ......................................................................13
Added challenge-response to RADIUS user authentication .......................................................13
SafeWord PremierAccess changed to support standards-based RADIUS token user
authentication
Updated serial console menu ...........................................................................................................13
..............................................................................................................................13
Features .....................................................................................................................................................13
Administration Tool ............................................................................................................................13
Firebox SSL VPN Gateway Settings ..................................................................................................14
Feature Summary ...............................................................................................................................16
The User Experience .............................................................................................................................16
Deployment and Administration .....................................................................................................17
Planning your deployment ................................................................................................................18
Deploying the Firebox SSL VPN Gateway in the Network DMZ .................................................18
Deploying the Firebox SSL VPN Gateway in a Secure Network .................................................18
Planning for Security with the Firebox SSL VPN Gateway ......................................................19
Configuring Secure Certificate Management ...............................................................................19
Authentication Support .................................................................................................................... 19
Deploying Additional Appliances for Load Balancing and Failover .........................................20
Installing the Firebox SSL VPN Gateway for the First Time .....................................................20
Getting Ready to Install the Firebox SSL VPN Gateway ...............................................................20
Setting Up the Firebox SSL VPN Gateway Hardware ...................................................................21
Configuring TCP/IP Settings for the Firebox SSL VPN Gateway .................................................21
Redirecting Connections on Port 80 to a Secure Port ..................................................................24
Using the Firebox SSL VPN Gateway ..............................................................................................24
The Firebox SSL VPN Gateway operates as follows: ..................................................................... 24
Starting the Secure Access Client ..................................................................................................... 25
Enabling Single Sign-On Operation for the Secure Access Client .............................................25
Establishing the Secure Tunnel ........................................................................................................26
Tunneling Destination Private Address Traffic over SSL or TLS ..................................................26
Operation through Firewalls and Proxies ......................................................................................26
Terminating the Secure Tunnel and Returning Packets to the Client .......................................27
Using Kiosk Mode ...............................................................................................................................28
Connecting to a Server Load Balancer ........................................................................................... 28
CHAPTER 3 Configuring Basic Settings .............................................................................................31
Firebox SSL VPN Gateway Administration Desktop ..................................................................32
To open the Administration Portal and Administrative Desktop ..............................................32
Using the Administration Portal .......................................................................................................32
Downloads Tab ...................................................................................................................................32
Admin Users Tab .................................................................................................................................33
Logging Tab .........................................................................................................................................33
Maintenance Tab ................................................................................................................................33
iv WatchGuard SSL VPN Gateway
Page 5

Using the Serial Console .....................................................................................................................33
To open the serial console .................................................................................................................34
Using the Administration Tool ..........................................................................................................34
To download and install the Administration Tool ........................................................................34
Publishing Settings to Multiple Firebox SSL VPN Gateways ..................................................35
To publish Firebox SSL VPN Gateway settings ...............................................................................35
Product Activation and Licensing ...................................................................................................35
Upgrading the tunnel and tunnel upgrade license ......................................................................35
Upgrading the LiveSecurity Renewal and Tunnel Renewal license ...........................................36
Managing Licenses ...............................................................................................................................36
To manage licenses on the Firebox SSL VPN Gateway ................................................................36
To install a license file .........................................................................................................................37
Information about Your Licenses ....................................................................................................37
Testing Your License Installation .....................................................................................................37
Blocking External Access to the Administration Portal ...........................................................38
To block external access to the Administration Portal ................................................................38
Using Portal Pages ................................................................................................................................38
Using the Default Portal Page .......................................................................................................... 38
Downloading and Working with Portal Page Templates ........................................................39
To download the portal page templates to your local computer .............................................40
To work with the templates for Windows and Linux users .........................................................40
Using the ActiveX Control .................................................................................................................40
Installing Custom Portal Files on the Firebox SSL VPN Gateway ...............................................40
Enabling Portal Page Authentication .............................................................................................41
To enable portal page authentication ...........................................................................................41
Linking to Clients from Your Web Site ...........................................................................................41
To include links to the Firebox SSL Secure Access Client and kiosk mode on your Web site .41
Multiple Log On Options using the Portal Page ...........................................................................42
Pre-Authentication Policy Portal Page ........................................................................................... 42
Double-source Authentication Portal Page ..................................................................................43
Connecting Using a Web Address ..................................................................................................43
Connecting Using Secure Access Client ........................................................................................ 43
Saving and Restoring the Configuration ......................................................................................44
To save the Firebox SSL VPN Gateway configuration .................................................................. 44
To restore a saved configuration .....................................................................................................44
Upgrading the Firebox SSL VPN Gateway Software .................................................................44
To upgrade the Firebox SSL VPN Gateway .....................................................................................44
Restarting the Firebox SSL VPN Gateway .....................................................................................45
To restart the Firebox SSL VPN Gateway ........................................................................................45
Shutting Down the Firebox SSL VPN Gateway ...........................................................................45
To shut down the Firebox SSL VPN Gateway .................................................................................45
Firebox SSL VPN Gateway System Date and Time .....................................................................45
To change the system date and time ..............................................................................................46
Network Time Protocol ......................................................................................................................46
Admin Guide v
Page 6

Allowing ICMP traffic ............................................................................................................................46
To enable ICMP traff ic ........................................................................................................................46
CHAPTER 4 Configuring Firebox SSL VPN Gateway Network Connections ...................47
Configuring Network Information ..................................................................................................47
General Networking .............................................................................................................................48
Name Service Providers ......................................................................................................................50
To enable split DNS .............................................................................................................................50
To edit the HOSTS file .........................................................................................................................50
Dynamic and Static Routing ..............................................................................................................51
Configuring Network Routing ..........................................................................................................51
Configuring Dynamic Routing .........................................................................................................52
Enabling RIP Authentication for Dynamic Routing .....................................................................52
Changing from Dynamic Routing to Static Routing ...................................................................53
Configuring a Static Route ................................................................................................................53
Static Route Example .........................................................................................................................54
Configuring Firebox SSL VPN Gateway Failover .........................................................................55
To specify Firebox SSL VPN Gateway failover ................................................................................55
Configuring Internal Failover ...........................................................................................................55
Controlling Network Access ..............................................................................................................56
Configuring Network Access ............................................................................................................56
Specifying Accessible Networks .......................................................................................................57
Enabling Split Tunneling .....................................................................................................................57
To enable split tunneling ...................................................................................................................58
Configuring User Groups ...................................................................................................................58
Denying Access to Groups without an ACL .................................................................................58
To deny access to user groups without an ACL .............................................................................59
Improving Voice over IP Connections ............................................................................................59
Enabling Improving Voice over IP Connections ............................................................................59
To improve latency for UDP traffic ..................................................................................................60
CHAPTER 5 Configuring Authentication and Authorization ..................................................61
Configuring Authentication and Authorization .........................................................................61
Configuring Authentication without Authorization ....................................................................63
The Default Realm ..............................................................................................................................63
Using a Local User List for Authentication .....................................................................................63
Configuring Local Users .....................................................................................................................64
Adding Users to Multiple Groups .....................................................................................................64
Changing Password for Users ..........................................................................................................64
Using LDAP Authorization with Local Authentication ................................................................65
Changing the Authentication Type of the Default Realm ......................................................65
Configuring the Default Realm ........................................................................................................65
Creating Additional Realms ..............................................................................................................66
Removing Realms ...............................................................................................................................67
Using SafeWord for Authentication ................................................................................................ 67
Configuring Secure Computing SafeWord Authentication ........................................................67
Configuring SafeWord Settings on the Access Gateway ............................................................. 67
vi WatchGuard SSL VPN Gateway
Page 7

To disable Firebox SSL VPN Gateway authentication ..................................................................68
SafeWord PremierAccess Authorization ........................................................................................68
Using SafeWord for Citrix or SafeWord RemoteAccess for Authentication ......................68
To configure the IAS RADIUS realm .................................................................................................69
Using RADIUS Servers for Authentication and Authorization ...............................................69
To configure Microsoft Internet Authentication Service for Windows 2000 Server ...............70
To specify RADIUS server authentication .......................................................................................72
To configure RADIUS authorization ................................................................................................ 72
Choosing RADIUS Authentication Protocols .................................................................................72
Using LDAP Servers for Authentication and Authorization ...................................................73
LDAP authentication ..........................................................................................................................73
To configure LDAP authentication ..................................................................................................74
LDAP Authorization ..............................................................................................................................75
Group memberships from group objects working evaluations ................................................76
Group memberships from group objects non-working evaluations ........................................76
LDAP authorization group attribute fields ....................................................................................76
To configure LDAP authentication ..................................................................................................76
To configure LDAP authorization ....................................................................................................77
Using certificates for secure LDAP connections ............................................................................78
Determining Attributes in your LDAP Directory ...........................................................................78
Using RSA SecurID for Authentication ...........................................................................................79
To generate a sdconf.rec file for the Firebox SSL VPN Gateway ................................................. 80
Enable RSA SecurID authentication for the Firebox SSL VPN Gateway ....................................81
Configuring RSA Settings for a Cluster ...........................................................................................82
Resetting the node secret ..................................................................................................................82
Configuring Gemalto Protiva Authentication ...............................................................................82
Configuring NTLM Authentication and Authorization ...............................................................83
Configuring NTLM Authorization ....................................................................................................84
Configuring Authentication to use One-Time Passwords ...........................................................84
Configuring Double-Source Authentication ...............................................................................85
To create and configure a double-source authentication realm ..............................................85
Changing Password Labels ...............................................................................................................86
CHAPTER 6 Adding and Configuring Local Users and User Groups ...................................87
Adding Local Users ...............................................................................................................................87
To create a user on the Firebox SSL VPN Gateway ........................................................................87
To delete a user from the Firebox SSL VPN Gateway ....................................................................88
User Group Overview ...........................................................................................................................88
Creating User Groups ...........................................................................................................................89
To create a local user group ..............................................................................................................89
To remove a user group .....................................................................................................................89
Configuring Properties for a User Group ......................................................................................90
Default group properties ...................................................................................................................90
Forcing Users to Log on Again .......................................................................................................... 90
Configuring Secure Access Client for single sign-on ....................................................................91
Enabling domain logon scripts ........................................................................................................91
Admin Guide vii
Page 8

Enabling session time-out ................................................................................................................92
Configuring Web Session Time-Outs ..............................................................................................93
Disabling Desktop Sharing ...............................................................................................................93
Setting Application Options .............................................................................................................93
Enabling Split DNS ..............................................................................................................................94
Enabling IP Pooling ............................................................................................................................94
Choosing a portal page for a group ................................................................................................95
Client certificate criteria configuration .......................................................................................... 95
Global policies .....................................................................................................................................96
Configuring Resources for a User Group ....................................................................................... 96
Adding Users to Multiple Groups .....................................................................................................98
Allowing and denying network resources and application policies .........................................98
Defining network resources ..............................................................................................................99
Allowing and Denying Network Resources and Application Policies .....................................100
Application policies ..........................................................................................................................101
Configuring file share resources ....................................................................................................102
Configuring kiosk mode ..................................................................................................................103
End point resources and policies ...................................................................................................104
Configuring an end point policy for a group ...............................................................................105
Setting the Priority of Groups .........................................................................................................106
Configuring Pre-Authentication Policies ......................................................................................107
CHAPTER 7 Creating and Installing Secure Certificates ..........................................................109
Generating a Secure Certificate for the Firebox SSL VPN Gateway ...................................109
Digital Certificates and Firebox SSL VPN Gateway Operation .............................................110
Overview of the Certificate Signing Request ............................................................................110
Password-Protected Private Keys ...................................................................................................110
Creating a Certificate Signing Request .........................................................................................111
Installing a Certificate and Private Key from a Windows Computer ......................................112
Installing Root Certificates on the Firebox SSL VPN Gateway ..................................................112
Installing Multiple Root Certificates ..............................................................................................113
Creating Root Certificates Using a Command Prompt .............................................................113
Resetting the Certificate to the Default Setting ..........................................................................113
Client Certificates ................................................................................................................................114
To require client certificates ............................................................................................................114
Installing Root Certificates .............................................................................................................115
Obtaining a Root Certificate from a CertificateAuthority ........................................................115
Installing Root Certificates on a Client Device ............................................................................115
Selecting an Encryption Type for Client Connections ................................................................115
Requiring Certificates from Internal Connections ...................................................................116
To require server certificates for internal client connections ....................................................116
Wildcard Certificates ..........................................................................................................................116
CHAPTER 8 Working with Client Connections .............................................................................117
System Requirements ........................................................................................................................117
Operating Systems ...........................................................................................................................117
Web Browsers ....................................................................................................................................117
viii WatchGuard SSL VPN Gateway
Page 9

Using the Access Portal .....................................................................................................................118
To connect using the default portal page ....................................................................................118
Connecting from a Private Computer ..........................................................................................119
Tunneling Private Network Traffic over Secure Connections ...................................................120
Operation through Firewalls and Proxies ....................................................................................121
Terminating the Secure Tunnel and Returning Packets to the Client .....................................121
ActiveX Helper ...................................................................................................................................122
Using the Secure Access Client Window .......................................................................................122
Configuring Proxy Servers for the Secure Access Client ............................................................125
Configuring Secure Access Client to Work with Non-Administrative Users ..........................126
Connecting from a Public Computer ..........................................................................................126
Connections Using Kiosk Mode ......................................................................................................126
Creating a Kiosk Mode Resource ...................................................................................................127
Working with File Share Resources ................................................................................................128
Client Applications ..............................................................................................................................129
To enable client applications ..........................................................................................................129
Firefox Web Browser .........................................................................................................................130
Remote Desktop client .....................................................................................................................130
SSH Client ...........................................................................................................................................130
Telnet 3270 Emulator Client ...........................................................................................................131
VNC Client ..........................................................................................................................................131
Gaim Instant Messenging ...............................................................................................................131
Supporting Secure Access Client ...................................................................................................132
Managing Client Connections ........................................................................................................133
Connection handling .......................................................................................................................133
Closing a connection to a resource ...............................................................................................134
Disabling and enabling a user .......................................................................................................134
Configuring Authentication Requirements after Network Interruption ................................134
APPENDIX A Firebox SSL VPN Gateway Monitoring and Troubleshooting ..................137
Viewing and Downloading System Message Logs ..................................................................137
To view and filter the system log ....................................................................................................137
Forwarding System Messages to a Syslog Server .......................................................................138
To forward Firebox SSL VPN Gateway system messages to a syslog server ..........................138
Viewing the W3C-Formatted Request Log ...................................................................................138
Enabling and Viewing SNMP Logs ................................................................................................139
To enable logging of SNMP messages ..........................................................................................139
Multi Router Traffic Grapher Example ..........................................................................................139
Viewing System Statistics .................................................................................................................140
Monitoring Firebox SSL VPN Gateway Operations ..................................................................140
To open the Firebox SSL VPN Gateway Administration Desktop .............................................141
Recovering from a Failure of the Firebox SSL VPN Gateway ................................................141
Reinstalling v 4.9 application software ........................................................................................142
Backing up your configuration settings .......................................................................................142
Upgrading to SSL v 5.0 .....................................................................................................................142
Upgrading to SSL v 5.5 .....................................................................................................................142
Admin Guide ix
Page 10

Launching the v 5.5 Administration Tool .....................................................................................143
Troubleshooting ..................................................................................................................................143
Troubleshooting the Web Interface ...............................................................................................143
Other Issues ........................................................................................................................................144
APPENDIX B Using Firewalls with Firebox SSL VPN Gateway ...............................................149
BlackICE PC Protection ......................................................................................................................150
McAfee Personal Firewall Plus .........................................................................................................150
Norton Personal Firewall ...................................................................................................................151
Sygate Personal Firewall (Free and Pro Versions) .....................................................................151
Tiny Personal Firewall .........................................................................................................................151
ZoneAlarm Pro ......................................................................................................................................152
APPENDIX C Installing Windows Certificates ...............................................................................153
To install Cygwin ...............................................................................................................................153
Unencrypting the Private Key .........................................................................................................154
To unencrypt the private key ..........................................................................................................154
Converting to a PEM-Formatted Certificate ...............................................................................155
To convert the certificate from PKCS7 to PEM format ...............................................................155
Combining the Private Key with the Signed Certificate ........................................................155
To combine the private key with the signed certificate .............................................................156
Generating Trusted Certificates for Multiple Levels ................................................................156
To generate trusted certificates for multiple levels .....................................................................156
APPENDIX D Examples of Configuring Network Access .........................................................159
Scenario 1: Configuring LDAP Authentication and Authorization ....................................160
Preparing for the LDAP Authentication and Authorization Configuration ..........................160
Configuring the Firebox SSL VPN Gateway to Support Access to the Internal Network
Resources
......................................................................................................................................163
Scenario 2: Creating Guest Accounts Using the Local Users List ........................................169
Creating a Guest User Authentication Realm .............................................................................170
Creating Local Users .........................................................................................................................171
Creating and Assigning a Network Resource to the Default User Group ..............................171
Scenario 3: Configuring Local Authorization for Local Users ..............................................172
APPENDIX E Legal and Copyright Information ............................................................................173
x WatchGuard SSL VPN Gateway
Page 11

CHAPTER 1 Getting Started with Firebox SSL
VPN Gateway
This chapter describes who should read the Firebox SSL VPN Gateway Administration Guide, how it is
organized, and its document conventions.
Audience
This user guide is intended for system administrators responsible for installing and configuring the Firebox SSL VPN Gateway. This document assumes that the Firebox SSL VPN Gateway is connected to an
existing network and that the administrator has experience configuring that network.
Operating System Requirements
The Firebox SSL VPN Gateway Administration Tool and Secure Access Client software can run on the following operating systems:
• Windows 2000 Professional
• Windows 2000 Server
• Windows XP Home Edition
• Windows XP Professional
• Windows Server 2003
• Windows Vista 32-bit
• Linux 2.4 platforms (all distributions)
Administration Guide 1
Page 12

Document Conventions
Document Conventions
Firebox SSL VPN Gateway documentation uses the following typographic conventions for menus, commands, keyboard keys, and items in the program interface:
Convention Meaning
Boldface Commands, names of interface items such as text boxes, option buttons, and user
Italics Placeholders for information or parameters that you provide. For example, filename in
%SystemRoot% The Windows system directory, which can be WTSRV, WINNT, WINDOWS, or other
Monospace
{ braces } A series of items, one of which is required in command statements. For example, { yes |
[ brackets ] Optional items in command statements. For example, [/ping] means that you can type
| (vertical bar) A separator between items in braces or brackets in command statements. For example,
… (ellipsis) You can repeat the previous item or items in command statements. For example, /
input.
a procedure means you type the actual name of a file. Italics also are used for new
terms and the titles of books.
name you specify when you install Windows.
Text displayed in a text file.
no } means you must type yes or no. Do not type the braces themselves.
/ping with the command. Do not type the brackets themselves.
{ /hold | /release | /delete } means you type /hold or /release or /delete.
route:devicename[,…] means you can type additional devicenames separated by
commas.
LiveSecurity Service Solutions
The number of new security problems and the volume of information about network security continues
to increase. We know that a firewall is only the first component in a full security solution. The WatchGuard® Rapid Response Team is a dedicated group of network security personnel who can help you to
control the problem of too much security information. They monitor the Internet security web sites to
identify new security problems.
Threat responses, alerts, and expert advice
After a new threat is identified, the WatchGuard Rapid Response Team sends you an e-mail to tell you
about the problem. Each message gives full information about the type of security problem and the
procedure you must use to make sure that your network is safe from attack.
Easy software updates
LiveSecurity® Service saves you time because you receive an e-mail when we release new version of
your software. These continued updates make sure that you do not have to use your time to find new
software.
Access to technical support and training
You can find information about your WatchGuard products quickly with our many online resources. You
can also speak directly to one of the WatchGuard technical support personnel. Use our online training to
2 Firebox SSL VPN Gateway
Page 13

learn more about your WatchGuard Firebox® and network security, or find a WatchGuard Certified Training Center in your area.
LiveSecurity Service Broadcasts
The WatchGuard® Rapid Response Team regularly sends messages and software information directly to
your computer desktop by e-mail. We divide the messages into categories to help you to identify and
make use of incoming information immediately.
Information Alert
Information Alerts give you a fast view of the newest information and threats to Internet
security. The WatchGuard Rapid Response Team frequently recommends that you make a
security policy change to protect against the new threat. When necessary, the Information Alert
includes instructions on the procedure.
Threat Response
If a new security threat makes it necessary, the WatchGuard Rapid Response Team transmits a
software update for your Firebox®. The Threat Response includes information about the security
threat and instructions on how to download a software update and install it on your Firebox
and management station.
LiveSecurity Service Broadcasts
Software Update
When necessary, WatchGuard updates the WatchGuard System Manager software. Product
upgrades can include new features and patches. When we release a software update, you get
an e-mail with instructions on how to download and install your upgrade.
Editorial
Each week, top network security personnel come together with the WatchGuard Rapid
Response Team to write about network security. This continuous supply of information can help
your network be safe and secure.
Foundations
The WatchGuard Rapid Response Team also writes information specially for security
administrators, employees, and other personnel that are new to this technology.
Loopback
At the end of each month LiveSecurity® Service sends you an e-mail with a summary of the
information sent that month.
Support Flash
These short training messages can help you to operate WatchGuard products. They are an
added resource to the other online resources:
• Online Help
•FAQs
• Known Issues pages on the Technical Support web site
Virus Alert
WatchGuard has come together with antivirus vendor McAfee to give you the most current
information about computer viruses. Each week, we send you a message with a summary of the
virus traffic on the Internet. When a hacker releases a dangerous virus on the Internet, we send
a special virus alert to help you protect your network.
Administration Guide 3
Page 14

LiveSecurity Service Self Help Tools
New from WatchGuard
When WatchGuard releases a new product, we first tell you — our customers. You can learn
about new features and services, product upgrades, hardware releases, and promotions.
Activating LiveSecurity Service
You can activate LiveSecurity® Service through the activation section of the LiveSecurity web pages.
To activate LiveSecurity Service, you must enable JavaScript on your browser.
To activate LiveSecurity Service through the Internet:
1 Make sure that you have your Firebox® serial number. This is necessary during the LiveSecurity
activation procedure.
• You can find the Firebox serial number on a label on the rear side of the Firebox below the
Universal Product Code (UPC), or on a label on the bottom of the Firebox.
• The license key numbers for LiveSecurity and LiveSecurity Tunnel Renewals are on the
WatchGuard LiveSecurity License Key certificate. Make sure that you enter the license key in
all capital letters and include hyphens.
2 Use your web browser to go to:
www.watchguard.com/account/register.asp
The Account page appears.
3 Complete the LiveSecurity Activation page. Use the TAB key or the mouse to move through the
fields on the page.
You must complete all the fields to activate correctly. This information helps WatchGuard to send you the
information and software updates that are applicable to your products.
4 Make sure that your e-mail address is correct. Your LiveSecurity e-mails about product updates and
threat responses come to this address. After you complete the procedure, you get an e-mail
message that tells you that you activated LiveSecurity Service succesfully.
5Click Register.
Note
LiveSecurity Service Self Help Tools
Online Self Help Tools enable you to get the best performance from your WatchGuard® products.
Note
You must activate LiveSecurity® Service before you can access online resources.
Instant Answers
Instant Answers is a guided Help tool designed to give solutions to product questions very
quickly. Instant Answers asks you questions and then gives you to the best solution based on
the answers you give.
Basic FAQs
The Basic FAQs (frequently asked questions) give you general information about the Firebox®
and the WatchGuard System Manager software. They are written for the customer who is new
to network security and to WatchGuard products.
4 Firebox SSL VPN Gateway
Page 15

WatchGuard Users Forum
Advanced FAQs
The Advanced FAQs (frequently asked questions) give you important information about
configuration options and operation of systems or products. They add to the information you
can find in this User Guide and in the Online Help system.
Fireware® “How To”’s
The Fireware How To documentation helps you to quickly find procedures for configuration
tasks specific to Fireware appliance software.
Known Issues
This Known Issues tool monitors WatchGuard product problems and software updates.
WatchGuard Users Forum
The WatchGuard Technical Support team operates a web site where customers can help each
other with WatchGuard products. Technical Support monitors this forum to make sure you get
accurate information.
Online Training
Browse to the online training section to learn more about network security and WatchGuard
products. You can read training materials and get a certification in WatchGuard products. The
training includes links to a wide range of documents and web sites about network security. The
training is divided into parts, which lets you use only the materials you feel necessary. To learn
more about online training, browse to:
www.watchguard.com/training/courses_online.asp
Learn About
Learn About is a list of all resources available for a specified product or feature. It is a site map
for the feature.
Product Documentation
The WatchGuard web site has a copy of each product user guide, including user guides for
software versions that are no longer supported. The user guides are in .pdf format.
General Firebox X Edge and Firebox SOHO Resources
This section of the web site shows basic information and links for Firebox X Edge and Firebox
SOHO customers. It can help you to install and use the Firebox X Edge and SOHO hardware.
To get access to the LiveSecurity Service Self Help Tools:
1 Start your web browser. In the address bar, type:
http://www.watchguard.com/support
2Click Self Help Tools.
You must log in.
3 Click your selection.
WatchGuard Users Forum
The WatchGuard® Users Forum is an online group. It lets users of WatchGuard products interchange
product information about:
• Configuration
• Connecting WatchGuard products and those of other companies
• Network policies
Administration Guide 5
Page 16

Online Help
This forum has different categories that you can use to look for information. The Technical Support team
controls the forum during regular work hours. You do not get special help from Technical Support when
you use the forum. To contact Technical Support directly from the web, log in to your LiveSecurity
account. Click on the Incidents link to send a Technical Support incident.
Using the WatchGuard Users Forum
To use the WatchGuard Users Forum you must first create an account. Browse to http://www.watchguard.com/forum for instructions.
Online Help
Online Help for the Firebox SSL VPN Gateway is included in the application software. It is available in the
pane on the left side of your application window.
Product Documentation
We copy all user guides to the web site at http://www.watchguard.com/help/documentation.
Technical Support
Your Li veSecurity® Service subscription includes technical support for the WatchGuard® System Manager software and Firebox® hardware. To learn more about WatchGuard Technical Support, browse to
the WatchGuard web site at:
http://www.watchguard.com/support
You must activate LiveSecurity Service before you can get technical support.
LiveSecurity Service technical support
All new Firebox products include the WatchGuard LiveSecurity Technical Support Service. You can speak
with a member of the WatchGuard Technical Support team when you have a problem with the installation, management, or configuration of your Firebox.
Hours
WatchGuard LiveSecurity Technical Support operates from 6:00 AM to 6:00 PM in your local
time zone, Monday through Friday.
Note
Telephone number
877.232.3531 (select option #2) in United States and Canada
+1.206.613.0456 in all other countries
Web site
http://www.watchguard.com/support
6 Firebox SSL VPN Gateway
Page 17

Training and Certification
Service time
We try for a maximum response time of four hours.
Single Incident Priority Response Upgrade (SIPRU) and Single Incident After Hours Upgrade (SIAU) are
also available. For more data about these upgrades, refer to the WatchGuard web site at:
http://www.watchguard.com/support
LiveSecurity Gold
WatchGuard Gold LiveSecurity Technical Support adds to your standard LiveSecurity Service. We recommend that you get this upgrade if you use the Internet or VPN tunnels for most of your work.
With WatchGuard Gold LiveSecurity Technical Support you get:
• Technical support 24 hours a day, seven days a week, including holidays.
• The Technical Support Team operates the support center from 7 PM Sunday to 7 PM Friday
(Pacific Time). For weekend support for critical problems, use the on-call paging system.
• We try for a maximum response time of one hour.
• To create a support incident, call WatchGuard LiveSecurity Technical Support. A Customer Care
representative records the problem and gives you an incident number. A Priority Support
technician calls you as quickly as possible. If you have a critical problem when the support center
is not open, use the LiveSecurity Technical Support phone number to page a technician.
You can also send an incident on the web site at: http://www.watchguard.com/support/
incidents/newincident.asp.
Firebox Installation Service
WatchGuard Remote Firebox Installation Service helps you to install and configure your Firebox. You can
schedule two hours with a WatchGuard Technical Support team member. The technician helps you to:
• Do an analysis of your network and security policy
• Install the WatchGuard System Manager software and Firebox hardware
• Align your configuration with your company security policy
This service does not include VPN installation.
VPN Installation Service
WatchGuard Remote VPN Installation Service helps you through a full VPN installation. You can schedule a two-hour time with one of the WatchGuard Technical Support team. During this time, the technician helps:
• Do an analysis of your VPN policy
• Configure your VPN tunnels
• Do a test of your VPN configuration
You can use this service after you correctly install and configure your Firebox devices.
Training and Certification
WatchGuard® product training is available online to help you learn more about network security and
WatchGuard products. You can find training materials on the Technical Support web site and prepare for
Administration Guide 7
Page 18

Training and Certification
a certification exam. The training materials include links to books and web sites with more information
about network security.
WatchGuard product training is also available at a location near you through a large group of WatchGuard Certified Training Partners (WCTPs). Training partners give training using certified training materials and with WatchGuard hardware. You can install and configure the products with an advanced
instructor and system administrator to help you learn. To find a training partner, go to
http://www.watchguard.com/training/partners_locate.asp
8 Firebox SSL VPN Gateway
Page 19

CHAPTER 2 Introduction to Firebox SSL VPN
Gateway
WatchGuard Firebox SSL VPN Gateway is a universal Secure Socket Layer (SSL) virtual private network
(VPN) appliance that provides a secure single point-of-access to any information resource — both data
and voice. Combining the best features of Internet Protocol Security (IPSec) and SSL VPN, without the
costly and cumbersome implementation and management, Firebox SSL VPN Gateway works through
any firewall and supports all applications and protocols. It is fast, simple, and cost-effective to deploy
and maintain with a Web-deployed and automatically updating client. Users receive a consistent desklike user experience with “always-on” connectivity, an integrated worm-blocking client, and integrated
end-point scanning. With the Firebox SSL VPN Gateway, organizations can quickly and easily deploy one
product for all of their secure remote access needs.
The Firebox SSL VPN Gateway gives the remote user seamless, secure access to authorized applications
and network resources. Remote users can work with files on network drives, email, intranet sites, and
applications just as if they are working inside of their organization’s firewall.
The Firebox SSL VPN Gateway also provides kiosk mode, which opens a virtual network computing-like
connection to the Firebox SSL VPN Gateway. Kiosk mode can include shared network drives, a variety of
built-in clients, servers running Windows Terminal Services (Remote Desktop), and client applications.
The following topics provide an overview to the Firebox SSL VPN Gateway:
•Overview
• New Features
• The User Experience
• Deployment and Administration
•Using the Firebox SSL VPN Gateway
• Using Kiosk Mode
Overview
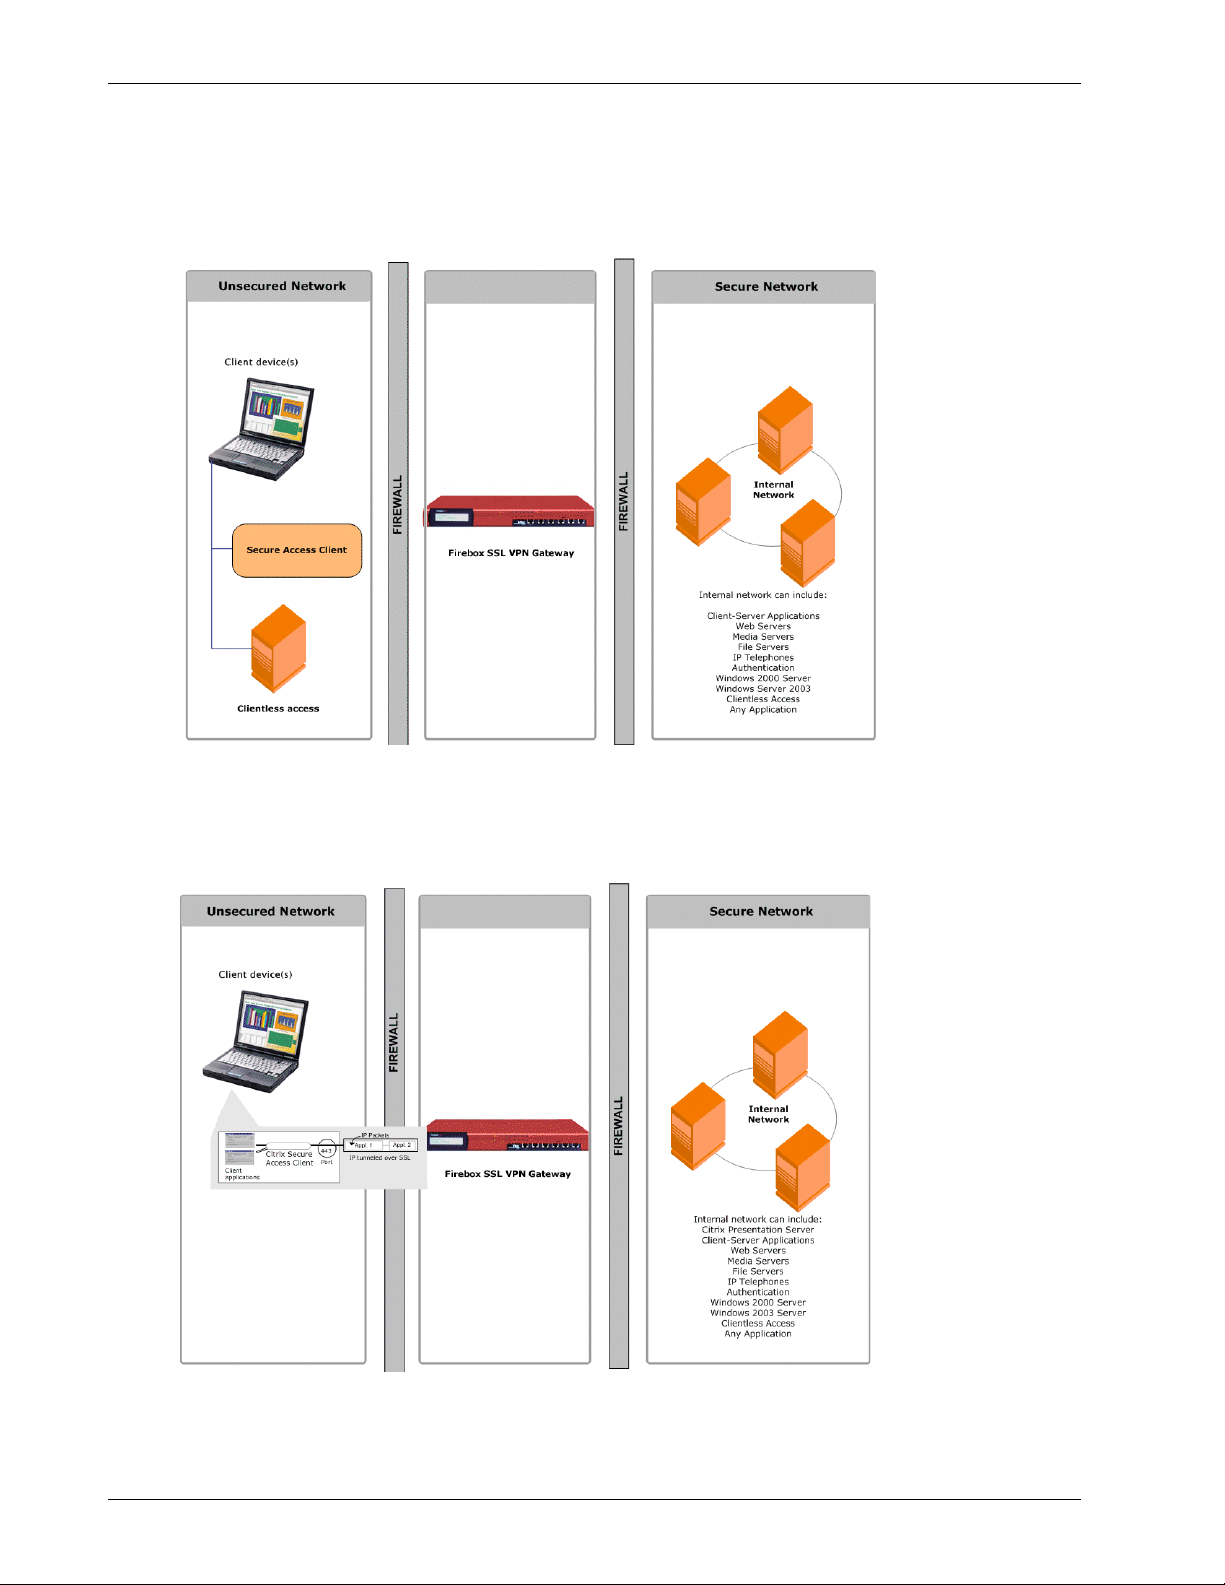
The Firebox SSL VPN Gateway is typically installed in the network demilitarized zone (DMZ) between the
public and private networks. Placing the Firebox SSL VPN Gateway in front of the private network protects internal server and IT resources. The Firebox SSL VPN Gateway can also partition internal local area
networks for access control and security between any two networks, such as wired/wireless and data/
voice networks.
Administration Guide 9
Page 20
Overview
As shown in the following illustration, the Firebox SSL VPN Gateway is appropriate for employees
accessing the organization remotely and intranet access from restricted LANs such as wireless networks.
Network topography showing the Firebox SSL VPN Gateway in the DMZ.
The following illustration shows how the Firebox SSL VPN Gateway creates a secure virtual TCP circuit
between the client computer running the Secure Access Client and the Firebox SSL VPN Gateway.
Network topology showing the TCP circuit.
10 Firebox SSL VPN Gateway
Page 21

The virtual TCP circuit is using industry standard Secure Socket Layer (SSL) and Transport Layer Security
(TLS) encryption. All packets destined for the private network are transported over the virtual TCP circuit. The Firebox SSL VPN Gateway is essentially acting as a low-level packet filter with encryption. It
drops traffic that does not have authentication or does not have permission for a particular network.
The Firebox SSL VPN Gateway opens up the following ports:
• Port 443 is opened for VPN network traffic
• Ports 9001 and 9002 are opened for administrator traffic for the Administration Portal and
Administration Tool
The first time the Firebox SSL VPN Gateway is started, use the Firebox SSL VPN Gateway Administration
Tool to configure the basic settings that are specific to your corporate network, such as the IP address,
subnet mask, default gateway IP address, and DNS address. After you complete the basic connection,
you then configure the settings specific to Firebox SSL VPN Gateway operation, such as the options for
authentication, authorization, and group-based access control, kiosk mode, end point resources and
polices, portal pages, and IP pools.
New Features
The v5.5 software update for the Firebox SSL Core VPN Gateway includes the following new features:
New Features
Authentication and one-time passwords
You can configure the Firebox SSL VPN Gateway to prevent caching of one-time passwords, such as
those used by an RSA SecurID. When this feature is enabled, it prevents users from being locked out of
their accounts in the event of a network interruption.
New versions of the Secure Access Client
There is a new version of the Secure Access Client for Windows Vista. This version of the Secure Access
Client is installed with the same ease-of-use as other versions of the Secure Access Client.
Configurable symmetric encryption ciphers
You can select the specific cipher that the Firebox SSL VPN Gateway uses for symmetric data encryption
on an SSL connection. You can select one of these three encryption ciphers:
RC4 128 Bit, MD5/SHA
3DES, SHA
AES 128/256 Bit, SHA
Automatic detection of proxy server settings
In this release, the Secure Access Client automatically detects the proxy server settings specified in the
operating system and when users are using Internet Explorer. Proxy server settings specified in proxy
autoconfiguration files are not supported.
Administration Guide 11
Page 22

New Features
Secure Access Client connections
The Secure Access Client included in this release can connect to earlier versions of the Firebox SSL VPN
Gateway. Also,earlier versions of the Secure Access Client can connect to this release of the Firebox SSL
VPN Gateway if enabled on the Global Cluster Policies tab.
Automatic port redirection
You can configure the Firebox SSL VPN Gateway so that any unsecure HTTP connection attempt on port
80 is automatically redirected by the Firebox SSL VPN Gateway to a secure HTTPS connection attempt
on port 443 (or other administrator-specified port).
Disable desktop sharing
You can disable the desktop sharing feature of the Secure Access Client for a user group. The Secure
Access Client desktop sharing feature allows a user to view a list of all other users who are logged on. If
this capability causes privacy concerns for your organization, you can disable the desktop sharing feature to prevent a specific group of users from viewing the list of online users.
Additional control over Secure Access Client connections
You can configure the Secure Access Client to disconnect from the Firebox SSL VPN Gateway if there is
no user activity on the connection for a specific time interval. You can also force a client disconnection if
the connection remains active for a specific time interval or if the Firebox SSL VPN Gateway does not
detect keyboard or mouse activity.
Disable kiosk mode
In this release, you can disable kiosk mode for client connections. When kiosk mode is disabled, users do
not see the kiosk link on the Web portal page. Users are only allowed to log on using the full Secure
Access Client.
Specify multiple ports and port ranges for network resources
This release allows you to configure port ranges. You have four options when configuring the ports the
Firebox SSL VPN Gateway uses to connect to internal network resources. You can specify a single port,
multiple individual ports, a range of ports, or all ports.
Voice over IP softphone support
The Firebox SSL VPN Gateway supports voice over IP softphones from Avaya, Nortel, and Cisco.
Editable HOSTS file
You can edit the HOSTS file on the Firebox SSL VPN Gateway from the user interface of the Administration Tool. The Firebox SSL VPN Gateway uses the HOSTS file in conjunction with DNS servers to force
DNS resolution to translate host names to IP addresses.
12 Firebox SSL VPN Gateway
Page 23

Features
NTLM authentication and authorization support.
If your environment includes Windows NT 4.0 domain controllers, the Firebox SSL VPN Gateway can
authenticate users against the user domain accounts maintained on the Windows NT server. The Firebox SSL VPN Gateway can also authorize users to access internal network resources based on a user’s
group memberships on the Windows NT 4.0 domain controller.
Added challenge-response to RADIUS user authentication
The Access Gateway now supports challenge-response token authentication with new PIN and next
token modes when RSA SecurID authentication is used with RADIUS.
SafeWord PremierAccess changed to support standards-based RADIUS token user authentication
The proprietary PremierAccess configuration file has been removed and replaced using RADIUS server
support. Legacy SafeWord PremierAccess realms are converted when the Firebox SSL VPN Gateway is
upgraded to Version 5.5. SafeWord authentication is configured using RADIUS-style parameters.
Updated serial console menu
There are new menu items on the serial console allowing you to change the Firebox SSL VPN Gateway
administrator password, set the duplex mode and network adapter speed, and revert to the default certificate that comes with the Firebox SSL VPN Gateway. Enhanced End-point and application access policies
Features
Administration Tool
The Firebox SSL VPN Gateway provides the Administration Tool to configure all of the settings for one or
more Firebox SSL VPN Gateway appliances. If you have more than one Firebox SSL VPN Gateway
installed, you can configure the settings once and then publish them to all of the appliances.
The Administration Tool is downloaded from the Firebox SSL VPN Gateway Administration Portal and
installed on a Windows computer that is located in the secure network. A desktop icon allows you to
start the Administration Tool without going to the Administration Portal.
The following sections describe the Administration Tool and where to configure the settings.
Networking, Logging, and Administration
Whether you deploy one or more appliances, basic administration of each Firebox SSL VPN Gateway is
done using the VPN Gateway Cluster tab. This includes:
• Network configuration
•Logging
• Administration
• Statistics
•Licensing
Administration Guide 13
Page 24

Features
• Date and time configuration
• Certificate generation and installation
• Restarting and shutting down the Firebox SSL VPN Gateway
• Saving and reinstalling configuration settings
Note
If the Firebox SSL VPN Gateway is upgraded to Version 5.5 from an earlier version, you must uninstall
and then reinstall the latest Administration Tool. You can uninstall the earlier version of the
Administration Tool using Add/Remove Programs in Control Panel.
User Groups, Local Users, and Resources
User groups, local users, and policies are configured on the Access Policy Manager tab. On this tab, you
can configure the following:
•Network resources
• Application policies
• File sharing
•Kiosk resources
• End point resources and policies
•Local users
Authentication and Authorization
Authentication and authorization are configured on the Authentication tab.
Double-source authentication (also known as two-factor authentication) is new for this release of the
Firebox SSL VPN Gateway.
Firebox SSL VPN Gateway Settings
The following table maps the Firebox SSL VPN Gateway settings.
Note
To configure group settings on the Access Policy Manager tab, right-click a group and then click
Properties.
Feature Firebox SSL VPN Gateway
General Networking
DNS/WINS
Dynamic and Static Routing
Firebox SSL VPN Gateway Failover Servers (includes internal
failover)
Logging Information
VPN Gateway Cluster > General Networking
VPN Gateway Cluster > Name Service Providers
VPN Gateway Cluster > Routes
VPN Gateway Cluster > Failover Servers
VPN Gateway Cluster > Logging/Settings
Cert ificate Requests
Certificate Installation
14 Firebox SSL VPN Gateway
VPN Gateway Cluster > Generate CSR
VPN Gateway Cluster > Administration
Page 25

Feature Firebox SSL VPN Gateway
Features
Server Upgrade
Server Restart
Server Shut Down
Server Statistics
Licensing
Date and Time
Enable External Administration
Saving and Restoring Server Configuration
Enable Split Tunneling
Accessible Networks
Deny Access without ACL
Require SSL Client Certificates
Validate SSL Certificates for Internal Connections
Improve Latency for Voice over IP Traffic
Internal Failover
Enable Portal Page Authentication
Configuration of Double Source Authentication
VPN Gateway Cluster > Administration
VPN Gateway Cluster > Administration
VPN Gateway Cluster > Administration
VPN Gateway Cluster > Statistics
VPN Gateway Cluster > Licensing
VPN Gateway Cluster > Date
VPN Gateway Cluster > Administration
VPN Gateway Cluster > Administration
Global Cluster Policies
Global Cluster Policies
Global Cluster Policies
Global Cluster Policies
Global Cluster Policies
Global Cluster Policies
Global Cluster Polices
Global Cluster Policies
Two Source radio button
Authentication and Authorization (LDAP, RADIUS, RSA SecurID,
local, and Safeword PremierAccess)
Local Users
Inherit Default Group Properties
Authentication after network interruption
Authenticate upon system resume
Enable Single Sign-On
Run Logon Scripts
Session Time-out
Deny Applications without Policies
Enable Split DNS
Enable IP pools
Custo m Portal Page
Web Interface Configuration (defines portal homepage and
proxy server)
Passthrough Authentication
Authentication > Authentication
Authentication > Authorization
Access Policy Manager
Access Policy Manager > User Groups > Properties > General
Access Policy Manager > User Groups > Properties > General
Access Policy Manager > User Groups > Properties > General
Access Policy Manager > User Groups > Properties > General
Access Policy Manager > User Groups > Properties > General
Access Policy Manager > User Groups > Properties > General
Access Policy Manager > User Groups > Properties >
Networking
Access Policy Manager > User Groups > Properties >
Networking
Access Policy Manager > User Groups > Properties > Gateway
Portal
Access Policy Manager > User Groups > Properties > Gateway
Portal
Access Policy Manager > User Groups > Properties > Gateway
Portal
Administration Guide 15
Page 26

The User Experience
Feature Firebox SSL VPN Gateway
Use SSL/TLS
Local Group Users
Client Certificate Criteria Expression
Network Resource Groups
Application Policies
File Share Resources
Kiosk Resources and Policies
End Point Resource and Policies
Pre-Authentication Policies
Portal Page Con figuration
Group Priority
Publish
Feature Summary
The following are key Firebox SSL VPN Gateway features:
• Universal SSL VPN. Supports all applications and protocols that improve productivity by
providing users with access to the applications and resources they need, without the need for
customization or converting the content for Web access.
• Standards-based security. Information is kept private and protected using industry standard SSL/
TLS encryption. Users are authenticated using standards such as LDAP, RADIUS, double-source
authentication, and client and server certificates.
• Web-deployed client. There is no need to preinstall or manage complex client software, reducing
the cost of ownership. (Note that a user must have Administrator access on the Windows
computer to install the client from the Web).
• Desk-like access. Users receive the same network experience and application access as if
physically connected to the corporate network.
• Always-on access. Automatically reconnects users to the appliance as soon as the network
connection is restored. Reduces user frustration when using public networks, such as wireless
connections in hotels or airports.
• Integrated end-point scanning. Ensures that the computer meets corporate standards to connect
and remains safe for connection to the network.
• Hides internal IP addresses. There is no IP stack or routing table entry, so internal IP addresses are
hidden, reducing the threat of worms propagating.
Access Policy Manager > User Groups > Properties >
Members
Access Policy Manager > User Groups > Properties > Client
Certificates
Access Policy Manager > Network Resources
Access Policy Manager > Application Policies
Access Policy Manager > File Share Resources
Access Policy Manager > Kiosk Resources
Access Policy Manger > End Point Resources
Access Policy Manager > End Point Policies
Access Policy Manager > Global Policies
Portal Page Configuration
Group Priority
Publish
The User Experience
The Firebox SSL VPN Gateway provides users with the desk-like network experience that they have with
an IPSec VPN, but does so without any need to pre-install or configure a client. The user starts the
16 Firebox SSL VPN Gateway
Page 27
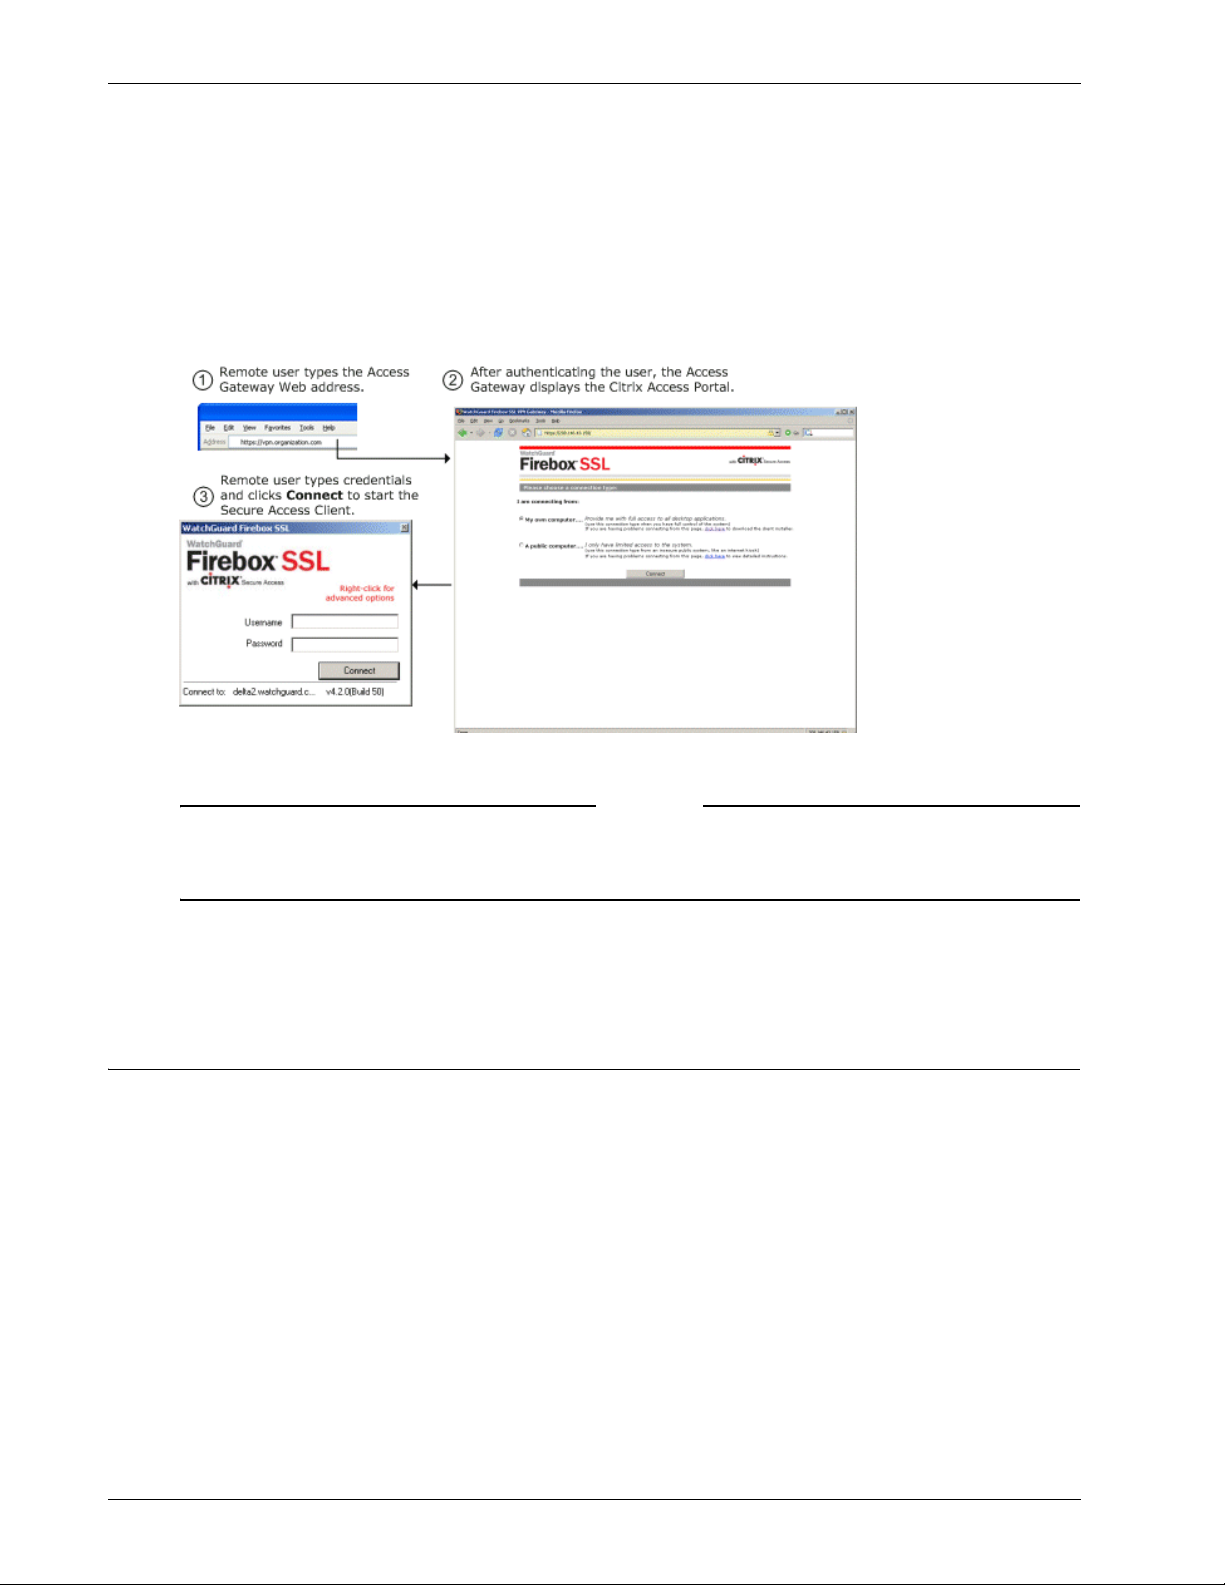
Deployment and Administration
Secure Access Client by typing a secure Web address in a standard Web browser and providing authentication credentials.
Because the Firebox SSL VPN Gateway encrypts traffic using standard SSL/TLS, it can traverse firewalls
and proxy servers, regardless of the client location. For a more detailed description of the user experience, see “Connecting from a Private Computer” on page 119.
The following illustration shows the Windows version of the Access Portal.
Connecting to the Firebox SSL Access Portal.
The Firebox SSL Access Portal can be customized. For more information, see “Using Portal Pages” on
page 38. You can also include a link to the clients on a Web site. For more information, see “Linking to
Clients from Your Web Site” on page 41.
After a successful logon, the user can work with network shares and use applications just as if the user
were sitting in the office.
Deployment and Administration
The Firebox SSL VPN Gateway is quick and easy to deploy and simple to administer. The most typical
deployment configuration is to locate the Firebox SSL VPN Gateway behind your firewall or in the demilitarized zone (DMZ). More complex deployments, such as with a server load balancer, are also supported and described in this chapter.
The first time the Firebox SSL VPN Gateway is started, use the Firebox SSL VPN Gateway Administration
Tool to configure the basic settings that are specific to your corporate network, such as the Firebox SSL
VPN Gateway IP address, subnet mask, default gateway IP address, and DNS address. After you complete
the basic connection, you then configure the settings specific to Firebox SSL VPN Gateway operation,
such as the options for authentication, authorization, and group-based access control; kiosk mode, end
point resources and polices, portal pages, and IP pools.
Firebox SSL VPN Gateway monitoring is performed through the Firebox SSL VPN Gateway Administration Desktop, providing access to a variety of standard network monitoring tools, including Ethereal
Network Monitor, xNetTools, Traceroute, fnetload, and System Monitor. The Firebox SSL VPN Gateway
Note
Administration Guide 17
Page 28

Planning your deployment
Administration Desktop also provides access to the Real-Time Monitor, where you can view a list of current users and close the connection for any user.
Planning your deployment
This chapter discusses deployment scenarios for the Firebox SSL VPN Gateway. You can deploy the Firebox SSL VPN Gateway at the perimeter of your organization’s internal network (or intranet) to provide a
secure single point-of-access to the servers, applications, and other network resources residing in the
internal network. All remote users must connect to the Firebox SSL VPN Gateway before they can access
any resources on the internal network.
This section discusses the following Firebox SSL VPN Gateway deployments:
• Deploying the Firebox SSL VPN Gateway in the network demilitarized zone (DMZ)
• Deploying the Firebox SSL VPN Gateway in a secure network that does not have a DMZ
Deploying the Firebox SSL VPN Gateway in the Network DMZ
Many organizations protect their internal network with a DMZ. A DMZ is a subnet that lies between an
organization’s secure internal network and the Internet (or any external network). When the Firebox SSL
VPN Gateway is deployed in the DMZ, users access it using the Secure Access Client or the kiosk client.
In this configuration, you install the Firebox SSL VPN Gateway in the DMZ and configure it to connect to
both the Internet and the internal network. When you deploy the Firebox SSL VPN Gateway in the DMZ,
client connections must traverse the first firewall to connect to the Firebox SSL VPN Gateway. By default,
clients use Secure Sockets Layer (SSL) on port 443 to establish this connection. To support this connectivity, you must allow SSL on port 443 through the first firewall.
Note
You can change the port clients use to connect to the Firebox SSL VPN Gateway by altering the port
setting in the Administration Tool. This port setting is discussed in “Configuring TCP/IP Settings Using
Network Cables”.
. The Firebox SSL VPN Gateway decrypts the SSL connections from the client and establishes a connection on behalf of the client to the network resources behind the second firewall. The ports that must be
open through the second firewall are dependent on the network resources that you authorize external
users to access.
For example, if you authorize external users to access a Web server in the internal network, and this
server listens for HTTP connections on port 80, you must allow HTTP on port 80 through the second firewall. The Firebox SSL VPN Gateway establishes the connection through the second firewall to the HTTP
server on the internal network on behalf of the external clients.
The Firebox SSL VPN Gateway administrative tools available on the Firebox SSL VPN Gateway also listen
for connections on these ports:
• Port 9001 - Connections to the Administration Portal occur on this port.
• Port 9002 - Connections to the Administration Tool occur on this port
Deploying the Firebox SSL VPN Gateway in a Secure Network
You can install the Firebox SSL VPN Gateway in the secure network. In this scenario, there is typically one
firewall between the Internet and the secure network. The Firebox SSL VPN Gateway resides inside the
firewall to control access to the network resources.
18 Firebox SSL VPN Gateway
Page 29

Planning for Security with the Firebox SSL VPN Gateway
When an Firebox SSL VPN Gateway is deployed in the secure network, the Secure Access Client or kiosk
client connections must traverse the firewall to connect to the Firebox SSL VPN Gateway. By default,
both of these clients use the SSL protocol on port 443 to establish this connection. To support this connectivity, you must open port 443 on the firewall.
Note
You can change the port on which clients connect to the Firebox SSL VPN Gateway by altering the port
setting in the Administration Tool. This port setting is discussed in “Configuring TCP/IP Settings Using
Network Cables”.
Planning for Security with the Firebox SSL VPN Gateway
When planning any type of Firebox SSL VPN Gateway deployment, there are basic security issues associated with certificates, authentication, and authorization that you should understand.
Configuring Secure Certificate Management
By default, the Firebox SSL VPN Gateway includes a self-signed SSL server certificate that enables it to
complete SSL handshakes. Self-signed certificates are adequate for testing or sample deployments, but
are not recommended for production environments.
Before you deploy the Firebox SSL VPN Gateway in a production environment, WatchGuard recommends that you request and receive a signed SSL server certificate from a known Certificate Authority
and upload it to the Firebox SSL VPN Gateway.
If you deploy the Firebox SSL VPN Gateway in any environment where the Firebox SSL VPN Gateway
must operate as the client in an SSL handshake (initiate encrypted connections with another server),
you must also install a trusted root certificate on the Firebox SSL VPN Gateway. For more information
about root certificates, see “Installing Root Certificates on the Firebox SSL VPN Gateway” on page 112.
For more information about certificates, see “Creating and Installing Secure Certificates” on page 109.
Authentication Support
You can configure the Firebox SSL VPN Gateway to authenticate users and control the level of access (or
authorization) that users have to the network resources on the internal network.
Before deploying the Firebox SSL VPN Gateway, your network environment should have the corporate
directories and authentication servers in place to support one of these authentication types:
• LDAP
•RADIUS
•RSA SecurID
•NTLM
• Secure Computing SafeWord products
If your environment supports none of the authentication types listed above, or you have a small population of remote users, you can create a list of local users on the Firebox SSL VPN Gateway and configure
the Firebox SSL VPN Gateway to authenticate users against this local list. With this configuration, it is not
necessary to maintain user accounts in a separate, external directory.
For more information about authentication and authorization, see “Configuring Authentication and
Authorization” on page 61.
Administration Guide 19
Page 30

Installing the Firebox SSL VPN Gateway for the First Time
Deploying Additional Appliances for Load Balancing and Failover
You can install multiple Firebox SSL VPN Gateway appliances into your environment for one or both of
these reasons:
• Scalability. If you have a large remote user population, install additional Firebox SSL VPN
Gateway appliances to accommodate the user load.
• High Availability. If an Firebox SSL VPN Gateway fails, you can install an additional Firebox SSL
VPN Gateway to ensure that the internal network remains available to remote users.
Note
To support only high availability, you can configure one Firebox SSL VPN Gateway as the primary
Firebox SSL VPN Gateway and one (or more) Firebox SSL VPN Gateway appliances as a failover device. If
the primary Firebox SSL VPN Gateway fails, client connections are directed to the failover Firebox SSL
VPN Gateway. For more information about this configuration, see “Configuring Firebox SSL VPN
Gateway Failover” on page 55.
To support both scalability and high availability, you can install a load balancer and then install multiple
Firebox SSL VPN Gateway appliances behind the load balancer. Deploying multiple appliances behind a
load balancer enables you to support a large population of remote users and maintain high availability
of the internal network to the users.
Installing the Firebox SSL VPN Gateway for the First Time
The Firebox SSL VPN Gateway installs in any network infrastructure without requiring changes to the
existing hardware or back-end software. It works with other networking products such as cache
engines, firewalls, routers, and IEEE 802.11 wireless devices.
WatchGuard recommends installing the Firebox SSL VPN Gateway in the corporate demilitarized zone
(DMZ). When installed in the DMZ, the Firebox SSL VPN Gateway participates on two networks: a private
network and a public network with a publicly routable IP address. Typically, the private network is the
corporate network and the public one is the Internet. You can also use the Firebox SSL VPN Gateway to
partition local area networks internally in the organization for access control and security. You can create partitions between wired or wireless networks and data and voice networks.
Getting Ready to Install the Firebox SSL VPN Gateway
Before installing the Firebox SSL VPN Gateway, collect materials for the initial configuration and for the
connection to your network.
For initial configuration, use one of the following setups:
• A cross-over cable and a Windows computer
• Two network cables, a network switch, and a Windows computer
A serial cable and a computer with terminal emulation software
•
For a connection to a local area network, use the following items:
• One network cable to connect the Firebox SSL VPN Gateway inside of a firewall.
• Two network cables to connect the Firebox SSL VPN Gateway located in the demilitarized zone
(DMZ) to the Internet and private networks
Collect the following network information for appliances:
• The Firebox SSL VPN Gateway internal IP address and subnet mask
• The Firebox SSL VPN Gateway external IP address and subnet mask
20 Firebox SSL VPN Gateway
Page 31

Installing the Firebox SSL VPN Gateway for the First Time
• The Firebox SSL VPN Gateway FQDN for network address translation (NAT)
• The IP address of the default gateway device
• The port to be used for connections
If connecting the Firebox SSL VPN Gateway to a server load balancer:
• The Firebox SSL VPN Gateway IP address and subnet mask.
• The settings of the server load balancer as the default gateway device (if required). See the load
balancer manufacturer’s documentation for more information.
• The FQDN of the server load balancer to be used as the external public address of the Firebox SSL
VPN Gateway.
• The port to be used for connections.
Note
The Firebox SSL VPN Gateway does not work with Dynamic Host Configuration Protocol (DHCP). The
Firebox SSL VPN Gateway requires the use of static IP addresses.
Setting Up the Firebox SSL VPN Gateway Hardware
This section provides procedures for setting up the Firebox SSL VPN Gateway for the first time.
To physically connect the Firebox SSL VPN Gateway
1 Install the Firebox SSL VPN Gateway in a rack if it is rack-mounted.
2 Connect the power cord to the AC power receptacle.
3 Connect either the serial cable to a Windows computer, a cross-over cable to a Windows computer,
or an RJ-45 network cable to a network switch and the Access Gateway.
4 Configure the TCP/IP settings using the instructions in “Configuring TCP/IP Settings for the Firebox
SSL VPN Gateway”
Configuring TCP/IP Settings for the Firebox SSL VPN Gateway
The preconfigured IP address of the Firebox SSL VPN Gateway is 10.20.30.40. The IP address can be
changed using a serial cable and a terminal emulation program, or by connecting the Firebox SSL VPN
Gateway using network cables and the Administration Tool.
You can use the serial console to set the IP address and subnet of the Firebox SSL VPN Gateway Interface
0, as well as the IP address of the default gateway device. All other configuration must be done using the
Administration Tool. You can also use the serial console to test a connection with the ping command. If
you want to reach the Firebox SSL VPN Gateway through the serial console before making any configuration settings, use a serial cable to connect the Firebox SSL VPN Gateway to a computer that has terminal emulation software.
The serial console provides the following options for configuring the Firebox SSL VPN Gateway:
• [0] Express Setup configures the TCP/IP settings for Interface 0 on the Firebox SSL VPN
Gateway Cluster > General Networking tab
• [1] Ping is used to ping other network devices to check for connectivity
• [2] Link Modes is used to set the duplex mode and speed mode for Interface 0 on the Firebox
SSL VPN Gateway Cluster > General Networking tab
• [3] External Administration Port enables or disables connections to the Administration Tool
from a remote computer
Administration Guide 21
Page 32

Installing the Firebox SSL VPN Gateway for the First Time
• [4] Display Log displays the Firebox SSL VPN Gateway log
• [5] Reset Certificate resets the certificate to the default certificate that comes with the Firebox
SSL VPN Gateway
• [6] Change Administrative Password allows you to change the default administrator password
of rootadmin
Important: WatchGuard recommends changing the administrator password before connecting the
Firebox SSL VPN Gateway to your network. The new password can be six to 127 characters long and
cannot begin or end with a space.
• [7] Help displays help information
• [8] Log Out logs off from the Firebox SSL VPN Gateway
WatchGuard recommends using both network adapters on the appliance. After configuring the TCP/IP
settings for Interface 0, use the Administration Tool to configure TCP/IP settings for Interface 1.
To c
onfigure TCP/IP settings using a serial cable
1 Connect the serial cable to the 9-pin serial port on the Firebox SSL VPN and connect the cable to a
computer that is capable of running terminal emulation software.
2 On the computer, start a terminal emulation application such as HyperTerminal.
HyperTerminal is not automatically installed on Windows 2000 Server or Windows Server 2003. To install
HyperTerminal, use Add/Remove Programs in the Control Panel.
Note
Note
Note
3 Set the serial connection to 9600 bits per second, 8 data bits, no parity, 1 stop bit. Hardware flow
control is optional.
4 Turn on the Firebox SSL VPN. The serial console appears on the computer terminal after about three
minutes.
5 If using HyperTerminal, press the Enter key.
6 On the serial console, enter the default administrator credentials. The user name is root and the
password is rootadmin.
Note
Important: Watchguard recommends changing the administrator password. You can do this using the
Administration Portal or the serial console.
7 To set the IP address and subnet mask and the default gateway device for Interface 0, type 0 and
press Enter to choose Express Setup. After you respond to the prompts, the information you
entered appears. To commit your changes, type y; the Access Gateway restarts.
8 To verify that the Firebox SSL VPN can ping a connected network device, type 1 and enter the IP
address of the device.
9 Remove the serial cable and connect the Firebox SSL VPN using either a cross-over cable to a
Windows computer or a network cable to a network switch and then turn on the Firebox SSL VPN.
Additional Firebox SSL VPN settings are configured using the Administration Tool.
22 Firebox SSL VPN Gateway
Page 33

Installing the Firebox SSL VPN Gateway for the First Time
To configure TCP/IP Settings Using Network Cables
The Firebox SSL VPN Gateway has two network adapters installed. One network adapter communicates
with the Internet and client computers that are not inside the corporate network. The other network
adapter communicates with the internal network.
WatchGuard recommends that both network adapters be configured for maximum security. If only one
network adapter is used, it has to be routable for internal resources using Network Address Translation
(NAT). Also, if only one network adapter is used, throughput of network traffic is cut in half and can
cause a bottleneck of network traffic.
You can install the Firebox SSL VPN Gateway and configure TCP/IP settings using network cables, such
as two RJ-45 network cables, or cross-over cables. The RJ-45 cables are connected to a network switch
and to the Firebox SSL VPN Gateway. The cross-over cables are connected to a Windows computer and
the Firebox SSL VPN Gateway.
To configure TCP/IP settings using network cables
1Power on the Firebox SSL VPN Gateway.
After about three minutes, the Firebox SSL VPN Gateway is ready for its initial configuration with your network.
2 Open a Web browser and type https://10.20.30.40:9001 to open the Administration Portal. Use the
default user name and password of root and rootadmin.
3On the Downloads tab, under Firebox SSL VPN Gateway Administration Tool, click Install the
Firebox SSL VPN Gateway Administration Tool.
Follow the prompts to complete installation.
4 Log on to the Administration Tool using the default user name and password.
5On the Firebox SSL VPN Gateway Cluster tab, open the window for the Firebox SSL VPN Gateway.
6On the General Networking tab, under Interface 0 and Interface 1, next to IP Address, type the
new IP addresses of the appliance.
7In Subnet mask, enter the subnet mask that is appropriate for the IP address entered for the
interface(s).
8In External FQDN, type the fully qualified domain name.
Note
Important: The FQDN must match what is on the digital certificate and the license for the Firebox SSL
VPN Gateway.
9In Duplex Mode select the direction of the transmission data. The default setting is auto. You can
also select full duplex or half duplex.
10 In Speed Mode select the network speed of the adapter.
The default setting is auto. You can also select 10Mbps, 100Mbps, or 1000Mbps.
11 In Maximum Transmission Unit (MTU), select the maximum transmission unit that defines the
maximum size of the transmitted packet.
The default setting is 1500.
12 In Port, select the incoming port that is used for connections. The default is 443.
13 To configure a default gateway, in IP address, type the IP address of the gateway. In Interface,
select the network adapter on the Firebox SSL VPN Gateway with which the Default Gateway
communicates.
The IP address is the default gateway device, such as the main router, firewall, or server load
balancers, depending on your network configuration. This should be the same as the Default
Gateway setting that is on computers on the same subnet.
Administration Guide 23
Page 34

Using the Firebox SSL VPN Gateway
For information about the relationship between the Default Gateway and dynamic or static routing,
see “Dynamic and Static Routing” on page 51.
After you configure your network settings on the Firebox SSL VPN Gateway, you need to restart the
appliance.
Note
Note: You do not need to restart the Firebox SSL VPN Gateway until you complete all configuration
steps.These include configuring network access for the appliance and installing certificates and licenses.
For more information about configuring additional network settings, see“Configuring Firebox SSL VPN
Gateway Network Connections” on page 47.
Redirecting Connections on Port 80 to a Secure Port
By default, the Firebox SSL VPN Gateway does not accept unsecure connections on port 80. If a user
attempts to connect to the Firebox SSL VPN Gateway using HTTP on port 80, the connection attempt
fails.
You can configure the Firebox SSL VPN Gateway to automatically redirect HTTP connection attempts on
port 80 to be secure connections on port 443 (or other secure port).
If a user attempts an unsecure connection on port 80, the Firebox SSL VPN Gateway automatically converts this connection attempt into a secure (SSL-encrypted) connection on port 443.
To redirect unsecure connections
1Click the Firebox SSL VPN Gateway Cluster tab and open the window for the Firebox SSL VPN
Gateway.
2Click the General Networking tab.
3Click the Advanced button.
4Click Redirect any requests for port 80 to a secure port.
5Click OK.
Note: If you use the default setting of Do not accept connections on port 80, all user connection
attempts on port 80 fail and there is no attempt to redirect them to port 443.
Using the Firebox SSL VPN Gateway
The Firebox SSL VPN Gateway performs the following functions:
• Authentication
• Termination of encrypted sessions
• Access control (based on permissions)
• Data traffic relay (when the first three functions are met)
Note
The Firebox SSL VPN Gateway operates as follows:
• A remote user downloads the Secure Access Client by connecting to a secure Web address and
providing authentication credentials.
24 Firebox SSL VPN Gateway
Page 35

Using the Firebox SSL VPN Gateway
• After downloading the Secure Access Client, the user logs on. When the user successfully
authenticates, the Firebox SSL VPN Gateway establishes a secure tunnel.
• As the remote user attempts to access network resources across the VPN tunnel, the Secure
Access Client encrypts all network traffic destined for the organization’s intranet and forwards the
packets to the Firebox SSL VPN Gateway.
• The Firebox SSL VPN Gateway terminates the SSL tunnel, accepts any incoming traffic destined
for the private network, and forwards the traffic to the private network. The Firebox SSL VPN
Gateway sends traffic back to the remote computer over a secure tunnel.
Starting the Secure Access Client
A remote user installs the Secure Access Client by typing a secure Web address, typically the fully qualified domain name (FQDN) of the Firebox SSL VPN Gateway. The Firebox SSL VPN Gateway prompts the
user for authentication over HTTP 401 Basic or Digest. The Firebox SSL VPN Gateway authenticates the
credentials using one of the following authentication methods: local authentication, RSA SecureID, SafeWord PremierAccess, LDAP, or RADIUS. If the credentials are correct, the Firebox SSL VPN Gateway finishes the handshake with the client. This logon step is required only when a user initially downloads the
Secure Access Client.
If the user is behind a proxy server, the user can specify the proxy server’s IP address and authentication
credentials.
To configure a proxy server
1 To open the logon dialog box, click the Secure Access Client icon on the desktop.
2In the Firebox SSL Secure Access logon dialog box, right-click anywhere in the dialog box and
select Advanced Options.
3In the Firebox SSL Secure Access Options dialog box, under Proxy Settings, select Use Proxy
Host.
4In Proxy Address and Proxy Port, type the IP address and port number.
5 If the authentication is required by the server, select Proxy server requires authentication.
The Secure Access Client is installed on the user’s computer. After the first connection, the remote user
can subsequently use a desktop shortcut to start the Secure Access Client.
The Advanced Options dialog box can also be opened by right-clicking the Firebox SSL Secure Access
icon on the desktop and then clicking Properties.
Enabling Single Sign-On Operation for the Secure Access Client
If the Secure Access Client is configured for single sign-on operation, it automatically starts after the
user logs on to Windows. The user’s Windows logon credentials are passed to the Firebox SSL VPN Gateway for authentication. Enabling single sign-on for the Secure Access Client facilitates operations on the
remote computer such as installation scripts and automatic drive mapping.
For more information about configuring single sign-on, see “Configuring Secure Access Client for single
sign-on” on page 91.
Note
Users must be logged on as a local administrator or be a member of the Administrators group to use
single sign-on for Secure Access Client.
Administration Guide 25
Page 36

Using the Firebox SSL VPN Gateway
Establishing the Secure Tunnel
After the Secure Access Client is started, it establishes a secure tunnel over port 443 (or any configured
port on the Firebox SSL VPN Gateway) and sends authentication information. When the tunnel is established, the Firebox SSL VPN Gateway sends configuration information to the Secure Access Client
describing the networks to be secured and containing an IP address if you enabled IP pool visibility.
Tunneling Destination Private Address Traffic over SSL or TLS
After the Secure Access Client is authenticated and started, all network traffic destined for specified private networks is captured and redirected over the secure tunnel to the Firebox SSL VPN Gateway.
The Firebox SSL VPN Gateway intercepts connections that are to be tunneled (usually trafic to your
according to your policy, and multiplexes/tunnels them over SSL to the Firebox SSL VPN Gateway.
where the traffic is demultiplexed and the connections are forwarded to the correct host and port combination.
The connections are subject to administrative security policies that apply to a single application, a subset of applications, or an entire intranet. You use the Firebox SSL VPN Gateway Administration Tool to
specify the resources (ranges of IP address/subnet pairs) that remote users can access through the VPN
connection.
If the device is configured todo this, all IP packets, regardless of protocol, are intercepted and transmitted over the secure link. Connections from local applications on the client computer are securely tunneled to the Firebox SSL VPN Gateway, which reestablishes the connections to the target server. Target
servers view connections as originating from the local Firebox SSL VPN Gateway on the private network,
thus hiding the client IP address. This is also called reverse Network Address Translation (NAT). Hiding IP
addresses adds security to source locations.
Locally, on the client computer, all connection-related traffic (such as SYN-ACK, PUSH, ACK, and FIN
packets) are recreated by the Secure Access Client to appear from the private server.
Operation through Firewalls and Proxies
Users of Secure Access Client are sometimes located inside of another organization’s firewall, as shown
in the following illustration.
Network topology connecting through an external corporate firewall.
26 Firebox SSL VPN Gateway
Page 37

Using the Firebox SSL VPN Gateway
NAT firewalls maintain a table that allows them to route secure packets from the Firebox SSL VPN Gateway back to the client computer. For circuit-oriented connections, the Firebox SSL VPN Gateway maintains a port-mapped, reverse NAT translation table. The reverse NAT translation table enables the
Firebox SSL VPN Gateway to match connections and send packets back over the tunnel to the client
with the correct port numbers so that the packets return to the correct application.
The Firebox SSL VPN Gateway tunnel is established using industry-standard connection establishment
techniques such as HTTPS, Proxy HTTPS, and SOCKS. This operation makes the Firebox SSL VPN Gateway
firewall friendly and allows remote computers to access private networks from behind other organizations’ firewalls without creating any problems.
For example, the connection can be made through an intermediate proxy, such as an HTTP proxy, by
issuing a CONNECT HTTPS command to the intermediate proxy. Any credentials requested by the intermediate proxy, are in turn obtained from the remote user (by using single sign-on information or by
requesting the information from the remote user) and presented to the intermediate proxy server.
When the HTTPS session is established, the payload of the session is encrypted and carries secure packets to the Firebox SSL VPN Gateway.
Terminating the Secure Tunnel and Returning Packets to the Client
The Firebox SSL VPN Gateway terminates the SSL tunnel and accepts any incoming packets destined for
the private network. If the packets meet the authorization and access control criteria, the Firebox SSL
VPN Gateway regenerates the packet IP headers so that they appear to originate from the Firebox SSL
VPN Gateway’s private network IP address range or the client-assigned private IP address. The Firebox
SSL VPN Gateway then transmits the packets to the network.
Note
If you run a packet sniffer such as Ethereal on the computer where the Secure Access Client is running,
you will see unencrypted traffic that appears to be between the client and the Firebox SSL VPN
Gateway. That unencrypted traffic, however, is not over the tunnel between the client and the Firebox
SSL VPN Gateway but rather the tunnel to the local applications.
The Secure Access Client maintains two tunnels: an SSL tunnel over which data is sent to the Firebox SSL
VPN Gateway (the sniffer also detects this tunnel) and a tunnel between the client and local
applications. The encrypted data that arrives over the SSL tunnel is then decrypted before being sent to
the local application over the second tunnel. The packet sniffer sees the second tunnel’s traffic, which
appears to be from the Firebox SSL VPN Gateway, after the traffic is already decrypted.
When an application client connects to its application server, certain protocols may require that the
application server in turn attempt to create a new connection with the client. In this case, the client
sends its known local IP address to the server by means of a custom client-server protocol. For these
applications, the Secure Access Client provides the local client application a private IP address representation, which the Firebox SSL VPN Gateway uses on the internal network. Many real-time voice applications and FTP use this feature.
Performance and Real-Time Traffic
Real-time applications, such as voice and video, are implemented over UDP, because TCP is not appropriate for real-time traffic due to the delay introduced by acknowledgements and retransmission of lost
packets. It is more important to deliver packets in real time than to ensure that all packets are delivered.
However, with any tunneling technology over TCP, such real-time performances cannot be met.
The Firebox SSL VPN Gateway overcomes this issue by routing UDP packets over the secure tunnel as
special IP packets that do not require TCP acknowledgements. Even if the packets get lost in the net-
Administration Guide 27
Page 38

Using the Firebox SSL VPN Gateway
work, no attempt is made by either the client or the server applications to regenerate them, so real-time
(UDP like) performance is achieved over a secure TCP-based tunnel.
For more information about improving latency with UDP connections and Voice over IP, see “Improving
Voice over IP Connections” on page 59.
Using Kiosk Mode
The Firebox SSL VPN Gateway provides secure access to a corporate network from a public computer
using kiosk mode. When users select A public computer on the Firebox SSL Access Portal page, the
Web browser opens. The user logs on and then can access applications provided in the browser window.
• For computers running Windows 2000 and above, kiosk mode is available through the Access
Portal. The link can be removed from the Access Portal on a group basis.
• For computers running JVM 1.5 or higher (such as Macintosh,
Windows 95, or Windows 98 computers), kiosk mode is available through a Java applet. For
Macintosh, Safari is the supported browser.
When the user is logged on using kiosk mode, the Firebox SSL VPN Gateway sends images only (no
data) over the connection. As a result, there is no risk of leaving temporary files or cookies on the public
computer. Both temporary files and cookies are maintained on the Firebox SSL VPN Gateway for the session.
The browser defaults to a Web address that is configured per group through the Firebox SSL VPN Gateway Administration Tool. The Web browser window can also include icons for Remote Desktop, SSH, Telnet 3270 emulator, Gaim instant messenging, and VNC clients. The icons are displayed in the bottomleft corner of the window. The applications are specified for each group. For more information about
configuring applications for kiosk mode, see “Configuring kiosk mode” on page 103.
The Web browser window also provides access to shared network drives. The Firebox SSL VPN Gateway
administrator configures the permissions granted (read-only or read/write) to each shared network
drive. For more information about configuring network shares, see “Configuring file share resources” on
page 102.
Users can copy files from the network share to their computer simply by dragging the file onto the
KioskFTP icon and selecting the destination in the File Download dialog box.
End point policies are not supported or enforced when users are logged on using kiosk mode.
Note
Connecting to a Server Load Balancer
You can connect one or more Firebox SSL VPN Gateways to a server load balancer. Characteristics of this
configuration include the following:
• Incoming Web traffic is intercepted by the server load balancer and load balanced among
multiple Firebox SSL VPN Gateways.
• For optimal load balancing, configure the settings to balance connections based on SSL session
identifiers (IDs). Load balancing based on source IP (Src IP) is also supported.
• For optimal performance, the server load balancer is configured with a fully qualified domain
name (FQDN). The FQDN is used by the Firebox SSL VPN Gateway when reestablishing a
connection to the server load balancer.
• The Firebox SSL VPN Gateway external public address is the external-facing (public) FQDN of the
server load balancer. The Firebox SSL VPN Gateway modifies all requests to include the external
28 Firebox SSL VPN Gateway
Page 39

Using the Firebox SSL VPN Gateway
public address. The external public address ensures that the redirected client returns to the
Firebox SSL VPN Gateway it first encountered, providing session stickiness. The association
between a particular request and the Firebox SSL VPN Gateway is broken only when the client
makes a new connection. To configure the Firebox SSL VPN Gateway to connect to the network,
see “Configuring Network Information” on page 47.
To establish the physical connection, connect the Firebox SSL VPN Gateway eth0 interface to the internal network. Use the Firebox SSL VPN Gateway Administration Tool to configure network settings. Specify the IP address of the server load balancer as the default gateway on the Firebox SSL VPN Gateway
VPN Gateway Cluster > General Networking tab.
Note
SSL sessions must terminate at the Firebox SSL VPN Gateway. In-line SSL acceleration hardware
appliances and bridging proxy servers cannot be used.
Administration Guide 29
Page 40

Using the Firebox SSL VPN Gateway
30 Firebox SSL VPN Gateway
Page 41

CHAPTER 3 Configuring Basic Settings
This chapter describes Firebox SSL VPN Gateway basic administration, including connecting to the Firebox SSL VPN Gateway, using the Administration Desktop, and using the Administration Tool to configure the Firebox SSL VPN Gateway.
Note
All submitted configuration changes are applied automatically to the Firebox SSL VPN Gateway and do
not cause a disruption for users connected to the Firebox SSL VPN Gateway. Policy changes take effect
immediately; if a connection violates a new policy, it is closed.
Topics covered in this chapter include:
• Firebox SSL VPN Gateway Administration Desktop
• Using the Administration Tool
• Using the Administration Portal
• Using the Serial Console
• Product Activation and Licensing
• Managing Licenses
• Blocking External Access to the Administration Portal
• Using Portal Pages
• Linking to Clients from Your Web Site
• Saving and Restoring the Configuration
• Restarting the Firebox SSL VPN Gateway
• Restarting the Firebox SSL VPN Gateway
• Shutting Down the Firebox SSL VPN Gateway
• Firebox SSL VPN Gateway System Date and Time
Note
This chapter assumes that you set up the Firebox SSL VPN Gateway hardware and performed the initial
configuration as described in “Getting Started with Firebox SSL VPN Gateway.”.
Administration Guide 31
Page 42

Firebox SSL VPN Gateway Administration Desktop
Firebox SSL VPN Gateway Administration Desktop
The Firebox SSL VPN Gateway Administration Desktop provides Firebox SSL VPN Gateway monitoring
tools. The taskbar includes one-click access to a variety of standard Linux monitoring applications as
well as the Real-Time Monitor, used to view and manage open connections, and the system time and
date.
The Administration Desktop includes features for monitoring, including the Real-Time Monitor, and
icons for monitoring applications. The middle of the taskbar has buttons for switching the work space
and task bar buttons. The right side of the taskbar contains processor and network usage information
and displays the system time and date.
The Administration Desktop is opened from the Administration Portal.
To open the Administration Portal and Administrative Desktop
1 Make sure that the Firebox SSL VPN Gateway is running.
2 From a Web browser, connect to the Firebox SSL VPN Gateway by entering the Web address:
https://ipAddress:9001
where:
ipAddress is the IP address of your Firebox SSL VPN Gateway.
9001 is the administration port of your Firebox SSL VPN Gateway.
3If a Security Alert dialog box appears, click Ye s .
4 Type the user name and password. The defaults are root and rootadmin.
5 The Firebox SSL VPN Gateway Administration Portal appears.
6Click Launch Firebox SSL VPN Gateway Administrative Desktop.
7In the WatchGuard Firebox SSL Remote Admin Terminal dialog box, type your user name and
password.
Note
By default, if you configure the Firebox SSL VPN Gateway to use both network adapters, the
Administration Portal can be accessed from either adapter. To block administrative access from the
network adapter that connects externally, see “Blocking External Access to the Administration Portal”
on page 38.
Using the Administration Portal
The Administration Portal provides a Web-based interface for administrators. There are several tabs in
the Administration Portal that provide a convenient place to do some administrative tasks of the Firebox
SSL VPN Gateway.
Downloads Tab
On this tab, you can do the following:
• Download the Administration Tool
• Download and install, or start, the Administration Desktop
• Download the Firebox SSL VPN Gateway Documentation
• Download portal page templates
32 Firebox SSL VPN Gateway
Page 43

Using the Serial Console
• Download a sample email for users
Admin Users Tab
The Firebox SSL VPN Gateway has a default administrative user account with full access to the Firebox
SSL VPN Gateway. To protect the Firebox SSL VPN Gateway from unauthorized access, change the
default password during your initial configuration.
Note
To reset the root administrative password to its default, you must reinstall the Firebox SSL VPN Gateway
server software.
The Firebox SSL VPN Gateway is preconfigured with the default user name of root and password of
rootadmin.
To change the administrator password
1 In the Firebox SSL VPN Gateway Administration Portal, on the Administration tab, click Admin
Users.
2Under Administrator Password, type the new password in the fields provided.
3Click Change Password.
Logging Tab
This tab displays the log for the Firebox SSL VPN Gateway. This is the same log that is in the Administration Tool on the VPN Gateway Cluster > Logging tab.
Maintenance Tab
This tab provides you a place to do administrative tasks. These are:
• Uploading a signed certificate
• Uploading a private key and certificate
• Uploading a saved configuration or appliance upgrade
• Saving the appliance configuration
• Restarting and shutting down the appliance
You can also log off from the Administration Portal by clicking Log Out.
Using the Serial Console
You can use the serial console to set the IP address and subnet of the Firebox SSL VPN Gateway Interface
0, as well as the IP address of the default gateway device. All other configuration must be done using the
Administration Tool. You can also use the serial console to test a connection with the ping command.
If you want to reach the Firebox SSL VPN Gateway through the serial console before making any configuration settings, use a serial cable to connect the Firebox SSL VPN Gateway to a computer that has terminal emulation software.
Administration Guide 33
Page 44

Using the Administration Tool
To open the serial console
1 Connect the RS232 cable to the serial port on the Firebox SSL VPN Gateway and to the serial port on
the computer.
2 Make sure that the Firebox SSL VPN Gateway is running.
3 Start a terminal emulation application (such as HyperTerminal or Putty) and create the following
settings:
If the serial console does not open, check the settings in the terminal emulation application. Set the
serial connection to 115,200 bits per second, 8 data bits, no parity, and 1 stop bit. The flow control
should be hardware. Set the terminal emulation to ANSI or Auto. Set the application to send a
delete operation when the backspace key is depressed.
4Press Enter twice in the terminal emulation application. The Firebox SSL VPN Gateway Banner
appears, along with the logon prompt.
5 Enter the default administrative user name root and password rootadmin.
The Serial Console menu appears.
Using the Administration Tool
The Administration Tool contains all Firebox SSL VPN Gateway configuration controls, except for administrative user account management, which is available only from the Administration Portal.
The Administration Tool allows you to configure global settings once and then publish them to multiple
Firebox SSL VPN Gateways on your network.
The left pane of the Administration Tool window displays Help information for the current tab. The
online Help corresponds to the task you are completing.
The Administration Tool is downloaded and installed from the Administration Portal. You can also
download documentation, portal page templates, and a sample email that can be customized with
instructions for users.
Note
If you upgraded from a previous version of the Firebox SSL VPN Gateway, you must uninstall the
Administration Tool using Add/Remove Programs in Control Panel and then install the latest version
from the Administration Portal.
To download and install the Administration Tool
1 In the Firebox SSL VPN Gateway Administration Portal, click Downloads.
2Under Administration, click Download Firebox SSL VPN Gateway Administration Tool Installer.
3 Select a location to save the installation application and click Save.
The installation tool is downloaded to your computer.
4 After downloading the file, navigate to the location where it was saved and then double-click the
file.
5 To install the Administration Tool, follow the instructions in the wizard.
6 To start the Administration Tool, click Start > Programs > WatchGuard> Firebox SSL VPN
Gateway Adminstration Tool > Firebox SSL VPN Gateway Administration Tool.
34 Firebox SSL VPN Gateway
Page 45

Publishing Settings to Multiple Firebox SSL VPN Gateways
7In Username and Password, type the Firebox SSL VPN Gateway administrator credentials. The
default user name and password are root and rootadmin. You can change the administrative
password as described in “To change the administrator password” on page 33.
Publishing Settings to Multiple Firebox SSL VPN Gateways
If you have multiple Firebox SSL VPN Gateway appliances in your network, you can configure the settings once and then publish them to all of the appliances on the network. The settings on the VPN
Gateway Cluster tab apply to individual Firebox SSL VPN Gateways. The general networking, logging,
administration, certificate generation and installation, and licensing are configured on the VPN Gate-
way Cluster tab. The settings on all other tabs in the Administration Tool can be published to multiple
Firebox SSL VPN Gateways.
To publish Firebox SSL VPN Gateway settings
1Click the Publish tab.
2Click Publish to all gateways.
Each Firebox SSL VPN Gateway configured on the VPN Gateway Cluster tab is listed on the Publish
tab. The following synchronization messages appear in the Sync Status field for each appliance:
In Sync
The Firebox SSL VPN Gateway configuration is successfully published.
Not in Sync
A change was made in the settings but is not published.
Sync Failed
Unable to synchronize the Firebox SSL VPN Gateway. Check the appliance and try the
synchronization again.
Unknown Status
The status of the Firebox SSL VPN Gateway cannot be determined. Check the appliance and try
the synchronization again.
Product Activation and Licensing
For new product installations, you will need to activate your Firebox SSL VPN Gateway by submitting the
included license key codes to your Live Security account. You access your LiveSecurity account by
browsing to the WatchGuard website at http://www.watchguard.com, then clicking LiveSecurity® Service
on the left.
There are two types of included license key codes with your Firebox SSL VPN Gateway: Tunnel and tun-
nel upgrade capacity, and LiveSecurity Renewal and Tunnel Renewal.
Upgrading the tunnel and tunnel upgrade license
In your Live Security account, under the Activation Center, you activate your product with the tunnel
and tunnel upgrade license key codes. Upon submittal and processing, you will receive license files or
feature keys that you must apply to the Firebox SSL VPN Gateway. You apply these license files using the
Administration Guide 35
Page 46

Managing Licenses
Firebox SSL VPN Gateway Administration Tool. To apply these license files, see “Managing Licenses” on
page 36.
For future tunnel capacity upgrades, you will follow these same steps to increase the capacity of your
Firebox® SSL VPN Gateway.
Upgrading the LiveSecurity Renewal and Tunnel Renewal license
In your Live Security account, under Your Activated Products, you can activate and extend your Live
Security support service by submitting the Live Security Renewal and Tunnel Renewal license keys. This
allows you continued access to the Live Security service for the Firebox SSL VPN Gateway appliance.
Chapter 1, “Getting Started with Firebox SSL VPN Gateway,” for more information about the LiveSecurity
Service.
Note
You must have a current Live Security account to upgrade your software or to add more tunnel capacity.
Managing Licenses
Firebox SSL VPN Gateway licensing limits the number of concurrent user sessions to the number of
licenses purchased. If you purchase 100 licenses, you can have 100 concurrent sessions at any time.
When a user ends a session, that license is released for the next user. A user who logs onto the Firebox
SSL VPN Gateway from more than one computer occupies a license for each session.
If all licenses are occupied, no additional connections can be opened until a user ends a session or the
administrator uses the Firebox SSL VPN Gateway Real-Time Monitor to close a connection, thereby
releasing a license. For information about using the Real-Time Monitor to close connections, see “Managing Client Connections” on page 133.
Licenses for the Firebox SSL VPN Gateway are installed using the Administration Tool. License files are
generated based on the host name, using either the external IP address or FQDN of the Firebox SSL VPN
Gateway. When the license is uploaded to the primary Firebox SSL VPN Gateway, the host identifier of
the license file is compared with the host names of each Firebox SSL VPN Gateway installed on the same
network. If a match is found, the license file is accepted. When the license is installed, it can then be published to all of the appliances in the cluster.
To manage licenses on the Firebox SSL VPN Gateway
1 On the administrative computer where you run the Firebox SSL VPN Gateway Administration Tool,
create a license directory.
2 Copy the license file (.lic) that you downloaded to the license directory.
Note
It is recommended that you retain a local copy of all license files that you receive. When you save a
backup copy of the configuration file, all uploaded license files are included in the backup. If you need
to reinstall the Firebox SSL VPN Gateway server software and do not have a backup of the configuration,
you will need the original license files. Store the license files on the administrative computer where you
run the Administration Tool.
36 Firebox SSL VPN Gateway
Page 47

Managing Licenses
Do not overwrite any .lic files in the license directory. If another file in that directory has the same name,
rename the newly received file. The Firebox SSL VPN Gateway software calculates your licensed features
based on all .lic files that are uploaded to the Firebox SSL VPN Gateway.
Do not edit a .lic file or the Firebox SSL VPN Gateway software ignores any features associated with that
license file. The contents of the file are encrypted and must remain intact. Should you copy, rename, or
insert a license file multiple times, the Firebox SSL VPN Gateway uses only the original file and ignores
any duplicate files.
To install a license file
1Click the VPN Gateway Cluster tab and then click the Licensing tab.
2Next to Upload a license file, click Browse and locate the .lic file that you want to upload.
3 Select the .lic file and then click Open to upload the license file.
4 If more than one Firebox SSL VPN Gateway is installed on the same network, on the Publish tab,
click Publish to all gateways.
To remove the licenses, next to Clear all licensing, click Remove All.
Information about Your Licenses
The Licensing tab displays information about the licenses that are installed on the Firebox SSL VPN
Gateway. This information includes:
• Total number of licenses available
• Number of licenses currently in use
In addition, you can download license logs that provide you with detailed information about license
use. When the logs are downloaded, they are in a compressed file called license_logs.zip.
To download license logs
1On the Firebox SSL VPN Gateway Cluster tab, click the Licensing tab.
2Under Information about this Firebox SSL VPN Gateway, next to Download licensing logs, click
Download All.
3 Select the location to download the files and then click Save.
When you make changes to licensing on the Firebox SSL VPN Gateway, you can refresh the information that is displayed on the Licensing tab.
Testing Your License Installation
To test that licensing is configured correctly, create a test user and then log on using the Secure Access
Client and credentials that you set up for the user.
To test your configuration
1 Open the Administration Tool.
2Click the Access Policy Manager tab.
3 Right-click the Local Users folder in the left pane and click New User.
4In the New User dialog box, in User Name, type a user name, and in Password and Ver ify
Password, type the same password in each field, and click OK.
Administration Guide 37
Page 48

Blocking External Access to the Administration Portal
5 In a Web browser, type the address of the Firebox SSL VPN Gateway using either the IP address or
fully qualified domain name (FQDN) to connect to either the internal or external interface. The
format should be either https://ipaddress or https://FQDN.
6 Type the logon credentials. The WatchGuard Firebox SSL VPN Gateway portal page appears.
7Click My own computer and then click Connect.
The Secure Access Client connection icon appears in the notification area, indicating a successful connection.
The initial configuration is complete. After completing the initial configuration, you can configure accessible networks so you can connect to all of your network resources, such as email, Web servers, and file
shares as if you are in the office. To test your configuration, try connecting to the applications and
resources that are available from the corporate network.
Blocking External Access to the Administration Portal
By default, if the Firebox SSL VPN Gateway is configured to use both network adapters, the external
adapter can be used to access the Administration Portal from outside the firewall. To block access to the
Administration Portal from the external adapter, clear the check box for this option.
To block external access to the Administration Portal
1Click the VPN Gateway Cluster tab.
2On the Administration tab, clear the check box for Enable External Administration.
3Click Apply Change.
Using Portal Pages
The Firebox SSL VPN Gateway provides logon access using five portal pages. The portal page users see
depends on the configuration of the Firebox SSL VPN Gateway. These include:
• Using the default portal page that provides full Secure Access Client and kiosk mode options. The
default portal page is the only one that can be customized with your company name and logo.
• Redirecting the user to the Web Interface logon page.
• Providing a portal page that allows users the choice of logging on using Secure Access Client, the
Web Interface, or kiosk mode.
• Pre-authentication Web page that appears when a pre-authentication policy is configured on the
Firebox SSL VPN Gateway.
• Redirection to a Web page when double-source authentication is configured on the Firebox SSL
VPN Gateway and the user logs on using Web access.
Using the Default Portal Page
Note
You can also include links to the Secure Access Client and kiosk mode on your Web site, as described in
“Linking to Clients from Your Web Site” on page 41.
38 Firebox SSL VPN Gateway
Page 49

Downloading and Working with Portal Page Templates
By default, users see a WatchGuard Firebox SSL VPN Gateway portal page when they open
https://Firebox SSL VPN Gateway_IP_or_hostname. For samples of the default portal pages for Windows,
Linux, and Java, see “Using the Access Portal” on page 118.
Several portal page templates that can be customized are provided. One of the templates includes links
to both the Firebox SSL Secure Access Client and kiosk mode. Customization of the default portal page
can be as simple as replacing the logo.
The text for My own computer and A public computer uses a variable to insert the text into the template. The text in these two sections cannot be changed.
The other two templates include links to just one of the clients. You choose a template based on the
access that you want to provide on a group basis. For example, you might want to provide access to
both clients to some users and access only to the Firebox SSL Secure Access Client or kiosk mode for
other users. You can do that by adding custom portal pages to the Firebox SSL VPN Gateway and then
specifying the portal page to be used for each user group.
Note
If you want to add text to the template or make format changes, you need to consult with someone who
is familiar with HTML. Changes to the templates other than those described in this section are not
supported.
The portal page templates are available from the Downloads page of the Administration Portal in the
section Sample Portal Page Templates.
Downloading and Working with Portal Page Templates
The portal page templates include variables that the Firebox SSL VPN Gateway replaces with the current
user name and with links that are appropriate for the connecting computer (Windows 2000 or higher, or
Linux).
If you also have users on platforms such as Macintosh, Windows 95, or Windows 98, you can provide
them access to the Java-based kiosk mode by inserting the appropriate variable in the template(s) used
by those groups, as described in this section. The variables that can be used in templates are described
in the following table.
Variable Content inserted by variable
$citrix_username;
$citrix_portal;
$citrix_portal_full_client_only;
$citrix_portal_kiosk_client_only;
$citrix_activex_object_include Inserts the ActiveX control that starts the client portal page.
A template can include only one of the three variables that start with $citrix_portal.
When choosing a template that is appropriate for a group, you need to know only whether the group
should have access to both the Firebox SSL Secure Access Client and kiosk mode or just one of the clients. The Firebox SSL VPN Gateway detects the user’s platform (Windows, Linux, Java) and inserts the
appropriate links into the templates that you upload to the Firebox SSL VPN Gateway.
Name of logged on user.
Links to both the Firebox SSL Secure Access Client and kiosk mode.
Link to the Firebox SSL Secure Access Client only.
Link to kiosk mode only.
Administration Guide 39
Page 50

Downloading and Working with Portal Page Templates
To download the portal page templates to your local computer
1 In the Firebox SSL VPN Gateway Administration Portal, click Downloads.
2Under Sample Portal Page Templates, right-click one of the links, click Save Target as, and specify
a location in the dialog box.
To work with the templates for Windows and Linux users
1 Determine how many custom portal pages that you need. You can use the same portal page for
multiple groups.
Use this portal page: To include links to these clients:
vpnAndKioskClients.html
vpnClientOnly.html Firebox SSL Secure Access Client only.
kioskClientOnly.html
Firebox SSL Secure Access Client and
Kiosk mode only.
2 Make a copy of each template that you will use and name the template, using the extension .html.
3 Open the file in Notepad or an HTML editing application.
4 To replace the WatchGuard image, locate the following line in the template:
<img src=”citrix-logo.gif”/>
5Replace citrix-logo.gif with the filename of your image. For example, if your image file is named
logo.gif, change the line to:
<img src=”logo.gif” />
An image file must have a file type of GIF or JPG. Do not change other characters on that line.
6 Save the file.
Using the ActiveX Control
If you would like to use the ActiveX control to start the client portal page, insert the following code into
the portal page template.
<html>
<head>
<title>Hello $citrix_username;</title>
$citrix_activex_object_include;
</head>
<body>
<img src=”citrix-logo.gif”>
<br/><br/>
<b>Hello $citrix_username;,</b>
<br/><br/>
$citrix_portal;
</body>
</html>
kiosk mode.
Installing Custom Portal Files on the Firebox SSL VPN Gateway
Custom portal pages and referenced image files must be installed on the Firebox SSL VPN Gateway.
40 Firebox SSL VPN Gateway
Page 51

Enabling Portal Page Authentication
To install a custom portal page or image on the Firebox SSL VPN Gateway
1Click the Portal Page Configuration tab.
2Click Add File.
3In File Identifier, type a name that is descriptive of the types of users who use the portal page.
The file name can help you later when you need to associate the portal page with a group. For example, you might
have a primary portal page used by many groups and a separate portal page used only by guests. In that case, you
might identify the files as Primary Portal and Guest Portal. Alternatively, you might have several portal pages that
correspond to user groups and use names such as Admin Portal, Student Portal, IT Portal.
4In File Type, select the type.
5 Portal pages must be an HTML file. Any images referenced from an HTML page must be either GIF or
JPG files.
6Click Upload File.
7 Navigate to the file and click Open.
The file is loaded on the Firebox SSL VPN Gateway.
To remove a portal file from the Firebox SSL VPN Gateway
On the Portal Page Configuration tab, select the page identifier in the list and click Remove Selected
File.
Enabling Portal Page Authentication
By default, a user must log on to the portal page and then again to the Firebox SSL Secure Access Client
or kiosk mode. You can eliminate the portal page logon step using either of the following methods:
• You can set a global policy that disables authentication for the portal page and that specifies the
portal page that displays for all users. This global policy overrides any portal page selections for
groups.
• You can include links to the Firebox SSL Secure Access Client and kiosk mode directly on your
Web site, as described in “Linking to Clients from Your Web Site” on page 41.
To enable portal page authentication
1Click the Global Cluster Policies tab.
2Under Advanced Options, select Enable Portal Page Authentication.
3Click Submit.
Linking to Clients from Your Web Site
You can also provide your users links to the Firebox SSL Secure Access Client and kiosk mode from your
Web site. The links launch the clients for Windows or direct the user to a page that explains how to
download and install the client for Linux.
To include links to the Firebox SSL Secure Access Client and kiosk mode on your Web site
1 Add the following code to the HEAD tag of the Web page that is to contain the links:
Administration Guide 41
Page 52

Linking to Clients from Your Web Site
<object id="Net6Launch" type="application/x-oleobject"
classid="CLSID:7E0FDFBB-87D4-43a1-9AD4-41F0EA8AFF7B"
codebase="net6helper.cab#version=2,1,0,6">
</object>
2 Add the links as follows to the Web page.
Client: Link to:
Firebox SSL Secure Access
Client (Windows/Java)
Kiosk mode (Windows/Java)
Firebox SSL Secure Access
Client (Linux)
https://ipAddress/CitrixSAClient.exe
https://ipAddress/net6javakiosk_applet.html
https://ipAddress/full_linux_instructions.html
where ipAddress is the address of the Firebox SSL
VPN Gateway.
This page includes a link to the Linux installer
executable.
Multiple Log On Options using the Portal Page
Users can have the option to log on using Secure Access Client, the Web Interface, or kiosk mode from
one Web page. This portal page cannot be configured like the default portal page. The user is presented
with three icons and users can choose which method they want to use to log on to the Firebox SSL VPN
Gateway. These are:
Secure Desktop Access
This icon starts the Secure Access Client.
Secure Application Access
This icon redirects the user to the Web Interface to log on.
Secure Kiosk Access
This icon logs on using kiosk mode.
This portal page is displayed only when the Redirect to URL and Show “Launch Client”
option page check boxes are selected on the Gateway Portal tab.
To configure multiple log on options
1On the Access Policy Manager tab, right-click a group in the left pane and then click Properties.
2On the Gateway Portal tab, select Redirect to URL.
3In Portal homepage, type the path of the server that is hosting the Web Interface.
4In Proxy Server, type the IP address or FQDN of the server that is hosting the Web Interface.
5 To secure the connection, click Use SSL/TLS.
6 To provide Secure Access Client log on, select Show “Launch Client” option page.
Pre-Authentication Policy Portal Page
If a pre-authentication policy is configured on the Firebox SSL VPN Gateway, when the user connects
using a Web address, a Web page appears while the policy is checked against the user’s computer. If the
client computer passes the pre-authentication policy check, users are then connected to the portal
page where they can connect to the Firebox SSL VPN Gateway using their credentials. If the pre-authen-
42 Firebox SSL VPN Gateway
Page 53

Connecting Using a Web Address
tication policy check fails, the users receive an error message instructing them to contact their system
administrator.
For more information about pre-authentication policies, see “Global policies” on page 96.
Double-source Authentication Portal Page
When the Firebox SSL VPN Gateway is configured to require users to log on using two types of authentication, such as LDAP and RSA SecurID, they are directed automatically to the Web page or Secure Access
Client dialog box and users enter their user name and passwords.
Note
When a user logs on using double authentication, the authentication is checked in the opposite order
that is configured in the realm.For example, if the primary authentication type is LDAP and the
secondary is RSA SecurID, the SecureID credentials are checked first, and then the LDAP credentials. If
the user log on fails the first authentication, the second authentication is not checked.
For more information about double-source authentication, see “Configuring Double-Source
Authentication” on page 85.
Connecting Using a Web Address
Users can connect to the Firebox SSL VPN Gateway using a Web browser by typing the Web address,
such as https://vpn.mycompany.com. When the IP address or FQDN of the Firebox SSL VPN Gateway is
entered and double-source authentication is configured, users are routed automatically to the logon
portal page as shown below.
Double-source authentication portal page
After entering the user name, the user then enters the passwords for each authentication type. After the
credentials are entered, the specified portal page appears and the user completes the connection from
this portal page. The connection can be either full access or kiosk mode.
The double-source authentication portal page cannot be customized.
Connecting Using Secure Access Client
Users can connect to the Firebox SSL VPN Gateway using the Secure Access Client that is downloaded
and installed on their computer. When double-source authentication is configured, users see a dialog
box that requires their user name and passwords for each authentication type. After the users enter the
credentials, they click Connect.
Administration Guide 43
Page 54

Saving and Restoring the Configuration
Saving and Restoring the Configuration
When you upgrade the Firebox SSL VPN Gateway, all of your configuration settings, including uploaded
certificates, licenses, and portal pages, are restore automatically. However, if you reinstall the Firebox
SSL VPN Gateway software, you must manually restore your configuration settings.
Note
Before using the Recovery CD to reinstall the Firebox SSL VPN Gateway software, save your
configuration. Reinstalling the Firebox SSL VPN Gateway software returns the Firebox SSL VPN Gateway
to its preconfigured state.
If you saved your configuration settings, as described in this section, you can easily restore them.
Note
You can also save and restore configuration settings from the Maintenance tab of the Administration
Portal.
To save the Firebox SSL VPN Gateway configuration
1 In the Administration Tool, click the VPN Gateway Cluster tab.
2 Open the dialog box for the appliance.
3On the Administration tab, by Save the current configuration, click Save Configuration.
4 Save the file, named config.restore, to your computer.
The entire Firebox SSL VPN Gateway configuration, including system files, uploaded licenses, and uploaded server
certificates, is saved.
To restore a saved configuration
1 In the Administration Tool, click the VPN Gateway Cluster tab.
2On the Administration tab, by Upload a Server Upgrade or saved Config, click Browse.
3 Locate the file named config.restore and click Open.
After the configuration file is uploaded, the Firebox SSL VPN Gateway restarts. All of your configuration settings,
licenses, and certificates are restored.
4 If you use RSA SecurID authentication, you must reset the node secret on the RSA ACE/Server, as
described in “Resetting the node secret” on page 82. Because the Firebox SSL VPN Gateway was
reimaged, the node secret no longer resides on it and attempts to authenticate with the RSA ACE/
Server fail.
Upgrading the Firebox SSL VPN Gateway Software
The software that resides on the Firebox SSL VPN Gateway can be upgraded when new releases are
made available.
To upgrade the Firebox SSL VPN Gateway
1 In the Firebox SSL VPN Gateway Administration Tool, click the VPN Gateway Cluster tab, select the
appliance, and then click the Administration tab.
44 Firebox SSL VPN Gateway
Page 55

2In Upload a Server Upgrade or Saved Config, click Browse.
3 Locate the upgrade file that you want to upload and click Open.
The file is uploaded and the Firebox SSL VPN Gateway restarts automatically.
When you upgrade the Firebox SSL VPN Gateway, all of your configuration settings are saved. For
information about saving and restoring a configuration, see “Saving and Restoring the
Configuration” on page 44.
Restarting the Firebox SSL VPN Gateway
After making changes to the Firebox SSL VPN Gateway, you might need to restart the service.
To restart the Firebox SSL VPN Gateway
1 From the Administration Tool, click the VPN Gateway Cluster tab and select the appliance that
needs to be restarted.
2On the Administration tab, next to Restart the server, click Restart, or from the Administration
Portal, go to the Maintenance tab and next to Restart the Server, click Restart.
Restarting the Firebox SSL VPN Gateway
Shutting Down the Firebox SSL VPN Gateway
Never shut down the Firebox SSL VPN Gateway by powering it off. Use the command in the Administration Tool to shut down the device. Use the power switch only to power on the device.
To shut down the Firebox SSL VPN Gateway
1 From the Administration Tool, click the VPN Gateway Cluster tab, and select the appliance that
needs to be shut down.
2On the Administration tab, next to Shut down the server, click Shut down.
3 Use the power switch to switch off the device.
Note
You can also shut down and restart the Firebox SSL VPN Gateway from the Maintenance page of
Administration Portal.
Firebox SSL VPN Gateway System Date and Time
The system time displays on the right side of the taskbar in the Administration Desktop window. To view
the system date, mouse over the system time.
To view a calendar, click the system time. Click the system time again to hide the calendar.
Administration Guide 45
Page 56

Allowing ICMP traffic
To change the system date and time
1 In the Administration Tool, click the VPN Gateway Cluster tab, select the appliance, and then click
the Date tab.
2In Time Zone, select a time zone.
3In Date, type the date and time.
4Click Submit.
Network Time Protocol
The Network Time Protocol transmits and receives time over TCP/IP networks. The Network Time Protocol is useful for synchronizing the internal clock of computers on the network to a common time source.
If you have a Network Time Protocol server in your secure network, you can use the Firebox SSL VPN
Gateway Administration Tool to configure the Firebox SSL VPN Gateway to synchronize the time with
the Network Time Protocol server.
To synchronize the Firebox SSL VPN Gateway with a Network Time Protocol server
1 In the Firebox SSL VPN Gateway Administration Tool, click the VPN Gateway Cluster tab.
2Click the Date tab.
3In Synchronization Mode, click Network Time Protocol (NTP).
4In NTP Server, type the FQDN of the server.
5In Synchronization Interval, select a schedule to perform updates.
Allowing ICMP traffic
Internet Control Message Protocol (ICMP) traffic to the Firebox SSL VPN Gateway is disabled by default.
To enable ICMP traffic, use the VPN Gateway Cluster > Administration tab.
When ICMP traffic is enabled, users can ping servers on the internal, secure network. The Firebox SSL
VPN Gateway itself cannot receive ICMP traffic.
To enable ICMP traffic
1 In the Administration Tool, click the VPN Gateway Cluster tab and select the appliance.
2On the Administration tab, select Enable ping.
3Click Apply Change.
46 Firebox SSL VPN Gateway
Page 57

CHAPTER 4 Configuring Firebox SSL VPN
Gateway Network Connections
The Firebox SSL VPN Gateway has two network adapters that can be configured to work on your network. The VPN Gateway Cluster > General Networking tabs in the Administration Tool are used to
configure most network settings.
The following topics describe how to configure Firebox SSL VPN Gateway network connections:
• Configuring Network Information
• Configuring Firebox SSL VPN Gateway Failover
• Controlling Network Access
• Enabling Split Tunneling
• Denying Access to Groups without an ACL
Note
When you have a working configuration, it is recommended that you back up the configuration as
described in “Saving and Restoring the Configuration” on page 44.
The configuration instructions throughout those topics assume the following setup:
• The Firebox SSL VPN Gateway is installed.
• The devices to which you are connecting the Firebox SSL VPN Gateway, such as a firewall or
server load balancer, are already part of a working configuration. This guide does not cover the
steps for configuring application or Web servers, firewalls, or a server farm with a server load
balancer.
Configuring Network Information
You define the connections between the Firebox SSL VPN Gateway and your network on the Network
tab.
The network adapter settings are configured on the VPN Gateway Cluster tab in the Firebox SSL VPN
Gateway Administration Tool. On the VPN Gateway Cluster tab, you can configure the following:
•The General Networking tab is where the network adapters that are installed on the Firebox SSL
VPN Gateway are configured
•The Name Service Providers tab is where the DNS and WINS servers are configured
Administration Guide 47
Page 58

General Networking
•The Routes tab is where dynamic and static routes are configured
•The Failover Servers tab is where multiple Firebox SSL VPN Gateway’s are configured
General Networking
The Firebox SSL VPN Gateway has two network adapters installed. If two network adapters are used,
then one network adapter communicates with the Internet and computers that are not inside the corporate network. The other network adapter communicates with the internal network.
If one network adapter is used, it has to be routable for internal resources using Network Address Translation (NAT). The Firebox SSL VPN Gateway network adapter settings are as follows:
IP address and Subnet mask for Interface 0 and, if used, Interface 1
When connecting the Firebox SSL VPN Gateway to your network, you typically place it either
inside of a firewall, inside of a server load balancer, or connected to two physical networks
along side your firewall (“straddling” a firewall). If the Firebox SSL VPN Gateway is inside a
firewall or connected to a server load balancer, choose Use Only Interface 0.
The Firebox SSL VPN Gateway located inside the firewall.
If the Firebox SSL VPN Gateway is in the DMZ, choose Use both interfaces. Use Interface 0 for the exter-
nal connection and Interface 1 for the internal connection.
48 Firebox SSL VPN Gateway
Page 59

The Firebox SSL VPN Gateway in the DMZ.
For more information, see “Connecting to a Server Load Balancer” on page 28.
General Networking
External Public FQDN
The Firebox SSL VPN Gateway uses the external IP address or FQDN to send its response to a
request back to the correct network connection. If the external IP address is not specified, the
Firebox SSL VPN Gateway sends responses out through the interface where the gateway is
identified. If the external IP address is specified, the Firebox SSL VPN Gateway sends all
connections to the interface with the specified host name or IP address.
Duplex mode
This is the direction of the transmission of data. Choices are either auto, full duplex, or half
duplex. Use the default setting, auto, unless you need to change it.
MTU
The maximum transmission unit that defines the maximum size of each transmitted packet. The
default is 1500. Use the default setting unless you need to change it.
VPN port
This is the incoming port on the Firebox SSL VPN Gateway that is used for VPN connections. The
default is port 443.
The Default Gateway has the following two settings:
IP address
This is the IP address of the default gateway device, such as the main router, firewall, or server
load balancer, depending on your network configuration. This should be the same as the
Default Gateway setting that is on computers on the same subnet.
For information about the relationship between the Default Gateway and dynamic or static
routing, see “Dynamic and Static Routing” on page 51.
Gateway Interface
This is the network adapter on the Firebox SSL VPN Gateway with which the Default Gateway
communicates.
Administration Guide 49
Page 60

Name Service Providers
IP pooling is configured per groups, as described in “Enabling IP Pooling” on page 94.
Name Service Providers
Name resolution is configured on the Name Service Providers tab. You can specify the following:
DNS Server 1, DNS Server 2, DNS Server 3
These are the IP address of the first, second, and third DNS servers.
DNS suffixes
These are the DNS suffixes of the servers. Each entry in the list is separated by a space. Each
entry should follow the format of site.com. Do not precede a suffix with a dot (“.”), such as
.site.com.
By default, the Firebox SSL VPN Gateway checks a user’s remote DNS only. If you want to allow
failover to a user’s local DNS, you need to enable split DNS.
WINS Server
This is the IP address of the WINS server.
To have client connections communicate with the WINS Server, the IP address must be
manually added to the Accessible Networks list on the Global Cluster Policies tab. For more
information, see “Controlling Network Access” on page 56. The IP address must also be added
as a network resource on the Access Policy Manager tab and added to the user group(s). For
more information, see “Defining network resources” on page 99.
Note
To enable split DNS
1On the Access Policy Manager tab, in the left pane, right-click a group and click Properties.
2On the Networking tab, select Enable split-DNS.
The Firebox SSL VPN Gateway fails over to the local DNS only if the specified DNS servers cannot be contacted, but
not if there is a negative response.
To edit the HOSTS file
You can add entries to the Firebox SSL VPN Gateway HOSTS file from the Name Service Providers tab.
The Firebox SSL VPN Gateway uses the entries in the HOSTS file to resolve FQDNs to IP addresses.
When the Firebox SSL VPN Gateway attempts to translate an FQDN to an IP address, the Firebox SSL VPN
Gateway checks its HOSTS file before connecting to DNS to perform the address translation. If the Firebox SSL VPN Gateway can translate the FQDN to an IP address using the information in the HOSTS file, it
does not use DNS to perform the address translation.
You might want to add entries to the HOSTS file in an Firebox SSL VPN Gateway deployment where the
network configuration prevents the Firebox SSL VPN Gateway from connecting to DNS to perform
address translations. Also, adding entries to the HOSTS file can optimize performance because the Firebox SSL VPN Gateway does not have to connect to a different server to perform the address translations.
To add an entry to the HOSTS file
1On the Firebox SSL VPN Gateway Cluster tab, open the window for an appliance.
2Click the Name Service Providers tab.
50 Firebox SSL VPN Gateway
Page 61

3Under Edit the HOSTS file, in IP address, enter the IP address that you want to associate with an
FQDN.
4In FQDN, enter the FQDN you want to associate with the IP address you entered in the previous
step.
5Click Add. The IP address and HOSTS name pair appears in the Host Table.
To remove an entry from the HOSTS file
1Under Host Table, click the IP address and HOSTS name pair you want to delete.
2Click Remove.
Dynamic and Static Routing
Configuring Network Routing
To provide access to internal network resources, the Firebox SSL VPN Gateway must be capable of routing data to the internal networks.
The networks to which the Firebox SSL VPN Gateway can route data are determined by the configuration of the Firebox SSL VPN Gateway routing table and the Default Gateway specified for the Firebox SSL
VPN Gateway.
When the Firebox SSL VPN Gateway receives a packet, it checks its routing table. If the destination
address of the packet is within a network for which a route exists in the routing table, the packet is
routed to that network.
If the Firebox SSL VPN Gateway receives a packet, and its routing table does not contain a route for the
destination address of the packet, the Firebox SSL VPN Gateway sends the packet to the Default Gateway. The routing capabilities of the Default Gateway then determine how the packet is routed.
The Firebox SSL VPN Gateway routing table must contain the routes necessary to route data to any
internal network resource that a user may need to access.
You control how the Firebox SSL VPN Gateway routing tables are configured. You can select a Routing
Information Protocol (RIP) option so that the routes are configured automatically by a RIP server, or you
can select a static routing option and manually configure the routes.
You can configure the Firebox SSL VPN Gateway to listen for the routes published by your routing
server(s) or to use static routes that you specify. The Firebox SSL VPN Gateway supports the Routing
Information Protocol (RIP and RIP 2).
The Default Gateway field on the General Networking tab is relevant to both dynamic and static rout-
ing.
Dynamic and Static Routing
Enable Dynamic Gateway
If this option is enabled, the default gateway is based on the routing table, not on the value
entered in the Default Gateway field on the General Networking tab.
Static Routing
If you add a static route, choose the Firebox SSL VPN Gateway network adapter that is not being
used by the default gateway.
Administration Guide 51
Page 62

Dynamic and Static Routing
Configuring Dynamic Routing
When dynamic routing is selected, the Firebox SSL VPN Gateway operates as follows:
• It listens for route information published through RIP and automatically populates its routing
table.
• If the Dynamic Gateway option is enabled, the Firebox SSL VPN Gateway uses the Default
Gateway provided by dynamic routing, rather than the value specified on the General
Networking tab.
• It disables any static routes created for the Firebox SSL VPN Gateway. If you later choose to
disable dynamic routing, any previously created static routes appear again in the Firebox SSL VPN
Gateway routing table.
To configure dynamic routing
1Click the VPN Gateway Cluster tab and then click the Routes tab.
2In Select routing type, select Dynamic Routing (RIP).
Selecting this option disables the static routes area. If static routes are defined, they do not display in the routing
table although they are still available if you want to switch back to static routing.
3Click Enable Dynamic Gateway to use the default gateway provided by the routing server(s).
Selecting this check box disables use of the Default Gateway that is specified on the General Networking tab.
4In Routing Interface, choose the Firebox SSL VPN Gateway network adapter(s) to be used for
dynamic routing. Typically, your routing server(s) are inside your firewall, so you would choose the
internal network adapter for this setting.
5Click Submit.
Dynamic routes are not displayed in the Firebox SSL VPN Gateway routing table.
Enabling RIP Authentication for Dynamic Routing
To enhance security for dynamic routing, you can configure the Firebox SSL VPN Gateway to support RIP
authentication.
Note
Your RIP server must transmit RIP 2 packets to use RIP authentication. RIP 1 does not support
authentication.
To support RIP authentication, both the RIP server and the Firebox SSL VPN Gateway must be configured to use a specific authentication string. The RIP server can transmit this string as plain text or
encrypt the string with MD5.
If the RIP server encrypts the authentication string with MD5, you must also select the MD5 option on
the Firebox SSL VPN Gateway.
You can configure the Firebox SSL VPN Gateway to listen for the RIP authentication string on Interface 0,
Interface 1, or both interfaces.
To enable RIP authentication for dynamic routing
1On the Firebox SSL VPN Gateway Cluster tab, open the window for an appliance.
2Click the Routes tab.
3In Routing Interface, select either Interface 0, Interface 1, or Both to specify the interface(s) on
which the Firebox SSL VPN Gateway listens for the RIP authentication string.
4 Select the RIP Authentication String for Interface check box.
52 Firebox SSL VPN Gateway
Page 63

Dynamic and Static Routing
5 In the text box, type a text string that is an exact, case-sensitive match to the authentication string
transmitted by the RIP server.
6 Select the Enable RIP MD5 Authentication for Interface check box if the RIP server transmits the
authentication string encrypted with MD5.
Do not select this option if the RIP server transmits the authentication string using plain text.
7Click Submit.
Changing from Dynamic Routing to Static Routing
Before you change from dynamic routing to static routing, you may want to save your dynamic routes to
the static route table. Selecting this option saves the current RIP dynamic routing information as static
routes.
If you change from dynamic routing to static routing, and you previously created static routes, the static
routes reappear in the Firebox SSL VPN Gateway routing table.
If these static routes are no longer valid, or if no static routes were created previously, you might lose
remote access to the Administration Tool and users could lose access to the internal network resources
until you manually configure the static routes.
Saving the current RIP dynamic routing information as static routes when you switch from dynamic
routing to static routing allows you to maintain connectivity until you properly configure the static
routes.
To save dynamic routes to the static route table
1On the Firebox SSL VPN Gateway Cluster tab, open the window for the appliance.
2Click the Routes tab.
3Click Save to static routes.
After you save the dynamic route, you can switch to static routing.
Configuring a Static Route
When setting up communication with another host or network, a static route might need to be added
from the Firebox SSL VPN Gateway to the new destination if you do not use dynamic routing.
Set up static routes on the Firebox SSL VPN Gateway adapter not being used by the Default Gateway
that is specified on the General Networking tab.
For an example static route setup, see “Static Route Example” on page 54.
To add a static route
1Click the VPN Gateway Cluster tab and then click the Routes tab.
2In Select routing type, select Static Routing.
3Under Add Static Route, in Destination LAN IP Address, type the IP address of the destination
local area network.
4In Subnet Mask, type the subnet mask for the gateway device.
5In Gateway, type the IP address for the default gateway. If you do not specify a gateway, the Firebox
SSL VPN Gateway can access content only on the local network.
6In Interface, select the network adapter for the static route. The default is eth0.
7Click Add Static Route.
Administration Guide 53
Page 64

Dynamic and Static Routing
8On the General Networking tab, click Submit.
The route name appears in the Static Routes list.
To test a static route
1 From the Firebox SSL VPN Gateway serial console, type 1 (ping).
2 Enter the host IP address for the device you want to ping and press Enter.
If you are successfully communicating with the other device, messages appear saying that the same
number of packets were transmitted and received, and zero packets were lost.
If you are not communicating with the other device, the status messages indicate that zero packets
were received and all the packets were lost. Return to Step 1 and recreate the static route.
To remove a static route
1Click the VPN Gateway Cluster tab and then click the Routes tab.
2 In the Static Route table, select each route that you want to delete.
3Click Remove Route.
Static Route Example
Suppose the IP address of the eth0 port on your Firebox SSL VPN Gateway is 10.0.16.20 and there is a
request to access information at 129.6.0.20 to which you currently do not have a path. You can create a
static route through the network adapter that is not set as your Firebox SSL VPN Gateway default gateway, and out to the requested network address, as shown in the following figure:
Network topology showing a static route.
This shows these connections:
• The eth0 adapter (10.0.16.20) leads to the default gateway (10.0.16.1), which connects to the rest
of the 10.0.0.0 network.
• The eth1 adapter (192.168.0.20) is set to communicate with the 192.168.0.0 network and its
gateway (192.168.0.1). Through this gateway, the eth1 port can communicate with the 129.6.0.0
network and the server at IP address 129.6.0.20.
54 Firebox SSL VPN Gateway
Page 65

Configuring Firebox SSL VPN Gateway Failover
To set up the static route, you need to establish the path between the eth1 adapter and IP address
129.6.0.20.
To set up the example static route
1Click the VPN Gateway Cluster tab and then click the Routes tab.
2In Destination LAN IP Address, set the IP address of the destination LAN to 129.6.0.0.
3In Subnet Mask, set the subnet mask for the gateway device.
4In Gateway, set the IP address of the default gateway to 192.168.0.1.
5In Interface, select eth1 as the gateway device adapter.
6Click Add Static Route.
Configuring Firebox SSL VPN Gateway Failover
The Firebox SSL VPN Gateway can be configured to fail over to multiple Firebox SSL VPN Gateway appliances. Because Firebox SSL VPN Gateway failover is active/active, you can use each Firebox SSL VPN
Gateway as a primary gateway for a different set of users.
During the initial connection from the Secure Access Client, the Firebox SSL VPN Gateway provides the
failover list to the client. If the client loses the connection to the primary Firebox SSL VPN Gateway, it
iterates through the list of failover appliances. If the primary Firebox SSL VPN Gateway fails, the connection waits for 20 seconds and then goes to the failover list to make the connection. The client performs a
DNS lookup for the first failover appliance and tries to connect. If the first failover Firebox SSL VPN Gateway is not available, the client tries the next failover appliance. When the client successfully connects to
a failover Firebox SSL VPN Gateway, the client is prompted to log on.
To specify Firebox SSL VPN Gateway failover
1Click the VPN Gateway Cluster tab and then click the Failover Servers tab.
2In Failover Server 1, Failover Server 2, and/or Failover Server 3, type the external IP address or
the fully qualified domain name (FQDN) of the Firebox SSL VPN Gateway(s) to be used for failover
operation.
The Firebox SSL VPN Gateways are used for failover in the order listed.
3In Port, type the port number. The default is 443.
4Click Submit.
Configuring Internal Failover
Configuring the client’s local DNS settings enables the Secure Access Client to connect to the Firebox
SSL VPN Gateway from inside the firewall. When internal failover is configured, the client will failover to
the internal IP address of the Firebox SSL VPN Gateway if the external IP address cannot be reached.
To enable internal failover
1Click the Global Cluster Policies tab.
2Under Advanced Options, select Enable Internal Failover.
When this check box is selected, the internal IP address of the Firebox SSL VPN Gateway is added to the
failover list. If you disabled external administrator access, port 9001 is unavailable. If you want to con-
Administration Guide 55
Page 66

Controlling Network Access
nect to port 9001 when you are logged on from an external connection, configure IP pools and connect
to the lowest IP address in the IP pool.
Controlling Network Access
Configuring Network Access
After you configure the appliance to operate in your network environment, the next step is to configure
network access for the appliance and for groups and users.
The steps to configure network access are:
• Step 1: Configuring networks to which clients can connect. By default, clients cannot connect
to any networks. The first step in configuring network access is to specify the networks that
clients can connect to, using the Global Cluster Policies tab.
• Step 2: Configuring authentication and authorization. Authentication defines how users log
on and is configured using realms. Authentication types include local, NTLM, LDAP, RADIUS, RSA
SecurID, and SafeWord. Authorization types include local, LDAP, RADIUS, NTLM, or no
authorization. For more information about configuring authentication and authorization,
see“Configuring Authentication and Authorization” on page 61.
• Step 3: Configuring user groups. User groups are used in conjunction with authorization. For
example, if your users are connecting using LDAP, create an LDAP authentication realm, and then
create a group. The names of the user group must be the same as that on the LDAP server. In
addition, you can create local users on the Firebox SSL VPN Gateway for local authentication.
Local users are then added to user groups. For information about configuring local users, see
“Adding and Configuring Local Users and User Groups” on page 87.
• Step 4: Configuring network access for groups. After you configure your user groups, you then
configure network access for the groups. This includes the network resources users in the group
are allowed to access, application policies, kiosk connections, and end point policies.
For more information about configuring accessible networks, user groups, and network access for users,
see“Adding and Configuring Local Users and User Groups” on page 87.
By default, the Firebox SSL VPN Gateway is blocked from accessing any networks. You must specify the
networks that the Firebox SSL VPN Gateway can access, referred to as accessible networks. You then control user access to those networks as follows:
• You create network resource groups.
A network resource group includes one or more network locations. For example, a resource
group might provide access to a single application, a subset of applications, a range of IP
addresses, or an entire intranet. What you include in a network resource group depends largely
on the varying access requirements of your users. You might want to provide some user groups
with access to many resources and other user groups with access to smaller subsets of resources.
By allowing and denying a user group access to network resource groups, you create an access
control list (ACL) for that user group.
• You specify whether or not any user group without an ACL has full access to all of the accessible
networks defined for the Firebox SSL VPN Gateway.
By default, user groups without an ACL have access to all of the accessible networks defined for
the Firebox SSL VPN Gateway. This default operation provides simple configuration if most of
your user groups are to have full network access. By retaining this default operation, you need to
configure an ACL only for the user groups that should have more restricted access. The default
operation can also be useful for initial testing.
56 Firebox SSL VPN Gateway
Page 67

Enabling Split Tunneling
You can change the default operation so that user groups are denied network access unless they
are allowed access to one or more network resource groups.
• You configure ACLs for user groups by specifying which network resources are allowed or denied
per user group.
By default, all network resource groups are allowed and network access is controlled by the Deny
Access without ACL option on the Global Cluster Policies tab. When you allow or deny one
resource group, all other resource groups are denied automatically and the network access for
the user group is controlled only through its ACL.
If a resource group includes a resource that you do not want a user group to access, you can
create a separate resource group for just that resource and deny the user group access to it.
The options just discussed are summarized in the following table.
ACL se t for
user group?
No No All accessible networks
Ye s No Allowed resource groups
No Yes Nothing
Ye s Yes Allowed resource groups
Deny access
without ACL?
User group can access:
Specifying Accessible Networks
You must specify which networks the Firebox SSL VPN Gateway can access.
When configuring network access, the most restrictive policy must be configured first and the least restrictive
last; for example, you want to allow access to everything on the 10.0.x.x network, but need to deny access to
the 10.0.20.x
10.0.x.x network.
To give the Firebox SSL VPN Gateway access to a network
1Click the Global Cluster Policies tab.
2Under Access Options, in Accessible Networks, type a list of networks. Use a space or carriage
return to separate the list of networks.
3Click Submit.
network. Configure network access to 10.0.20.x first and then configure access to the
Enabling Split Tunneling
You ca n e nable split tunneling on the Global Cluster Policies tab to prevent the Secure Access Client
from sending unnecessary network traffic to the Firebox SSL VPN Gateway.
When split tunneling is not enabled, the Secure Access Client captures all network traffic originating
from a client computer, and sends the traffic through the VPN tunnel to the Firebox SSL VPN Gateway.
If you enable split tunneling, the Secure Access Client sends only traffic destined for networks protected
by the Firebox SSL VPN Gateway through the VPN tunnel. The Secure Access Client does not send network traffic destined for unprotected networks to the Firebox SSL VPN Gateway.
Administration Guide 57
Page 68

Denying Access to Groups without an ACL
When you enable split tunneling, you must enter a list of accessible networks on the Global Cluster
Policies tab. The list of accessible networks must include all internal networks and subnetworks that the
user may need to access with the Secure Access Client.
The Secure Access Client uses the list of accessible networks as a filter to determine whether or not
packets transmitted from the client computer should be sent to the Firebox SSL VPN Gateway.
When the Secure Access Client starts, it obt ains the list of accessible networks from the Firebox SSL
VPN Gateway . The Secure Access Client examines all p ackets tran smitted on the network from the client computer and compares the addresses within the packets to the list of accessible networks. If the
destination address in the packet is within one of the accessible networks, the Secure Access Client
sends the packet through the VPN tunnel to the Firebox SSL VPN Gate way. If the destination address
is not in an accessible network, the packet is not encrypted and the client routes the packet appropriately.
To enable split tunneling
1Click the Global Cluster Policies tab.
2Under Access Options, click Enable Split Tunneling.
3In Accessible Networks, type the IP addresses. Use a space or carriage return to separate the list of
networks.
4Click Submit.
Configuring User Groups
User groups define the resources the user has access to when connecting to the corporate network
through the Firebox SSL VPN Gateway. Groups are associated with the local users list. After adding local
users to a group, you can then define the resources they have access to on the Access Policy Manager
tab. For more information about configuring local users, see “Configuring Properties for a User Group”
on page 90.
When you enable authorization on the Firebox SSL VPN Gateway, user group information is obtained
from the authentication server after a user is authenticated. If the group name that is obtained from the
authentication server matches a group name created locally on the Firebox SSL VPN Gateway, the properties of the local group are used for the matching group obtained from the authentication servers.
Note
Important: Group names on authentication servers and on the Firebox SSL VPN Gateway must be
identical and they are case-sensitive
Denying Access to Groups without an ACL
Each user should belong to at least one group that is defined locally on the Firebox SSL VPN Gateway. If
a user does not belong to a group, the overall access of the user is determined by using access control
lists (ACLs) that are defined by the Deny access without access control list (ACL) setting as follows:
If the Deny Access option is enabled, the user cannot establish a connection
If the Deny Access option is disabled, the user has full network access
In either case, the user can use kiosk mode, but network access within that session is determined by the
Deny access without access control list (ACL) setting.
58 Firebox SSL VPN Gateway
Page 69

To deny access to user groups without an ACL
1Click the Global Cluster Policies tab.
2Under Access Options, select Deny Access without ACL.
3Click Submit.
Improving Voice over IP Connections
Real-time applications, such as voice and video, are implemented over UDP. TCP is not appropriate for
real-time traffic due to the delay introduced by acknowledgements and retransmission of lost packets. It
is more important to deliver packets in real time than to ensure that all packets are delivered. However,
with any tunneling technology over TCP, such real-time performances cannot be met.
The Firebox SSL VPN Gateway overcomes this issue by routing UDP packets over the secure tunnel as
special IP packets that do not require TCP acknowledgements. Even if the packets get lost in the network, no attempt is made by either the client or the server applications to regenerate them, so real-time
(UDP like) performance is achieved over a secure TCP-based tunnel.
When the Firebox SSL VPN Gateway is installed as a stand alone appliance, and users connect using the
Secure Access Client, two-way communication is supported with the following voice over IP (VoIP) softphones:
Avaya IP Softphone
•
• Nortel IP Softphone
• Cisco IP Softphone
• Cisco IP Communicator
Secure tunneling is supported between the manufacturer’s IP PBX and the softphone software running
on the client computer. To enable the VoIP traffic to traverse the secure tunnel, you must install the
Secure Access Client and one of the softphones listed above on the same system. When the VoIP traffic
is tunneled over the secure tunnel, the following softphone features are supported:
Outgoing calls that are placed from the IP softphone
•
• Incoming calls that are placed to the IP softphone
• Bidirectional voice traffic
Improving Voice over IP Connections
Enabling Improving Voice over IP Connections
Voice over IP (VoIP) traffic is carried over the UDP protocol. This kind of traffic is very sensitive to latency.
The Firebox SSL VPN Gateway tunnels the UDP traffic through SSL connections. If you experience
latency in your VoIP application, you can select the Improving Voice over IP Connections setting to
minimize latency and improve the audio quality.
When you select this setting, the Firebox SSL VPN Gateway employs weaker encryption ciphers (56-bit).
These weaker ciphers are used for all traffic that is transmitted using the UDP protocol, not just the VoIP
traffic. Before selecting this option, you might want to consider the security implications of using these
weaker ciphers to encrypt the UDP traffic.
The specific ciphers used to encrypt the UDP traffic include
• RSA EXP 1024, RC4 56 Bit, MD5
• RSA EXP 1024, RC4 56 Bit, SHA
Administration Guide 59
Page 70

Improving Voice over IP Connections
If the Improving Voice over IP Connections setting is not selected, the UDP traffic is encrypted using
the symmetric encryption cipher that is specified in the Select encryption type for client connections
setting on the Global Cluster Policies tab.
The encryption ciphers are negotiated between the client computer and the Firebox SSL VPN Gateway
in the order listed. The first accepted method is the one chosen for the session.
To improve latency for UDP traffic
1Click the Global Cluster Policies tab.
2Under SSL Options, select Improve latency for Voice over IP traffic.
3Click Submit.
Note
60 Firebox SSL VPN Gateway
Page 71

CHAPTER 5 Configuring Authentication and
Authorization
The Firebox SSL VPN Gateway supports several authentication types including LDAP, RADIUS, RSA SecurID, NTLM, and Secure Computing’s SafeWord products.
The following topics describe how to configure Firebox SSL VPN Gateway
authentication:
• Choosing When to Configure Authentication on the Firebox SSL VPN Gateway
• Configuring Authentication on the Firebox SSL VPN Gateway
• Configuring Local Authentication
• Configuring Local Users
• Configuring LDAP Authentication and Authorization
• Configuring RADIUS Authentication and Authorization
• Configuring RSA SecurID Authentication
• Configuring Secure Computing SafeWord Authentication
• Configuring NTLM Authentication and Authorization
• Configuring Double-Source Authentication
Configuring Authentication and Authorization
By default the Firebox SSL VPN Gateway authenticates users against a user list stored locally on the Firebox SSL VPN Gateway.
SecurID, SafeWord, or NTLM (Windows NT 4.0) authentication servers. The Firebox SSL VPN Gateway supports realm-based authentication to accommodate site s with more than one LDAP or RADIUS
server or with a combination of SafeWord, LDAP, RADIUS, NTLM, and/or RSA SecurID authentication
servers.
Administration Guide 61
You can configure the Firebox SSL VPN Gateway to use LDAP, RADIUS, RSA
Page 72

Configuring Authentication and Authorization
Communications between the Firebox SSL VPN Gateway and authentication servers.
If a user is not located on an authentication server or fails authentication on that server, the Firebox SSL
VPN Gateway checks the user against the local user
on the Firebox SSL VPN Gateway is selected on the Authentication > Settings ta b.
list, if the check box Use the local user database
Communication between the client, the Firebox SSL VPN Gateway, and the local user account.
After a user is authenticated, the Firebox SSL VPN Gateway performs a group authorization check by
obtaining the user’s group information from either an LDAP server, a RADIUS server, a Windows NT 4.0
server (for NTLM authorization), or the local group file (if not available on the LDAP or RADIUS server). If
group information is available for the user, the Firebox SSL VPN Gateway then checks the network
resources allowed for the group. LDAP authorization works with all supported authentication methods.
You can configure the Firebox SSL VPN Gateway to obtain an authenticated user’s group(s) from an
LDAP server. If the user is not located on the LDAP server, the Firebox SSL VPN Gateway checks its local
group file
selected on the Authentication > Settings tab.
if the check box Use the local user database on the Firebox SSL VPN Gateway is
The group names obtained from the LDAP server are compared with the group names created locally
on the Firebox SSL VPN Gateway. If the two group names match, the properties of the local group apply
to the group obtained from the LDAP server.
62 Firebox SSL VPN Gateway
Page 73

Configuring Authentication and Authorization
Configuring Authentication without Authorization
The Firebox SSL VPN Gateway can be configured to authenticate users without requiring authorization.
When users are not authorized, the Firebox SSL VPN Gateway does not perform a group authorization
check. The settings from the Default user group are assigned to the user.
To remove authorization requirements from the Firebox SSL VPN Gateway
1On the Authentication tab, select an authorization realm.
2On the Authorization tab, in Authorization type, select No authorization.
The Default Realm
The Firebox SSL VPN Gateway has a permanent realm named Default with the following characteristics:
• For a new installation, the Default realm is configured for local authentication.
• The authentication type of the Default realm can be changed.
• The Default realm cannot be removed unless you immediately replace it with a new Default
realm.
• The Default realm is assumed when a user enters only a user name when logging on to the
Firebox SSL VPN Gateway.
When a user logs on to any other realm, the user must log on using realmName\userName. Therefore, if
all of your users are authenticated against one authentication server, configure the Default realm for
that type of authentication so that users do not have to enter a realm name when logging on.
Using a Local User List for Authentication
For a new installation, the Default realm is set to local authentication. This enables users to log on to the
Firebox SSL VPN Gateway without having to enter a realm name.
If some users authenticate only against the local user list on the Firebox SSL VPN Gateway, you can keep
the Default realm set to local authentication. Alternatively, you can create a different realm for local
authentication and use the Default realm for another authentication type, as described in “To remove
and create a Default realm”.
If all users authenticate against authentication servers, you do not need a realm for local authentication.
The Firebox SSL VPN Gateway can check the local user database on the appliance for authentication
information if a user fails to authenticate on another authentication server. For example, If you are using
LDAP and the authentication fails, users can log on using the local user database.
To authenticate using the local user list on the
1On the Authentication tab, open the authentication realm on which you
2 want to configure local authentication.
3Click the Settings tab.
4 Select Use the local user database on the Firebox SSL VPN Gateway.
5Click Submit.
This check box is unavailable if the realm is configured for local authentication
Firebox SSL VPN
Note
Gateway
Administration Guide 63
Page 74

Configuring Authentication and Authorization
Configuring Local Users
You can create user accounts locally on the Firebox SSL VPN Gateway to supplement the
users on authentication servers. For example, you might want to create local user
accounts for temporary users, such as consultants or visitors, without creating an
entry for those users on the authentication server. In that case, you add the user to
the Firebox SSL VPN Gateway local user list as described in this section.
To add a user to another group, under Local Users, click and drag the user to the
appropriate user group.
If a user is not a member of a group or groups you defined on the Firebox SSL VPN Gateway, the user
receives the settings for the Default user group. If a user is part of a group other than the Default group,
the user inherits only the settings of the
Default group if the group is configured to receive those settings. For more information, see “Default
group properties” on page 90.
To create a user on the
Firebox SSL VPN
Gateway
1Click the Access Policy Manager tab.
2In the left-pane, right-click Local Users and then click New User.
3In User Name, type a user name. User names can contain spaces.
Note
Note: User names are not case-sensitive. Do not use a forward slash (/) in the user name or password.
Passwords cannot begin or end with a space.
4In Password and Verify Password, type the password for the user.
A user enters this password when logging on. A password must be six or more characters up to a maximum of 127
characters.
5Click OK.
To delete a user from the
Firebox SSL VPN
Gateway
1Click the Access Policy Manager tab.
2 In the left pane, right-click the user in the Local Users list and click Remove.
Adding Users to Multiple Groups
After creating the local user list, you can then add the users to groups that you created on the Firebox
SSL VPN Gateway.
If you associate more than one group with a user account, the properties of the first group that you
select on the Group Priority tab is used for the user.
To add a user to a group
Click the user in the Local Users list and drag it to a group.
Changing Password for Users
You can change the password for a user in the Administration tool.
64 Firebox SSL VPN Gateway
Page 75

Changing the Authentication Type of the Default Realm
To change a user’s password
1On the Access Policy Manager tab, right-click a user, and click Set Password.
2 Type the password twice and then click OK.
Using LDAP Authorization with Local Authentication
By default, the Firebox SSL VPN Gateway obtains an authenticated user’s group(s) from the local group
file stored on the Firebox SSL VPN Gateway. Alternatively, you can configure the Firebox SSL VPN Gateway to obtain an authenticated user’s group(s) from an LDAP server. If the user is not located on the
LDAP server, the Firebox SSL VPN Gateway checks its local group file.
To use LDAP authorization with local authentication
1 In the Firebox SSL VPN Gateway Administration Tool, click the Authentication tab.
2 Open the window for the realm that is configured for local authentication. This is the Default realm
unless the authentication type was changed.
3Click the Authorization tab.
4In Authorization Type, select LDAP Authorization.
5 Complete the information for the LDAP server.
For a description of LDAP server settings, see “Using LDAP Servers for Authentication and Authorization” on page
73. For information about looking up LDAP server settings, see “Determining Attributes in your LDAP Directory”
on page 78.
Changing the Authentication Type of the Default Realm
When a user logs on to the Default realm, the user does not have to specify a realm name. For any other
realm, the user must specify a realm name when logging on. Thus, if most users are logging on to a nonlocal authentication realm, change the authentication type of the Default realm.
To change the authentication type of the Default realm, remove the Default realm and then immediately create a new one.
Configuring the Default Realm
The Firebox SSL VPN Gateway has a permanent realm named Default. The Default realm is preconfigured for local authentication. If you want to change the authentication method of the Default realm, it
must be immediately replaced with a new Default realm.
The Default realm is assumed when a user enters only a user name when logging on to the Access Gateway. For any other realm, the user must specify a realm name when logging on. Thus, if most users are
logging on to a non-local authentication realm, change the authentication type of the Default realm.
To change the authentication type of the Default realm, remove the Default realm
and then immediately create a new realm with the appropriate authentication
configuration.
To remove and create a Default realm
1Click the Authentication tab.
2 Open the window for the Default realm.
Administration Guide 65
Page 76

Changing the Authentication Type of the Default Realm
3On the Action menu, select Remove Default realm.
A warning message appears. Click Ye s .
4Under Add an Authentication Realm, in Realm name, type Default.
Important: When creating a new Default realm, the word Default is case-sensitive and an uppercase D
must be used.
5 Do one of the following:
If configuring one authentication type, select One Source and click Add.
•
If configuring double-source authentication, select Two Source and click Add.
•
6In Authentication type, select the type of authentication and then click
7 Configure the authentication settings. For more information, see:
“Using a Local User List for Authentication” on page 63
•
• “Using LDAP Servers for Authentication and Authorization” on page 73
• “Using RADIUS Servers for Authentication and Authorization” on page 69
• “Using RSA SecurID for Authentication” on page 79
• “Using SafeWord for Authentication” on page 67
• “Configuring NTLM Authentication and Authorization” on page 83
Note
OK.
Creating Additional Realms
You can create realms in addition to the Default realm. For example, you want the Default realm to be
used for authentication to an LDAP server. If you want to use additional authentication methods for
users, such as RADIUS, SafeWord, RSA SecurID, NTLM, or locally on the appliance, you can create
realms for each of these. When the user logs on to realms that are not th e Defa ult r ealm , they n eed to
type the realm name and their user name, such as realm name\user name.
Note
Note: Watchguard recommends that realm names map to their corresponding domain names. This
enables users to log on using either realm name\user name or user name@realm name.
To create a realm
1On the Authentication tab, under Add an Authentication Realm, in Realm name, type the name of
the realm.
2 Do one of the following:
If users have one authentication type, click One Source.
-or-
If users have two authentication types, click Two Source.
3Click Add.
4In Authentication type, select the authentication method, and click OK.
If you are configuring double-source authentication, in Primary
that users will log on to first. In Secondary authentication type, select the type that users will log on to
second. For more information, see “Configuring Double-Source Authentication” on page 85.
5 Configure the settings for the realm and then click Submit.
authentication type, select the type
66 Firebox SSL VPN Gateway
Page 77

Removing Realms
If you are retiring an authentication server or removing a domain server, you can remove any realm
except for the realm named Default. You can remove the Default realm only if you immediately create a
new realm named Default. For more information, see “Configuring the Default Realm” on page 65.
To remove a realm
1On the Authentication tab, open the realm you want to remove.
2On the Action menu, click Remove realm name realm.
The realm is removed.
If you remove the Default realm and do not immediately replace it as described above, the Firebox SSL
VPN Gateway retains the Default realm that you attempted to remove.
Using SafeWord for Authentication
Using SafeWord for Authentication
Note
Configuring Secure Computing SafeWord Authentication
The SafeWord product line provides secure authentication using a token-based passcode. After the
passcode is used, it is immediately invalidated by SafeWord and cannot be used again.
The Firebox SSL VPN Gateway supports SafeWord authentication to the following Secure Computing
products:
•
SafeWord PremierAccess
• SafeWord for Citrix
• SafeWord RemoteAccess
Configuring the Firebox SSL VPN Gateway to authenticate using Secure Computing’s SafeWord products
can be done in several ways:
•
Configure authentication to use a PremierAccess RADIUS server that is installed as part of SafeWord
PremierAccess and allow it to handle authentication.
• Configure authentication to use the SafeWord IAS agent, which is a component of SafeWord
RemoteAccess, SafeWord for WatchGuard, and SafeWord PremierAccess 4.0.
• Install the SafeWord Web Interface Agent to work with the WatchGuard Web Interface. Authentication
does not have to be configured on the Firebox SSL VPN Gateway and can be handled by the
WatchGuard Web Interface. This configuration does not use the PremierAccess RADIUS server or the
SafeWord IAS Agent.
Configuring SafeWord Settings on the Access Gateway
When configuring the SafeWord server, you need the following information:
The IP address of the Firebox SSL VPN Gateway. This should be the same as what is configured on the
•
RADIUS server client configuration.
A shared secret. This secret is also configured on the Authentication tab on the Firebox SSL VPN
•
Gateway.
The IP address and port of the SafeWord server.
•
Administration Guide 67
Page 78

Using SafeWord for Citrix or SafeWord RemoteAccess for Authentication
Configure a SafeWord realm to authenticate users. The Firebox SSL VPN Gateway acts as a SafeWord
agent authenticating on behalf of users logged on using Secure Access Client. If a user is not located on
the SafeWord server or fails authentication, the Access Gateway checks the user against the local user
list if Use the local user database on the Access Gateway is selected on the Settings tab.
To use SafeWord as the Default realm, remove the current Default realm and
described in “To remove and create a Default realm”
To configure SafeWord on the Access Gateway
1 In the Administration Tool, click the Authentication tab.
2Under Add an Authentication Realm, in Realm name, type a name.
3 Select One Source and then click Add.
4In Authentication type, select SafeWord authentication and click OK.
5For the Primary SafeWord server Settings, enter the following settings:
In IP Address, type the IP address of the SafeWord server.
•
• In Port, type the port number for the SafeWord RADIUS server. The default is 1812.
This port must match the number you configured on the RADIUS server.
In Server Secret, enter a RADIUS shared secret.
•
6 The shared secret must match what is configured on the RADIUS server.
7 If there is a second SafeWord server, configure the settings in Secondary SafeWord Server
Settings.
create a new one as
To disable Firebox SSL VPN Gateway authentication
On the Global Cluster Policies tab, under Advanced Options, clear Enable Portal Page Authentication.
SafeWord PremierAccess Authorization
If you are using SafeWord PremierAccess for authentication, you can use the following authorization
types:
•LDAP
• Local user list
•RADIUS
• No authorization
To configure LDAP authorization, see “To configure LDAP authorization” on page 77.
Using SafeWord for Citrix or SafeWord RemoteAccess for
Authentication
Both Safeword for Citrix and SafeWord RemoteAccess use Microsoft’s Internet Authentication Server
(IAS) to provide RADIUS authentication service to the Firebox SSL VPN Gateway. The IAS RADIUS server
receives authentication requests from the Firebox SSL VPN Gateway and sends the user’s credentials to
SafeWord for verification using an installed SafeWord agent for IAS. Multiple instances of IAS (with the
SafeWord agent for IAS) can be deployed for redundancy.
68 Firebox SSL VPN Gateway
Page 79

Using RADIUS Servers for Authentication and Authorization
If you are already using SafeWord for Citrix or SafeWord RemoteAccess in your configuration to authenticate using the Web Interface, you need to do the following:
• Install and configure the SafeWord IAS Agent
• Configure the IAS RADIUS server to recognize the Firebox SSL VPN Gateway as a RADIUS client
• Configure the Firebox SSL VPN Gateway to send RADIUS authentication requests to the IAS
RADIUS server
To install and configure the IAS Agent and the IAS RADIUS server, see the SafeWord for Citrix or SafeWord Remote Access product documentation.
If you are not currently using SafeWord for Citrix or SafeWord RemoteAccess, you should first install one
of these servers following the product documentation.
To configure the Firebox SSL VPN Gateway to send RADIUS authentication requests to the IAS RADIUS
server, follow the instructions in “Using RADIUS Servers for Authentication and Authorization” on page
69.
To configure the IAS RADIUS realm
1Click the Authentication tab.
2In Realm Name, type a name for the authentication realm that you will create, select One Source,
and then click Add.
3In Select Authentication Type, in Authentication Type, select RADIUS Authentication and click
OK.
4On the Authentication tab, in Server IP Address, type the IAS RADIUS server IP address.
5In Server Port, type the IAS RADIUS server port. The default port numbers are 1812 and 1645.
6In Server Secret, type a RADIUS share secret.
Note
Make sure you use a strong shared secret. A strong shared secret is one that is at least eight characters
and includes a combination of letters, numbers, and symbols.
7 If there is a secondary IAS RADIUS server, configure the settings for the server in Secondary Radius
Server.
The RADIUS port number and the RADIUS server secret configured on the Firebox SSL VPN Gateway must match
those configured on the IAS RADIUS server.
Using RADIUS Servers for Authentication and Authorization
You can configure the Firebox SSL VPN Gateway to authenticate user access with one or more RADIUS
servers. For each RADIUS realm that you use for authentication, you can configure both primary and secondary RADIUS servers. If the primary RADIUS server is unavailable, the Firebox SSL VPN Gateway
attempts to authenticate against the secondary RADIUS server for that realm.
If a user is not located on the RADIUS servers or fails authentication, the Firebox SSL VPN Gateway
checks the user against the user information stored locally on the Firebox SSL VPN Gateway if the
Enable Local Database lookup check box is selected on the Settings tab of the realm.
The Firebox SSL VPN Gateway software also includes RADIUS authorization, which is configured using
Remote Access Policy in Microsoft Internet Authentication Service (IAS). During configuration of the
Firebox SSL VPN Gateway, the following information needs to be provided:
• Vendor ID is the vendor-specific code number that was entered in IAS.
Administration Guide 69
Page 80

Using RADIUS Servers for Authentication and Authorization
•Type is the vendor-assigned attribute number.
• Attribute name is the type of attribute name that is defined in IAS. The default name is
CTXSUserGroups=.
• Separator is defined if multiple user groups are included in the RADIUS configuration. A separator
can be a space, a period, a semicolon, or a colon.
To configure IAS so the Firebox SSL VPN Gateway can use RADIUS authorization, follow the steps below.
These steps assume that IAS is installed from the Add/Remove Programs Control Panel. For more information about installing IAS, see Windows Help.
To configure Microsoft Internet Authentication Service for Windows 2000 Server
1 Open the Microsoft Management Console (MMC) by clicking Start > Run.
2In Open, type MMC.
3 In the MMC console, on the File menu, click Add/Remove Snap-in.
4Click Add and in the Add/Remove Snap-in dialog box, select Internet Authentication Service
and click Add.
5 Select Local computer and click Finish.
6Click Close and then click OK.
7Right-click Remote Access Policies and then click New Remote Access Policy.
8 Select Set up a custom policy.
9In Policy name, give the policy a name and click Next.
10 Under Policy Conditions, click Add, select Windows-Groups, and click Add.
11 In Select Groups, click Add, and then type the name of the group.
12 A summary of conditions to match the policy is shown. To add more conditions, click Add,
otherwise, click Next.
13 In the Edit Dial-In Profile dialog box, on the Authentication tab, select Encrypted
Authentication (CHAP) and Unencrypted Authentication (PAP, SPAP).
Note
Password Authentication Protocol (PAP) is an authentication protocol that allows Point-to-Point
Protocol (PPP) peers to authenticate one another. PAP passes the password and host name or user name
unencrypted. PAP does not prevent unauthorized access but identifies the remote end.
14 Clear Microsoft Encrypted Authentication version 2 (MS-CHAP v2) and Microsoft Encrypted
Authentication (MS-CHAP).
15 Click OK.
The Firebox SSL VPN Gateway needs the Vendor-Specific Attribute to match the users defined in the group on the
server with those on the Firebox SSL VPN Gateway. This is done by sending the Vendor-Specific Attributes to the
Firebox SSL VPN Gateway.
16 In the Edit Dial-in Profile dialog box, click the Advanced tab.
17 Click Add.
70 Firebox SSL VPN Gateway
Page 81

Using RADIUS Servers for Authentication and Authorization
18 In the Add Attributes dialog box, select Vendor-Spec ific and click Add.
19 In the Vendor-Specific Attribute Information dialog box, choose Select from list and accept the
default RADIUS=Standard.
The Firebox SSL VPN Gateway needs the Vendor-Specific Attribute to match the users defined in the group on the
server with those on the Firebox SSL VPN Gateway.
This is done by sending the Vendor-Specific Attributes to the Firebox SSL VPN Gateway
20 The RADIUS default is 0. When configuring RADIUS authorization on the Firebox SSL VPN Gateway,
in the field Vendor Code, use this default number.
21 Click Yes . I t conf o rm s and then click Configure Attribute.
22 Under Vendor-assigned attribute number, type 0.
This is the assigned number for the User Group attribute. The attribute is in string format. The default is 0.
23 In Attribute format, select String.
24 In Attribute value, type the attribute name and the groups.
For the Firebox SSL VPN Gateway, the attribute value is CTXSUserGroups=
such as sales and finance, the attribute value is CTXSUserGroups=sales;finance. Separate each group with a
semicolon.
groupname
. If two groups are defined,
25 Click OK.
26 In the Edit Dial-in Profile dialog box, remove all the other entries, leaving the one that says
Vendor-Specific.
27 Click OK.
When you are finished configuring the Remote Access Policy in IAS, go to the Firebox SSL VPN Gateway
and configure the RADIUS authentication and authorization.
Administration Guide 71
Page 82

Using RADIUS Servers for Authentication and Authorization
To specify RADIUS server authentication
1Click the Authentication tab.
2In Realm Name, type a name for the authentication realm that you will create, select One Source,
and then click Add.
If your site has multiple authentication realms, use a name that identifies the RADIUS realm for which you will
specify settings. Realm names are case-sensitive and can contain spaces.
If you want the Default realm to use RADIUS authentication, remove the Default realm as described in
“Changing the Authentication Type of the Default Realm” on page 65.
3In Select Authentication Type, choose RADIUS Authentication and click OK.
The dialog box for the authentication realm opens.
4In Server IP Address, type the IP address of the RADIUS server.
5In Server Port, type the port number. The default port number is 1812.
6In Server Secret, type the RADIUS server secret.
The server secret is configured manually on the RADIUS server and on the Firebox SSL VPN Gateway.
7 If you use a secondary RADIUS server, enter its IP address, port, and server secret.
Make sure you use a strong shared secret. A strong shared secret is one that is at least eight characters
and includes a combination of letters, number, and symbols.
Note
Note
To configure RADIUS authorization
1Click the Authorization tab and in Authorization Type, select RADIUS Authorization.
You can use the following authorization types with RADIUS authentication:
• RADIUS authorization
• Local authorization
• LDAP authorization
• No authorization
2 Complete the settings using the attributes defined in IAS.
For more information about the values for these fields, see “To configure Microsoft Internet Authentication Service
for Windows 2000 Server” on page 70.
3Click Submit.
Choosing RADIUS Authentication Protocols
The Firebox SSL VPN Gateway supports implementations of RADIUS that are configured to use the Password Authentication Protocol (PAP) for user authentication. Other authentication protocols such as the
Challenge-Handshake Authentication Protocol (CHAP) are not supported.
If your deployment of Firebox SSL VPN Gateway is configured to use RADIUS authentication and your
RADIUS server is configured to use PAP, you can strengthen user authentication by assigning a strong
shared secret to the RADIUS server. Strong RADIUS shared secrets consist of random sequences of
uppercase and lowercase letters, numbers, and punctuation and are at least 22 keyboard characters
long. If possible, use a random character generation program to determine RADIUS shared secrets.
To further protect RADIUS traffic, assign a different shared secret to each Firebox SSL VPN Gateway
appliance. When you define clients on the RADIUS server, you can also assign a separate shared secret to
each client. If you do this, you must configure separately each Firebox SSL VPN Gateway realm that uses
72 Firebox SSL VPN Gateway
Page 83

Using LDAP Servers for Authentication and Authorization
RADIUS authentication. If you synchronize configurations among several Firebox SSL VPN Gateway
appliances in a cluster, all the appliances are configured with the same secret. Shared secrets are configured on the Firebox SSL VPN Gateway when a RADIUS realm is created.
Using LDAP Servers for Authentication and Authorization
You can configure the Firebox SSL VPN Gateway to authenticate user access with an LDAP server. If a
user is not located in an LDAP directory or fails authentication on a server, the Firebox SSL VPN Gateway
checks the user against the user information stored locally on the Firebox SSL VPN Gateway.
LDAP authorization requires identical group names in Active Directory, on the LDAP server, and on the
Firebox SSL VPN Gateway. The characters and case must also be the same.
LDAP authentication
Starting with Version 5.0 of the Firebox SSL VPN Gateway, LDAP authentication, by default, is secure
using SSL/TLS. There are two types of secure LDAP connections. With one type, the LDAP server accepts
the SSL/TLS connection on a port separate from the port used to accept clear LDAP connections. After a
client establishes the SSL/TLS connection, LDAP traffic can be sent over the connection. The second
type allows both unsecure and secure LDAP connections and is handled by a single port on the server.
In this scenario, to create a secure connection, the client first establishes a clear LDAP connection. Then,
the LDAP command StartTLS is sent to the server over the connection. If the LDAP server supports StartTLS, the connection is converted to a secure LDAP connection using TLS.
The standard port numbers for unsecure LDAP connections is 389. The port number for secure LDAP
connections with SSL/TLS is 636. LDAP connections that use the StartTLS command use port number
389. The Microsoft port numbers for unsecure and secure LDAP connections are 3268 and 3269. If port
numbers 389 or 3268 are configured on the Firebox SSL VPN Gateway, it tries to use StartTLS to make
the connection. If any other port number is used, connection attempts are made using SSL/TLS.
When configuring the Firebox SSL VPN Gateway to use LDAP authentication and the check box Allow
Unsecure Traffic is selected, LDAP connections are unsecure.
Note
When upgrading the Firebox SSL VPN Gateway from an earlier version, and an LDAP realm is already
configured, LDAP connections are unsecure by default. If this is a new installation of the Firebox SSL VPN
Gateway, or you are creating a new LDAP realm, LDAP connections are secure by default.
When configuring the LDAP server, the letter case must match what is on the server and what is on the
Firebox SSL VPN Gateway. If the root directory of the LDAP server is specified, all of the subdirectories
are also searched to find the user attribute. In large directories, this can affect performance; we recommend that you use a specific organizational unit (OU).
The following table contains examples of user attribute fields for LDAP servers.
LDAP Server User Attribute Case Sensitive
Microsoft Active Directory Server sAMAccountName No
Novell eDirectory cn Yes
IBM Directory Server uid
Lotus Domino CN
Sun ONE directory (formerly iPlanet) uid or cn Yes
Administration Guide 73
Page 84

Using LDAP Servers for Authentication and Authorization
This table contains examples of the base dn
Microsoft Active Directory Server DC=citrix, DC=local
Novell eDirectory dc=citrix,dc=net
IBM Directory Server
Lotus Domino OU=City, O=Citrix, C=US
Sun ONE directory (formerly iPlanet) ou=People,dc=citrix,dc=com
The following table contains examples of bind dn:
Microsoft Active Directory Server CN=Administrator, CN=Users, DC=citrix, DC=local
Novell eDirectory cn=admin, dc=citrix, dc=net
IBM Directory Server
Lotus Domino CN=Notes Administrator, O=Citrix, C=US
Sun ONE directory (formerly iPlanet) uid=admin,ou=Administrators,
ou=TopologyManagement,o=NetscapeRoot
Note
For further information to determine the LDAP server settings, see “Determining Attributes in your
LDAP Directory” on page 78.
To configure LDAP authentication
1Click the Authentication tab.
2In Realm Name, type a name for the authentication realm.
If your site has multiple authentication realms, you might use a name that identifies the LDAP realm for which you
specify settings. Realm names are case-sensitive and can contain spaces.
Note
If you want the Default realm to use LDAP authentication, remove the Default realm as described in
“Changing the Authentication Type of the Default Realm” on page 65.
3 Select One Source and click Add.
4In Select Authentication Type, in Authentication Type, choose LDAP Authentication and click
OK.
The Realm dialog box opens.
5Click the Authentication tab.
6In Server IP Address, type the IP address of the LDAP server.
7In Server Port, type the port number.
The LDAP Server port defaults to 389. If you are using an indexed database, such as Microsoft Active
Directory with a Global Catalog, changing the LDAP Server port to 3268 significantly increases the
speed of the LDAP queries.
If your directory is not indexed, use an administrative connection rather than an anonymous
connection from the Firebox SSL VPN Gateway to the database. Download performance improves
when you use an administrative connection.
74 Firebox SSL VPN Gateway
Page 85

LDAP Authorization
8 Select Allow Unsecure Traffic to allow unsecure LDAP connections.
When this check box is clear, all LDAP connections are secure.
9In Administrator Bind DN, type the Administrator Bind DN for queries to your LDAP directory.
The following are examples of syntax for Bind DN:
“domain/user name”
“ou=administrator,dc=ace,dc=com”
“user@domain.name” (for Active Directory)
“cn=Administrator,cn=Users,dc=ace,dc=com”
For Active Directory, the group name specified as cn=groupname is required. The group name that
is defined in the Firebox SSL VPN Gateway must be identical to the group name that is defined on
the LDAP server.
For other LDAP directories, the group name either is not required or, if required, is specified as
ou=groupname.
The Firebox SSL VPN Gateway binds to the LDAP server using the administrator credentials and then
searches for the user. After locating the user, the Firebox SSL VPN Gateway unbinds the
administrator credentials and rebinds with the user credentials.
10 In Administrator Password, type the password.
11 In Base DN (where users are located), type the Base DN under which users are located.
Base DN is usually derived from the Bind DN by removing the user name and specifying the group
where users are located. Examples of syntax for Base DN:
“ou=users,dc=ace,dc=com”
“cn=Users,dc=ace,dc=com”
12 In Server login name attribute, type the attribute under which the Firebox SSL VPN Gateway
should look for user logon names for the LDAP server that you are configuring. The default is
sAMAccountName. If you are using other directories, use cn.
13 Click Submit.
If a user is not located in an LDAP directory or fails authentication on a server, the Firebox SSL VPN Gateway checks the user against the user information stored locally on the Firebox SSL VPN Gateway.
LDAP authorization requires identical group names in Active Directory, on the Firebox SSL VPN Gateway,
and on the LDAP server. The characters and case must also be the same.
Note
For further information to determine the LDAP server settings, see “Determining Attributes in your
LDAP Directory” on page 78.
LDAP Authorization
The following is a discussion of LDAP group memberships attributes that will and will not work with
Firebox SSL VPN Gateway authorization.
You can use the following authorization types with LDAP authentication:
Local authorization
•
• LDAP authorization
• No authorization
If you are using double-source authentication, authorization is based on the primary authentication
method, not the secondary authentication method.
Administration Guide 75
Page 86

LDAP Authorization
Group memberships from group objects working evaluations
LDAP servers that evaluate group memberships from group objects indirectly work with Firebox SSL
VPN Gateway authorization.
Some LDAP servers enable user objects to contain information about groups to which they belong, such
as Active Directory or eDirectory. A user’s group membership can be computable attributes from the
user object, such as IBM Directory Server or Sun ONE directory server. In some LDAP servers, this
attribute can be used to include a user’s dynamic group membership, nesting group membership, and
static group membership to locate all group memberships from a single attribute.
For example, in IBM Directory Server, all group memberships, including the static, dynamic, and nested
groups, can be returned using the ibm-allGroups attribute. In Sun ONE, all roles, including managed, filtered, and nested, are calculated using the nsRole attribute.
Group memberships from group objects non-working evaluations
LDAP servers that evaluate group memberships from group objects indirectly will not work with Firebox
SSL VPN Gateway authorization.
Some LDAP servers enable only group objects such as the Lotus Domino LDAP server to contain information about users. The LDAP server does not enable the user object to contain information about
groups. For this type of LDAP server, group membership searches are performed by locating the user on
the member list of groups.
LDAP authorization group attribute fields
The following table contains examples of LDAP group attribute fields.
Microsoft Active Directory Server memberOf
Novell eDirectory groupMembership
IBM Directory Server ibm-allGroups
Sun ONE directory (formerly iPlanet)* nsRole
To configure LDAP authentication
1Click the Authentication tab.
2In Realm Name, type a name for the authentication realm that you will create, select One Source,
and then click Add.
If your site has multiple authentication realms, you might use a name that identifies the LDAP realm for which you
will specify settings. Realm names are case-sensitive and can contain spaces.
Note
If you want the Default realm to use LDAP authentication, remove the Default realm as described in
“Changing the Authentication Type of the Default Realm” on page 65.
3In Select Authentication Type, choose LDAP Authentication and click OK.
The Realm dialog box opens.
4Click the Authentication tab.
5In Server IP Address, type the IP address of the LDAP server.
6In Server Port, type the port number.
76 Firebox SSL VPN Gateway
Page 87

LDAP Authorization
The LDAP Server port defaults to 389. If you are using an indexed database, such as Microsoft Active
Directory with a Global Catalog, changing the LDAP Server port to 3268 significantly increases the
speed of the LDAP queries.
If your directory is not indexed, use an administrative connection rather than an anonymous
connection from the Firebox SSL VPN Gateway to the database. Download performance improves
when you use an administrative connection.
7In Administrator Bind DN, type the Administrator Bind DN for queries to your LDAP directory.
The following are examples of syntax for Bind DN:
“domain/user name”
“ou=administrator,dc=ace,dc=com”
“user@domain.name” (for Active Directory)
“cn=Administrator,cn=Users,dc=ace,dc=com”
For Active Directory, the group name specified as cn=groupname is required. The group name that
is defined in the Firebox SSL VPN Gateway must be identical to the group name that is defined on
the LDAP server.
For other LDAP directories, the group name either is not required or, if required, is specified as
ou=groupname.
The Firebox SSL VPN Gateway binds to the LDAP server using the administrator credentials and then
searches for the user. After locating the user, the Firebox SSL VPN Gateway unbinds the
administrator credentials and rebinds with the user credentials.
8In Administrator Password, type the password.
9In Base DN (where users are located), type the Base DN under which users are located.
Base DN is usually derived from the Bind DN by removing the user name and specifying the group
where users are located. Examples of syntax for Base DN:
“ou=users,dc=ace,dc=com”
“cn=Users,dc=ace,dc=com”
10 In Server login name attribute type the attribute under which the Firebox SSL VPN Gateway
should look for user logon names for the LDAP server that you are configuring. The default is
sAMAccountName. If you are using other directories, use cn.
11 Click Submit.
After configuring LDAP authentication, configure LDAP authorization.
To configure LDAP authorization
1Click the Authorization tab.
2In LDAP Server IP Address, type the IP address of the LDAP server.
3In LDAP Server Port, type the port number. The default port number is 389.
4In LDAP Administrator Bind DN, type the Administrator Bind DN for queries to your LDAP
directory.
The following are examples of syntax for Bind DN:
domain/user name
“ou=administrator,dc=ace,dc=com”
“user@domain.name” (for Active Directory)
“cn=Administrator,cn=Users,dc=ace,dc=com”
Administration Guide 77
Page 88

LDAP Authorization
For Active Directory, the group name specified as cn=groupname is required. The group name that
is defined in the Firebox SSL VPN Gateway must be identical to the group name that is defined on
the LDAP server.
For other LDAP directories, the group name either is not required or, if required, is specified as
ou=groupname.
The Firebox SSL VPN Gateway binds to the LDAP server using the administrator credentials and then
searches for the user. After locating the user, the Firebox SSL VPN Gateway unbinds the
administrator credentials and rebinds with the user credentials.
5In LDAP Administrator Password, type the password.
6In LDAP Base DN (where users are located), type the Base DN under which users are located.
Base DN is usually derived from the Bind DN by removing the user name and specifying the group
where users are located. The following are examples of syntax for Base DN:
“ou=Users,dc=ace,dc=com”
“cn=Users,dc=ace,dc=com”
7In LDAP Server login name attribute, type the attribute under which the Firebox SSL VPN
Gateway should look for user logon names for the LDAP server that you are configuring. The default
is cn. If Active Directory is used, type the attribute sAMAccountName.
8In LDAP Group Attribute, type the name of the attribute. The default is “memberOf.” This attribute
enables the Firebox SSL VPN Gateway to obtain the groups associated with a user during
authorization.
9Click Submit.
Using certificates for secure LDAP connections
You can use a secure client certificate with LDAP authentication and authorization. To use a client certificate, you must have an enterprise Certificate Authority, such as Certificate Services in Windows Server
2003, running on the same computer that is running Active Directory. You can create a client certificate
using the Certificate Authority.
To use a client certificate with LDAP authentication and authorization, it must be a secure certificate
using SSL. Secure client certificates for LDAP are uploaded to the Firebox SSL VPN Gateway.
To upload a secure client certificate for LDAP
1On the VPN Gateway Cluster tab, click the Administration tab.
2Next to Upload Private Key + Client Certificate for LDAP, click Browse.
3 Navigate to the client certificate and click Open.
Determining Attributes in your LDAP Directory
If you need help determining your LDAP Directory attributes, you can easily look them up with the free
LDAP Browser from Softerra.
To install and set up the LDAP Browser
1 Download the free LDAP Browser application from the Softerra LDAP Administrator Web site http://
www.ldapbrowser.com.
2 Install LDAP Browser and open it.
3 From the LDAP Browser window, choose File > New Profile and specify the following settings:
78 Firebox SSL VPN Gateway
Page 89

Using RSA SecurID for Authentication
Host
Host name or IP address of your LDAP server.
Port
Defaults to 389.
Base DN
You can leave this field blank. (The information provided by the LDAP Browser will help you
determine the Base DN needed for the Authentication tab.)
Anonymous Bind
Select the check box if the LDAP server does not require credentials to connect to it. If the LDAP
server requires credentials, leave the check box cleared, click Next, and enter the credentials.
4Click Finish.
The LDAP Browser displays the profile name that you just created in the left pane of the LDAP Browser window and
connects to the LDAP server.
To look up LDAP attributes
1 In the left pane of the LDAP Browser, select the profile name that you created.
2 To look up the Base DN, in the right pane, locate the namingContexts attribute. The value of that
attribute is the Base DN for your site. The Base DN is typically dc=myDomain,dc=com (if your
directory tree is based on Internet domain names) or ou=domain,o=myOrg,c=country.
3 Navigate through the browser to locate other attributes.
Using RSA SecurID for Authentication
If your site uses an RSA ACE/Server and SecurID for authentication, you can configure the Firebox SSL
VPN Gateway to authenticate user access with the
RSA ACE/Server. The Firebox SSL VPN Gateway acts as an RSA Agent Host, authenticating on behalf of
the users who use Secure Access to log on. The Firebox SSL VPN Gateway supports the use of one RSA
ACE/Server.
Administration Guide 79
Page 90

Using RSA SecurID for Authentication
The Firebox SSL VPN Gateway supports RSA ACE/Server Version 5.2 and higher. The Firebox SSL VPN
Gateway also supports replication servers. Replication server configuration is completed on the RSA
ACE/Server and is part of the sdconf.rec file that is uploaded to the Firebox SSL VPN Gateway. If this is
configured on the RSA ACE/Server, the Firebox SSL VPN Gateway attempts to connect to the replication
servers if there is a failure or network connection loss with the primary server.
If you are running a RADIUS server on an RSA server, configure RADIUS authentication as described in
“Using RADIUS Servers for Authentication and Authorization” on page 69.
If a user is not located on the RSA ACE/Server or fails authentication on that server, the Firebox SSL VPN
Gateway checks the user against the user information stored locally on the Firebox SSL VPN Gateway
the check box Use the local user database on the Access Gateway is checked on the Settings tab.
The Firebox SSL VPN Gateway supports Next Token Mode. If a user enters three incorrect passwords, the
Secure Access Client prompts the user to wait until the next token is active before logging on. If a user
logs on too many times with an incorrect password, the RSA server might disable the user’s account.
To contact the RSA ACE/Server, the Firebox SSL VPN Gateway must include a copy of the ACE Agent Host
sdconf.rec configuration file that is generated by the RSA ACE/Server. The following procedures
describe how to generate and upload that file.
The following steps describe the required settings for the Firebox SSL VPN Gateway. Your site might
have additional requirements. Refer to the RSA ACE/ Server documentation for more information.
If the Firebox SSL VPN Gateway needs to be imaged again, see “Resetting the node secret” on page 82.
Note
, if
Note
To generate a sdconf.rec file for the Firebox SSL VPN Gateway
1 On the computer where your RSA ACE/Server Administration interface is installed, go to Start >
Programs > RSA ACE Server > Database Administration - Host Mode.
2 In the RSA ACE/Server Administration interface, go to Agent Host > Add Agent Host (or, if you are
changing an Agent Host, Edit Agent Host).
3In the Name field, enter a descriptive name for the Firebox SSL VPN Gateway (the Agent Host for
which you are creating a configuration file).
4In the Network address field, enter the internal Firebox SSL VPN Gateway IP address.
5For Agent type, select UNIX Agent.
6 Make sure that the Node Secret Created check box is clear and inactive when you are creating an
Agent Host. The RSA ACE/Server sends the Node Secret to the Firebox SSL VPN Gateway the first
time that it authenticates a request from the Firebox SSL VPN Gateway. After that, the Node Secret
Created check box is selected. By clearing the check box and generating and uploading a new
configuration file, you can force the RSA ACE/Server to send a new Node Secret to the Firebox SSL
VPN Gateway.
7 Indicate which users can be authenticated through the Firebox SSL VPN Gateway through one of
the following methods:
• To configure the Firebox SSL VPN Gateway as an open Agent Host, click Open to All Locally
Known Users and then click OK.
• To select the users to be authenticated, click OK, go to Agent Host > Edit Agent Host, select the
Firebox SSL VPN Gateway host, and then click OK. In the dialog box, click the User Activations
button and select the users.
80 Firebox SSL VPN Gateway
Page 91

Using RSA SecurID for Authentication
8 To create the configuration file for the new or changed Agent Host, go to Agent Host > Generate
Configuration Files.
The file that you generate (sdconf.rec) is what you will upload to the Firebox SSL VPN Gateway, as described in the
next procedure.
Enable RSA SecurID authentication for the Firebox SSL VPN Gateway
You can use the following authorization types with RSA SecureID authentication:
RSA authorization
•
• Local authorization
• LDAP authorization
•No authorization
To enable RSA SecurID authentication
1 Click the Authentication tab.
2In Realm Name, type a name to identify the RSA ACE/Server. Realm names are case-sensitive and
can contain spaces.
3 Select One Source and click Add.
Note
If you want the Default realm to use RSA authentication, remove the Default realm as described in
“Changing the Authentication Type of the Default Realm” on page 65.
4In the Select Authentication Type dialog box, in Authentication Type, select RSA SecurID
Authentication.
5Click OK.
A dialog box for the authentication realm opens.
6 To upload the sdconf.rec file that you generated in the previous procedure, on the Authentication
tab, click Upload sdconf.rec file and use the dialog box to locate and upload the file.
The sdconf.rec file is typically written to ace\data\config_files and to windows\system32.
Note
If an invalid sdconf.rec file is uploaded to the Firebox SSL VPN Gateway, it might cause the Firebox SSL
VPN Gateway to send out messages to non-existent IP addresses. This might be flagged in a network
monitor as network spamming.
• The file status message indicates whether or not an sdconf.rec file was uploaded. If one was
uploaded and you need to replace it, click Upload sdconf.rec file and use the dialog box to
locate and upload the file.
• The first time that a client is successfully authenticated, the
RSA ACE/Server writes some configuration files to the Firebox SSL VPN Gateway. If you
subsequently change the IP address of the Firebox SSL VPN Gateway, click Remove ACE
Configuration Files, restart when prompted, and then upload a new sdconf.rec file.
7 To use LDAP for authorization, click the Authorization tab and complete the settings.
For more information about LDAP settings, see “Using LDAP Servers for Authentication and Authorization” on
page 73. For looking up LDAP server settings, see “Determining Attributes in your LDAP Directory” on page 78.
8Click Submit.
Administration Guide 81
Page 92

Using RSA SecurID for Authentication
Configuring RSA Settings for a Cluster
If you have two or more appliances configured as a cluster, the sdconf.rec file needs to contain the
FQDNs of all the appliances. The sdconf.rec file is installed on one Access Gateway and then published.
This allows all of the appliances to connect to the RSA server.
You can also limit connections to the RSA server from user connections. For example, you have three
appliances in your cluster. If the FQDNs of the first and second appliances are included in the sdconf.rec
file and the third appliance is not, users can connect only to the RSA server using the first two appliances.
Resetting the node secret
If you reimaged the Firebox SSL VPN Gateway, giving it the same IP address as before, and restored your
configuration, you must also reset the node secret on the RSA ACE/Server. Because the Firebox SSL VPN
Gateway was reimaged, the node secret no longer resides on it and an attempt to authenticate with the
RSA ACE/Server fails.
After you reset the server secret on the RSA ACE/Server, the next authentication attempt prompts the
RSA ACE/Server to send a node secret to the Firebox SSL VPN Gateway.
To reset the node secret on the RSA ACE/Server
1 On the computer where your RSA ACE/Server Administration interface is installed, go to Start >
Programs > RSA ACE Server > Database Administration - Host Mode.
2 In the RSA ACE/Server Administration interface, go to Agent Host > Edit Agent Host.
3 Select the Firebox SSL VPN Gateway IP address from the list of agent hosts.
4Clear the Node Secret Created check box and save the change.
5 The RSA server sends the node secret on the next authentication attempt from the Firebox SSL VPN
Gateway.
Configuring Gemalto Protiva Authentication
Protiva is a strong authentication platform that was developed to use the strengths of Gemalto’s smart card
authentication. With Protiva, users log on with a user
by the Protiva device. Similar
tion Server and the password is either validated or rejected.
to RSA SecurID, the authentication request is sent to the Protiva Authentica-
To configure Gemalto Protiva to work with the Access Gateway, use the following guidelines:
Install the Protiva server.
•
• Install the Protiva Internet Authentication Server (IAS) agent plug-in on a Microsoft IAS RADIUS server.
Make sure you note the IP address and port number of the IAS server
• Configure a realm on the Access Gateway to use RADIUS authentication and enter the settings of the
Protiva server.
To configure a Gemalto Protiva realm
1 In the Administration Tool, click the Authentication tab.
2Under Add an Authentication Realm, in Realm name, type a name.
3 Select One Source and then click Add.
82 Firebox SSL VPN Gateway
name, password, and one-time password generated
Page 93

Using RSA SecurID for Authentication
Note
Note: If you are configuring double-source authentication, click Two Source and then click Add. For
more information about configuring double-source authentication, see “Configuring Double-Source
Authentication” on page 85.
4In IP address type the IP address of the RADIUS IAS server.
5In Port, type the port number.
6In Server secret, type the node secret of the RADIUS IAS server.
7 Select Use the password one time and click Submit
Configuring NTLM Authentication and Authorization
You can configure the Firebox SSL VPN Gateway to use Windows NT LAN Manager (NTLM) authentication to authenticate users against the user database on a Windows NT 4.0 domain controller.
If a user is not located in the user database on the Windows NT 4.0 domain controllers, or fails authentication, the Firebox SSL VPN Gateway can check for the user name in the Local Users list on the Firebox
SSL VPN Gateway and authenticate the user against the local list if Use the local user database on the
Firebox SSL VPN Gateway check box is selected on the Settings tab.
A Windows NT 4.0 domain controller maintains domain user accounts in a database on the Windows NT
4.0 server. A domain user account includes a user name and password and other information about the
user.
To configure NTLM authentication, you create an NTLM authentication realm
and port that the Firebox SSL VPN Gateway uses to connect to the Windows NT 4.0 domain controller. You
also specify a time-out value in which an authentication attempt to the server must complete.
When a user logs on to the Firebox SSL VPN Gateway, the user enters the user name and password maintained in the domain user account on the Windows NT 4.0 server.
The Firebox SSL VPN Gateway connects to the Windows NT 4.0 server and passes these credentials to
the server. The server authenticates the user.
that includes the address
To configure NTLM authentication
1Click the Authentication tab.
2Under Add an Authentication Realm, in Realm name, type a name for
If your site has multiple authentication realms, you might use a name that identifies the NTLM realm for which you
specify settings. Realm names are case-sensitive and can contain spaces.
the authentication realm.
Note
Note: If you want the Default realm to use NTLM authentication, remove the Default realm as described
in “To remove and create a Default realm” on page 70.
3 Select One Source and click Add.
4In Select Authentication Type, in Authentication type, choose NTLM
The Realm dialog box opens.
authentication and click OK.
5Click the Authentication tab.
6In IP Address or FQDN, type the IP address of the Windows NT 4.0 domain controller.
7In Port, type the port number on which the Windows NT 4.0 domain
authentication connection.
The default port entry for NTLM authentication connections is 139.
Administration Guide 83
controller listens for the NTLM
Page 94

Using RSA SecurID for Authentication
Note: When 0 (zero) is entered as the port, the Access Gateway attempts to automatically detect a port
number for this connection.
8In Time-out (in seconds), enter the number of seconds within which the authentication attempt
must complete. If the authentication does not complete within this time interval, it fails.
9Click Submit.
Configuring NTLM Authorization
A Windows NT 4.0 domain controller maintains group accounts. A group account is a collection of individual user domain accounts (and other accounts).
To configure NTLM authorization, you click the Authorization tab in the authentication realm and enter
the address and port that the Firebox SSL VPN Gateway uses to connect to the Windows NT 4.0 domain
controller. You also specify a time-out value in which an authorization attempt to the Windows NT
server must complete.
After a user successfully authenticates, the domain controller returns to the Firebox SSL VPN Gateway a
list of all global groups of which the authenticated user is a member.
The Firebox SSL VPN Gateway then looks for a user group name on the Firebox SSL VPN Gateway that
matches the name of a Windows NT 4.0 global group to which the user belongs. If the Firebox SSL VPN
Gateway finds a match, the user is granted the authorization privileges to the internal networks that are
associated with the user group on the Firebox SSL VPN Gateway.
Note
To configure NTLM authorization
1Click the Authentication tab and open the authentication realm for which you want to enable NTLM
authorization.
2Click the Authorization tab.
3In Authorization type, select NTLM authorization.
4In Server IP Address or FQDN, type the FQDN or IP address of the Windows NT 4.0 domain
controller that will perform the NTLM authorization.
5In Server Port, type the port number.
The default port entry for NTLM authentication connections is 139.
Note
Note: When 0 (zero) is entered as the port, the Firebox SSL VPN Gateway attempts to automatically
detect a port number for this connection.
6In Timeout (in seconds), enter the number of seconds within which the authorization attempt must
complete before the authentication attempt is abandoned.
7Click Submit.
Configuring Authentication to use One-Time Passwords
If authentication on the Firebox SSL VPN Gateway is configured to use a one-time password with
RADIUS, such as provided by an RSA SecurID token, the Firebox SSL VPN Gateway attempts to reauthenticate users using the cached password. This occurs when changes are made to the Firebox SSL VPN
Gateway using the Administration Tool or if the connection between the Secure Access Client and the
Firebox SSL VPN Gateway is interrupted and then restored.
84 Firebox SSL VPN Gateway
Page 95

You can prevent the storage of one-time passwords in cache, which forces the user to enter their credentials again.
To prevent caching of one-time passwords
1 In the Administration Tool, click the Authentication tab.
2 Open the authentication realm that uses the one-time password.
3 Select Use the password one time and click Submit.
Configuring Double-Source Authentication
The Firebox SSL VPN Gateway supports double-source authentication. On the Authentication tab, you
can configure two types of authentication, such as LDAP and RSA SecurID for one realm. When users log
on to the Firebox SSL VPN Gateway using a Web browser, and double-source authentication is configured, they are redirected automatically to a logon Web portal page. There, they type in their user name
and passwords for each type of authentication. If they are using the Secure Access Client to log on, the
Secure Access dialog box appears requesting the same information as the Web page.
There can be a mix of double-source authentication realms. For example, you can have one or more
realms for single authentication and then have one or more realms configured for double-source
authentication. In a mixed authentication environment, when users log on using either the Web
browser or Secure Access Client, they will see two password fields. If they are logging on using only one
authentication method, the second password field is left blank.
For more information about logging on using the Web-based portal page, see “Double-source Authentication Portal Page” on page 43.
Configuring Double-Source Authentication
To create and configure a double-source authentication realm
1On the Authentication tab, click Authentication.
2In Realm Name, type a name.
3 Select Two Source and then click Add.
4In the Select Authentication Type dialog box, select the authentication types in Primary
Authentication Type and Secondary Authentication Type.
5Click Add.
6On the Primary Authentication tab, configure the settings for the first authentication type and
click Submit.
7On the Secondary Authentication tab, configure the settings for the second authentication type
and click Submit.
8On the Authorization tab, in Authorization Type, select the authorization type you want to use,
configure the settings, and click Submit.
Double-source authentication works in reverse of how it is configured on the Firebox SSL VPN Gateway.
For example, if you configured RSA SecurID on the Secondary Authentication tab and LDAP on the
Primary Authentication tab, when users log on, they type their LDAP password in the first password
field and the RSA SecurID personal identification number (PIN) and passcode in the second password
field. When users click Connect, the Firebox SSL VPN Gateway authenticates using the RSA SecureID PIN
Administration Guide 85
Page 96

Configuring Double-Source Authentication
and passcode first and then the LDAP password second. Whatever is typed in the first password field is
done last and the second password field is done first.
Changing Password Labels
You can change the password labels to accurately reflect the authentication type with which the user is
logging on and to provide the correct prompt for what the user needs to type. This is useful when the
Firebox SSL VPN Gateway is configured to support third-party authentication types. For example, if
users are required to authenticate using LDAP and Gemalto protiva strong authentication system
(RADIUS), you can change the password labels to reflect what the user needs to type in the fields.
Instead of the labels, Password and Secondary Password, the labels could be Windows domain pass-
word and Gemalto protiva passcode.
The labels can be changed if you are using one-source or double-source authentication.
To change the password labels
1Click the Authentication tab, and under Add an Authentication Realm, click Advanced.
2In Password label and Secondary password label, type the values for the labels.
3Click OK
When users log on, they see the new password labels.
86 Firebox SSL VPN Gateway
Page 97

CHAPTER 6 Adding and Configuring Local Users
and User Groups
User groups define the resources the user has access to when connecting to the corporate network
through the Firebox SSL VPN Gateway. Groups are associated with the local users list. After adding local
users, you can then define the resources they have access to on the Access Policy Manager tab. This
chapter discusses the following group settings:
•Adding Local Users
•User Group Overview
• Creating User Groups
• Configuring Properties for a User Group
• Configuring Resources for a User Group
• Setting the Priority of Groups
Adding Local Users
You can create user accounts locally on the Firebox SSL VPN Gateway to supplement the users on
authentication servers. For example, you might want to create local user accounts for temporary users,
such as consultants or visitors, without creating an entry for those users on the authentication server. In
that case, you add the user to the Firebox SSL VPN Gateway local user list as described in this section.
If you associate more than one group with a user account, the properties of the first group that you
select for the user is used.
To create a user on the Firebox SSL VPN Gateway
1 Click the Access Policy Manager tab.
2 In the left-pane, right-click Local Users and then click New User.
3 In User name, type a user name. This is the logon name the user needs when logging onto Secure
Access. User names can contain spaces.
4 In Password and Verify Password, type a password for the user in the two fields.
A user enters this password when logging onto Secure Access. A password must be six or more characters up to a
maximum of 128 characters. Do not use a forward slash (/) in the user name or password.
Administration Guide 87
Page 98

User Group Overview
5 All users are members of the Default resource group. To add a user to another group, under Local
Users, click and drag the user to the user group to which you want the user to belong.
To delete a user from the Firebox SSL VPN Gateway
Right-click the user in the Local Users list and click Remove.
User Group Overview
When you enable authorization on the Firebox SSL VPN Gateway, user group information is obtained
from the authentication server after a user is authenticated. If the group name that is obtained from the
authentication server matches a group name created locally on the Firebox SSL VPN Gateway, the properties of the local group are used for the matching group obtained from the authentication servers.
Note
Group names on authentication servers and on the Firebox SSL VPN Gateway must be identical and
they are case sensitive.
Each user should belong to at least one group that is defined locally on the Firebox SSL VPN Gateway. If
a user does not belong to a group, the overall access of the user is determined by the Deny Access
without ACL setting on the Global Cluster Policies tab, as follows:
• If the Deny Access option is enabled, the user cannot establish a connection
• If the Deny Access option is disabled, the user has full network access
• In either case, the user can use kiosk mode, but network access within that session is determined
by the Deny Access without ACL setting
You can also add local groups that are not related to groups on authentication servers. For example, you
might create a local group to set up a contractor or visitor to whom you want to provide temporary
access without having to create an entry on the authentication server. For information about creating a
local user, see “Adding Local Users” on page 87.
Several aspects of Firebox SSL VPN Gateway operation are configured at the group level. These are separated between group properties and group resources.
Group properties include:
• Groups that inherit properties from the default group.
• Requiring users to log on again if there is a network interruption or if the computer is coming out
of standby or hibernate.
• Enabling single sign-on.
• Running logon scrips when a user logs on using domain credentials.
• Denying access to applications to the network that do not have a defined application policy.
• Specify the length of time a session is active. If the user has a 60 minute session time-out, the
session ends at 60 minutes. Users are given a one minute warning that their session is about to
end.
• Enabling Split DNS allows local DNS servers to be contacted if the DNS servers for the remote
client are non-responsive.
• IP pooling where a unique IP address is assigned to each client’s session.
• Portal page usage that defines the portal page the user sees when logging on. The portal page
can be one of the provided templates, modified for individual companies.
• Requiring client certificates.
88 Firebox SSL VPN Gateway
Page 99

Group resources include:
• Network resources that define the networks to which clients can connect.
• Application policies that define the applications users can use when connected. In addition to
selecting the application, you can further define which networks the application has access to
and if any end point policies need to be met when connecting.
• File share resources that define which file shares the user can connect to when logged on in kiosk
mode.
• Kiosk resources that defines how the user can log on, the Web address the user needs, and which
file shares and applications the user can use when logged on.
• End point resources and policies that define the required and option parameters that must be on
the user’s computer when logging on.
If a user belongs to more than one group, group policies are applied to the user based on the group priorities set on the Group Priority tab, as described in “Setting the Priority of Groups” on page 106.
Creating User Groups
User groups are created on the Access Policy Manager tab. Multiple user groups can be created and
configured. When a new group is created, the properties page appears that allows you to configure the
settings for the group.
ers. After the settings are complete, resources can be added to the group.
If you create a user group that has more than 127 characters and then delete that user group, it still
appears on the Group Priority tab after deletion. To resolve this problem, user group names should
have fewer than 127 characters. Any characters over this limit are truncated.
Creating User Groups
You can also add local groups that are not related to groups on authentication serv-
Note
To create a local user group
1 Click the Access Policy Manager tab.
2 In the left pane, right-click User Groups and then click New Group.
3 In Group Name, type a descriptive name for the group, such as “Temp Employees” or “accounting”
and then click OK.
A dialog box for the added group appears.
Note
If you want the group’s properties to be used for authentication obtained from authentication servers,
the group name must match the authentication server group name, including case and use of spaces.
4 To configure the group, see “Configuring Properties for a User Group” on page 90.
To remove a user group
On the Access Policy Manager tab, in the left-pane, right-click a group and then click Delete.
Administration Guide 89
Page 100

Configuring Properties for a User Group
Configuring Properties for a User Group
Group properties include configuring access, networking, portal pages, and client certificates. Properties are configured by right-clicking a group and then clicking Properties. Settings for the group are
configured on the General, Networking, Gateway Portal, Members, and Client Certificates tabs.
Default group properties
If the only group that is configured on the Firebox SSL VPN Gateway is the Default user group, all local
users receive the settings configured for this group. You can control access to the Default user group
settings by configuring additional groups on the Firebox SSL VPN Gateway and then restricting access
to the Default user group.
For example, two users are part of a group for contractors. They are allowed to connect to specific corporate resources, such as an Exchange server and a file server. If they inherit the settings from the
Default group, you might have unintentionally configured these users to have access to resources that
are only for permanent employees.
You can allow or deny users to inherit the Default group settings in the user group properties. This check
box is not available for the Default group.
To enable or disable Default group properties
1 Click the Access Policy Manager tab.
2 In the left pane, right-click the user group and then click Properties.
3 On the General tab, do one of the following:
• To prevent users from inheriting the Default group settings, clear Inherit properties from the
Default Group
• To allow users to inherit the Default group settings, select Inherit properties from the Default
Group
4 Click OK.
Forcing Users to Log on Again
By default, if a user’s network connection is briefly interrupted, the user does not have to log on again
when the connection is restored. You can require that users log on after interruptions such as when a
computer comes out of hibernate or standby, when the user switches to a different wireless network, or
when a connection is forcefully closed.
To force users to log on after a network interruption or on system resume
1 Click the Access Policy Manager tab.
2 In the left pane, right-click a group and click Properties.
3 On the General tab, under Session Options, select one or both of the following:
• Authenticate after network interruption. This option forces a user to log on again if the
network connection is briefly interrupted.
• Authenticate upon system resume. This option forces a user to log on again if the user’s
computer awakens from stand by or hibernate. This option provides additional security for
unattended computers.
4 Click OK.
90 Firebox SSL VPN Gateway
 Loading...