

Page 1

WatchGuard® Firebox® SOHO 6
MUVPN Clients Guide
SOHO 6.0
Page 2

Using this Guide
To use this guide you need to be familiar with your computer’s
operating system. If you have questions about navigating in your
computer’s environment, please refer to your system user manual.
The following conventions are used in this guide.
Convention Indication
Bold type Menu commands, dialog box options, Web page
options, Web page names. For example: “On the
System Information page, select Disabled.”
NOTE Important information, a helpful tip or additional
instructions.
ii MUVPN Client
Page 3

Notice to Users
Information in this guide is subject to change without notice. Companies, names, and data
used in examples herein are fictitious unless otherwise noted. No part of this guide may be
reproduced or transmitted in any form or by any means, electronic or mechanical, for any
purpose, without the express written permission of WatchGuard Technologies, Inc.
Copyright, Trademark, and Patent Information
Copyright© 1998 - 2002 WatchGuard Technologies, Inc. All rights reserved.
Firebox, Firebox 1000, Firebox 2500, Firebox 4500, Firebox II, Firebox II Plus, Firebox II
FastVPN, Firebox III, Firebox SOHO, Firebox SOHO|tc, Firebox V100, Firebox V80,
Firebox V60, Firebox V10, LiveSecurity, RapidStream, RapidCore, WatchGuard,
WatchGuard Technologies, Inc., AppLock, AppLock/Web, Designing peace of mind, DVCP
technology, Enforcer/MUVPN, FireChip, HackAdmin, HostWatch, LockSolid, RapidCare,
SchoolMate, ServerLock, ServiceWatch, Smart Security. Simply Done., SpamScreen,
Vcontroller are either registered trademarks or trademarks of WatchGuard Technologies,
Inc. in the United States and/or other countries.
© Hi/fn, Inc. 1993, including one or more U.S. Patents: 4701745, 5016009, 5126739, and
5146221 and other patents pending.
Microsoft®, Internet Explorer®, Windows® 95, Windows® 98, Windows NT® and
Windows® 2000 are either registered trademarks or trademarks of Microsoft Corporation
in the United States and/or other countries.
Netscape and Netscape Navigator are registered trademarks of Netscape Communications
Corporation in the United States and other countries.
RC2 Symmetric Block Cipher, RC4 Symmetric Stream Cipher, RC5 Symmetric Block
Cipher, BSAFE, TIPEM, RSA Public Key Cryptosystem, MD, MD2, MD4, and MD5 are
either trademarks or registered trademarks of RSA Data Security, Inc. Certain materials
herein are Copyright © 1992-1999 RSA Data Security, Inc. All rights reserved.
RealNetworks, RealAudio, and RealVideo are either a registered trademark or trademark of
RealNetworks, Inc. in the United States and/or other countries.
Java and all Jave-based marks are trademarks or registered trademarks of Sun
Microsystems, Inc. in the United States and other countries. All right reserved.
© 1995-1998 Eric Young (eay@cryptsoft). All rights reserved.
© 1998-2000 The OpenSSL Project. All rights reserved. Redistribution and use in source
and binary forms, with or without modification, are permitted provided that the following
conditions are met:
1. Redistributions of source code must retain the above copyright notice, this list of
conditions and the following disclaimer.
MUVPN Clients Guide iii
Page 4

2. Redistributions in binary form must reproduce the above copyright notice, this list of
conditions and the following disclaimer in the documentation and/or other materials
provided with the distribution.
3. All advertising materials mentioning features or use of this software must display the
following acknowledgment: "This product includes software developed by the OpenSSL
Project for use in the OpenSSL Toolkit. (http://www.openssl.org/)"
4. The names "OpenSSL Toolkit" and "OpenSSL Project" must not be used to endorse or
promote products derived from this software without prior written permission. For written
permission, please contact openssl-core@openssl.org.
5. Products derived from this software may not be called "OpenSSL" nor may "OpenSSL"
appear in their names without prior written permission of the OpenSSL Project.
6. Redistributions of any form whatsoever must retain the following acknowledgment: "This
product includes software developed by the OpenSSL Project for use in the OpenSSL Toolkit
(http://www.openssl.org/)"
THIS SOFTWARE IS PROVIDED BY THE OpenSSL PROJECT ``AS IS'' AND ANY
EXPRESSED OR IMPLIED WARRANTIES, INCLUDING, BUT NOT LIMITED TO, THE
IMPLIED WARRANTIES OF MERCHANTABILITY AND FITNESS FOR A
PARTICULAR PURPOSE ARE DISCLAIMED. IN NO EVENT SHALL THE OpenSSL
PROJECT OR ITS CONTRIBUTORS BE LIABLE FOR ANY DIRECT, INDIRECT,
INCIDENTAL, SPECIAL, EXEMPLARY, OR CONSEQUENTIAL DAMAGES
(INCLUDING, BUT NOT LIMITED TO, PROCUREMENT OF SUBSTITUTE GOODS OR
SERVICES; LOSS OF USE, DATA, OR PROFITS; OR BUSINESS INTERRUPTION)
HOWEVER CAUSED AND ON ANY THEORY OF LIABILITY, WHETHER IN
CONTRACT, STRICT LIABILITY, OR TORT (INCLUDING NEGLIGENCE OR
OTHERWISE) ARISING IN ANY WAY OUT OF THE USE OF THIS SOFTWARE, EVEN
IF ADVISED OF THE POSSIBILITY OF SUCH DAMAGE.
This product includes cryptographic software written by Eric Young
(eay@cryptsoft.com). This product includes software written by Tim
Hudson (tjh@cryptsoft.com).
© 1995-1998 Eric Young (eay@cryptsoft.com)
All rights reserved.
This package is an SSL implementation written by Eric Young (eay@cryptsoft.com).
The implementation was written so as to conform with Netscapes SSL.
This library is free for commercial and non-commercial use as long as the following
conditions are aheared to. The following conditions apply to all code found in this
distribution, be it the RC4, RSA, lhash, DES, etc., code; not just the SSL code. The SSL
documentation included with this distribution is covered by the same copyright terms except
that the holder is Tim Hudson (tjh@cryptsoft.com).
Copyright remains Eric Young's, and as such any Copyright notices in the code are not to be
removed. If this package is used in a product, Eric Young should be given attribution as the
author of the parts of the library used. This can be in the form of a textual message at
program startup or in documentation (online or textual) provided with the package.
iv MUVPN Client
Page 5

Redistribution and use in source and binary forms, with or without modification, are
permitted provided that the following conditions are met:
1. Redistributions of source code must retain the copyright notice, this list of conditions and
the following disclaimer.
2. Redistributions in binary form must reproduce the above copyright notice, this list of
conditions and the following disclaimer in the documentation and/or other materials
provided with the distribution.
3. All advertising materials mentioning features or use of this software must display the
following acknowledgement: "This product includes cryptographic software written by Eric
Young (eay@cryptsoft.com)" The word 'cryptographic' can be left out if the routines from the
library being used are not cryptographic related :-).
4. If you include any Windows specific code (or a derivative thereof) from the apps directory
(application code) you must include an acknowledgement: "This product includes software
written by Tim Hudson (tjh@cryptsoft.com)"
THIS SOFTWARE IS PROVIDED BY ERIC YOUNG ``AS IS'' AND ANY EXPRESS OR
IMPLIED WARRANTIES, INCLUDING, BUT NOT LIMITED TO, THE IMPLIED
WARRANTIES OF MERCHANTABILITY AND FITNESS FOR A PARTICULAR
PURPOSE ARE DISCLAIMED. IN NO EVENT SHALL THE AUTHOR OR
CONTRIBUTORS BE LIABLE FOR ANY DIRECT, INDIRECT, INCIDENTAL, SPECIAL,
EXEMPLARY, OR CONSEQUENTIAL DAMAGES (INCLUDING, BUT NOT LIMITED TO,
PROCUREMENT OF SUBSTITUTE GOODS OR SERVICES; LOSS OF USE, DATA, OR
PROFITS; OR BUSINESS INTERRUPTION) HOWEVER CAUSED AND ON ANY
THEORY OF LIABILITY, WHETHER IN CONTRACT, STRICT LIABILITY, OR TORT
(INCLUDING NEGLIGENCE OR OTHERWISE) ARISING IN ANY WAY OUT OF THE
USE OF THIS SOFTWARE, EVEN IF ADVISED OF THE POSSIBILITY OF SUCH
DAMAGE.
The licence and distribution terms for any publicly available version or derivative of this
code cannot be changed. i.e. this code cannot simply be copied and put under another
distribution licence [including the GNU Public Licence.]
The mod_ssl package falls under the Open-Source Software label because it's distributed
under a BSD-style license. The detailed license information follows.
Copyright (c) 1998-2001 Ralf S. Engelschall. All rights reserved.
Redistribution and use in source and binary forms, with or without modification, are
permitted provided that the following conditions are met:
1. Redistributions of source code must retain the above copyright notice, this list of
conditions and the following disclaimer.
2. Redistributions in binary form must reproduce the above copyright notice, this list of
conditions and the following disclaimer in the documentation and/or other materials
provided with the distribution.
3. All advertising materials mentioning features or use of this software must display the
following acknowledgment:
MUVPN Clients Guide v
Page 6

"This product includes software developed by Ralf S. Engelschall <rse@engelschall.com>
for use in the mod_ssl project (http://www.modssl.org/)."
4. The names "mod_ssl" must not be used to endorse or promote products derived from this
software without prior written permission. For written permission, please contact
rse@engelschall.com.
5. Products derived from this software may not be called "mod_ssl" nor may "mod_ssl"
appear in their names without prior written permission of Ralf S. Engelschall.
6. Redistributions of any form whatsoever must retain the following acknowledgment: "This
product includes software developed by Ralf S. Engelschall <rse@engelschall.com> for use
in the mod_ssl project (http://www.modssl.org/)."
THIS SOFTWARE IS PROVIDED BY RALF S. ENGELSCHALL ``AS IS'' AND ANY
EXPRESSED OR IMPLIED WARRANTIES, INCLUDING, BUT NOT LIMITED TO, THE
IMPLIED WARRANTIES OF MERCHANTABILITY AND FITNESS FOR A
PARTICULAR PURPOSE ARE DISCLAIMED. IN NO EVENT SHALL RALF S.
ENGELSCHALL OR HIS CONTRIBUTORS BE LIABLE FOR ANY DIRECT, INDIRECT,
INCIDENTAL, SPECIAL,
EXEMPLARY, OR CONSEQUENTIAL DAMAGES (INCLUDING, BUT NOT LIMITED TO,
PROCUREMENT OF SUBSTITUTE GOODS OR SERVICES; LOSS OF USE, DATA, OR
PROFITS; OR BUSINESS INTERRUPTION) HOWEVER CAUSED AND ON ANY
THEORY OF LIABILITY, WHETHER IN CONTRACT, STRICT LIABILITY, OR TORT
(INCLUDING NEGLIGENCE OR OTHERWISE) ARISING IN ANY WAY OUT OF THE
USE OF THIS SOFTWARE, EVEN IF ADVISED OF THE POSSIBILITY OF SUCH
DAMAGE.
The Apache Software License, Version 1.1
Copyright (c) 2000 The Apache Software Foundation. All rights reserved.
Redistribution and use in source and binary forms, with or without modification, are
permitted provided that the following conditions are met:
1. Redistributions of source code must retain the above copyright notice, this list of
conditions and the following disclaimer.
2. Redistributions in binary form must reproduce the above copyright notice, this list of
conditions and the following disclaimer in the documentation and/or other materials
provided with the distribution.
3. The end-user documentation included with the redistribution, if any, must include the
following acknowledgment:
"This product includes software developed by the Apache Software Foundation (http://
www.apache.org/)." Alternately, this acknowledgment may appear in the software itself, if
and wherever such third-party acknowledgments normally appear.
4. The names "Apache" and "Apache Software Foundation" must not be used to endorse or
promote products derived from this software without prior written permission. For written
permission, please contact apache@apache.org.
vi MUVPN Client
Page 7

5. Products derived from this software may not be called "Apache", nor may "Apache" appear
in their name, without prior written permission of the Apache Software Foundation.
THIS SOFTWARE IS PROVIDED ``AS IS'' AND ANY EXPRESSED OR IMPLIED
WARRANTIES, INCLUDING, BUT NOT LIMITED TO, THE IMPLIED WARRANTIES OF
MERCHANTABILITY AND FITNESS FOR A PARTICULAR PURPOSE ARE
DISCLAIMED. IN NO EVENT SHALL THE APACHE SOFTWARE FOUNDATION OR
ITS CONTRIBUTORS BE LIABLE FOR ANY DIRECT, INDIRECT, INCIDENTAL,
SPECIAL, EXEMPLARY, OR CONSEQUENTIAL DAMAGES (INCLUDING, BUT NOT
LIMITED TO, PROCUREMENT OF SUBSTITUTE GOODS OR SERVICES; LOSS OF
USE, DATA, OR PROFITS; OR BUSINESS INTERRUPTION) HOWEVER CAUSED AND
ON ANY THEORY OF LIABILITY, WHETHER IN CONTRACT, STRICT LIABILITY, OR
TORT (INCLUDING NEGLIGENCE OR OTHERWISE) ARISING IN ANY WAY OUT OF
THE USE OF THIS SOFTWARE, EVEN IF ADVISED OF THE POSSIBILITY OF SUCH
DAMAGE.
This software consists of voluntary contributions made by many individuals on behalf of the
Apache Software Foundation. For more information on the Apache Software Foundation,
please see <http://www.apache.org/>.
Portions of this software are based upon public domain software originally written at the
National Center for Supercomputing Applications, University of Illinois, Urbana-Champaign
All other trademarks or trade names mentioned herein, if any, are the property of their
respective owners.
Part No
MUVPN Clients Guide vii
Page 8

viii MUVPN Client
Page 9

Contents
CHAPTER 1 Configure the SOHO 6 .............................. 1
Redeem your SOHO 6 Upgrade Options .......................... 2
Configure the SOHO 6 for MUVPN Clients ........................ 3
CHAPTER 2 Preparation, Installation, and Connection 7
Prepare the Remote Computers ....................................... 7
Install the MUVPN Client ................................................ 19
Connect and Disconnect the MUVPN Client .................... 27
Monitor the MUVPN Client Connection ........................... 31
System requirements ..................................................... 8
Windows 98/ME operating system setup ........................... 8
Windows NT operating system setup .............................. 11
Windows 2000 operating system setup ........................... 13
Windows XP operating system setup .............................. 16
Configuring the MUVPN Client ...................................... 21
Uninstall the MUVPN client ........................................... 25
Connecting the MUVPN Client ...................................... 27
The Mobile User VPN client icon .................................... 27
Allowing the MUVPN client through the personal firewall .... 29
Disconnecting the MUVPN client ................................... 30
The Log Viewer .......................................................... 31
MUVPN Client Guide ix
Page 10

The Connection Monitor ...............................................31
CHAPTER 3 The ZoneAlarm Personal Firewall ...........33
ZoneAlarm Features .......................................................34
The Alerts Panel .......................................................... 34
Up and Down Graphs .................................................. 35
Expanded Alert Panel .................................................. 35
The Lock Panel ...........................................................36
Expanded Lock Panel ...................................................38
Undoing an Inactivity Lock ............................................ 39
The Stop Button ......................................................... 39
The Security Panel ....................................................... 40
The Programs Panel ..................................................... 44
The Configuration Panel ............................................... 46
Frequently Asked Questions about ZoneAlarm .................48
Allowing Traffic through ZoneAlarm ................................ 52
Shutting Down ZoneAlarm ............................................ 53
Uninstalling ZoneAlarm ................................................ 53
CHAPTER 4 Troubleshooting Tips ............................... 55
My computer is hung up just after installing the MUVPN
client... ...........
I have to enter my network log in information even when I’m not
connected to the network... ...........................................
I am not prompted for my user name and password when I turn my
computer on... ...............................................................
Is the Mobile User VPN tunnel is working... ...................... 56
My mapped drives have a red X through them... ............... 57
How to map a network drive ......................................... 57
I sometimes get prompted for a password when I am browsing the
company network... ........................................................
It takes a really long time to shut down the computer after using
Mobile User VPN... .........................................................
I lost the connection to my ISP, and now I can’t use the company
network... ........................................................................
............................................................. 55
56
56
57
58
58
Copyright and Patent Information ................................... 59
x MUVPN Client
Page 11

CHAPTER 1 Configure the SOHO 6
This guide applies to both the SOHO 6TM and the SOHO 6tcTM–the name
SOHO 6 is used to refer to both these devices throughout the guide. The
only difference between them is the ability to create and use a Virtual
Private Network (VPN) other than the MUVPN client. This VPN option
can be added to the SOHO 6, while the SOHO 6tc comes with the VPN
option already installed and is used to create a Branch Office VPN tunnel
between two IPSec compliant devices allowing data from an entire
network rather than a single remote user.
This chapter describes how to configure a SOHO 6 for use with the
Watch Guard
® Mobile User VPN (MUVPN)™ client.
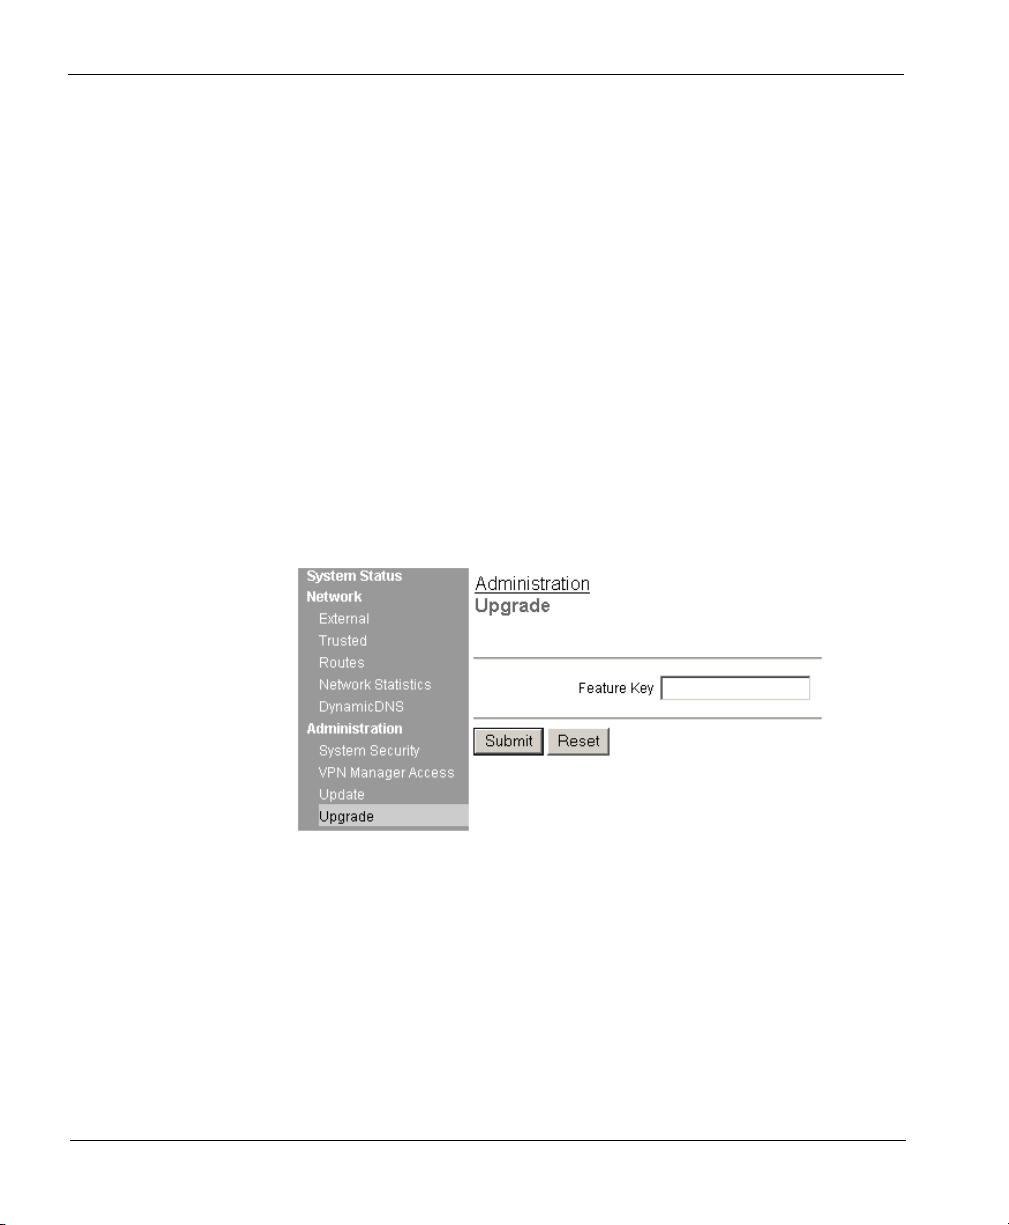
Redeem your SOHO 6 Upgrade Options
When you purchase a SOHO 6, the software for all upgrade options is
provided with the unit regardless of whether you have actually
purchased any of those options. The Feature Key that enables these
software options is stored within the SOHO 6. Once you purchase an
upgrade option and redeem it at the LiveSecurity Service Web site, you
will receive a Feature Key, which you can then copy and paste into a
SOHO 6 configuration page, to activate the software upgrade.
MUVPN Client Guide 1
Page 12
CHAPTER 1: Configure the SOHO 6
For information on registering your SOHO 6 with the LiveSecurity
Service, see “Register your SOHO 6 and Activate the LiveSecurity
Service” in the WatchGuard Firebox SOHO 6 User Guide.
Follow these steps to redeem your upgrade option license key:
1 With your Web browser, go to:
2 Click the LiveSecurity link at the top of the page and log into the site.
3 Follow the instructions provided on the site to redeem your upgrade
license key.
4 Copy the Feature Key displayed at the LiveSecurity Service Web site.
5 With your Web browser, go to the System Status page using the
Trusted IP address of the SOHO 6.
For example, if using the default IP address, go to: http://192.168.111.1
6 From the navigation bar on the left side, select Administration =>
Upgrade.
The Upgrade page appears.
http://www.watchguard.com/upgrade
7 Paste the Feature Key in the appropriate field.
8 Click Submit.
2 MUVPN Client
Page 13
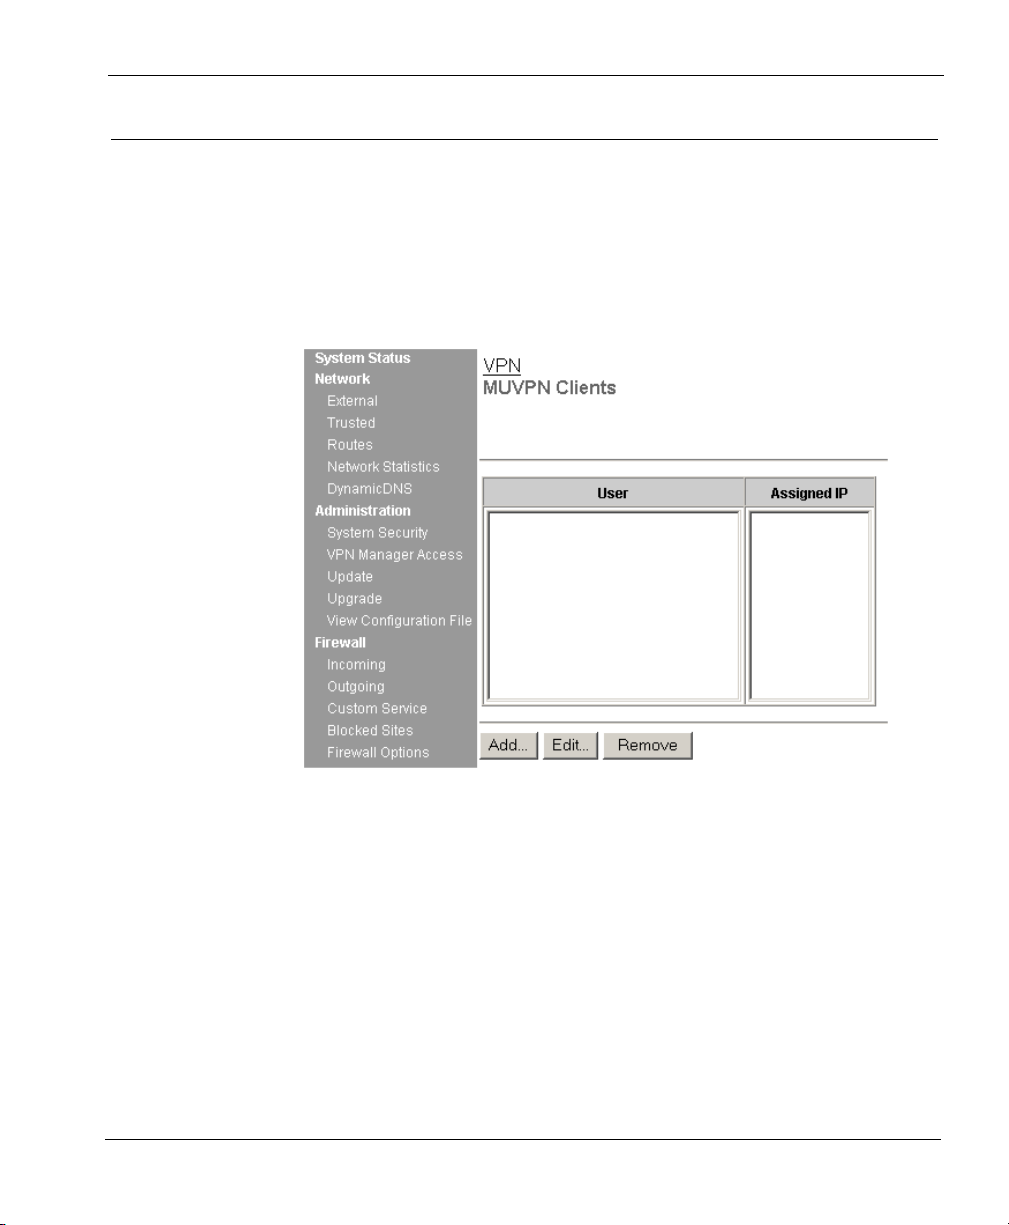
Configure the SOHO 6 for MUVPN Clients
Configure the SOHO 6 for MUVPN Clients
Flow these steps to configure your SOHO 6:
1 With your Web browser, go to the System Status page using the
Trusted IP address of the SOHO 6.
For example, if using the default IP address, go to: http://192.168.111.1
2 From the navigation bar on the right side, select VPN => MUVPN
Clients.
The MUVPN Clients page appears.
3 Click the Add button.
The Add MUVPN Client page appears.
MUVPN Client Guide 3
Page 14
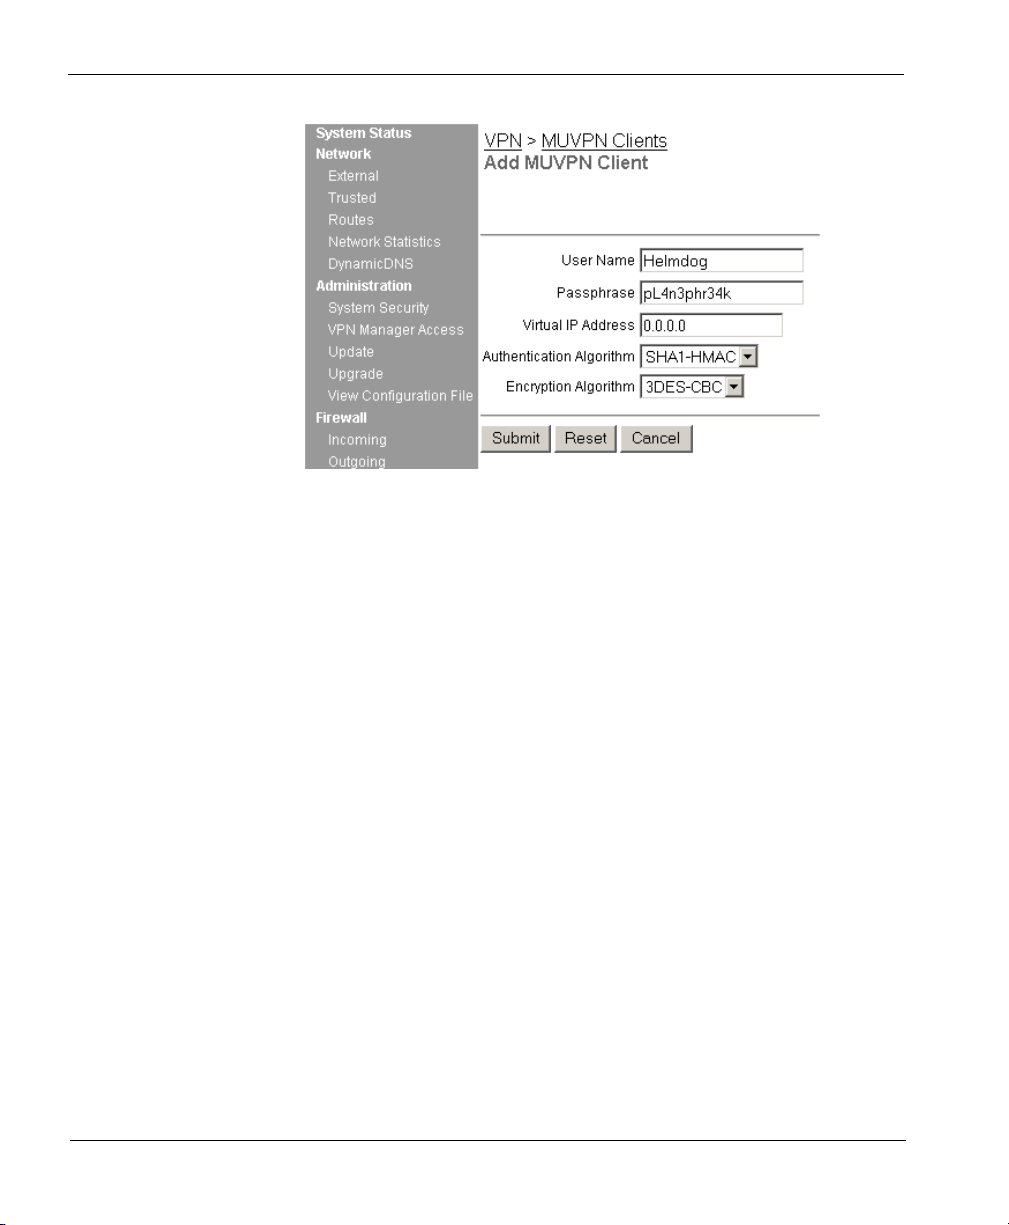
CHAPTER 1: Configure the SOHO 6
4 Enter a Username in the appropriate field.
This Username will be used as the E-mail Address when setting up the MUVPN
client. In our example, Helmdog.
5 Enter a Passphrase in the appropriate field.
This passphrase will be used as the Pre-Shared Key when setting up the MUVPN
client. In our example, pL4n3phr34k
6 Enter the Virtual IP address which will be used by the MUVPN
computer when connecting to the SOHO 6 in the appropriate field.
In our example, 192.168.111.4.
7 Select the Authentication Algorithm.
In our example, SHA1-HMAC.
8 Select the Encryption Algorithm.
In our example, 3DECS-CBC.
9 Click the Submit button.
4 MUVPN Client
Page 15

CHAPTER 2 Preparation, Installation, and
Connection
Watch Guard® Mobile User VPN (MUVPN)™ client uses Internet Protocol
Security (IPSec) to establish a secure connection over an unsecured
network from a remote computer to your protected network.
For example, the MUVPN client is installed on an employee’s computer,
on the road or working from home. The employee establishes a standard
Internet connection and activates the MUVPN client. The MUVPN client
then creates an encrypted tunnel to your trusted network, protected
behind a SOHO 6. The MUVPN client allows you to provide remote
access to your internal networks without compromising security.
®
ZoneAlarm
optional feature with the MUVPN client to provide further security for
your end users.
, a personal firewall software application, is included as an
The purpose of this guide is to assist users of the SOHO 6 to set up the
MUVPN client on an end-user’s remote computer and to explain the
features of the personal firewall.
MUVPN Client Guide 7
Page 16

CHAPTER 2: Preparation, Installation, and Connection
Prepare the Remote Computers
The MUVPN client is only compatible with the Windows operating
system. Every Windows system used as a MUVPN remote computer must
have the following system requirements.
System requirements
• PC-compatible computer with Pentium processor or equivalent
• Compatible operating systems and minimum RAM:
- Microsoft Windows 98: 32 MB
- Microsoft Windows ME: 64 MB
- Microsoft Windows NT 4.0 Workstation: 32 MB
- Microsoft Windows 2000 Professional: 64 MB
- Microsoft Windows XP: 64 MB
• The latest service packs for each operating system are recommended,
but not necessarily required.
• 10 MB hard disk space
• Native Microsoft TCP/IP communications protocol
• Microsoft Internet Explorer 5.0 or later
• An Internet Service Provider account
• A Dial-Up or Broadband (DSL or Cable modem) Connection
Additionally, in order for Windows file and print sharing to occur
through the MUVPN client tunnel each Windows operating system must
have the proper components installed and configured to use the remote
WINS and DNS servers on the trusted and optional networks behind the
Firebox.
N
OTE
However, if you plan to use the MUVPN client virtual adapter, the WINS
not
and DNS settings are
on the Firebox.
8 MUVPN Client
configured on the client computers, but rather
Page 17

Windows 98/ME operating system setup
The following networking components must be configured and installed
on a remote computer running Windows 98/ME in order for the MUVPN
client to function properly.
Configuring networking names
From the Windows desktop:
1 Select Start => Settings => Control Panel. Double-click the Network
icon.
The Network window appears.
2 Verify that the Client for Microsoft Networks is installed.
If Client for Microsoft Networks is not installed, you
instructions, see the following section, “Installing the Client for Microsoft
Networks”.
3 Click the Identification tab.
4 Enter a name for the remote computer.
This
must
be a unique name on the remote network.
5 Enter the domain name you are connecting to.
This should be the same as the Logon to Windows NT domain value.
6 Enter a description for your computer (optional).
7 Click OK. Click OK to close and save changes to the Network control
panel.
Click Cancel if you do not want to save any changes.
8 Reboot the machine.
Prepare the Remote Computers
must
install it. For
Installing the Client for Microsoft Networks
From the Networks window:
1 Click the Configuration tab. Click Add.
The Select Network Component Type window appears.
2 Select Client. Click Add.
The Select Network Client window appears.
3 Select Microsoft from the list on the left. Select Client for Microsoft
Networks from the list on the right. Click OK.
4 Select Client for Microsoft Networks.
5 Click Properties.
6 Enable the Log on to Windows NT domain option.
MUVPN Client Guide 9
Page 18

CHAPTER 2: Preparation, Installation, and Connection
7 In the Windows NT Domain field, type the domain name.
For example, your domains might be sales, office, and warehouse.
8 Enable the Logon and Restore Network Connections option.
Installing Dial-Up Networking
The Mobile User VPN Adapter, which supports L2TP, installs only if Dialup Networking is already installed on your computer. If Dial-up
Networking is not installed, follow these instructions.
From the Windows desktop:
1 Select Start => Settings => Control Panel. Double-click the Add/
Remove Programs icon.
The Add/Remove Properties window appears.
2 Click the Windows Setup tab.
The Windows Setup dialog box appears and searches for installed components.
3 Enable the Communications checkbox and click the OK button.
The Copying Files dialog box appears and copies the necessary files.
4 The Dial-Up Networking Setup dialog box appears and prompts you
to restart the computer. Click the OK button.
The computer reboots.
Further, Windows 98 requires that the Dial-up Networking component be
updated with the 1.4 patch. Please see the Microsoft Web site to receive
this free update.
Configuring the WINS and DNS settings
Yo u must configure the remote computer to use the WINS and DNS
servers of the trusted network behind the Firebox only if you do not plan
to use the MUVPN client’s virtual adapter.
From the Windows desktop:
1 Select Start => Settings => Control Panel. Double-click the Network
icon.
The Network window appears.
2 Select the network component TCP/IP => Dial-Up Adapter, then click
the Properties button.
The TCP/IP Properties Information dialog box appears.
3 Click the OK button.
10 MUVPN Client
Page 19

Prepare the Remote Computers
4 Click the DNS Configuration tab.
Verify that the Enable DNS option has been enabled.
5 Under the “DNS Server Search Order” heading, enter your DNS
server IP address, then click the Add button.
If you have multiple remote DNS servers repeat this step.
N
OTE
Yo u
must
list the DNS server on the Private network behind the Firebox
first.
6 Click the WINS Configuration tab.
7 Verify that the Enable WINS Resolution option has been enabled.
8 Under the “WINS Server Search Order” heading, enter your WINS
server IP address, then click the Add button.
If you have multiple remote WINS servers repeat this step.
9 Click the OK button to close the TCP/IP Properties window.
10 Click the OK button to close the Network window.
The System Settings Change dialog box appears.
11 Click the Ye s button to restart the computer and implement the
changes.
Windows NT operating system setup
The following networking components must be installed and configured
on a remote computer running Windows NT in order for the MUVPN
client to function properly.
Installing Remote Access Services on Windows NT
The Mobile User VPN Adapter, which supports L2TP, installs only if the
Remote Access Services (RAS) network component is already installed on
the computer.
Follow the Windows desktop:
1 Select Start => Settings => Control Panel. Double-click the Network
icon.
2 Select the Services tab.
3 Click the Add button.
MUVPN Client Guide 11
Page 20

CHAPTER 2: Preparation, Installation, and Connection
4 Select Remote Access Services from the list, then click the OK button.
5 Enter the path to the Windows NT install files or insert your system
installation CD, then click the OK button.
The Remote Access Setup dialog box appears.
6 Click the Ye s button to add a RAS capable device and enable you to
add a modem.
7 Click the Add button and complete the Install New Modem wizard.
If there is no modem installed, you can enable the Don't detect my modem;
I will select it from a list checkbox then add a Standard 28800 modem.
Windows NT requires at least one RAS device such as a modem if the
RAS component is installed. If no modems are available, a dial-up
networking, serial cable between two computers can be selected.
8 Select the modem added in the last step in the Add RAS Device dialog
box, then click the OK button.
9 Click the Continue button, then click the Close button.
10 Reboot your computer.
N
OTE
Configuring the WINS and DNS settings
Yo u must configure the remote computer to use the WINS and DNS
servers of the trusted network behind the Firebox only if you do not plan
to use the MUVPN client’s virtual adapter.
From the Windows desktop:
1 Select Start => Settings => Control Panel. Double-click the Network
icon.
The Network window appears.
2 Click the Protocols tab.
3 Select the TCP/IP protocol and click the Properties button.
The Microsoft TCP/IP Properties window appears.
4 Click the DNS tab.
5 Click the Add button.
6 Enter your DNS server IP address in the appropriate field.
If you have multiple remote DNS servers repeat the previous three steps.
12 MUVPN Client
Page 21

N
OTE
Yo u
must
list the DNS server on the Private network behind the Firebox
first.
7 Click the WINS Address tab.
8 Enter your WINS server IP address in the appropriate field, then click
the OK button.
If you have multiple remote WINS servers repeat this step.
9 Click the Close button to close the Network window.
The Network Settings Change dialog box appears.
10 Click the Ye s button to restart the computer and implement the
changes.
Windows 2000 operating system setup
The following networking components must be installed and configured
on a remote computer running Windows 2000 in order for the MUVPN
client to function properly.
From the Windows desktop:
1 Select Start => Settings => Network and Dial-up Connections, then
select the Dial-up connection you use to access the Internet.
The connection window appears.
2 Click the Properties button.
3 Select the Networking tab.
4 Verify that the following components are present and enabled:
- Internet Protocol (TCP/IP)
- File and Printer Sharing for Microsoft Networks
- Client for Microsoft Networks
Prepare the Remote Computers
Install these components if they are not already present.
Installing the Internet Protocol (TCP/IP) network component
From the Windows desktop:
1 Select Start => Settings => Network and Dial-up Connections, then
select the Dial-up connection you use to access the Internet.
The connection window appears.
MUVPN Client Guide 13
Page 22

CHAPTER 2: Preparation, Installation, and Connection
2 Click the Properties button.
3 Select the Networking tab and then click the Install button.
The Select Network Component Type window appears.
4 Double click the Protocol network component.
The Select Network Protocol window appears.
5 Select the Internet Protocol (TCP/IP) Network Protocol and then click
the OK button.
Installing the File and Printer Sharing for Microsoft Networks
From the Windows desktop:
1 Select Start => Settings => Network and Dial-up Connections, then
select the Dial-up connection you use to access the Internet.
The connection window appears.
2 Click the Properties button.
3 Select the Networking tab and then click the Install button.
The Select Network Component Type window appears.
4 Double click the Services network component.
The Select Network Service window appears.
5 Select the File and Printer Sharing for Microsoft Networks Network
Service and then click the OK button.
Installing the Client for Microsoft Networks
From the Windows desktop:
1 Select Start => Settings => Network and Dial-up Connections, then
select the Dial-up connection you use to access the Internet.
The connection window appears.
2 Click the Properties button.
3 Select the Networking tab and then click the Install button.
The Select Network Component Type window appears.
4 Double click the Client network component.
The Select Network Protocol window appears.
5 Select the Client for Microsoft Networks Network Client and then
click the OK button.
6 Click the Cancel button to close the Select Network Component Type
window.
7 Click the OK button to preserve the installed components.
14 MUVPN Client
Page 23

8 Click the Cancel button to close the Dial-up connection window.
Configuring the WINS and DNS settings
Yo u must configure the remote computer to use the WINS and DNS
servers of the trusted network behind the Firebox only if you do not plan
to use the MUVPN client’s virtual adapter.
From the Windows desktop:
1 Select Start => Settings => Network and Dial-up Connections, then
select the Dial-up connection you use to access the Internet.
The connection window appears.
2 Click the Properties button.
3 Click the Networking tab.
4 Select the Internet Protocol (TCP/IP) component, then click the
Properties button.
The Internet Protocol (TCP/IP) Properties window appears.
5 Click the Advanced button.
The Advanced TCP/IP Settings window appears.
6 Click the DNS tab.
7 Under the “DNS server addresses, in order of use” heading, click the
Add button.
The TCP/IP DNS Server window appears.
8 Enter your DNS server IP address in the appropriate field, then click
the Add button.
If you have multiple remote DNS servers repeat the last two steps.
N
OTE
Yo u
must
list the DNS server on the Private network behind the Firebox
first.
Prepare the Remote Computers
9 Enable the Append these DNS suffixes (in order) option.
10 Click the Add button.
The TCP/IP Domain Suffix window appears.
11 Enter your Domain suffix in the appropriate field.
If you have multiple DNS suffixes repeat the last two steps.
12 Click the WINS tab.
MUVPN Client Guide 15
Page 24

CHAPTER 2: Preparation, Installation, and Connection
13 Under the “WINS addresses, in order of use” heading, click the Add
button.
The TCP/IP WINS Server window appears.
14 Enter your WINS server IP address in the appropriate field, then click
the Add button.
If you have multiple remote DNS servers repeat the last two steps.
15 Click the OK button to close the Advanced TCP/IP Settings window.
16 Click the OK button to close the Internet Protocol (TCP/IP) Properties
window.
17 Click the OK button to close the next window.
18 Click the Cancel button again to close the Dial-up connection
window.
Windows XP operating system setup
The following networking components must be installed and configured
on a remote computer running Windows XP in order for the MUVPN
client to function properly.
From the Windows desktop:
1 Select Start => Control Panel => Network Connections, then select the
connection you use to access the Internet.
The connection window appears.
2 Click the Properties button.
3 Select the Networking tab.
4 Verify that the following components are present and enabled:
- Internet Protocol (TCP/IP)
- File and Printer Sharing for Microsoft Networks
- Client for Microsoft Networks
Install these components if they are not already present.
Installing the Internet Protocol (TCP/IP) Network Component
From the Windows desktop:
1 Select Start => Control => Network Connections, then select the
connection you use to access the Internet.
The connection window appears.
16 MUVPN Client
Page 25

Prepare the Remote Computers
2 Click the Properties button.
3 Select the Networking tab and then click the Install button.
The Select Network Component Type window appears.
4 Double click the Protocol network component.
The Select Network Protocol window appears.
5 Select the Internet Protocol (TCP/IP) Network Protocol and then click
the OK button.
Installing the File and Printer Sharing for Microsoft Networks
From the Windows desktop:
1 Select Start => Control => Network Connections, then select the
connection you use to access the Internet.
The connection window appears.
2 Click the Properties button.
3 Select the Networking tab and then click the Install button.
The Select Network Component Type window appears.
4 Double click the Services network component.
The Select Network Service window appears.
5 Select the File and Printer Sharing for Microsoft Networks Network
Service and then click the OK button.
Installing the Client for Microsoft Networks
From the Windows desktop:
1 Select Start => Control => Network Connections, then select the
connection you use to access the Internet.
The connection window appears.
2 Click the Properties button.
3 Select the Networking tab and then click the Install button.
The Select Network Component Type window appears.
4 Double click the Client network component.
The Select Network Protocol window appears.
5 Select the Client for Microsoft Networks Network Client and then
click the OK button.
6 Click the Cancel button to close the Select Network Component Type
window.
7 Click the OK button to preserve the installed components.
MUVPN Client Guide 17
Page 26

CHAPTER 2: Preparation, Installation, and Connection
8 Click the Cancel button to close the Dial-up connection window.
Configuring the WINS and DNS settings
Yo u must configure the remote computer to use the WINS and DNS
servers of the trusted network behind the Firebox only if you do not plan
to use the MUVPN client’s virtual adapter.
From the Windows desktop:
1 Select Start => Control Panel => Network Connections, then select the
Dial-up connection you use to access the Internet.
The connection window appears.
2 Click the Properties button.
3 Click the Networking tab.
4 Select the Internet Protocol (TCP/IP) component, then click the
Properties button.
The Internet Protocol (TCP/IP) Properties window appears.
5 Click the Advanced button.
The Advanced TCP/IP Settings window appears.
6 Click the DNS tab.
7 Under the “DNS server addresses, in order of use” heading, click the
Add button.
The TCP/IP DNS Server window appears.
8 Enter your DNS server IP address in the appropriate field, then click
the Add button.
If you have multiple remote DNS servers repeat the last two steps.
Yo u
must
list the DNS server on the Private network behind the Firebox
first.
N
OTE
9 Enable the Append these DNS suffixes (in order) option.
10 Click the Add button.
The TCP/IP Domain Suffix window appears.
11 Enter your Domain suffix in the appropriate field.
If you have multiple DNS suffixes repeat the last two steps.
12 Click the WINS tab.
18 MUVPN Client
Page 27

13 Under the “WINS addresses, in order of use” heading, click the Add
button.
The TCP/IP WINS Server window appears.
14 Enter your WINS server IP address in the appropriate field, then click
the Add button.
If you have multiple remote WINS servers repeat the last two steps.
15 Click the OK button to close the Advanced TCP/IP Settings window.
16 Click the OK button to close the Internet Protocol (TCP/IP) Properties
window.
17 Click the OK button to close the next window.
18 Click the Cancel button again to close the Dial-up connection
window.
Install the MUVPN Client
Install the SOHO 6 MUVPN client software on each remote computer.
The MUVPN installation files are available at the WatchGuard Web site:
http://www.watchguard.com/support
Install the MUVPN Client
The installation process consists of two parts: installing the client software
on the remote computer and configuring the client.
N
OTE
In order to perform the installation process successfully, you
the remote computer with local administrator rights.
Follow these steps to install the client:
must
log into
1 Copy the MUVPN installation file to the remote computer.
2 Double-click the MUVPN installation file.
If at any time during the installation process you inadvertently skip a step, simply
cancel the process and begin again.
3 The installation welcomes you to the InstallShield Wizard. Click the
Next button.
During the Setup Status portion of the install procedure, the InstallShield may
detect ReadOnly Files. If this occurs, click Yes for each event in order to continue
the install.
MUVPN Client Guide 19
Page 28

CHAPTER 2: Preparation, Installation, and Connection
4 The installation welcomes you again. Click the Next button.
The Software Licence Agreement appears.
5 Click the Ye s button to accept the terms of the License Agreement and
to continue with the installation.
The Setup Type window appears.
6 Select the type of setup. By default, Typical is enabled–this is the
setup recommended by WatchGuard. Click the Next button.
7 If you are installing the client on a Windows 2000 host, the
InstallShield detects the native Windows 2000 L2TP component. The
client uses this component and does not need to install its own. Click
the OK button to continue with the install.
The Select Components window appears.
8 Keep the default components and click the Next button.
The Start Copying Files window appears.
9 Click the Next button to begin copying files.
A command prompt window appears while the dni_vapmp file is installed—this
is normal. When it is complete, the installation will continue.
10 When the InstallShield Wizard is complete, click the Finish button.
11 The InstallShield Wizard then searches for a User Profile file, click the
Next button as this step is not necessary.
An Information dialog box appears.
12 Click the OK button to continue with the installation.
13 The InstallShield Wizard has completed the install of the SOHO 6
MUVPN client, verify that the option Yes, I want to restart my
computer now is enabled and click the Finish button.
The computer reboots.
The ZoneAlarm personal firewall may interfere with regular Local
network traffic preventing access to network resources. If the remote
computer is connected to the network after reboot, this may disrupt the
network logon process. If in doubt, log on to the computer locally the first
time after installation. For more information regarding ZoneAlarm, see
Chapter 3 “The ZoneAlarm Personal Firewall” on page 33.
N
OTE
20 MUVPN Client
Page 29

Configuring the MUVPN Client
Once you have restarted the machine, the WatchGuard Policy Import
dialog box appears. Click the Cancel button as this step is not necessary.
From the Windows desktop system tray:
1 Right-click on the Mobile User VPN client icon.
The Security Policy Editor window interface appears.
2 Select Edit => Add => Connection.
A New Connection will appear under the My Connections folder within the Network
Security Policy field on the left side of the Editor.
The ZoneAlarm personal firewall may immediately begin to display alerts
on your Windows desktop. For more information regarding ZoneAlarm
see “The ZoneAlarm Personal Firewall” on page 33.
N
Install the MUVPN Client
OTE
3 Under the Connection Security header on the right side of the Security
Policy Editor window, enable the Secure option.
4 Under the Remote Party Identity and Addressing header, select IP
Subnet from the ID Type drop list.
MUVPN Client Guide 21
Page 30

CHAPTER 2: Preparation, Installation, and Connection
5 Enter the network IP Address of the Trusted Network behind the
SOHO 6 in the field labeled “Subnet”.
In our example, 192.168.111.0.
6 Enter the Subnet Mask of the Trusted Network behind the SOHO 6 in
the field labeled “Mask”.
In our example, 255.255.255.0.
7 From the Protocol drop list, verify that All has been selected.
8 Enable the Connect using checkbox and select Secure Gateway
Tunnel from the drop list.
9 From the ID Type drop list, select IP Address.
10 Enter the External IP Address of the SOHO 6 in the appropriate field.
In our example, 206.253.208.100.
11 From the Network Security Policy on the left, expand New
Connection.
My Identity and Security Policy should appear below New Connection.
12 From the Network Security Policy, select Security Policy.
13 From the Select Phase 1 Negotiation Mode header, enable the
Aggressive Mode option.
14 Select My Identity.
22 MUVPN Client
Page 31

Install the MUVPN Client
15 Click the Pre-Shared Key button.
The Pre-Shared Key window appears.
16 Click the Enter Key button.
17 Enter the same Passphrase configured on the SOHO 6 in the
appropriate field.
In our example, pL4n3phr34k.
18 From the Select Certificate drop list, verify that None has been
selected.
19 From the ID Type drop list, select E-mail Address.
20 Enter the same Username configured on the SOHO 6.
In our example, Helmdog.
N
OTE
Both the Pre-Shared Key and the E-mail Address,
must
exactly match the
System Passphrase and System Administrator Name configured on the
SOHO 6 or the connection will fail.
MUVPN Client Guide 23
Page 32

CHAPTER 2: Preparation, Installation, and Connection
21 From the Virtual Adapter drop list, verify that Disabled has been
selected.
22 From the Network Security Policy expand Security Policy, then
expand Key Exchange (Phase 2).
My Identity and Security Policy should appear below New Connection.
23 Select Proposal 1.
My Identity and Security Policy should appear below New Connection.
24 Verify that the Encapsulation Protocol (ESP) check box is enabled.
25 Set the Encrypt Alg and Hash Alg drop lists to the same values
configured on the SOHO 6.
The “Hash Alg” setting refers to the “Authentication Algorithm” and the
“Encrypt Alg” setting refers to the “Encryption Algorithm” settings on the SOHO
6. In our example, Triple DES and MD5.
N
OTE
These two setting
must
exactly match those on the SOHO 6 or the
connection will fail.
24 MUVPN Client
Page 33

26 Select File => Save Changes.
Uninstall the MUVPN client
At some point, it may become necessary to completely uninstall the
MUVPN client. WatchGuard recommends a complete uninstall using the
Windows Add/Remove Programs tool.
First, disconnect all existing tunnels and dial-up connections and reboot
the remote computer. Then, from the Windows desktop:
1 Select Start => Settings => Control Panel.
The Control Panel window appears.
2 Double click the Add/Remove Programs icon.
The Add/Remove Programs window appears.
3 Select Mobile User VPN and click the Change/Remove button.
The InstallShield Wizard window appears.
4 Select Remove. Click the Next button.
The Confirm File Deletion dialog box appears.
5 Click the OK button to completely remove all of the components.
A command prompt window appears while the dni_vapmp file is installed—this
is normal. When it is complete, the installation will continue.
The Uninstall Security Policy dialog box appears.
6 Click the Ye s button to delete the Security Policy Personal Certificates
and Private/Public Keys.
The InstallShield Wizard window appears.
7 Verify that the option Yes, I want to restart my computer now is
enabled and click Finish.
The computer will reboot.
The ZoneAlarm personal firewall settings are preserved under the
following default directories.
N
Install the MUVPN Client
OTE
Windows 98:
c:\windows\internet logs\
Windows NT and 2000: c:\winnt\internet logs\
Windows XP: c:\windows\internet logs
If you wish to disregard these settings, delete the contents.
8 When the computer has restarted, select Start => Programs.
MUVPN Client Guide 25
Page 34

CHAPTER 2: Preparation, Installation, and Connection
9 Right-click Mobile User VPN and select Delete to remove this
selection from your Start Menu.
Connect and Disconnect the MUVPN Client
The MUVPN client enables the remote computer to establish a secure,
encrypted connection to a protected network over the Internet. To do this,
you must first connect to the Internet and then use the MUVPN client to
connect to the protected network.
Connecting the MUVPN Client
1 First establish an Internet connection through either Dial-Up
Networking or directly through a local area network (LAN) or wide
area network (WAN).
From the Windows desktop system tray:
2 Verify the MUVPN client status–it must be activated. If it is not,
right-click the icon and select Activate Security Policy.
For information on how to determine the status of the MUVPN icon, see the
following section “The Mobile User VPN client icon”.
Then, from the Windows desktop:
3 Select Start => Programs => Mobile User VPN => Connect.
The WatchGuard Mobile User Connect widow appears.
4 Click the Ye s button.
The Mobile User VPN client icon
The Mobile User VPN icon exists in the Windows desktop system tray
and displays several different status images. The following lists these
images and provides a brief description of each.
Deactivated
The MUVPN Security Policy is deactivated or the Windows
operating system did not start a necessary Mobile User VPN
26 MUVPN Client
Page 35

Connect and Disconnect the MUVPN Client
service properly and the remote computer must be restarted (if
this continues you may need to reinstall the MUVPN client).
Activated
The MUVPN client is ready to establish a secure, MUVPN tunnel
connection.
Activated and Transmitting Unsecured Data
The MUVPN client is ready to establish a secure, MUVPN tunnel
connection. The red bar on the right of the icon indicates that the
client has begun transmitting unsecured data.
Activated and Connected
The MUVPN client has established at least one secure, MUVPN
tunnel connection but is not transmitting data.
Activated, Connected and Transmitting Unsecured Data
The MUVPN client has established at least one secure, MUVPN
tunnel connection. The red bar on the right of the icon indicates
that the client is transmitting only unsecured data.
Activated, Connected and Transmitting Secured Data
The MUVPN client has established at least one secure, MUVPN
tunnel connection. The green bar on the right of the icon indicates
that the client is transmitting only secured data.
Activated, Connected and Transmitting both Secure and Unsecured
Data
MUVPN Client Guide 27
Page 36

CHAPTER 2: Preparation, Installation, and Connection
The MUVPN client has established at least one secure, MUVPN
tunnel connection. The red and green bars on the right of the icon
indicate that the client is transmitting both secured and unsecured
data.
Allowing the MUVPN client through the personal firewall
There are a couple of programs associated with the MUVPN client, which
you must allow through the personal firewall in order to establish the
MUVPN tunnel:
• MuvpnConnect.exe
•IreIKE.exe
The personal firewall will detect the attempt of these programs to access
the Internet. The New Program alert dialog box appears requesting access
for the MuvpnConnect.exe program.
From the ZoneAlarm alert dialog box:
1 Enable the Remember this answer the next time I use this program
option and click the Yes button.
This enables ZoneAlarm to allow the MuvpnConnect.exe program through each
time you attempt to make a MUVPN connection.
28 MUVPN Client
Page 37

The New Program alert dialog box appears requesting access for the
IreIKE.exe program.
2 Enable the Remember this answer the next time I use this program
option and click the Yes button.
This enables ZoneAlarm to allow the IreIKE.exe program through each time you
attempt to make a MUVPN connection.
Disconnecting the MUVPN client
The MUVPN tunnel is independent of the Internet connection. Close the
MUVPN tunnels when the remote computer encounters either of the
following events.
- Loses the Internet connection
- No longer needs the MUVPN tunnel
From the Windows desktop system tray:
1 Right-click the Mobile User VPN client icon.
2 Select Disconnect All.
The MUVPN Client closes all tunnels. This process does not affect your connection
to the Internet. You
3 Right-click the Mobile User VPN client icon and select Deactivate
Security Policy.
The MUVPN icon displays a red slash to indicate a deactivated Security Policy.
If you are using the ZoneAlarm personal firewall, deactivate this as well.
must
disconnect from the Internet separately.
Monitor the MUVPN Client Connection
From the Windows desktop system tray:
1 Right-click the ZoneAlarm icon and select Shutdown
ZoneAlarm.
The ZoneAlarm dialog box appears.
2 Click the Ye s button when prompted to quit ZoneAlarm.
Monitor the MUVPN Client Connection
There are two tools that accompany the MUVPN client which can be used
to monitor your connection and diagnose problems that may occur: the
Log Viewer and the Connection Monitor.
MUVPN Client Guide 29
Page 38

CHAPTER 2: Preparation, Installation, and Connection
The Log Viewer
The LogViewer displays the communications log, a diagnostic tool that
lists the negotiations that occur during the MUVPN client connection.
From the Windows desktop system tray:
1 Right-click the Mobile User VPN client icon.
2 Select Log Viewer.
The Log Viewer window appears.
The Connection Monitor
The Connection Monitor displays statistical and diagnostic information
for each active connection in the security policy. This module shows the
actual security policy settings and the security association (SA)
information established during Phase 1 IKE negotiations and Phase 2
IPSec negotiations.
From the Windows desktop system tray:
1 Right-click the Mobile User VPN client icon.
2 Select Connection Monitor.
The Connection Monitor window appears.
30 MUVPN Client
Page 39

Monitor the MUVPN Client Connection
An icon appears to the left of the connection name:
• SA indicates that the connection has only a Phase 1 IKE SA. This
occurs when connecting to a secure gateway tunnel or when a Phase 2
IPSec SA fails to establish or has not been established yet.
• A key indicates that the connection has a Phase 2 IPSec SA, or both a
Phase 1 and Phase 2 SA.
• A key with a black line moving below it indicates that the client is
processing secure IP traffic for that connection.
• When a single Phase 1 SA to a gateway protects multiple Phase 2 SAs,
there is a single Phase 1 connection with the SA icon and individual
Phase 2 connections with the key icon displayed above that entry.
MUVPN Client Guide 31
Page 40

CHAPTER 2: Preparation, Installation, and Connection
32 MUVPN Client
Page 41

CHAPTER 3 The ZoneAlarm Personal
Firewall
A personal firewall is a barrier between your computer and the outside
world. The computer is most vulnerable at its doors, called ports. Without
ports, no connection to the Internet is possible.
ZoneAlarm protects these ports by following a simple rule: Block all
incoming and outgoing traffic unless you explicitly allow it for trusted
programs.
When using ZoneAlarm, you often see Program Alert dialog boxes
similar to the image below.
MUVPN Client Guide 33
Page 42

CHAPTER 3: The ZoneAlarm Personal Firewall
This alert appears whenever one of your programs (in this example,
Internet Explorer) attempts to access the Internet or your local network.
This powerful feature means no information leaves your computer unless
you give it permission.
If you enable the “Remember the answer each time I use this program”
checkbox you will only have to answer this question once for each
program.
ZoneAlarm Features
The ZoneAlarm personal firewall provides a brief tutorial of the product
immediately after installation of the MUVPN client. Carefully read each
step to familiarize yourself with the application.
There are five buttons on the ZoneAlarm personal firewall panel. These
are described in detail below.
The Alerts Panel
The Alert messages generated by ZoneAlarm contain information on
what ZoneAlarm is blocking.
Up and Down Graphs
Notice the two sets of UP and DN (Up and Down) graphs on the
ZoneAlarm Panel. Whenever data is being sent to the Internet, red bars
are displayed inside the two UP graphs. Whenever data is being received,
green bars are displayed inside the DN graphs. If there is no activity to or
from the Internet, ZoneAlarm will display "ZA" on a red and yellow
background.
• The two graphs in the top portion of the icon display Internet traffic as
it occurs.
34 MUVPN Client
Page 43

• The two graphs in the lower portion of the icon display a
chronological history of Internet traffic as it is generated on your
machine.
• Whenever red or green flashing bars appear in the Alerts icon, the
application receiving or sending traffic is shown as a blinking icon
inside the Programs icon.
You might also notice traffic being displayed when you are not on the
Internet. This is local broadcast traffic from your computer.
Expanded Alert Panel
Click on the button to display the entire Alerts panel.
At the top of the panel, Today's Summary shows the total amount of data
sent and received by all applications. The middle portion of the panel
details Current Alerts. In the Alert Settings area, at the bottom of the
panel, there are options to display and save alerts.
N
ZoneAlarm Features
OTE
MUVPN Client Guide 35
Page 44

CHAPTER 3: The ZoneAlarm Personal Firewall
Pressing the “More Info” button launches the Zone Labs Alert Analyzer
Web page which provides additional information on traffic blocked by
ZoneAlarm.
The Lock Panel
The purpose of the lock to is block all network activity inbound and
outbound from your computer. Therefore, only use the lock during
extended inactivity of your PC.
A locked or unlocked padlock is displayed in the middle of the icon. To
immediately turn Internet access on or off for all the applications installed
on your machine that are not set to bypass the lock, click directly on the
padlock.
36 MUVPN Client
Page 45

ZoneAlarm Features
• When the bar below the Lock button is green, the Internet Lock is not
on. This means that ZoneAlarm is allowing Internet traffic in and out
of your computer.
If the bar displays a countdown timer, this is the time remaining before
the Automatic Lock will engage.
• When the bar is red, the lock is closed and no Internet traffic is
allowed. When the lock is closed, the countdown timer counts
upwards, showing the amount of time the lock has been active.
Expanded Lock Panel
Click on the button to display the entire Lock panel.
MUVPN Client Guide 37
Page 46

CHAPTER 3: The ZoneAlarm Personal Firewall
The Automatic Lock will activate at whatever set intervals you select. You
can program the Automatic Lock to activate in the following situations:
• Whenever your computer has not been used for a preset number of
minutes
• Whenever the screen saver takes control of your desktop
N
OTE
If Internet access is locked when the screen saver activates, it will be
unlocked when the screen saver is deactivated.
The option “Pass Lock programs may access the Internet” allows Internet
activity for applications that have been given rights to bypass the lock.
Using this bypass feature, you can allow programs like your email client
to check for mail during intervals when the Automatic Lock is in effect for
all your other applications.
38 MUVPN Client
Page 47

The High Security setting will stop all applications' Internet activity
regardless of the program's access settings. Please see the section of this
document titled, “The Programs Panel” for more information.
Undoing an Inactivity Lock
If you have activated the Automatic Lock using the minutes-of-inactivity
option, unlock the lock by clicking on the padlock inside the Lock icon.
After clicking on the padlock to deactivate the lock, the bar under the
padlock will be set to green. This means that the lock is no longer
stopping Internet traffic.
The Stop Button
Clicking on the STOP button immediately stops all network traffic. This
includes local traffic as well, regardless if you are on a LAN, WAN, or
stand-alone workstation. The only reason to use this button is if you are
monitoring activity and encounter a compromise in progress.
ZoneAlarm Features
The STOP button overrides the Pass Lock settings in the Programs panel.
This is useful for stopping Trojan horses and other malicious programs
that want to gain access to the Internet from your PC. To reactivate
Internet access, press the stop button again.
N
OTE
Using the emergency stop button completely cuts off connections to the
Internet. Connections and data transfer by all programs on your computer
must
be restarted.
The Security Panel
The Security panel is used to regulate ZoneAlarm's protection levels.
MUVPN Client Guide 39
Page 48

CHAPTER 3: The ZoneAlarm Personal Firewall
The Local and Internet Zone each have a security level selector, that you
drag up and down to change the security level. Local Zone security is
displayed in green, and Internet Zone security in blue.
The default security settings are medium for the Local Zone and high for
the Internet Zone.
For all three security levels, the application privileges in the Program
panel are enforced. The following is a description of the three security
levels:
Low
This is the minimal security setting. The Internet Lock feature
allows only application traffic, not server traffic (that is, traffic
outbound from the computer but not inbound from the network).
All local network access to and from your computer and server
applications are allowed, such as Windows file and print shares.
Medium
This is the recommended setting for computers connected to the
Internet through a LAN or WAN. The Internet Lock feature blocks
all traffic. All local network access to and from your computer and
server application is allowed, such as Windows file and print
shares.
High
This is the maximum security setting. The Internet Lock feature
blocks all traffic. All local network access to and from your
computer and server application is blocked, such as Windows file
and print shares. All ports not is use are hidden.
40 MUVPN Client
Page 49

ZoneAlarm Features
Use the block servers checkbox for each zone to prevent all programs
from acting as servers for that zone. By checking this option, no
application will be allowed to listen for incoming connections in that
zone, even if you've checked the Allow Server option in the Programs
panel.
Definition of Zones
ZoneAlarm divides traffic into two separate zones: the Local Zone and the
Internet Zone.
The purpose of the Local Zone is to enable ZoneAlarm to recognize what
you as the user, deem as permissible traffic.
The Local Zone is made up of the computers and resources you have
defined as trusted. These are usually resources on your local network but
they can include any resource of your choosing. Use the Advanced button
on the Security panel to define and modify the components of the Local
Zones.
MUVPN Client Guide 41
Page 50

CHAPTER 3: The ZoneAlarm Personal Firewall
The members of the Internet Zone are defined as all computers and
addresses you have not included in your trusted Local Zone for
protection.
Members of the Local Zone can include hosts, Web sites, trusted IP
Addresses, IP Subnets, and IP Ranges.
Configuring the Local Zone
Click on the button in the Security panel to display the Local
Zone Properties.
Use the Local Zone Properties to add the following:
•Web sites
• IP addresses or ranges of IPs
•Subnets
Click the Add button to add any of these elements and the Remove button
to remove items from your Local Zone list. Click on the Properties button
to modify the name or IP address of any element of your Local Zone
properties.
The Adapter Subnets section lists all the Network Interface Cards (NICs)
on your machine. Checking an adapter automatically adds the network
adapter's local subnet to the Local Zone.
If you are on a local area network, checking an adapter automatically
adds any computers and other devices such as printers using that subnet
to your Local Zone. On a LAN or WAN using multiple subnets, you
would need to add these individually.
42 MUVPN Client
Page 51

ZoneAlarm Features
To add items to the Local Zone, follow these instructions:
1 At the Security panel, click the Advanced button.
The Local Zone Properties window appears.
2 Click Add and select Host/Site (where you have the URL of the
remote server Web site rather than the IP address), IP address, IP
Range or Subnet.
3 Under Description, enter a name for the entry. This description can be
anything and has no bearing on functionality. It is intended to help
you distinguish multiple entries in the Local Zone.
4 Enter the name of the Host/Site, IP Address, IP Range, or Subnet.
For example, www.addhostsite.com or 10.10.10.1
5 Click the OK (or Next if adding a Host/Site) button.
6 Click Finish (if adding a Host/site).
7 Click the OK button to close the Local Zone Properties window.
N
OTE
The MUVPN client should add the VPN destinations contained within the
configuration file (.wgx) to the Local Zone by default.
MUVPN Client Guide 43
Page 52

CHAPTER 3: The ZoneAlarm Personal Firewall
The Programs Panel
The programs panel displays programs that have attempted to access the
Internet.
The extended portion of the Programs panel is the Program List. This is
the list of programs installed on your machine that have attempted to
connect to the Internet. Use the checkboxes in this panel to control the
connection behavior of any program on the list or to specify each
program's access rights for the Local Zone or the Internet Zone.
The same functions are available by bringing up the popup menu by
right-clicking on a program name in the Program list.
In the Program List, the Allow server column allows you to control which
applications can perform server functions. The Allow connect column
allows you to control which applications make outgoing connections to
the Internet or the Local Zone. Run your mouse pointer over the
Programs List or right-click on an entry in the list to see more statistics.
44 MUVPN Client
Page 53

Using the Panel
Go to the Allow connect column in the main body of the panel to change a
program's permissions. Click directly on the dots within the column to
change the access level.
In the same way, you can change the settings in the Allow server column.
• The question mark indicates that ZoneAlarm will prompt you each
time that particular program attempts to pass traffic to or from the
either the Internet or Local zones.
• The checkmark indicates that ZoneAlarm will allow that program
access to the selected zone.
• The red X indicates that ZoneAlarm will deny that program access to
the selected zone.
ZoneAlarm Features
• The column labeled “Allow connect” is for a program which is
attempting to make a connection out to the Internet.
• The column labeled “Allow server” is for a program which is
attempting to make a connection in to your computer.
• The column labeled “Pass Lock” allows an exception to the Internet
lock feature.
In the Program column, the program's name and version number are
displayed. Run your mouse over the program name to see more statistics:
-Product name
- The name of the file used to access the Internet
- The location of the file
- Product version
- Creation date and file size
MUVPN Client Guide 45
Page 54

CHAPTER 3: The ZoneAlarm Personal Firewall
See the section of this document titled, “Allowing Traffic through
ZoneAlarm” for more information on allowing a few common
applications and all of their necessary programs through the ZoneAlarm
personal firewall.
The Configuration Panel
Use the configuration panel to set the basic operational characteristics for
ZoneAlarm.
Click the button to display the Configuration panel. This
button is located directly below the Help button in the top right corner of
ZoneAlarm. Use the checkboxes and buttons in the Configuration Panel
to determine the following:
• ZoneAlarm should be displayed on top of other applications on your
computer screen when Internet activity is selected.
• The Desk Band Tool bar should be displayed (applies to Windows 98
and NT 4 only).
• ZoneAlarm should load when you start your computer.
• To check for product updates.
• To change the registration information you've submitted to Zone
Labs.
46 MUVPN Client
Page 55

ZoneAlarm Features
The first checkbox on the Configuration Panel is On top during Internet
activity. This checkbox controls whether or not ZoneAlarm will be
displayed on top of other applications whenever Internet activity is
detected.
The Load ZoneAlarm at Startup checkbox is selected by default. This
causes ZoneAlarm to be loaded when you start your computer. If you
disable this checkbox, Internet traffic monitoring will not begin until you
start ZoneAlarm on your machine.
N
OTE
The ZoneAlarm personal firewall may interfere with regular Local
network traffic. Please see the troubleshooting item in this document
titled, “Why am I not prompted for my user name and password when I
turn my computer on?”
Older versions of Windows NT (those without the Windows Shell
Update) allow you to choose a "Show shell toolbar" option. Under newer
MUVPN Client Guide 47
Page 56

CHAPTER 3: The ZoneAlarm Personal Firewall
versions and Windows 98/ME or Windows 2000, this option is part of the
Windows Shell.
The Check for update button contacts the web for ZoneAlarm product
updates.
The Change Registration button allows you to review and change your
ZoneAlarm registration information
Frequently Asked Questions about ZoneAlarm
What is Internet Traffic?
ZoneAlarm keeps an eye on all Internet traffic.
Internet traffic includes all data movement to and from the
Internet. It also includes all connection attempts from your
machine to the Internet and vice versa.
The ZoneAlarm personal firewall only stops undesired traffic.
When it does stop an instance of traffic, ZoneAlarm will issue an
alert. The alert can be displayed and stored in a number of places.
Data movement and connection attempts that are allowed
according to your rules in ZoneAlarm, will be allowed to pass
through the firewall.
What is an Internet Alert?
An alert is basically a blocked Internet connection. When
ZoneAlarm blocks some kind of inbound or outbound Internet
traffic, an alert is produced based on the rules you've set up in the
various ZoneAlarm panels.
By going to the Alerts panel, you can easily find out the basic
information behind an alert.
What Will ZoneAlarm Block?
What ZoneAlarm blocks is the result of how selections are made
in ZoneAlarm panels in these two ways:
- Default settings that were installed with the product that you
did not change.
48 MUVPN Client
Page 57

ZoneAlarm Features
- Modifications made to those settings by you or your system
administrator.
The higher the security setting in a zone, the more ZoneAlarm
will block. In the Security panel, if you allow overall security for
the Internet Zone to be set to high, the firewall will block, and
create an alert, for the three events shown in the lower part of the
example below.
What Are the Red and Green Traffic Indicators
The most visible Internet traffic indicators are the red and green
bars you can see at any time inside the first box on the left side of
the DeskBand Toolbar.
Red bars indicate data being sent; green bars indicate data being
received. These indicators don't indicate alerts or illegal traffic,
but simply that Internet traffic is occurring.
When you open the product, you see a larger version of these
indicators on the Alerts icon:
MUVPN Client Guide 49
Page 58

CHAPTER 3: The ZoneAlarm Personal Firewall
Whenever red or green flashing bars appear in the Alerts icon, the
application receiving or sending traffic is shown as a blinking icon
inside the Programs icon.
How Do I View My Internet Traffic?
If you really want to see Internet traffic every single time it occurs,
make sure the first checkbox below, located on the Configuration
panel, is enabled.
This means that, in addition to being able to view the red and
green bars, you will also see the main ZoneAlarm panel displayed
on top of all the other applications on your desktop.
This will make it obvious that Internet traffic is occurring. Since so
much Internet traffic can occur when you have a live Internet
connection, many ZoneAlarm users disable this checkbox and rely
on the red and green bars only.
How Do I Know How Many Bytes Are Sent and Received?
About Internet traffic, you can always view how many bytes have
been sent to your PC and how many have been received since you
launched ZoneAlarm. These statistics are available at the top of
the Alerts panel as shown below.
Why Did I Get That Alert?
Just below the Bytes received area in the Alerts panel, statistics are
always available immediately after your ZoneAlarm personal
firewall detects an Internet connection attempt that it is being
blocked by the firewall rules you've set up throughout
ZoneAlarm.
The example below shows that a connection attempt by Internet
Explorer was blocked.
50 MUVPN Client
Page 59

ZoneAlarm Features
A number of rules could be responsible for this alert. One
possibility is that, in the Allow connect column of the Programs
panel, you have established a rule to block Internet Explorer's
access to the Zone where the IP address mentioned in the alert.
In this case, the IP address would be in the Internet zone, because
the Red X is in the Internet Zone area.
How Do I Get More Info about a Particular Alert
Clicking on the More Info button, located to the right of the alert
description, gives you access to the Alert Analyzer, located on the
Zone Labs web site.
How Do I Control ZoneAlarm for Displaying Alerts?
The area at the bottom of the Alerts panel allows you to control
whether you want the Alert Log to be created, and whether or not
you want alert popups to be displayed each time there is an alert.
MUVPN Client Guide 51
Page 60

CHAPTER 3: The ZoneAlarm Personal Firewall
If you enable the second checkbox, you'll get a display like the
example below each time firewall rules trigger an alert.
Allowing Traffic through ZoneAlarm
When an application requires access through the ZoneAlarm personal
firewall, a Program Alert will be displayed on the Windows desktop
informing the user which particular program needs access. Often, the
program associated with the application is not readily indicative of the
application the user is attempting to execute.
In the example above, the Internet Explorer Web browser application has
been launched and is attempting to access the users home page. The
52 MUVPN Client
Page 61

ZoneAlarm Features
program which actually needs to pass through the firewall is
“IEXPLORE.EXE”.
In order to allow this program access each time the application is
executed, enable the Remember the answer each time I use this program
checkbox.
Here is a list of a few essential programs which will need access through
the ZoneAlarm personal firewall in order to operate some important
applications.
Programs Which
Must
Be Allowed
MUVPN client
MUVPN Connection Monitor
MUVPN Log Viewer
Programs Which
May
be Allowed
MS Outlook
MS Internet Explorer
Netscape 6.1 netscp6.exe
Opera Web browser
Standard Windows network applications
Shutting Down ZoneAlarm
From the Windows desktop system tray:
1 Right-click on the ZoneAlarm icon and select Shutdown
ZoneAlarm.
The ZoneAlarm dialog box appears.
2 Click the Ye s button when prompted to quit ZoneAlarm.
IreIKE.exe
MuvpnConnect.exe
CmonApp.exe
ViewLog.exe
OUTLOOK.exe
IEXPLORE.exe
Opera.exe
lsass.exe
services.exe
svchost.exe
winlogon.exe
MUVPN Client Guide 53
Page 62

CHAPTER 3: The ZoneAlarm Personal Firewall
Uninstalling ZoneAlarm
From the Windows desktop:
1 Select Start => Programs => Zone Labs => Uninstall ZoneAlarm.
The Confirm Uninstall dialog box appears.
2 Click the Ye s button.
The ZoneLabs TrueVector service dialog box appears.
3 Click the Ye s button to continue with uninstalling the TrueVector
service and disable its Internet Security features.
The Select Uninstall Method window appears.
4 Veri f y that Automatic is selected and then click the Next button.
5 Click the Finish button to perform the uninstall.
The Remove Shared Component window may appear. During the initial
installation of ZoneAlarm, some files were installed that could be shared
by other programs on the system. Click the Ye s t o A ll button to completely
remove all of these files.
6 The Install window appears and prompts you to restart the computer.
Click the OK button to reboot your system.
N
OTE
54 MUVPN Client
Page 63

CHAPTER 4 Troubleshooting Tips
WatchGuard maintains a knowledge base on our Web site, including an
In-Depth FAQ section on configuring and using the MUVPN client. This
is available at:
www.watchguard.com/support
A few of the most common issues found in installing, configuring, and
using the MUVPN client are described below.
My computer is hung up just after installing the MUVPN client...
This is most likely due to either the ZoneAlarm personal firewall
application interfering with regular Local network traffic or it is because
the MUVPN client is active and is unsuccessfully attempting to create
VPN tunnels.
When the MUVPN client is not in use, ZoneAlarm should be shutdown
and the client deactivated.
From the Windows desktop system tray:
1 First, reboot your computer.
2 Right-click on the Mobile User VPN client icon.
MUVPN Client Guide 55
Page 64

CHAPTER 4: Troubleshooting Tips
3 Select Disconnect All.
The MUVPN client closes all VPN tunnels.
4 Right-click on the Mobile User VPN client icon and select Deactivate
Security Policy.
The MUVPN icon will display a red slash to indicate that the Security Policy has
been deactivated.
5 Right-click on the ZoneAlarm icon and select Shutdown
ZoneAlarm.
The ZoneAlarm dialog box appears.
6 Click the Ye s button when prompted to quit ZoneAlarm.
I have to enter my network log in information even when I’m not connected to the network...
When you start your computer, you are prompted to enter your Windows
network user name, password and domain. It is very important that you
enter this information correctly, just as you would if you were at the office
connected to the network. Windows stores the information for use by
network adapters and networked applications. Later, when you connect
to your ISP and start the MUVPN client, your computer uses the stored
user name, password, and domain to connect to the company network.
I am not prompted for my user name and password when I turn my computer on...
This is most likely due to the ZoneAlarm personal firewall application.
This program is very good at what it does: keeping your computer secure
from unauthorized incoming or outgoing traffic. Unfortunately, it may
block your computer from broadcasting its network information thereby
preventing the machine from sending the necessary login information.
You should be certain to shut down ZoneAlarm each time you disconnect
the MUVPN connection.
Is the Mobile User VPN tunnel is working...
The Mobile User VPN client icon, which appears in the Windows desktop
system tray once it has been launched, will display a key within the icon
once the client has connected.
To test the connection, ping a computer on your company network.
56 MUVPN Client
Page 65

• Select Start => Run. Type ping and the IP address of a computer on
your company network.
My mapped drives have a red X through them...
Windows 98/ME, NT, and 2000 verifies and maps networks drives
automatically when the computer starts. Because there is no way for you
to establish a remote session with the company network before the
computer actually starts, drive mapping fails during the boot process and
a red X appears on the drive icon. Establish a MUVPN tunnel and open
the network drive. The red X should disappear.
How to map a network drive
Due to a Windows operating system limitation, mapped network drives
disappear when you work remotely. To remap a network drive from the
Windows desktop:
1 Right-click on Network Neighborhood.
2 Select Map Network Drive.
The Map Network Drive dialog box appears.
3 Use the drop list to select a drive letter.
Either use the drop list or type a network drive path. For example:
\\techsupport\share2\rodolfo
4 Click OK.
The mapped drive appears in the My Computer window. Even if you
enable the “Reconnect at Logon” checkbox, the mapped drive will not
appear the next time you start your computer unless it is physically
connected to the network.
I sometimes get prompted for a password when I am browsing the company network...
Due to a Windows networking limitation, remote user virtual private
networking products only allow access to a single network domain. If
your company is large enough to require subnetting (multiple networks
connected together), you will only be able to browse your own domain.
Attempts to access other domains will result in a password prompt.
Unfortunately, even providing the correct information will not open these
additional networks.
MUVPN Client Guide 57
Page 66

CHAPTER 4: Troubleshooting Tips
It takes a really long time to shut down the computer after using Mobile User VPN...
If you open and browse a mapped network drive during a MUVPN session,
the Windows operating system waits for a signal from the
times out and completes the shut down cycle.
I lost the connection to my ISP, and now I can’t use the company network...
If you lose Internet connection long enough, MUVPN also loses the secure
tunnel. Follow the steps to close the tunnel. Then connect to the Internet
and restart the MUVPN client.
Copyright and Patent Information
Copyright© 1998 - 2001 WatchGuard Technologies, Inc. All rights reserved.
WatchGuard, Firebox, Mobile User VPN, and MUVPN are either registered
trademarks or trademarks of WatchGuard Technologies, Inc. in the United States
and other countries. This product is covered by one or more pending patent
applications.
Microsoft®, Internet Explorer®, Windows® 95, Windows® 98, Windows NT®
and Windows® 2000 are either registered trademarks or trademarks of Microsoft
Corporation in the United States and/or other countries.
All other trademarks and tradenames are the property of their respective owners.
Printed in the United States of America.
Part No: 1200016
network before it
58 MUVPN Client
 Loading...