

Page 1

WatchGuard
®
Firebox™ System
User Guide
Firebox System 4.6
Page 2

Disclaimer
Information in this guide is subject to change without notice. Companies, names, and data used in
examples herein are fictitious unless otherwise noted. No part of this guide may be reproduced or
transmitted in any form or by any means, electronic or mechanical, for any purpose, without the
express written permission of WatchGuard Technologies, Inc.
Copyright and Patent Information
Copyright© 1998 - 2001 WatchGuard Technologies, Inc. All rights reserved.
WatchGuard, Firebox, LiveSecurity, and SpamScreen are either registered trademarks or
trademarks of WatchGuard Technologies, Inc. in the United States and other countries. This product
is covered by one or more pending patent applications.
Red Hat® is a registered trademark of Red Hat, Inc. This product is not a product of Red Hat, Inc.
and is not endorsed by Red Hat, Inc. This is a product of WatchGuard and we have no relationship
with Red Hat, Inc.
Adobe, Acrobat, the Acrobat logo, and PostScript are trademarks of Adobe Systems Incorporated.
© 1999 BackWeb Technologies, Inc. All rights reserved. BackWeb is a registered trademark of
BackWeb Technologies, Inc.
CyberNOT, CyberNOT List, CyberYES, and CyberYES List are trademarks of Learning Company
Properties Inc.
© Hi/fn, Inc. 1993, including one or more U.S. Patents: 4701745, 5016009, 5126739, and
5146221 and other patents pending.
© 1995-1998 Eric Young (eay@cryptsoft). All rights reserved.
© 1998-1999 The OpenSSL Project. All rights reserved.
Java and all Java-based marks are trademarks or registered trademarks of Sun Microsystems, Inc.
in the United States and other countries.
Microsoft®, Internet Explorer®, Windows® 95, Windows® 98, Windows NT® and Windows®
2000 are either registered trademarks or trademarks of Microsoft Corporation in the United States
and/or other countries.
Netscape and Netscape Navigator are registered trademarks of Netscape Communications
Corporation in the United States and other countries.
RC2 Symmetric Block Cipher, RC4 Symmetric Stream Cipher, RC5 Symmetric Block Cipher,
BSAFE, TIPEM, RSA Public Key Cryptosystem, MD, MD2, MD4, and MD5 are either trademarks
or registered trademarks of RSA Data Security, Inc. Certain materials herein are Copyright ©
1992-1999 RSA Data Security, Inc. All rights reserved.
RealNetworks, RealAudio, and RealVideo are either a registered trademark or trademark of
RealNetworks, Inc. in the United States and/or other countries.
VPCom™ Copyright © 1997-1999 Ashley Laurent, Inc. All rights reserved.
All other trademarks and tradenames are the property of their respective owners.
Printed in the United States of America.
DocVer: WatchGuard Firebox Security System 4.6 User Guide - 4.6.1
ii
Page 3

WatchGuard Technologies, Inc.
Firebox System Software
End-User License Agreement
WatchGuard Firebox System (WFS) End-User License Agreement
IMPORTANT — READ CAREFULLY BEFORE ACCESSING WATCHGUARD SOFTWARE:
This WFS End-User License Agreement (“AGREEMENT”) is a legal agreement between you (either
an individual or a single entity) and WatchGuard Technologies, Inc. (“WATCHGUARD”)for the
WATCHGUARD WFS software product identified above, which includes computer software and may
include associated media, printed materials, and on-line or electronic documentation (“SOFTWARE
PRODUCT”). WATCHGUARD is willing to license the SOFTWARE PRODUCT to you only on the
condition that you accept all of the terms contained in this Agreement. Please read this Agreement
carefully. By installing or using the SOFTWARE PRODUCT you agree to be bound by the terms of
this Agreement. If you do not agree to the terms of this AGREEMENT, WATCHGUARD will not
license the SOFTWARE PRODUCT to you, and you will not have any rights in the SOFTWARE
PRODUCT. In that case, promptly return the SOFTWARE PRODUCT, along with proof of payment,
to the authorized dealer from whom you obtained the SOFTWARE PRODUCT for a full refund of the
price you paid.
1. Ownership and License. The SOFTWARE PRODUCT is protected by copyright laws and
international copyright treaties, as well as other intellectual property laws and treaties. This is a
license agreement and NOT an agreement for sale. All title and copyrights in and to the
SOFTWARE PRODUCT (including but not limited to any images, photographs, animations, video,
audio, music, text, and applets incorporated into the SOFTWARE PRODUCT), the accompanying
printed materials, and any copies of the SOFTWARE PRODUCT are owned by WATCHGUARD or
its suppliers. Your rights to use the SOFTWARE PRODUCT are as specified in this AGREEMENT,
and WATCHGUARD retains all rights not expressly granted to you in this AGREEMENT. Nothing
in this AGREEMENT constitutes a waiver of our rights under U.S. copyright law or any other law or
treaty.
2. Permitted Uses. You are granted the following rights to the SOFTWARE PRODUCT:
(A) You may install and use the SOFTWARE PRODUCT on any single computer at any single
location. If you wish to use the SOFTWARE PRODUCT on a different computer, you must erase the
SOFTWARE PRODUCT from the first computer on which you installed it before you install it onto
a second.
(B) To use the SOFTWARE PRODUCT on more than one computer at once, you must license an
additional copy of the SOFTWARE PRODUCT for each additional computer on which you want to
use it.
(C)You may make a single copy of the SOFTWARE PRODUCT for backup or archival purposes only.
3. Prohibited Uses. You may not, without express written permission from WATCHGUARD:
(A) Use, copy, modify, merge or transfer copies of the SOFTWARE PRODUCT or printed materials
except as provided in this AGREEMENT;
(B) Use any backup or archival copy of the SOFTWARE PRODUCT(or allow someone else to use
such a copy) for any purpose other than to replace the original copy in the event it is destroyed or
becomes defective;
(C) Sublicense, lend, lease or rent the SOFTWARE PRODUCT;
User Guide iii
Page 4

(D) Transfer this license to another party unless (i) the transfer is permanent, (ii) the third party
recipient agrees to the terms of this AGREEMENT, and (iii) you do not retain any copies of the
SOFTWARE PRODUCT; or
(E) Reverse engineer, disassemble or decompile the SOFTWARE PRODUCT.
4. Limited Warranty. WATCHGUARD makes the following limited warranties for a period of
ninety (90) days from the date you obtained the SOFTWARE PRODUCT from WatchGuard
Technologies or an authorized dealer:
(A) Media. The disks and documentation will be free from defects in materials and workmanship
under normal use. If the disks or documentation fail to conform to this warranty, you may, as your
sole and exclusive remedy, obtain a replacement free of charge if you return the defective disk or
documentation to us with a dated proof of purchase.
(B) SOFTWARE PRODUCT. The SOFTWARE PRODUCT will materially conform to the
documentation that accompanies it. If the SOFTWARE PRODUCT fails to operate in accordance
with this warranty, you may, as your sole and exclusive remedy, return all of the SOFTWARE
PRODUCT and the documentation to the authorized dealer from whom you obtained it, along with a
dated proof of purchase, specifying the problems, and they will provide you with a new version of the
SOFTWARE PRODUCT or a full refund, at their election.
Disclaimer and Release. THE WARRANTIES, OBLIGATIONS AND LIABILITIES OF
WATCHGUARD, AND YOUR REMEDIES, SET FORTH IN PARAGRAPHS 4, 4(A) AND 4(B)
ABOVE ARE EXCLUSIVE AND IN SUBSTITUTION FOR, AND YOU HEREBY WAIVE,
DISCLAIM AND RELEASE ANY AND ALL OTHER WARRANTIES, OBLIGATIONS AND
LIABILITIES OF WATCHGUARD AND ALL OTHER RIGHTS, CLAIMS AND REMEDIES YOU
MAY HAVE AGAINST WATCHGUARD, EXPRESS OR IMPLIED, ARISING BY LAW OR
OTHERWISE, WITH RESPECT TO ANY NONCONFORMANCE OR DEFECT IN THE
SOFTWARE PRODUCT (INCLUDING, BUT NOT LIMITED TO, ANY IMPLIED WARRANTY OF
MERCHANTABILITY OR FITNESS FOR A PARTICULAR PURPOSE, ANY IMPLIED
WARRANTY ARISING FROM COURSE OF PERFORMANCE, COURSE OF DEALING, OR
USAGE OF TRADE, ANY WARRANTY OF NONINFRINGEMENT, ANY WARRANTY THAT
THIS SOFTWARE PRODUCT WILL MEET YOUR REQUIREMENTS, ANY WARRANTY OF
UNINTERRUPTED OR ERROR-FREE OPERATION, ANY OBLIGATION, LIABILITY, RIGHT,
CLAIM OR REMEDY IN TORT, WHETHER OR NOT ARISING FROM THE NEGLIGENCE
(WHETHER ACTIVE, PASSIVE OR IMPUTED) OR FAULT OF WATCHGUARD AND ANY
OBLIGATION, LIABILITY, RIGHT, CLAIM OR REMEDY FOR LOSS OR DAMAGE TO, OR
CAUSED BY OR CONTRIBUTED TO BY, THE SOFTWARE PRODUCT).
Limitation of Liability. WATCHGUARD’ liability (whether in contract, tort, or otherwise; and
notwithstanding any fault, negligence, strict liability or product liability) with regard to THE
SOFTWARE Product will in no event exceed the purchase price paid by you for such Product. IN
NO EVENT WILL WATCHGUARD BE LIABLE TO YOU OR ANY THIRD PARTY, WHETHER
ARISING IN CONTRACT (INCLUDING WARRANTY), TORT (INCLUDING ACTIVE, PASSIVE
OR IMPUTED NEGLIGENCE AND STRICT LIABILITY AND FAULT), FOR ANY INDIRECT,
SPECIAL, INCIDENTAL, OR CONSEQUENTIAL DAMAGES (INCLUDING WITHOUT
LIMITATION LOSS OF BUSINESS PROFITS, BUSINESS INTERRUPTION, OR LOSS OF
BUSINESS INFORMATION) ARISING OUT OF OR IN CONNECTION WITH THIS WARRANTY
OR THE USE OF OR INABILITY TO USE THE SOFTWARE PRODUCT, EVEN IF
WATCHGUARD HAS BEEN ADVISED OF THE POSSIBILITY OF SUCH DAMAGES.
5. United States Government Restricted Rights. The enclosed SOFTWARE PRODUCT and
documentation are provided with Restricted Rights. Use, duplication or disclosure by the U.S.
Government or any agency or instrumentality thereof is subject to restrictions as set forth in
iv
Page 5

subdivision (c)(1)(ii) of the Rights in Technical Data and Computer Software clause at DFARS
252.227-7013, or in subdivision (c)(1) and (2) of the Commercial Computer Software -- Restricted
Rights Clause at 48 C.F.R. 52.227-19, as applicable. Manufacturer is WatchGuard Technologies,
Incorporated, 505 Fifth Avenue, Suite 500, Seattle, WA 98104.
6. Export Controls. You agree not to directly or indirectly transfer the SOFTWARE PRODUCT or
documentation to any country to which such transfer would be prohibited by the U.S. Export
Administration Act and the regulations issued thereunder.
7. Termination. This license and your right to use the SOFTWARE PRODUCT will automatically
terminate if you fail to comply with any provisions of this AGREEMENT, destroy all copies of the
SOFTWARE PRODUCT in your possession, or voluntarily return the SOFTWARE PRODUCT to
WATCHGUARD. Upon termination you will destroy all copies of the SOFTWARE PRODUCT and
documentation remaining in your control or possession.
8. Miscellaneous Provisions. This AGREEMENT will be governed by and construed in accordance
with the substantive laws of Washington excluding the 1980 United National Convention on
Contracts for the International Sale of Goods, as amended. This is the entire AGREEMENT between
us relating to the contents of this package, and supersedes any prior purchase order,
communications, advertising or representations concerning the contents of this package AND BY
USING THE SOFTWARE PRODUCT YOU AGREE TO THESE TERMS. No change or
modification of this AGREEMENT will be valid unless it is in writing, and is signed by
WATCHGUARD.
9. Canadian Transactions: If you obtained this SOFTWARE PRODUCT in Canada, you agree to
the following:
The parties hereto have expressly required that the present AGREEMENT and its Exhibits be drawn
up in the English language. / Les parties aux presentes ont expressement exige que la presente
conventions et ses Annexes soient redigees en la langue anglaise.
Declaration of Conformity
WatchGuard Technologies, Inc.
505 Fifth Avenue South
Suite 500
Seattle, WA 98104-3892
Declares the CE-marked product:
Product: Firebox family of appliances
Complies with: 73/23/EEC Low Voltage Directive 89/336/EEC
Compliance
Standards:
Electromagnetic Compatibility Directive
EN60950:1992 Electrical Safety A1:1993, A2:1993,
EN55022,Class A RF Emissions Information Technology
EN50082-1 EMC Immunity Standard
A3:1995, A4:1997, A11:1997
User Guide v
Page 6

FCC Certification
This device has been tested and found to comply with limits for a Class A digital
device, pursuant to Part 15 of the FCC Rules. Operation is subject to the following
two conditions:
1 This device may not cause harmful interference.
2 This device must accept any interference received, including interference that
may cause undesired operation.
CE Notice
The official CE symbol indicates compliance of this WatchGuard Technologies, Inc.
product to the EMC directive of the European Community. The CE symbol found
here or elsewhere indicates that this WatchGuard product meets or exceeds the
following standards:
EN60950:1992 Electrical Safety A1:1993, A2:1993, A3:1995,
EN55022,Class ARF Emissions Information Technology
EN50082-1 EMC Immunity Standard
A4:1997, A11:1997
CSA Statement
This Class A digital apparatus meets all requirements of the Canadian InterferenceCausing Equipment Regulations.
Cet appareil numerique de la classe A respecte toutes les exigences du Reglement sur
le materiel broulleur du Canada.
vi
Page 7

Table of Contents
PART I
PART II
CHAPTER 1 LiveSecurity Service .......................................................... 7
CHAPTER 2 Technical Support ........................................................... 11
CHAPTER 3 WatchGuard Options ...................................................... 17
Introduction ................................................................................1
Welcome to WatchGuard ............................................................... 1
WatchGuard Firebox System components .....................................1
Minimum requirements .................................................................. 3
WatchGuard Services ..................................................................5
LiveSecurity broadcasts ..................................................................7
Accessing frequently asked questions (FAQ) ...............................11
Getting Internet technical support ............................................... 12
Getting telephone support .......................................................... 12
Training .........................................................................................13
WatchGuard users group ..............................................................14
Online Help .................................................................................. 14
Currently available options ........................................................... 17
Obtaining WatchGuard options ...................................................18
PART III
User Guide vii
Configuring a Security Policy ....................................................19
CHAPTER 4 Firebox Basics .................................................................. 21
What is a Firebox? ........................................................................ 21
Opening a configuration file ........................................................ 23
Saving a configuration file ............................................................ 23
Page 8

Resetting Firebox passphrases .....................................................24
Setting the time zone ...................................................................25
Reinitializing a misconfigured Firebox ..........................................25
CHAPTER 5 Using the WatchGuard Control Center .........................27
Navigating the WatchGuard Control Center ................................27
Control Center components .........................................................27
Working with the Control Center ..................................................30
Policy Manager .............................................................................31
Firebox Monitors ...........................................................................32
LogViewer .....................................................................................32
HostWatch ....................................................................................33
Historical Reports ..........................................................................33
LiveSecurity Event Processor ........................................................33
CHAPTER 6 Configuring a Network ...................................................35
Running the QuickSetup wizard ....................................................35
Setting up a drop-in network ........................................................36
Setting up a routed network .........................................................37
Adding a secondary network ........................................................38
Defining a network route ..............................................................38
Defining a host route ....................................................................39
Changing an interface IP address .................................................39
Setting the default gateway ..........................................................39
Entering WINS and DNS server addresses ...................................40
Defining a Firebox as a DHCP server ............................................40
CHAPTER 7 Blocking Sites and Ports .................................................43
Configuring default packet handling ............................................43
Blocking a site permanently .........................................................44
Blocking a port permanently ........................................................45
Blocking sites temporarily with service settings ...........................46
CHAPTER 8 Configuring Services .......................................................47
Adding an existing service ............................................................47
Creating a new service ..................................................................48
Defining service properties ...........................................................49
Configuring services for authentication ........................................51
Modifying a Service ......................................................................51
viii
Deleting a service .........................................................................51
Setting up proxy services ..............................................................52
Page 9

Service precedence ...................................................................... 56
CHAPTER 9 Controlling Web Traffic .................................................. 59
How WebBlocker works ................................................................59
Configuring the WebBlocker service ............................................ 60
Manually downloading the WebBlocker database ....................... 62
CHAPTER 10 Setting Up Network Address Translation ..................... 63
What is dynamic NAT? .................................................................63
Using simple dynamic NAT .......................................................... 64
Using service-based NAT .............................................................65
Configuring a service for incoming static NAT .............................66
CHAPTER 11 Setting Up Logging and Notification ...........................69
Ensure logging with failover logging ...........................................69
WatchGuard logging architecture ................................................70
Designating Event Processors for a Firebox ................................. 70
Setting up the LiveSecurity Event Processor ................................ 73
Setting global logging and notification preferences ....................75
Customizing logging and notification by service or option ......... 76
CHAPTER 12 Connect with Out-of-Band Management .................... 79
PART IV
CHAPTER 13 Creating Aliases and Implementing Authentication .. 85
CHAPTER 14 Monitoring Firebox Activity ...........................................93
Connecting a Firebox with OOB management ............................79
Enabling the Management Station ............................................... 79
Configuring the Firebox for OOB ................................................. 81
Establishing an OOB connection ................................................. 81
Administering a Security Policy ................................................83
Using host aliases ......................................................................... 85
What is user authentication? ........................................................87
Configuring Firebox authentication .............................................88
Configuring Windows NT Server authentication ..........................88
Configuring RADIUS server authentication ..................................89
Configuring CRYPTOCard server authentication ......................... 90
Configuring SecurID authentication ............................................. 91
Using authentication to define remote user VPN access ............. 92
Firebox Monitors .......................................................................... 93
HostWatch .................................................................................... 98
User Guide ix
Page 10

CHAPTER 15 Reviewing and Working with log files ........................103
Viewing files with LogViewer ......................................................103
Displaying and hiding fields .......................................................105
Working with log files .................................................................106
CHAPTER 16 Generating Reports of Network Activity ....................109
Starting Historical Reports ..........................................................109
Creating and editing reports ......................................................109
Specifying report sections ..........................................................110
Specifying a report time span .....................................................111
Consolidating report sections .....................................................111
Setting report properties ............................................................111
Exporting reports ........................................................................112
Using report filters ......................................................................113
Scheduling and running reports .................................................114
Report sections and consolidated sections ................................115
PART V
CHAPTER 17 Configuring Branch Office Virtual Private Networking.121
CHAPTER 18 Configuring the Firebox for Remote User VPN .........133
CHAPTER 19 Preparing a Host for Remote User VPN .....................141
WatchGuard® Virtual Private Networking ............................ 119
Configuration checklist ...............................................................121
Using DVCP to connect to devices .............................................122
Branch office VPN with IPSec ......................................................124
Configuring WatchGuard VPN ....................................................130
Configuration checklist ...............................................................133
Configuring shared servers for RUVPN .......................................134
Adding remote access users .......................................................134
Configuring services to allow incoming RUVPN .........................135
Configuring the Firebox for Remote User PPTP .........................136
Configuring the Firebox for Mobile User VPN ............................137
Configuring debugging options .................................................140
Preparing the client computers ..................................................141
Configuring the remote host for RUVPN with PPTP ...................145
Using Remote User PPTP ............................................................146
Configuring debugging options .................................................147
Index ............................................................................................. 149
x
Page 11

PART I
Introduction
Welcome to WatchGuard
The WatchGuard Firebox System consists of:
• A suite of management and security software tools
• A Plug and Play network appliance called the WatchGuard Firebox
• A security-related broadcast service
In the past, a connected enterprise needed a complex set of tools, systems, and
personnel for access control, authentication, virtual private networking, network
management, and security analysis. These costly systems were difficult to integrate
and not easy to update. Today, the WatchGuard Firebox System delivers a complete
network security solution to meet modern security challenges:
• Keep network defenses current
• Protect every office connected to the Internet
• Encrypt communications to remote offices and traveling users
• Manage the security system from a single site
The WatchGuard Firebox System is a reliable, flexible, scalable, and inexpensive
network security solution. Its setup and maintenance costs are small, and it supports
a rich feature set. When properly configured and administered, the Firebox System
reliably defends any network against external threats.
WatchGuard Firebox System components
The WatchGuard Firebox System has all of the components needed to conduct ebusiness safely. It is made up of the following:
• Security appliance (the WatchGuard Firebox)
• Control Center
User Guide 1
Page 12

WatchGuard Firebox System components
•Security suite
• LiveSecurity Service
WatchGuard Firebox
The Firebox family of appliances are specially designed and optimized machines.
They are small, efficient, and reliable. The Firebox is a low-profile component with an
indicator display panel in front and physical interfaces in back.
For detailed Firebox specifications, see the Reference Guide.
WatchGuard Control Center
WatchGuard Control Center is a toolkit of applications run from a single location,
enabling you to configure, manage, and monitor your network security policy.
Control Center includes:
Policy Manager
Used to design, configure, and manage the electronic portion of a network
security policy.
Firebox Monitors
Combines the WatchGuard set of monitoring tools into a single user interface.
LogViewer
Displays a static view of the log data, which you can filter by type, search for
keywords and fields, and print and save to a separate file.
HostWatch
Displays active connections occurring on a Firebox in real time or represents
the connections listed in a log file. HostWatch either plays back a previous file
for review or displays connections in real time, as they are added to the
current log file.
Historical Reports
Creates HTML reports that display session types, most active hosts, most used
services, URLs, and other data useful in monitoring and troubleshooting your
network.
WatchGuard security suite
In addition to basic security policy configuration, the Firebox System includes a suite
of advanced software features. These include:
• User authentication
• Network address translation
• Remote user virtual private networking
• Branch office virtual private networking
• Selective Web-site blocking
2
Page 13

Minimum requirements
LiveSecurity Service
The innovative LiveSecurity Service subscription makes it easy to maintain the
security of an organization’s network. WatchGuard’s team of security experts publish
alerts and software updates, which are broadcast to your e-mail client.
Minimum requirements
This section describes the minimum hardware and software configurations necessary
to successfully install, run, and administer version 4.6 of the WatchGuard Firebox
System.
Software requirements
WatchGuard Firebox System software version 4.6 can run on Microsoft Windows 95,
Windows 98, Windows NT 4.0, or Windows 2000, as specified below:
Windows 95 requirements
•Microsoft Windows 95
• Service Release 2 or later
Windows 98 requirements
•Microsoft Windows 98
Windows NT requirements
•Microsoft Windows NT 4.0
• Microsoft Service Pack 4, Service Pack 5, or Service Pack 6a for Windows NT 4.0
Windows 2000 requirements
• Microsoft Windows 2000
Web browser requirements
You must have Microsoft Internet Explorer 4.0 or later to run the installation from the
CD. The following HTML-based browsers are recommended to view WatchGuard
Online Help:
• Netscape Communicator 4.7 or later
• Microsoft Internet Explorer 5.01 or later
Microsoft Internet Explorer 5.5 is not currently supported.
User Guide 3
Page 14

Minimum requirements
Hardware requirements
Minimum hardware requirements are the same as for the operating system on which
the WatchGuard Firebox System 4.6 runs. The recommended hardware ranges are
listed below.
Hardware
feature
CPU Pentium II
Memory Same as for operating system.
Hard disk space 25 MB to install all WatchGuard modules
CD-ROM drive
(optional)
Minimum requirement
Recommended:
32 MB for Windows 95a
64 MB for Windows 98
64 MB for Windows NT 4.0
64 MB for Windows 2000 Professional
256 MB for Windows 2000 Server
15 MB minimum for log file
Additional space as required for log files
Additional space as required for multiple
configuration files
One CD-ROM drive to install WatchGuard from
its CD-ROM distribution disk, or download the
software from the LiveSecurity Web site
4
Page 15

PART II
The WatchGuard Firebox System is considerably more than a piece of hardware. This
section describes two WatchGuard service components that address your security
requirements, and the optional features available to you.
WatchGuard® Services
LiveSecurity Service
The key to a high quality, effective network security policy is rapid response
to challenges and threats. The LiveSecurity Service enables network security
experts to provide quick responses to the changing Internet security
environment. Information such as alerts, editorials, threat responses, and
software updates are sent through your e-mail client.
Technical Support
The WatchGuard Technical Support team offers services to assist
configuration and administration of the Firebox System. Services include
Frequently Asked Questions, a WatchGuard user-group mailing list, Internet
and telephone support, and training.
WatchGuard Optional Features
WatchGuard expands its network security package with additional features
suited to some company and office environments. Current offerings include
VPN Manager, High Availability, Mobile User VPN, and SpamScreen.
User Guide 5
Page 16

6
Page 17

CHAPTER 1 LiveSecurity Service
No Internet security solution is complete without systematic updates. From the latest
hacker techniques to the most recently discovered operating system bug, the daily
barrage of new threats poses a perpetual challenge to any Internet security solution.
The LiveSecurity Service keeps your security system up-to-date by delivering
solutions to you. Software Updates, Threat Responses, and other broadcasts are emailed directly to your desktop.
LiveSecurity broadcasts
The WatchGuard LiveSecurity Rapid Response Team periodically broadcasts
information and software directly to your desktop through e-mail. Broadcasts are
divided into several channels to help you immediately recognize and process
incoming information.
Information Alert
Information Alerts provide timely notification of breaking news and current
issues in Internet security. By the time the mass media report on a new hacker
threat, you have already been briefed on its impact and the proper system
configuration necessary to protect against it.
Threat Response
After a newly discovered threat is identified, the Rapid Response Team
transmits an update specifically addressing this threat to make sure your
network is continuously protected. Each Threat Response includes a
description detailing the nature and severity of the threat, the risks it poses,
and what steps you should take.
Software Update
In addition to Threat Responses that address security challenges, you receive
functional software enhancements on an ongoing basis that cover your entire
WatchGuard Firebox System. An installation wizard and release notes
User Guide 7
Page 18

LiveSecurity broadcasts
accompany each transmission for easy installation. These convenient
transmissions relieve you of the burden of tracking the latest software version
to keep your system state of the art.
Editorial
Leading security experts from around the world join the WatchGuard Rapid
Response Team in contributing useful editorials to provide a source of
continuing education on this rapidly changing subject.
Support Flash
These technical tutorials provide tips for managing the WatchGuard Firebox
System. Support Flashes supplement other resources such as online Help,
FAQs, and Known Issues pages on the Technical Support Web site.
Virus Alert
In cooperation with TrendMicro, WatchGuard issues weekly broadcasts that
provide the latest information on new computer viruses. WatchGuard also
issues special virus-specific alerts as conditions warrant.
New from WatchGuard
To keep you abreast of new features, product upgrades, and upcoming beta
programs, WatchGuard announces their availability first to our existing
customers.
Activating the LiveSecurity Service
The LiveSecurity Service can be activated two ways: through the setup wizard on the
CD-ROM, and through the activation section of the WatchGuard LiveSecurity Web
pages. The setup wizard is detailed thoroughly in the Install Guide. Refer to that
document for further information.
To activate the LiveSecurity Service through the Web:
1 Be sure that you have the LiveSecurity license key and the Firebox serial number
handy. You will need these during the activation process.
2 Using your Web browser, go to
http:\\www.watchguard.com\activation
The “Activate Your LiveSecurity Service Subscription” page appears.
You must have JavaScript enabled on your browser to be able
to activate LiveSecurity Service.
3 Complete the LiveSecurity Activation form.
All of the fields are required for successful registration. The profile information helps
WatchGuard to target information and updates to your needs. The following tips may assist you
in completing the form:
• Navigate fields using either the TAB key or the mouse.
• The Firebox serial number is displayed in two locations:
- A small silver sticker on the outside of the shipping box.
- A sticker on the back of the Firebox, just below the UPC bar code.
8
Page 19

LiveSecurity broadcasts
• The License Key number is located on the WatchGuard LiveSecurity
Agreement License Key Certificate. Enter the number in the exact form shown
on the key, including the hyphens.
• Verify that your e-mail address is correct. You will receive your activation
confirmation mail and all of your LiveSecurity broadcasts at this address.
4Click Submit.
5 Select a download site.
WatchGuard recommends selecting the server that is geographically closest to you. After you
select a server, a scrollable list of WatchGuard software and documentation appears.
6 Minimize or close your Web browser.
User Guide 9
Page 20

LiveSecurity broadcasts
10
Page 21

CHAPTER 2 Technical Support
Developing and implementing a network security policy can be a challenge. In
addition to familiarity with the WatchGuard Firebox System, it requires experience
with advanced networking concepts, programs, and protocols.
The WatchGuard Technical Support team has a variety of methods to answer your
questions and assist you with improving the security of your network, including:
•FAQs
• Internet support
• Telephone support
• Training
•Online Help
Accessing frequently asked questions (FAQ)
The WatchGuard Technical Support team listens to our customers. When a question
about firewall configuration or administration occurs repeatedly, we pull together an
FAQ to document the issue and provide explanation and clarification. Where
appropriate, the FAQs also include workarounds and troubleshooting tips.
From the Control Center:
1Click the
Or, from your Web browser, go to http://www.watchguard.com/FAQS.
2 Select On the Web. Select Frequently Asked Questions.
If you would like WatchGuard to produce a new FAQ on a particular
topic, send e-mail to
LiveSecurity Control Center button (shown at right).
faq@watchguard.com with “FAQ Request” in the subject line.
User Guide 11
Page 22

Getting Internet technical support
Known issues
Another source of information about the WatchGuard Firebox System is the Known
Issues page on the Technical Support Web. When our engineering or Technical
Support team discovers a limitation or problem with our product, we immediately
post the information on the Known Issues page. We provide a description of the issue
as well as workarounds and, where appropriate, the software version where a
permanent fix will be implemented. To access the Known Issues page:
1Open your Web browser to
https://www.watchguard.com/support/
2Log in.
3Click the Technical Support link on the left.
The Customer Support page appears.
4Click the LSS/SOHO Known Issues link on the left.
The Known Issues page opens.
Getting Internet technical support
Our Technical Support team developed a Web page to assist with framing and
submitting a technical support issue. The information you provide allows us to route
the question to the appropriate support technician. It also enables us to link the
question with information you report about your network as well as our database of
all the support issues you have brought to our attention.
To access Internet technical support, you must have your LiveSecurity License key.
To access Technical Support and its Web interface, from the Control Center:
1Click the
2 Select
Or, open your Web browser and connect to the secure WatchGuard support site
at https://www.watchguard.com/support/.
LiveSecurity Control Center button (shown at right).
On the Web. Select Product Support.
3Log in.
4Click
Create New Incident.
5 Complete the Support Incident form. Click
Your issue is entered in the WatchGuard Technical Support database and routed to the
appropriate support technician.
Getting telephone support
If you have a problem, please contact us via the Web to submit a profile of your case.
Follow up with a phone call only if the need is too time-critical to wait for a Web
response.
Submit.
12
The WatchGuard Technical Support team recognizes that no one likes to be put on
hold. We make it our policy to answer every call. If we cannot answer your question
immediately, we request your telephone number and call you back as soon as we
have an answer.
Page 23
Training
When you call WatchGuard Technical Support, you are prompted for your
LiveSecurity License key. We use this key to track the information you report about
your network, and to add this issue to our database of all the support issues you have
brought to our attention.
After you enter your LiveSecurity License key, you are automatically routed to a
support technician familiar with your WatchGuard product. If no one is available,
our call manager will speak with you, logging your call and a description of your
issue to ensure the fastest possible response. The call manager may be aware of new
documentation or FAQs that can aid you immediately.
Before calling Technical Support, you should:
• Check online for an FAQ.
• Document your question.
• Be prepared with your LiveSecurity key.
• Have completed the Network Configuration Worksheet.
Often, the Technical Support team requires access to your Firebox to assist with
troubleshooting the problem. Please have this service configured to allow for remote
WatchGuard troubleshooting prior to calling Technical Support. To open your
Firebox for remote access by WatchGuard Technical Support, edit the Incoming
service properties for the WatchGuard service icon to allow:
WatchGuard Technical Support numbers are:
(877) 232-3531 (U.S. end-user support)
(206) 521-8375 (U.S. authorized reseller support)
(360) 482-1083 (International support)
Training
WatchGuard is committed to providing you with accessible and comprehensive
training covering our entire product line. Although WatchGuard products are
designed for ease of use, understanding how to correctly install, configure, manage,
and troubleshoot these products is an important component of effective Internet
security.
WatchGuard Interactive Training System (WITS)
WatchGuard Training offers the WatchGuard Interactive Training System (WITS), a
freely available online training system. WITS is designed to guide students through
all components of the Firebox System. Courseware features Basic and Advanced
curriculums, and is divided into training modules and units for self-paced
instruction. WITS is available to all current LiveSecurity subscribers. To access WITS,
log in to your LiveSecurity account and click the link to Training.
• From: network address 208.146.43.0/24
•To: Any
User Guide 13
Page 24

WatchGuard users group
Instructor-led courses
WatchGuard offers a series of courses supporting our product line. Current titles
include a two-day course on firewalling basics with the WatchGuard Firebox System
and a one-day course on virtual private networking. These courses are delivered by
certified WatchGuard trainers, both at our facility in Seattle and by our partners
around the country. For more information on upcoming training dates, please send a
request to traininginfo@watchguard.com or visit our Web site at
http://www.watchguard.com/training/main.html.
WatchGuard users group
The WatchGuard users group is an online forum in which the users of the
WatchGuard Firebox System exchange ideas, questions, and tips regarding all aspects
of the product, including configuration, compatibility, and networking. Although
WatchGuard engineers and Technical Support monitor the users group, the forum
should not be used for reporting support issues to WatchGuard Technical Support.
Instead, contact WatchGuard Technical Support directly via the Web interface or
telephone.
Subscribing to wg-users@watchguard.com
To join the WatchGuard users group, send e-mail to wg-users-
request@watchguard.com
message (not the subject line).
Unsubscribing from wg-users@watchguard.com
To remove yourself from the WatchGuard users group, send e-mail to wg-users-
request@watchguard.com
(not the subject line). This removes your e-mail address from the wg-users list, and
you will no longer receive e-mail from the group.
Contributing to wg-users@watchguard.com
To post a message to the WatchGuard Users Group, send e-mail to
wg-users@watchguard.com.
Online Help
WatchGuard Online Help is a Web-based system with cross-platform functionality
that enables you to install a copy on virtually any computer. A static version of the
Online Help system is installed automatically with the Firebox System software in a
subdirectory of the installation directory called Help. In addition, a “live,”
continually updated version of Online Help is available at:
with the word “subscribe” anywhere in the body of the
with the word “unsubscribe” in the body of the message
14
http://help.watchguard.com/lss/46
Page 25

Online Help
Starting WatchGuard Online Help
WatchGuard Online Help can be started either from the WatchGuard Management
Station or directly from a browser.
Searching for topics
You can search with WatchGuard Online Help three ways:
• In the Management Station software, press F1.
• On any platform, browse to the directory containing WatchGuard Online Help.
Open
LSSHelp.html. The default installation directory is C:/Program Files/
WatchGuard/Help .
Contents
The Contents tab displays a list of topics within the Help system. Double-click
a book to expand a category. Click a page title to view topic contents.
Index
The index provides a list of keywords found within Help. Begin typing the
keyword and the index list will automatically scroll to entries beginning with
those letters. Click a page title to view topic contents.
Search
The Search feature offers a full-text search of the entire Help system. Enter a
keyword. Press ENTER to display a list of topics containing the word. The
Search feature does not support Boolean searches.
Copying the Help system to additional platforms
WatchGuard Online Help can be copied from the Management Station to additional
workstations and platforms. When doing so, copy the entire Help directory from the
WatchGuard installation directory on the Management Station. It is important to
include all subdirectories exactly as they appear in the original installation.
Online Help system requirements
Web browser
• Internet Explorer 4.0 or higher
• Netscape Navigator 4.7 or higher
Microsoft Internet Explorer 5.5 is currently not supported.
Operating system
• Windows 95/98, Windows NT 4.0, or Windows 2000
•Sun Solaris
•Linux
User Guide 15
Page 26

Online Help
Context-sensitive Help
In addition to the regular online Help system, context-sensitive or What’s This? Help
is also available. What’s This? Help provides a definition and useful information on
fields and buttons in the dialog boxes. To access What’s This? Help:
1 Right-click any field or button.
2Click
What’s This? when it appears.
A box appears with the field name on the top and information about the field beneath it.
3 To print or save the Help box as a separate file, right-click the Help field.
A menu offering Copy or Print appears.
4 Select the menu item you want.
5 When you are done, left-click anywhere outside the box to dismiss it.
Context-sensitive Help does not currently support the question
mark icon.
16
Page 27

CHAPTER 3 WatchGuard Options
The WatchGuard Firebox System is enhanced by optional features designed to
accommodate the needs of different customer environments and security
requirements.
Currently available options
VPN Manager
WatchGuard VPN Manager is a centralized module for creating and managing the
network security of an organization that uses the Internet to conduct business. VPN
Manager can administer and monitor an enterprise’s sum total of Fireboxes, log hosts,
networks, and VPN tunnels. VPN Manager also contains the controls to launch the
applications of the WatchGuard Firebox System.
High Availability
High Availability enables one Firebox to take over when another fails. When using
High Availability, you place two Fireboxes and the Management Station on the
trusted network and provide each Firebox with the same configuration file. The first
Firebox manages traffic and protects the network while the second waits in a passive,
listening mode. If the first Firebox fails for any reason, the second Firebox
immediately takes over. When the first Firebox returns to functioning capacity, the
second Firebox again takes the passive role, ensuring that your network is constantly
protected.
To use High Availability, purchase the High Availability option as well as a second
Firebox of the same model as your first.
User Guide 17
Page 28

Obtaining WatchGuard options
Mobile User VPN
Mobile User VPN is the WatchGuard IPSec implementation of remote user virtual
private networking. Mobile User VPN connects an employee on the road or working
from home to trusted and optional networks behind a Firebox using a standard
Internet connection, without compromising security.
Mobile User VPN licenses are available in packs of five. Each license enables a
connection for one remote host IP address.
SpamScreen
SpamScreen helps to control “spam”–e-mail sent to you or your end users without
permission. Spam consumes valuable bandwidth on your Internet connection and on
the hard disk space and CPU time of your mail server. If allowed to enter your
network unchecked, spam consumes workers’ time to read and remove. WatchGuard
SpamScreen identifies spam as it comes through the Firebox. You can choose to either
block the spam at the Firebox or tag it for easy identification or sorting.
Obtaining WatchGuard options
WatchGuard options are available from your local reseller. For more information
about purchasing WatchGuard products visit
http://www.watchguard.com/sales/
18
Page 29

PART III
This section describes how to configure your security system. Its primary focus is on
using the WatchGuard Control Center and Policy Manager to develop and
implement a network security policy. It includes chapters on:
Configuring a Security Policy
WatchGuard Control Center
The WatchGuard Control Center is an intuitive management, monitoring, and
reporting package that puts everything you need at your fingertips. From a
single location, you can configure your system, implement security policies,
and monitor all of your protected systems.
Firebox basics
Complete basic tasks related to setting up and using the Firebox hardware,
including opening and saving configuration files, and setting the Firebox time
zone.
Configure a network
After installation, the next step in implementing a security policy is to
delineate your network. Set up either a drop-in or routed network, add
secondary networks, and define network and host routes.
Block sites and ports
Use default packet handling to establish a global policy for dynamically
blocking packets and sites. Alternatively, configure your network to
permanently block individual sites and ports.
Configure services
With the network configured, apply protection for individual services such as
SMTP and FTP. Define both incoming and outgoing traffic rules as well as
specific service properties.
Control Web traffic
Use the WebBlocker feature of the WatchGuard Firebox System in conjunction
with the HTTP proxy to provide Web-site filtering capabilities. This enables
User Guide 19
Page 30

you to exert fine control over the type of Web sites users on your Trusted
network are allowed to view.
Set up network address translation (NAT)
Hide the real IP addresses of the hosts and networks behind your firewall
through the use of network address translation. You can set NAT policy at
both the global and the individual service levels.
Set up logging and notification
What events are logged and how and when a network administrator is
notified is an important component of a security policy. Assign and configure
the LiveSecurity Event Processor and set both global and service-specific log
and notification preferences.
Connect with out-of-band management
Configure a Firebox over a modem connection using out-of-band (OOB)
management.
20
Page 31

CHAPTER 4 Firebox Basics
This chapter describes the following tasks, which require direct interaction between
the Management Station and the Firebox:
•Set up a Firebox
• Open and save a configuration file to a local hard disk or the Firebox
• Reset Firebox passphrases
• Set the Firebox time zone
• Reinitialize a misconfigured Firebox
• Manage the flash memory of the Firebox
What is a Firebox?
Fireboxes are specially designed and optimized machines. They are small, efficient,
and reliable.
There are no user-serviceable parts within the Firebox. If a user
opens a Firebox case, it voids the limited hardware warranty.
User Guide 21
Page 32
What is a Firebox?
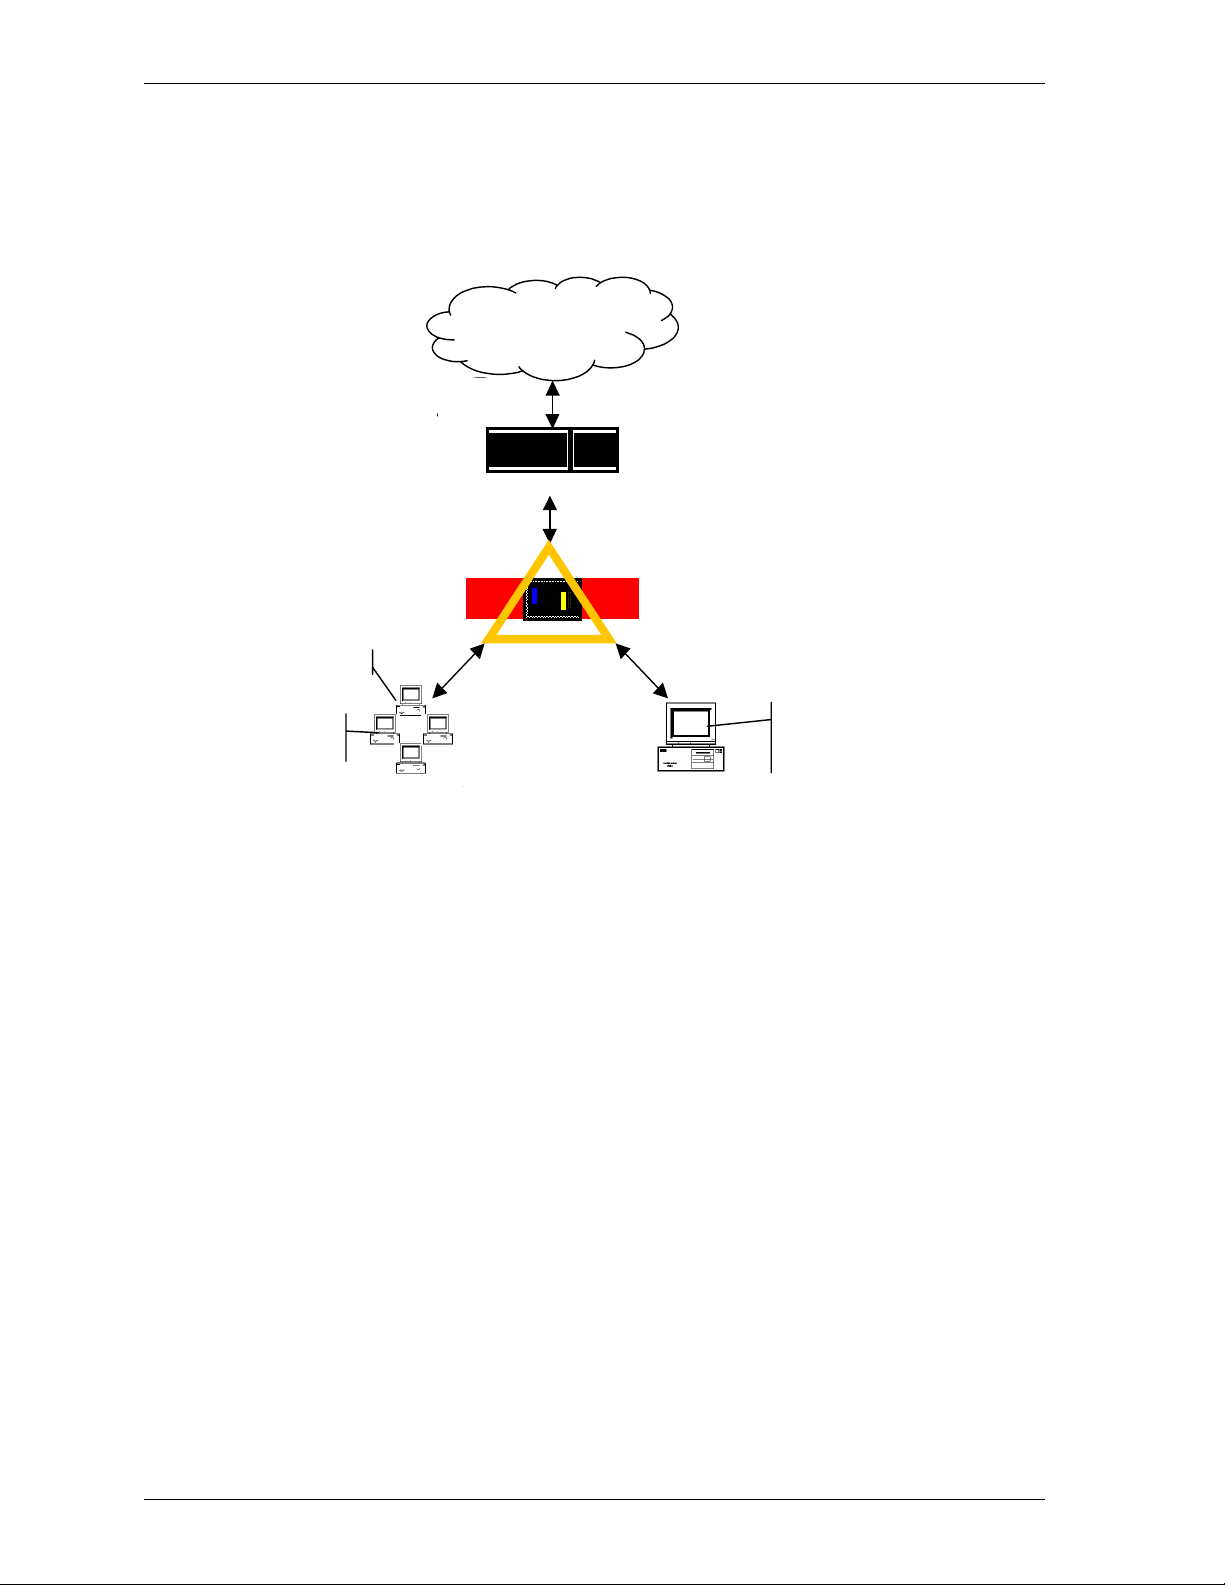
Placing a Firebox within a network
The most common location for a Firebox is directly behind the Internet router, as
pictured below:
Internet
The Security Challenge
Router
Event Processor
Management
Station
Trusted Network Optional Network
Firebox II
Other parts of the network are as follows:
Management Station
The computer on which you install and run the WatchGuard LiveSecurity
Control Center.
Event Processor
The computer that receives and stores log messages and sends alerts and
notifications. You can configure the Management Station to also serve as the
Event Processor.
Trusted network
The network behind the firewall that must be protected from the security
challenge.
External network
The network presenting the security challenge, typically the Internet.
SMTP Server
HTTP Server
FTP Server
22
Optional network
A network protected by the firewall but still accessible from the trusted and
the external networks. Typically, the optional network is used for public
servers such as an FTP or Web server.
Page 33

Opening a configuration file
Policy Manager is a comprehensive software tool for creating, modifying, and saving
configuration files. A configuration file, with the extension .cfg, contains all the
settings, options, addresses, and information that together constitute your Firebox
security policy. You can open and edit a configuration file residing on either your
local hard disk or in the primary area of the Firebox flash disk. From Policy Manager:
Opening a configuration file
1 Select Start => Programs => WatchGuard
2 If you are prompted to run the Quick Setup wizard, click Continue
=> Control Center.
.
3 If you are prompted to connect to the Firebox, click Cancel.
4 From within the WatchGuard Control Center (or WatchGuard VPN
Manager if you purchased this option), click the Policy Manager icon
(shown at right).
Opening a configuration from the Firebox
From Policy Manager in the Advanced view:
1Click File
=> Open => Firebox.
2Use the Firebox drop list to select a Firebox.
You can also type the IP address or DNS name of the Firebox.
3In the Passphrase text box, type the Firebox monitoring passphrase. Click OK.
You can use either the monitoring (read-only) or configuration (read-write) passphrase.
However, to save the configuration to the Firebox you must use the configuration passphrase.
The configuration file stored on the primary area of the Firebox flash disk opens, and configured
services appear in the Services Arena.
Opening a configuration from a local hard disk
From Policy Manager in the Advanced View:
1 Select File
To bring up the Advanced view of Policy Manager, select View => Advanced. A checkmark will
appear next to the menu option.
=> Open => Configuration File.
2 Locate and select the configuration file to open. Click Open.
The configuration file opens and configured services appear in the Services Arena.
Saving a configuration file
After making changes to a configuration file, you must save it to a local hard disk.
When you save a new configuration directly to a Firebox, Policy Manager prompts
you to restart that Firebox so that it will use the new configuration. The new policy is
not active until the Firebox finishes rebooting. Some tasks, such as adding new
Firebox users and changing certain IPSec settings, do not require a restart in order to
take effect.
VPN Manager Guide 23
Page 34

Resetting Firebox passphrases
Saving a configuration to the local hard disk
From Policy Manager in the Advanced view:
1 Select File
The Save dialog box appears.
=> Save => As File.
2 Enter the name of the file.
The default is to save the file to the WatchGuard directory.
3Click Save.
The configuration file is saved to the local hard disk.
Saving a configuration to the Firebox
From Policy Manager in the Advanced view:
1 Select File
=> Save => To Fi r ebo x.
2Use the Firebox drop list to select a Firebox.
3 Enter the configuration (read-write) passphrase. Click OK.
The configuration file is saved first to the local hard disk and then to the primary area of the
Firebox flash disk. You are prompted to restart the Firebox. The new Firebox configuration will
not be enabled until the Firebox is restarted.
4 If you entered the IP address of a different Firebox, you are asked to confirm your
choice. Click Yes .
Resetting Firebox passphrases
WatchGuard recommends that for optimum security you periodically change the
Firebox passphrases. To do this, you must have the current configuration passphrase.
From Policy Manager:
1 Open the configuration file running on the Firebox.
For more information, see “Opening a configuration from the Firebox” on page 23.
2 Select File => Save => To Fi rebo x.
3Use the Firebox drop list to select a Firebox. Enter the configuration passphrase.
Click
OK.
4 Enable the Save To Firebox checkbox. Select Save Configuration File and New
Flash Image. Click Continue.
5 Enter the new monitoring (read-only) and configuration (read-write) passphrases.
Click
OK.
The new image, including the new passphrases, is saved to the Firebox, and the Firebox
automatically restarts.
Make certain that your monitoring and configuration passphrases are different from one
another.
Tips for creating secure passphrases
Although an attacker could crack any passphrase eventually, you can toughen your
passphrases using the following tips:
24
Page 35

• Don’t use words in standard dictionaries, even if you use them backward or in
a foreign language. Create your own acronyms instead.
• Don’t use proper names, especially company names or those of famous people.
• Use a combination of uppercase and lowercase characters, numerals, and
special characters (such as Im4e@tiN9).
Setting the time zone
The Firebox time zone determines the date and time stamp that appear on logs and
that are displayed by services such as LogViewer, Historical Reports, and
WebBlocker. Use the time zone to view log information in local time. The default time
zone is Greenwich Mean Time (Coordinated Universal Time).
From Policy Manager in the Advanced view:
Setting the time zone
1 Select Setup
=> Time Zone.
2 Use the drop list to select a time zone. Click OK.
Check the drop list carefully. WatchGuard provides a comprehensive list of time zones to
accommodate areas in the same general time zone that follow different rules regarding the
observance and/or onset and rollback of Daylight Saving Time, and other timekeeping details.
Reinitializing a misconfigured Firebox
The Firebox can boot from the primary area of the flash disk (Sys A) in a mode that
provides fail-safe access in cases when you need to:
• Install a Firebox for the first time
• Troubleshoot problems in which all access to the Firebox is lost
• Reset Firebox passwords when you do not know or have forgotten them
This Enhanced System Mode is the default mode for new Fireboxes shipped from the
factory. If a Firebox is in this mode, its Sys A light blinks. A Firebox can also be placed
into Enhanced System Mode by connecting any two of the Firebox Ethernet interfaces
in a loopback configuration. Use a red crossover cable included with the Firebox for
this purpose.
To access a Firebox in Enhanced System Mode:
1 Establish a physical Ethernet connection between the Trusted interface of the
Firebox and the Management Station on the same segment.
2 Attach the red crossover cable between the remaining two Firebox interfaces, and
then turn the power on the Firebox off and then on. If a small, “factory default”
switch is present on the rear of the Firebox, press and hold that switch while you
turn the Firebox power off and then on.
The Firebox boots into the Enhanced System Mode. This is indicated by a blinking Sys A light.
3 Reinitialize the Firebox using the QuickSetup wizard.
For more information on the QuickSetup wizard, see the
VPN Manager Guide 25
Install Guide
.
Page 36

Reinitializing a misconfigured Firebox
4 When you complete the QuickSetup wizard, remove the loopback cable
(assuming your Firebox has one) and return the Firebox to its regular position in
your network. The Firebox resumes normal operation the next time it restarts.
Some Fireboxes have a factory default button. To place the unit into factory default
mode, press and hold this button during power-up
Booting from the system area
You can also use the Flash Disk Management Tool to boot into the system area (Sys B)
for recovery of a Firebox. For information on using the Flash Disk Management Tool,
see the Reference Guide.
26
Page 37

CHAPTER 5 Using the WatchGuard Control
Center
The WatchGuard Control Center combines access to WatchGuard Firebox System
applications and tools in one intuitive interface. The Control Center also displays a
real-time monitor of traffic through the firewall, connection status, tunnel status, and
recent log activity.
Navigating the WatchGuard Control Center
You interact with the Control Center using the QuickGuide toolbar and menu system.
Starting the Control Center and connecting to a Firebox
From the Windows Desktop:
1 Select Start => Programs => WatchGuard => Control Center.
2Click Continue.
3 Use the Firebox drop list to select a Firebox.
You can also type the Firebox name or IP address.
4 Enter the Firebox monitoring (read-only) passphrase.
5Click OK.
Control Center components
The Control Center consists of:
• A QuickGuide toolbar to invoke configuring, monitoring, and report programs
• A duplication of the Firebox front panel that graphically displays traffic flow
and rejected packets
• Firebox and VPN tunnel status
User Guide 27
Page 38

Control Center components
• A real-time monitor of traffic through the Firebox.
QuickGuide
The top part of the display just below the title bar is the QuickGuide. It contains
buttons to:
• Open the WatchGuard Control Center menu
• Pause the display
• Launch Policy Manager
• Launch Firebox Monitors
• Launch LogViewer
• Create Historical Reports
• Change the dimensions of the Firebox and Tunnel Status window
Front panel
Under the toolbar is a representation of the front panel of the Firebox, including the
Security Triangle Display, Traffic Volume Indicator, Processor Load Indicator, and
basic status information.
The lights on the display represent those found on the front panel of the Firebox. The
triangle shows the predominant flows of traffic among the Trusted, External, and
Optional interfaces. A red corner of the triangle lights when that interface is blocking
packets. The two bar graphs indicate traffic volume and the proportion of Firebox
capacity being used.
Firebox and VPN tunnel status
The section in the Control Center directly below the front panel shows the current
status of the Firebox and of Branch Office VPN tunnels and Remote VPN tunnels.
Firebox status
In Firebox status, three branches show the traffic being sent and received through the
three Firebox interfaces – Trusted, External, and Optional. Specifically, the status
box provides the MAC (network Ethernet card) address of each interface, and the
number of packets sent and received since the last time the Firebox rebooted.
High Availability host
If the High Availability option is installed, the first entry within the Firebox Status
tree is High Availability host. When properly configured and operational, the IP
address of the standby box appears. If High Availability is installed but the secondary
Firebox is not responding, the display indicates “Not Responding.”
28
Branch office VPN tunnels
Beneath Firebox status is a branch for branch office VPN tunnels, in which three
categories of branch office VPN tunnels appear:
Page 39

Control Center components
•IPSec
•DVCP
• WatchGuard VPN
The first line of the tunnel entry shows the name that was assigned when the tunnel
was created, along with the tunnel type (IPSec, DVCP, or WatchGuard). If the tunnel
is an IPSec or DVCP tunnel, it also shows the IP address of the destination IPSec
device (such as another Firebox, SOHO, or SOHO|tc). If the tunnel is DVCP, the IP
address refers to the entire remote network address rather than that of the Firebox or
equivalent IPSec device.
The next two lines display the amount of data sent and received on that tunnel in
both bytes and packets.
If the tunnel is IPSec or DVCP, the lines below the packet quantities show when the
key expires and the tunnel is renegotiated. Expiration can be expressed in bytes
passed or time deadline. DVCP tunnels that have been configured for both traffic and
time deadline expiration thresholds display both; this type of tunnel expires when
either event occurs first (time runs out or bytes are passed). These lines below the
packet quantities also show the authentication and encryption levels set for that
tunnel.
If the tunnel is using WatchGuard VPN, the tunnel displays the packet statistics only.
Remote VPN tunnels
Following the branch office VPN tunnels is an entry for remote VPN tunnels. Remote
VPN tunnels can either be Mobile User VPN (with IPSec) or Remote User PPTP.
If the tunnel is Mobile User VPN, the branch displays the same statistics as for the
DVCP or IPSec Branch Office VPN as described previously. The tunnel shows the
tunnel name, followed by the destination IP address, followed by the tunnel type.
Below are the packet statistics, followed by the key expiration, authentication, and
encryption specifications.
If the remote VPN tunnel is PPTP, then the display shows only the quantity of sent
and received packets. Byte count and total byte count are not applicable to PPTP
tunnel types.
Expanding and collapsing the display
To expand a branch of the display, click the plus sign (+) next to the entry, or doubleclick the name of the entry. To collapse a branch, click the minus sign (—) next to the
entry. A lack of either a plus or minus sign indicates that there is no further
information about the entry.
Red exclamation point
A red exclamation point appearing next to any item indicates that something within
its branch is not functioning properly. For example, a red exclamation point next to
the Firebox entry indicates that a Firebox is not communicating with either the
LiveSecurity Event Processor or Management Station. A red exclamation point next
to a tunnel listing indicates a tunnel is down.
User Guide 29
Page 40

Working with the Control Center
When you expand an entry that has a red exclamation point, another exclamation
point appears next to the specific device or tunnel with the problem. Use this feature
to rapidly identify and locate problems with your VPN network.
Traffic Monit or
The Traffic Monitor shows, in real time, the traffic through the Firebox.
Working with the Control Center
The basic tasks you perform with the Control Center are connecting to a Firebox,
changing the interval at which the Firebox is queried for status information, and
opening other Firebox System applications. You can also move and work with the
Traffic Monitor display to best suit your needs.
Connecting to a Firebox
When launched, the Control Center automatically prompts you to connect to the last
Firebox with which it established a connection. However, you may need to establish a
connection with another Firebox. From the Control Center:
1 Click the WatchGuard Control Center button (shown at right),
which is located on the upper-left corner of Control Center. Select
Connect.
The Connect to Firebox dialog box appears.
2 Use the Firebox drop list to select a Firebox.
You can also type the Firebox name or IP address.
3 Enter the Firebox monitoring (read-only) passphrase.
4Click OK.
The Control Center connects to the Firebox and displays its real-time status.
Changing the polling rate
You can change the interval of time (in seconds) at which the Control Center polls the
Firebox and updates the Front Panel and Firebox and Tunnel Status displays.
Consider, however, the trade-off between polling frequency and demand on the
Firebox. The shorter the interval, the more accurate the display, but also the more
demand made of the Firebox. From the Control Center:
1Click the WatchGuard Control Center button. Click Settings.
2 Type or use the scroll control to change the polling rate. Click OK.
Setting the maximum number of log messages
You can change the maximum number of status Syslog messages that are stored and
viewable in Traffic Monitor. After the maximum is reached, the earliest logs are
removed as more come in. A high value in this field places a large demand on your
system if you have a slow processor or a limited amount of RAM. Log Viewer is a
30
Page 41

Policy Manager
much more appropriate tool for tracking logs; Traffic Monitor just provides a realtime view of what the Firebox activity.
1 Click the WatchGuard Control Center button. Click Settings.
2 Type or use the scroll control to change the Max Log Entries field. Click OK.
The value entered represents the number of logs in thousands. If you enter 0 in this field, the
maximum number of logs (100,000) is permitted.
Manipulating the Traffic Monitor
You can move and manipulate the Traffic Monitor on the Desktop independent of the
rest of the Control Center:
Tear Of f
Point to the Traffic Monitor title bar. Drag the Traffic Monitor to a new
location on the Desktop. To reattach the Traffic Monitor to the Control Center,
drag the Traffic Monitor to the immediate vicinity of the Control Center
display. The Traffic Monitor window automatically snaps back onto the
Control Center.
Expand
Point to an edge of the Traffic Monitor window. Drag the edge outward to
expand the window or inward to shrink it.
Scroll
Use the scroll control of the Traffic Monitor window to scroll chronologically
up and down through log records. While scrolling, the Traffic Monitor
temporarily ceases to jump to the most recent records. Page down to the
bottom of the Traffic Monitor window to restart the rolling display.
Copy and Paste
Use Click/Ctrl-Click or Click/Shift-Click to select multiple records. Rightclick the selected records, and select Copy. Paste the selected records into
another application such as e-mail, word processing, or a spreadsheet.
Opening WatchGuard Firebox System tools
To open a WatchGuard Firebox System application such as Policy Manager or
HostWatch, either click the application button on the QuickGuide or click the
WatchGuard Control Center button, select Tools, and then select the tool name.
Policy Manager
Use the WatchGuard Policy Manager tool to design, configure, and
manage the network security policy. Within Policy Manager, you can
configure networks and services, set up virtual private networking,
regulate incoming and outgoing access, and control logging and
notification. To open Policy Manager, click the Policy Manager button
(pictured at left) on the Control Center QuickGuide. Policy Manager opens and
displays the Services Arena.
User Guide 31
Page 42

Firebox Monitors
The Policy Manager display includes:
Pull-down menus
Toolbar
Services Arena
Changing the Policy Manager view
Policy Manager includes two view options: Basic and Advanced. The Advanced view
displays less frequently used commands. To toggle between the Policy Manager Basic
and Advanced views, select View => Advanced.
Menus that provide access to most configuration and administration tasks.
A row of buttons immediately below the pull-down menus. Each button
corresponds to a frequently performed Policy Manager task. Position the
mouse over the button to view a tooltip and explanatory status bar text.
A large, open panel that displays icons to represent each network service.
Double-click an icon to display the Properties dialog box, where you
configure access controls and logging for that service.
Service icons beginning with “wg_” are created automatically when you enable
features such as PPTP and authentication. These icons appear only in the Advanced
view. The “wg_” service icons rarely require modification. WatchGuard recommends
leaving “wg_” icons in their default settings.
Much of this User Guide is devoted to configuring and administering a network
security policy using Policy Manager.
Firebox Monitors
Firebox Monitors combines an extensive set of WatchGuard monitoring
tools into a single user interface accessible from the Control Center. To
open Firebox Monitors, click the Firebox Monitors button (pictured at
left) on the Control Center QuickGuide. Firebox Monitors opens and
displays the Bandwidth Meter tab. For more information, see “Monitoring Firebox
Activity” on page 93.
LogViewer
The LogViewer application displays a static view of the log file. You can
filter by type, search for keywords and fields, and print and save log data
to a separate file. To launch LogViewer, click the LogViewer button
(pictured at left) on the Control Center QuickGuide. For more
information, see “Reviewing and Working with log files” on page 103.
32
Page 43

HostWatch
HostWatch
The HostWatch application displays active connections occurring on a
Firebox in real time. It can also graphically represent the connections
listed in a log file, either playing back a previous file for review or
displaying connections as they are added to the current log file. To open
HostWatch, click the HostWatch button (pictured at left) on the Control Center
QuickGuide. For more information, see “HostWatch” on page 98.
Historical Reports
Historical Reports is a report-building tool that creates HTML reports
displaying session types, most active hosts, most used services, URLs,
and other data useful in monitoring and troubleshooting your network.
To open Historical Reports, click the Historical Reports button (pictured
at left) on the Control Center QuickGuide. For more information, see “Generating
Reports of Network Activity” on page 109.
LiveSecurity Event Processor
The LiveSecurity Event Processor controls logging, report schedules, and
notification. It also provides timing services for the Firebox. The Event
Processor automatically runs when you start the machine on which it is
installed.
Unlike other Firebox System applications, the Event Processor button does not
appear in Control Center. To open the Event Processor, double-click the LiveSecurity
Event Processor icon (pictured above) in the Windows Desktop tray. For more
information, see “Setting up the LiveSecurity Event Processor” on page 73.
User Guide 33
Page 44

LiveSecurity Event Processor
34
Page 45

CHAPTER 6 Configuring a Network
Configuring a network refers to setting up the three Firebox interfaces. To do this,
you need to:
• Enter the IP address or addresses for the Firebox interfaces.
• Enter the IP addresses of secondary networks that are connected to and
associated with a Firebox interface.
• Enter the default gateway for the Firebox.
Use Policy Manager to configure parameters for the three Firebox interfaces–
Trusted, External, and Optional.
Trusted
Modify settings for the Ethernet device connecting the Firebox to the
protected LAN or other host.
External
Modify settings for the Ethernet device connecting the Firebox to the outside
world.
Optional
Modify settings for the Ethernet device connecting the Firebox to the optional
bastion network (this is sometimes called the “Demilitarized Zone,” or
“DMZ”). As its name implies, you can use the Optional network in different
ways. One common application is to use it for a public Web server.
Running the QuickSetup wizard
During the installation of the WatchGuard Firebox System, you are prompted to run
the QuickSetup wizard. The QuickSetup wizard creates a basic configuration file and
saves it to the primary area (Sys A) of the Firebox flash disk. The Firebox loads the
primary configuration file when it boots.
User Guide 35
Page 46

Setting up a drop-in network
The QuickSetup wizard also writes a basic configuration file called
wizard.cfg to the hard disk of the Management Station. If you later want to expand
or change the basic Firebox configuration using Policy Manager, use
the base file to which you make changes.
You can run the QuickSetup wizard again at any time to a create new, basic
configuration file.
The QuickSetup wizard replaces the configuration file, writing over any prior
version. To make a backup copy of the configuration file on the flash disk, see
the Firebox System Area chapter in the
To run the QuickSetup wizard:
1 Complete the Network Configuration Worksheet.
A copy is included with the
Documentation directory.
2 From the Windows Desktop, select S t a r t => P r o g ra m s => W a t c h G u a r d =>
QuickSetup Wizard.
You can also, from the Control Center, select LiveSecurity => QuickSetup Wizard
QuickSetup wizard prompts for information about your network and security policy preferences.
Documentation for running the QuickSetup wizard is contained in the
wizard’s on-panel instructions,
When the wizard prompts you to enter monitoring (read-only) and
configuration (read-write) passphrases, use two completely different
passphrases.
Install Guide
wizard.cfg as
Reference Guide
. It can also be found as a .pdf file in the WatchGuard
LiveSecurity => QuickSetup Wizard. The
LiveSecurity => QuickSetup WizardLiveSecurity => QuickSetup Wizard
Install Guide
, and Online Help.
.
Setting up a drop-in network
A drop-in network configuration is useful for situations where you can distribute
network address space across the Firebox interfaces. In a drop-in configuration, you
place the Firebox physically between the router and the LAN, without reconfiguring
any of the machines on the Trusted interface.
Characteristics of a drop-in configuration:
• A single network that is not subdivided into smaller networks; the network is
not subnetted.
• WatchGuard performs proxy ARP.
- The Firebox answers ARP requests for machines that cannot hear the
broadcasts.
- The Firebox can be placed in a network without changing default gateways
on the Trusted hosts. This is because the Firebox answers for the router, even
though the router cannot hear the Trusted host’s ARP requests.
- To enable proxy ARP, you must assign the same IP address to all three
interfaces for the Firebox. This is the only supported address assignment in
drop-in configuration.
• All Trusted computers must have their ARP caches flushed.
36
Page 47

Setting up a routed network
• The Trusted interface ARP address replaces the router’s ARP address.
• All three Firebox interfaces are assigned the same IP address. This is true
whether or not you use the Optional interface.
• The majority of a LAN resides on the Trusted interface.
• You can have other networks in other address ranges behind the Firebox using
secondary networks. List the IP address of secondary networks in the
configuration file.
Use the sample network configuration and the Network Configuration Worksheet
(found in the Install Guide) to design your drop-in network. Then either run the
QuickSetup wizard to create a new configuration file or manually modify an existing
configuration file using Policy Manager. To set up a drop-in network, from Policy
Manager:
1 Select Network => Configuration. Click the Drop-In Configuration tab.
2 Enable the Automatic checkbox if you want the Firebox to use proxy ARP for all
hosts. Disable the checkbox if you want the Firebox to use proxy ARP only on
behalf of all hists on the network you specify with the Default Network drop-
down menu.
When automatic mode is enabled, the Hosts list is useful to lock a host to the specified interface.
To add specific hosts that the Firebox should use proxy ARP for, enter the IP address and the
interface they reside on in the Hosts section of the Drop-In Configuration tab.
3Click Add to add a new host. To remove a host, select it and click Remove.
4 When you are done setting up your network, click OK.
Setting up a routed network
Use a routed network configuration when the Firebox is put in place with separate
logical networks on its interfaces. This configuration assigns separate network
addresses to at least two of the three Firebox interfaces.
If you have two separate network addresses and you want to use the routed
configuration, use only the External and Trusted interfaces (not the Optional
interface). Each interface must be on a separate network in routed configuration
mode.
If you have three or more network addresses, use the routed network configuration
and map a network to each interface. Add more networks as secondary networks to
one of the interfaces. You can relate different networks to different interfaces. Those
networks then come under the protection and access rules set up for that interface.
The Firebox forwards packets to the various interfaces depending on how you define
and configure services in Policy Manager.
Use the sample network configuration and the Network Configuration Worksheet
(found in the Install Guide) to design your routed network. Then either run the
QuickSetup wizard to create a new configuration file or manually modify an existing
configuration file.
User Guide 37
Page 48

Adding a secondary network
Adding a secondary network
A secondary network is a network on the same physical wire as a Firebox interface
that has an address belonging to an entirely different network. Adding a secondary
network to a Firebox interface maps an IP address from the secondary network to the
IP address of the interface. This process is also known as adding an IP alias to the
Firebox interface.
The secondary network IP address becomes the default gateway for all the machines
on that network. Adding the secondary network also tells the Firebox that another
network resides on the wire.
The Policy Manager does not verify that you have entered the correct address.
Check secondary network addresses carefully. For example, WatchGuard
recommends that you not enter a subnet on one interface that is part of a
larger network on another interface.
The procedure for adding a network route to all three of the Firebox interfaces is
identical. The description below is for a secondary network on the Optional interface.
From Policy Manager:
1 Select Network => Configuration.
2Click the Optional tab.
3In the Secondary Networks section of the dialog box, enter the network address
in slash notation in the text box to the left of the Add button. Click Add.
The address appears in the Secondary Networks list.
Defining a network route
If you have router behind the Firebox, you need to define a network route. From
Policy Manager:
1 Verify that you are using the Advanced view of Policy Manager.
From Policy Manager, select View. Verify that the Advanced menu item has a checkmark in the
box in front of it. If it doesn’t, click it.
2 Select Network => Routes.
3Click Add.
4 Enter the network address in slash notation.
5In the Gateway text box, enter the route gateway.
Be sure to specify a route IP address that is on the same network as the Firebox.
6Click OK.
The Setup Routes dialog box lists the newly configured network route.
7Click OK.
The route data is written to the configuration file.
38
Page 49

Defining a host route
Defining a host route
Configure a host route if there is only one host behind the router. Enter the IP address
of that single, specific host, and do not enter a bitmask. From Policy Manager in the
Advanced view:
1 Select Network => Routes.
The Setup Routes dialog box appears.
2Click Add.
The Add Route dialog box appears.
3Click the Host option.
4 Enter the host IP address.
5In the Gateway text box, enter the route gateway.
Be sure to specify a route IP address that is on the same network as the Firebox.
6Click OK.
The Setup Routes dialog box lists the newly configured host route.
7Click OK.
The route data is written to the configuration file.
Changing an interface IP address
The IP addresses of the three Firebox interfaces are generally configured using the
QuickSetup Wizard. However, if you need to modify an interface address, you can do
so manually. From Policy Manager:
1 Select Network => Configuration.
The Network Configuration dialog box appears.
2 Click the tab of the interface requiring modification.
3In the IP Address text box, type the interface address in slash notation.
Setting the default gateway
The default gateway is generally configured using the QuickSetup Wizard. However,
if you need to modify the default gateway, you can do so manually. From Policy
Manager:
1 Select Network => Default Gateway.
2 Enter the IP address of the default gateway.
3Click OK.
User Guide 39
Page 50

Entering WINS and DNS server addresses
Entering WINS and DNS server addresses
Several advanced features of the Firebox, such as DHCP and Remote User VPN, rely
on shared Windows Internet Name Server (WINS) and Domain Name System (DNS)
server addresses. These servers must be accessible from the Firebox Trusted interface.
From Policy Manager:
1 Select Network => Configuration. Click the General tab.
2 Enter primary and secondary addresses for the WINS and DNS servers. Enter a
domain name for the DNS server.
Defining a Firebox as a DHCP server
Dynamic Host Configuration Protocol (DHCP) is an Internet protocol that simplifies
the task of administering a large network. A device defined as a DHCP server
automatically assigns IP addresses to network computers from a defined pool of
numbers. You can now define the Firebox as a DHCP server for your network behind
the firewall.
One parameter that you define for a DHCP server is lease times. This is the amount of
time a DHCP client can use an IP address that it received from the DHCP server.
When the time is close to expiring, the client will contact the DHCP server to renew
the lease.
From Policy Manager:
1 Select Network => Configuration. Click the DHCP Server tab.
2 Enable the Enable DHCP Server checkbox.
3 Enter the default lease time for the server.
The default lease time is provided to clients who don’t specifically request times.
4 Enter the maximum lease time.
The maximum lease time is the longest time the server will provide for a client. If a client
requests a longer time, the request is denied and the maximum lease time is provided.
Adding a new subnet
To increase the number of available (private) IP addresses available to DHCP clients,
add a subnet. To add a new subnet, you specify a range of IP addresses to be assigned
to clients on the network. For example, you could define the address range from
10.1.1.100 to 10.1.1.19. This gives clients a pool of 10 addresses. From Policy Manager:
1 Select Network => Configuration. Click the DHCP Server tab.
2Click Add.
3 Enter a name for the subnet.
40
4 Define the address pool by entering values for Starting IP address and Ending IP
address.
5Click OK.
Page 51

Defining a Firebox as a DHCP server
Modifying an existing subnet
From Policy Manager:
1 Select Network => Configuration. Click the DHCP Server tab.
2 Click the subnet to review or modify. Click Edit.
3 When you have finished reviewing or modifying the subnet, click OK.
Removing a Subnet
From Policy Manager:
1 Select Network => Configuration. Click the DHCP Server tab.
2 Click the subnet to remove it. Click Remove.
3Click OK.
User Guide 41
Page 52

Defining a Firebox as a DHCP server
42
Page 53

CHAPTER 7 Blocking Sites and Ports
Many types of network security attacks are easily identified by patterns found in
packet headers. Port space probes, address space probes, and spoofing attacks all
exhibit characteristic behavior that a good firewall can recognize and protect against.
WatchGuard allows both manual and dynamic blocking of ports and sites, and uses
default packet-handling options to automatically and temporarily block hosts that
originate probes and attacks. Logging options can assist you in identifying suspect
sites that repeatedly exhibit suspicious behavior. You can then manually and
permanently block a suspect site. In addition, you can protect ports with known
vulnerabilities by blocking their unauthorized use.
Configuring default packet handling
The WatchGuard Firebox System examines and handles packets according to default
packet-handling options that you set. The firewall examines the source of the packet
and its intended destination by IP address and port number. It also watches for
patterns in successive packets that indicate unauthorized attempts to access the
network.
The default packet-handling configuration determines whether and how the firewall
handles incoming communications that appear to be attacks on a network. Packet
handling can:
• Reject potentially threatening packets
• Automatically block all communication from a source site
• Add an event to the log
• Send notification of potential security threats
From Policy Manager in the Advanced view:
1 Select Setup => Default Packet Handling.
User Guide 43
Page 54

Blocking a site permanently
2 Modify the default packet-handling properties according to your security policy
preferences.
For a description of each control, right-click the control, and then click What’s This?
3Click OK.
Blocking a site permanently
The WatchGuard auto-blocking and logging mechanisms help you decide which sites
to permanently block.
Use Policy Manager to block a site permanently. The default configuration blocks
three network addresses – 10.0.0.0/8, 172.16.0.0/12, and 192.168.0.0/16. These are
the “unconnected” network addresses. Because they are for private use, backbone
routers should never pass traffic with these addresses in the source or destination
field of an IP packet. Traffic from one of these addresses is almost certainly a spoofed
or otherwise suspect address. RFCs 1918, 1627, and 1597 cover the use of these
addresses.
The Blocked Sites list applies only to traffic on the External interface.
Connections between the Trusted and Optional interfaces are not subject to
the Blocked Sites list.
From the Policy Manager:
1 On the toolbar, click the Blocked Sites icon.
You can also select Setup => Blocked Sites. The Blocked Sites dialog box appears.
2Click Add.
3Use the Choose Type drop list to select a member type.
4 Enter the member value.
Depending on the member type, the value can be an IP address, host name, or username.
5Click OK.
The Blocked Sites dialog box appears, displaying the new member in the Blocked Sites list.
Removing a blocked site
From the Blocked Sites dialog box, select the site to remove, and then click Remove.
Changing the auto-block duration
From the Blocked Sites dialog box, either type or use the scroll control to change the
duration, in minutes, that the firewall automatically blocks suspect sites. Duration
can range from 1 to 32,767 minutes (about 22 days).
44
Logging and notification for blocked sites
From the Blocked Sites dialog box:
1Click Logging.
The Logging and Notification dialog box appears.
Page 55

Blocking a port permanently
2In the Category list, click Blocked Sites.
3 Modify the logging and notification parameters according to your security policy
preferences.
For detailed instructions, see “Customizing logging and notification by service or option” on
page 76.
Blocking a port permanently
You can block ports to explicitly cut off from external access certain network services
that are vulnerable entry points to your network. The Blocked Ports list takes
precedence over all service properties. For more information on precedence, see
Chapter 8, “Configure Services.”
Blocking ports can be useful in several ways:
• Blocked ports provide an independent check to protect the most sensitive
services. Even if another part of your security policy is misconfigured, blocked
ports provide an additional defense for the most vulnerable services.
• Probes to particularly sensitive services can be logged independently.
• Some TCP/IP services that use ports greater than 1024 are vulnerable to attack
if the attacker originates the connection from an allowed well-known service
less than 1024. Thus, these connections can be attacked by appearing to be an
allowed connection in the opposite direction. You should add the port numbers
of such services to the Blocked Ports list.
By default, Policy Manager blocks quite a few destination ports. This measure
provides convenient defaults that many administrators find sufficient. However,
additional ports can be added to the Blocked Ports list. From Policy Manager:
1 On the toolbar, click Blocked Ports.
You can also select Setup => Blocked Ports.
2 In the text box to the left of the Add button, type the port number. Click Add.
The new port number appears at the bottom of the Blocked Ports list.
Removing a blocked port
From the Blocked Ports dialog box, click a port number in the Blocked Ports list.
Click Remove.
Logging and notification for blocked ports
From the Blocked Ports dialog box:
1Click Logging.
The Logging and Notification dialog box appears.
2In the Category list, click Blocked Ports.
3 Modify the logging and notification parameters according to your security policy
preferences.
For detailed instructions, see “Customizing logging and notification by service or option” on
page 76.
User Guide 45
Page 56

Blocking sites temporarily with service settings
Blocking sites temporarily with service settings
Use service properties to automatically and temporarily block sites when incoming
traffic attempts to use a denied service. You can use this feature to individually log,
block, and monitor sites that attempt access to restricted ports on your network.
Configuring a service to temporarily block sites
Configure the service to automatically block sites that attempt to connect using a
denied service. From Policy Manager:
1 Double-click the service icon in the Services Arena.
The Properties dialog box appears.
2Use the Incoming Service Connections Are drop list to select Enabled and
Denied.
3 Enable the Auto-Block Sites that Attempt to Connect Via checkbox.
To change the auto-block duration, see “Changing the auto-block duration” on page 44.
Viewing the Blocked Sites list
Use Firebox Monitors to view sites that are automatically blocked according to a
service’s property configuration. From the Control Center:
1On the QuickGuide, click the Firebox Monitors icon.
2Click the Blocked Site List tab. (You might need to use the arrows to access this
tab.)
The Blocked Sites list appears.
46
Page 57

CHAPTER 8 Configuring Services
The Services Arena of Policy Manager displays an icon for each configured service. A
service represents a particular type of proxy or packet-filtering connection such as
FTP, SMTP, or proxied HTTP. A symbol next to the service indicates whether the
service is configured for outgoing traffic, incoming traffic, or both. Services with no
symbol are not active.
The Firebox System includes many well-known service types. You can also add
unique or custom services. This feature accommodates new TCP/IP services as they
are developed.
Adding an existing service
Add an existing, well-known service using the Services dialog box. From Policy
Manager:
1 On the toolbar, click the Add Services icon (it appears as a plus sign (+)).
You can also select Edit => Add Service.
2 Click to select a service from the list of available services.
You can expand the tree to display all available services. When you click a service, the service
icon appears in the dialog box, on the right side. Also, a Details box displays basic information
about the service. For more information about individual services, see the “Types of Services”
Appendix in the
3Click Add.
4In the Comments text box, enter comments or a description of this version of the
service, to assist with identification.
Comments appear under the Properties tab in the Comments field of the Properties dialog box.
5Click OK.
The service’s Properties dialog box appears. For more information, see “Defining service
properties” on page 49.
6Click OK to close the Properties dialog box.
Reference Guide
.
User Guide 47
Page 58

Creating a new service
7 You can add multiple services to the Services Arena while the Services dialog box
is open. When you finish adding services, click Close.
The Services Arena displays an icon for each service added.
8Click F i l e => S a v e => T o F i r e b o x to save your changes to the Firebox. Specify the
location and name of the new configuration file.
Creating a new service
In addition to well-known services, you can create and add a new or custom service.
From Policy Manager:
1 On the toolbar, click Add Services.
2Click New.
3 Enter the name of the new service.
It must be a unique name not already listed under Services in the Services dialog box.
4 Enter a description of the new service.
The description appears in the Details section of the Services dialog box when you select the
service.
5Click Add.
Use the Add Port dialog box to configure the port for the new service.
6Use the Protocol drop list to select a protocol:
TCP
TCP-based services
UDP
UDP-based services
HTTP
Services examined by the HTTP proxy
IP
Filter a service using something other than TCP (protocol number 6) or UDP
(protocol 17) for the next-level protocol. Select IP to create a protocol number
service.
7Use the Client Port drop list to select a client port:
Ignore
Client ports will ignore the source port.
Secure
Client is dynamically allocated a port less than 1024 (for secure services such
as SSH).
Port
Client port uses same port as listed in the Port number field of the service’s
icon.
48
Client
Client is dynamically allocated a port above 1000.
Page 59

Defining service properties
8In the Por t text box, enter the well-known port number for this service.
For a list of well-known services and their associated ports, see the
Help.
9Click OK.
Policy Manager adds the port configuration to the New Service dialog box.
10 Verify that the name, description, and configuration of this service are correct.
11 Click Add to configure another port for this service. Repeat the process until all
ports for the service are configured. When you finish, click OK.
The Services dialog box appears with the new service. You can now add the custom service to the
Services Arena just as you would an existing service. For more information, see “Adding an
existing service” on page 47.
12 Click F i l e => S a v e => T o F i r e b o x to save your changes to the Firebox. Specify the
location and name of the new configuration file.
Defining service properties
Use the Properties dialog box to configure a service’s incoming and outgoing access
rules. Defining service properties includes:
Reference Guide
or Online
• Adding incoming hosts, networks, and users
• Adding outgoing hosts, networks, and users
The Properties dialog box for a typical service displays Incoming and Outgoing tabs.
The Incoming tab defines which hosts and users outside the Firebox can use the
service to initiate sessions with your protected users and hosts. The Outgoing tab
defines which hosts and users behind the Firebox can use the service to initiate
sessions with an outside host. You can make any service a one-directional filter by
setting the Connections Are drop list to Disabled.
After defining service properties, you need to save your configuration file, as
described at the end of the previous procedures.
Adding incoming service properties
From Policy Manager:
1 In the Services Arena, double-click the service.
The Properties dialog box appears, displaying the Incoming tab.
2Use the Incoming Connections Are drop list to select Enabled and Allowed.
3 To define specific external users or hosts that the service will allow in, click Add
beneath the From list.
The Add Address dialog box appears. For a description, see “Adding addresses to service
properties” on page 50.
4 To define specific destinations within the Trusted network that can receive
through the service, click Add beneath the To list.
5 To customize logging and notification for incoming traffic for this service, click
Logging. Configure logging and notification according to your security policy
preferences.
For a description of each control, right-click the control and then click What’s This?
User Guide 49
Page 60

Defining service properties
6Click OK.
Adding outgoing service properties
From Policy Manager:
1 In the Services Arena, double-click the service. Click the Outgoing tab.
The Properties dialog box displays the Outgoing properties tab.
2Use the Outgoing Connections Are drop list to select Enabled and Allowed.
3 To define specific users and hosts on the Trusted network that can send packets
out through the service, click Add beneath the From list.
The Add Address dialog box appears. For a description, see “Adding addresses to service
properties” on page 50.
4 To define specific allowed external destinations for traffic through this service,
click Add beneath the To list.
5 To customize logging and notification for outgoing traffic for this service, click
Logging. Configure logging and notification according to your security policy
preferences.
For a description, see “Customizing logging and notification by service or option” on page 76.
6Click OK.
Adding addresses to service properties
Both the Incoming and Outgoing properties include From and To lists of addresses.
Use the Add Address dialog box to add a network, IP address, or specific user to the
From or To list. From the service’s Properties dialog box:
1Click Add.
2 To add a member that has already been defined, click your selection on the
Members list. Click Add.
The member appears in the Selected Members and Addresses list.
3 To add a new entry, click Add Other.
4Use the Choose Type drop list to select the member type.
5In the Val ue text box, enter the member IP address or name.
6Click OK.
The member appears in the Selected Members and Addresses list.
7 To view a list of users associated with a host on the Members list, select the
member and then click Show Users.
Working with wg_ icons
Service icons beginning with “wg_” are created automatically when you enable
features such as PPTP and authentication. These icons appear only in the Advanced
view of Policy Manager, in the Services Arena. The “wg_” service icons rarely require
modification. WatchGuard recommends leaving “wg_” icons in their default settings.
50
Page 61

Configuring services for authentication
Configuring services for authentication
One way to create effective user authentication environments is to restrict all
outgoing services to allow connections only from authenticated users.
The following example applies to dynamically addressed (DHCP-based) networks.
1 Create a group on the Windows NT server that contains all the user accounts.
2 In the Policy Manager Services Arena, double-click the Outgoing or Proxy service
icon.
The Properties dialog box appears, displaying the Filter Rules tab.
3 Under Internal Hosts, click Add.
The Add Address dialog box appears.
4 Enter the group name you just created on the Windows NT server.
5Configure the Outgoing From lists on services in the Services Arena according to
your security policy preferences.
Modifying a service
After adding a service, some features and attributes can be changed while others
require that you delete the service and add it again. In general, you can modify any
property contained in the Properties dialog box. You must delete and add a new
service for any property set during the initial setup.
Properties that can be modified on an existing service include:
• Rule sets for incoming and outgoing traffic
• Logging and notification characteristics
Properties that require deleting the service and adding it back again include:
• Port configuration
• Client port setting
•Protocol
To modify service properties, see “Defining service properties” on page 49 and
“Customizing logging and notification by service or option” on page 76.
To completely modify a service by deleting it and then adding it again, see “Deleting
a service” on page 51 and“Adding an existing service” on page 47.
Deleting a service
The Delete Service command deletes the selected service from the Services Arena.
When you remove a service and save the new configuration, the Firebox denies
incoming connections to the service and stops all but default logging from the service.
From Policy Manager, in the Services Arena:
1 Select the service to delete.
User Guide 51
Page 62

Setting up proxy services
2 On the toolbar, click the Delete Service icon (it appears as an “X”).
You can also select Edit => Delete. A verification alert appears.
3Click Yes.
Policy Manager removes the service from the Services Arena.
4Click F i l e => S a v e => T o F i r e b o x to save your changes to the Firebox. Specify the
location and name of the new configuration file.
Setting up proxy services
The WatchGuard Firebox System uses a technology called “transparent proxies.”
Transparent proxies can be employed without any special third-party or proxy-aware
software, and are transparent to client programs. WatchGuard has applicationspecific proxies for SMTP, FTP, and HTTP.
When performing incoming, static NAT, internal hosts must point to the
internal IP address of the server, not the Firebox or public IP address.
Users should have their WINS, host file, or internal DNS set to resolve to
the internal IP of the server in question. For more information, see
“Configuring a service for incoming static NAT” on page 66.
Configuring an SMTP proxy service
The SMTP proxy limits several potentially harmful aspects of e-mail. The proxy scans
the content type and content disposition headers and matches them against a userdefinable list of known hostile signatures. E-mail containing suspect attachments is
blocked and replaced with messages indicating that this action has been taken.
The list of disallowed signatures can be modified from the Content Types tab in the
SMTP Proxy dialog box. You do not have to reboot the Firebox when you make these
SMTP configuration changes.
The proxy also automatically disables nonstandard commands such as Debug, and
can limit message size and number of recipients. If the message exceeds preset limits,
the Firebox refuses the mail.
The Policy Manager uses separate dialog boxes for incoming and outgoing SMTP
rules. Because incoming messages pose a greater threat to your network than
outgoing ones, the dialog box for incoming SMTP has more controls and configurable
properties.
Configuring the incoming SMTP proxy
Use the Incoming SMTP Proxy dialog box to set the incoming parameters of the
SMTP proxy. You must already have an SMTP Proxy service icon in the Services
Arena. From the Services Arena:
52
1 Double-click the SMTP Proxy icon to open the SMTP Proxy Properties dialog
box.
2Click the Properties tab.
Page 63

Setting up proxy services
3Click Incoming.
The Incoming SMTP Proxy dialog box appears, displaying the General tab.
4 Modify general properties according to your preference.
For a description of each control, right-click it, and then click What’s This?.
5 To modify logging properties, click the Logging tab.
Selecting content types
From the SMTP Proxy Properties dialog box:
1Click the Content Types tab.
2Click Add under the Content Types box.
The Select MIME Type dialog box appears.
3 Select a content type. Click OK.
4 To create a new MIME type, click New Type. Enter the MIME type and
description. Click OK.
The new type appears at the bottom of the Content Types drop list. Repeat this process for each
content type. For a list of MIME content types, see the
Adding address patterns
Reference Guide
.
From the SMTP Proxy Properties dialog box:
1Click the Address Patterns tab.
2Use the Category drop list to select a category.
3 Type the address pattern in the text box to the left of the Add button.
4Click Add.
The address pattern appears at the bottom of the pattern list.
Protecting your mail server against relaying
Hackers and spammers can use an open relay to send mail from your server. To
prevent this, disable open relay on your mail server. From the SMTP Proxy
Properties dialog box:
1Click the Address Patterns tab.
2 Select Allowed To from the Category drop list.
3 In the text box to the left of the Add button, enter your own domain.
With this setting, outside IPs can send mail only to your domain and not relay to other domains.
4Click Add.
Select headers to allow
From the SMTP Proxy Properties dialog box:
1Click the Headers tab.
2 To add a new header, type the header name in the text box to the left of the Add
button. Click Add.
The new header appears at the bottom of the header list.
3 To remove a header, select the header name in the header list. Click Remove.
The header is removed from the header list.
User Guide 53
Page 64

Setting up proxy services
Configuring the outgoing SMTP proxy
Use the Outgoing SMTP Proxy dialog box to set the parameters for traffic going from
your Trusted and Optional network to the world. You must already have an SMTP
Proxy service icon in the Services Arena. Double-click the icon to open the service’s
Properties dialog box:
1Click the Properties tab.
2Click Outgoing.
The Outgoing SMTP Proxy dialog box appears, displaying the General tab.
3 To add a new header pattern, type the pattern name in the text box to the left of
the Add button. Click Add.
4 To remove a header from the pattern list, click the header pattern. Click Remove.
5 Set a time-out value in seconds.
6 To modify logging properties, click the Logging tab.
Add masquerading options
SMTP masquerading converts an address pattern behind the firewall into an
anonymized public address. For example, the internal address pattern might be
inside.salesdept.bigcompany.com, which would be anonymized to their public
address bigcompany.com.
1Click the Masquerading tab.
2 Enter the official domain name.
This is the name you want visible to the outside world.
3In the Substitute text box, type the address patterns that are behind your firewall
that you want replaced by the official domain name.
All patterns entered here appear as the official domain name outside the Firebox.
4In the Don’t Substitute text box, type the address patterns that you want to
appear “as is” outside the firewall.
5 Enable other masquerading properties according to your security policy
preferences.
Configuring an FTP proxy service
To enable the FTP proxy, add the FTP icon to the Services Arena. From the Policy
Manager Services Arena:
1 Double-click the FTP Proxy service icon to open the FTP Proxy Properties dialog
box.
Outgoing FTP does not work without an FTP icon in the Services Arena to
trigger the FTP proxy.
54
2Click the Properties tab.
3Click Settings.
4 Enable FTP proxy properties according to your security policy preferences.
For a description of each control, right-click it, and then click What’s This?
Page 65

Setting up proxy services
5Click OK.
6Click F i l e => S a v e => T o F i r e b o x to save your changes to the Firebox. Specify the
location and name of the new configuration file.
Configuring an HTTP proxy service
HyperText Transfer Protocol (HTTP) is the protocol used by the World Wide Web to
move information around the Internet. HTTP defines how messages are formatted
and transmitted, and what actions Web servers and browsers take in response to
commands. For example, when you enter a URL into your browser, you are sending
an HTTP command to the Web server, directing it to find and send you the requested
Web page.
The HTTP proxy does content-based filtering on outgoing connections only, with a
set of options that you can easily configure according to your own requirements. The
HTTP proxy does not process incoming connections. In addition, the HTTP proxy can
serve as a content filter for Web browsers. For more information, see “Configuring the
WebBlocker ser vice” on page 60.
You can use two types of HTTP services:
• Proxied-HTTP service allows outbound HTTP on TCP port 80 to be proxied
through the Firebox. The proxy has the capability of performing HTTP-specific
content filtering of each connection. Such content filtering can include denying
or removing “unsafe” content types (such as Java or ActiveX) and performing
general verifications on the HTTP exchange.
• Filtered-HTTP service allows outbound HTTP on all TCP ports, but incoming
access only on port 80. Filtered HTTP is filtered by the standard packet filter,
which can restrict access by IP address or alias only. No proxy is used with this
service, meaning that Filtered-HTTP cannot make use of any of the advanced
HTTP-specific content-filtering options provided by the proxy. You must use
proxied-HTTP if you want accounting logs – for example, byte counts.
With either type of HTTP service, you should have a single icon that allows for
general outgoing HTTP access (for most internal users) and incoming HTTP access to
a limited set of Web servers.
The WatchGuard service called “HTTP” is not to be confused with an HTTP
caching proxy. An HTTP caching proxy refers to a separate machine that
performs caching of Web data.
From Policy Manager:
1 Double-click the HTTP Proxy service icon to open the HTTP Proxy Properties
dialog box.
2Click the Properties tab. Click Settings.
User Guide 55
Page 66

Service precedence
3 If you are using the HTTP proxy service because you want to use WebBlocker,
follow the procedure in the next section. Otherwise, enable HTTP proxy
properties according to your security policy preferences.
For detailed descriptions of HTTP proxy options, see the
Zip files are denied when you deny Java or ActiveX applets, because zip files
often contain these applets.
4Click the Safe Content tab.
5 Add or remove properties according to your security policy preferences. Click
OK.
Service precedence
Precedence is generally given to the most specific service and descends to the most
general service. However, exceptions exist. There are three different precedence
groups for services:
Reference Guide
.
• The “Any” service (see the Online Help system for information about the
“Any” packet filter service). This group has the highest precedence.
• IP and ICMP services and all TCP/UDP services that have a port number
specified. This group has the second highest precedence and is the largest of the
three.
• “Outgoing” services that do not specify a port number (they apply to any port).
This group includes Outgoing TCP, Outgoing UDP, and Proxy.
“Multiservices” can contain subservices of more than one precedence group.
“Filtered-HTTP” and “Proxied-HTTP,” for example, contain both a port-specific TCP
subservice for port 80 as well as a nonport subservice that covers all other TCP
connections. When precedence is being determined, individual subservices are given
precedence according to their group (described previously) independent of the other
subservices contained in the multiservice.
Precedence is determined by group first. Services from a higher precedence group
always have higher precedence than the services of a lower-precedence group,
regardless of their individual settings (for example, the lowest precedence “Any”
service will take precedence over the highest precedence Telnet service).
The precedences of services that are in the same precedence group are ordered from
the most specific services (based on source and destination targets) to the least
specific service. The method used to sort services is based on the specificity of targets,
from most specific to least specific. The following order is used:
56
From To Rank
IP IP 0
List IP 1
IP List 2
List List 3
Page 67

Service precedence
From To Rank
Any IP 4
IP Any 5
Any List 6
List Any 7
Any Any 8
“IP” refers to exactly one host IP address; “List” refers to multiple host IP addresses, a
network address, or an alias; and “Any” refers to the special “Any” target (not “Any”
services).
When two icons are representing the same service (for example, two Telnet icons or
two Any icons) they are sorted using the above tables. The most specific one will
always be checked first for a match. If a match is not made, the next specific service
will be checked, and so on, until either a match is made or there are no services left to
check. In the latter case, the packet is denied. For example, if there are two Telnet
icons, telnet_1 allowing from A to B and telnet_2 allowing from C to D, a Telnet
attempt from C to E will first check telnet_1, and then telnet_2. Because no match is
found, the rest of the rules are considered. If an Outgoing service will allow from C to
E, it will do so.
When only one icon is representing a service in a precedence category, only that
service is checked for a match. If the packet matches the service and both targets, the
service rule applies. If the packet matches the service but fails to match either target,
the packet is denied. For example, if there is one Telnet icon allowing from A to B, a
Telnet attempt from A to C will be blocked without considering any services further
down the precedence chain, including Outgoing services.
User Guide 57
Page 68

Service precedence
58
Page 69

CHAPTER 9 Controlling Web Traffic
WebBlocker is a feature of the Firebox System that works in conjunction with the
HTTP proxy to provide Web-site filtering capabilities. It enables you to exert fine
control over the type of Web sites that users on your trusted network are allowed to
view.
For more information about WebBlocker and site blocking, see the WebBlocker
section of the Network Security Handbook.
How WebBlocker works
WebBlocker relies on a URL database built and maintained by SurfControl. The
WebBlocker database contains more than 65,000 IP addresses and 40,000 directories.
The database is copied to the WatchGuard WebBlocker site at regular intervals. The
Event Processor is automatically configured to download the most recent version of
the database from the WatchGuard WebBlocker site over an authorized channel. In
turn, the Firebox regularly queries the Event Processor for changes and, when
appropriate, downloads a new version and generates a log entry to show the transfer.
If the database is either corrupted, incompletely retrieved, or in any other way
incomplete, the Firebox does not load it. It repeats the attempt until it completes a
successful transfer.
When you restart your Firebox, all Web access is blocked for a brief period of time.
Users might receive the error message “Database not loaded” until the Firebox
downloads a database.
Reverting to old WebBlocker databases
To revert to a previous copy of the WebBlocker database, use the files named
Webblocker.old and Webblocker.old2 found in the installation directory. Rename the
files Webblocker.db and Weblocker.db2, respectively. The Firebox automatically
updates to the latest WebBlocker database the next time it queries Event Processor.
User Guide 59
Page 70

Configuring the WebBlocker service
Logging and WebBlocker
WebBlocker logs attempts to access sites blocked by WebBlocker. The log that is
generated displays information about source and destination address as well as the
blocked URL and the category that caused the denial.
WebBlocker also generates a log entry showing the results of any attempted database
retrieval, including whether or not it was successful and, if not successful, why.
Prerequisites to using WebBlocker
You need to complete several tasks before you can configure the Firebox to use
WebBlocker:
• Configure the WatchGuard service icon
Because WebBlocker relies on copying updated versions of the WebBlocker
database to the Event Processor, you must configure the WatchGuard service
setting Allow Outgoing to Any. It is possible to narrow this setting and use the IP
address of webblocker.watchguard.com. However, this address may change
without notice.
• Add some form of HTTP service icon
To use WebBlocker, add the Proxied-HTTP, Proxy, or HTTP service. WatchGuard
recommends using Proxied-HTTP, which provides filtering on all ports. (HTTP
without the Proxy service blocks only on port 80.) WebBlocker takes precedence
over other settings in the HTTP or Proxy services. If the HTTP service allows
outgoing from Any to Any but WebBlocker settings are set to “Block All URLs,”
all Web access is blocked. For information on adding an HTTP proxy service, see
“Configuring an HTTP proxy service” on page 55.
Configuring the WebBlocker service
WebBlocker is a built-in feature of the service icons including HTTP, Proxied HTTP,
and Proxy. When WebBlocker is installed, five tabs appear in the HTTP service icon
dialog box:
• WebBlocker Controls
• WB: Schedule
• WB: Operational Hours
• WB: Non-Operational Hours
• WB: Exceptions
60
Activating WebBlocker
To start using WebBlocker, you must activate the feature. WatchGuard recommends
enabling the Auto Download option at the same time. This ensures that Event
Page 71

Configuring the WebBlocker service
Processor regularly and automatically updates the WebBlocker database stored on
your Firebox. From Policy Manager:
1 If you have not already done so, double-click the service icon you are using for
HTTP. Click the Properties tab. Click Settings.
The proxy’s dialog box appears.
2Click the WebBlocker Controls tab.
The WebBlocker Controls tab appears only if you selected WebBlocker during installation. If the
tabs are not visible, run the installation wizard and install the WebBlocker option. For more
information, see the
Install Guide
3 Enable the Activate WebBlocker checkbox.
4 If appropriate, enable the Auto-Download the WebBlocker Database checkbox.
5 Enter the message to be displayed when an end-user attempts to open a blocked
Web site.
Scheduling operational and non-operational hours
With WebBlocker, you can differentiate between operational hours and nonoperational hours in selecting which categories to block. From the proxy’s dialog box:
.
1Click the WB: Schedule tab.
2 Click hour blocks to toggle from Operational to Non-Operational.
Setting privileges
WebBlocker differentiates URLs based on their content. Select the types of content
accessible during operational and non-operational hours using the Privileges tabs.
The options are identical for Operational and Non-Operational. From the proxy’s
dialog box:
1Click the WB: Operational Privileges tab.
2 Enable the content type checkboxes for the categories you would like to block.
For more information on WebBlocker Categories, see the
Reference Guide
.
Creating WebBlocker exceptions
Use exceptions to override any WebBlocker setting. Exceptions take precedence over
all other rules. These blocked URLs apply only to HTTP traffic and are not related to
the Blocked Sites list.
Exceptions are listed by IP address, but can be entered as domain names, network
addresses, or host IP addresses. You can fine-tune an exception by specifying a port
number, path, or string that is to be blocked for a particular Web site. For more
information on working with exceptions, see the WebBlocker section of the Network
Security Handbook.
From the HTTP Proxy dialog box:
1Click the WB: Exceptions tab (you might need to use the arrow keys at the right of
the dialog box to see this tab).
User Guide 61
Page 72

Manually downloading the WebBlocker database
2In the Allowed Exceptions section, click Add to add either a network or host IP
address to be allowed at all times.
To allow a specific string for a domain, select Host Address. To allow a specific directory
pattern, enter the string to be allowed.
3In the Deny Exceptions section, click Add to add either a network or an IP
address to be denied at all times.
To block a specific string to be denied for a domain, select Host Address. To block a specific
directory pattern, enter the string to be blocked (for example, “*poker”).
4 To remove an item from either the Allow or the Deny list, click the address. Click
the corresponding Remove button.
Manually downloading the WebBlocker database
You can manually force a download of the latest blocked URL database from
webblocker.watchguard.com using a DOS utility called dbfetch.
1 Open an MS-DOS Prompt window.
2 Change directories to the WatchGuard installation directory.
3 Issue the dbfetch command. The command syntax is
dbfetch [-debug] [name or IP address] [port]
debug
—
— Outputs debugging information.
––––
— —
name or IP address
port
—
— Sets port number; defaults to 4103.
— —
—
— Defaults to webblocker.watchguard.com.
— —
62
Page 73

CHAPTER 10 Setting Up Network Address
Translation
Network address translation (NAT) hides internal network addresses from hosts on
an external network. WatchGuard supports two types of NAT:
• Outgoing dynamic NAT
Hides network addresses from hosts on another network; works only on outgoing
messages.
• Incoming static NAT
Provides port-to-host remapping of incoming IP packets destined for a public
address to a single internal address; works only on incoming messages.
For more information on NAT, see the Network Security Handbook.
What is dynamic NAT?
Also known as IP masquerading or port address translation, dynamic NAT hides
network addresses from hosts on another network. Hosts elsewhere only see
outgoing packets from the Firebox itself. This feature protects the confidentiality and
architecture of your network. Another benefit is that it enables you to conserve IP
addresses.
WatchGuard implements two forms of outgoing dynamic NAT:
• Simple NAT – Using host aliases or IP host and network IP addresses, the
Firebox globally applies network address translation to every outgoing packet.
• Service-based NAT – Configure each service individually for outgoing
dynamic NAT.
Machines making incoming requests over a VPN connection are allowed to
access masqueraded hosts.
User Guide 63
Page 74

Using simple dynamic NAT
Using simple dynamic NAT
In the majority of networks, the preferred security policy is to globally apply network
address translation to all outgoing packets. Simple dynamic NAT provides a quick
method to set NAT policy for your entire network.
Enabling simple dynamic NAT
The default configuration of simple dynamic NAT enables it from the Trusted
network to the External network. To enable simple dynamic NAT, use the Setup
Dynamic NAT dialog box. From Policy Manager:
1 Select Setup => NAT.
2 Enable the Enable Dynamic NAT checkbox.
Adding dynamic NAT entries
Using built-in host aliases, you can quickly configure the Firebox to masquerade
addresses from your Trusted and Optional networks. For the majority of networks,
only a single entry is necessary:
•From: Trusted
•To: External
Larger or more sophisticated networks may require additional entries in the From or
To lists of hosts, or host aliases. The Firebox applies dynamic NAT rules in the order
in which they appear in the Dynamic NAT Entries list. WatchGuard recommends
prioritizing entries based on the volume of traffic that each represents. From the
Setup Dynamic NAT dialog box:
1Click Add.
2Use the From drop list to select the origin of the outgoing packets.
For example, use the trusted host alias to globally enable network address translation from the
Trusted network. For a definition of built-in Firebox aliases, see “Using host aliases” on
page 85. For information on how to add a user-defined host alias, see “Adding a host alias” on
page 86.
3Use the To drop list to select the destination of outgoing packets.
4 To add either a host or network IP address, click the ... button. Use the drop list to
select the address type. Enter the IP address. Network addresses must be entered
in slash notation.
5Click OK.
The new entry appears in the Dynamic NAT Entries list.
Reordering dynamic NAT entries
To reorder dynamic NAT entries, select the entry and click either Up or Down. There
is no method to modify a dynamic NAT entry. Instead, use the Remove button to
remove existing entries and the Add button to add new entries.
64
Page 75

Using service-based NAT
Using service-based NAT
Using service-based NAT, you can set outgoing dynamic NAT policy on a service-byservice basis. Service-based NAT is most frequently used to make exceptions to a
globally applied simple dynamic NAT entry.
For example, use service-based NAT on a network with simple NAT enabled from
the Trusted to the Optional network with a Web server on the Optional network that
should not be masqueraded to the actual Trusted network. Add a service icon
allowing Web access from the Trusted to the Optional Web server, and disable NAT.
In this configuration, all Web access from the trusted network to the optional Web
server is made with the true source IP, and all other traffic from Trusted to Optional is
masqueraded.
You can also use service-based NAT in lieu of simple dynamic NAT. Rather than
applying NAT rules globally to all outgoing packets, you can start from the premise
that no masquerading takes place and then selectively masquerade a few individual
services.
Enabling service-based NAT
Service-based NAT is not dependent on enabling simple dynamic NAT. From Policy
Manager:
1 Select Setup => NAT. Click Advanced.
2 Enable the Enable Service-Based NAT checkbox.
3Click OK to close the Advanced NAT dialog box. Click OK to close the Dynamic
NAT dialog box.
Configuring service-based NAT exceptions
By default, services take on whatever dynamic NAT properties you have set for
simple NAT. However, you can override this setting in the service’s Properties dialog
box. There are three options:
• Use Default (Simple NAT) – Service-based NAT is not enabled for the
service. The service will use the simple dynamic NAT rules configured in the
Dynamic NAT Entries list (see “Adding dynamic NAT entries” on page 64).
• Disable NAT – Disables dynamic NAT for outgoing packets using this
service. Use this setting to create service-by-service exceptions to outgoing
NAT.
• Enable NAT – Enables service-based NAT for outgoing packets using this
service regardless of how the simple dynamic NAT settings are configured.
From Policy Manager:
1 Double-click the service icon. Click Outgoing.
If either simple dynamic NAT or service-based NAT is already enabled, an entry appears at the
bottom of the Outgoing tab.
2Use the Choose Dynamic NAT Setup drop list to select either the default, disable,
or enable setting.
3Click OK.
User Guide 65
Page 76

Configuring a service for incoming static NAT
Configuring a service for incoming static NAT
Static NAT works on a port-to-host basis. Incoming packets destined for a specific
public address and port on the External network are remapped to an address and
port behind the firewall. You must configure each service separately for static NAT.
Typically, static NAT is used for public services such as Web sites and e-mail that do
not require authentication.
Static NAT can be used only to forward connections from the outside to an internal
host. It is not possible for hosts already behind the Firebox to use the static NAT entry
when accessing an internal server. While hosts on the External interface of the Firebox
connect to the Firebox IP address and specified port (which then forwards the
connection internally), hosts on the inside of the Firebox must connect directly to the
actual, internal server IP address. This is usually only a problem when DNS is
involved. To avoid this problem, it is best to use a private DNS server (or static DNS
mapping, such as /etc/hosts for UNIX machines, or an Lmhosts file for Windows
machines) for internal hosts. This way, internal systems that try to connect to the
server by name will always get the internal IP address.
Adding external IP addresses
Static NAT converts a Firebox public IP and port into specific destinations on the
Trusted or Optional networks. If the Firebox has not already been assigned the public
IP address you want to use, you must designate a new public IP address using the
Add External IP dialog box. From Policy Manager:
1 Select Network => Configuration. Click the External tab.
2Click Aliases.
3 At the bottom of the dialog box, enter the public IP address. Click Add.
4 Repeat until all external public IP addresses are added. Click OK.
Setting static NAT for a service
Static NAT, like service-based NAT, is configured on a service-by-service basis.
Because of the way static NAT functions, it is available only for services containing
TCP, UDP, FTP, SMTP, or HTTP. A service containing any other protocol cannot use
incoming static NAT, and the button in the service’s Properties dialog box is
disabled.
1 Double-click the service icon in the Services Arena.
The service’s Properties dialog box appears, displaying the Incoming tab.
2Use the Incoming drop list to select Enabled and Allowed.
To use static NAT, the service must allow incoming traffic.
3 Under the To list, click Add.
The Add Address dialog box appears.
4Click NAT.
5Use the External IP Address drop list to select the “public” address to be used for
this service.
If the public address does not appear in the drop list, click Edit to open the Add External IP
Address dialog box.
66
Page 77

Configuring a service for incoming static NAT
6 Enter the internal IP address.
The internal IP address is the final destination on the Trusted network.
7 If appropriate, enable the Set Internal Port To Different Port Than Service
checkbox.
This feature is rarely used. It enables you to redirect packets not only to a specific internal host
but also to an alternative port. If you enable the checkbox, enter the alternative port number in
the Internal Port field.
8Click OK to close the Add Static NAT dialog box.
The static NAT route appears in the Members and Addresses list.
9Click OK to close the Add Address dialog box. Click OK to close the service’s
Properties dialog box.
User Guide 67
Page 78

Configuring a service for incoming static NAT
68
Page 79

CHAPTER 11 Setting Up Logging and
Notification
Logging and notification are crucial to an effective network security policy. Together,
they make it possible to monitor your network security, identify both attacks and
attackers, and take action to address security threats and challenges.
Logging occurs when the firewall records the occurrence of an event to a log file.
Notification occurs when the firewall sends e-mail, pops up a window on the Event
Processor, or dials a pager to notify an administrator that WatchGuard detected a
triggering event.
WatchGuard logging and notification features are both flexible and powerful. You
can configure your firewall to log and notify on a wide variety of events, including
specific events at the level of individual services.
Ensure logging with failover logging
WatchGuard relies on failover logging to minimize the possibility of missing log
events. With failover logging, you configure a list of Event Processors to accept logs
in the event of a failure of the primary Event Processor. By default, the Firebox sends
log messages to the primary Event Processor. If for any reason the Firebox cannot
establish communication with the primary Event Processor, it automatically sends
User Guide 69
Page 80

WatchGuard logging architecture
log messages to the second Event Processor. It continues through the list until it finds
an Event Processor capable of recording events.
Multiple Event Processors operate in failover mode, not redundancy
mode—that is, events are not logged to multiple Event Processors
simultaneously; they are logged only to the primary Event Processor unless
that host becomes unavailable. Then the logs are passed on to the next
available Event Processor according to the order of priority. As soon as a
higher-priority Event Processor becomes available again, the logs are
shifted to that host. The highest-ranking Event Processor available always
receives the logs.
The LiveSecurity Event Processor software must be installed on each Event
Processor. For more information, see “Setting up the LiveSecurity Event
Processor” on page 73.
WatchGuard logging architecture
The flexible architecture of the Firebox System makes it possible to separate the
logging and notification responsibilities to multiple machines. By default, the Policy
Manager and the log and notification application – the LiveSecurity Event Processor
– are installed on the same computer. You can, however, install the Event Processor
software on a separate or multiple computers.
You must complete the following tasks to configure the firewall for logging and
notification:
Policy Manager
- Add logging and notification host(s)
- Customize preferences for services and packet handling options
- Save the configuration file with logging properties to the Firebox
LiveSecurity Event Processor
- Install the software on each Event Processor
- Set global logging and notification preferences for the host
- Set the log encryption key on the Event Processor identical to the key set in
Policy Manager.
Designating Event Processors for a Firebox
You should have at least one Event Processor to run the WatchGuard Firebox System.
The default primary Event Processor is the Management Station, which is set when
70
Page 81

Designating Event Processors for a Firebox
you run the QuickSetup wizard. You can specify a different primary Event Processor
as well as multiple backup Event Processors.
• IP address of each Event Processor
• Encryption key to secure the connection between the Firebox and Event
Processors
• Priority order of primary and backup Event Processors
Adding an Event Processor
From Policy Manager:
1 Select Setup => Logging.
2Click Add.
3 Enter the IP address to be used by the Event Processor.
4 Enter the encryption key that secures the connection between the Firebox and the
Event Processor.
The default encryption key is the monitoring passphrase set in the QuickSetup wizard. You must
use the same log encryption key for both the Firebox and the LiveSecurity Event Processor.
5Click OK.
Repeat until all primary and backup Event Processors appear in the LiveSecurity Event
Processors list.
Enabling Syslog logging
Note that Syslog logging is not encrypted; therefore, do not set the Syslog server to a
host on the External interface. From Policy Manager:
1 Select Setup => Logging.
The Logging Setup dialog box appears.
2In the Logging Setup dialog box, click the Syslog tab.
3 Enable the Enable Syslog Logging checkbox.
4 Enter the IP address of the Syslog server.
Editing an Event Processor setting
Modify an Event Processor entry to change the log encryption key. From Policy
Manager:
1 Select Setup => Logging.
The Logging Setup dialog box appears.
2 Click the host name. Click Edit.
3 Modify the IP address or log encryption key fields. Click OK.
You must use the same log encryption key for both the Firebox and the LiveSecurity Event
Processor. To change the log encryption key on the Event Processor, see “Setting the log
encryption key” on page 75.
User Guide 71
Page 82

Designating Event Processors for a Firebox
Removing an Event Processor
Remove an Event Processor when you no longer want to use it for any logging
purpose. From Policy Manager:
1 Select Setup => Logging.
The Logging Setup dialog box appears.
2 Click the host name. Click Remove.
3Click OK.
The Logging Setup dialog box closes and removes the Event Processor entry from the
configuration file.
If you move the Event Processor to a host on another network
and change the Event Processor’s host address on the Firebox,
make sure to uninstall the Event Processor software from the
machine that is no longer the Event Processor host.
Reordering Event Processors
Event Processor priority is determined by the order in which they appear in the
LiveSecurity Event Processor(s) list. The host that is listed first receives log messages.
Use the Up and Down buttons to change the order of the Event Processors. From the
Logging Setup dialog box:
• To move a host down, click the host name. Click Down.
• To move a host up, click the host name. Click Up.
Synchronizing Event Processors
Synchronizing Event Processors is the act of setting the clocks of all your Event
Processors to a single common time source. Synchronizing Event Processors keeps
logs orderly and avoids time discrepancies in the log file if failovers occur.
The Firebox sets its clock to the current Event Processor. If the Firebox and the Event
Processor time are different, the Firebox time drifts toward the new time, which often
results in a brief interruption in the log file. Rebooting the Firebox resets the Firebox
time to that of the primary Event Processor. Therefore, you should set all Event
Processors’ clocks to a single source. In a local installation where all Event Processors
are on the same domain, set each Event Processor to the common domain controller.
For Windows NT Event Processors
1 Go to each Event Processor. Open an MS-DOS Command Prompt window. Type
the following command:
net time /domain:domainName /set
where domainName is the domain in which the Event Processors operate.
72
The system returns a message naming the domain controller.
2Type Y.
The time of the local host is set to that of the domain controller.
Page 83

Setting up the LiveSecurity Event Processor
Another way to set the Event Processor (and domain controller) clocks is to use an
independent source such as the atomic clock—based servers available on the Internet.
One place to access this service is:
http://www.bldrdoc.gov/timefreq
Setting up the LiveSecurity Event Processor
The LiveSecurity Event Processor controls logging and notification. It also provides
scheduling services for the Firebox; if the Event Processor is not running, you may be
unable to connect to the Firebox.
Installing the Event Processor program
The LiveSecurity Event Processor program is separate from the WatchGuard Control
Center and Policy Manager. It must be installed and the log encryption key entered
on all Event Processors. Although it can be installed on the Management Station
during the QuickSetup wizard installation process, you must also install and run it on
any additional Event Processors.
The LiveSecurity Event Processor program is available both as a command-line utility
and, on a Windows NT host, as a service. During installation, the setup utility detects
whether or not the host is operating Windows NT or Windows 2000. If so, it installs
the program as a service that automatically starts when you restart the machine:
1 Run the WatchGuard Firebox System installation wizard.
2 When the wizard asks if you would like to set up logging and notification, select
Ye s.
Running an Event Processor on Windows 98
If the Event Processor is to be run on a Windows 98 operating system, it must be run
from the command line in a DOS window or directly from the Startup folder. A DOS
window stays open as long as the LiveSecurity Event Processor is running. If you
must log off a Windows 98 Event Processor, the program exits and logging will not
work. On the Event Processor host:
1Open a DOS window.
Select Start => Programs => MS-DOS Prompt.
2 Change directories to the WatchGuard installation directory.
The default installation directory is C:\Program Files\WatchGuard.
3 Enter the following command:
controld -i
The Event Processor starts. You can minimize the DOS window. Do not, however, close the
window. Closing the DOS window halts the Event Processor.
Running an Event Processor on Windows NT or Windows 2000
If the Event Processor is to be run on a Windows NT or Windows 2000 operating
system, there are two methods to run it: interactive mode from a DOS window or as a
User Guide 73
Page 84

Setting up the LiveSecurity Event Processor
Windows NT service. The default method on installation is for it to run as a Windows
NT service.
As a Windows NT or Windows 2000 Service
By default, the Event Processor is installed to run as a Windows NT service, starting
automatically every time the host computer restarts. You can also install and run the
Event Processor manually:
1 At the command line, type:
controld -nt-install
2 Start the LiveSecurity Event Processor service.
Select Start => Settings => Control Panel. Double-click Services. Click WG LiveSecurity Event
Processor. Click Start. You can also restart your computer. The service starts automatically
every time the host reboots.
3 To remove the Event Processor as a service, stop it using Control Panel. Then, at
the command line, type:
controld -nt-remove
In addition, if the Event Processor is running as a service and you are using pop-up
notifications, you must ensure that the service can interact with the Desktop:
1 In Control Panel, double-click Services. In Windows 2000, click Start => Settings
=> C o n t r o l P a n e l => A d m i n i s t r a t i v e To o l s => S e r v i c e s .
2Click WG LiveSecurity Event Processor. Click Startup.
3 Verify that the Allow Service To Interact With Desktop checkbox is enabled.
If the Event Processor was running, restart it after saving the changes.
Interactive mode from a DOS window
On the Event Processor:
1Open a DOS window.
Select Start => Programs => Command Prompt.
2 Change directories to the WatchGuard installation directory.
The default installation directory is C:\Program Files\WatchGuard.
3 Type the following command:
controld -NT-interactive
The Event Processor starts. You can minimize the DOS window. Do not, however, close the
window. Closing the DOS window halts the Event Processor.
Viewing the Event Processor
While the LiveSecurity Event Processor is running, a Firebox-and-traffic icon appears
in the Windows Desktop tray. To view the Event Processor, right-click the tray icon
and select Log Center.
74
If the Event Processor icon is not in the tray, in the Control Center, select LiveSecurity
=> Logging => Event Processor Interface. To start the Event Processor interface when
you log in to the system, add a shortcut to the Startup folder in the Start menu. The
WatchGuard installation program does this automatically if you set up logging.
Page 85

Setting global logging and notification preferences
Starting and stopping the Event Processor
The Event Processor starts automatically when you start the host on which it resides.
However, it is possible to stop or restart the Event Processor from its interface at any
time. Open the Event Processor interface:
• To start the Event Processor, select File => Start Service.
• To stop the Event Processor, select File => Stop Service.
Setting the log encryption key
The log connection (but not the log file) between the Firebox and an Event Processor
is encrypted for security purposes. Both the Management Station and the Event
Processor must possess the same encryption key.
You must enter an encryption key in order for the Event Processor to receive
logs from the Firebox. It must be the same key used when adding an Event
Processor to the Management Station.
From the LiveSecurity Event Processor:
1 Select File => Set Log Encryption Key.
2 Enter the log encryption key in both text boxes. Click OK.
Setting global logging and notification preferences
The LiveSecurity Event Processor lists the connected Firebox and displays its status. It
has three control areas:
• Log File tab – Specify the maximum number of records stored in the log file.
• Reports tab – Schedule regular reports of log activity.
• Notification tab – Control to whom and how notification takes place.
Together, these controls set the general parameters for most global event processing
and notification properties.
Setting the interval for log rollover
Log records accumulate at different rates depending on the volume of network traffic
and the logging and notification settings configured for services and properties. You
can control when the Event Processor rolls log entries from one file to the next using
the Log Files tab in the Event Processor. For example, configure the Event Processor
to roll over from one log file to the next by time interval, number of entries, or both.
From the Event Processor interface:
1Click the Log Files tab.
2 For a time interval, enable the By Time Interval checkbox. Select the frequency.
Use the Schedule First Log Roll For drop list to select a date. Use the scroll
control or enter the first time of day.
User Guide 75
Page 86

Customizing logging and notification by service or option
3 For a record size, enable the By Number of Entries checkbox. Use the scroll
control or enter a number of log record entries.
The Approximate Size field changes to display the approximate file size of the final log file. For
a detailed description of each control, right-click it, and then select What’s This?.
4Click OK.
The Event Processor Interface closes and saves your entries. New settings take effect
immediately.
Scheduling log reports
You can use the Event Processor to schedule the automatic generation of network
activity reports. For more information, see “Scheduling a report” on page 114.
Controlling notification
Notification occurs when the firewall sends an e-mail, pops up a window on the
Event Processor, or dials a pager to notify an administrator that the Firebox detected a
triggering event. Use the Event Processor to control when and to whom such
notifications are sent. From the Event Processor interface:
1Click the Notification tab.
2 Modify the settings according to your security policy preferences.
For more information on individual settings, right-click the setting, and then select What’s
This?.
Customizing logging and notification by service or option
The Firebox System allows you to create custom logging and notification properties
for each service and blocking option. You can fine-tune your security policy, logging
only those events that require your attention and limiting notification to truly highpriority events.
To make logging and notification configuration easier, services, blocking categories,
and packet-handling options share an identical dialog box. Therefore, once you learn
the controls for one type of service, you can easily configure the remainder.
The Logging and Notification dialog box contains the following controls:
Category
The event types that can be logged by the service or option. This list changes
depending on the service or option. Click the event name to display and set its
properties.
Enter it in the log
Enable this checkbox to log the event type; clear it to disable logging for the
event type. Because the Firebox must perform domain name resolution, there
may be a time lag before logs appear in the log file. All denied packets are
logged by default.
76
Page 87

Customizing logging and notification by service or option
Send Notification
Enable this checkbox to enable notification on the event type; clear it to disable
logging for the event type.
The remaining controls are active when you enable the Send Notification checkbox:
E-mail
Triggers an e-mail message when the event occurs. Set the e-mail recipient in
the Notification tab of the LiveSecurity Event Processor.
Pager
Triggers a page when the event occurs. Set the pager number in the
Notification tab of the LiveSecurity Event Processor.
Popup Window
Triggers a pop-up window display on the Event Processor when the event
occurs.
Custom Program
Triggers a custom program when the event occurs. WatchGuard allows only
one notification type per event. A custom batch file or program enables you to
trigger multiple types of notification. Type the full path to the program in the
accompanying field, or use Browse to locate and select the program.
Setting Launch Interval and Repeat Count
There are two parameters that work in conjunction with the Event Processor Repeat
Interval to control notification timing:
Launch Interval
The minimum time (in minutes) between separate launches of a notifier. Set
this parameter to prevent the launch of several notifiers in response to similar
events that take place in a short amount of time.
Repeat Count
The threshold for how often a notifier can repeat before the Firebox activates
the special repeat notifier. The repeat notifier creates a log entry that the
notifier in question is repeating. Notification repeats only after this number of
events occurs.
For an example of how launch interval and repeat count interact, see the Network
Security Handbook.
Setting logging and notification for a service
For each service added to the Services Arena, you can control logging and notification
of the following events:
• Incoming packets that are allowed
• Incoming packets that are denied
• Outgoing packets that are allowed
• Outgoing packets that are denied
User Guide 77
Page 88

Customizing logging and notification by service or option
From Policy Manager:
1 Double-click a service in the Services Arena.
The Properties dialog box appears.
2Click Logging.
The Logging and Notification dialog box appears. The options for each service are identical; the
main difference is based on whether the service in question is for incoming, outgoing, or
bidirectional communication.
3 Modify logging and notification properties according to your security policy
preferences. Click OK.
Setting logging and notification for default packet-handling
options
When this option is enabled, you can control logging and notification properties for
the following default packet-handling options:
• Spoofing attacks
• IP options
• Port probes
• Address space probes
• Incoming packets not handled
• Outgoing packets not handled
From Policy Manager:
1 Select Setup => Default Packet Handling.
The Default Packet Handling dialog box appears.
2Click Logging.
3 Modify logging and notification properties according to your security policy
preferences. Click OK.
Setting logging and notification for blocked sites and ports
You can control logging and notification properties for both blocked sites and
blocked ports. The process is identical for both operations. The example below is for
blocked sites.
From Policy Manager:
1 Select Setup => Blocked Sites.
The Blocked Sites dialog box appears.
2Click Logging.
3 Modify logging and notification properties according to your security policy
preferences. Click OK.
78
Page 89

CHAPTER 12 Connect with Out-of-Band
Management
The WatchGuard Firebox System out-of-band (OOB) management feature enables the
Management Station to communicate with a Firebox by way of a modem and
telephone line. OOB is useful for remotely configuring a Firebox when access via the
Ethernet interfaces is unavailable.
Connecting a Firebox with OOB management
To connect to the Firebox using OOB management, you must:
• Connect the Management Station to a modem – Connect a modem between
the serial port on the Management Station and an analog telephone line.
• Connect the Firebox modem – Connect an external or PCMCIA (also known as
PC Card) modem to the Firebox. External modems must be attached to the
CONSOLE port of the Firebox.
• Enable the Management Station for dial-up networking connections.
• Set Firebox network configuration properties.
Enabling the Management Station
For a dial-up PPP connection to work between a Management Station and a Firebox,
you must configure the Management Station to use a PPP connection. In Windows
NT, Windows 95/98, and Windows 2000, PPP is the default protocol used by Dial-Up
Networking. There are separate procedures for configuring a PPP connection on the
Windows NT, Windows 95/98, and Windows 2000 platforms.
User Guide 79
Page 90

Enabling the Management Station
Preparing a Windows NT Management Station for OOB
Install the Microsoft Remote Access Server (RAS) on the Management Station. From
the Windows NT Desktop:
1 Attach a modem to your computer according to the manufacturer’s instructions.
2 Select Start => Settings => Control Panel.
3Double-click Network.
4Click Add.
The Select Network Service dialog box appears.
5Click Remote Access Server. Click OK.
Follow the rest of the prompts to complete the installation. If Dial-Up Networking is not already
installed, you will be prompted to install it.
Preparing a Windows 95/98 Management Station for OOB
From the Windows 95/98 desktop:
1Double-click My Computer. Double-click Dial-Up Networking. Double-click
Make New Connection.
2 Enter the name of the connection, select a device, and select your modem. Click
Next.
3 Enter the area code and phone number of the Firebox (the phone number of the
analog line connected to the Firebox’s modem). Click Finish.
If Dial-Up Networking is not already installed, you will be prompted to install it.
Preparing a Windows 2000 Management Station for OOB
Before configuring the Management Station, you must first install the modem. If the
modem is already installed, go to the instructions for configuring Windows 2000 to
work with OOB.
Install the modem
1 From the Desktop, click Start => Control Panel => Modem and Phone Options.
2Click the Modem tab.
3Click Add. The Add/Remove Hardware wizard appears.
4 Follow the wizard through, completing the information requested.
You will need to know the name and model of the Firebox modem and the modem speed.
5Click Finish to complete the modem installation.
Configure the dial-up connection
80
1 From the Desktop, click My Network Places => Properties => Make New
Connection.
The Network Connection wizard appears.
2Click Next. Select Dial up to Private Network. Click Next.
3 Enter the telephone number of the line connected to the modem in the Firebox.
Click Next.
4 Choose the proper designation for your connection. Click Next.
Page 91

Configuring the Firebox for OOB
5 Enter a name for your connection.
This can be anything that reminds you of the icon’s purpose — VPN Connection, for example.
6Click Finish.
7 Click either Dial or Cancel.
A new icon is now in the Network and Dial-Up Connections folder. To use this dialup connection, double-click the icon in the folder.
Configuring the Firebox for OOB
OOB management features are configured in Policy Manager using the Network
Configuration dialog box, OOB tab. The OOB tab is divided into two identical halves:
The top half controls the settings of any external modem attached. The lower half
configures any PCMCIA modem if one is present.
The OOB management features are enabled by default on the Firebox. When trying to
connect to a Firebox via OOB for the first time, WatchGuard first tries to do so with
the default settings. From Policy Manager:
1 Select Network => Configuration. Click the OOB tab.
2 Modify OOB properties according to your security policy preferences.
For a description of each control, right-click it, and then click What’s This?.
3Click OK.
Establishing an OOB connection
In the Management Station, command your dial-up networking software to call the
Firebox modem. After the modems connect, the Firebox negotiates a PPP connection
with the calling host, and IP traffic can pass. After the connection is established, you
can use the WatchGuard Control Center and tools by specifying the dial-up PPP
address of the Firebox. The default address is 192.168.254.1.
In the Dial-Up Networking folder, click the icon corresponding to the Firebox.
Configuring PPP for connecting to a Firebox
In its default configuration, Firebox PPP accepts connections from any standard
client. The settings you use on your Management Station are the same as if you were
dialing into a typical Internet service provider, except that you need not specify a
username or password; leave these fields blank.
OOB time-out disconnects
The Firebox will start the PPP session and wait for a valid connection from Policy
Manager on your Management Station. If none is received within the default period
of 90 seconds, the Firebox terminates the PPP session.
User Guide 81
Page 92

Establishing an OOB connection
82
Page 93

PART IV
Network security is more than just designing and implementing a security policy and
copying the resulting configuration file to a WatchGuard Firebox. Truly effective
network security requires constant vigilance and ongoing adaptation to changing
business needs. WatchGuard provides the following functionality for administering
your security policy:
Administering a Security Policy
Aliases and Authentication
Control access to services by requiring users to identify themselves. In
addition to our own authentication scheme, WatchGuard also supports
Windows NT, RADIUS, CRYPTOCard, and SecurID server authentication.
Use host aliases to speed configuration of authentication and service
properties.
Firebox Activity Monitors
Firebox Monitors displays real-time traffic through your Firebox. View
bandwidth usage, dynamically and manually blocked sites, and Firebox
status. Use HostWatch to monitor active connections and LogViewer to read
and print a log file.
Network Activity Reports
Use the Web-based Historical Reports utility to build, display, modify, and
print reports of activity through the Firebox.
VPN Manager Guide 83
Page 94

84
Page 95

CHAPTER 13 Creating Aliases and
Implementing Authentication
Aliases are shortcuts used to identify groups of hosts, networks, or users with one
name. The use of aliases simplifies user authentication and service configuration.
User authentication provides access control for outgoing connections. Authentication
dynamically maps an individual username to a workstation IP address, allowing the
tracking of connections based on name rather than static IP address.
For more information on aliases or authentication, see the Network Security Handbook.
Using host aliases
Host aliases provide a simple way to remember host IP addresses, host ranges,
groups, usernames, and network IP addresses. They function in a similar fashion to email distribution lists–combining addresses and names into easily recognizable
groups. Use aliases to quickly build service filter rules or configure authentication.
Aliases cannot, however, be used to configure the network itself.
WatchGuard automatically adds four host aliases to the basic configuration:
firebox Addresses assigned to the three Firebox interfaces
trusted Any host or network routed through the physical Trusted interface
optional Any host or network routed through the physical Optional interface
external Any host or network routed through the physical External interface; in
A host alias takes precedence over a Windows NT or RADIUS group with
the same name.
most cases, the Internet
VPN Manager Guide 85
Page 96

Using host aliases
Adding a host alias
From Policy Manager:
1 Select Setup => Authentication.
The Member Access and Authentication Setup dialog box appears.
2Click the Aliases tab.
3Click Add.
4In the Host Alias Name text box, enter the name used to identify the alias when
configuring services and authentication.
5Click Add.
The Add Address dialog box appears.
6 Define the alias by adding hosts or users. To add an existing member, click the
name in the Members list. Click Add.
7 To configure a new member, click Add Other.
The Add Member dialog box appears.
8Use the Choose Type drop list to select a category. In the Val ue text box, enter the
address or host name. Click OK.
9 When you finish adding members, click OK.
The Host Alias dialog box appears listing the new alias. Click the alias to view its members.
Modifying a host alias
Use the Host Alias dialog box to review or modify a host alias configuration. From
Policy Manager:
1 Select Setup => Authentication. Click the Aliases tab.
The Member Access and Authentication Setup dialog box appears displaying the Aliases tab.
2 Click the host to review or modify. Click Edit.
The Host Alias dialog box appears, displaying the host’s members.
3 To add new members, click Add and follow the directions described in steps 6—9
of the previous procedure. To delete members, select them and click Remove.
4 When you finish reviewing or modifying the host alias, click OK.
Removing a host alias
When you remove a host alias from the Aliases list, you must also remove the alias
from any services configured to use the alias. From Policy Manager:
1 Select Setup =>Authentication. Click the Aliases tab.
The Member Access and Authentication Setup dialog box appears, displaying the Aliases tab.
2 Click the host to remove. Click Remove.
3Click OK.
The Member Access and Authentication dialog box closes.
4 In the Services Arena, double-click a service that is configured to use the alias.
The service’s Properties dialog box appears and displays the Incoming tab.
5 Remove the alias from the Incoming and Outgoing tabs as appropriate.
For more information, see “Defining service properties” on page 49.
6 Repeat these steps for every service configured with the host alias you removed.
86
Page 97

What is user authentication?
User authentication allows the tracking of connections based on name rather than IP
address. With authentication, it no longer matters what IP address is used or from
which machine a person chooses to work; the username defines the permissions of
the user, and follows the user from workstation to workstation.
To gain access to Internet services (such as outgoing HTTP or outgoing FTP), the user
provides authenticating data in the form of a username and password. For the
duration of the authentication, the session name is tied to connections originating
from the IP address from which the individual authenticated.
For more information about authentication, see the Network Security Handbook.
User authentication types
The WatchGuard Firebox System supports five authentication methods identified by
the server type used:
•Firebox
•Windows NT
• RADIUS
What is user authentication?
•CRYPTOCard
•SecurID
A client performs the same sequence of tasks to authenticate against any of the five
types of authentication. For the administrator, the Firebox method requires the
administrator to add usernames, passwords, and groups using Policy Manager, while
the other four methods require storing the data on the server performing
authentication.
While more than one type of authentication scheme can be implemented, only
one type of authentication can be applied to a single user session.
How user authentication works
A specialized-HTTP server runs on the Firebox. To authenticate, clients must connect
to the authentication server using a Java-enabled Web browser pointed to
http://IP address of any Firebox interface:4100/
A Java applet loads a prompt for a username and password that it then passes to the
authentication server using a challenge-response protocol. Once successfully
authenticated, users minimize the Java applet and browser window and begin using
allowed network services.
As long as the Java window remains active (it can be minimized but not closed) and
the Firebox doesn’t reboot, users remain authenticated until the session times out. To
prevent an account from authenticating, disable the account on the authentication
server.
VPN Manager Guide 87
Page 98

Configuring Firebox authentication
Configuring Firebox authentication
You can use the WatchGuard Firebox System to define users and groups for
authentication. Enter Firebox User information using Policy Manager.
Firebox Users are intended for remote user virtual private networking (VPN).
WatchGuard automatically adds two Firebox user groups to the basic configuration
file:
• ipsec_users – Add the names of authorized users of remote user VPN with
IPSec (Mobile User).
• pptp_users – Add the names of authorized users of remote user VPN with
PPTP.
For more information, see “Adding remote access users” on page 134.
From Policy Manager:
1 Select Setup => Authentication.
The Member Access and Authentication Setup dialog box appears.
2 Under Authentication Enabled Via, click the Firebox option.
3Click the Firebox Users tab.
4 To add a new group, click the Add button beneath the Groups list.
The Add Firebox Group dialog box appears.
5 Type the name of the group. Click OK.
6 To add a new user, click the Add button beneath the Users list.
The Setup Firebox User dialog box appears.
7 Enter the username and password.
8 To add the user to a group, select the group name in the Not Member Of list.
Click the left-pointing arrow to move the name to the Member Of list.
9 When you finish adding the user to groups, click Add.
The user is added to the User list. The Setup Remote User dialog box remains open and cleared
for entry of another user.
10 To close the Setup Remote User dialog box, click Close.
The Firebox Users tab appears with a list of the newly configured users.
11 When you finish adding users and groups, click OK.
The users and groups can now be used to configure services and authentication.
Configuring Windows NT Server authentication
Windows NT Server authentication is based on Windows NT Server Users and
Groups. It uses the Users and Groups database already in place on your Windows NT
network. Only end users are allowed to authenticate; the default Windows NT
groups Administrators and Replicators will not authenticate using this feature. From
Policy Manager:
88
1 Select Setup => Authentication.
The Member Access and Authentication Setup dialog box appears.
Page 99

Configuring RADIUS server authentication
2 Under Authentication Enabled Via, click the NT Service option.
WatchGuard activates the Windows NT Server controls.
3Click the Windows NT Server tab.
4 To identify the host either:
- Enter both the host name and the IP address of the Windows NT network.
- Enter the host name. Click Find IP.
5 Enable or clear the checkbox labeled Use Local Groups.
Enable use the local groups on the authentication host and clear use the global groups on the
authentication host. Consult your Windows NT documentation for details.
6Click Test to ensure the integrity of the host name and IP address.
WatchGuard searches the network for a matching server. If it finds one, it adds it to the listbox
on this tab. If the cursor returns and the listbox remains blank, your host name or IP address is
incorrect or the designated server is either not a Windows NT 4.0 server or for some reason is
currently unavailable. This functionality is not supported on Windows 95 or Windows 98
machines.
7Click OK.
Configuring RADIUS server authentication
The Remote Authentication Dial-In User Service (RADIUS) provides remote users
with secure access to corporate networks. RADIUS is a client-server system that
stores authentication information for users, remote access servers, and VPN gateways
in a central user database that is available to all servers. Authentication for the entire
network happens from one location.
To add or remove services accessible by RADIUS authenticated users, add the
RADIUS user or group in the individual service properties dialog box, and the IP
address of the Firebox on the RADIUS authentication server.
Although WatchGuard supports both CHAP and PAP authentication, CHAP is
considered more secure.
From Policy Manager
1 Select Setup => Authentication.
The Member Access and Authentication Setup dialog box appears.
2 Under Authentication Enabled Via, click the RADIUS Server option.
3Click the RADIUS Server tab.
4 Enter the IP address of the RADIUS server.
5 Enter or verify the port number used for RADIUS authentication.
The default is 1645. (RFC 2138 states the port number as 1812, but many RADIUS servers still
use post number 1645.)
6 Enter the value of the secret shared between the Firebox and the RADIUS server.
The shared secret is case sensitive and must be identical on the Firebox and the RADIUS server.
7Click OK.
VPN Manager Guide 89
Page 100

Configuring CRYPTOCard server authentication
On the RADIUS Server
Gather the IP address of the Firebox and the user or group aliases you want
to authenticate using RADIUS. The aliases appear in the “From” and “To”
listboxes for the individual services’ Properties dialog boxes.
1 Add the IP address of the Firebox where appropriate according to the RADIUS
server vendor.
Some RADIUS vendors may not require this. To determine if this is required for your
implementation, check the RADIUS server vendor documentation.
2 Take the user or group aliases gathered from the service properties’ listboxes and
add them to the defined Filter-IDs in the RADIUS configuration file.
For example, to add the groups Sales, Marketing, and Engineering enter:
Filter-Id=”Sales”
Filter-Id=”Marketing”
Filter-Id=”Engineering”
The filter rules for RADIUS user filter-IDs are case sensitive.
For more information, consult the RADIUS server documentation.
Configuring CRYPTOCard server authentication
To add or remove services accessible by CRYPTOCard authenticated users, add the
CRYPTOCard user or group in the individual service’s Properties dialog box, and the
IP address of the Firebox on the CRYPTOCard authentication server.
From Policy Manager:
1 Select Setup => Authentication.
The Member Access and Authentication Setup dialog box appears.
2 Under Authentication Enabled Via, click the CRYPTOCard Server option.
3Click the CRYPTOCard Server tab.
You might need to use the arrow buttons in the upper-right corner of the dialog box to bring this
tab into view.
4 Enter the IP address of the CRYPTOCard server.
5 Enter or verify the port number used for CRYPTOCard authentication.
The standard is 624.
6 Enter the administrator password.
This is the administrator password in the passwd file on the CRYPTOCard server.
7 Enter or accept the time-out in seconds.
The time-out period is the maximum amount of time, in seconds, a user can wait for the
CRYPTOCard server to respond to a request for authentication. Sixty seconds is CRYPTOCard’s
recommended time-out length.
90
 Loading...