

Page 1
I
N
T
E
G
R
A
T
E
D
A
P
P
L
I
A
N
C
E
E
X
P
A
N
D
A
B
L
E
P
L
A
T
F
O
R
M
I
N
T
E
L
L
I
G
E
N
T
L
A
Y
E
R
E
D
S
E
C
U
R
I
T
Y
I
N
T
U
I
T
I
V
E
U
S
E
R
E
X
P
E
R
I
E
N
C
E
E
X
P
E
R
T
G
U
I
D
A
N
C
E
&
S
U
P
P
O
R
T
WatchGuard®Firebox®X QuickStart Guide 2-8
WatchGuard®Firebox®X QuickStart-Anleitung 9-15
Guía de instalación rápida de WatchGuard®Firebox®X 16-22
23-29
30-36
W
Note:
Click on your language below
in the table of contents to
reach the section you need
atchGuard® Firebox® X QuickStart
WatchGuard® Firebox® X
Page 2
2
WatchGuard®Firebox®X QuickStart Guide
Getting Started
WatchGuard® Firebox® X has the security you really need. A fully integrated appliance, it contains powerful
layered network security, intuitive management and premium support through LiveSecurity Service. This
QuickStart Guide covers the initial installation of WatchGuard Firebox X. Please refer to your Hardware Guide
and User Guide for hardware specifications and comprehensive setup instructions.
Check Package Contents
✔ WatchGuard Firebox X appliance
✔ QuickStart Guide
✔ User Documentation
✔ One serial cable (blue)
✔ Ethernet crossover cable (red)
✔ Three Ethernet cables (green)
✔ Power cable
✔ WatchGuard System Manager CD
✔ License Key Certificate
Selecting a Firewall Configuration Mode
Important! Before installing the WatchGuard Firebox X, you need
to decide how to incorporate the Firebox X into your network. To
begin, select the configuration mode that most closely reflects
your existing network. There are two possible options: Routed and
Drop-in Configuration. The choices you make here will be used in step 5.
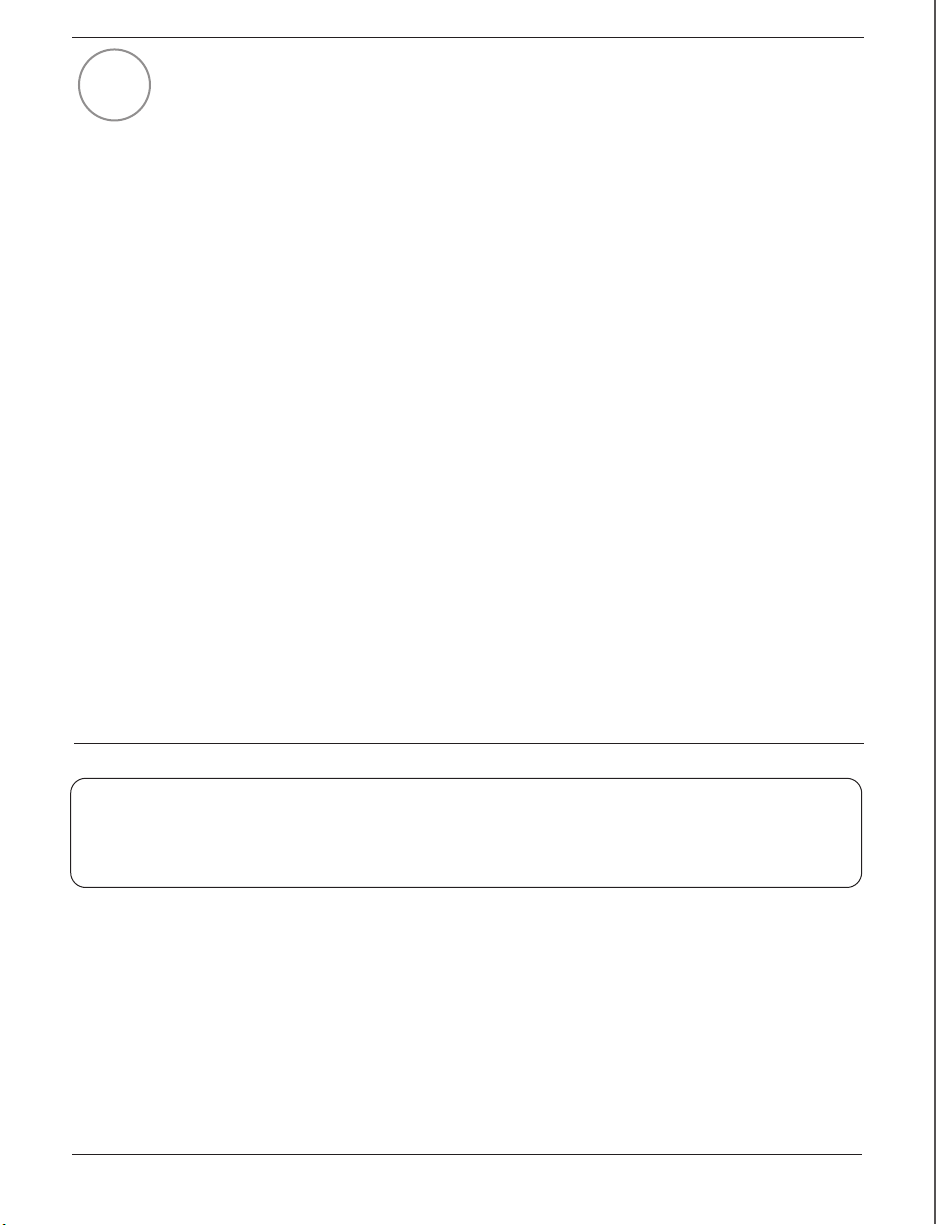
Routed Configuration (Figure 1)
This configuration is necessary when the number of
public IP addresses is limited or when you have
dynamic IP addressing on the external interface. The
Firebox is put into place with separate logical networks and separate network addresses on each of its
interfaces. Most networks are best served by a
Routed configuration. Public servers behind the
Firebox use private addresses, and traffic is routed
using network address translation.
NOTE: Please read the
entire QuickStart Guide
before beginning the install
process.
Review Steps for Installation
✔ Selecting a firewall configuration mode
✔ Gathering network information
✔ Setting up a management station
✔ Cabling the Firebox X
✔ Running the QuickSetup Wizard
✔ Deploying the Firebox X into your network
✔ Registering your LiveSecurity® Service
1
Option 1: Routed Configuration
Internet
Router
24.4.5.1/24
24.4.5.7/24
Figure 1
External
Interface
Trusted Interface
10.10.10.254
Optional Interface
192.168.10.254
Page 3

3
Drop-in Configuration (Figure 2)
This configuration is necessary when Public servers
behind the Firebox use public addresses, and traffic is
routed through the Firebox with no network address
translation. The Firebox is put in place with the same
network address on all interfaces. Because this configuration mode distributes the network’s logical address
space across the Firebox interfaces, you can “drop”
the Firebox between the router and the LAN without
reconfiguring any local machines.
Using a Secondary Network
(Figure 3)
Whether you have chosen Routed or Drop-in mode,
your configuration may require a secondary network
on the trusted interface. A secondary network is a
separate logical network connected to the Firebox
interface by a switch or hub.
Note: The IP address you declare as a secondary network becomes the default gateway for computers on
that network.
QUESTIONS
For more information about Routed or
Drop-in Configurations, please refer to the
Getting Started section of the User Guide.
FIREWALL CONFIGURATION MODE
Routed Drop-in
SECONDARY NETWORK
YES
NO
Option 2: Drop-in Configuration
Internet
Router
66.4.5.1/24
Figure 2
External
Interface
66.4.5.2/24
Trusted Interface
66.4.5.2/24
Optional Interface
66.4.5.2/24
Secondary Network
Primary
Network
Hub/
Switch
10.10.10.1
10.10.10.5
10.10.10.25
Secondary Network
Trusted Interface
10.10.10.254 (Primary)
172.16.1.254 (Secondary)
172.16.1.10
172.16.1.15
172.16.1.20
Figure 3
Page 4
4
Gathering Network Information
Use the following tables to gather network information. This material will be required for steps 4
and 6. Please keep the QuickStart guide in a secure location for future reference.
Network Addresses (refer to Figure 6)
______________ . ______________ . ______________ . ______________
Default Gateway
______________ . ______________ . ______________ . ______________ /________________
External Inter face
______________ . ______________ . ______________ . ______________ /________________
Trusted Interface (routed only)
______________ . ______________ . ______________ . ______________ /________________
Optional Interface (routed only)
______________ . ______________ . ______________ . ______________
Management Station used for installation
Firebox X Serial Number, found on the back of your Firebox under the barcode.
________________________________________________________________________________
PPP Authentication (if using PPPoE on external interface) Provided by your ISP if
it uses PPPoE.
________________________________________________________________________________
PPP Username
________________________________________________________________________________
PPP Password
Additional Optional IP Addresses (refer to Figure 6)
______________ . ______________ . ______________ . ______________ /________________
Secondary Network on the Trusted Interface
______________ . ______________ . ______________ . ______________ /________________
Mail (SMTP) Server
______________ . ______________ . ______________ . ______________ /________________
Web (HTTP) Server
______________ . ______________ . ______________ . ______________ /________________
FTP Server
2
Page 5
5
Setting Up the Management Station
You can administer the WatchGuard Firebox X from any
computer that you designate as the management station. By default, your Firebox logs will be saved to this
computer as well. Microsoft® Windows® NT/2000/XP
with Intel® Pentium® II 500 Mhz or higher is required.
25 MB hard disk space is required to install all
WatchGuard modules, plus 15 MB minimum for
log files.
To designate the management station, install the management software as follows:
1. Insert the WatchGuard System Manager CD-ROM. If the installation wizard does not appear
automatically, double-click install.exe in the root directory of the CD.
2. Click Download the Latest Software on the Firebox X Installation screen. This launches your Web browser
and connects you to the WatchGuard Website. (If you do not have an Internet connection, you can install
directly from the CD-ROM. However, you will not be eligible for support and VPN functionality until you
activate LiveSecurity Service.)
3. Follow the instructions on the screen to activate your LiveSecurity Service subscription.
4. Download the WatchGuard System Manager software. Download time will vary depending on your
connection speed.
NOTE: Make sure you write down the name and path of the file as you save it to your hard drive!
5. Execute self-extracting file, follow the screens until the “WatchGuard Firebox X Set-up:
Set-up Complete” screen.
6. By default, the QuickSetup Wizard will launch at the end of the software installation. You must first
cable the Firebox before continuing with the QuickSetup Wizard.
3
DOWNLOAD THE LATEST SOFTWARE!
ACTIVATE your LiveSecurity® Service
to get the latest version of the management station software!
www.watchguard.com/support
IMPORTANT
If you want to use virtual private networking (VPN) with IPSec, you must
download medium or strong encryption software. See the Getting Started section of the
User Guide for more information.
USING SLASH NOTATION
In slash notation, a single number indicates how many
bits of the IP address identify the network where the host
resides. A network mask of 255.255.255.0 has a slash equivalent of
8+8+8=24. For example, writing 192.168.42.23/24 is the same as
specifying the IP address 192.168.42.23 with a corresponding network mask of 255.255.255.0. Click the Help button in the
QuickSetup Wizard for more information.
Page 6
6
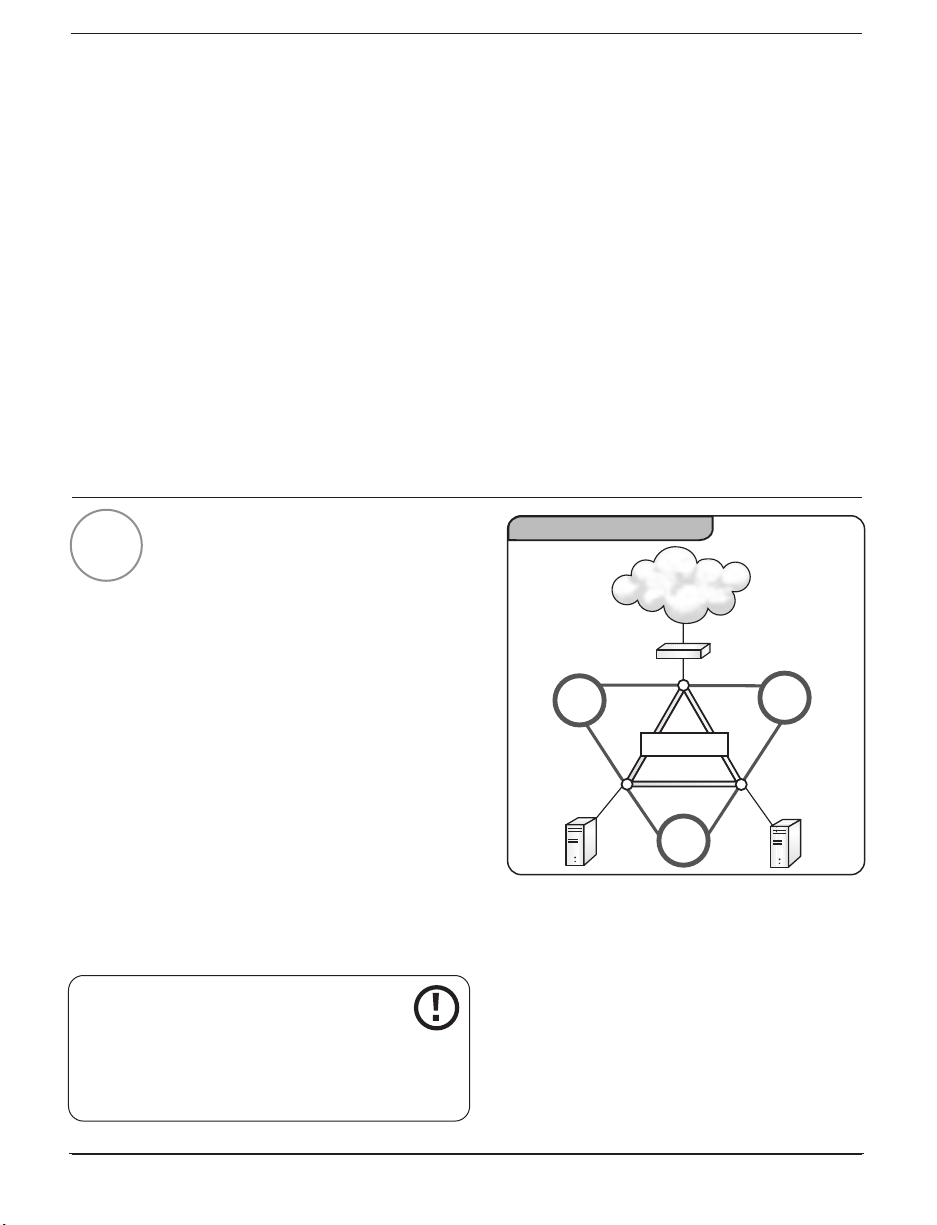
Cabling the Firebox® X
Cable the Firebox X to your management station as
follows. (Refer to Figures 4, 5, 6 and 7 below.) Note:
All Firebox ports are NIC ports, not hub ports. Refer
to Figure 5 for details on unmarked ports.
Running the QuickSetup Wizard
After you finish setting up the Management Station and
cabling the Firebox X, use the QuickSetup Wizard to
create a basic configuration file. This enables the
Firebox X to function as a simple but immediately
effective firewall.
4
IMPORTANT
To set up the Firebox X using
TCP/IP, see the Getting Started
section of the User Guide.
5
■
Only the external port is labeled on the
Firebox X. Please review highlighted areas for
the trusted ports.
■
Plug the power cord into the Firebox power
input and into a power source. Leave the
power switch ‘off’ until the end of step 6.
■
Use the blue serial cable to connect the
Firebox Serial Port (CONSOLE) to the
management station COM port.
Use the red crossover cable to connect the
Firebox trusted interface to the management
station Ethernet port. (You can disconnect
your Internet connection if necessary.)
To test your connection to
the Firebox through the
Management Software before
deploying the Firebox on your
network, see the Getting Started
section of the User Guide.
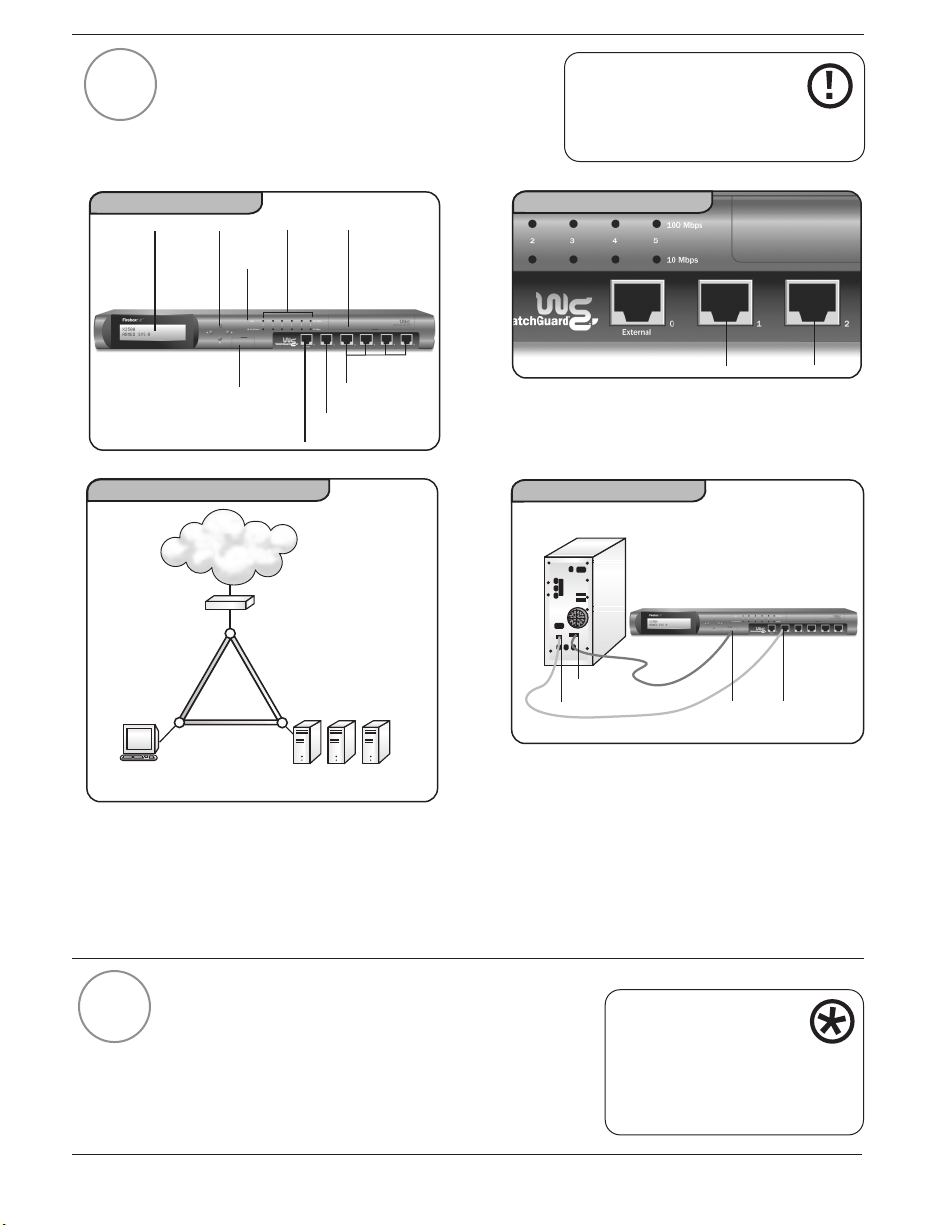
Firebox X Front Panel
LCD
Display
Network Configuration Diagram
Trusted Optional
Management
Scrolling
Buttons
Internet
Network
Port
lights
Power
Light
Console
Router (optional)
External
HTTP
Server
Trusted
Interface
External
Interface
SMTP
Server
Removable
Hard Drive Slot
Optional
Interfaces
Server
Figure 4
Figure 6
FTP
Location of trusted ports
Figure 5
Trusted
Optional
Cabling for Provisioning
Management Station PC
(back)
Firebox X (front)
COM Port
Ethernet Port
Console
Figure 7
Trusted
Page 7
7
If the QuickSetup Wizard is not already launched, launch it from the Windows desktop by selecting Start
=>Programs => WatchGuard =>QuickSetup Wizard. Provide the information as prompted by the
QuickSetup Wizard, referring to the tables and choices in steps 1 and 2 of this guide. Please note the
following:
■
IP Addressing
When entering an IP address, type the digits, periods,
and slashes in sequence. Do not use the Tab or Arrow
keys to jump past the periods.
■
Secondary “Non-routed” Networks
The QuickSetup Wizard checkbox labeled “I have an
additional non-routed network behind my Firebox”
refers to the Secondary Network on the Trusted
Interface entry in the network
configuration table in Step 3.
When you see the “Firebox Basic Configuration Complete” dialog box in the WatchGuard QuickSetup Wizard,
you have successfully completed the installation of your Firebox.
Deploying the Firebox® X
into Your Network
The Firebox X can now be used as a basic firewall with the following properties:
■
All outgoing traffic is allowed.
■
All incoming traffic is blocked unless you specified
a server in the QuickSetup Wizard.
■
Logs are sent to the WatchGuard Security Event
Processor on the Management Station.
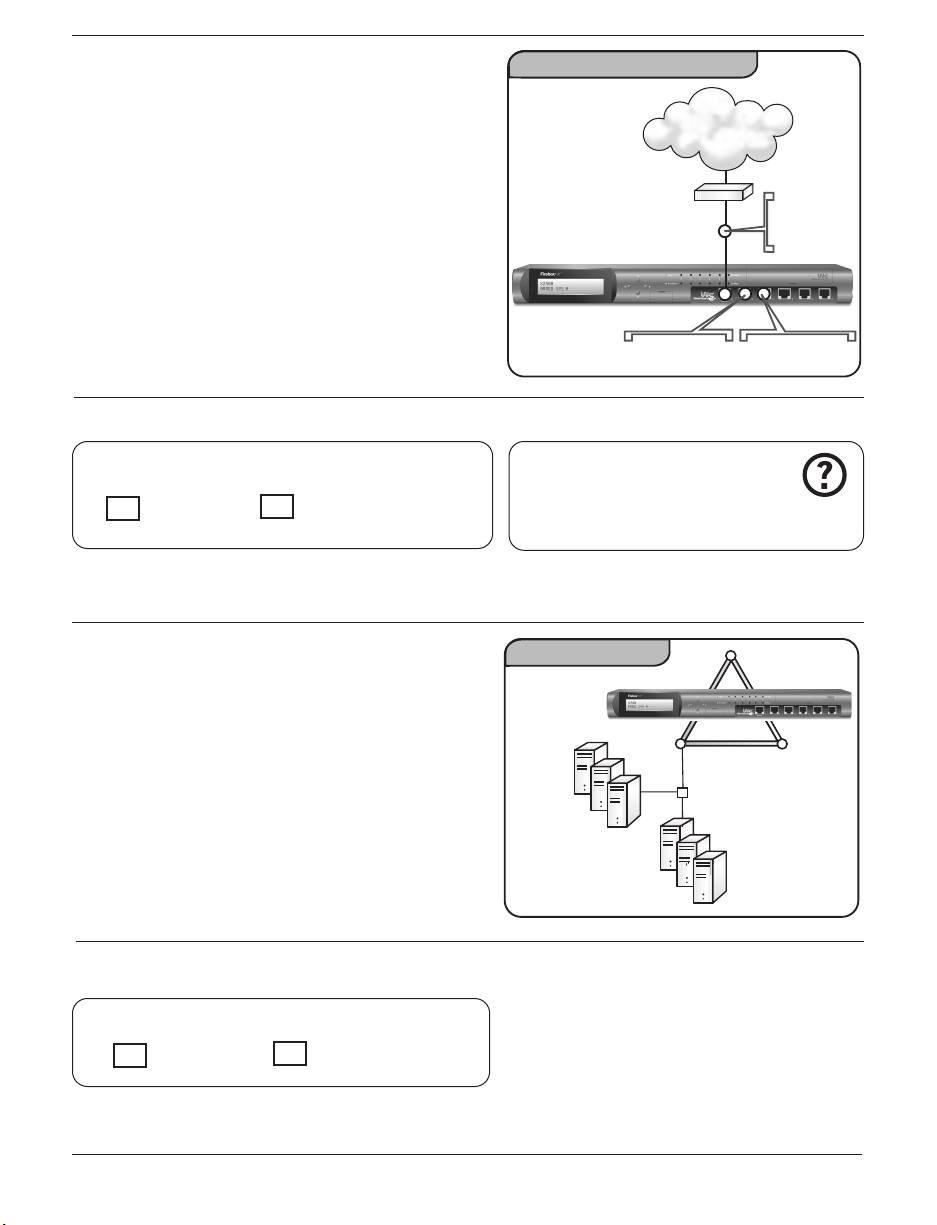
Deploy the Firebox X into your network
■
Place the Firebox in its permanent location.
■
Connect the Firebox to your network.
NOTE: Be sure to avoid the network deployment
errors shown in Figure 8.
■
Change the default gateway setting on all
desktops connected behind the Firebox Trusted
or Optional interfaces.
■
Passphrases
Passphrases are case-sensitive and must be
at least seven characters long. They can be
any combination of letters, numbers, and
special characters. You will create two
passphrases. The status passphrase is used to
establish read-only connections to the
Firebox. The configuration passphrase is used
to establish read/write connections to
the Firebox.
6
Beware of inadvertently connecting Firebox
interfaces to one another; for example by
connecting them to the same hub or switch. This
is known as a “Looped Configuration” and will
bypass all firewalling capabilities, rendering
your Firebox useless.
IMPORTANT
The configuration file created using the QuickSetup
Wizard is a basic configuration. You should now
create a configuration file that meets your security policy
needs. Please refer to the Getting Started section of the
User Guide to begin this process.
Network Deployment Error
Internet
NO!
Router
External
Interface
Figure 8
NO!
WARNING!
Trusted
Interface
Optional
Interface
NO!
Page 8
8
What’s Next?
Congratulations! You have successfully installed, configured, and deployed your new Firebox X on
your network. What’s next? Below are some things to remember as a new customer.
Customizing your security policy
You customize your security policy by adding services—application layer filters (called proxies) and packet filters—that broaden or restrict what you allow in and out of your firewall. Every service brings trade-offs
between network security and accessibility. When selecting services, balance the needs of your organization
with the requirement that computer assets be protected from attack. Some common services that organizations typically add are the following:
■
HTTP (Web Service)
■
SMTP (Email Service)
■
DNS (Domain Name Service)
■
FTP (File Transfer Service)
Set up Added Services
Please refer to the “Types of Services” chapter of the Reference Guide for a comprehensive list of services you
can add, and the “Configuring Filtered Services” and “Configuring Proxied Services” chapters of the User Guide
to learn more about adding services such as SpamScreen or WebBlocker and application layer filters.
What to Expect from Your LiveSecurity® Service
Your Firebox X includes a subscription to our award-winning LiveSecurity® Service. Your subscription:
✔ Provides up-to-date network protection with the latest software upgrades.
✔ Solves problems with comprehensive technical support including step-by-step tutorials and Frequently
Asked Questions (FAQs).
✔ Reduces downtime with alerts and configuration tips to combat the newest threats and vulnerabilities.
✔ Develops your expertise with detailed interactive training resources.
✔ Keeps you prepared for upcoming security threats with editorials and analysis from industry experts.
✔ Extends your network security with bundled software, utilities, and special offers.
7
+1.206.613.0456
(all other countries)
www.watchguard.com/support
Technical Support
1.877.232.3531
(U.S. and Canada)
Page 9

9
WatchGuard®Firebox®X QuickStart-Anleitung
Getting Started
Die WatchGuard® Firebox® X ist ein vollständig integriertes Gerät und vereint leistungsstarke mehrschichtige
Netzwerksicherheit, intuitive Verwaltung und erstklassigen Support durch den LiveSecurity® Service. Diese
QuickStart-Anleitung beschreibt die Erstinstallation der WatchGuard Firebox X. Weitere Informationen zu den
Hardware-Spezifikationen sowie umfassende Installationsanweisungen finden Sie im Hardware Guide und im
User Guide.
Checkliste: Verpackungsinhalt
✔ WatchGuard Firebox X (Gerät)
✔ QuickStart-Anleitung
✔ Benutzerdokumentation
✔ 1 serielles Kabel (blau)
✔ Ethernet-Patchkabel, gekreuzt (rot)
✔ 3 Ethernet-Patchkabel (grün)
✔ Netzkabel
✔ WatchGuard System Manager-CD
✔ LiveSecurity® Service Key Dokument
Firewall-Konfigurationsmodus auswählen
Wichtig! Vor der Installation müssen Sie festlegen, wie die
Firebox X in Ihr Netzwerk integriert werden soll. Wählen Sie
zunächst den Konfigurationsmodus, der Ihrem vorhandenen
Netzwerk am besten entspricht. Es sind zwei Konfigurationsoptionen möglich: Routed und Drop-in. Die von Ihnen hier
gewählten Optionen kommen in Schritt 5 zum Einsatz.
Routed-Konfiguration (Abb. 1)
Diese Konfiguration ist erforderlich, wenn die Anzahl
der öffentlichen IP-Adressen begrenzt ist oder wenn
Sie an der externen Schnittstelle eine dynamische IPAdressierung einsetzen. Die Firebox wird dann für
jede ihrer Schnittstellen mit separaten logischen
Netzwerken und separaten Netzwerkadressen
konfiguriert. Für die meisten Netzwerke ist die
Routed-Konfiguration am besten geeignet.
Öffentliche Server hinter der Firebox verwenden
private Adressen, und der Datenverkehr wird über
NAT (Network Address Translation – Übersetzung von
Netzwerkadressen) geroutet.
HINWEIS: Bitte lesen Sie
die gesamte QuickStartAnleitung, bevor Sie mit dem
Installationsvorgang
beginnen.
Checkliste: Installationsschritte
✔ Firewall-Konfigurationsmodus auswählen
✔ Netzwerkinformationen zusammenstellen
✔ Management Station einrichten
✔ Firebox X anschließen
✔ QuickSetup-Assistenten ausführen
✔ Firebox X im Netzwerk einsetzen
✔ LiveSecurity® Service registrieren
1
Option 1: Routed-Konfiguration
Internet
Router
24.4.5.1/24
Sichere Schnittstelle
10.10.10.254
Optionale Schnittstelle
192.168.10.254
Abb. 1
Externe
Schnittstelle
24.4.5.7/24
Page 10
10
Drop-in-Konfiguration (Abb. 2)
Diese Konfiguration ist erforderlich, wenn öffentliche
Server hinter der Firebox öffentliche Adressen
verwenden und der Datenverkehr ohne NAT durch die
Firebox geroutet werden muss. Die Firebox wird dann
für jede ihrer Schnittstellen mit derselben
Netzwerkadresse konfiguriert. Da bei diesem
Konfigurationsmodus der logische Adressraum des
Netzwerks auf die Firebox-Schnittstellen verteilt wird,
können Sie die Firebox zwischen dem Router und dem
LAN ohne Neukonfigurieren der lokalen Computer
einfügen.
Sekundäres Netzwerk verwenden
(Abb. 3)
Unabhängig vom gewählten Modus benötigt Ihre
Konfiguration möglicherweise ein sekundäres
Netzwerk an der sicheren Schnittstelle. Ein
sekundäres Netzwerk ist ein separates logisches
Netzwerk, das an die Firebox-Schnittstelle über einen
Switch oder Hub angeschlossen ist.
Hinweis: Die IP-Adresse, die Sie als sekundäres
Netzwerk deklarieren, wird das Standardgateway für
die Computer in diesem Netzwerk.
FRAGEN
Weitere Informationen zum Routedund zum Drop-in-Modus finden Sie im
Abschnitt „Getting Started“ des User Guide.
FIREWALL-KONFIGURATIONSMODUS
Routed-Modus Drop-in-Modus
SEKUNDÄRES NETZWERK
JA
NEIN
Option 1: Drop-in-Konfiguration
Internet
Router
66.4.5.1/24
Abb. 2
Externe
Schnittstelle
66.4.5.2/24
Sichere Schnittstelle
66.4.5.2/24
Optionale Schnittstelle
66.4.5.2/24
Sekundäres Netzwerk
Primäres
Netzwerk
Hub/
Switch
10.10.10.1
10.10.10.5
10.10.10.25
Sekundäres Netzwerk
Sichere Schnittstelle
10.10.10.254 (Primär)
172.16.1.254 (Sekundär)
172.16.1.10
172.16.1.15
172.16.1.20
Abb. 3
Page 11
11
Netzwerkinformationen zusammenstellen
Verwenden Sie die folgenden Tabellen, um die Netzwerkinformationen zusammenzustellen. Diese
Angaben werden für die Schritte 4 und 6 benötigt. Bewahren Sie die QuickStart-Anleitung an
einem sicheren Ort auf, um später darauf zurückgreifen zu können.
Netzwerkadressen (siehe Abb. 6)
______________ . ______________ . ______________ . ______________
Standardgateway
______________ . ______________ . ______________ . ______________ /________________
Externe Schnittstelle
______________ . ______________ . ______________ . ______________ /________________
Sichere Schnittstelle (im Routed Mode)
______________ . ______________ . ______________ . ______________ /________________
Optionale Schnittstelle (im Routed Mode)
______________ . ______________ . ______________ . ______________
Management Station für die Installation
Seriennummer der Firebox X (an der Geräterückseite unterhalb des Barcodes)
________________________________________________________________________________
PPP-Authentifizierung (bei Verwendung von PPPoE über externe Schnittstelle): Vom ISP
bereitgestellt, falls PPPoE verwendet wird
________________________________________________________________________________
PPP-Benutzername
________________________________________________________________________________
PPP-Kennwort
Zusätzliche optionale IP-Adressen (siehe Abb. 6)
______________ . ______________ . ______________ . ______________ /________________
Sekundäres Netzwerk an der sicheren Schnittstelle
______________ . ______________ . ______________ . ______________ /________________
Mail-Server (SMTP)
______________ . ______________ . ______________ . ______________ /________________
Web-Server (HTTP)
______________ . ______________ . ______________ . ______________ /________________
FTP-Server
2
Page 12
12
Management Station einrichten
Sie können einen beliebigen Computer als Management
Station für die WatchGuard Firebox X konfigurieren.
Auf diesem Computer werden standardmäßig auch die
Firebox-Protokolle gespeichert. Zu den
Systemvoraussetzungen gehören Microsoft® Windows®
NT/2000/XP und ein Intel® Pentium® II-Prozessor mit
500 MHz oder höher. Für die Installation aller
WatchGuard-Module werden 25 MB Festplattenspeicher
benötigt sowie zusätzlich mindestens 15 MB für Protokolldateien.
So installieren Sie die Verwaltungssoftware auf der gewählten Management Station:
1. Legen Sie die WatchGuard System Manager CD-ROM ein. Wenn der Installationsassistent nicht automatisch
startet, doppelklicken Sie im Stammverzeichnis der CD auf „install.exe“.
2. Klicken Sie im Installationsbildschirm der Firebox X auf „Download the Latest Software“. Hierdurch wird Ihr
Webbrowser gestartet und eine Verbindung zur WatchGuard-Website hergestellt. (Wenn Sie keinen
Internetzugriff haben, können Sie die Installation direkt von der CD-ROM ausführen. Allerdings verfügen Sie
erst nach der Registrierung des LiveSecurity® Service über Zugriff auf den Support und die VPN-Funktionalität.)
3. Folgen Sie den Bildschirmanweisungen zum Aktivieren Ihres LiveSecurity® Service-Abonnements.
4. Laden Sie die WatchGuard System Manager-Software herunter. Die Downloadzeit hängt von Ihrer
Verbindungsgeschwindigkeit ab.
HINWEIS: Notieren Sie sich den Namen und den Pfad, unter denen die Datei auf der Festplatte gespeichert
wird!
5. Verwenden Sie die selbstausführbare Datei und folgen Sie den Bildschirmanweisungen, bis der Bildschirm
„WatchGuard Firebox X Set-up: Set-up Complete“ angezeigt wird.
6. Nach Abschluss der Softwareinstallation wird standardmäßig der QuickSetup-Assistent gestartet. Bevor Sie
mit dem QuickSetup-Assistenten fortfahren können, müssen Sie die Firebox anschließen.
3
LADEN SIE DIE NEUESTE SOFTWARE
HERUNTER!
AKTIVIEREN Sie den LiveSecurity®
Service, um die neueste Version der
Management Station-Software zu
erhalten!
www.watchguard.com/support
WICHTIG
Wenn Sie virtuelle private Netzwerke
(VPN) mit IPSec verwenden möchten,
müssen Sie eine Verschlüsselungssoftware mit
mittlerer oder starker Verschlüsselung
herunterladen. Weitere Informationen finden
Sie im Abschnitt „Getting Started“ des User
Guide.
SLASH-NOTATION
Bei der Slash-Notation wird durch eine einzelne Zahl
angegeben, wie viele Bits in dem Netzwerk, in dem sich
der Host befindet, für den Netzanteil der IP-Adressen reserviert
sind. Die Netzwerkmaske 255.255.255.0 hat in der Slash-Notation
die Entsprechung 8+8+8=24. Beispielsweise entspricht die
Adressschreibweise 192.168.42.23/24 der IP-Adresse 192.168.42.23
mit der zugehörigen Netzwerkmaske 255.255.255.0. Um weitere
Informationen anzuzeigen, klicken Sie im QuickSetup-Assistenten
auf die Hilfeschaltfläche.
Page 13

13
Firebox® X anschließen
So schließen Sie die Firebox X an die Management Station
an. (Siehe Abbildungen 4, 5, 6 und 7 unten.) Hinweis: Alle
Firebox-Anschlüsse sind NIC-Anschlüsse (Endgeräte), keine
Hub-Anschlüsse. Details zu den nicht gekennzeichneten
Anschlüssen können Sie Abbildung 5 entnehmen.
QuickSetup-Assistenten ausführen
Nach erfolgtem Einrichten der Management Station und
Anschließen der Firebox X verwenden Sie den QuickSetupAssistenten, um eine grundlegende Konfigurationsdatei zu
erstellen. Hierdurch kann die Firebox X als einfache, aber
sofort wirksame Firewall eingesetzt werden.
4
WICHTIG
Im Abschnitt „Getting Started“
des User Guide wird
beschrieben, wie Sie die Firebox X mit
TCP/IP einrichten.
5
■
Auf der Firebox X ist nur der externe
Anschluss beschriftet. Die sicheren Anschlüsse
sind in der Abbildung hervorgehoben.
■
Schließen Sie das Netzkabel am
Netzspannungseingang der Firebox und an
einer Netzsteckdose an. Lassen Sie den
Netzschalter bis zum Abschluss von Schritt 6
ausgeschaltet.
■
Verbinden Sie unter Verwendung des blauen
seriellen Kabels den seriellen Anschluss der
Firebox (CONSOLE) mit dem COM-Anschluss
der Management Station.
Verbinden Sie mit dem roten gekreuzten
Patchkabel die sichere Schnittstelle der
Firebox mit dem Ethernet-Anschluss der
Management Station. (Unterbrechen Sie
gegebenenfalls Ihre Internet-Verbindung.)
Im Abschnitt „Getting
Started“ des User Guide wird
beschrieben, wie Sie die
Verbindung zur Firebox über die
Verwaltungssoftware testen,
bevor Sie die Firebox in Ihrem
Netzwerk einsetzen.
Vorderseite der Firebox X
LCDDisplay
Menütasten
Netzleuchte
NetzanschlussLeuchten
Abb. 4
Steckplatz für
Wechselfestplatte
Anordnung der sicheren Anschlüsse
Optionale
Externe
Schnittstelle
HTTP-
Schnittstelle
Sichere
Schnittstelle
SMTPServer
Server
FTP-
Konsole
Netzwerk-Konfigurationsdiagramm
Internet
Router (optional)
Extern
Sicher Optional
Verwaltung
Server
Abb. 6
Abb. 5
Sicher
Optional
Anschlussverkabelung
Management Station-PC
(Rückseite)
Firebox X (Vorderseite)
COMAnschluss
Ethernet-Anschluss
Konsole
Abb. 7
Sicher
Page 14

14
Ist der QuickSetup-Assistent noch nicht gestartet, starten Sie ihn über den Windows-Desktop, indem Sie
Start => Programme => WatchGuard => QuickSetup Wizard wählen. Geben Sie die vom QuickSetup-
Assistenten angeforderten Informationen ein, entsprechend den Tabellen und Optionen zu den Schritten 1 und
2 in dieser Anleitung. Beachten Sie die folgenden Punkte:
■
IP-Adressierung
Geben Sie bei IP-Adressen die Ziffern, Punkte und
Schrägstriche in kontinuierlicher Folge ein. Verwenden
Sie nicht die Tabulatortaste oder die Pfeiltasten, um
die Punkte zu überspringen.
■
Sekundäre „nicht geroutete“ Netzwerke
Das Kontrollkästchen „I have an additional non-routed
network behind my Firebox“ des QuickSetup-Assistenten
bezieht sich auf die Angabe zum sekundären Netzwerk
an der sicheren Schnittstelle in der NetzwerkKonfigurationstabelle aus Schritt 3.
Wird im WatchGuard QuickSetup-Assistenten das Dialogfeld
„Firebox Basic Configuration Complete“ angezeigt, ist die Installation der Firebox erfolgreich abgeschlossen.
Firebox®X im Netzwerk
einsetzen
Die Firebox X kann jetzt als einfache Firewall mit den
folgenden Eigenschaften eingesetzt werden:
■
Jeglicher ausgehender Datenverkehr wird zugelassen.
■
Jeglicher eingehender Datenverkehr wird gesperrt,
solange Sie im QuickSetup-Assistenten keinen Server
angegeben haben.
■
Protokolle werden an den WatchGuard Security Event
Processor der Management Station gesendet.
So setzen Sie die Firebox X in Ihrem Netzwerk ein:
■
Stellen Sie die Firebox am gewünschten
Installationsort auf.
■
Schließen Sie die Firebox an Ihrem Netzwerk an.
HINWEIS: Achten Sie darauf, fehlerhafte
Netzwerkanschlüsse (wie beispielsweise in
Abbildung 8 gezeigt) zu vermeiden.
■
Ändern Sie die Standardgateway-Einstellung auf allen
Desktop-Systemen, die hinter der Firebox an die sichere
oder die optionale Schnittstelle angeschlossen sind.
■
Kennwörter
Bei Kennwörtern wird die Groß-/Kleinschreibung berücksichtigt. Sie müssen
mindestens sieben Zeichen lang sein und
können aus einer beliebigen Kombination von
Buchstaben, Ziffern und Sonderzeichen
bestehen. Sie müssen zwei Kennwörter
festlegen. Das Statuskennwort dient zum
Herstellen schreibgeschützter Verbindungen
zur Firebox. Das Konfigurationskennwort dient
zum Herstellen lese- und schreibberechtigter
Verbindungen zur Firebox.
6
Achten Sie darauf, die Firebox-Schnittstellen
nicht versehentlich miteinander zu verbinden,
indem Sie sie beispielsweise an denselben Hub
oder Switch anschließen. Diese Struktur wird
„Schleifenkonfiguration“ genannt und führt zu
einer Überbrückung aller Firewall-Funktionen,
wodurch die Firebox wirkungslos wird.
WICHTIG
Die mit dem QuickSetup-Assistenten erstellte
Konfigurationsdatei bietet lediglich eine
grundlegende Konfiguration. Sie sollten jetzt eine
Konfigurationsdatei erstellen, die Ihren Sicherheitsrichtlinien
entspricht. Im Abschnitt „Getting Started“ des User Guide
wird dieser Vorgang näher beschrieben.
Fehlerhafte Netzwerkanschlüsse
Internet
Externe
FALSCH!
Schnittstelle
Router
Abb. 8
FALSCH!
WARNUNG!
Sichere
Schnittstelle
FALSCH!
Optionale
Schnittstelle
Page 15

Und wie geht es weiter?
Herzlichen Glückwunsch! Sie haben Ihre neue Firebox X erfolgreich installiert, konfiguriert und in
Ihrem Netzwerk eingesetzt. Und wie geht es jetzt weiter? Nachfolgend einige Punkte, die Sie als
neuer Kunde beachten sollten.
Sicherheitsrichtlinien anpassen
Sie passen Ihre Sicherheitsrichtlinie an, indem Sie Services hinzufügen. Das sind Filter auf Anwendungsebene
(auch Proxies genannt) sowie Paketfilter, die den über die Firewall ein- und ausgehenden Datenverkehr
erweitern oder beschränken. Jeder Service führt einen Kompromiss zwischen Netzwerksicherheit und
Zugriffsmöglichkeiten mit sich. Wägen Sie bei der Auswahl von Services die Bedürfnisse Ihrer Organisation mit
der Notwendigkeit ab, Ihr Computerinventar vor Angriffen zu schützen. Zu den üblichen Services, die
Organisationen in der Regel hinzufügen, gehören:
■
HTTP (Web-Service)
■
SMTP (E-Mail-Service)
■
DNS (Domain Name Service)
■
FTP (File Transfer Service)
Hinzugefügte Services einrichten
Im Kapitel „Types of Services“ des Reference Guide finden Sie eine umfassende Liste der Services, die Sie
hinzufügen können. In den Kapiteln „Configuring Filtered Services“ und „Configuring Proxied Services“ des User
Guide finden Sie weitere Informationen zum Hinzufügen von Services (wie z. B. SpamScreen oder WebBlocker)
sowie von Filtern auf Anwendungsebene.
Vorteile des LiveSecurity® Service
Zu Ihrer Firebox X erhalten Sie ein Abonnement unseres mehrfach ausgezeichneten LiveSecurity® Service. Ihr
Abonnement bietet:
✔ Netzwerkschutz auf dem neuesten Stand durch Aktualisierungen auf die neuesten Softwareversionen.
✔ Problemlösungen durch umfassenden technischen Support, interaktive Lernprogramme und FAQs (Frequently
Asked Questions).
✔ Verringerte Ausfallzeiten durch Alarmmeldungen und Konfigurationstipps zur Abwehr der neuesten
Bedrohungen und Anfälligkeiten.
✔ Spezifische Weiterbildung durch ausführliches interaktives Schulungsmaterial.
✔ Vorbereitung auf neue Sicherheitslücken durch Expertenartikel und Analysen von Fachleuten.
✔ Erweiterung Ihrer Netzwerksicherheit durch Softwarepakete, Dienstprogramme und Sonderangebote.
15
7
+1 206 613 0456
(alle anderen Länder)
www.watchguard.com/support
Technischer Support
+1 877 232 3531
(USA und Kanada)
Page 16

16
Guía de instalación rápida de WatchGuard®Firebox®X
Introducción
WatchGuard® Firebox® X es un dispositivo que contiene poderosos niveles de seguridad para redes, una fácil
gestión y asistencia de primera a través del servicio LiveSecurity. Esta guía rápida describe la instalación inicial
de WatchGuard Firebox X. Consulte las guías del hardware y del usuario para conocer las especificaciones de
hardware y para tener acceso a instrucciones de configuración detalladas.
Verificación del contenido del paquete
✔ Dispositivo WatchGuard Firebox X
✔ Guía de instalación rápida
✔ Documentación para el usuario
✔ Un cable serial (azul)
✔ Cable Ethernet cruzado (rojo)
✔ Tres cables Ethernet (verdes)
✔ Cable de alimentación eléctrica
✔ CD WatchGuard System Manager
✔ Certificado con código de licencia
Selección del modo de configuración del
Firewall
¡Importante! Antes de instalar WatchGuard Firebox X, debe decidir
cómo incorporarlo a la red. Empiece seleccionando el modo de
configuración que sea más adecuado para la red existente. Hay
dos opciones disponibles: Configuraciones Routed mode y Drop-in
mode. Las selecciones que realice en este paso se utilizarán en el
paso 5.
Configuración Routed mode
(Figura 1)
Esta configuración es necesaria si el número de
direcciones IP públicas es limitado o si su proveedor
de Internet le da un direccionamiento IP dinámico en
la interfaz External. El Firebox se ubica en redes
lógicas independientes y con direcciones de red
separadas en cada una de las interfaces. La
configuración Routed mode es la que mejor responde
en la mayoría de las redes. Los servidores públicos
conectados al Firebox utilizan direcciones privadas y
el tráfico se dirige mediante la traducción de
direcciones de red (NAT).
NOTA: Lea la guía de
instalación rápida por
completo antes de
comenzar con el proceso de
instalación.
Revisión de los pasos necesarios para la instalación
✔ Selección de un modo de configuración para el
Firewall
✔ Recopilación de información de su red
✔ Configuración de una estación de gestión
✔ Conexión de los cables al Firebox X
✔ Ejecución del programa QuickSetup Wizard
✔ Implementación del Firebox X en su red
✔ Registro del servicio LiveSecurity®
1
Opción 1: Configuración Routed mode
Internet
Ruteador
24.4.5.1/24
Interfaz Trusted
10.10.10.254
Figura 11
Interfaz
External
24.4.5.7/24
Interfaz Optional
192.168.10.254
Page 17

Configuración Drop-in mode
(Figura 2)
Esta configuración es necesaria si los servidores
públicos conectados al Firebox utilizan direcciones
públicas y el tráfico se dirige a través del dispositivo
sin que se traduzcan las direcciones de red. El Firebox
utiliza la misma dirección de red en todas las
interfaces. Ya que este modo de configuración
distribuye las direcciones lógicas de la red en las
interfaces del Firebox, puede "colocar" el Firebox entre
el ruteador y la LAN sin volver a configurar los
computadores internos en la red.
Uso de una red secundaria
(Figura 3)
Tanto si ha seleccionado el modo Routed o Drop-in,
puede que su configuración necesite una red
secundaria en la interfaz Trusted. Una red secundaria
es una red lógica independiente conectada a la
interfaz del Firebox mediante un switch o hub.
Nota: La dirección IP que defina como red secundaria
pasará a ser la ruta de salida de los computadores de
esa red.
17
PREGUNTAS
Para obtener más información sobre las
configuraciones Routed mode o Drop-in
mode, consulte la sección Getting Started de la guía
del usuario.
MODO DE CONFIGURACIÓN DEL FIREWALL
Routed mode Drop-in mode
RED SECUNDARIA
SÍ
NO
Opción 2: Configuración Drop-in mode
Internet
Ruteador
66.4.5.1/24
Interfaz Trusted
66.4.5.2/24
Interfaz Optional
Figura 2
Interfaz
External
66.4.5.2/24
66.4.5.2/24
Red secundaria
Red
Primaria
10.10.10.1
10.10.10.5
10.10.10.25
Red secundaria
Hub/
Switch
Interfaz Trusted
10.10.10.254 (Primaria)
172.16.1.254 (Secundaria)
172.16.1.10
172.16.1.15
Figura 3
172.16.1.20
Page 18

18
Recopilación de información de la red
Utilice las siguientes tablas para recopilar información de la red. Necesitará este material de
referencia en los pasos 4 y 6. Tenga la guía de instalación rápida a mano por si la vuelve a
necesitar.
Direcciones de red (consulte la Figura 6)
______________ . ______________ . ______________ . ______________
Ruta de salida (Default Gateway)
______________ . ______________ . ______________ . ______________ /________________
Interfaz External
______________ . ______________ . ______________ . ______________ /________________
Interfaz Trusted (sólo en modo routed)
______________ . ______________ . ______________ . ______________ /________________
Interfaz Optional (sólo en modo routed)
______________ . ______________ . ______________ . ______________
Estación de gestión usada para la instalación
Número de serie del Firebox X, ubicado en la parte posterior del dispositivo bajo el código
de barras.
________________________________________________________________________________
Autenticación PPP (si utiliza PPPoE en la interfaz External); proporcionado por el proveedor
ISP si utiliza PPPoE.
________________________________________________________________________________
Nombre del usuario de PPP
________________________________________________________________________________
Contraseña de PPP
Direcciones IP opcionales adicionales (consulte la Figura 6)
______________ . ______________ . ______________ . ______________ /_______________
Red secundaria en la interfaz Trusted
______________ . ______________ . ______________ . ______________ /________________
Servidor de correo (SMTP)
______________ . ______________ . ______________ . ______________ /________________
Servidor Web (HTTP)
______________ . ______________ . ______________ . ______________ /________________
Servidor FTP
2
Page 19

19
Configuración de una estación de
gestión
Puede administrar el WatchGuard Firebox X desde
cualquier computador previamente definido como
estación de gestión. Así, los registros de logs del Firebox
se guardarán también en el computador de forma
predeterminada. Se necesita Microsoft® Windows®
NT/2000/XP con Intel® Pentium® II 500 MHz o superior,
25 MB de espacio en el disco duro es requerido para
instalar todos los módulos de WatchGuard y 15 MB como
mínimo para los archivos de logs.
Para definir la estación de gestión, instale el software correspondiente conforme al siguiente
procedimiento:
1. Inserte el CD-ROM WatchGuard System Manager. Si el asistente de instalación no se inicia de forma
automática, haga doble click en install.exe en el directorio raíz del CD.
2. Haga click en Download the Latest Software en la pantalla de instalación del Firebox X para descargar el
software más actualizado. De esta forma, se iniciará el navegador Web y se establecerá la conexión con el
sitio Web de WatchGuard. (Si no dispone de conexión a Internet, puede instalar directamente desde el
CD-ROM. No obstante, no podrá optar al servicio de asistencia ni de la funcionalidad VPN hasta que
active el servicio LiveSecurity.)
3. Siga las instrucciones de la pantalla para activar la suscripción al servicio LiveSecurity.
4. Descargue el software WatchGuard System Manager. El tiempo de descarga depende de la velocidad de la
conexión.
NOTA: Asegúrese de anotar el nombre y la ruta del archivo cuando lo guarde en el disco duro.
5. Ejecute el archivo de descompresión automática y avance por las pantallas hasta que aparezca el mensaje
“WatchGuard Firebox X Set-up: Set-up Complete”, indicativo de que la instalación se ha completado.
6. De forma predeterminada, el QuickSetup Wizard se iniciará una vez concluida la instalación del software.
Antes de continuar con el QuickSetup Wizard, deberá conectar los cables del Firebox.
3
DESCARGUE EL SOFTWARE MÁS
RECIENTE
ACTIVE el servicio LiveSecurity® para
conseguir las versiones más recientes
del software de la estación de gestión.
www.watchguard.com/support
IMPORTANTE
Si desea utilizar redes privadas virtuales
(VPN) con IPSec, deberá descargar el
software con encriptación media o alta.
Consulte la sección Getting Started de la guía
del usuario para obtener más información.
CÓMO UTILIZAR LA ANOTACIÓN CON BARRAS (/)
En la anotación con barras, un número simple indica
cuántos bits de la dirección IP identifican a la red en la
que se ubica el host. Una máscara de red de 255.255.255.0 tiene
un equivalente en barras de 8+8+8=24. Por ejemplo, escribir
192.168.42.23/24 es lo mismo que especificar la dirección IP
192.168.42.23 con la máscara de red correspondiente
255.255.255.0. Haga click en el botón Help del QuickSetup Wizard
para obtener más información.
Page 20

20
Conexión de los cables del
Firebox® X
Conecte el cable del Firebox X a la estación de
gestión como se indica a continuación. (Consulte las
figuras 4, 5, 6 y 7.) Nota: Los puertos del Firebox son
puertos NIC, no de hub. Consulte la Figura 5 para
obtener más datos sobre los puertos no marcados.
Ejecución del programa QuickSetup
Wizard
Una vez configurada la estación de gestión y conectados
los cables al Firebox, recurra al QuickSetup Wizard para
crear un archivo de configuración básico. Firebox X podrá
funcionar como un Firewall sencillo y eficaz.
4
IMPORTANTE
Para configurar Firebox X
utilizando TCP/IP, consulte la
sección Getting Started de la guía del
usuario.
5
■
El único puerto identificado en el Firebox X es
el puerto External. Examine las áreas
resaltadas para localizar los puertos de
confianza.
■
Conecte el cable de alimentación eléctrica a
la entrada correspondiente del dispositivo
Firebox y a la toma de corriente. Deje el
interruptor de encendido en la posición de
apagado hasta que termine el paso 6.
■
Utilice el cable serial azul para conectar el
puerto serial del Firebox (CONSOLA) al puerto
COM de la estación de gestión. Utilice el
cable rojo cruzado para conectar el puerto
Trusted del Firebox al puerto Ethernet de la
estación de gestión. (Puede cerrar la conexión
a Internet en caso necesario.)
Para probar la conexión del
Firebox a través del software
de gestión antes de
implementar el dispositivo en la
red, consulte la sección Getting
Started de la guía del usuario.
Panel frontal del Firebox X
Panel LCD
desplazamiento
Diagrama de la configuración de la red
Trusted
Gestión
Luz de
encendido
Botones de
Internet
Luces de
los puertos
de la red
Puerto de
Consola
(Serial)
Ruteador (opcional)
External
Optional
Servidor
HTTP
Interfaz
Trusted
Interfaz
External
Servidor
SMTP
Figura 4
Ranura para el
disco duro
removible
Interfaz
Optional
Figura 6
Servidor
FTP
Ubicación de los puertos de confianza
Figura 5
Trusted
Optional
Cableado para aprovisionamiento
PC de la estación de gestión
(parte posterior)
Firebox X (parte delantera)
Puerto
COM
Puerto Ethernet
Puerto
Consola
Figura 7
Puerto
Trusted
Page 21

21
Si el QuickSetup Wizard no se abre, inícielo desde el escritorio de Windows seleccionando Inicio =>Programas
=> WatchGuard =>QuickSetup Wizard. Indique la información que el QuickSetup Wizard vaya solicitando
según los datos recogidos en las tablas y las selecciones realizadas en los pasos 1 y 2 de esta guía. Tenga
en cuenta lo siguiente:
■
Direccionamiento IP
Al introducir una dirección IP, teclee los números,
puntos y barras de la secuencia. No utilice las teclas
de tabulación o de flecha para pasar los puntos.
■
Redes secundarias "no enrutadas"
La casilla de verificación del QuickSetup Wizard "I have
an additional non-routed network behind my Firebox"
confirma la opción de contar con una red secundaria no
enrutada conectada al Firebox y hace referencia a la
entrada sobre la red secundaria de la interfaz Trusted de
la tabla de configuración descrita en el paso 3.
Cuando aparezca el cuadro de diálogo “Firebox Basic Configuration Complete” en el QuickSetup Wizard de
WatchGuard, habrá completado correctamente la instalación del Firebox.
Implementación del Firebox
X en la red
Firebox X se puede utilizar como un Firewall básico
con las siguientes propiedades:
■
Se permite todo el tráfico saliente.
■
El tráfico entrante se bloquea, a menos que
especifique un servidor en el QuickSetup Wizard.
■
Los logs son enviados a la estación de gestión que
contiene el WatchGuard Security Event Processor.
Implemente el dispositivo Firebox X en la red
■
Sitúe el dispositivo Firebox en su ubicación
permanente.
■
Conéctelo a la red.
NOTA: Asegúrese de no cometer los errores de
implementación en la red mostrados en la Figura 8.
■
Cambie la ruta de salida en todos los equipos
conectados a las interfaces Trusted u Optional
del Firebox.
■
Contraseñas (passphrases)
Las contraseñas distinguen mayúsculas y
minúsculas, y deben tener al menos siete
caracteres. Pueden componerse de caracteres
alfanuméricos y caracteres especiales. Deberá
crear dos contraseñas. La correspondiente al
estado se utiliza para establecer conexiones
de sólo lectura con el Firebox y, la
correspondiente a la configuración, para
conexiones de lectura/escritura con el mismo.
6
Evite interconectar las interfaces del Firebox
accidentalmente, por ejemplo, conectándolas al
mismo hub o switch. Esto es lo que se conoce
como "configuración de bucle", proceso que pasa
por alto las funciones del Firewall y que inutiliza
el dispositivo Firebox.
IMPORTANTE
El archivo de configuración creado con el
QuickSetup Wizard contiene parámetros básicos.
Para que la configuración responda a sus necesidades de
seguridad específicas, deberá crear otro archivo. Consulte la
sección Getting Started de la guía del usuario para iniciar
este proceso.
Error de implementación en la red
Internet
Ru
Interfaz
Ex
NO!
ternal
Figura 8
teador
NO!
ADVERTENCIA
Interfaz
Truste
d
Interfaz
Optional
NO!
Page 22

Asistencia técnica
1.877.232.3531
(EE.UU. y Canadá)
Siguiente paso
¡Felicidades! Ha instalado, configurado e implementado correctamente su nuevo dispositivo
Firebox X en la red. ¿Cuál es el siguiente paso? A continuación, le recordamos algunos aspectos
que debe tener en cuenta como nuevo cliente.
Personalización de las políticas de seguridad
Puede personalizar las políticas de seguridad adicionando servicios (filtros en el nivel de las aplicaciones, o
proxies, y filtros de paquetes) que amplíen o restrinjan el tráfico de entrada o salida en el Firewall. Todos los
servicios mantienen un buen equilibrio entre seguridad y accesibilidad de la red. Antes de seleccionar un
servicio u otro, tenga en cuenta las necesidades de su empresa con la condición de que los recursos
informáticos estén protegidos. Éstos son algunos de los servicios más comunes que suelen incorporar las
empresas:
■
HTTP (Servicio Web)
■
SMTP (Servicio de correo electrónico)
■
DNS (Servicio de nombres de dominio)
■
FTP (Servicio de transferencia de archivos)
Configuración de servicios
Consulte el capítulo “Types of Services” de la guía de referencia para obtener una lista detallada de los
servicios que puede añadir, así como los capítulos “Configuring Filtered Services” y “Configuring Proxied
Services” de la guía del usuario para conocer más acerca de la adición de servicios como SpamScreen o
WebBlocker y filtros en el nivel de las aplicaciones.
Garantías del servicio LiveSecurity®
Firebox X incluye una suscripción a nuestro galardonado servicio LiveSecurity®. Al suscribirse, podrá
beneficiarse de los siguientes aspectos:
✔ Protección actualizada de la red con las últimas actualizaciones de software
✔ Resolución de problemas a través de un competente servicio de asistencia técnica que incluye tutoriales
paso a paso y preguntas frecuentes
✔ Reducción del período de inactividad con alertas y consejos de configuración para combatir los peligros más
recientes
✔ Desarrollo de su capacidad con detallados recursos de capacitación interactiva
✔ Preparación ante las amenazas que pueden afectar a su seguridad con editoriales y análisis de
expertos del sector
✔ Ampliación de la seguridad de la red con software integrado, utilidades y ofertas especiales
22
7
+1.206.613.0456
(el resto de los países)
www.watchguard.com/support
Page 23

23
WatchGuard®Firebox®X QuickStart
ガイド
はじめに
WatchGuard® Firebox® X は本当に必要なセキュリティを提供します。完全統合されたこの装置には、強力かつ多様な
ネットワーク・セキュリティ、直感的管理、そして
LiveSecurity サービスによるプレミアム・サポートが装備されて
います。このガイドでは、
WatchGuard Firebox X の初期インストールについて説明します。ハードウェアの仕様や
包括的なセットアップ手順については、『
Hardware Guide』および『User Guide』を参照してください。
パッケージの内容を確認します。
✔ WatchGuard Firebox X 装置
✔ QuickStart ガイド
✔ ユーザー・マニュアル
✔ シリアル・ケーブル (青) × 1
✔ Ethernet クロスオーバー・ケーブル (赤)
✔ Ethernet ケーブル (緑) × 3
✔ 電源ケーブル
✔ WatchGuard System Manager CD
✔ ライセンス・キー証明書
ファイアウォール設定モードの選択
重要!: WatchGuard Firebox X をインストールする前に、Firebox X を
ネットワークに組み込む方法を選択する必要があります。まず、既存の
ネットワークに最も近い設定モードを選択します。ここで、ルーテッド
設定およびドロップイン設定という
2 つのオプションがあります。
ここで選択した設定は手順
5 で使用します。
ルーテッド設定 (図 1)
この設定は、公開 IP アドレスの数が制限されている場
合、または外部インターフェイスに動的
IP アドレスを
使用している場合に必要です。
Firebox は、各インター
フェイスに独立した論理ネットワークおよび独立した
ネットワーク・アドレスを使用して実行されます。
ほとんどのネットワークについては、ルーテッド設定が
最適です。
Firebox の背後にある公開サーバーはプライ
ベート・アドレスを使用し、トラフィックは ネットワーク・
アドレス変換を使用してルーティングされます。
注: インストールを開始
する前に、『
QuickStart
ガイド』全体をお読み
ください。
インストールの手順を確認します。
✔ ファイアウォール設定モードの選択
✔ ネットワーク情報の収集
✔ 管理ステーションの設定
✔ Firebox X のケーブル接続
✔ QuickSetup ウィザードの実行
✔ Firebox X のネットワークへの配置
✔ LiveSecurity® サービスへの登録
1
オプション 1:ルーテッド設定
インタ ー ネット
ルーター
24.4.5.1/24
図 1
外部
インター フェイス
24.4.5.7/24
内部
インター フェイス
10.10.10.254
オプション・
インター フェイス
192.168.10.254
Page 24

24
ドロップイン設定 (図 2)
この設定は、Firebox の背後にある公開サーバーが公開
アドレスを使用している場合、およびトラフィックが
ネットワーク・アドレス変換を使用せずに
Firebox を介
してルーティングされる場合に必要です。
Firebox は、
すべてのインターフェイスで同じネットワーク・アド
レスを使用して実行されます。この設定モードは、ネッ
トワークの論理アドレス・スペースを
Firebox の各イン
ターフェイスに分散するため、ローカル・マシーンを再
設定せずにルーターと
LAN の間に Firebox を「ドロップ」
することができます。
セカンダリー・ネットワークの使用
(図 3)
ルーテッド設定またはドロップイン設定のいずれのモードを
選択しても、内部インターフェイスでセカンダリー・
ネットワークが必要になる場合があります。セカンダ
リー・ネットワークとは、スイッチまたはハブによって
Firebox のインターフェイスに接続される、独立した論理
ネットワークです。
注
: セカンダリー・ネットワークとして指定する IP アド
レスは、そのネットワーク上のコンピューター のディフォ
ルト・ゲートウェイになります。
詳細についての質問
ルーテッド設定 またはドロップイン設定の
詳細については、『
User Guide』の 『Getting
Started』 のセクションを参照してください。
ファイアウォール設定モード
ルーテッド ドロップイン
セカンダリー・ネットワーク
あり
なし
オプション 2:ドロップイン設定
インタ ー ネット
ルーター
66.4.5.1/24
図 2
外部
インター フェイス
66.4.5.2/24
内部
インター フェイス
66.4.5.2/24
オプション・
インター フェイス
66.4.5.2/24
セカンダリー・ネットワーク
プラ イマリー・
ネットワー ク
ハブ /
スイッチ
10.10.10.1
10.10.10.5
10.10.10.25
セカンダリー・ネットワー ク
内 部 インター フェイス
10.10.10.254 ( プライマリー )
172.16.1.254 ( セカンダリー )
172.16.1.10
172.16.1.15
172.16.1.20
図 3
Page 25

25
ネットワーク情報の収集
次の表を使用して、ネットワーク情報を収集します。この情報は手順 4 および手順 6 で必要になります。
『
QuickStart ガイド』は、いつでも参照できるように分かりやすい場所に保管してください。
ネットワーク・アドレス (図 6 を参照)
______________ . ______________ . ______________ . ______________
ディフォルト・ゲートウェイ
______________ . ______________ . ______________ . ______________ /________________
外部インターフェイス
______________ . ______________ . ______________ . ______________ /________________
内部インターフェイス (ルーテッド設定のみ)
______________ . ______________ . ______________ . ______________ /________________
オプション・インターフェイス (ルーテッド設定のみ)
______________ . ______________ . ______________ . ______________
インストールに使用する管理ステーション
Firebox X シリアル・ナンバー (Firebox 底面のバーコードの下に記載)
________________________________________________________________________________
PPPoE を使用している場合に ISP から提供される PPP 認証 (外部インターフェイスで PPPoE を
使用している場合
)
________________________________________________________________________________
PPP
ユーザー名
________________________________________________________________________________
PPP
パスワード
追加のオプション IP アドレス (図 6を参照)
______________ . ______________ . ______________ . ______________ /________________
内部インターフェイスのセカンダリー・ネットワーク
______________ . ______________ . ______________ . ______________ /________________
メール (SMTP) サーバー
______________ . ______________ . ______________ . ______________ /________________
ウェブ (HTTP) サーバー
______________ . ______________ . ______________ . ______________ /________________
FTP サーバー
2
Page 26

26
管理ステーションの設定
管理ステーションに指定したどのコンピューターからでも
WatchGuard Firebox X を管理することができます。ディフォ
ルトでは、管理ステーションに指定したコンピューターに
Firebox ログも保存されます。Intel® Pentium® II 500 Mhz
以上を搭載した Microsoft® Windows® NT/2000/XP が必要
です。すべての
WatchGuard モジュールをインストールする
には
25 MB のハード・ディスク空き容量、およびログ・ファ
イル用に最低
15 MB が必要です。
管理ステーションを指定するには、次の手順に従って管理ソフトウェアをインストールします。
1. WatchGuard System Manager CD-ROM を挿入します。インストール・ウィザードが自動的に表示されない場合は、
CD のルート・ディレクトリーにある install.exe をダブルクリックします。
2. [Firebox X Installation] 画面で [Download the Latest Software] をクリックします。ウェブ・ブラウザーが起動し、
WatchGuard ウェブサイトが表示されます。(インターネット接続をしていない場合は、CD-ROM から直接イン
ストールできます。ただし、
LiveSecurity サービスを有効にするまではサポートおよび VPN 機能を利用することは
できません
)。
3. 画面の指示に従って、LiveSecurity サービスの契約を有効にします。
4. WatchGuard System Manager ソフトウェアをダウンロードします。ダウンロード時間は接続スピードによって
異なります。注
: ハード・ディスクにファイルを保存する際には、ファイル名とパスをメモしておいてください。
5. 自己解凍ファイルを実行して、画面の指示に従って進むと [WatchGuard Firebox X Set-up: Set-up Complete]
画面が表示されます。
6. ディフォルトでは、ソフトウェアのインストール終了時に QuickSetup ウィザードが起動します。QuickSetup
ウィザードを続ける前に、まず Firebox をケーブル接続する必要があります。
3
最新ソフトウェアを
ダウンロードしましょう
!
LiveSecurity® サービスを有効にして、
最新版の管理ステーション・ソフト
ウェアを入手しましょう。
www.watchguard.com/support
重要
IPSec で仮 想プライベート・ネットワーク
(VPN) を使用する場合は、中程度または
強力な暗号化ソフトをダウンロードする必要が
あります。詳細については、『
User Guide』の
『
Getting Started』のセクションを参照してくだ
さい。
スラッシュを使用した表記
スラッシュを使用した表記では、1 つの数字はホストの
存在するネットワークを識別する
IP アドレスのビット数を
示します。
255.255.255.0 というネットワーク・マスクには、
8+8+8=24 に相当するスラッシュが含まれています。たとえば、
192.168.42.23/24 と表記することは、255.255.255.0 という対応
するネットワーク・マスクを持った
IP アドレス 192.168.42.23 を
指定することと同じことです。詳細については、
QuickSetup
ウィザードで [Help] ボタンをクリックしてください。
Page 27

27
Firebox® X のケーブル接続
次の手順に従って、Firebox X を管理ステーションに
ケーブル接続します
(下記の図 4、5、6 および 7 を
参照
)。注: Firebox のポートはハブ・ポートではなく、
すべて
NIC ポートです。表示のないポートの詳細に
ついては、図
5 を参照してください。
QuickSetup ウィザードの実行
管理ステーションの設定および Firebox X のケーブル接続が
終了したら、
QuickSetup ウィザードを使用して、基本設定
ファイルを作成します。これにより、
Firebox X は、シン
プルながら即座に効果の出るファイアウォールとして機能し
ます。
4
重要
TCP/IP を使用して Firebox X を
セットアップするには、
『
User Guide』の『Getting Started』の
セクションを参照してください。
部
部
ョン
置
5
5
■
Firebox X では外部ポートのみが表示されてい
ます。内部ポートについては、強調表示された
図を参照してください。
■
電源コードを Firebox 側の端子と電源に差し込
みます。手順
6 が終了するまで、電源スイッチ
は切っておきます。
■
青色のシリアル・ケーブルを使用して、Firebox
シリアル・ポート (コンソール) を管理ステー
ションの
COM ポートに接続します。赤色の
クロスオーバー・ケーブルを使用して、
Firebox
内部インターフェイスを管理ステーションの
Ethernet ポートに接続します (必要に応じて
インターネットの接続を切ります
)。
Firebox をネットワークに配置
する前に、管理ソフトウェアを
介して
Firebox への接続を
テストするには、『
User Guide』の
『
Getting Started』のセクションを
参照してください。
Firebox X フロント・パネ ル
LCD
ディスプレイ
スクロール・
ボタン
電源
ランプ
コンソー ル
ネットワーク・
ポート・
ランプ
オプション・
インター フェイス
内 部イン ターフェイス
外 部 インターフェイス
取り外し可能
ハード・
ディスク・
スロット
ネットワーク構成 図
イン ター ネット
ルーター( オプション )
外部
内部 オプション
管理
HTTP
サーバー
SMTP
サーバー
FTP
サーバー
図
図6
4
内部ポートの位
外
内
オプシ
準備のためのケーブル接続
管理ステーション PC
背面)
(
Firebox X (正面)
COM ポート
Ethernet ポート
コンソール
図7
ಊ
Page 28

28
QuickSetup ウィザードがまだ起動していない場合は、Windows デスクトップの [スタート] メニューから、[プログ
ラム
]、[WatchGuard]、[QuickSetup Wizard] の順にクリックして起動します。このガイドの手順 1 で選択した設定
および手順
2 で作成した表を参照しながら、QuickSetup ウィザードのメッセージに従って情報を入力します。次の
点に注意してください。
■
IP アドレス入力
IP アドレスを入力する際には、数字、ピリオド、
およびスラッシュを続けて入力してください。入力
箇所を移動する際に
Tab キーや矢印キーを使用しな
いでください。
■
ルーティングされていないセカンダリー・
ネットワーク
QuickSetup ウィザードの [I have an additional nonrouted network behind my Firebox]
というチェック
ボックスは、手順
2 のネットワーク構成表に入力し
た内部インターフェイスのセカンダリー・ネット
ワークを示しています。
WatchGuard QuickSetup ウィザードで [Firebox Basic Configuration Complete] ダイアログ・ボックスが表示され
たら、
Firebox のインストールは完了です。
Firebox® X のネットワークへの
配置
Firebox X は次のプロパティを持つ基本ファイアウォール
として使用できまるようになりました。
■
すべての送信トラフィックが許可されます。
■
QuickSetup ウィザードでサーバーを指定していない場
合は、すべての着信トラフィックがブロックされます。
■
ログは、管理ステーションにある WatchGuard セキュ
リティ・イベント・プロセッサーに送信されます。
Firebox X をネットワークに配置します。
■
Firebox を設置する場所に置きます。
■
Firebox をネットワークに接続します。
注
: 図 8 に示したようなネットワーク配置エラーが
起こらないように注意してください。
■
Firebox の内部インターフェイスまたはオプション・
インターフェイスの背後に接続されているすべての
デスクトップについて、ディフォルト・ゲートウェイの
設定を変更します。
6
Firebox の各インターフェイスを、同じハブまたは
スイッチに接続するなど、相互に接続しないよう
に注意してください。この接続は「ループ設定」
と呼ばれ、これを行うと
Firebox が使用できなく
なり、すべてのファイアウォール機能が回避され
てしまいます。
重要
QuickSetup ウィザードを使用して作成した設定
ファイルは基本設定です。セキュリティ・ポリシーに応じて
設定ファイルを作成する必要があります。設定ファイルを
作成するには、『
User Guide』の『Getting Started』のセク
ションを参照してください。
■
パスフレーズ
パスフレーズは
7 文字以上必要で、大文字と小文字を
区別します。文字、数字、および特殊文字を組み合わ
せて入力することができます。
2 種類のパスフレー
ズを作成します。ステータス・パスフレーズは、
Firebox への読み取り専用接続に使用します。設定パス
フレーズは、
Firebox への読み書き接続に使用します。
ネットワーク配置 エラー
イン ター ネット
NO!
ルーター
外部
インタ ー
フェイス
図8
NO!
警告 !
内部
インタ ー
フェイス
オプション・
インタ ー フェイス
NO!
Page 29

29
おわりに
これですべての設定が完了しました。新しい Firebox X が正常にインストールおよび設定され、ネット
ワークに配置されました。最後に、
Firebox X をはじめてお使いになるお客様は以下をお読みください。
セキュリティ・ポリシーのカスタマイズ
ファイアウォール内外の出入りを広げたり制限したりするサービス
(プロキシーと呼ばれるアプリケーション・レイ
ヤー・フィルターやパケット・フィルター
) を追加して、セキュリティ・ポリシーをカスタマイズできます。どの
サービスも、ネットワーク・セキュリティと接続性のどちらかが影響を受けます。サービスを選択する際には、所属
する組織のニーズとコンピューター資産を攻撃から保護する要件のバランスを取ってください。一般的によく利用
されているサービスは以下のとおりです。
■
HTTP (ウェブ・サービス)
■
SMTP (電子メール・サービス)
■
DNS (ドメイン名サービス)
■
FTP (ファイル転送サービス)
追加サービスの設定
追加サービスの一覧は、『
Reference Guide』の『Types of Services』の章を参照してください。また、SpamScreen、
WebBlocker、およびアプリケーション・レイヤー・フィルターなどの追加サービスについての詳細は『User Guide』の
『
Configuring Filtered Services』および『Configuring Proxied Services』の章を参照してください。
LiveSecurity® サービスご利用の利点
Firebox X には、数々の賞を受賞した LiveSecurity® サービスへの登録が含まれます。
サービス内容は以下のとおりです。
✔ 最新のソフトウェア・アップグレードにより、最新のネットワーク保護が可能になります。
✔ 手順を分かりやすく記載したチュートリアルやよくあるお問い合わせ (FAQ) を含む、総合的なテクニカル・
サポートで問題を解決することができます。
✔ 最新の脅威やセキュリティ・ホールに対抗するための警告や設定のヒントで、ダウンタイムを削減します。
✔ 詳細でインタラクティブなトレーニング・リソースで専門知識を深めます。
✔ 業界のエキスパートによる特集記事や分析で、将来のセキュリティ脅威に備えます。
✔ 包括的なソフトウェア、ユティリティ、および特別サービスで、ネットワーク・セキュリティを高めます。
7
テクニカル・サポート
1.877.232.3531
(
米国およびカナダ)
+1.206.613.0456
(
その他の国)
005-31-11-4950
(
日本のお客様)
www.watchguard.com/support
www.watchguard.co.jp/support/index.html
Page 30

30
WatchGuard®Firebox®X
快速入门指南
使用入门
WatchGuard® Firebox® X
是一个完全集成的设备,通过
LiveSecurity®
服务提供了功能强大的分层网络安
全、直观管理及高级支持。此《快速入门指南》包括
WatchGuard Firebox X
的初始安装说明。有关硬
件规格和完整的设置说明,请参阅您的
Hardware Guide 和User Guide
。
检查包装箱内容
✔
WatchGuard Firebox X
设备
✔ 《快速入门指南》
✔ 用户说明文档
✔ 一根串行电缆(蓝色)
✔ 以太网交叉电缆(红色)
✔ 三根以太网电缆(绿色)
✔ 电源线
✔
WatchGuard
系统管理器
CD
✔ 许可密钥证书
选择防火墙配置模式
要点!安装
WatchGuard Firebox X
前,需要决定如何将
Firebox X
并入网络。首先,选择最密切反映现有网络的配置
模式。有两种可能的选项:
Routed 和Drop-in
配置。您在此
处的选择将在步骤5 中使用。
Routed
配置(图1)
如果公共
IP
地址数量受限制,或者在外部接口
上使用动态
IP
地址,必须使用此配置。
Firebox
可以在它每个接口上将单独的逻辑网络和网络地
址放在一起。大多数网络在使用
Routed
配置时
效果最好。
Firebox
后面的的公共服务器使用私有
地址,并且流量通过网络地址转换进行路由。
注:在开始执行安装过程
前请通篇阅读《快速入门
指南》。
检查安装步骤
✔ 选择防火墙配置模式
✔ 收集网络信息
✔ 设置管理工作站
✔ 连接到
Firebox X
✔ 运行
QuickSetup Wizard
✔ 将
Firebox X
部署到您的网络
✔ 注册
LiveSecurity
服务
1
Page 31

Drop-in
如果
且流量通过
由,必须使用此配置。
使用相同的网络地址。由于此配置模式将网络的
逻辑地址空间分布到
将
Firebox
重新配置任何本地机器。
配置(图2)
后面的公共服务器使用公共地址,并
Firebox
而不使用网络地址转换进行路
Firebox
在所有接口上都应
Firebox
接口,因此,您可以
Firebox
“混入”到路由器与局域网之间而无需
防火墙配置模式
Routed Drop-in
使用辅助网络(图3)
无论您选择了
网络结构可能需要在受信任接口上配置一个辅助
网络。辅助网络作为一个分开的逻辑网络通过集
线器或交换机连接到
注:宣布为辅助网络的
Routed 或Drop-in
Firebox
IP
算机的默认网关。
辅助网络
配置模式,您的
接口。
地址将成为该网络上计
问题
有关
Routed 或Drop-in
参阅
User Guide 的Getting Started
配置的详情,请
部分。
是
否
31
Page 32

收集网络信息
2
网络地址(参见图6)
______________ . ______________ . ______________ . ______________
默认网关
______________ . ______________ . ______________ . ______________ /________________
外部接口
______________ . ______________ . ______________ . ______________ /________________
受信任接口(仅限路由模式)
______________ . ______________ . ______________ . ______________ /________________
可选接口(仅限路由模式)
______________ . ______________ . ______________ . ______________
用于安装的管理工作站
使用下表收集网络信息。步骤4 和步骤6 中将需要用到此资料。请将《快速入门指南》
放置在安全位置以备将来参考。
PPPoE
用户名
密码
(SMTP)
服务器
系列号在
时由您的
地址(参见图6)
IP
服务器
Firebox
服务器
Firebox X
________________________________________________________________________________
使用
________________________________________________________________________________
PPP
________________________________________________________________________________
PPP
其它可选
______________ . ______________ . ______________ . ______________ /________________
受信任接口上的辅助网络
______________ . ______________ . ______________ . ______________ /________________
邮件
______________ . ______________ . ______________ . ______________ /________________
Web (HTTP)
______________ . ______________ . ______________ . ______________ /________________
FTP
后面的条形码下。
提供的
ISP
验证(如果在外部接口上使用
PPP
PPPoE
)
32
Page 33

设置管理工作站
3
要指定管理工作站,请按以下操作安装管理软件:
可以从您指定为管理工作站的任一台计算机上管理
WatchGuard Firebox X
将保存到此计算机。要求使用
NT/2000/XP
高。需要
,以及
25 MB
模块,加上最少
。默认情况下,
Microsoft® Windows®
Intel® Pentium® II 500 Mhz
硬盘空间安装所有
空间存储日志文件。
15 MB
WatchGuard
Firebox
日志也
或更
下载最新软件!
激活您的
新版本的管理工作站软件!
LiveSecurity®
服务以获得最
www.watchguard.com/support
插入
1.
2.
WatchGuard
install.exe
单击
。
Firebox X Installation
WatchGuard
LiveSecurity
遵循屏幕上的指示激活
3.
下载
4.
WatchGuard
系统管理器
CD-ROM
屏幕上的
网站。(如果您没有
服务前,您将不能使用支持和
LiveSecurity
。如果安装向导不自动显示,则双击
Download the Latest Software
Internet
连接,则可以直接从
功能。)
VPN
服务预订。
系统管理器软件。下载时间将随连接速度不同而异。
注:确保在将文件保存到硬盘驱动器时记下了文件的名称和路径!
执行自解压文件,遵循屏幕指示操作,直至出现“
5.
WatchGuard Firebox X Set-up: Set-up Complete
屏幕。
默认情况下,
6.
QuickSetup Wizard
QuickSetup Wizard
要点
如果要通过
,则必须下载中等或强加密软
(VPN)
件。有关详情,请参阅
Getting Started
使用虚拟专用网
IPSec
部分。
。
User Guide
将在软件安装结束时启动。您必须先将
使用斜杠注释
在斜杠注释中,单个数字表示多少位
的
机驻留的网络。网络掩码
8+8+8=24
具有相应网络掩码
单击
的斜杠。例如,编写
QuickSetup Wizard 中的Help
根目录中的
CD
。这将会启动
CD-ROM
安装。然而,在激活
Firebox
255.255.255.0
192.168.42.23/24
255.255.255.0 的IP 地址192.168.42.23
(帮助)按钮以了解详情。
浏览器并连接到
Web
连线才可继续
地址确定主
IP
具有等于
等同于指定
”
。
Page 34

4
连接到
执行以下操作,将
站。(参见下面的图4、5、6 和7)注:所有
Firebox
参见图5 以了解未标记端口的详情。
Firebox
端口为
®
X
Firebox X
端口,而不是集线器端口。
NIC
连接到管理工作
要点
要使用
TCP/IP
,请参阅
X
Getting Started
User Guide
设置
部分。
Firebox
的
■
将电源线插入
将电源开关置于“
结束。
运行
5
在完成管理工作站设置和
QuickSetup Wizard
可作为一个简单而有效的防火墙。
电源输入端和电源。
Firebox
”位置直至步骤
off
QuickSetup Wizard
Firebox X
创建基本配置文件。这使
6
连线后,使用
■
Firebox X
信任端口的突出显示区域。
■
使用蓝色串行电缆将
(控制台)连接到管理工作站
使用红色交叉电缆将
连接到管理工作站以太网端口。(如有必
要,您可以断开以太网连接。)
Firebox X
上只标记了外部端口。请查看受
串行端口
Firebox
COM
受信任接口
Firebox
要在网络上部署
前通过管理软件测试到
的连接,请参阅
Firebox
User Guide 的Getting Started
Firebox
端口。
部分。
3433
Page 35

如果
QuickSetup Wizard
启动该向导。参照本指南步骤1 和2 中的表格与选择,按
Wizard
尚未启动,则通过选择“开始”=>“程序”
请注意以下信息:
=> WatchGuard => QuickSetup
QuickSetup Wizard
提示提供信息。
■
寻址
IP
输入
不要使用
■
辅助“非路由”网络
标签为“
behind my Firebox
地址时,按顺序键入数字、句点和斜杠。
IP
或方向键跳过句点。
Tab
I have an additional non-routed network
”的
QuickSetup Wizard
是指步骤3 网络配置表中的“受信任接口上的
辅助网络”项。
WatchGuard QuickSetup Wizard
中出现“
Firebox Basic Configuration Complete
成功完成。
将
Firebox
®
部署到您的网络
X
6
Firebox X
■
■
■
将
■
■
■
现有可用作具有以下属性的基本防火墙:
允许所有输出业务。
除非在
QuickSetup Wizard
中指定了服务器,否则
阻止所有输入业务。
日志将发送到管理工作站上的
WatchGuard
事件处理程序。
Firebox X
将
将
部署到网络
放入其永久位置。
Firebox
连接到网络。
Firebox
注:确保避免出现图8 所示的网络部署错误。
更改在
受信任或可选接口后连接的所有
Firebox
桌面上的默认网关设置。
复选框
安全
■
密码短语
密码短语区分大小写,并且长度必须至少
为七个字符。它们可以是字母、数字和特
殊字符的任意组合。您将创建两个密码短
语。状态密码短语用于建立到
Firebox
读连接。配置密码短语用于建立到
的读/写连接。
”对话框时,
Firebox
的只
Firebox
安装已
要点
使用
QuickSetup Wizard
配置。您现在应创建符合安全策略需要的配置
文件。请参阅
执行此过程。
User Guide 的Getting Started
创建的配置文件是基本
部分以开始
注意防止意外将
接口彼此相连,例
Firebox
如将它们连接到同一集线器或交换机。这称
为“环路配置”,并且将忽略所有防火墙功
能,使您的
Firebox
不起作用。
Page 36

下一步操作
7
自定义您的安全策略
通过添加服务 — 应用层过滤器(称为代理)和分组过滤器以拓宽或限制防火墙内外允许的操作,您
可自定义安全策略。每个服务均会在网络安全与可访问性之间形成折衷。选择服务时,权衡组织的需
要与保护计算机资产免受攻击的要求。组织通常添加的一些常见服务如下:
恭喜您!您已成功在网络上安装、配置和部署了新
要记住的一些内容。
Firebox X
。下一步操作下面是新客户
■
HTTP(Web
■
SMTP
■
DNS
■
(文件传送服务)
FTP
设置添加的服务
请参阅
Guide 的“Configuring Filtered Services
SpamScreen 或WebBlocker
LiveSecurity®
Firebox X
✔ 通过最新软件升级,提供最新的网络保护。
✔ 解决与完整技术支持相关的问题,包括逐步教程和常见问题
✔ 通过警告和配置提示来防止最新的威胁和漏洞,减少停机时间。
✔ 通过详细的交互式培训资源,开发自己的专门技术。
✔ 通过行业专家的教学和分析,时刻准备好防止即将到来的安全威胁。
✔ 通过随附软件、实用程序和特别提供的产品,延伸网络安全。
服务)
(电子邮件服务)
(域名服务)
Reference Guide 的“Types of Services
”和“
等服务和应用层过滤器的更多信息。
服务功能
包括了我们的获奖
LiveSecurity
”章节,了解可以添加的完整服务列表,并参阅
Configuring Proxied Services
服务预订。您的预订:
”章节,了解有关添加诸如
。
(FAQ)
技术支持
1.877.232.3531
(美国和加拿大)
+1.206.613.0456
(所有其它国家/地区)
www.watchguard.com/support
User
3635
Page 37

U.S. SALES:
1.800.734.9905
INTERNATIONAL
SALES:
+1.206.613.0895
FAX:
+1.206.521.8342
©2004 WatchGuard Technologies, Inc. All rights reserved. WatchGuard, Firebox, LiveSecurity and the WatchGuard logo are either trademarks or
registered trademarks of WatchGuard Technologies, Inc. in the United States and/or other countries. All other trademarks are the properties of
their respective owners. P.N. 1312-002 WGP66041_0204
ADDRESS:
505 Fifth Avenue South, Suite 500
Seattle, WA 98104-3892
E-MAIL:
information@watchguard.com
WEB:
www.watchguard.com
 Loading...