

Watchguard DVR4ENTPACK2, DVR4ENTPACK, DVR4CHSOV4 User Manual
- 1 -
MODEL: DVR4ENTPACK2
Professional Surveillance Pack
Digital Video Recorder with 4 Security Cameras
‘USER MANUAL’
DVR 2 x Cameras – 30m night-vision range
- Advanced MPEG4 Video Compression Technology - High Quality CCD Image sensor
- Multiplex Operation - 24 x IR LED’s
- Long Recording Duration - 420 TVL Resolution, 520 x 582 Pixels
- Intelligent Video Motion Detection Recording 2 x Cameras – 15m night-vision range
- Remote Network Surveillance & Backup Functions - High Quality CCD Image sensor
- Easy to operate like a VCR - 12 x IR LED’s
- System Auto recovery after power loss (blackout) - 420 TVL Resolution, 520 x 582 Pixels
Note: The latest version of this manual can be found at:
http://www.watchguardalarms.com.au
N517
www.watchguardalarms.com.au

- 2 -
Safety Warning
CAUTION
To reduce the risk of electric shock, do not expose this machine to rain or moisture.
Only operate this machine from the type of power source indicated on the label.
RhinoCo Technology shall not be liable for any damages arising out of any improper use, even if we have been advised
of the possibility of such damages.
The lightning flash with arrowhead symbol, within an equilateral triangle, is intended to alert the user to the presence of
uninsulated “dangerous voltage” within the product’s enclosure that may be of sufficient magnitude to constitute a risk of
electric shock to persons.
This exclamation point within an equilateral triangle is intended to alert the user to the presence of important operating
and maintenance (servicing) instructions in the literature accompanying the appliance.
C-Tick & CE Mark
This apparatus is manufactured to comply with the radio interference requirements.
RhinoCo Technology does not warrant that this manual will be uninterrupted or error-free. We reserve the right to revise
or remove any content in this manual at any time.
THIS PRODUCT IS LICENSED UNDER THE MPEG-4 VISUAL PATENT PORTFOLIO LICENSE FOR THE PERSONAL
AND NON-COMMERCIAL USE OF A CONSUMER FOR (i) ENCODING VIDEO IN COMPLIANCE WITH THE MPEG-4
VISUAL STANDARD (“MPEG-4 VIDEO”) AND/OR (ii) DECODING MPEG-4 VIDEO THAT WAS ENCODED BY A
CONSUMER ENGAGED IN A PERSONAL AND NON-COMMERCIAL ACTIVITY AND/OR WAS OBTAINED FROM A
VIDEO PROVIDER LICENSED BY MPEG LA TO PROVIDE MPEG-4 VIDEO. NO LICENSE IS GRANTED OR SHALL
BE IMPLIED FOR ANY OTHER USE. ADDITIONAL INFORMATION INCLUDING THAT RELATING TO PROMOTIONAL
INTERNAL AND COMMERCIAL USES AND LICENSING MAY BE OBTAINED FROM MPEG LA, LLC.
About This Manual
This user manual covers the menu system and network functionality of your digital video recorder (DVR). Please refer to
the included Quick Installation Guide for information on:
• Package contents.
• Unpacking and connecting your DVR system.
• Setting the date and time.
• Starting and stopping recording.
• Searching and playing back recorded footage.
• Using the Keylock feature.
• Troubleshooting

- 3 -
Table of Contents
Safety Warning....................................................................................................................................................................2
About This Manual ..............................................................................................................................................................2
Table of Contents ................................................................................................................................................................3
Menu System ..........................................................................................................................................................................4
Navigating the Menu ...........................................................................................................................................................4
Menu Tree ...........................................................................................................................................................................5
Record .................................................................................................................................................................................6
Timer ...................................................................................................................................................................................7
Date.....................................................................................................................................................................................7
Advance ..............................................................................................................................................................................8
Advance > Camera .............................................................................................................................................................8
Advance > Detection ...........................................................................................................................................................8
Advance > Detection > Detection Setup .............................................................................................................................8
Advance > Detection > Detection Timer ...........................................................................................................................10
Advance > Display ............................................................................................................................................................10
Advance > Alert .................................................................................................................................................................11
Advance > Remote............................................................................................................................................................12
Advance > System ............................................................................................................................................................13
Advance > Network ...........................................................................................................................................................14
Advance > HDD Info .........................................................................................................................................................14
Advance > Event Log ........................................................................................................................................................14
Section 2 – Network Operation.............................................................................................................................................15
Introduction........................................................................................................................................................................15
Default DVR Network settings...........................................................................................................................................15
Connecting via AP Software .............................................................................................................................................15
Playback Operation ...........................................................................................................................................................16
Playback Operation ...........................................................................................................................................................17
System Config > Network > Dynamic DNS......................................................................................................................19
System Config > Network > Mail.......................................................................................................................................19
System Config > Network > FTP.......................................................................................................................................20
System Config > DVR .......................................................................................................................................................20
System Config > Device....................................................................................................................................................20
System Config > Detection................................................................................................................................................21
System Config > DVR > Network Backup.........................................................................................................................22
System Config > DVR > Search List .................................................................................................................................23
System Config > DVR > Timer Record .............................................................................................................................23
System Config > DVR > Record Setting ...........................................................................................................................24
System Config > Alarm .....................................................................................................................................................25
System Config > General ..................................................................................................................................................25
System Config > General > Account.................................................................................................................................26
System Config > General > Online User Info....................................................................................................................27
System Config > General > File Path................................................................................................................................27
Troubleshooting.................................................................................................................................................................28
Connecting via Internet Explorer.......................................................................................................................................29
RS-232 Protocol ................................................................................................................................................................32
Hard Drive Installation .......................................................................................................................................................33
Section 3 - Remote Setup Guide ..........................................................................................................................................34
Introduction........................................................................................................................................................................34
General Connection Information .......................................................................................................................................34
Configuration of a D-link DSL504T (v2) for use with the DVR..........................................................................................34
Initial Router Setup............................................................................................................................................................34
Dynamic DNS....................................................................................................................................................................34
DVR IP Address ................................................................................................................................................................35
LAN Clients .......................................................................................................................................................................35
Port Forwarding.................................................................................................................................................................36
Connecting Remotely ........................................................................................................................................................36
- 4 -
Menu System
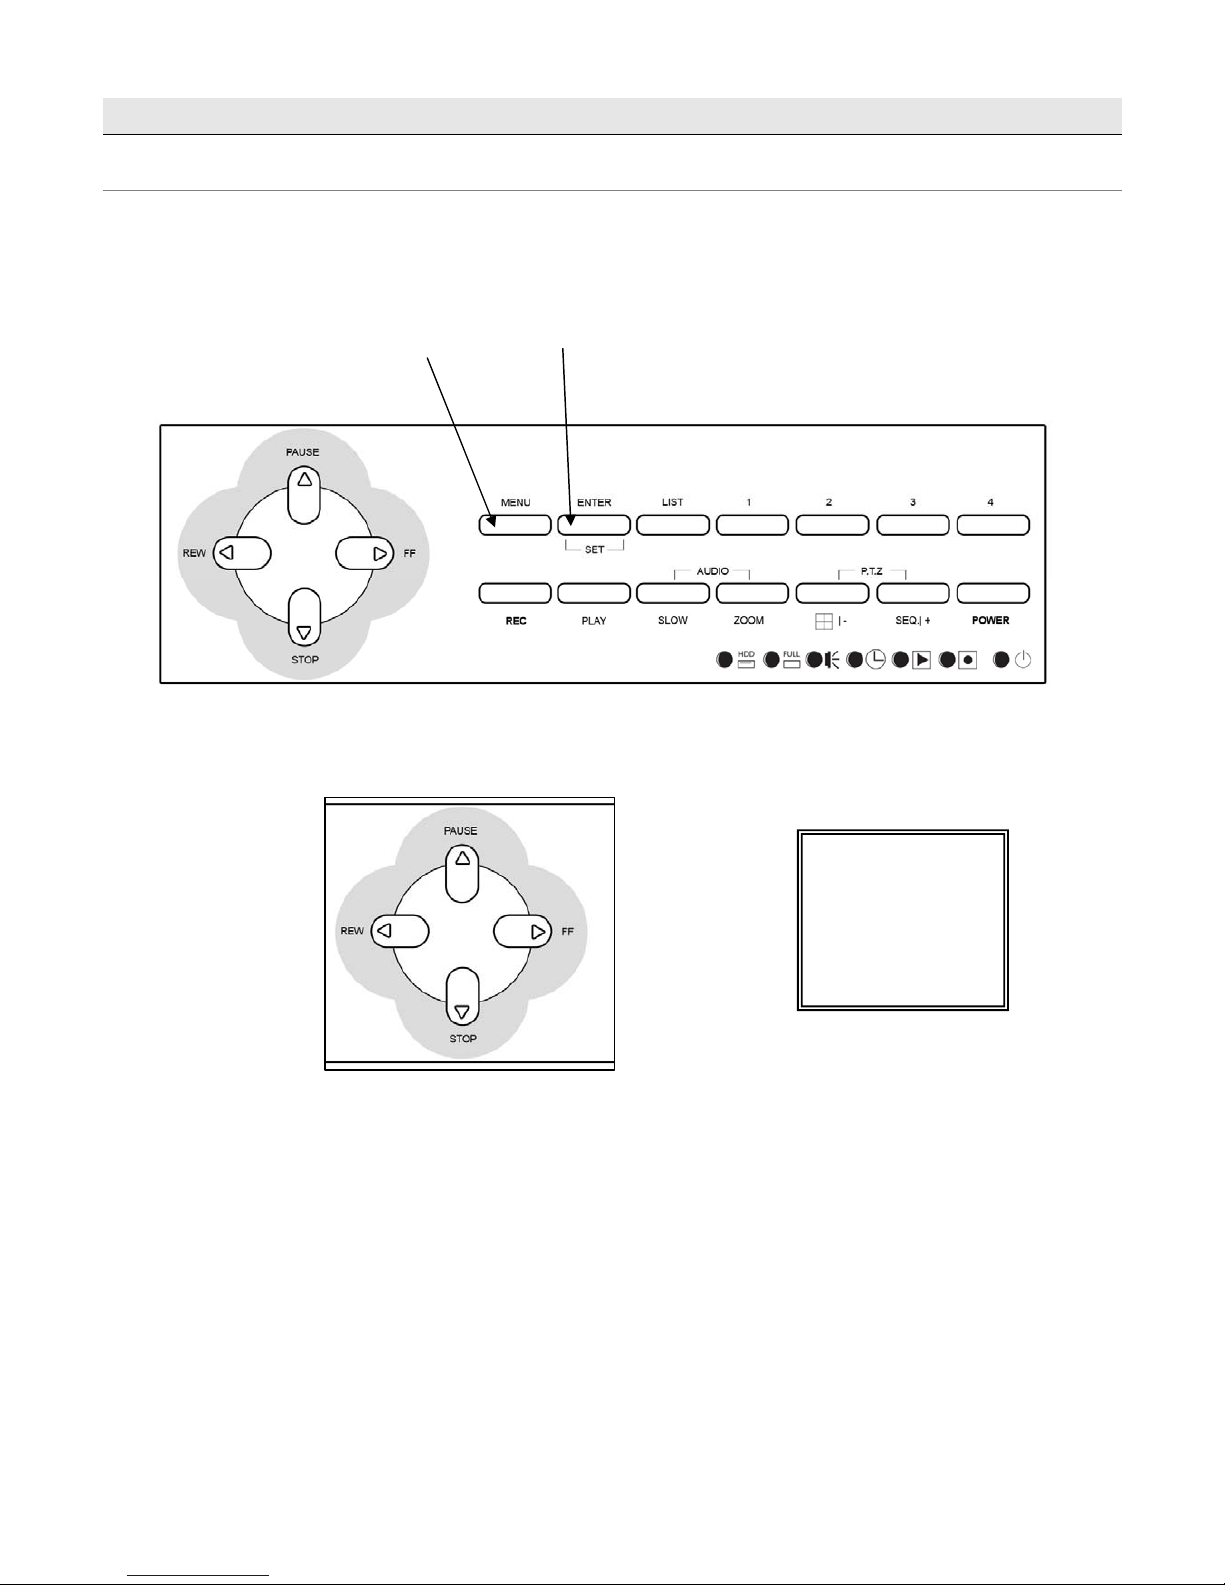
Navigating the Menu
The following buttons are used to navigate through the menu.
UP=▲,
DOWN=▼,
LEFT=◄, RIGHT=►
Press “MENU” button to enter the
(OSD) On Screen Display menu list
The default admin password is 0000.
Enter the default password by pressing
“ENTER” 4 times
(MENU)
RECORD
TIMER
DDAATTEE
ADVANCE
- 5 -
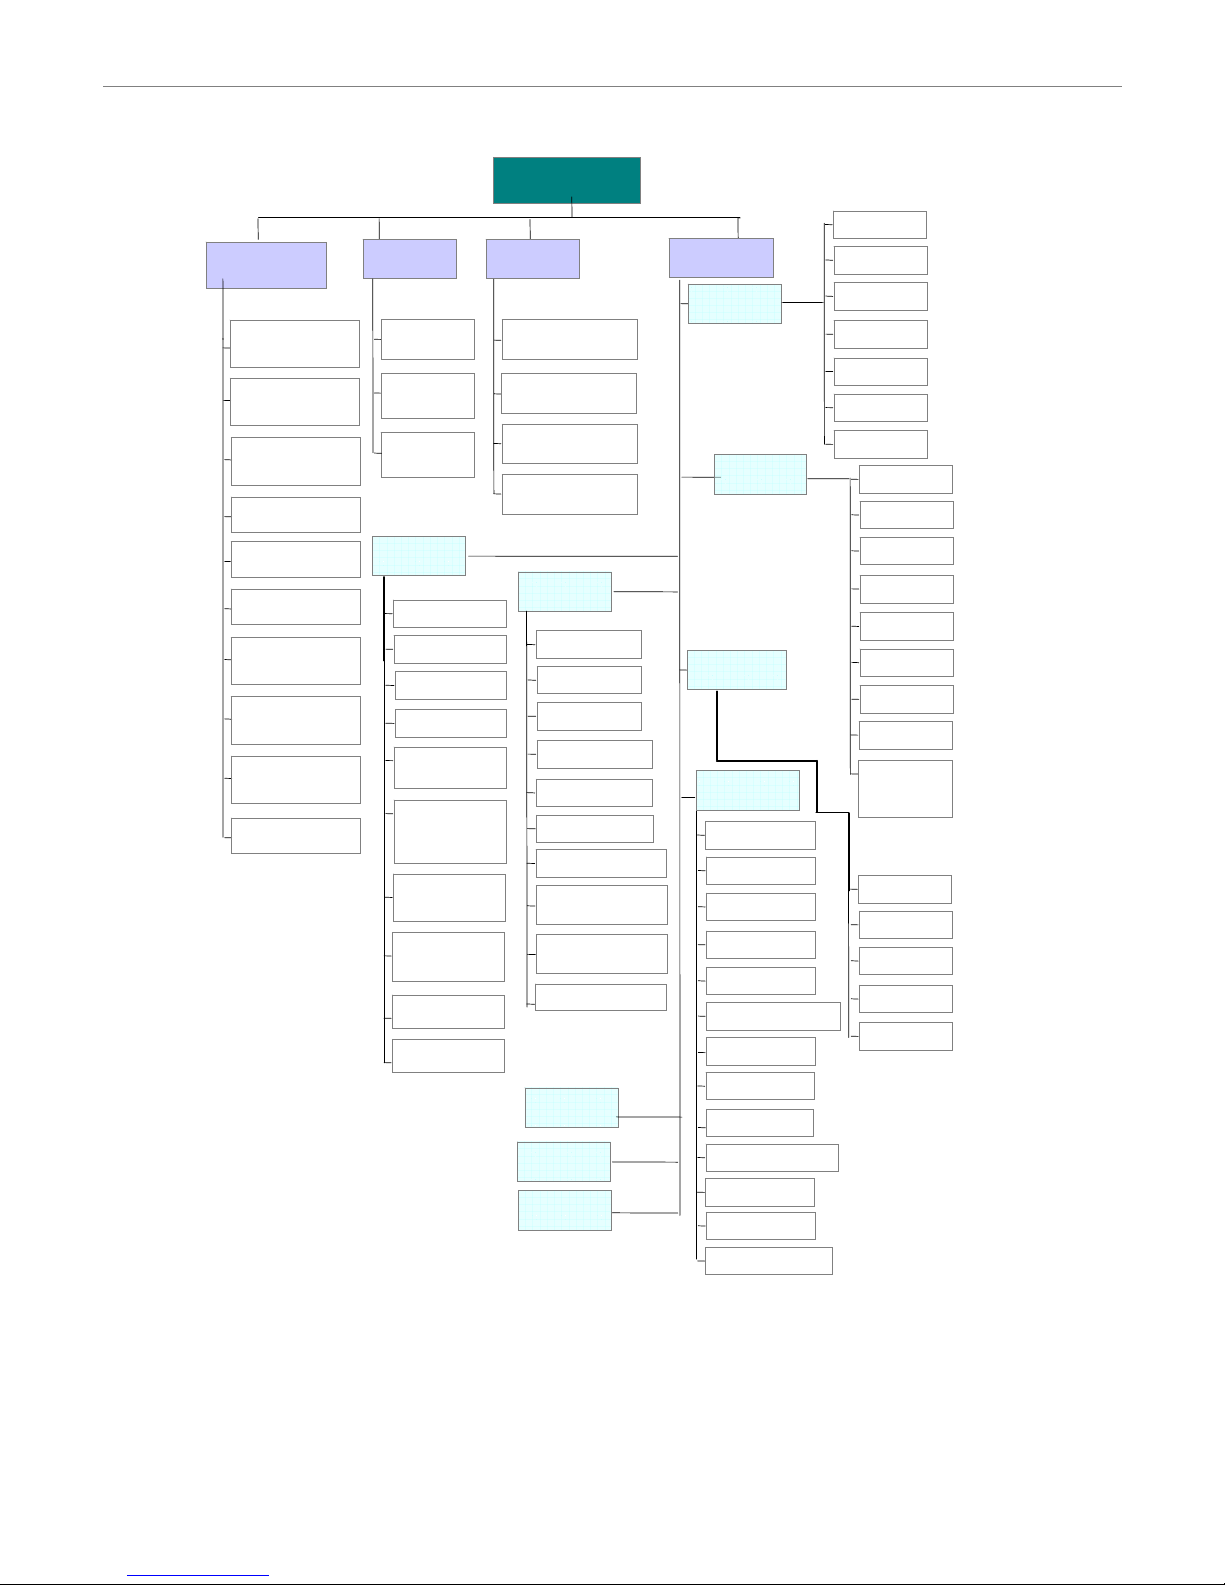
Menu Tree
The menu system for the DVR can be reached by pressing the MENU button. The menu system has the following
structure.
DDAATTEE::
FFOORRM
M
A
A
TT::YY--MM-
-
TTIIMMEE::
MMEEN
N
RREECCO
O
TTIIMME
E
D
D
A
A
T
T
ADV
A
N
C
TTIITTLLEE
BBRRIIGG
CCOONNTT
S
S
A
A
TTUU
HHUUEE
CCO
O
V
V
RREECC
C
C
A
A
MMEER
R
DDIISSPPL
L
RREEMMO
O
NNEETTWWO
O
MMAANNUUAALL
EEVVEENNTT
TTIIMMEERR
O
O
V
V
EERRWWRRIITTEE
RREECCOORRDD IIMMGG
RREECCOORRDD
MMAANNUUAALL
EEVVEENNTT
TTIIMMEERR
TTOOT
T
A
A
LL IIPPSS
D
D
A
A
TTEE
SSTTAARRTT
EENNDD
A
A
LLE
E
E
E
V
V
EENNT
T
HHDDD
D
TTIITTLLEE
D
D
A
A
TTEE
HHDDDD
LLOOSSSS
PPLLAAYYBBAAC
C
DDWWEELLLL
DDUURRAATTIIOONN
DDEE--
E
E
X
X
TT.
.
IINNTT.
.
K
K
EEY
Y
V
V
LLOOSSS
S
MMOOTTIIOON
N
A
A
L
L
A
A
RRM
M
AALLAARRMM
HHDDDDBBUUZZZZEER
R
HHDDDD NNEEAARRLLYY
SSYYSSTTE
E
SSEERRI
I
A
A
L
L
B
B
A
A
UUD
D
HHOOSST
T
IIR
R
P
P
A
A
SSSSWWO
O
RREESSEET
T
CCLLE
E
A
A
R
R
UUPPGGR
R
A
A
DDE
E
V
V
EERRSSIIOON
N
V
V
IIDDEEO
O
L
L
A
A
NNGGU
U
A
A
G
G
RR..EE..TT..RR.
.
A
A
UUTTO
O
W
W
A
A
TTEERRM
M
A
A
PPRREE-
-
A
A
L
L
A
A
RRM
M
D
D
A
A
YYLLIIGGHHT
T
TTIITTLLEE
DDEETT
A
A
RRE
E
A
A
LLSS
SSSS
TTSS
RREE
A
A
L
L
A
A
RRMM
DDEETTEECCTTI
I
TTIITTLLEE
DDE
E
V
V
IICCEE
IIDD
PPRROOTTOOC
C
R
R
A
A
TTEE
DDEETTEECCTTIIO
O
MMOONNIITTOORR
OOSSDD

- 6 -
Record
Manual Record Enable
Indicates whether the DVR has been manually set to record. If you have pressed the REC button on the front panel to
start recording, then this will say YES.
You can start or stop recording manually, by changing this value to either YES or NO.
Event Record Enable
Sets whether the DVR should start recording when motion is detected or the external alarm is triggered.
For more information on motion detection and external alarms see Advance > Detection
Timer Record Enable
Sets whether the DVR should use the timer schedule to start and stop recording.
Overwrite
Sets whether the DVR should automatically overwrite the oldest footage when the hard drive becomes full.
Record IMG Size
Sets the resolution the DVR will record in. Recording in FRAME mode forces the DVR into MJPEG and will use
approximately 5 times as much space as CIF mode.
FRAME (MJPEG) 704 x 576 pixels
CIF (MPEG4) 352 x 288 pixels
Record Quality
Sets the quality to record in. It is best to experiment with these settings to find a quality level that suits you. There are four
options available – BEST, HIGH, NORMAL and BASIC.
Manual Record IPS
Sets how many IPS the DVR will record in when manually set to record by the user.
Event Record IPS
Sets how many IPS the DVR will record in when it detects motion or is triggered by an external alarm.
Timer Record IPS
Sets how many IPS the DVR will record in when it is recording off the timer schedule.
Total IPS Share
This option does not apply to this model DVR.
Note: The images per second (IPS) settings are global. This means that if you have the IPS set to 100, each camera
will record at 25 IPS. Likewise
,
a setting of 12 would have each camera record at 3 IPS.
RREECCOORRDD
MANUAL RECORD ENABLE
EVENT RECORD ENABLE
TIMER RECORD ENABLE
OVERWRITE
RECORD IMG SIZE
RECORD QUALITY
MANUAL RECORD IPS
EVENT RECORD IPS
TIMER RECORD IPS
TOTAL IPS SHARE

- 7 -
Timer
Using the Timer menu you can setup multiple recording schedules. The DATE specifies what days the schedule applies.
The START and END times indicate (in 24 hour format) when the DVR will record.
Date
The Date menu is used to set the date, time and daylight savings settings for the DVR.
The daylight savings option will tell the DVR to adjust the time during a certain date range.
Example - In the image above: During the daylight savings time period (starting on the 4th Sunday of March and ending
on the 4th Sunday of October), the DVR time will run one hour ahead.
Note: Never change the date and time when the DVR is recording - stop recording before hand.
RREECCOORRDD
DATE START END
OFF 00 : 00 - 00 : 00
DAILY 08 : 00 - 18 : 00
SUN 06 : 00 - 23 : 00
MON-FRI 00 : 00 - 00 : 00
OFF 00 : 00 - 00 : 00
OFF 00 : 00 - 00 : 00
OFF 00 : 00 - 00 : 00
Note: The DVR will only use the timer schedule if the Record > Timer Record Enable option is set to YES.
DDAATTEE
DATE 2006-MAY-12 16:30:00
FORMAT Y-M-D
DAYLIGHT SAVING ON
DDAAYYLLIIGGHHTT SSAAVVIINNGG
START 4TH-SUN-MAR 01: 00: 00
END 4TH-SUN-OCT 01: 00: 00
ADJUST 01 : 00

- 8 -
Advance
Advance > Camera
Title
This option allows you to create a name for the camera.
Brightness / Contrast / Saturation / Hue
This option allows you to modify these four values for the camera.
Covert
This option allows you to hide a camera from display. It will still record, but will only show during playback.
Record
This option allows you to configure whether to record this camera or leave it as display only.
Advance > Detection
Advance > Detection > Detection Setup
Detection
This option enables and disables motion detection for this individual camera.
Area
Press ENTER to setup area masking for this camera.
Note: The Advance menu of the DVR is enthusiasts or experts only. Changing settings in this section of the menu
can drastically alter the performance and functionality of the DVR. It is recommended you do not change anything
in this section unless
y
ou know what you are doing.
AADDVVAANNCCEE
CAMERA
DETECTION
DISPLAY
ALERT
REMOTE
SYSTEM
NETWORK
HDD INFO
EVENT LOG
DDEETTEECCTTIIOONN
DETECTION SETUP
DETECTION TIMER
DDEETTEECCTTIIOONN
TITLE DET AREA LS SS TS RE ALARM
01 ON SETUP 07 03 02 10 OFF
02 ON SETUP 07 03 02 10 LOW
03 ON SETUP 07 03 02 10 HIGH
04 ON SETUP 07 03 02 10 OFF
- 9 -
LS
The sensitivity of comparing two different images. The smaller the value is, the higher sensitivity for motion detection. The
highest sensitivity setting is 00 and the lowest sensitivity setting is 15. The default value is 07.
SS
The sensitivity regarding the size of the triggered object on the screen (the number of motion detection grids). The smaller
the value, the higher sensitivity for motion detection. The highest sensitivity setting is 00 and the lowest sensitivity setting
is 15. The default setting is 03.
TS
The sensitivity regarding how long the object gets triggered. The smaller the value, the higher motion detection sensitivity
will be. The highest sensitivity setting is 00 and the lowest sensitivity setting is 15. The default setting is 02.
RE
The value of RE is a reference for detection. The default value is 10, which means DVR will compare 10 continuous
images at one time according to the sensitivity of LS, SS, TS simultaneously. The bigger the value, the higher sensitivity
for motion detection. The highest sensitivity is 61.
Alarm
Select LOW / HIGH for the alarm. The default alarm value is OFF.
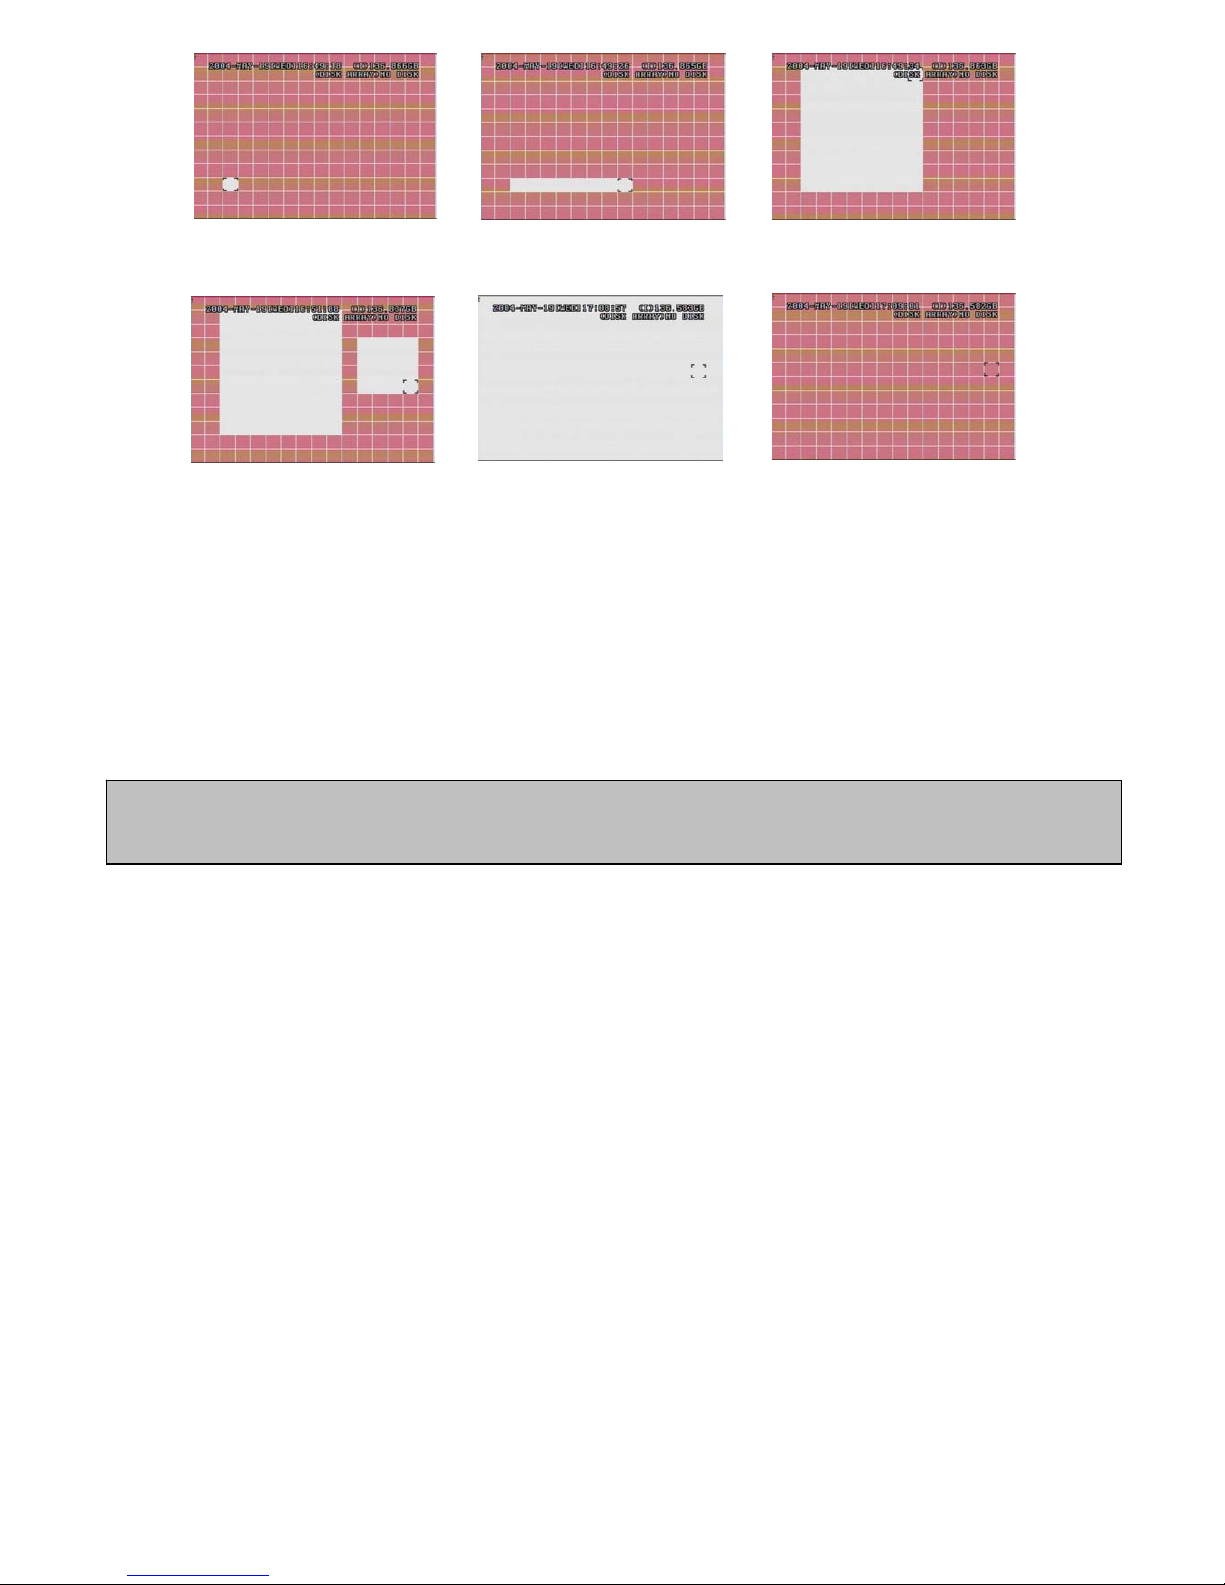
Press “ENTER” to confirm the
start area
Press ◄ or ► to choose the
width of the area
Press ▲ or ▼ to choose the
height of the area, and press
“ENTER” again to confirm.
Multi-detection areas
Press “-” to set the whole
area under detection
Press “+” to set the whole
undetected
Note: The default setting of Spatial Sensitivity is 03, which means once a object is detected more than 3 grids, the
system will get triggered. So the value of Spatial Sensitivity must be less than the number of grids that you set up for
the motion detection area.

- 10 -
Advance > Detection > Detection Timer
The DVR will only check for alarm inputs or motion when in a scheduled time period.
Advance > Display
Title Display / Date Display
Configures whether or not to show camera title and date information on screen.
HDD Info
This option configures whether or not to show the current hard drive capacity on screen.
Loss Screen
Configures whether to show a BLUE or BLACK screen when video loss is detected.
Playback Info
This option configures whether to show playback info in the bottom left (NORMAL) or center (CENTER).
Dwell Duration
This option configures how long the DVR should ‘dwell’ on each camera when it is in sequencing mode.
De-Interlace
This option configures whether the monitor output is de-interlaced.
Monitor Out
This DVR does not support multiple output monitors. Do not change this value.
OSD
This sub menu lets you customise the colour values of the on-screen display.
Watermark
This option places a security watermark in stored video. It is recommended that you leave this option turned on.
DDEETTEECCTTIIOONN TTIIMMEERR
DATE START END
OFF 00 : 00 - 00 : 00
DAILY 08 : 00 - 18 : 00
SUN 06 : 00 - 23 : 00
MON-FRI 00 : 00 - 00 : 00
OFF 00 : 00 - 00 : 00
OFF 00 : 00 - 00 : 00
OFF 00 : 00 - 00 : 00
DDIISSPPLLAAYY
TITLE DISPLAY ON
DATE DISPLAY ON
HDD INFO ON
LOSS SCREEN BLUE
PLAYBACK INFO NORMAL
DWELL DURATION (SEC) 2
DE-INTERLACE ON
MONITOR OUT MAIN
OSD SETUP
WATERMARK ON

- 11 -
Advance > Alert
External Alert
Configures whether to sound the buzzer when the external alarm is triggered.
Internal Buzzer
Sets the sound of the internal buzzer.
Key Buzzer
Configures whether to sound the buzzer when pressing buttons on the front panel.
Video Loss Buzzer
Configures whether to sound the buzzer when video loss is detected.
Motion Buzzer
Configures whether to sound the buzzer when motion is detected.
Alarm Buzzer
Configures whether to sound the buzzer when the internal alarm is triggered.
HDD Buzzer
Configures whether to sound the buzzer when the hard drive is full.
HDD Nearly Full (GB)
Sets the amount of remaining hard drive capacity required before the alarm will sound.
Alarm Duration (SEC)
Sets the amount of time to record once an alarm event has been detected.
Pre-Alarm
Sets whether the DVR should record events before an alarm trigger occurs.
AALLEERRTT
EXT. ALERT ON
INT. BUZZER ON
KEY BUZZER ON
VLOSS BUZZER ON
MOTION BUZZER ON
ALARM BUZZER ON
HDD BUZZER ON
HDD NEARLY FULL (GB) 05
ALARM DURATION (SEC) 05
PRE-ALARM OFF
 Loading...