

Page 1
WatchGuard® AP
AP325
HW Model: C-110
Quick Start Guide
WatchGuard® Technologies, Inc.
Page 2
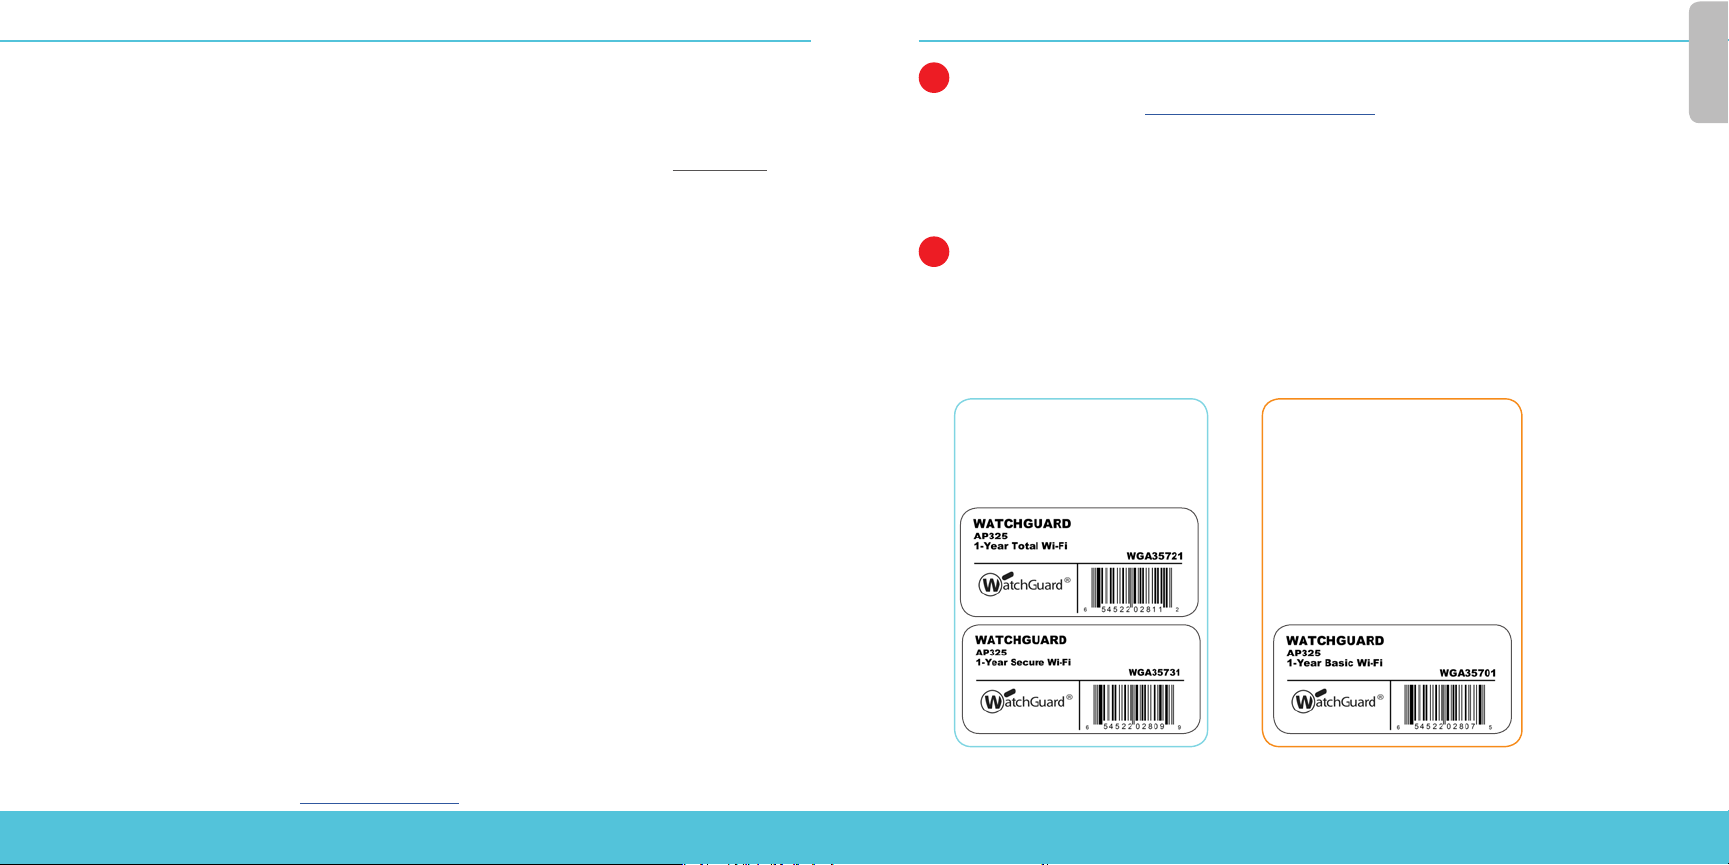
1
ACTIVATE YOUR AP
1. Go to www.watchguard.com/activate
2. Log in to your WatchGuard account, or create a new account*.
*If you create a new account, return to www.watchguard.com/activate after you finish the
account creation process.
3. Type the serial number for your device.
2
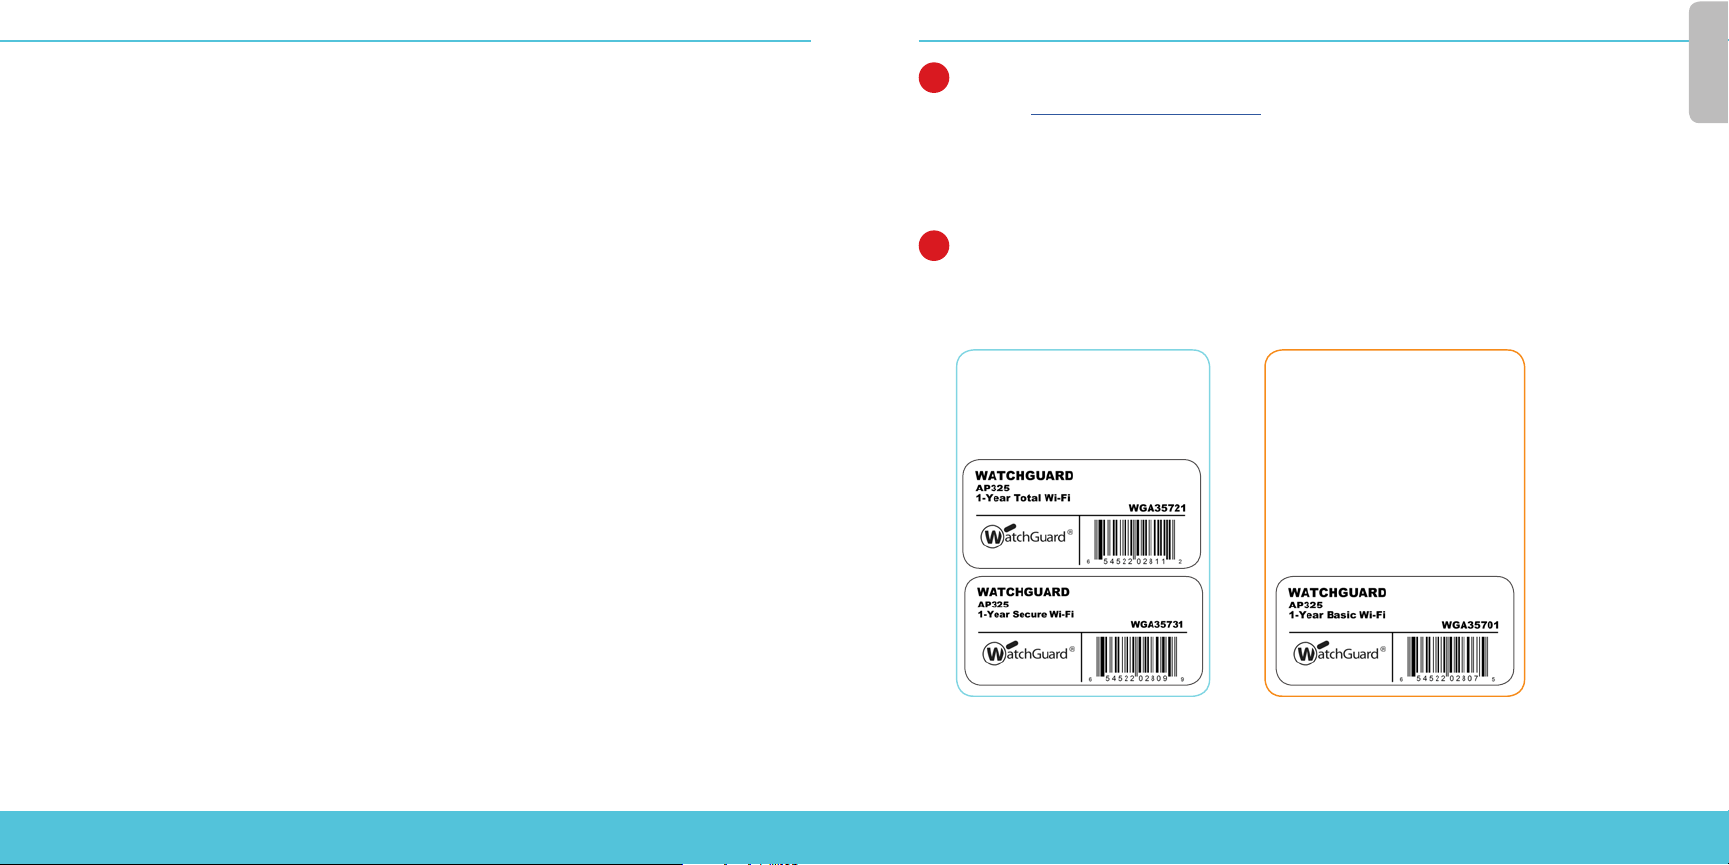
SELECT YOUR AP MANAGEMENT METHOD
When you purchased your AP, you selected the method you wanted to use to manage it. This guide
includes basic setup instructions for both methods. To verify which instructions to use, look at the
sticker on the outside of the box your AP came in.
English
Total & Secure Wi-Fi
Manage, congure, and
monitor APs from the WatchGuard Wi-Fi Cloud.
Basic Wi-Fi
Manage, congure, and monitor
APs directly from your WatchGuard Firebox. Requires Fireware
OS v12.1 or higher.
2 3
Page 3

English
SET UP AN AP WITH WIFI CLOUD
Connect the AP
• Connect an Ethernet cable between your network and the
Ethernet (LAN1) interface on your AP.
• You must enable DHCP on the network where you connect the AP.
- Make sure that the AP has Internet connectivity and can communicate to WatchGuard
Wi-Fi Cloud services on these ports: HTTP TCP 80/443 and UDP 3851.
If you have a Firebox the WatchGuard Wi-Fi Cloud policy opens the necessary ports.
• If your network does not support Power over Ethernet (PoE+), connect the optional power adapter or
PoE+ injector (sold separately).
• After you power on the AP, wait a few minutes until the Power indicator and the Ethernet (LAN1) indi-
cator turn solid green. This shows the AP is online and can communicate with the WatchGuard Wi-Fi
Cloud.
Connect to the WatchGuard Wi-Fi Cloud
To connect to the WatchGuard Wi-Fi Cloud, log in to the WatchGuard Support Center or go to
https://login.watchguard.cloudwi.com
Congure your AP
1. From the WatchGuard Wi-Fi Cloud Dashboard, launch Go.
2. Add a new wireless network and type the SSID you want to use.
3. Select a security mode. We recommend WPA2 PSK.
4. Click Save to reset your AP with the new conguration.
5. Toggle on your new wireless network.
Verify AP Status
• From the WatchGuard Wi-Fi Cloud Dashboard, launch Manage.
• Select Monitoring > Managed Devices.
• Make sure your AP appears and the status is active.
It may take several minutes for the AP to display as active after the initial conguration.
For complete information about how to congure your AP with WatchGuard Wi-Fi Cloud,
see WatchGuard Wi-Fi Cloud Help at watchguard.com/help.
Getting Started with the WatchGuard
Wi-Fi Cloud Video Tutorial (10 minutes)
http://wgrd.tech/2cDXQRM
HINT:
Use a mobile device
to verify that your new
wireless network is
broadcasting.
SET UP AN AP WITH A FIREBOX
Connect the AP
• Connect the AP to a Firebox trusted or optional interface with DHCP enabled.
For information about using a static IP address, see Fireware Help.
• If your network does not support Power over Ethernet (PoE+), connect the optional power adapter
or PoE+ injector (sold separately).
• Log in to Fireware Web UI and make sure the interface the AP connects to has DHCP
enabled.
Enable the Gateway Wireless Controller
• Select Network > Gateway Wireless Controller, then select the Enable Gateway
Wireless Controller check box.
• Type the AP Passphrase the Firebox will use for APs after they are paired.
Discover and pair the AP
• Click Refresh to start Access Point discovery.
• Select the discovered Access Point and click Pair.
• Congure radio settings for each radio. Click Save.
Congure an SSID for the AP
• Select the SSIDs tab. Click Add.
• In the Network Name text box, type a name for this wireless network.
• In the SSID settings, select the Security tab. Congure wireless security settings.
• In the SSID settings, select the Access Points tab. Select the Access Point radios.
• Click Save.
Verify AP status
• Select Dashboard > Gateway Wireless Controller, then select the Access Points tab.
• Make sure your known APs are trusted and the device status is Online.
For complete information about how to congure your AP with the Gateway Wireless Controller on your
Firebox, see Fireware Help at watchguard.com/help.
4 5
Page 4
简体中文
1
激活 AP 设备
1. 转到 www.watchguard.com/activate
2. 登录 WatchGuard 帐户,或创建一个新的帐户*。
*
如果创建新帐户,请在完成帐户创建过程后返回到
www.watchguard.com/activate
。
3. 输入设备的序列号。
2
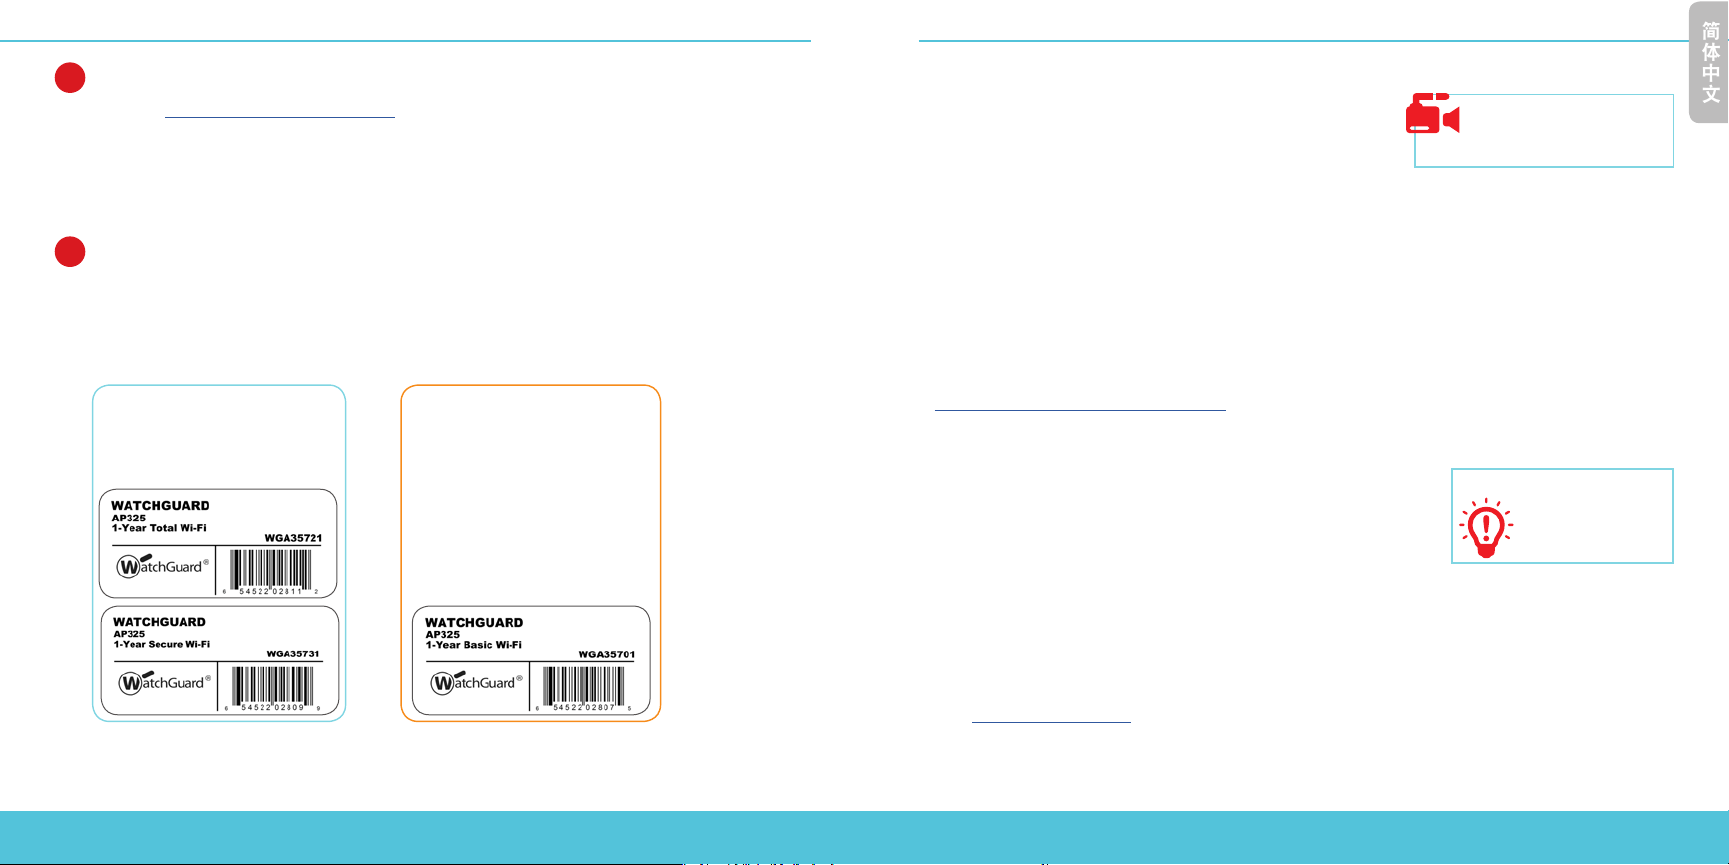
选择 AP 管理方法
购买 AP 设备时,您需要选择相应的管理方法。本指南包含两种方法的基本设置说明。要验证具体
应使用哪些说明,请查看 AP 设备包装箱外部的不干胶标签。
Total & Secure Wi-Fi
通过 WatchGuard Wi-Fi 云管理、
配置和监视 AP 设备。
Basic Wi-Fi
通过 WatchGuard Firebox 管理、
配置和监视 AP 设备。需要
Fireware 操作系统 v12.1 或
更高版本。
使用 WI-FI CLOUD 设置 AP
连接 AP 设备
• 在网络和 AP 设备上的以太网 (LAN1) 接口之间连接一条
以太网电缆。
• 必须在连接 AP 设备的网络上开启 DHCP。
- 确保 AP 设备有 Internet 连接,并且可以在这些端口上与 WatchGuard Wi-Fi 云服务通信。
HTTP TCP 80/443 以及 UDP 3851。
如果您有
Firebox,WatchGuard Wi-Fi
云策略将会打开必要的端口。
• 如果网络不支持以太网供电 (PoE+),请 连 接 到 可 选 电 源 适 配 器 或 PoE+ 供 电 器( 单 独 销 售 )。
• 在AP 设备开机后, 请稍等几分钟时间 直至电源指示灯与以太网(LAN1)指示灯变为绿色长亮 这表示
AP 设备已连上网络,且可与WatchGuard Wi-Fi 云通信。
连接到 WatchGuard Wi-Fi 云
要连接到 WatchGuard Wi-Fi 云,请登录到 WatchGuard 支持中心,或转到
https://login.watchguard.cloudwi.com
配置 AP 设备
1. 从 WatchGuard Wi-Fi 云控制面板中,点击开始。
2. 添加一个新的无线网络,并输入要使用的 SSID。
3. 选择一种安全模式。我们建议使用 WPA2 PSK。
4. 点击保存以使用新配置重置 AP 设备。
5. 开启您的新无线网络。
验证 AP 设备状态
• 从 WatchGuard Wi-Fi Cloud 仪表板中,启动“管理”。
• 选择“监控”>“受管设备”。
• 确保您的 AP 显示,并且状态为活动。
有关如何使用 WatchGuard Wi-Fi 云配置 AP 设备的完整信息,请参阅 WatchGuard Wi-Fi
网址为 watchguard.com/help.
WatchGuard Wi-Fi 云入门指南
视频教程(10 分钟)
http://wgrd.tech/2cDXQRM
使用移动设备验证
提示:
您的新无线网络是否
正在广播。
云帮助
,
6 7
Page 5

Français
使用 FIREBOX 设置 AP
连接 AP 设备
• 将 AP 设备连接至 Firebox 的可信赖或可选接口,并开启 DHCP。
有关静态
• 如果网络不支持以太网供电 (PoE+),请 连 接 到 可 选 电 源 适 配 器 或 PoE+ 供 电 器( 单 独 销 售 )。
• 登录 Fireware 的网络用户界面,确保 AP 设备连接的接口已开启 DHCP。
开启网关无线控制器
• 选择网络 > 网关无线控制器,然后选中开启网关无线控制器复选框。
• 输入 AP 密码短语,Firebox 和 AP 设备配对后将会用到这一密码短语。
发现并配对 AP 设备
• 点击刷新,开始发现接入点。
• 选择发现的接入点,并点击配对。
• 配置各个射频的射频设置。点击保存。
为 AP 设备配置 SSID
• 选择 SSID 选项卡。点击添加。
• 在网络名称文本框中,输入此无线网络的名称。
• 在 SSID 设置中,选择安全选项卡。配置无线安全设置。
• 在 SSID 设置中,选择接入点选项卡。选择接入点射频。
• 点击保存。
验证 AP 设备状态
• 选择控制面板 > 网关无线控制器,然后选择接入点选项卡。
• 确保您的已知 AP 设备可信,并且设备状态为“联机”。
IP
地址的更多信息,请参见
Fireware
帮助。
1
ACTIVEZ VOTRE PÉRIPHÉRIQUEAP
1. Rendez-vous sur la page www.watchguard.com/activate
2. Connectez-vous à votre compte WatchGuard ou créez un nouveau compte*.
* Si vous créez un nouveau compte, retournez sur la page www.watchguard.com/activate à la fin du
processus de création de compte.
3. Saisissez le numéro de série de votre appareil.
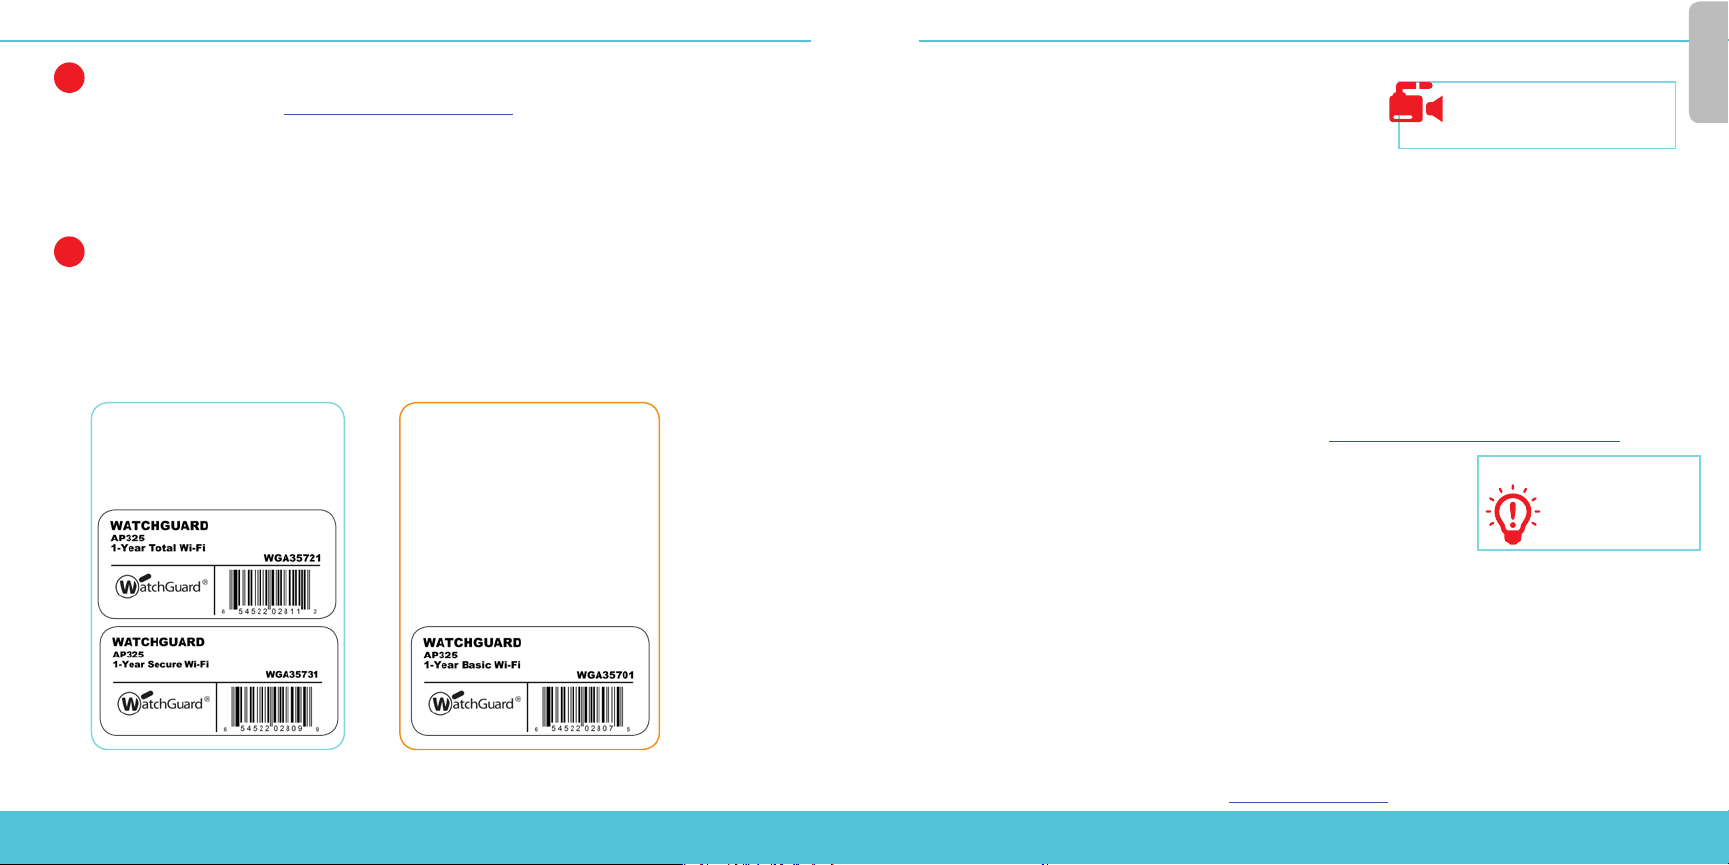
SÉLECTIONNEZ LE MODE DE GESTION DE VOTRE PÉRIPHÉRIQUEAP
2
Lorsque vous avez acheté votre périphériqueAP, vous avez sélectionné la méthode que vous
souhaitez utiliser pour le gérer. Ce guide contient des instructions de conguration de base pour
les deux méthodes. Pour savoir quelles instructions utiliser, consultez l'étiquette collée sur la boîte
de votre périphériqueAP.
Total & Secure Wi-Fi
Gérez, congurez et surveillez
vos périphériquesAP depuis
WatchGuard Wi-Fi Cloud.
Basic Wi-Fi
Gérez, congurez et surveillez
vos périphériquesAP
directement depuis votre
Firebox WatchGuard. Nécessite
Fireware OSv12.1 ou version
supérieure.
有关如何在 Firebox 上使用网关无线控制器配置 AP 设备的完整信息,请参阅 Fireware 帮助,
网址为 watchguard.com/help。
8 9
Page 6

Français
CONFIGURER UN POINT D’ACCÈS AVEC WIFI CLOUD
Connecter le périphériqueAP
• Connectez un câble Ethernet entre votre réseau et
l'interface Ethernet (LAN1) de votre périphériqueAP.
• Vous devez activer le protocole DHCP sur le réseau auquel vous connectez le périphériqueAP.
- Assurez-vous que le périphériqueAP dispose d'une connectivité Internet et peut communiquer avec
les services WatchGuard Wi-Fi Cloud sur ces ports: HTTP TCP80/443 et UDP3851.
Si vous disposez d'une appliance Firebox, la politique WatchGuard Wi-Fi Cloud ouvre les ports nécessaires.
• Si votre réseau ne prend pas en charge le protocole Power over Ethernet (PoE+), connectez
l’adaptateur secteur en option à l’injecteur PoE+ (vendu séparément).
• Après avoir mis le périphérique AP sous tension, attendez quelques minutes jusqu’à ce que le
voyant d’alimentation et le voyant Ethernet (LAN1) s’illumine en vert xe. Cela indique que le
périphérique AP est en ligne et peut communiquer avec le WatchGuard Wi-Fi Cloud.
Connectez-vous à WatchGuard Wi-Fi Cloud
Pour vous connecter à WatchGuard Wi-Fi Cloud, connectez-vous au Centre de support technique de
WatchGuard ou rendez-vous à l'adresse https://login.watchguard.cloudwi.com
Congurez votre périphériqueAP
1. Depuis le tableau de bord de WatchGuard Wi-Fi Cloud, lancez Go.
2. Ajoutez un nouveau réseau sans l et saisissez le SSID que vous
souhaitez utiliser.
3. Sélectionnez un mode de sécurité. Nous recommandons WPA2PSK.
4. Cliquez sur Enregistrer pour réinitialiser votre périphériqueAP avec la nouvelle conguration.
5. Activez votre nouveau réseau sans l.
Vérier le statut du périphérique AP
• Dans le tableau de bord de WatchGuard WiFi Cloud, cliquez sur Manager (Gérer).
• Sélectionnez Monitoring (Surveillance) > Managed Devices (Appareils gérés).
• Vériez que votre point d’accès apparaît et que son statut est actif
L’apparition de l’appareil AP comme actif peut prendre quelques minutes suite à la conguration initiale.
Pour obtenir des informations complètes sur la conguration de votre périphériqueAP avec WatchGuard
Wi-Fi Cloud, consultez l'Aide WatchGuard Wi-Fi Cloud, disponible à l'adresse watchguard.com/help.
Tutoriel vidéo Démarrer avec
WatchGuard Wi-Fi Cloud (10minutes)
http://wgrd.tech/2cDXQRM
ASTUCE:
Utilisez un appareil
mobile pour vous assurer
que votre nouveau
réseau sans l est actif.
CONFIGURER UN POINT D’ACCÈS AVEC UNE FIREBOX
Connecter le périphériqueAP
• Connectez le périphériqueAP à une interface Firebox approuvée ou en option sur laquelle le
protocole DHCP est activé.
Pour plus d'informations sur l'utilisation d'une adresse IP statique, voir l'Aide de Fireware.
• Si votre réseau ne prend pas en charge le protocole Power over Ethernet (PoE+), connectez
l'adaptateur secteur en option à l'injecteur PoE+ (vendu séparément).
• Connectez-vous à l'interface utilisateur Web Fireware et assurez-vous que le protocole DHCP est
activé sur l'interface à laquelle le périphériqueAP se connecte.
Activez le Gateway Wireless Controller
• Sélectionnez Réseau > Gateway Wireless Controller, puis cochez la case Activer Gateway
Wireless Controller.
• Saisissez le mot de passeAP que Firebox utilisera pour les périphériquesAP une fois qu'ils
seront associés.
Détectez et associez le périphérique AP
• Cliquez sur Actualiser pour lancer la détection de périphériquesAP.
• Sélectionnez le périphériqueAP détecté et cliquez sur Associer.
• Congurez les paramètres de radio de chaque radio. Cliquez sur Enregistrer.
Congurer un SSID pour le périphériqueAP
• Sélectionnez l'onglet SSID. Cliquez sur Ajouter.
• Dans la zone de texte Réseau, saisissez un nom pour ce réseau sans l.
• Dans les paramètres SSID, sélectionnez l'onglet Sécurité. Congurez les paramètres de sécurité sans l.
• Dans les paramètres SSID, sélectionnez l'onglet Points d'accès. Sélectionnez les radios du
périphérique AP.
• Cliquez sur Enregistrer.
Vérier le statut du périphériqueAP
• Sélectionnez Tableau de bord > Gateway Wireless Controller, puis sélectionnez l'onglet Points d'accès.
• Assurez-vous que vos périphériqueAP connus sont approuvés et que leur état est Online (En ligne)
Pour obtenir des informations complètes sur la conguration de votre périphériqueAP avec Gateway
Wireless Controller sur votre Firebox, consultez l'Aide de Fireware à l'adresse watchguard.com/help.
10 11
Page 7
Deutsch
1
AKTIVIEREN DES APGERÄTS
1. Rufen Sie die Website www.watchguard.com/activate auf.
2. Melden Sie sich bei Ihrem WatchGuard-Account an, oder erstellen Sie ein neues Konto.*
* Falls Sie ein neues Konto erstellen, kehren Sie nach erfolgreichem Abschluss zur Seite
www.watchguard.com/activate zurück.
3. Geben Sie die Seriennummer Ihres Geräts ein.
AUSWÄHLEN DER APVERWALTUNGSMETHODE
2
Beim Kauf Ihres AP-Geräts haben Sie sich für eine entsprechende Verwaltungsmethode
entschieden. Dieser Leitfaden enthält grundlegende Anleitungen zur Einrichtung nach beiden
Methoden. Um herauszunden, welche Anweisungen für Sie gelten, sehen Sie sich den Aufkleber
auf dem Karton an.
Total & Secure Wi-Fi
Verwalten, kongurieren und
überwachen Sie AP-Geräte über
die WatchGuard Wi-Fi Cloud.
Basic Wi-Fi
Verwalten, kongurieren und
überwachen Sie AP-Geräte direkt
von der WatchGuard Firebox
aus. Hierfür ist das FirewareBetriebssystem ab Version 12.1
erforderlich.
Einrichten von Wi-Fi Cloud für AP-Geräte
Anschließen des AP-Geräts
• Schließen Sie ein Ethernet-Kabel zwischen dem Netzwerk
und der Ethernet-Schnittstelle (LAN1) des AP-Geräts an.
• Beim Herstellen der Verbindung zum AP-Gerät muss DHCP für die Netzwerkschnittstelle aktiviert sein.
– Stellen Sie sicher, dass das AP-Gerät mit dem Internet verbunden ist und über die folgenden
Ports mit WatchGuard Wi-Fi Cloud-Services kommunizieren kann: HTTP TCP 80/443 und UDP
3851.
Wenn Sie eine Firebox haben, werden die entsprechenden Ports durch die WatchGuard Wi-Fi Cloud-Richtlinie geöffnet.
• Wenn Ihr Netzwerk PoE+ (Power over Ethernet) nicht unterstützt, verbinden Sie das AP-Gerät mit
dem optionalen Netzteil bzw. PoE+-Injektor (wird separat vertrieben).).
• Warten Sie nach dem Einschalten des AP-Geräts einige Minuten, bis die Betriebsanzeige und
die Ethernet-Anzeige (LAN1) beide grün leuchten. Das AP-Gerät ist jetzt online und kann mit
WatchGuard Wi-Fi Cloud kommunizieren.
Herstellen der Verbindung zur WatchGuard Wi-Fi Cloud
Um eine Verbindung zur WatchGuard Wi-Fi Cloud herzustellen, melden Sie sich beim WatchGuard
Support Center an, oder rufen Sie die folgende URL auf: https://login.watchguard.cloudwi.com
Kongurieren des AP-Geräts
1. Starten Sie im Dashboard der WatchGuard Wi-Fi Cloud die App Go.
2. Fügen Sie ein neues drahtloses Netzwerk hinzu, und geben Sie
die SSID ein, die Sie verwenden möchten.
3. Wählen Sie einen Sicherheitsmodus aus. Empfohlen wird WPA2 PSK.
4. Klicken Sie auf Save (Speichern), um Ihr AP-Gerät auf die neue Konguration zurückzusetzen.
5. Schalten Sie das neue drahtlose Netzwerk ein.
Überprüfen des AP-Gerätestatus
• Starten Sie „Manage“ (Verwalten) im Dashboard der WatchGuard Wi-Fi Cloud.
• Wählen Sie „Monitoring“ (Überwachen) > Managed Devices (Verwaltete Geräte) aus.
• Überprüfen Sie, ob das AP-Gerät mit aktivem Status angezeigt wird.
Nach der anfänglichen Konguration kann es mehrere Minuten dauern, bis das AP-Gerät als aktiv
angezeigt wird.
Ausführliche Informationen zum Kongurieren des AP-Geräts mit WatchGuard Wi-Fi Cloud nden Sie
in der Hilfe zu WatchGuard Wi-Fi Cloud unter watchguard.com/help.
Videoanleitung zum Schnelleinstieg für
WatchGuard Wi-Fi Cloud (10 Minuten)
http://wgrd.tech/2cDXQRM
Überprüfen Sie die
Tipp:
Übertragungsfähigkeit
des neuen drahtlosen
Netzwerks auf einem
Mobilgerät.
12 13
Page 8
Italiano
Einrichten von Firebox für AP-Geräte
Anschließen des AP-Geräts
• Verbinden Sie das AP-Gerät mit einer Firebox-Trusted- oder optionalen Schnittstelle mit
aktiviertem DHCP.
Weitere Informationen zur Verwendung einer statischen IP-Adresse finden Sie in der Fireware-Hilfe.
• Wenn Ihr Netzwerk PoE+ (Power over Ethernet) nicht unterstützt, verbinden Sie das AP-Gerät mit
dem optionalen Netzteil bzw. PoE+-Injektor (wird separat vertrieben).
• Melden Sie sich an der Fireware Web UI an, und überprüfen Sie, ob an der Schnittstelle, über die
das AP-Gerät angeschlossen ist, DHCP aktiviert ist.
Aktivieren des Gateway Wireless Controllers
• Wählen Sie Network > Gateway Wireless Controller aus, und aktivieren Sie anschließend das
Kontrollkästchen Enable Gateway Wireless Controller.
• Geben Sie die AP-Passphrase ein, die die Firebox nach dem Koppeln für AP-Geräte verwenden soll.
Erkennen und Koppeln des AP-Geräts
• Klicken Sie auf Refresh, um die Access Point-Erkennung zu starten.
• Wählen Sie den erkannten Access Point aus, und klicken Sie auf Pair.
• Kongurieren Sie die einzelnen Funkeinstellungen. Klicken Sie auf Save.
Kongurieren einer SSID für das AP-Gerät
• Wählen Sie die Registerkarte SSIDs aus. Klicken Sie auf Add.
• Geben Sie im Textfeld Network Name einen Namen für dieses drahtlose Netzwerk ein.
• Klicken Sie unter den Einstellungen für SSID auf die Registerkarte Security. Kongurieren Sie die
WiFi-Sicherheitseinstellungen.
• Klicken Sie unter den Einstellungen für SSID auf die Registerkarte Access Points. Wählen Sie die
Access Point-Funkeinstellungen aus.
• Klicken Sie auf Save.
Überprüfen des AP-Gerätestatus
• Wählen Sie Dashboard > Gateway Wireless Controller aus, und klicken Sie anschließend auf die
Registerkarte Access Points.
• Stellen Sie sicher, dass Ihre bekannten AP-Geräte als„Trusted“(vertrauenswürdig) gelten und der
Gerätestatus„Online“lautet.
Ausführliche Informationen zum Kongurieren des AP-Geräts mit dem Gateway Wireless Controller der Firebox
nden Sie in der Fireware-Hilfe unter watchguard.com/help.
1
ATTIVAZIONE DEL DISPOSITIVO AP
1. Navigare all’indirizzo www.watchguard.com/activate
2. Accedere al proprio account WatchGuard, oppure crearne uno nuovo*.
* Se si crea un nuovo account, tornare a www.watchguard.com/activate dopo aver terminato la
procedura di creazione dell’account.
3. Digitare il numero di serie del proprio dispositivo.
SELEZIONE DEL METODO DI GESTIONE AP
2
Al momento dell’acquisto del dispositivo AP (access point) è stato selezionato il metodo da
utilizzare per gestirlo. Questa guida contiene le istruzioni di congurazione di base per entrambi
i metodi. Per stabilire quali istruzioni è opportuno seguire, guardare l’adesivo situato sulla parte
esterna della confezione del dispositivo AP.
Total & Secure Wi-Fi
Gestione, congurazione e
monitoraggio dei dispositivi AP
da WatchGuard Wi-Fi Cloud.
Basic Wi-Fi
Gestione, congurazione e
monitoraggio dei dispositivi AP
da WatchGuard Firebox. Richiede
Fireware OS v12.1 o superiore.
14 15
Page 9

Italiano
CONFIGURAZIONE DI UN AP CON WIFI CLOUD
Collegare il dispositivo AP
• Collegare un cavo Ethernet tra la rete e l’interfaccia
Ethernet (LAN1) del dispositivo AP.
• È necessario abilitare DHCP sulla rete a cui si connette il dispositivo AP.
- Assicurarsi che il dispositivo AP disponga della connettività Internet e possa comunicare con i servizi
di WatchGuard Wi-Fi Cloud sulle porte seguenti: HTTP TCP 80/443 e UDP 3851.
Se si dispone di un dispositivo Firebox, la policy WatchGuard Wi-Fi Cloud apre le porte necessarie.
• Se la rete non supporta il protocollo Power over Ethernet (PoE+), collegare l’adattatore di
alimentazione opzionale o l’iniettore PoE+ (venduto separatamente).
• Dopo aver acceso il dispositivo AP, attendere per alcuni minuti no a quando sia l’indicatore di
alimentazione che l’indicatore di rete Ethernet (LAN1) si accendano ssi e di colore verde. Questo
signica che il dispositivo AP è online e può comunicare con il cloud Wi-Fi WatchGuard.
Eseguire la connessione a WatchGuard Wi-Fi Cloud
Per eseguire la connessione a WatchGuard Wi-Fi Cloud, accedere a WatchGuard Support Center o andare
all’indirizzo https://login.watchguard.cloudwi.com
Congurare il dispositivo AP
1. Nel dashboard di WatchGuard Wi-Fi Cloud, selezionare Go.
2. Aggiungere una nuova rete wireless e digitare il codice SSID
da utilizzare.
3. Selezionare una modalità di sicurezza. Si consiglia WPA2PSK.
4. Fare clic su Save per reimpostare il dispositivo AP con la nuova congurazione.
5. Attivare la nuova rete wireless.
Vericare lo stato del dispositivo AP
• Nel dashboard di WatchGuard Wi-Fi Cloud, apri Manage.
• Seleziona Monitoring > Managed Devices.
• Verica che l’AP sia visualizzato e che lo stato sia attivo.
Potrebbe trascorrere qualche minuto prima che il dispositivo AP venga visualizzato come attivo dopo la
congurazione iniziale.
Per informazioni complete sulla congurazione del dispositivo AP con il cloud Wi-Fi WatchGuard,
vedere la Guida di WatchGuard Wi-Fi Cloud su watchguard.com/help.
Primi passi con il tutorial video
WatchGuard Wi-Fi Cloud (10 minuti)
http://wgrd.tech/2cDXQRM
SUGGERIMENTO: Utilizzare un
dispositivo mobile
per vericare che la
nuova rete wireless sta
trasmettendo.
CONFIGURAZIONE DI UN AP CON UN FIREBOX
Collegare il dispositivo AP
• Collegare il dispositivo AP all’interfaccia Firebox adabile o opzionale con DHCP abilitato.
Per informazioni sull’utilizzo di un indirizzo IP statico, vedere la Guida di Fireware.
• Se la rete non supporta il protocollo Power over Ethernet (PoE+), collegare l’adattatore di
alimentazione opzionale o l’iniettore PoE+ (venduto separatamente).
• Accedere all’interfaccia utente web Fireware e vericare che sull’interfaccia alla quale si collega
il dispositivo AP sia abilitato il protocollo DHCP.
Abilitare il Gateway Wireless Controller
• Selezionare Network > Gateway Wireless Controller, quindi selezionare la casella Enable Gateway
Wireless Controller.
• Digitare la passphrase AP che Firebox utilizzerà per i dispositivi AP dopo avere eettuato
l’associazione.
Rilevare e associare il dispositivo AP
• Fare clic su Refresh per avviare il rilevamento dell’Access Point.
• Selezionare l’Access Point rilevato e fare clic su Pair.
• Congurare le impostazioni radio per ogni radio. Fare clic su Save.
Congurare un SSID per il dispositivo AP
• Selezionare la scheda SSID. Fare clic su Add.
• Nella casella di testo Network Name, digitare un nome per la rete wireless.
• Nelle impostazioni SSID, selezionare la scheda Security. Congurare le impostazioni di sicurezza
wireless.
• Nelle impostazioni SSID, selezionare la scheda Access Point. Selezionare le radio dell’Access Point.
• Fare clic su Save.
Vericare lo stato del dispositivo AP
• Selezionare Dashboard > Gateway Wireless Controller, quindi selezionare la scheda Access Point.
• Verica che i dispositivi AP noti siano adabili e che lo stato dei dispositivi sia Online.
Per informazioni complete sulla congurazione del dispositivo AP con il Gateway Wireless Controller sul Firebox
in uso, vedere la Guida di Fireware su watchguard.com/help.
16 17
Page 10

日本語
AP
1
2
デバイスの起 動
1. www.watchguard.com/activate
2.
登録済みの
*
新しいアカウントを作成する場合は、アカウントの作成が完了してからもう一度
WatchGuard
www.watchguard.com/activate
3.
デバイスのシリアル番号を入力します。
AP
管理方法の選択
デバイスの購入時、二つの管理方法のうち一つを選びます。このガイドではその両方の基本設定
AP
方法を記載しています。設定方法の選択にあたっては、
ステッカーをご 参照ください。
Total & Secure Wi-Fi
WatchGuard Wi-Fi Cloud で
AP デ バ イ ス を 管 理 、設 定 、
モニターしま す。
にアクセスします。
アカウントにログインするか、新しいアカウントを作成します*。
にアクセスしてください。
デバイスが梱包されていた箱表面の
AP
Basic Wi-Fi
WatchGuard Firebox から直接
AP デ バ イ ス を 管 理 、設 定 、
モニターしま す。Fireware OS
v12.1 以上が必要です。
W i - F i C l o u d で アク セス ポ イントを セットアップ す る
AP
デバイスを接 続する
•
イー サネ ット ケ ーブルで ネット ワー クと
イ ー サ ネ ッ ト(
• AP
デバイスを 接 続 する際 は 、 ネット ワー ク上で
- AP
ス と 通 信 で きる こと を確 認してく ださい:
Firebox
•
お使いのネットワークが
パワーアダプタ または、
•
AP デバイスの電源を入れた後、電源及び Ethernet(LAN1) ランプが緑色に点灯するまで数分間お
待ちください。 このランプ状態は、AP デバイスがオンラインであり、WatchGuard Wi-Fi Cloud
と 通信可能であることを意味しています
WatchGuard Wi-Fi Cloud
WatchGuard Wi-Fi Cloud
クしてくだ さい。
AP
デバイスを設定する
1. WatchGuard Wi-Fi Cloud
2.
新たな ワイヤレス ネット ワー クを 追 加し、 お使 いになる
入 力します。
3.
セ キュリティ モードを 選 びま す。
4.
新しい設定で
5.
新し いワイヤレス ネット ワー クに切 り換えます。
AP デバイスの状態を確認
•
WatchGuard Wi-Fi Cloud ダッシュボードから、[Manage ( 管理 )] を開始し ます。
•
[Monitoring ( 監視 )] > [Managed Devices ( 管理対象デバイス )] を選択し ます。
• アクセスポイントが表示され、状態がアクティブになっていることを確認します。
初期構成の後、AP デバイスがアクティブになるまで数分かかることがあります。
WatchGuard Wi-Fi Cloud
Cloud Help
を 参照してくだ さい。
LAN1
)イ ン タ ーフ ェ イ ス を 接 続 し ま す 。
デバイス がインターネットに接続し、次に挙げるポートから
をお持ちであれば、
WatchGuard Wi-Fi Cloud
PoE+(Power over Ethernet
PoE+
インジェクタ(別売り)を接続してください。
に接 続する
に接 続するには、
https://login.watchguard.cloudwi.com
ダッシュボードか ら
AP
デバイス をリ セットするには 、
を使った
AP
watchguard.com/help.
AP
デバイス 上の
DHCP
を有効にする 必 要が あります。
HTTP TCP 80/443 UDP 3851。
ポリシーによって必要なポートが開きます。
)をサポートしていない場合、オプションの
WatchGuard Support Center
Go
を 選択します。
SSID
WPA2 PSK
デバイス設定の詳細につ いては、下 記
が 推奨モードです。
Save
をクリックしま す。
WatchGuard Wi-Fi Cloud ビデオ
チ ュート リ ア ル( 10 分間)はこちら
http://wgrd.tech/2cDXQRM
WatchGuard Wi-Fi Cloud
にロ グイン するか、 下記 をクリッ
新た なワイヤレス
参 考:
ネットワークが 確立
しているかは、モバイル
を
端末で確認します。
URL の WatchGuard Wi-Fi
サービ
18 19
Page 11

한국어
F i r e b o x で アク セ スポ イ ントを セットアップ する
AP
デバイスを接 続する
• AP
デバイスを信頼 できる
接 続し ます。
IP
固定
アドレスに 関して は
•
お使いのネットワークが
パワーアダプタ または、
• Fireware Web UI
を確 認します。
Gateway Wireless Controller
• Network > Gateway Wireless Controller
チェックボックスを 選択します。
• Firebox と AP
お使いになる
• Access Point
•
該当する
•
無 線を各 回 線ごとに 設 定します。
AP
デバイス 用の
• SSIDs
• Network
• SSID
設定で、
• SSID
設定で、
• Save
をクリックしま す。
AP
デバイスの状 態を 確認
• Dashboard > Gateway Wireless Controller
•
お使いの既知の AP デバイスが信頼できるものでありオンラインの状態になっていることを確認しま
す。
Firebox
上での
をご 参照ください。
デバイスの ペアリング終了後に
AP
デバイスとのペアリング
を探すには、
Access Point
SSID
タブ を 選択します。
名の テキストボックスの中に、 ご使 用になるワイヤレス ネット ワー クの 名 前を入 力し ます。
Security
Access Points
Gateway Wireless Controller
watchguard.com/help.
Firebox
、または
Fireware
PoE+(Power over Ethernet
PoE+
インジェクタ(別売り)を接続してください。
に接 続し、
の設定
AP
デバイスを接 続するインターフェイスの
の有効化
Refresh
Pair
を選 び、
Save
Add
をクリックしま す。
タブ を 選択します。無線セキュリティ設 定を 行いま す。
タブ を 選択します。
DHCP
が有効になっているオプション イ ンターフェ イス に
ヘルプ をご参照ください。
)をサポートしていない場合、オプションの
の順に選び、
Firebox
をクリックしま す。
をクリックしま す。
をクリックしま す。
の順に選び、
を使った
AP
Enable Gateway Wireless Controller
で使用する
Access Point
Access Points
デバイス設定の詳 細は、下記
無 線回線を 選 択します。
DHCP
が有効になっていること
AP
パ スフ レ ーズ を入力し ます。
タブ を 選択します。
URL の Fireware
ヘルプ
1
AP 장치 활성화
1. www.watchguard.com/activate로 이동합니다.
2. WatchGuard 계정으로 로그인하거나 새 계정을 만듭니다*.
*
새 계정을 만들 경우 계정 생성 과정을 마친 후
www.watchguard.com/activate
로
돌아가십시오.
3. 장치의 일련 번호를 입력합니다.
AP 관리 방법 선택
2
AP 장치를 구입할 때, 사용하길 원하는 장치 관리 방법을 선택하셨습니다. 이 가이드에는 두
가지 방법 모두에 대한 기본적인 설정 방법이 포함되어 있습니다. 어떠한 지침을 사용해야 할지
확인하려면 AP 장치가 들어 있던 상자 외부에 부착된 스티커를 확인하십시오.
Total & Secure Wi-Fi
WatchGuard Wi-Fi Cloud에서
AP 장치를 관리하고, 구성하며
모니터링할 수 있습니다.
Basic Wi-Fi
WatchGuard Firebox에서 직접
AP 장치를 관리하고, 구성하며
모니터링할 수 있습니다.
여기에는 Fireware OS v12.1
이상 버전이 필요합니다.
20 21
Page 12

한국어
Wi-Fi Cloud로 AP 설정
AP 장치 연결
• 네트워크와 AP 장치의 이더넷(LAN1) 인터페이스 간에 이더넷
케이블을 연결합니다.
• AP 장치를 연결하는 네트워크에서 DHCP를 사용하도록 설정해야 합니다.
- AP 장치가 인터넷에 연결되어 있어야 하고 HTTP TCP 80/443 및 UDP 3851 포트를 통해
WatchGuard Wi-Fi Cloud 서비스와 통신할 수 있어야 합니다.
Firebox
를 사용하는 경우
WatchGuard Wi-Fi Cloud
정책에서 필요한 포트를 엽니다.
• 네트워크에서 PoE+(Power Over Ethernet)가 지원되지 않을 경우, 옵션인 전원 어댑터 또는 PoE+
인젝터를 연결합니다(별도 판매).
• AP 장치의 전원을 켠 후 전원 표시등과 이더넷(LAN1) 표시등이 녹색으로 켜질 때까지 몇분 동안
기다립니다. 이 상태는 AP 장치가 온라인이고 WatchGuard Wi-Fi Cloud와 통신할 수 있음을
나타냅니다.
WatchGuard Wi-Fi Cloud에 연결
WatchGuard Wi-Fi Cloud에 연결하려면 WatchGuard 지원 센터에 로그인하거나
https://login.watchguard.cloudwi.com 웹 사이트로 이동하십시오.
AP 장치 구성
1. WatchGuard Wi-Fi Cloud Dashboard에서 Go를 실행합니다.
2. 새로운 무선 네트워크를 추가하고 사용하려는 SSID를 입력합니다.
3. 보안 모드를 선택합니다. WPA2 PSK를 권장합니다.
4. Save를 클릭하여 새로운 구성으로 AP 장치를 재설정합니다.
5. 새로운 무선 네트워크로 전환합니다.
AP 장치 상태 확인
• WatchGuard Wi-Fi Cloud Dashboard에서 Manage를 실행합니다.
• Monitoring > Managed Devices를 선택합니다.
• AP가 표시되고 활성화된 상태인지 확인합니다
초기 설정 후 AP 장치가 활성 상태로 표시되려면 몇 분 정도 소요될 수 있습니다.
WatchGuard Wi-Fi Cloud에서 AP 장치를 구성하는 방법에 대한 자세한 내용은
WatchGuard Wi-Fi Cloud
도움말
(watchguard.com/help)을 참조하십시오.
WatchGuard Wi-Fi Cloud 시작하기
동영상 튜토리얼(10분)
http://wgrd.tech/2cDXQRM
새로운 무선 네트워크가
힌트:
브로드캐스팅되는지
확인하려면 모바일
장치를 사용하 십시오.
Firebox로 AP 설정
AP 장치 연결
• DHCP가 활성화되어 있으며 Firebox의 인증을 받았거나 옵션인 인터페이스에 AP 장치를 연결합니다.
정적
IP
주소 사용에 대한 자세한 내용은
• 네트워크에서 PoE+(Power Over Ethernet)가 지원되지 않을 경우, 옵션인 전원 어댑터 또는 PoE+
인젝터를 연결합니다(별도 판매).
• Fireware Web UI에 로그인하고, AP 장치가 연결되는 인터페이스에 DHCP가 활성화되어 있는지
확인합 니다.
Gateway Wireless Controller 활성화
• Network > Gateway Wireless Controller를 선택한 다음, Enable Gateway
Wireless Controller 확인란을 선택합니다.
• AP 장치가 페어링된 후 Firebox가 AP 장치에 대해 사용할 AP Passphrase를 입력합니다.
AP 장치 검색 및 페어링
• Refresh를 클릭하여 액세스 포인트 검색을 시작합니다.
• 검색된 액세스 포인트를 선택하고 Pair를 클릭합니다.
• 각 라디오에 대한 라디오 설정을 구성합니다. Save를 클릭합니다.
AP 장치에 대한 SSID 구성
• SSIDs 탭을 선택합니다. Add를 클릭합니다.
• Network Name 텍스트 상자에 이 무선 네트워크의 이름을 입력합니다.
• SSID 설정에서 Security 탭을 선택합니다. 무선 보안 설정을 구성합니다.
• SSID 설정에서 Access Points 탭을 선택합니다. 액세스 포인트 라디오를 선택합니다.
• Save를 클릭합니다.
AP 장치 상태 확인
• Dashboard > Gateway Wireless Controller를 선택한 다음, Access Points 탭을 선택합니다.
• 알려진 AP 기기가 신뢰할 수 있고 기기 상태가 온라인인지 확인하세요.
Firebox에서 Gateway Wireless Controller를 사용하여 AP 장치를 구성하는 방법에 대한 자세한 내용은
Fireware
도움말
(watchguard.com/help)을 참조하십시오.
Fireware
도움말을 참조하십시오.
22 23
Page 13

Español
1
ACTIVE SU DISPOSITIVO AP
1. Visite www.watchguard.com/activate
2. Inicie sesión con su cuenta de WatchGuard o cree una cuenta nueva*.
* Si usted crea una cuenta nueva, regrese a www.watchguard.com/activate luego de finalizar el
proceso de creación de la cuenta.
3. Ingrese el número de serie de su dispositivo.
SELECCIONE SU MÉTODO DE ADMINISTRACIÓN DE AP
2
Cuando adquirió su dispositivo AP, usted seleccionó el método deseado para gestionarlo. Esta guía
incluye instrucciones básicas de instalación para ambos métodos. Para vericar qué instrucciones
utilizar, lea la etiqueta que se encuentra en la parte exterior de la caja del dispositivo AP.
Total & Secure Wi-Fi
Administre, congure y
supervise dispositivos AP desde
la Nube Wi de WatchGuard.
Basic Wi-Fi
Administre, congure y
supervise dispositivos AP
directamente desde su Firebox
de WatchGuard. Requiere
Fireware OS v12.1 o superior.
CONFIGURAR UN AP CON WIFI CLOUD
Conecte el Dispositivo AP
• Conecte un cable Ethernet entre su red y la interfaz de
Ethernet (LAN1) en su dispositivo AP.
• Debe habilitar DHCP en la red donde conecte el dispositivo AP.
- Asegúrese de que el dispositivo AP tenga conexión a Internet y pueda comunicarse con los servicios
de la Nube Wi de WatchGuard en estos puertos: HTTP TCP 80/443 y UDP 3851.
Si tiene Firebox, la política de la Nube Wifi de WatchGuard abre los puertos necesarios.
• Si su red no es compatible con Alimentación a través de Ethernet (PoE+), conecte el inyector PoE+
o adaptador de alimentación opcional (se vende por separado).
• Después de encender el dispositivo AP, espere unos minutos hasta que los indicadores Power y
Ethernet (LAN1) se iluminen en color verde. Esto indica que el dispositivo AP está en línea y se
puede comunicar con la nube Wi de WatchGuard.
Conéctese a la Nube Wi de WatchGuard
Para conectarse a la Nube Wi de WatchGuard, inicie sesión en el Centro de soporte de WatchGuard
o ingrese a https://login.watchguard.cloudwi.com
Congure su Dispositivo AP
1. En el panel de control de la Nube Wi de WatchGuard, elija Go (Ir).
2. Añada un nueva red inalámbrica e introduzca el identicador de
conjunto de servicio (SSID) que desee usar.
3. Seleccione un tipo de seguridad. Le recomendamos que elija WPA2 PSK.
4. Haga clic en Save (Guardar) para reiniciar su dispositivo AP con la nueva conguración.
5. Conéctese a la nueva red inalámbrica.
Verique el estado del dispositivo AP
• En el panel de control de Wi-Fi Cloud de WatchGuard, elija Administrar.
• Seleccione Supervisión > Dispositivos administrados.
• Compruebe que se muestre su AP y que el estado sea activo.
Es posible que el dispositivo AP tarde varios minutos en mostrarse como activo luego de la conguración
inicial.
Para obtener información completa sobre cómo congurar su dispositivo AP con la Nube Wi
de WatchGuard, consulte WatchGuard Wi-Fi Cloud Help (Ayuda de la Nube Wifi de WatchGuard) en
watchguard.com/help.
Tutorial en video: Cómo comenzar
con la Nube Wi de WatchGuard
(10minutos)
http://wgrd.tech/2cDXQRM
CONSEJO:
use un dispositivo
móvil para vericar si su
nueva red inalámbrica
está emitiendo señal.
24 25
Page 14

Português
CONFIGURAR UN AP CON FIREBOX
Conecte el Dispositivo AP
• Conecte el dispositivo AP a una interfaz de Firebox conable u opcional habilitada para DHCP.
Para obtener información sobre el uso de una dirección IP estática, consulte Fireware Help (Ayuda de
Fireware).
• Si su red no es compatible con Alimentación a través de Ethernet (PoE+), conecte el inyector PoE+
o adaptador de alimentación opcional (se vende por separado).
• Inicie sesión en la interfaz de usuario web de Fireware y asegúrese de que DHCP esté habilitado en
la interfaz a la que se conecta el dispositivo AP.
Active el Controlador Inalámbrico de Puerta de Enlace
• Seleccione Network (Red) > Gateway Wireless Controller (Controlador Inalámbrico de Puerta
de Enlace), luego seleccione la casilla de vericación Enable Gateway Wireless Controller (Activar
Controlador Inalámbrico de Puerta de Enlace).
• Ingrese la Contraseña de AP que Firebox usará para los dispositivos AP después de que estos se
hayan establecido como pares.
Descubra el Dispositivo AP y Establézcalo como Par
• Haga clic en Refresh (Actualizar) para iniciar el descubrimiento del Punto de Acceso.
• Seleccione el Punto de Acceso descubierto y haga clic en Pair (Establecer como Par).
• Establezca la conguración de radio para cada radio. Haga clic en Save (Guardar).
Congure una SSID para el Dispositivo AP
• Seleccione la pestaña SSIDs. Haga clic en Add (Añadir).
• En el cuadro de texto Network Name (Nombre de Red), ingrese un nombre para esta red inalámbrica.
• En la conguración de SSID, seleccione la pestaña Security (Seguridad). Establezca la
conguración de seguridad inalámbrica.
• En la conguración de SSID, seleccione la pestaña Access Points (Puntos de Acceso). Seleccione las
radios de punto de acceso.
• Haga clic en Save (Guardar).
Verique el estado del dispositivo AP
• Seleccione Dashboard (Panel de Control) > Gateway Wireless Controller (Controlador Inalámbrico
de Puerta de Enlace), luego seleccione la pestaña Access Points (Puntos de Acceso).
• Asegúrese de que sus dispositivos AP conocidos sean de conanza y su estado sea Online (En
línea).
Para obtener información completa sobre cómo congurar su dispositivo AP con el Controlador
Inalámbrico de Puerta de Enlace en su Firebox, consulte Fireware Help (Ayuda de Fireware) en
watchguard.com/help.
1
ATIVAR O DISPOSITIVO DE AP
1. Acesse www.watchguard.com/activate
2. Faça login na conta WatchGuard ou crie uma nova*.
* Se for criar uma conta nova, acesse www.watchguard.com/activate depois de concluído o
processo de criação de conta.
3. Insira o número de série do dispositivo.
SELECIONAR O MÉTODO DE GERENCIAMENTO DO AP
2
Quando comprou o dispositivo AP, você selecionou o método que queria usar para gerenciá-lo.
Este guia inclui instruções básicas de conguração para os dois métodos. Para vericar que
instruções usar, procure o adesivo na parte externa da embalagem do dispositivo AP.
Total & Secure Wi-Fi
Gerencie, congure e
monitore os dispositivos AP
no WatchGuard Wi-Fi Cloud.
Basic Wi-Fi
Gerencie, congure e monitore
os dispositivos AP diretamente
do WatchGuard Firebox.
Exige Fireware OS v12.1 ou mais
recente.
26 27
Page 15

Português
CONFIGURAR UM AP COM WIFI CLOUD
Conectar o dispositivo AP
• Conecte um cabo Ethernet entre a rede e a interface
Ethernet (LAN1) do dispositivo AP.
• Será preciso ativar o DHCP na rede em que o dispositivo
AP for conectado.
- Lembre-se de conferir a conectividade do dispositivo AP com a internet e se ele consegue
se comunicar com os serviços do WatchGuard Wi-Fi Cloud nestas portas: HTTP TCP 80/443 e
UDP 3851.
Se você tem um Firebox, a política do WatchGuard Wi-Fi Cloud abre as portas necessárias.
• Se a sua rede não é compatível com Power over Ethernet (PoE+), conecte a fonte de alimentação
opcional ou o injetor de PoE+ (vendido separadamente).
• Após ligar o dispositivo AP, aguarde alguns minutos até que o indicador de energia e o indicador
de Ethernet (LAN1) quem verde contínuo. Isto indica que o dispositivo AP está on-line e consegue
se comunicar com o WatchGuard Wi-Fi Cloud.
Conecte ao WatchGuard Wi-Fi Cloud
Para conectar ao WatchGuard Wi-Fi Cloud, faça login no WatchGuard Support Center ou acesse
https://login.watchguard.cloudwi.com
Congure o dispositivo AP
1. No Painel do WatchGuard Wi-Fi Cloud, execute Go.
2. Adicione uma nova rede sem o e digite o SSID que deseja usar.
3. Selecione um modo de segurança. Recomendamos WPA2 PSK.
4. Clique em Save para redenir o dispositivo AP com a nova conguração.
5. Mude para a nova rede sem o.
Vericar o status do dispositivo AP
• No painel do WatchGuard Wi-Fi Cloud, inicie Manage (Gerenciar).
• Selecione Monitoring (Monitoramento) > Managed Devices (Dispositivos gerenciados).
• Verique se o AP é exibido e se o status é ativo.
Poderá levar vários minutos para que o dispositivo AP seja exibido como ativo depois da conguração
inicial.Para obter informações completas sobre como congurar o dispositivo AP com o WatchGuard Wi-Fi
Cloud, conra Ajuda do WatchGuard Wi-Fi Cloud em watchguard.com/help.
Tutorial em vídeo sobre os Primeiros
passos com o WatchGuard Wi-Fi Cloud
(10 minutos)
http://wgrd.tech/2cDXQRM
DICA:
Use um dispositivo
móvel para vericar se
a nova rede sem o está
transmitindo.
CONFIGURAR UM AP COM UM FIREBOX
Conectar o dispositivo AP
• Conecte o dispositivo AP a um Firebox de conança ou interface opcional com DHCP ativado.
Para obter informações sobre como usar um endereço IP estático, confira a Ajuda do Fireware.
• Se a sua rede não é compatível com Power over Ethernet (PoE+), conecte a fonte de alimentação
opcional ou o injetor de PoE+ (vendido separadamente).
• Faça o login na interface de usuário da web do Fireware e conra se a interface do dispositivo AP
tem DHCP ativado.
Ativar o Gateway Wireless Controller
• Selecione Network > Gateway Wireless Controller e marque a caixa de seleção Enable Gateway
Wireless Controller.
• Digite a AP Passphrase que o Firebox usará para dispositivos AP depois do pareamento.
Descubra e faça o pareamento do dispositivo AP
• Clique em Refresh para iniciar a descoberta de ponto de acesso.
• Selecione o ponto de acesso descoberto e clique em Pair.
• Dena as congurações para cada rádio. Clique em Save.
Congurar um SSID para o dispositivo AP
• Selecione a guia SSIDs. Clique em Add.
• Na caixa de texto Network Name, digite um nome para a rede sem o.
• Nas congurações de SSID, selecione a guia Security. Dena as congurações de segurança da
rede sem o.
• Nas congurações de SSID, selecione a guia Access Points. Selecione os rádios do Ponto de Acesso.
• Clique em Save.
Vericar o status do dispositivo AP
• Selecione Dashboard > Gateway Wireless Controller e acesse a guia Access Points.
• Conra se os seus dispositivos de ponto de acesso (AP) conhecidos são conáveis e se o status dos
dispositivos está On-line.
Para obter informações completas sobre como congurar o dispositivo AP com o Gateway Wireless Controller
no Firebox, consulte a Ajuda do Fireware em watchguard.com/help.
28 29
Page 16

繁體中文
1
啟動您的 AP 裝置
1. 請前往 www.watchguard.com/activate
2. 登入您的 WatchGuard 帳戶,或是建立新的帳戶*。
*
若您建立新帳戶,請在完成帳戶建立程序之後返回
www.watchguard.com/activate
。
3. 輸 入 您 的裝置序號。
2
選擇您的 AP 管理方法
當您購買 AP 裝置時,您已選取裝置管理方法。此指南包含適用於兩種方法的基本設定指示。為判斷應
該 使 用 哪 些 指 示,請 查 看 AP 裝置包裝 盒 外 的 貼 紙。
Total & Secure Wi-Fi
從 WatchGuard Wi-Fi Cloud
管 理、設 定 及 監 視 AP 裝 置。
Basic Wi-Fi
直接從您的 WatchGuard Firebox
管 理、設 定 及 監 視 AP 裝 置。需 要
Fireware OS v12.1 或更高版本。
使用 WI-FI CLOUD 設定 AP
連接 AP 裝置
• 將乙太網路線連接到網路與您 AP 裝置的
乙太網路 (LAN1) 介 面。
• 您必須在 AP 裝置所連接的網路啟用 DHCP。
- 確定 AP 裝置可連線到網際網路,而且可以在下列連接埠與 WatchGuard Wi-Fi Cloud 服 務 通 訊:
HTTP TCP 80/443 與 UDP 3851。
若您有
Firebox,WatchGuard Wi-Fi Cloud
原 則會 開啟 必 要 連接埠。
• 若您的網路不支援乙太網路供電 (PoE+),請連接選擇性的變壓器或 PoE+ 插入器 (另行銷售)。
• 在您開啟AP 裝置的電源後,請等待幾分鐘,直到電源指示燈,以及以太網絡(LAN1) 指示燈長亮綠
色。 這表示AP 裝置的狀態是線上,並且與WatchGuard Wi-Fi 雲端建立了通信。
連線到 WatchGuard Wi-Fi Cloud
若要連線到 WatchGuard Wi-Fi Cloud,請 登 入 WatchGuard 支 援 中 心,或 移 至
https://login.watchguard.cloudwi.com
設定您的 AP 裝置
1. 從 WatchGuard Wi-Fi Cloud 儀表板,按一下 [Go] ( 執 行)。
2. 新增無線網路並輸入您要使用的 SSID。
3. 選取安全性模式。我們建議使用 WPA2 PSK。
4. 按 一下 [Save] (儲存) 以使用新設定重設您的 AP 裝 置。
5. 切換到您的新無線網路。
驗證 AP 裝置狀態
•從WatchGuardWi-FiCloud儀錶板,啟動Manage(管理)。
•請選擇Monitoring(監測中)>ManagedDevices(受管裝置)。
•請確認您的AP已經出現,且處於作用中狀態。
在初始配置后,AP设备可能需要几分钟才会显示为活动。
如需有關如何在 WatchGuard Wi-Fi Cloud 設定 AP 裝置的完整資訊,請參閱 WatchGuard Wi-Fi Cloud 說 明,
網址是 watchguard.com/help.
WatchGuard Wi-Fi Cloud 入門影片
教學課程 (10 分鐘)
http://wgrd.tech/2cDXQRM
使用行動裝置確認
提 示:
您的無線網路是否
廣播其 SSID。
30 31
Page 17

使用FIREBOX 設定 AP
連接 AP 裝置
• 將 AP 裝置連接到信任的 Firebox 或已啟用 DHCP 的 選 擇 性 介 面。
如需有關使用靜態
• 若您的網路不支援乙太網路供電 (PoE+),請連接選擇性的變壓器或 PoE+ 插入器 (另行銷售)。
• 登入 Fireware Web UI 並確定 AP 裝置所連線的介面已啟用 DHCP。
啟用 Gateway Wireless Controller (閘道無線控制器)
• 選取 [Network] (網路) > [Gateway Wireless Controller] (閘道無線控制器),然後選取
[Enable Gateway Wireless Controller] (啟用閘道無線控制器) 核取方塊。
• 在 [AP Passphrase] (AP 密碼) 中輸入配對後 Firebox 將為 AP 裝置使用的 AP 密 碼。
探索及配對 AP 裝置
• 點按 [Refresh] (重新整理) 以開始進行 Access Point (無線基地台) 探索。
• 選取已探索到的 Access Point (無線基地台),並點按 [Pair] (配對 )。
• 設定每個無線電頻道的無線電頻道設定。點按 [Save] ( 儲 存)。
設定 AP 裝置的 SSID
• 選取 [SSIDs] 索引標 籤。點 按 [Add] ( 新 增)。
• 在 [Network Name] (網路名稱) 文字方塊中,輸入此無線網路的名稱。
• 在 [SSID] 設 定 中,選 取 [Security] (資訊安全) 索引標籤。設定無線資訊安全設定。
• 在 [SSID] 設 定 中,選 取 [Access Points] (無線基地台) 索引標煙。選取 Access Points (無線基地台) 的無線
電 頻 道。
• 點按 [Save] ( 儲 存)。
驗證 AP 裝置狀態
• 選取 [Dashboard] (儀表板) > [Gateway Wireless Controller] (閘道無線控制器),然後選取
Access Points (無線基地台) 索引標籤。
• 請確認您的已知 AP 裝置受信任,且裝置狀態為「Online」(上線)。
如需有關如何搭配 Firebox 上的 Gateway Wireless Controller (閘道無線控制器) 設定 AP 裝置的完整資訊,
請參閱 Fireware Help
IP
位址的資訊,請參閱
(韌體說明)
Fireware
,網 址 是 watchguard.com/help。
說明。
繁體中文
32 33
Page 18

Certications
NOTICES:
All WatchGuard products are designed and tested to meet strict safety requirements. These
requirements include product safety approvals and other global compliance standards. Please read
the following instructions carefully before operating the product, and refer to them as needed to
ensure the continued safe operation of your product. Additional information can be found in the
Hardware Guide located on the WatchGuard website:
http://www.watchguard.com/help/documentation/hardware.asp
The WatchGuard product is safety certied under the following standards:
• IEC 60950-1:2005 (Second Edition)+Am 1:2009+Am 2:2013
• EN 60950-1:2006+A11+A1+A12+A2:2013
• EN 61000-3-2:2014
• EN 61000-3-3:2013
Safety Warning
• Do not place objects on the power cord.
• Do not obstruct the ventilation openings. These openings prevent overheating of the machine.
• Never push objects of any kind into slots or openings on this equipment. Making a contact with a
voltage point or shorting out a part may result in re or electrical shock.
• When removing or installing an appliance, follow the general installation safety instructions.
Disclaimer
WatchGuard shall not be held liable if the end user alters, modies, or repairs any WatchGuard
hardware appliance.
HINWEISE ZUR SICHERHEIT
Alle WatchGuard Produkte werden entwickelt und getestet, um strenge Sicherheitsanforderungen zu
erfüllen. Diese Anforderungen umfassen Produktsicherheit Zulassungen und andere globale ComplianceStandards. Bitte lesen Sie die folgenden Anweisungen sorgfältig, bevor Sie das Produkt, und bezeichnen sie
als notwendig, um den sicheren Betrieb des Geräts zu gewährleisten. Weitere Informationen nden Sie in
der elektronischen Hardware Guide.
Die WatchGuard Produkt ist Sicherheit unter den folgenden Normen zertiziert:
• IEC 60950-1:2005 (Second Edition)+Am 1:2009+Am 2:2013
• EN 60950-1:2006+A11+A1+A12+A2:2013
• EN 61000-3-2:2014
• EN 61000-3-3:2013
Sicherheitshinweis
• Legen Sie keine Gegenstände auf das Netzkabel.
• Verdecken Sie nicht die Lüftungsönungen. Diese Önungen verhindern eine Überhitzung
der MaschineStecken Sie niemals Gegenstände jeglicher Art in die Schlitze oder Önungen des
Geräts stecken. Der Kontakt mit einem spannungsführenden Punkt oder das Kurzschließen eines
Bauteils kann zu einem Brand oder elektrischen Schlag führen.
• Beim Entfernen oder Installieren eines Gerätes, nach den allgemeinen Installation
Sicherheitshinweise.
34 35
Page 19

Certications
AVISO DE SEGURIDAD
Todos los productos WatchGuard están diseñados y probados para satisfacer estrictos requisitos de
seguridad. Estos requisitos incluyen la homologación de productos de seguridad y otras normas de
cumplimiento global. Por favor, lea atentamente las siguientes instrucciones antes de utilizar el producto, y
se reeren a ellos como sea necesario para garantizar el funcionamiento seguro y continuo de su producto.
Información adicional se puede encontrar en la Guía del usuario electrónica.
Certicación de seguridad del producto
El producto tiene certicación de seguridad WatchGuard bajo las siguientes normas:
• IEC 60950-1:2005 (Second Edition)+Am 1:2009+Am 2:2013
• EN 60950-1:2006+A11+A1+A12+A2:2013
• EN 61000-3-2:2014
• EN 61000-3-3:2013
Advertencia de seguridad
• No coloque objetos sobre el cable de alimentación.
• No obstruya las aberturas de ventilación. Estas aberturas evitan el sobrecalentamiento de la
máquina.
• Nunca introduzca objetos de ningún tipo en las ranuras o aberturas del equipo. El contacto con
puntos de voltaje o el cortocircuito de una pieza podría provocar un incendio o una descarga
eléctrica.
• Al extraer o instalar un electrodoméstico, siga las instrucciones generales de instalación de
seguridad.
FCC CERTIFICATION
This device complies with part 15 of the FCC Rules. Operation is subject to the following two conditions: (1)
This device may not cause harmful interference, and (2) this device must accept any interference received,
including interference that may cause undesired operation.
This equipment has been tested and found to comply with the limits for a Class B digital device, pursuant
to part 15 of the FCC Rules. These limits are designed to provide reasonable protection against harmful
interference in a residential installation. This equipment generates, uses and can radiate radio frequency
energy and, if not installed and used in accordance with the instructions, may cause harmful interference
to radio communications. However, there is no guarantee that interference will not occur in a particular
installation. If this equipment does cause harmful interference to radio or television reception, which
can be determined by turning the equipment o and on, the user is encouraged to try to correct the
interference by one or more of the following measures:
• Reorient or relocate the receiving antenna.
• Increase the separation between the equipment and receiver.
• Connect the equipment into an outlet on a circuit dierent from that to which the receiver is
connected.
• Consult the dealer or an experienced radio/TV technician for help.
* FCC Caution: Any changes or modications not expressly approved by the party responsible for
compliance could void the user’s authority to operate this equipment.
This transmitter must not be co-located or operating in conjunction with any other antenna or transmitter.
For operation within 5.15 ~ 5.25GHz / 5.47 ~5.725GHz frequency range, it is restricted to indoor
environment. The band from 5600-5650MHz will be disabled by the software during the manufacturing
and cannot be changed by the end user. This device meets all the other requirements specied in Part 15E,
Section 15.407 of the FCC Rules.
36 37
Page 20

Certications
IMPORTANT NOTE:
FCC Radiation Exposure Statement:
This equipment complies with FCC radiation exposure limits set forth for an uncontrolled environment.
This equipment should be installed and operated with minimum distance 28cm between the radiator &
your body.
Note: The country code selection is for non-US model only and is not available to all US model.
Per FCC regulation, all WiFi product marketed in US must fixed to US operation channels only.
Dieses Gerät wurde getestet und entspricht den Grenzwerten für ein Digitalgerät der Klasse B gemäß
Teil 15 der Federal Communications Commission (FCC) Regeln einhalten. Diese Grenzwerte sollen einen
angemessenen Schutz vor schädlichen Störungen, wenn das Gerät in einer kommerziellen Umgebung
betrieben wird. Dieses Gerät erzeugt, verwendet und kann Hochfrequenzenergie abstrahlen, und
wenn nicht installiert und in Übereinstimmung mit der Bedienungsanleitung, kann es Störungen im
Funkverkehr verursachen. Der Betrieb dieses Gerätes in einem Wohngebiet wird wahrscheinlich schädliche
Interferenzen in dem Fall muss der Benutzer die Störungen auf seine / ihre eigene Kosten zu beheben.
CE Notice
The CE symbol on your WatchGuard Technologies equipment indicates that it is in compliance
with the Electromagnetic Compatibility (EMC) directive and the Low Voltage Directive (LVD) of the
European Union (EU).
This equipment complies with EU radiation exposure limits set forth for an uncontrolled environment. This
equipment should be installed and operated with minimum distance 28cm between the radiator & your
body.
INDUSTRY CANADA CERTIFICATION
This device complies with ISED’s licence-exempt RSSs. Operation is subject to the following two conditions:
(1) This device may not cause harmful interference, and (2) this device must accept any interference
received, including interference that may cause undesired operation.
Le présent appareil est conforme aux CNR d’ ISED applicables aux appareils radio exempts de licence.
L’exploitation est autorisée aux deux conditions suivantes : (1) le dispositif ne doit pas produire de
brouillage préjudiciable, et (2) ce dispositif doit accepter tout brouillage reçu, y compris un brouillage
susceptible de provoquer un fonctionnement indésirable.
Caution:
(i) the device for operation in the band 5150-5250 MHz is only for indoor use to reduce the potential for
harmful interference to co-channel mobile satellite systems;
(ii) the maximum antenna gain permitted for devices in the bands 5250-5350 MHz and 5470-5725 MHz
shall be such that the equipment still complies with the e.i.r.p. limit;
(iii) the maximum antenna gain permitted for devices in the band 5725-5850 MHz shall be such that
the equipment still complies with the e.i.r.p. limits specied for point-to-point and non-point-to-point
operation as appropriate; and
(iv) the worst-case tilt angle(s) necessary to remain compliant with the e.i.r.p. elevation mask requirement
set forth in Section 6.2.2(3) shall be clearly indicated.
(v) Users should also be advised that high-power radars are allocated as primary users (i.e. priority users)
of the bands 5250-5350 MHz and 5650-5850 MHz and that these radars could cause interference and/or
damage to LE-LAN devices.
38 39
Page 21

Certications
Dynamic Frequency Selection (DFS) for devices operating in the bands 5250- 5350 MHz, 5470-5600 MHz
and 5650-5725 MHz.
Sélection dynamique de fréquences (DFS) pour les dispositifs fonctionnant dans les bandes 5250-5350
MHz, 5470-5600 MHz et 5650-5725 MHz.
For indoor use only.
Pour une utilisation en intérieur uniquement.
Avertissement:
Le guide d’utilisation des dispositifs pour réseaux locaux doit inclure des instructions précises sur les
restrictions susmentionnées, notamment :
(i) les dispositifs fonctionnant dans la bande 5150-5250 MHz sont réservés uniquement pour une utilisation
à l’intérieur an de réduire les risques de brouillage préjudiciable aux systèmes de satellites mobiles
utilisant les mêmes canaux;
(ii) le gain maximal d’antenne permis pour les dispositifs utilisant les bandes de 5250 à 5 350 MHz et de
5470 à 5725 MHz doit être conforme à la limite de la p.i.r.e;
(iii) le gain maximal d’antenne permis (pour les dispositifs utilisant la bande de 5 725 à 5 850 MHz) doit
être conforme à la limite de la p.i.r.e. spéciée pour l’exploitation point à point et l’exploitation non point à
point, selon le cas;
(iv) les pires angles d’inclinaison nécessaires pour rester conforme à l’exigence de la p.i.r.e. applicable au
masque d’élévation, et énoncée à la section 6.2.2 3), doivent être clairement indiqués.
(v) De plus, les utilisateurs devraient aussi être avisés que les utilisateurs de radars de haute puissance sont
désignés utilisateurs principaux (c.-à-d., qu’ils ont la priorité) pour les bandes 5250-5350 MHz et 5650-5850
MHz et que ces radars pourraient causer du brouillage et/ou des dommages aux dispositifs LAN-EL.
Brasil ANATEL
Este equipamento não tem direito à proteção contra interferência prejudicial e não pode causar
interferência em sistemas devidamente autorizados.
Mexico NOM
La operación de este equipo está sujeta a las siguientes dos condiciones: (1) es posible que este equipo
o dispositivo no cause interferencia perjudicial y (2) este equipo o dispositivo debe aceptar cualquier
interferencia, incluyendo la que pueda causar su operación no deseada.
Radiation Exposure Statement:
This equipment complies with ISED radiation exposure limits set forth for an uncontrolled environment.
This equipment should be installed and operated with minimum distance 28cm between the radiator &
your body.
Déclaration d’exposition aux radiations:
Cet équipement est conforme aux limites d’exposition aux rayonnements ISED établies pour un
environnement non contrôlé. Cet équipement doit être installé et utilisé avec un minimum de 28cm de
distance entre la source de rayonnement et votre corps.
40 41
Page 22

Certications
Europe - EU Declaration of Conformity (Wireless)
This device complies with the essential requirements of the RED Directive 2014/53/EU. The following test
methods have been applied in order to prove presumption of conformity with the essential requirements
of theRED Directive 2014/53/EU:
EN60950-1/A12:2011+A2:2013
Safety of Information Technology Equipment
EN62311:2008 & EN62479:2010
Product standard to demonstrate the compliance of radio base stations and xed terminal stations for
wireless telecommunication systems with the basic restrictions or the reference levels related to human
exposure to radio frequency electromagnetic elds (110MHz - 40 GHz) - General public
EN 300 328 V2.1.1 (2016-11)
Electromagnetic compatibility and Radio spectrum Matters (ERM); Wideband transmission systems; Data
transmission equipment operating in the 2.4GHz ISM band and using wide band modulation techniques;
Harmonized EN covering the essential requirements of article 3.2 of the RED Directive
EN 301 893 V2.1.1 (2017-05)
Broadband Radio Access Networks (BRAN); 5GHz high performance RLAN; Harmonized EN covering the
essential requirements of article 3.2 of the RED Directive
Draft EN 301 489-1 V2.2.0 (2017-03)
Electromagnetic compatibility and Radio spectrum Matters (ERM); Electro Magnetic Compatibility (EMC)
standard for radio equipment and services; Part 1: Common technical requirements
Draft EN 301 489-17 V3.2.0 (2017-03)
Electromagnetic compatibility and Radio spectrum Matters (ERM); ElectroMagnetic Compatibility (EMC)
standard for radio equipment; Part 17: Specic conditions for Broadband Data Transmission Systems
This device is a 5GHz wideband transmission system (transceiver), intended for use in all EU member states
and EFTA countries, except in France and Italy where restrictive use applies.
In Italy the end-user should apply for a license at the national spectrum authorities in order to obtain
authorization to use the device for setting up outdoor radio links and/or for supplying public access to
telecommunications and/or network services.
This device may not be used for setting up outdoor radio links in France and in some areas the RF output
power may be limited to 10 mW EIRP in the frequency range of 2454 - 2483.5 MHz. For detailed
information the end-user should contact the national spectrum authority in France. The device is restricted
to indoor use only when operating in the 5150 to 5350 MHz frequency range.
RoHS Statement
The member states of the European Union approved directive 2002/95/EC, Restrictions of Hazardous
Substances (“RoHS directive”‘) that became valid on July 1, 2006. It states that all new electrical and
electronic equipment put on the market within the member states must not contain certain hazardous
materials. This device complies with the European Union’s R0HS directive 2002/95/EC and similar
regulations that may be adopted by other countries for European Sales.
WEEE Statement
WEEE is a general set of requirements dictated in the EU Directive 2002/96/EC. This Directive mandated
that member EU countries enact regulations governing the Waste of Electrical and Electronic Equipment
(WEEE). The Directive, and its individual transpositions into specic country laws and legislation, is aimed at
the reduction of WEEE through reuse, recovery, and recycling of WEEE.
WatchGuard is working in partnership with our European Union (EU) distribution partners to ensure
that our products are in compliance with the WEEE statutes, and that the recovery of our product per
the specic EU country legislative requirements is seamless for our product’s end users. If you have a
WatchGuard product that is at its end of life and needs to be disposed of, please contact WatchGuard
Customer Care Department at:
U.S. Customers: 877.232.3531
International Customers: +1.206.613.0456
WatchGuard is reasonably condent that our products do not contain any substances or hazardous
materials presently banned by any legislation, and do not present a risk due to hazardous materials. WEEE
recovery professionals should also note that these products do not have any materials that are of particular
high value in their individual form.
42 43
Page 23

Japan VCCI Notice (Class B ITE)
この装置は、クラス B 情報技術装置です。この装置は、住宅環境で使用することを目的とし
ていますが、この装置がラジオやテレビジョン受信機に近接して使用されると、受信障害を
引き起こすことがあります。取扱説明書に従って正しい取り扱いをして下さい。VCCI-B
5GHz band (W52, W53): Indoor use only.
REACH Certicate of Compliance
The new EU chemicals policy REACH (Registration, Evaluation, Authorization and restriction of Chemicals)
came into eect on June 1, 2007. REACH is Europe’s new chemicals legislation, which is applicable in all
27 EU Member States as well as the EFTA European Economic Area (EEA). REACH creates a new system
for gathering information, assessing risks to human health and the environment, and authorizing or
restricting the marketing and use of chemicals produced or supplied in the EEA. REACH has an impact
on EEA producers and importers of nished products and users of chemicals in the course of industrial or
professional activities.
WatchGuard supports the overall REACH objective of improving the protection of human health and
the environment and will meet all applicable REACH requirements. WatchGuard is strongly committed
to working with our customers and supply chain to dene and implement the REACH requirements and
ensure a smooth transition to compliance.
One of the REACH requirements is that manufacturers and importers have the duty to register substances
they are producing or importing. In accordance with the regulations, the products of WatchGuard do not
need to be registered for the following reasons:
• WatchGuard does not import more than 1 metric ton per year of a substance as dened by REACH.
• WatchGuard products are non-chemical products that are not designed to release any substance
under normal and reasonably predictable application.
Our products do not contain the listed substances at more than 0.1% by weight of the whole product/part.
Taiwan NCC
低功率電波輻射性電機管理辦法
第十二條 經型式認證合格之低功率射頻電機 , 非經許可 , 公司﹑商號或使用者均不得擅自變更頻率﹑
加大功率或變更原設計之特性及功能。
第十四條 低功率射頻電機之使用不得影響飛航安全及干擾合法通信;經發現有干擾現象時 , 應立即停
用 , 並改善至無干擾時方得繼續使用。前項合法通信 , 指依電信法規定作業之無線電通信。
低功率射頻電機須忍受合法通信或工業、科學及醫療用電波輻射性電機設備之干擾。在 5.25-5.35 秭
赫頻帶內操作之無線資訊傳輸設備,限於室內使用。
電磁波曝露量 MPE 標準值 1mW/cm2,本產品使用時建議應距離人體:28 cm。 無線資訊傳輸設備避
免影響附近雷達系統之操作
Taiwan Class B Notice
警告使用者:這是乙類產品,應使用並正確安裝。本產品可能會造成無線電干擾,在這種情況下,用戶
可能需要 採 取 適 當的措施。
警示 本電池如果更換不正確會有爆炸的危險,請勿自行更換電池
44 45
Page 24

Certications
WatchGuard Technologies Inc. hereby declares that the product(s) listed below conform to the
Product (s):
Wireless Access Point, WatchGuard Model AP325
EU Directive(s):
Low Voltage (2006/95/EC)
Electromagnetic Compatibility (2004/108/EC) Energy-related
Products (2009/125/EC)
RoHS (2002/95/EC)
WEEE Directive 2002/96/EC
The Radio Equipment Directive (2014/53/EU)
Common Standard(s):
EN 60950-1:2006+A11:2009+A1:2010+A12:2011+A2:2013 Safety for ITE
EN 55024:2010
EN 55032:2015/AC:2016
EN 62311:2008
EN 62479:2010
EN 61000-3-2:2014 Harmonics
EN 61000-3-3:2013 Flicker
Wireless Standard(s):
EN 301 489-01 v2.2.0 EMC and Radio Spectrum Matters
EN 301 489-17 v3.2.0 EMC and Radio Spectrum Matters
EN 300 328 v2.1.1 Radio Spectrum Matters
EN 301 893 v2.1.1 Broadband Radio Access Networks
Hereby, declare under our sole responsibility that the requirements set out in the Directive 2014/53/EU has been fully fulfilled on our product
with indication below:
Product Name: 802.11ac Tri Band PoE Access Point
Model Number: AP325, C-110
Object of the declaration:
The object of the declaration described above is in conformity with the relevant Union harmonization legislation:
Radio Equipment Directive (RED) 2014/53/EU
The following standards and technical specifications have been applied:
Spectrum : EN 300 328 V2.1.1, EN 301 893 V2.1.1
EMC : EN 301 489-1 V2.2.0, EN 301 489-17 V3.2.0, EN 55032:2015/AC:2016, EN 55024:2010
Healthy (EMF) : EN 62311: 2008, EN 62479: 2010
Safety (LVD) : EN 60950-1:2006+A11:2009+A1:2010+A12:2011+A2:2013
The above device complies with the essential requirements and other relevant provisions to Directive
2014/53/EU when used for its intended purpose. This equipment may be operated in the USA, Canada, & Europe Union.
Warning! This is a Class B product. In a domestic environment this product may cause radio interference in which case the user may be
required to take adequate measures.
All operational modes:
2.4GHz: 802.11b, 802.11g, 802.11n (HT20), 802.11n (HT40), 802.11ac (VHT20), 802.11ac (VHT40), Bluetooth(BR/EDR, LE)
5GHz: 802.11a, 802.11n (HT20), 802.11n (HT40), 802.11ac (VHT20), 802.11ac (VHT40), 802.11ac (VHT80)
The frequency and maximum transmitted power limit in EU are listed as belows,
2412-2472MHz: 19.99dBm
2402-2480MHz (BR/EDR): 8.19dBm
2402-2480MHz (LE): 9.87dBm
5180-5240MHz: 22.84 dBm
5260-5320MHz: 22.94 dBm
5500-5700MHz: 29.95 dBm
Restrictions: France (i) les dispositifs fonctionnant dans la bande 5150-5250 MHz sont réservés uniquement pour une utilisation à l’intérieur
afin de réduire les risques de brouillage préjudiciable aux systèmes de satellites mobiles utilisant les mêmes canaux; (ii) De plus, les
utilisateurs devraient aussi être avisés que les utilisateurs de radars de haute puissance sont désignés utilisateurs principaux (c.-à-d., qu’ils
ont la priorité) pour les bandes 5 250-5 350 MHz et 5 650-5 850 MHz et que ces radars pourraient causer du brouillage et/ou des dommages
aux dispositifs LAN-EL.
Die oben genannten Gerät entspricht den grundlegenden Anforderungen und anderen relevanten Bestimmungen der Richtlinie 2014/53/EU,
wenn für den vorgesehenen Zweck verwendet werden. Dieses Gerät ist für die Verwendung in den USA, Kanada, and Europäische Union.
Warnung! Dies ist eine Einrichtung der Klasse B. Diese Einrichtung kann im Wohnbereich Funkstörungen verursachen. In diesem Fall kann
vom Betreiber verlangt werden, angemessene Maßnahmen durchzuführen
Einschränkungen: Frankreich –(i)-Geräte, die im Band 5150-5250 MHz ist nur für den Innenbereich, um das Risiko von Störungen des
mobilen Satelliten-Systeme, die die gleichen Kanäle (ii) Darüber hinaus reduzieren vorbehalten, sollten Benutzer auch darauf hingewiesen
werden, dass die Nutzer von Hochleistungs-Radare bezeichnet werden primäre Benutzer (dh d. sie haben Priorität) der Bänder 5 250-5 350
MHz und 5 650-5 850 MHz und dass diese Radargeräte können Störungen und / oder Schäden an LE-LAN-Geräten verursachen.
DeclarationofConformity
European Union directives and standards identified in this declaration.
Immunity for ITE
Signature
Full Name: Laurence Huang
Position:
Manufacturing Program Manager
Date: Nov 2, 2017
46 47
Page 25

WATCHGUARD TECHNICAL SUPPORT
1.877.232.3531
(U.S. and Canada)
+1.206.613.0456
(all other countries)
www.watchguard.com/support
ADDRESS: 505 Fifth Avenue South, Suite 500, Seattle, WA 98104
WEB: www.watchguard.com • U.S. SALES: 1.800.734.9905 • INTERNATIONAL SALES: +1.206.613.0895
© 2018 WatchGuard Technologies, Inc. All rights reserved. WatchGuard, the WatchGuard Logo, Fireware,
and LiveSecurity are registered trademarks of WatchGuard Technologies, Inc. in the United States and/or
other countries. All other trademarks and tradenames are the property of their respective owners.
352-4325-001 Rev B 071718
48
 Loading...