

Page 1
WatchGuard® AP
AP102
Quick Start Guide
Guide de démarrage rapide
Kurzanleitung
Guida introduttiva
Guía Rápida
Guia de início rápido
快速設定手冊
WatchGuard® Technologies, Inc.
Page 2
Package Contents
• AP device and mounting kit
• Quick Start Guide
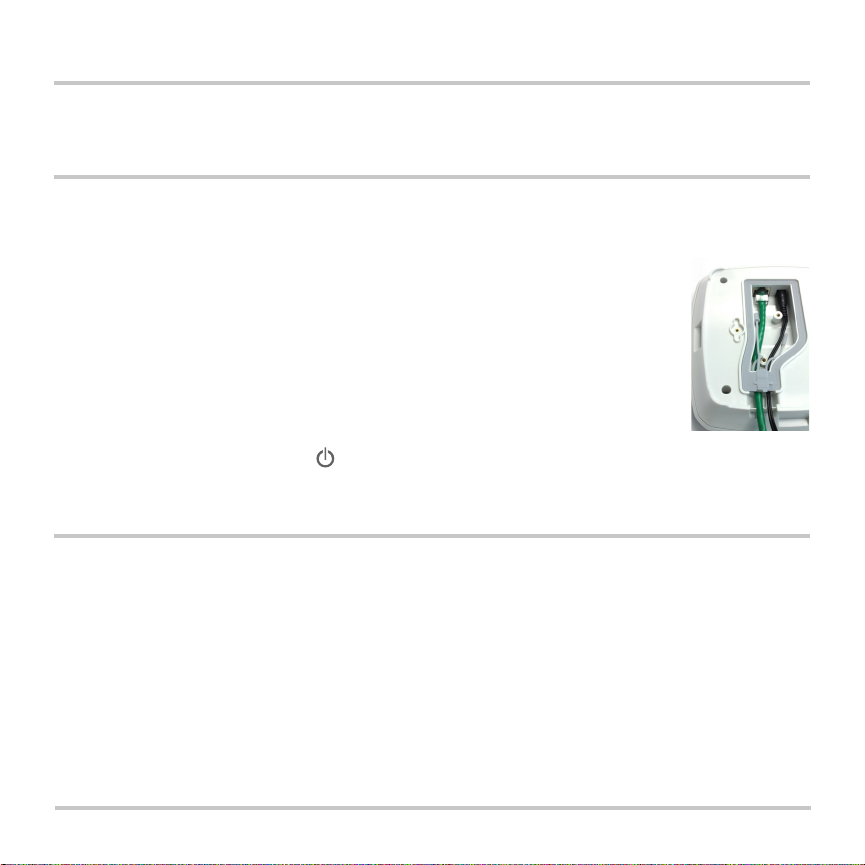
Connect the WatchGuard AP Device
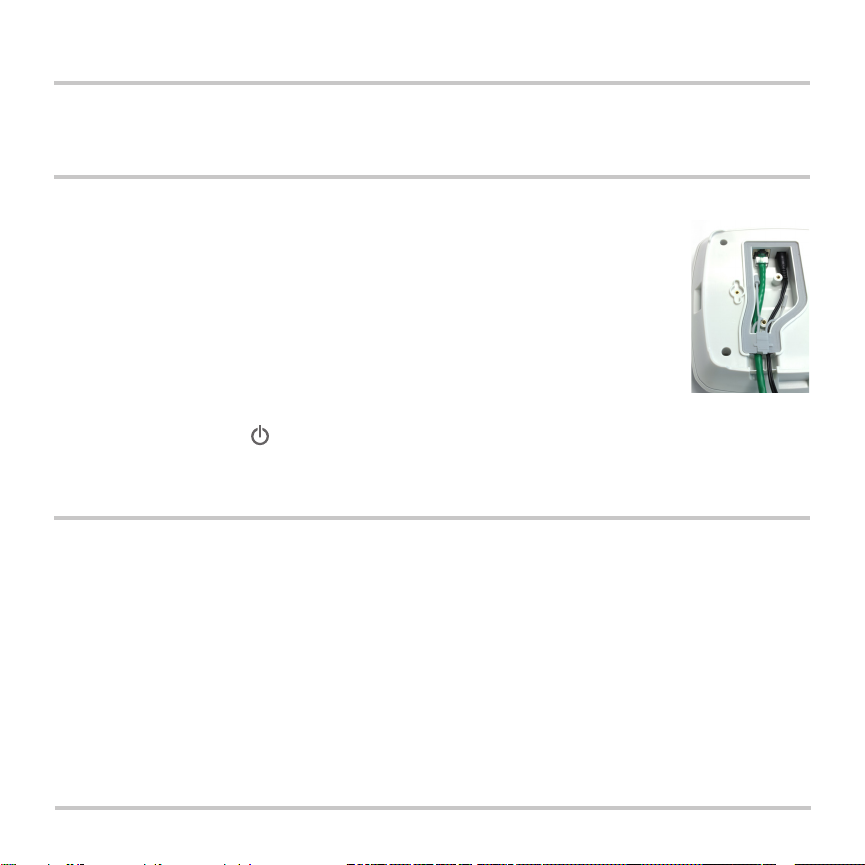
1. Loosen the two screws on the rear cover of the AP device and remove the cover.
2. If you plan to use an AC power adapter, remove the plug from the right gasket
opening. Then, connect the power adapter and push the cord into the right
gasket opening. Note: If you use PoE, do not remove the plug from the right
gasket opening.
3. Connect an Ethernet cable and push the cable into the left gasket opening.
4. Put the gasket cover over the gasket opening and push it in place.
5. Replace the AP device cover and tighten the screws.
6. Connect the other end of the Ethernet cable to your network.
7. Connect your power supply.
The device powers on. The light on the front of the device ashes amber while the device boots up and
then changes to steady green when the device is ready.
Assign an IP Address to the WatchGuard AP Device
There are two ways the WatchGuard AP device can get an IP address:
• Automatic IP Address Conguration by DHCP - When rst powered on, the WatchGuard AP
device automatically requests an IP address from a DHCP server on your network.
• Manual IP Address Conguration - If you do not use DHCP on your network, you must directly
connect to the WatchGuard AP device to assign a static IP address.
To set the IP address on your WatchGuard AP device:
• Connect an Ethernet cable from the AP device to your computer.
• Congure your computer to use these settings: IP Address: 192.168.1.2, Subnet mask:
255.255.255.0, Gateway: 192.168.1.1.
• Open a web browser and type https://192.168.1.1.
• To log in to the WatchGuard AP web UI, type the default password: wgwap.
• Set the IP address of the AP device to an IP address on the same network as your XTM device.
1
Page 3

Pair the AP Device
You can now pair the WatchGuard AP device with a Firebox or XTM device.
1. Use Policy Manager or the Fireware XTM Web UI to edit the Firebox or XTM device conguration.
2. Select Network > Gateway Wireless Controller.
3. Enable the Gateway Wireless Controller, and save the conguration to the Firebox or XTM device.
4. In the Gateway Wireless Controller conguration, on the Access Points tab, click Refresh to
discover the AP device.
5. Select the unpaired Access Point and click Pair.
6. In the Pairing Passphrase dialog box, type the passphrase of the AP device. The default
passphrase is wgwap.
For detailed information about WatchGuard AP pairing, management, and conguration with your Firebox
or XTM device, see the WatchGuard AP Device Setup section of the product Help at
http:www.watchguard.com/help/documentation/xtm.asp
English
2
Page 4
包装内容
• AP 设备和安装工具包
• 快速入门指南
连接 WatchGuard AP 设备
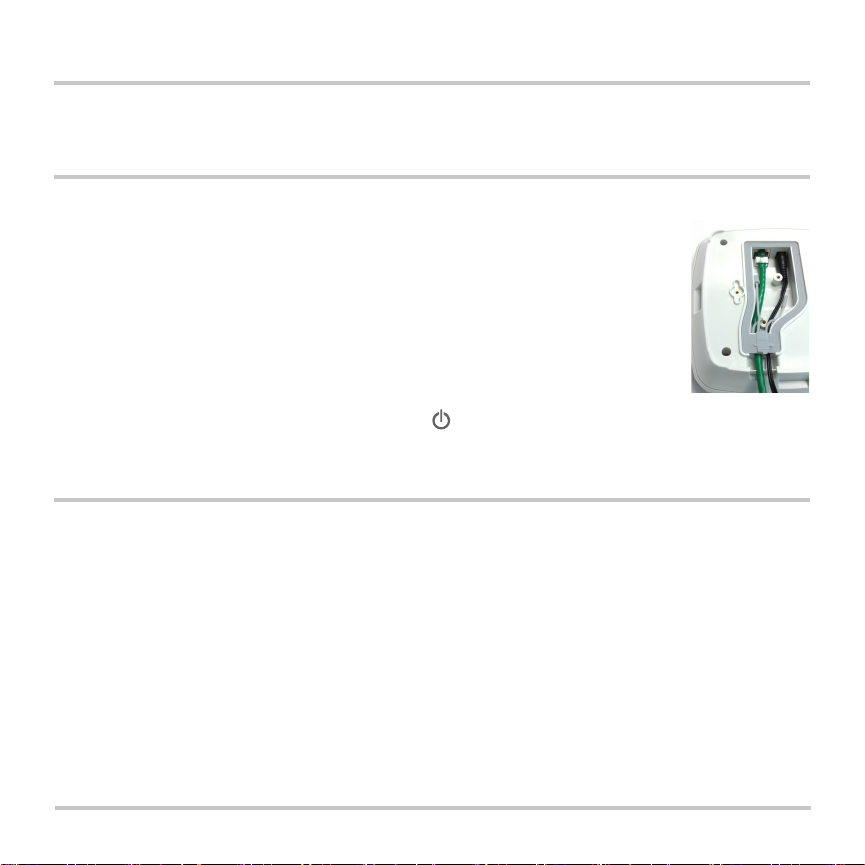
1. 拧松 AP 设备后盖上的两个螺钉,卸下后盖。
2. 如果您打算使用交流电源适配器,请取下右侧密封口的塞子。然后,连接电
源适配器并将线缆推入右侧密封口。注意:如果您使用 PoE,请勿取下右侧
密封口的塞子。
3. 请连接以太网线缆并将其插入左侧密封口。
4. 将密封盖置于密封口上并将其推入到位。
5. 装上 AP 设备盖,然后拧紧螺钉。
6. 将以太网线缆的另一端连接到网络。
7. 连接电源。
这时设备处于开机状态。在启动期间,设备正面的 灯会呈琥珀色闪烁;设备准备就绪后,该指示
灯呈绿色常亮状态。
为 WatchGuard AP 设备分配 IP 地址
可通过两种方式为 WatchGuard AP 设备分配 IP 地址:
• 通过 DHCP 自动配置 IP 地址 - 首次开机时,WatchGuard AP 设备会自动从您网络上的 DHCP 服
务器申请 IP 地址。
• 手动配置 IP 地址 - 如果您的网络中未使用 DHCP,则必须直接连接到 WatchGuard AP 设备以分
配静态 IP 地址。
要在 WatchGuard AP 设备上设置 IP 地址,请执行以下操作:
• 通过以太网线缆将 AP 设备连接到您的计算机。
• 将您的计算机配置为使用以下设置:IP 地址:192.168.1.2,子网掩码:255.255.255.0,
网关:192.168.1.1。
• 打开 Web 浏览器并输入 https://192.168.1.1。
• 要登录 WatchGuard AP Web 用户界面,请输入默认密码:wgwap。
• 将 AP 设备的 IP 地址设置为相同网络上 XTM 设备使用的 IP 地址。
3
Page 5

AP 设备配对
现在,您可以将 WatchGuard AP 设备与 Firebox 或 XTM 设备配对。
1. 使用 Policy Manager 或 Fireware XTM Web 用户界面编辑 Firebox 或 XTM 设备的配置。
2. 选择 Network> Gateway Wireless Controller。
3. 启用“Gateway Wireless Controller”,并将配置保存到 Firebox 或 XTM 设备。
4. 在“Gateway Wireless Controller”配置中,找到 Access Points 选项卡,然后单击 Refresh以查
找 AP 设备。
5. 选择未配对的接入点并单击 Pair。
6. 在 Pairing Passphrase 对话框中,输入 AP 设备的密码。默认密码为 wgwap。
有关 WatchGuard AP 配对、管理以及 Firebox 或 XTM 设备配置的详细信息,请参阅产品“Help”
中的“WatchGuard AP Device Setup”(WatchGuard AP 设备设置)部分,网址为
http://www.watchguard.com/help/documentation/xtm.asp
简体中文
4
Page 6
Contenu de l'emballage
• Périphérique AP et kit de montage
• Guide de démarrage rapide
Connecter le périphérique WatchGuard AP
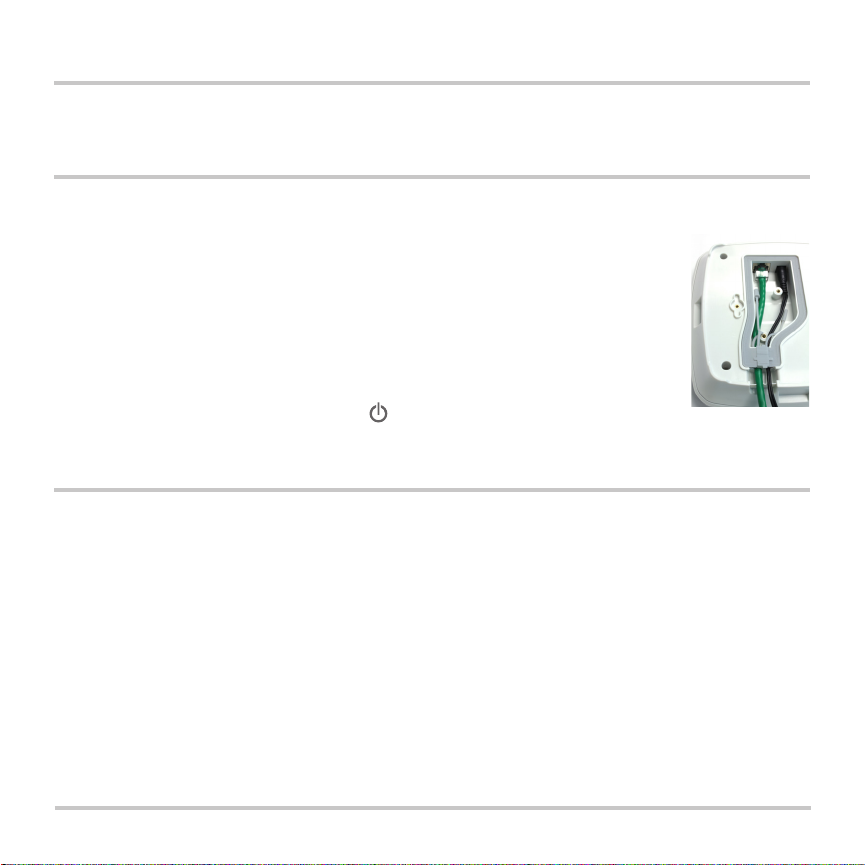
1. Dévissez les deux vis situées sur le panneau arrière du périphérique AP et retirez le panneau.
2. Si vous comptez utiliser un adaptateur secteur, retirez la prise de l'orice droit de l'ouverture jointée.
Ensuite, branchez l'adaptateur secteur et insérez le cordon dans l'orice droit de
l'ouverture jointée. Remarque: Si vous utilisez PoE, ne retirez pas la prise de l'orice
droit de l'ouverture jointée.
3. Branchez un câble Ethernet et insérez ce câble dans l'orice gauche de l'ouverture
jointée.
4. Remettez le couvercle de l'ouverture jointée en place.
5. Replacez le panneau du périphérique AP et serrez les vis.
6. Connectez l'autre extrémité du câble Ethernet à votre réseau.
7. Branchez votre alimentation.
Le périphérique se met sous tension. Le voyant situé à l'avant du périphérique clignote en
couleur ambre lorsque le périphérique s'allume et devient vert lorsqu'il est prêt à être utilisé.
Attribuer une adresse IP au périphérique WatchGuard AP
Il y a deux façons d'attribuer une adresse IP au périphérique WatchGuard AP:
• Conguration automatique de l'adresse IP grâce au protocole DHCP - Lorsque vous l'allumez pour
la première fois, le périphérique WatchGuard AP demande automatiquement une adresse IP au serveur
DHCP de votre réseau.
• Conguration manuelle de l'adresse IP - Si vous n'utilisez pas le protocole DHCP sur votre réseau, vous
devez vous connecter directement au périphérique WatchGuard AP pour lui attribuer une adresse IP statique.
Pour dénir une adresse IP sur votre périphérique WatchGuard AP:
• Connectez un câble Ethernet reliant le périphérique AP et votre ordinateur.
• Congurez votre ordinateur avec les paramètres suivants: adresses IP: 192.168.1.2, masque de
sous-réseau: 255.255.255.0, passerelle: 192.168.1.1.
• Ouvrez votre navigateur Web et saisissez https://192.168.1.1.
• Pour vous connecter à l'interface Web du périphérique WatchGuard AP, saisissez le mot de passe
par défaut: wgwap.
• Dénissez l'adresse IP du périphérique AP sur une adresse IP se trouvant sur le même réseau que
votre périphérique XTM.
5
Page 7

Associer le périphérique AP
Vous pouvez maintenant associer le périphérique WatchGuardAP à un périphérique XTM.
1. Utilisez Policy Manager ou l'interface Web Fireware XTM pour modier la conguration du périphérique
XTM.
2. Sélectionnez Network > Gateway Wireless Controller.
3. Activez le Gateway Wireless Controller et enregistrez la conguration sur le périphérique XTM.
4. Dans la conguration Gateway Wireless Controller, cliquez sur Refresh dans l'onglet Access Points pour
acher le périphérique AP.
5. Sélectionnez le point d'accès non associé et cliquez sur Pair.
6. Dans la boîte de dialogue Pairing Passphrase saisissez le mot de passe du périphérique AP. Le mot de
passe par défaut est wgwap.
Pour obtenir des informations détaillées sur l'association, la gestion et la conguration du périphérique
WatchGuard AP avec votre périphérique XTM, consultez la section d'installation du périphérique WatchGuard AP
de l'interface Web Fireware XTM ou l'aide WSM en ligne accessible à l'adresse
http://www.watchguard.com/help/documentation/xtm.asp
Français
6
Page 8
Paketinhalt
• AP-Gerät und Einbausatz
• Kurzanleitung
Anschließen eines WatchGuard AP-Geräts
1. Lösen Sie die zwei Schrauben an der Abdeckung auf der Rückseite des AP-Geräts, und entfernen Sie
die Abdeckung.
2. Wenn Sie einen Wechselstromadapter verwenden möchten, ziehen Sie den Stecker aus der rechten
Dichtungsönung. Schließen Sie dann den Stromadapter an, und drücken Sie das
Kabel in die rechte Dichtungsönung. Hinweis: Wenn Sie PoE verwenden möchten,
ziehen Sie nicht den Stecker aus der Dichtungsönung auf der rechten Seite.
3. Schließen Sie ein Ethernet-Kabel an, und schieben Sie das Kabel in die linke
Dichtungsönung.
4. Setzen Sie den Dichtungsabdeckung auf die Dichtungsönung, und drücken Sie,
damit sie einrastet.
5. Setzen Sie die AP-Geräteabdeckung wieder ein, und ziehen Sie die Schrauben fest.
6. Verbinden Sie das andere Ende des Ethernet-Kabels mit Ihrem Netzwerk.
7. Schießen Sie das Gerät an die Stromversorgung an.
Das Gerät wird eingeschaltet. Das Licht auf der Vorderseite des Geräts blinkt gelb, während das Gerät
hochgefahren wird und leuchtet anschließend dauerhaft grün, wenn das Gerät betriebsbereit ist.
Zuweisen einer IP-Adresse für das WatchGuard AP-Gerät
Dem WatchGuard AP-Gerät kann eine IP-Adresse auf zweierlei Weise zugewiesen werden:
• Automatische IP-Adressenkonguration durch DHCP: Wenn das WatchGuard AP-Gerät zum ersten Mal
eingeschaltet wird, fordert es automatisch von einem DHCP-Server des Netzwerks eine IP-Adresse an.
• Manuelle IP-Adressenkonguration: Wenn Sie für das Netzwerk kein DHCP verwenden, muss eine
direkte Verbindung zum WatchGuard AP-Gerät hergestellt werden, damit eine statische IP-Adresse
zugewiesen werden kann. So richten Sie die IP-Adresse auf dem WatchGuard AP-Gerät ein:
• Verbinden Sie das AP-Gerät und den Computer mit einem Ethernet-Kabel.
• Kongurieren Sie den Computer so, dass folgende Einstellungen verwendet werden:
IP-Adresse: 192.168.1.2, Subnetzmaske: 255.255.255.0, Gateway: 192.168.1.1.
• Önen Sie einen Webbrowser, und geben Sie https://192.168.1.1 ein.
• Geben Sie zum Anmelden auf der Webbenutzeroberäche von WatchGuard AP das
Standardkennwort wgwap ein.
• Verwenden Sie als IP-Adresse des AP-Geräts eine IP-Adresse, die sich im selben Netzwerk bendet
wie das XTM-Gerät.
7
Page 9

Koppeln des AP-Geräts
Sie können jetzt das WatchGuard AP-Gerät mit einem Firebox- oder XTM-Gerät koppeln.
1. Verwenden Sie den Policy Manager oder die Webbenutzeroberäche von Fireware XTM zum Bearbeiten
der Firebox- oder XTM-Gerätekonguration.
2. Wählen Sie Network > Gateway Wireless Controller aus.
3. Aktivieren Sie den Gateway Wireless Controller, und speichern Sie die Konguration auf dem Fireboxoder XTM-Gerät.
4. Klicken Sie in der Gateway Wireless Controller-Konguration auf der Registerkarte Access Points auf
Refresh, damit das AP-Gerät erkannt wird.
5. Wählen Sie den nicht gekoppelten Zugrispunkt aus, und klicken Sie auf Pair.
6. Geben Sie im Dialogfeld Pairing Passphrase die Passphrase des AP-Geräts ein. Die Standard-Passphrase
lautet wgwap.
Genauere Informationen über die Kopplung, Verwaltung und Konguration von WatchGuard AP nden Sie auf
der Webbenutzeroberäche von Fireware XTM im Abschnitt über die Einrichtung von WatchGuard AP-Geräten
oder in der WSM-Hilfe unter http://www.watchguard.com/help/documentation/xtm.asp.
Deutsch
8
Page 10

Contenuti pacchetto
• Dispositivo AP e kit di montaggio
• Guida di avvio rapido
Connessione del dispositivo WatchGuard AP
1. Allentare le due viti sul coperchio posteriore del dispositivo AP e rimuoverlo.
2. Se si ha intenzione di inserire un adattatore per l’alimentazione CC, rimuovere
la presa dall’apertura destra della guarnizione. In seguito, collegare l’adattatore
dell’alimentazione e inserire il cavo nell’apertura destra della guarnizione.
Nota: Se si utilizza Power Over Ethernet (PoE), non rimuovere la presa
dall’apertura destra della guarnizione.
3. Collegare un cavo Ethernet e inserirlo nell’apertura sinistra della guarnizione.
4. Mettere la copertura della guarnizione sull’apertura della guarnizione e inserirla
al suo posto.
5. Riposizionare il dispositivo AP e stringere le viti.
6. Collegare l’altra estremità del cavo Ethernet alla rete.
7. Collegare all’alimentazione.
Il dispositivo si accende. La spia sulla parte anteriore del dispositivo lampeggia in ambra mentre il dispositivo si
avvia e quindi diventa verde a luce ssa quando il dispositivo è pronto.
Assegnazione di un indirizzo IP al dispositivo WatchGuard AP
Il dispositivo WatchGuard AP può ottenere un indirizzo IP secondo l’uno o l’altro dei seguenti modi:
• Congurazione indirizzo IP automatica tramite DHCP - Quando si accende, il dispositivo WatchGuard
AP richiede automaticamente un indirizzo IP da un server DHCP della rete.
• Congurazione manuale dell’indirizzo IP - Se non si usa DHCP sulla rete, occorre collegarsi
direttamente al dispositivo WatchGuard AP per assegnare un indirizzo IP statico.
Per impostare l’indirizzo IP sul dispositivo WatchGuard AP:
• Collegare un cavo Ethernet dal dispositivo AP al computer.
• Congurare il computer con le seguenti impostazioni: Indirizzo IP: 192.168.1.2, subnet mask:
255.255.255.0, gateway: 192.168.1.1.
• Aprire un browser e digitare https://192.168.1.1.
• Per accedere all’interfaccia utente web del dispositivo WatchGuard AP, digitare la password
predenita: wgwap.
• Impostare l’indirizzo IP del dispositivo AP in modo che corrisponda a un indirizzo IP sulla stessa
rete del dispositivo XTM.
9
Page 11

Associazione del dispositivo AP
A questo punto si può associare il dispositivo WatchGuard AP a un dispositivo Firebox o XTM.
1. Usare Policy Manager o l’interfaccia utente web di Fireware XTM per modicare la congurazione del
dispositivo Firebox o XTM.
2. Selezionare Network > Gateway Wireless Controller.
3. Abilitare il Gateway Wireless Controller e salvare la congurazione nel dispositivo Firebox o XTM.
4. Nella congurazione del Gateway Wireless Controller, sulla scheda Access Points, fare clic su Refresh
per rilevare il dispositivo AP.
5. Selezionare l’Access Point non associato e fare clic su Pair.
6. Nella nestra di dialogo Pairing Passphrase, digitare la password del dispositivo AP. La password
predenita è wgwap.
Per informazioni dettagliate sull’associazione del dispositivo WatchGuard AP, sulla gestione, e sulla congurazione
con il dispositivo Firebox o XTM, consultare la sezione WatchGuard AP Device Setup della guida in linea su:
http://www.watchguard.com/help/documentation/xtm.asp
Italiano
10
Page 12

パッケージの 内 容
• APデバイスおよびマ ウ ン ト・キ ッ ト
• クイックスタ ート・ガイド
WatchGuard APデバイスの 接 続
1. APデバイスの背面カバーの2本のネジを緩 め 、カバーを取り外します。
2. AC電源アダプタを使用する場合は、右のガスケット開口部からプラグを取り外します。
その後、電源アダプタを接続して、右側のガスケット開口部にケーブルを押し込み
ます。注意︰PoEを使用する場合は、右のガスケット開口部からプラグを取り外さな
いでください。
3. イーサネット・ケーブルを接続し、左のガスケット開口部にケーブルを押し込みま
す。
4.
ガスケット開口部にガスケット・カバーを被せ、所定の位置に押し込みます。
5. APデバイスのカバーを取り付け、ネジを締めます。
6. イーサネット・ケーブルのもう一方の端をネットワークに接続します。
7. 電源に接続します。
デバイスの電源がオンになります。デバイス前面の ライトは、デバイスの起動中はオレンジ色に点滅し、デ
バイスの準備が完了すると緑色の点灯に変わります。
WatchGuard APデバイスへ の IPアドレスの 割り当 て
WatchGuard APデバイスがIPアドレスを取得するには、次の2つの方法があります。
• DHCPによる自 動 IPアドレ ス 設 定 - WatchGuard APデバイスは、最初に電源がオンになったときに、ネット
ワーク上のDHCPサーバーからIPアドレスを自動的に要求します。
• 手 動 による IPアドレ ス 設 定 - ネットワーク上でDHCPを使用しない場合は、直接WatchGuard APデバイス
に接続して、静的IPアドレスを割り当てる必要 が あります。
WatchGuard APデバイスにIPアドレスを割り当てるには、以下の操作を行います。
• イーサネット・ケーブルをAPデバイスからお使いのコンピュータに接続します。
• コンピュータに以下を設定します。IPアドレ ス ︰192.168.1.2、サブ ネットマスク︰
255.255.255.0、ゲ ー ト ウ ェ イ ︰192.168.1.1。
• ウェブ・ブラウザを開いてhttps://192.168.1.1と入力します。
•
WatchGuard APのウェ ブ UIにログインするに は 、デフォルトのパスワードwgwapを入 力します。
•
XTMデバイスと同じネットワーク上 の IPアドレスに、APデバイスのIPアドレスを設定します。
11
Page 13

APデバイスの ペアリング
以上の操作で、WatchGuard APデバイスを FireboxまたはXTMデバイスで ペアリングすることがで きます。
1. Policy ManagerまたはFireware XTMのウェブ UIを使って、FireboxまたはXTMデバイスの設定を編集しま
す。
2. [Network] > [Gateway Wireless Controller]の順に選択します。
3. Gateway Wireless Controllerを有 効にして、FireboxまたはXTMデバイスに設定を保存します。
4. Gateway Wireless Controller設定の[Access Points]タブで[Refresh]をクリックし 、APデバ イスを検 出しま
す。
5. ペアリングされていないアクセス・ポイントを選択し、[Pair]をクリックしま す 。
6. [Pairing Passphrase]ダイアログボックスで、APデバイスのパスフレーズを入力します。デフォルトのパ
スフレーズはwgwapです。
FireboxまたはXTMデバイスでのWatchGuard APのペアリング、管理、設定に関する詳細は、
http://www.watchguard.com/help/documentation/xtm.asp
セクションをご覧ください。
の製品ヘルプの「WatchGuard APデバイスの設定」
日本語
12
Page 14

패키지 구성품
• AP 장치 및 마운팅 키트
• 빠른 시작 가이드
WatchGuard AP 장치 연결
1. AP 장치의 후방 덮개에 있는 나사 두 개를 풀고 덮개를 제거합니다.
2. AC 전원 어댑터를 사용하려면 오른쪽 개스킷 구멍에서 플러그를
제거합니다. 그런 다음, 전원 어댑터를 연결하고 코드를 오른쪽 개스킷
입구로 밀어 넣습니다. 참고: PoE를 사용하는 경우에는 오른쪽 개스킷
구멍에서 플러그를 제거하지 마십시오.
3. 이더넷 케이블을 연결하고 케이블을 왼쪽 개스킷 구멍으로 밀어 넣습니다.
4. 개스킷 입구 위에 개스킷 덮개를 놓고 제자리에 끼워 넣습니다.
5. AP 장치 덮개를 다시 장착하고 나사를 조입니다.
6. 이더넷 케이블의 다른 쪽을 네트워크에 연결합니다.
7. 전원 공급장치를 연결합니다.
장치의 전원이 켜집니다. 장치가 부팅되는 동안 장치 전면의 등이 황색으로 깜빡이며, 장치가
준비 완료되면 녹색으로 바뀌어 켜진 상태를 유지합니다.
WatchGuard AP 장치에 IP 주소 할당
WatchGuard AP 장치가 IP 주소를 가져오는 방법에는 다음의 두 가지가 있습니다.
• DHCP를 통한 IP 주소 자동 구성 - 처음 전원을 켜면 WatchGuard AP 장치가 네트워크의 DHCP
서버에 IP 주소를 자동으로 요청합니다.
• IP 주소 수동 구성 - 네트워크에서 DHCP를 사용하지 않을 경우 WatchGuard AP 장치에 직접
연결하여 고정 IP 주소를 할당해야 합니다.
WatchGuard AP 장치에 IP 주소를 설정하려면 다음을 따릅니다.
• AP 장치와 컴퓨터를 이더넷 케이블로 연결합니다.
• 다음 설정을 사용하도록 컴퓨터를 구성합니다. IP 주소: 192.168.1.2, 서브넷 마스크:
255.255.255.0, 게이트웨이: 192.168.1.1.
• 웹 브라우저를 열고 https://192.168.1.1을 입력합니다.
• 기본 암호인 wgwap를 입력하여 WatchGuard AP 웹 UI에 로그인합니다.
• AP 장치의 IP 주소를 XTM 장치와 동일한 네트워크의 IP 주소로 설정합니다.
13
Page 15

AP 장치 페어링
이제 WatchGuard AP 장치를 Firebox 또는 XTM 장치와 페어링할 수 있습니다.
1. Policy Manager 또는 Fireware XTM Web UI를 사용하여 Firebox 또는 XTM 장치 구성을
편집합니다.
2. Network > Gateway Wireless Controller를 선택합니다.
3. Gateway Wireless Controller를 사용 설정하고 구성을 Firebox 또는 XTM 장치에 저장합니다.
4. Gateway Wireless Controller 구성의 Access Points 탭에서 Refresh를 클릭하여 AP 장치를
검색합니다.
5. 페어링되지 않은 액세스 포인트를 선택하고 Pair를 클릭합니다.
6. Pairing Passphrase 대화 상자에 AP 장치의 암호를 입력합니다. 기본 암호는 wgwap입니다.
Firebox 또는 XTM 장치를 사용한 WatchGuard AP 페어링, 관리, 구성에 대한 자세한 내용은 제품
도움말(http://www.watchguard.com/help/documentation/xtm.asp)의 WatchGuard AP 장치 설정
(WatchGuard AP Device Setup) 섹션을 참조하십시오.
한국어
14
Page 16

Contenidos del paquete
• Dispositivo AP y kit de montaje
• Guía de inicio rápido
Conecte el dispositivo AP de WatchGuard
1. Aoje los dos tornillos ubicados en la cubierta posterior del dispositivo AP y retire la cubierta.
2. Si planea usar un adaptador de alimentación CA, retire el enchufe de la apertura de la
junta derecha. Luego, conecte el adaptador de alimentación y empuje el cable dentro
de la apertura de la junta derecha. Nota: Si usa Alimentación a través de Ethernet
(Power Over Ethernet, PoE), no retire el enchufe de la apertura de la junta derecha.
3. Conecte un cable de Ethernet y empuje el cable dentro de la apertura de la junta
izquierda.
4. Coloque la cubierta de la junta sobre la apertura de la junta y presiónela para que
quede en el lugar.
5. Vuelva a colocar la cubierta del dispositivo AP y ajuste los tornillos.
6. Conecte el otro extremo del cable Ethernet a su red.
7. Conecte su alimentación.
El dispositivo se encenderá. La luz en el frente del dispositivo se encenderá de forma intermitente con color
ámbar mientras el dispositivo se esté iniciando y luego quedará ja de color verde cuando el dispositivo esté listo.
Asigne una dirección IP al dispositivo WatchGuard AP
Hay dos formas de asignar una dirección IP al dispositivo WatchGuard AP:
• Conguración automática de dirección IP por DHCP: la primera vez que se enciende el dispositivo
WatchGuard AP, solicita automáticamente una dirección IP a un servidor DHCP de su red.
• Conguración manual de dirección IP: si no utiliza DHCP en su red, debe conectarse directamente con
el dispositivo WatchGuard AP para asignarle una dirección IP estática.
Para congurar la dirección IP de su dispositivo WatchGuard AP:
• Conecte un cable Ethernet del dispositivo AP a su computadora.
• Congure su computadora para que utilice estos parámetros: Dirección IP: 192.168.1.2, Máscara de
subred: 255.255.255.0, Puerta de enlace: 192.168.1.1.
• Abra un explorador web e ingrese https://192.168.1.1.
• Para iniciar sesión en la interfaz web de WatchGuard AP, escriba la contraseña predeterminado: wgwap.
• Congure la dirección IP del dispositivo AP con los datos de una dirección IP de la misma red que su
dispositivo XTM.
15
Page 17

Congure como pares el dispositivo AP
Ahora puede establecer como pares el dispositivo WatchGuard AP y un dispositivo Firebox o XTM.
1. Use la función Policy Manager o la interfaz web de Fireware XTM para editar la conguración del
dispositivo Firebox o XTM.
2. Seleccione Network > Gateway Wireless Controller.
3. Active el controlador inalámbrico de puerta de enlace y guarde la conguración del dispositivo Firebox
o XTM.
4. En la conguración del controlador inalámbrico de puerta de enlace, en la pestaña Access Points,
haga clic en Refresh para descubrir el dispositivo AP.
5. Seleccione el punto de acceso sin par y haga clic en Pair.
6. En el cuadro de diálogo Pairing Passphrase, escriba la contraseña del dispositivo AP. La contraseña
predeterminada es wgwap.
Para obtener información detallada sobre el establecimiento de pares con WatchGuard AP, su administración
y su conguración con su dispositivo Firebox o XTM, consulte la sección WatchGuard AP Device Setup
(Conguración de dispositivos WatchGuard AP) de la Ayuda del producto en
http://www.watchguard.com/help/documentation/xtm.asp
Español
16
Page 18

Conteúdo da embalagem
• Dispositivo AP e kit de montagem
• Quick Start Guide
Conectar o dispositivo WatchGuard AP
1. Solte os dois parafusos na tampa traseira do dispositivo AP e remova a tampa.
2. Se você pretende usar um adaptador de corrente CA, remova o plug da abertura da
vedação direita. Em seguida, conecte o adaptador de corrente e passe o cabo pela
abertura da vedação direita. Nota: Se você usa PoE, não remova o plugue da
abertura da vedação direita.
3. Conecte um cabo Ethernet e passe o cabo pela abertura da vedação esquerda.
4. Coloque a tampa da vedação sobre a abertura da vedação e encaixe-a em seu lugar.
5. Substitua a tampa do dispositivo AP e aperte os parafusos.
6. Conecte a outra extremidade do cabo Ethernet à sua rede.
7. Conecte o adaptador de corrente.
O dispositivo será ligado. A luz na frente do dispositivo pisca em âmbar enquanto o dispositivo inicia e,
em seguida, ca constantemente verde quando o dispositivo está pronto.
Designar uma endereço IP ao dispositivo WatchGuard AP
Há duas maneiras pelas quais o dispositivo WatchGuard AP pode obter um endereço IP:
• Conguração automática de endereço IP por DHCP - Ao ser ligado pela primeira vez, o dispositivo
WatchGuard AP solicita automaticamente um endereço IP de um servidor DHCP na sua rede.
• Conguração manual de endereço IP - Se DHCP não é usado na sua rede, é necessário conectar
diretamente o dispositivo WatchGuard AP para designar um endereço IP estático.
Para congurar o endereço IP no seu dispositivo WatchGuard AP:
• Conecte um cabo Ethernet do dispositivo AP ao seu computador.
• Congure seu computador para usar as seguintes denições: Endereço IP: 192.168.1.2,
Máscara de sub-rede: 255.255.255.0, Gateway: 192.168.1.1.
• Abra um navegador da web e digite https://192.168.1.1.
• Para fazer logon na interface de usuário na web do WatchGuard AP, digite a senha padrão: wgwap.
• Estabeleça o endereço IP do dispositivo AP para um endereço IP na mesma rede do seu
dispositivo XTM.
17
Page 19

Parear o dispositivo AP
Agora você pode parear um dispositivo WatchGuard AP com um dispositivo Firebox ou XTM.
1. Use o Policy Manager ou a interface de usuário na web do Fireware XTM para editar as congurações
do dispositivo Firebox ou XTM.
2. Selecione Network > Gateway Wireless Controller.
3. Habilite o Controlador sem o de Gateway e salve as congurações no dispositivo Firebox ou XTM.
4. Nas congurações do Controlador sem o de Gateway, na guia Access Points, clique em Refresh para
descobrir o dispositivo AP.
5. Selecione o Ponto de acesso não pareado e clique em Pair.
6. Na caixa de diálogo Pairing Passphrase, digite a frase secreta do dispositivo AP. A frase secreta padrão
é wgwap.
Para informações detalhadas sobre pareamento, gerenciamento e conguração do WatchGuard AP com o seu
dispositivo Firebox ou XTM, consulte a seção de Conguração de dispositivo WatchGuard AP na ajuda do produto
no site http://www.watchguard.com/help/documentation/xtm.asp
Português
18
Page 20

套件內容
• AP 裝置與底座配件
• 快速入門手冊
連接 WatchGuard AP 裝置
1. 鬆開 AP 裝置後蓋上的兩個螺絲,並拿起背蓋。
2. 若欲使用 AC 電源轉接器,請拿起右方墊片開口的塞子。接著,連接電源轉接器,並將電源線
插入右方墊片開口。注意:若使用 PoE,請不要拿起右方墊片開口的塞子。
3. 連接乙太網路線並將網路線插入左方墊片開口。
4. 蓋上墊片上蓋,並推至定位。
5. 蓋上 AP 裝置背蓋,並將螺絲鎖緊。
6. 將乙太網路線的另一端與網路連線。
7. 連接電源供應器。
裝置的電源開啟,裝置前方的 燈號於裝置開機時會閃爍黃光,裝置就緒時則長亮綠光。
指派 IP 位址至 WatchGuard AP 裝置
WatchGuard AP 裝置能以 2 種方式取得 IP 位址:
• 由 DHCP 自動設定 IP 位址 - 首次開機時,WatchGuard AP 裝置會自動從網路中的 DHCP 伺服器
請求配置一組 IP 位址。
• 手動設定 IP 位址 - 若您無法使用網路的 DHCP,您必須直接連線至 WatchGuard AP 裝置來指派
一組靜態 IP 位址。
若要替 WatchGuard AP 裝置設定 IP 位址:
• 將乙太網路線從 AP 裝置連接至您的電腦。
• 使用以下設定值設定您的電腦:IP 位址:192.168.1.2,子網路遮罩:255.255.255.0,
閘道:192.168.1.1。
• 開啟網頁瀏覽器,並輸入 https://192.168.1.1。
• 若要登入 WatchGuard AP 網頁使用介面,請輸入預設密碼:wgwap。
• 將 AP 裝置的 IP 位址設定至與 XTM 裝置位於相同網路的一組 IP 位址。
19
Page 21

配對 AP 裝置
您可以開始將 WatchGuard AP 裝置與 Firebox 或 XTM 裝置配對。
1. 使用原則管理員或 Fireware XTM 網頁使用介面來編輯 Firebox 或 XTM 裝置的設定。
2. 選取 Network > Gateway Wireless Controller。
3. 啟用 Gateway Wireless Controller,並將設定儲存至 Firebox 或 XTM 裝置。
4. 在 Gateway Wireless Controller 設定中,於 Access Points 索引標籤中按一下 Refresh 以搜尋
AP 裝置。
5. 選取尚未配對的 Access Point,並按一下 Pair。
6. 在 Pairing Passphrase 對話方塊中,輸入 AP 裝置的配對密碼。預設的配對密碼為 wgwap。
如需 WatchGuard AP 配對、管理,以及 Firebox 或 XTM 設定之詳細相關資訊,請參閱產品說明中與
WatchGuard AP 裝置設定相關的章節:http://www.watchguard.com/help/documentation/xtm.asp
繁體中文
20
Page 22

Product Safety Certications
The WatchGuard product is safety certied under the following standards:
• CAN/CSA-C22.2 No.60950-1-07+A1:2011
• IEC 60950-22 1st Edition
• UL 60950-1:2007 R12.11
• EN 60950-1:2006+A11+A1+A12 (2nd Edition)
• EN 60950-22:2006
• IP66 Rated
Safety Warning
• Do not place objects on the power cord.
• Do not obstruct the ventilation openings. These openings prevent overheating of the machine.
• Never push objects of any kind into slots or openings on this equipment. Making a contact with a
voltage point or shorting out a part may result in re or electrical shock.
• When removing or installing an appliance, follow the general installation safety instructions.
Disclaimer
WatchGuard shall not be held liable if the end user alters, modies, or repairs any WatchGuard
hardware appliance.
HINWEISE ZUR SICHERHEIT
Alle WatchGuard Produkte werden entwickelt und getestet, um strenge Sicherheitsanforderungen zu
erfüllen. Diese Anforderungen umfassen Produktsicherheit Zulassungen und andere globale ComplianceStandards. Bitte lesen Sie die folgenden Anweisungen sorgfältig, bevor Sie das Produkt, und bezeichnen sie
als notwendig, um den sicheren Betrieb des Geräts zu gewährleisten. Weitere Informationen nden Sie in
der elektronischen Hardware Guide.
Die WatchGuard Produkt ist Sicherheit unter den folgenden Normen zertiziert:
• CAN/CSA-C22.2 No.60950-1-07+A1:2011
• IEC 60950-22 1st Edition
• UL 60950-1:2007 R12.11
• EN 60950-1:2006+A11+A1+A12 (2nd Edition)
• EN 60950-22:2006
• IP66 Rated
Sicherheitshinweis
• Legen Sie keine Gegenstände auf das Netzkabel.
• Verdecken Sie nicht die Lüftungsönungen. Diese Önungen verhindern eine Überhitzung
der Maschine
21
Page 23

• Stecken Sie niemals Gegenstände jeglicher Art in die Schlitze oder Önungen des Geräts stecken.
Der Kontakt mit einem spannungsführenden Punkt oder das Kurzschließen eines Bauteils kann
zu einem Brand oder elektrischen Schlag führen.
• Beim Entfernen oder Installieren eines Gerätes, nach den allgemeinen Installation
Sicherheitshinweise.
AVISO DE SEGURIDAD
Todos los productos WatchGuard están diseñados y probados para satisfacer estrictos requisitos de
seguridad. Estos requisitos incluyen la homologación de productos de seguridad y otras normas de
cumplimiento global. Por favor, lea atentamente las siguientes instrucciones antes de utilizar el producto, y
se reeren a ellos como sea necesario para garantizar el funcionamiento seguro y continuo de su producto.
Información adicional se puede encontrar en la Guía del usuario electrónica.
Certicación de seguridad del producto
El producto tiene certicación de seguridad WatchGuard bajo las siguientes normas:
• CAN/CSA-C22.2 No.60950-1-07+A1:2011
• IEC 60950-22 1st Edition
• UL 60950-1:2007 R12.11
• EN 60950-1:2006+A11+A1+A12 (2nd Edition)
• EN 60950-22:2006
• IP66 Rated
Advertencia de seguridad
• No coloque objetos sobre el cable de alimentación.
• No obstruya las aberturas de ventilación. Estas aberturas evitan el sobrecalentamiento de
la máquina.
• Nunca introduzca objetos de ningún tipo en las ranuras o aberturas del equipo. El contacto
con puntos de voltaje o el cortocircuito de una pieza podría provocar un incendio o una
descarga eléctrica.
• Al extraer o instalar un electrodoméstico, siga las instrucciones generales de instalación
de seguridad.
Certications
22
Page 24

Federal Communication Commission Interference Statement
This equipment has been tested and found to comply with the limits for a Class B digital device, pursuant
to Part 15 of the FCC Rules. These limits are designed to provide reasonable protection against harmful
interference in a residential installation. This equipment generates, uses and can radiate radio frequency
energy and, if not installed and used in accordance with the instructions, may cause harmful interference
to radio communications. However, there is no guarantee that interference will not occur in a particular
installation. If this equipment does cause harmful interference to radio or television reception, which can be
determined by turning the equipment o and on, the user is encouraged to try to correct the interference
by one of the following measures:
- Reorient or relocate the receiving antenna.
- Increase the separation between the equipment and receiver.
- Connect the equipment into an outlet on a circuit dierent from that
to which the receiver is connected.
- Consult the dealer or an experienced radio/TV technician for help.
FCC Caution: Any changes or modications not expressly approved by the party responsible for compliance
could void the user’s authority to operate this equipment.
This device complies with Part 15 of the FCC Rules. Operation is subject to the following two conditions: (1)
This device may not cause harmful interference, and (2) this device must accept any interference received,
including interference that may cause undesired operation.
This transmitter must not be co-located or operating in conjunction with any other antenna or transmitter.
IMPORTANT NOTE:
FCC Radiation Exposure Statement:
This equipment complies with FCC radiation exposure limits set forth for an uncontrolled environment. This
equipment should be installed and operated with minimum distance 20cm between the radiator & your body.
Industry Canada statement:
This device complies with RSS-210 of the Industry Canada Rules. Operation is subject to the following
two conditions: (1) This device may not cause harmful interference, and (2) this device must accept any
interference received, including interference that may cause undesired operation.
Ce dispositif est conforme à la norme CNR-210 d’Industrie Canada applicable aux appareils radio exempts
de licence. Son fonctionnement est sujet aux deux conditions suivantes: (1) le dispositif ne doit pas produire
de brouillage préjudiciable, et (2) ce dispositif doit accepter tout brouillage reçu, y compris un brouillage
susceptible de provoquer un fonctionnement indésirable.
Caution :
(i) the device for operation in the band 5150-5250 MHz is only for indoor use to reduce the potential for
harmful interference to co-channel mobile satellite systems;
(ii) the maximum antenna gain permitted for devices in the bands 5250-5350 MHz and 5470-5725 MHz shall
comply with the e.i.r.p. limit; and
(iii) the maximum antenna gain permitted for devices in the band 5725-5825 MHz shall comply with the
e.i.r.p. limits specied for point-to-point and non point-to-point operation as appropriate.
23
Page 25

(iv) Users should also be advised that high-power radars are allocated as primary users (i.e. priority users)
of the bands 5250-5350 MHz and 5650-5850 MHz and that these radars could cause interference and/or
damage to LE-LAN devices.
Avertissement:
Le guide d’utilisation des dispositifs pour réseaux locaux doit inclure des instructions précises sur les
restrictions susmentionnées, notamment :
(i) les dispositifs fonctionnant dans la bande 5 150-5 250 MHz sont réservés uniquement pour une
utilisation à l’intérieur an de réduire les risques de brouillage préjudiciable aux systèmes de satellites
mobiles utilisant les mêmes canaux;
(ii) le gain maximal d’antenne permis pour les dispositifs utilisant les bandes 5 250-5 350 MHz et 5 470-5
725 MHz doit se conformer à la limite de p.i.r.e.;
(iii) le gain maximal d’antenne permis (pour les dispositifs utilisant la bande 5 725-5 825 MHz) doit se
conformer à la limite de p.i.r.e. spéciée pour l’exploitation point à point et non point à point, selon le cas.
(iv) De plus, les utilisateurs devraient aussi être avisés que les utilisateurs de radars de haute puissance sont
désignés utilisateurs principaux (c.-à-d., qu’ils ont la priorité) pour les bandes 5 250-5 350 MHz et 5 650-5
850 MHz et que ces radars pourraient causer du brouillage et/ou des dommages aux dispositifs LAN-EL.
WEEE Statement
WEEE is a general set of requirements dictated in the EU Directive 2002/96/EC. This Directive mandated
that member EU countries enact regulations governing the Waste of Electrical and Electronic Equipment
(WEEE). The Directive, and its individual transpositions into specic country laws and legislation, is aimed at
the reduction of WEEE through reuse, recovery, and recycling of WEEE.
WatchGuard is working in partnership with our European Union (EU) distribution partners to ensure
that our products are in compliance with the WEEE statutes, and that the recovery of our product per
the specic EU country legislative requirements is seamless for our product’s end users. If you have a
WatchGuard product that is at its end of life and needs to be disposed of, please contact WatchGuard
Customer Care Department at:
U.S. Customers: 877.232.3531
International Customers: +1.206.613.0456
WatchGuard is reasonably condent that our products do not contain any substances or hazardous
materials presently banned by any legislation, and do not present a risk due to hazardous materials. WEEE
recovery professionals should also note that these products do not have any materials that are of particular
high value in their individual form.
Certications
R&TTE Compliance Statement
This device complies with the essential requirements of the R&TTE Directive 1999/5/EC. The following test
methods have been applied in order to prove presumption of conformity with the essential requirements
of the R&TTE Directive 1999/5/EC.
24
Page 26

0560
Česky
[Czech]
Dansk
[Danish]
Deutsch
[German]
Eesti
[Estonian]
English Hereby, WatchGuard, declares that this AP102 is in compliance with the essential requirements
Español
[Spanish]
Ελληνική
[Greek]
Français
[French]
Italiano
[Italian]
Latviski
[Latvian]
Lietuvių
[Lithuanian]
Nederlands
[Dutch]
Malti
[Maltese]
Magyar
[Hungarian]
Polski
[Polish]
Português
[Portuguese]
Slovensko
[Slovenian]
WatchGuard tímto prohlašuje, že tento AP102 je ve shodě se základními požadavky a dalšími
příslušnými ustanoveními směrnice 1999/5/ES.
Undertegnede WatchGuard erklærer herved, at følgende udstyr AP102 overholder de
væsentlige krav og øvrige relevante krav i direktiv 1999/5/EF.
Hiermit erklärt WatchGuard, dass sich das Gerät AP102 in Übereinstimmung mit den grundlegenden Anforderungen und den übrigen einschlägigen Bestimmungen der Richtlinie 1999/5/
EG bendet.
Käesolevaga kinnitab WatchGuard seadme AP102 vastavust direktiivi 1999/5/EÜ põhinõuetele
ja nimetatud direktiivist tulenevatele teistele asjakohastele sätetele.
and other relevant provisions of Directive 1999/5/EC.
Por medio de la presente WatchGuard AP102 cumple con los requisitos esenciales y cualesqui-
era otras disposiciones aplicables o exigibles de la Directiva 1999/5/CE.
ΜΕ ΤΗΝ ΠΑΡΟΥΣΑ WatchGuard ΔΗΛΩΝΕΙ ΟΤΙ AP102 ΣΥΜΜΟΡΦΩΝΕΤΑΙ ΠΡΟΣ ΤΙΣ ΟΥΣΙΩΔΕΙΣ
ΑΠΑΙΤΗΣΕΙΣ ΚΑΙ ΤΙΣ ΛΟΙΠΕΣ ΣΧΕΤΙΚΕΣ ΔΙΑΤΑΞΕΙΣ ΤΗΣ ΟΔΗΓΙΑΣ 1999/5/ΕΚ.
Par la présente WatchGuard déclare que l'appareil AP102 est conforme aux exigences essenti-
elles et aux autres dispositions pertinentes de la directive 1999/5/CE.
Con la presente WatchGuard dichiara che questo AP102 è conforme ai requisiti essenziali ed
alle altre disposizioni pertinenti stabilite dalla direttiva 1999/5/CE.
Ar šo WatchGuard deklarē, ka AP102 atbilst Direktīvas 1999/5/EK būtiskajām prasībām un
citiem ar to saistītajiem noteikumiem.
Šiuo WatchGuard deklaruoja, kad šis AP102 atitinka esminius reikalavimus ir kitas 1999/5/EB
Direktyvos nuostatas.
Hierbij verklaart WatchGuard dat het toestel AP102 in overeenstemming is met de essentiële
eisen en de andere relevante bepalingen van richtlijn 1999/5/EG.
Hawnhekk, WatchGuard, jiddikjara li dan AP102 jikkonforma mal-ħtiġijiet essenzjali u ma prov-
vedimenti oħrajn relevanti li hemm d-Dirrettiva 1999/5/EC.
Alulírott, WatchGuard nyilatkozom, hogy a AP102 megfelel a vonatkozó alapvetõ követelmé-
nyeknek és az 1999/5/EC irányelv egyéb elõírásainak.
Niniejszym WatchGuard oświadcza, że AP102 jest zgodny z zasadniczymi wymogami oraz
pozostałymi stosownymi postanowieniami Dyrektywy 1999/5/EC.
WatchGuard declara que este AP102 está conforme com os requisitos essenciais e outras
disposições da Directiva 1999/5/CE.
WatchGuard izjavlja, da je ta AP102 v skladu z bistvenimi zahtevami in ostalimi relevantnimi
določili direktive 1999/5/ES.
25
Page 27

Certications
Slovensky
[Slovak]
Suomi
[Finnish]
Svenska
[Swedish]
WatchGuard týmto vyhlasuje, že AP102 spĺňa základné požiadavky a všetky príslušné ustanovenia Smernice 1999/5/ES.
WatchGuard vakuuttaa täten että AP102 tyyppinen laite on direktiivin 1999/5/EY oleellisten
vaatimusten ja sitä koskevien direktiivin muiden ehtojen mukainen.
Härmed intygar WatchGuard att denna AP102 står I överensstämmelse med de väsentliga
egenskapskrav och övriga relevanta bestämmelser som framgår av direktiv 1999/5/EG.
RoHS Statement
The member states of the European Union approved directive 2002/95/EC, Restrictions of Hazardous
Substances (“RoHS directive”‘) that became valid on July 1, 2006. It states that all new electrical and
electronic equipment put on the market within the member states must not contain certain hazardous
materials. This device complies with the European Union’s R0HS directive 2002/95/EC and similar
regulations that may be adopted by other countries for European Sales.
FOR MOBILE DEVICE USAGE
Radiation Exposure Statement:
This equipment complies with IC radiation exposure limits set forth for an uncontrolled environment.
This equipment should be installed and operated with minimum distance 20cm between the radiator &
your body.
Déclaration d’exposition aux radiations:
Cet équipement est conforme aux limites d’exposition aux rayonnements IC établies pour un
environnement non contrôlé. Cet équipement doit être installé et utilisé avec un minimum de 20cm de
distance entre la source de rayonnement et votre corps.
Europe – EU Declaration of Conformity
This device complies with the essential requirements of the R&TTE Directive 1999/5/EC. The following test
methods have been applied in order to prove presumption of conformity with the essential requirements
of the R&TTE Directive 1999/5/EC:
EN60950-1 - Safety of Information Technology Equipment
EN50385 - Generic standard to demonstrate the compliance of electronic and electrical apparatus with the
basic restrictions related to human exposure to electromagnetic elds (0 Hz - 300 GHz)
EN 300 328 - Electromagnetic compatibility and Radio spectrum Matters (ERM); Wideband Transmission
systems; Data transmission equipment operating in the 2,4 GHz ISM band and using spread spectrum
modulation techniques; Harmonized EN covering essential requirements under article 3.2 of the R&TTE
Directive
EN 301 893 - Broadband Radio Access Networks (BRAN); 5 GHz high performance RLAN; Harmonized EN
covering essential requirements of article 3.2 of the R&TTE Directive
EN 301 489-1 - Electromagnetic compatibility and Radio Spectrum Matters (ERM); ElectroMagnetic
Compatibility (EMC) standard for radio equipment and services; Part 1: Common technical requirements
26
Page 28

EN 301 489-17 - Electromagnetic compatibility and Radio spectrum Matters (ERM); ElectroMagnetic
Compatibility (EMC) standard for radio equipment and services; Part 17: Specic conditions for 2,4 GHz
wideband transmission systems and 5 GHz high performance RLAN equipment
This device is a 5GHz wideband transmission system (transceiver), intended for use in all EU member states
and EFTA countries, except in France and Italy where restrictive use applies.
In Italy the end-user should apply for a license at the national spectrum authorities in order to obtain
authorization to use the device for setting up outdoor radio links and/or for supplying public access to
telecommunications and/or network services.
This device may not be used for setting up outdoor radio links in France and in some areas the RF
output power may be limited to 10 mW EIRP in the frequency range of 2454 – 2483.5 MHz. For detailed
information the end-user should contact the national spectrum authority in France.
REACH Certicate of Compliance
The new EU chemicals policy REACH (Registration, Evaluation, Authorization and restriction of Chemicals)
came into eect on June 1, 2007. REACH is Europe’s new chemicals legislation, which is applicable in all
27 EU Member States as well as the EFTA European Economic Area (EEA). REACH creates a new system
for gathering information, assessing risks to human health and the environment, and authorizing or
restricting the marketing and use of chemicals produced or supplied in the EEA. REACH has an impact
on EEA producers and importers of nished products and users of chemicals in the course of industrial or
professional activities.
WatchGuard supports the overall REACH objective of improving the protection of human health and
the environment and will meet all applicable REACH requirements. WatchGuard is strongly committed
to working with our customers and supply chain to dene and implement the REACH requirements and
ensure a smooth transition to compliance.
One of the REACH requirements is that manufacturers and importers have the duty to register substances
they are producing or importing. In accordance with the regulations, the products of WatchGuard do not
need to be registered for the following reasons:
• WatchGuard does not import more than 1 metric ton per year of a substance as dened by REACH.
• WatchGuard products are non-chemical products that are not designed to release any substance
under normal and reasonably predictable application.
• Our products do not contain the listed substances at more than 0.1% by weight of the whole
product/part.
Brazil
Este equipamento opera em caráter secundário, isto é, não tem direito a proteção contra interferência
prejudicial, mesmo de estações do mesmo tipo, e não pode causar interferência a sistemas operando em
caráter primário.
27
Page 29

France
(i) les dispositifs fonctionnant dans la bande 5150-5250 MHz sont réservés uniquement pour une utilisation
à l’intérieur an de réduire les risques de brouillage préjudiciable aux systèmes de satellites mobiles
utilisant les mêmes canaux;
(ii) De plus, les utilisateurs devraient aussi être avisés que les utilisateurs de radars de haute puissance sont
désignés utilisateurs principaux (c.-à-d., qu’ils ont la priorité) pour les bandes 5 250-5 350 MHz et 5 650-5
850 MHz et que ces radars pourraient causer du brouillage et/ou des dommages aux dispositifs LAN-EL.
China
Certications
VCCI Notice Class A ITE (Japan)
28
Page 30

Korea
사용자안내문
기 종 별 사 용 자 안 내 문
A 급 기기
(업무용방송통신기자재)
After sales information:
IT LOGIN JOEUN
#1402, 14F Yongsungbiztel 314-1 Woori-venturetownII 3F, 82-29
Hangangro-2ga Yongsangu Seoul, Korea
Seoul, SEOU 140-750 Seoul, SEOU 140-750
이 기기는 업무용(A 급) 전자파적합기기로서
판매자 또는 사용자는 이 점을 주의하시기 바
라며, 가정외의 지역에서 사용하는 것을 목적
으로 합니다.
Mexico
Este La operación de este equipo está sujeta a las siguientes dos condiciones:
1. es posible que este equipo o dispositivo no cause interferencia perjudicial y
2. este equipo o dispositivo debe aceptar cualquier interferencia, incluyendo la que pueda causar su
propia operación no deseada.
Taiwan Class A Type Device
29
Page 31

Certications
30
Page 32

Limited Hardware Warranty
This Limited Hardware Warranty (the “Warranty”) applies to the enclosed hardware product, not including any
associated software, which is licensed pursuant to a separate end-user license agreement and warranty (the
“Product”). BY USING THE PRODUCT, YOU (either an individual or a single entity) AGREE TO THE TERMS HEREOF.
If you do not agree to these terms, please return this package, along with proof of purchase, to the authorized
dealer from which you purchased it for a full refund. WatchGuard Technologies, Inc. (“WatchGuard”) and you agree
as set forth below or on the reverse side of this card, as applicable:
1. LIMITED WARRANTY. WatchGuard warrants that upon delivery and for one (1) year thereafter (the “Warranty
Period”): (a) the Product will be free from material defects in materials and workmanship, and (b) the Product,
when properly installed and used for its intended purpose and in its intended operating environment, will
perform substantially in accordance with WatchGuard applicable specications.
This warranty does not apply to any Product that has been: (i) altered, repaired or modied by any party other
than WatchGuard except for the replacement or inclusion of specied components authorized in, and performed
in strict accordance with, documentation provided by WatchGuard; or (ii) damaged or destroyed by force majeure
events, accidents, power spikes or similar events, or by any intentional, reckless or negligent acts or omissions
of any party. You may have additional warranties with respect to the Product from the manufacturers of Product
components. However, you agree not to look to WatchGuard for, and hereby release WatchGuard from any
liability for, performance of, enforcement of, or damages or other relief on account of, any such warranties or any
breach thereof.
2. REMEDIES. If any Product does not comply with the WatchGuard warranties set forth in Section 1 above,
WatchGuard will, following the receipt of the product you claim is defective and at its option, either (a) repair
the Product, or (b) replace the Product with a like or similar product; provided, that you will be responsible for
returning the Product and for all costs of shipping and handling. Repair or replacement of the Product shall not
extend the Warranty Period. Any Product, component, part or other item replaced by WatchGuard becomes the
property of WatchGuard. WatchGuard shall not be responsible for return of or damage to any software, rmware,
information or data contained in, stored on, or integrated with any returned Products.
3. DISCLAIMER AND RELEASE. THE WARRANTIES, OBLIGATIONS AND LIABILITIES OF WATCHGUARD, AND YOUR
REMEDIES, SET FORTH IN PARAGRAPHS 1 AND 2 ABOVE ARE EXCLUSIVE AND IN SUBSTITUTION FOR, AND YOU
HEREBY WAIVE, DISCLAIM AND RELEASE ANY AND ALL OTHER WARRANTIES, OBLIGATIONS AND LIABILITIES
OF WATCHGUARD AND ALL OTHER RIGHTS, CLAIMS AND REMEDIES YOU MAY HAVE AGAINST WATCHGUARD,
EXPRESS OR IMPLIED, ARISING BY LAW OR OTHERWISE, WITH RESPECT TO ANY NONCONFORMANCE OR DEFECT
IN THE PRODUCT (INCLUDING, BUT NOT LIMITED TO, ANY IMPLIED WARRANTY OF MERCHANTABILITY OR FITNESS
FOR A PARTICULAR PURPOSE, ANY IMPLIED WARRANTY ARISING FROM COURSE OF PERFORMANCE, COURSE OF
DEALING, OR USAGE OF TRADE, ANY WARRANTY OF NONINFRINGEMENT, ANY WARRANTY OF UNINTERRUPTED
OR ERROR-FREE OPERATION, ANY OBLIGATION, LIABILITY, RIGHT, CLAIM OR REMEDY IN TORT, WHETHER OR NOT
ARISING FROM THE NEGLIGENCE (WHETHER ACTIVE, PASSIVE OR IMPUTED) OR FAULT OF WATCHGUARD OR FROM
31
Page 33

PRODUCT LIABILITY, STRICT LIABILITY OR OTHER THEORY, AND ANY OBLIGATION, LIABILITY, RIGHT, CLAIM OR
REMEDY FOR LOSS OR DAMAGE TO, OR CAUSED BY OR CONTRIBUTED TO BY, THE PRODUCT ).
4. LIMITATION AND LIABILITY. WATCHGUARD’S LIABILITY (WHETHER ARISING IN CONTRACT (INCLUDING
WARRANTY), TORT (INCLUDING ACTIVE, PASSIVE OR IMPUTED NEGLIGENCE AND STRICT LIABILITY AND FAULT)
OR OTHER THEORY) WITH REGARD TO ANY PRODUCT WILL IN NO EVENT EXCEED THE PURCHASE PRICE PAID BY
YOU FOR SUCH PRODUCT. THIS SHALL BE TRUE EVEN IN THE EVENT OF THE FAILURE OF ANY AGREED REMEDY.
IN NO EVENT WILL WATCHGUARD BE LIABLE TO YOU OR ANY THIRD PARTY (WHETHER ARISING IN CONTRACT
(INCLUDING WARRANTY), TORT (INCLUDING ACTIVE, PASSIVE OR IMPUTED NEGLIGENCE AND STRICT LIABILITY
AND FAULT) OR OTHER THEORY) FOR COST OF COVER OR FOR ANY INDIRECT, SPECIAL, INCIDENTAL, OR
CONSEQUENTIAL DAMAGES (INCLUDING WITHOUT LIMITATION LOSS OF PROFITS, BUSINESS, OR DATA) ARISING
OUT OF OR IN CONNECTION WITH THIS WARRANTY OR THE USE OF OR INABILITY TO USE THE PRODUCT, EVEN IF
WATCHGUARD HAS BEEN ADVISED OF THE POSSIBILITY OF SUCH DAMAGES. THIS SHALL BE TRUE EVEN IN THE
EVENT OF THE FAILURE OF ANY AGREED REMEDY.
5. MISCELLANEOUS PROVISIONS. This Warranty will be governed by the laws of the state of Washington, U.S.A.,
without reference to its choice of law rules. The provisions of the 1980 United Nations Convention on Contracts
for the International Sales of Goods, as amended, shall not apply. You agree not to directly or indirectly transfer
the Product or use of the product or associated documentation to any country to which such transfer would
be prohibited by the U.S. Export laws and regulations. If any provision of this Warranty is found to be invalid or
unenforceable, then the remainder shall have full force and eect and the invalid provision shall be modied or
partially enforced to the maximum extent permitted by law to eectuate the purpose of this Warranty. This is
the entire agreement between WatchGuard and you relating to the Product, and supersedes any prior purchase
order, communications, advertising or representations concerning the Product AND BY USING THE PRODUCT
YOU AGREE TO THESE TERMS. IF THE PRODUCT IS BEING USED BY AN ENTITY, THE INDIVIDUAL INDICATING
AGREEMENT TO THESE TERMS BY USING THE PRODUCT REPRESENTS AND WARRANTS THAT (A) SUCH INDIVIDUAL
IS DULY AUTHORIZED TO ACCEPT THE WARRANTY ON BEHALF OF THE ENTITY AND TO BIND THE ENTITY TO THE
TERMS OF THIS WARRANTY; (B) THE ENTITY HAS THE FULL POWER, CORPORATE OR OTHERWISE, TO ENTER INTO
THE WARRANTY AND PERFORM ITS OBLIGATIONS UNDER THE WARRANTY AND; (C) THE WARRANTY AND THE
PERFORMANCE OF THE ENTITY’S OBLIGATIONS UNDER THE WARRANTY DO NOT VIOLATE ANY THIRD-PARTY
AGREEMENT TO WHICH THE ENTITY IS A PARTY. No change or modication of the Warranty will be valid unless it is
in writing and is signed by WatchGuard.
All WatchGuard products are designed and tested to meet strict safety requirements. These requirements include
product safety approvals and other global compliance standards. Please read the following instructions carefully
before operating the product, and refer to them as needed to ensure the continued safe operation of your
product. Additional information can be found in the electronic Hardware Guide.
32
Page 34

WATCHGUARD TECHNICAL SUPPORT
1.877.232.3531 +1.206.613.0456 www.watchguard.com/support
(U.S. and Canada) (all other countries)
ADDRESS: 505 Fifth Avenue South, Suite 500, Seattle, WA 98104
WEB: www.watchguard.com • U.S. SALES: 1.800.734.9905 • INTERNATIONAL SALES: +1.206.613.0895
© 2014 WatchGuard Technologies, Inc. All rights reserved. WatchGuard, the WatchGuard Logo, Fireware, and
LiveSecurity are registered trademarks of WatchGuard Technologies, Inc. in the United States and/or other
countries. All other trademarks and tradenames are the property of their respective owners.
P.N. 352-4815-001 Rev B 062314
 Loading...