

Page 1
Document revision: B
Page 2

Important Notice
Copyright © 2018 WatchGuard, Inc. All rights reserved. This document and supporting data are
the exclusive property of WatchGuard, Inc. and may not be copied and/or reproduced without
permission.
Software updates
WatchGuard is committed to the continual testing and improvement of our software. As new
software revisions become available, these updates will be made available to your agency; fees
may apply depending on your licensing agreement.
Manufacturer contact information
WatchGuard, Inc.
Attn: Customer Service Department
415 Century Parkway
Allen, Texas 75013
800-605-6734
CSRequest@WatchGuardVideo.com
Send us your suggestions
We want to hear from you. Tell us about your experience and how you are using WatchGuard
Video products. We will do our best to accommodate any suggestions you may have in future
revisions.
For U.S. customers, call Customer Service at 800-605-6734 or email us at
CSRequest@WatchGuardVideo.com with your comments, questions, and concerns.
International customers, please contact your local distributor.
Trademark notices
Microsoft, Windows, Windows Server, SQL Server, Active Directory, Exchange, .Net, and
Internet Explorer are trademarks or registered trademarks of Microsoft Corporation in the
United States and/or other countries.
Google Chrome is a trademark of Google, Inc.
All other marks, names, and logos mentioned herein are the property of their respective
owners.
4RE Interview Room System
ii
WGD00118 Revision B
Build 100
Page 3

Contents
Contents
Introduction 5
About this document 5
Prerequisites and assumptions 5
Installing Interview Room Equipment 7
Overview 8
Camera options 8
One Camera with External Microphone 9
Two Cameras with External Microphone 10
Configuring the 4RE DVR 11
Overview 12
Recommended workflow for configuring an interview room 4RE DVR 13
Creating a Configuration 14
Adding an Interview Room to the Central List 15
Assigning User Groups to the Configuration 17
Setting Up the EventCategory Event Tag 19
About categories 20
Adding categories to the list 20
Setting the Recording Properties 23
Setting the DVR Behavior Properties 25
Enabling Automatic Configuration Deployment 27
Deploying a Configuration Manually 29
Deploying a configuration to a 4RE DVR 31
Removing a USB thumb drive safely from a 4RE DVR 33
Using the Transfer function 33
Using the Stop button 34
Running the Interview Room Script on the 4RE DVR 35
Using the 4RE DVR 37
Overview 38
About the 4RE DVR 39
DVR 39
4RE Interview Room System
WGD00118 Revision B
iii
Page 4

Contents
Display 40
Powering On the 4RE DVR 41
Logging In to the 4RE DVR 42
Starting and Stopping Recordings 43
The interview room wall switch 44
The 4RE DVR Display Control Panel 44
Adjusting the Live Audio on the 4RE DVR 45
Muting the Audio During a Recording 46
Changing the Camera View on the 4RE DVR 47
Deactivating Camera Streams During a Recording 48
Tagging a Recorded Event on the 4RE DVR 50
Event Category tag 50
Tagging an event 51
Using Watch Commander 53
Using Evidence Library 4 Web 54
Index 55
iv
4RE Interview Room System
WGD00118 Revision B
Page 5
Introduction
Introduction
Welcome to the WatchGuard 4RE Interview Room System. This guide is designed to help you
set up and use the WatchGuard 4RE DVR (and its supporting equipment and software) for your
interview room.
About this document
The 4RE Interview Room System covers the following topics:
l Installing the interview room equipment (page 7)
l Configuring the 4RE DVR for an interview room (page 11)
l Using the DVR for an interview room (page 37)
l Using Watch Commander to monitor a live video stream coming from the interview room DVR
(page 53)
l Using Evidence Library (EL) to search for, play back, and manage interview room video evidence
(page 54)
Note: The images in this document are representative of what you could see on
your screen. They are meant to serve as a guide.
This guide covers the basic installation, configuration, and use of the 4RE DVR and its
supporting equipment and software for an interview room. It is not a comprehensive manual
for every possible action or situation you could face while setting up or using your interview
room DVR. If you have a question about an interview room DVR that is not covered in this user
guide, contact WatchGuard Customer Service.
Prerequisites and assumptions
l 4RE DVR firmware version 3.6 or above
l Evidence Library 4 Web (EL4 Web), version 4.0 or above, installed and working in the system
l Watch Commander 1.2 or above, installed and working in the system
Note: If the EL4 Web version is 4.1.2 or above, the Watch Commander
version must be 1.3 or above.
4RE Interview Room System
WGD00118 Revision B
5
Page 6

Introduction
This page intentionally left blank.
6
4RE Interview Room System
WGD00118 Revision B
Page 7

Installing Interview Room Equipment
Installing Interview Room Equipment
In this section...
l Interview room setup and installation options (page 8)
o
One camera, external microphone (page 9)
o
Two cameras, external microphone (page 10)
l Interview room camera options (page 8)
4RE Interview Room System
WGD00118 Revision B
7
Page 8
Installing Interview Room Equipment
Overview
WatchGuard Video offers two recommended installation options for your interview rooms:
l One camera with external microphone (page 9)
l Two cameras with one external microphone (page 10)
Note: The options included in this manual are those recommended by
WatchGuard Video. If you need to set up your interview room differently, consult
with your WatchGuard Video representative.
All the recommended options include:
l WatchGuard Video's 4RE DVR and Display
l Either one or two cameras
l One channel audio using a separate, external microphone
Important! The equipment installation should be done by professional, certified
closed-circuit TV (CCTV)/video installers , using standard CCTV best practices. The
wiring diagrams that show the interview room installation options assume CCTV
best practices are followed.
Camera options
WatchGuard Video offers two options for your interview room cameras:
l Fixed-dome analog camera (part number WGP02264)
l Passive-infrared (PIR) covert analog camera (part number WGP02265)
8
4RE Interview Room System
WGD00118 Revision B
Page 9
One Camera with External Microphone
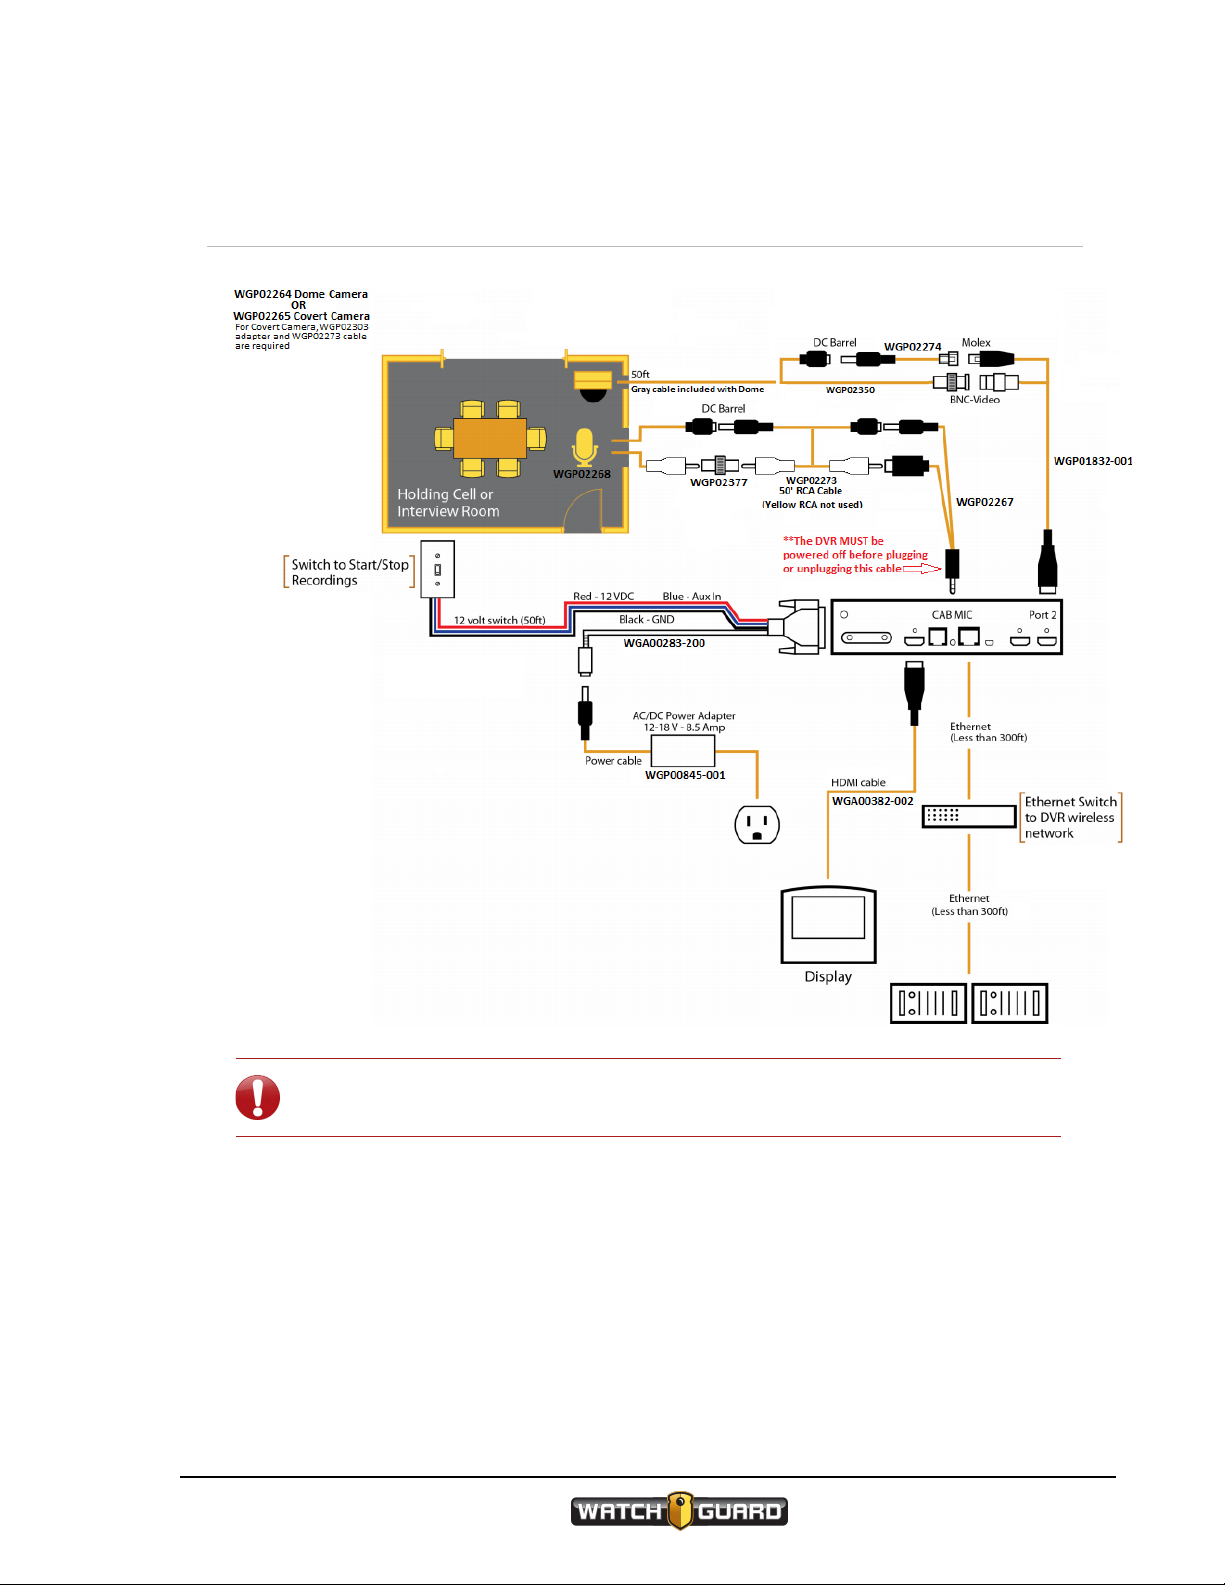
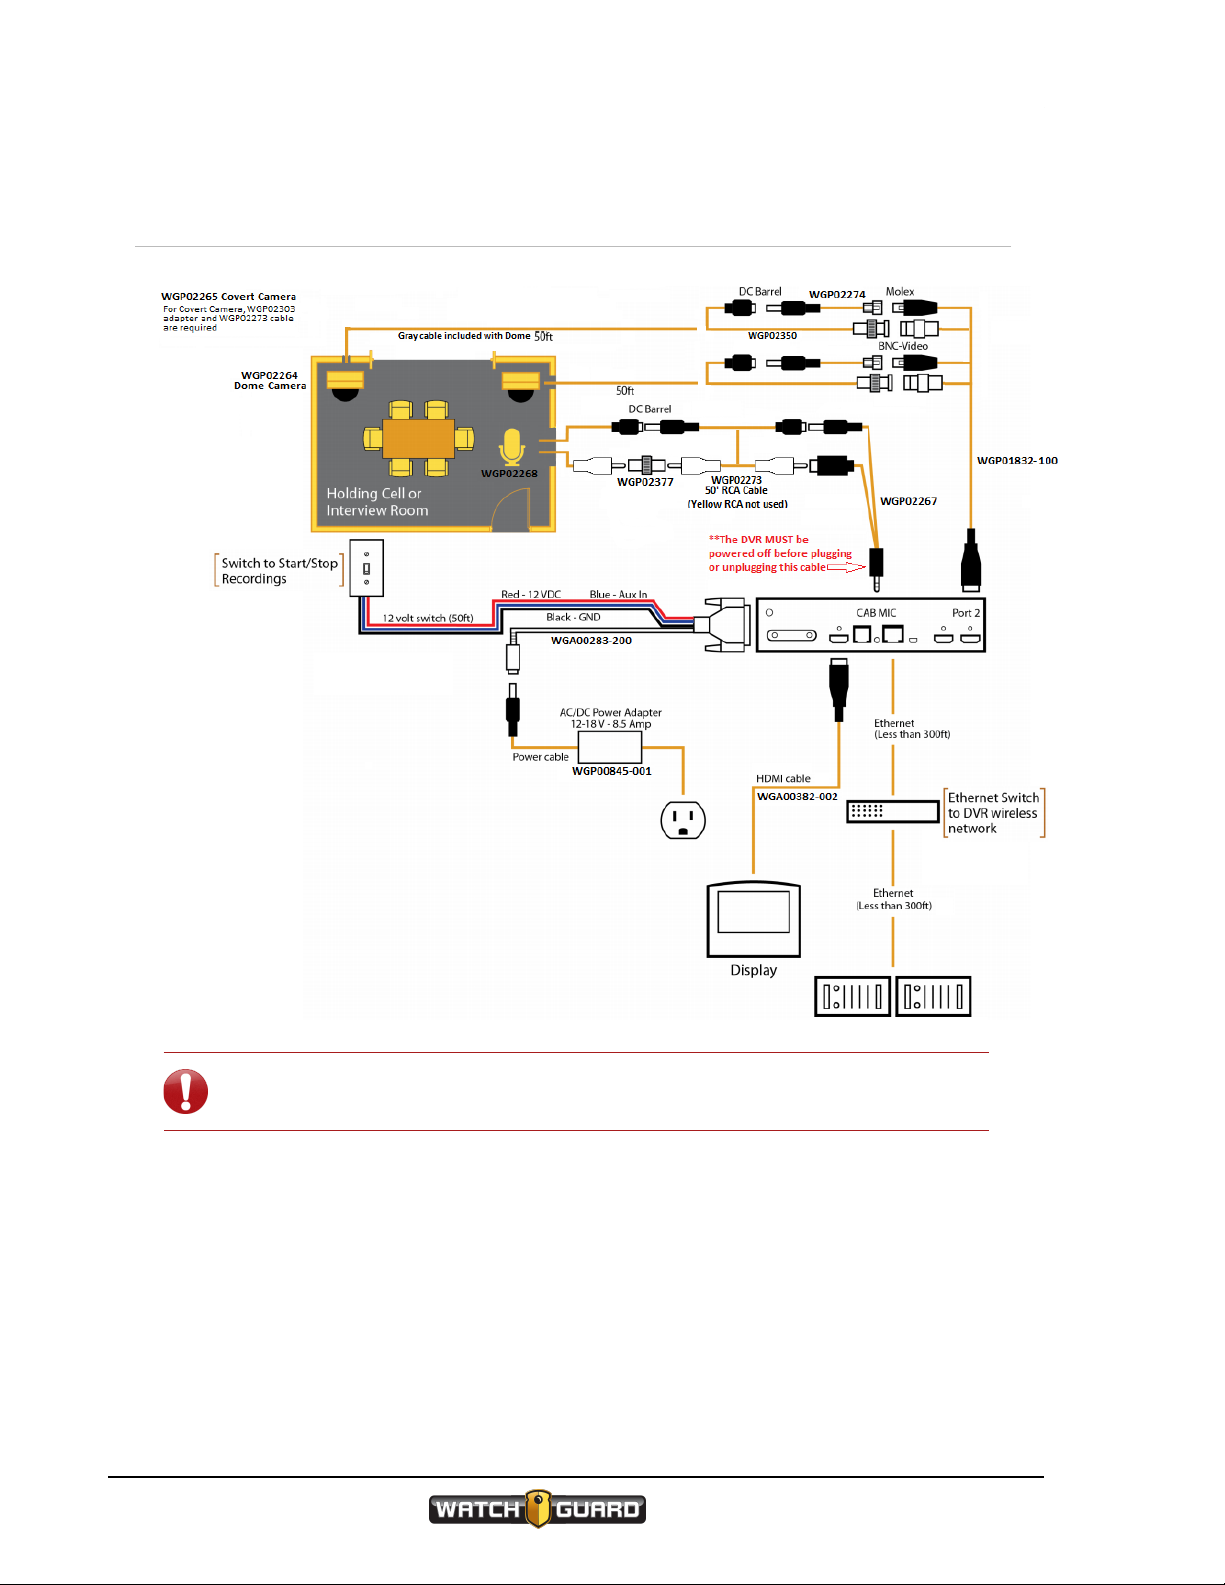
One Camera with External Microphone
Important! You should install your interview room equipment using standard
CCTV (closed-circuit TV) best practice.
4RE Interview Room System
WGD00118 Revision B
9
Page 10
Installing Interview Room Equipment
Two Cameras with External Microphone
10
Important! You should install your interview room equipment using standard
CCTV (closed-circuit TV) best practice.
4RE Interview Room System
WGD00118 Revision B
Page 11

Configuring the 4RE DVR
In this section...
l Recommended workflow (page 13)
l Creating a default configuration (page 14)
l Adding an interview room to the central list of DVRs (page 15)
l Assigning a user group to the interview room configuration (page 17)
l Setting up the EventCategory event tag (page 19)
l Setting Recording Properties (page 23)
l Setting DVR Behavior properties (page 25)
l Enabling automatic configuration deployment (page 27)
l Manually deploying the initial interview room configuration (page 29)
o
Deploying the interview room configuration to the DVR (page 31)
o
Removing a USB thumb drive safely from the DVR (page 33)
Configuring the 4RE DVR
l Running the interview room script on the DVR (page 35)
4RE Interview Room System
WGD00118 Revision B
11
Page 12
Configuring the 4RE DVR
Overview
For Evidence Library 4 Web (EL4 Web), Evidence Library Administrator (EL Administrator)
Device Management helps your agency manage its fleet of 4RE DVRs.
Note: To use EL Administrator Device Management, you must be assigned the
correct permissions by your system administrator in EL Administrator Security
Management. If you need system permission to use Device Management,
contact your system administrator.
You use Device Management to create configurations for your interview rooms, then deploy the
configurations to the interview room 4RE DVRs. The configuration assigns settings to the 4RE
that help it function specifically for an interview room setup.
Once you have the configuration deployed to the 4RE, you run the interview room script on the
4RE to finish setting it up for interview room use.
Important! You must deploy configurations to the interview room 4REs before
you run the interview room script on them. See the recommended workflow on
page 13.
Note: The instructions in this section assume some knowledge of EL
Administrator Device Management. They assume that other agency
configurations already exist. If you have questions about configuring your
interview room 4REs that are not addressed in this section, see the Managing
Devices section of the Evidence Library 4 Web User Guide or Online Help, or
contact your system administrator.
12
4RE Interview Room System
WGD00118 Revision B
Page 13

Recommended workflow for configuring an interview room 4RE DVR
Recommended workflow for configuring an interview room
4RE DVR
Note: WatchGuard follows a basic workflow when setting up an agency and its
4RE DVRs in Evidence Library Administrator Device Management. This workflow
is one possible way of doing things and does not cover all possible Device
Management situations.
The following steps make up a recommended workflow for initially configuring your interview
room 4REs:
1. Access Evidence Library Administrator.
2. Access 4RE Management.
3. Create a default configuration to customize for an interview room 4RE. (page 14)
4. Add interview rooms to the agency central list of 4RE DVRs and assign them to the interview
room configuration. (page 15)
5. Assign enrollments (user groups) to the interview room configuration. (page 17)
6. Set up the EventCategory event tag for the interview room 4RE. (page 19)
7. Set up retention rules for any new event categories you added for the interview room.
For instructions how to set up retention rules in Evidence Library 4 Web (EL4 Web), see
Managing Evidence Retention and Cleanup in the Managing Evidence Storage section in the
Evidence Library 4 Web User Guide or Online Help.
8. Set up Recording Properties for the interview room 4RE. (page 23)
9. Set up DVR Behavior properties for the interview room 4RE. (page 25)
10. Enable automatic configuration deployment. (page 27)
11. Load the new interview room configuration on a USB thumb drive. (page 29)
12. Deploy the interview room configuration to the interview room 4RE. (page 31)
13. Change the IP address, subnet, and gateway of the 4RE to match the agency's internal
network.
Tip: You can update the agency network information using the 4RE's
Maintenance Menu. For more information, contact WatchGuard
Customer Service.
14. Run the interview room script on the 4RE. (page 35)
4RE Interview Room System
WGD00118 Revision B
13
Page 14
Configuring the 4RE DVR
Creating a Configuration
Note: These instructions correspond to step 3 on the recommended workflow
(page 13).
Before you can customize a configuration for the interview room, you create a default
configuration.
Note: You can copy an existing agency in-vehicle configuration as your starting
point, if desired. See the Managing Devices section of the Evidence Library 4 Web
User Guide for more information.
To create a new configuration with system default settings:
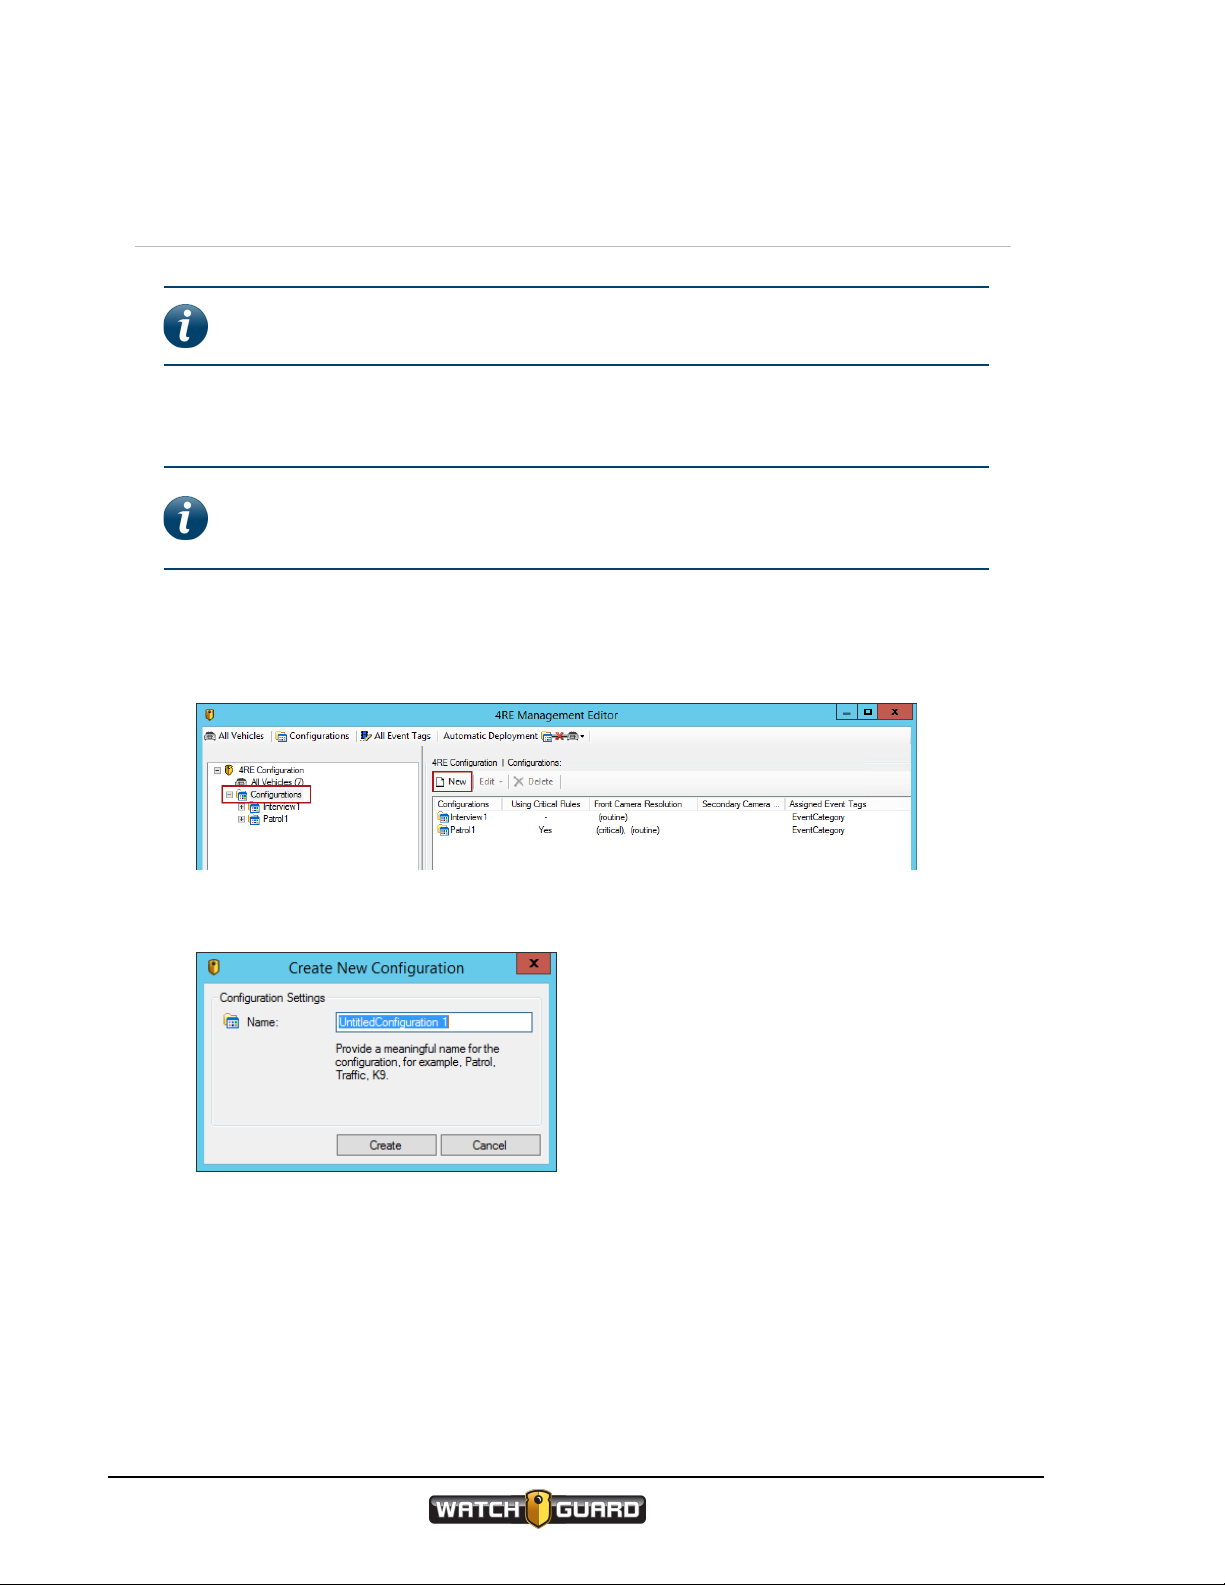
1. Click Configurations in the left pane of the 4RE Management Editor dialog box.
The list of 4RE configurations appears.
2. Cick New.
The Create New Configuration dialog box opens.
3. Enter a name for the new interview room configuration, then click Create.
The new configuration with system default settings is added to the list of your agency
configurations.
14
4RE Interview Room System
WGD00118 Revision B
Page 15
Adding an Interview Room to the Central List
Adding an Interview Room to the Central List
Note: These instructions correspond to step 4 on the recommended workflow
(page 13).
With Evidence Library 4 Web (EL4 Web), you add your interview rooms to a central list of all
agency 4RE DVRs, All Vehicles. The All Vehicles list contains settings identifying each 4RE
that records video evidence for your agency, whether in a vehicle or an interview room. You use
the Create New Vehicle dialog box to add your interview rooms to the All Vehicles list.
Tip: WatchGuard recommends that you name your interview rooms using
identifiers that are obviously interview rooms, for example, Room B or Interview
214. This distinguishes them from the vehicle identifiers on the All Vehicles list.
To add an interview room to the All Vehicles list:
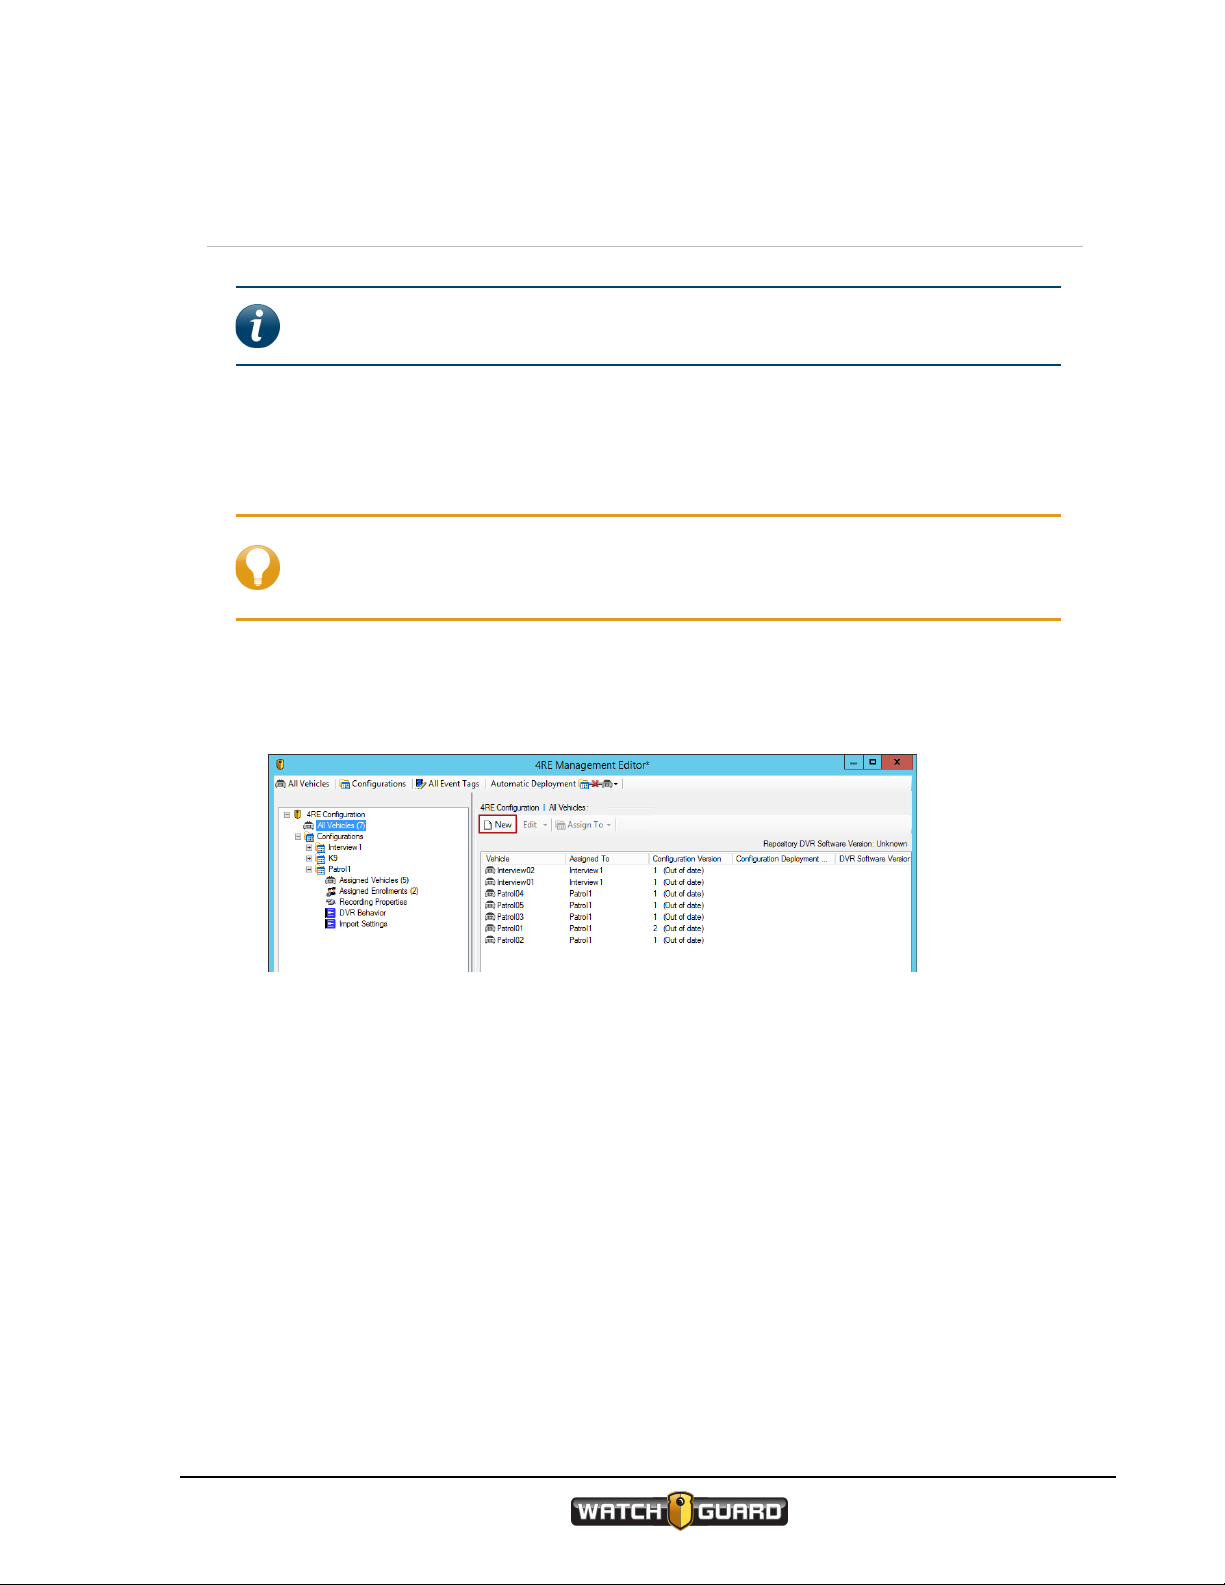
1. Click All Vehicles in the left pane of the 4RE Management Editor dialog box.
The All Vehicles list appears.
4RE Interview Room System
WGD00118 Revision B
15
Page 16
Configuring the 4RE DVR
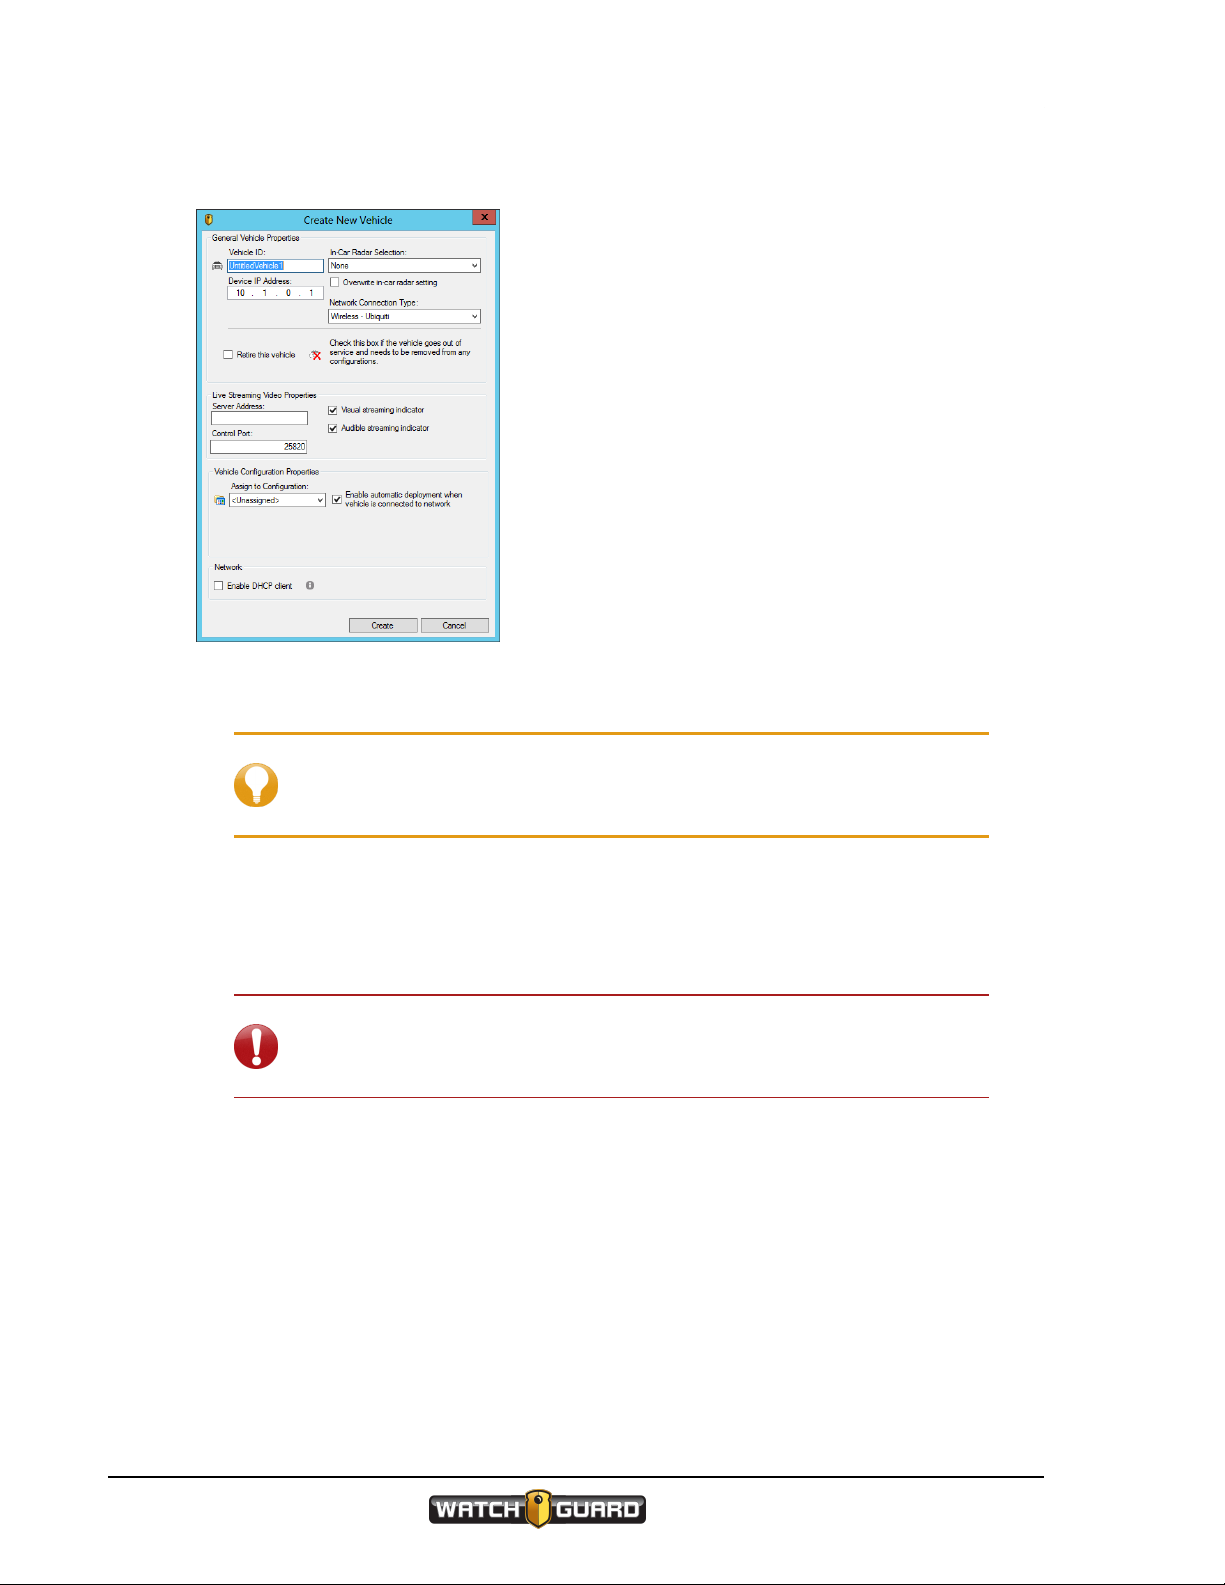
2. Click New.
The Create New Vehicle dialog box opens.
3. Enter the interview room ID in the Vehicle ID field and verify that None is selected in the
radar field.
Tip: Name your interview room using a unique identifier that is
obviously an interview room, for example, Room B or Interview 214. This
distinguishes it from the vehicle identifiers on the All Vehicles list.
4. Select the None or Wired option from the Network Connection Type drop-down list.
5. If this room's video will be live-streamed to Watch Commander, in the Server Address field,
enter the IP address or machine name of the Watch Commander server; in the Control Port
field, enter the control port number if different than the default.
Important! The default port number 25820 will be the control port in
most cases. Do not change the port number without consulting your
WatchGuard representative.
6. Choose whether the 4RE should alert the investigator monitoring it that its video is being livestreamed, using an icon on the display screen or a beep.
16
4RE Interview Room System
WGD00118 Revision B
Page 17
Assigning User Groups to the Configuration
7. Select the interview room configuration that this 4RE will be assigned to, then choose whether
the configuration should automatically deploy to the 4RE DVR each time the configuration is
updated.
Note: For instructions how to assign an interview room to a
configuration at a time other than when you add the room to the All
Vehicles list, see the Managing Devices section of the Evidence Library 4
Web User Guide.
8. Verify that the Enable DHCP client checkbox is clear.
9. Click Create.
The interview room is added to the All Vehicles list.
10. Click Apply on the bottom of the 4RE Management Editor dialog box.
Assigning User Groups to the Configuration
Note: These instructions correspond to step 5 on the recommended workflow
(page 13).
In Evidence Library 4 Web (EL4 Web), users are assigned to a configuration through user
groups. User groups are set up by your system administrator according to your agency's
network security protocols in conjunction with the features in Evidence Library Administrator
(EL Administrator) Security Management.
Tip: WatchGuard recommends that your system administrator set up one or
more unique user groups for personnel who use the interview rooms and view
live streams from the 4RE DVR.
You assign user groups to the interview room configuration on the Assigned Enrollments
working pane.
To assign a user group to a configuration:
1. On the 4RE Management Editor dialog box, select the 4RE configuration you want to assign
a user group to, then click the plus sign (+) next to the configuration name.
4RE Interview Room System
WGD00118 Revision B
17
Page 18

Configuring the 4RE DVR
The configuration expands to show its five parts.
2. Click Assigned Enrollments.
The Assigned Enrollments list appears.
3. In the unassigned section, select the user group you want to assign to the configuration, then
click Assign.
The user group is assigned to its new 4RE configuration: the user group name moves from the
unassigned section to the assigned section on the Assigned Enrollments list.
4. Click Apply on the bottom of the 4RE Management Editor dialog box.
18
4RE Interview Room System
WGD00118 Revision B
Page 19

Setting Up the EventCategory Event Tag
Setting Up the EventCategory Event Tag
Note: These instructions correspond to step 6 on the recommended workflow
(page 13).
Event tags are questions or statements that the system shows the investigator on the 4RE
DVR at the end of a recording. The system prompts investigators to give a response for each
event tag when they stop a recorded event, either by turning off the switch in the interview
room or pressing the 4RE DVR's Stop button.
The system-provided EventCategory event tag is used to classify a recorded event, for
example, as an Assault. This classification can help refine a search for the interview evidence
later.
The EventCategory tag is also used to control how the system applies retention policies to
recorded events. Depending on how your agency configures its data retention, some
EventCategory classifications are kept longer than others, some are automatically archived or
purged at the end of their retention period.
Note: For more information about the EventCategory event tag, see the
Managing Devices section of the Evidence Library 4 Web User Guide or Online
Help. For information about data retention in EL4 Web, see the Managing
Evidence Storage section of the Evidence Library 4 Web User Guide or Online
Help.
In Evidence Library 4 Web (EL4 Web), all of your agency's event tags (both 4RE and VISTA) are
set up in the same Evidence Library Administrator (EL Administrator) location, the Event Tags
Editor.
Currently, an interview room setup only uses the 4RE DVR, so you only need to set up 4RE
event tags and category answers for an interview room configuration.
4RE Interview Room System
WGD00118 Revision B
19
Page 20

Configuring the 4RE DVR
Note: For instructions how to set up event tags other than EventCategory, see
the Managing Devices section of the Evidence Library 4 Web User Guide or Online
Help.
About categories
The EventCategory event tag includes a number of categories by default. Your agency may
have already changed these default categories and added others for in-vehicle use. You can add
categories to the list, as needed, for interview room use. (below)
Important! The list of categories for the EventCategory event tag applies to
your agency as a whole; it should include categories applicable to both in-vehicle
and interview room recorded events.
Adding categories to the list
To add an interview room category to the EventCategory event tag:
1. At the top of the 4RE Management Editor dialog box, click All Event Tags.
The Global Event Tag Definitions dialog box opens showing your agency's event tags.
20
4RE Interview Room System
WGD00118 Revision B
Page 21

Adding categories to the list
2. Select EventCategory on the list of event tags, then click Edit Tag.
The Editing Event Tag dialog box opens showing the attributes for the EventCategory
event tag.
3. Click Add.
The Create Dropdown Answer for Tag dialog box opens.
4. Enter the Display Answer for both 4RE and VISTA.
Note: The system requires that you enter a VISTADisplay Answer
even though the VISTA answer is not applicable for the interview room.
4RE Interview Room System
WGD00118 Revision B
21
Page 22

Configuring the 4RE DVR
5. Click OK.
The new category is added to the bottom of the lists of Display Answers.
6. Check the VISTA Retired checkbox to prevent the answer from displaying on your agency's
VISTAcameras, as applicable.
7. Click the up or down arrow to the right of the category list to adjust the new category's position
in the list, as needed.
Important! Remember that the event tag categories apply to all your
agency 4RE DVRs, including those in vehicles and those for interview
rooms.
8. Repeat steps 3 through 7 as needed to add further interview room categories to the
EventCategory event tag list.
9. Click OK.
22
4RE Interview Room System
WGD00118 Revision B
Page 23

Setting the Recording Properties
Setting the Recording Properties
Note: These instructions correspond to step 8 on the recommended workflow
(page 13).
In Evidence Library Administrator (EL Administrator), the 4RE Recording Properties allow
you to set the video quality for the interview room cameras (secondary cameras), the autostart recording setting for the interview room switch, and additional record time you want to
include in your recorded event (pre- or post-event). You also assign event tags to a
configuration with Recording Properties.
Note: For more information on the individual Recording Properties settings,
see the Managing Devices section of the Evidence Library 4 Web (EL4 Web) User
Guide or Online Help.
To set up the Recording Properties for an interview room configuration:
1. On the 4RE Management Editor dialog box, click the plus sign (+) next to the name of the
configuration whose Recording Properties you want to set.
The configuration expands to show its five parts.
4RE Interview Room System
WGD00118 Revision B
23
Page 24

Configuring the 4RE DVR
2. Click Recording Properties.
The Recording Properties settings appear.
3. Set the Secondary Camera Settings.
Note: The interview room setup does not use a front camera or a
panoramic camera, so neither the Front Camera Settings nor the
Panoramic Camera Settings are applicable.
a. Set the User Permissions to indicate whether you want to give the investigator the
ability to turn off an interview room camera from the 4RE DVR.
Tip: On the DVR, the investigator can only turn a camera off during
a recording if there is more than one camera in the interview room
setup.
Select either the Camera on, off or background or the Camera
on or off option if the investigator may need to momentarily turn off
a camera while continuing to record audio.
b. Select the Video Quality and Frame Rate for the interview room cameras.
24
4RE Interview Room System
WGD00118 Revision B
Page 25

Setting the DVR Behavior Properties
4. Set the Auto-Start Record settings for an interview room:
a. Check the Auxiliary Input checkbox to automatically start a recording when the
investigator turns on the switch in the interview room.
b. Clear all other checkboxes (except the Auxiliary Input checkbox).
Warning! Make sure none of the other checkboxes in the Auto-
Start Record section are checked. If any of the checkboxes other
than Auxiliary Input are checked, the interview room setup script
for the 4RE DVR may fail.
5. Select how much Pre-Event and Post-Event Time you want to add to a recorded event
using the Additional Record Time section.
6. Select the Event Tags you want to assign to the interview room configuration using the
Assigned Event Tags section.
For information about setting up the EventCategory event tag for an interview room, see
Setting Up the EventCategory Event Tag on page 19.
7. You can accept the defaults for the rest of the Recording Properties settings.
Note: For more information on the individual settings on Recording
Properties, see the Managing Devices section of the Evidence Library 4
Web (EL4 Web) User Guide or Online Help.
8. Click Apply.
The Recording Properties are saved and applied to the interview room configuration.
Setting the DVR Behavior Properties
Note: These instructions correspond to step 9 on the recommended workflow
(page 13).
In Evidence Library Administrator (EL Administrator), the 4RE DVR Behavior properties allow
you to set values that determine some of the behavior of an interview room 4RE DVR.
Note: For more information on the individual DVR Behavior settings, see the
Managing Devices section of the Evidence Library 4 Web (EL4 Web) User Guide or
Online Help.
4RE Interview Room System
WGD00118 Revision B
25
Page 26

Configuring the 4RE DVR
To set up the DVR Behavior properties for an interview room configuration:
1. On the 4RE Management Editor dialog box, click the plus sign (+) next to the name of the
configuration whose DVR Behavior properties you want to set.
The configuration expands to show its five parts.
2. Click DVR Behavior.
The DVRBehavior properties appear.
3. Double-click the Time Zone property to set the time zone where your agency operates.
4. Double-click the Locale property to set the language and location applicable to your agency.
26
4RE Interview Room System
WGD00118 Revision B
Page 27

Enabling Automatic Configuration Deployment
5. Double-click the Server IP Address property to set the EL4 Web server IP address.
Note: This is the EL server address that the 4RE DVR uses to upload
evidence over your agency's wired network.
6. Double-click the Officer video review level property to select what level of video review an
investigator can perform on the 4RE DVR without entering a supervisor password.
7. Double-click the Power DVR OFF automatically with ignition property to change the
value to No.
8. Click Apply.
The DVR Behavior properties are saved and applied to the interview room configuration.
Note: You can accept the default settings for the rest of the
DVRBehavior properties. Not all the properties are applicable to an
interview room setup, but when the property is applicable, the default
setting is the most appropriate option.
If you have questions about the best DVR Behavior settings for your
agency, consult with your system administrator or your WatchGuard
representative.
Enabling Automatic Configuration Deployment
Note: These instructions correspond to step 10 on the recommended workflow
(page 13).
As part of the interview room configuration, you can enable a switch in Evidence Library
Administrator (EL Administrator) that allows EL4 Web to deploy updated configurations
automatically to your agency 4RE DVRs. The initial 4RE DVR configurations (including the
enabled switch) must be deployed to the 4REs manually, but after that, the enabled switch
allows EL Administrator to update each 4RE's configuration automatically as new versions are
available.
Important! The switch to enable automatic deployment is a global setting for
your agency. Changing this setting affects configuration deployment for your
agency as a whole.
If your agency does not want to automatically deploy configurations to its fleet of
4RE DVRs, it can deploy them manually. For information on deploying
configurations manually, see the Managing Devices section of the Evidence
Library 4 Web User Guide or Online Help.
Automatic Configuration Deployment is disabled by default.
4RE Interview Room System
WGD00118 Revision B
27
Page 28

Configuring the 4RE DVR
To enable or disable automatic 4RE configuration deployment:
1. On the 4RE Management Operations dialog box, click Edit.
The 4RE Deployment Settings dialog box opens.
2. Select the Enable or Disable option, then click OK.
Warning! Changing the Automatic Configuration Deployment
setting affects automatic configuration updates for ALLof your agency's
4REs, not just the interview room 4REs. Consult with your EL
administrator before changing this setting.
When the global Automatic Configuration Deployment switch is enabled, if an updated
configuration is available for an interview room 4RE DVR, it is deployed to the DVR
automatically.
Note: For more information about deploying to your agency 4RE DVRs, see the
Managing Devices section of the Evidence Library 4 Web User Guide or Online
Help.
28
4RE Interview Room System
WGD00118 Revision B
Page 29

Deploying a Configuration Manually
Deploying a Configuration Manually
Note: These instructions correspond to step 11 on the recommended workflow
(page 13).
The first time you deploy a configuration to a 4RE DVR, you must deploy manually with a USB
thumb drive. Even though the interview room 4REs have a wired connection to your agency
network, until the first configuration is manually deployed, no connection can be made
between an interview room 4RE and the Evidence Library 4 Web (EL4 Web) server.
When you manually deploy a configuration, you use an empty USB thumb drive (minimum 512
MB), or a USB thumb drive that has been used only for deploying configuration files.
When you deploy a configuration manually, you select which interview room 4REs should have
that configuration applied to them. The system generates a configuration file specific to each
interview room 4RE. It uses the configuration assignment you made when you added the 4RE
to the All Vehicles list. For instructions how to add an interview room 4RE to the All Vehicles
list, see Adding an Interview Room to the Central List on page 15.
Note: For more information about deploying configurations to your agency's
4RE DVRs, see the Managing Devices section of the Evidence Library 4 Web User
Guide or Online Help.
To manually deploy the initial configuration to an interview room 4RE DVR:
1. On the 4RE Management Operations dialog box, click Deploy configurations manually.
The USB Deployment Operations dialog box opens listing all the 4RE DVRs (in-vehicle and
interview room) on the All Vehicles list.
4RE Interview Room System
WGD00118 Revision B
29
Page 30

Configuring the 4RE DVR
2. Check the checkboxes next to the IDs of the 4RE DVRs (Vehicle) you want to deploy a
configuration to, then click Deploy Configuration.
The Select Folder dialog box opens.
3. If you have not already done so, insert the USB thumb drive into the computer, navigate to
and select the USB thumb drive, then click Select Folder.
30
Important! Make sure you select the USBthumb drive at the top level,
that is, do not select a folder on the USB thumb drive to save your
configuration files to.
4RE Interview Room System
WGD00118 Revision B
Page 31

Deploying a configuration to a 4RE DVR
The Configuration Deploy Completed message box opens confirming that the 4RE
configurations were successfully saved to the USB thumb drive.
Note: EL4 Web saves the configuration files on the USBthumb drive
within the folder structure wgv\config.
4. Click OK.
5. Eject the USB thumb drive correctly for the operating system installed on the EL Administrator
computer.
Warning! You must eject the USB thumb drive correctly for the
operating system you have installed. Removing the USB thumb drive
incorrectly can result in corruption of data or other unexpected results.
See Microsoft Windows® help for instructions to safely remove a USB
thumb drive for your operating system.
6. Load the 4RE configuration on the interview room 4RE using the USB thumb drive.
For instructions how to load the 4RE configuration on the 4RE DVR, see Deploying a
configuration to a DVR below.
Deploying a configuration to a 4RE DVR
Note: These instructions correspond to step 12 on the recommended workflow
(page 13).
After you have loaded the interview room configuration on a USB thumb drive, you deploy it to
the 4RE DVR.
To deploy a 4RE configuration to the interview room DVR:
1. If needed, remove the USB thumb drive containing recorded events from the 4RE DVR. For
instructions how to safely remove a USB thumb drive from a 4RE DVR, see Removing a USB
Thumb Drive Safely from a 4RE DVR on page 33.
4RE Interview Room System
WGD00118 Revision B
31
Page 32

Configuring the 4RE DVR
Warning! It is critical that you only remove a USB thumb drive from a
4RE DVR when it is safe to do so. Removing the USB thumb drive too
early can result in loss of evidence or other unexpected results when data
is imported from the USB thumb drive.
2. Insert the interview room configuration USB thumb drive into the interview room 4RE DVR.
The Select Configuration screen appears on the 4REDisplay Screen.
3. Select the configuration you want to deploy, then touch Load.
Tip: Each configuration listed on the Selected Configuration screen
corresponds to a specific 4RE DVR. Select the configuration appropriate to
the DVR you are working on.
The Supervisor Login screen appears.
4. Enter your supervisor password, then touch Login.
The It is now safe... message box appears.
5. Touch OK and remove the USB thumb drive containing the interview room configuration from
the 4RE DVR.
32
4RE Interview Room System
WGD00118 Revision B
Page 33

Removing a USB thumb drive safely from a 4RE DVR
Note: If a message appears on the 4RE Display Screen instructing you
to reboot the DVR, touch OK. Remove the interview room configuration
USB thumb drive, power the DVR off, wait 10 seconds, then power it back
on.
6. If needed, replace the USB thumb drive containing recorded events in the 4RE DVR.
Note: For more information about working with the 4RE DVR in an
interview room setup, see Using the 4RE DVR on page 37.
Removing a USB thumb drive safely from a 4RE DVR
Warning! It is critical that you only remove a USB thumb drive from a 4RE DVR
when it is safe to do so. Removing the USB thumb drive too early can result in
loss of evidence or other unexpected results when data is imported from the USB
thumb drive.
There are two ways to safely remove the USB thumb drive from the 4RE DVR. The first uses the
Transfer function on the Display Screen's Main Menu. The second uses the Stop button on
the Display Control Panel.
Using the Transfer function
To safely remove a USB thumb drive from a 4RE DVR using the Transfer function:
1. If the door on the front of the 4RE DVR is closed and locked, insert the key and turn it
clockwise.
The door opens and the USB thumb drive pops out.
2. On the Display Screen's Main Menu, touch Transfer.
The Status screen appears.
4RE Interview Room System
WGD00118 Revision B
33
Page 34

Configuring the 4RE DVR
3. Touch USB.
The USB screen appears.
4. Touch Safely Remove.
If it is not yet safe to remove the USB thumb drive, the The system is currently writing...
message appears.
5. Touch OK.
When it is safe to remove the USB thumb drive, the It is now safe... message appears.
6. Touch OK and remove the USB thumb drive from the 4RE DVR.
Using the Stop button
To safely remove a USB thumb drive from a 4RE DVR using the Stop button:
1. If the door on the front of the 4RE DVR is closed and locked, insert the key and turn it
clockwise.
The door opens and the USB thumb drive pops out.
34
4RE Interview Room System
WGD00118 Revision B
Page 35

Running the Interview Room Script on the 4RE DVR
2. On the Display Control Panel, press and hold the Stop button for three seconds, then release it.
The Do you wish to safely remove... message appears.
3. Touch Yes.
The It is now safe... message appears.
4. Touch OK and remove the USB thumb drive from the 4RE DVR.
Note: For more information about working with the 4RE DVR for an interview
room setup, see Using the 4RE DVR on page 37.
Running the Interview Room Script on the 4RE DVR
Note: These instructions correspond to step 14 on the recommended workflow
(page 13).
For the 4RE DVR to work in an interview room setup, you must run the interview room script
(part number WGS00187) on the 4RE.
Running the interview room script allows the 4RE to:
l Play live audio from the interview room microphone through the Display
l Use the interview room wall switch as a record start and stop trigger
l Stream higher quality video to Watch Commander (30 frames/second instead of the default 5
frames/second)
Important! Only run the interview room script on the 4RE after you have
deployed an Evidence Library configuration to the 4RE DVR. See the
recommended workflow on page 13.
4RE Interview Room System
WGD00118 Revision B
35
Page 36

Configuring the 4RE DVR
To run the interview room script on the 4RE:
1. If needed, remove the USB thumb drive containing stored recordings from the 4RE. For
instructions how to safely remove a USBthumb drive from a 4RE, see Removing a USB Thumb
Drive Safely from a 4RE DVR on page 33.
Warning! It is critical that you only remove a USB thumb drive from a
4RE when it is safe to do so. Removing the USB thumb drive too early can
result in loss of evidence or other unexpected results when data is
imported from the USB thumb drive.
2. Insert the USB thumb drive containing the interview room script into the 4RE.
The script runs automatically.
When it is finished, the message that it is safe to remove the USB device appears.
3. Touch OK and remove the USB thumb drive from the 4RE.
A message appears instructing you to reboot the DVR.
Important! Make sure you remove the USB thumb drive containing the
interview room script from the 4REbefore you reboot it.
4. Touch OK, then power off the 4RE, wait 10 seconds, and power it back on.
5. If needed, replace the USB thumb drive containing recorded events in the 4RE.
Tip: If the 4RE Display shows you an Interview room configuration failure
message, follow the instructions in the message to successfully run the script. If
you have further questions, contact WatchGuard Customer Service.
36
4RE Interview Room System
WGD00118 Revision B
Page 37

Using the 4RE DVR
In this section...
l About the 4RE DVR (page 39)
l Powering on the 4RE (page 41)
l Logging in to the 4RE (page 42)
l Starting and stopping a recorded event (page 43)
l Adjusting the live audio volume (page 45)
l Muting the audio on the recorded event (page 46)
l Changing camera views of the live video (page 47)
l Deactivating a camera stream on the recorded event (page 48)
l Tagging the recorded event (page 50)
Using the 4RE DVR
4RE Interview Room System
WGD00118 Revision B
37
Page 38

Using the 4RE DVR
Overview
The DVR (digital video recorder) is the central component of the 4RE system (page 39). The
4REDVR is a Linux-based computer that processes and stores evidence collected through
connected cameras and microphones.
In an interview room setup, the 4RE DVR is also connected to Evidence Library 4 Web (EL4
Web) through your agency's computer network. For information on using EL4 Web with your
interview room evidence, see Using Evidence Library 4 Web on page 54.
The following procedures cover the basics of using the 4RE DVR to collect evidence from an
interview room:
l Powering on the 4RE (page 41)
l Logging into the 4RE (page 42)
l Starting a recorded event (page 43)
l Adjusting the live audio (page 45)
l Muting the event audio (page 46)
l Changing camera views on the 4RE (page 47)
l Turning off an event camera stream (page 48)
l Tagging the event (page 50)
38
4RE Interview Room System
WGD00118 Revision B
Page 39

About the 4RE DVR
About the 4RE DVR
The 4RE DVR has two parts:
l DVR (below)
l Display (page 40)
DVR
The DVR contains two storage devices used to record and store video evidence:
l 200 GB hard disk drive (HDD) or 64 GB solid state drive (SSD)
l Removable 16 or 32 GB USB thumb drive
The USB thumb drive functions primarily as a backup storage device for the hard drive.
WatchGuard Video provides a 16 GB (optional 32 GB) USB thumb drive. If no USB thumb drive
is present, the DVR remains fully functional.
On the front of the DVR is a locked door panel. When you unlock the door panel, a small, red
arm extends outward holding the USB thumb drive. All DVR keys are identical.
Warning! It is critical that you only remove a USB thumb drive from a 4RE DVR
when it is safe to do so. Removing the USB thumb drive too early can result in
loss of evidence when data is imported from the USB thumb drive. For
instructions how to properly remove a USB thumb drive from the DVR, see
Removing a USB thumb drive safely from a 4RE DVR on page 33.
In an interview room setup, evidence is usually uploaded automatically to the Evidence Library
server using your agency's computer network. You can use the USB thumb drive to transfer
evidence from the DVR to the Evidence Library server if a network link is unavailable.
Note: A USB thumb drive is also used to configure the DVR. For more
information, see Configuring the 4RE DVR for an Interview Room on page 11.
4RE Interview Room System
WGD00118 Revision B
39
Page 40

Using the 4RE DVR
Display
The 4RE DVR Display has two parts:
l Display Control Panel: Press the buttons to perform basic 4RE functions
l Display Screen: Touch the screen to make additional choices
The Display Screen shows one or more live video streams from the interview room cameras.
The foreground contains current user and status information including:
l 4RE DVR hard drive and USB thumb drive (if present) storage status
If bars appear in the storage drive meters, the DVR contains recorded events that need to be
uploaded to the Evidence Library server.
Warning! If the DVR hard drive fills completely, the 4RE stops recording.
l Date and time
l Name of the agency
l Name of the officer logged into the 4RE
l Interview room ID
To hide the user and status information:
n Touch Hide in the upper right corner of the Display Screen.
40
4RE Interview Room System
WGD00118 Revision B
Page 41

Powering On the 4RE DVR
Powering On the 4RE DVR
The 4RE DVR must be powered on before you can perform any other 4RE function. You power
on the 4RE DVR using the Power switch on the Display Control Panel.
To power on the 4RE DVR:
n Press and hold the Power | button up for about a half second.
The lights on the Display Control Panel flash when the boot-up process starts.
The entire boot-up process takes about a minute. As the 4RE boots up, the Display Screen
shows its progress with a number of status bars.
The Display sounds a triple tone when the boot-up process has finished.
4RE Interview Room System
WGD00118 Revision B
41
Page 42

Using the 4RE DVR
Logging In to the 4RE DVR
When you log in to the 4RE DVR, you associate your name as the investigator with the
evidence recorded in the interview room.
Important! WatchGuard Video recommends that you log in to the 4RE DVR (or
verify that you are logged in) before each interview. Logging in ensures that your
name is associated with the interview recording.
To log in to the 4RE DVR:
1. On the Display Control Panel, press Menu.
The Main Menu screen appears on the Display Screen.
2. Touch Officer.
The Select Officer screen appears on the Display Screen.
42
4RE Interview Room System
WGD00118 Revision B
Page 43

Starting and Stopping Recordings
3. Select your name from the list, then touch Login.
Your name shows as the logged in officer in the bottom right corner of the Display Screen.
Starting and Stopping Recordings
When you use the 4RE DVR to record evidence during an interview, you can start or stop the
recorded event using:
l The interview room wall switch (if applicable) (page 44)
l The Record and Stop buttons on the 4RE DVR Display Control Panel (page 44)
The wall switch and the buttons function as triggers that start and stop a recorded event on the
4RE.
Warning! An event can be stopped at the DVR even if it was started using the
switch in the interview room. If the Stop button is pressed on the DVR while the
interview room switch is in the Onposition, the interview room switch seems to
indicate that the DVR is still recording, but it is NOT.
To avoid this scenario, if you used the interview room switch to start an event, do
not press Stop on the DVR Display Control Panel to stop the event. Only stop the
recorded event by turning off the interview room switch.
When you trigger a recorded event on the 4RE DVR, the DVR records both audio and video. If
the interview room is set up with two cameras, the recorded video includes both camera views
by default. If the interview room has two cameras, you can deactivate one of them during an
event, depending on the 4RE's configuration. If one camera is deactivated, the 4RE continues
to record the other camera view as well as the audio. For more information, see Deactivating
Camera Streams During a Recording on page 48.
Note: The 4RE DVR requires that one camera always be active.
If you need to, you can also mute the audio during a recording. For instructions how to mute
the audio during a recording, see Muting the Audio During a Recording on page 46.
4RE Interview Room System
WGD00118 Revision B
43
Page 44

Using the 4RE DVR
The interview room wall switch
To start a recorded event using the interview room wall switch:
n Turn on the switch in the interview room.
The 4RE starts recording an event.
To stop an event using the interview room wall switch:
n Turn off the switch in the interview room.
The 4RE DVR Display Control Panel
To start a recorded event using the buttons on the 4RE DVR Display Control Panel:
n Press Record.
When the 4RE starts recording:
l The Display beeps
l The Display Screen shows REC
l The Record button on the Display Control Panel lights up red
To stop an event using the buttons on the 4RE DVR Display Control Panel:
n Press Stop.
44
4RE Interview Room System
WGD00118 Revision B
Page 45

Adjusting the Live Audio on the 4RE DVR
Adjusting the Live Audio on the 4RE DVR
If you need to, you can adjust the volume of the live audio coming through the speaker on the
4RE DVR.
Note: Changing the volume of the live audio coming through the 4RE DVR
Display Screen does NOT affect whether the audio is included in a recorded event.
To adjust the volume of the audio coming through the Display speaker:
1. On the Display Control Panel, press the Volume control.
The Tones Volume control appears.
2. Touch Advanced below the Tones Volume control.
The Volume Settings screen appears.
3. Touch Live on the left of the screen, then adjust the Live Audio Volume slider to the volume
you want.
4. To return to the camera view, press Menu on the Display Control Panel.
4RE Interview Room System
WGD00118 Revision B
45
Page 46

Using the 4RE DVR
Muting the Audio During a Recording
Note: The ability to turn off the audio for a recorded event must be configured in
Evidence Library (EL). For more information on configuring the 4RE DVR for use
in an interview room, see Configuring the 4RE DVR for an Interview Room on
page 11.
If you need to turn off the interview room audio during a recorded event, you can use the 4RE
DVR to mute the audio on the recording while continuing to record video in the room.
When you trigger an event (either with the switch in the interview room, or the Record button
on the DVR Display Control Panel), the microphone in the interview room activates. To mute
the audio on an event:
1. On the DVR Display Control Panel, press the Microphones control.
The active microphone button appears on the Display Screen.
2. Touch the microphone button.
The green checkmark on the microphone button changes to a red circle with a slash. The audio
on the event is muted.
The microphone button disappears from the Display Screen after about 4 seconds.
3. When you want to unmute the audio on the recorded event, press Microphones on the
Display Control Panel, then touch the deactivated microphone button.
46
4RE Interview Room System
WGD00118 Revision B
Page 47

Changing the Camera View on the 4RE DVR
Changing the Camera View on the 4RE DVR
Note: You can only change the camera view on the 4RE DVR if you have more
than one camera in your interview room setup.
If you have two cameras in your interview room, you can change how the camera views appear
on the DVR Display Screen.
Important! Changing how the camera views show on the DVR Display Screen
does not affect whether both camera streams are included in a recorded event.
For instructions how to deactivate a camera stream so it is NOT included in an
event, see Deactivating Camera Streams During a Recording on page 48.
By default, both the camera views show on the Display Screen in a split configuration, like in
the following example:
To show one or the other view on the Display Screen by itself:
n Touch the camera view you want to display.
4RE Interview Room System
WGD00118 Revision B
47
Page 48

Using the 4RE DVR
The view you touched fills the Display Screen.
To return to the split configuration view:
n Touch the screen.
Note: If you touch the lock icon (above the disk storage meters on the left), the
camera view locks in place on the Display Screen. When you touch the lock icon
again, the camera view unlocks.
Deactivating Camera Streams During a Recording
Note: The ability to turn off a camera (deactivate a stream) duringa recorded
event must be configured in Evidence Library 4 Web (EL4 Web). For more
information, see Configuring the 4RE DVR on page 11.
If you need to turn off one of the interview room cameras during an event, you can use the 4RE
DVR to deactivate that camera stream while continuing to record the other camera stream and
the audio in the room.
Important! You can only deactivate a camera stream on an event if you have
more than one camera in your interview room setup. The 4RE requires that one
camera always be active.
48
4RE Interview Room System
WGD00118 Revision B
Page 49

Deactivating Camera Streams During a Recording
To deactivate one of the camera streams during a recorded event:
1. Press the Cameras control on the Display Control Panel.
The active camera buttons appear on the Display Screen.
2. Touch the camera button for the camera stream you want to deactivate.
The camera stream corresponding to the button you touched is deactivated (turned Off).
The camera buttons disappear from the Display Screen after about 4 seconds.
3. When you want to reactivate the camera stream, press Cameras on the Display Control
Panel, then touch the camera button for the deactivated stream.
4RE Interview Room System
WGD00118 Revision B
49
Page 50

Using the 4RE DVR
Tagging a Recorded Event on the 4RE DVR
Note: Event categories and other event tag questions (as well as whether a 4RE
asks you to tag an event) are determined by your agency and configured in
Evidence Library 4 Web (EL4 Web). For more information, see Configuring the
4RE DVR on page 11.
After you finish an interview, the 4RE DVR asks you to tag the recorded event of that interview.
Note: You can tag the event on the 4RE immediately after you stop it, or you
can tag it later using EL4 Web. For more information on editing event tags in EL4
Web, see Using Evidence Library 4 Web on page 54.
When you stop an event (either by turning off the switch in the room or pressing the Stop
button on the 4RE), the 4RE shows you questions that ask you to provide information about
the interview you just completed. You may be asked only one question (to categorize the
interview) or multiple questions with different types of answers. The questions asked are
determined by your agency.
Event Category tag
The Event Category tag (the first question shown on the 4RE) is used to classify the interview
recording. This classification can help refine a search for the interview evidence later in EL. The
categories in the Event Category tag list are determined by your agency.
Note: The Event Category tag list contains all your agency categories, including
those for the in-vehicle 4RE DVRs.
The Event Category tag classification is also used to control how the EL system applies
retention policies to recordings. Depending on how your agency configures its data retention,
some classifications are kept longer than others; some are automatically archived or purged at
the end of their retention period.
The Event Category tag is usually required by your agency, so the category request stays on
the DVR Display Screen until you select an event category or start another recorded event. If
the 4RE is waiting for you to categorize an event and you start a new event, the 4RE saves the
first event without an event category and uploads it to EL. You can categorize the
uncategorized event later in EL using the event properties feature. For more information on
editing event tags in EL, see Using Evidence Library 4 Web on page 54.
50
4RE Interview Room System
WGD00118 Revision B
Page 51

Tagging an event
Important! Because the Event Category tag affects data retention, setting its
answer value incorrectly can cause an event to be improperly purged or archived.
For information on your agency's purge and archive criteria, contact your system
administrator.
Tagging an event
To tag a recorded event on the 4RE DVR:
1. Stop the event (by turning off the interview room switch or pressing Stop on the DVR Display
Control Panel).
The Event Tag screen appears.
2. Select the category from the list that best describes the nature of the interview event. Scroll
down the list as needed.
Note: The Event Category tag list contains all your agency categories,
including those for the in-vehicle 4RE DVRs.
3. Touch Save in the upper right corner of the screen.
4. If other event tag screens appear, answer each event tag question, as appropriate, touching
Save after each question.
4RE Interview Room System
WGD00118 Revision B
51
Page 52

Using the 4RE DVR
This page intentionally left blank.
52
4RE Interview Room System
WGD00118 Revision B
Page 53

Using Watch Commander
Using Watch Commander
You use Watch Commander to monitor the live video streams from your interview rooms. For
in-depth information and instructions how to use the various Watch Commander features, see
the Watch Commander User Guide or Online Help.
For instructions how to:
l Log in to Watch Commander, see Signing In to Watch Commander
l Locate the interview room video stream on the Vehicle List view, see Watch
Commander Views > Vehicle List view
l View an interview room video stream, see Viewing Live Video Streams > Viewing a single
live video stream
l View multiple interview room video streams at once, see Viewing Live Video Streams >
Viewing multiple live video streams simultaneously
l Change an interview room stream's camera view, see Viewing Live Video Streams >
Changing a live video stream's camera view
l Add another interview room's video stream to the Live Streaming view, see Viewing
Live Video Streams > Adding another vehicle's video stream to the Live Streaming view
4RE Interview Room System
WGD00118 Revision B
53
Page 54

Using Evidence Library 4 Web
Using Evidence Library 4 Web
You use Evidence Library 4 Web (EL4 Web) for reviewing and managing the evidence you
recorded in your interview rooms. For in-depth information and instructions how to use the
various EL4 Web features, see the Evidence Library 4 Web User Guide or Online Help.
For instructions how to:
l Log in to EL4 Web, see About Evidence Library 4 Web > Using Evidence Library 4 Web
l Search for evidence in EL4 Web, see Working with Recorded Events > Searching for
Recorded Events
l Play back video evidence in EL4 Web, see Working with Recorded Events > Playing Back
Recorded Events
l Edit the name of the officer who recorded the evidence, see Working with Recorded
Events > Viewing and Editing Event Details
l Edit the EventCategory event tag, see Working with Recorded Events > Viewing and
Editing Event Details
54
4RE Interview Room System
WGD00118 Revision B
Page 55

Index
A
adding
categories, 20
users, 17
adjusting speaker volume, 45
All Vehicles list, 15
Assigned Enrollments, 17
assigning interview rooms to vehicle list, 15
assumptions, 5
audio
muting recording, 46
turning down volume, 45
Automatic Configuration Deployment switch,
27
automatic deployment, 27
B
booting up the DVR, 41
C
camera
options, 8
settings, 24
turning off, 48
camera views, changing
DVR, 47
Watch Commander, 53
Cameras control, 49
categories
adding, 20
event, 20
reordering, 20
categorizing recordings, 19-20, 50-51
changing c amera views
DVR, 47
Watch Commander, 53
classifying recordings, 19-20, 50-51
configuration
creating new, 14
deployment, 27, 29
DVR, 31
configuring DVR workflow, 13
Control Panel, 40
Index
D
deactivating c amera, 48
deploying
automatically, 27
configurations, 27, 29, 31
manually, 29
Display Screen, 40
DVR
configuration workflow, 13
firmware version, 5
powering on, 41
script, 35
signing in, 42
storage, 39-40
DVR Behavior, 25
DVR Display Control Panel, 40
DVR Display Screen, 40
E
editing
EventCategory tag, 54
officer name, 54
event tags, 19
EventCategory tag, 19-20, 50, 54
evidence
searching for, 54
uploading, 39
Evidence Library, 54
server address, 27
version, 5
F
firmware
version, 5
Fleet Management permissions, 12
G
Global Event Tag Definitions, 20
I
interview room
naming, 15
script, 35
switch, 44
users, 17
L
Linux, 38
live video stream, Watch Commander, 53
lock icon, 48
logged-in officer, 43
4RE Interview Room System
WGD00118 Revision B
55
Page 56

Index
logging in
DVR, 42
Evidence Library, 54
Watch Commander, 53
M
manually deploying configurations, 29, 31
Microphones control, 46
muting recording audio, 46
N
naming interview rooms, 15
new configuration, 14
O
officer name, editing, 54
options
camera, 8
P
permissions, Fleet Management, 12
playing back video, 54
powering on DVR, 41
prerequisites, 5
R
Record button, 44
Recording Properties, 23
recordings
categorizing, 19
deactivating c amera, 48
muting audio, 46
starting and stopping, 43
removing thumb drive from DVR, 33
reordering categories, 20
S
safely removing thumb drive from DVR, 33
Screen, 40
script, interview room, 35
searching for evidence, Evidence Library, 54
server address, 27
signing in
DVR, 42
Evidence Library, 54
Watch Commander, 53
split configuration view, 47
starting recordings, 43
Stop button, 44
stopping recordings, 43
storage, DVR, 39-40
switch, interview room, 44
T
tagging a recording, 50-51
thumb drive
removing safely, 31, 33
storage, 39
triggering recordings, 43
turning down volume, 45
turning off
audio, 46
camera, 48
U
uploading DVR evidence, 39
USB thumb drive storage, 39
user groups, 17
users, interview room, 17
V
vehicle list, 15
video, playing back, 54
viewing video stream, Watch Commander,
53
Volume control, 45
W
Watch Commander, 53
version, 5
workflow, configuring DVR, 13
56
4RE Interview Room System
WGD00118 Revision B
 Loading...