


Quick Start Guide
XL PLUS NVR MODELS
Watcherprotect.com ♦ Watcher Products ♦ 877-289-2824 1
The purpose of this guide it to provide a brief overview of the Watcher XL Plus, XL Plus Mini,
and XL Plus Xtreme model NVRs. For a more in-depth approach to various setup and usability
concepts, please refer to the appropriate guide(s) from our website at
http://www.watcherprotect.com/knowledge-base.html.
Initial Setup
Once you have received your new Watcher XL Plus NVR remove the system from the box and follow
the diagrams along with the IP Camera Setup Guide for setting up your particular system.
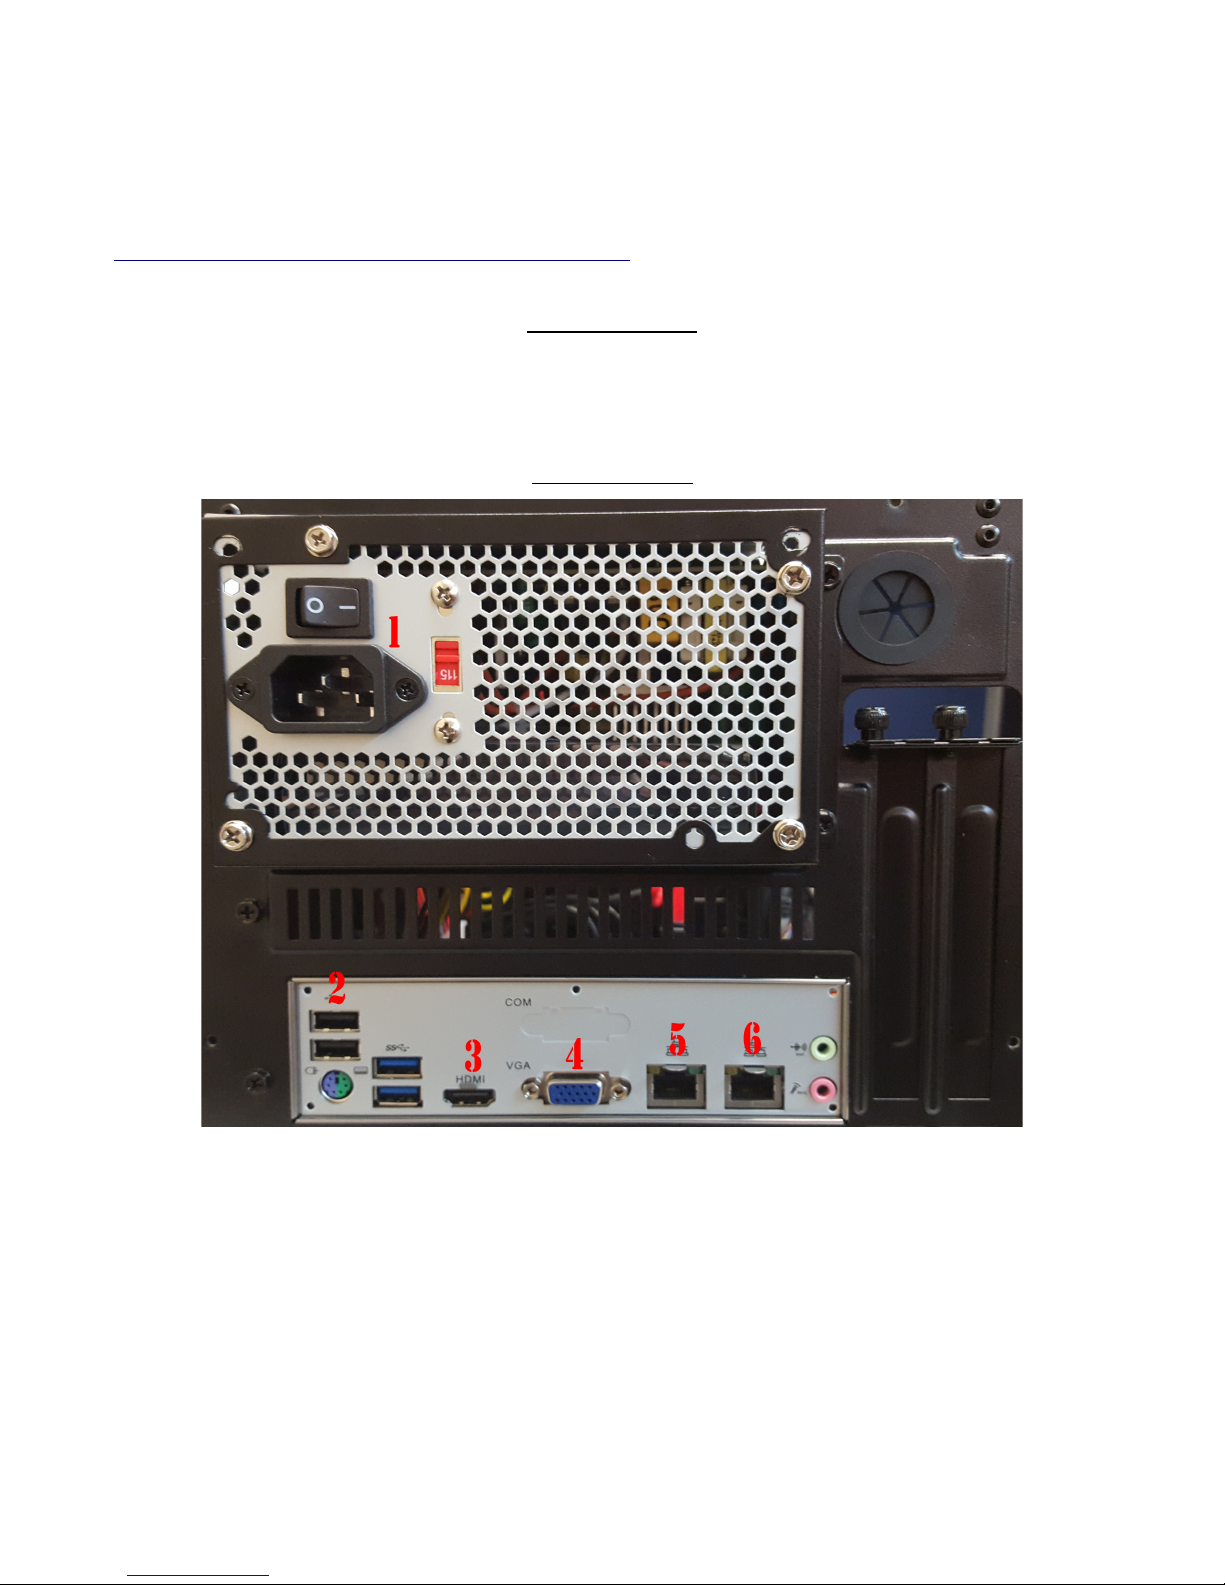
XL Plus Mini
1. AC Power Connection
2. USB Connections for Keyboard and Mouse
3. HDMI Output
4. VGA Output
5. Network Adapter (Each adapter will be labeled with which port it is)
6. Network Adapter
Watcherprotect.com ♦ Watcher Products ♦ 877-289-2824 2
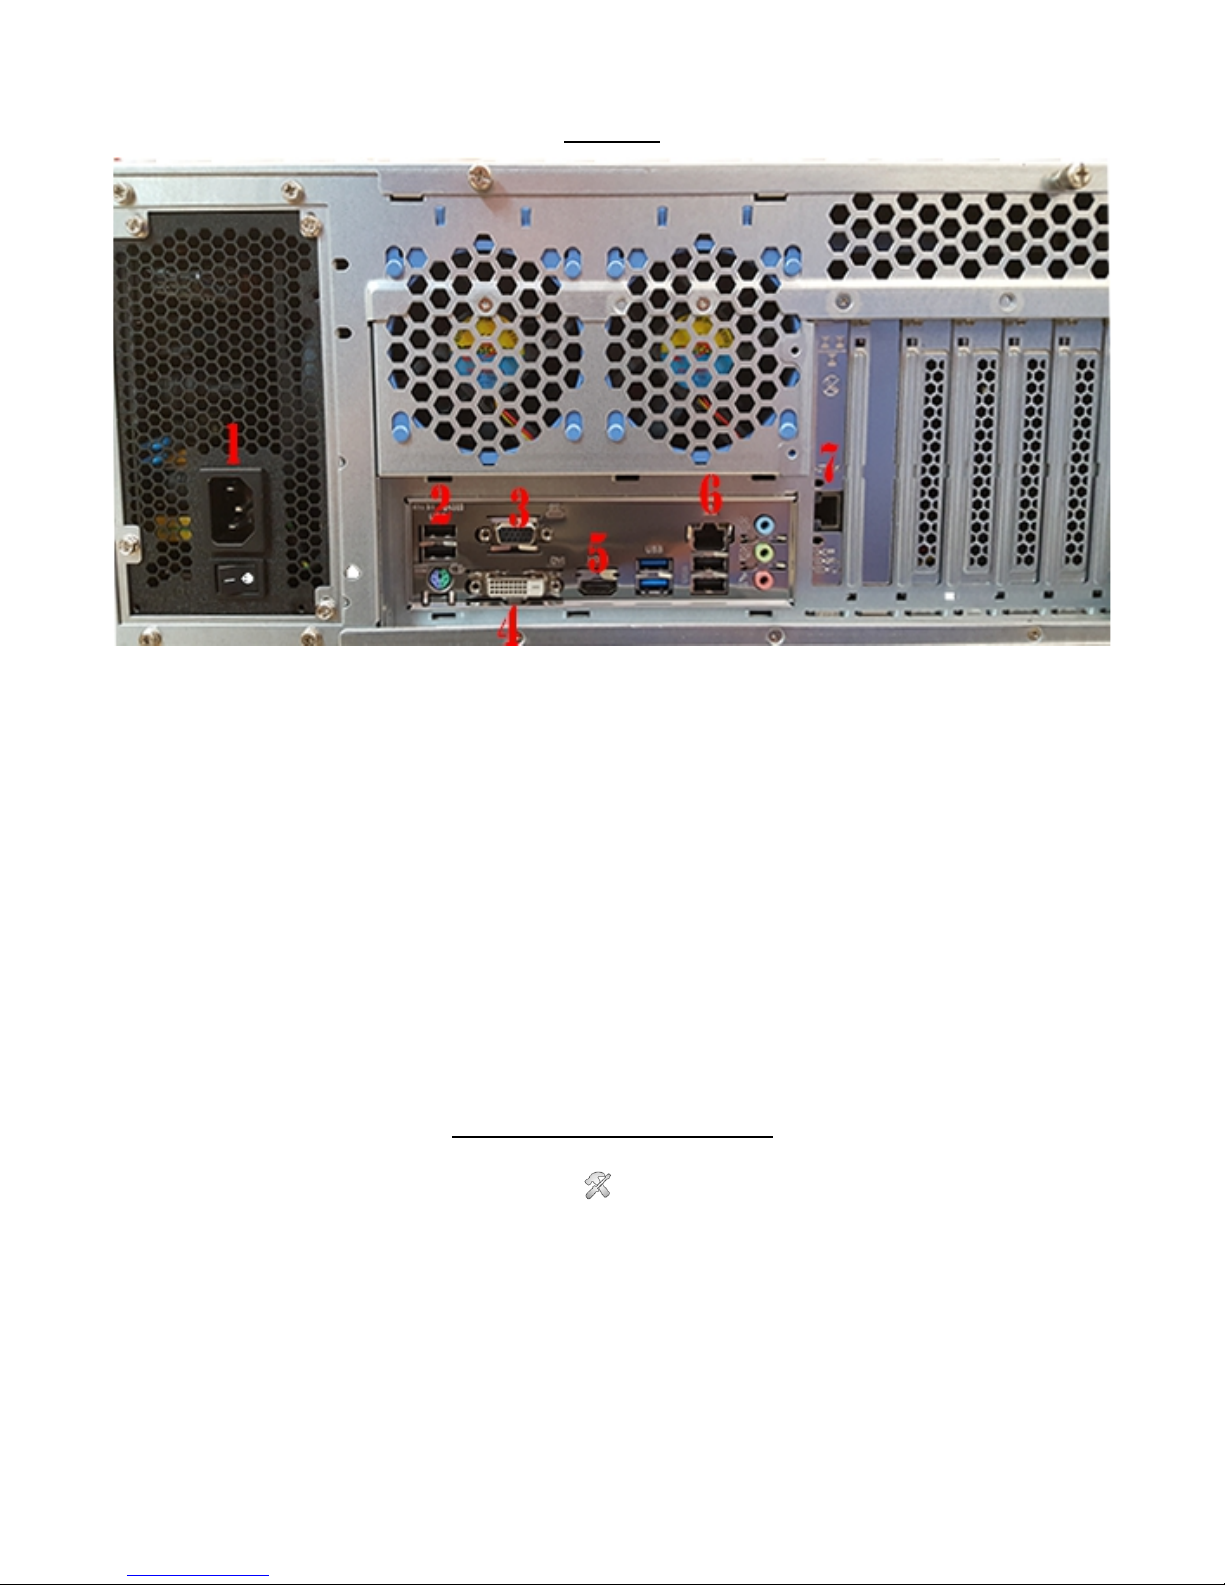
XL Plus
1. AC Power Connection
2. USB Connections for Keyboard and Mouse
3. VGA Output
4. DVI Output
5. HDMI Output
6. Network Adapter (Each adapter will be labeled with which port it is)
7. Network Adapter
To begin accessing your XL Plus, there is a default user name and password to unlock the system:
User name: admin
Password: admin
Network Configuration
To configure the network settings go to ( ) for “Settings” at the bottom of the screen. Then,
from the left select “Network Settings”. The Network Adapters correspond to the labeled ports on the
back. Your locations network should be number 1 and the camera network should be on number 2.
Configure adapter 1 with ythe IP settings for your network. Adapter 2 can be left as 192.168.4.100 or
changed to a scheme of your choice for the cameras.
Watcherprotect.com ♦ Watcher Products ♦ 877-289-2824 3
Basic Overview
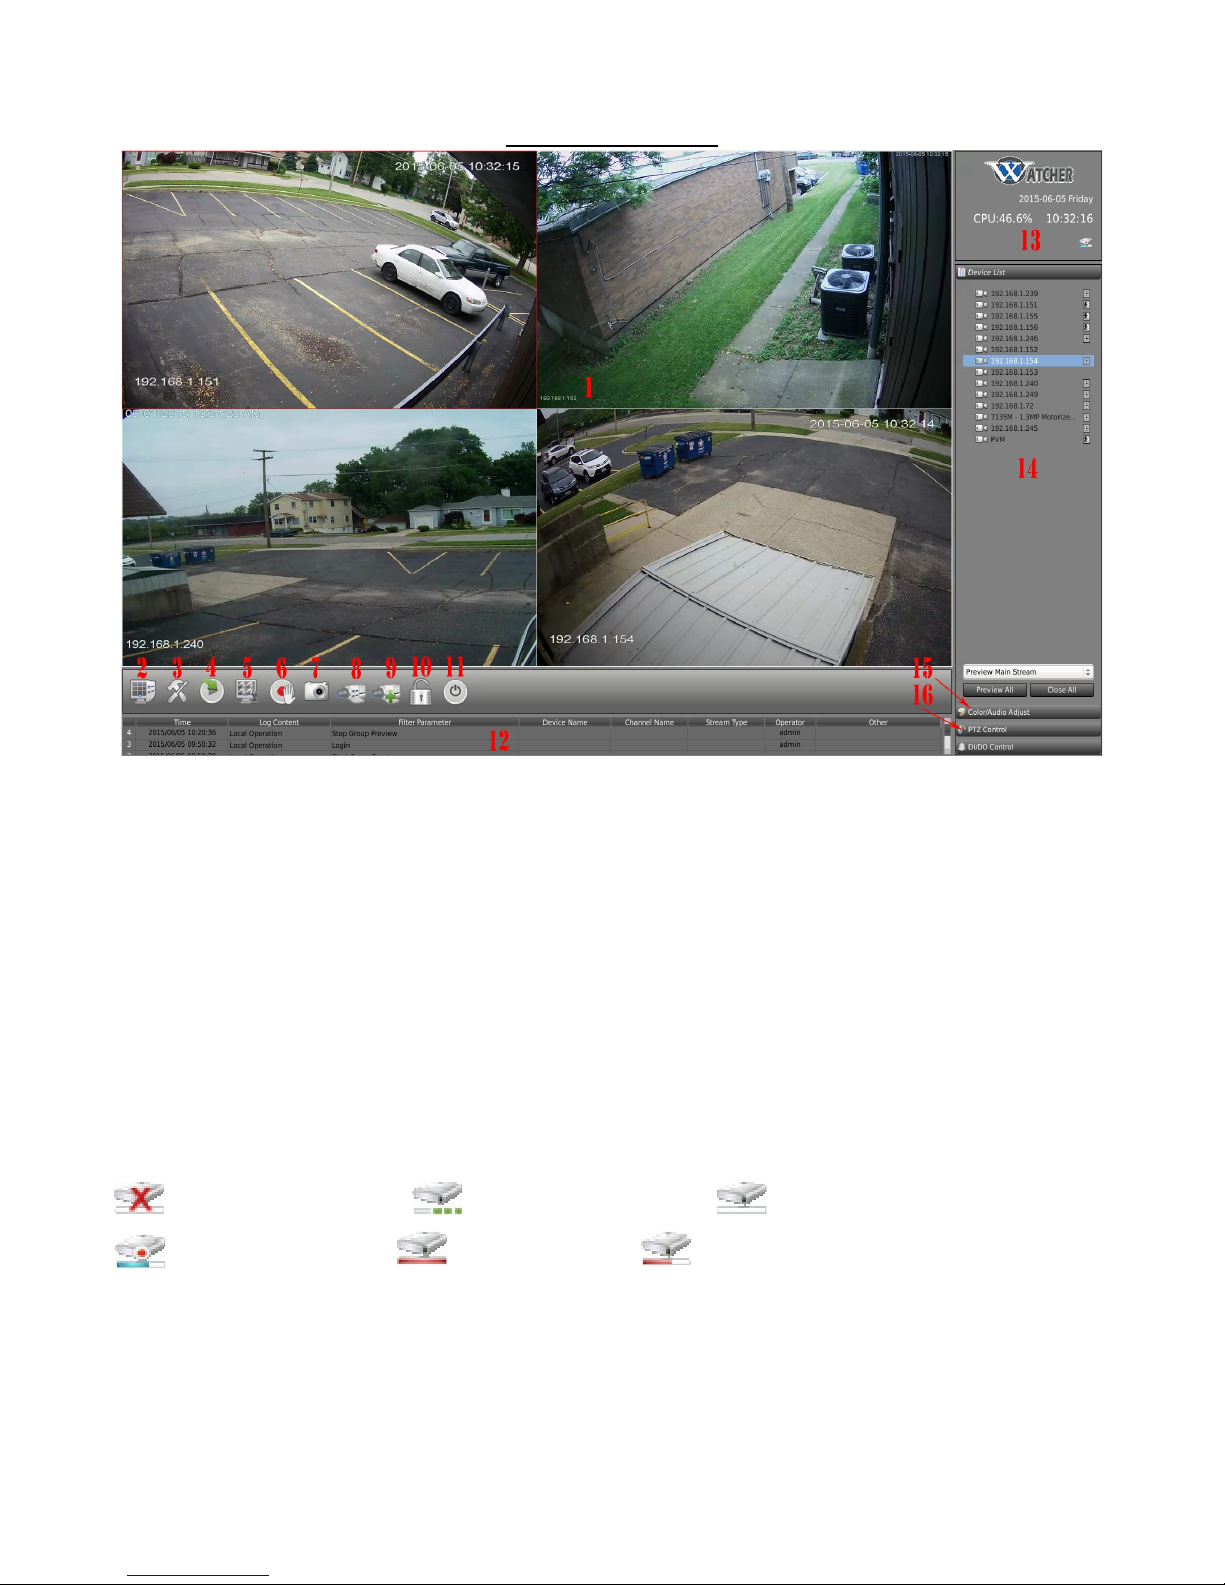
1. Live Preview Screen – Displays live video from selected devices
2. Split View Button – Allows you to select how many live screens are displayed
3. Settings Button – Opens the “Settings” menu
4. Playback Button – Opens Playback for viewing and backing up recorded video
5. Group View&Settings Button – Opens display group settings
6. Manual Record Button – This will turn on/off manual recording for all cameras connected
7. Capture Image Button – This will take a snapshot image of the currently selected camera and save
it to the specified location in System Settings. These can be viewed in playback.
8. Channel Setting Button – Opens the camera settings menu
9. Add Device Button – Use this to add a new camera to the system
10. System Lock Button – Locks the system and prompts for a username and password
11. Power Button – Shutdown or restart the system
12. Log Info Panel – Detailed log of operations
13. Info Panel – Gives you details on CPU usage, time/date, and HDD status.
– The HDD has an error. – The HDD is formatting. – The HDD is empty
– The HDD is writing. – The HDD is full. – The HDD is used but not full.
14. Device List Panel – Shows each connected device and its record status
15. Color & Audio Adjustment Panel – Allows to adjust color and audio settings of selected camera.
16. PTZ Control Panel – Controls for PTZ cameras.
Watcherprotect.com ♦ Watcher Products ♦ 877-289-2824 4
Display Groups
To populate the windows with connected cameras, simply drag a camera from the Device List
over to the windows of your choosing. Continue to do this for each camera on the list that you would
like to preview. To rearrange the live preview windows, just left-click the desired window to move,
hold the mouse button down, and drag the window to the new desired location.
Setting up Display Groups from Live View:
After rearranging the camera windows how you want them, to save the configuration right-click
anywhere on the live preview windows and go to “Group View & Setting” → “Save the Current View
as” then select which group number to save it as.
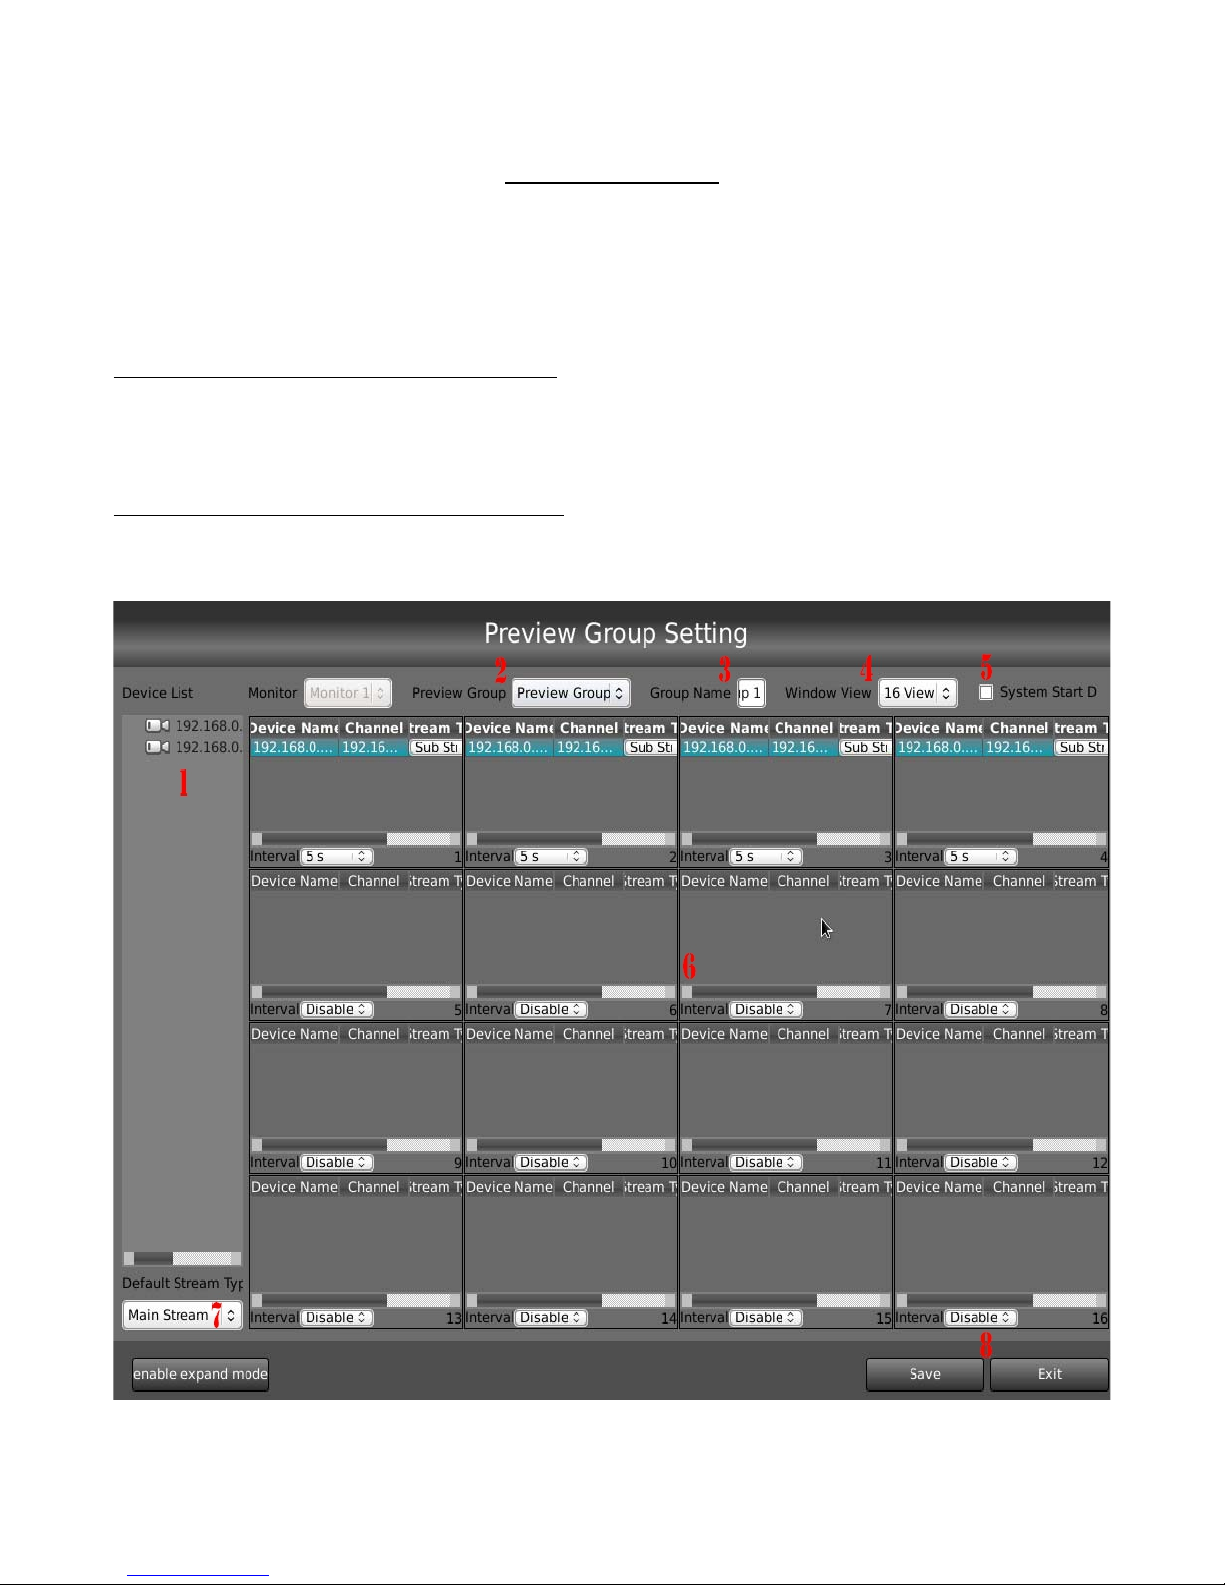
Using Preview Group Setting Menu Option:
Click the Group View/Settings Button on the live preview screen and select Preview Group
Setting. It will bring up this window.
Watcherprotect.com ♦ Watcher Products ♦ 877-289-2824 5
1. Device List – Displays all connected Devices
2. Preview Group – Used to assign a group number
3. Group Name – Personalize your group with a name.
4. Window View – Allocates the number of windows in the display group
5. System Start Group – Sets the current group to open on start-up
6. Window Layout Screen – This is the layout of the windows and how they will look during live
preview. In each window, you can add multiple cameras and have them rotate on a time interval. To set
the time interval, use the Interval option (within each window) and set it to the desired delay time to
show each camera image. (For instance, an interval of 30s will display each camera feed for 30 seconds
before switching to the next one on the list for that window)
7. Stream Type – This will change the default stream type when adding cameras to the display group.
It is recommended to not use main stream on more than 9 cameras when using live preview. This can
also be done on an individual window basis by using the stream type option in each window. This,
however, does not affect video recording. All recordings will be in main stream. For any number of
cameras over 9, please use the sub stream for live preview. This also does not affect single window
view mode. If you double-click on a camera in live preview, it will go to a single view mode and switch
to main-stream if in sub-stream
8. Save & Exit – Saves and exits the group settings
You can view your display groups by right-clicking on the Live View screen → left-click Group View
& Setting → left-click the group that you would like to see.
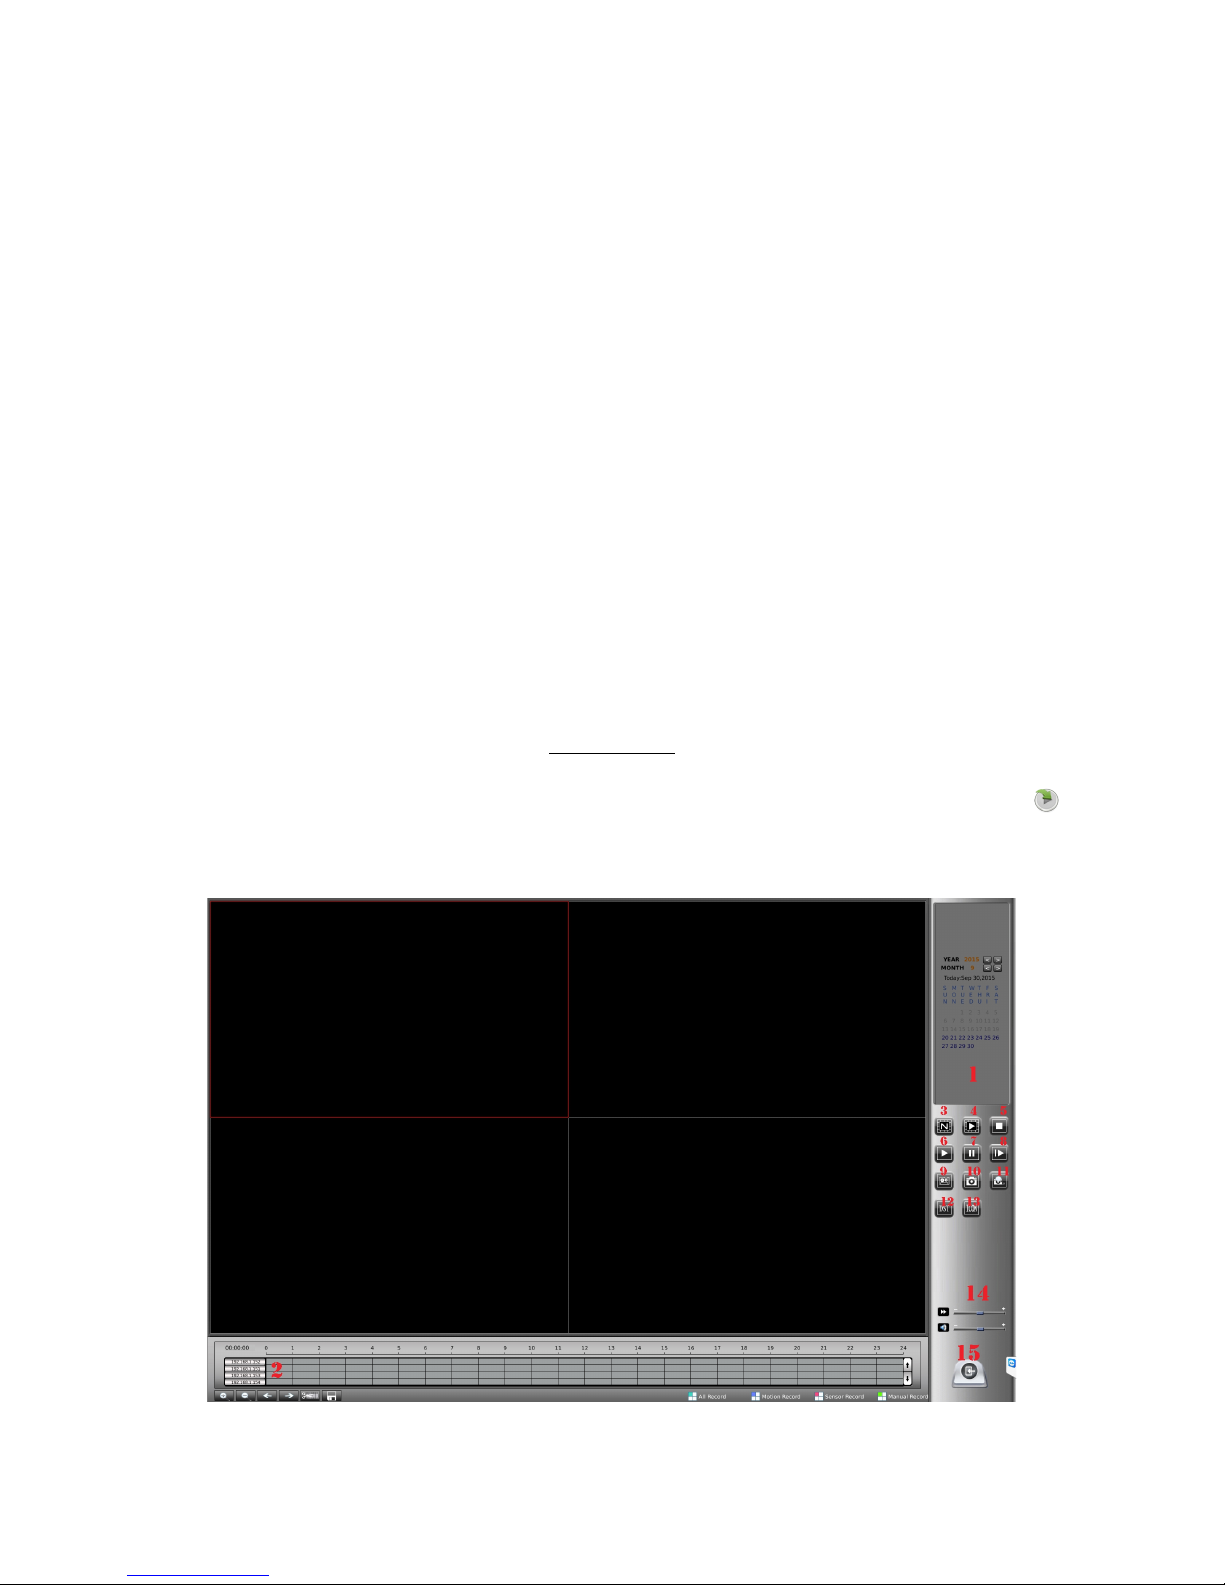
Playback
To review and backup recorded video, enter playback at the bottom of the main screen ( ).
This will bring you to the playback screen. Here you can view recorded video, save pictures, and
backup to CD or USB drive. To play video just select a date on the right hand side then double-click a
time and camera on the time line at the bottom to start playing.
Watcherprotect.com ♦ Watcher Products ♦ 877-289-2824 6
1. Date Select – Select the date you would like to view
2. Device List – Double click a line and time you would like to play
3. View Select – Select the number of windows you want up
4. Play All Cameras – Plays all cameras at time selected
5. Close All Cameras – Stops and closes all cameras
6. Play – Plays the selected camera
7. Stop – Stops the selected camera
8. Next Frame – Goes to the next frame of selected camera
9. Backup – Allows you to backup recorded video to USB or CD/DVD
10. Screen Shot - Saves a screen shot of the selected video
11. Search Images - View all screen shots
12. DST Playback – Will not be used
13. ICON Search – Opens the icon search to view a time interval on one camera
14. Play Speed – Speed up or slow down the video. Click the button to the left for normal speed
15. Exit – Exit Playback
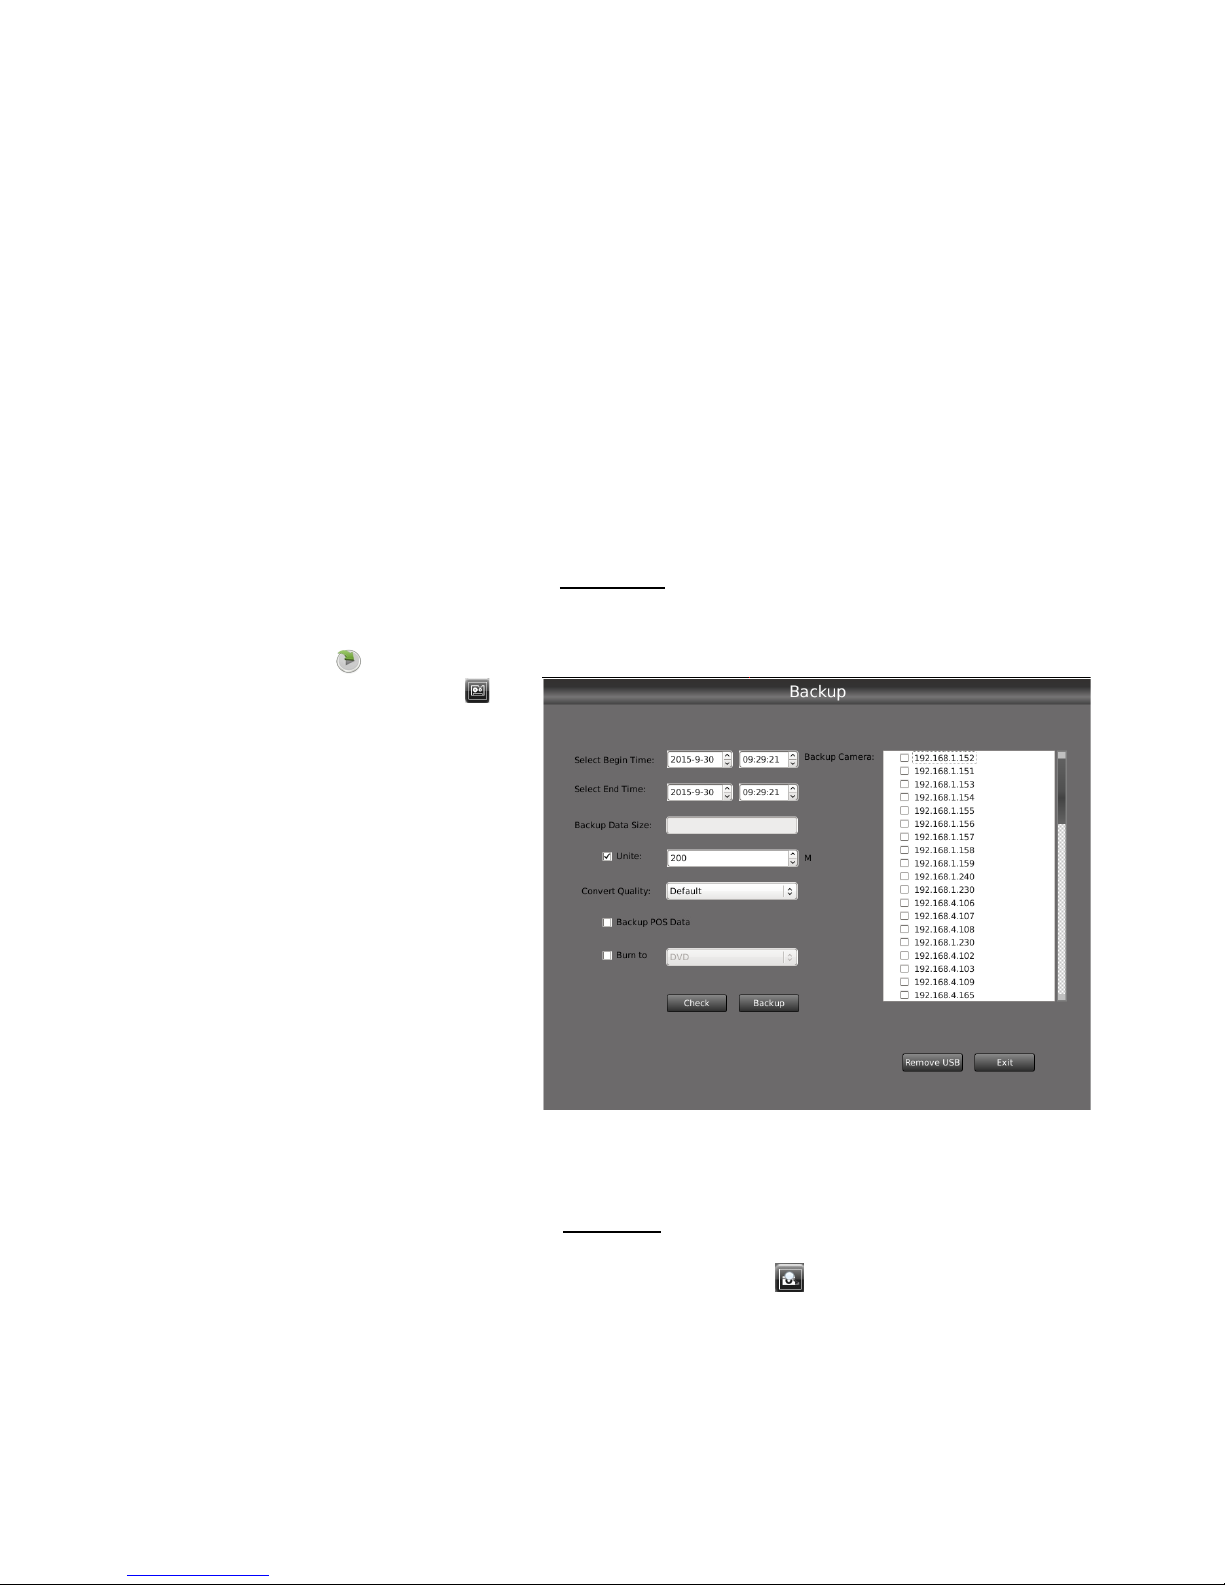
Backup
To backup video data you will first need to insert a CD/DVD or USB drive into the system.
Then go to playback ( ). Find the date time and which cameras you would like to backup and write
this down. Then enter the backup ( ).
At the top select your begin time/date and
end time/date. Select your camera from
the device list on the right. If you have
multiple cameras from the same time/date
you may select them. If you have different
cameras at different dates/times you will
need to do them separately. Once the
date/time and cameras are selected, hit the
check button at the bottom. This will tell
you the file size in the “Backup Data Size”.
Selecting the “Unite” size will break the
video into segments of the size specified.
If you are backing up to USB just hit the
Backup button. If burning to a CD/DVD
Check the box for burn to and select DVD.
A blue bar will go across the bottom. Once it is finished wait 5 seconds and hit “Remove USB”. Wait
another 5 seconds and take the USB out of the system. You can now play the video from any computer
that will play .AVI video files.
To save a picture to USB or CD/DVD click Search Images ( ). In here you can select which
camera the image is from and either select to copy all the images or just individually. Once you have
decided which images you want hit Copy or Copy All. The software will only copy images to USB
drives. To save to a CD/DVD either transfer to another computer using the USB or call Watcher
Technical Support.
Watcherprotect.com ♦ Watcher Products ♦ 877-289-2824 7
Images
 Loading...