

Waste King 560C396P01 Owner's Manual
Food Waste Disposer
Owner's Guide
IMPORTANT - Read all instructions thoroughly. Keep this guide for
future reference.
CAUTION - Be sure to review SAFETY INSTRUCTIONS PERTAINING TO
A RISK OF FIRE, ELECTRICAL SHOCK OR INJURY TO PERSONS before
installing disposer.
CONGRATULATIO NS. YOU HAVE PURCHASED THE
#1 PERFORMANCE LEADER IN FOOD WASTE DISPOSERS.
Our food waste disposer is a reliable appliance that will offer your household many years of
trouble free use. This disposer has been uniquely designed to free your kitchen of all organic
food waste left over after the preparation and clean-up of meals. Simply turn on the water,
switch the disposer on, put your food waste in the disposer and it will shred the garbage into
very fine particles that are easily flushed through the sewer system without any problem. For
Batch Feed Operations, please see Section 6 of this manual.
Before installing and operating this disposer:
1. Make sure that the installation of this appliance is allowed by the authorities.
2. Please read and follow all recommendations in this manual to ensure
trouble free operations.
If you have any questions, please contact your distributor.
TABLE OF CONTENTS
1 MOUNTING ASSEMBLY
2 ELECTRICAL CONNECTIONS
3 DISHWASHER CONNECTION
4 ATTACHING THE DISCHARGE ELBOW
5 CONNECTING DISPOSER TO MOUNT ASSEMBLY
6 OPERATING INSTRUCTIONS
7 TROUBLESHOOTING
8 CLEANING AND MAINTENANCE
560C396P01 REV C

IMPORTANT SAFETY INSTRUCTIONS
INSTRUCTIONS PERTAINING TO RISK OF FIRE, ELECTRIC SHOCK OR INJURY TO
PERSONS. SAVE THESE INSTRUCTIONS.
WARNING - When using electrical appliances, basic precautions should always be followed,
including the following:
1. Read all instructions before using
the appliance.
2. To reduce the risk of injury, close
supervision is necessary when an
appliance is used near children.
3. Do not put fingers or hands into a
waste disposer while it is functioning.
4. Turn the power switch to the off position
before attempting to clear a jam or
remove an object from the disposer.
5. When attempting to loosen a jam in a
waste disposer, use a long wooden
spoon or a broom handle.
6. When attempting to remove objects
from a disposer, use long-handled
tongs or pliers.
7. To reduce the risk of injury by materials
that might be expelled by a waste
disposer, or damage to it, do not put
the following in the disposer:
a. Clam or oyster shells
b. Drain cleaner
c. Glass, china or plastic
d. Large whole bones
e. Metal, such as bottle caps,
tin cans or aluminum foil
f. Whole corn husks
8. When not operating the disposer, leave
the stopper in place to reduce the risk
of objects falling into the disposer.
9. Do not operate disposer unless
splash guard is in place. Not applicable
to Batch Feed models.
10. For proper earthing instructions
see the ELECTRICAL CONNECTION
portion of this manual.
11. If you are not familiar with electrical
power and procedures, call a qualified
electrician.
12. The symbol on the product or on its
packaging indicates that this product may
not be treated as household waste.
Instead, it shall be handed over to the
applicable collection point for the recycling
of electrical and electronic equipment. By
ensuring this product is disposed of
correctly, you will help prevent potential
negative consequences for the
environment and human health, which
could otherwise be caused by
inappropriate waste handling of this
product. For more detailed information
about recycling of this product, please
contact your local city office, your
household waste disposal service or the
shop where you purchased the product.
g. Tea or coffee bags
1
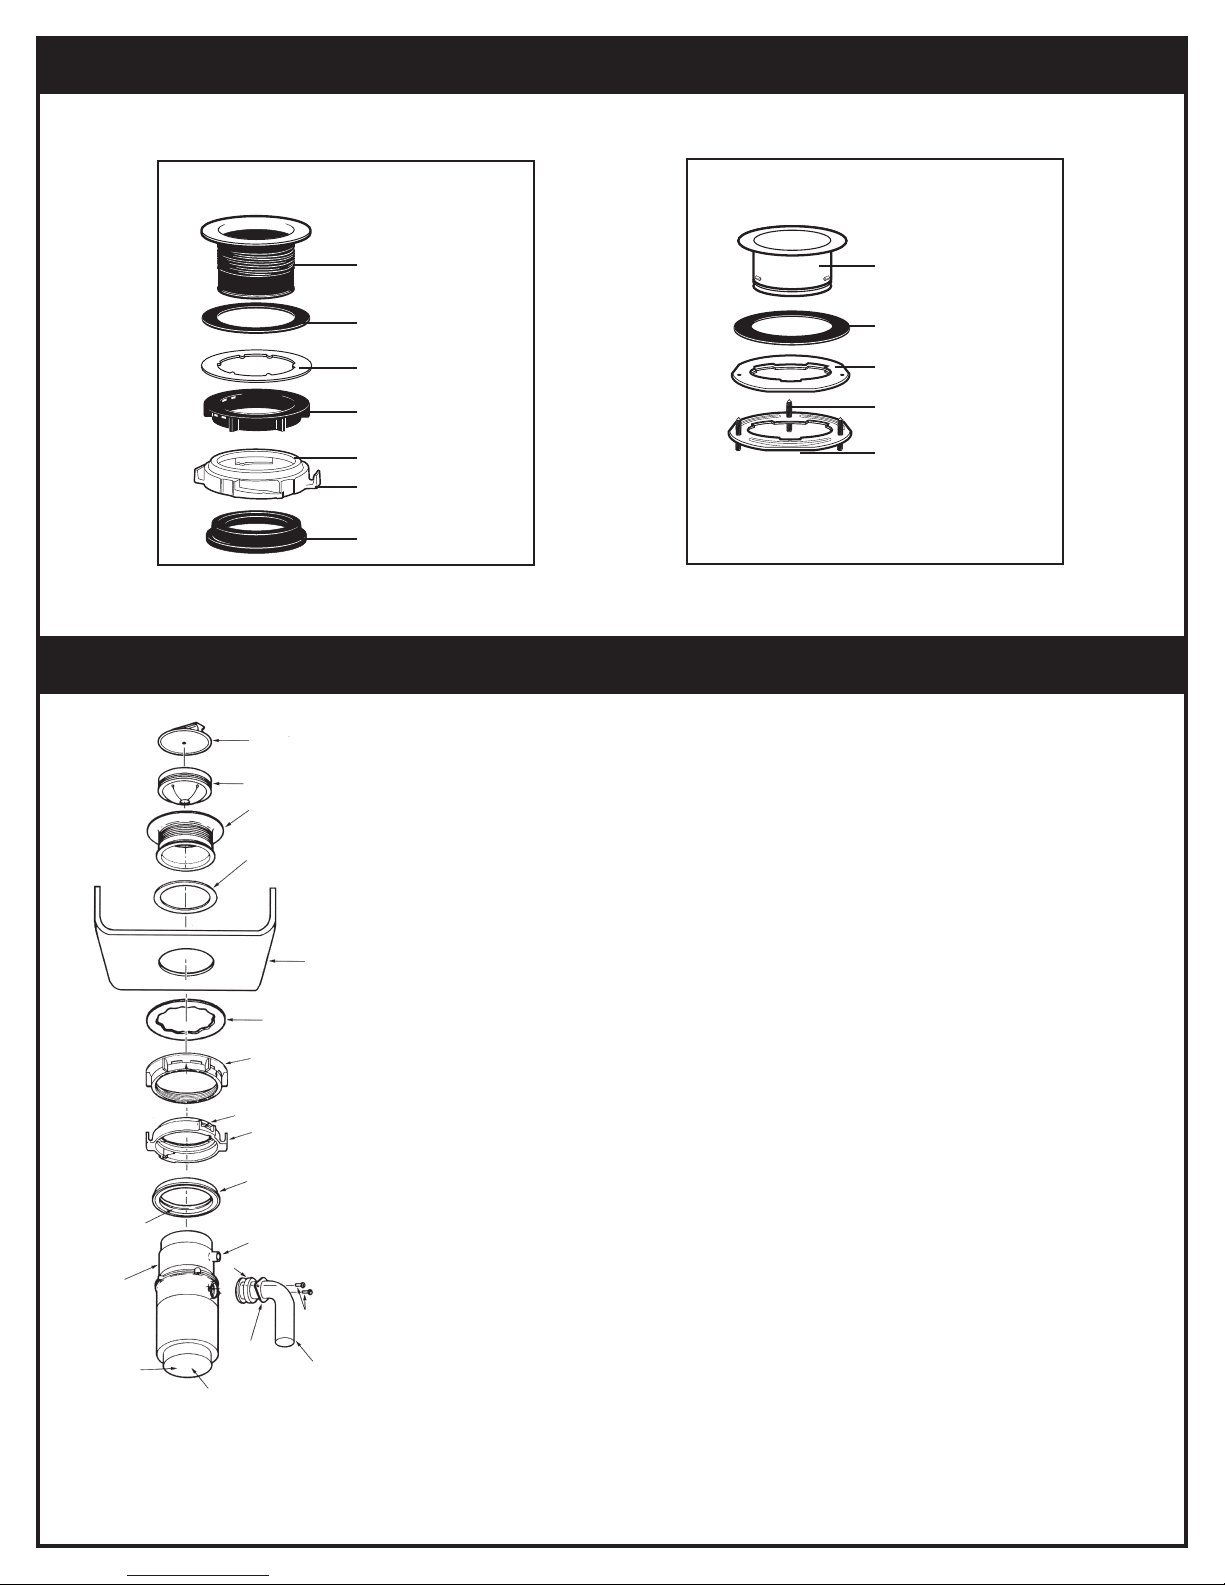
INSTALLATION OF MOUNTING ASSEMBLY
YOUR DISPOSER COMES WITH ONE OF THE FOLLOWING MOUNT SYSTEMS
Z Mount System
E
SINK FLANGE
INK FLANGE GASKET
S
SUPPORT RING
MOUNT RING
TIGHTENING EARS
CUSHION MOUNT
Proceed to the instructions for your type of mount system.
INSTALLATION OF EZ MOUNT ASSEMBLY
STOPPER
*
REMOVABLE
**
SPLASH GUARD
SINK FLANGE
RUBBER SINK
FLANGE GASKET
SINK
FIBER GASKET
SUPPORT RING
NOTE: ARROWS
INDICATING UP
‡ MOUNT RING
TIGHTENING EARS
CUSHION MOUNT
GROOVE
HOPPER
END BELL
(ELECTRICAL
CONNECTIONS)
Batch feed stopper looks different than stopper
*
shown here (see Section 6).
** Not applicable to batch feed models.
‡ Mount ring may look different and may not have
tightening ears.
SERIAL NUMBER
LOCATED HERE
DISHWASHER
DISCHARGE INLET
ELBOW GASKET
SCREWS
ELBOW
FLANGE
DISCHARGE
ELBOW
FIBER GASKET
3-Bolt Mount System
SINK FLANGE*
INK FLANGE GASKET
S
PROTECTOR RING
OUNTING SCREWS (3)
M
INK MOUNT RING
S
* An extended sink flange (Item # 3140) is
available for deep-well, cast iron sinks. (For
3-bolt mount only.)
(Read completely before starting.)
NOTE: Pay close attention to the order of mount assembly parts,
as they have been correctly assembled by the factory.
Also, reference the cushion mount detail illustration below for
the proper orientation of the cushion mount.
A. Disassemble mount assembly from disposer by turning mount ring
to the left (clockwise) and remove.
B. Raise mount ring toward top of sink flange. Remove cushion
mount. Remove mount ring. You may want to practice installing
the cushion mount at this point before you are under the sink.
See paragraph "H."
C. Unscrew support ring from sink flange and remove fiber gasket.
You are now left with sink flange and rubber gasket.
D. The rubber gasket is used instead of plumbers putty with
stainless steel sinks. Other sinks may require putty.
E. If no putty is used, insert sink flange through rubber gasket into
sink opening. Do not rotate sink flange once it is seated.
F. If you use putty instead of the gasket, form a ring around
underside of sink flange. Insert flange into sink opening, press
down hard to squeeze out excess putty. From under sink, trim off
excess putty flush with bottom edge of sink opening.
G. From underneath sink, slip fiber gasket onto exposed sink flange.
With arrows pointing up, screw support ring onto the sink flange,
hand tighten until the sink flange will not move (see 1A). At this
point you may want to insert stopper in sink and fill with water to
check sink flange seal and insure there are no leaks.
 Loading...