

Wassermann Wamix-Classic IV, Wamix-Injector IV User Manual

Vacuum Mixers
Wamix-Classic IV and
Wamix-Injector IV
USER MANUAL
Wamix-Classic IV
Wamix-Injector IV
Dear customer,
Thank you for choosing a product from the Wassermann range. Wassermann Dental-
Maschinen incorporates the highest standards of quality and the latest technology.
In order to enjoy maximum performance and years of trouble-free operation, please read
this user manual carefully before you connect this device and start work, and operate the
device according to the recommended guidelines. The operation safety and the
functionality of this device can only be guaranteed if you follow both the general safety
guidelines and the applying laws to prevent accidents as well as the precautions given in
this user manual. We are not liable for any damages which occur due to inappropriate
usage or faulty operation of this device.
Make sure that anyone using this device has read and understood this user
manual.
Keep this user manual in a safe place where it can be referred to as required at
any time.
The unit complies with the relevant EU guidelines.
The unit is subject to the EU guidelines 2012/19/EU (WEEE Directive).
Company address:
Wassermann Dental-Maschinen GmbH
Rudorffweg 15-17
21031 Hamburg, Germany
Phone : +49 (0)40 730 926 -20/ -24 Fax.: +49 (0)40 730 37 24
export@wassermann-dental.com
www.wassermann.hamburg
Erstellt: 17.07.17/ms Version: 1 Wamix-Classic/Injector: IV 171979/171978
.

Contents
1 Features.............................................................................................................................4
2 Safety symbols used in this manual..................................................................................5
3 Safety guidelines................................................................................................................5
4 Responsibility for operation or damage.............................................................................6
5 Application..........................................................................................................................6
6 Before starting....................................................................................................................7
6.1 Transport.....................................................................................................................7
6.2 Installation...................................................................................................................7
6.3 Storage........................................................................................................................7
6.4 Mounting instruction fastening set for wall mounting..................................................8
7 Start-up / Installation........................................................................................................11
8 Operation.........................................................................................................................13
8.1 General operating instructions..................................................................................13
8.2 VACUUM MIXING with the Wamix...........................................................................14
9 Troubleshooting...............................................................................................................17
10 Care and maintenance...................................................................................................18
10.1 Cleaning..................................................................................................................18
10.2 Maintenance............................................................................................................19
10.2.1 Changing the filter.............................................................................................19
10.3 Warranty..................................................................................................................20
10.4 Spare Parts..............................................................................................................20
10.5 Service Hotline 0049 (0)40 730 926 -20/ -24..........................................................20
10.6 Scope of delivery/ Accessories...............................................................................20
10.7 Repairs....................................................................................................................21
11 Disposing of the Unit......................................................................................................21
11.1 Information on Disposal for Countries within the EU..............................................21
12 Technical data................................................................................................................22
13 EU Declaration of Conformity........................................................................................23

1 Features
Wamix is a manufacturer of vacuum mixers used not only for mixing all kinds of plasters,
embedding media and silicones, but also designed for specialised dental procedures and
for vacuum-rinsing of prostheses.
When mixing silicones, make sure that the beaker is only filled to the max. height for
silicone. Otherwise, silicone could penetrate the interior of the unit itself.
Units have separate drives for vacuum generation and for the mixing mechanism. The
mixer in the Wamix-Classic and -Injector IV versions can be switched on and off at any
time by pressing a button, without interruption of vacuum.
Until changed, the current preset mixing time (up to 999 sec.) becomes the default for
subsequent use. An audible signal (approx. 5 sec.) indicates the end of the mixing
process, time display flashes.
The vacuum is guaranteed because the beaker on the Wamix-Classic and -Injector IV is
held to the flange by the vacuum. Mixers are supplied as wall units, but can be converted
for tabletop use at any time. (For accessories, see 8.5)
• compact vacuum stirrers with powerful, maintenance-free motors
• perfect mixing of all kinds of plaster, embedding materials and silicone
• press-button start; automatic mixing when beaker is applied
• audible signal at programme end, time display flashes
• mixing time adjustable up to 999 seconds
• Speed: 200-600 rpm
• beaker vented only after ON/OFF switch is activated
• separate motor and pump drive, the mixing mechanism can be switched on and off
at any time without interruption of vacuum
• low-maintenance
• simple cleaning thanks to stay-clean surfaces
• 350 ml beaker and wall bracket supplied, table stand and other beaker sizes
available as extras
4
2 Safety symbols used in this manual
Warning!
This is a warning of risk situations and dangers.
Failure to observe this warning could be life-threatening. These warnings has to
be observed.
Information!
This symbol draws your attention to specific features that has to be observed.
3 Safety guidelines
Configuring and operating this equipment requires precise knowledge and observance
of the instructions in this user manual. The equipment is designed only for its intended
application.
WARNING:
Servicing and repairs should be carried out only by authorised specialists.
This equipment is designed to operate at 220-240V / 50/60 Hz.
Make sure it is always connected to the appropriate power supply.
Always remove the plug from the power socket before undertaking maintenance
or cleaning work.
A locking hook underneath each unit prevents it coming loose once it has
been mounted in the bracket.
Allow the condensers to discharge before opening the unit.
5

4 Responsibility for operation or damage
The responsibility for operating the device lies exclusively with the owner or user if said
device is incorrectly serviced, maintained or altered by persons not employed by an
authorised dealer or if the device is used in a manner contrary to its specified purpose.
The unit has to be maintained and operated in accordance with this user manual.
Wassermann Dental-Maschinen GmbH is not responsible for damage arising from the
nonobservance of these instructions.
Warranty and responsibility provisions contained in the sales and supply conditions of
Wassermann Dental-Maschinen GmbH are not extended by these instructions.
5 Application
Wamix equipment is used for mixing all kinds of plasters, embedding media and silicones
under vacuum.
The vacuum can be as high as approx. 900 - 950 mbar.
This unit is also suitable for vacuum rinsing of models for special dental procedures. The
insulating layer between the model and the prosthesis cannot separate prematurely
because the model remains moister in the pressure-embedding unit than when water is
used.
Only use the device for this type of application.
6

6 Before starting
6.1 Transport
Before transporting the unit, ensure that it has been unplugged from the power socket.
Make sure that it is packed correctly in order to avoid accidental damage.
Be sure to check for any transport damage when unpacking the goods. Note down
any damage if found.
6.2 Installation
Open the box, remove the packing materials, and carefully lift out the device and
accessories. Check the included accessories.
The device must stand on a steady and level surface or use the supplied bracket to mount
it on the wall.
If mounting on a wall, ensure that the wall is strong enough to support the unit. For
drawing a drilling scheme to drill the dowel holes please see page 8. Leave at least 30-
35 cm free space beneath the unit.
Install the device in a place where it will not block the working area and the
functionality (take the dimensions into account). Make sure that there are about
10 cm of free space on each side to guarantee air circulation (heat dissipation).
Do not install the unit outdoors or in places without proper ventilation.
Before start-up, be sure the device reaches room temperature.
6.3 Storage
If the unit is to be stored for an extended period, protect it from moisture and dust.
7
6.4 Mounting instruction fastening set for wall mounting
Please check the included accessories:
Incl. in delivery item.-no. 174358 fastening set
Quantity Name
1 Securing bracket
1 Phillips head screw M 4x8
1 Washer Ø 4,3
1 Serrated washer Ø 4,3
1 Slotted screw 4 x 16
2 Slotted screw 6 x 50
2 Screw anchor S8
1 Screw anchor S5
Mounting instruction :
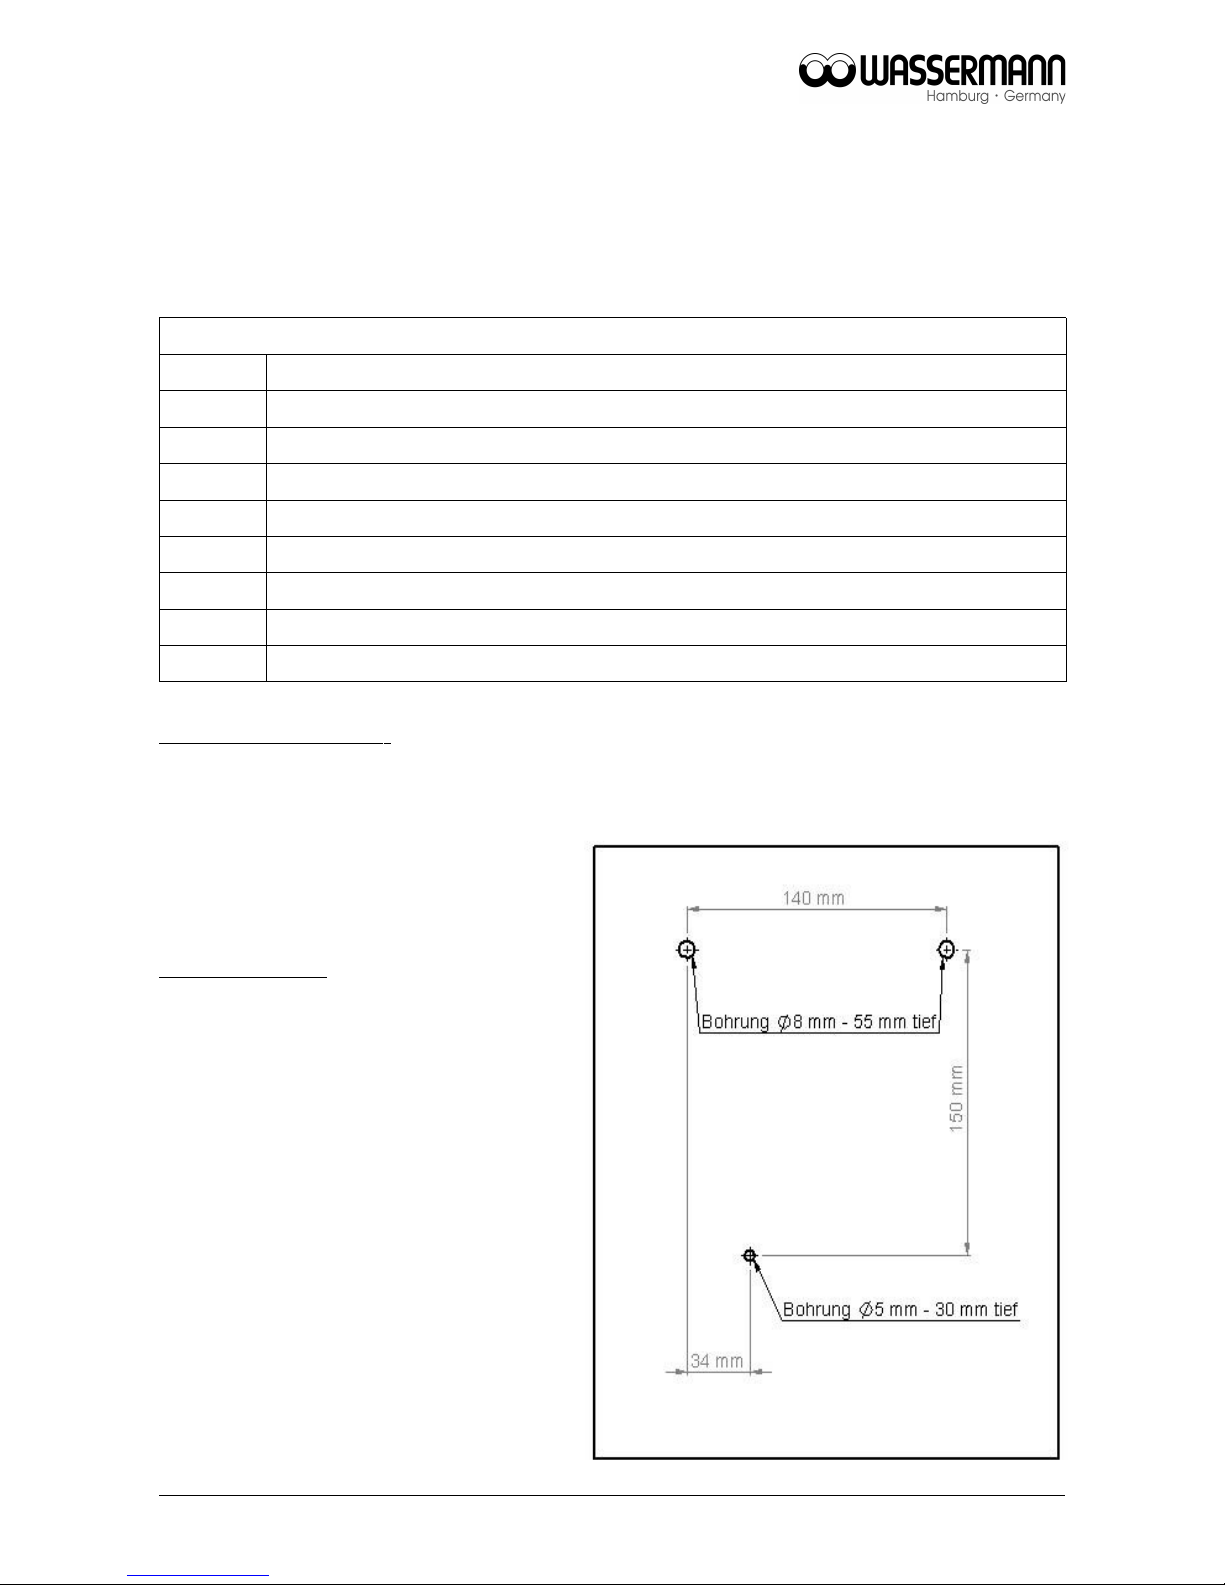
Please drill the holes as indicated in the following drilling template. Please make sure
before that the wall is really suitable for mounting a device (aerated concrete walls and
drywall are problematic).
Drilling template:
Bohrung=drilling
tief=deep
8
 Loading...