

Wassermann 170996, WAPO-Ex IVOCAP, 170995 Service Manual
Die Basis für Ihr Labor
Service manual
Wapo-Ex
Wax scalding and
polymerisation unit
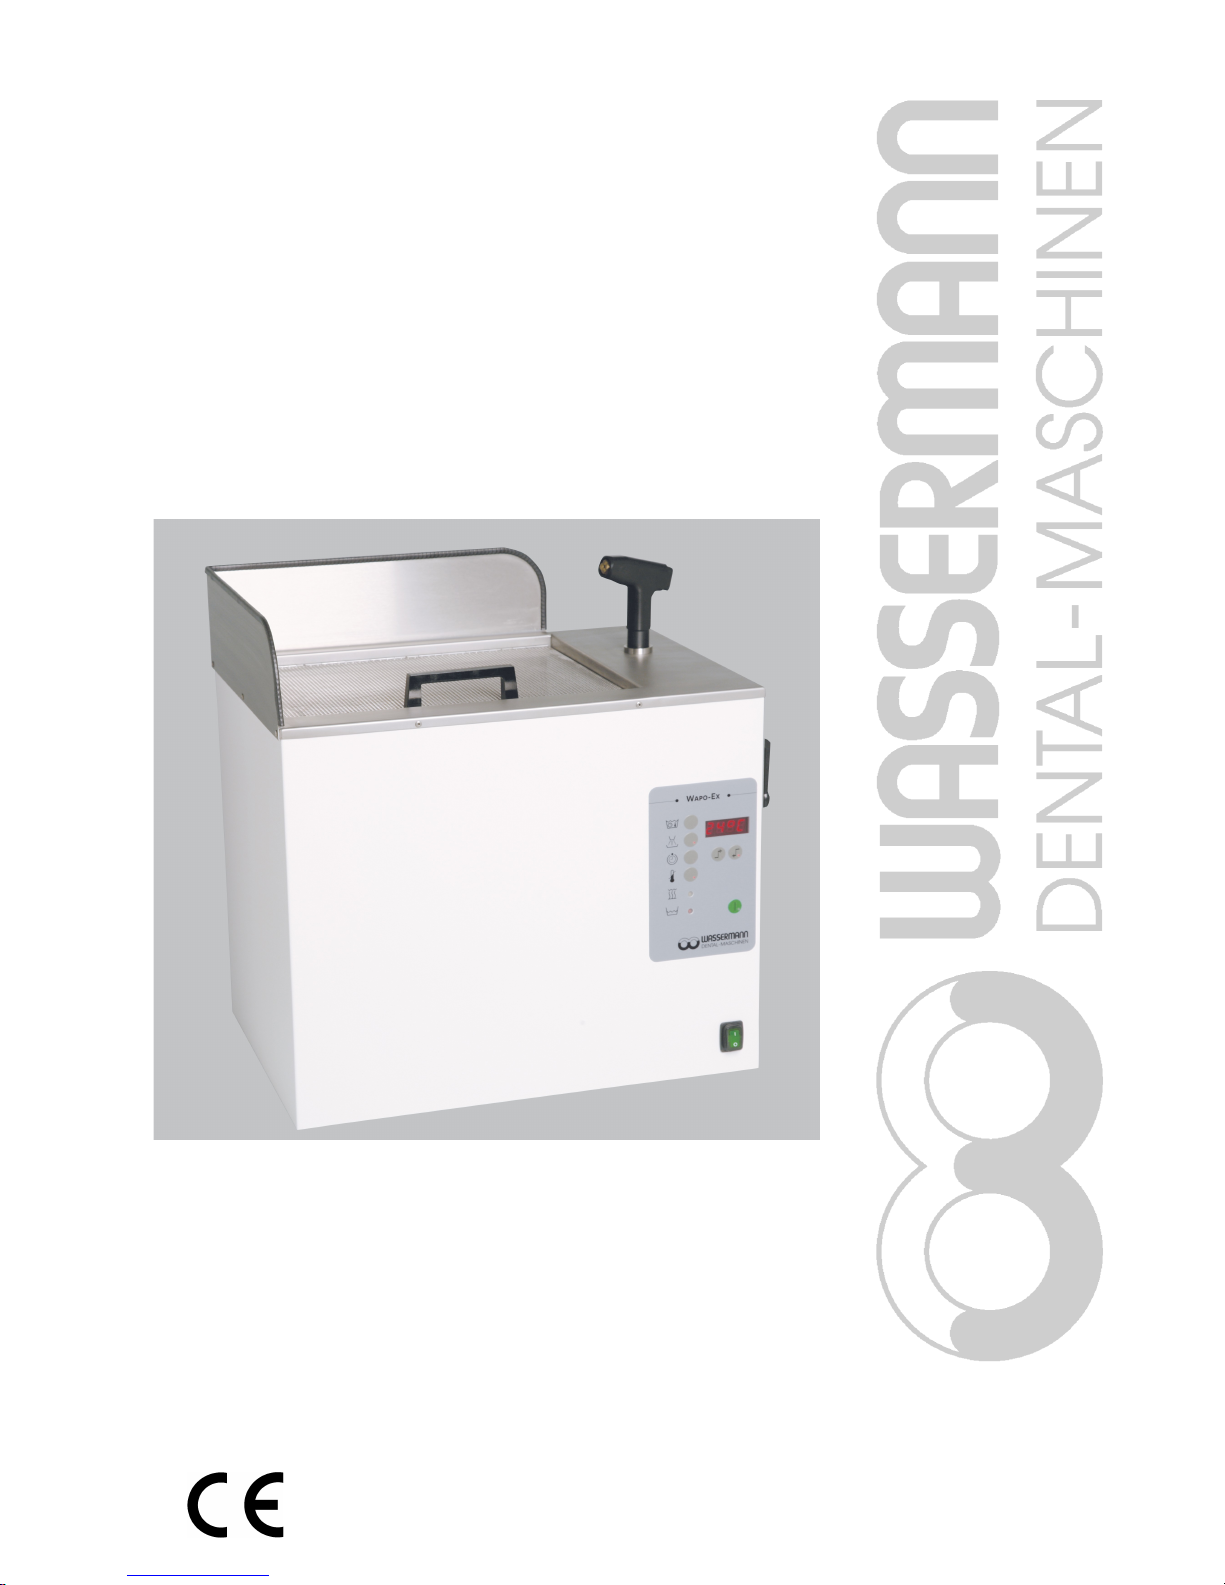
Figure 1: Wapo-Ex
Dear customer,
Thank you for choosing a product from the Wassermann range. Wassermann dental
equipment incorporates the highest standards of quality and the latest technology.
In order to enjoy maximum performance and years of trouble-free operation, please
read this service manual carefully before you connect this device and start work, and
operate the device according to the recommended guidelines. The operation safety and
the functionality of this device can only be guaranteed if you follow both the general
safety guidelines and the applying laws to prevent accidents as well as the precautions
given in this service manual. We are not liable for any damages which occur due to
inappropriate usage or faulty operation of this device.
Make sure that anyone using this device has read and understood this service
manual.
Keep this service manual in a safe place where it can be referred to as required at
any time.
Company address:
Wassermann Dental-Maschinen GmbH
Rudorffweg 15-17
D-21031 Hamburg, Germany
Tel. : +49 (0)40 / 730 926 – 0 Fax.: +49 (0)40 / 730 37 24
E-mail: info@wassermann-dental.com
URL: http//www.wassermann-dental.com
- 1 -
Published: 03.05.13 / fl msc Version: 2 job: 170996/ab # 132640

Contents
1 Features..........................................................................................................................3
2 For your safety................................................................................................................3
2.1 Your service manual....................................................................................................3
2.2 Safety guidelines.........................................................................................................4
2.3 Responsibility for operation and damage....................................................................4
3 Applications.....................................................................................................................5
4 Before you start..............................................................................................................5
4.1 Unpacking / Transport.................................................................................................5
4.2 Set-up and storage......................................................................................................5
5 Start-up...........................................................................................................................6
6 Operation.......................................................................................................................7
6.1 Operation.....................................................................................................................7
6.2 Setting time and temperature......................................................................................8
6.2.1 For scalding (button 2)....................................................................................................... 8
6.2.2 Conversion table °C - °F.....................................................................................................8
6.2.3 Polymerisation (choice of 3 times and 3 temperatures).......................................................9
6.2.4 Setting the time................................................................................................................... 9
6.2.5 Setting the temperature....................................................................................................10
6.3 Storing........................................................................................................................11
6.4 Special function: “Scalding during polymerisation”...................................................11
6.5 Manual operation.......................................................................................................12
7 Troubleshooting / Correcting errors..............................................................................12
8 Maintenance.................................................................................................................14
8.1 Cleaning.....................................................................................................................14
8.2 Maintenance..............................................................................................................15
8.3 Warranty....................................................................................................................15
8.4 Spare parts and accessories.....................................................................................16
8.5 Repairs.......................................................................................................................16
9 Technical data..............................................................................................................17
10 EC CONFORMITY CERTIFICATE.............................................................................18
11 Wiring diagram............................................................................................................19
12 Spare part diagram.....................................................................................................20
Tel.: + 49 (0)40 / 730 926 – 0................................................................................................. 1
- 2 -

1 Features
The proven Wassermann WAPO - Ex combination unit, now with an easy-to-read
multifunction display, is an extremely compact piece of bench top equipment, which is
used for scalding wax and for polymerisation. It can take 4 half-caps for scalding and/or
6 caps in a denture for polymerisation. A housing and chamber in stainless steel
contribute to its long service life.
The unit has a low-water monitor to protect the heater, and for scalding small items,
there is a recessed lid and a hand-held spray in non-heat-conducting plastic.
The special WAPO-Ex / IVOCAP model has an automatic water-level regulator.
2 For your safety
2.1 Your service manual
Configuring and operating this equipment requires precise knowledge and observance
of the instructions in this service manual. The equipment is designed only for its
intended application.
Very important points in this service manual are signalled as follows:
Warning!
This is a warning of risk situations and dangers. Failure to observe this
warning could be life-threatening. These warnings must be observed.
Information!
This symbol draws your attention to specific features, which must be
observed.
- 3 -

2.2 Safety guidelines
This unit is designed for a mains voltage of 220-240 V / 50/60 Hz.
Make sure that it is connected to the correct mains voltage.
Always disconnect the power cable before undertaking cleaning or
maintenance.
2.3 Responsibility for operation and damage
The responsibility for operating the unit lies exclusively with the owner or user if the said
unit is incorrectly serviced, maintained or altered by persons not employed by an
accredited dealer or if the unit is used in a manner contrary to its specified purpose.
The unit must be maintained and operated in accordance with this service manual.
Wassermann Dental-Maschinen GmbH is not responsible for damage arising from the
non-observance of these instructions.
Guarantee and responsibility provisions contained in the sales and supply conditions of
Wassermann Dental-Maschinen GmbH are not extended by these instructions.
Ensure that this service manual is accessible at all times and has been
read and understood.
- 4 -
3 Applications
The WAPO - Ex is used for scalding up to 4 half-caps and up to 6 caps for
polymerisation. A divider in the trough creates two separate chambers. You can also
scald small items using a hand spray.
Only use the device for this type of application.
4 Before you start
4.1 Unpacking / Transport
- Open the cartons, remove the packing materials, and carefully lift out the instrument
and accessories. Check that the accessories are correct (see 8.4).
− When transporting the unit, make sure that it has been disconnected from the power
supply. Use appropriate packing materials to avoid accidental damage.
4.2 Set-up and storage
− Set the unit up on a level surface.
− Use clamps to attach the drain hose supplied firmly to the unit and arrange a suitable
drainage system.
− Always set the unit up with sufficient workspace around it (check its dimensions). Do
not set it up out of doors.
- If the unit is to be stored for an extended period, protect it from dust and moisture.
It is very important to have the unit connected rigidly to a drainage
system as very hot water (about 95°C) is involved. It will also facilitate
emptying the unit completely for cleaning, for example.
- 5 -
5 Start-up
− Insert the power plug into the mains socket (220-240 V / 50/60 Hz).
− Insert the filter white side down.
− Fill the unit with water (about 20 litres) at least up to the white plastic ring in the
container.
− Turn on the main switch (green rocker switch).
− The unit immediately heats up to its default setting (65°C), or to the last stored
scalding temperature.
− When the desired temperature has been reached, the yellow LED (9) goes out and
the unit is ready for operation.
Wear heat-resistant gloves when working with the WAPO-Ex.
The WAPO - Ex has a dry-run protection device to prevent the heater
burning out due to a lack of water (red LED). A warning signal also
sounds while the program is running.
Make sure that the water level is always above the white plastic ring (in
the container), otherwise the heater will cut out automatically and the
red LED will flash.
If the unit is not to be used for an extended period, pull out the power plug.
- 6 -
6 Operation
6.1 Operation
1. Turn on main switch (green rocker switch).
2. The red water-level LED (10) should not come on or flash. If it does, check the water
level or the water-level sensor.
3. Choose Polymerisation or Scalding.
4. Place prepared caps in unit.
5. Set desired time and temperature for scalding (see 6.2.1).
6. Set desired time and temperature for polymerisation (see 6.2.2).
7. Use Start/Stop (7) to start the program.
8. The yellow LED (9) comes on during heating.
9. After the set time, the unit switches off automatically and a tone sounds.
Note: Each button has a built-in red LED. Start the program once the
desired temperature has been reached.
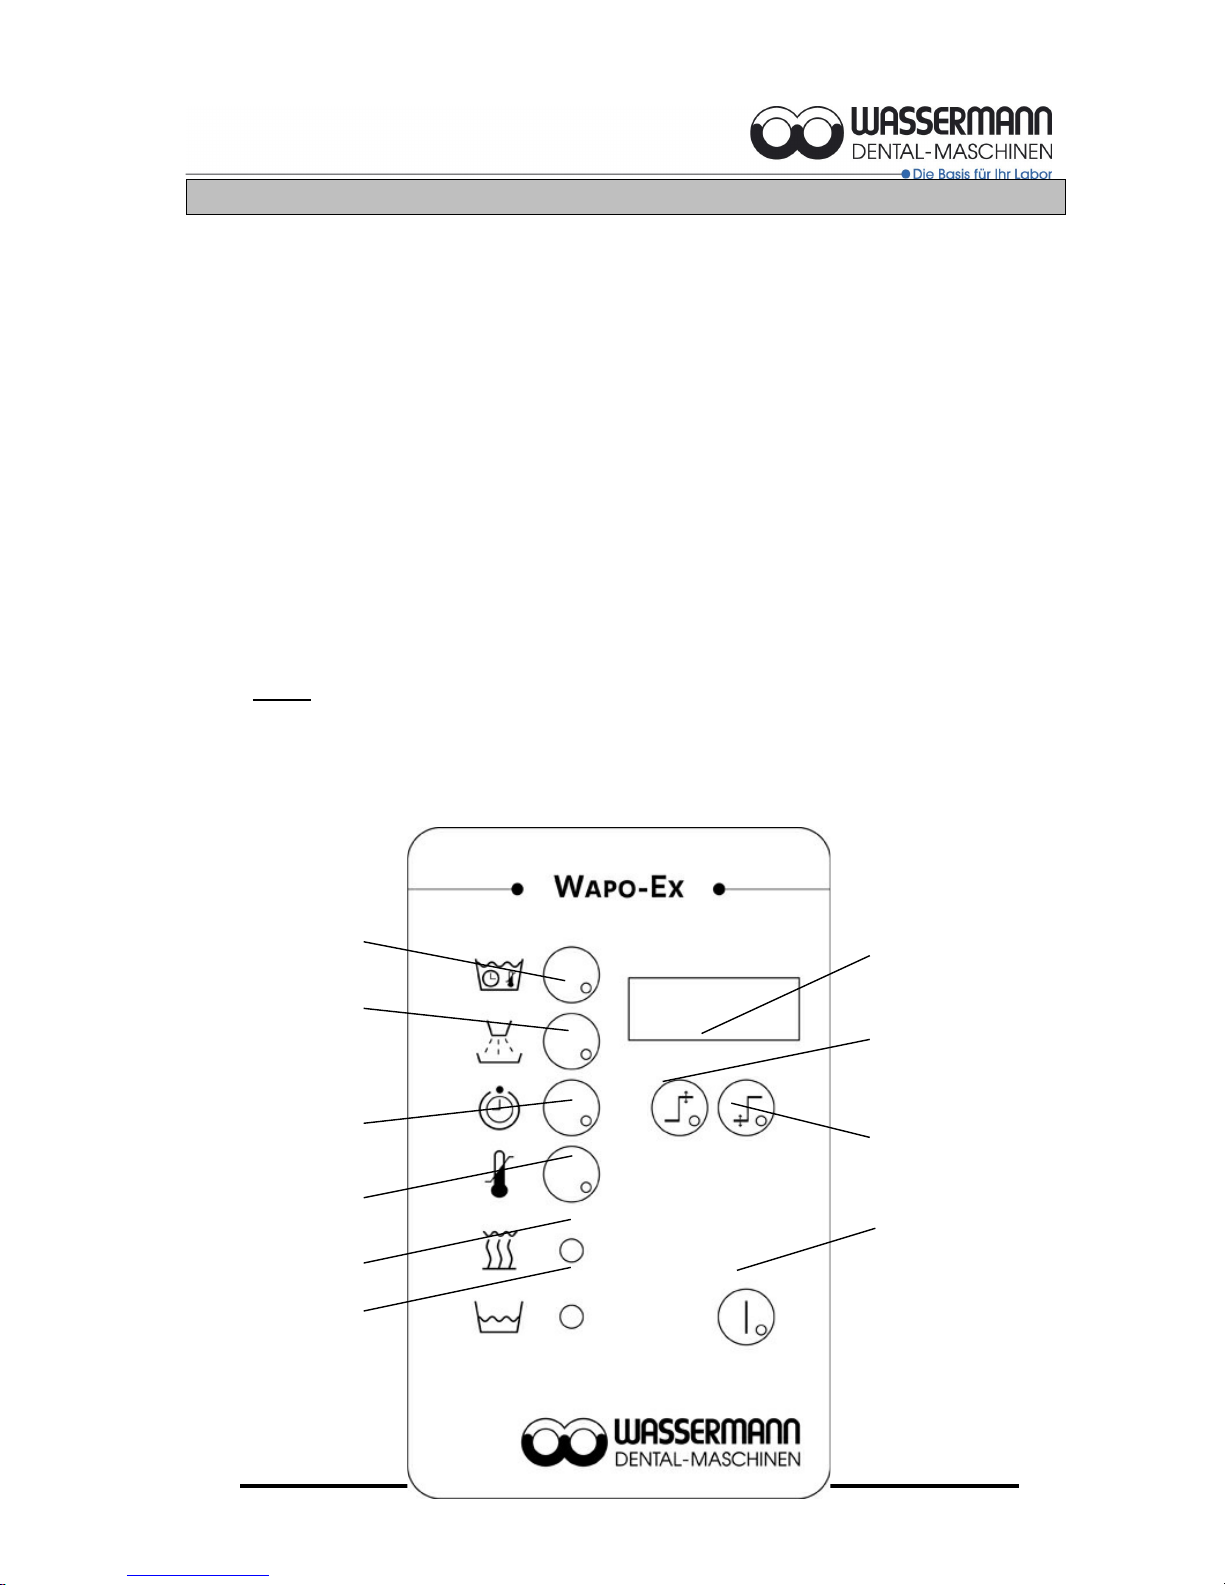
- 7 -
1
2
3
6
7
5
4
8
9
10
Start/ Stop
Time
Temperature
Heater
Low water level
Digital display
Set / Plus
Default / Minus
Polymerisation
Scalding
 Loading...