

Wasp WPL606 Quick Start Manual
5. Adjust the label guide by sliding it along
its bar to meet the width of the label. Then
rotate the Label Guide counter-clockwise
and secure it to the Media Guide Bar.
6. Adjust the Gap Detector to overlap at
least one inch of the label by moving the
yellow Gap Detector Handle located under
the media and just in front of the media
guide bar.
7. Close the print head lift lever.
8. Close the front panel and printer cover.
6. Install Drivers
Turn the printer on and wait for the Power
and Online lights to turn green. Put the Driver
CD in your CD ROM drive. The driver install
program should run automatically but if it
does not, run PrnInst.exe on the root of the
CD.
Follow the prompts to install the drivers and
set up the WPL606 printer.
7. Calibrate
Turn the printer off.
Press and hold the Pause button while
turning the printer back on. When the LCD
reads “GAP/BLINE sensor calibrating….” you
can release the button.
The printer will detect the gap and advance
8. Software
The printer is now ready to print labels.
Labels can be printed from Microsoft Word or
from any label printing software. Wasp has
created a full featured label printing software
program called Labeler that is optimized to
print labels with the WPL606 printer.
9. Documentation
Several documents are included on the CD.
The user’s guide for the printer includes more
detailed setup instructions a trouble shooting
guide and care and maintenance.
# 000000
WPL606
Thermal Printer
Quick Start
Guide
Gap / Black
Mark Detector
Gap
Detector
Handle
Label Guide
Steps for setting up the
WPL606
1. Unpack
Remove the WPL606 from the box and
place it on a stable, flat surface. Remove
all plastic and padding. Open the plastic
bags containing parts for the printer. You
will have:
Power cord
Empty paper core
1” Label tab
Centronics / Parallel printer cable
CD with printer drivers and printable
documentation
NOTE: There will be several zip ties
securing the print head for shipping. Open
the case and remove then before starting
the setup.
2. Connect to Your computer
Connect the Centronics end of the printer
cable to the back of the printer and the
other end to the parallel port of your
computer.
If you are connecting this printer using
USB, there is a printable USB connection
guide on the included CD.
3. Connect the Power
Plug the power cord into the back of the
printer. Plug the wall plug into a grounded
and surge protected outlet or power strip.
4. Load a Ribbon
The printer automatically detects if a
ribbon is installed after power on and will
switch between thermal transfer and direct
thermal printing mode. If you are using
direct thermal labels, do not load a ribbon.
On the included CD is a more detailed
guide to installing ribbon and labels. If you
have trouble installing these, first look at
the diagram on the inside cover of the
printer and then print the User Guide for
the WPL606.
1. Open the printer’s right side cover and
front panel.
2. Raise print head lift lever.
3. Wasp ribbons are wound with the dull
ink side out and come with the rewind
spindle connected to the ribbon. Wasp
ribbons also come with the Wasp logo
printed on the leader. Slide the ribbon onto
the ribbon supply spindle so that when the
rewind spindle is extended toward the
back of the printer the Wasp logo is facing
up. Slide the ribbon about half way onto
the spindle.
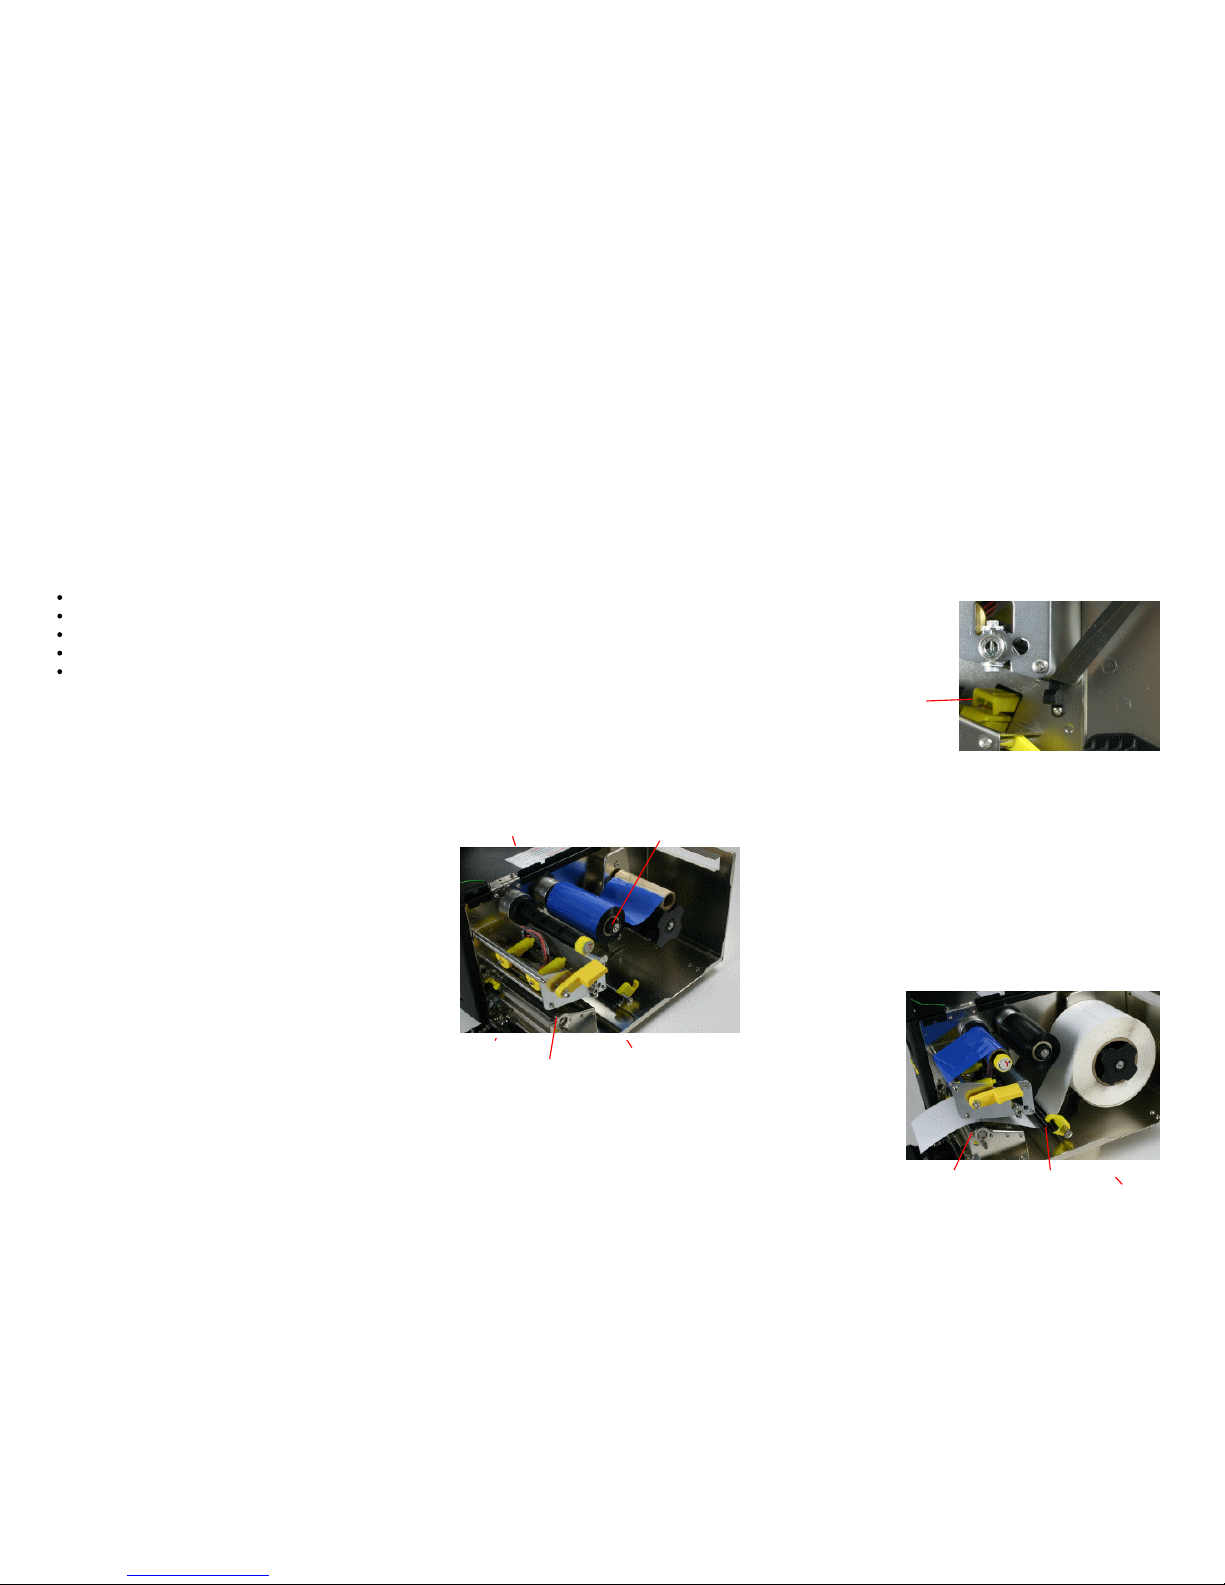
4. Wrap the ribbon under the print head
and out the front of the printer. The Wasp
logo will be facing down toward the platten
roller. The Platen Roller is the black rubber
roller bar that advances the media.
5. Pull the paper core up to the rewind
spindle and slide it on. Slide both the
ribbon and rewind spindle all the way to be
flush with the case side of the spindle. The
Wasp logo will face up again.
6. Roll the rewind spindle by hand until
some of the actual ribbon shows in the
front of the printer. The Wasp logo will roll
over the top of the spindle.
7. The ribbon must travel above the black
ribbon sensor under the back of the print
head.
5. Load Labels
1. Open the printer case, front panel and
the print head lift lever.
2. Rotate the Label Guide clockwise away
from the Media Guide Bar.
3. Insert a new label roll into the label
spindle.
4. Pull the labels forward under the black
media guide bar, through the gap/black
mark sensor and place the first label onto
the Platen Roller.
Platen Roller
Print Head Lever
Ribbon Supply Spindle
Print Head
Platen Roller
Rewind Spindle
Print Head
Ribbon Sensor
Media Guide Bar
Label Guide
 Loading...