

Wasp WPL305 User Manual

WPL305 Thermal Label Printer
User’s Guide
For Wasp Technologies
DT/TT Printer
Copyright Wasp Bar Code Technologies 2004.
All rights reserved.
No part of this publication may be reproduced or transmitted in any
form or by any means without the written permission of Wasp Bar
Code Technologies. The information contained in this document is
subject to change without notice.
Wasp is a trademark of Wasp Bar Code Technologies. All other trademarks are the property of their
respective owners.
i

Contents
1. Introduction.........................................................................................1
2. Getting Started....................................................................................1
2.1 Unpacking and Inspection............................................ 1
2.2 Equipment Checklist..................................................... 1
2.3 Printer Parts................................................................... 2
3. Setup.................................................................................................... 2
3.1 Setting Up the Printer ................................................... 2
3.2 Loading the Ribbon....................................................... 3
3.3 Loading Label Stock ..................................................... 4
3.7 Top Cover Operation..................................................... 6
4. Power on Utilities................................................................................8
4.1 Initialization ...................................................................8
4.2 Ribbon Sensor Calibration ...........................................9
4.3 Gap/Black Mark Calibration.......................................... 9
5. Maintenance...................................................................................... 12
5.1 Cleaning ....................................................................... 12
6. Troubleshooting................................................................................12
6.1 LED Status ................................................................... 12
6.2 Print Quality................................................................. 13
7. Specifications ...................................................................................14
7.1 Printer Specifications .................................................14
7.2 Label Stock Specifications......................................... 15
7.3 Ribbon Specifications................................................. 15
7.4. LED and Button Operation ........................................15
8. Product Support ...............................................................................16
9. Warranty Information........................................................................16
Revised Date: 7/26/2004
ii

1. Introduction
Thank you for purchasing the W305 Thermal Transfer and Direct Thermal Bar
Code Printer. Although the printer takes only a small amount of space, it
delivers reliable, superior performance.
This printer provides both thermal transfer and direct thermal printing at user
selectable speed of: 2.0, 3.0, 4.0 or 5.0ips. It accepts roll feed, die-cut, and
fan-fold labels for both thermal transfer and direct thermal printing. All common
bar codes formats are available. Fonts and bar codes can be printed in 4
directions, 8 different alphanumeric bitmap fonts and a build-in true type font
capability. You will enjoy high throughput for printing labels with this printer.
2. Getting Started
2.1 Unpacking and Inspection
This printer has been specially packaged to withstand damage during shipping.
Please carefully inspect the packaging and printer upon receipt. Please retain
the packaging materials in case you need to reship the printer.
2.2 Equipment Checklist
Printer
Software CD disk
Sample ribbon roll
Sample label roll
Label spindle (1 inch diameter core)
2 Label spindle fixed tabs with 1.5” core adapters
Paper core
2 Ribbon supply/rewind spindles
Parallel / Centronics cable
Auto switching power supply
Power cord
Quick start guide
To unpack the unit, remove the packaging material and parts carefully from the
box. Remove and discard the tape holding the two halves of the printer and the
media door. Open the media door and remove the Styrofoam. Open the printer
and remove the two cushioning pads from the mouth of the printer. Remove
the protective covers over the media door and back viewing door.
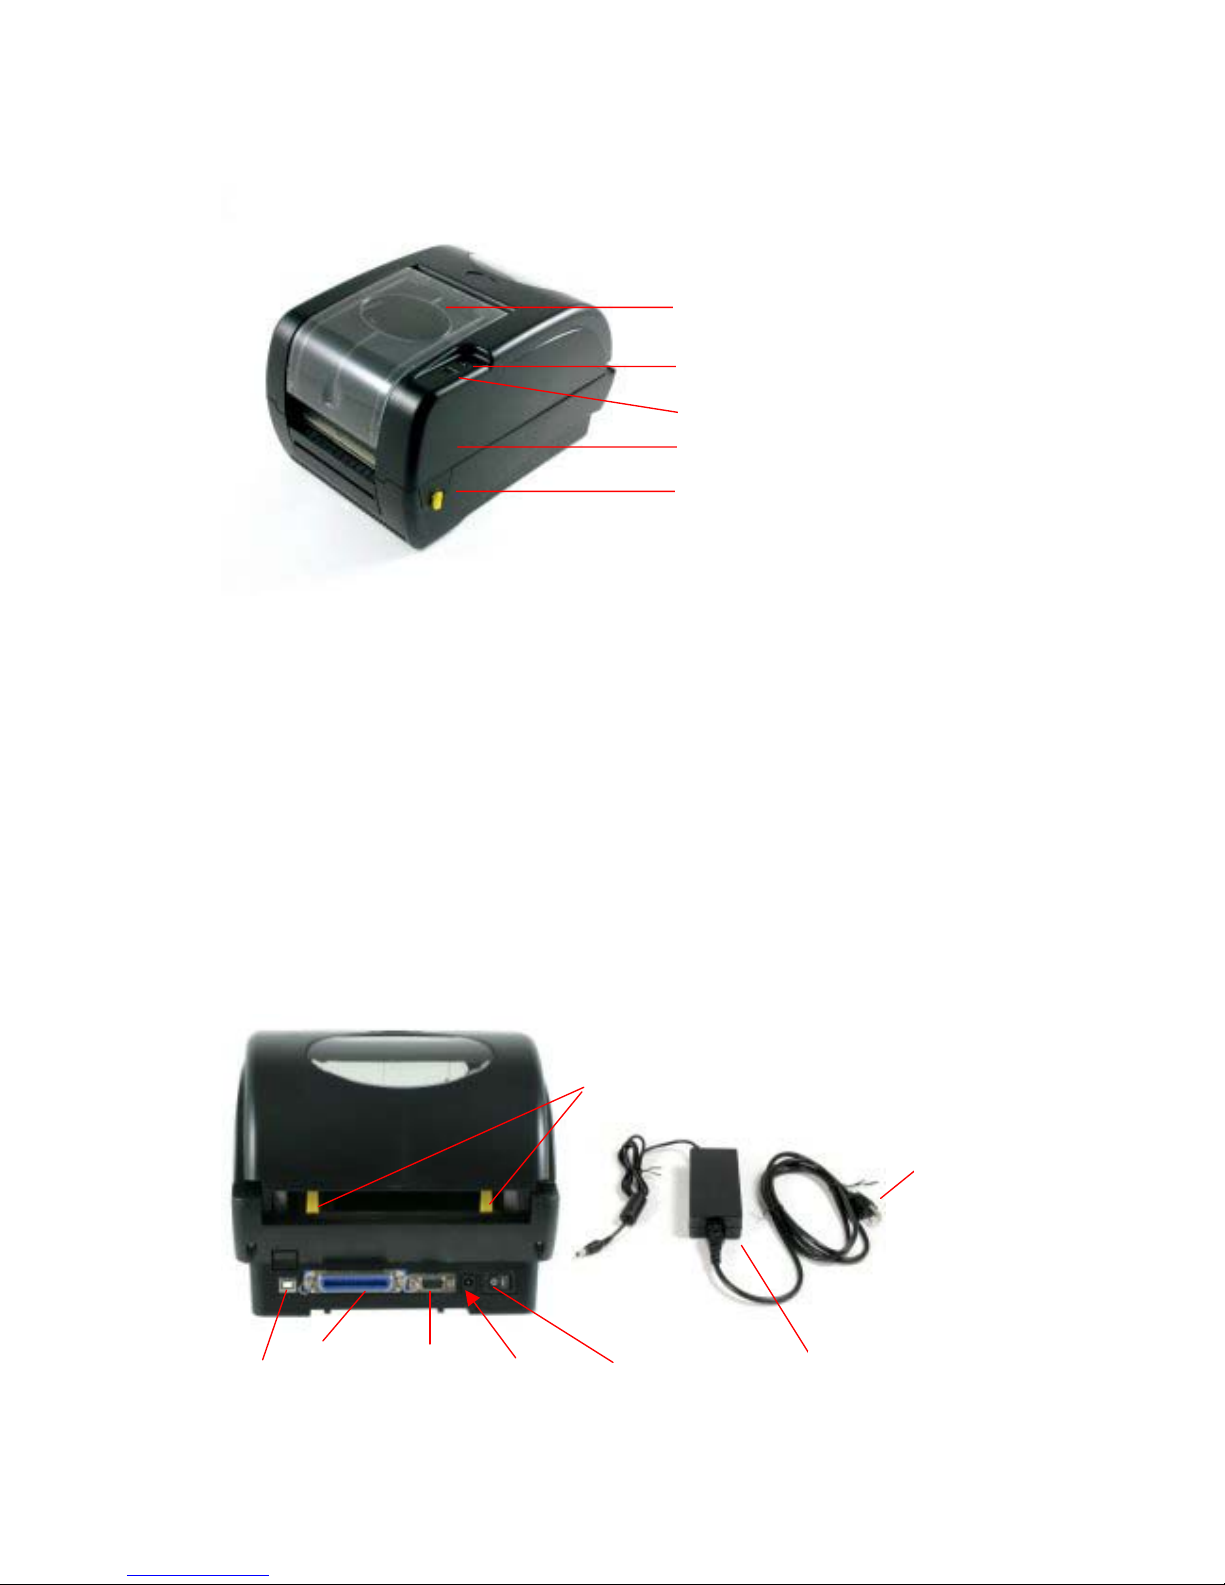
2.3 Printer Parts
Ribbon Access Window
Top Cover Open Lever
Feed Button
Printer Top Cover
LED Indicator
Figure 1: Top front view
3. Setup
3.1 Setting Up the Printer
1. Place the printer on a flat, secure surface.
2. Make sure the power switch is off.
3. Connect the printer to the computer with the Centronics or USB cable.
4. Plug the power cord into the power supply connector at the rear of the
printer, and then plug the power cord into a properly grounded
receptable.
Rear Paper Guides
Wall
Plug
Power Supply
Figure 2: Back of Printer Parts
Centronics
/ Parallel
RS-23
USB
Power
Power Switch
2
3.2 Loading the Ribbon
The printer automatically detects if a ribbon is installed after power on and will
switch to thermal transfer or direct thermal printing mode. If printer does not
detect the ribbon, the motor that drives the ribbon rewind spindle will be turned
off. In case the ribbon is installed but the printer does not detect the ribbon,
please refer to the ribbon calibration procedure to calibrate the ribbon sensor.
NOTE: If you are using direct thermal labels you should not load a ribbon.
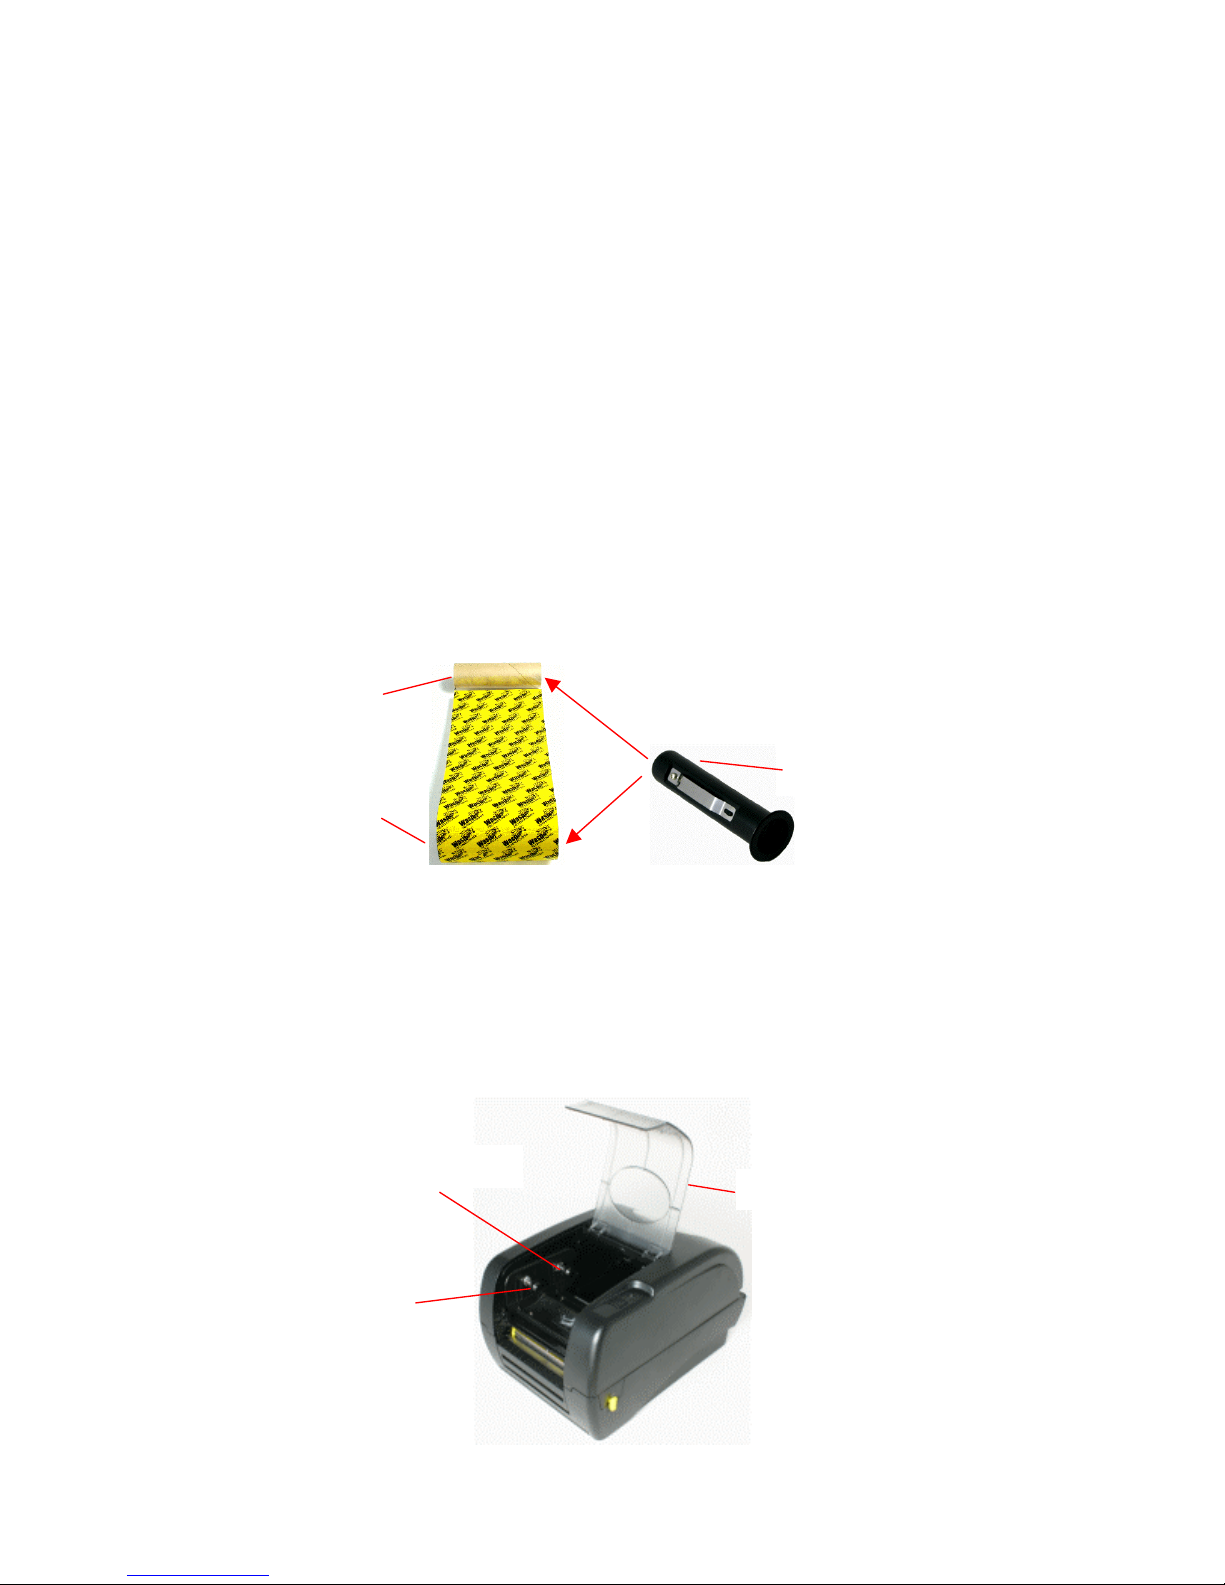
1. Push down on the ribbon access window to unlock and open the cover.
2. Wasp Ribbons come with the cardboard rewind core already attached to
the ribbon for ease of accurate installation. Arrange the ribbon and core as
seen in the picture below so that the core is rolled out about 4 inches and
the dull side of the printer ribbon is facing toward you. On Wasp Ribbons
the Wasp logo should face you.
3. Put the two spindles into the two cores from the right. Make sure the right
side of the spindle is flush with the core after insertion.
4. Pull the cover access lever to open the printer
5. Hold the ribbon with the wide end of the spindle on the right and lower the
rewind core through the back of the ribbon compartment
Back Hub
Ribbon Core
Rewind Core
Spindle
Ribbon Access Window
Front Hub
3

Figure 3: Ribbon installation
6. Attach the ribbon spindle to the Back Hub by placing the left side of the
spindle against the knob with the spring on it and compressing with the
ribbon spindle. Slide the right side down over the other knob. The ribbon
spindle should not be able to be removed without re-compressing the
spring. You may have to turn the ribbon until the grooves on the spindle
align and it clicks into place.
7. Reach between the two halves of the printer and gently pull the rewind
spindle and core under and around the print head and mount it on the Front
Hub as above.
8. Rotate the ribbon rewind core away from you until the black ribbon is on the
rewind core.
9. Close the ribbon access window and press down to lock it.
Make sure both the ribbon access window and the printer top cover are closed
when powering up the printer.
3.3 Loading Label Stock
1. Insert a 1” label spindle into the label roll. If your paper core is 1 inch, you
can remove the 1.5” core adapters from the centering tab. If the label width
is 4 inches wide, the two centering tabs are not required.
1.5” Core Adapter
1” Label Spindle
Printing Side
Face Up
Centering Tab
Figure 4: Label Roll Installation
2. Open the printer’s top cover by pulling the yellow top cover open levers
located on each side of the printer and lifting the top cover. A top cover
support at the rear of the printer will hold the printer top cover open.
4
 Loading...