

Page 1
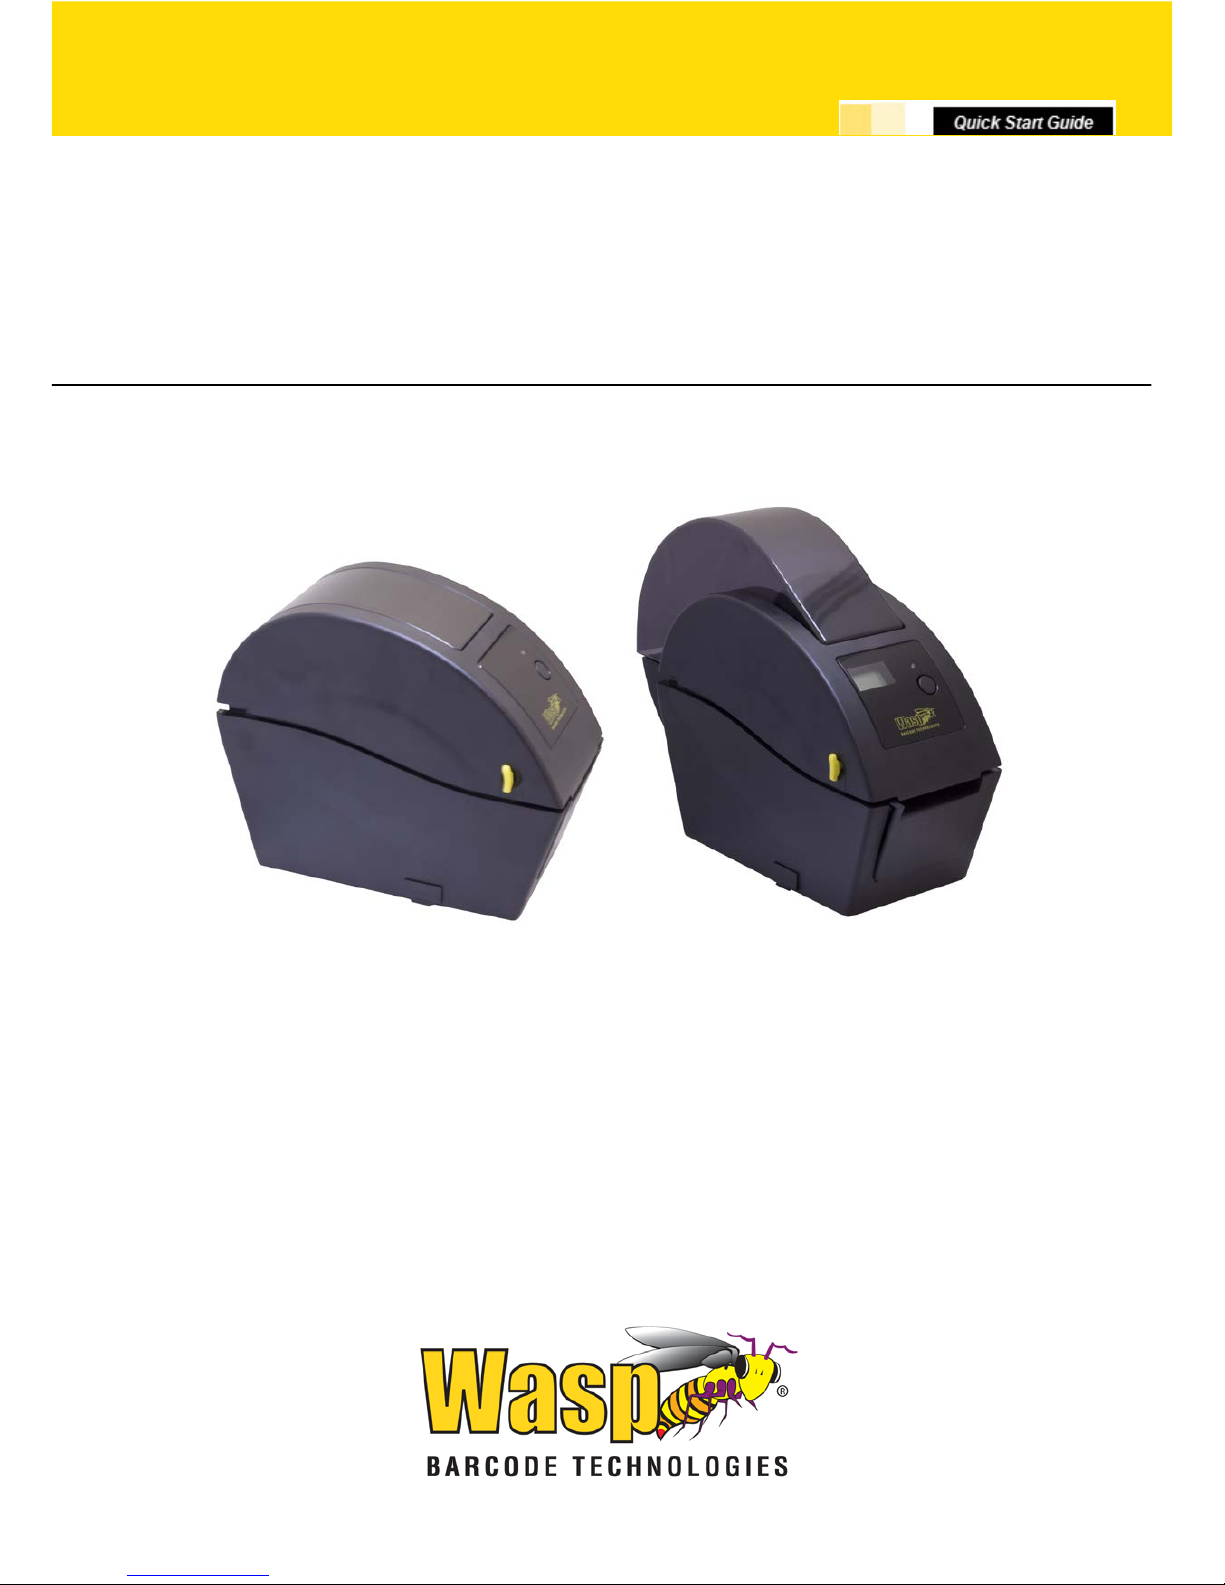
WPL25/WHC25
Page 2

Table of Contents
Unpac king and Ins pection ..................................................................................................... 1
Setup .................................................................................................................................... 5
Loadi ng t he Me di a ................................................................................................................. 6
Moun t the Printer on the Wall .............................................................................................. 16
LED and Button Functions ................................................................................................... 17
Troubleshooting................................................................................................................... 18
Page 3
1
WPL25/WHC25 Quick Start Guide
Unpacking and Ins pection
This printer has been specially packaged to withstand damage during shipping. Please carefully
inspect the packaging and printer upon receiving the barcod e print er. Pl ease retain th e packaging
mat er i als in case you need to r eship the printer.
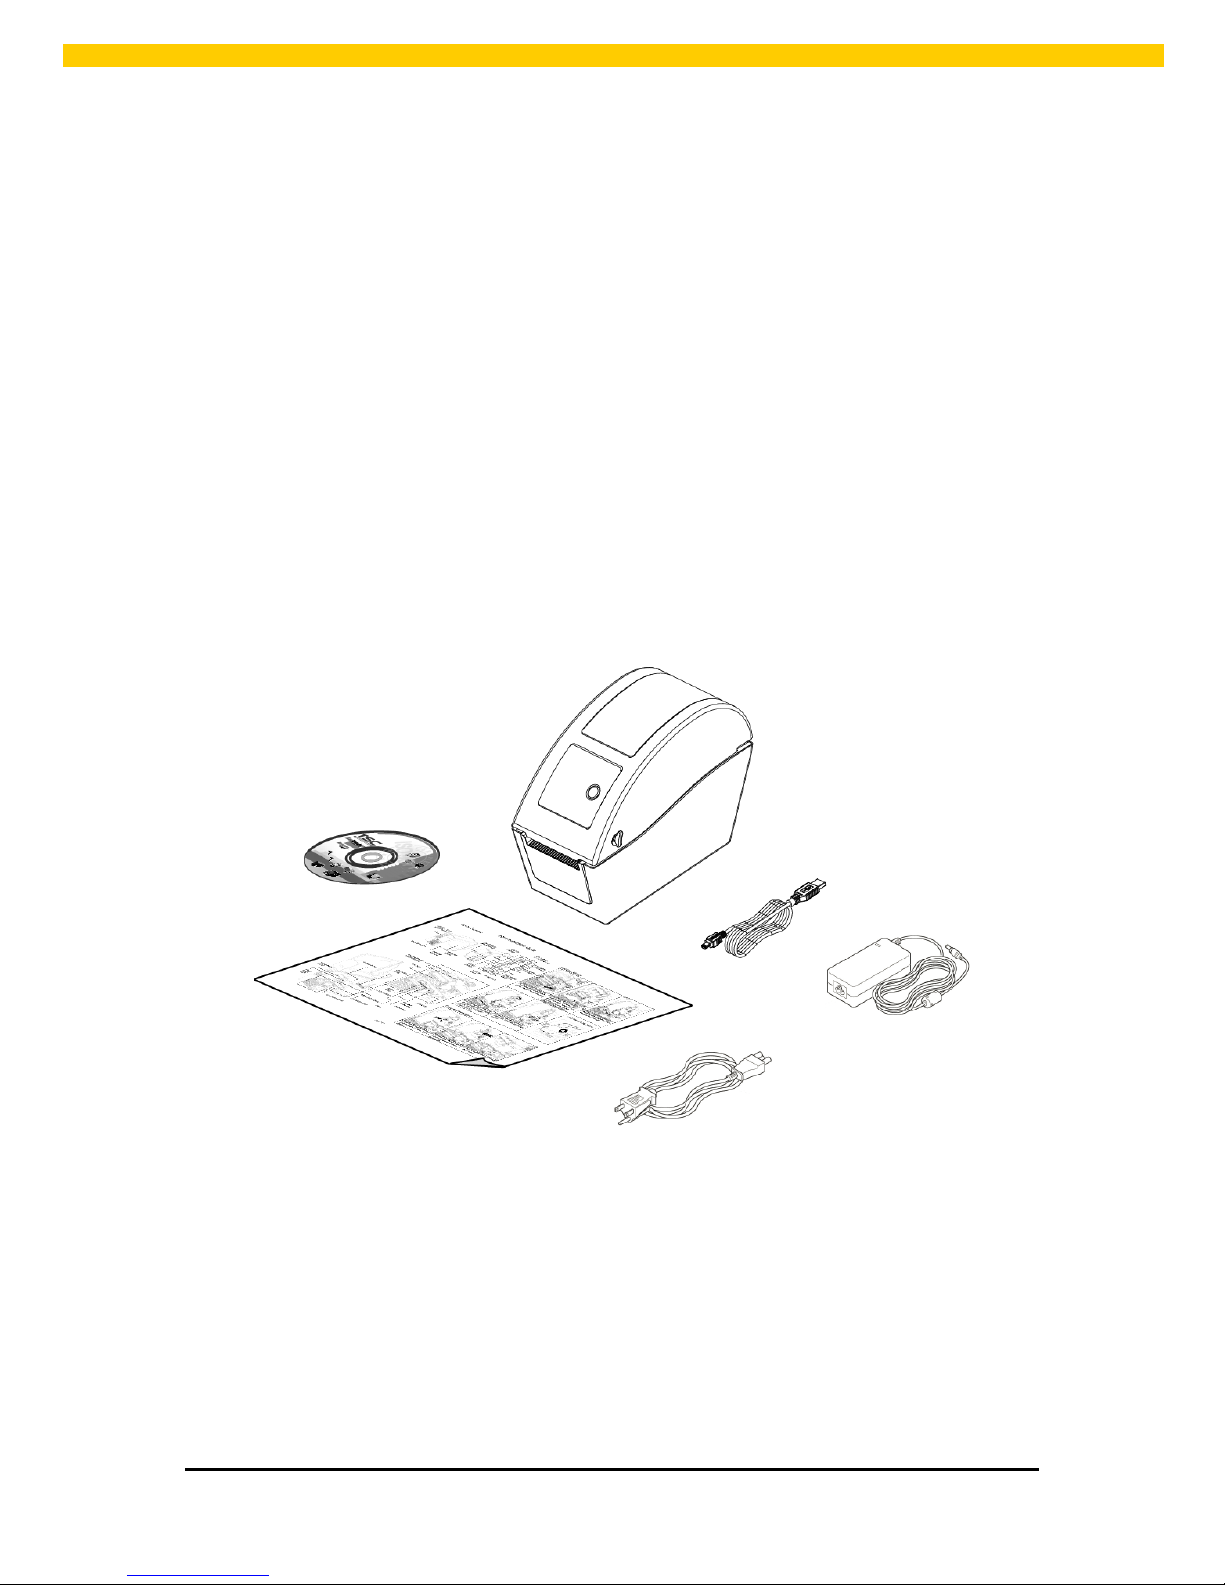
Unpacking the printe r, the following items are i ncluded in the carton.
One printer unit
One Windows labeling software/Windows driver CD dis k
One power cord
One auto sw it chi n g power supply
One USB int er face cable
If any p ar ts are missi ng, please contact W asp Barcode Technolog ies.
Page 4
2
WPL25/WHC25 Quick Start Guide
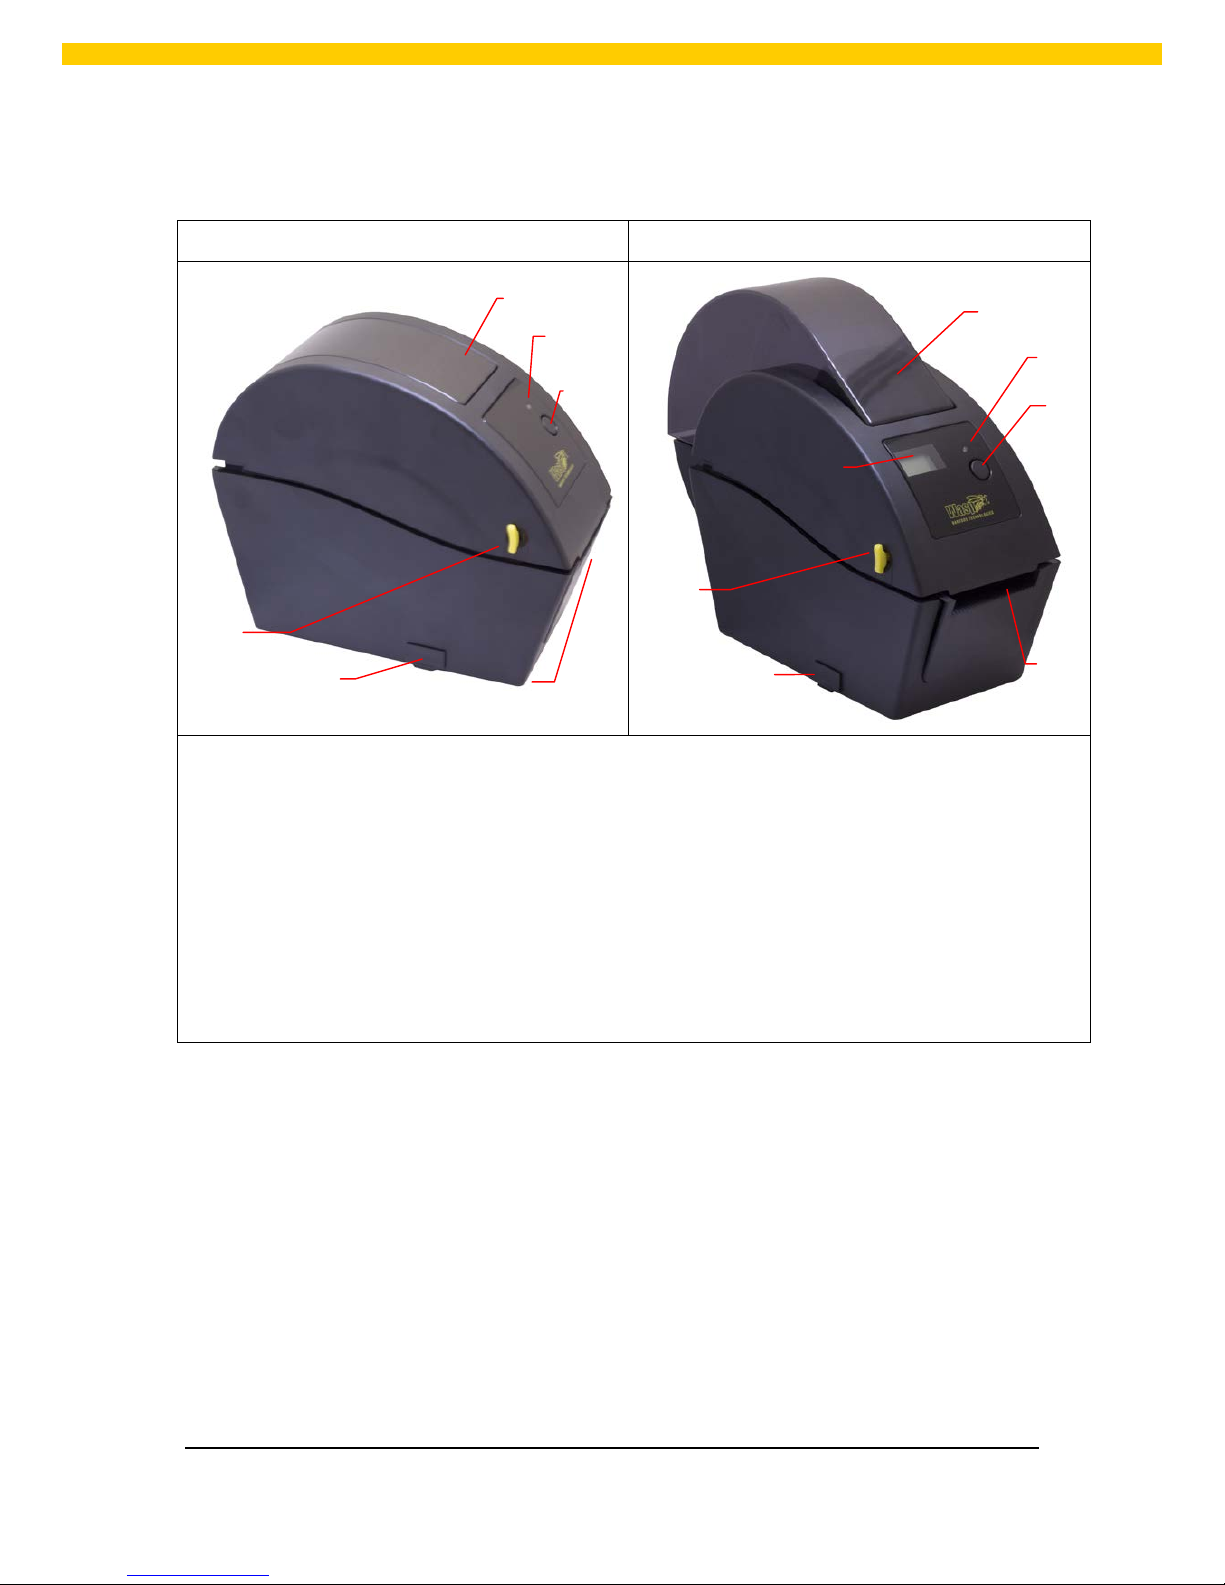
Front View
WPL25 model WHC25 model
1. Top cover op en lever
2. MicroSD card socket
3. Media view window
4. LED in dicator
5. Feed button
6. Paper exit chute
7. LCD display (Option for WPL25 model)
1
3
4
5
2
6 1 3
4
5
2
6
7
Page 5
3
WPL25/WHC25 Quick Start Guide
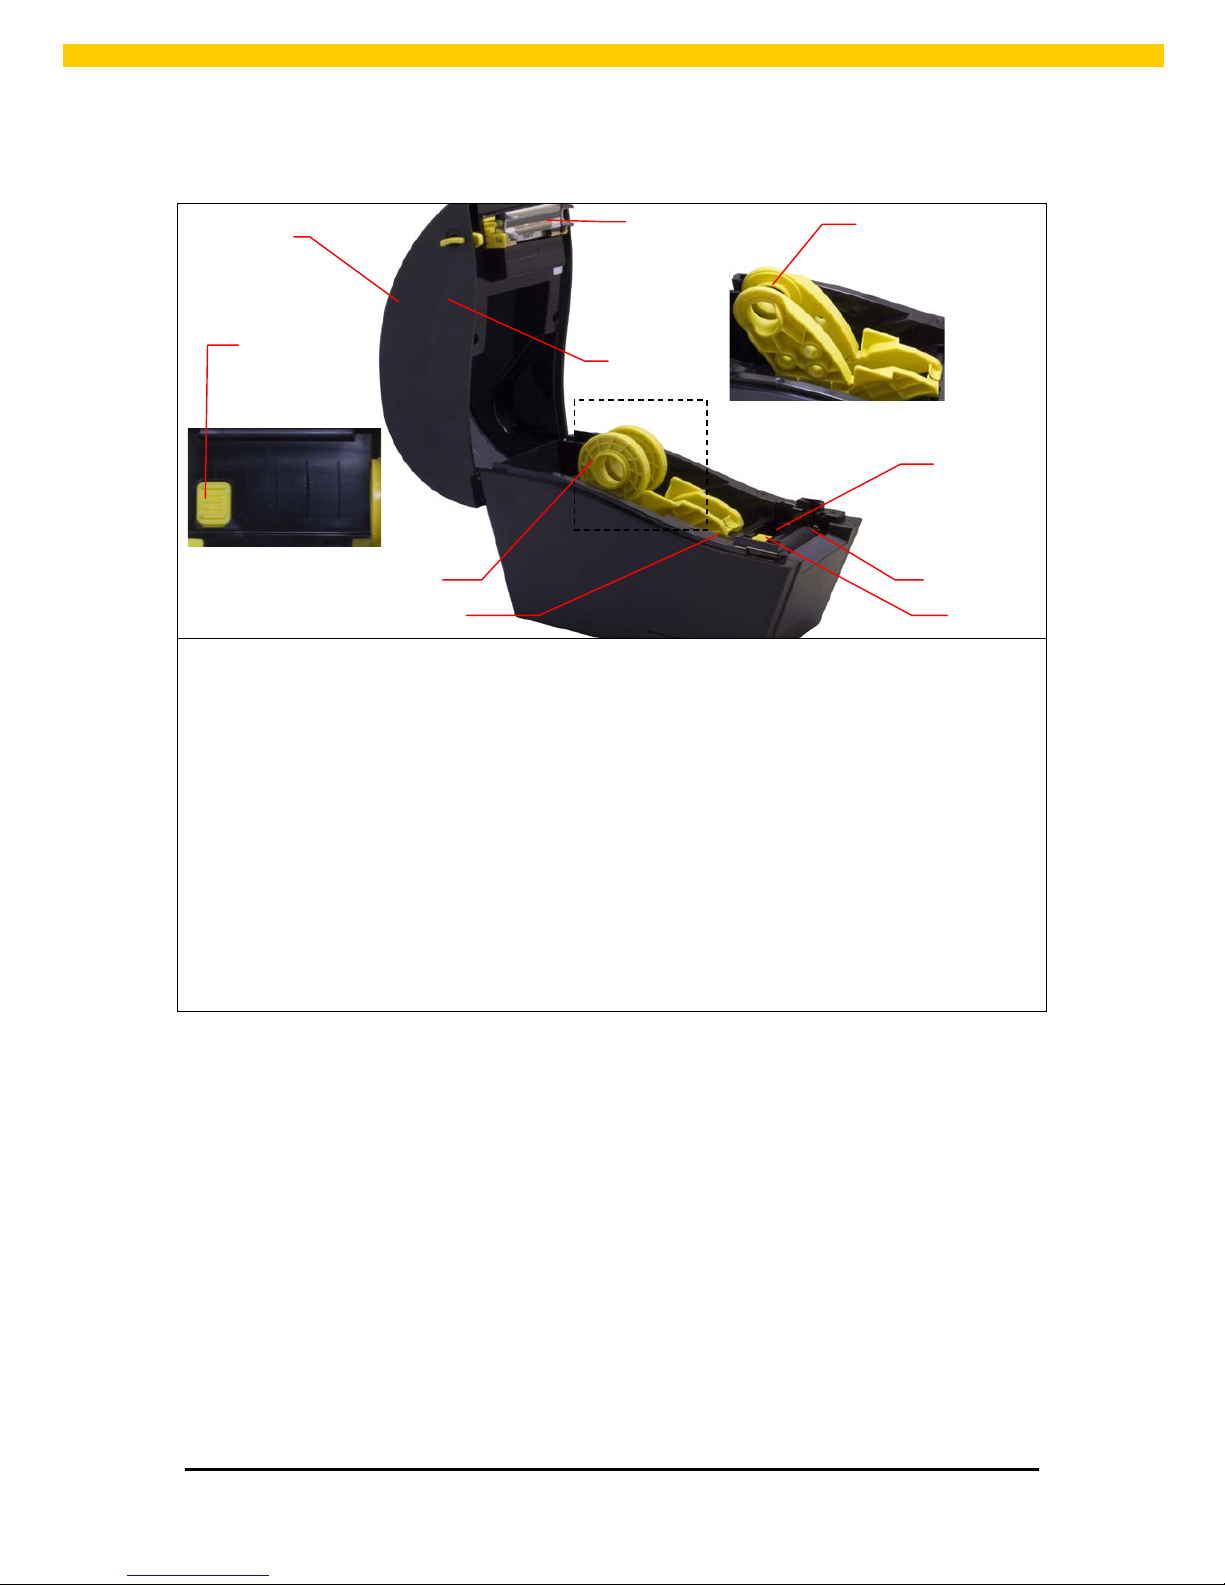
Interior View
1. Top cover
2. Media holder
3. Media guide
4. Printhead
5. Gap sensor (receiver)
6. Gap sensor (transmitter)
7. Platen roller
8. Black mark sensor
9. M edia holder lock switch
7
6
5
4
1
8
3
2 (WPL25 model)
9
2 (WHC25 model)
Page 6
4
WPL25/WHC25 Quick Start Guide
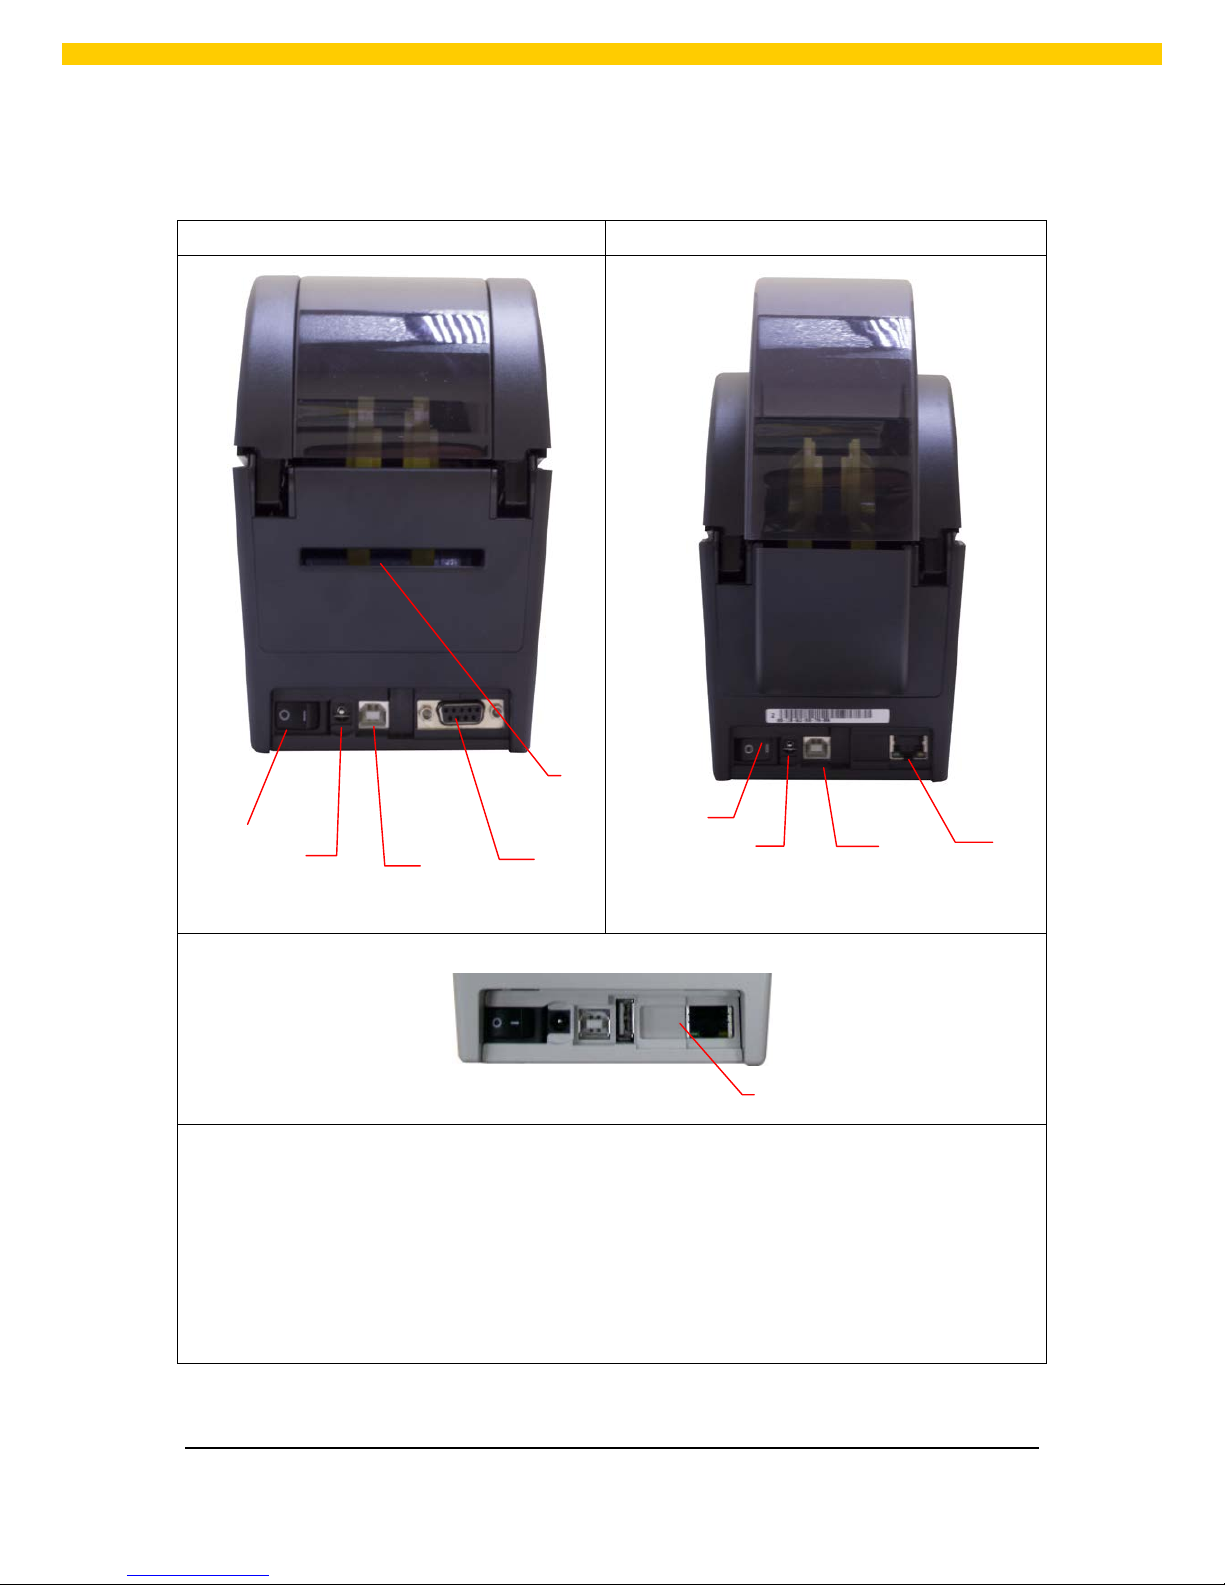
Rear View
WPL25 model WHC25 model
1. Power switch
2. Power jack socket
3. USB interface
4. RS-232 C interface (Opt ion for WPL25 mode)
5. Fan-fold paper entrance chute
6. Ethernet interface ( Option for WPL25 model)
7. US B host ( Factory option for WHC25 mode)
1
4
3
2
5
6
1
3
2
7
Page 7

5
WPL25/WHC25 Quick Start Guide
Setup
Setting Up the Printer
1. Place the printer on a flat, secure s urface.
2. Make sure th e power switch is set to “off”.
3. Connect the printer to the computer wit h the provided USB cabl e.
4. Plug the po wer cor d i nto the AC power cord socket at the r e ar of the pri nte r, and the n pl u g the
power cord into a properly grounded power outlet.
Note: Please switch OFF printer power switch prior to plug in the power cord to printer p ow er
jack.
Page 8
6
WPL25/WHC25 Quick Start Guide
Loading the M edia
Loading
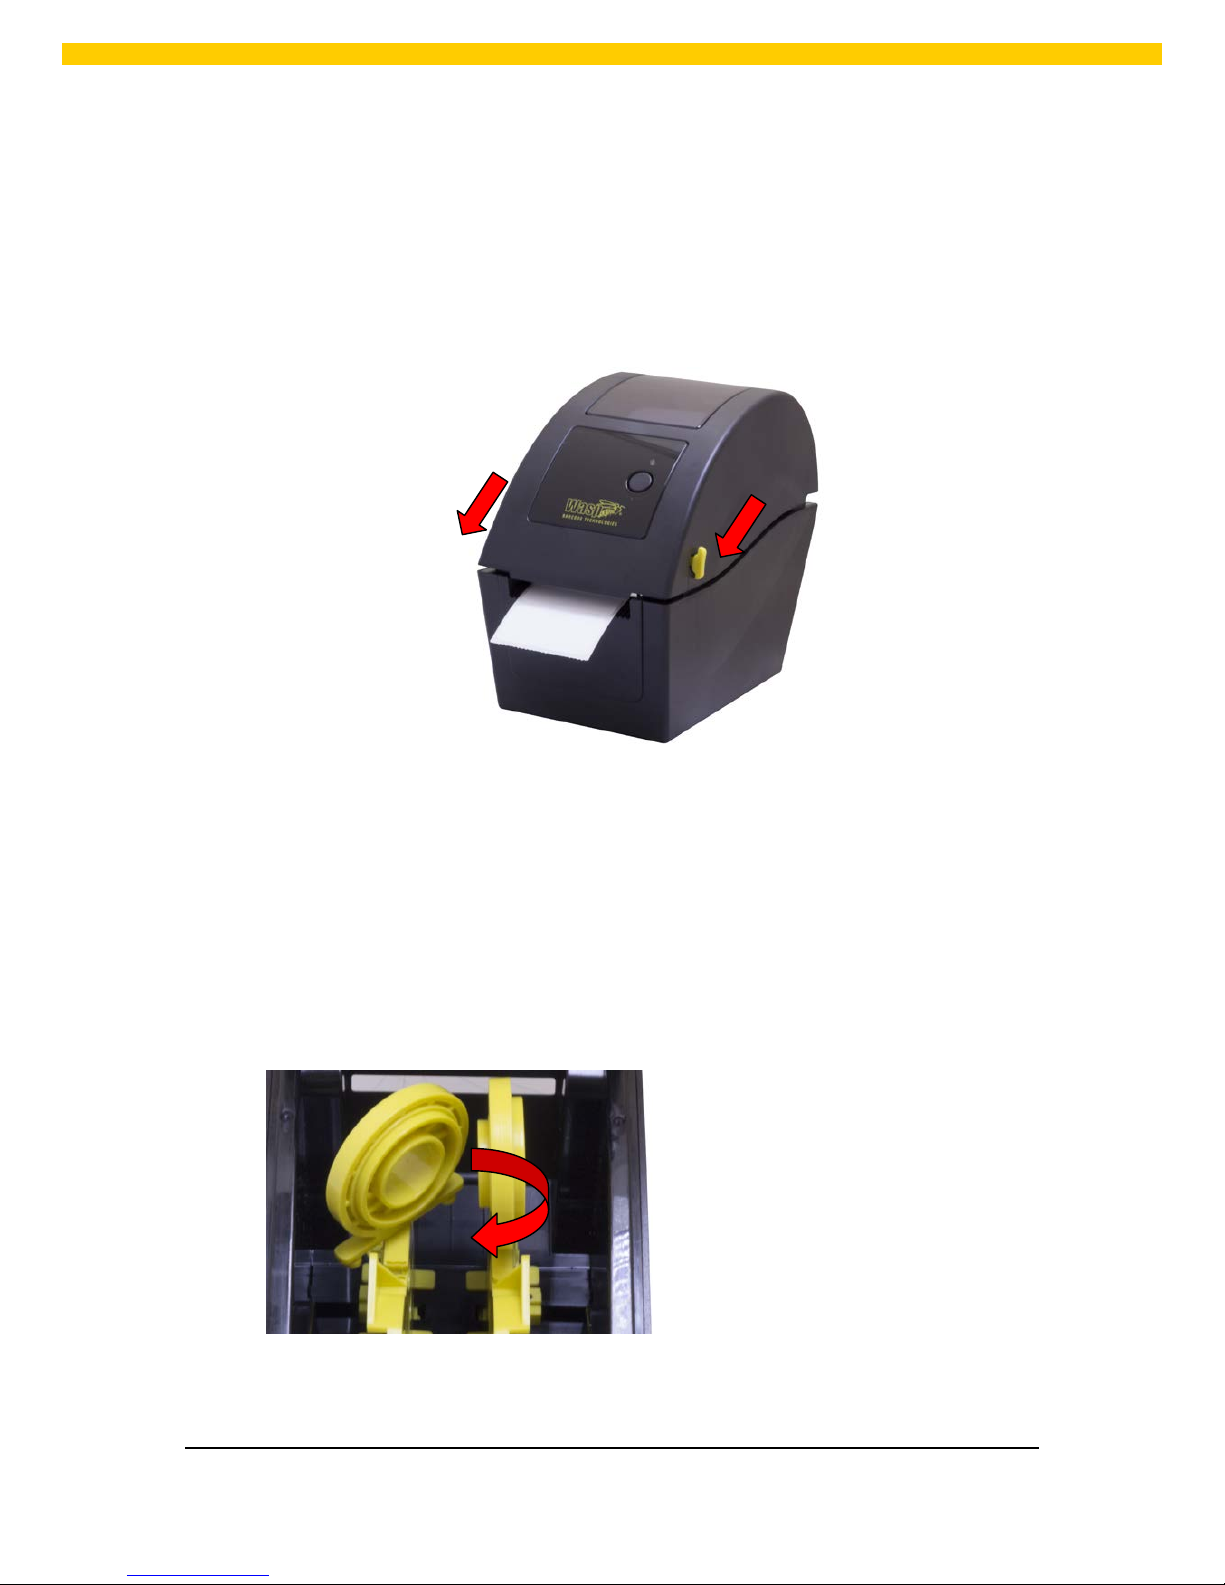
1. Open the printer top cover by pu lling the tab s locat ed on each side towards the fron t of th e
printer, and then lift the top cover to the m aximum open angle.
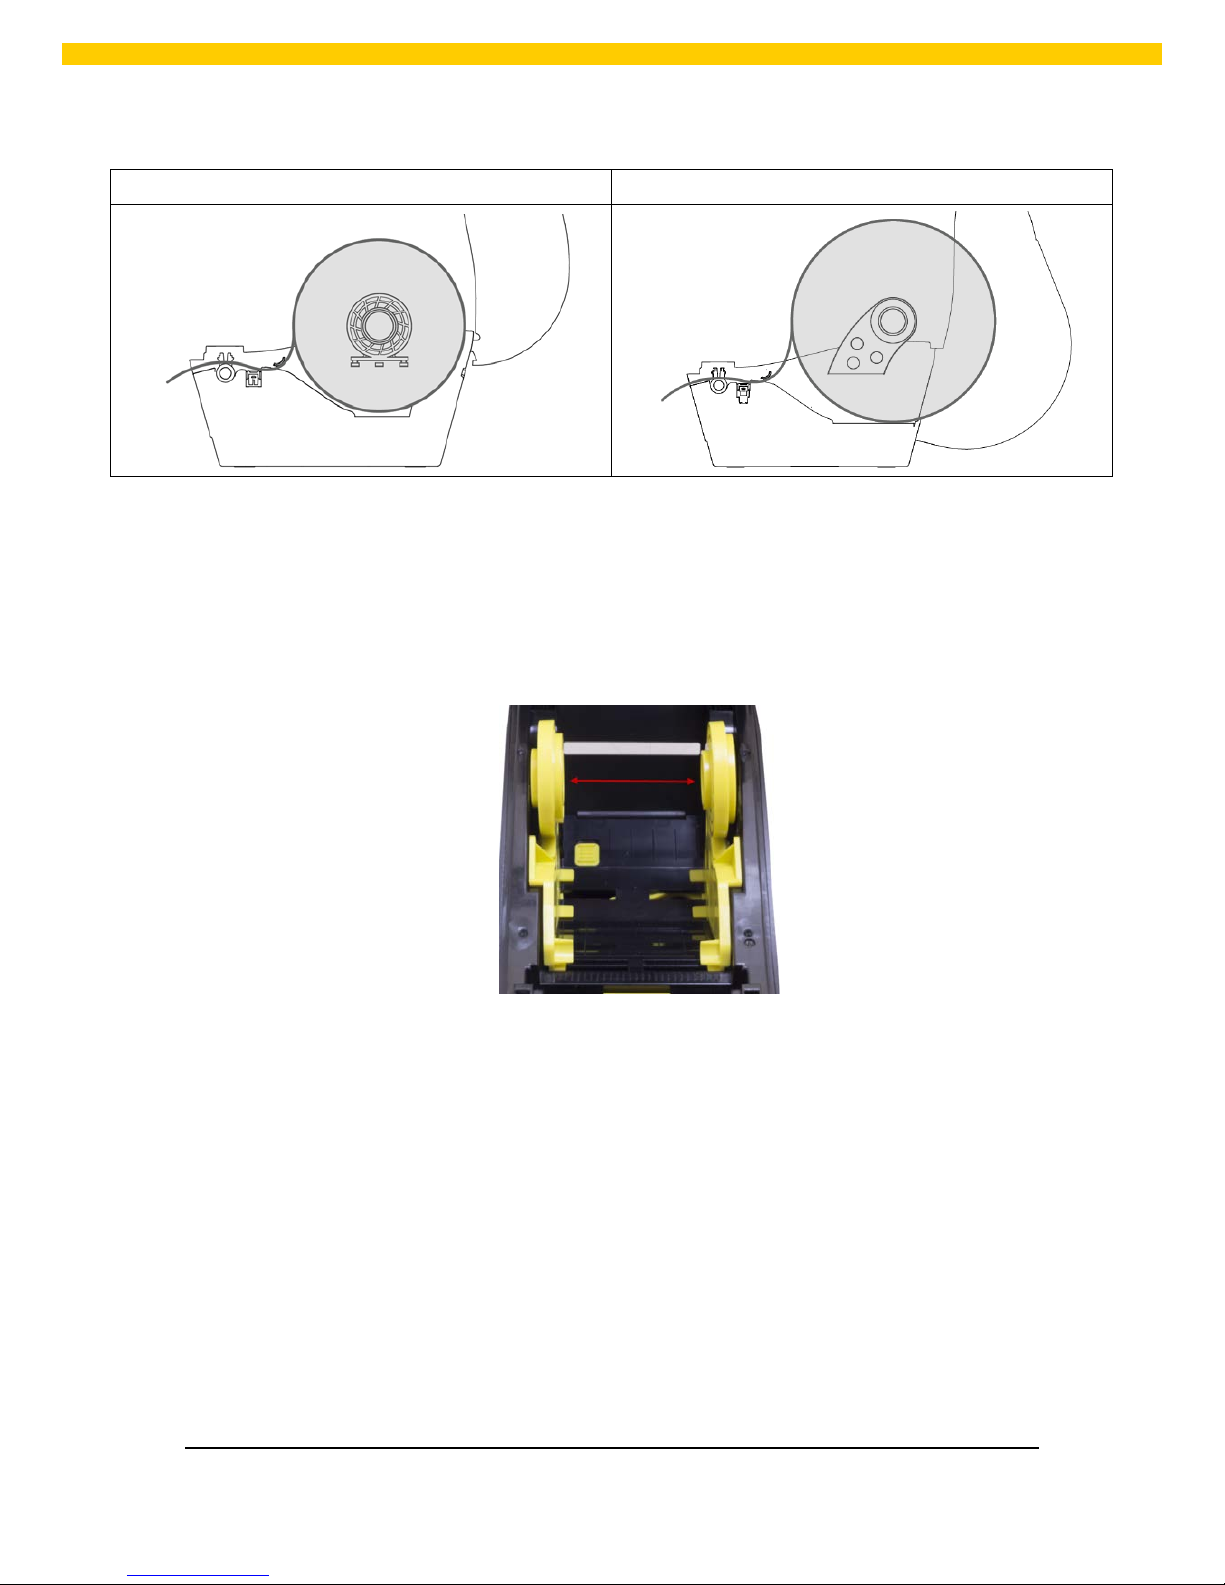
2. The media hol der can be used for 1” and 1.5” media c or e by rotating the up per part of l abel
holder180 degrees clockwise. (For WPL25 model only).
Page 9
7
WPL25/WHC25 Quick Start Guide
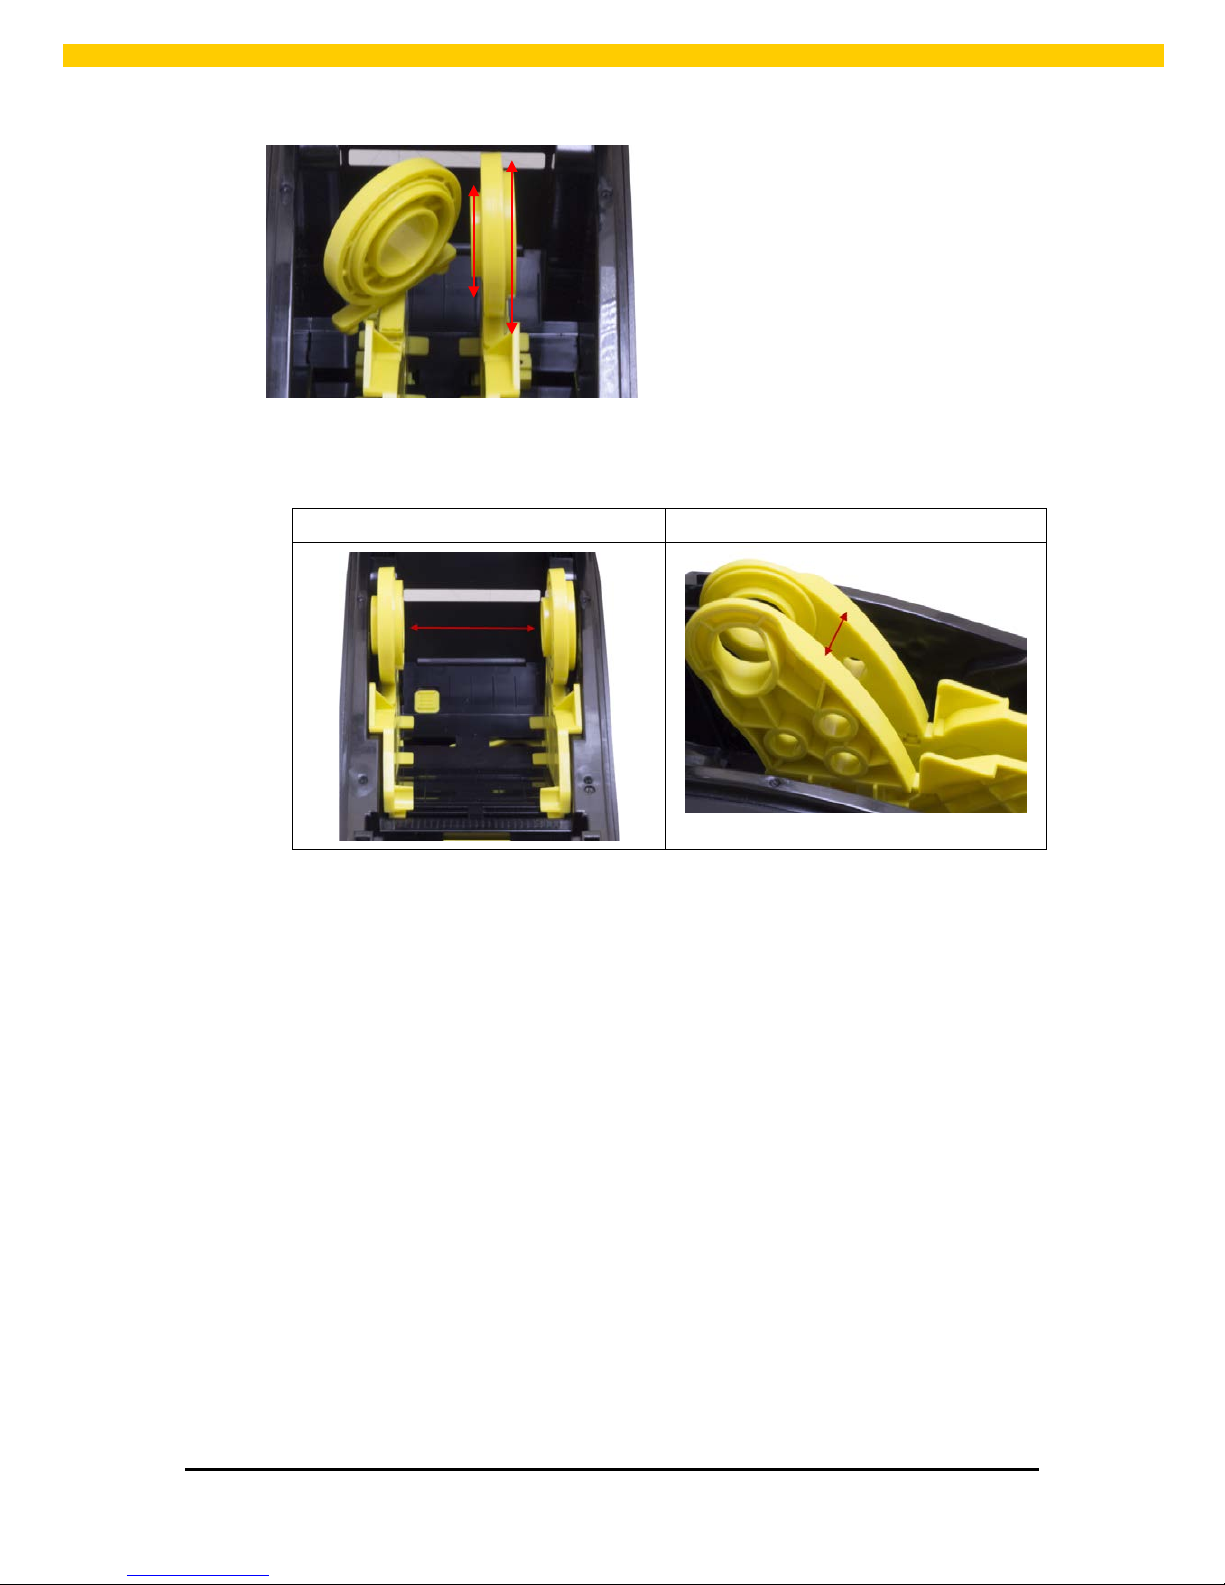
3. Separ ate the media holder s to the lab el r oll width.
WPL25 model WHC25 model
1”
1.5”
Page 10
8
WPL25/WHC25 Quick Start Guide
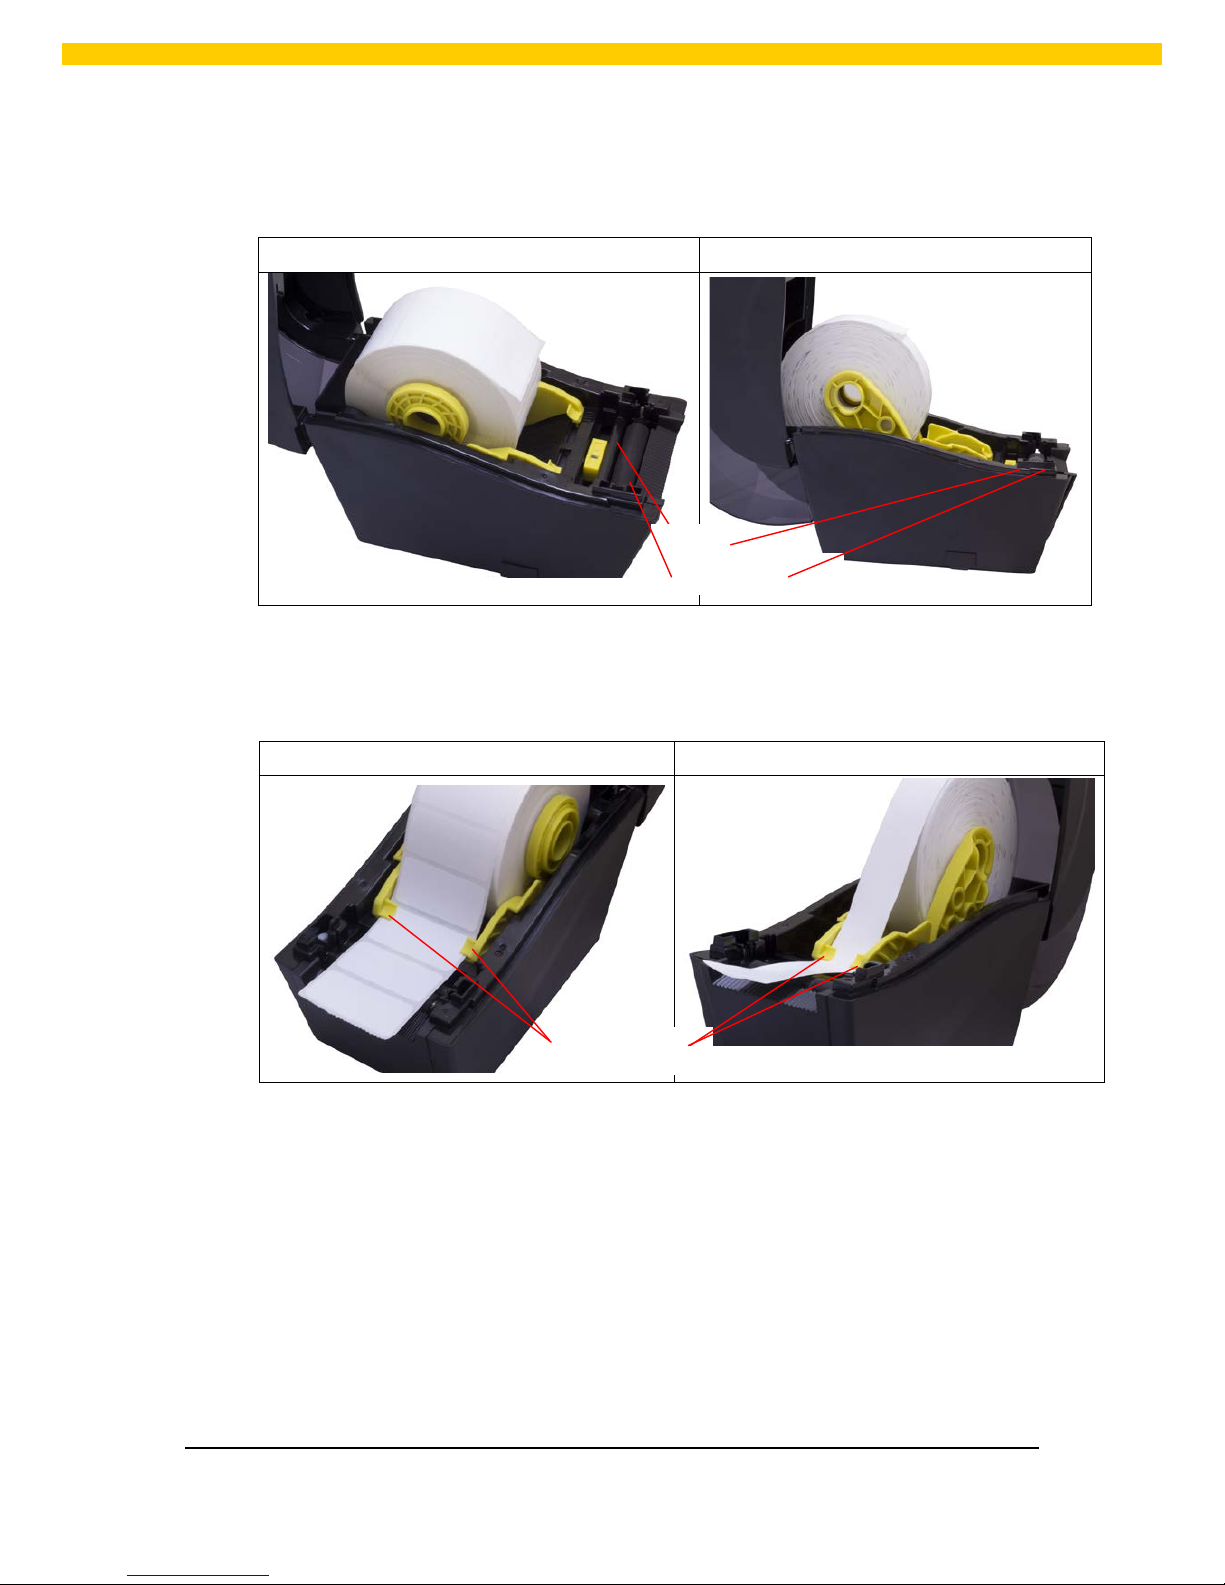
4. Place the rol l between the holders and close them onto the core.
WPL25 model WHC25 model
5. Place the paper, printing side fac e up, th r ough the media guides, media sensor and place the
label l eading edge onto the p l aten rol l er.
WPL25 model WHC25 model
Plat en roller
Sensor
Media guides
Page 11
9
WPL25/WHC25 Quick Start Guide
6. Close t he top cover gently an d make sur e the cover latches securely.
WPL25 model WHC25 model
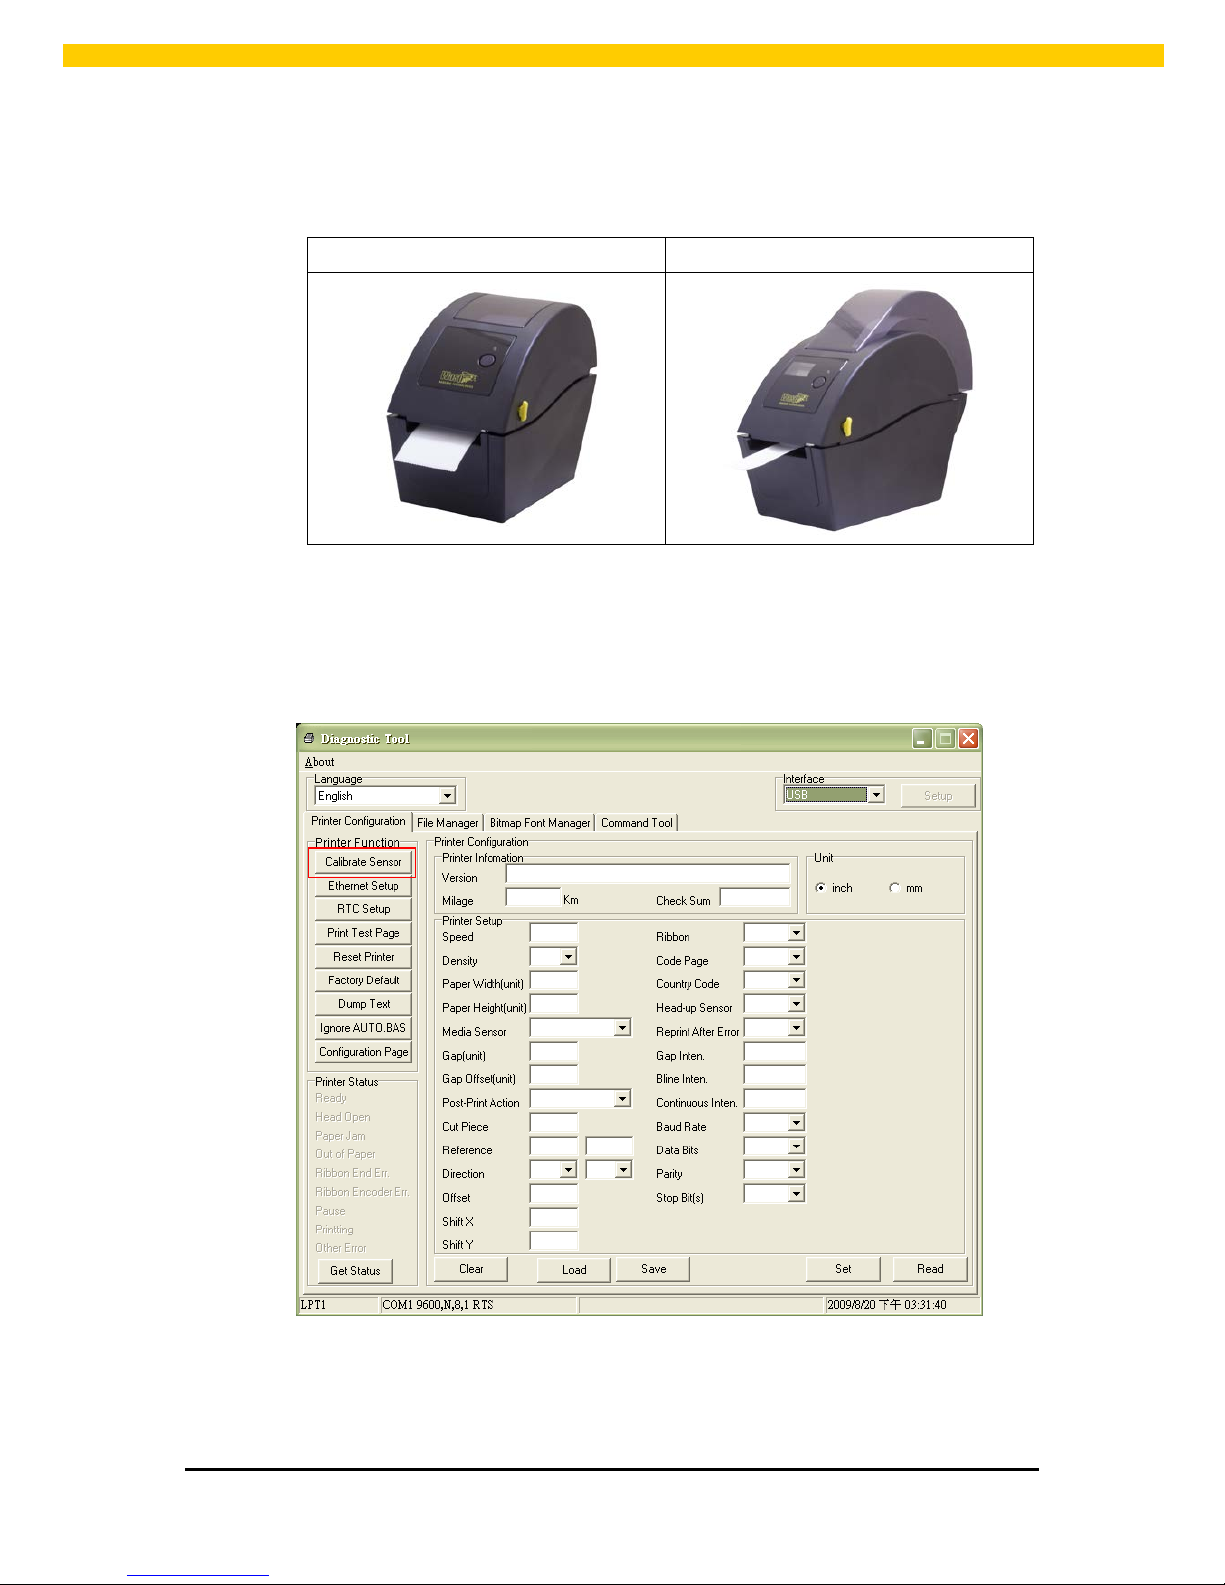
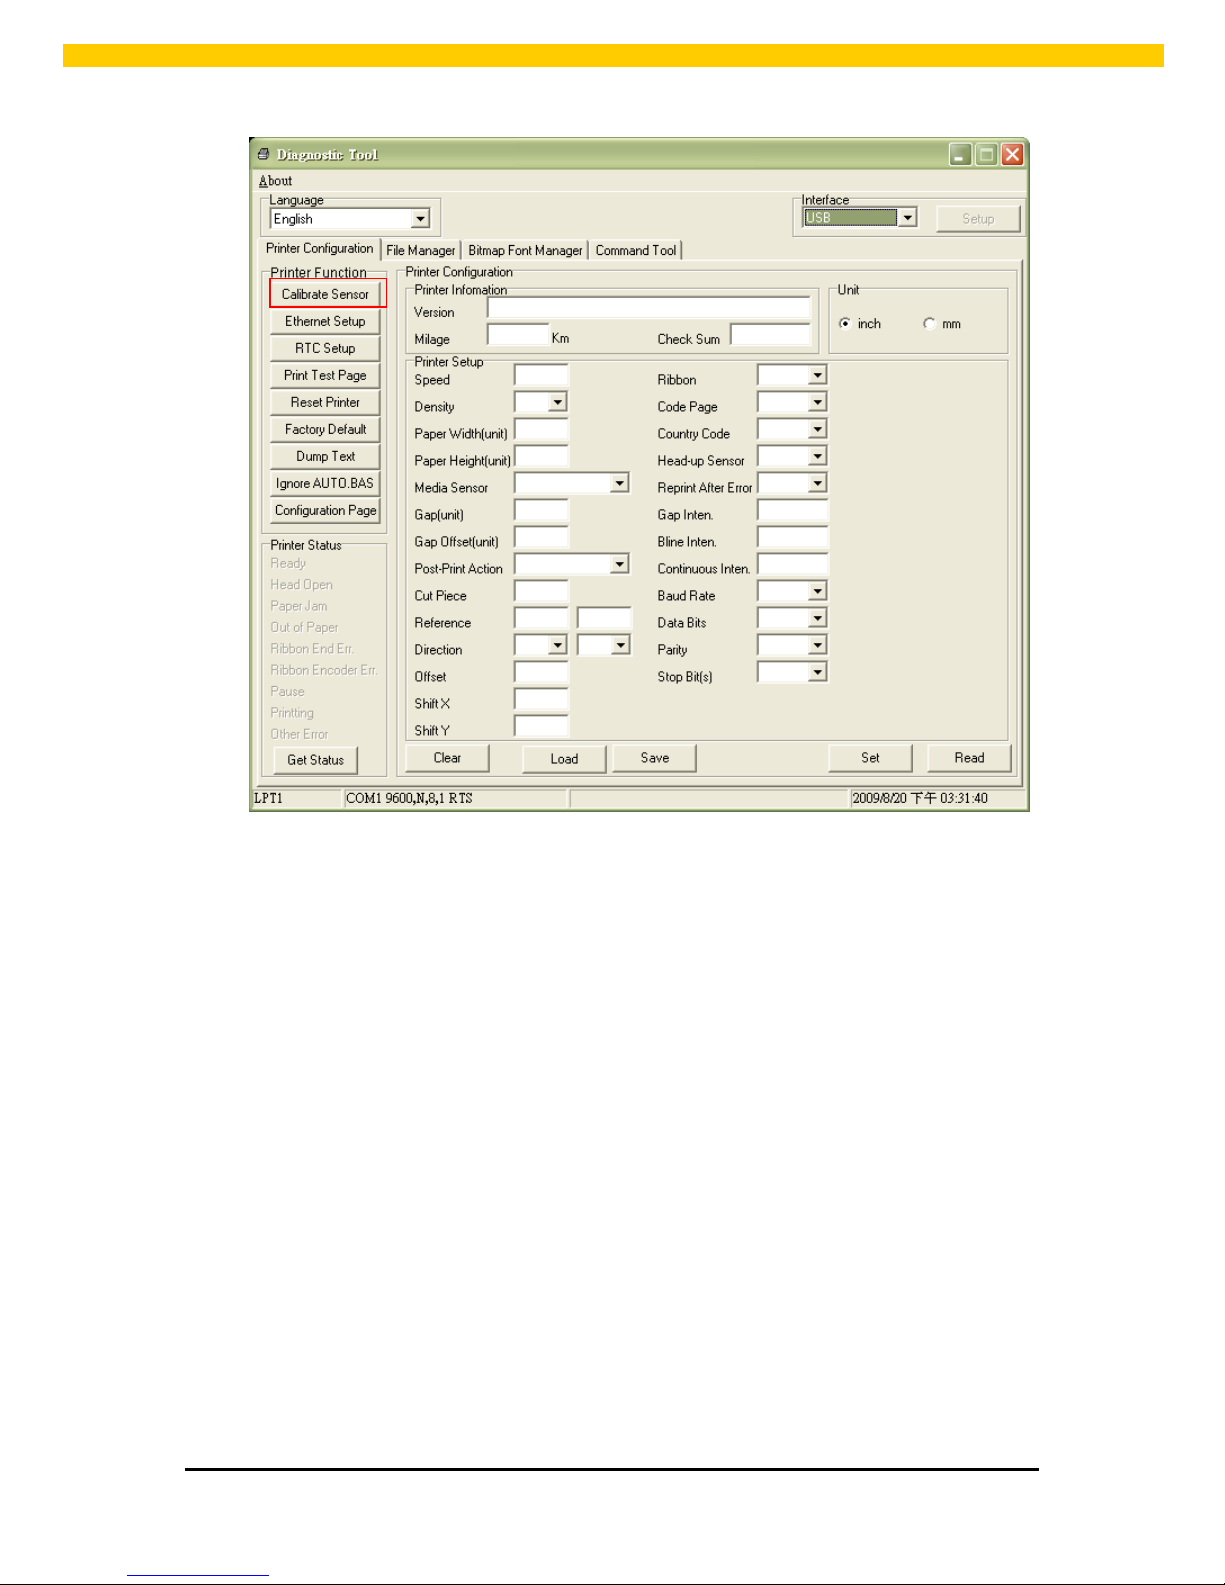
7. Use “Diagnos tic Tool” to set the media sensor type an d calibrate the selected sensor. (Start
the “ D iagn ostic tool” Sel ect the “Pr inter Configuration” tab Click the “Calibr ate Sensor”
button)
Note: Please calibrate the gap/black mark sensor when changing media.
1. Loading path for r oll labels
Page 12
10
WPL25/WHC25 Quick Start Guide
WPL25 model WHC25 model
Loading External Media (WPL25 model only)
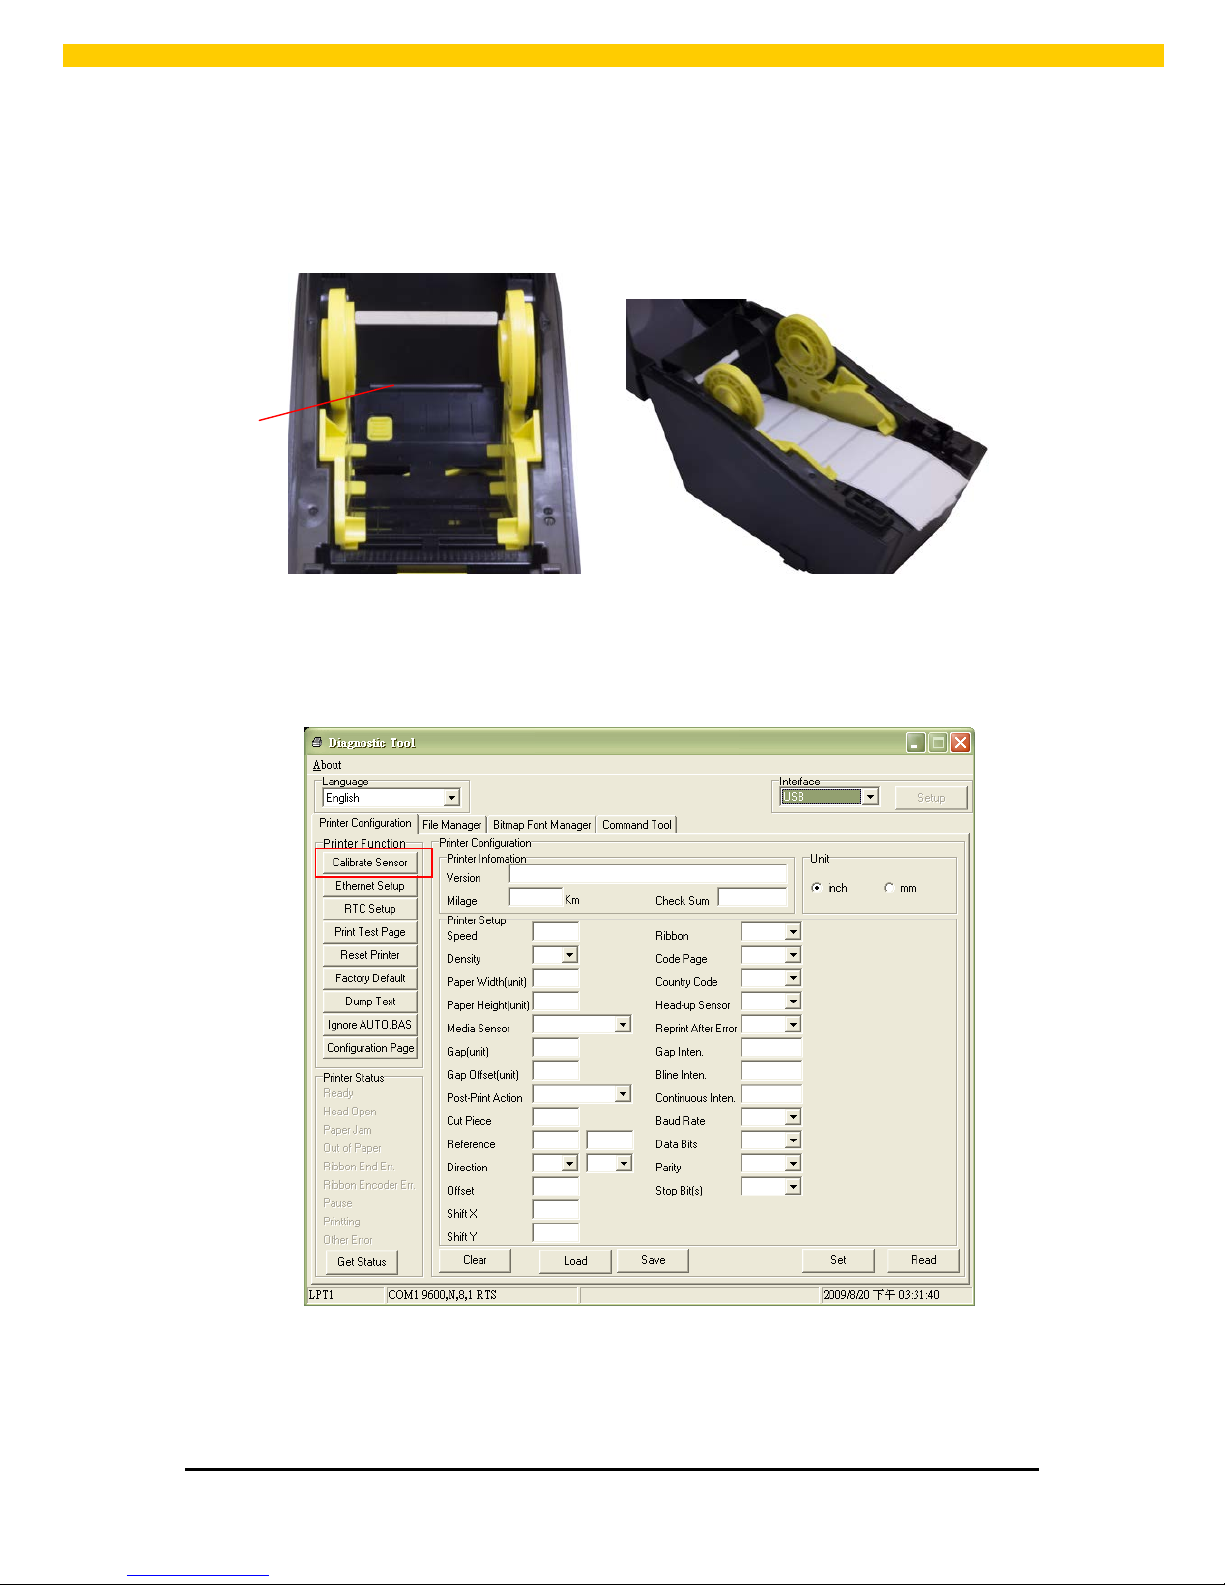
1. Open the pr i nte r’s top cover an d separate the m edia h ol ders to fit the media width.
2. Press down the media holder lock switch to fix the media h older.
Page 13
11
WPL25/WHC25 Quick Start Guide
3. Feeds the media through the rear external label en tranc e chut e. And place the paper, prin ting
side face up , through the m edia guides, media sensor and place the lab el leading edge onto
the platen roller.
4. Close the top cover gen tly.
5. Use “Diagnos tic Tool” to set th e med i a sensor type an d calibr ate the selected sensor. (Start
the “ D iagn ostic tool” Sel ect the “Pr inter Configuration” tab Click the “Calib r ate Sensor”
button)
Note: Please calibrate the gap/black mark sensor when changing media.
Rear external
label en t rance
Page 14
12
WPL25/WHC25 Quick Start Guide
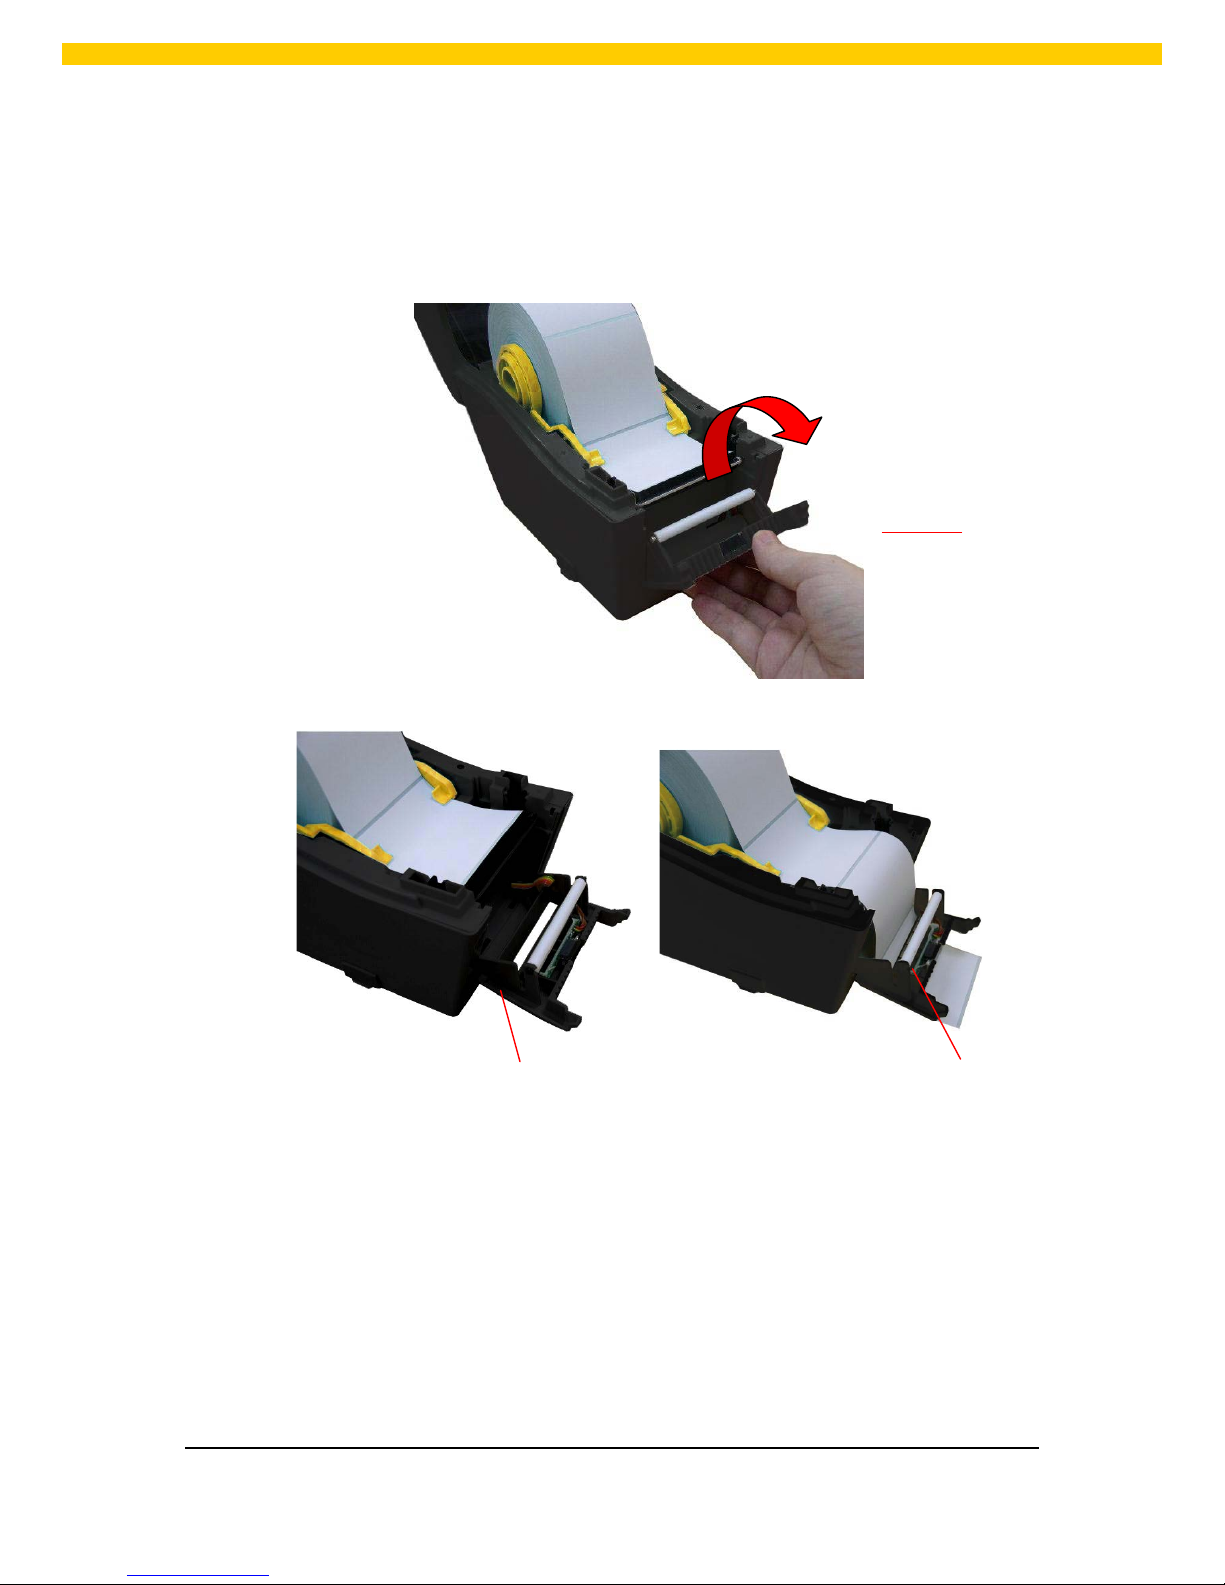
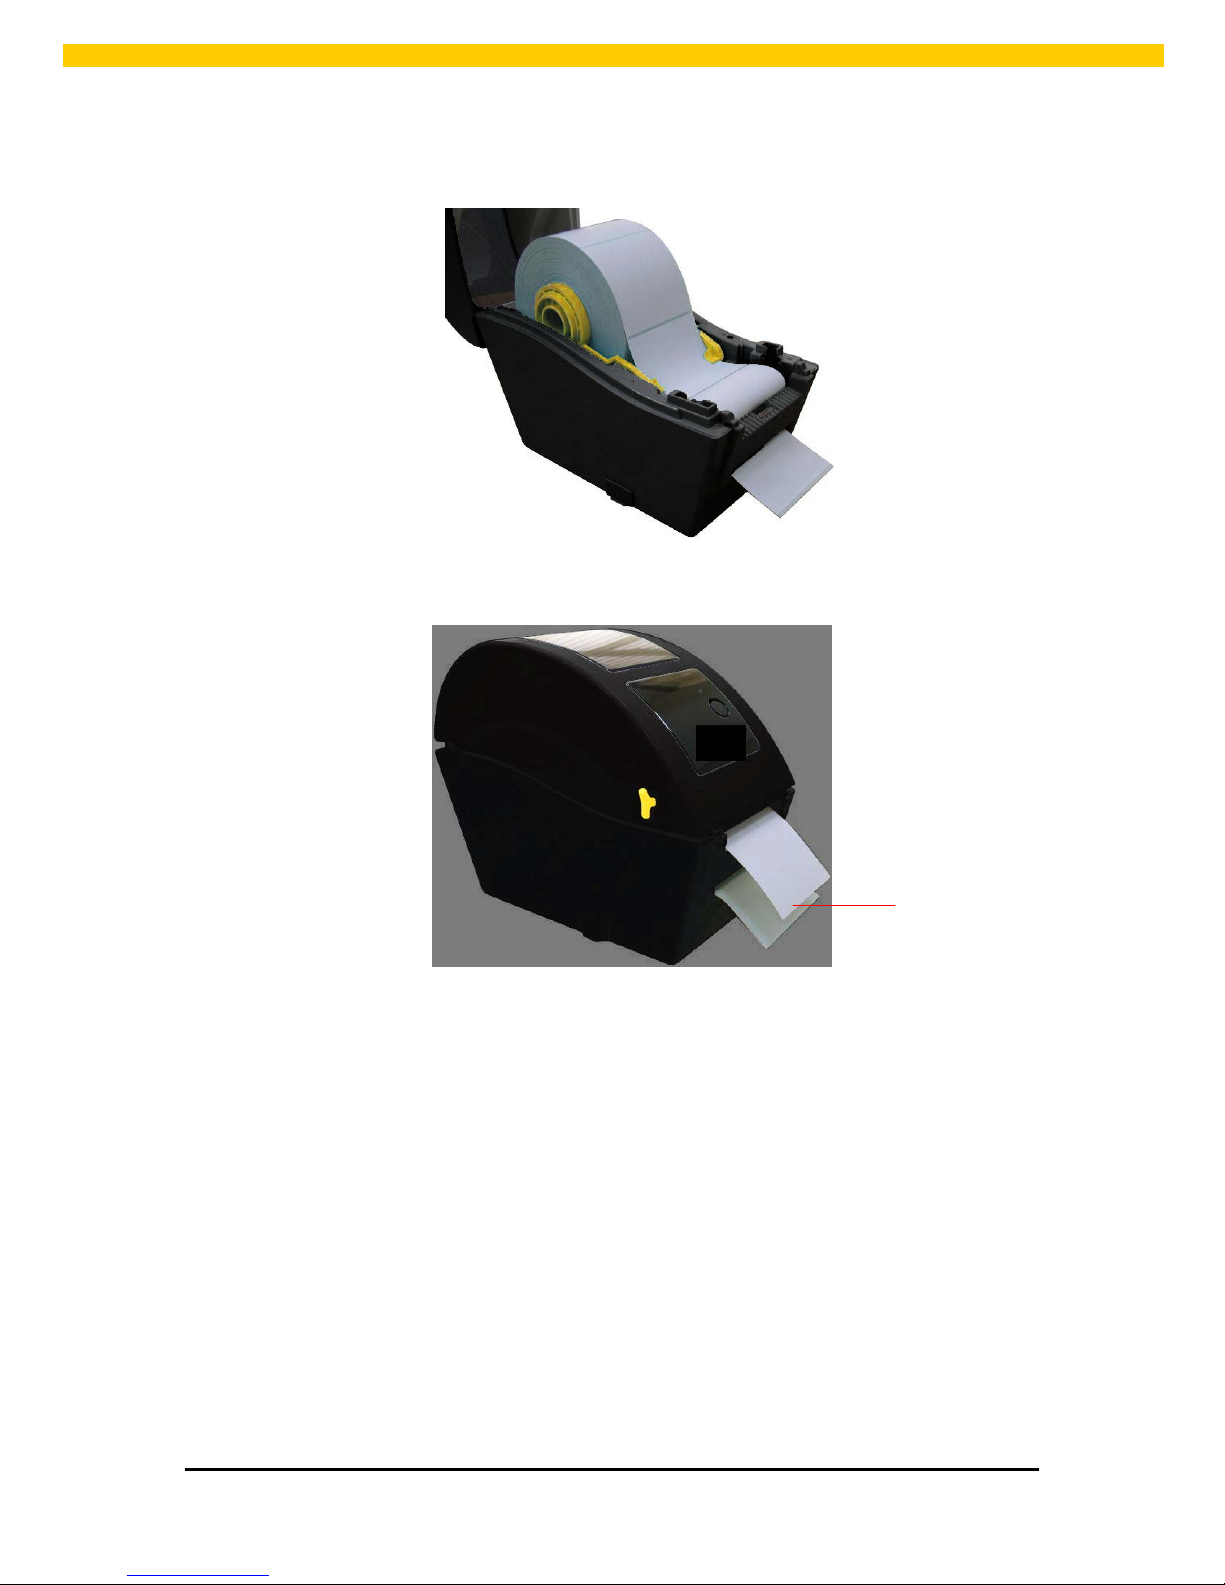
Loading Media in Peel-off Mode (Option)
1. Refer t o secti on 3.2.1 to load the media.
2. Open the t op cover and peel-off panel after calibrated the sensor.
3. Lead the media thr ough the backing paper opening, beneath the peel-off roller.
Peel-off panel
Peel-off roller
Backing paper opening
Page 15
13
WPL25/WHC25 Quick Start Guide
4. Push the peel-off panel back to the printer
5. Close the top cover gen tly.
6. Press the FEED but ton to t est.
Note: Please calibrate the gap/black mark sensor when changing media.
Backing paper (Liner)
Page 16
14
WPL25/WHC25 Quick Start Guide
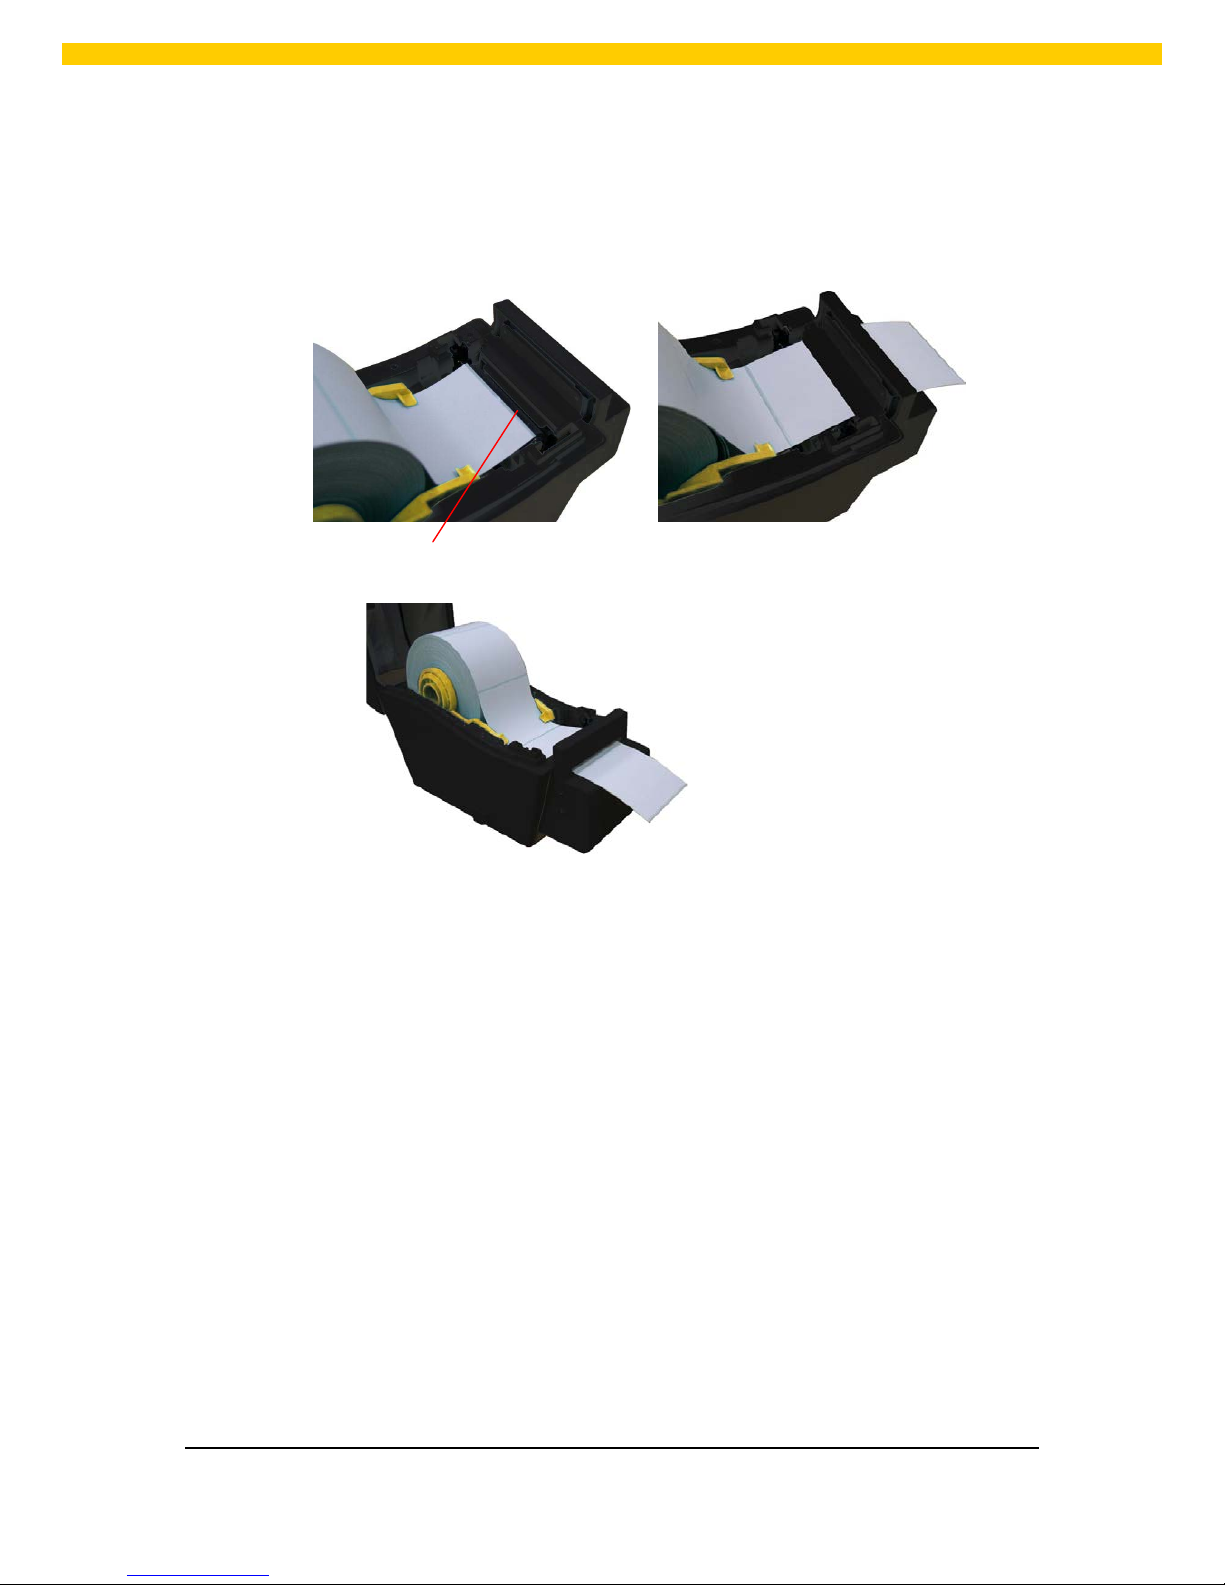
Loading Media in Cutter Mode (Option)
1. Refer t o secti on 3.2.1 to load the media.
2. Lead the media thr ough the cutter paper opening.
3. Close the top cover gen tly.
4. Use “Diagn ostic Tool” to set the medi a sensor type and calib r ate the selected sensor. (Start
the “ D iagn ostic tool” Sel ect the “Pr inter Configuration” tab Click the “Calib r ate Sensor”
button)
Cutter paper opening
Page 17
15
WPL25/WHC25 Quick Start Guide
Note: Please calibrate the gap/black mark sensor when changing media.
Page 18
16
WPL25/WHC25 Quick Start Guide
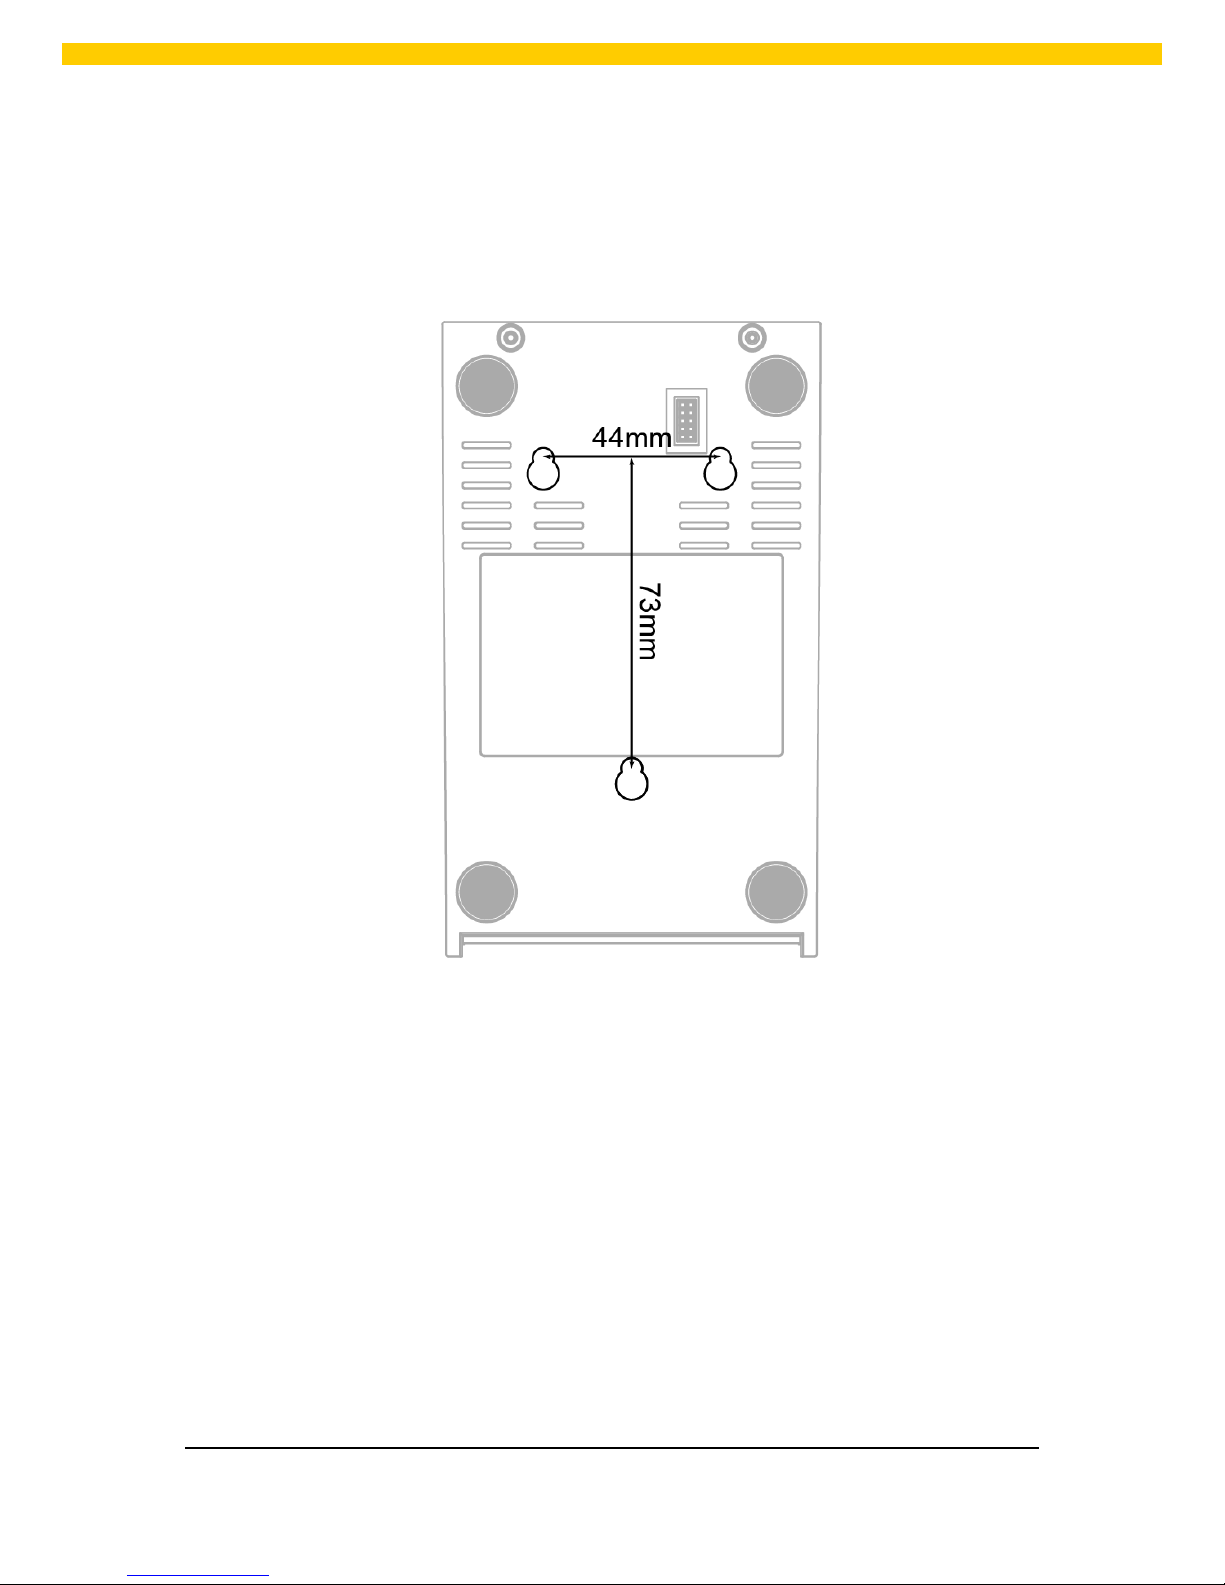
Mount the Printer on the Wall
There are three holes in the bot tom of printer. P r i nter can b e m ounted on the wall b y the
3.0m m~3.5m m screw head screws.
Note: Please hang pr operly to avoid fall down
Page 19

17
WPL25/WHC25 Quick Start Guide
LED and Button Functions
This printer ha s o ne button and one thr e e -color LED i ndi cator. By indica ti ng t he LED with dif ferent color
and press ing the button, printer can feed labels, pause the printing job, select and calib r ate the media
sensor, print printer self-test report, reset pri nter to defau lts (i niti alizati on). Please refer to the button
operat i on bel ow for different functions.
LED Indicator
LED Color Description
Green / Solid
This il l uminates that the power is on and the d evice is ready to
use.
Green / Flash
This illuminates that the system is downloading data from PC to
memory or the printer i s paused.
Amber This illuminates that the system is clear i ng data from prin ter.
Red / Solid This il l uminates printer head open, cutter error.
Red / Flash
This il l uminates a printing er r or, such as head open, paper
empty, paper jam or memory error etc.
Regular B utton Functions
1. Feed labels
When the printer is r eady, press the b utton to feed one l abel to the beginning of next lab el .
2. Pause the printing job
When the printer is pr i nting, press the button to pa use a printing job. Whe n t he pr i nt e r is paused,
the LED will be green blinking. Press the bu tton again to continue the printing job.
Page 20

18
WPL25/WHC25 Quick Start Guide
Troubleshooting
The following guide li sts the most common problems that may be encount er ed when operati ng this
barcode pri nter. If the pr in ter st ill does not function after all suggest ed solutions have been invoked,
please cont act the Customer Service Department of your purchased res eller or distri butor for
assistance.
LED Sta tus
This section lists the c om mon pr oblems that according to the LE D status and other probl ems you may
encounter when operati ng the printer. Al so, it provides solu tions.
LED Status /
Color
Printer
Status
Possible Cause Recovery Procedure
OFF No resp onse No power * Turn on the power switch.
* Chec k if th e gr een LED is lit on power
supply. If it is not lit on, power supply is
broken.
* Check both power connections from the
power cord to the power supply and from
the power supply to the printer power jack
if
they are c onnected secur ely.
Solid Green ON The printer i s ready
to use
* No action necess ar y.
Green with
blinking
Pause The printer is
paused
* Press the FEED button to resume for
printing.
Red with
blinking
Error The out of label or
the printer setting is
not correct
1. Out of label
* Load a r oll of label and follow the
instruc tions in loading the media then p
ress
the FEED button to resume for printing.
2. Printer setti n g is not correct
* Initialize the printer by instructions in
“Power on Utility” or “Di agnos tic Tool”.
Note: Printer status can be easily shown on the Diagnostic Tool. For more information about the
Diagnostic Tool, please refer to the instruction in the software CD disk.
Page 21
19
WPL25/WHC25 Quick Start Guide
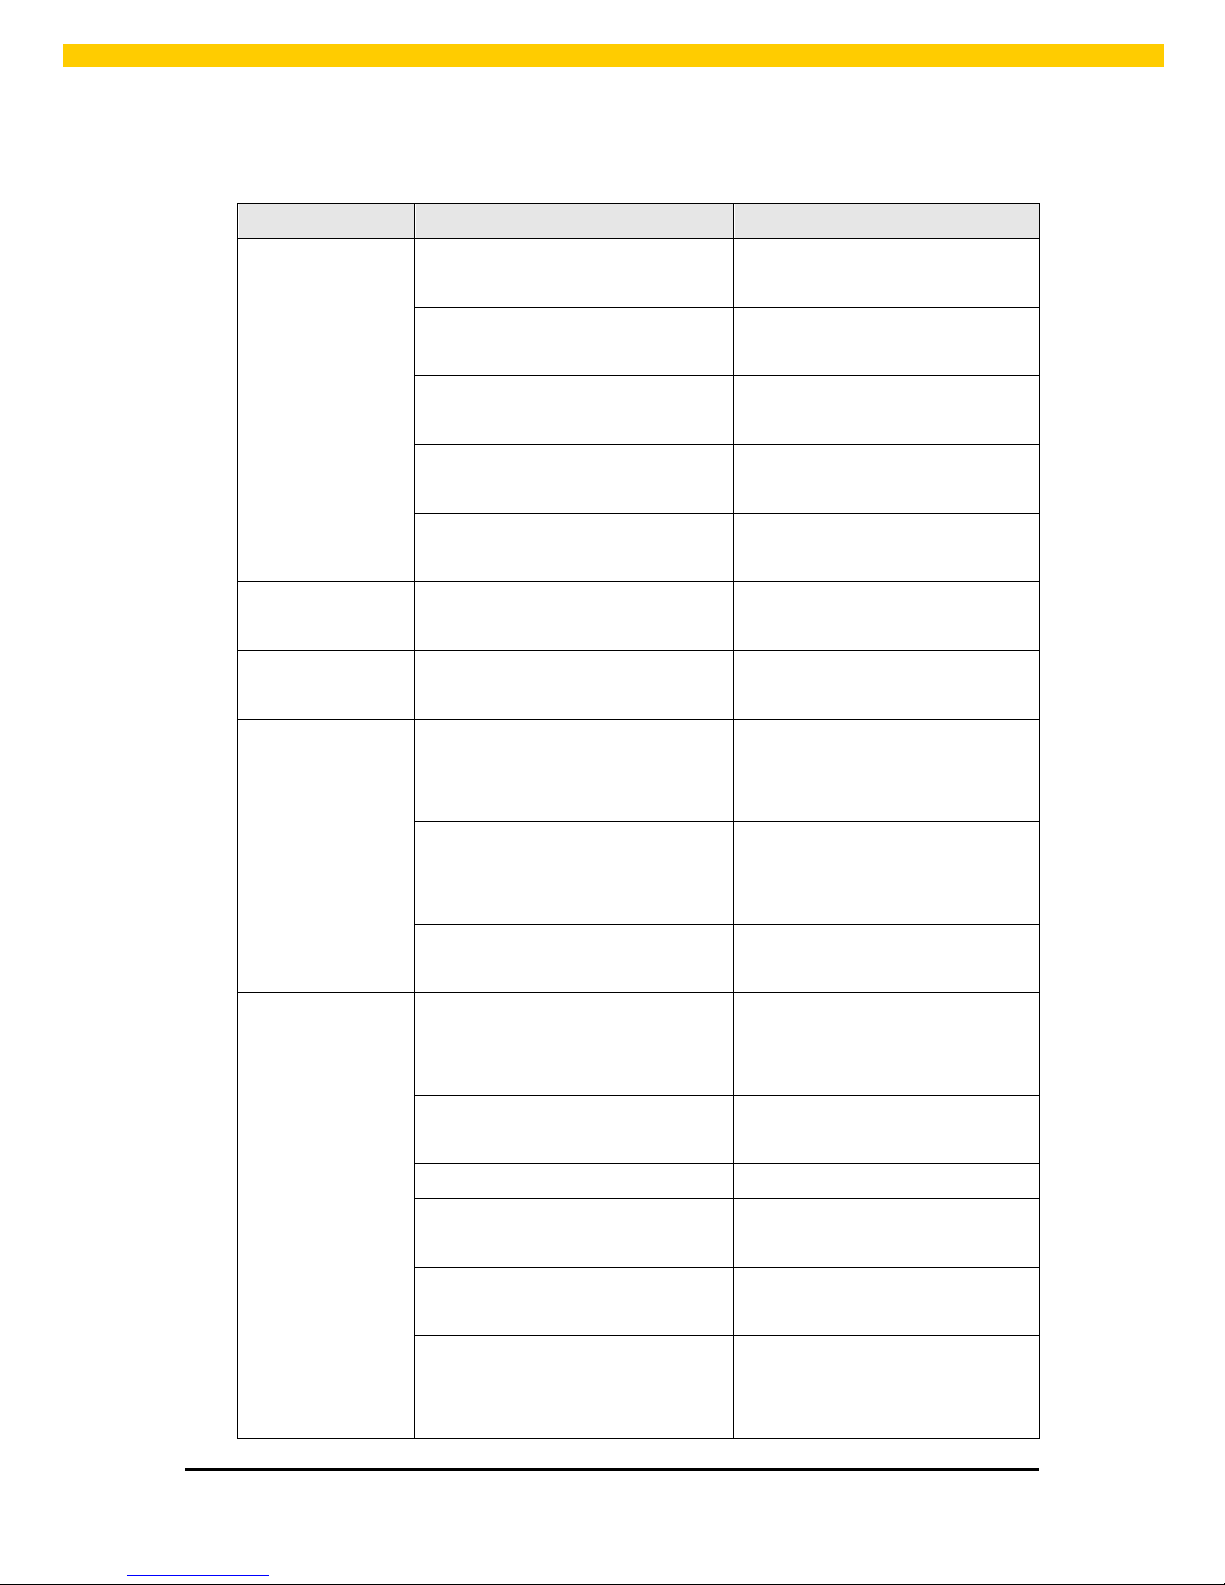
Print Problem
Problem Possible Cause Recovery Procedure
Not Printing
Check if int er face cable is well
connected to th e interface connect or.
Re-connect cable to interfac e.
The serial port cab le pin configur ation
is not pin to pin connected.
Please r eplace th e cable wit h pi n to
pin connected.
The serial port setting is not
consi s te nt betwe e n hos t and pr i nte r.
Please r eset the s er i al port setti ng.
The port specified in the Windows
driver is not correct.
Select the correct printer port in the
driver.
The Et hernet IP, subnet mas k,
gatew ay is not configured properly.
Configure the IP, subnet mask and
gateway.
No print on the
label
Label loaded not correctly.
Follow the instructions in loading
the media.
Continuous
feeding labels
The printer setting may go wrong.
Please do the initialization and
gap/black mark calibration.
Paper Jam
Gap/black mark sensor sensitivity is
not set pr operly (sensor sensitivity is
not enough)
Cal
ibrate the gap/black mark
sensor.
Make sure label size is set p r operly. Set label size exactly as installed
paper in the labeling software or
program.
Labels may be stuck inside the printer
mechanism near the sen sor area.
Remove the st uck l abel.
Poor Print Quality
Top cover i s not closed proper ly.
Close t he top c over comp letel y and
make sure the right side and left
side levers are latched proper ly
Wrong power supply is connected
with printer
Check if 24 V DC out put is supp lied
by the power supply.
Check if supply is loaded cor r ectly. Reload the supply.
Check if dust or adhesives are
accumulated on the print head.
Clean the print head.
Check if print density is set properly.
Adjust the print density and print
speed.
Check print head test pattern if head
element is damaged.
Run printer self-
test and check the
print h ead tes t pattern if there is dot
mis sing in the pat tern.
Page 22
20
WPL25/WHC25 Quick Start Guide
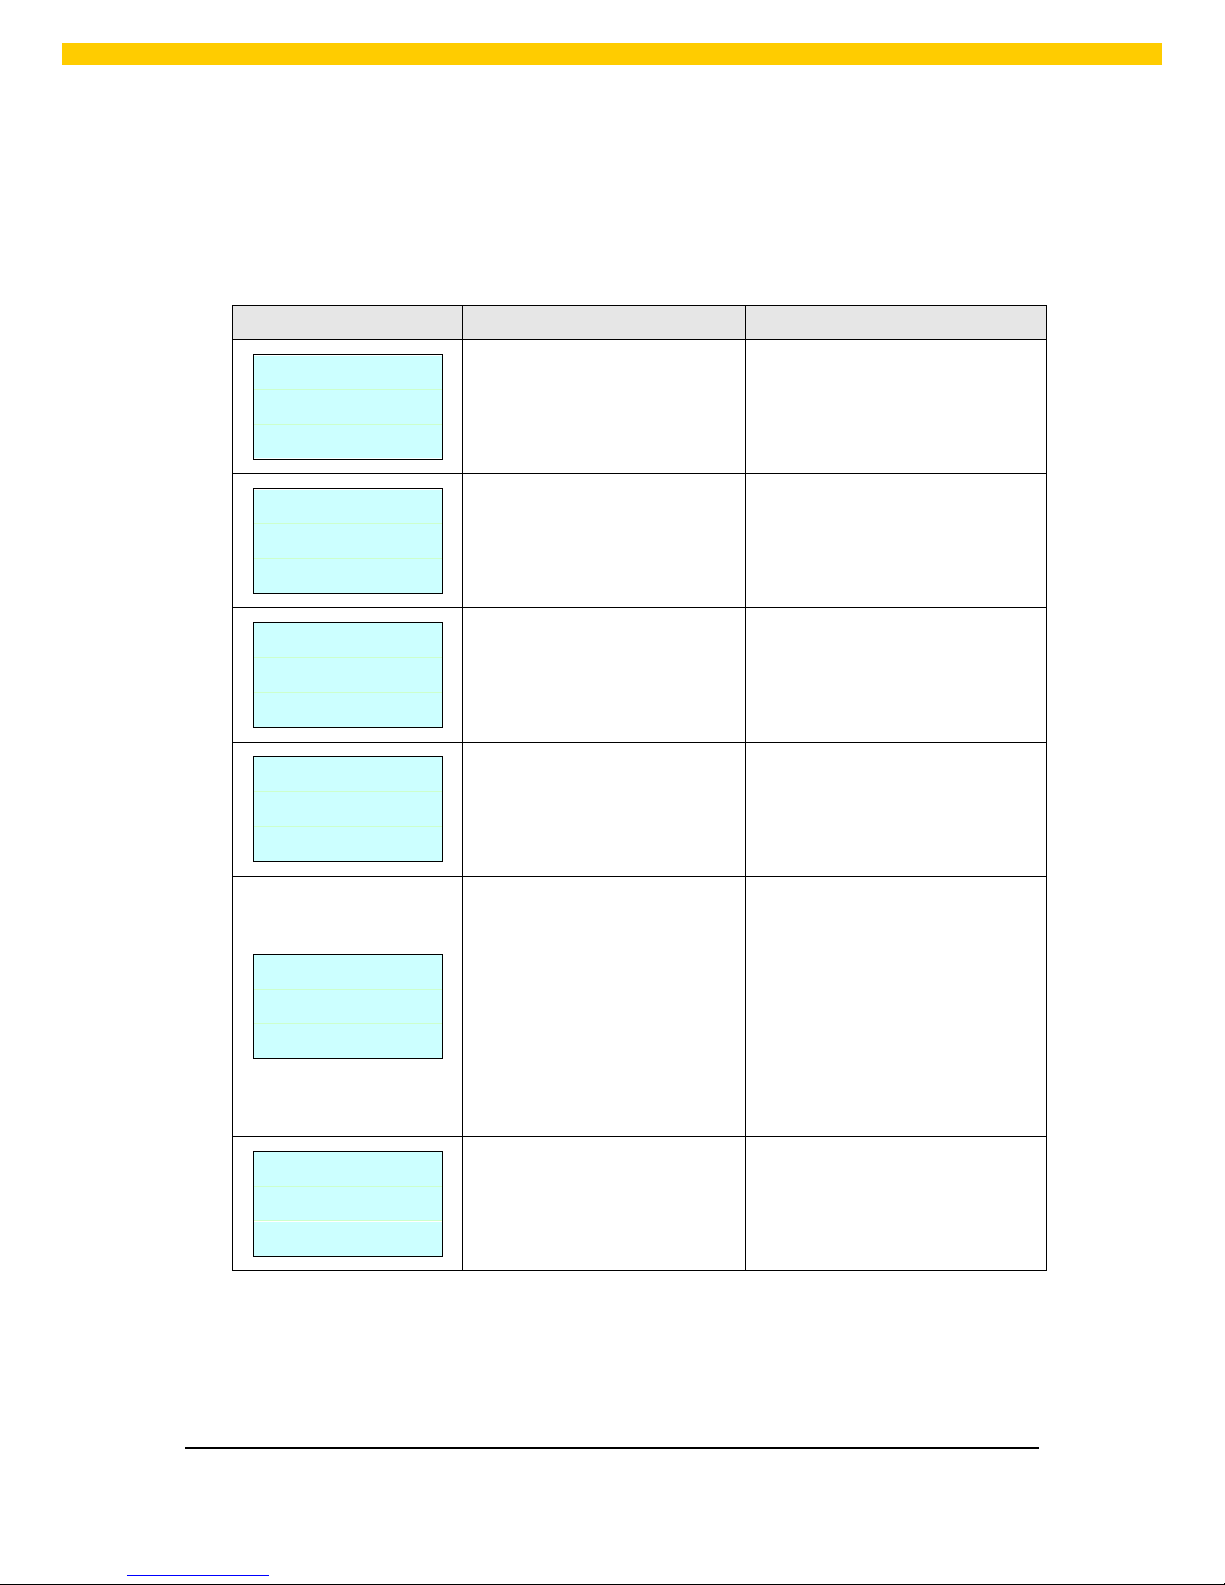
LCD Display (WPL25)
This section lists the LCD display messages that you may encounter when operating the p r inter. Also,
it provides solu tions.
Messages Possible Cause Recovery Procedure
Head Open
* The printer top cover is op en. * Pleas e close the top cover.
No Paper
* Running out of label .
* The label is installed
incorrectly.
* Gap /black m ar k sensor is not
calibrated.
* Supp l y a new lab el r oll.
* Pleas e r efer to the steps i n
user’s manual to rein stall the
label roll.
* Calibrate the gap/black mark
sensor.
Paper Jam
* Gap /black m ar k sensor is not
set properly.
* Make sure label size is set
properly.
* Labels may be stuck inside
the printer mechanism.
* Calibrate the gap/black mark
sensor.
* Set label s i ze correctly.
Out of Mem
* The space of FLASH/DRAM
or MicroS D card is full.
* Delete unused files in the
FLASH/DRAM or MicroS D card.
Take Label
* Peel function is enabled.
Waiting us er to take lab el
away to print the next label.
* Pleas e take the label away to
print the next label if peel er
module is installed.
* If peel er module is i nstalled and
label i s been taken away, but
the message remains. Please
chec k if th e peeler module
connector is connected to main
board prop er l y.
* If peel er module is not inst alled,
please disable the peeler
function.
Cutter Err or
* Cu tter jam .
* There is no cutter instal led on
the printer.
* Cu tter or cu tter driver circuit
board is damaged.
* Remove the jamm ed label.
* Make s ure the medi a thickness
is equal or les s th an 0.19mm.
* Rep l ace th e cutter or cut ter
driver circuit board.
 Loading...