

Wasp WPA1000 User Manual

WPA 1000
User’s Manual


Table of Contents
Preface
About This Manual
Notices ..................................................................................................................................... iii
Battery Charge Notice ............................................................................................................ iii
Storage and Safety Notice...................................................................................................... iv
RoHS Statement..................................................................................................................... iv
Chapter 1
Getting Started
Introducing the WPA1000................................................................................................. 1
Features ................................................................................................................................. 1
Package Contents ............................................................................................................... 2
A Tour of the WPA1000 ..................................................................................................... 3
Front View............................................................................................................................... 3
Back View ............................................................................................................................... 4
Setting up the WPA1000 ................................................................................................... 5
Installing the Battery ............................................................................................................... 5
Charging the WPA1000 .......................................................................................................... 6
Powering on the WPA1000..................................................................................................... 8
iii
1
Chapter 2
Using the Hardware
Using the Keypad ................................................................................................................ 9
Using the Stylus................................................................................................................. 10
Using the SDIO/MMC Slot............................................................................................... 11
Using the Laser Scanner ................................................................................................ 12
Command Interface .......................................................................................................... 14
Today Screen ....................................................................................................................... 14
Start Menu ............................................................................................................................ 17
Navigation Bar ...................................................................................................................... 17
Command Bar....................................................................................................................... 18
Pop-up Menus ...................................................................................................................... 19
Notifications .......................................................................................................................... 19
Chapter 3
Getting Connected
Establishing Device-PC Connection.......................................................................... 21
Installing Microsoft ActiveSync ............................................................................................. 21
Connecting the Device to Your Computer ............................................................................ 22
9
21
v

Using ActiveSync .............................................................................................................. 24
Synchronizing Information with Your Computer ................................................................... 24
Using ActiveSync to Exchange Files .................................................................................... 26
Synchronization Options....................................................................................................... 27
Chapter 4
Wireless Communications
Managing Wireless Connections ................................................................................ 28
Using the Wireless Manager................................................................................................. 28
Connectivity Features...................................................................................................... 29
Beam Function...................................................................................................................... 29
Infrared Connection .............................................................................................................. 30
Bluetooth Connection ........................................................................................................... 30
Wi-Fi Connection .................................................................................................................. 34
Connecting to the Internet ............................................................................................. 35
Chapter 5
Managing Programs
Accessing Programs........................................................................................................ 36
Using the Barcode Scanner Programs ..................................................................... 37
28
36
Scan2Key ............................................................................................................................. 37
Scanner Settings .................................................................................................................. 38
Chapter 6
Customizing Your WPA1000
Adjusting Settings............................................................................................................. 41
Checking Main and Backup Battery Status ............................................................ 42
Extending Battery Life ..................................................................................................... 43
Adjusting the Backlight Setting................................................................................... 44
Resetting the Device ........................................................................................................ 45
Warm Boot............................................................................................................................ 45
Clean Boot............................................................................................................................ 45
Cold Boot .............................................................................................................................. 46
Viewing Flash ROM Files................................................................................................ 46
Adding Programs to Your Device ............................................................................... 46
Adding a Program to the Start Menu......................................................................... 47
Removing Programs......................................................................................................... 50
Appendix A
System Specifications
41
51
Appendix B
Regulatory Compliance Statements
vi
72

Preface
About This Manual
This manual explains how to install, operate and maintain the WPA1000 mobile device.
No part of this publication may be reproduced or used in any form, or by any electrical or
mechanical means, without permission in writing from the manufacturer. This includes
electronic or mechanical means, such as photocopying, recording, or information storage and
retrieval systems. The material in this manual is subject to change without notice.
© Copyright 2010 Wasp Barcode Technology All rights reserved.
Bluetooth is a registered trademark of Bluetooth SIG.
Microsoft, Windows and ActiveSync are either registered trademarks or trademarks of
Microsoft Corporation. Other product names mentioned in this manual may be trademarks or
registered trademarks of their respective companies and are hereby acknowledged.
Notices
This unit is equipped with a battery pack and backup battery. It is possible that the WPA1000
may not power-on due to battery discharge as a result of storage.
In the above situation, plug the WPA1000 to the USB charging cable which is with DC in port
or put the unit into the WPA1000 USB Docking Station (with 5V/3A AC-DC adapter), and
recharge the unit for 16 hours in order to fully charge its backup battery.
The backup battery will charge from external power or the main battery (if the main battery still
has enough power to turn on). In the event the main battery is fully charged, refrain from using
the WPA1000 for 16 hours in order for the main battery to fully charge the backup battery.
Backing-up data by backup battery only without the main battery installed in battery
compartment may take as long as 1 hour. Therefore, in order to prevent data protection failure
due to backup battery failure, do not leave the WPA1000 without the rechargeable battery
pack installed, or without connection to AC power for an extended period of time.
Battery Charge Notice
It is important to consider the environment temperature whenever you are charging the
Lithium-Ion battery pack. The process is most efficient at normal room temperature or slightly
cooler. It is essential that you charge batteries within the stated range of 0°C to 50°C.
Charging batteries outside of the specified range could damage the batteries and shorten their
charging life cycle.
iii

Storage and Safety Notice
Although charged Lithium-Ion batteries may be left unused for several months, their capacity
may be depleted due to build up of internal resistance. If this happens they will require
recharging prior to use. Lithium-Ion batteries may be stored at temperatures between -20°C to
60°C, however they may be depleted more rapidly at the high end of this range. It is
recommended to store batteries within normal room temperature ranges.
RoHS Statement
This device conforms to RoHS (Reduction Of Hazardous Substances) European Union
regulations that set maximum concentration limits on hazardous materials used in electrical
and electronic equipment.
iv

Chapter 1
Getting Started
Introducing the WPA1000
Thank you for purchasing the WPA1000. Your WPA1000 was designed for users needing a compact
and durable portable computer for data collection and real time transactions.
Ultra-rugged Design
The WPA1000 is a compact mobile computing device designed for maximum durability.
Easy to Use
The unit is equipped with a color display with touch screen, a five-way directional key, and six
application keys. The WPA1000 supports integrated long range scanners for fast and accurate data
collection.The device also supports Infrared interface, Bluetooth, and wireless communication
capability for exchanging information between a computing or communication system.
Features
Powerful system
• Microsoft Windows Mobile 5.0 operating
system
• Intel PXA270 processor with speed of up
to 520 MHz
System memory
• 64 MB SDRAM
• 64 MB Flash ROM
Display
• 3.5-inch QVGA LCD touch-sensitive
screen
• 320 x 240 resolution
Barcode scanner
• Symbol SE950
• Hitachi HD6433657W barcode decoder
Expansion slot
• SDIO/MMC slot
Wireless connectivity
• 802.11b/g with diversity antenna
• Bluetooth
• Infrared port
Communication
• 802.11b/g
• Bluetooth
• Infrared
• USB Host & Client
Battery life
• Normal usage: 4 hours
• Charging time: 3.5 hours
• Embedded backup battery cell: 1 hour
User-friendly interface
• Special keys to launch particular
applications and display the on-screen
keyboard
• Keys for barcode scanning
1
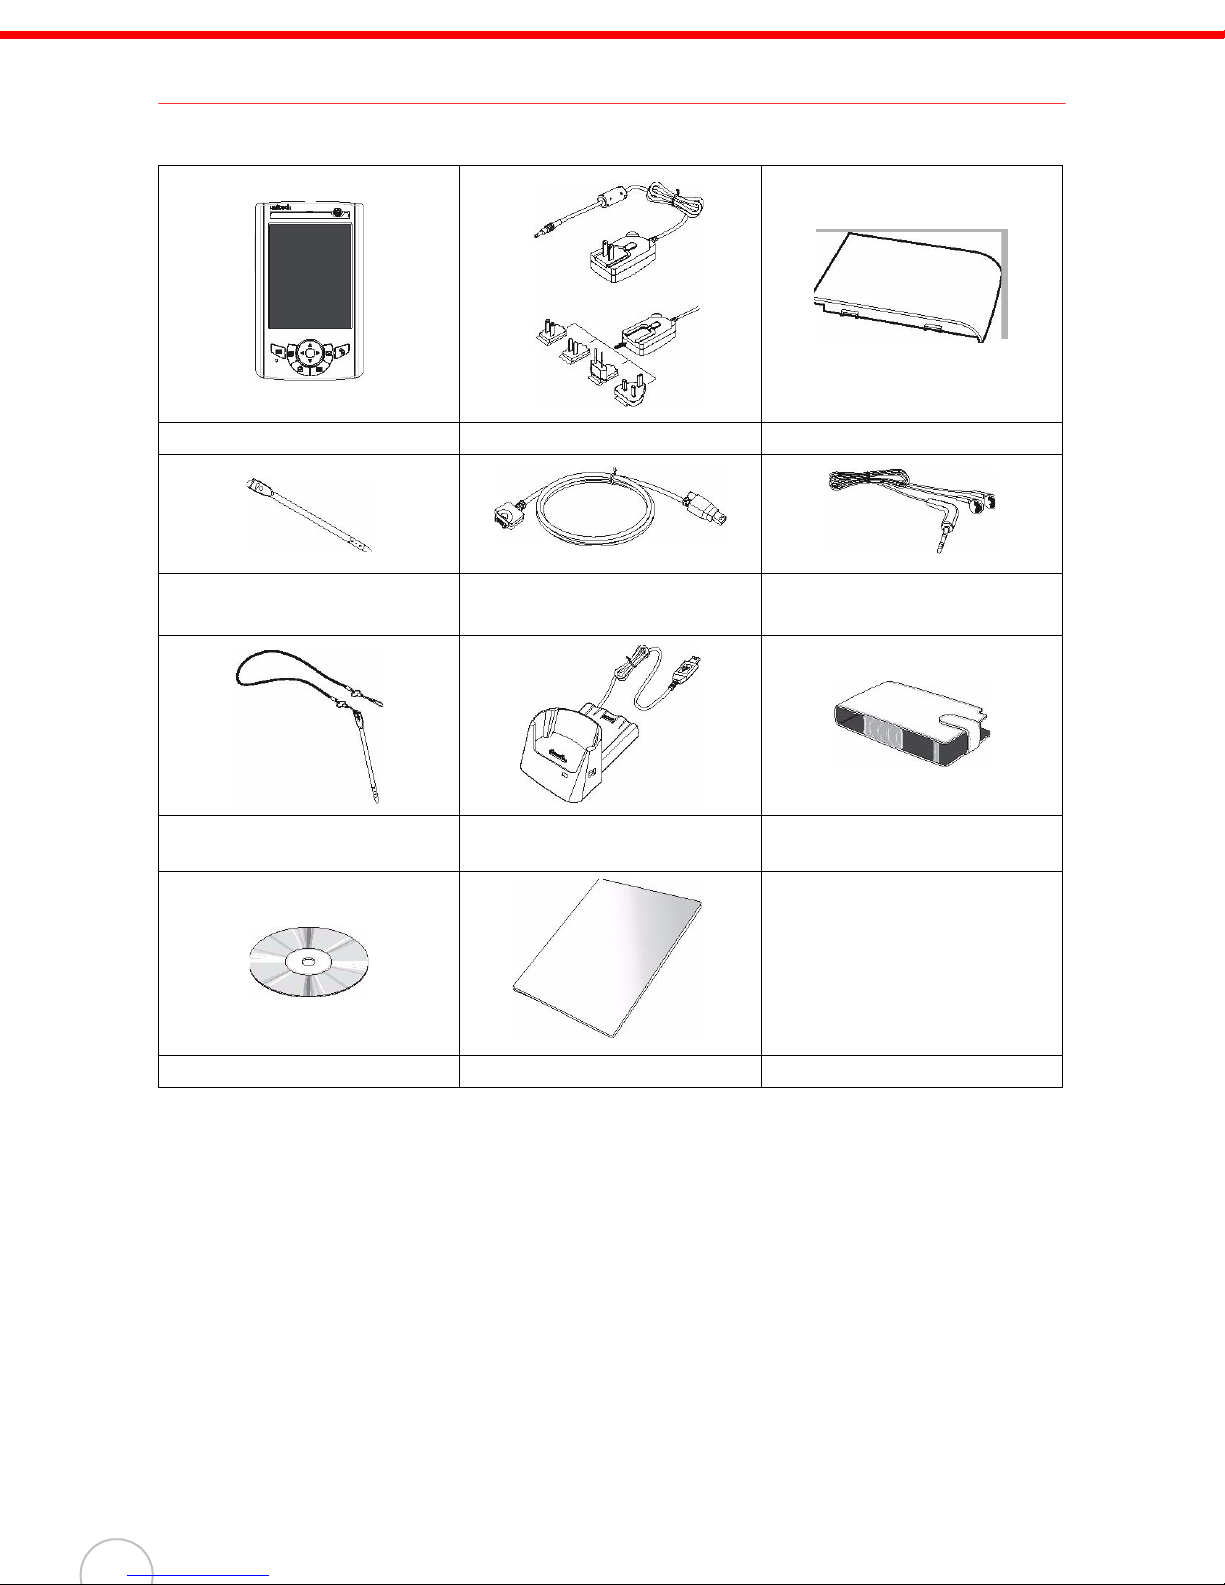
Package Contents
After opening the box, ensure the following accessories for the WPA1000 are present:
WPA1000 Terminal Power Adapter* Battery Pack
Stylus USB charging cable
Stylus with bungee lanyard
(optional)
CD-ROM Quick Reference Guide
* The adapter’s replaceable clip plugs availability depends on region.
If anything is missing or appears damaged in any way, contact your dealer.
USB docking station
(optional)
Earphone
Leather case (optional)
2
C
hapter
1
G
A Tour of the WPA1000
The following sections describe the main components and features of the WPA1000.
Front View
etting Started
No. Component Description
1.
2.
3.
4.
5.
6.
7.
8.
9.
Barcode laser scanner
(optional)
Status indicator Indicates the battery charging and barcode scanning status.
SDIO/MMC slot Accepts an SD (Secure Digital), MMC (Multimedia Card) or SDIO
Power button If the device is off, press this button to turn it on.
LCD touch screen Displays the applications and data stored on your device. It is
Keypad Includes a software keyboard button, navigation key and
Microphone Inputs audio into your device when recording voice notes.
Left scanner trigger
key
Cord holder Eyelet for holding the elastic bungee lanyard.
Reads and captures information on a barcode label.
• Green - Battery is fully charged, the device is running on
battery power, or barcode scanning process is completed
without error.
• Red - Battery is charging, barcode scanner is activated and
processing.
(Secure Digital Input Output) cards, allowing you to add more
memory.
Install add-on applications or use audio text files stored in it for
use with internal applications. You can also use it to back up data
from your device.
Alternatively, when the unit is on, this key must be pressed and
held down for about two seconds in order to turn the device off.
touch-sensitive and responds to the stylus or finger.
application buttons to launch Microsoft Outlook Mobile programs.
Press to activate the barcode laser scanner.
3
Back View
No. Component Description
10.
11.
12.
13.
14.
15.
16.
17.
18.
Speaker Listen to audio media. When speaker phone is active,
sounds are emitted here.
Battery release latch Slide toward the right side of the device and hold firmly,
then detach the battery from its bay.
Reset button Press the end of the stylus into the button to reset your
device.
Main battery Removable and rechargeable 3.7 V, 2200 mAh battery
pack.
Universal connector Connects your device to a USB charging cable, which in
turn connects to the computer’s USB port and through
the AC adapter to an electrical outlet. This allows you to
recharge your device and perform an ActiveSync
operation.
You can also use it to connect a peripheral hardware,
such as a docking station, to your device.
Earphone jack Lift the rubber cover from the earphone jack and connect
an audio line-out device (earphone or headphone).
Right scanner trigger key Press to activate the barcode laser scanner.
Infrared (IR) port Uses infrared technology to transmit and receive data
from other IR-enabled devices.
Stylus To use the stylus, remove it from its holder and hold it the
same way you hold a pen or pencil.
4
C
hapter
1
G
etting Started
Setting up the WPA1000
Perform the following easy set up tasks to begin using your device:
• Install the battery pack
• Charge your device
• Power on the WPA1000
Installing the Battery
WARNING! There is a risk of fire and burns if the battery pack is handled
improperly. DO NOT disassemble, crush, puncture, short external
contacts, or dispose the battery pack in fire or water. DO NOT attempt
to open or service the battery pack. Dispose of used batteries
according to local recycling guidelines in your area.
A backup battery cell is embedded into your device to prevent data loss in instances when the
removable battery pack is removed or completely discharged. This backup battery cell retains data for
60 minutes after which you risk loosing all data on the internal memory of your device.
NOTE: To enable the internal battery cell to provide backup power supply, charge your device
with the main battery pack for at least three and a half hours.
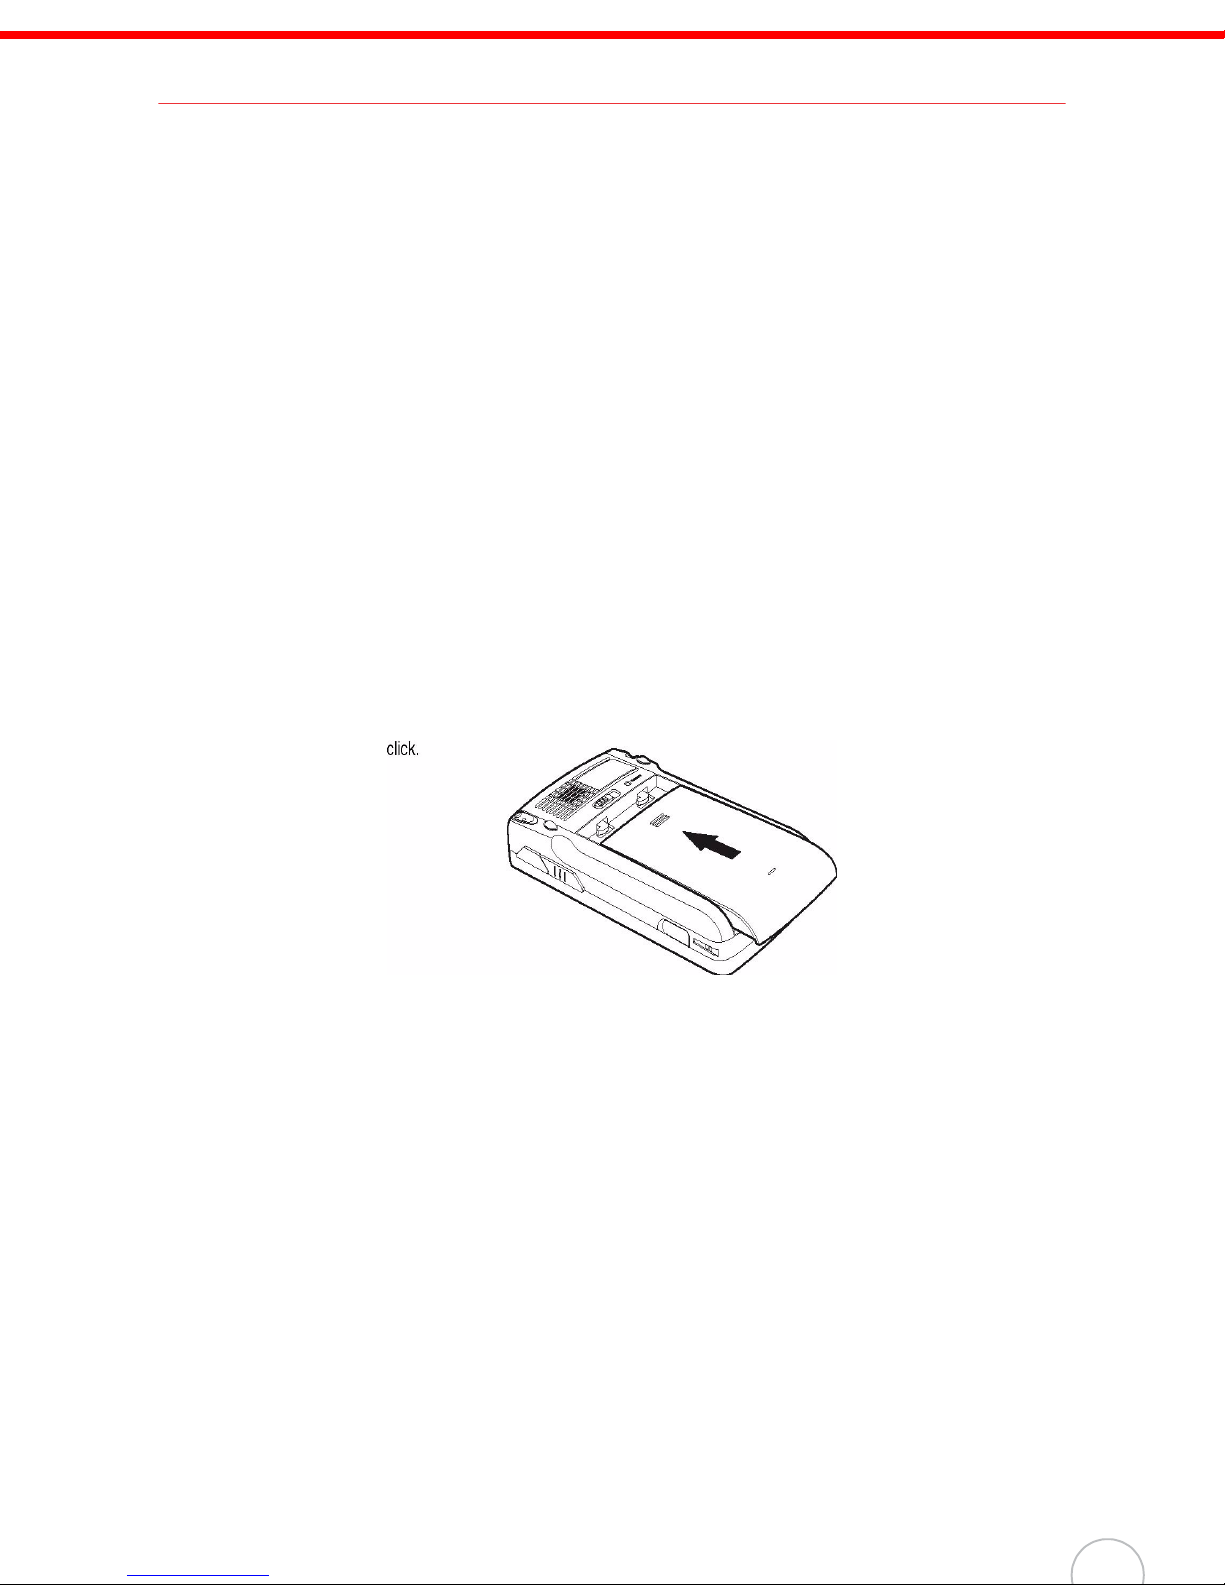
1. Position the battery pack, making sure the battery pack fits the shape of the battery
compartment.
2. Slide the battery pack into the battery bay. The battery pack locks to the chassis with an audible
click.
5
Charging the WPA1000
For initial use, you need to charge your device for about 16 hours. After that, you can charge it
everyday to recharge the battery to full capacity. You can charge your device using the USB charging
cable or the docking station.
CAUTION! Operating the WPA1000 for the first time without the AC adapter, and
without fully charging the backup battery may result in loss of data
stored in RAM memory.
NOTE: Data you enter may not be properly stored until the internal backup battery has been
adequately charged.
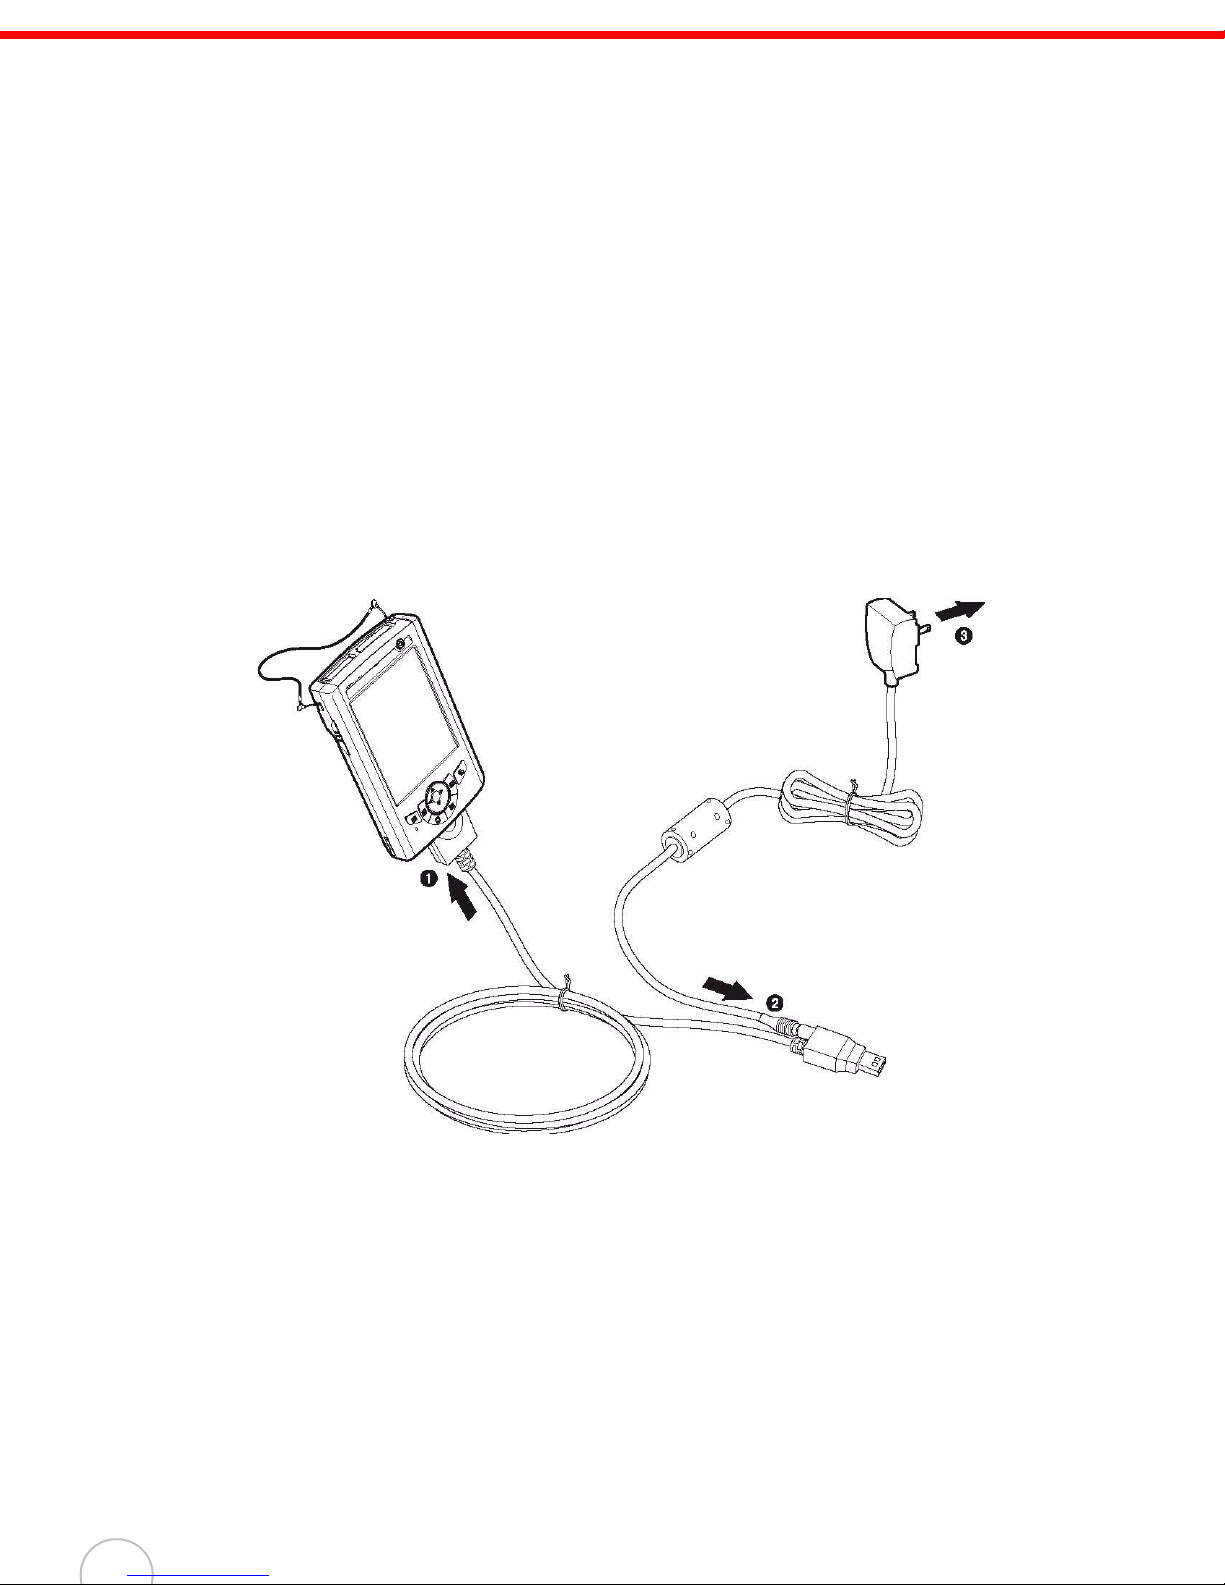
To charge the device using the USB charging cable:
1. Install the clip plug to the AC adapter, if necessary. Slide the replaceable clip plug into the AC
adapter until it locks into place with an audible click.
2. Press and hold the connector button on the USB charging cable and connect it to the WPA1000
(1).
3. Plug the AC adapter cable into the power jack on the USB charging cable (2).
4. Connect the AC adapter into an electrical outlet (3).
6
C
1
G
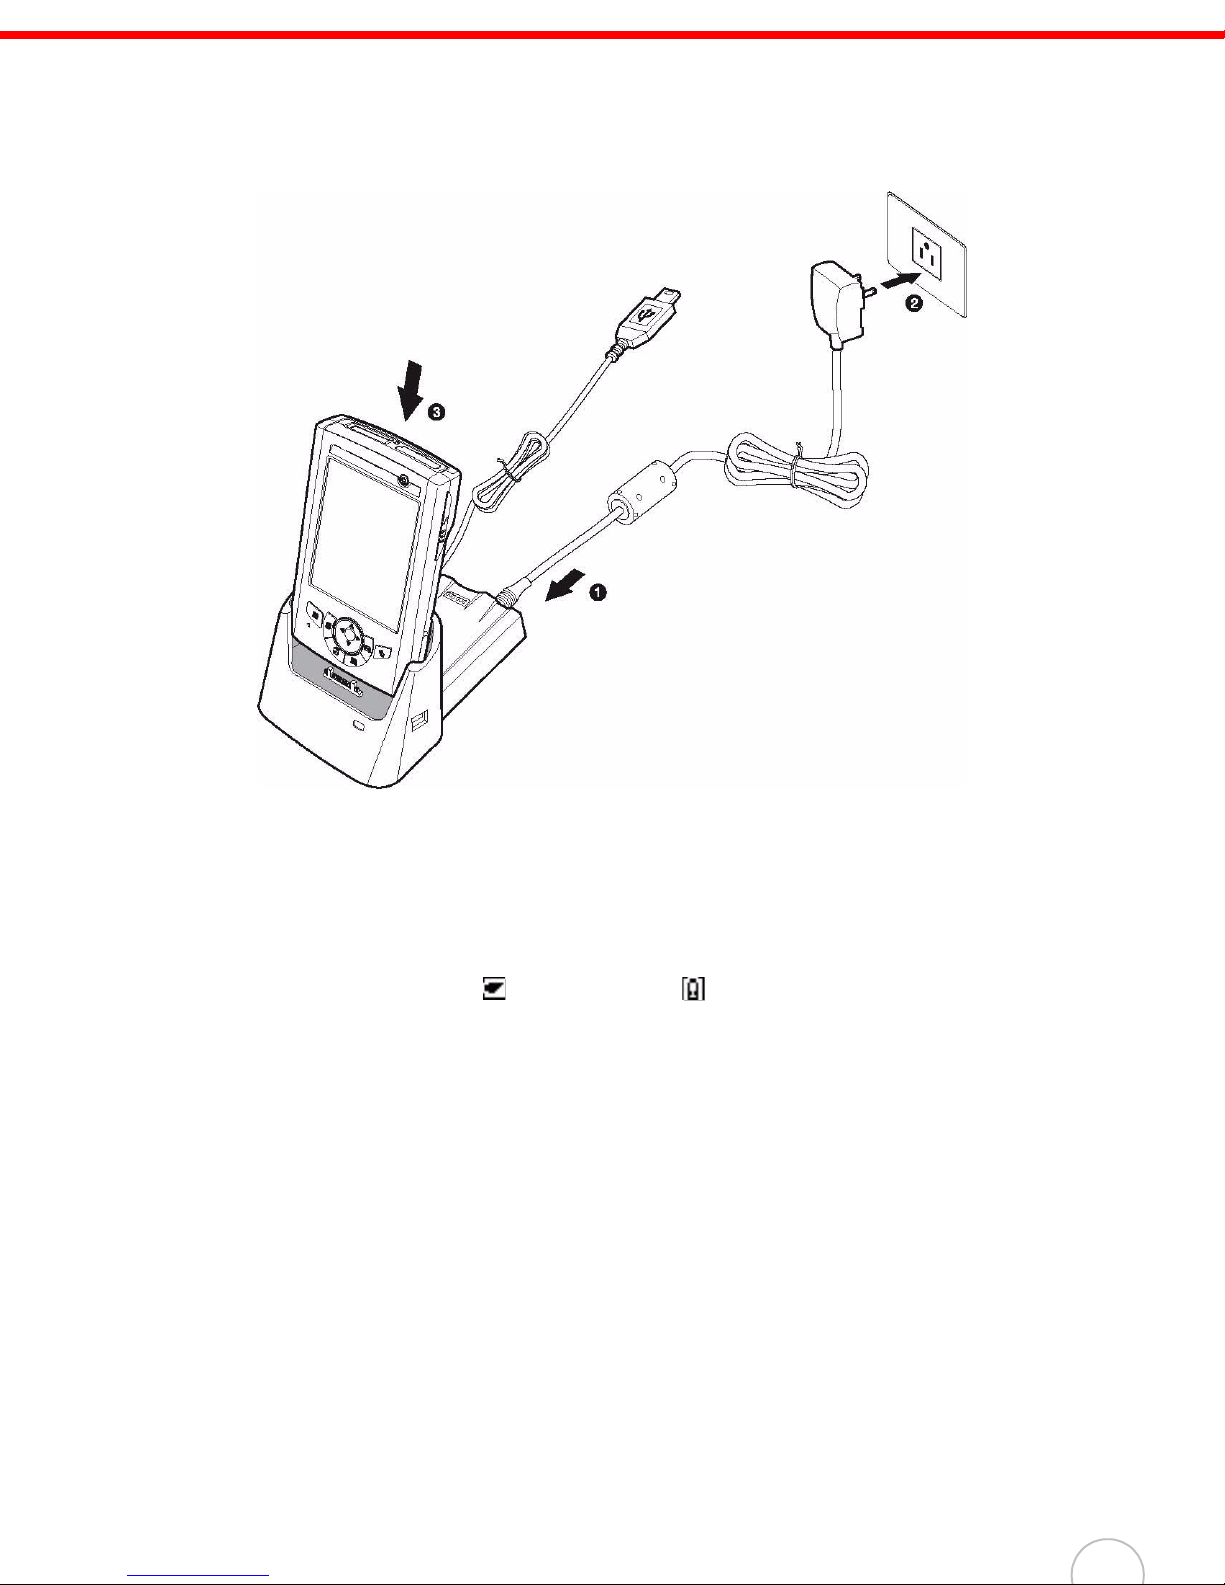
To charge the device using the docking station:
1. Plug the AC adapter cable into the power jack on the docking station.
2. Plug the AC adapter into an electrical outlet.
3. Slide the device into the docking station until it clicks into place.
hapter
etting Started
The connection is secure when the bottom edge of the device is aligned smoothly with the
docking station, and the LED indicator on the docking station and device lights up red.
LED status during charging:
– Solid red: Charging
– Solid green: Charging complete
If the battery level becomes low in the course of normal use, a status icon appears on the
device screen indicating low or very low battery
ActiveSync operation to back up your data, then recharge your device as soon as possible.
If the battery level reaches low status, the device will enter sleep mode; if the battery level
reaches very low status, the device will enter deep sleep mode. In this case, you have about
72 hours to recharge your device after which you risk losing all data on your device’s internal
memory.
status. In both cases, perform an
7
Powering On the WPA1000
After you have initially charged your device for about 16 hours, the device is ready to be used. You can
now start up your device where you’ll calibrate the display, set up the system time zone, and learn some
basic stylus usage.
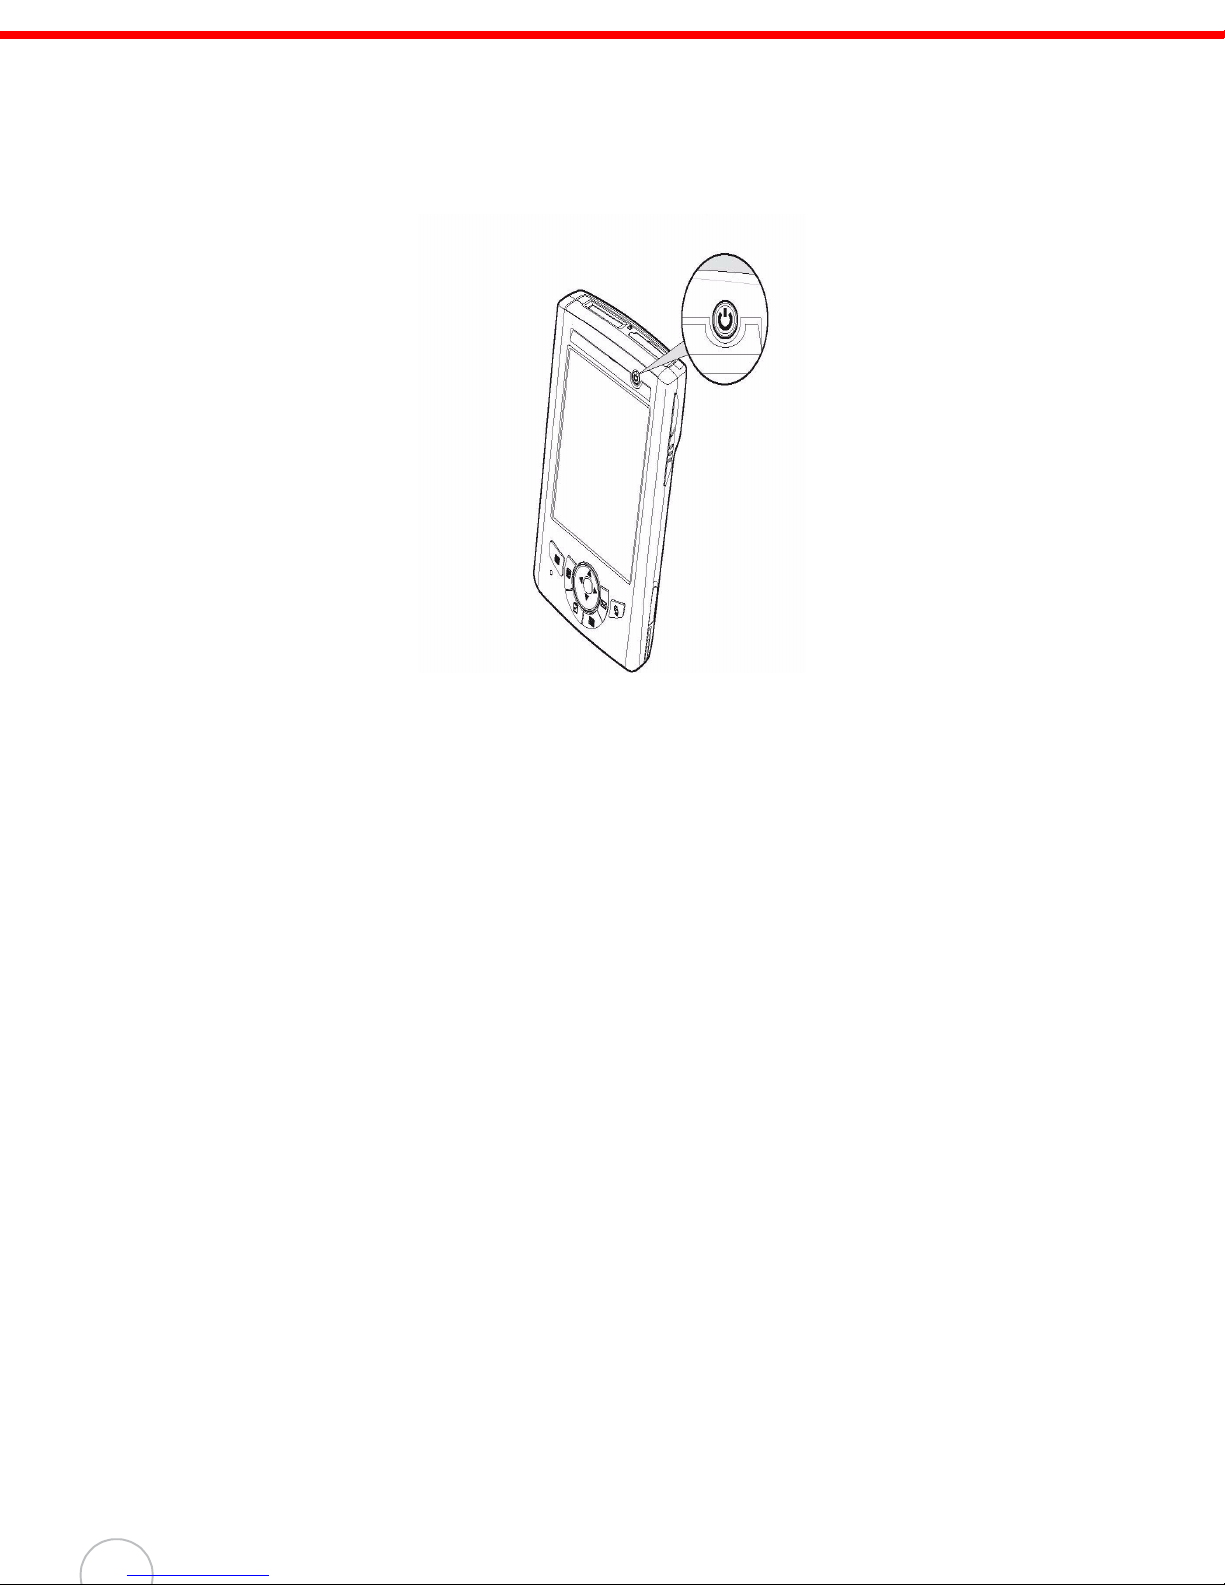
1. Turn on your device by pressing the Power button
on the front panel.
NOTE: The WPA1000 screen ships with a protective plastic film. You may remove this if
desired by peeling from one corner. The screen will be more susceptible to scratching
without the film, but will be more readable.
The WPA1000 welcome screen appears. The Windows Mobile screen will appear shortly
thereafter.
2. Calibrate the WPA1000
The calibrate screen will automatically appear when the unit is powered-on for the first time or
after the system is reset. This screen can also be accessed at any time by tapping Start →
Settings → System tab → Screen.
The WPA1000 will prompt you to calibrate the unit by tapping a sequence of screen locations.
Tap gently but firmly. When you have completed the series of taps, press the Enter button to
confirm it.
3. Set the Time Zone, Date, and Time
Select your current time zone from the Time zone drop-down menu, then tap Next.
4. Follow all onscreen instructions to complete the set up. The setup wizard provides tips for using
the pop-up menus and assign a lock password to access your device.
After the device setup, you can create an ActiveSync partnership to synchronize information
between your computer and your device. See Establishing Device-PC Connection on page 21
for detailed instructions.
8
Chapter 2
Using the Hardware
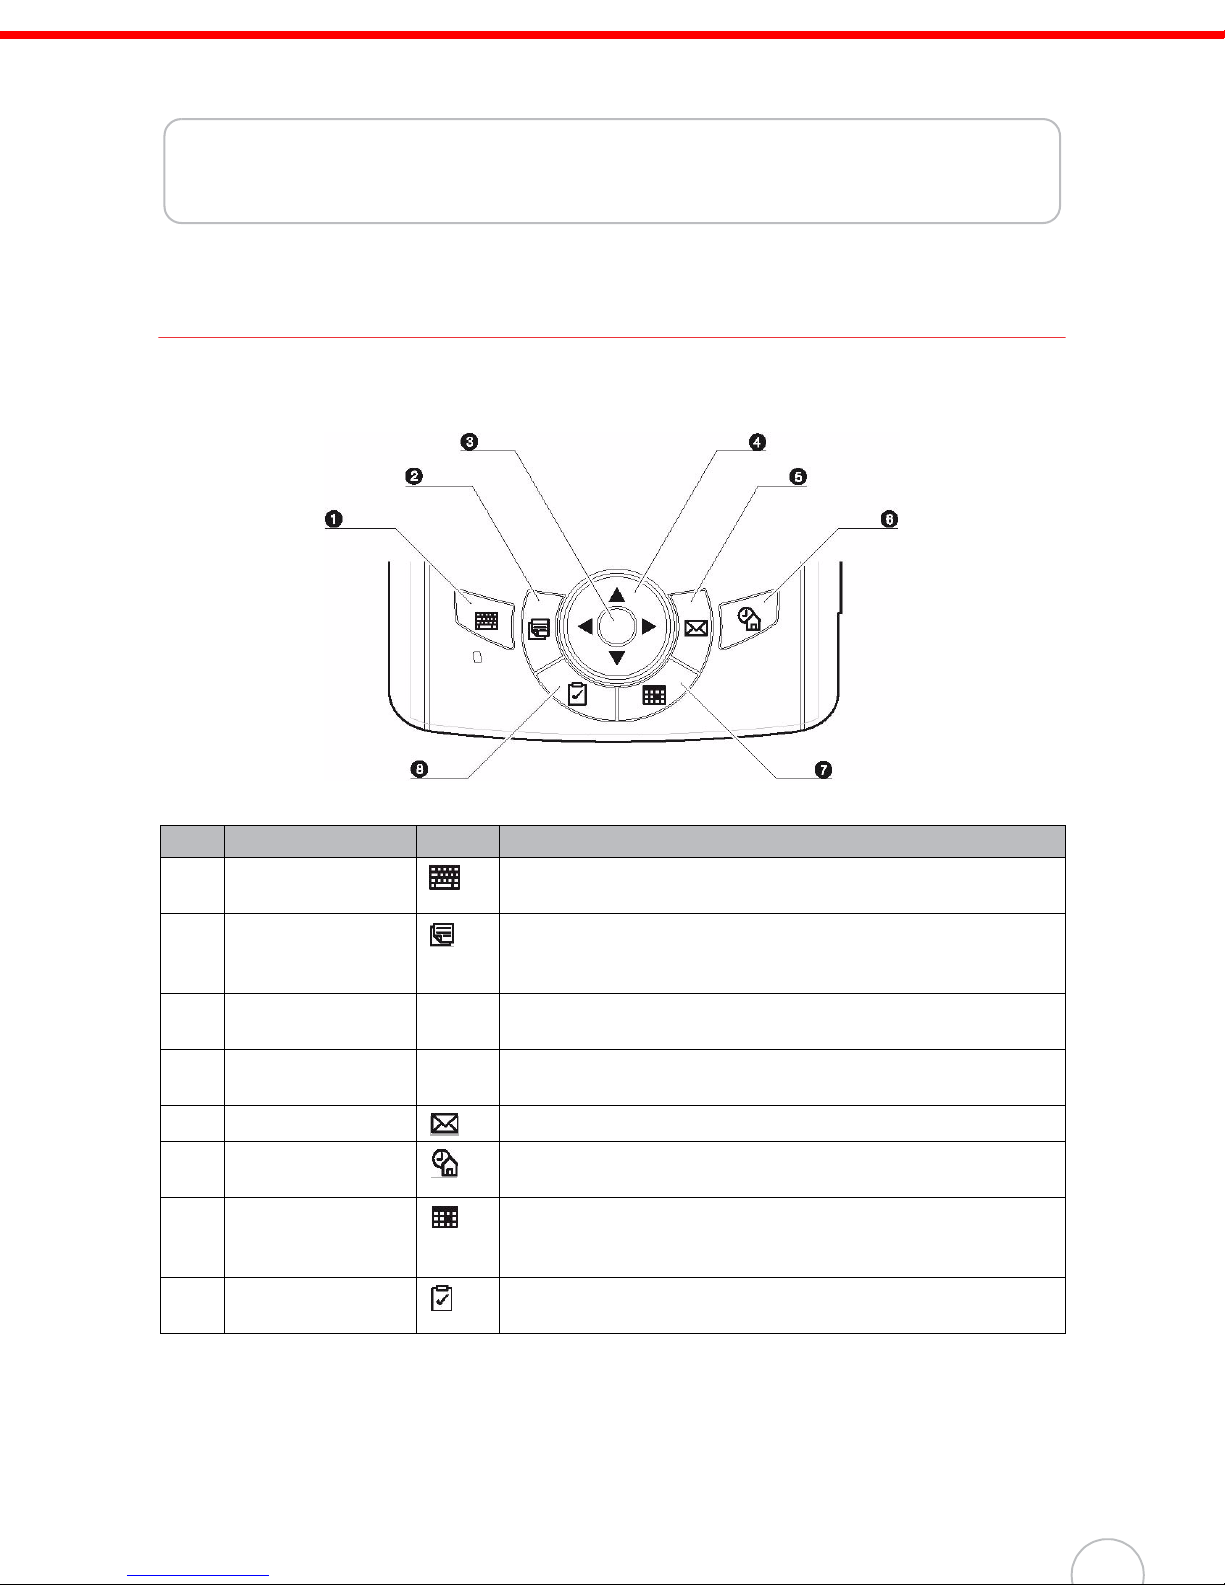
Using the Keypad
The WPA1000 keypad has a navigation key and six special keys to launch particular applications and
display the on-screen keyboard.
No. Component Icon Description
Software keyboard
1.
button
Notes button Press to open Notes. Notes allows you to quickly capture
2.
Enter button Press the Enter button, center of the navigation key, to
3.
Navigation key Use the up, down, left, and right arrow keys to navigate
4.
Email button Launch Microsoft Outlook Express.
5.
Today button Customize the look and information that is displayed on the
6.
Calendar button Press to bring up Calendar. Calendar enables you to
7.
Tasks button Keep track of what you have to do and prioritize them based
8.
Press to launch the Windows CE or on-screen keyboard.
thoughts, reminders, ideas, drawings, and phone numbers.
You can create a written note or include a recording in a note.
access the menu options and confirm your selection.
through the menu options.
Today screen.
conveniently manage your schedules and appointments or
any other activities associated with a date and time.
on their importance and urgency.
9
Using the Stylus
CAUTION! Never use anything other than the WPA1000 stylus on the screen.
Using another object as a stylus could cause permanent damage.
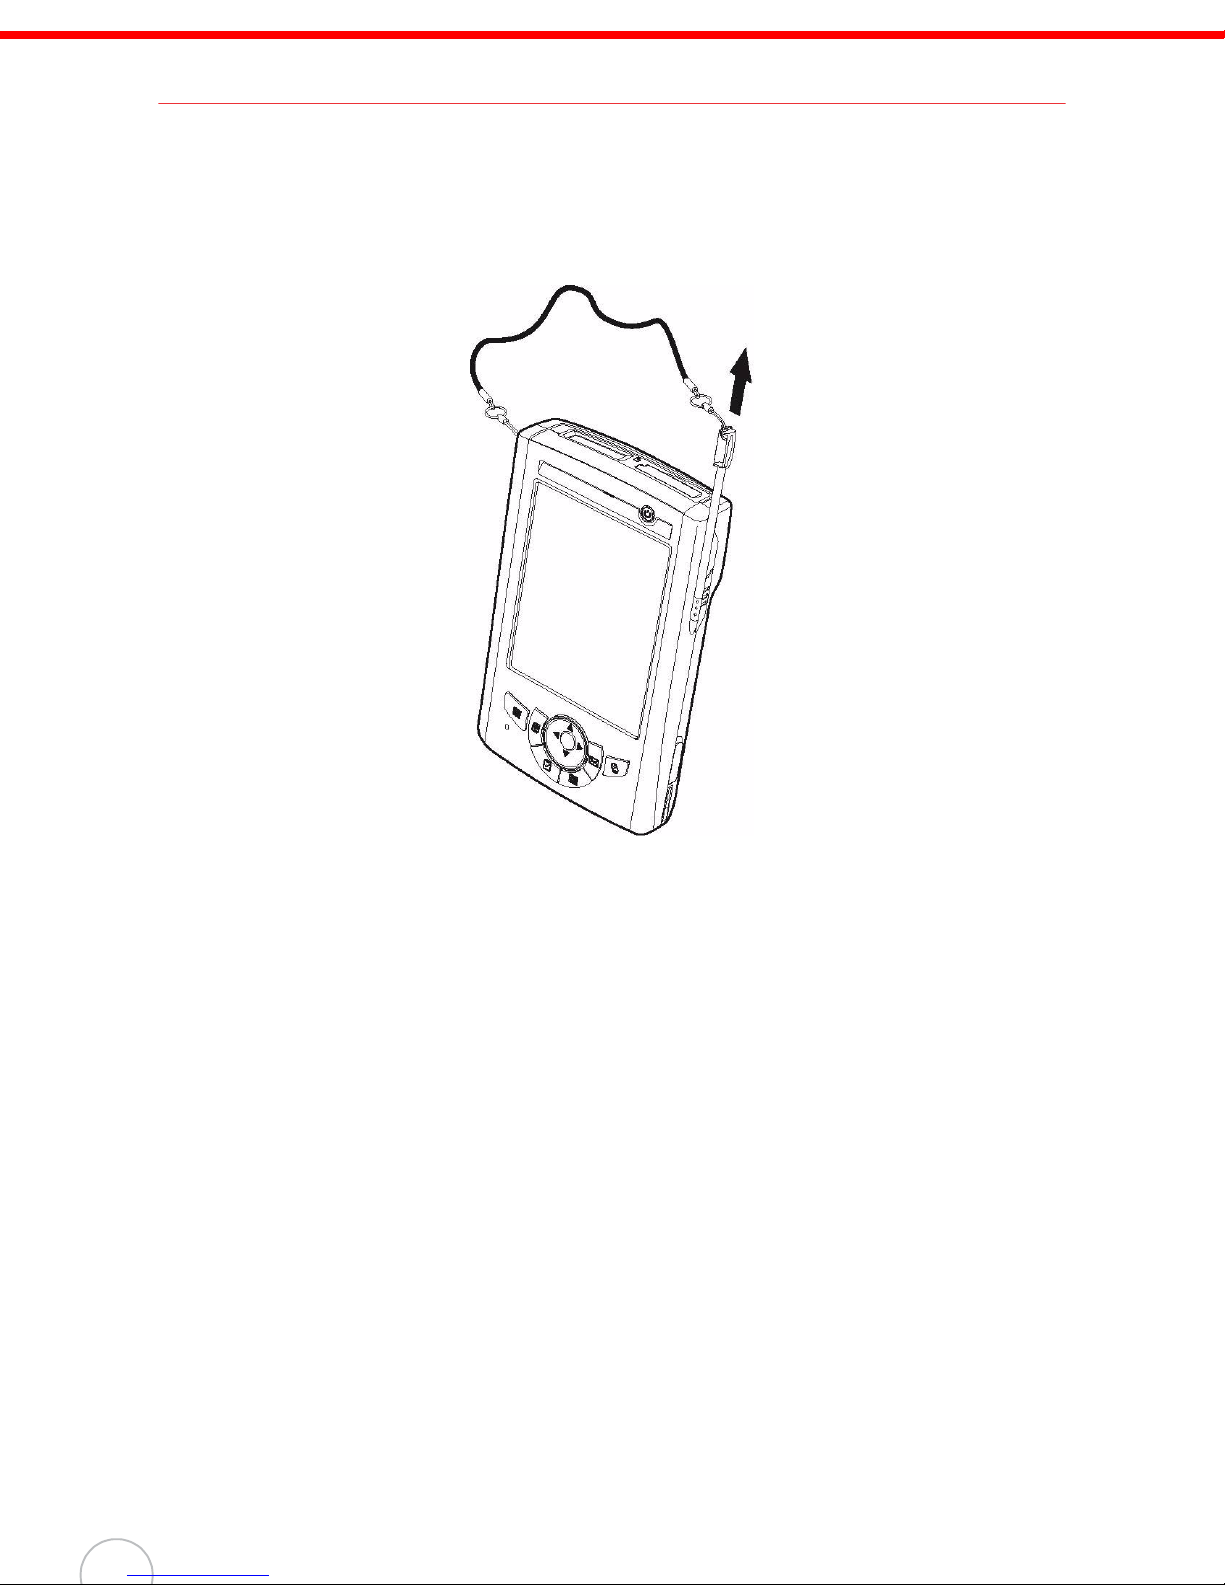
1. Slide the stylus in the direction of the arrow, then pull out to remove the stylus from its holder.
2. Hold the stylus like a pencil.
3. To make a choice from a menu, lightly tap the tip of the stylus on that choice.
4. To write data into a field on a form, use the stylus to print the letters or numbers. Use very light
pressure.
10

C
hapter
2
Using the Hardware
Using the SDIO/MMC Slot
Your device has an expansion slot compatible with a range of SD, SDIO, and MMC storage cards,
which are primarily used to back up or transfer files and data.
To insert a storage card:
1. Hold the device securely, then lift the rubber cover from the SDIO/MMC slot .
2. Push the card into the slot until you hear an audible system sound; this will signal that the card
is already properly seated within the slot.
The card is secure when it is not protruding from the slot.
To remove a storage card:
1. Hold the device securely; then push against the top of the card, as if you were pushing it further
into the slot, letting the card spring out. An audible system sound will signal that the card has
been released.
2. Gently remove the card from the slot.
11

Using the Laser Scanner
WPA1000 has an integrated laser scanner which reads all major barcode labels with excellent
performance.
NOTE: The reading software must be enabled in order to operate the scanner. This can be a
user-loaded application or a pre-loaded utility such as Scanner Settings.
To scan a barcode:
1. Launch the Scanner Settings application.
a. Tap Start → Settings.
b. On the System tab, tap Scanner Settings.
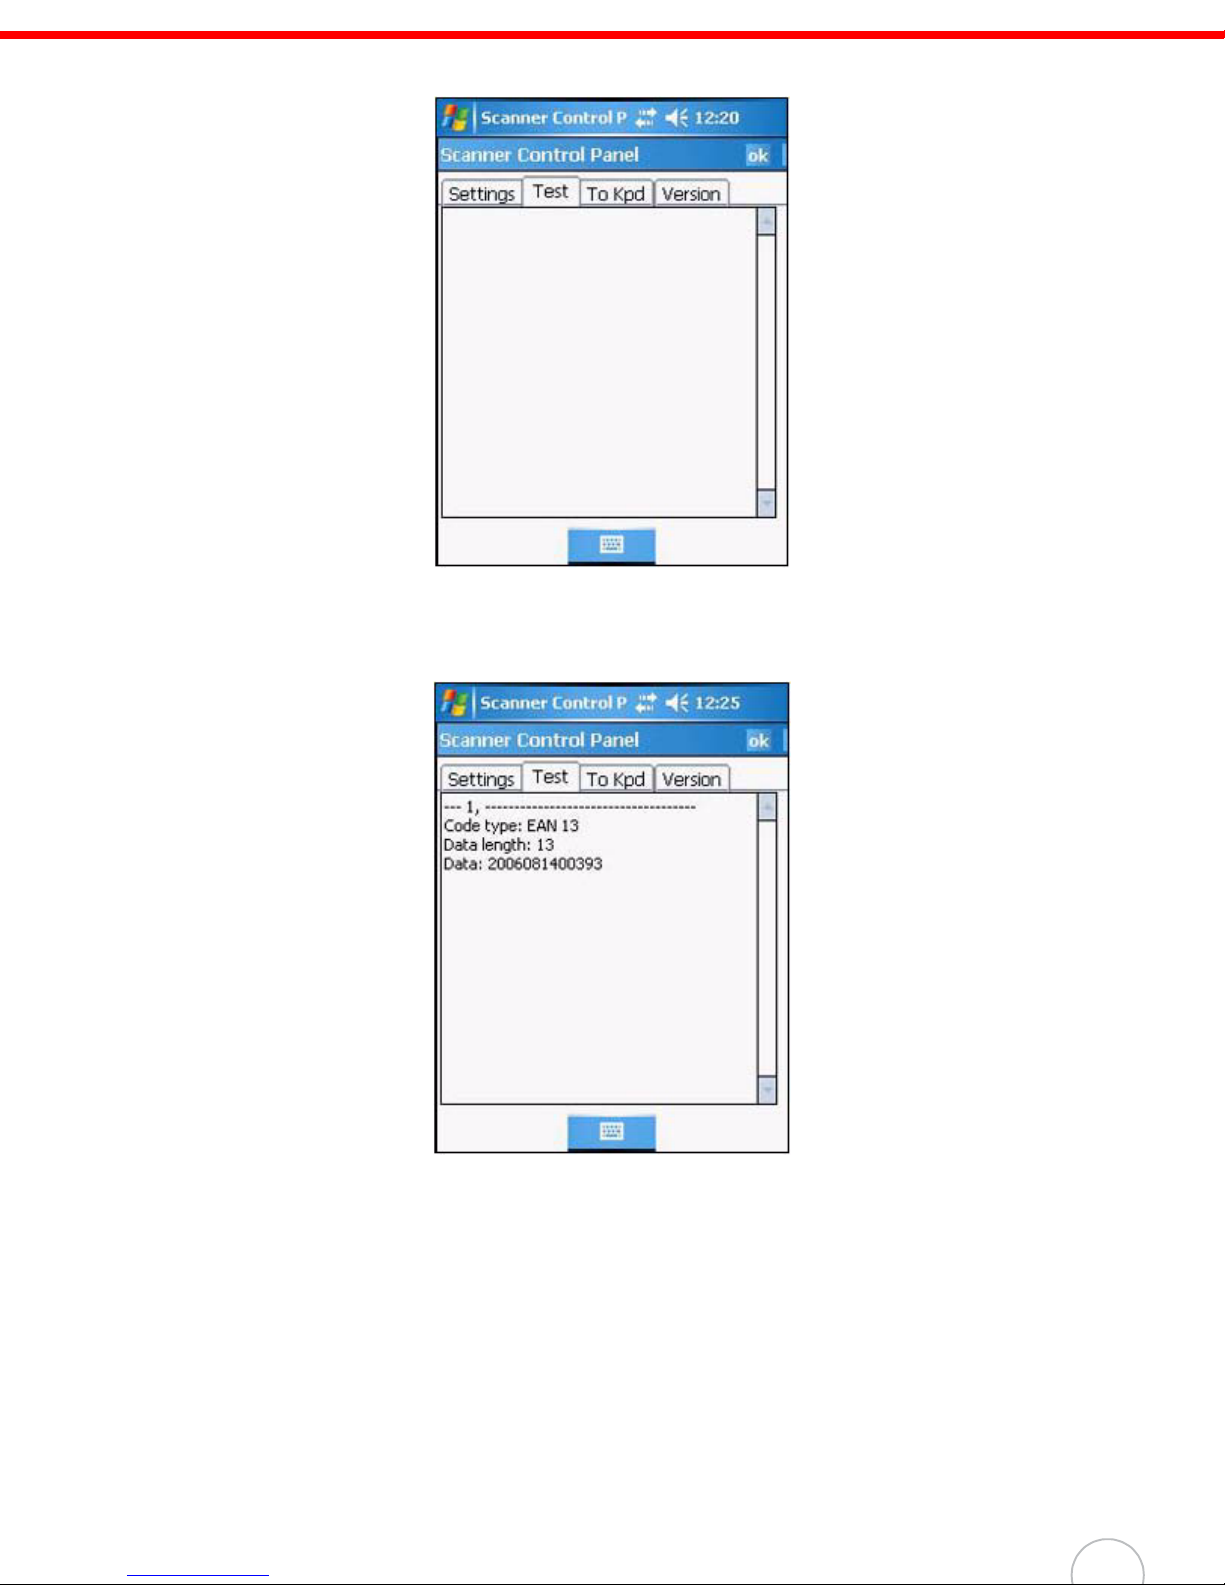
In the Scanner Control Panel screen, you can configure barcode scanner parameters such
as enabling or disabling barcode symbologies, setting data transmission options,
configuring magnetic and proximity reading options, and setting power management
options.
c. On the Settings tab, tap Barcode IDs.
12
C
2
d. Tap the Test tab.
hapter
Using the Hardware
2. Press either one of the scanner trigger keys on the device.
3. Aim the laser scanner at the selected barcode and press both trigger keys to scan. The
scanned barcode data appears on the screen.
4. On the Scanner Control Panel screen, tap ok to exit
13
Command Interface
The following section explains the WPA1000 command interface.
Today Screen
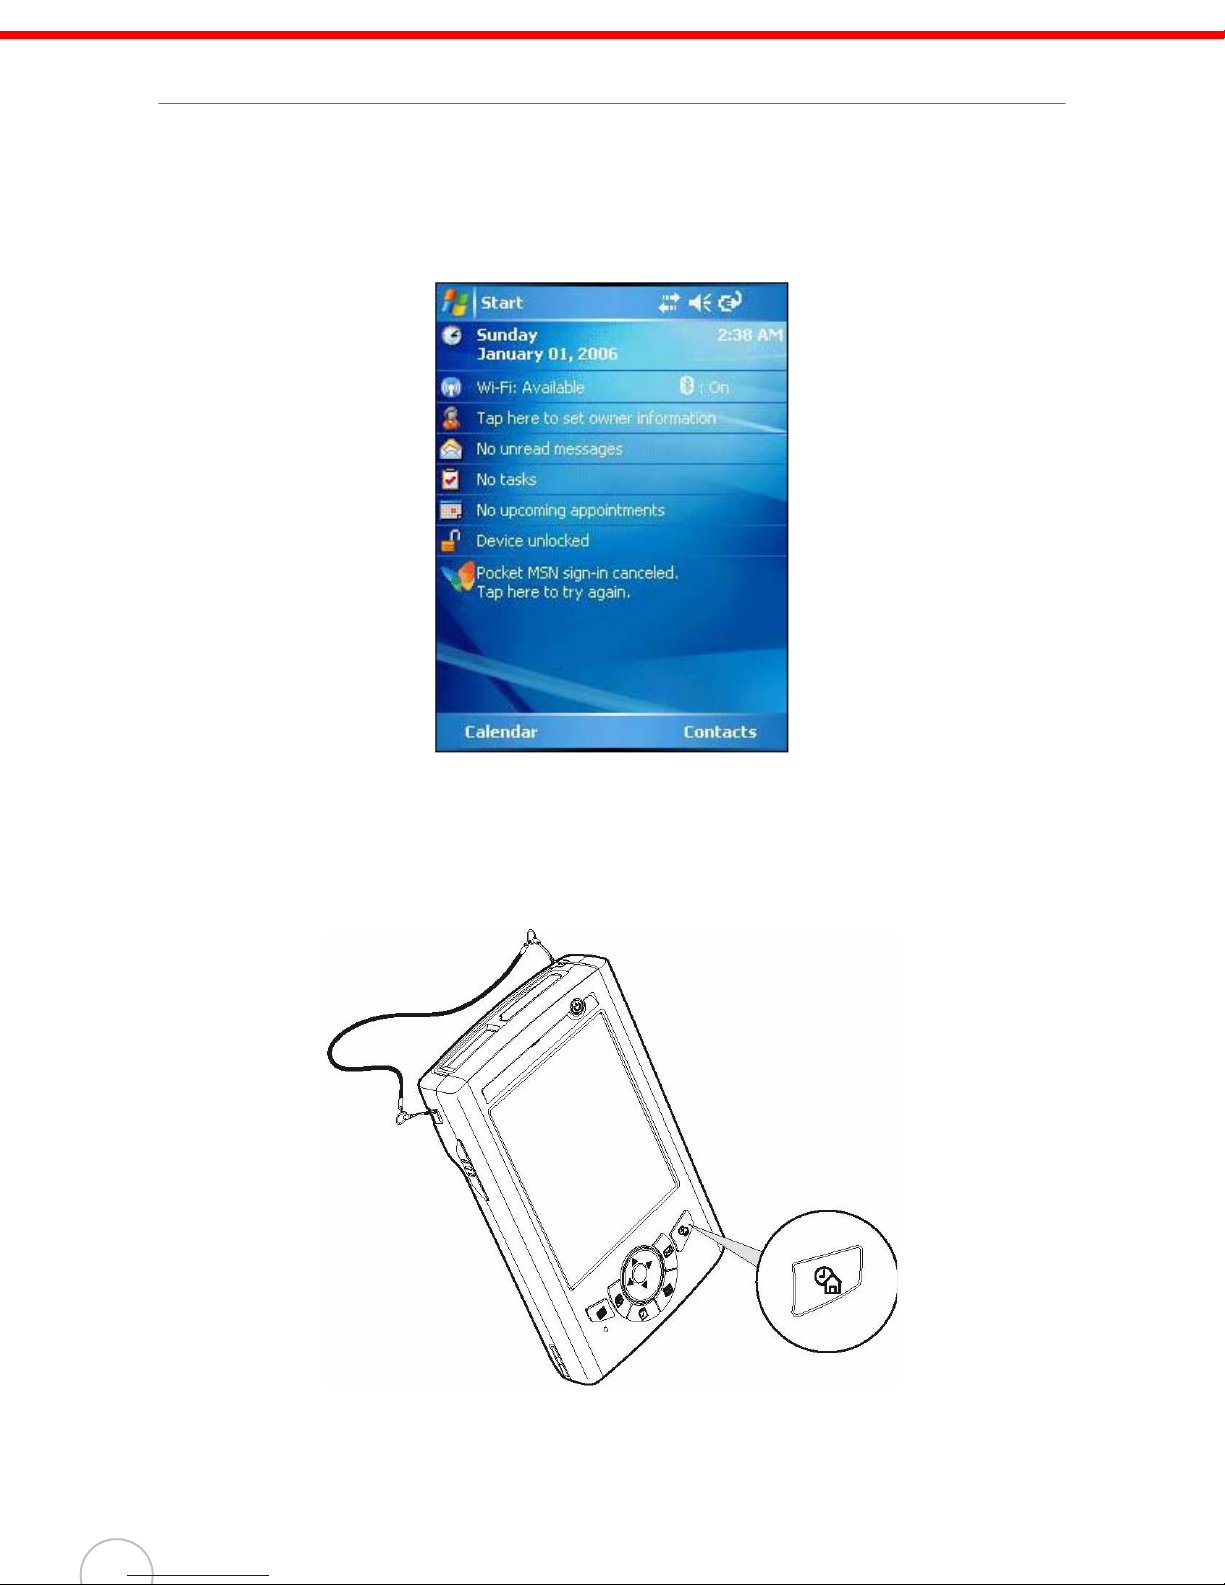
When you turn on your device for the first time each day or after a preset period of inactivity, you’ll see
the Today screen.It provides an at-a-glance view of the important reminders and details.
To display the Today screen:
When viewing another screen, you can do either of the following:
•Tap Start → Today.
• Press the Today button on the device’s front panel.
14
C
hapter
2
Using the Hardware
To define a preset period of inactivity after which the Today screen is displayed:
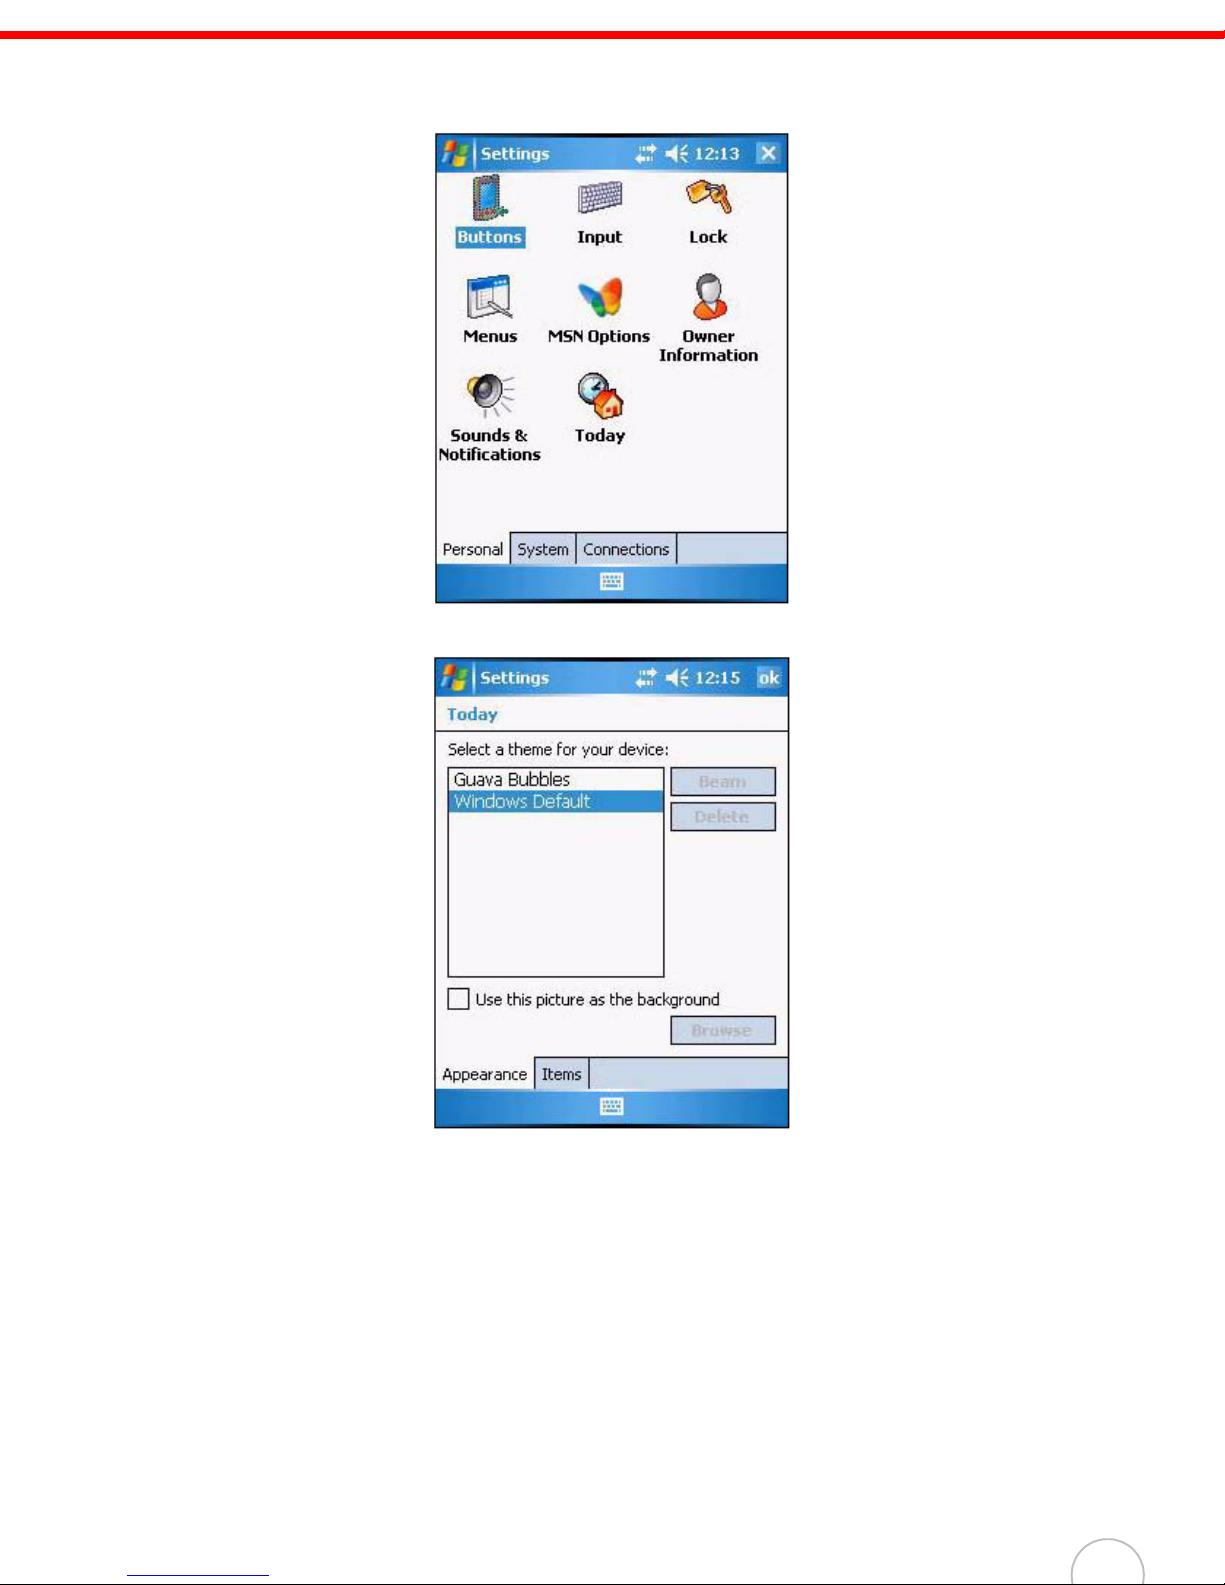
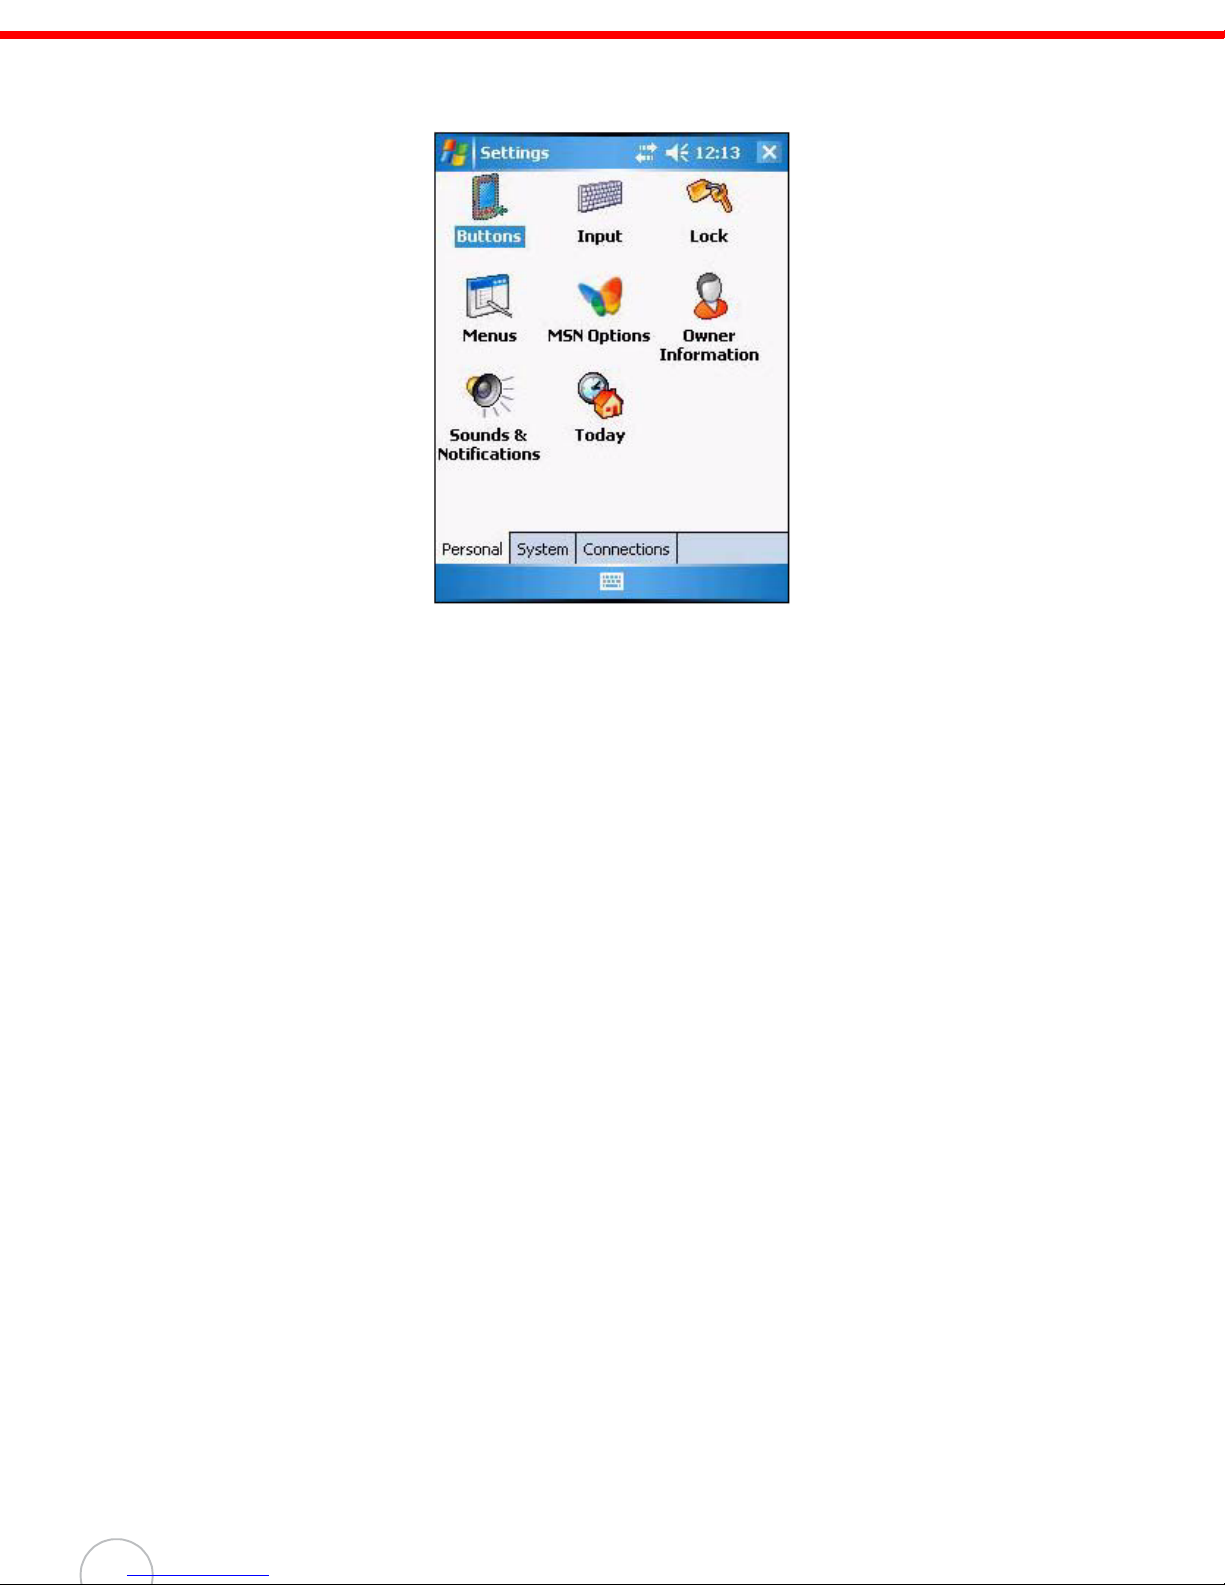
1. Tap Start → Settings.
2. On the Personal tab, tap Today.
15
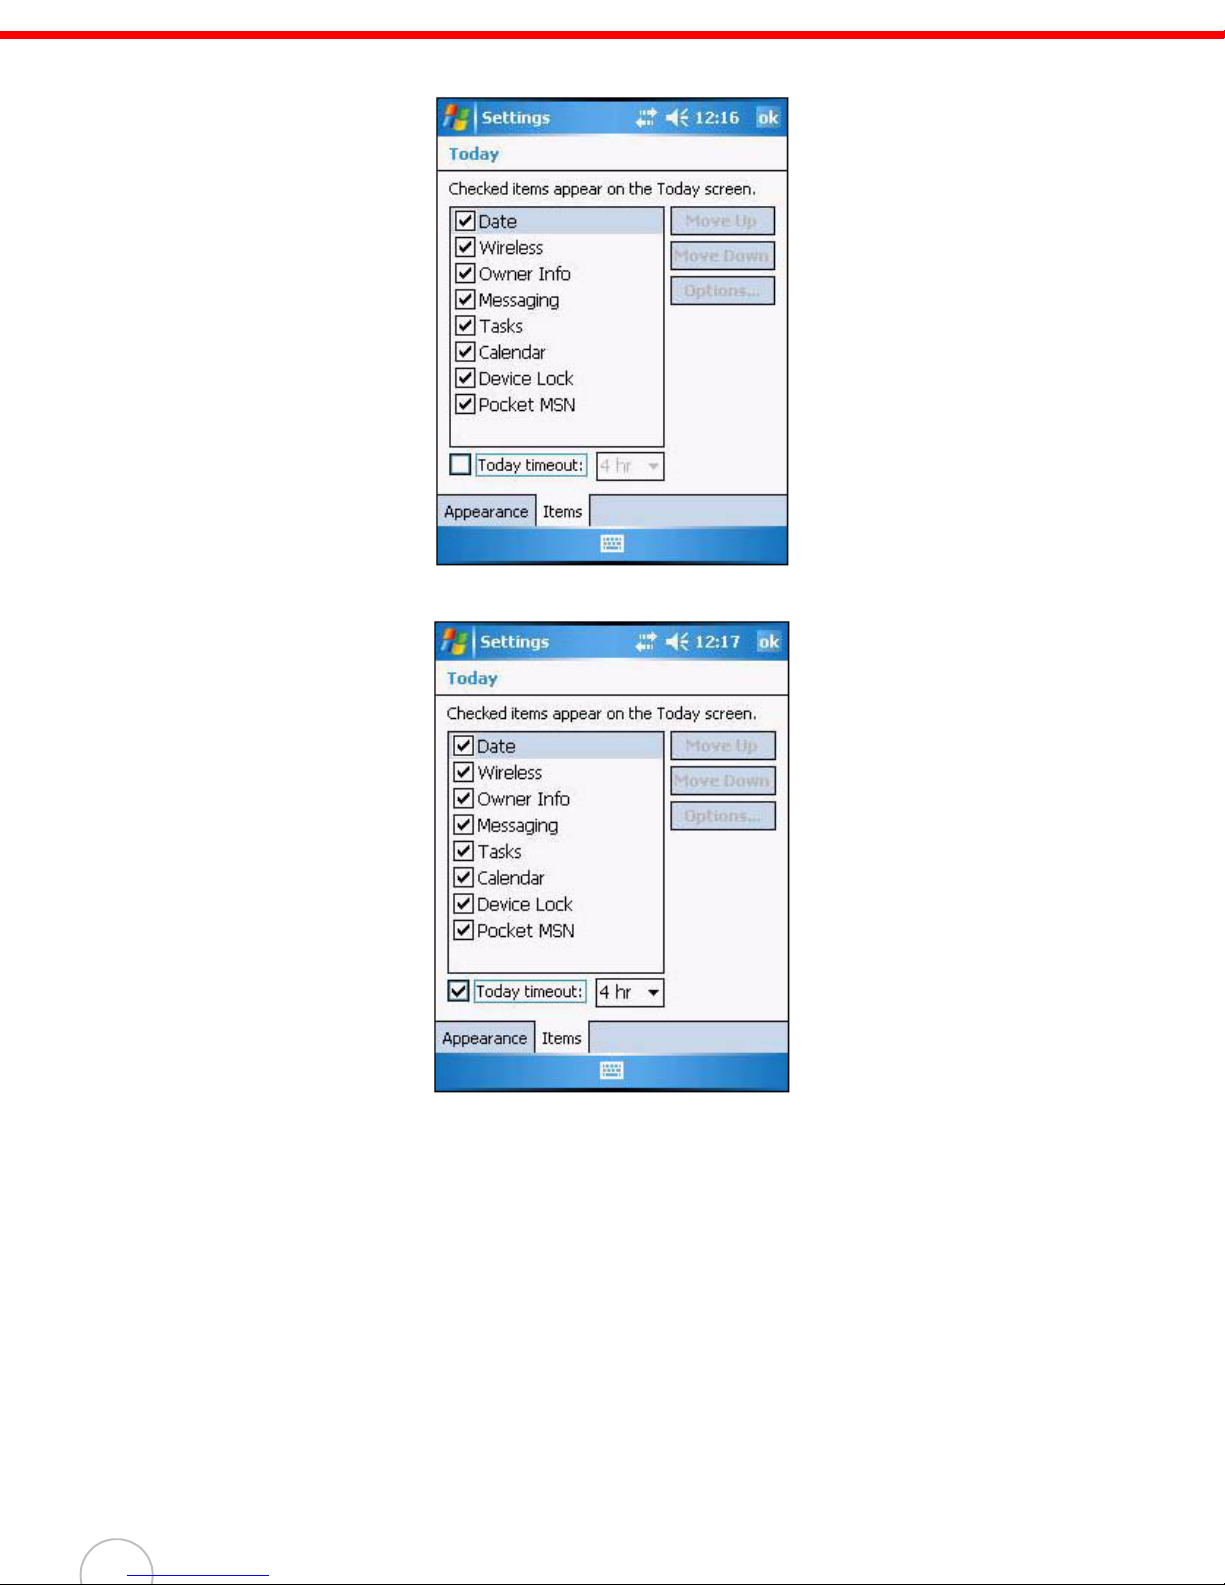
3. On the Items tab, select the “Today timeout” check box.
4. Tap the pick list beside the check box to set the period of inactivity.
5. Tap ok.
16
C
hapter
2
Using the Hardware
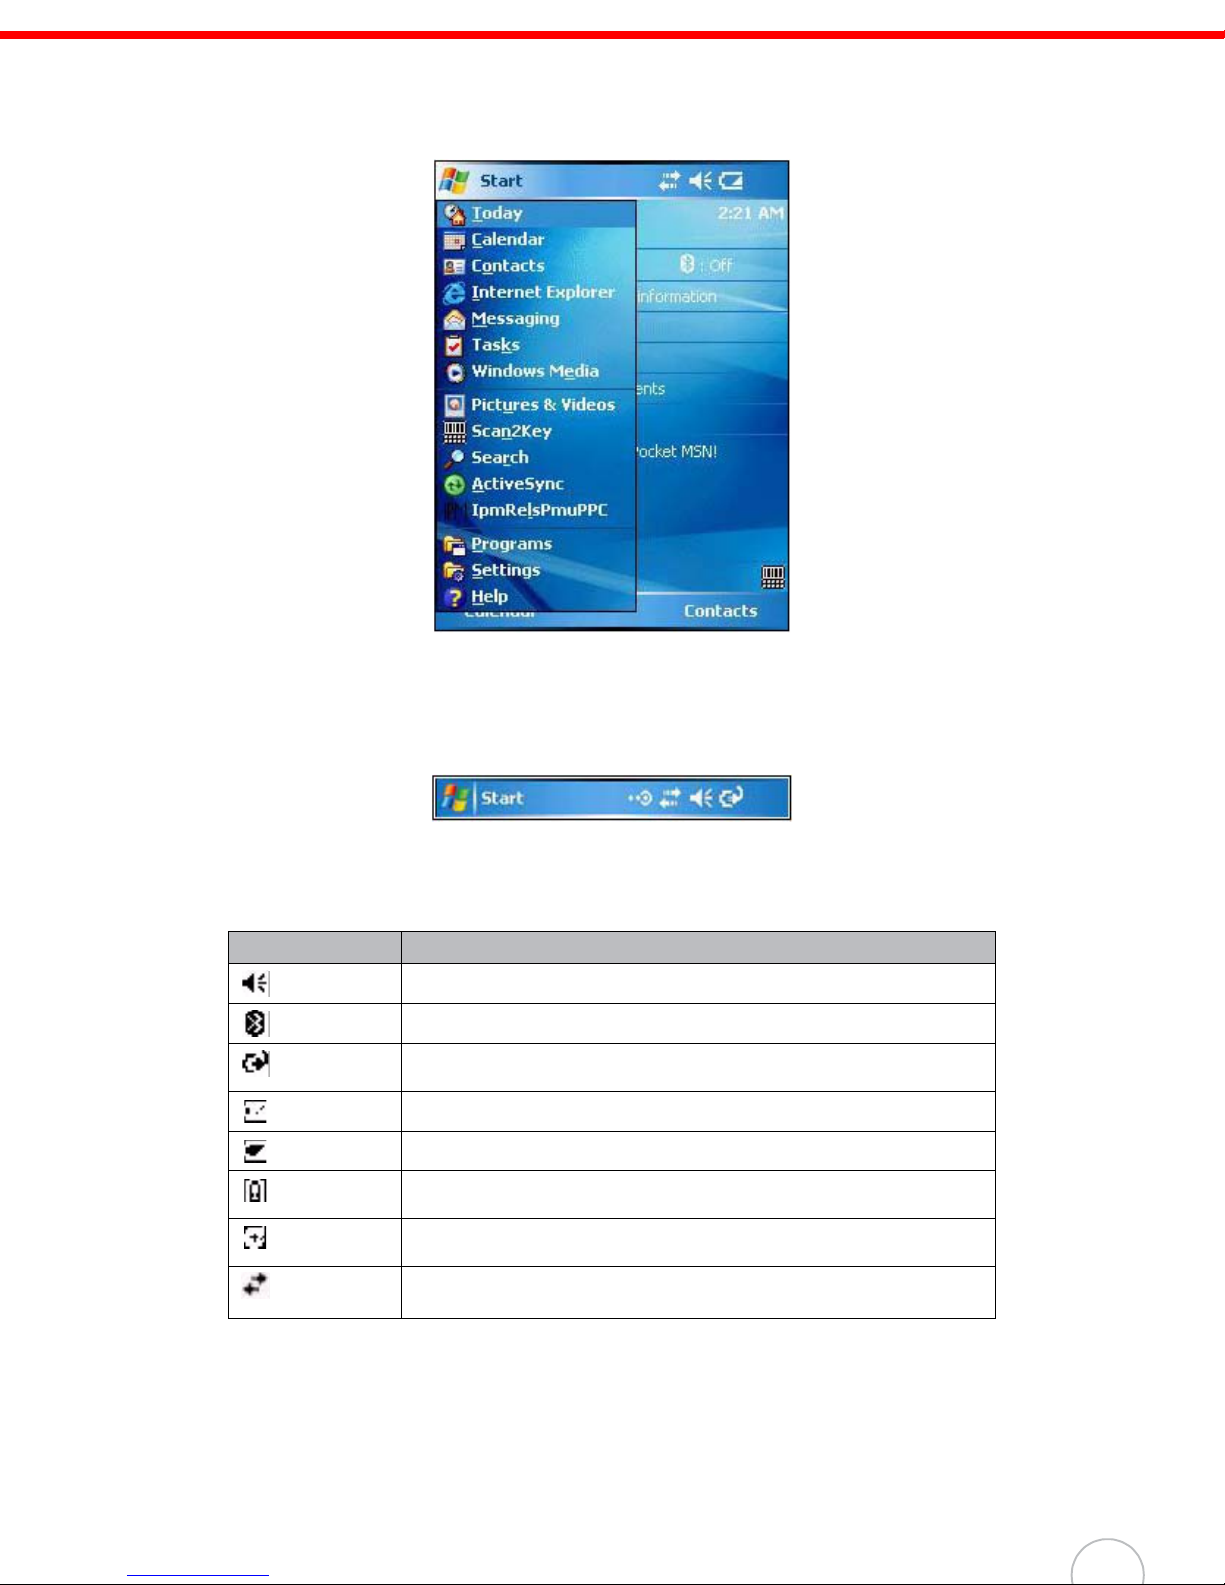
Start Menu
The Start menu displays a list of active programs, as well as options to view the Programs, Settings and
Help screens.
Navigation Bar
The navigation bar is located at the top of the screen. It displays the notification icons for system alarms and
reminders, status icons for the data connectivity, battery charge, and volume control.
Status Icons
The table below describes some of the status icons you may see on your device.
Status Icon Description
Turns all sounds on and off.
Indicates Bluetooth wireless technology is on.
Indicates that the main battery is charging. The WPA1000 is either plugged-in via
the AC adapter or docking station.
Indicates the main battery is fully charged.
Indicates the main battery is low and needs to be charged.
Indicates the main battery is very low. Stop device operation and charge the
device immediately.
Indicates the backup battery is very low. Stop device operation and charge the
device immediately.
Indicates device is synchronized with a computer.
Wireless and Bluetooth connection is activated.
For more detailed description of the status icons, tap Start → Help.
17
Command Bar
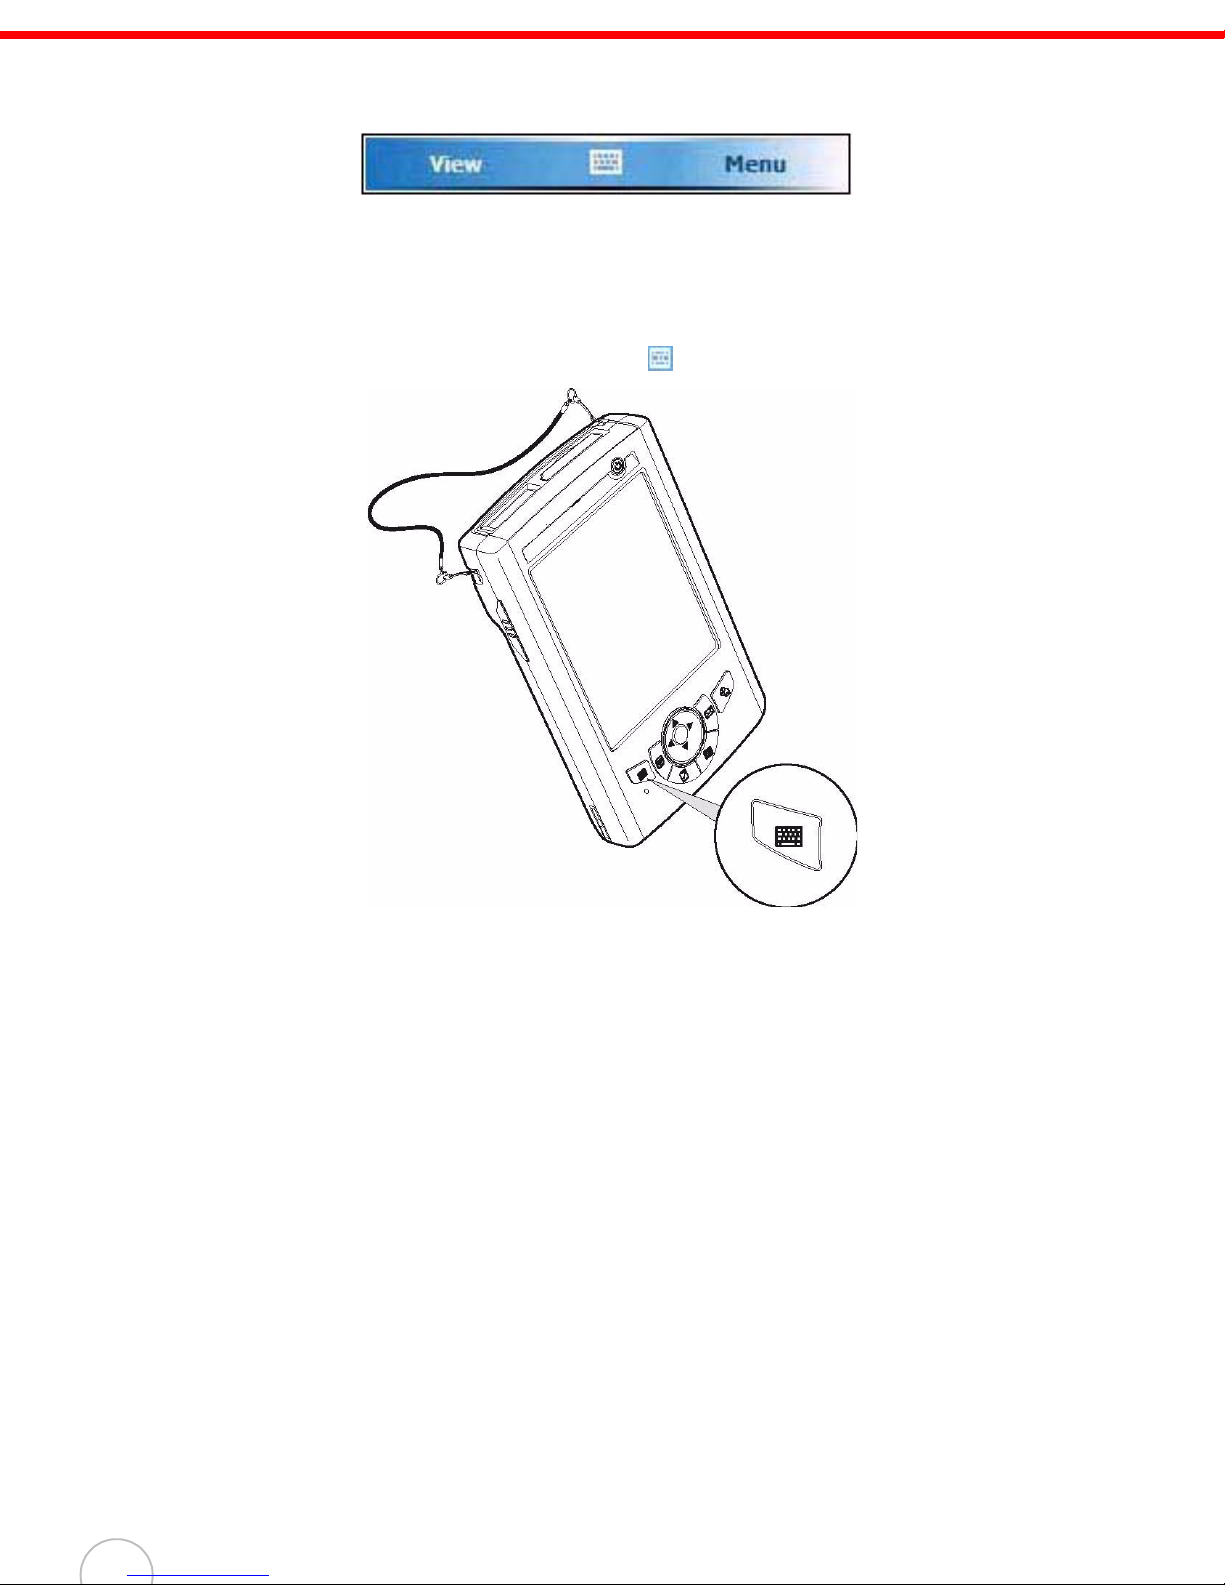
Use the command bar at the bottom of the screen to perform tasks in programs.
The command bar includes menu names, buttons, and the Input Selector button.
• To create a new item in the current program, tap New.
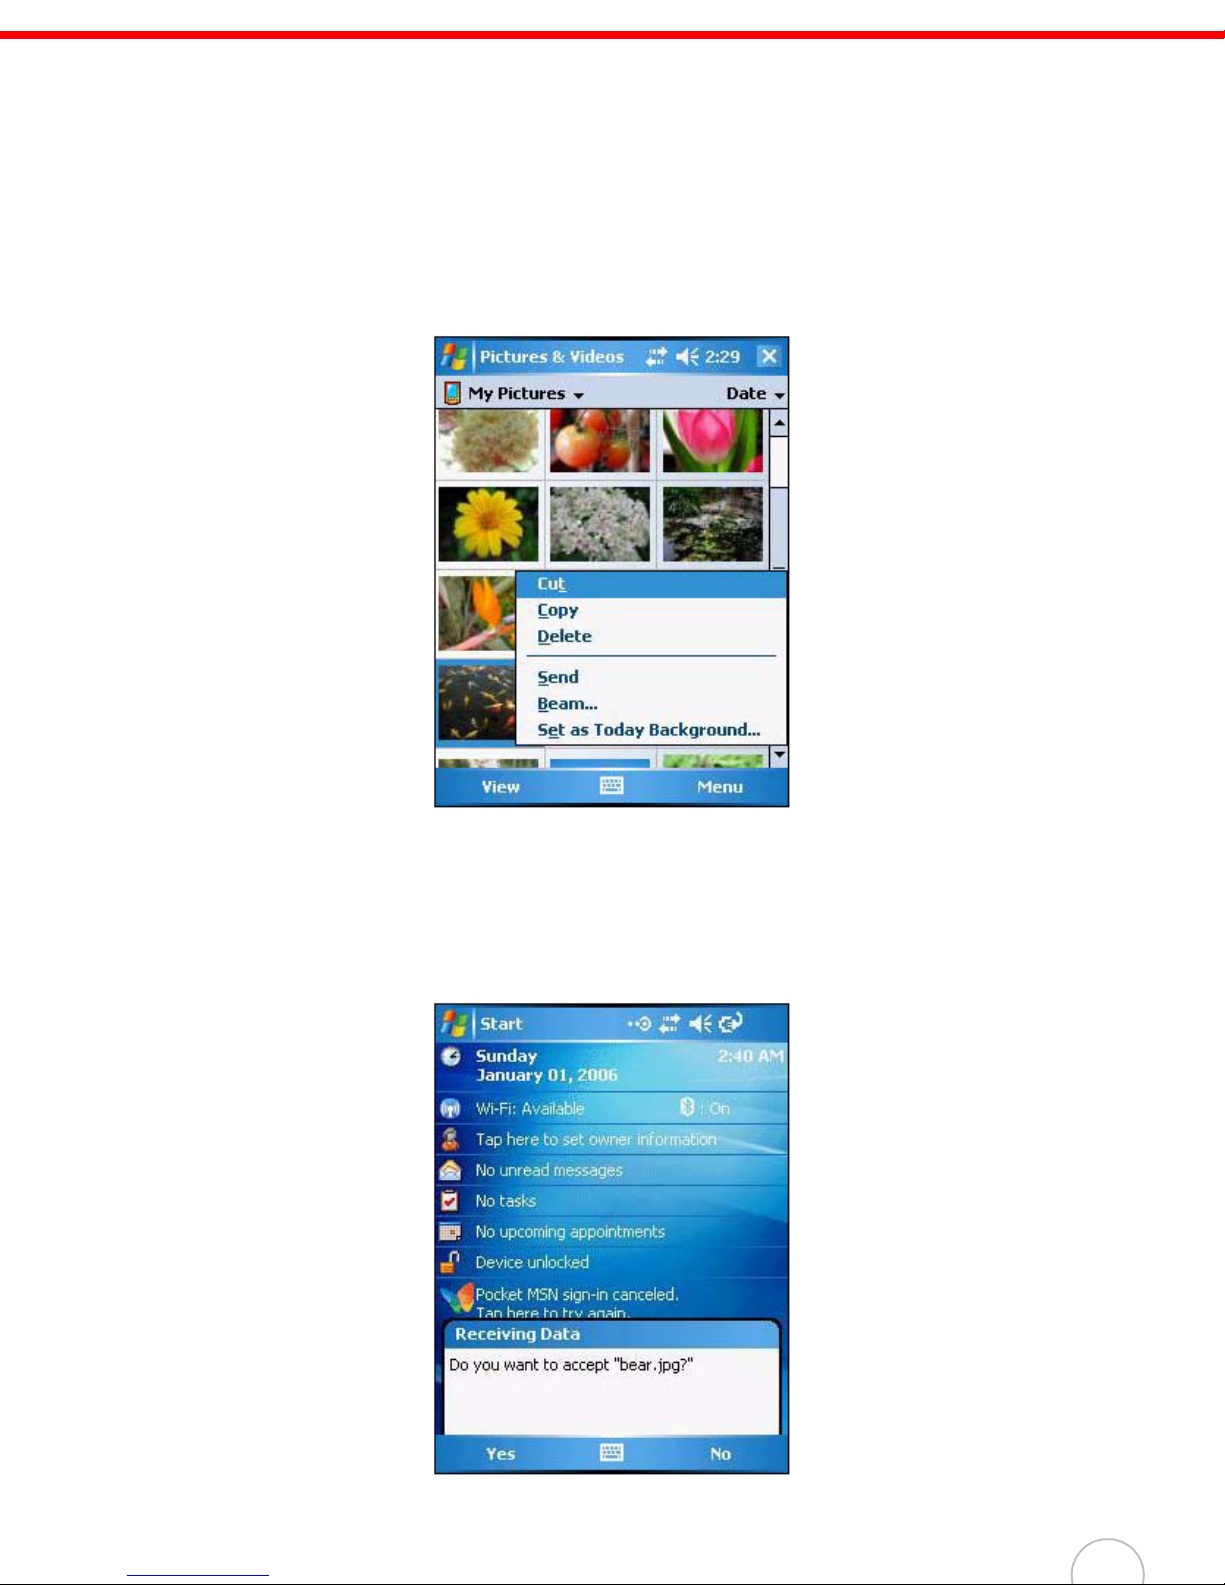
• To view a notification or an image file received on your device, tap View.
• To see the name of a button, tap and hold the stylus on the button. Drag the stylus off the button so that the
command is not carried out.
• To view the soft keyboard, tap the Input Selector button or you can press the Software keyboard button.
18
C
hapter
2
Using the Hardware
Pop-up Menus
With pop-up menus, you can quickly choose an action for an item. The actions in the pop-up menus
vary from program to program.
To display a pop-up menu:
1. Tap and hold the stylus on the item that you want to perform the action on.
2. When the menu appears, lift the stylus, then do either of the following:
– Tap the action you want to perform.
– Tap anywhere outside the menu to close the menu without performing an action.
Notifications
Your device reminds you in a variety of ways when you have something to do or receive a message.
For example, if you’ve set up an appointment in Calendar, a task with a due date in Tasks, data or
message received, or an alarm in Clock; you’ll be notified in any of the following ways:
• A message box appears on the screen.
• A sound, which you can specify, is played.
19
To choose reminder types and sounds for your device:
1. Tap Start → Settings.
2. On the Personal tab, tap Sounds & Notifications.
3. On the Sounds tab, select the kind of events you want to be notified of.
4. On the Notifications tab, select the manner of notification you prefer. The options you choose
here are applied globally in your device.
5. Tap ok.
20
 Loading...