

Page 1

WaspBio Clock
™
User Manual
© 2005 Wasp Technologies
Page 2

Wasp Technologies reserves the right to revise documentation and to make changes
from time to time to the content herein without obligation to notify any person of such
revision or changes.
Page 3

WaspBio Clock™ User Manual
Table of Contents
INTRODUCTION ............................................................................................................................. 2
WHAT’S IN THE BOX ..................................................................................................................... 3
POWERING UP THE WASPBIO..................................................................................................... 4
USING THE WASPBIO TERMINAL KEYBOARD........................................................................... 5
CORRECT FINGER PLACEMENT ................................................................................................. 7
ENROLL USERS............................................................................................................................. 8
W
HAT IS USER ENROLLMENT ......................................................................................................... 8
HOW TO ENROLL USERS ................................................................................................................ 8
U
SER ID NUMBER ......................................................................................................................... 9
ENROLL WITH FINGERPRINTS ......................................................................................................... 9
ENROLL WITH PASSWORD ............................................................................................................ 10
E
NROLL WITH PASSWORD AND FINGERPRINT ................................................................................ 11
SUGGESTIONS FOR SUCCESSFUL ENROLLMENT ............................................................................ 13
USER VERIFICATION .................................................................................................................. 14
F
INGERPRINT VERIFICATION ......................................................................................................... 14
ID NUMBER AND FINGERPRINT..................................................................................................... 14
ID NUMBER AND PASSWORD VERIFICATION .................................................................................. 15
AUTHORITY LEVELS ................................................................................................................... 16
MANAGING MATCH THRESHOLD LEVELS ............................................................................... 17
M
ATCH THRESHOLDS................................................................................................................... 17
S
ETTING MATCH THRESHOLD SETTINGS ....................................................................................... 17
SETTING SYSTEM OPTIONS ...................................................................................................... 19
S
ETTING THE DATE AND TIME....................................................................................................... 19
C
HANGING THE LANGUAGE........................................................................................................... 19
RESETTING SYSTEM SETTINGS AND VALUES TO DEFAULT ............................................................. 19
NLY ONE TO ONE VERIFICATION MODE ...................................................................................... 20
O
T
URN OFF VOICE......................................................................................................................... 20
ESTABLISHING YOUR ETHERNET CONNECTION ................................................................... 22
CARE AND MAINTENANCE......................................................................................................... 26
MENU MAP ................................................................................................................................... 27
1
Page 4

WaspBio Clock™ User Manual
Introduction
Congratulations on your purchase of the WaspBio Clock! This manual explains how to
use the terminal through the built in keyboard and how to connect to your Host
computer.
2
Page 5
WaspBio Clock™ User Manual
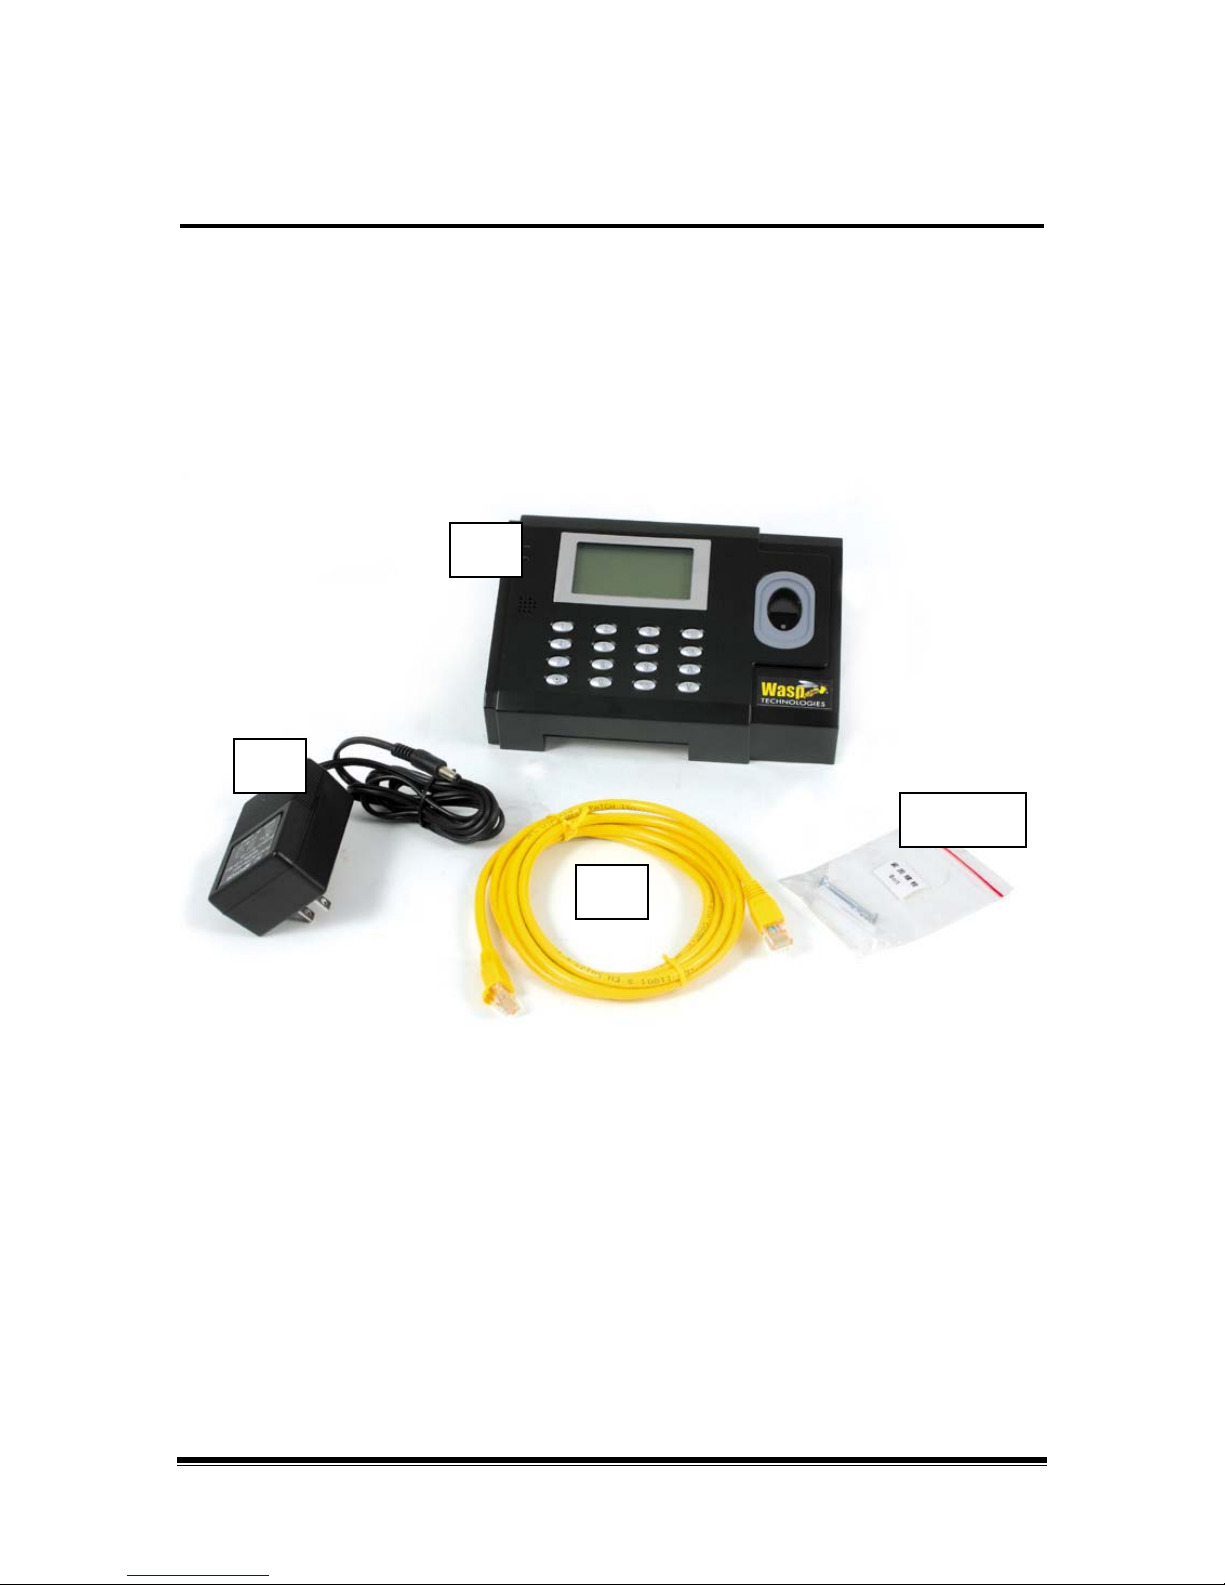
What’s in the Box
In your box you will find the following items:
1. WaspBio Terminal 1 unit
2. AC power adapter 1 pc
3. Drywall screws (Phillips) 2 pcs
4. Wall Anchors 2 pcs
5. Ethernet Cable 8 ft
1
2
3 and 4
5
3
Page 6

WaspBio Clock™ User Manual
Powering up the WaspBio
(You should mount the clock to the wall, if desired, prior to powering up the clock.)
1. Connect the power cable to the WaspBio terminal.
2. Connect the power cable to 110V 50Hz AC power source
4
Page 7
WaspBio Clock™ User Manual
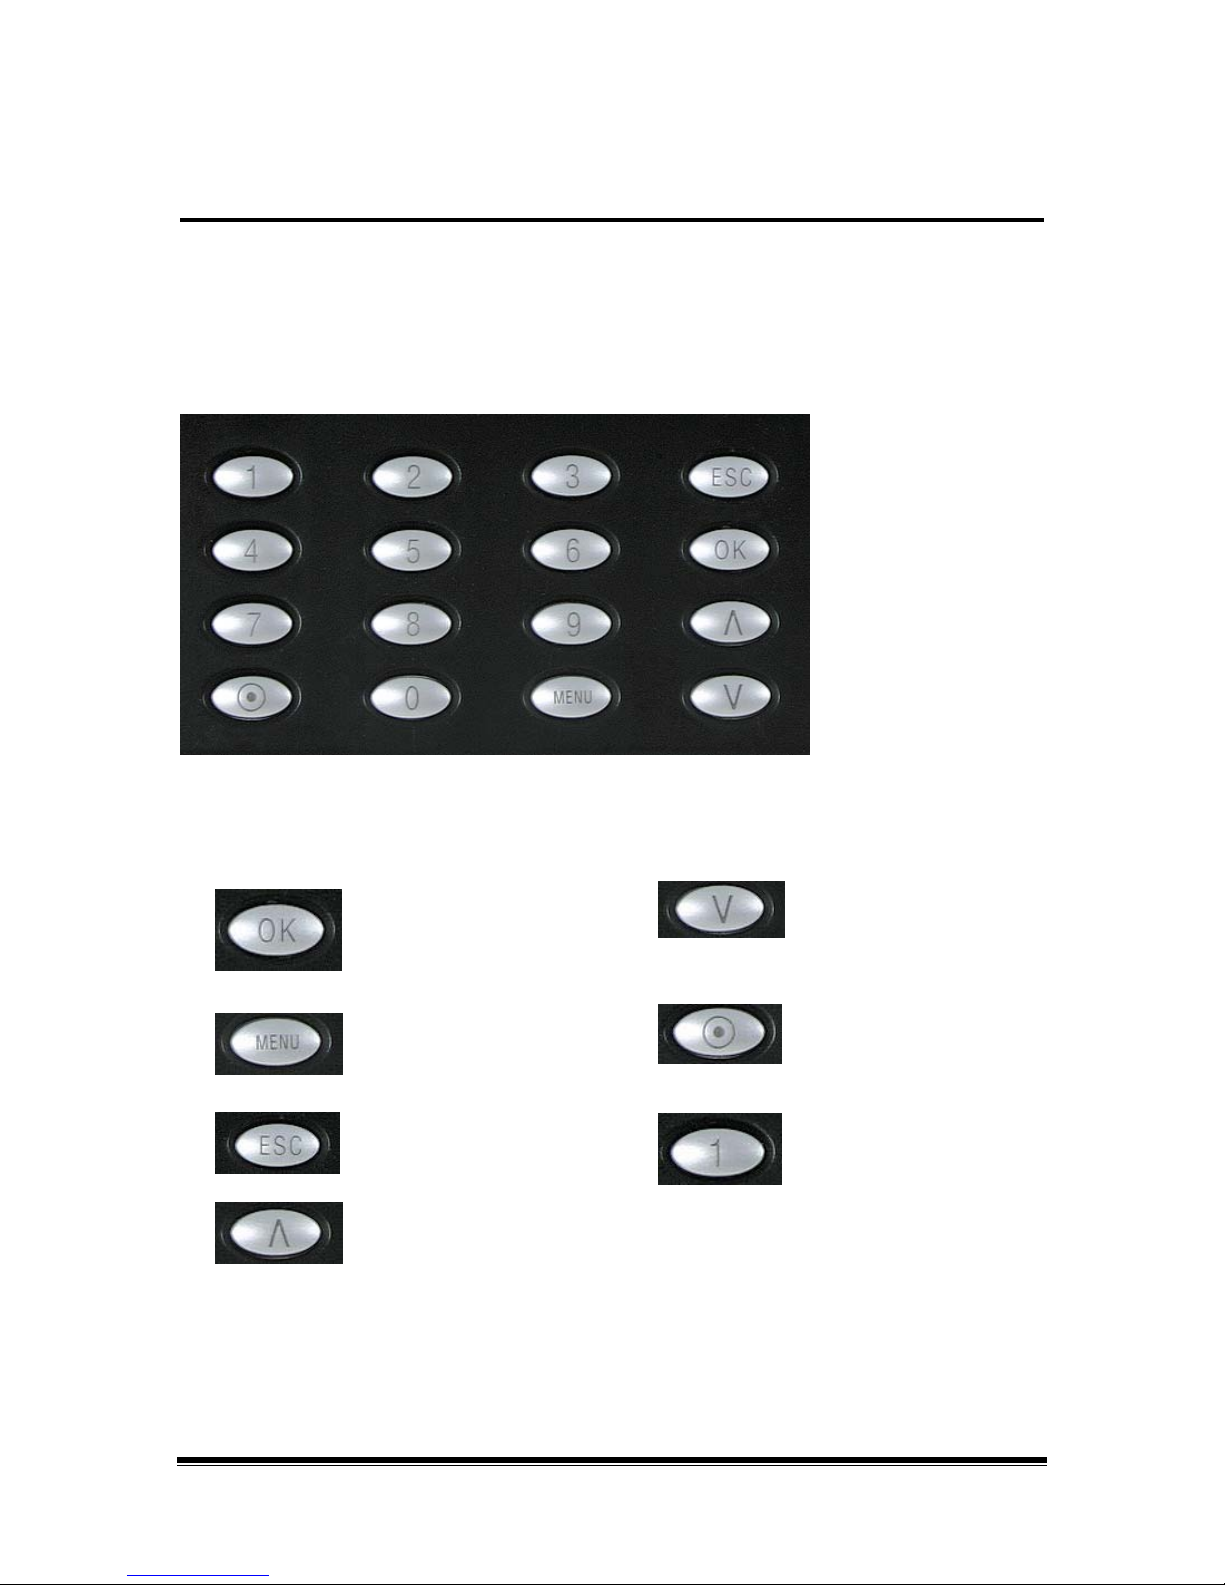
Using the WaspBio Terminal Keyboard
Making Changes within the WaspBio Menus
To enroll users and perform other functions, you can use the WaspBio Clock’s keyboard.
WaspBio Keypad:
Keypad Definition
Confirms the current request.
Access to Menu.
Escape or cancel.
Scroll up.
Scroll down.
Power button.
Numeric keys.
5
Page 8

WaspBio Clock™ User Manual
At the Welcome screen, when the key is pressed, the WaspBio terminal
configuration options are enabled and you can make changes as needed. The key
sequence to make changes and save those changes is as follows;
1. Arrow keys identify the item to be changed.
2. [OK] key to select the field (the field will be highlighted when it is selected).
3. The Arrow keys can then be used to change the option.
4. The [OK] key will accept or save the change.
5. To complete the save for a change, press the [ESC] key, then press [OK] to
Save.
MENU
Welcome
02-18-05 FRI
8:55
System Opt
Save?
ESC OK(SAVE)
6
Page 9
WaspBio Clock™ User Manual
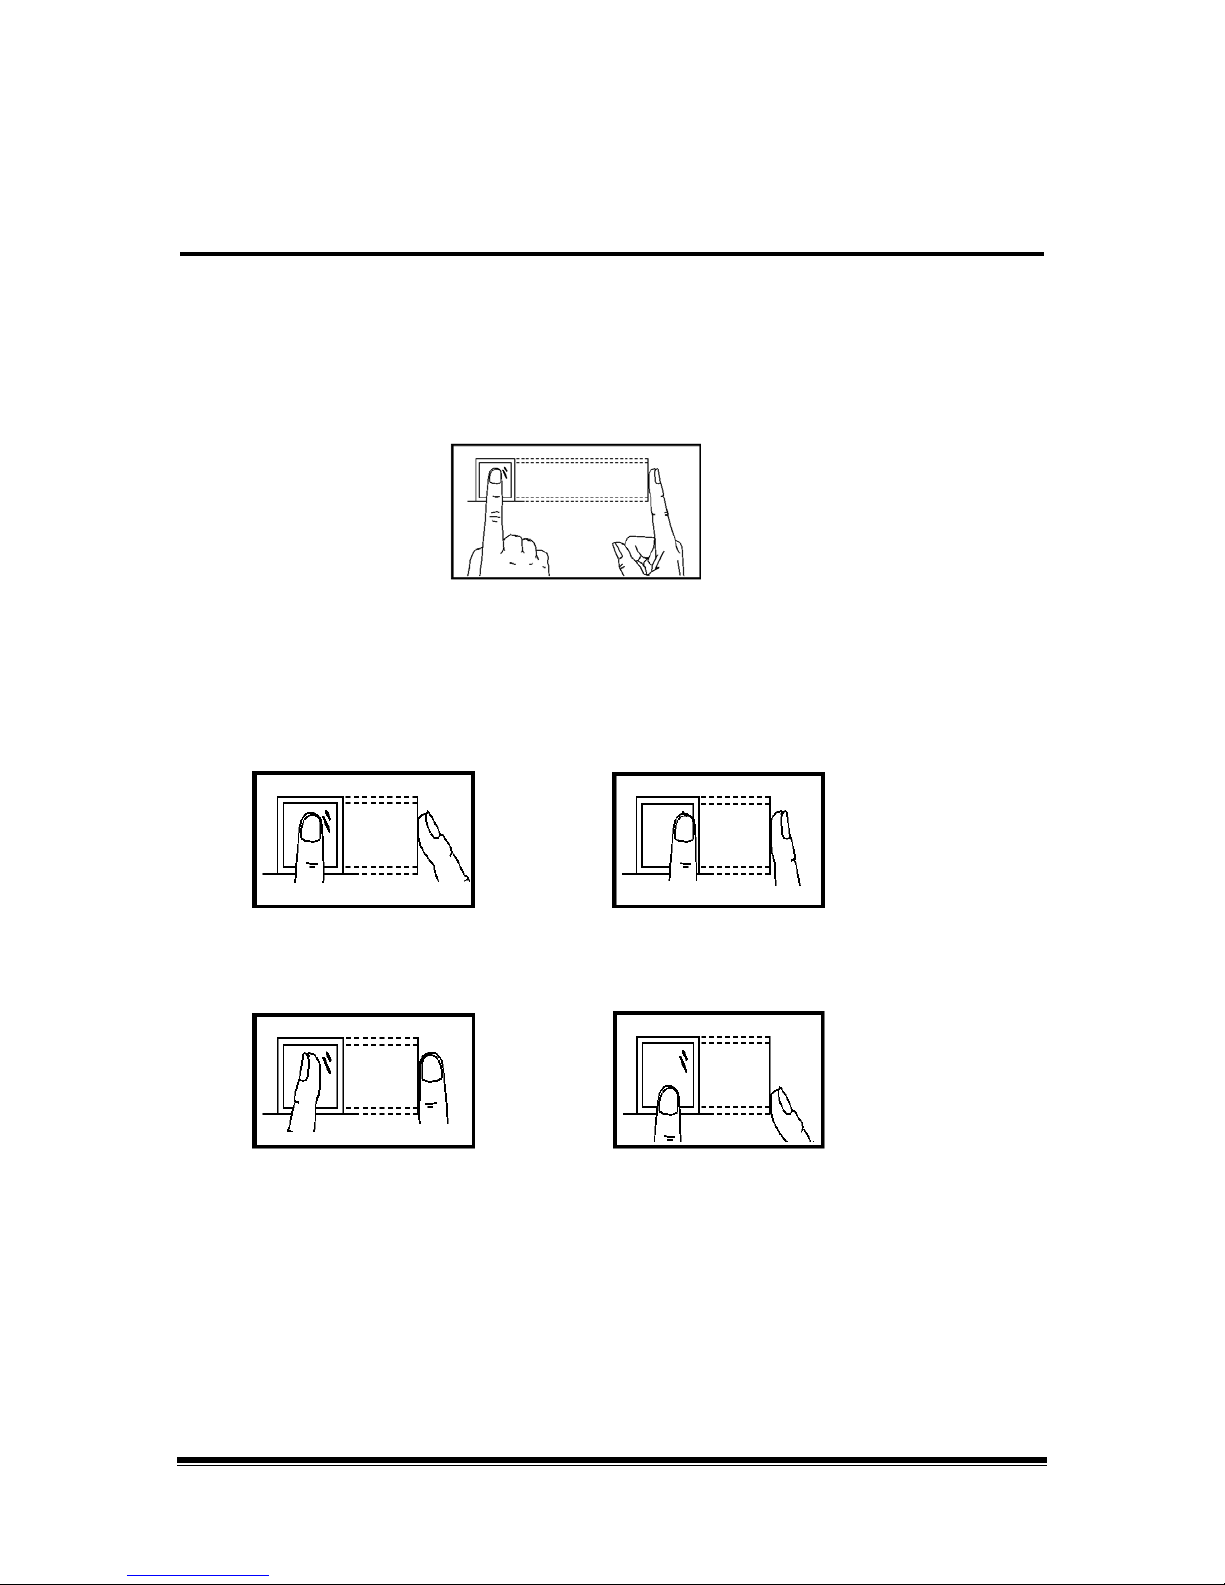
Correct Finger Placement
Finger placement and position is the first step in creating a good template image. The
following pictures demonstrate correct and incorrect finger placement on the optic
sensor.
1. The correct way is to place a finger flat and centered on the sensor surface.
2. Examples of incorrect finger placement are shown below with descriptions.
Note: Please adopt correct finger placement; Wasp Technologies assumes no
Upright
Skew or Side
responsibility for errors from the use of the clock.
Finger Top on edge of sensor
Not Centered
7
Page 10

WaspBio Clock™ User Manual
Enroll Users
What is User Enrollment
Enrollment is the process of creating an ID number and scanning a user’s finger three
times to create a template. This template is associated with a user ID number and is
stored in the clock. For information regarding backing up these fingerprint templates to
your WaspTime Database, please refer to the ClockSetup online help.
During user verification (when the user is punching in or out), the stored template is
compared to the current fingerprint scan to confirm the user’s identity.
Enrollment is performed at the clock designated as the Primary Clock in ClockSetup.
The user can verify his/her fingerprint at the same clock terminal on which he/she was
enrolled, and on any other clock terminal you transfer the fingerprint template to. For
information on designating a clock as the Primary and on transferring fingerprint
templates to other bioclocks, please refer to the ClockSetup online help.
Up to ten fingers can be enrolled for a single user with the same ID number.
The clock can hold up to 1500 fingerprint templates and still maintain optimum
performance (2 second response time).
If you use 1 to 1 verification only, you can enroll up to 3000 fingerprints, while still
keeping optimum performance. Please see the chapter titled Managing Match
Thresholds for further information on 1 to 1 verification.
How to Enroll Users
If this is the first enrollment on a new system, everyone is essentially an Enrollee, or a
User. If there are already administrators setup in the system, only the administrators
have the right to enroll new users.
There are three ways to enroll users:
• Fingerprint enrollment - used for most people who have good quality
fingerprints.
• Password enrollment - used for those who can enroll successfully, but
who are not able to provide quality fingerprints.
• Fingerprint and Password enrollment – used for those users who want to
have the option to use fingerprints or a password for verification.
If there are no administrators, enroll yourself first (if you will be the administrator) and
give yourself administrator access. To do this:
1. Press the [Menu] button.
2. Select User Manage.
3. Select Enroll Admin.
8
Page 11

WaspBio Clock™ User Manual
N
N
N
4. Follow the steps beginning on the next page to enroll with fingerprint or with
fingerprint and password.
User ID Number
Before beginning enrollment, a user should be assigned a User ID. This User ID is used
by the system to access the fingerprint record during user verification. Usually this is the
badge number or employee number assigned in WaspTime.
By default the next available user ID number will be assigned to you automatically. You
can change it with the up and down keys or the number keys (the range is 1 to 65534).
Enroll with Fingerprints
1. From the WaspBio Menu screen, navigate to “Enroll FP” and press “OK”.
MENU
User Manage Enroll User Enroll FP
The following screen will display:
2. Select to continue. The following screen will display:
3. Place your finger on the sensor 3 times. If successful, the following screen
displays:
The last digit, 0, indicates that this is the first fingerprint for this user (User
number 00001)
ew Enroll
User ID 00001
ESC OK
OK
ew Enroll
Place Finger…
ESC
ew Enroll
00001-0
ESC OK [Save]
9
Page 12

WaspBio Clock™ User Manual
N
N
4. Select “OK” to save.
If there is a problem with the fingerprint capture you will be prompted to try again and
should restart the enrollment process.
If you want to exit the New User Enrollment mode, press the “ESC” button. The system
will then prompt you to enter back-up fingerprints for the user you just enrolled. You can
then choose the User ID and enroll multiple fingerprints for that user.
Enroll with Password
1. Navigate Menu on the Clock to “Enroll Pwd”, the press “OK”.
MENU
User Manage Enroll User Enroll Pwd
The following screen appears:
2. If known, input the user ID number and press .
Note: By default the next sequential user ID number
will appear. You can change it with the up and down keys or
the numeric keys (the range is 1 to 65534).
3. The password is numeric and can be one to five digits in length.
Enroll Pwd
New Enroll?
ESC OK
ew Enroll
User ID 00008
ESC OK
Enter the password, then press :
OK
ew Enroll
Input Pwd *****
ESC OK
OK
10
Page 13

WaspBio Clock™ User Manual
N
N
N
4. Enter the password again to verify and press :
OK
The following is displayed with the ID followed by the
letter P. This last letter P indicates the user ID is stored
with a password.
ew Enrollment
Input Pwd: *****
Pwd Affirm:
*****
ew Enroll
00008-P
ESC OK [Save]
5. Press , the previous message continues to be displayed while the
OK
data is stored.
Enroll with Password and Fingerprint
1. Navigate on the Clock to “Enroll FP & Pwd”, then press “OK”.
MENU
The following screen will appear:
FP & Pwd
New Enroll?
ESC OK
User Manage Enroll User Enroll FP & Pwd
2. Press , at the FP & Pwd prompt:
This will begin a new enrollment process and request
a user ID.
ESC OK
OK
ew Enroll
User ID 00008
11
Page 14

WaspBio Clock™ User Manual
N
N
N
N
3. If known, input the user Id number and press .
Note: By default the next sequential user ID number
will appear. You can change it with the up and down keys or
the numeric keys (the range is 1 to 65534).
4. When the following prompt appears, place the finger to be enrolled on the reader
3 times as prompted:
ew Enroll
00008-0
Place finger…
ESC/Exit
5. When the following prompt appears, enter user’s password, then press
The Password is one to five digits in length.
ew Enroll
Input Pwd:
*****
ESC OK
6. Input the password again for verification, press :
ew Enroll
Input Pwd: *****
Pwd Affirm: *****
ESC OK
If successful the following will appear:
ew Enroll
00008-1P
ESC OK [Save]
Notice that the ID (00008) is followed by a number and the letter P. The number
indicates the current fingerprint template associated with this ID (this user has
two fingerprints entered into the system). The number sequence for fingerprints
captured is 0-9. The letter P indicates the user ID is stored with a password.
Note: In the example above for New Enroll, 00008—1P is broken down as ID –
00008, Second fingerprint – 1 (where fingerprints captured are 0-9), and the last
letter P means password.
OK
OK
OK
12
Page 15

WaspBio Clock™ User Manual
7. Press . The message in the screen shot above continues to be
displayed while the template is created.
OK
Suggestions for Successful Enrollment
When a fingerprint is captured successfully, the verification speed will be fast. If the
fingerprint is of poor quality, slow reads and false rejections are possible.
In order to improve the fingerprint verification quality, try the following suggestions:
Failures to Validate Enrollee or Fingerprints of Poor Quality
Problem Resolution
Dry fingerprints
Not enough pressure
on the sensor
How to select the
finger
How to place the
finger
Fingerprint change
Influence
Other
Moisten the finger by holding it to the palm in a fist position.
The user should place a finger firmly and squarely on the
sensor surface.
The left or right index or middle finger is normally
recommended. Otherwise the middle or ring fingers can be
used to capture good fingerprint templates.
Use fingerprints of good quality, not worn or injured.
Place finger firmly on the sensor surface, finger placement
must cover 2/3 of the sensor surface.
The fingerprint should not touch perpendicular to the sensor
surface.
Do not touch the finger too fast; or move the finger on the
sensor surface.
Worn or injured fingers can influence verification.
If the finger quality is too poor, use password verification.
No matter how advanced the reader, there is a percentage
of people whose fingerprint scans may not validate. For this
small group, the alternatives are to use ID and fingerprint
validation, lower the match threshold (explained later in this
manual), or use password validation.
13
Page 16

WaspBio Clock™ User Manual
User Verification
Users can verify themselves at the clock. The system
verifies through the three methods previously mentioned:
Fingerprint Verification
ID Number and Password Verification
ID Number and Fingerprint Verification
Fingerprint Verification
At the Welcome screen simply place the finger on the
sensor surface, and the following will appear:
The message will display for about 0.5 seconds.
If the test is successful, it will say “Thank you”,
and the following will appear:
If the user identity cannot be verified, the user will
be prompted to try again, the following will appear:
The message will display for about 0.5 seconds, and then return to the start-up window.
ID Number and FingerPrint
At the Welcome screen, enter your ID number. The
display will change to show the User ID entered.
Welcome
08:25
04-01-02 FRI
FP Verify
Remove Finger
FP Verify
User ID 00008
Verified!
FP Verify
Place Finger Agn:
Welcome
08:25
04-01-02 FRI
14
Page 17

WaspBio Clock™ User Manual
The option to enter a password is present, but not
needed for ID Number and FingerPrint combination.
To verify, place an enrolled finger on the
Reader. The following will appear:
ID Number and Password Verification
To start the verification process, enter the user ID number
at the Welcome screen.
Once the user ID is entered, the clock displays the
appropriate prompts for a user ID stored with a password.
Press , to accept the password acknowledgement
and the display will change to the Input Password prompt.
Input correct user password (passwords are masked by
Asterisks). Press , and if verified the following
will appear:
OK
OK
If the password cannot be verified an error message
will appear.
1:1 FP Verify
User ID 00008
ESC OK [Pwd]
1:1 FP Verify
User ID 00008
Verified!
Welcome
08:25
04-01-02 FRI
1:1 FP Verify
User ID 00008
ESC OK [Pwd]
Pwd Affirm
User ID 00008
Input Pwd: *****
Pwd Affirm
User ID 00008
Verified!
Pwd Affirm
User ID 00008
Error pwd !
15
Page 18

WaspBio Clock™ User Manual
Authority Levels
WaspBio Clock has four authority or status levels, as defined below:
Users People whose identity must be verified to have their
attendance recorded.
Enrollers Users who are authorized to enroll new users or delete
users on the system.
Administrators Users who can enroll new users and have the authority to
change the settings of the terminal, except set Advanced
Options.
Supervisors Users who have authority to change the clock settings,
including the system setup, as well as enroll new users.
Note:
If there are no Administrators or Supervisors in the Clock, the Enrollers can enroll a
new Administrator or Supervisor.
If there is no Supervisor in the Clock, Administrator can enroll a Supervisor.
16
Page 19

WaspBio Clock™ User Manual
Managing Match Threshold Levels
Match Thresholds
The Match Threshold is a number that represents the degree to which verification is
examined to ensure that the person is actually the person being identified. You can set
match threshold levels on the Clock.
The Match Threshold Levels establish a balance between False Acceptance Rate (FAR)
and False Rejection Rate (FRR). FAR measures how often a non-authorized user is
falsely recognized and granted access to the system. FRR measures how often an
enrolled and authorized user, who should be granted access to the system, is denied on
the basis that the system did not recognize him.
If the fingerprint verification is difficult for a certain user, he/she can use ID & Fingerprint
verification (match one to one).
Raising the threshold increases accuracy, while lowering it decreases accuracy. The
correct balance is essential. For users with worn or injured fingers, match threshold
levels can (and should) be reduced.
A suggestion for the Match Threshold Value is shown in table 1:
Table 1—1 Suggested Match Threshold Settings
FRR FAR One to Many One to One
High Low 45 25
Middle Middle 35 15
Low High 25 10
Setting Match Threshold Settings
1. To change match threshold settings for one to many (1:N), navigate to Match
Threshold, and press ..
MENU
2. Use the arrow keys, or the number keys to set the threshold number desired and
press .
OK
OK
Options Adv Option Match Thr
17
Page 20

WaspBio Clock™ User Manual
3.
To change the one to one (1:1), match threshold setting, navigate to 1:1
Threshold, and press .
OK
MENU
4. Use the arrow keys, or the number keys to set the threshold number desired and
Press .
OK
Options Adv Option 1:1 Thr
18
Page 21

WaspBio Clock™ User Manual
Setting System Options
Setting the Date and Time
1. Navigate to the Date/Time screen as follows and Press .
OK
MENU
When you Access Date Time, the following will appear:
2. Scroll between the year, month, date, hour, minutes and seconds using the arrow
keys. To modify the selected field, press and change the field using the
number keys.
Options System Opt Date Time
Date Time
2004-01-02
08:24:35
ESC OK
OK
Changing the Language
1. Navigate to the Language screen as follows and press .
MENU
2. When the Language setting is accessed, it defaults to ENG. Use the arrow keys
to select another language. The WaspBio comes with three built-in languages,
simplified Chinese, traditional Chinese, and English for all displays.
Options System Opt Language
OK
3. Select the language that you will use, and press then press to
return to Options. The system will request confirmation for the displayed
language. Press to accept the language displayed.
OK
OK
ESC
Resetting System Settings and Values to Default
The Advanced Option selections provide functions to reset settings and data deletion.
1. Navigate to the Advanced Options screen as follows, and press .
OK
MENU
19
Options System Opt Adv Option
Page 22

WaspBio Clock™ User Manual
The Advanced Option setting will display.
2. The arrow keys allow you to navigate to the desired
function. Press to access the function, and
follow the prompts.
3. Press to save.
OK
The Advanced Option functions include:
Restore Deflt Restores the various options to their default values.
Clear all Data Deletes all enrolled users, fingerprints and logs.
Delete Logs Deletes all logs of flash disk.
Clear Admin Pri Clears all administrative privileges.
Only One to One Verification Mode
The WaspBio Terminal can be set to require one to one verification (User ID and
fingerprint).
1. To do so, navigate to the Advanced Options menu and press .
OK
Adv Option ▼
Restore Deflt
Del AttLogs
Clear all Data
OK
MENU
Options System Opt Adv Option
The Advanced Option setting will display.
2. Use the arrow keys to navigate to the Only 1:1
Function. Press . Use the arrow keys to toggle between Yes and No.
3. Press to save.
OK
Turn Off Voice
The voice confirms verification or denies verification by stating “Thank You” or “Please
Try Again”. This option can be turned off and on.
OK
Adv Option ▼
Restore Deflt
Del AttLogs
Clear all Data
20
Page 23

WaspBio Clock™ User Manual
1. To do so, navigate to the Advanced Options menu and press .
OK
MENU
The Advanced Option setting will display.
2. Use the arrow keys to navigate to the Voice
Function. Press . Use the arrow keys to toggle
between Yes and No.
3. Press to save.
OK
Options System Opt Adv Option
OK
Adv Option ▼
Restore Deflt
Del AttLogs
Clear all Data
21
Page 24

WaspBio Clock™ User Manual
Establishing Your Ethernet Connection
The WaspBio Clock can be connected to a computer using a RJ-45 CAT 5 cable to
connect to your Ethernet. Once connected to your computer, you can control certain
functions on the WaspBio Terminal using WaspTime ClockSetup.
Ethernet connection
22
Page 25

WaspBio Clock™ User Manual
Ethernet Connection
The following steps will assist with the Ethernet setup. Note that when you first receive
your clock you will need to manually set the date and time (see previous chapter) and
manually set the IP Address, Net Mask and Default Gateway. After you have connected
your clock to ClockSetup, changes to these items can be made through the ClockSetup
Application.
1. Connect your WaspBio Clock to Ethernet port or hub using a standard RJ –45 CAT 5
Ethernet cable.
2. Plug the power cable to the power outlet to power on the WaspBioTerminal.
3. Wait for the power on screens to cycle through to the startup display.
4. Press the Menu key.
5. Use the down arrow key to highlight Options, then
6. Use the down arrow key to highlight Comm Opt, then press the OK key.
Welcome
08:25
04-01-02 FRI
press the OK key.
Menu
User Manage
Options
Sys Info
Options ▼
System Opt
Power Mng
Comm Opt
23
Page 26

WaspBio Clock™ User Manual
The following options will be available by using the down arrow to scroll selections.
7. To configure the Ethernet connection, the options on this screen should be set as
follows:
Baud Rate: Leave at the Default
Device Number: machine ID, the range is 1 to 255. The default is 1. The Device
Number is recognized by the software.
Net Speed: Leave at the Default value (Auto).
IP address: Defaults to IP address 192.168.0.0. You can enter a new IP address
here, if needed.
Comm Opt ▼
Baud Rate 1115200
Dev Num 1
Net Speed Auto
IP address
Net Mask
Gateway
RS232 No
RS485 No
Comm Key 0
Net Mask: This should match the subnet mask on your Service computer.
To determine the subnet mask:
1. On the computer where you installed the service, select Start > Run.
2. Type cmd in the Open field, then click the OK button. The Command
prompt screen appears.
3. On the Command prompt screen, type ipconfig. Your computer’s
settings will appear. A listing for Subnet Mask will appear. You need to
match your IP address to the format of your Subnet Mask.
Example: If your Subnet Mask is 255.255.0.0 and the IP Address shown
on the ipconfig screen is 192.168.0.1, you should set your clock’s IP
Address to 192.168.xxx.xxx where the last two sets of numbers are any
numbers of your choosing between 1 and 254.
24
Page 27

WaspBio Clock™ User Manual
Gateway: This needs to be set to your computer’s gateway address. To determine
the address, follow the steps described for Net Mask, above. In the ipconfig
information there is a listing for Default Gateway. Enter this number in the Gateway
field.
If you do not plan to put the clock on the other side of the router from your
WaspTime software, the gateway can be left as the default (192.168.1.1).
RS232: Yes
RS485: No
Com Key: Leave at the default value (0).
25
Page 28

WaspBio Clock™ User Manual
Care and Maintenance
Cleaning the optical sensor may be required if performance begins to degrade or is
visibly obstructed. A fine, lint free optical quality cloth can be used to wipe off the optical
plate and the terminal.
26
Page 29

WaspBio Clock™ User Manual
Menu Map
BioTimeTM Menu Map
User Manage
Enroll User
Enroll Admin
Delete
Options
Sys tem Op t
Pow er Mng
Comm Op t
Log Opt
Auto Test
Menu
User Manage
Options
PenDrive Mng
Syst em Info
PenD rive Mn g
Download Attlog
Download User
Upload User
Enroll User
Enroll FP
Enroll Pwd
FP & Pwd
Enroll Admin
Enroll FP
Enroll Pwd
FP & Pwd
Syst em Opt
Date Time
Language
Fmt
Adv Option
Power Mn g
Shutdown
Power On
Sleep
Idle
Idle Min
Comm Op t
BaudRat e
Dev Num
Net Speed
IP Addr
Net Mask
Gateway
RS232
RS485
COMM Key
Log Opt
Alm SuperLog
Alm AttLog
ReCheck Mi n
Auto Test
Run All Test
LCD Test
Voice Test
FP Reader
Key Test
RIC Test
Adv Option
Reset Opts
Del AttLogs
Clear All Data
Clr A dmin Pri
Show Score
Match Thr
Only 1 To 1
1:1 Thr
Voice
Image Ql t
27
Sys Info
User Cnt
FP Cnt
Att Log
Admin Cnt
Pwd Usr
Super Logs
Free Space Info
Dev Info
Free Space In fo
FP Cnt
Att Log
Super Logs
Dev Info
FPCnt(100)
AttLog(10k)
Super Logs
Manu T ime
Serial N um
Device Name
Alg Version
Firmware Ver
 Loading...