

Page 1

Operator Manual
GM
Page 2

WARNING
Before installation and commissioning, you must read the safety instructions and warnings
carefully and all the warning labels attached to the equipment.
IMPORTANT
Failure to comply (even partially) with the instructions given in this manual will invalidate
the product warranty and relieves the manufacturer of any responsibility
IMPORTANT
The alteration of machine operation, design or the replacement of parts not approved by
the manufacturer may void warranties and approvals.
2 GM - Operator Manual 141218
WARNING
Before installation and commissioning, you must read the safety instructions
and warnings carefully and all the warning labels attached to the equipment.
IMPORTANT
Failure to comply (even partially) with the instructions given in this manual
will invalidate the product warranty and relieves the manufacturer of any
responsibility.
IMPORTANT
The alteration of machine operation, design or the replacement of parts not
!
!
!
CONTENTS
Safety Instructions.......................................................................................................................................................3
Installation..................................................................................................................................................................... 4
Installation Diagram.................................................................................................................................................... 5
Operating Procedures................................................................................................................................................ 6
Troubleshooting........................................................................................................................................................... 8
Wiring Diagram.............................................................................................................................................................10
We have checked that the contents of this document correspond to the model described. There
may be discrepancies nevertheless, and no guarantee can be given that they are completely
identical. The information contained in this document is reviewed regularly and any necessary
changes will be included in the next edition. We welcome suggestions for improvement.
Specifications and document subject to change without prior notice.
Information supplied in this manual is copyright. No part of this work may be reproduced or
copied in any form or by any means, electronic or mechanical without the express permission of
the author / publisher.
Service 1 800 622 216
Parts 1 800 337 963
Distributed in Australia by Moffat Pty Limited
740 Springvale Road, Mulgrave, Victoria
Tel 09 9518 3888 | Fax 03 9518 3818
Page 3

Safety Instructions
WARNING
Before installation and commissioning, you must read the safety instructions
and warnings carefully and all the warning labels attached to the equipment.
!
WARNING
Equipment contains dangerous voltages and can be hazardous if installed or operated
incorrectly. Non-compliance with warnings or failure to follow the instructions
contained in this manual can result in loss of life, severe personal injury or serious
damage to property.
Installation
• Use qualified, skilled personnel
• Follow installation instructions
• Connect to correct voltage and supply current
• Provide fully accessible electrical Isolation Switch & water supply valves
Training and Supervision
• Read and understand the Operating instructions and train all staff
• This appliance must not be operated by children or infirm persons
• Machine panels must only be removed by suitably qualified and trained personnel
– internal hazards include live electrics and very hot surfaces
• This appliance is not intended for use as a stepladder
Hot Surfaces
• Some surfaces may be hot or very hot
Chemicals
• Commercial dishwashing detergents are hazardous – handle with care
• Read and follow the safety information found on the labels of detergent
containers and Material Safety Data Sheets
• Use protective eyewear and clothing if decanting containers
Hot Water
• Do not put hands in wash water which may be over 60°C and contain hazardous
caustic detergent
• Rinse water can be over 90°C
• Door safety switches are designed for emergency use only
Cleaning
• Do not hose down the machine or splash water over the exterior
• Watch for broken glass etc when cleaning the inside of the machine
Service/repair
• Under no circumstances the user should attempt to carry out repairs
• All service/repair work must be carried out by qualified personnel only
Power Cord Replacement
• If the supply cord is damaged, it must be replaced by the manufacturer or its
service agent or a similar qualified person in order to avoid a hazard
3 GM - Operator Manual 141218
Page 4

Unpack
• Unpack the machine, check for damage and complete delivery.
Positioning
• Place machine on sound waterproof self draining floor and adjust feet to level
• Allow room for adjacent chemical containers
Water
• Flush supply lines before connection
• Connect hose supplied to adjacent accessible isolator valve - 20 mm 3/4 male
• Flow rate required - 20 litres per minute
• Temperature - 65˚C (Hot Water Supply)
• Consumption per cycle - 2.0 litres
• Pressure required - 200-350 kPa - fit limiter above this pressure
• Back Flow - Dual Check Valve (DCV) supplied with the machine
• Potable water quality is required - filter or soften if necessary
Power
• Machine shipped with cordset for 15 A 240V 50Hz via adjacent switched outlet.
Waste
• Connect drain pump hose supplied to vented upstand or sink waste connection
Detergent
• Note that detergent is hazardous - read instructions and handle with care
• Insert hose into container of commercial dishwasher low foam detergent
• Pump will prime as machine fills and then come up to strength with use
Rinse Fluid
• Insert hose into adjacent container of commercial dishwasher rinse fluid
• Injector accessible via front panel. Factory setting is middle of half turn adjustment range
from 0 to 1.3ml per litre of rinse water. A fine screw driver is required to adjust dosage.
Operation
• Run several cycles, ensure that operator has read and understands instructions
Troubleshooting Installation
• If machine doesn’t fill after switching on power, check & ensure that hot water supply tap is
open, water supply pressure is not below specification and DCV is correctly installed as per
arrow on DCV body.
Installation Checklist
4 GM - Operator Manual 141218
WARNING
Installer must be suitably qualified and ensure compliance with all codes and standards
including AS/NZS3500.1.
WARNING
Before installation and commissioning, you must read the safety instructions
and warnings carefully and all the warning labels attached to the equipment.
!
Page 5
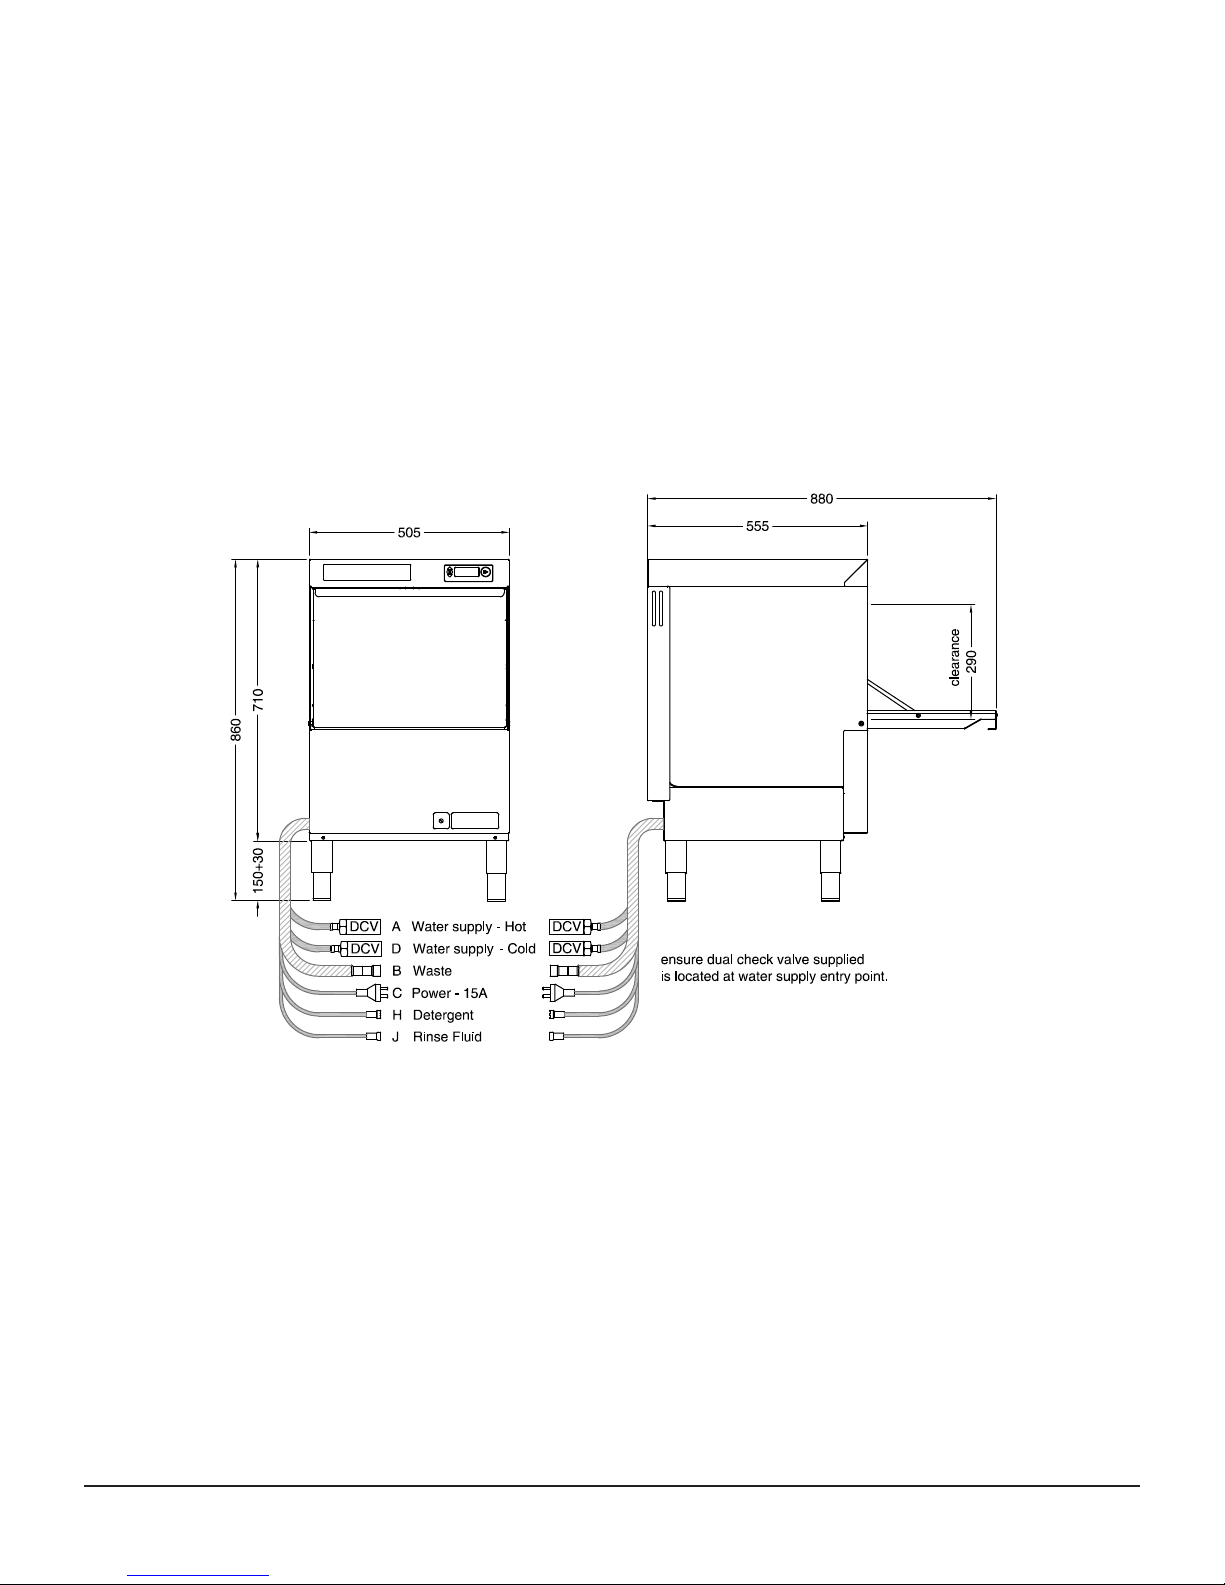
GM Installation Diagram
GM INST 24-11-14 3C
5 GM - Operator Manual 141218
Page 6
PRE-RINSING
Pre-scraping of dishes is required by Food Hygiene Regulations. The
best method is to pre-rinse with warm water with a Fisher
Pre-rinse Unit - or alternatively by scraping or dunking in water.
Cutlery should be pre-soaked in warm water, preferably containing
cutlery pre-soak compound - refer your chemical supplier.
RACKING PROCEDURES
Do not overload racks or cutlery containers, minimise the overlap
of crockery. Wash cutlery unsorted, handles down.
Cycle times are short and water consumption per cycle low – so
there is no advantage in overloading racks.
CYCLE TIMES
The GM has a 1, 2, 3 minute and manual cycle.
CHEMICAL
Correct type and quantity of detergent is essential for good results.
Use good quality chemicals and regularly check containers. Discuss
the use of drying agent and cutlery pre soak solution with your
chemical supplier. Detergent concentration can be changed by
adjusting dispensing time on the keypad (refer to page 8 User
Programming). Rinse Fluid is factory set to a low injection rate, and
will take many cycles to prime. The operator can adjust this via the
adjusting screw on the front cover (refer service manual)
DRYING
Single tank commercial dishwashers do not have a drying cycle.
However, the machines do rinse at high temperatures which
promotes fast drying particularly when drying agents are used.
At the end of the cycle promptly remove the rack from the
machine - leave the rack on the bench for 2 to 3 minutes before
emptying. This time will be reduced with correct use of drying
agent (rinse fluid) which reduces water surface tension and allows
water to drain quickly from wash ware. For advice on drying agents
and injectors refer to your chemical supplier.
Operating Procedures
Keypad Operation
Service 1 800 622 216
Parts 1 800 337 963
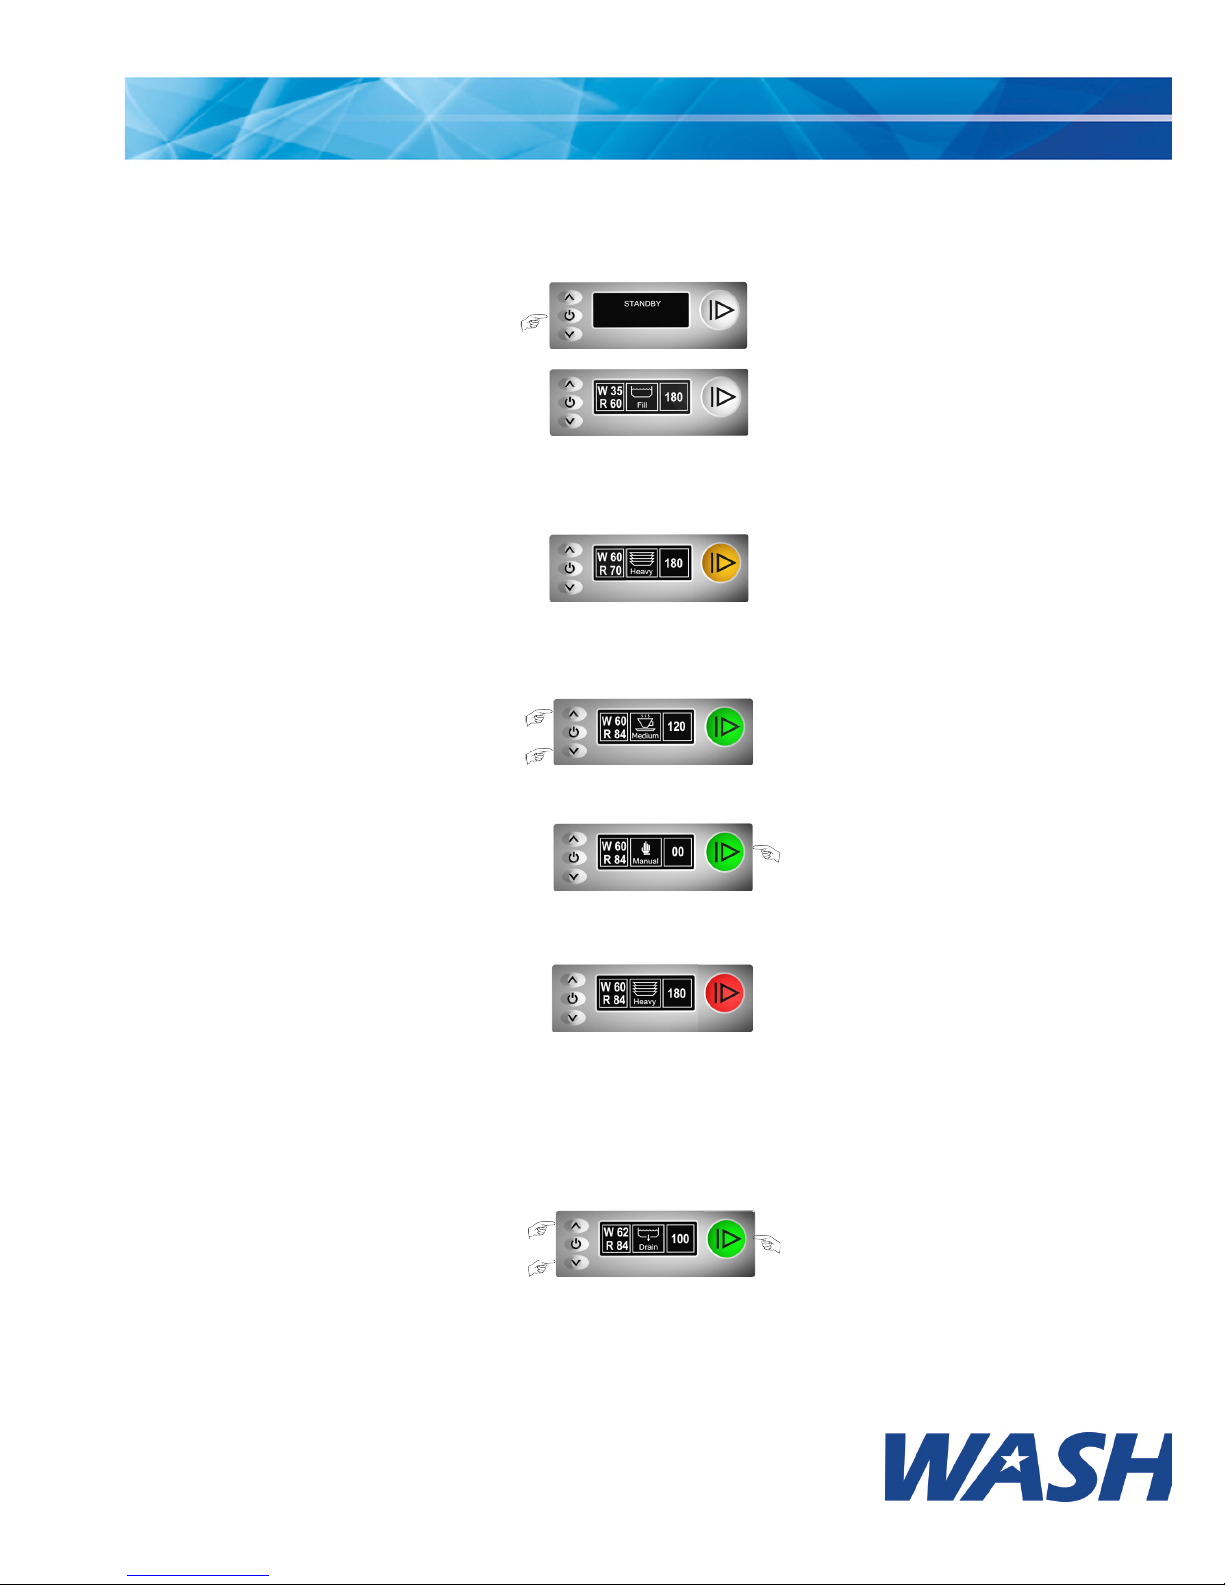
Turn machine on at wall, Fit filter, drain
upstand and shut door. Press On/Off Key
for 3 Seconds
Start key glows white as machine fills. If
door is open then the start key glows
purple
Once full, rinse heating starts. Start key
glows orange while heating.
Machine can be started when machine
is heating. NOTE: If rinse temperature
is not sufficient cycle countdown will
stop at 22 seconds.. Washing continues
until rinse reaches temperature required
for sanitization and countdown then
resumes.
Start key glows green when machine is
fully heated. For different cycles press
the UP and DOWN arrows: Light,
Medium, Heavy, Manual or Drain.
Close door, press start key to start cycle.
When manual cycle is selected machine
will continue washing until START button
is pressed. Rinsing and draining follow
washing to complete cycle.
Start key glows red during cycle.
Pressing Start key again terminates cycle
without rinse. Timer counts down to
double zero and flashes 00 at cycle end
until door is opened.
Press UP or DOWN keys to select Drain
cycle. Remove drain upstand and shut
the door. Press START key to start Drain
cycle. Machine drains for 100 seconds
with a cleaning rinse mid-cycle. When
Draining is complete machine goes into
Standby mode. Remove filter basket;
rinse clean and replace.
SHUT DOWN - EVERY NIGHT
Page 7
Care
DAILY CLEANING
It is essential that the machine is drained and cleaned at the end of
each day. Drain the machine as per the shut down instructions.
Remove, clean and replace filters. Regularly check the wash and
rinse jets and clean if necessary – see below
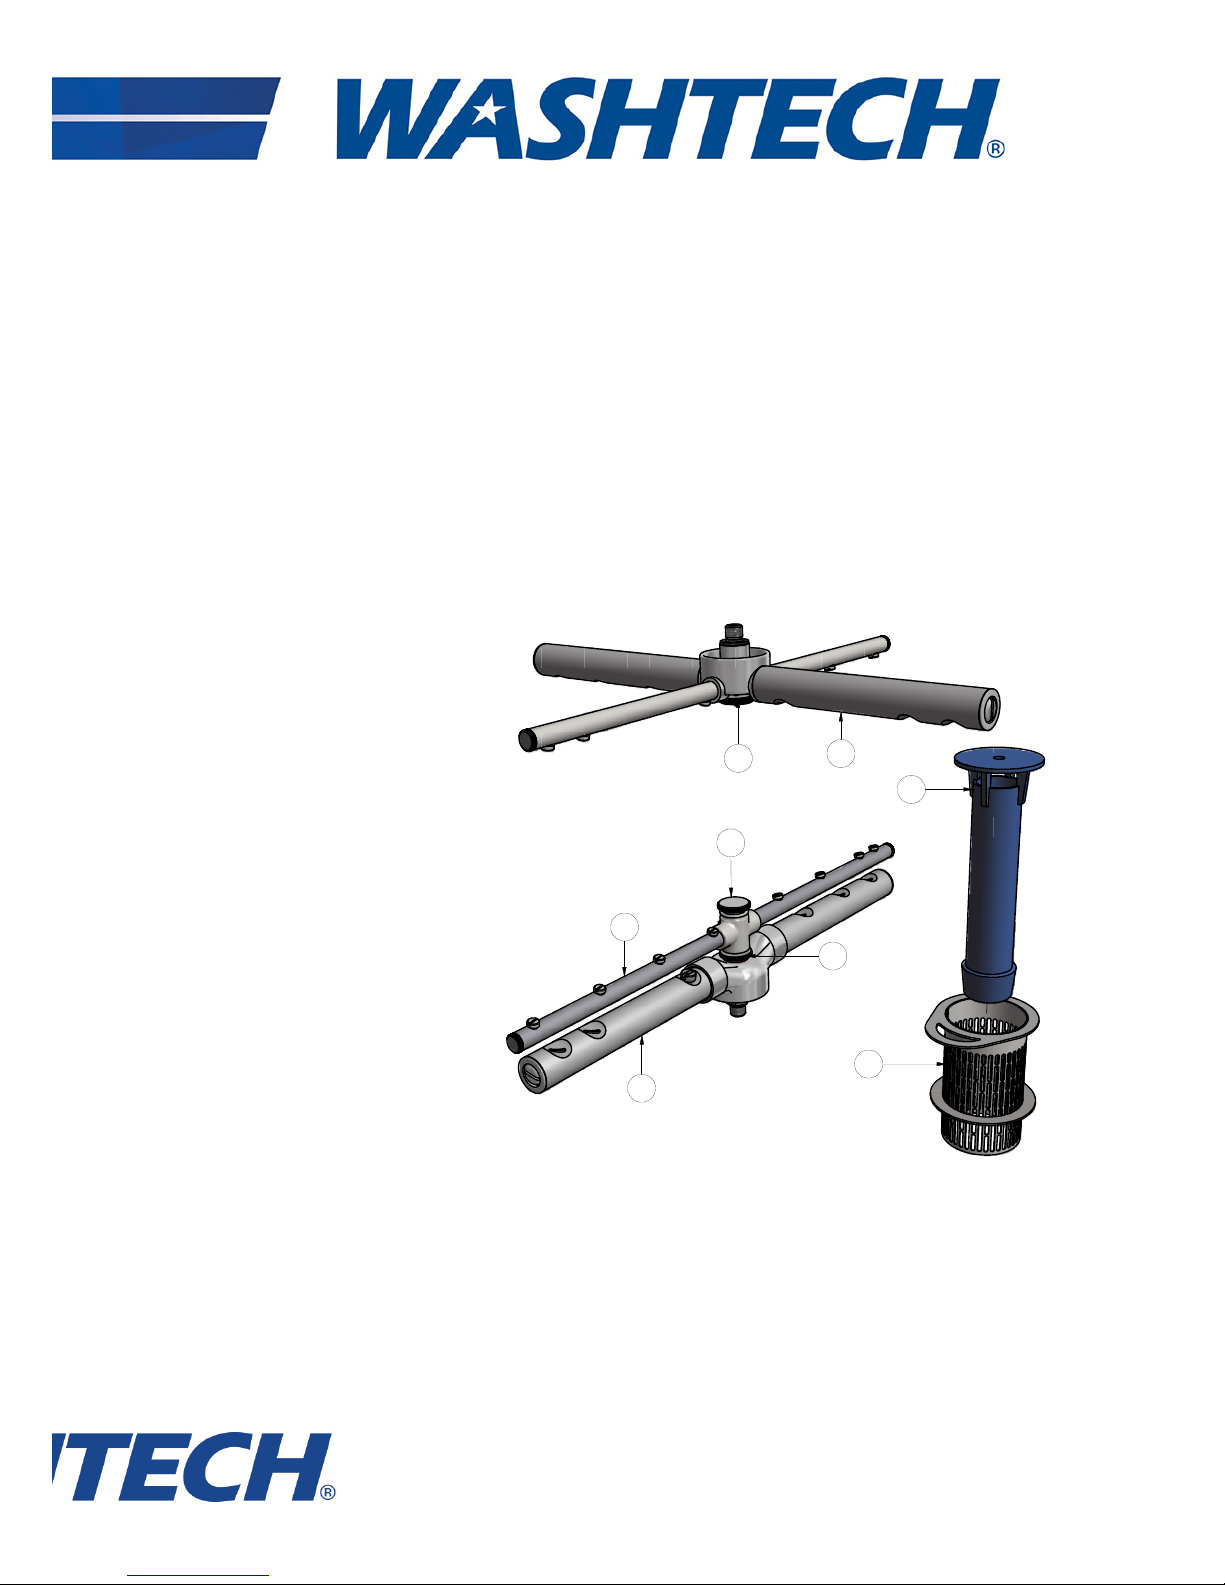
REGULAR CLEANING – at least once a week remove filter (1 ) and
upstand (2). Remove wash (3) and rinse arms (4) by undoing the
central thumbscrews (5). Remove joined wash and rinse arm (8) by
undoing central thumb screw (7). Inspect all jets – use toothpick or
paperclip and remove arm end-caps if necessary to flush and clear.
Clean and then replace all items.
MAINTENANCE
Regular servicing of the dishwasher is essential for high
performance, efficient operation and long machine life.
Contact us for information on maintenance contracts.
Distributed in Australia by Moffat Pty Limited
740 Springvale Road, Mulgrave 3170 Victoria
Tel (03) 9518 3888 | Fax (03) 9518 3818
Web www.moffat.com.au
1
2
4
3
8
5
7
6
Page 8
8 GM - Operator Manual 141218
User Settings Default Selection
Power Save ON ON/OFF
Detergent Injection Time 12 5 - 30 secs
Display Contrast 27 10 - 40
User Programming
The User Settings menu is accessed for programming by pressing the UP and DOWN
keys simultaneously for a few seconds. The programming options are specified in the
table below:
Power Save function reduces the rinse temperature setting by 10°C when the machine is
idle for 5 minutes or more. The temperature settings return to the set value when door is
opened or START/STOP key is pressed.
QuickStart starts washing regardless of rinse temperature. If rinse temperature is not
sufficient cycle countdown will stop at 22 seconds. Washing continues until rinse reaches
temperature required for sanitization and countdown then resumes.
Troubleshooting
If an error message appears on the control display first try turning the machine OFF for 30
seconds and then back ON.
Display Code Cause Remedy
7. Fill Failure - wash tank
not full after fill timeout
Check drain upstand fitted Fit upstand before
filling
Check flow rate of water supply Check water supply
8. Drain Failure Drain hose jammed/blocked Check/unblock drain
hose
Drain upstand not removed Remove upstand
before draining
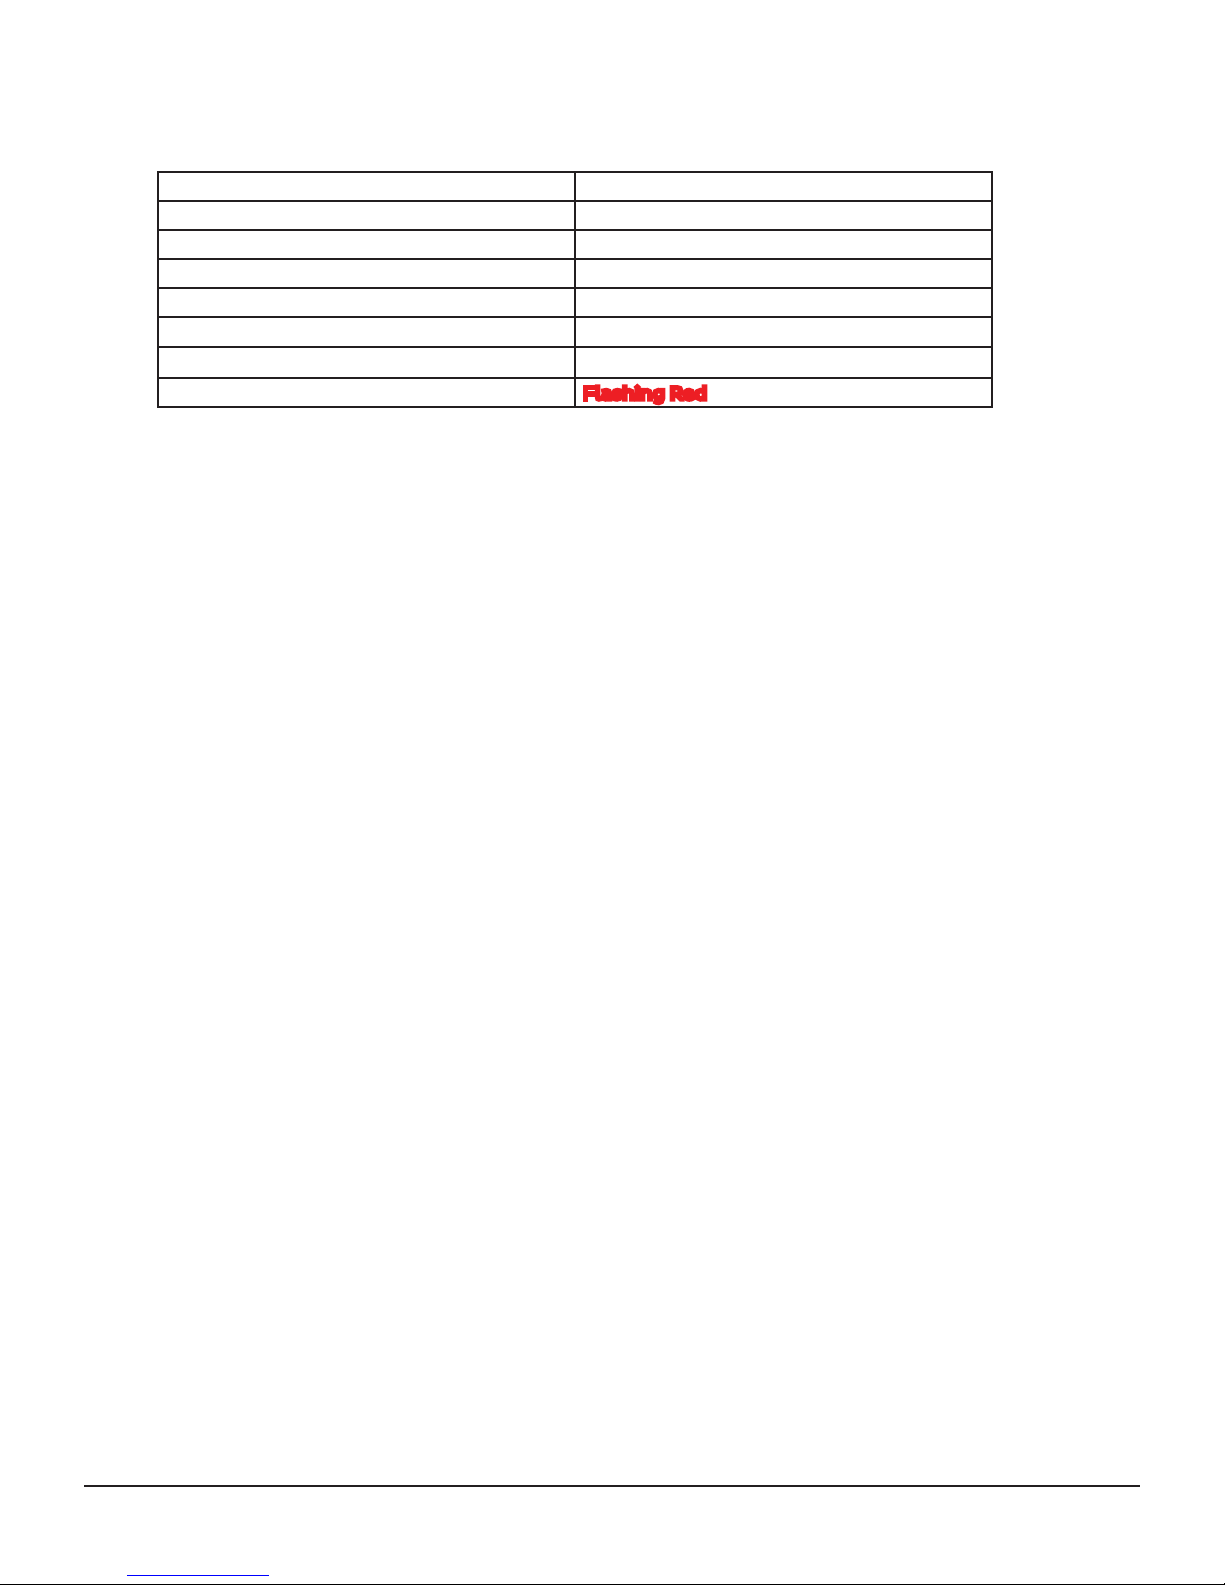
Keypad Start Button Colours
Machine State Colour
Door Open Purple
Filling White
Heating Orange
Ready Green
Ecopower Blue
Washing Red
Error Flashing Red
If the error message remains call for service
Page 9

9 GM - Operator Manual 141218
Fault Cause Remedy
Filling
Not filling Water supply valve shut Check Water supply valve
Door Switch not operating Check Door is closed
Filling during wash cycle Upstand not fitted properly Check Drain upstand is fitted
Heating
Dishes not hot enough Rinsing but not hot Check water arms spinning freely
Cycle start
Does not start Door switch Check door is closed
Cycle Finish
Wash too long Water supply cold Check water temperature
Performance
Poor wash result Detergent not used Use quality low foam product
Overloading racks Do not overload racks
Not pre-rinsing Use Fisher pre-rinse
Wash arms not rotating Remove and clean arms/check
bushes
Wash jets blocked Remove arms and clean jets
Excessive soiling Pre-rinse/use long cycle
Unrealistic expectation E.g. baked on soiling requires
pre-soaking
Poor rinse results Rinse jets blocked Remove arms and clean jets
Rinse arms not turning Remove arms, clean jets, check
bushes
Poor racking procedures Do not overload racks
Wash tank soil build up Pre-rinse, change wash water
regularly
Not drying Poor wash/rinse performance Refer above
Low temperatures Check heating systems
Drying agent not used Use quality drying agent/rinse fluid
Foaming Wash Excessive Rinse Fluid Adjust Rinse Fluid
Troubleshooting
Page 10
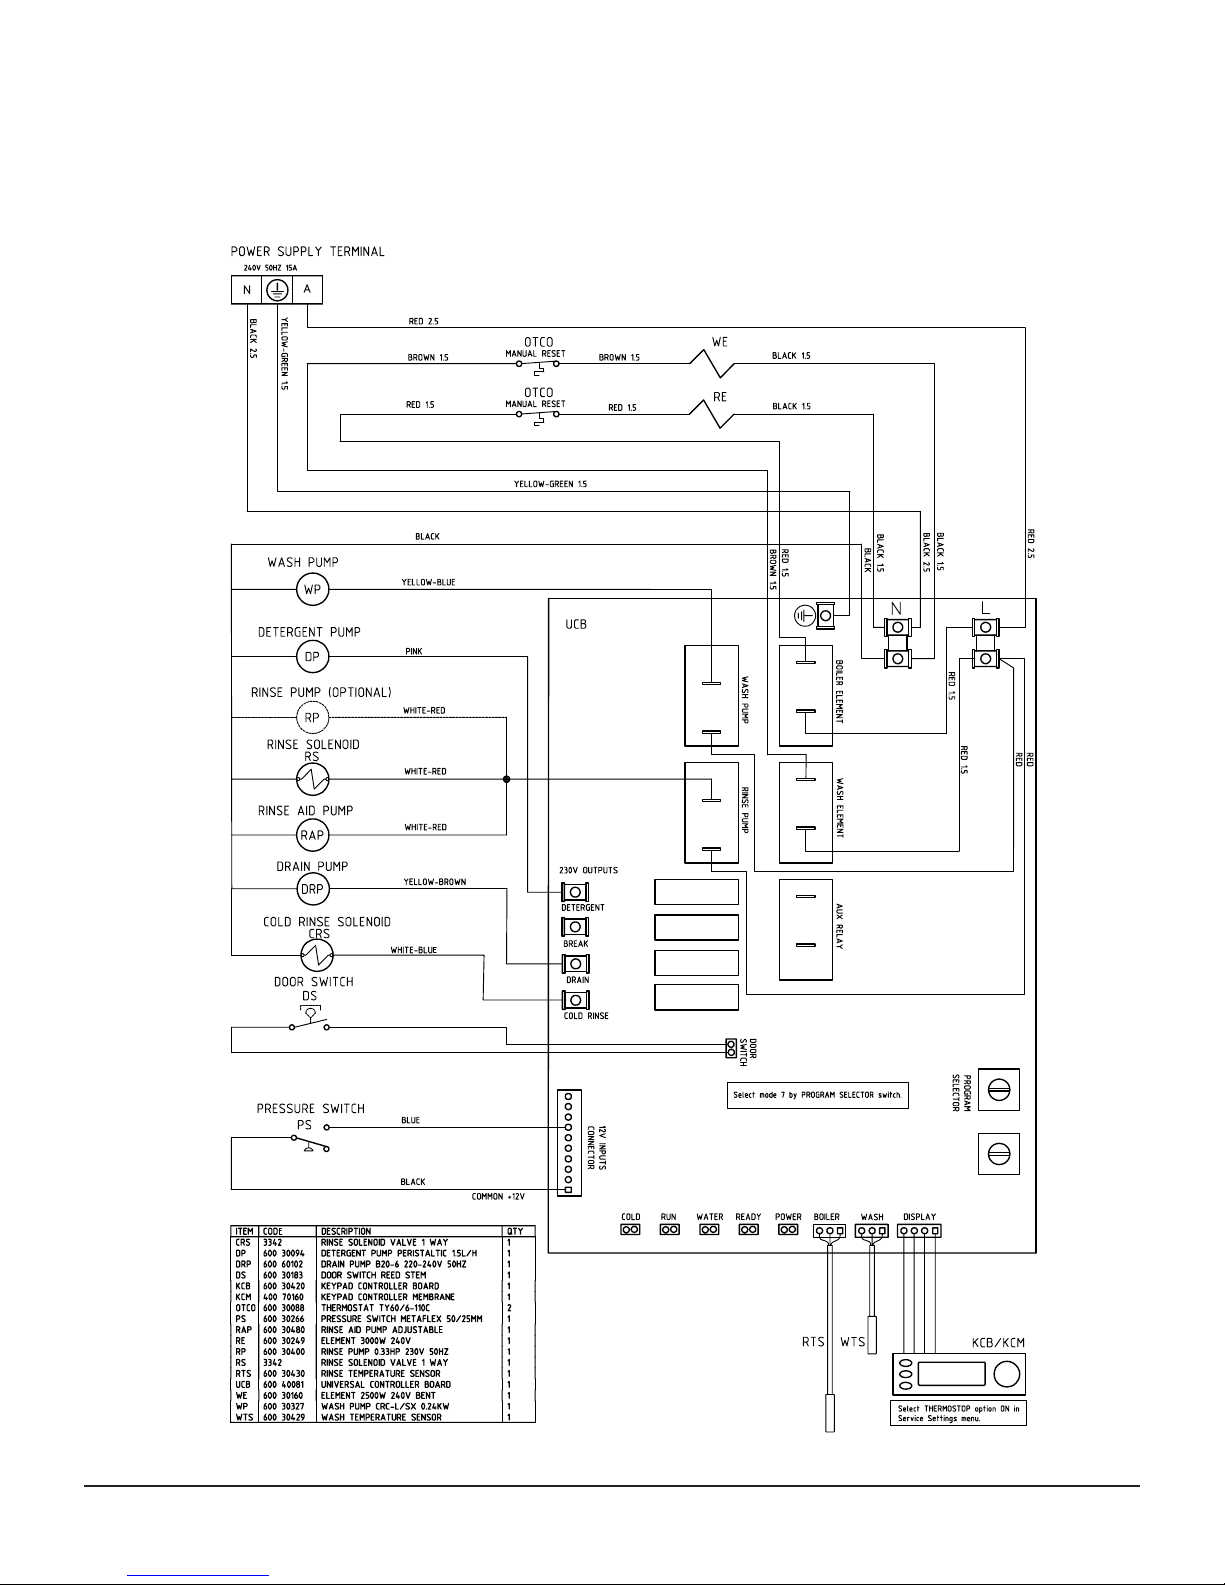
10 GM - Operator Manual 141218
GM7 Wiring Diagram
060247 19/12/14 3D
GM7(W) WIRING DIAGRAM
Page 11
11 GM - Operator Manual 141218
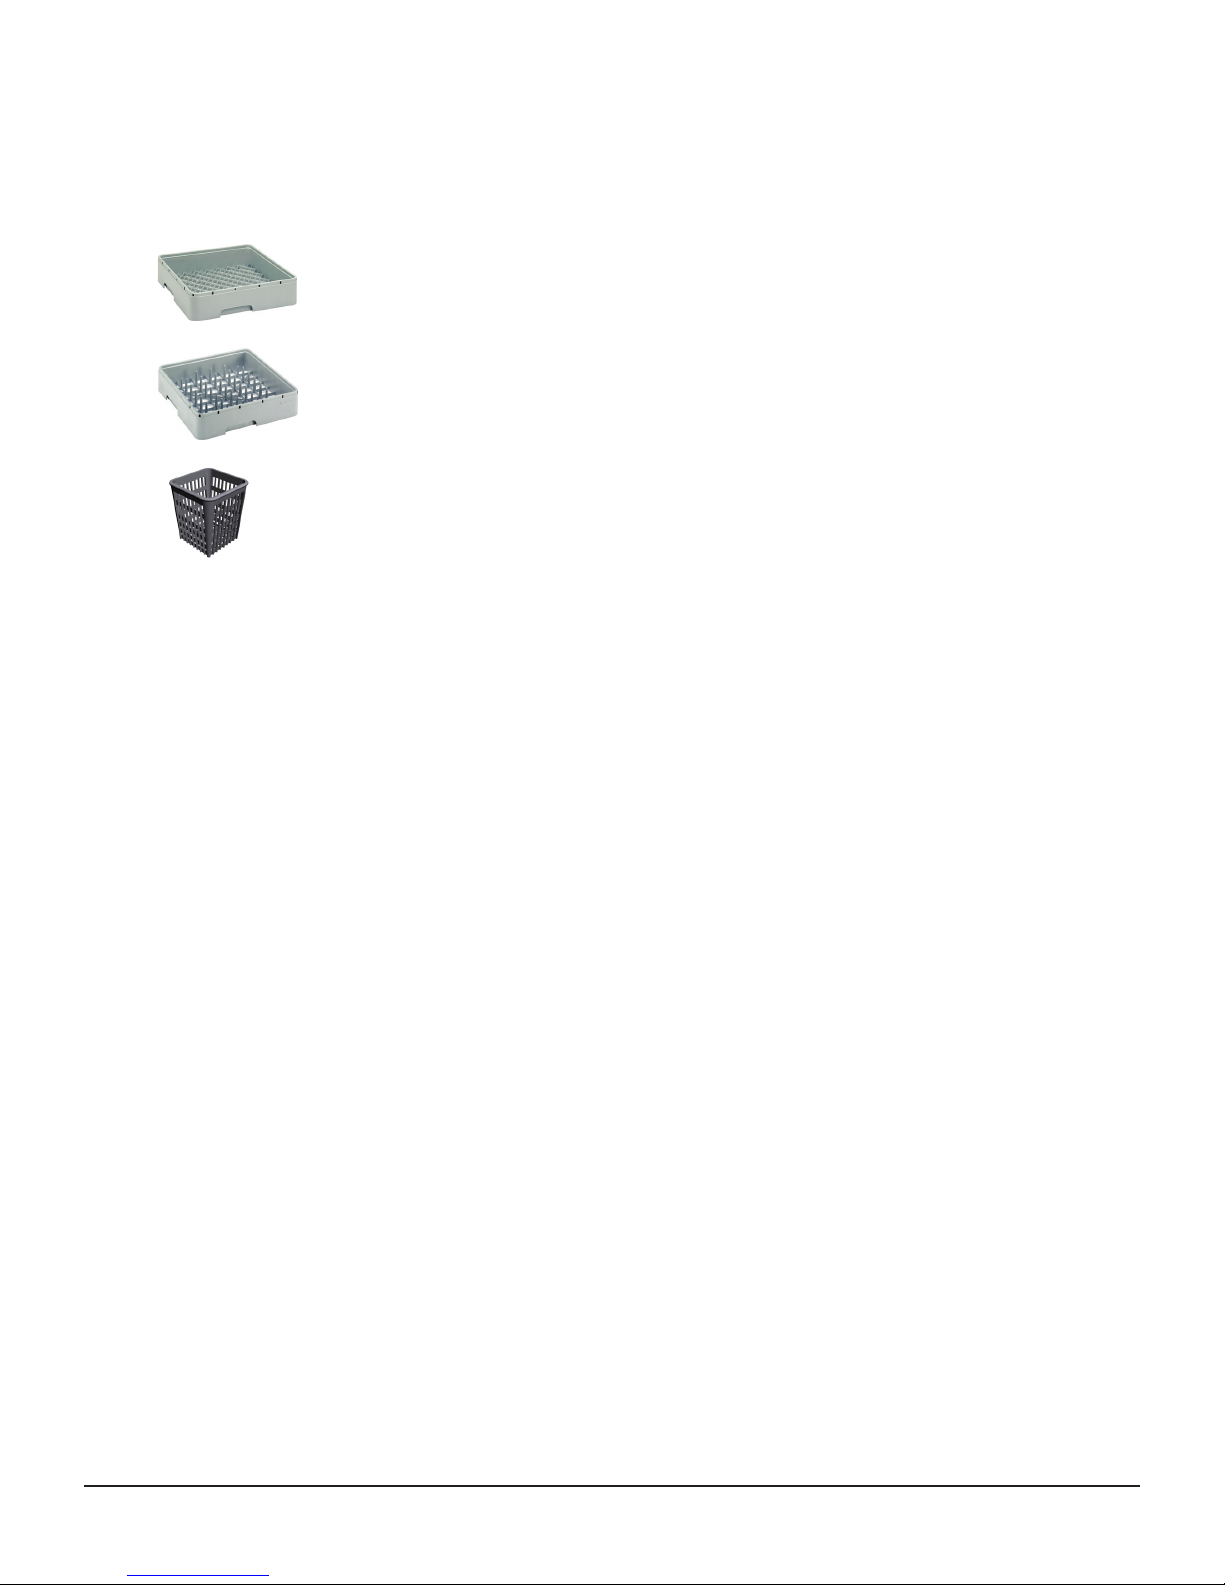
Accessories
Code Description
0428001 Cuprack 450mm
0428002 Dishrack 450mm
C660503 G Cutlery Container
Page 12

Information supplied in this manual is copyright.
No part of this work may be reproduced or copied
in any form or by any means, electronic or
mechanical without the express permission of the
author/publisher
Distributed in Australia by Moffat Pty Limited
740 Springvale Road
Mulgrave 3170
Victoria
Australia
24HR Service 1 800 622 216
Parts 1 800 337 963
ISO9001
All Washtech products are designed and
manufactured by Washtech using the
internationally recognised ISO9001 quality
management system, covering design,
manufacture and final inspection, ensuring
consistent high quality at all times.
In line with policy to continually develop and
improve its products, Washtech Ltd reserves the
right to change specifications and design without
prior notice.
 Loading...