

Page 1
Warrior Products, Inc.
16850 SW Upper Boones Ferry Rd
Ste. A
Durham, OR 97224
Phone (888) 220-6861
Fax (503) 692-0364
sales@warriorproducts.com
Protecting Your Adventure Lifestyle
===================== ======== ========================= ======== ==========================
QUALITY
•
INTEGRITY
•
INNOVATION
•
SERVICE
FJ Cruiser Rear Bumper
INSTALLATION INSTRUCTIONS
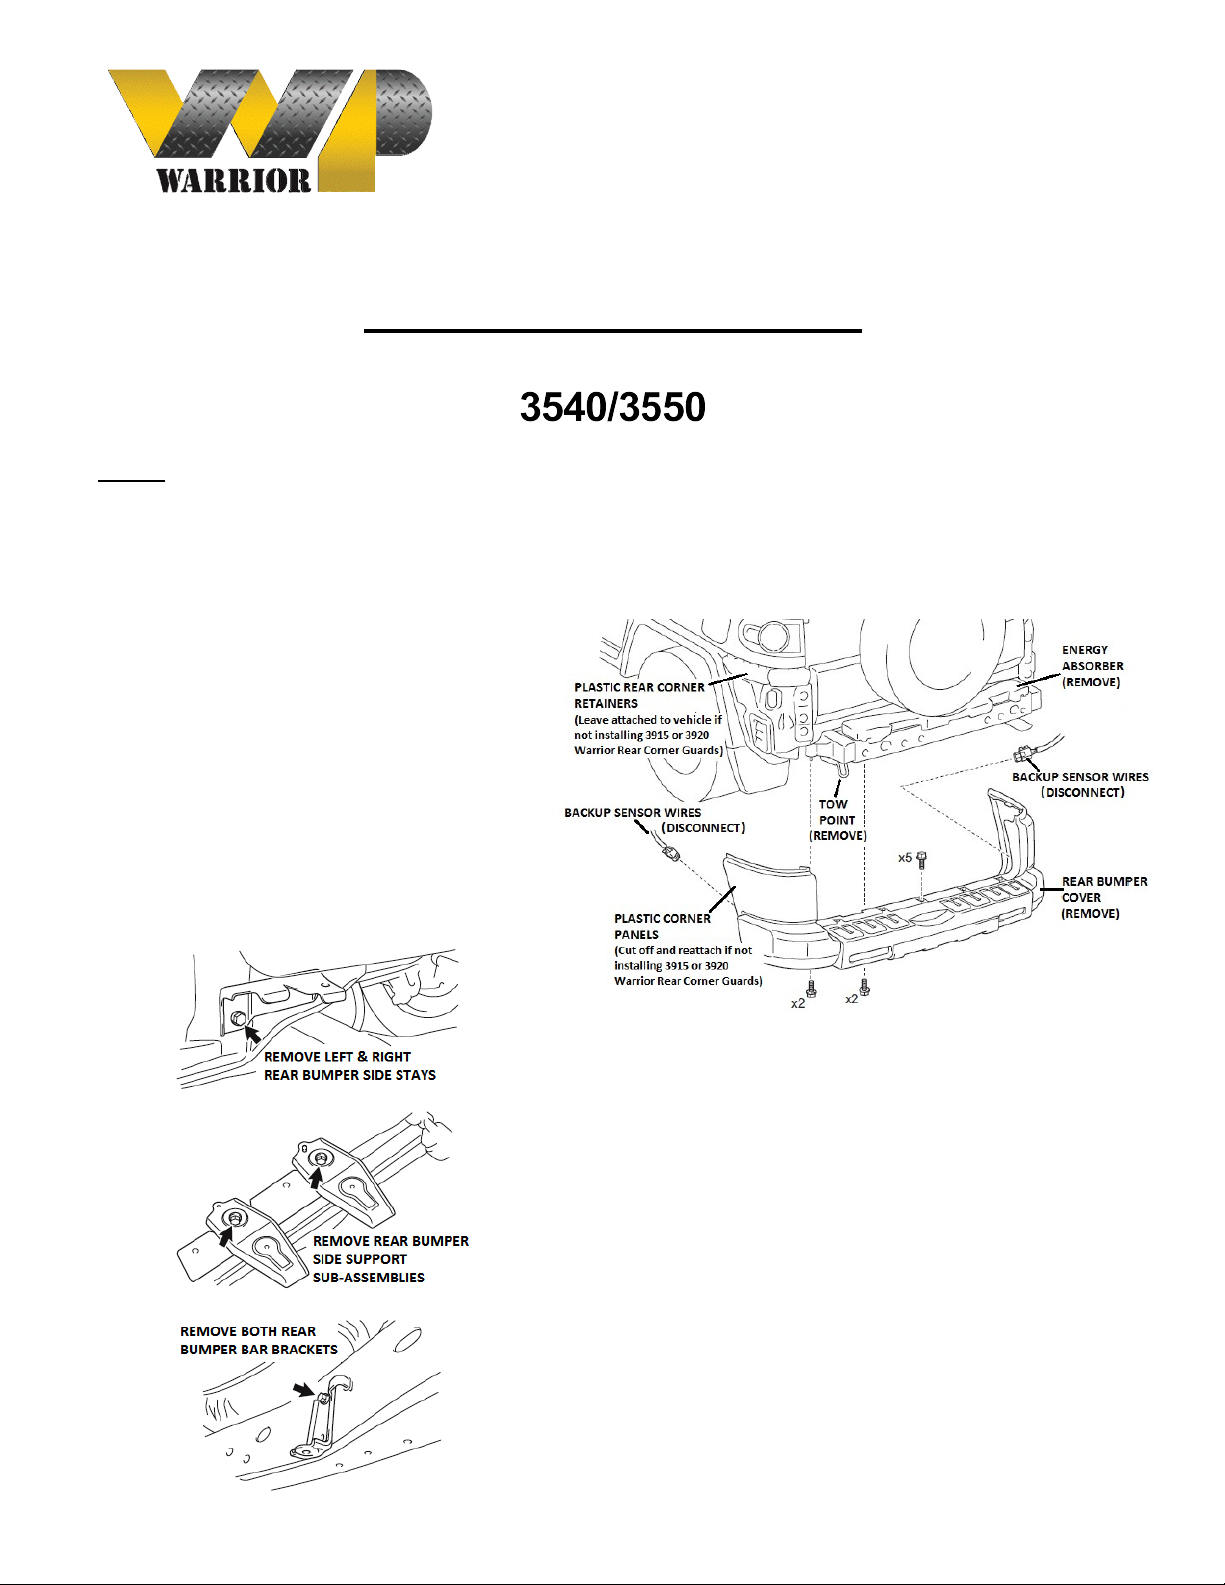
NOTE: To fit the Warrior Products 3540 or 3550 FJ Cruiser rear bumper you must remove (i.e. cut) the
plastic corner panels free from the rear bumper cover and reattach them utilizing the OEM rear corner
retainers. For a much cleaner appearance, Warrior Products offers 3915 & 3920 FJ Cruiser Rear Corner
Guards as armored replacements to the factory plastic corners.
1. Begin the installation by removing
the OEM rear bumper cover /
corners and all associated trim
pieces. Remove the 5 screws along
the top step of the bumper cover and
4 screws on the underside. Lastly,
locate and remove the push-pins on
the inner tailgate edge of the plastic
corner panels. Disconnect the
backup sensor wiring and/or trailer
harness bracketry if equipped.
2. Begin removal of the rear bumper cover taking care not
to break any mounting tabs of the plastic corner panels.
Remove the rear bumper energy absorber, side stays,
side support sub-assemblies, rear bumper bar brackets
and the tow point.
Page 2
Warrior Products, Inc.
16850 SW Upper Boones Ferry Rd
Ste. A
Durham, OR 97224
Phone (888) 220-6861
Fax (503) 692-0364
sales@warriorproducts.com
Protecting Your Adventure Lifestyle
===================== ======== ========================= ======== ==========================
QUALITY
•
INTEGRITY
•
INNOVATION
•
SERVICE
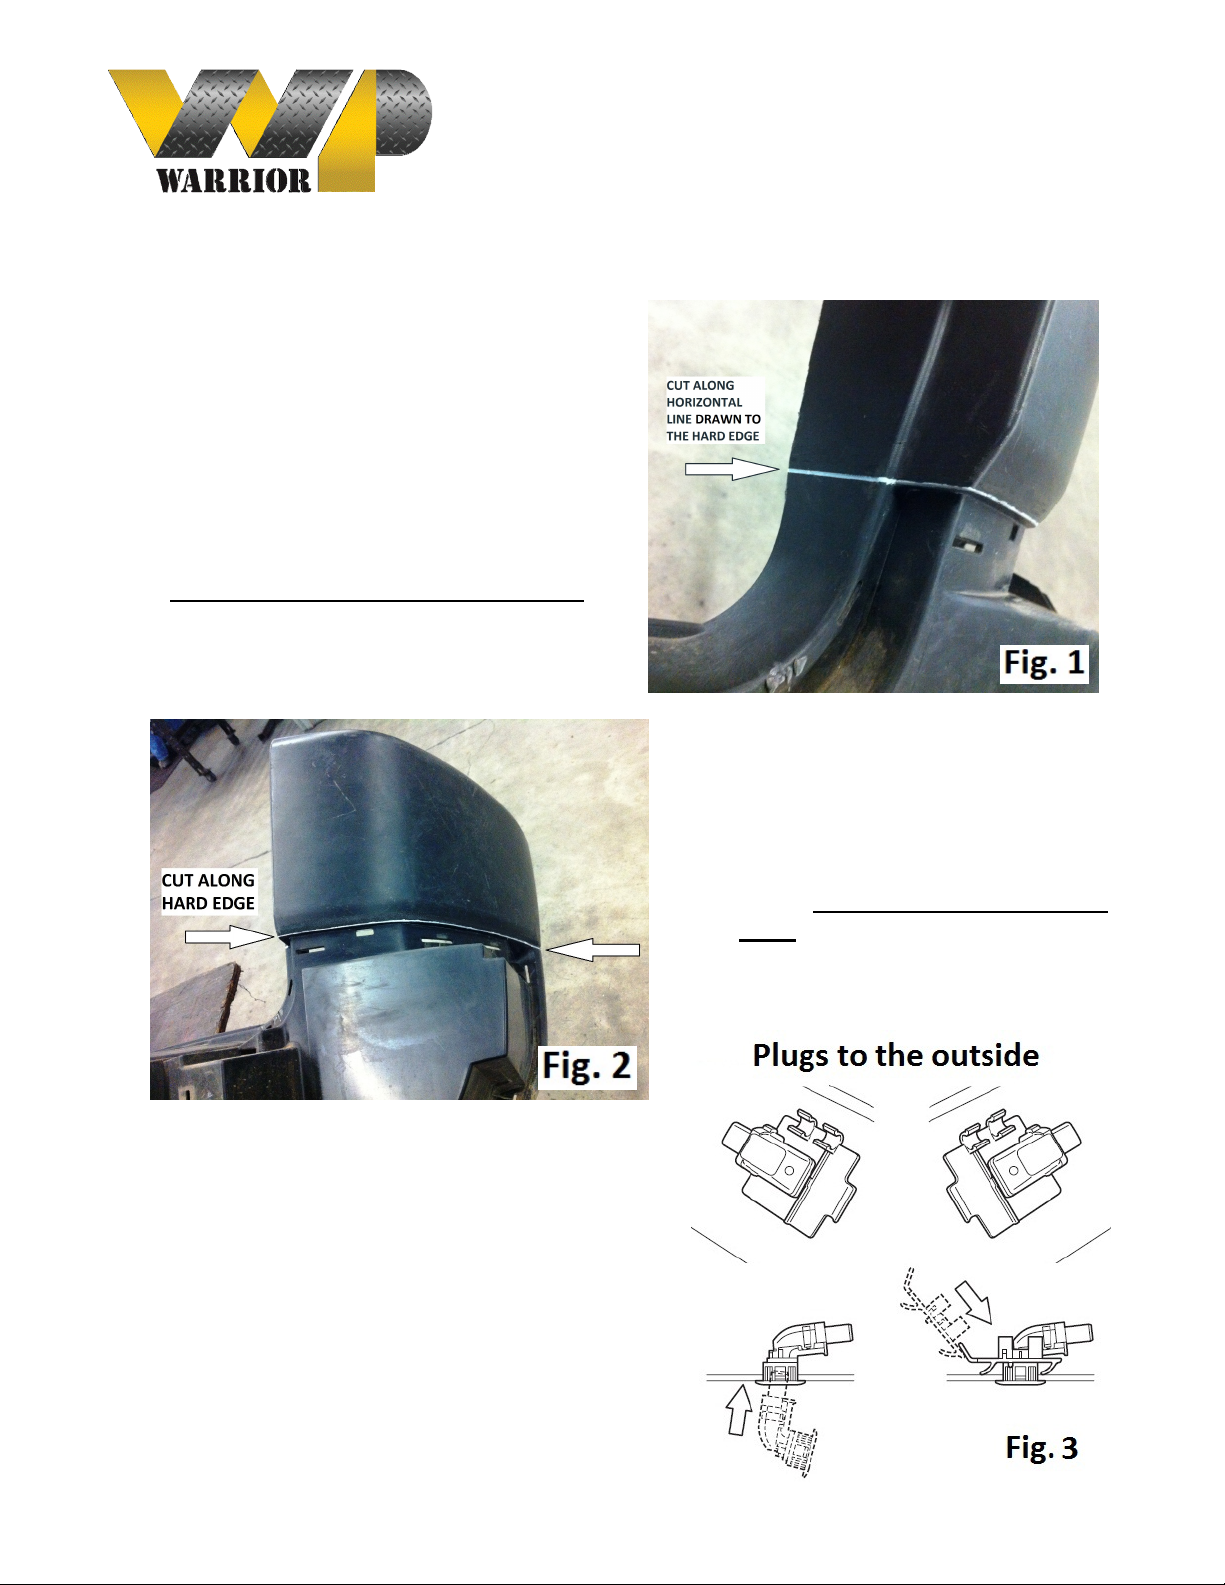
3. If you are reinstalling the factory plastic corner
panels, you will need to cut them completely
free of the rear bumper cover. This is
accomplished by using a razor knife or
hacksaw blade and cutting them along the
hard edge where they meet the top of the
factory bumper endcaps. (Fig. 1 & 2) To allow
easier access to this area when cutting,
remove the silver endcaps by unclipping the
plastic tab on the inside of the bumper cover.
Use caution and cut away from yourself.
Clean up any burrs with a file or sandpaper
and set the corners aside for reinstallation
following the bumper.
4. If your FJ is equipped with the backup
sensors, remove them from the plastic
bumper cover by sliding the retainers
off and gently pulling the sensors out.
Reinstall into the Warrior rear bumper
in the same manner you removed them.
(Fig. 3) Use care as they are delicate
units. If your FJ is not equipped with
the sensors, plastic plugs are provided
to cover the holes.
5. Next, you will be mounting the (2) bumper frame
boxes to the inside surface of the FJ’s rear cross
member. Each side utilizes two factory 8mm
threaded holes to locate the frame boxes. Once the
frame boxes are attached, use the _”x1-1/2” bolts
and the 5/8”x1-1/2” bolts to structurally fasten them
to the cross-member. (Fig. 4) Access these
washers and nuts though holes located on the front
face of the rear cross member.
Page 3

Warrior Products, Inc.
16850 SW Upper Boones Ferry Rd
Ste. A
Durham, OR 97224
Phone (888) 220-6861
Fax (503) 692-0364
sales@warriorproducts.com
Protecting Your Adventure Lifestyle
===================== ======== ========================= ======== ==========================
QUALITY
•
INTEGRITY
•
INNOVATION
•
SERVICE
6. After both frame boxes have been
located and bolted onto the rear crossmember, take the rear bumper and slide
it most of the way onto the rear crossmember. If you have the backup
sensors, take this moment to feed the
wiring through the bumper and plug them
back into the sensors. Once you are
certain there is no pinching or binding of
the sensor wiring, slide the bumper the
rest of the way lining up the holes in the
frame boxes with the slots in the bumper
brackets.
7. Using the _”x1-1/2” bolts, _” nuts, 7/16”
flatwashers and _” lockwashers, loosely
thread them through the bumper
bracketry and frame boxes. Next, slip
the two slotted frame spacers between
the FJ’s frame and the lower extended
sections of the bumper bracketry. Use
the (4) M12x40mm bolts, 7/16”
flatwashers and _” lockwashers and
thread them most of the way into the
frame. Stand back and visually align the
bumper from the back and from the side
of the FJ. There will be little if any sideto-side adjustability. If you are satisfied
with the placement, begin tightening all
the mounting bolts starting with the lower extended section of the bumper bracketry. Torque the
frame bolts and frame box hardware to 80-100lbs.
8. Reinstall the plastic corner panels by snapping them back into the plastic corner retainers and
using the push-pin fasteners. The backup sensor brackets may also be bent up to improve the
appearance. Reinstall the towing harness bracket if equipped. Your installation of the Warrior FJ
Cruiser Rear Bumper is now complete.
If you need further assistance installing your product, please contact us by email at
techsupport@warriorproducts.com or call us at (888) 220-6861
THANK YOU FOR PURCHASING WARRIOR PRODUCTS
 Loading...