

Page 1
Protecting Your Adventure Lifestyle
========================================================================================
QUALITY • INTEGRITY • INNOVATION • SERVICE
Warrior, Inc.
16850 SW Upper Boones Ferry Rd
Ste. A
Durham, OR 97224
Phone: (888) 220-6861
Fax: (503) 692-0364
[email protected]
www.warriorproducts.com
30720 TJ 2” LIFT KIT
INSTALLATION INSTRUCTIONS
Warrior recommends this system be installed by a certified technician. In
addition to these instructions, professional knowledge of
disassemble/reassembly procedures as well as post installation checks must
be known. Attempts to install this system without this knowledge and
expertise may jeopardize the integrity and/or operating safety of the vehicle.
Please read instructions before beginning installation. Check the kit
hardware against the parts layout and list found on the last page of these
instructions. Be sure you have all needed parts and know where they go.
With the installation of all lift kits and larger tires it is important to check the condition of your steering stabilizer. If the
stabilizer is worn or is leaking it should be replaced. Steering stabilizers are designed to restrain “bump steering” and front
end vibration, giving added life to tires, ball joints, and other steering components. A multiple stabilizer kit is recommended
for vehicles equipped with a winch or larger tires
PRODUCT USE INFORMATION
1. As a general rule, the taller a vehicle is, the easier it will roll. Offset, as much as possible, what is lost in rollover
resistance by increasing tire track width. In other words, go "wide" as you go "tall". Many sportsmen remove their mud
tires after hunting season and install ones more appropriate for street driving; always use as wide a tire and wheel
combination as possible to enhance vehicle stability.
2. We strongly recommend, because of rollover possibility, that the vehicle be equipped with a functional roll-bar and cage
system. Seat belts and shoulder harnesses should be worn at all times. Avoid situations where a side rollover may occur
3. Generally, braking performance and capability are decreased when significantly larger/heavier tires and wheels are used.
Take this into consideration while driving.
4. Do not add, alter, or fabricate any factory or after-market parts to increase vehicle height over the intended height of the
Warrior product purchased. Mixing component brands is not recommended.
5. Warrior makes no claims regarding lifting devices and excludes any and all implied claims. We will not be responsible
for any product that is altered.
6. The required installation time for this system is approximately 8 hours.
7. This suspension system was developed using a 33 x 12.50R – 15 tire, on a 8” wheel. Before installing other
combinations, please consult your local tire and wheel specialist.
8. The following tools and supplies are recommended for proper installation of this kit.
a. Spring Compressor
b. Safety Glasses – Wear safety glasses at all times
c. Silicone Spray
d. Wheel Chocks (Wooden Blocks)
e. Drill Assortment (1/8” to 1/2")
f. Heavy Duty Jack Stands
g. Hammer
h. Drill Motor
i. Combination Wrenches
j. Torque Wrench (250 ft lbs. Capacity)
k. Torx Key Socket
l. _” Drive Ratchet and Sockets
m. File
n. Allen Wrenches
o. Hydraulic Floor Jacks
If question exist we will be happy to answer any questions concerning the design, function, and correct use of our products.
FIGURE
Page 2
Protecting Your Adventure Lifestyle
========================================================================================
QUALITY • INTEGRITY • INNOVATION • SERVICE
Warrior, Inc.
16850 SW Upper Boones Ferry Rd
Ste. A
Durham, OR 97224
Phone: (888) 220-6861
Fax: (503) 692-0364
[email protected]
www.warriorproducts.com
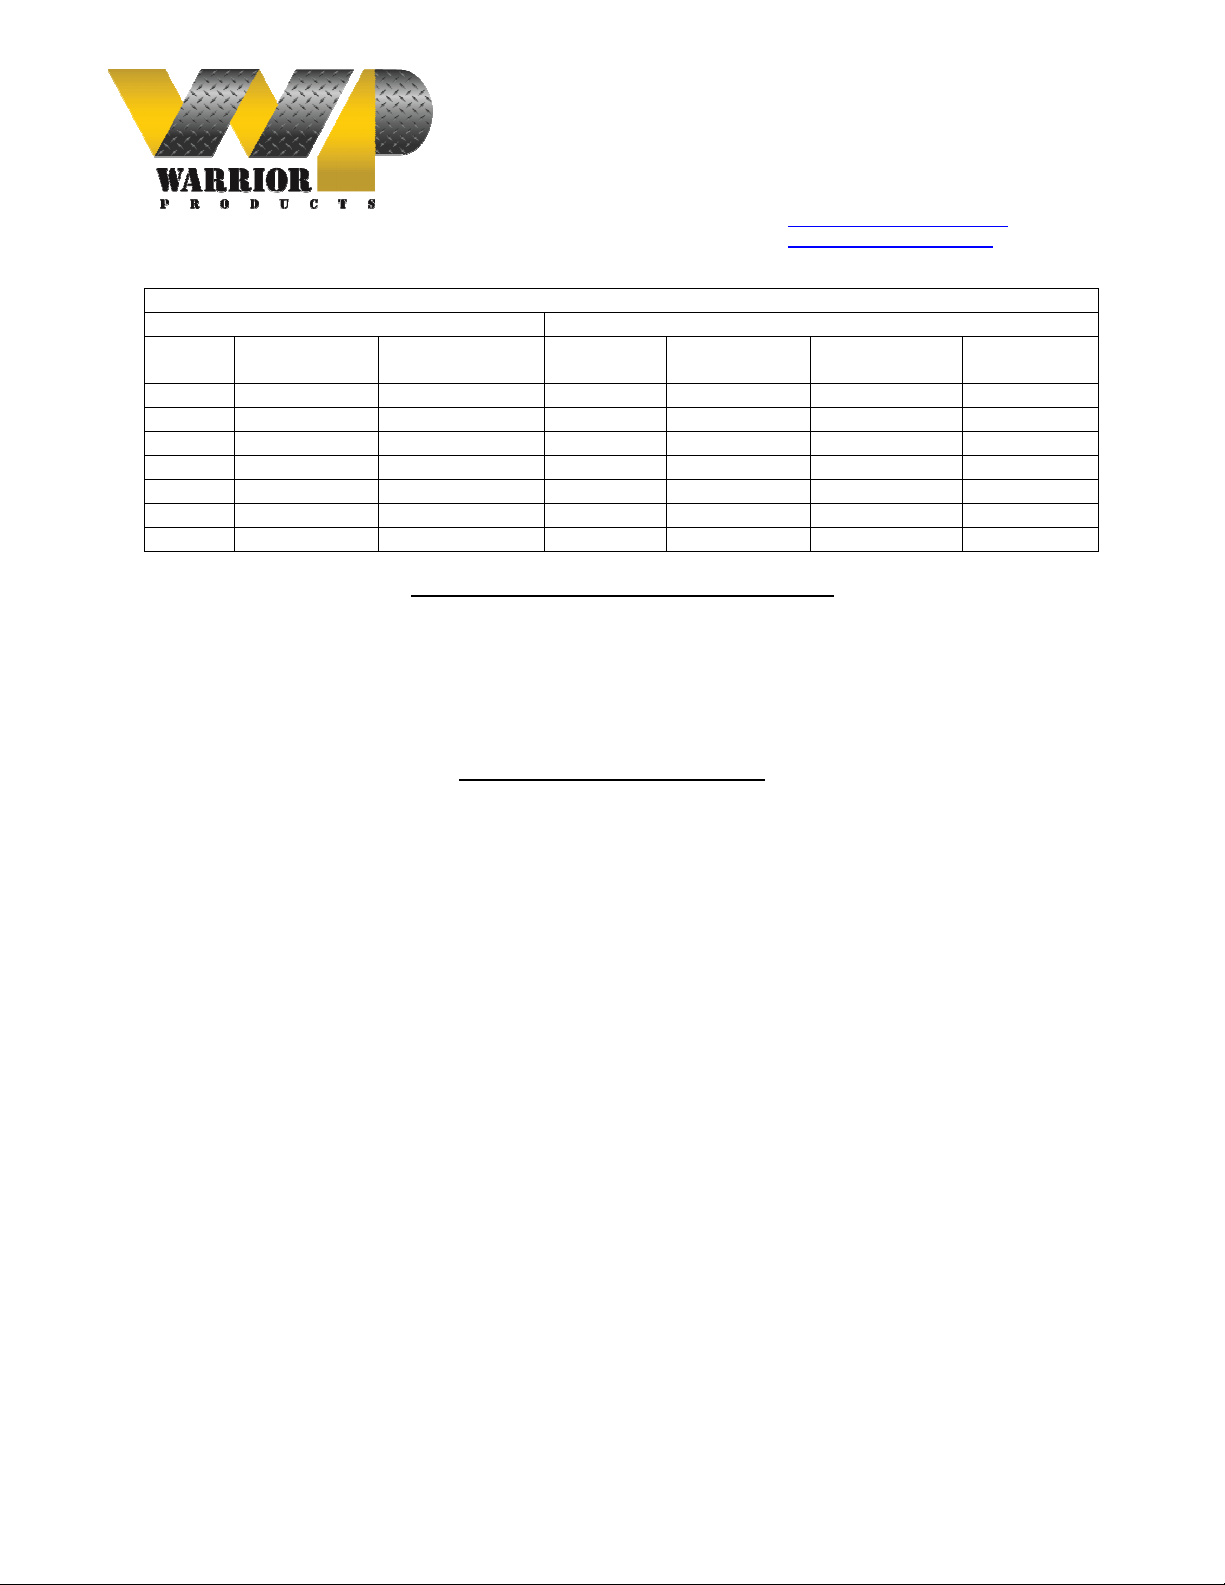
STANDARD BOLT TORQUE SPECIFICATIONS
INCH SYSTEM
METRIC SYSTEM
Bolt
Size
Grade 5
Grade 8
Bolt Size
Class 9.8
Class 10.9
Class 12.9
5/16
15 Ft – Lbs
20 Ft – Lbs
M 6
5 Ft – Lbs
9 Ft – Lbs
12 Ft – Lbs
3/8
30 Ft – Lbs
35 Ft – Lbs
M 8
18 Ft – Lbs
23 Ft – Lbs
27 Ft – Lbs
7/16
45 Ft – Lbs
60 Ft – Lbs
M10
32 Ft – Lbs
45 Ft – Lbs
50 Ft – Lbs
_
65 Ft – Lbs
90 Ft – Lbs
M12
55 Ft – Lbs
75 Ft – Lbs
90 Ft – Lbs
9/16
95 Ft – Lbs
130 Ft – Lbs
M14
85 Ft – Lbs
120 Ft – Lbs
145 Ft – Lbs
5/8
135 Ft – Lbs
175 Ft – Lbs
M16
130 Ft – Lbs
165 Ft – Lbs
210 Ft – Lbs
_
185 Ft – Lbs
280 Ft – Lbs
M18
170 Ft – Lbs
240 Ft – Lbs
290 Ft – Lbs
NOTICE TO DEALER AND VEHICLE OWNER
Any vehicle equipped with any Warrior product should have a “Warning to Driver” decal installed on the inside of the
windshield or on the vehicle’s dash. The decal should act as a constant reminder for whoever is operating the vehicle of its
unique handling characteristics.
INSTALLING DEALER - it is your responsibility to install the warning decal and forward these installation instructions on
to the vehicle owner for review. These instructions should be kept in the vehicle for its service
INSTALLATION INSTRUCTIONS
1. The front-end components are installed first.
2. Place the vehicle on a level surface. Set the parking brake. Center front wheels and chock rear wheels. From inside the
engine compartment, remove the upper shock stud nut, retainer and grommet form both of the front shocks Jack up the
vehicle and place jack stands on the frame rail behind the lower control arm mount on the frame. Installation is done one
end at a time.
3. Remove the front tires and wheels.
4. Place a floor jack underneath the axle for support and complete the removal of the front shock absorbers (DO NOT
REUSE THE ORIGINAL SHOCK ABSORBERS).
5. Remove the track rod from the axle housing and secure out of the way. Save the bolt and flag nut they will be reused in a
later step. Remove both of the front sway bar end links.
6. Remove the brake calipers and secure out of the way.
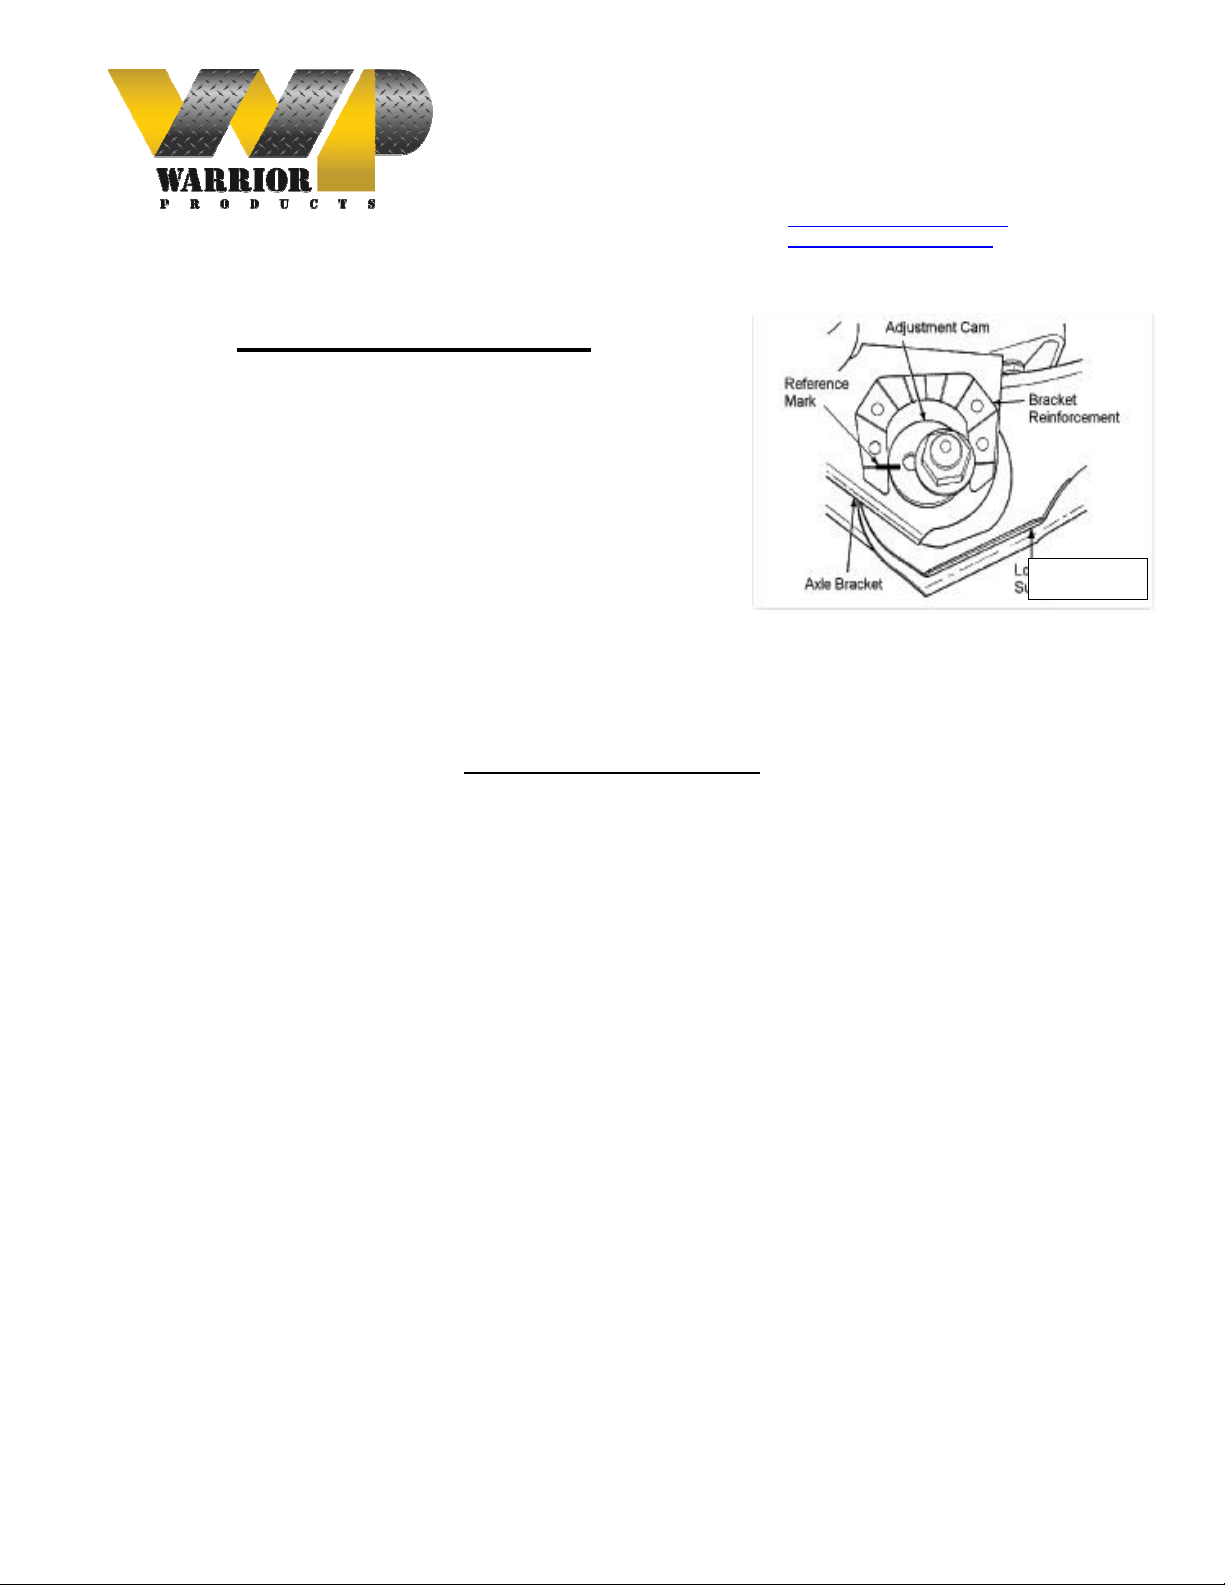
7. Mark the position of the lower control arm cam bolt and axle brackets for installation reference. (See Figure #1) If
equipped with ABS brakes, Remove the sensor wires and clamps for the inside of the lower arms and save clamps for reuse.
8. Remove the coil spring clip located on the bottom coil seat on both sides of the vehicle. Lower the axle and remove the
coil spring. A coil spring or strut compressor may be needed to remove the stock coil spring.
9. Install the coil spring spacer by slipping it over the bump stop tube at the top spring seat. A coil spring or strut
compressor is highly recommended for the coil spring installation. Compress the coil spring to 16” in length. Your
new spacer becomes the upper spring pocket, replacing the factory rubber isolator. Re-install the coil spring into the
upper and lower spring pockets and carefully remove the compressor. Make sure the coil is seated properly in the lower
coil seat by rotating the spring so the pig tail end fits in the spring pocket. Install the coil spring clamp and torque the
spring clip bolt to 16ft.-lbs.
10. Repeat steps on other side.
11. Assemble the boots on your new #60506 front shock absorbers, and install in the factory lower mounts. Install the upper
stud bushings and tighten the upper mounting point. Tighten the bar pin on the bottom of the shock with the stock
hardware. Repeat this on the opposite side of the vehicle. Re-install the brake calipers tires, wheels and lug nuts. Lower
the vehicle to the ground.
12. Align the reference marks on the adjustment cams and lower arm axle brackets and tighten to 85 ft. lbs.
Note: Longer brake lines are not required in the front with this kit unless the sway bar is disconnected. If disconnects are
used, longer brake lines are required. Install tires and wheels.
Page 3
Protecting Your Adventure Lifestyle
========================================================================================
QUALITY • INTEGRITY • INNOVATION • SERVICE
Warrior, Inc.
16850 SW Upper Boones Ferry Rd
Ste. A
Durham, OR 97224
Phone: (888) 220-6861
Fax: (503) 692-0364
[email protected]
www.warriorproducts.com
13. Chock the front wheels. Jack up the rear of the vehicle and remove the tires and wheels. Place jack stands on the frame
rail to support the vehicle. Place a floor jack under the differential. Remove the stock shock absorbers and sway bar
links. Retain the factory shock hardware it will be reused.
14. On the rear of the vehicle unbolt the track rod from the axle and secure out of the way.
15. Carefully lower the axle with the floor jack and remove the coil springs. NOTE: It may be necessary to use a coil
spring or strut compressor to remove the stock coil springs. Be careful not to overextend the vent tube on the axle. It
may be necessary to disconnect the hose during installation and reroute the hose after installation.
16. Install coil spring spacers over the bottom spring pad. It is highly recommended to use a coil spring or strut compressor
to re-install the coil springs. Jack up the axle to compress the coil spring and to align the track rod with the new
mounting point and install the stock mounting hardware.
17. Install your new shocks #60507 on the vehicle with the factory hardware and sway bar end links.
18. Reinstall the wheels, tires. Lower the vehicle to the ground and tighten the lug nuts to the factory torque specifications
(80-110 ft-lbs.)
19. Tighten lower arm pivot bolts to 130 ft. lbs and the track bar mounting bolts to 74 ft. lbs.
POST INSTALLATION INSTRUCTIONS
1. Check all fasteners for proper torque. Check to ensure there is adequate clearance between all rotating, mobile, fixed and
heated members. Check steering gear for interference and proper working order. Test brake system.
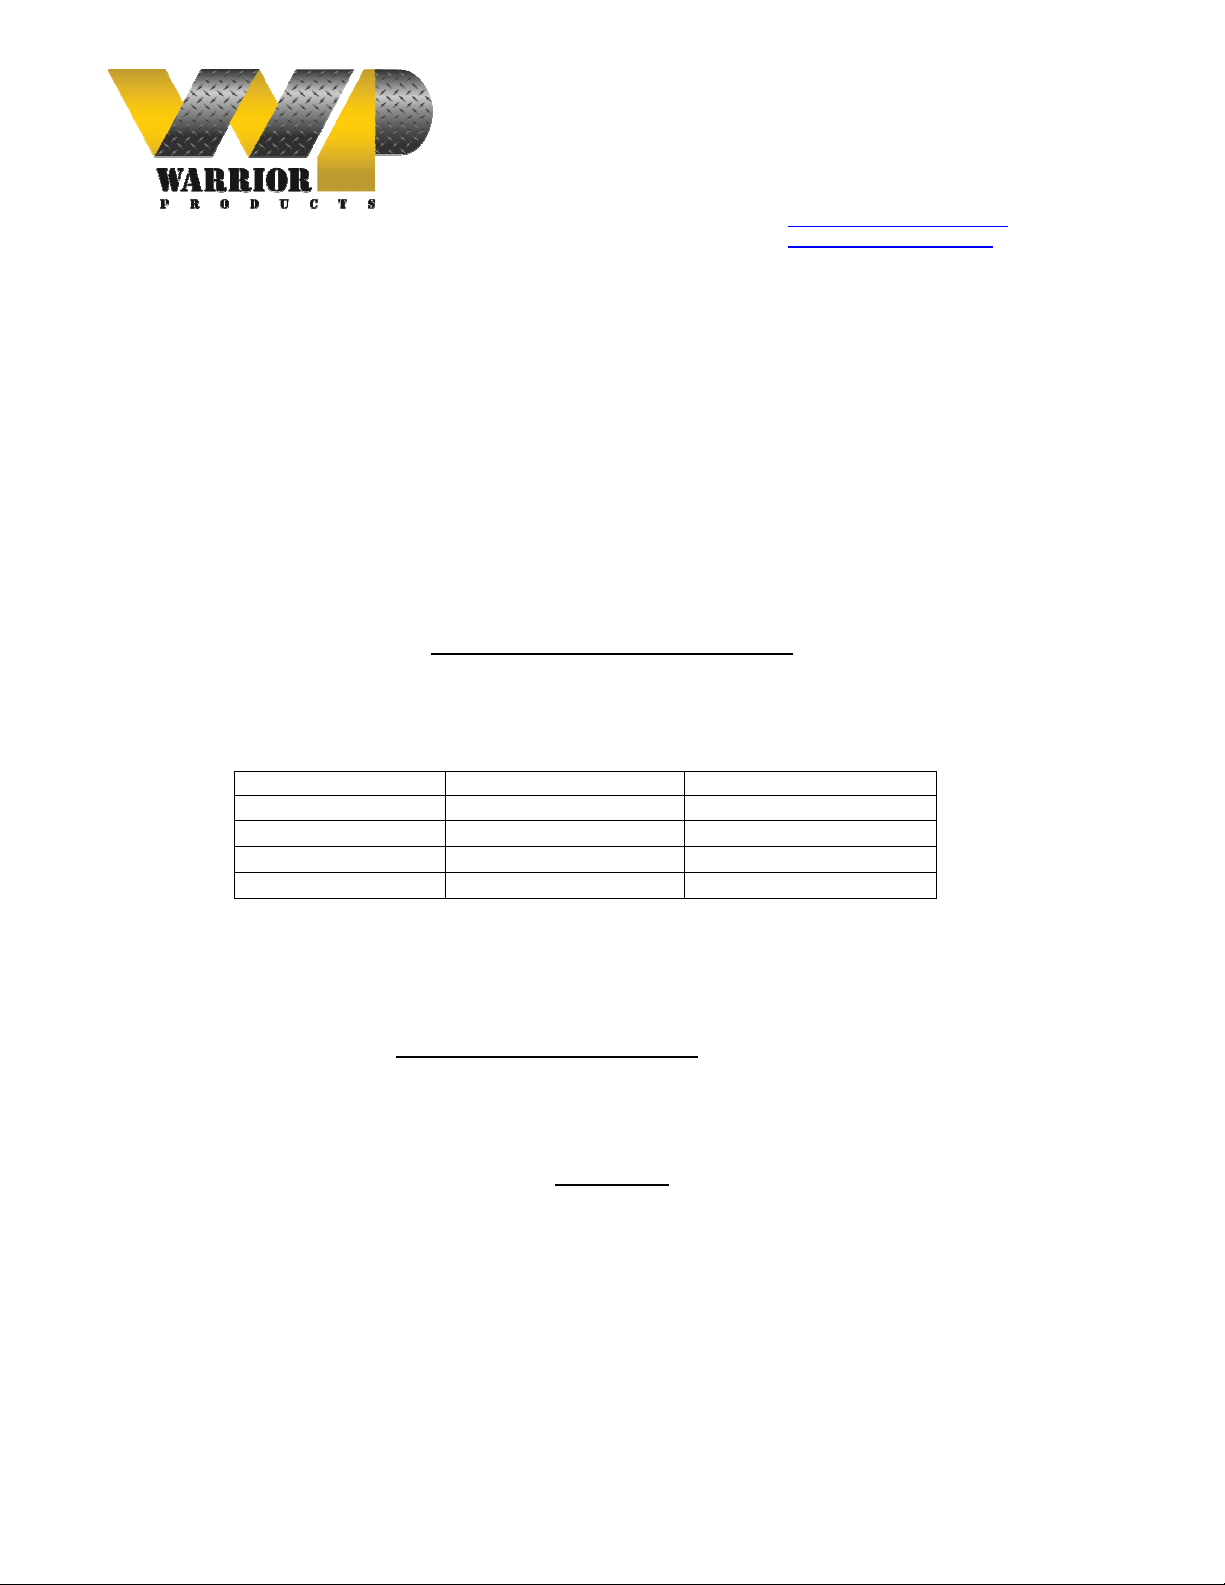
2. Readjust headlamps. Have the vehicle aligned to the following specifications:
Adjustment
Preferred
Range
Caster
7°
± 1°
Camber
- 0.25°
± .63°
Toe In (each wheel)
0.15°
± .15°
Thrust Angle
0°
± .15°
3. Perform steering sweep. Check to ensure brake hoses have sufficient slack and will not contact rotating, mobile, or fixed
members, adjust lines/brackets to eliminate interference and maintain proper working order. Failure to perform
inspections may result in component failure.
4. Re torque all fasteners after 500 miles. Visually inspect components and re torque fasteners during routine vehicle
service.
MAINTENANCE INFORMATION
It is the ultimate buyers responsibility to have all bolts/nuts checked for tightness after the first 100 miles and then every
1000 miles. Wheel alignment, steering system, suspension and driveline systems must be inspected by a qualified
professional mechanic at least every 3000 miles.
PARTS LIST
FRONT COIL SPRING SPACERS (2)
REAR COIL SPRING SPACERS (2)
FRONT SHOCKS (2)
REAR SHOCKS (2)
SHOCK BOOTS (4)
INSTALLATION INSTRUCTIONS
 Loading...