

T
u
e
a
o
i
D
u
e
W
ro
St
In
bl
re
sta
sh
llat
ot
H
on
ing
™
&
G
id
P/N: S
1
P120A
Rev B

1. INTRODUCTION ........................................................................................................................... 4
2. FEATURES ................................................................................................................................... 4
3. SYSTEM REQUIREMENTS .......................................................................................................... 4
4. SPECIFICATIONS ........................................................................................................................ 5
4.1 Audio/Video Base ................................................................................................................... 5
4.2 PC and Device Adapters ........................................................................................................ 5
4.3 Standards ............................................................................................................................... 5
4.4 General .................................................................................................................................. 5
5. PACKAGE CONTENTS. ............................................................................................................... 5
6. SOFTWARE INSTALLATION. ....................................................................................................... 6
6.1 Installation Steps .................................................................................................................... 7
6.2 Removing the Software .......................................................................................................... 9
7. SETTING UP THE ADAPTER ....................................................................................................... 9
7.1 Connect the PC Adapter ........................................................................................................ 9
7.2 Connect the Reciever Base .................................................................................................... 9
7.2.1 Connect the Power Adapter ................................................................................................ 9
7.2.2 Connecting a monitor or TV or Project .............................................................................. 10
7.2.3 Connecting Audio devices ................................................................................................ 10
7.2.4 Connecting USB devices .................................................................................................. 11
8. USING THE STREAMHD™ ........................................................................................................ 11
8.1 Introducing the UWB Connection Manager. ......................................................................... 11
8.2 Accessing the UWB Connection Manager ............................................................................ 11
8.3 Adjusting video settings ........................................................................................................ 14
8.3.1 Selecting Extended mode or Mirror mode ......................................................................... 14
8.4 Configuring the Display ........................................................................................................ 15
8.4.1 Setting options for the display ........................................................................................... 15
8.4.2 Configuring the Display in Windows XP/Vista ................................................................... 16
8.4.3 Configuring the Display in Windows 7 ............................................................................... 17
8.5 Adjusting audio settings ....................................................................................................... 19
8.5.1 Configuring audio ports ..................................................................................................... 19
8.5.2 Setting Audio Output Device ............................................................................................. 19
2

9. TROUBLESHOOTING AND SUPPORT ...................................................................................... 21
9.1 Troubleshooting ................................................................................................................... 21
9.1.1 Display/Video .................................................................................................................... 21
9.1.2 Audio/Sound ..................................................................................................................... 25
9.1.3 Connection/Docking.......................................................................................................... 26
9.1.4 USB PORT ....................................................................................................................... 26
9.2 Warpia Support .................................................................................................................... 27
9.3 Contacting Warpia ................................................................................................................ 27
3

1. Introduction
y The StreamHD Wireless PC to TV Display Adapter with HDMI, VGA & Stereo Audio
Outputs allows users to watch and share any notebook or PC content (such as pictures,
movies and presentations) and any Internet content on their HDTV, projector, or monitor
without cable limitations and in up to stunning 1080p HD.
y The PC Adapter connects to a USB 2.0 port available in the notebook/ PC, and the
Receiver Base connects to either an HDMI port available in flat screen TVs or a VGA
connection in monitors & projectors. Stereo audio is supported via the HDMI port (along
with the video) or via a separate 3.5mm audio jack. Use the S/PDIF output for connection
to home audio components for a stunning wireless audio/video experience.
y The StreamHD Wireless Display Adapter set provides full room coverage, is easy to set
up and use, and is an ideal solution for both home and office use. It delivers the best
combination of performance and cost in a variety of living room, conference room and
classroom environments.
2. Features
y Wireless connectivity from notebook or PC to any HDTV, Monitor or Projector
y HDMI with audio & video support, as well as VGA video output
y Additional audio support through a 3.5mm stereo jack or S/PDIF optical output
y Same room coverage, up to 30ft line of site range between PC & TV
y Graphics resolution up to 2048 x1152
y 1080p Streaming Video
y 6-9GHz Ultrawide Band Wireless technology – Free from Wi-Fi interference
y QuickLink™ association between Host Transmitter and Receiver
y Windows® 7/ Vista SP2/ XP® 32bit SP3
3. System Requirements
• CPU: Core Core2Duo or equivalent, 2.2 GHZ
• Graphics Chipsets Supported: Intel, AMD, and NVIDIA
• 2GB memory
• One Host USB 2.0 port
• 30MB of avai lable disk space
• Windows® XP SP2 or SP3, Windows Vista® SP1 or SP2 (32-bit or 64-bit), and
Windows® 7 (32-bit or 64- bit)
Note. The minimum system requirements described above support 1080p streaming video.
Lower resolution video and static graphic screens are supported with lo wer system specific ations.
.
4

4. Specifications
4.1 Receiver Base
• Video Out: HDMI Connector, VGA Connector
• Audio Output : S/PDIF optical, 3.5mm Stereo Jack
• 32-bit True Color support with display resolution of up to 2048 x1152 (SXGA+)
• Streaming vi d eo u p t o 1080p resoluti o n
• Supports both Mirror Mode and Extended Mode (TV/monitor as a second screen)
• 48 kHz, 16-bit Stereo via audio jack, S/PIF, or HDMI connector
• Whip Antenna
• 5VDC Power Adapter
• LED power and Tri-color signal strength indicators
4.2 PC Adapter
• USB type-A male
• Internal transmission antenna
4.3 Standards
• Wireless USB 1.0, UWB certified
• Certified WiMedia PHY and MAC
4.4 General
• Same room, line of site range, up to 30ft
• 128-bit AES security
• Regulation compliant to US, Japan, Europe, Korea
• Software driv er s : Wi nd o ws ® 7/ Vist a™ SP2/ XP® SP3
• Input voltage: 100-240V, 50/60Hz
• Operating temperature range: 0-40 C
5. Package Contents.
• PC Adapter
• Receiver Base
• Power Supply Unit
• Quick Start Guide
5
• CD wit
h
s
p
a
u
w
s
m
a
n
r
e
e
t
e
p
t
e
s
u
e
W
e
e
N
s
t
s
a
s
t
o
h
e
W
w
y
s
y
s
n
c
n
s
a
D
e
W
d
e
)
e
B
m
i
E
n
)
o
D
e
s
Receiver B
Receiver B
software d
ase Front Vi
ase Back Vi
ivers and us
w
w
er informati
n
6. So
ftware In
If your PC
perform a
y
The install
the comp
http://ww
AAB15C5
Anti Virus
y
It is recom
The install
y
requireme
experience
tallation.
contains a
roper unins
tion softwar
ter. In cas
.microsoft.c
E04F5&dis
oftware set
ended to t
tion checks
ts of the sy
index) calc
previous
all procedur
requires
e it is not in
om/downloa
laylang=en
o very high
mporarily di
the PC cap
tem. For Vi
lation prior
arpia or ot
using the
.
ET Frame
talled it ma
ds/details.a
security ma
able the A
bilities and
ta/Win7 it is
o installatio
er Wireles
indows Co
ork
version
be downlo
px?FamilyI
prevent th
ti viruses S
ompares th
recommen
.
USB driv
ntrol Panel.
2.0 (or later
ded from th
=0856EAC
installer fro
during the
em to the m
ed to run W
r installatio
to be instal
following l
-4362-4B0
running.
installation.
nimum syst
I (Window
, please
led on
cation:
-8EDD-
m
6
6.1
a
e
o
n
a
C
o
s
s
C
h
o
O
S
e
h
W
u
t
H
E
s
B
b
r
f
A
e
a
m
U
E
m
m
o
L
t
g
Install
tion Step
y Ensur
y Prior t
prior i
comp
nies. IF Y
THE S
TREAMHD
y Go to
you d
not see eit
that the P
installing t
stallation
ontrol Pan
Adapter is
e Warpia S
f Wireless
U HAVE T
OFTWAR
l- Program
er of the foll
nplugged f
reamHD so
USB or Di
IS SOFTW
NOT TO W
and Featur
owing progr
om the PC.
tware it is i
splay Link
RE IN YO
ORK PROP
s and look
ms:
portant to
software fr
R SYSTEM
RLY
through you
ake sure th
m Warpia
, THIS WIL
r programs
ere is no
or other
CAUSE
o ensure
y If you
and cli
ee either
cking on the
ireless US
Uninstall ta
or Display
.
7
Link progra
s, uninstall
them by hi
hlighting
s
e
f
o
s
n
h
D
e
u
a
c
_
h
f
t
D
a
n
d
c
l
c
d
n
o
a
s
a
r
t
e
r
y
y Next, I
y The in
y Doubl
nsert the ins
tallation C
click on th
tallation CD
Autoplay m
StreamHD
in the PC C
enu is displ
Setup.exe f
ROM drive
yed
ile to install
river softw
re
• Check
• The so
• If you
Files f
the “In
“Optio
choice,
the “I agree
tware will a
lder. If you
ave chosen
then click o
tall” tab to
s”
to the licen
tomatically
re ok with t
ontinue. I
to override
n “OK” to co
se terms a
reate a fol
e software
you would
he Install lo
ntinue
d conditio
er and load
reating its
ike to manu
ation, brow
s” box.
into the C: d
wn folder fo
lly change
e to find th
rive in the P
installation,
he directory
location of
ogram
click on
, click on
our
8
2
t
2
v
r
t
c
y
c
n
o
o
S
n
e
e
e
e
t
c
o
e
o
S
B
d
s
d
v
t
&
p
a
s
I
p
o
e
c
a
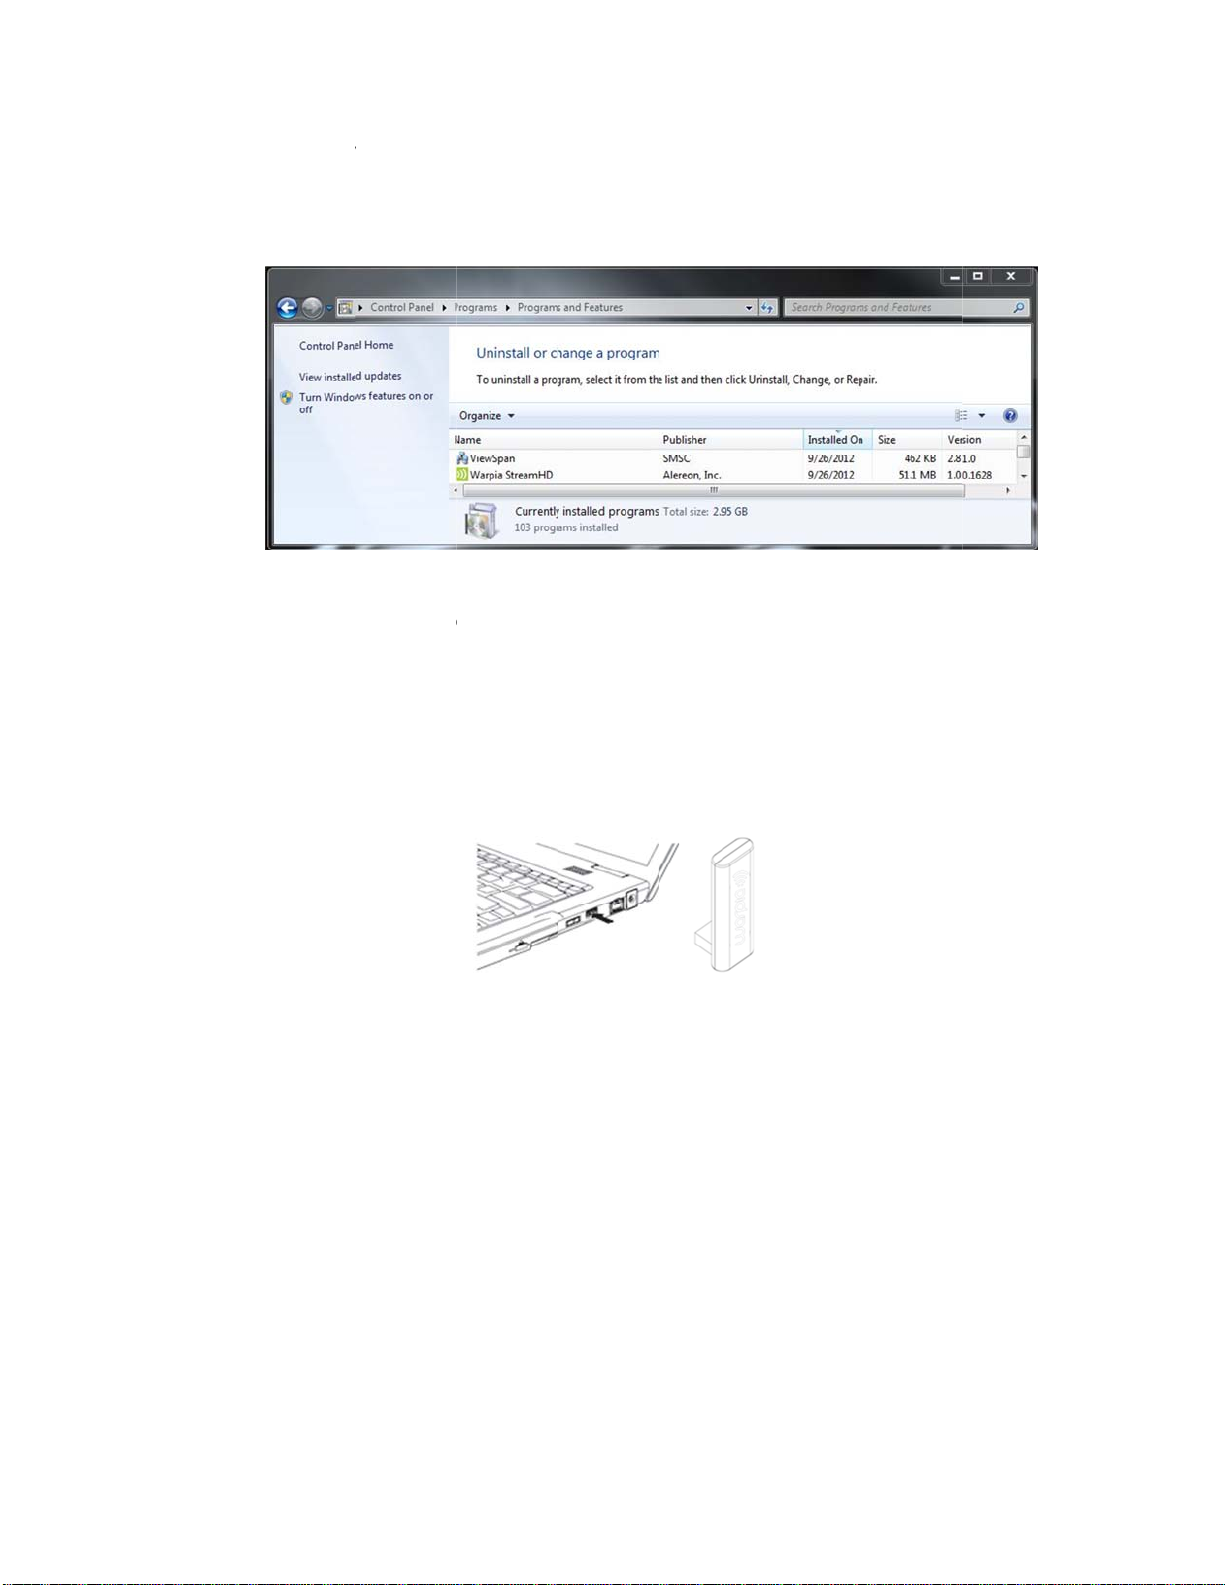
6.
Remo
ing the
oftware
7. Se
7.1
• In the
Featu
ting up
Conne
y Conne
The s
event you
es and Sel
he Adapt
t the Wir
ct the Wirel
stem will au
eed to rem
ct Warpia
er
less US
ss USB PC
omatically
ve the sof
treamHD
PC Ada
Adapter to
etect and in
ware, go t
ViewSpan
ter
high speed
tall the driv
Control Pa
to uninstall.
PC USB po
rs.
nel – Progr
rt.
ms and
7.
Conne
7.2.1 Co
y Pl
y C
t the Re
nect the
ug the AC A
nnect the p
gl
ws red wh
eiver Ba
Power A
dapter cord
wer plug to
n the Recei
e
apter
into the DC-
a live electr
er Base is
N on the ba
ical outlet. T
owered on.
ck of the Re
he power lig
eiver Base
ht on the fro
nt panel
9

n
m
n
n
n
r
e
e
o
d
t
a
t
M
e
A
D
a
d
s
a
n
D
e
a
v
t
s
r
o
o
a
A
o
o
a
a
n
a
s
J
a
w
7.2.2 Co
y You
one
y Con
y Con
necting
can connec
onitor can
ect an HD
ect the oth
TV, Mo
a digital (H
be connect
I or VGA C
r end of the
itor or P
MI) or anal
d to the HD
ble to the H
cable to the
ojector
g (VGA) m
Adapter at
DMI or VG
TV, Project
nitor to the
time.
port on the
r or extern
Receiver Ba
Receiver B
l monitor.
se. Only
se
7.2.3 Co
The Wi
illustrati
y Th
Headphon
Digital audi
(e.g.: Soun
optical inpu
necting
eless USB
ns
following t
Au
s/headsets/
equipment
receivers
port)
udio de
evice Adap
ble indicate
io Device
peakers
:
nd speaker
ices
er provides
which po rt
system with
10
two audio p
to use for e
an
rt, as show
ch type of
Use thi
3.5mm
S/PDIF
in the follo
udio activit y
port
ack
Jack
ing

TaY
2
7.2.4 Co
n
e
nsup
t
C
a
a
u
C
t
m
a
n
s
e
e
s
r
U
B
n
h
™
o
M
k
U
M
n
y
a
t
c
d
p
W
B
s
o
h
s
D
n
h
r
e
o
m
e
c
g
t
2
x
a
l
u
M
t
e
o
b
c
a
s
w
s
f
e
i
m
t
o
m
n
a
e
o
s
h
s
a
T
u
i
d
y Th
necting
Receiver
SB devic
ase provide
es
one USB
.0 port
8. Us
y Co
ing the S
his section
nd adjust s
y UWB
y Warpi
y Warpi
ou can also
nection ca
ported as t
reamHD
provides inf
ettings to su
onnection
Multi-Cha
Video Doc
refer to this
be made t
ey require t
rmation on
it your need
anager
nnel Audio
utility
section to le
, Printers, E
roughput th
using the fo
:
evice utility
arn how to
ternal HDD
t the wirele
lowing soft
ninstall the
’s etc. So
s signal ca
are to man
oftware.
e Webcam’
not support
ge the Stre
are not
.
mHD™
8.1
Introd
The UWB
driver is au
The Strea
communic
UWB Con
perform ta
y Conne
y Chang
y Disabl
y Disabl
8.
Acces
To sta
cing the
onnection
omatically i
HD’s™ PC
te wirelessl
ection Man
ks such as
ct/Disconne
e/Select the
/Enable ra
/Enable po
ing the U
t the UW
WB Con
anager is t
stalled whe
Adapte
with the R
ger driver s
he following
channel us
io communi
con
t the Strea
-up messa
B Conn
Connec
ection
e driver sof
n you run th
tains a radi
ceiver Base
ftware ena
:
HD™ from
d for radio
ations
es
ection M
ion Mana
11
anger So
ware for th
StreamHD
transmitter
. This radio
les you to
your compu
ommunicati
nger
ger:
tware
Warpia Str
™ Installati
that enable
s known as
anage the
er
n
amHD™.
n CD.
your comp
the host rad
ost radio an
his
ter to
o. The

y Doubl
e
W
htraYohidcaMa
W
c
a
n
o
w
W
e
n
o
d
e
e
S
m
n
c
c
n
s
n
n
D
e
b
e
p
C
e
y
a
k
p
s
t
e
r
s
o
y
b
o
e
U
r
f
N
h
r
c
H
d
a
n
p
p
r
n
g
c
a
your
-click the U
indows® d
B Conne
sktop.
tion Manag
r icon in th
System tra
y/Notificatio
Area of
Note : T
e UWB Co
y/Notificati
u may nee
den icons.
n access th
nager icon
nection Ma
n Area only
to click the
If the icon i
UWB Con
on your Win
ager icon a
when the P
Show Hidd
not displa
ection Man
dows® des
pears as G
adaptor i
n Icons butt
ed in the S
ger by dou
top.
een in your
connected
n [ ] or [
stem Tray
le clicking t
System
to your com
], to dis
otification A
e UWB Co
uter.
lay
ea, you
nection
The U
B Conn
ction Ma
ager dis
lay wind
w app ea
s
Conne
The Ste
Not Con
establish
connecti
ting the
mHD™ first
ected. Si
a connectio
n.
treamH
appears on
ply click on
n. It will tak
™ to you
the Device
the Connec
a few minu
r comput
tab of the
t tab next to
es for the D
r
WB Conne
the Stream
rivers to loa
tion Mana
D Device I
upon first
er as
on to
When the
the Stream
ireless con
HD Device I
ection has
on, making
een made,
it the defaul
a yellow sta
t device for
will autom
uture conne
tically appe
ctions.
r next to
12

e
u
y
v
™
c
o
W
a
o
e
m
a
a
e
y
S
u
t
n
t
g
e
R
a
h
n
s
y
t
w
f
o
S
a
w
h
e
m
e
l
v
t
u
c
S
a
m
u
r
S
e
n
s
h
t
v
n
™
m
d
m
r
o
r
m
c
h
h
s
e
u
-
a
t
o
H
d
h
s
a
m
m
Disconn
Your comp
If you have
temporaril
On the De
StreamHD
default dev
“Disconne
Note. Y
cting th
ter can onl
more than
prevent yo
ices tab of
Device a
ice you can
t”. The de
u can chan
ireless USB
to
differentiat
me, select
n
StreamH
be connec
teamHD™
r computer
he UWB C
d unselect “
hen either
vice will no
e the name
Manager. T
between th
ename fro
D™ from
ed with one
ithin range
rom connec
nnection M
et as defa
. double cli
move back
of the each
is is especi
m. To rena
the shortc
your c om
SteamHD™
of your com
ing wireles
anager, rig
lt”. Once
k on the de
to Not Con
treamHD
lly useful if
e a Strea
t menu, an
pute
at a time.
puter, you
ly to a parti
t - click on t
he device is
ice or b. rig
ected statu
listed on th
you have m
HD™, right
then enter
ay want to
ular Steam
e connecte
not longer t
t-click and
Devices t
ltiple Strea
click on the
custom na
D™.
e
elect
b of the
HD’s,
default
e.
Radio C
Chang
The Co
change r
radio to
mmunic
/Select t
municatio
dio setting
utomaticall
tions
e chann
s tab of the
. The defau
locate an a
l used fo
Wireless U
t channel s
ailable cha
radio co
B Manage
tting is Aut
nel for com
munica
enables y
matic, whic
munications
ion
u to view an
h enables th
.
d
e host
13
tcb
c
e
o
n
a
a
i
a
e
u
r
t
n
n
t
o
T
v
d
o
a
m
t
m
v
o
B
e
g
r
i
o
o
o
r
d
e
a
™
x
W
o
g
e
o
a
n
r
B
A
n
c
n
e
d
d
Note. I
is recomm
hannel that
andwidth wi
hannel sho
nded to lea
is being use
ll be shared
ld be used f
e this settin
by anothe
by both dev
r each Stre
on Autom
StreamHD
ces. To ma
amHD™
tic. If you m
in the vici
imize perfo
nually sele
ity, the cha
mance, a s
t a
nel
parate
Disabl
To temp
Click the
Commu
the Stre
To re-en
/Enable
rarily disabl
Off button o
ication sta
mHD Icon i
ble commu
adio com
e the host r
n the Com
us area of
the Syste
ications, re
municati
dio, do one
unications
he window).
Tray will n
erse the pr
ns
of the follow
tab of the
The radi
w turn Oran
cedure.
ing:
ireless US
is now in
e:
Manager (
irplane Mo
in the
e and
8.3
Adjust
8.3.1 Sel
You c
or Mir
ng video
cting Ex
n choose t
ror mode.
settings
ended m
set the US
he default s
de or Mi
to VGA A
tting is Ext
14
ror mod
apter’s vide
nd mode.
output sig
al to Exten
mode

M
mwbeo
4
m
e
a
r
s
r
d
d
o
w
p
n
u
t
w
a
t
h
c
m
o
e
o
n
n
a
o
e
s
k
h
p
s
u
a
a
x
g
G
e
r
u
e
w
a
s
n
r
o
e
c
r
A
s
p
y
e
e
c
e
o
t
a
n
e
e
f
a
c
p
a
t
c
Extend
ode
exten
ds your des
top space
cross multi
le monitors,
so that you
an
display diff
number of
• View la
• Multita
• Compa
• View vi
rent inform
dvantages
ge spreads
k more effe
e two docu
eos/TV on
tion on eac
o increase
eets acros
tively witho
ents simult
ne screen
[ E
monitor co
roductivity,
two screen
t overlappi
neously ac
nd reviews
tend Mod
nnected to
including th
g windows
oss two scr
n the other
]
our comput
ability to:
ens
r. This provi
des a
irror mo
onitor(s) c
ant to vie
uilt-in com
xternal mo
verall imag
e
duplicat
nnected t
informatio
uter scree
itor’s resol
e quality b
s the ima
USB to V
on a larg
. In Mirror
ution, colo
sed on yo
e on your
A Adapte
r, external
mode, the
quality, an
r
computer’
omputer s
. This mod
desktop m
dpater au
d refresh r
settings.
reen on th
is useful i
nitor inste
omatically
te settings
external
, for exam
d of a sm
adjusts the
to provide
le, you
ller,
he best
[ Mirror
w
Mode ]
Config
8.
8.4.1 Set
The follo
the Base
ring the
ing opti
ing are the
Adapter:
y
Mirror Mod
Extend Mod
y
Laptop with
y
External Di
y
Display
ns for th
suggested
e
Lid Closed
play Only
display
ork configu
15
rations whe
connecting
a display s
reen to

c
x
s
D
8.4.2 Co
n
a
w
d
e
y
e
t
a
y
V
r
n
s
r
e
o
s
d
o
o
a
h
s
n
y
V
r
P
n
o
m
m
t
m
f
p
o
o
a
E
n
1) U
figuring
ing Viewsp
the Displ
n icon in S
Click
y in Win
stem tray/N
iewspan ic
ows XP/
otificatio n A
n
ista
ea
Advan
Set a
Set
ed Settings
E
tend to
Entended
Set
as Mirror
isplay Off
2) U
Configur
Specify t
Extende
connect
is physic
to Right”
Extend
different
Duplicat
monitor
Turn off
ing Windo
ing the Displ
he extensio
mode. Thi
d monitors
ally position
.
our desktop
information
the image
he external
s Display P
ay via Wind
direction if
setting sho
elative to e
d to the rig
space acro
n each mo
howing on
display.
eperties on
ws Display
you are usi
uld match th
ch other. F
t of your co
s multiple
itor connec
our comput
Windows X
Properies in
g multiple
e physical o
r example, i
puter's dis
onitors, so t
ed to your c
er's screen
/Vista
Windows X
onitors and
rientation of
the extern
lay, select“
hat you can
mputer.
n the exter
P/Vista
the
l monitor
xtend
display
al
16

g
o
e
t
t
g
e
c
c
n
n
h
m
a
n
h
L
d
a
n
n
n
n
7
s
p
d
p
n
a
r
o
n
y
k
d
w
a
a
h
r
M
s
e
a
e
s
i
h
d
p
o
w
t
p
p
m
t
p
o
m
W
h
m
u
v
d
t
o
y Settin
Mirr
Ext
y Adjus
Use
y Adjus
Use
y Settin
Sel
Che
Che
the Displ
r Mode : u
nd Mode : c
ing Screen
the Resoluti
ing Color
the Colors
the Prim
ct the scree
Monitor on
k the optio
Vista –Exte
k the optio
is my main
Click OK to
y to Exten
check the o
eck the opt
Resolutio
on slider to
evel (Colo
rop-down b
ry Display
that is con
SMSC XDD
Extend m
d the des
s Use this
monitor)
save the ne
or Mirror
tion “Exten
ion “Extend
(Screen re
djust the d
quality)
x to select
ected to th
M Graphic
Windows
top onto th
evice as t
settings.
ode
d my Wind
my Windo
olution)
sired resolu
color com
Base Ada
Driver as s
desktop on
s monitor”)
e primary
ws deskto
s desktop
ion of the di
lexity level)
ter- for exa
hown in the
to this mon
onitor (in
on to this
n to this
splay
ple 2.Defa
screen abo
itor (in Win
indows Vis
monitor”
onitor”
lt
e
ows
a-This
8.4.3 Co
1)
figuring
I
windows
t
e window
enu will a
the Displ
, there is
key toget
pe
y in Win
built in su
er with the
17
ows 7
port for ex
P key(
ernal moni
+ P), and t
tor. To use
en the foll
it press
wing

U
r
o
e
g
e
n
W
e
d
y
n
S
w
E
s
n
S
w
/
h
n
1) For
2) Fo
Mirror mod
Extend mo
: choose D
e : choose
uplicate
xtend
2)
sing Wind
y
Click the Vi
ws Displa
wspan ico
Prepertie
( ) in the
on Windo
System tray
s 7
Notification
Area
Click Chan
y
y
To configur
The followi
e Display
screen res
g windows
ettings
olution or a
ill apper
y other disp
lay option, c
oose Adva
ced.
indows 7
Display
ettings
18

y
i
n
t
C
s
n
e
e
e
o
o
d
s
i
p
t
D
t
c
t
e
n
C
o
i
t
P
k
e
u
u
e
u
e
t
e
d
r
d
y
a
p
e
,
o
D
e
i
e
u
c
p
m
o
t
a
M
k
t
o
u
S
o
t
e
e
e
S
e
s
r
e
a
y
e
o
™
t
a
c
e
a
m
a
y
s
p
d
o
e
a
f
a
n
r
R
A
s
y
t
u
o
s
u
i
To chang
Select th
should se
Base Ada
any of the
appropriat
lect the nam
pter.
external dis
display na
e of the TV
lay settings
e in the
r Monitor o
Di
play scroll
Projector c
own option
nnected to
. You
our
y
Select th
Resoluti
Orientati
Multiple
y
Make thi
primary d
8.5
Adjust
8.5.1 Co
ng audio
figuring
y
You can
audio por
StreamH
By defaul
y
time you
audio por
To chang
y
settings i
use the P
default se
desired val
n:
your ext
n:
select ei
isplays:
my main
splay on wh
s
settings
audio po
layback au
. However,
™ at the s
, the audio
onnect. Wh
s on the PC
the default
Windows®
’s audio p
ttings
e in any of
rnal display
her Landsc
lect either
isplay:
mar
ich the desk
ts
io either thr
ou cannot
me time.
orts on the
n you disc
are automa
settings, yo
as describ
rts while th
he availabl
resolution.
pe or Portr
irror or Exte
this option
op is displa
ugh the Str
se the audi
treamHD
nnect the S
ically re-en
u may need
d in this se
PC is dock
settings
it.
nd mode.
to make the
ed
amHD’s au
ports on th
are autom
reamHD™
bled.
to manually
tion. For ex
d, you will
external dis
dio ports or
PC and on
tically enabl
rom the PC,
adjust the a
mple, if you
eed to chan
play the
he PC’s
the
ed each
the
dio
want to
ge the
8.5.2 Se
The P
wirele
does
In Wi
y
y
y
ting Audi
audio outp
s audio dev
ot switch au
ndows X
Right clic
Properti
In the
So
In the
So
Output
ut device sh
ce when th
omatically,
:
the Volum
s
.
nds and A
nd Playba
evice
ould set itse
wireless co
t can be sel
icon in the
dio Devic
k > Default
19
lf automatic
nnection is
cted manu
System Tra
s Propertie
Device
dro
lly to the St
ade to the
lly.
and select
screen, se
-down box,
eamHD’s c
eceiver Ba
djust Vol
lect the Aud
select the U
nnected
e. If it
me
o tab.
SB PnP

y
o
k
e
t
W
k
u
n
D
o
c
”
y
D
S
a
l
Sound D
Click OK
vice.
o save the
ew setting.
In Wind
y
For a
Clic
ws Vista/
Right clic
devices.
ll audio o
“Speakers
in7:
the Audio
tputs (H
USB PnP S
properties i
MI, 3.5m
und Device
on in the S
m or S/P
and click “
stem Tray
IF)
et Default”.
nd select
P
ayback
20

9. Tr
o
o
e
c
r
n
y
u
c
u
o
e
S
t
o
g
™
’
c
o
o
o
d
u
m
e
e
a
e
b
t
a
a
d
o
c
o
i
f
n
W
s
o
t
n
n
m
D
t
m
n
c
s
r
9.1
ublesho
Troubl
ting and
shootin
Support
This se
your St
regardi
tion provi
eamHD
g Warpia
des answ
. If you n
s support
rs for pro
ed to con
services
lems you
act Warpi
t the end
may enc
a, you will
f this sec
unter whe
find infor
ion.
n using
ation
Before
manual
with yo
ou conta
, in your c
r optional
t Warpia,
mputer’s
peripher
please re
user’s gui
l devices.
d the trou
e and/or
bleshooti
n any ma
g advice i
uals that
this
ame
This se
followin
y Di
y A
y C
y N
y U
y O
tion provi
g categori
splay/Video
dio/sound
nnection/D
twork
B
her
des troubl
es:
cking
shooting
guidance
or proble
s in the
9.1.1 Dis
play/Vide
te
N
For ad
please
www.s
External
itional infor
visit the Wa
pport.warpi
onitor does
mation on tr
rpia Techni
a.com .
not turn on (
21
ubleshooti
al Support
the monitor’
g StreamH
ebsite at
power ligh
™ video is
does not tu
ues,
n on).

y Make sure that the external monitor’s power switch is on.
y Confirm that the external monitor’s power cable is plugged into a live
electrical ou t let.
y Make sure that the external monitor is securely connected to the
StreamHD™.
y Check the external monitor settings.
y Refer also to the computer user’s manual and to the external monitor’s
documentation.
No image displays on the external monitor connected to the StreamHD™.
y If you connect through an HDMI or VGA Cable, check to ensure your cable
is connected properly on both sides.
y Make sure you have the correct video input selected on the TV or Projector
y Try adjusting the resolution, contrast and or brightness controls on the
external monitor.
y Check to make sure that the wireless connection is established between
the PC and the StreamHD (the StreamHD™ icon in the System Tray is
green, and when you double click on it, your TV or Monitor shows
connected).
y Make sure your Windows® operating system is updated with the latest
available Service Pack from Microsoft®.
y Your computer BIOS (Basic Input/Output System) may also need to be
updated. Refer to the your computer manufacturer's Web site for more
information.
y Restart your computer after updating the operating system and/or the BIOS,
and try using the StreamHD™ again.
Display error.
y
Check that the cable connecting the external monitor to the StreamHD™ is
firmly attached to both the Receiver Base and the TV/Monitor.
The external monitor connected to the StreamHD™ shows only the wallpaper
background of my Windows® desk t o p.
.
y The default configuration for the external monitor connected to the
StreamHD™ is Extend mode (an extension of the image on the computer to
a second screen).
y This mode allows you to display different information on each monitor
connected to your computer. Drag a window off of the right side of your
primary display to have it appear on the external monitor.
22

y T o switch to Mirror mode, so that an exact duplicate of the image on your
primary monitor display s on the exte rnal monito r, please s ee “Adjusting
video settings” beginning on page 14 .
Video or game playback is slow or choppy on the external monitor connected
to the StreamHD™.
y Confirm that the PC meets the minimum system requirements to run the
StreamHD™. You can find the requirements on the packaging, or online
in the product pages at www.warpia.com
y Ensure the PC is within 30ft of the TV/Monitor and the PC Adapter has
direct line of site to the Receiver Base.
y Double click on the StreamHD™ icon in the system tray and note the
signal strength meter next to the device icon in the Window. Signal
strength must be 4-5 bars to play high definition video.
y The StreamHD™ uses an advanced video graphics cont roller to display
video images, however it does not support 3D Gaming.
My Windows Vista® system runs more slowly when an external monitor is
connected to the computer via the StreamHD™.
y This may occur if the external monitor is set to Mirror mode and the display
resolution is higher than 1280 x 800. You can take one or more of the
following actions to resolve the problem:
9 Disable the Aero color scheme. (Click Start, Control Panel,
Appearance and Personalization, Personalization, and then Window
Color and Appearance. The Appearance Settings window opens.
Select a different color scheme oth er than "Windows Aero."
9 Lower the display resolution.
9 Switch to Extend mode.
Cannot play videos on an external monitor connected to the StreamHD™.
y Try a different media player. VLC Media Player is recommended, though
the StreamHD supports many different players.
The Screen Resolution window in the Control Panel does not list all of the
resolution modes my monitor is capable of displaying.
y The StreamHD™ video card requires Extended Display Identification Data
(EDID) to be supplied by a connected monitor. This information includes
resolution settings supported by the monitor. Some monitors do not supply
23

this information, and in such cases the resolution settings available in the
Screen Resolution Window will be limited, to avoid damage to the monitor.
The external monitor connected to the StreamHD™ is incorrectly identified as a
"Non-PNP monitor" in the Windows® Device Manager.
y The monitor name displayed in the Windows® Device Manager is
controlled by Windows®.This designation will not affect the functionality of
the device.
The computer's built-in display does not turn off when the external monitor
connected to the StreamHD™ is set as the primary monitor.
y On some systems, the StreamHD™ video adapter cannot control the
internal display.
Mirror mode is not available (grayed out).
y Mirror mode is not available if the external monitor connected to the
StreamHD™ is set as the primary display.
y To enable Mirror mode, set the computer's built-in display as the primary
display in the Windows Display Properties dialog box.
Scalable Link Interface ( SLI) mode is not available
y
This product does not support SLI mode when more than two graphics
cards are installed in the connected computer. In such cases, SLI mode is
disabled
In Windows Display Properties, I cannot move the external monitor icon where I
want relative to the icon of the computer's built-in display
y Try dragging the computer's built-in display icon instead, relative to the
external monitor icon.
I cannot drag windows from my primary display to the external monitor onnected
to the StreamHD
y Follow these steps to fix the problem:
1) Open the Windows® Display Properties dialog box and position the
monitor icons on the Settings tab to match the physical arrangement of
your monitors.
2) Make sure the "Extend to" setting matc hes the physical arrangement of
your monitors.
24

For example, if the external monitor is to the right of the computer
display, select "Extend to right."
3) Drag the window you want to move in the direction that matches the
extension setting.
For example, if the desktop space is extended to the right, drag the
window off of the right edge of the primary display and it will appear on
the extended desktop.
I cannot run a 3D program or a program using DirectDraw commands on the
external monitor connected to the StreamHD™
y This product does not support 3D programs.
y Running applications that use certain DirectDraw commands (such as
some 2D gaming applications) is also not supported. If you want to play
these games in full-screen mode, disconnect the StreamHD™ and use your
computer's display.
9.1.2 Audio/Sound
There is no sound coming from the external audio device connected to the
StreamHD™.
y Check and adjust the volume settings.
y Make sure the cable connecting the audio device to the StreamHD’s audio
output is secur e.
y Check that the Mute all/Mute checkboxes in Microsoft® Windows® are not
selected or that the volume is not set too low.
y To locate these settings, double-click the speaker icon in your Windows®
System tray/Notification Area.
y Close your media player application, if it is running. Wait approximately 10-
15 seconds for the operating system to recognize the audio device conne -
- ted to the StreamHD™ and then restart your media player application.
y The audio port on the StreamHD™ may be disabled. To enable the port,
follow the instructions in “Configuring audio ports” on page 19.
There is no sound coming from the computer’s internal speakers, or from the
headphones/headset connected directly to the docked computer.
By default, the internal sp eakers and audio ports on the computer are disabled
y
when the computer is con n ected to the StreamHD. To enable the spea kers or
audio ports on the computer,
follow the instructions in “Configuring audio
25

ports” on page 19
Check that the Mute all/ Mute checkboxes in Windows® are not selected. To locate
y
these settings double-click the speaker icon in your Windo ws
Notification Area.
y
Close the media player application, if it is running. Wait approximately 10-15
seconds for the operating system to recognize the audio device and then restart
the media player application.
® System Tray/
Sound is distorted or delayed when playing some multimedia files.
y Disconnect the StreamHD™ from your computer, reconnect and play the
file again.
y Close the Media Player being used and restart the player.
9.1.3 Connection/Docking
My computer does not automatically detect the PC adaptor.
y Make sure you have properly connected the PC adaptor to your computer’s USB
port.
y Unplug, then re-plug in the adaptor.
y Reboot the PC
y The computer's USB port may be damaged. Check to see if other devices can be
successfully connected to the port.
The connection to the StreamHD™ has been lost.
y The computer may be out of wireless communication range. Bring the computer
within close range of the StreamHD™ to automatically reconnect.
y The compute r may be in standby/sleep/hibernation mode. The compu ter will re-
connect when it resumes from standby/sleep/hibe rnation.
y The USB adaptor may have been disconnected. Re-connect the USB adaptor to
the computer.
9.1.4 USB
USB device does not work.
y
Make sure the StreamHD™ is connected to your computer and the computer is
docked (indicator light on StreamHD™ is green).
y
Check that the cable conne ction between the USB port on the StreamHD™ and
the USB device is secure.
26

The StreamHD™ is not charging the USB device.
My real-time device (for example, a Web camera, microphone, or speakers)
9.2 Warpia Support
If you require additional help or are still having problems operating the StreamHD™, you
may contact Warpia for additional technical assistance.
Before you call
Since some problems may be related to software or the operating system, it is important
that you investigate other sources of assistance first.Try the following, before contacting
Warpia
Make sure that the StreamHD™ drivers are properly installed. Refer to the
y
operating system documentation for more information.
y
Make sure that the AC adaptor (if applicable) is connected securely to the Receiver
Base and a live electrical outlet.
does not operate properly when connected to the StreamHD™.
y Due to USB bandwidth limitations, real- time devices (for example, Web
cameras, microphones, and speakers) may not operate correctly and
cannot be supported.
y Review the user’s manual and/or troubleshooting sect ions in the documentation
supplied with your StreamHD™.
y Ensure you have the latest Windows software updates for your computer.
y If a problem occurs when you are running particular soft ware applications, consult
the software documentation for troubleshooting suggestions. Contact the software
company’s technical support department for assistance.
y Consult the Warpia technical support website at www.support.warpia.com This is
your best resource for current information and support.
9.3 Contacting Warpia
Warpia’s technical support Web site
To stay current on the most recent software and hardware updates for your StreamHD™
and for other product information, be sure to regularly check the Warpia Web site at
http://www.warpia.com/support.
Contacting Warpia’s technical support
27

Before contacting Warpia, make sure you have :
y Your Strea mHD’s seri al number
y The computer and any optional devices related to the problem
y Backup copies of your Windows
on your choice of media
y Name and version of the program involved in the problem, if applicable, along with the
its installation media
y Information about what you were doing when the problem occurred
y Exact error messages and when they occurred
For technical support, email the Warpia Customer Support Center:
Email Support
support@warpia.com
® operating system and all other preloaded software
28
 Loading...